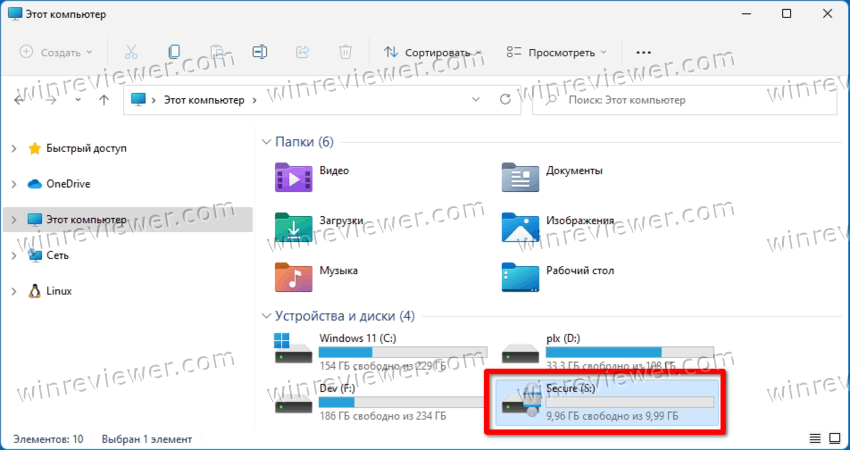
Для дополнительной защиты Windows 10 позволяет включить BitLocker для фиксированных дисков (разделов дисков и внутренних устройств хранения). Он поддерживает защиту с помощью смарт-карты или пароля. Есть также возможность автоматической разблокировки дисков при входе в учетную запись.
BitLocker был впервые представлен в Windows Vista и до сих пор существует в Windows 10. Он был реализован исключительно для Windows и не имеет официальной поддержки в альтернативных операционных системах. BitLocker может использовать доверенный платформенный модуль (TPM) вашего ПК для хранения секретных ключей шифрования.
РЕКОМЕНДУЕМ:
Как посмотреть информацию о шифровании диска BitLocker в Windows 10
В современных версиях Windows, таких как Windows 8.1 и Windows 10, BitLocker поддерживает аппаратно-ускоренное шифрование, если выполняются определенные требования (диск должен поддерживать его, должна быть включена безопасная загрузка и многие другие требования).
Без аппаратного шифрования BitLocker переключается на программное шифрование, что снижает производительность вашего диска. BitLocker в Windows 10 поддерживает ряд методов шифрования и поддерживает изменение силы шифрования.
Содержание
- Шифрование диска Butlocker
- Отключить BitLocker из командной строки
- Отключить BitLocker с помощью PowerShell
Шифрование диска Butlocker
В Windows 10 шифрование диска BitLocker доступно только в выпусках Pro, Enterprise и Education. BitLocker может зашифровать системный диск (на котором установлена ОС Windows) и внутренние жесткие диски. Функция
BitLocker To Go позволяет защитить файлы, хранящиеся на съемных дисках, таких как флэш-накопитель USB.
Существует разные способы отключения BitLocker жестких и твердотельных дисков.
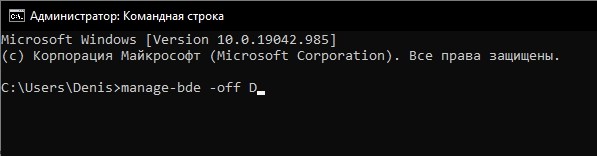
Шаг 1: Откройте командную строку от имени администратора. Для этого, на панели задач нажмите иконку поиска, введите «cmd» и нажмите «Запуска от имени администратора».
Шаг 2: Введите и выполните следующую команду:
|
manage—bde —off <букву диска>: |
Шаг 3: Замените
<букву диска> фактической буквой диска, который вы хотите расшифровать.
Например отключим BitLocker на диске D:

Отключить BitLocker с помощью PowerShell
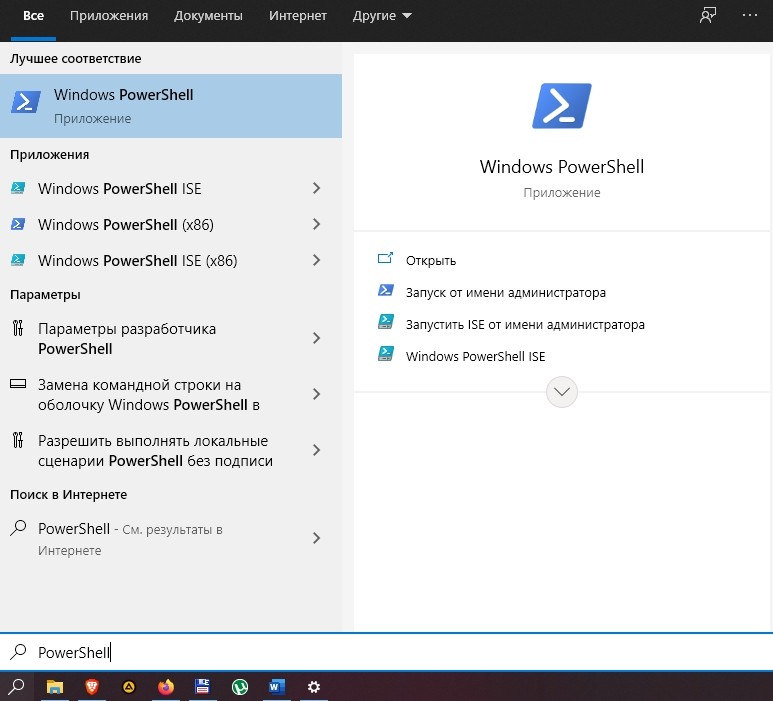
Шаг 1: Откройте новую командную строку от имени администратора. Для этого, на панели задач нажмите иконку поиска, введите «powershell» и нажмите «Запуска от имени администратора».
Шаг 2: Введите и выполните следующую команду:
|
Disable—BitLocker —MountPoint «<drive letter>:» |
Шаг 3: Замените <букву диска> фактической буквой диска, который вы хотите расшифровать.
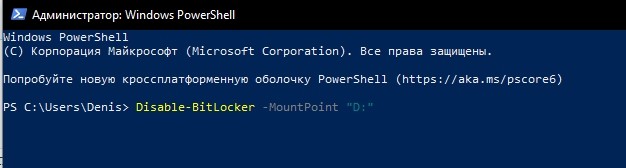
Например отключим шифрования BitLocker диска D:
|
Disable—BitLocker —MountPoint «D:» |

РЕКОМЕНДУЕМ:
Лучшие аналоги Bitlocker
На этом все. Теперь вы знаете, как отключить BitLocker из командной строки и с помощью PowerShell.
The fastest way to disable the Bitlocker is through Control Panel
by Milan Stanojevic
Milan has been enthusiastic about technology ever since his childhood days, and this led him to take interest in all PC-related technologies. He’s a PC enthusiast and he… read more
Updated on
- There are many situations when you may need to disable your BitLocker.
- For those of you that don’t know how, here’s a step-by-step tutorial on how to do so.
Some users have been complaining about an issue regarding BitLocker encryption on Windows 10 devices, mainly, an incompatibility between a drive encrypted on Windows 7 and later used in a Windows 10 machine.
If you are experiencing this issue, then maybe this guide will give you the solution.
If you have not heard about BitLocker by now, and you want an extra layer of security for your Windows computer, then you should definitely do some research regarding what it can do and how it can protect your files.
But even with its advantages, Microsoft’s encryption feature has some issues when moving drives from Windows 7 computers to Windows 10.
We’ll consider the following scenario: you have been using BitLocker on a Windows 7 computer and you have recently bought a new Windows 10 computer and you want to install your old hard drive into the new tower.
When you try to access the encrypted partitions, Windows 10 advises you to turn off BitLocker or does not recognize your password.
There are a few ways around this problem, some being simpler than others, and it is up to you to determine which of them can be of use in your case.
BitLocker is a great way to protect your files, and in this article, we’re going to cover the following issues:
- Disable BitLocker Windows 10 – Disabling BitLocker is rather simple, and the disabling process is almost identical on Windows 10.
- Disable BitLocker command line, PowerShell – If you’re an advanced user, you can disable BitLocker using the command line. You can disable BitLocker with both PowerShell and Command Prompt, and in this article we’re going to show you how to do it.
- Completely remove BitLocker Windows 10 – BitLocker is a built-in feature of Windows, and while you can’t remove it, you can disable it and all its related services. By doing so you’ll permanently disable BitLocker on your PC.
- Disable BitLocker external hard drive, USB encryption, removable drive, USB drive – BitLocker also works with external drive and removable storage. If you want to disable BitLocker for your USB drive you can do so using any of our solutions.
- Disable BitLocker to update BIOS – Few users reported that they are unable to update their BIOS before disabling BitLocker. However, you should be able to disable BitLocker after reading this article.
- Disable BitLocker Windows 10 Group Policy – If you want, you can disable BitLocker simply by modifying your group policy. This method works for Windows 10.
Here’s how you disable BitLocker on Windows 10.
- How do I disable BitLocker on Windows 10?
- 1. Disable BitLocker from Windows 10 Control Panel
- 2. Disable BitLocker from Windows 10 using the Local Group Policy Editor
- 3. Use another PC to disable BitLocker
- 4. Use Command Prompt
- 5. Use PowerShell
- 6. Disable BitLocker service
- 7. Turn off device encryption from the Settings app
How do I disable BitLocker on Windows 10?
Quick Tip:
How we test, review and rate?
We have worked for the past 6 months on building a new review system on how we produce content. Using it, we have subsequently redone most of our articles to provide actual hands-on expertise on the guides we made.
For more details you can read how we test, review, and rate at WindowsReport.
While Bitlocker may only be able to encrypt entire drives, there are situations when you don’t need that.
That being the case, if you need a tool that can encrypt only the data that you need, then give Folder Lock a try.
The program can also create encrypted backups as well, so recovery will be made easier.
Other than that, both BitLocker and Folder Lock are very similar since they both offer high levels of encryption, thus improving the security of whatever you have on your drives.
⇒ Get Folder Lock
1. Disable BitLocker from Windows 10 Control Panel
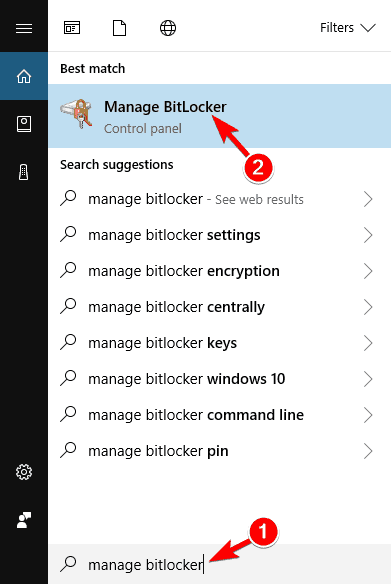
- Open the Search bar and type Manage BitLocker.
- Select the Manage BitLocker from the menu.

- This will open the BitLocker window, where you will see all your partitions and you can either select to suspend BitLocker or completely disable it.
- Select the option you want and follow the wizard.


Similarly to how you’d go about this problem in Windows 7, it might work to disable BitLocker from Control Panel, assuming you know your passkey and it still works.
After doing that, BitLocker should be permanently disabled for the selected drive.
2. Disable BitLocker from Windows 10 using the Local Group Policy Editor
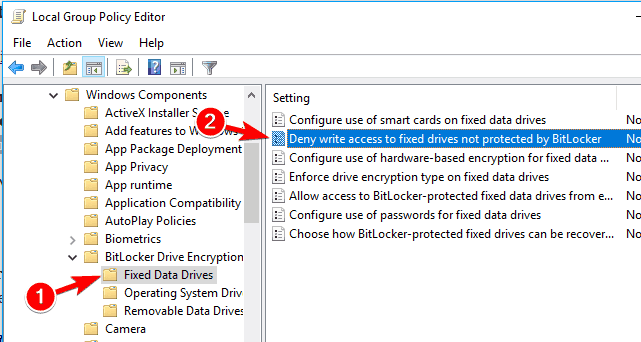
- Open the Search bar and type in Group Policy, then select Edit Group Policy from the menu.

- From here, navigate using the left-hand side menu to Computer Configuration -> Administrative Templates -> Windows Components – > BitLocker Drive Encryption -> Fixed Data Drives and select the Deny write access to fixed drives not protected by BitLocker option and double click it.

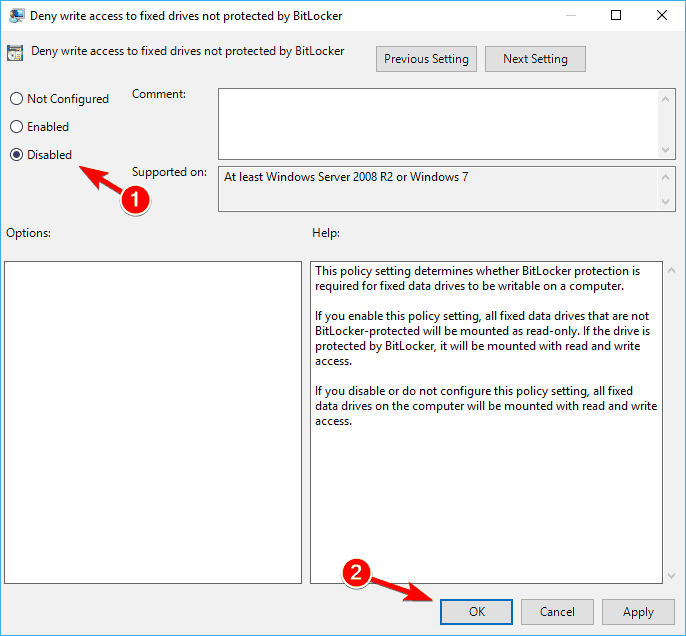
- Click Not Configured or Disabled, and click on Apply and OK to save changes.


If the first method is not a viable option for you, then using the Group Policy utility (GPO) might offer the solution.
After doing that, restart your PC and your problem should be resolved completely.
3. Use another PC to disable BitLocker

If both methods have failed, then all you’re left with is installing your encrypted hard drive back to a different computer and going through the methods once again.
In this scenario, method 1 will fix your problem and decrypt your drive, allowing you to use it in your Windows 10 PC.
4. Use Command Prompt
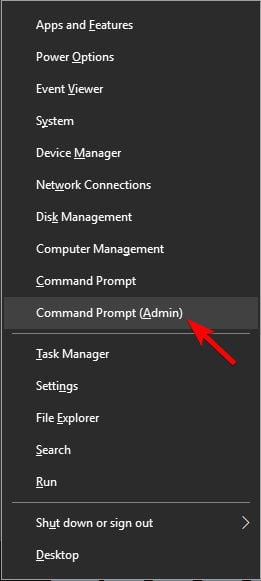
- Open Command Prompt as administrator.
- To do that quickly press Windows Key + X to open Win + X menu and choose Command Prompt (Admin) from the menu.

- To do that quickly press Windows Key + X to open Win + X menu and choose Command Prompt (Admin) from the menu.
- When Command Prompt opens, enter the following command, and run it:
manage-bde -off X:
- Be sure to replace X with the actual hard drive letter.

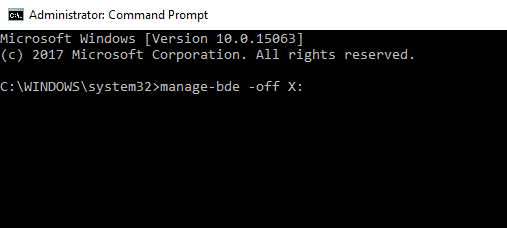
If you’re an advanced user, you can turn off BitLocker by using Command Prompt.
The decryption process will now start. Keep in mind that this process can take a while, so don’t interrupt it.
After the process is finished, your driver will be unlocked and BitLocker will be turned off for that drive.
As you can see, this is a quick and easy way to turn off Bitlocker, and if you’re familiar with Command Prompt, feel free to try this solution.
Working with Command Prompt will be like a walk in the park after you read this guide!
5. Use PowerShell
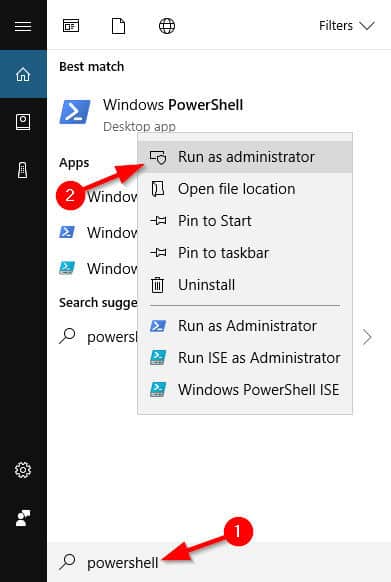
- Press Windows Key + S and enter Powershell.
- Right-click Windows PowerShell from the list of results and choose Run as administrator.
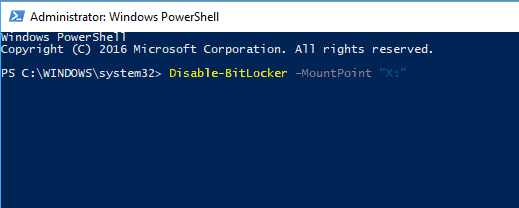
- When PowerShell opens, enter this command and press Enter to run it:
Disable-BitLocker -MountPoint "X:"- Before running the command, be sure to replace X with the letter that represents your hard drive partition.

You can also turn off BitLocker for all drives on your PC using PowerShell. To do that, follow these steps:
- Open PowerShell as administrator.
- Now run the following commands:
$BLV = Get-BitLockerVolumeDisable-BitLocker -MountPoint $BLV
If you prefer using command-line tools, you should know that you can turn off BitLocker for specific drive simply by using PowerShell.
By running these two commands you’ll get the list of encrypted volumes and decrypt them with a single command.
Keep in mind that the decryption process can take a while, so don’t interrupt it. Once the drive is decrypted, BitLocker will be turned off for that drive.
6. Disable BitLocker service
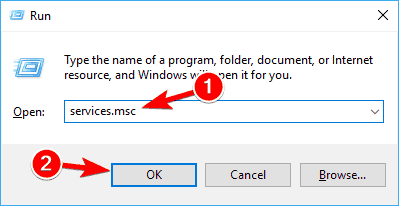
- Press Windows Key + R and enter services.msc.
- Press Enter or click on OK.

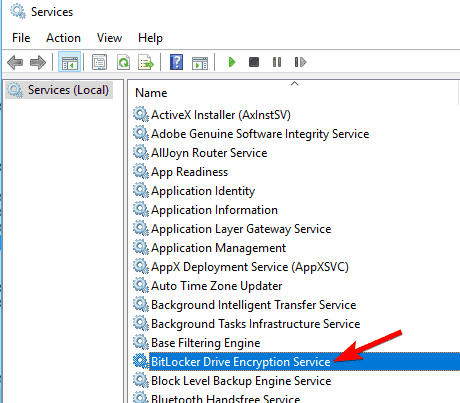
- When Services window opens, locate and double-click on BitLocker Drive Encryption Service.

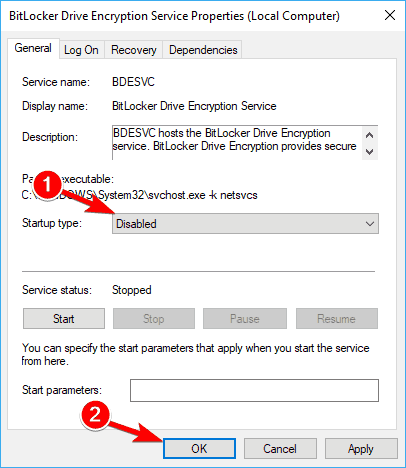
- Set the Startup type to Disabled and click on Apply and OK to save changes.

If you want to turn off BitLocker, you can do that by disabling its service.
After disabling the BitLocker service, BitLocker should be turned off on your device.
7. Turn off device encryption from the Settings app
- Open the Settings app. You can do that by pressing Windows Key + I shortcut.
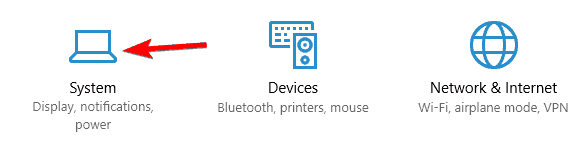
- When the Settings app opens, navigate to the System section.

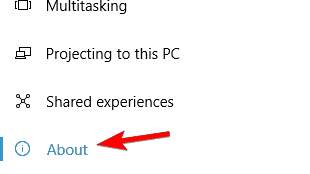
- In the left pane, select About.
- Now locate Device encryption section in the right pane and click on Turn off button.

- When the confirmation dialog appears, click on Turn off again.
If you want to turn off BitLocker, you’ll be pleased to hear that you can do that right from the Settings app. After doing that, BitLocker should be disabled on your PC.
BitLocker can be useful if you want to protect your files from unauthorized access, but if you don’t want to use this feature, you should be able to turn it off by using one of our solutions.
![]()
В этой статье рассказывается, как разблокировать диск, зашифрованный BitLocker, и отключить шифрование диска BitLocker в Windows 11 и 10 Домашняя (Home Edition). BitLocker — это полнофункциональная функция шифрования, входящая в состав различных версий Windows. К сожалению, в Windows Домашняя нет шифрования диска BitLocker (BDE). Однако предположим, что у вас есть внешний диск, который уже зашифрован с помощью BDE. В этом случае Windows 11/10 Домашняя сможет получить доступ к диску, если у пользователя есть 48-значный пароль восстановления BitLocker или ключ восстановления.
Апплет панели управления «Управление BitLocker» отсутствует в Windows 10/11 Домашняя (Home Edition). Тем не менее, вы можете разблокировать этот диск и отключить BDE на устройстве с любой версией ОС с помощью инструмента командной строки с именем manage-bde.exe. Конечно, это предполагает, что у вас есть ключ шифрования BitLocker или 48-значный пароль восстановления.
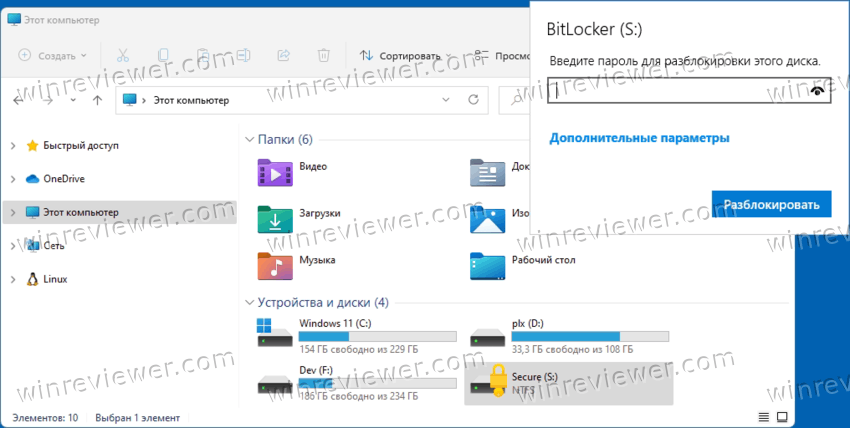
Допустим, у вас есть локальный или внешний диск, зашифрованный с помощью BitLocker на компьютере с Windows 10 Pro (или выше). Когда вы попытаетесь открыть его на другом компьютере, вам будет предложено ввести 48-значный пароль восстановления, чтобы разблокировать диск.
Хотя Windows Домашняя не имеет графического интерфейса BitLocker в классической Панели управления или Параметрах, вы можете разблокировать и отключить BDE с помощью командной строки manage-bde.exe. Запустите команду manage-bde.exe /?, чтобы изучить, как ей пользоваться.
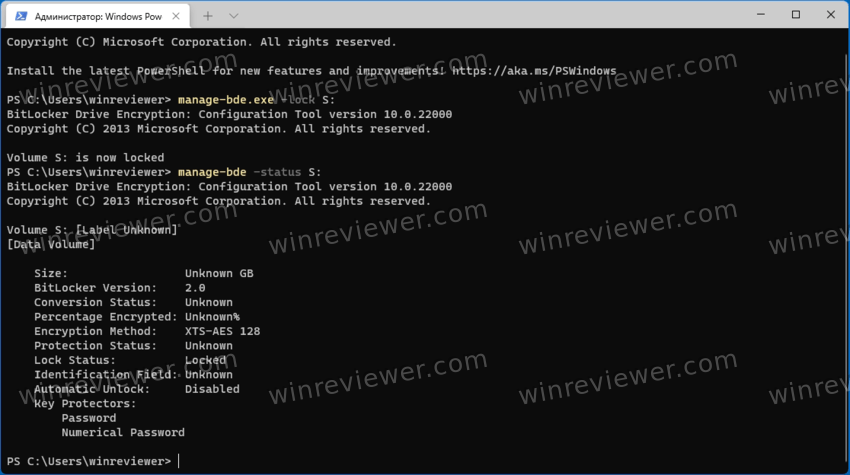
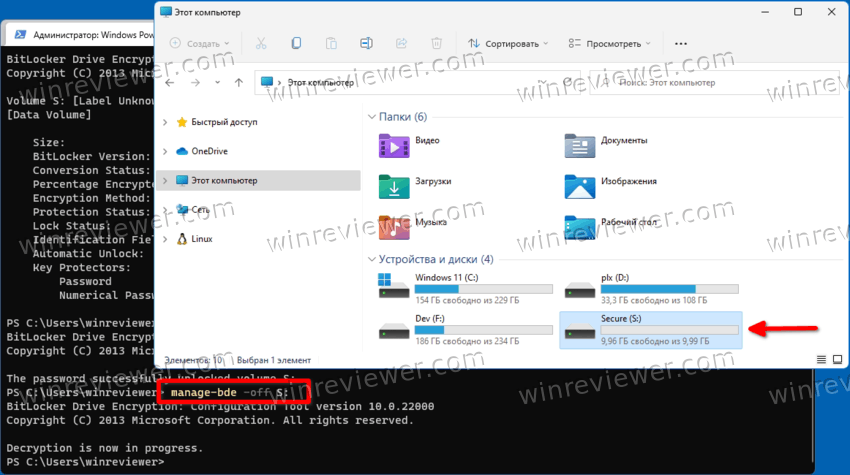
Команда manage-bde -status, выполненная из командной строки от Администратора позволит узнать, какие из подключенных жестких дисков зашифрованы с помощью BitLocker, а также выведет используемый метод шифрования.
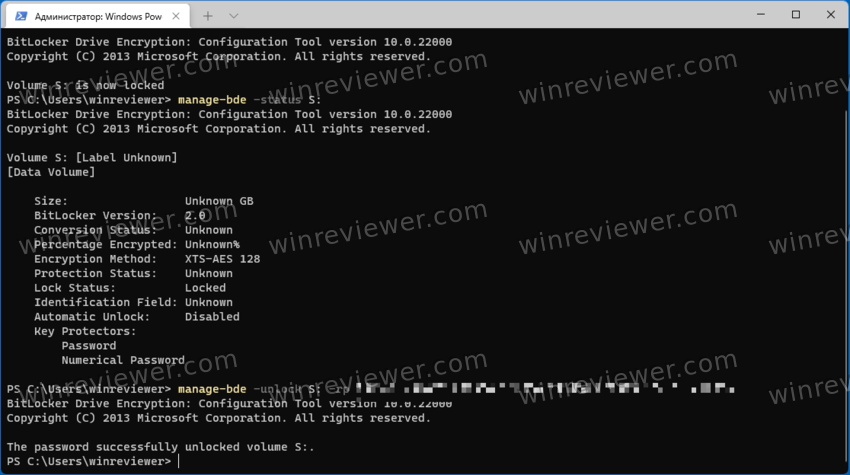
Чтобы отключить BitLocker в Домашней редакции Windows 11 и 10, выполните команду
manage-bde -unlock S: -RecoveryPassword <ваш пароль восстановления из 48 цифр>
Более короткий вариант команды выглядит так:
manage-bde -unlock S: -rp <ваш пароль восстановления из 48 цифр>
В командах выше замените «S:» на букву вашего диска, который вы хотите расшифровать.
Диск будет разблокирован и будет отображаться с иконкой «открытый замок» в Проводнике. Теперь вы сможете получить доступ к данным, хранящимся на этом диске.
Затем, чтобы отключить шифрование диска BitLocker на диске, выполните следующую команду:
manage-bde -off S:
Готово!
Обратите внимание, что нельзя включить BitLocker с команды manage-bde.exe -on в домашних редакциях Windows 11 и Windows 10. Вы увидите сообщение об ошибке:
ОШИБКА: Произошла ошибка (код 0x8031005a):
Эта версия Windows не поддерживает эту функцию шифрования диска BitLocker. Чтобы использовать эту функцию, обновите операционную систему.
На этом всё.
💡Узнавайте о новых статьях быстрее. Подпишитесь на наши каналы в Telegram и Twitter.
Судя по тому, что вы читаете этот текст, вы дочитали эту статью до конца. Если она вам понравилась, поделитесь, пожалуйста, с помощью кнопок ниже. Спасибо за вашу поддержку!
I turned on Bitlocker on drive F:\ which has alot of important content in it.
Now when I try to unlock it the PC hangs. Only restart fixes this. I know the password, but the recover key is lost.
Is there anything I can do to restore my files?
![]()
asked Feb 17, 2011 at 10:44
0
at first sight http://technet.microsoft.com/en-us/library/ee706522(WS.10).aspx looks good:
- Manage-bde:
This tool can be used to turn on or turn off BitLocker, specify unlock mechanisms, update recovery methods, and unlock BitLocker-protected data drives.»
The site of Manage-bde gives:
-off
Syntax manage-bde –off Volume [-ComputerName Name]
So, you can try to:
manage-bde -off F:
answered Feb 17, 2011 at 11:45
![]()
akiraakira
61.2k17 gold badges136 silver badges165 bronze badges
This sounds like a hardware problem. My suggestion would be to first try to unlock the drive using the manage-bde utility.
- Open an elevated cmd prompt
- Type
manage-bde F: -statusand look under «Key Protectors» to ensure that «Password» appears. - Type
manage-bde F: -unlock -pwand type your password to unlock the drive.
If this fails, I suggest trying to unlock the drive on another machine in case the hardware problem is on your first computer. The computer will need to have Win7 installed. Alternatively, you can create a bootable WinRE (not WinPE) DVD, which will also allow you to manage BitLocker and attempt to unlock the drive. Instructions for this are here here.
You said that the recovery key is lost but if you have the recovery password (the 48-digit number generated during BitLocker setup) you can recover the drive using the repair-bde command line tool included in Win7. If your computer was connected to a network with Active Directory, your recovery password was backed up to AD and can be recovered by contacting your AD admin.
answered Feb 24, 2011 at 18:42
![]()
mtlynchmtlynch
5015 silver badges4 bronze badges
Remove the drive, connect it to another computer capable of reading Bitlocker drives, then use the recovery key that you should have written down/backed up to disk somewhere safe to unlock it.
If you don’t have the recovery key, and unlocking it normally is hosed then you’re screwed. Since your data is important, I’m assuming you have a backup of it somewhere. Restore it from that.
answered Feb 17, 2011 at 14:18
![]()
MDMarraMDMarra
20.5k4 gold badges44 silver badges54 bronze badges
Try to restart computer without F: drive — unplug it if it’s removable.
Once computer is up and no longer hanging, plug F: back in and try to use «manage-bde -off F:» command that akira mentioned above.
answered Feb 18, 2011 at 20:51
![]()
romkaromka
1362 bronze badges
1
Another, albeit, desperate method might involve a system recovery tool like, NTFS Undelete.
When you install BitLocker on your drives you are forced to back the key up to a removable drive.
If in your case this was onto an infrequently used USB stick and you simply deleted the key from that stick and haven’t used the stick much since then, it might be possible to pull your recovery file off the stick by scanning it with a tool like NTFS Undelete.
It’s an absolute long shot but desperate does as desperate is.
answered Feb 18, 2012 at 23:16
![]()
rismrism
6623 gold badges10 silver badges22 bronze badges
You must log in to answer this question.

ОС Windows 10 оснащена различными функциями защиты персональных данных пользователя. Причем система безопасности заключается далеко не только в установке пароля или регистрации отпечатка пальца для входа. Также существует защита жесткого диска, которая доставляет пользователям множество неудобств. А потому, когда речь заходит о BitLocker, приходится искать способ, как отключить функцию.
Как отключить функцию
Если ранее вы зашифровали накопитель, но в определенный момент передумали, то отменить блокировку можно будет встроенными средствами Windows 10. Существует несколько вариантов отключения Битлокера, каждый из которых обладает отличительными особенностями.
Важно. Для разблокировки жесткого диска может потребоваться ввод пароля, который присваивался в процессе активации BitLocker. Поэтому перед выполнением операции обязательно проверьте наличие ключа.
Из Командной строки
Самый простой способ убрать шифрование дисков – обратиться к помощи Командной строки. Это специальный интерфейс, созданный для обработки пользовательских запросов. При вводе команды отключения Битлокера компьютер и сам накопитель перестает требовать ввод пароля:
- Щелкните ПКМ по иконке «Пуск».
- Выберите запуск Командной строки от имени Администратора.
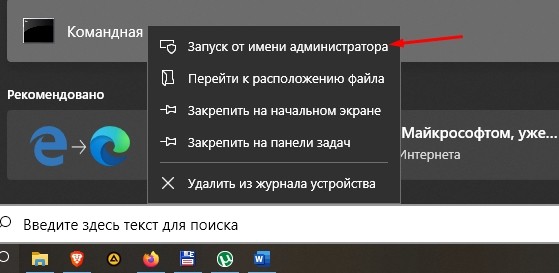
- Введите запрос «manage-bde -off D:», где вместо «D» может быть указана буква любого другого раздела накопителя.
- Нажмите на клавишу «Enter».
После выполнения последнего шага проследите, как на это действие отреагирует Командная строка. Она должна подтвердить отключение функции.
Панель управления
Еще один доступный вариант отключения блокировки накопителя. В этот раз не придется запоминать сложную команду. Достаточно будет выполнить несколько простых шагов:
- Используя поисковую строку Windows 10, найдите и запустите «Панель управления».
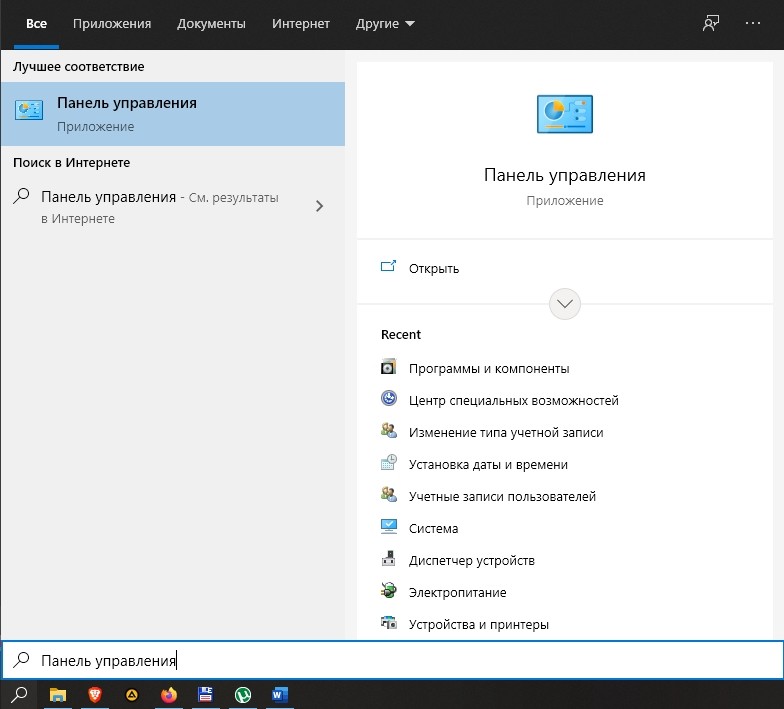
- Перейдите в раздел «Система и безопасность».

- Кликните по надписи «Шифрование диска BitLocker», а затем нажмите на кнопку «Отключить».
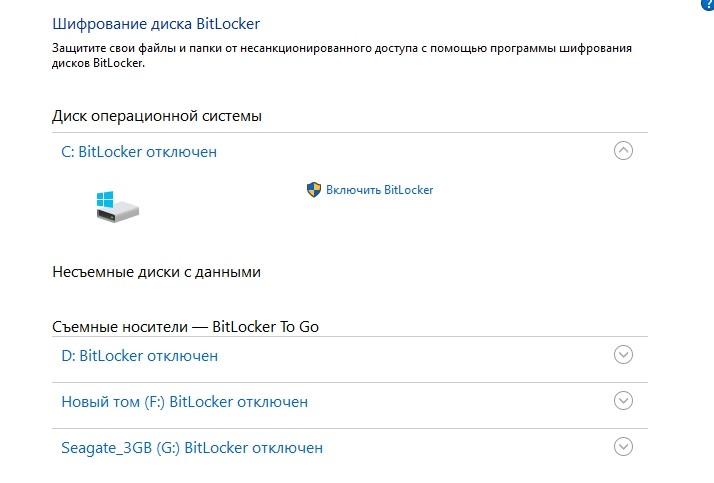
Если один из указанных пунктов не отображается в «Панели управления», то в пункте «Просмотр» установите значение «Категория». Так вам удастся включить показ дополнительных инструментов, среди которых будет функция деактивации Битлокера.
Редактор групповой политики
Альтернативный вариант разблокировки, задействующий другой интерфейс Windows 10. Чтобы не допустить ошибку, нужно действовать в строгом соответствии с инструкцией:
- Зажмите клавиши «Win» + «R» для запуска окна «Выполнить».

- Введите запрос «gpedit.msc» и нажмите на кнопку «ОК». Это позволит открыть Редактор групповой политики.

- Перейдите в директорию, расположенную по пути: «Конфигурация компьютера/Административные шаблоны/Компоненты Windows/Шифрование диска BitLocker/Диски операционной системы».
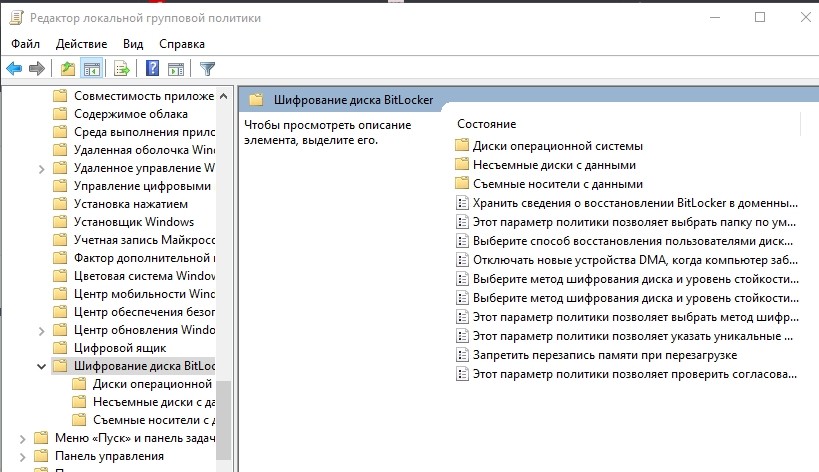
- Двойным щелчком ЛКМ откройте настройки параметра «Этот параметр политики позволяет настроить требование дополнительной проверки подлинности при запуске».
- Установите значение «Отключено».
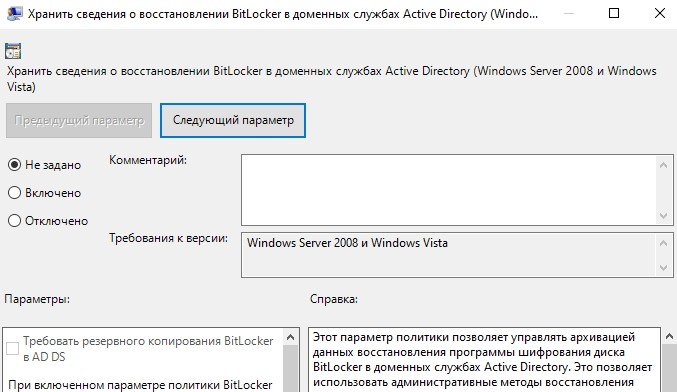
После сохранения изменений накопитель перестанет требовать ввод ключа при запуске компьютера или при подключении к другому устройству. Для обратной блокировки потребуется выставить значение параметра «Включено».
Отключение службы
За работу BitLocker на компьютере с операционной системой Windows 10 отвечает соответствующая служба. Следовательно, если выключить службу, то устройство больше не будет требовать ввод ключа. Снимается блокировка следующим образом:
- Откройте окно «Выполнить», используя комбинацию клавиш «Win» + «R».

- Введите запрос «services.msc» и нажмите на кнопку «ОК», чтобы запустить служебное меню.
- Найдите в списке пункт «Служба шифрования диска BitLocker», а затем дважды кликните по ней ЛКМ.
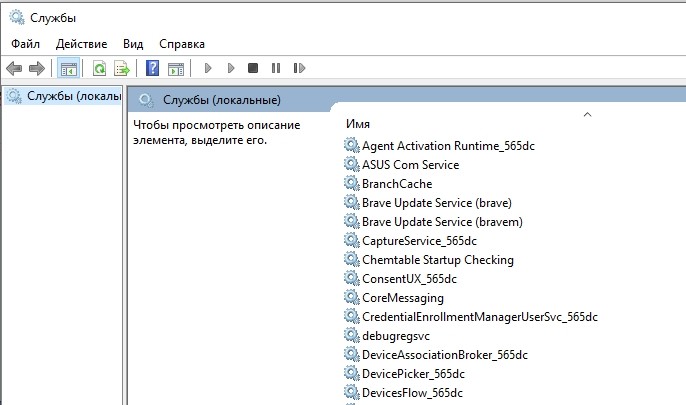
- В пункте «Тип запуска» установите значение «Отключено».

- Нажмите на кнопку «Применить» для сохранения настроек.

Теперь перезагрузите компьютер. Это даст понять, вступили ли изменения в силу. При входе в систему может потребоваться ввод пароля, но это уже будет не ключ Битлокера, а код доступа к учетной записи.
Приложение «Настройки»
На Windows 10 есть удобная утилита «Параметры», позволяющая менять любые настройки компьютера. В частности, допускается принудительное отключение BitLocker. Для осуществления задуманного обратитесь к инструкции:
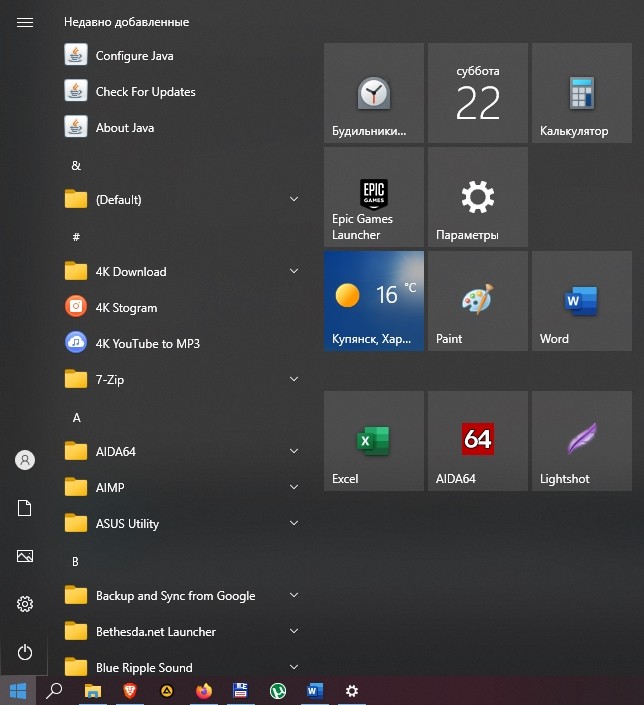
- Кликните ЛКМ по значку «Пуск».
- Нажмите на иконку в виде шестеренки для перехода в «Параметры».
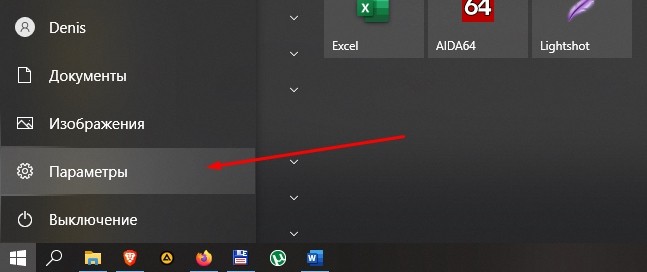
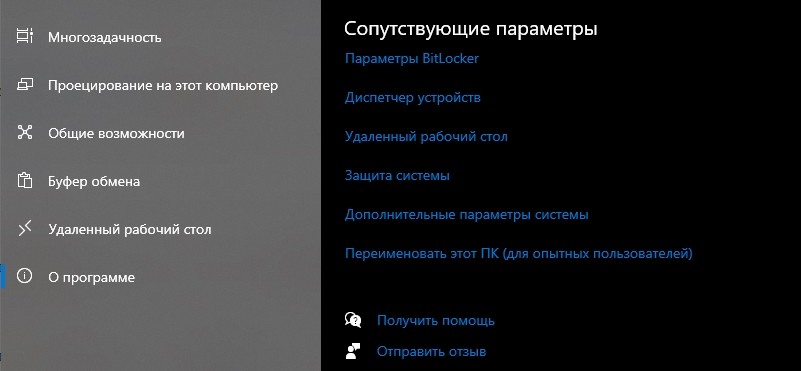
- Перейдите в раздел «Система», а затем откройте вкладку «О программе».
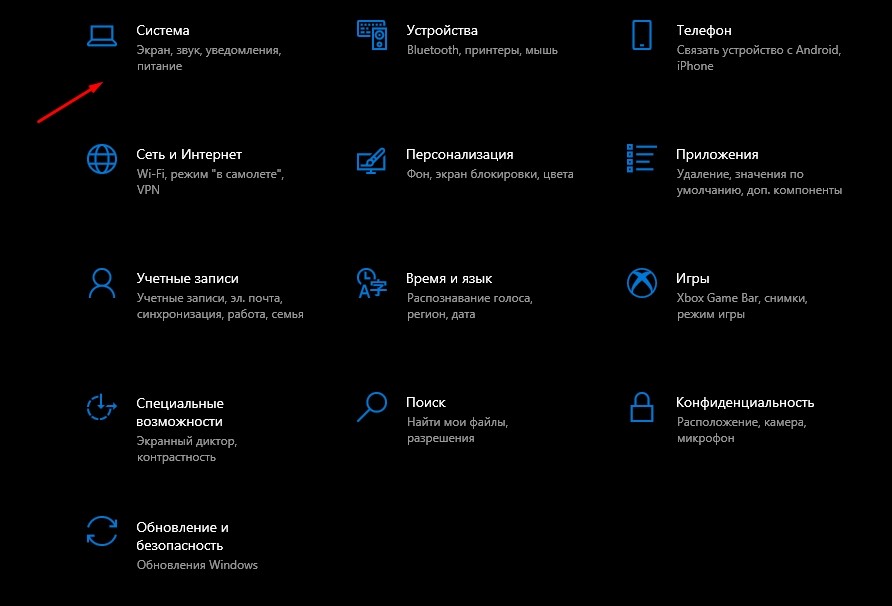
- Под заголовком «Шифрование устройства» нажмите на кнопку «Отключить».
Деактивация шифрования автоматически приведет к отключению функцию Битлокера. Если этот вариант не помог – обратите внимание на заключительный способ.
PowerShell
Удалить шифрование диска помогает еще один инструмент, внешне очень напоминающий Командную строку. Это консоль PowerShell, которая также призвана обрабатывать пользовательские запросы:
- Щелкните ПКМ по иконке «Пуск».
- Выберите запуск PowerShell с административными правами.
- Введите запрос «Disable-BitLocker -MountPoint «D:»», где вместо «D» укажите букву заблокированного раздела диска.
- Нажмите на клавишу «Enter».
Таким образом, инструкция по отключению Битлокера в PowerShell аналогична варианту деактивации через Командную строку. Единственное отличие – формулировка запроса, которая здесь выглядит иначе.
Особенности Bitlocker в Windows 10
Если вам вдруг потребуется снова активировать функцию, то рекомендуется принять во внимание ее особенности. Так вы получите полное представление относительно того, как работает Битлокер.
BitLocker – это встроенная функция шифрования жестких дисков, твердотельных и флеш-накопителей. В отличие от защиты учетной записи, Битлокер позволяет защитить не сам компьютер, а его содержимое. Ведь злоумышленнику не составит труда извлечь HDD или SSD, а затем подключить его к своему устройству. Но в данном случае он не сможет снять блокировку.
На заметку. Функция BitLocker не доступна в Windows 10 Home. Она работает только в профессиональной и корпоративной версиях ОС.
Вероятность взлома накопителя, защищенного Битлокером, очень мала. Но она существует. Для разблокировки злоумышленник должен подобрать ключ, а на это может уйти несколько дней или месяцев, при условии постоянных попыток ввода пароля.