-
#1
Вы можете использовать помощник по установке, чтобы принудительно выполнить обновление до Windows 11 23H2, и в этом руководстве вы узнаете, как это сделать.

На компьютерах под управлением исходного выпуска Windows 11 или Windows 10 можно использовать «Помощник по установке» для обновления до Windows 11 23H2, когда обновление компонентов не загружается из настроек Центра обновления Windows.
Помощник по установке — это инструмент, предназначенный для обновления компьютеров до новой версии Windows 11 при возникновении проблем с Центром обновления Windows или по другой неизвестной причине, не связанной с совместимостью оборудования или программного обеспечения. Однако вы также можете использовать его для принудительной (в данном случае) установки обновления Windows 11 2023.
Важно: Эти шаги предназначены для обновления системы после того, как обновление компонентов станет официально доступным. Если вы попытаетесь использовать средство до выпуска версии 23H2, вы не сможете выполнить обновление. Вы были предупреждены.
Хотя никогда не рекомендуется обновлять устройство в первые дни развертывания или когда компьютер не получает обновление автоматически через Центр обновления Windows, так как это может указывать на то, что оборудование не полностью совместимо, вы можете выполнить следующие действия для обновления:
- Загрузите помощник по установке из раздела «Windows 11 Installation Assistant», нажав кнопку «Загрузить сейчас» на странице загрузки поддержки программного обеспечения Microsoft.
- Дважды щелкните файл Windows11InstallationAssistant.exe, чтобы запустить инструмент.
- Нажмите кнопку «Принять и установить», чтобы начать установку.

- Как только инструмент подтвердит, что конфигурация аппаратного и программного обеспечения совместима, файлы Windows 11 23H2 будут загружены на компьютер. Затем нажмите кнопку «Перезагрузить», чтобы завершить установку.
Помощник по установке должен занять менее часа, чтобы завершить процесс на вашем настольном компьютере, ноутбуке или планшете.
Windows 11 version 23H2 is yet to be launched by Microsoft later this year. However, you can install it right now to check out the latest features, improvements, and bug fixes.
You can install Windows 11 23H2 using 2 methods: Either perform a clean install by downloading Windows 11 23H2 ISO using the UUP Dump tool or alternatively, join the Windows Insider channel.
This article gives you a step-by-step guide on installing Windows 11 v23H2 using both of these methods.
Install Windows 11 23H2 through Windows Update
As mentioned earlier, you can install Windows 11 23H2 by joining the Windows Insider program, more specifically, the Beta channel. Here is how you can join the Windows Insider Beta channel through the Windows Update Settings page:
-
Press the Windows Key + i to open the settings app.
-
Navigate to the following:
Settings app >> Windows Update >> Windows Insider Program
-
Click “Get started.”

Join the Windows Insider Program -
[Conditional] If a Microsoft account is not already linked, click “Link an account” and enter your Microsoft account details.
-
Next, select “Beta channel” and click Continue.
Select the Beta Insider channel -
Click Continue again.
-
Click “Restart now.”
Restart computer When the computer restarts, you will have joined the Beta channel. However, the work is not yet completed.
-
Go to the following page again:
Settings app >> Windows Update
-
Click “Check for updates.”

Check for pending updates -
Install pending preview updates.
When the updates are installed, you will have transitioned to Windows 11 version 23H2.


Install Windows 11 23H2 using ISO file
You can also perform a clean Windows 11 23H2 install using an ISO file and making a bootable USB flash drive.
To begin, you must first download the Windows 11 23H2 ISO image and create a bootable USB drive. Once you have done that, you may then use the following steps to install it on a computer:
Note: If the computer already has an operating system installed, or any prior data, it will be removed on the hard disk where the new OS will be installed, using the following steps. Therefore, it is recommended that you back up your data elsewhere before proceeding.
-
Confirm that the target PC meets the minimum Windows 11 requirements.
-
Plug in the bootable Windows 11 23H2 USB flash drive in the target computer.
-
Turn on/reboot the computer and open its One Time Boot Menu (Usually through the F12, F10, or Esc button).
-
Select the external USB drive to boot from the bootable USB.
-
You will now see a menu such as the one below. Click “Next.”

Proceed with installation -
Click “Install Now.”

Install Windows -
On the next screen, click “I don’t have a product key.”
Even if you do have one, you can activate the product later after installation.

Proceed without entering key -
Select the Windows 11 edition that you want to install on this device from the list. When selected, click Next.
Select Windows 11 edition to install -
Check the box to accept the license agreement and click Next.

Accept terms -
Select “Custom: Install Windows only (advanced).”
You will now be asked if you want to upgrade your existing OS or perform a custom installation. Since this is a clean and fresh Windows 11 installation, we will be selecting Custom.
Custom installation -
Click New and create the disk partitions as you want them. Remember to have at least 60GB of space in the primary (C) drive for Windows installation.
Enter the size of the partition to create (in MBs), then click Apply.
Create disk partitions -
If intimated about additional partitions creations, click Ok.
Automatic creation of additional partitions prompt -
Select the partition you wish to install the operating system on and click Next.
Select the primary partition to install Windows Windows 11 will now begin installing on your device. This step may take a few minutes and your device may reboot a few times.


Learn how to install Windows 11 without an internet connection or without a Microsoft account.
Further ahead in the process, you will be asked to configure your PC through several Out Of Box Experience (OOBE) screens. Proceed with the on-screen instructions and configure your PC, and you will have successfully installed Windows 11 v23H2.
The on-screen instructions will include the following steps, in that order:
- Choose a region
- Select a keyboard layout
- Rename your PC
- How to set up the device (personal or for work)
- Sign in with a Microsoft account.
- Restore from a previous device or set up as new
- Create a PIN.
- Adjust privacy settings.
- Customize user experience by selecting interests.
- Link an Android phone.
- Set up OneDrive.
- Set up Microsoft 365.
- Game Pass subscription.
Once it finishes, you will be logged into your user account on the all-new Windows 11 23H2 PC!
Takeaway
Although you can download and install Windows 11 23H2, it might not be fully stable just yet. Microsoft is still improving the OS before making a stable release. Therefore, it is advised that you do not install Windows 11 23H2 inside a live production environment just yet.
That said, you are welcome to test out the latest features and updates in Windows 11 23H2 before everyone else using the steps in this post.
В этой статье описаны способы установки Windows 11.
Примечание: Для перехода на Windows 11 устройства должны соответствовать минимальным требованиям к системе в Windows 11. Часть функций Windows 10 недоступна в Windows 11. Требования к системе для некоторых функций и приложений Windows 11 будут превышать минимальные требования для Windows 11. Технические характеристики Windows 11, описание компонентов и требований к компьютеру
Перед началом работы
Убедитесь, что устройство, на которое вы хотите установить Windows 11, соответствует минимальным требованиям к системе. Если ваше устройство в настоящее время работает под управлением Windows 10, рекомендуем проверить минимальные требования к системе с помощью приложения «Проверка работоспособности ПК Windows». Не рекомендуется устанавливать Windows 11 на устройстве, которое не соответствует требованиям. Дополнительные сведения см. в статье Установка Windows 11 на устройства, не соответствующим минимальным требованиям к системе.
Центр обновления Windows в параметрах (рекомендуется)
Если вы выполняете обновление с Windows 10, рекомендуется дождаться уведомления через Центр обновления Windows о том, что обновление готово для вашего устройства. Чтобы проверить, готова ли Windows 11 для вашего устройства, выберите Пуск > Параметры > Обновление и безопасность > Центр обновления Windows > Проверить наличие обновлений.
Чтобы узнать об известных проблемах, которые могут повлиять на ваше устройство, вы также можете проверить Центр работоспособности выпусков Windows.
Другие способы установки Windows 11 (не рекомендуется)
Обновление с помощью Помощника по установке
Рекомендуется подождать, пока вашему устройству будет предложено обновление до Windows 11, прежде чем использовать Помощник по установке. Когда все будет готово, его можно найти на странице загрузки программного обеспечения Windows 11.
Предупреждение:
-
Корпорация Майкрософт рекомендует не устанавливать Windows 11 на устройстве, которое не соответствует минимальным требованиям к системе Windows 11. Если вы устанавливаете Windows 11 на устройстве, которое не соответствует этим требованиям, и вы признаете и понимаете риски, вы можете создать следующие значения раздела реестра и обойти проверку TPM 2.0 (требуется как минимум TPM 1.2) и семейства ЦП и модели.
-
Раздел реестра: HKEY_LOCAL_MACHINE\SYSTEM\Setup\MoSetup
-
Имя: AllowUpgradesWithUnsupportedTPMOrCPU
-
Тип: REG_DWORD
-
Значение: 1
-
Примечание. Неправильное изменение параметров системного реестра с помощью редактора реестра или любым иным путем может привести к возникновению серьезных неполадок. Для этих проблем может потребоваться переустановка операционной системы. Корпорация Майкрософт не гарантирует, что такие неполадки могут быть устранены. Внося изменения в реестр, вы действуете на свой страх и риск.
Существует два пути установки:
-
Выполните обновление, запустив программу установки на носителе под управлением Windows 10. Вы можете:
a. Выполните полное обновление, при котором сохраняются личные файлы (включая драйверы), приложения и параметры Windows. Это функция по умолчанию, которую использует Помощника по установке.
б. Сохранять только данные. При этом будут сохранены только личные файлы (включая драйверы), но не приложения и параметры Windows.
c. Чистая установка установит Windows 11 и ничего не сохранит при установке Windows 10. Дополнительные сведения см. в статье Новый запуск компьютера. -
Загрузка из мультимедиа для запуска программы установки. Этот путь является чистой установкой и не сохраняет предыдущие файлы или параметры. Дополнительные сведения см. в статье Новый запуск компьютера.
Важно: Убедитесь, что ваше устройство соответствует минимальным требованиям к системе, прежде чем выбрать загрузку с носителя, потому что это позволит вам установить Windows 11, если у вас есть как минимум TPM 1.2 (вместо минимальных требований к системе TPM 2.0), и он не будет убедитесь, что ваш процессор находится в утвержденном списке ЦП в зависимости от семейства и модели процессора.
Создание установки изображения
Используйте DISM или сторонние инструменты, чтобы напрямую применить существующий образ Windows 11 к диску.
Важно: При установке изображении Windows 11 не проверяются следующие требования: TPM 2.0 (требуется как минимум TPM 1.2), а также семейство и модель ЦП.
Статьи по теме
Установка Windows 11 на устройства, не соответствующие минимальным требованиям к системе
Нужна дополнительная помощь?
Нужны дополнительные параметры?
Изучите преимущества подписки, просмотрите учебные курсы, узнайте, как защитить свое устройство и т. д.
В сообществах можно задавать вопросы и отвечать на них, отправлять отзывы и консультироваться с экспертами разных профилей.
Есть ли Windows 11 23H2? Как скачать Windows 11 23H2? Как установить обновление Windows 11 23H2? Если вас интересуют эти вопросы, вы попали по адресу. В этом посте MiniTool покажет вам подробную информацию о загрузке и установке Windows 11 23H2 (предварительная версия).
Есть ли Windows 11 23H2? Как Microsoft заявляла ранее, Windows 11 2023 Update — это пакет активации, который, как ожидается, будет выпущен в сентябре, но эта компания откладывает выпуск (возможно, в четвертом квартале 2023 года), поскольку выпускает обновление KB5030310. Хотя Microsoft не выпускает это основное обновление, вы можете воспользоваться новыми функциями раньше других, если вы являетесь участником программы предварительной оценки Windows.
По данным Microsoft, она выпустила Windows 11 23H2 на канале Release Preview 26 сентября 2023 года. Кроме того, ISO-файл для Windows 11 версии 23H2 Build 22631 доступен на странице загрузки Windows Insider ISO. Теперь давайте перейдем к следующей части, чтобы узнать подробности о загрузке Windows 11 23H2.
Прежде чем скачивать Windows 11 23H2 ISO, вам следует обратить внимание на следующее:
- Убедитесь, что у вас стабильное подключение к Интернету
- Если вы обновляете операционную систему со старой версии Windows, убедитесь, что ваш компьютер соответствует системным требованиям Windows 11, и приложение PC Health Check может вам очень помочь. Если у вас неподдерживаемое компьютерное оборудование, вы можете использовать Rufus, чтобы обойти эти ограничения.
- Обязательно заранее создайте резервные копии важных файлов, чтобы избежать потери данных из-за проблем с обновлением или при чистой установке. Для этого запустите MiniTool ShadowMaker — бесплатное программное обеспечение для резервного копирования и следуйте инструкциям — Как сделать резервную копию Windows 11 (с акцентом на файлы и систему).
Пробная версия MiniTool ShadowMakerНажмите, чтобы загрузить100% чисто и безопасно
Далее давайте посмотрим, как загрузить ISO-файл Windows 11 23H2.
Шаг 1. Откройте браузер и посетите страницу загрузок Windows Insider Preview — https://aka.ms/wipISO.
Шаг 2. Войдите на эту страницу под своей учетной записью Microsoft.
Шаг 3: Прокрутите вниз до Выберите издание раздел и выберите Windows 11 Insider Preview (канал Release Preview) — сборка 22631. Затем подтвердите выбор.
Шаг 4. Выберите язык и нажмите кнопку 64-битная загрузка кнопка. Затем вы получите ISO-файл обновления Windows 11 2023, размер которого составит 6,1 ГБ.
Установите Windows 11 23H2 через ISO с USB-накопителя.
После получения загружаемого файла Windows 11 23H2 вы можете использовать этот ISO-образ для установки обновления на свой компьютер посредством чистой установки.
Шаг 1. Загрузите Rufus и запустите этот инструмент.
Шаг 2. Подключите USB-накопитель к компьютеру, выберите Windows 11 23H2 ISO и настройте схему разделов и другие параметры. Затем нажмите НАЧИНАТЬнастройте установку Windows и начните создавать загрузочный USB-накопитель с обновлением Windows 11 2023 Update.
Шаг 3. Перезагрузите компьютер, нажмите Принадлежащий, Ф2или другую клавишу (в зависимости от марки ПК) для входа в меню BIOS, после чего вы увидите интерфейс установки Windows.
Шаг 4. Следуйте инструкциям на экране, чтобы установить Windows 11 23H2.
Установите обновление Windows 11 2023 через программу предварительной оценки Windows
Помимо загрузки ISO-образа Windows 11 23H2 и установки его с USB-накопителя, вы можете установить это обновление через программу предварительной оценки Windows в настройках. Давайте посмотрим, как обновиться до Windows 11 2023 Update таким способом:
Шаг 1: Нажмите Победа + Я чтобы открыть Настройки. Затем перейдите к Центр обновления Windows > Программа предварительной оценки Windows.
Шаг 2. Нажмите на Начало работы > Привязка аккаунта и выберите свою учетную запись Microsoft для входа.
Шаг 3: Проверьте Предварительный релиз от Выберите настройки предварительной оценки. Затем перезагрузите устройство, чтобы получить сборки.
Шаг 4: Под Центр обновления Windows страница, проверьте наличие обновлений, и вы увидите в списке Windows 11 версии 23H2. Просто нажмите на Скачать и установить кнопка, чтобы начать обновление.
Заключительные слова
В этом посте вы можете найти много информации о загрузке и установке Windows 11 23H2. Вы можете получить ISO-файл на официальной странице загрузки программы предварительной оценки для установки или напрямую присоединиться к программе предварительной оценки Windows для обновления до Windows 11 2023 Update. Выбирайте способ в соответствии с вашей ситуацией и действуйте!
Like the previous version Windows 11 22H2, 23H2 allows installation using multiple modes. For example, you can use the default Settings app, Update Assistant tool, In-Place upgrade, ISO as bootable media. Once released, the update will be provided simultaneously if your device will meet system requirements. If you are a tech enthusiast and excited to get it as early as it’s available, you can download and install Windows 11 23H2 manually. See: How to install Windows 11 without TPM and Secure Boot.
Windows 11 is already enriched with a lot of features such as redesigned taskbar, improved user interface, centered Start Menu, and visual enhancements. In addition to the visual changes, it brings performance improvements, including faster startup times and improved power efficiency. With Windows 11, Microsoft also introduces compatibility with Android apps, which can be downloaded and run through the dedicated store. Besides, snap Layouts for easier window management, Virtual Desktops, and improved support for touch, pen, and voice input are equally significant.
Here is how to download and install Windows 11 23H2 update –
Using Update Assistant
Update Assistant is a native tool by Microsoft that allows you to upgrade your Windows operating system to the latest version available. With the utility, you can manually initiate the process and upgrade your OS without waiting for the automatic Windows Update to deliver it.
Initially, the tool checks your system’s compatibility with the latest Windows 11 version and starts the upgrading process only if your device matches the requirements. Before you start, it’s important to save any ongoing work and let the update process complete without interruption.
- Visit the official Microsoft website for the Windows Update Assistant tool.
- Once on the webpage, click Download now present under Windows 11 Installation Assistant.
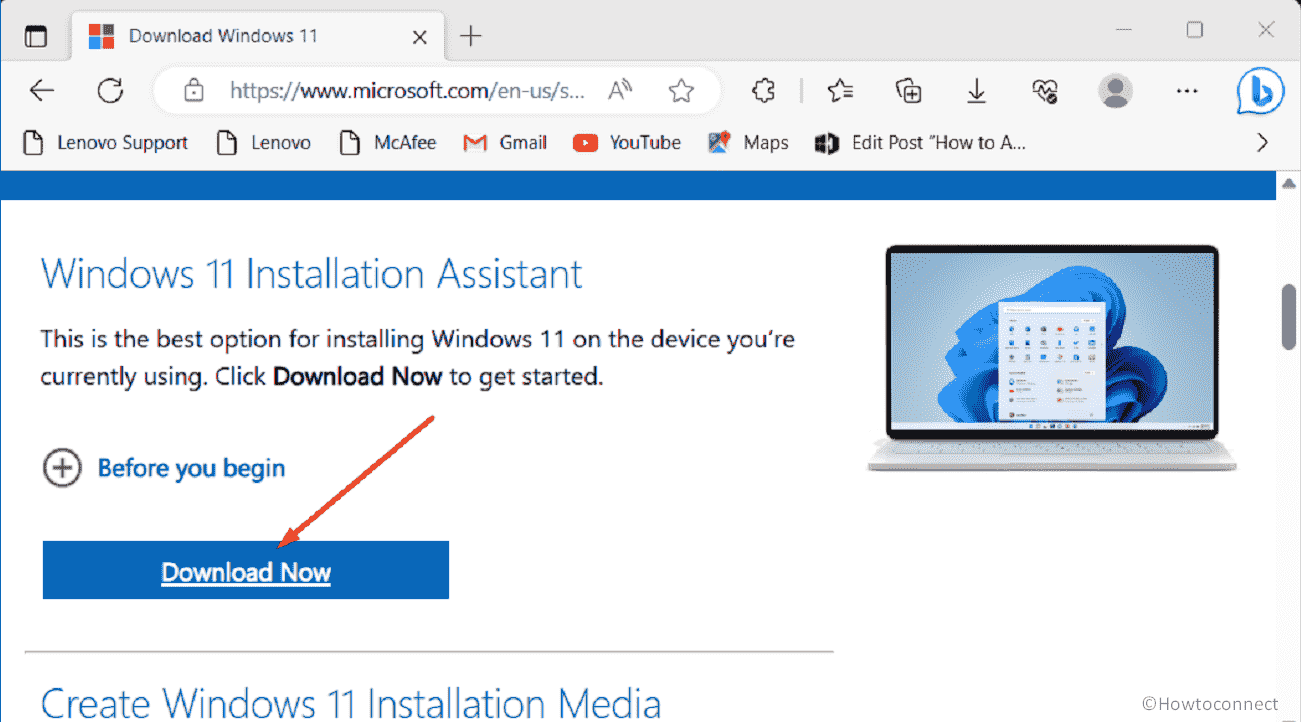
- Double-click on Windows11InstallationAssistant.exe.
- For appearing UAC, click Yes.
- The Update Assistant will check your system for compatibility with Windows 11 23H2.
- If minimum system prerequisites are met, the Update Assistant will prompt you to begin the upgrade process.
Note – In case your system is incompatible, it will show “This PC doesn’t meet the minimum system requirement to install Windows 11“. To get the details, you can use PC Health Check app.
- Follow the on-screen instructions provided by the Update Assistant.
- Download the necessary files and prepare your system for the update.
- During the process, your computer may restart multiple times. If it asks you to restart manually, do it too.
- After the update is finished, your computer will start up with the latest version 23H2.
Check for updates from the Settings app
If you are currently running a genuine and activated version of Windows 11 and your PC meets minimum requirements, you may be eligible for a free upgrade through Windows Update. You will not have to download and install Windows 11 23H2 manually. Check for the availability of the upgrade by going Settings app. steps are as followed –
- Press Windows + I.
- In the Settings page, select Windows Update from left sidebar.
- Move to the right pane and then click on Check for updates button.
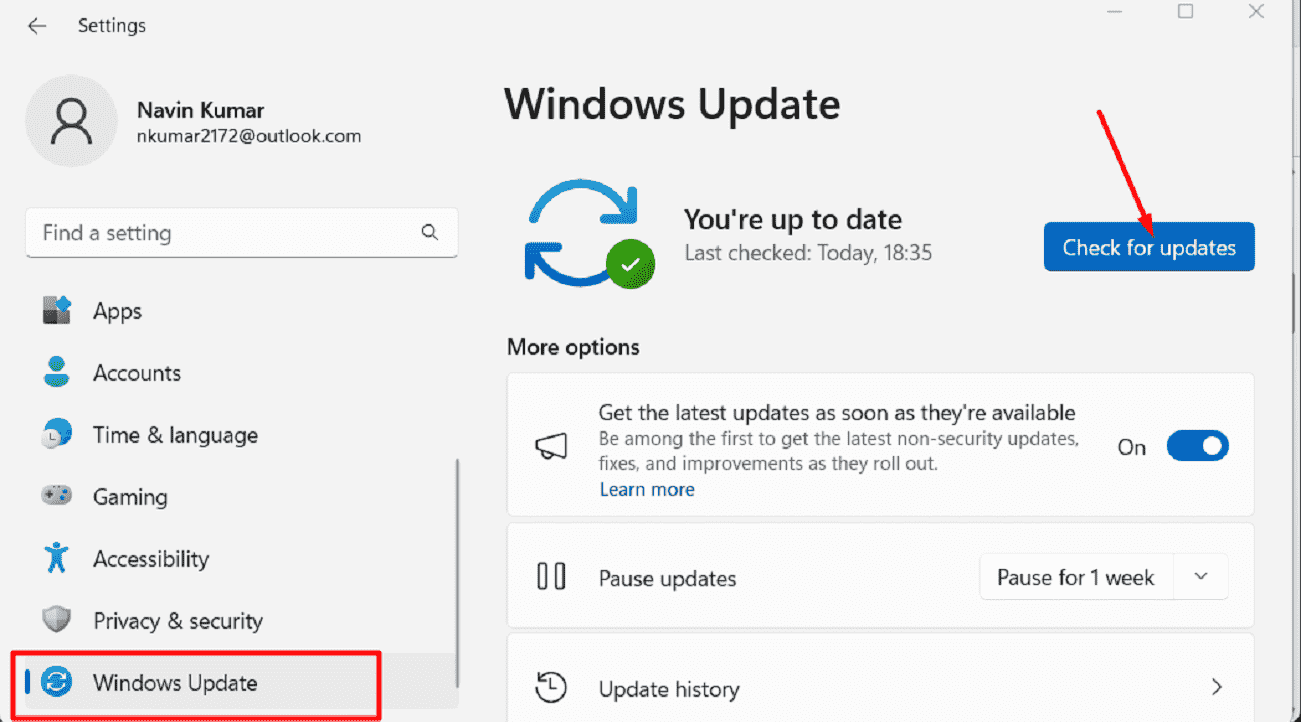
- Windows will then start checking for available updates online.
- If updates are found, they will be listed.
- Click Download.
- The downloaded update files usually get installed automatically. If not, you might need to click Install.
- Once the updates are installed, restart your computer to complete the installation.
Try ISO installation (In-Place upgrade)
You can download a Windows 11 ISO file from the official Microsoft website or other trusted sources. Once you have the ISO file, create a bootable USB drive using tools like the Windows USB/DVD Download Tool, Rufus, or the Media Creation Tool provided by Microsoft. After creating the bootable USB drive, you can boot from it to install Windows 11 23H2.
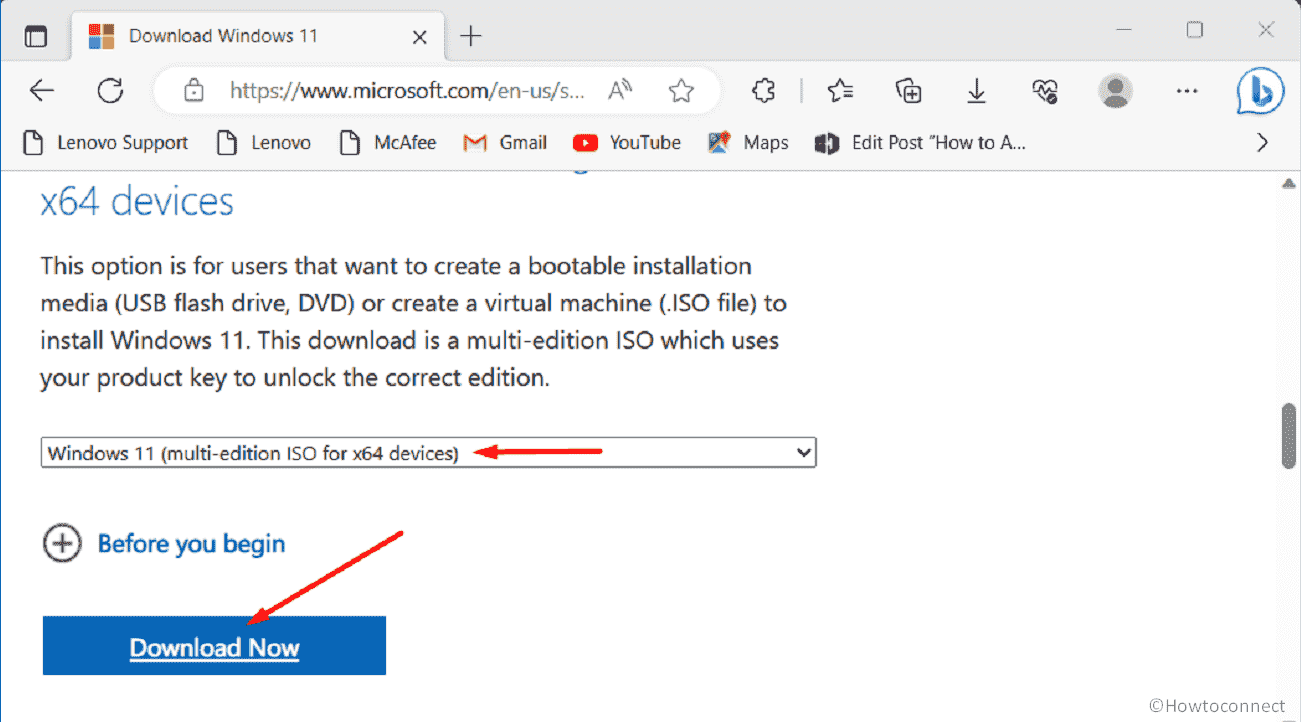
- Visit official Microsoft website.
- Click the drop-down menu present beneath Download Windows 11 Diskk Image (ISO) for x64 devices section. Note: If your device has ARM64 CPU the name will be changed.
- Select Windows 11 (multi-edition ISO for x64 devices).
- Click Download Now button.
- After validating the request, the webpage will ask to select product language.
- Click the drop-down menu and choose your preferred language.
- Hit Confirm.
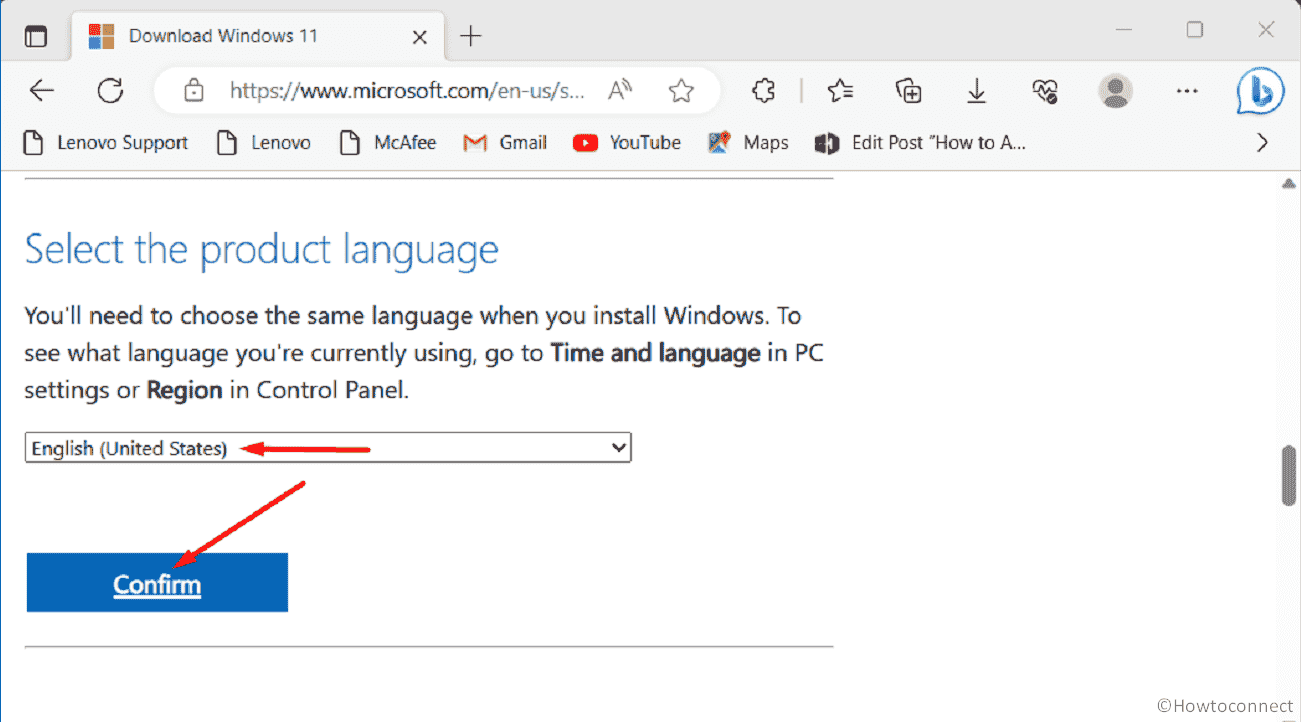
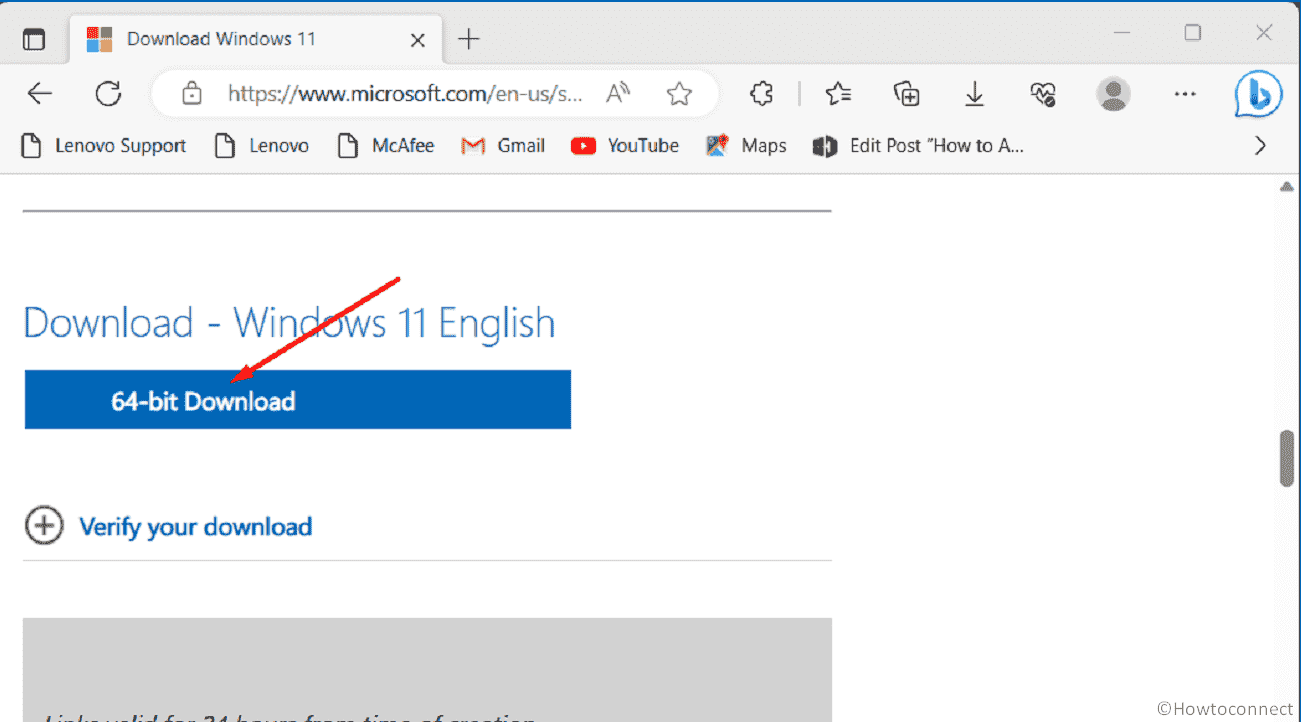
- Once the webpage generates a download link after reviewing your request, click 64-bit Download.
- System will start downloading ISO file. Since the file is larger than 5GB, it will take time depending on your internet speed.
- After successfully downloading, go to the directory where system saves downloaded files.
- Right-click the ISO file and choose Properties.
- When dedicated wizard turns up where General tab is open, click Change.
- A small pop-up will prompt. Select Windows Explorer and then click OK.
- Now, right-click the ISO file and choose Mount.
- A virtual bootable disc will be created.
- Then Double-click the setup.exe to Install Windows 11 23H2.
- Follow the on-screen instructions of Setup wizard to complete the installation from the ISO file.
Perform clean install
If you prefer to start fresh or have compatibility issues with the upgrade, you can clean install Windows 11 23H2. This involves formatting your system drive and installing Windows 11 from scratch using a bootable USB drive created from the ISO file.
Note – Before you proceed forward, make sure to back up all files like photos, documents, or apps you want to keep from the Windows device you will clean install. During the process, everything will be deleted.
- Navigate to the official Microsoft website.
- Click Download now button located beneath Create Windows 11 Installation Media section.

- Open the mediacreationtool.exe file you downloaded.
- When a UAC asks for your consent, click Yes.
- Once Windows 11 Setup wizard is ready, hit Accept button.
- The next page includes options for selecting language and edition. However, these remain selected by default. You just need to click Next.
- Choose the radio button set before USB flash drive and hit Next button.
- Select the flash drive where you want to write the files. In case of not getting any, click the link that says Refresh drive list and then opt for the desired one.
- Click Next to initiate downloading Windows 11 23H2.
- After the download is complete, click Finish.
Now, your USB drive is ready to serve as bootable media. You clean install Windows 11 23H2 on your device from the installation media you created on the USB flash drive. For that, follow the way –
Clean install Windows 11 23H2
- Plug in the USB to the device on which you want to clean install Windows 11 23H2.
- Restart the machine while holding the shift key. This will boot your PC into Windows Recovery Environment (WinRE).
- Choose to boot from USB drive.
- Once on the Windows Setup page, select your language, time, and keyboard preferences and then click Next.
- Hit Install now button.
- After installation, if the utility asks to activate Windows, choose the option I don’t have a product key. If you are reinstalling the same edition of Windows, it will be automatically activated after signing back into your Microsoft Account.
- Click Next.
- Select the verified Windows edition installed on the PC and then click Next.
- Hit Accept to agree to the Microsoft Software License Terms and then click Next.
- Select Custom: Install Windows only (advanced) as the install type.
- Choose the hard drive on your PC where you want to install Windows and click Next.
- Finally, Windows installation will begin. Please Don’t turn off your PC.
Methods:
Using Update Assistant
Check for updates from Settings app
Try ISO installation (In-Place upgrade)
Perform clean install
That’s all!!