If you are still running Windows Server, you should upgrade to Windows Server 2019 since Windows Server 2012 R2 will end the support. In this post from MiniTool Solution, you can see a full guide on the Windows Server upgrade. Also, some things that should be done before the upgrade are described here.
Windows Server is a family of operating systems created by Microsoft specifically for use on servers. Servers are extremely powerful machines designed to run continuously and provide resources to other computers. This means that in almost all cases, Windows Server is only used in business environments.
It Is Necessary to Upgrade Windows Server 2012 R2 to 2019
Since Windows Server 2012 R2 has ended mainstream support in 2018 and extended support in 2023, it’s recommended to upgrade Windows 2012 R2 to 2019.
Besides, there are other significant reasons.
1. The new system is more compatible with new services and applications.
Windows Server 2019 makes it easier to integrate Linux with new features such as Linux Containers on Windows, Windows Subsystem for Linux (WSL), and the new Windows Server 2019 application platform.
2. The new system is safer.
Windows Server 2019 is built on its strong security foundation. Now it not only blocks threats but also monitors and reacts to perceived threats. Windows Server 2019 is designed to be used with or in the cloud. Users can more easily connect their existing on-premises environments to Microsoft Azure.
Can You Upgrade Windows Server 2012 R2 to 2019?
Can you upgrade Windows Server 2012 R2 to 2019? The answer is Yes. You can upgrade Windows Server 2012 R2 to 2019. However, if you are upgrading Windows Server 2012 to 2019, you will need to upgrade Windows Server 2012 to 2016, and then upgrade from 2016 to 2019. Otherwise, you can only do a fresh install of 2019 to overwrite the existing OS and avoid data loss, it is necessary to back up the server in advance.
Before you upgrade Windows Server 2012 R2 to 2019, the following are some system requirements you need to meet:
Processor:
- 1.4 GHz 64-bit processor
- Compatible with x64 instruction set
- NX and DEP support
- Supports CMPXCHG16b, LAHF/SAHF and PrefetchW
- Supports secondary address translation (EPT or NPT)
Memory:
- 512 MB (2 GB for servers with Desktop Experience install option)
- ECC (Error Correcting Code) type or similar technology for physical host deployments
Disk space for system partition: A fresh or fresh installation requires 32 GB of free disk space. To perform an in-place upgrade, you should plan for at least 60 GB of free disk space.
Network Adapter Requirements:
- Ethernet adapter with at least gigabit throughput
- Compliant with PCI Express Architecture Specification
Other demands: DVD drive (if you plan to install the operating system from DVD media)
Another point you may need to consider is the price. How much will it cost to upgrade Windows Server 2012 R2 to 2019?
There are many factors affecting price, such as hardware, virtualization, etc. However, if you’re referring to the cost of upgrading licenses, the answer is clear. Microsoft typically doesn’t offer an upgrade sale, so you’ll need to buy a copy of Windows Server 2019 separately.
Tips:
If you want to know the exact price, you can go to the Microfost official website.
Another issue worth considering is that some third-party applications may not be compatible with Windows Server 2019. So you had better check if the third-party applications support Windows Server 2019 before upgrading.
Public or private cloud companies may also support an in-place upgrade of Server 2012 R2 to 2019, but you will need to consult your cloud provider for details. Also, you cannot perform an in-place upgrade on any Windows Server that is configured to boot from a VHD. In-place upgrades from Windows Storage Server editions to Windows Server 2019 are also not supported. In this case, you can do a migration or a fresh install.
How to Upgrade Windows Server 2012 R2 to 2019
Before You Upgrade
If you decide to upgrade Windows Server 2012 R2 to 2019, there are some things you should pay attention to before the update to avoid some potential problems.
- Patch your Windows Server 2012 R2 with the latest updates.
- Insert and install Windows Server 2019 installation media.
- Before upgrading, Microsoft recommends that you collect some information about your device. You can use it for troubleshooting when an upgrade fails.
- Cannot run any virtual machines during an in-place upgrade.
- Create a system image for your system so that you can restore the system to a normal state if the update causes some system issues.
To create a system image, you can use the professional Windows backup software, MiniTool ShadowMaker. It is designed to back up the system by default. Besides, you can use it to back up files, disks, and partitions. Just download it by following the button below.
It is compatible with Windows 1110/8/8.1/7 and Windows Server 2019/2016/2012/2012 R2/2008/2008 R2/2003/2003 R2. Now get its trial edition by clicking the following download button and install it on your Windows Server.
MiniTool ShadowMaker TrialClick to Download100%Clean & Safe
How to back up your PC before starting to update Windows Server 2012 R2 to 2019:
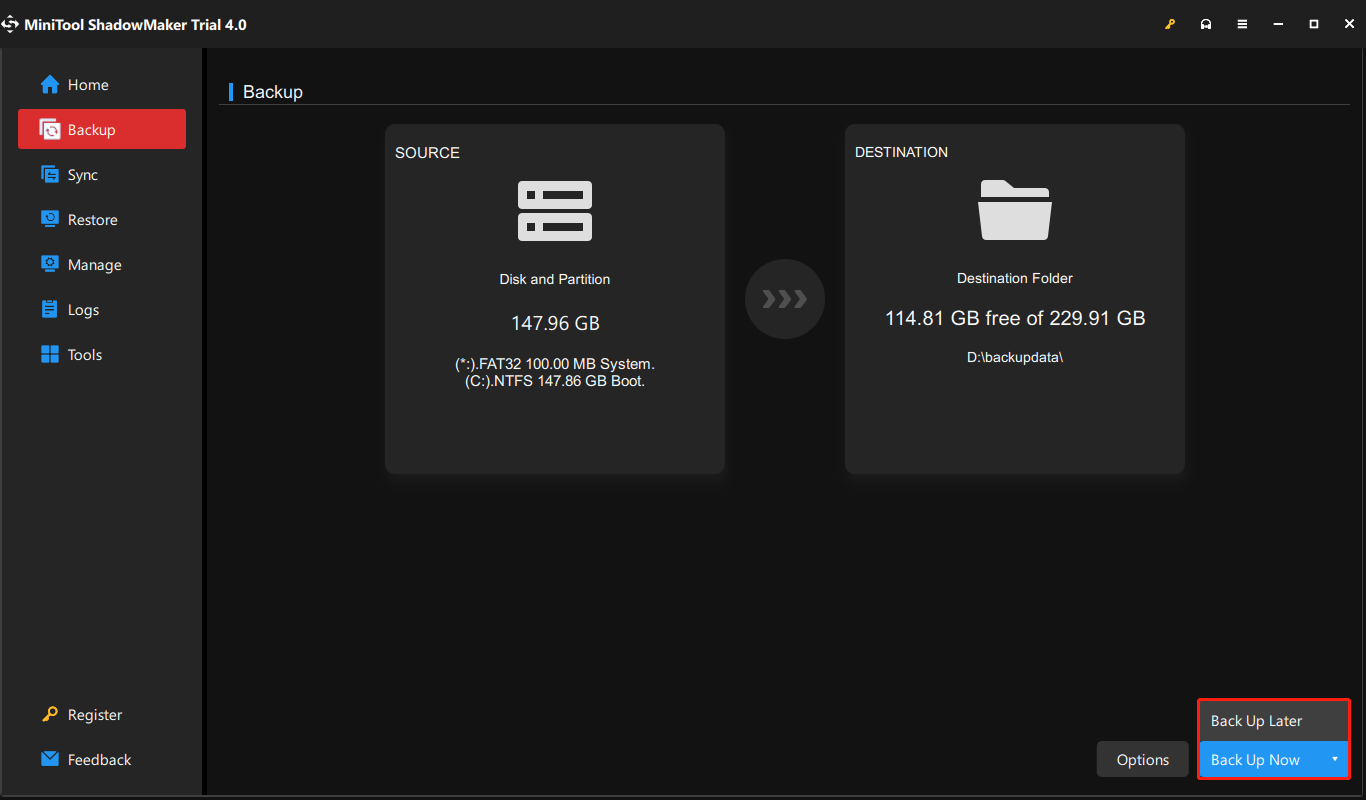
1. Double-click the icon of MiniTool ShadowMaker to launch it to its main interface.
2. When going to the Backup tab, you can see this software backs up the system by default. You only need to choose a destination to store the system image.
If you need to back up files, go to SOURCE to choose items that you want to back up and go to DESTINATION to select a storage path.
3. Click Back Up Now to start backing up immediately or click Back Up Later to delay the task.
Tips:
It is recommended to create a bootable USB flash drive with MiniTool Media Builder so that you can perform a system recovery when your PC doesn’t work properly after Windows Server 2012 R2 to 2019 update.
Start to Upgrade
Now that you have completed the prerequisites you can perform the upgrade. In this section, you will use Windows Server Setup to choose upgrade settings. Windows Server Setup will use these settings to upgrade your version of Windows Server, during which time your computer will restart several times. Follow the guide below:
Step 1: Open File Explorer, and go to the Windows Server Setup media. Then open setup.exe. For example, if you’re using removal media the file path might be D:\setup.exe.
Tips:
Depending on your security settings, User Account Control may prompt you to allow setup to make changes to your device. If you’re happy to continue select Yes.
Step 2: By default, the setup will automatically download updates for the installation. After checking the default settings, click Next to continue.
If you don’t want Setup to automatically download updates, you can select Change how Setup downloads updates and choose the option appropriate to your environment, then select Next.
Step 3: If prompted, enter your product key, then select Next.
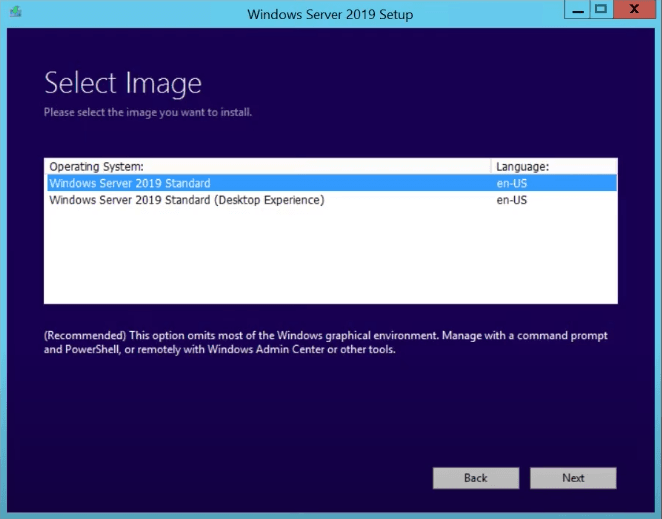
Step 4: Select the edition of Windows Server you want to install, then select Next.

Step 5: Review the applicable notices and license terms, if you agree to the terms, select Accept.
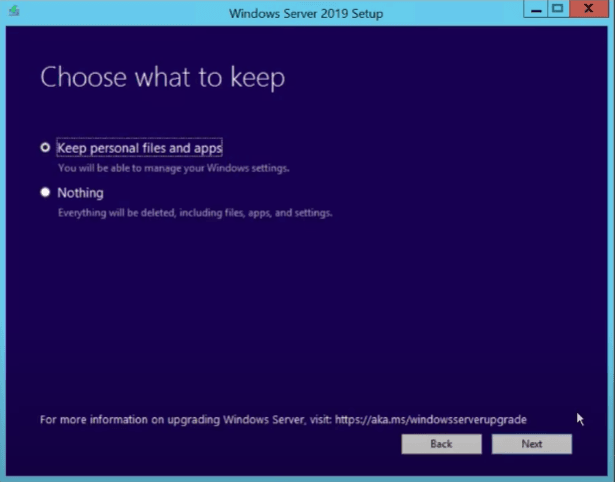
Step 6: Select Keep personal files and apps to choose to do an in-place upgrade, then select Next.
Step 7: After Setup finishes analyzing your device, the setup will display the Ready to install screen, to continue the upgrade select Install.
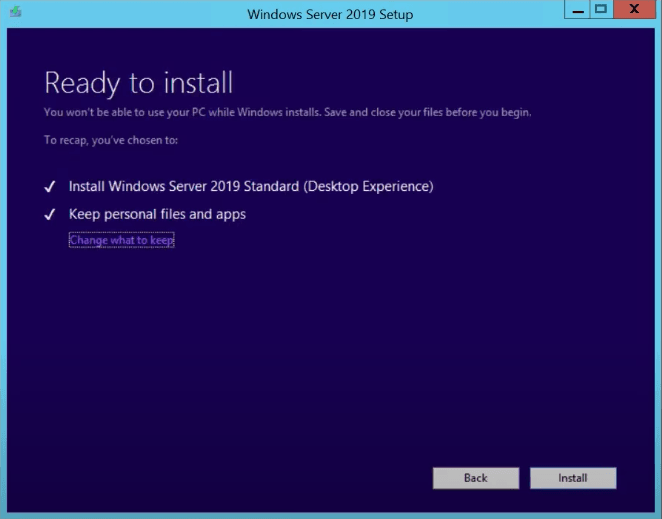
The in-place upgrade will start, and you should see a progress bar. After the upgrade finishes, your server will restart.
Check If Your Upgrade Was Successful
After the upgrade to Windows Server is done, you must make sure the upgrade was successful. To make sure your upgrade was successful:
Step 1: Open an elevated PowerShell prompt, and run the following command to verify the version and edition match the media and values you selected during setup.
PowerShellCopy
Get-ComputerInfo -Property WindowsProductName
Step 2: Make sure all of your applications are running and that your client connections to the applications are successful.
Bottom Line
Do you need to upgrade Windows Server 2012 R2 to 2019? How to Windows Server 2012 R2 to 2019? After reading this post, you know it. Also, what to do before the update is also told to you. Now, don’t hesitate to perform the Windows Server update by following the guide above.
On the other hand, if you have any questions or suggestions, remember to let us know. Leaving a comment below or contacting [email protected] is for you to choose.
Upgrade Windows Server 2012 R2 to 2019 FAQ
Can Windows Server 2016 be upgraded to 2019?
Yes, you can upgrade Windows Server 2016 to 2019. The steps are similar to is the same as the steps for upgrading 2012 R2 to 2019. You can take a reference from the content above.
Is Server 2012 R2 still supported?
The support for Windows Server 2012 R2 will end on October 10, 2023. After this date, Windows Server 2012 and 2012 R2 will stop receiving regular patches or critical security updates. Thus, you had better upgrade your Windows Server 2012 R2 as soon as possible.
How long can a server last?
However, according to a report by a leading analyst firm, the potential useful life of servers is between 7 and 10 years (typically 6 years for rack-mounted servers and 10 years for integrated systems).
Can SQL Server 2019 run on Windows Server 2012 R2?
Если вы хотите сохранить существующее оборудование и все роли сервера, которые вы настроили, без сжатия сервера, необходимо выполнить обновление на месте. При обновлении на месте вы переходите с более старой версии операционной системы на более новую, сохраняя свои параметры, роли сервера и данные. Эта статья поможет вам перейти с Windows Server 2012 R2 на Windows Server 2019.
Подготовка к обновлению на месте
Перед началом обновления Windows Server рекомендуется выполнить сбор данных с устройств для диагностики и устранения неполадок. Так как эти сведения предназначены для использования только в случае сбоя обновления, необходимо убедиться в том, что вы храните информацию в расположении, доступ к которому можно получить с вашего устройства.
Сбор данных
Откройте командную строку, перейдите в c:\Windows\system32 , а затем введите systeminfo.exe.
Скопируйте, вставьте и сохраните полученные сведения о системе в любом расположении на устройстве.
Введите ipconfig /all в командной строке, а затем скопируйте и вставьте полученные сведения о конфигурации в то же расположение, что и ранее.
Откройте редактор реестра, перейдите в куст HKEY_LOCAL_MACHINE\SOFTWARE\Microsoft\WindowsNT\CurrentVersion, а затем скопируйте и вставьте значения BuildLabEx (версия) и EditionID (выпуск) для Windows Server в то же расположение, что и выше.
После получения всех данных, относящихся к Windows Server, мы настоятельно рекомендуем создать резервную копию операционной системы, приложений и виртуальных машин. Кроме того, необходимо завершить работу, выполнить быструю миграцию или динамическую миграцию всех виртуальных машин, выполняющихся в данный момент на сервере. Во время обновления на месте виртуальные машины не могут работать.
Выполнение обновления
Убедитесь, что значение ProductName соответствует версии Windows Server 2012 R2.
Найдите установочный носитель Windows Server 2019 и выберите setup.exe.

Выберите Да, чтобы начать процесс установки.

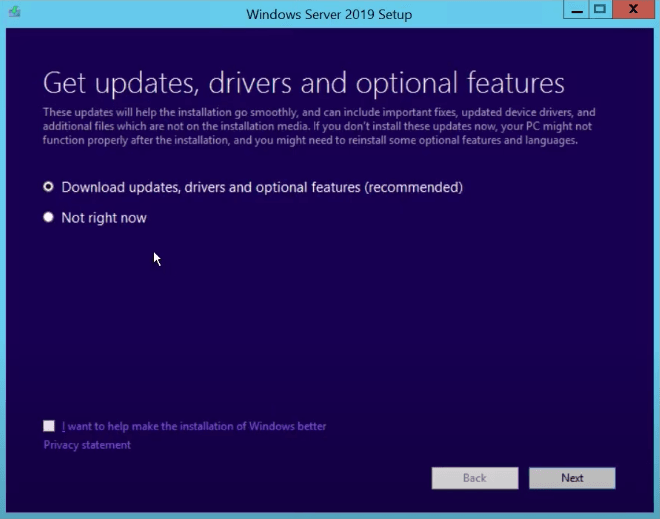
Для устройств, подключенных к Интернету, выберите вариант Скачать обновления, драйверы и дополнительные компоненты (рекомендуется) , а затем щелкните Далее.

Программа установки проверяет конфигурацию устройства. Дождитесь ее завершения и щелкните Далее.
В зависимости от канала распространения, из которого был получен носитель Windows Server (розничная, корпоративная, OEM, ODM и т. д.) и лицензия на сервер, может появиться запрос на ввод лицензионного ключа для продолжения.
Выберите выпуск Windows Server 2019, который вы хотите установить, а затем щелкните Далее.

Выберите Принимаю, чтобы подтвердить условия лицензионного соглашения, исходя из вашего канала распространения (например, розничная, корпоративная, OEM, ODM версия и т. д.).

Программа установки предложит вам удалить модуль Microsoft Endpoint Protection через оснастку Установка и удаление программ.
Эта функция несовместима с Windows Server 2019.
Выберите Сохранить личные файлы и приложения, чтобы выполнить обновление на месте, а затем щелкните Далее.

Когда программа установки завершит анализ устройства, она предложит перейти к обновлению, выбрав действие Установить.

Начнется обновление на месте, в котором отображается окно Обновление Windows с информацией о ходе выполнения. После завершения обновления сервер перезапустится.

Действия по завершении обновления
После завершения обновления необходимо убедиться, что обновление до Windows Server 2019 прошло успешно.
Проверка успешности обновления
Откройте редактор реестра, перейдите в куст HKEY_LOCAL_MACHINE\SOFTWARE\Microsoft\WindowsNT\CurrentVersion и просмотрите запись ProductName. Вы должны увидеть здесь выпуск Windows Server 2019, например Windows Server 2019 Datacenter.
Убедитесь, что все приложения работают, и что подключения клиентов к приложениям выполняются успешно.
Если вы считаете, что во время обновления возникли проблемы, скопируйте и создайте архив каталога %SystemRoot%\Panther (обычно C:\Windows\Panther ) и обратитесь в службу поддержки Майкрософт.
7 Steps to Migrate Windows 2012 R2 Domain Controllers to Windows Server 2019

One of the best ways to secure your systems is to make sure that Active Directory (AD) domain controllers (DCs) are running an up-to-date version of Windows Server. DCs are critical infrastructure because they manage the security and access to all your IT resources. If a DC is compromised, then you should consider your entire network compromised. DCs are high-value targets for hackers and you should take all reasonable steps to protect them.
Many organizations are still running DCs on Windows Server 2012 R2. And while the OS is supported under Microsoft’s extended support until 10/10/2023, later versions of Windows Server are significantly more secure, offering features like built-in antimalware in the form of Windows Defender, Credential Guard to protect local and remote domain credentials on compromised servers, and many under-the-hood security enhancements that make newer versions of Windows more robust.
It is often the case that organizations are licensed to upgrade to the latest version of Windows Server but don’t because they don’t want to touch their working infrastructure. But because of the nature of AD, it’s relatively easy to swap out an old domain controller for a new one. And without interrupting critical IT services.
In this article, I’m going to take you through the high-level steps for migrating a Windows Server 2012 R2 DC to Windows Server 2016 or Windows Server 2019. The procedure is the same, regardless of whether you choose Server 2016 or 2019. But I recommend migrating straight to Windows Server 2019. There simply isn’t a reason not to.
1. Set up a new server using Windows Server 2019
The first step is to install Windows Server 2019 on a new physical device or virtual machine. If you are more technically experienced with Windows Server, you could choose to install Server Core and then perform the necessary steps using PowerShell or by remotely connecting to the new server using Server Manager or Windows Admin Center. Otherwise, install Windows Server with the Desktop Experience role enabled.
If you are installing Windows Server 2016, you can check out Aidan Finn’s article on Petri here.
2. Join the new server to your existing Active Directory domain
Once the new server is up and running, join it to your existing AD domain. You can start the process from the Local Server tab in Server Manager by clicking WORKGROUP under the Properties. The procedure is then the same as joining Windows 10 to an AD domain. You will need to reboot the server to complete the process.
3. Install the Active Directory Domain Services role
Wait for the server to reboot and then sign in with a domain admin account. You can then install the Active Directory Domain Services (AD DS) server role using Server Manager and the Add Roles and Features wizard in the Manage menu. You can also use the following PowerShell command:
4. Promote the new server to a domain controller
When the AD DS server role has been installed, you’ll get a notification in Server Manager prompting you to promote the server to a domain controller. Clicking the yellow exclamation mark icon will launch the AD DS configuration wizard. You should choose to ‘Add a domain controller to an existing domain’ and follow through the on-screen instructions. And providing that you are signed in with a domain admin account, adprep will automatically prepare your existing domain.
5. Move Flexible Single Master Operation (FSMO) roles to new server
The next step is to log on to the old domain controller and move the domain and forest FSMO roles, there are five in total, to the new DC. The easiest way to do this is using PowerShell. In the command below, you should replace DC1 with the name of your new DC.
This article assumes you have a domain with only one DC. In practice it’s likely that you will have more than one DC, so make sure you understand how FSMO roles work and on which DCs they are located in your domain and forest.
On the new domain controller, confirm that the FSMO roles have been moved. Start by checking the domain FSMO roles. Using Get-ADDomain, check the name of the server next to the following entries: InfrastructureMaster, PDCEmulator, and RIDMaster. The server name should match that of your new domain controller. Similarly, using Get-ADForest, check the name of the server next to the following entries: SchemaMaster and DomainNamingMaster. Again, the server name should match that of your new domain controller.
 7 Steps to Migrate Windows 2012 R2 Domain Controllers to Windows Server 2019 (Image Credit: Russell Smith)
6. Demote your old domain controller
Now that you have moved the FSMO roles to the new DC, you can safely demote the old Windows Server 2012 R2 domain controller. You can demote a DC using Server Manager. One way to demote a DC is to use the Remove Roles and Features command in the Manage menu to remove the AD DS server role. Removing the role will open the Active Directory Domain Services Configuration wizard and take you through the steps to demote the DC before the AD DS role can be removed.
Alternatively, you can use the Uninstall-ADDSDomainController and Uninstall-WindowsFeature PowerShell cmdlets to demote the DC and uninstall the AD DS server role respectively.
7. Raise the domain and forest functional levels
Finally, you can raise the domain and forest functional levels to Windows Server 2016. Even if you are running Windows Server 2019, the highest functional levels are Windows Server 2016. You can confirm the domain and forest levels using Get-ADDomain and Get-ADForest cmdlets.
And that is it! As you can see, while there are several steps, it is relatively simple to migrate a DC to a more current version of Windows Server. So, I encourage you to look at migrating any DCs that are running anything below Windows Server 2016.
More from Russell Smith

Project Volterra, Hybrid Loop, and NPUs to Supercharge AI on Your Devices

Windows 11 Approved for Broad Deployment and ‘One Outlook’ Drops for Insiders

Microsoft Takes on Rival Calendly with Outlook Bookings — Plus the Latest IT News Updates
Whether it’s Security or Cloud Computing, we have the know-how for you. Sign up for our newsletters here.

Microsoft Announces Entra, A New Identity and Access Management Suite
May 31, 2022 | Rabia Noureen
Microsoft Releases Out-Of-Band Patches to Fix Windows AD Authentication Issues
May 20, 2022 | Rabia Noureen

Cloud Conversations – Ståle Hansen on Digital Wellbeing and Viva Explorers
May 19, 2022 | Laurent Giret
How to Access Active Directory
May 17, 2022 | Michael Reinders

Microsoft Rolls Out Azure AD Verifiable Credentials Service to More Customers
Full Guide | Upgrade Windows Server 2012 R2 to 2019 Securely
To upgrade Windows Server 2012 r2 to 2019 on the same hardware and keep all the server roles and data intact, in-place upgrade is a good idea. Theoretically it shouldn’t delete any of your data, but it’s best to make a backup before upgrading just in case.

By Delia  / Last update January 27, 2022
Why upgrade to Windows Server 2019
If you are still running older system like Windows Server 2012 or 2012 r2, maybe it’s time to move on and upgrade to the latest version — Windows Server 2019. Here are some of the significant reasons:
◇ Newer system has better compatibility with new services and applications.
◆ Windows Server 2019 makes it easier to integrate Linux with the new features like Linux Containers on Windows, Windows Subsystem for Linux (WSL), and the new Windows Server 2019 application platform.
◇ Windows Server 2019 builds on its strong foundation of security. Now it can not only block threats, but also monitor and reacts to perceived threats.
◆ Windows Server 2019 has been designed to work with or in the Cloud. It’s easier for users to connect their existing local environments to Microsoft Azure.
In addition, Windows Server 2012 R2 has ended mainstream support in 2018, and the end of extended support is in 2023. It means Microsoft will focus on newer OS like 2019, and an upgrade can bring you better follow-up support.
Can Windows Server 2012 r2 be upgraded to 2019?
First of all, the answer is yes. In-place upgrade enables you to upgrade older system to the newer one directly while keeping the same hardware and all the settings, server roles, data intact without flattening the server.
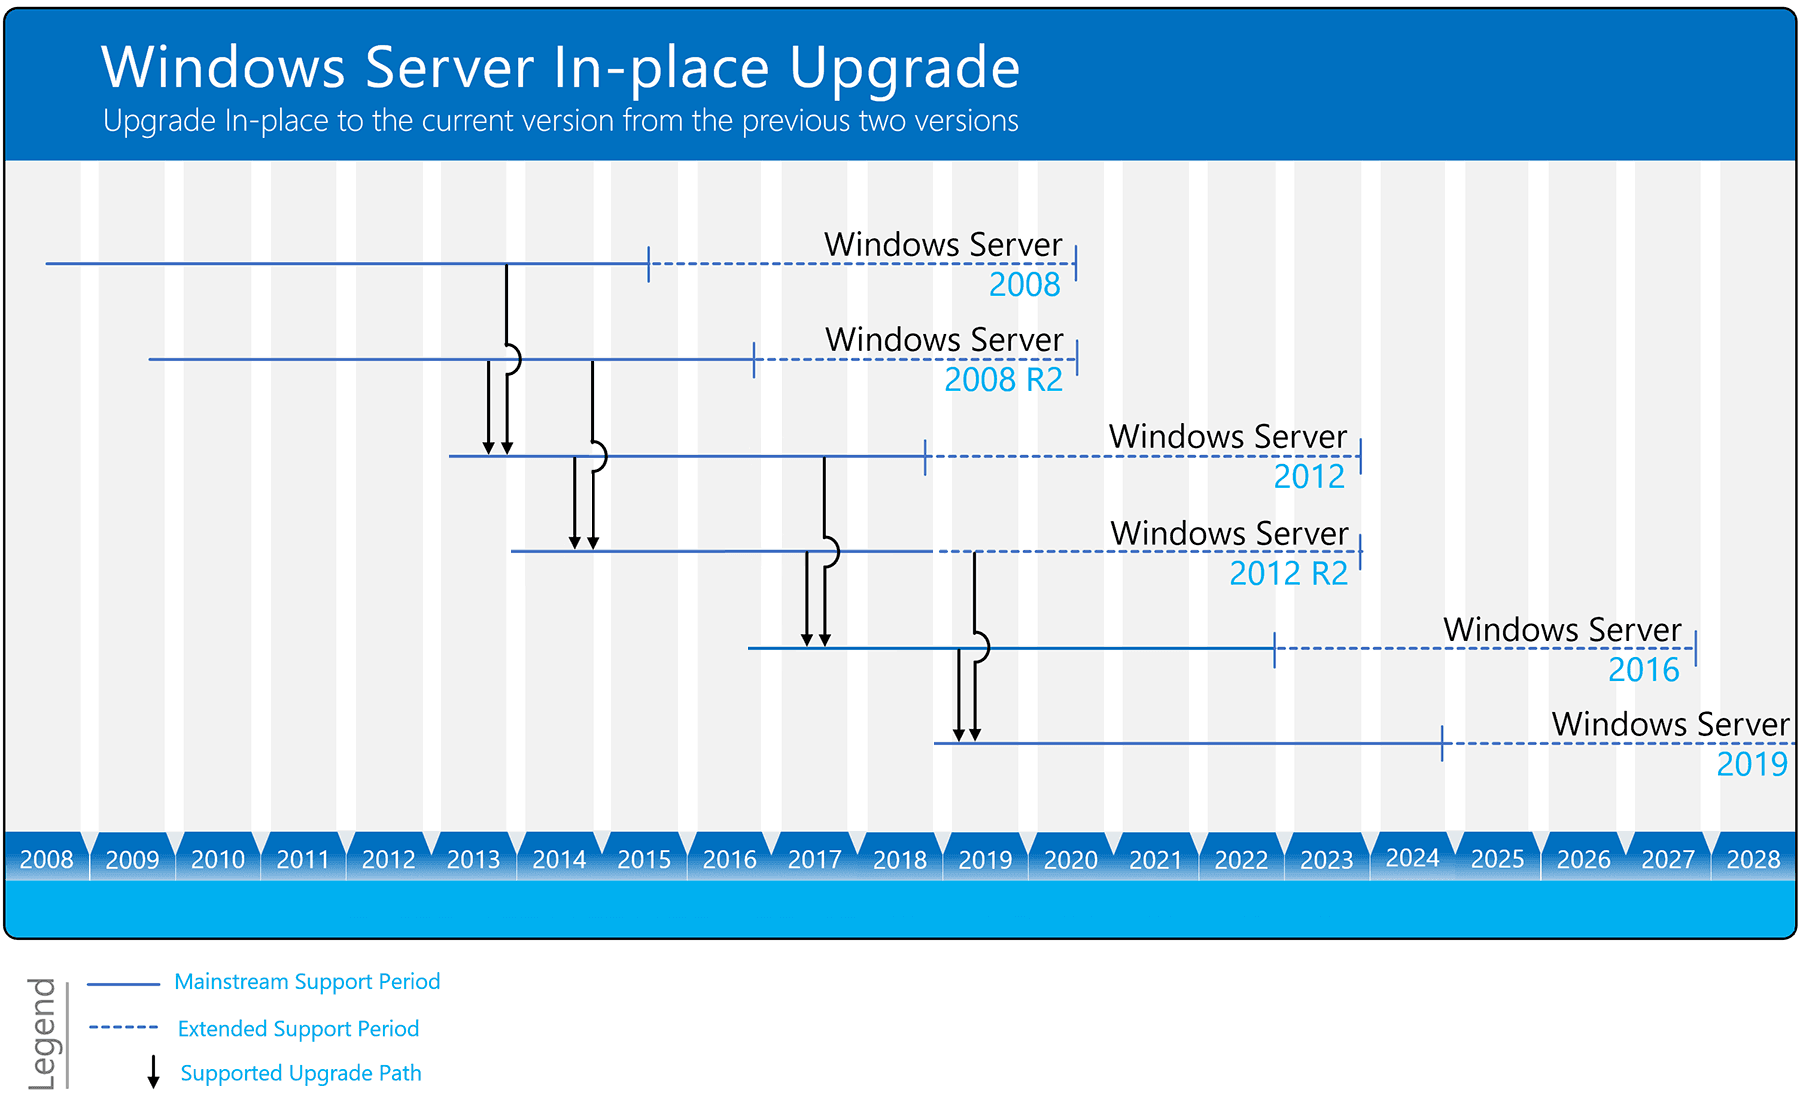
As shown in the figure below, in-place upgrade is supported between any two operating systems that are linearly connected, so you are allowed to upgrade Windows Server 2012 r2 to 2019, indeed.
However, if you want to upgrade Windows Server 2012 to 2019, you’ll need to in-place upgrade it to 2016, then 2016 to 2019. Otherwise you can only clean install 2019 to overwrite the existing operating system, and to avoid data loss, it’s necessary to backup the server in advance. This is also true for older OS like Windows Server 2008 (r2).
Must-know information for Windows Server 2019 upgrading
◉ Windows Server 2019 has its own system requirements. If your computer does not meet the minimum standards, you will not be able to upgrade to Server 2019 successfully.
System requirements of Windows Server 2019
1.4 GHz 64-bit processor
Compatible with x64 instruction set
Supports NX and DEP
Supports CMPXCHG16b, LAHF/SAHF, and PrefetchW
Supports Second Level Address Translation (EPT or NPT)
512 MB (2 GB for Server with Desktop Experience installation option)
ECC (Error Correcting Code) type or similar technology, for physical host deployments
Disk space for system partition
Network adapter requirements
An Ethernet adapter capable of at least gigabit throughput
Compliant with the PCI Express architecture specification
DVD drive (if you intend to install the operating system from DVD media)
◉ How much does upgrade Windows Server 2012 r2 to 2019 cost? Well, there are many factors involved in this question, like hardware, virtualization and so on. But if you mean the cost of license for upgrading, the answer is clear. Microsoft generally doesn’t offer an upgrade sale, so you need to purchase a copy or Windows Server 2019 separately. Here’s a list for your reference.
Pricing and licensing overview
Pricing Open NL ERP
Highly virtualized datacenters and cloud environments
Windows Server CAL
Physical or minimally virtualized environments
Windows Server CAL
Small businesses with up to 25 users and 50 devices
Specialty servers (server license)
No CAL required
◉ Another issue worth considering is that some third-party applications may not be compatible with the latest systems. So to avoid subsequent troubles, you’d better check whether they support Windows Server 2019 or not before upgrading.
◉ In-place upgrade Server 2012 r2 to 2019 might also be supported by public or private cloud companies, but you need to check with your cloud provider for the details. Additionally, you cannot perform an in-place upgrade on any Windows Server configured to Boot from VHD. In-place upgrade from Windows Storage Server Editions to Windows Server 2019 is not supported, either. In this case, you could do a migration or clean installation instead.
Guide to in-place upgrade Windows Server 2012 r2 to 2019
Preparations before upgrading:
>> Patch your Windows Server 2012 r2 with the latest updates.
>> Insert and mount the Windows Server 2019 setup media.
>> Before upgrading, Microsoft suggests you to collect some information of the device. You can use it for troubleshooting purpose when the upgrade fails.
Go to C:\Windows\system32 and run “systeminfo.exe”. Copy and store the system information.
Open Command Prompt, type “ipconfig /all” and press Enter. Copy and store the configuration information.
Open Registry Editor, go to the HKEY_LOCAL_MACHINE\SOFTWARE\Microsoft\WindowsNT\CurrentVersion, then copy and store the Windows Server BuildLabEx (version) and EditionID (edition).
>> Although an in-place upgrade should not delete anything theoretically, there are also reported data-loss cases. So after you’ve collected related information, it’s highly recommend to make a backup of your operating system and important data.
>> Note you can’t have any virtual machines running during the in-place upgrade.
To perform Windows Server 2019 in-place upgrade:
1. Locate the Windows Server 2019 setup media, run setup.exe directly.
2. Select Download updates, drives and optional features (recommended) and click Next.
3. It will take some time to check device configuration, click Next when it’s done.
Whether you need to enter a license key to proceed is depending on the distribution channel you received the Windows Server 2019 setup media from.
4. Choose an edition of Windows Server 2019 that you want to install, click Next.
5. Accept the terms, then you can choose whether to keep personal files and apps. Click Next to continue.
6. If there’s anything incompatible with Windows Server 2019, it will prompt you a message requiring you to Confirm.
7. Wait for a while and click Install to start upgrading. After finishing, your PC will automatically restart.

Now you’ve in-place upgraded Server 2012 r2 to 2019, you could take a little more time to make sure your operation is successful.
Check your current edition:
You can open Registry Editor and go to HKEY_LOCAL_MACHINE\SOFTWARE\Microsoft\WindowsNT\CurrentVersion, then check the edition of your Windows Server in ProductName.
Backup server in case of any data loss after upgrading
Although Windows Server comes with a backup utility Windows Server Backup, if you ever used it, you’ll find it complicated, slow, and not fully functional. It also has some conspicuous limitations such as the 2 TB limit for backup, the numbers of backups it could keep, the lack of individual file backup feature, etc.
With all these concerns, I prefer to use AOMEI Backupper as a Windows Server Backup alternative. It has different editions, and the Server edition is specially designed for Windows Server.
AOMEI Backupper Server supports Windows Server 2003, 2008, 2011, 2012, 2016, 2019, 2022 (including R2), Windows SBS 2003, 2008, 2011 and Windows XP, Vista, 7, 8, 8.1, 10, 11. No matter you want to upgrade Windows Server 2012 r2 to 2019, 2016 to 2019 or 2022, you could use this software to backup server to internal/external hard drive, NAS, network share, cloud service, etc.
As for functionality, it includes file/folder/partition/disk/system level backup & restore with many useful options. For instance, you can create scheduled incremental or different backup, set up retention policy to auto delete older backup, restore system image to different hardware, etc. And the operation is much simpler than WSB.
Moreover, it contains Sync features to copy your data with original format and structure, Clone features to duplicate hard drive and therefore migrate Windows Server to SSD. Have a try and find more practical tools.
Backup Windows 2012 r2 before upgrading:
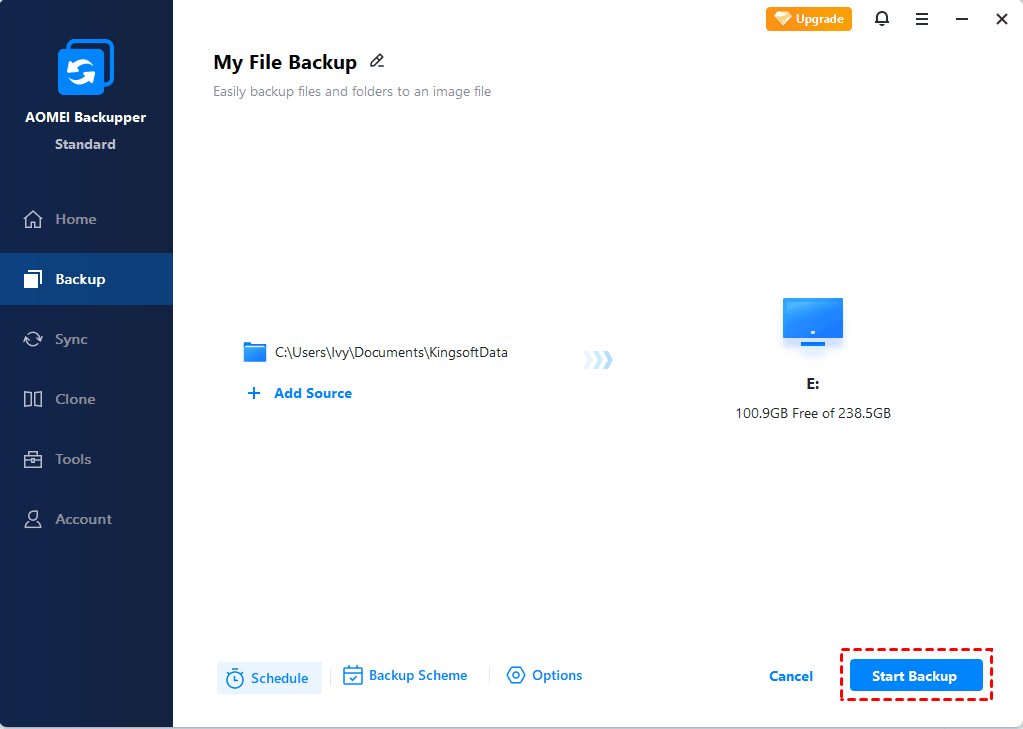
1. Click Backup on the left pane and choose a backup type. To show you how to perform individual file backup, I’ll take File Backup as an example. Optionally, you can also use System Backup in case of upgrade failure.

2. Tap Add Folder or Add File to select the data you want to backup, then specify a destination to store it.
For the source folder, you can tap the funnel icon to include/exclude files with specific suffix in Filter settings.
For the destination path, you can choose to Select a network location or Select a cloud in the drop-down menu.

3. After that, you can manage more settings to customize the backup, and then Start Backup.
Options: Manage compression level, image splitting, backup encryption, comment, email notification, etc.
Backup Schedule: Set up an automatic task on basis of daily/weekly/monthly/event triggers/USB plug in.
Backup Scheme: You can choose backup method as full/incremental/differential, and enable automatic cleanup to delete obsolete backups automatically.
With this simple operation, you could backup whatever you want to keep before upgrading Windows Server 2012 r2 to 2019. Thus even if something goes wrong in the process of upgrading, you can easily retrieve important files or restore the operating system to an earlier state.
Conclusion
You can in-place upgrade Windows Server 2012 r2 to 2019 directly, and this process shouldn’t delete any of your files. But to avoid any unwanted data loss, it’s still recommended to backup important files in advance. Besides, if you want to upgrade Server 2012 or 2008 to 2019 through clean installation, backup is especially essential.
AOMEI Backupper is an ideal backup & restore solution for Windows Server with its high compatibility and complete features. In addition to basic data protection, it also enables you to automatically backup Windows Server to cloud, bare metal restore Windows Server to different hardware, restore Windows Server to virtual machine and so on.
Windows Server in-place upgrade to Windows Server 2019
Microsoft’s standard support cycle ends on the 10 year anniversary of the release for most products. As such, we are reaching the end of extended support for Windows 2008 and Windows 2008 R2 servers in January 2020. All the system/server administrators still have 2 months to migrate their critical applications to a new Windows server.
This requires new hardware or virtual systems where applications and data can be migrated to. Users must verify with the vendor to check compatibility of applications with new OS versions, such as server 2012, server 2016 or 2019.
If the application is compatible with a newer version of the server operating system and you have a development environment available in your organization, you are able to do an in-place upgrade from Windows Server 2008 R2 to Windows 2012 R2, Server 2016 or even Server 2019. Follow the below steps to complete an in-place upgrade.

In my Lab, I have a wiki web server running on Windows 2008 R2. We will perform 2 step upgrades to upgrade windows server 2008 R2 to Windows Server 2019 in this article. It will cover all the steps including testing for an upgrade and a web server.
I am using a free wiki software called MediaWiki.

In-place upgrade to 2012
The first step will upgrade to Windows server 2012 R2 as an in-place upgrade. Attached is the ISO for Windows Server 2012 R2.

Select Run the setup.

Select Install Now. On the next page check for security and driver updates.

This will download the update package. The download will take 5 to 10 minutes, depending on your internet speed.


Select the version you need to install.

Select Upgrade, which allows you to install the new Windows with old files, settings, and application

This process will take 30 to 45 minutes depending on your system configuration.

Your system is ready with Windows 2012 R2. Login with the same user name password as your Server 2008 R2. Verify the server version.

Check the web application which we are using on Server 2008 R2.

Upgrade to Windows Server 2019
The next steps will walk through the upgrade from Windows Server 2012 R2 to Windows Server 2019. Attached is the ISO for Windows server 2019. On the next page, check for security and driver updates.


Select the version you need to install

To upgrade the current version, select Keep personal files and apps. This allows you to perform an in-place upgrade from Windows Server 2012 R2 or Windows server 2016 to Windows Server 2019.


This will check system and storage availability for the in-place upgrade.

Select Install to start the install.


Once the system is up after the upgrade, use the same user name password to login to the server.

Test the web application we are running on the server.

If all went well, we have successfully upgraded from Windows Server 2008 R2 to Windows Server 2019.
Note: Check with the application vendor for application compatibility with the Server version you plan on upgrading to.
I hope this article helps you upgrade your old Windows 2008 to the version you need to support a more secure infrastructure for your application.
Thank you for reading!
Обновлено: 08.10.2023
Если вы хотите сохранить то же оборудование и все роли сервера, которые вы уже настроили, без выравнивания сервера, вам нужно выполнить обновление на месте. Обновление на месте позволяет вам перейти от старой операционной системы к более новой, сохраняя при этом свои настройки, роли сервера и данные. Эта статья поможет вам перейти с Windows Server 2012 R2 на Windows Server 2019.
Перед началом обновления на месте
Прежде чем вы начнете обновление до Windows Server, мы рекомендуем вам собрать некоторую информацию с ваших устройств для диагностики и устранения неполадок. Поскольку эта информация предназначена для использования только в случае сбоя обновления, вы должны убедиться, что храните информацию где-то, чтобы вы могли получить к ней доступ со своего устройства.
Для сбора вашей информации
Откройте командную строку, перейдите в папку c:\Windows\system32 и введите systeminfo.exe.
Скопируйте, вставьте и сохраните полученную системную информацию где-нибудь вне вашего устройства.
Введите ipconfig /all в командной строке, а затем скопируйте и вставьте полученную информацию о конфигурации в то же место, что и выше.
Откройте редактор реестра, перейдите в раздел HKEY_LOCAL_MACHINE\SOFTWARE\Microsoft\WindowsNT\CurrentVersion, а затем скопируйте и вставьте Windows Server BuildLabEx (версия) и EditionID (редакция) в то же место, что и выше.
После того как вы соберете всю информацию, связанную с Windows Server, мы настоятельно рекомендуем вам сделать резервную копию операционной системы, приложений и виртуальных машин. Вы также должны завершить работу, выполнить быструю миграцию или динамическую миграцию всех виртуальных машин, работающих в данный момент на сервере. Во время обновления на месте нельзя запускать виртуальные машины.
Чтобы выполнить обновление
Убедитесь, что в значении ProductName указано, что вы используете Windows Server 2012 R2.
Найдите установочный носитель Windows Server 2019 и выберите setup.exe.

Выберите Да, чтобы начать процесс установки.
Для устройств, подключенных к Интернету, выберите параметр Загрузить обновления, драйверы и дополнительные функции (рекомендуется), а затем нажмите кнопку Далее.
Программа установки проверит конфигурацию вашего устройства, вы должны дождаться ее завершения, а затем нажать кнопку Далее.
В зависимости от канала распространения, из которого вы получили носитель Windows Server (розничная торговля, корпоративная лицензия, OEM, ODM и т. д.), и лицензии для сервера вам может быть предложено ввести лицензионный ключ, чтобы продолжить.
Выберите редакцию Windows Server 2019, которую хотите установить, и нажмите кнопку Далее.

Нажмите «Принять», чтобы принять условия лицензионного соглашения в зависимости от вашего канала распространения (например, розничная торговля, корпоративная лицензия, OEM, ODM и т. д.).

Программа установки порекомендует вам удалить Microsoft Endpoint Protection с помощью функции «Установка и удаление программ».
Эта функция несовместима с Windows Server 2019.
Выберите «Сохранить личные файлы и приложения», чтобы выполнить обновление на месте, а затем нажмите «Далее».

После того, как программа установки проанализирует ваше устройство, она предложит вам продолжить обновление, выбрав «Установить».

Начнется обновление на месте, и вы увидите экран «Обновление Windows» с его ходом. После завершения обновления ваш сервер перезагрузится.
После завершения обновления
После завершения обновления необходимо убедиться, что обновление до Windows Server 2019 прошло успешно.
Чтобы убедиться, что обновление прошло успешно
Откройте редактор реестра, перейдите в куст HKEY_LOCAL_MACHINE\SOFTWARE\Microsoft\WindowsNT\CurrentVersion и просмотрите ProductName. Вы должны увидеть свой выпуск Windows Server 2019, например Windows Server 2019 Datacenter.
Убедитесь, что все ваши приложения запущены и что ваши клиентские подключения к приложениям выполнены успешно.
Если вы считаете, что во время обновления что-то пошло не так, скопируйте и заархивируйте каталог %SystemRoot%\Panther (обычно C:\Windows\Panther ) и обратитесь в службу поддержки Microsoft.
Чтобы обновить Windows Server 2012 r2 до версии 2019 на том же оборудовании и сохранить все роли сервера и данные нетронутыми, рекомендуется выполнить обновление на месте. Теоретически он не должен удалять ваши данные, но на всякий случай лучше сделать резервную копию перед обновлением.

Автор Delia / Последнее обновление: 27 января 2022 г.
Зачем переходить на Windows Server 2019
Если вы все еще используете более старую систему, такую как Windows Server 2012 или 2012 r2, возможно, пришло время перейти к последней версии — Windows Server 2019. Вот некоторые важные причины:
◇ Более новая система лучше совместима с новыми сервисами и приложениями.
◆ Windows Server 2019 упрощает интеграцию Linux с новыми функциями, такими как контейнеры Linux в Windows, подсистема Windows для Linux (WSL) и новая платформа приложений Windows Server 2019.
◇ Windows Server 2019 построен на надежном фундаменте безопасности. Теперь он может не только блокировать угрозы, но и отслеживать предполагаемые угрозы и реагировать на них.
◆ Windows Server 2019 разработан для работы в облаке или в облаке. Пользователям стало проще подключать существующие локальные среды к Microsoft Azure.
Кроме того, в 2018 году прекращена основная поддержка Windows Server 2012 R2, а в 2023 году — окончание расширенной поддержки. Это означает, что Microsoft сосредоточится на более новых ОС, таких как 2019 год, и обновление может обеспечить более качественную последующую поддержку.
Можно ли обновить Windows Server 2012 r2 до версии 2019?
Во-первых, да. Обновление на месте позволяет напрямую обновить старую систему до более новой, сохранив при этом то же оборудование и все настройки, роли сервера и данные без выравнивания сервера.
Как показано на рисунке ниже, обновление на месте поддерживается между любыми двумя линейно связанными операционными системами, поэтому вам действительно разрешено обновлять Windows Server 2012 r2 до версии 2019.
Однако, если вы хотите обновить Windows Server 2012 до версии 2019, вам потребуется выполнить обновление на месте до версии 2016, а затем с версии 2016 до версии 2019. В противном случае вы можете выполнить только чистую установку версии 2019, чтобы перезаписать существующую во избежание потери данных необходимо заранее сделать резервную копию сервера. Это также верно для более старых ОС, таких как Windows Server 2008 (r2).
Обязательная информация для обновления Windows Server 2019
◉ Windows Server 2019 имеет собственные системные требования. Если ваш компьютер не соответствует минимальным стандартам, вы не сможете успешно выполнить обновление до Server 2019.
Системные требования Windows Server 2019
64-разрядный процессор 1,4 ГГц
Совместимость с набором инструкций x64
Поддерживает NX и DEP
Поддерживает CMPXCHG16b, LAHF/SAHF и PrefetchW
Поддерживает трансляцию адресов второго уровня (EPT или NPT)
512 МБ (2 ГБ для версии Server with Desktop Experience)
Тип ECC (код исправления ошибок) или аналогичная технология для развертывания на физическом хосте
Дисковое пространство для системного раздела
Требования к сетевому адаптеру
Адаптер Ethernet с пропускной способностью не менее гигабита
Соответствует спецификации архитектуры PCI Express
DVD-привод (если вы собираетесь устанавливать операционную систему с DVD-носителя)
◉ Сколько стоит обновление Windows Server 2012 r2 до версии 2019? Что ж, на этот вопрос влияет множество факторов, таких как аппаратное обеспечение, виртуализация и так далее. Но если вы имеете ввиду стоимость лицензии на апгрейд, то ответ ясен. Microsoft обычно не предлагает продажу обновлений, поэтому вам необходимо приобрести копию или Windows Server 2019 отдельно. Вот список для справки.
Обзор цен и лицензий
Цены Open NL ERP
Высоко виртуализированные центры обработки данных и облачные среды
Лицензионная лицензия Windows Server
Физические или минимально виртуализированные среды
Лицензионная лицензия Windows Server
Малый бизнес с 25 пользователями и 50 устройствами
Специальные серверы (серверная лицензия)
CAL не требуется
◉ Еще одна проблема, которую стоит учитывать, заключается в том, что некоторые сторонние приложения могут быть несовместимы с новейшими системами. Поэтому, чтобы избежать последующих неприятностей, перед обновлением лучше проверить, поддерживают ли они Windows Server 2019 или нет.
◉ Обновление Server 2012 r2 до версии 2019 на месте также может поддерживаться общедоступными или частными облачными компаниями, но для получения подробной информации необходимо обратиться к поставщику облачных услуг. Кроме того, вы не можете выполнить обновление на месте любого Windows Server, настроенного на загрузку с виртуального жесткого диска. Обновление на месте с выпусков Windows Storage Server Edition до Windows Server 2019 также не поддерживается. В этом случае вы можете вместо этого выполнить миграцию или чистую установку.
Руководство по обновлению Windows Server 2012 r2 до версии 2019 на месте
Подготовка перед обновлением:
>> Установите последние обновления для Windows Server 2012 r2.
>> Вставьте и смонтируйте установочный носитель Windows Server 2019.
>> Перед обновлением Microsoft предлагает вам собрать некоторую информацию об устройстве. Вы можете использовать его для устранения неполадок при сбое обновления.
Перейдите в папку C:\Windows\system32 и запустите «systeminfo.exe». Скопируйте и сохраните системную информацию.
Откройте командную строку, введите «ipconfig /all» и нажмите Enter. Скопируйте и сохраните информацию о конфигурации.
Откройте редактор реестра, перейдите в раздел HKEY_LOCAL_MACHINE\SOFTWARE\Microsoft\WindowsNT\CurrentVersion, затем скопируйте и сохраните Windows Server BuildLabEx (версия) и EditionID (редакция).
>> Хотя обновление на месте теоретически не должно ничего удалять, также сообщалось о случаях потери данных. Поэтому после сбора соответствующей информации настоятельно рекомендуется сделать резервную копию операционной системы и важных данных.
>> Обратите внимание, что во время обновления на месте нельзя запускать виртуальные машины.
Чтобы выполнить обновление до Windows Server 2019 на месте:
<р>1. Найдите установочный носитель Windows Server 2019 и запустите setup.exe напрямую.
<р>2. Выберите «Загрузить обновления, диски и дополнительные компоненты (рекомендуется)» и нажмите «Далее».

<р>3. Проверка конфигурации устройства займет некоторое время. По завершении нажмите «Далее».
Необходимость ввода лицензионного ключа для продолжения зависит от канала распространения, из которого вы получили установочный носитель Windows Server 2019.
<р>4. Выберите выпуск Windows Server 2019, который вы хотите установить, нажмите «Далее».

<р>5. Примите условия, после чего вы сможете выбрать, сохранять ли личные файлы и приложения. Нажмите «Далее», чтобы продолжить.
<р>6. Если есть что-то несовместимое с Windows Server 2019, появится сообщение, требующее подтверждения.
<р>7. Подождите некоторое время и нажмите «Установить», чтобы начать обновление. После завершения ваш компьютер автоматически перезагрузится.
Теперь, когда вы на месте обновили Server 2012 r2 до версии 2019, вам может потребоваться немного больше времени, чтобы убедиться, что ваша операция прошла успешно.
Проверьте текущую версию:
Вы можете открыть редактор реестра и перейти в раздел HKEY_LOCAL_MACHINE\SOFTWARE\Microsoft\WindowsNT\CurrentVersion, а затем проверить выпуск Windows Server в ProductName.
Резервный сервер на случай потери данных после обновления
Хотя Windows Server поставляется с утилитой резервного копирования Windows Server Backup, если вы когда-либо пользовались ею, вы обнаружите, что она сложная, медленная и не полностью функциональная. Он также имеет некоторые заметные ограничения, такие как ограничение в 2 ТБ для резервного копирования, количество резервных копий, которые он может хранить, отсутствие функции резервного копирования отдельных файлов и т. д.
С учетом всех этих проблем я предпочитаю использовать AOMEI Backupper в качестве альтернативы резервному копированию Windows Server. У него есть разные выпуски, а выпуск Server специально разработан для Windows Server.
AOMEI Backupper Server поддерживает Windows Server 2003, 2008, 2011, 2012, 2016, 2019, 2022 (включая R2), Windows SBS 2003, 2008, 2011 и Windows XP, Vista, 7, 8, 8.1, 10, 11. Независимо от того, хотите ли вы обновить Windows Server 2012 r2 до 2019, 2016 до 2019 или 2022, вы можете использовать это программное обеспечение для резервного копирования сервера на внутренний/внешний жесткий диск, NAS, сетевую папку, облачную службу и т. д.
Что касается функциональности, он включает в себя резервное копирование и восстановление на уровне файлов/папок/разделов/дисков/системы с множеством полезных опций. Например, вы можете создать инкрементную или другую резервную копию по расписанию, настроить политику хранения для автоматического удаления старой резервной копии, восстановить образ системы на другом оборудовании и т. д. Эта операция намного проще, чем WSB.
Кроме того, он содержит функции синхронизации для копирования данных в исходном формате и структуре, функции клонирования для дублирования жесткого диска и, следовательно, переноса Windows Server на SSD. Попробуйте найти более практичные инструменты.
Создайте резервную копию Windows 2012 r2 перед обновлением:
<р>1. Нажмите «Резервное копирование» на левой панели и выберите тип резервного копирования. Чтобы показать вам, как выполнять резервное копирование отдельных файлов, я возьму в качестве примера резервное копирование файлов. При желании вы также можете использовать резервную копию системы в случае сбоя обновления.

<р>2. Нажмите «Добавить папку» или «Добавить файл», чтобы выбрать данные для резервного копирования, а затем укажите место для их хранения.
Для исходной папки вы можете нажать значок воронки, чтобы включить/исключить файлы с определенным суффиксом в настройках фильтра.
Для пути назначения вы можете выбрать «Выбрать сетевое расположение» или «Выбрать облако» в раскрывающемся меню.

<р>3. После этого вы можете управлять дополнительными параметрами, чтобы настроить резервное копирование, а затем запустить резервное копирование.
Параметры: управление уровнем сжатия, разделением изображений, шифрованием резервных копий, комментариями, уведомлением по электронной почте и т. д.
Расписание резервного копирования: настройка автоматической задачи на основе ежедневных/еженедельных/ежемесячных/событийных триггеров/подключения USB.
Схема резервного копирования. Вы можете выбрать способ резервного копирования: полное, инкрементное или дифференциальное, а также включить автоматическую очистку для автоматического удаления устаревших резервных копий.

С помощью этой простой операции вы можете создать резервную копию всего, что хотите сохранить, перед обновлением Windows Server 2012 r2 до версии 2019. Таким образом, даже если в процессе обновления что-то пойдет не так, вы сможете легко получить важные файлы или восстановить операционную систему до исходного состояния. ранее состояние.
Заключение
Вы можете напрямую обновить Windows Server 2012 r2 до версии 2019 на месте, и этот процесс не должен удалять ваши файлы. Но чтобы избежать нежелательной потери данных, рекомендуется заранее сделать резервную копию важных файлов. Кроме того, если вы хотите обновить Server 2012 или 2008 до 2019 путем чистой установки, резервное копирование особенно необходимо.
AOMEI Backupper — идеальное решение для резервного копирования и восстановления для Windows Server с высокой совместимостью и полным набором функций. Помимо базовой защиты данных, он также позволяет автоматически создавать резервные копии Windows Server в облаке, восстанавливать Windows Server с нуля на другом оборудовании, восстанавливать Windows Server на виртуальной машине и т. д.
В этой статье я собираюсь обновить стандарт Windows Server 2012 R2 до стандарта Windows Server 2019. Локальное обновление операционной системы позволяет администратору обновить текущую установку Windows Server до новой версии без изменения существующих параметров и функций.
Функция Windows Server 2019 при обновлении позволит вам обновить существующий выпуск канала долгосрочного обслуживания (LSTC), например Windows Server 2012 R2 — Windows Server 2016 — Windows Server 2019. Служба обновления на месте позволяет организациям обновления до более новых версий в кратчайшие сроки. Прямое обновление возможно, даже если существующая установка сервера требует некоторых зависимостей перед обновлением.
Стандарт Windows Server 2012 R2.

Я скопировал какую-то папку перед обновлением сервера.

Как выполнить обновление до Windows Server 2019
Используя обновление на месте для перехода на Windows Server 2019, используйте DVD-диск, USB-носитель Windows Server 2019, чтобы начать установку.
Существующая установка будет обнаружена, и вы сможете выполнить обновление на месте. Установка не займет более 5 минут, но все зависит от скорости сервера, запущенных ролей и функций.
Следующий процесс демонстрирует обновление на месте с Windows Server 2012 R2 до 2019 с использованием файла ISO. .
Смонтируйте ISO-файл и нажмите «Настройка»
Посмотреть видео: как обновить Windows Server 2012 до Server 2019


Получить обновления, нажмите «Далее», чтобы начать (загрузить и установить обновления по умолчанию)

Получение обновлений Windows

Установка Windows Server 2019

Укажите ключ продукта Windows и нажмите «Далее».

Выберите редакцию Server с параметром рабочего стола и нажмите «Далее».

Примите условия лицензии пользователя и нажмите «Принять».

Выберите вариант сохранения личных файлов и программ, поскольку мы намерены обновить сервер. Выберите Далее.
Сервер также является сервером AD, и клиент использует SQL Server 2008 и Sql Server 2014 для поддержки своих основных приложений.
Я думал о настройке Hyper-V Environmnet для решения, но мне все равно нужно обновить сервер 2012 Rw.
Итак, на мой вопрос: кто-нибудь из вас, ребята или девушки, пытался выполнить обновление с Windows Server 2012 R2 std до Windows 2019 std, и есть ли какие-либо ошибки, о которых мне следует знать?


орджанерикссон
Примите участие, чтобы выиграть Oculus Win, наушники/колонки или подарочную карту на 300 евро

jrp78
- отметить 71 лучший ответ
- thumb_up – 225 благодарных отзывов
Поскольку Роберт предложил несколько советов и рекомендаций, я отвечу на ваш вопрос более прямо.
Да, я обновился с Server 2012R2 до Server 2019. Я действительно сделал это на прошлой неделе. То, о чем следует больше всего беспокоиться (IMO), — это выживание сторонних приложений, я бы назвал это. Вы никогда не знаете, как приложение (я) отреагирует на обновление, и если вы можете увидеть периодические проблемы от указанного обновления. Я более склонен выполнять обновление на месте, если на сервере работают все родные роли и функции Windows, а я нахожусь в затруднительном положении и/или мне нечего терять. Некоторые сервисы легко восстановить и/или быстро перестроить. Даже на некоторых родных обновлениях MS, которые я выполнял, я видел, что запланированные задачи просто переставали работать после обновления, и мне приходилось открывать и сохранять каждое из них, чтобы заставить их снова работать. Как только вы перейдете к сторонним приложениям, я полностью за новые установки. В вашем случае на этом сервере есть много вещей, и я бы не стал делать обновление на месте в вашем сценарии.
Читайте также:
- Как установить драйвер mtk usb на Windows 10
- Выключение Linux из командной строки
- Указанная сетевая папка подключена с использованием другого имени пользователя и пароля Windows 10
- Extreme Injector v3 не запускается в Windows 10
- 0xc1900209 ошибка обновления windows 10 2004 как исправить
In this article I will guide you How to upgrade Windows Server 2012 R2 to 2019
Before you upgrade Windows Server 2012 R2 to 2019, you read Windows Server 2019 systyem requires.
System requirements of Windows Server 2019
- At least 1.4GHz 64-Bit processor.
- 2GB RAM (for GUI-based installation).
- A minimum of 32GB of free space on the hard drive.
- Network adapter(s) compliant with PCIe architecture.
Note: This method only upgrades upgrade Windows Server 2012 R2 to Windows Server 2019. After you do it, you need to buy Windows Server 2019 Standard product key to activate it. You can buy Windows Server 2019 Standard product key for $70/key here: https://cheapproductkeys.com/product/windows-server-2019-standard-product-key/
You can watch this video to know how to upgrade Windows Server 2012 R2 to 2019
Step 1: If you want to keep your files and apps you convert Windows Server 2012 R2 Evaluation to Windows Server 2012 R2 non Evaluation
(If your Windows Server 2012 R2 is Standard/Datacenter version, you can skip step 1)
Step 2: You download Windows Server 2019 setup file here: https://www.mediafire.com/file/5rww0wn2uzb1ppz/en_windows_server_2019_x64_dvd_3c2cf1202.iso/file
Step 3: You open this file you download. Then you click setup
Step 4: You copy and paste Windows Server 2019 setup key: N69G4-B89J2-4G8F4-WWYCC-J464C
Step 5: You select “Windows Server 2019 Standard (Destop Experience)
Step 6: You select “Keep personal files and apps”
Step 7: You confirm your pc meets requirements of Windows Server 2019. Then you click install
Done. You wait for a moment.
After you upgrade Windows Server 2012 R2 to 2019, you need buy Windows Server 2019 Standard product key to activate it. You can buy Windows Server 2019 Standard product key for $70/key here: https://cheapproductkeys.com/product/windows-server-2019-standard-product-key/
Tag: in place upgrade windows server 2012 r2 to 2019, how to upgrade windows server 2012 r2 to 2019, upgrade windows server 2012 r2 to 2019 step by step, upgrade server 2012 r2 to 2019
Read more:
- Download Windows Server 2012 R2
- Download Windows Server 2016
- Download Windows Server 2019
- Download Windows Server 2022