Download Windows Speedup Tool to fix errors and make PC run faster
Windows Defender in Windows 11, Windows 10 or Windows 8.1 is set to automatically download and install the definition updates using Windows Update, once a day. If for some reason, your Windows Defender will not update automatically, or if you wish to download and save the definition updates in order to maybe update Windows Defender offline, on different installations of Windows 11/10/8/7/Vista, then this post will be of interest to you.
We have already seen how to download Windows Update manually. Today, we will see how you can update Windows Defender manually in Windows 11. Windows 10, Windows 8.1 and Windows 7. I will also give links for downloading updates for Windows Defender in the post.
First, check whether you are using a 32-bit or 64-bit version of Windows 11/10/8.1/7. Once you know the version of Windows installed on your device, download the installers from the following links:
- Download definition updates for Windows Defender in Windows 11, Windows 10, Windows 8.1/8: 32-bit | 64-bit | ARM.
- Download definition updates for Windows Defender in Windows 7 and Windows Vista: 32-bit | 64-bit.
- Download definition updates for Microsoft Security Essentials: 32-bit | 64-bit.
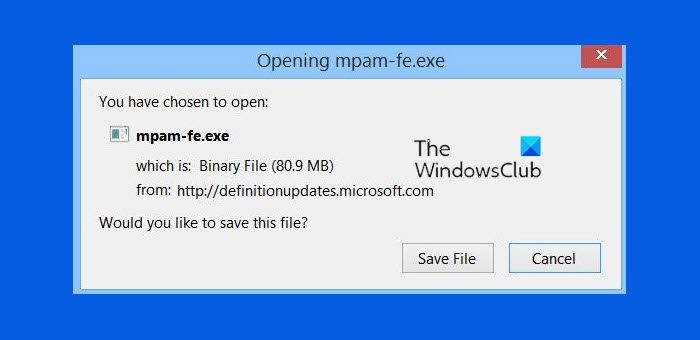
Once the file has finished downloading, go to your download location and double-click the file mpam–fe.exe. Follow the prompts to install the update.
You can also update Windows Defender definitions using Windows PowerShell.
If you think some malware is preventing the installation of Windows Defender definition updates, you may want to run a scan with Microsoft Safety Scanner or for more stubborn malware, use Windows Defender Offline.
TIP: See how to update Windows offline.
Why can’t I update my Windows Defender?
If you have installed some third-party antivirus tool, then that security program can interfere with Microsoft Defender Antivirus, and that could be the reason that you aren’t able to update it. In that case, you should disable any third-party security tool and then try to update the Microsoft Defender Antivirus. You can also run the Windows Update troubleshooter to find and fix issues related to virus definition updates.
How to update Defender using CMD?
To update Windows Defender or Microsoft Defender Antivirus using CMD, first, run Command Prompt as administrator and access the Windows Defender directory. After that, clear the current cache for the update, and then start the update using the following commands:
MpCmdRun.exe -removedefinitions -dynamicsignatures
MpCmdRun.exe -SignatureUpdate
These links are sure to interest you too:
- Update Windows Defender even when Automatic Windows Updates is disabled
- Windows Defender is turned off or not working
- Unable to turn on Windows Defender.
Anand Khanse is the Admin of TheWindowsClub.com, a 10-year Microsoft MVP (2006-16) & a Windows Insider MVP (2016-2022). Please read the entire post & the comments first, create a System Restore Point before making any changes to your system & be careful about any 3rd-party offers while installing freeware.

Contents
- 1 How To Update Microsoft Defender Via Windows Security
- 2 How To Update Microsoft Defender Via Command Prompt
- 3 How To Update Microsoft Defender Via Task Scheduler
- 4 How to Run Windows Defender from the Command Line (CMD)
- 5 Windows Defender Application Guard: How to Turn It On or Off
- 6 How to Turn on the Hidden Adware Blocker in Windows Defender
Microsoft Defender, previously known as “Windows Defender,” is a built-in utility on Windows 10 and Windows 11 that aims to protect your PCs from attacks and viruses. Because new malware or threats are developing on your PC, you must keep your Windows Defender antimalware Definition up to date to provide numerous effective antimalware to protect your PC on Windows 11.
Note: In 2020, Microsoft changed the name of the security feature on Windows 10 to “Microsoft Defender”. Read more here.
How Microsoft Defender Definitions Updates Work
Microsoft regularly updates security intelligence in antimalware products to cover the most recent threats. It improves detection logic, improving the capacity of Microsoft Defender Antivirus and other Microsoft antimalware solutions to identify threats effectively. This security intelligence collaborates directly with cloud-based protection to give AI-enhanced, next-generation protection that is quick and powerful.
If you have Microsoft Defender switched on, it will update most of the time automatically. However, in rare situations, Microsoft Defender does not update itself for an extended time, leaving your machine vulnerable to unwanted attacks. With the requirement for many individuals to update Windows Defender, there are often two options: automatically and manually updating Microsoft Defender for Windows 10 and 11.
⚠️ Please note: The process described below is the same in Windows 11 as it is in Windows 10. However, bear in mind that we’ll be using screenshots from Windows 11, so your UI may look a little different. We’ll point out any changes you need to be aware of as they come up.
If you are used to making things flawless, select the option of automatically upgrading Microsoft Defender. As a result, Microsoft Defender Antimalware and antivirus may always acquire the most up-to-date definitions on Windows 11.
- Click on the “Windows” icon, type in “Windows Security,” and select “Windows Security” from the result

- Under “Virus & threat protection updates,” click on “Protection Updates”

- Click on “Check for Updates” to update the Windows Defender


How To Update Microsoft Defender Via Command Prompt
You can use the command prompt to update the Microsoft Defender in Windows 11. Follow along.
- Click on the “Windows” icon, type in “Command Prompt,” and select “Command Prompt” from the result

- Enter the following command in the command prompt
"%ProgramFiles%Windows DefenderMpCmdRun.exe" -removedefinitions -dynamicsignatures
After running this command, you can see all the version definitions of the Windows Defender.

- To update, run the following command in the command prompt
"%ProgramFiles%Windows DefenderMpCmdRun.exe" -SignatureUpdate


How To Update Microsoft Defender Via Task Scheduler
Method description
- Click on the “Windows” icon, type in “Task Scheduler,” and select “Task Scheduler” from the result

- In the “Task Scheduler,” right-click on the “Task Scheduler Library” and select “New Folder” from the context menu

- Type in “Antivirus,” and click “OK”

- Right-click on the newly created folder “Antivirus,” and select “Create Task…” from the context menu

- In the “Create Task” dialogue box, under the “General” tab, check the radio button “Run whether user is logged on or not”

- Under the “Triggers” tab, click on the “New…” button

- Fill in all the details, select “On a schedule,” select the starting time, and select “Daily” from the side options

- Under the “Action” tab, click on the “New…” button

- In the “New Action” dialogue box, select “Start a program” from the action list, type in the following command in the “Program/script,” and then click “OK”
"%ProgramFiles%Windows DefenderMpCmdRun.exe" -removedefinitions
Add the following argument as shown in the picture:
-dynamicsignatures

- Under the “Actions” tab, click on the “New…” button

- In the “New Action” dialogue box, select “Start a program” from the action list, type in the following command in the “Program/script,” and then click “OK”
"%ProgramFiles%Windows DefenderMpCmdRun.exe"
Add the next argument as shown in the picture:
-SignatureUpdate

- Under the “Settings” tab, check all the checkboxes as shown in the image, fill in the detail as required, and then click “OK”

- Type in your username and password, and click “OK”


How to Run Windows Defender from the Command Line (CMD)
Knowing how to run Windows Defender from the command line can be very useful. Perhaps you’ve been locked out of its UI due to malware, are trying to run a scan from recovery media, or are using a GUI-less Windows Server install. In any of these situations, knowing a scan command or two can save you a lot of trouble.

Windows Defender Application Guard: How to Turn It On or Off
Windows Defender Application Guard and its enforcer, Windows Defender Application Control, are tools to keep employees productive and prevent attacks. Under the system, administrators can prevent regular access to anything other than manually selected work-related sites. In our other tutorial we show you how to turn Windows Defender Application Guard on or off.

How to Turn on the Hidden Adware Blocker in Windows Defender
Windows is great at preventing trojans, ransomware, and other serious issues, but it can fail to stop adware and potentially unwanted programs in its default configuration. Thankfully, the Windows Defender has an adware blocker just for this, and it’s great at stopping unwanted changes to your system or annoying pop-ups.

If you can’t open Windows Defender or access any of its settings, or if you have accidentally uninstalled Windows Defender, this guide will show you how to reinstall Windows Defender in Windows 11 via PowerShell command lines.
Although Windows Defender has always been the default antivirus software that comes preinstalled with Windows, some users may find the app missing after certain events such as after updating Windows or after installing or uninstalling certain third party antivirus software.
When the problem occurs and you try to open Windows Defender, Windows may prompt you the “You’ll need a new app to open this Windows Defender link” pop up that ask you to find a compatible app from Microsoft Store to open Windows Defender related link or setting. This indicates that Windows Defender is either missing or corrupted in Windows 11.
Reinstall Windows Defender in Windows 11
You can reinstall Microsoft Windows Defender in Windows 11 by executing a single line of command through PowerShell or Windows Terminal. However, you will need administrator rights to be able to execute the command.
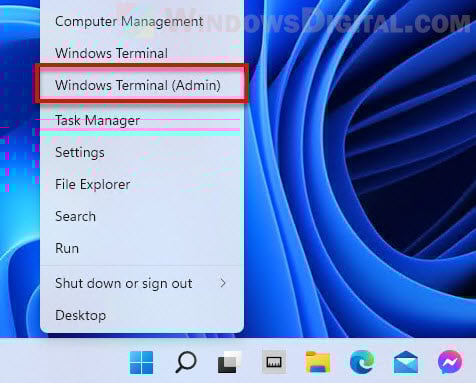
Thus, you will need to first open Windows Terminal or PowerShell with admin rights. To do so, right-click the Start button on the taskbar and select “Windows Terminal (Admin)“.
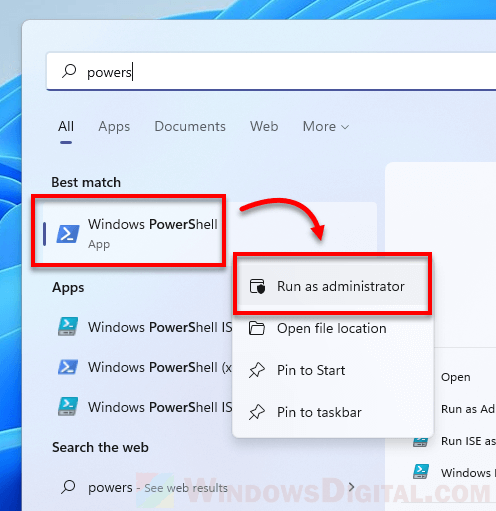
Alternatively, you can search for PowerShell through Start menu. Then, right-click Windows PowerShell from the search result and select Run as administrator.
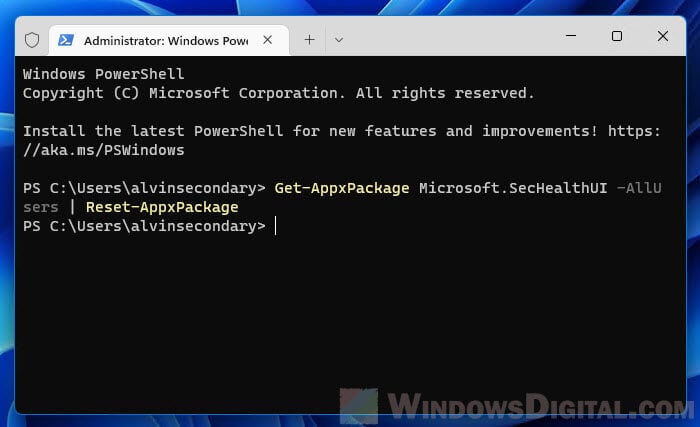
Once you have an elevated (admin) Windows Terminal or PowerShell window opened, enter the following command to reset and reinstall Windows Defender in Windows 11.
Get-AppxPackage Microsoft.SecHealthUI -AllUsers | Reset-AppxPackage
After executing the command, Windows Terminal will begin to reset Windows Defender and show a progress message that says “Deployment operation progress”. It may take a while for the process to complete.
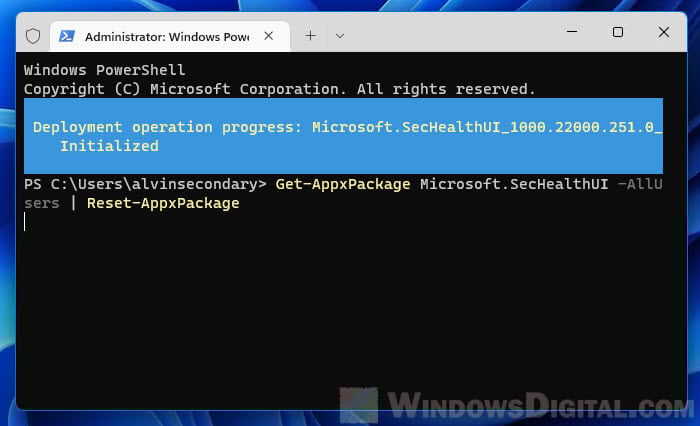
Once completed, the progress message will disappear and Windows Terminal will start at a new line, which indicates the previous command has been executed.
Now, you can press Win + i keys to open Settings and go to Privacy & security > Windows Security. This should open up the Windows Security (Windows Defender) settings like it used to.
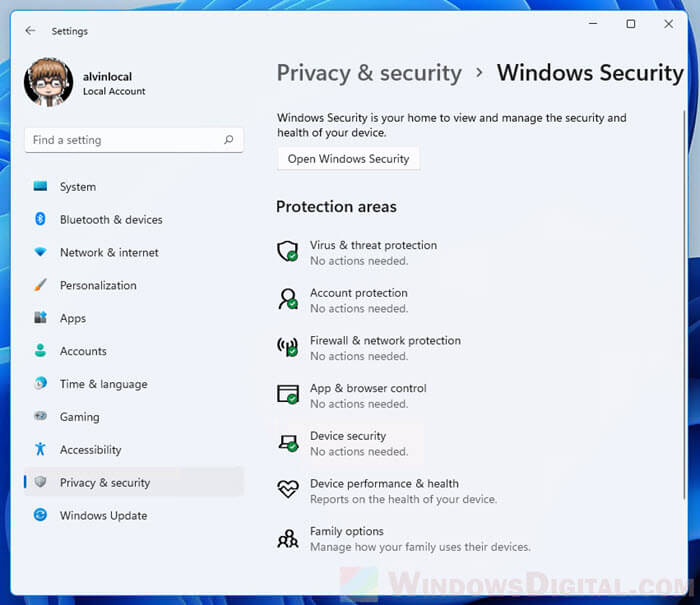
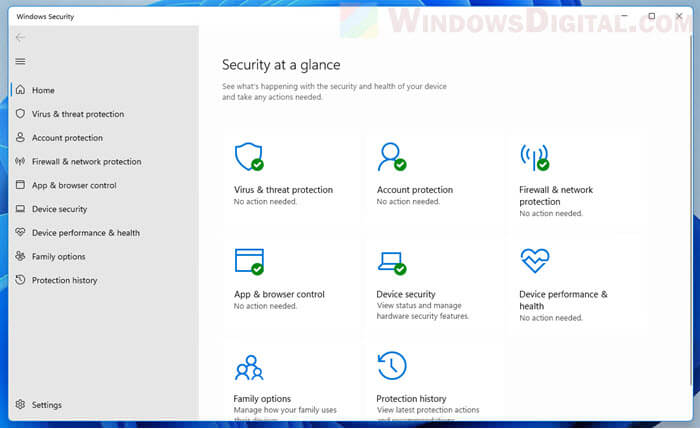
To further verify if Windows Defender is successfully installed, click on the “Open Windows Security” button to open the Windows Security window. From there, you can manage your computer’s security such as virus protection, firewall, network protection, browser control, etc.
PowerShell shows errors when executing the command
If the command above doesn’t work or if you receive errors when you execute the command, try the following commands instead to reinstall Windows Defender in Windows 11.
In an elevated (admin) Windows Terminal or PowerShell window, enter the following commands in the following order.
Set-ExecutionPolicy Unrestricted
Get-AppXPackage -AllUsers | Foreach {Add-AppxPackage -DisableDevelopmentMode -Register "$($_.InstallLocation)\AppXManifest.xml"}
Set-ExecutionPolicy Default
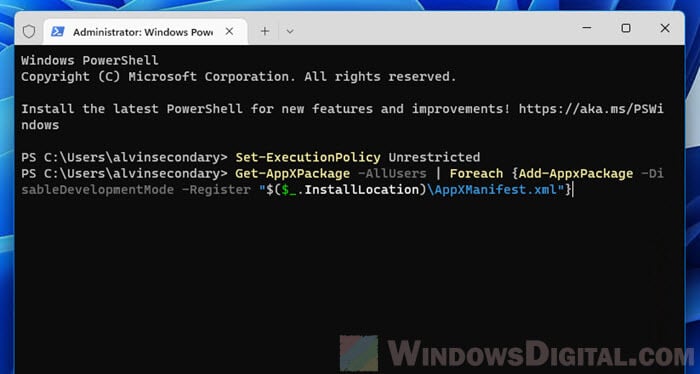
Since the command requires execution policy to be set to unrestricted in order to be executed successfully, you should set the execution policy back to its default (by running the third line of command as shown above) after the Get-AppXPackage process is completed.
If you receive an error that says “Access is denied”, it indicates that you do not have the rights to run the command. As mentioned above, you need to open Windows Terminal or PowerShell as administrator in order to execute the command successfully.
How to enable Windows Defender if you already have an existing antivirus software
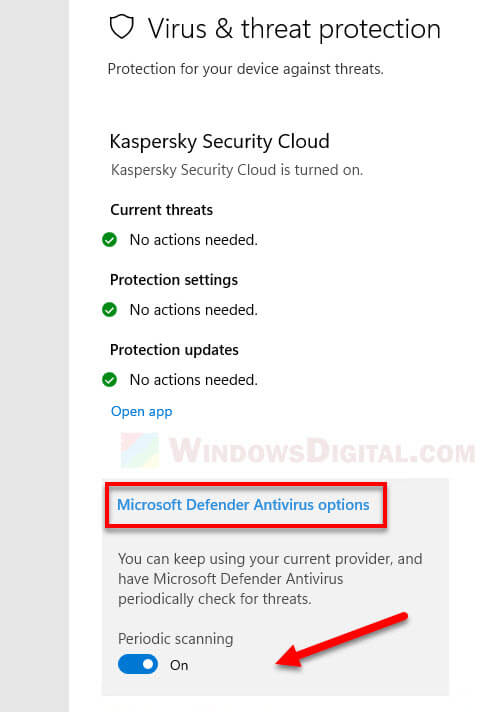
If you already have an existing third party antivirus program actively running and protecting your PC, Microsoft Defender Antivirus will be disabled. However, you can re-enable Microsoft Defender periodic scanning to have it periodically check for threats in conjunction with your other antivirus software.
To enable Windows Defender with periodic scanning when you are already using an existing third party antivirus software, open Settings and navigate to Privacy & Security > Windows Security, then click the Open Windows Security button.
Next, select Virus & threat protection and click Microsoft Defender Antivirus options. This will expand the setting and you should then be able to see a toggle option. Toggle on the Periodic scanning option to enable Windows Defender periodic scan while also using your other antivirus software.
Многие пользователи Windows 11 застряли с устаревшей версией Windows Defender, поскольку каждое связанное с ней обновление Windows Update выдает одну и ту же ошибку (0x80070643). Подавляющее число пользователей, столкнувшихся с этой проблемой, находятся на сборке 22000.160.

После изучения этой проблемы выяснилось, что существует несколько основных причин, которые могут быть ответственны за появление этого кода ошибки. Вот краткий список потенциальных виновников, которые могут быть ответственны за эту проблему:
- Поврежденный компонент Windows Update – Чаще всего эта проблема связана с каким-либо повреждением, которое влияет на компонент WU (Windows Update). В этом случае самым простым способом устранения проблемы является запуск средства устранения неполадок Windows Update Troubleshooter и применение рекомендуемого исправления.
- Обновление Windows частично нарушено – Также можно столкнуться с этой проблемой исключительно при обновлении Windows Defender. Некоторые пользователи сообщают, что сбой только обновления безопасности Windows для Защитника Windows пока кумулятивный & другие типы обновлений устанавливаются нормально, пользователи сообщают, что им удалось обойти эту ошибку, используя каталог Microsoft Update для установки неработающих обновлений вручную.
- Поврежденные зависимости WU – При более серьезных обстоятельствах (когда каждое ожидаемое обновление Windows Update завершается с одной и той же ошибкой) становится ясно, что вы имеете дело с повреждением системного файла, влияющим на компонент WU. Если этот сценарий применим, идеальным способом устранения проблемы является выполнение процедуры установки восстановления (восстановления на месте).
Теперь, когда вы получили обзор всех возможных причин, из-за которых ваша Windows 11 не может обновить компонент Windows Defender, давайте’ рассмотрим некоторые стратегии устранения, которые другие пользователи успешно использовали, чтобы разобраться с этой проблемой.
Прежде чем переходить к другим стратегиям ремонта, следует запустить средство устранения неполадок Windows Update Troubleshooter и проверить, способна ли ваша операционная система самостоятельно справиться с этой проблемой.
Примечание: Средство устранения неполадок Windows Update Troubleshooter содержит коллекцию стратегий устранения неполадок для наиболее распространенных проблем, затрагивающих компонент Windows Update. Этот инструмент способен автоматически применять стратегии исправления, которые обычно нужно устанавливать вручную.
Если неспособность вашей операционной системы’ обновить Защитник Windows связана с компонентом WU, эта операция должна помочь вам устранить корень этой проблемы.
Следуйте приведенным ниже инструкциям, чтобы узнать, как запустить средство устранения неполадок Windows Update Troubleshooter и применить рекомендуемое исправление:
- Нажмите клавиша Windows + I открыть меню Настройки Windows 11.
- На главном экране Настройки Приложение, откройте вертикальное меню слева и щелкните на вкладке Система.

Доступ к вкладке «Устранение неполадок Примечание: Если вертикальное меню по умолчанию не видно, нажмите на кнопку действия (левый верхний раздел), чтобы сделать его видимым.
- Внутри Система вкладку, перейдите на правую панель и нажмите на Устранение неполадок.
- из Устранение неполадок вкладку, нажмите на Другие средства устранения неполадок, затем нажмите кнопку Запустить кнопка, связанная с Windows Update.

Запуск обновления Windows - Как только вы запустите это средство устранения неполадок, утилита начнет сканирование на предмет известных проблем, которые могут влиять на Windows Update компонент.
- Если найдено жизнеспособное исправление, просто нажмите кнопку Примените это исправление и подождать, пока стратегия ремонта не будет приведена в действие.

Примените это исправление для Windows Update Примечание: В зависимости от рекомендованного исправления, вам может потребоваться выполнить некоторые действия вручную – следуйте инструкциям на экране для их выполнения.
- После успешного применения рекомендованного исправления перезагрузите компьютер, если вам’ не будет предложено сделать это автоматически, и попытайтесь установить сбойное обновление после следующего запуска.


Если проблема все еще не устранена, перейдите к следующему методу ниже для дополнительного способа установки неудачных обновлений Windows Defender.
Установите неработающие обновления вручную
Если Windows Update Troubleshooter считает компонент WU неисправимым, вы, вероятно, сможете полностью обойти ошибку, установив неудачные обновления вручную с помощью Microsoft Update Catalog.
Хотя это, скорее всего, позволит вам установить неудачные обновления Windows Defender, это не устранит корневую проблему, которая вызывает такое странное поведение Windows 11. Если вы не хотите, чтобы эта проблема повторилась с другими обновлениями, вам’ необходимо дополнительно устранить неполадки в компоненте WU. \
Примечание: Эта процедура позволит вам установить обновление напрямую (без участия локального компонента WU). Это означает, что в случае, если некоторые поврежденные зависимости вызывают такое поведение, этот метод позволит вам обойти их полностью.
Следуйте приведенным ниже инструкциям, чтобы установить сбойные обновления Windows Defender вручную с помощью Microsoft Update Catalog:
- Прежде чем делать что-либо еще, вам необходимо знать архитектуру вашей операционной системы (32- или 64-разрядная). Если вы этого не знаете, откройте страницу Проводник файлов, щелкните правой кнопкой мыши на This PC и выберите Свойства из появившегося контекстного меню.

Доступ к экрану свойств - Из О сайте системная вкладка, прокрутите вниз под Технические характеристики устройства и проверить Тип системы чтобы узнать архитектуру вашей ОС.

Проверка архитектуры системы Примечание: Если в типе системы указано 64-bit, вам нужно загрузить 64-bit обновление, а если указано 32-bit, вам понадобится 32-bit эквивалент Windows Update.
- Теперь, когда вы знаете архитектуру своей ОС, посетите главную страницу Каталог обновлений Microsoft и используйте функцию поиска (правый верхний угол) для поиска сбойного обновления.
Поиск нужного обновления Примечание: Вы можете узнать имя неудачного обновления, посмотрев на ошибку, которую вы получаете в Windows Update, когда ожидающее обновление не удается установить.
- Далее в списке результатов найдите нужное обновление для антивирусной платформы Microsoft Defender Antivirus, обратив внимание на архитектуру. Как только вы найдете нужный листинг, нажмите кнопку Скачать для локальной загрузки обновления.

Загрузка правильного обновления - Дождитесь завершения загрузки, затем перейдите в место, откуда было загружено обновление (скорее всего, в каталог Microsoft Update Catalog) Загрузки папку), затем откройте папку .установочный пакет msu и следуйте подсказкам на экране, чтобы установить обновление локально.
- После завершения установки перезагрузите компьютер и проверьте, устранена ли проблема после загрузки ПК.


Если проблема все еще не устранена, перейдите к последнему потенциальному варианту решения проблемы ниже.
Выполните инсталляцию восстановления
Если ни один из вышеперечисленных методов не оказался эффективным в вашем случае, остается только сбросить компонент WU вместе со всеми связанными зависимостями, которые могут повлиять на работу обновления.
A Чистая установка Windows 11 это всегда вариант, но мы бы не советовали его использовать, если вы можете.

Наша рекомендация Восстановительная установка Windows 11 (восстановление на месте) поскольку она затрагивает только системные файлы, хранящиеся на диске ОС. Вы получаете возможность сохранить все личные файлы, приложения, игры и документы, которые вы’ в настоящее время храните на разделе, где установлена Windows 11.
This PowerShell command reinstalls Windows Defender in seconds
Updated on September 22, 2022
What to Know
- You don’t need to download Windows Defender, because it’s integrated into Windows 11.
- Enter this in a PowerShell window: Get-AppxPackage Microsoft.SecHealthUI -AllUsers | Reset-AppxPackage.
- Or, go to Settings > Apps > Installed apps > Windows Security > three dots > Advanced options > Reset.
This article explains when and how to reinstall Windows Defender through the command line or Settings app in Windows 11.
How to Reinstall Windows Defender in Windows 11
Windows Defender (aka, Microsoft Defender) isn’t installed on your computer like a typical program, so you can’t reinstall it like you can regular software. Instead, follow these directions to use a PowerShell command to get the job done. It might take anywhere from 5 seconds to a few minutes to complete. If you can open Settings normally, there’s an easier method after these steps.
-
Right-click the Start button and select Terminal (Admin).
If that doesn’t work for whatever reason, use the search bar on the taskbar to search for PowerShell, and then right-click it to find the Run as administrator option.
-
Copy the command exactly as it’s shown here, and then right-click in the PowerShell window to paste it (Ctrl+V works, too):
Get-AppxPackage Microsoft.SecHealthUI -AllUsers | Reset-AppxPackage -
Press Enter to immediately start the process to reset Windows Defender to its original settings so that it performs as a freshly installed app.
-
You’ll know when it’s finished because you’ll see the blinking cursor again on a new line below the command you entered. In the meantime, you might briefly see a Deployment operation progress message.
If you see lots of red text, and an «Access is denied» message, return to step 1 and make sure you’re opening PowerShell as an administrator.
Another way to reset Windows Defender is through Settings. If Settings opens fine for you, you don’t need to bother with a PowerShell command. Instead, go to Settings > Apps > Installed apps > Windows Security > three dots > Advanced options > Reset.
When to Reinstall Windows Defender
Technically, you’re not really reinstalling the program because Windows doesn’t actually let you uninstall it. That said, you might run the above command to reset Windows Defender if it’s just not working correctly.
The most obvious sign you need to do this is if you see an error when you try to open it. If it’s not opening as it should, and you see this message, the above command should fix it right away:
You'll need a new app to open this windowsdefender linkLook for an app in the Microsoft Store
Or, maybe it does open, but some of its toggles won’t turn on or off, or you can’t even find a link to it on your computer. In these cases, the PowerShell command should refresh the tool back to working order.
Windows Defender Might Just Be Off
It’s possible that you’ve considered reinstalling Windows Defender because it isn’t catching malware, when in reality, it’s just not turned on. You might think it’s been uninstalled or is broken, but really it’s just disabled.
This is completely possible since Windows 11 lets you turn off its built-in antivirus program if you’d rather not use it.
Learn how to turn Windows Defender on and off for specific directions.
FAQ
-
Is Windows Defender a good antivirus?
Not really. While Windows Defender provides basic protection from threats, it’s no substitute for third-party antivirus software.
-
How do I add exceptions to Windows Defender?
Go to Start > Settings > Privacy & Security > Windows Security > Virus & threat protection. Under Virus & Threat Protection Settings, select Manage settings, then under Exclusions, select Add or remove exclusions.
Thanks for letting us know!
Get the Latest Tech News Delivered Every Day
Subscribe