Содержание
- Как обновить сертификаты в Windows 10?
- Как управлять сертификатами в Windows 10?
- Как обновить центр сертификации?
- Как доверять сертификатам в Windows 10?
- Как установить сертификат SSL?
- Где мои сертификаты хранятся в Windows 10?
- Как управлять сертификатами в Chrome?
- Как развернуть сертификат SSL в Windows?
- Что такое диспетчер сертификатов Windows?
- Какие доверенные сертификаты обновляются?
- Как получить доверенный корневой сертификат?
- Как загрузить доверенный корневой сертификат?
- Что такое доверенный сертификат?
- Этот корневой сертификат CA не является доверенным?
- Как работают корневые сертификаты?
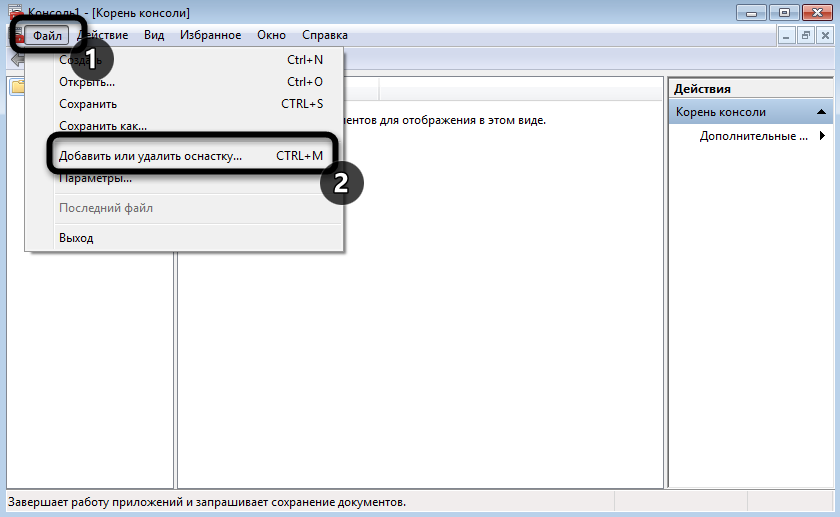
Перейдите в меню «Файл», нажмите «Добавить / удалить оснастку» и добавьте оснастку «Сертификаты» для локального компьютера. После добавления щелкните правой кнопкой мыши в среднем окне и выберите Все задачи & gt; Импортировать. После импорта сертификат должен отображаться в разделе «Локальный компьютер», а не «Текущий пользователь».
Как управлять сертификатами в Windows 10?
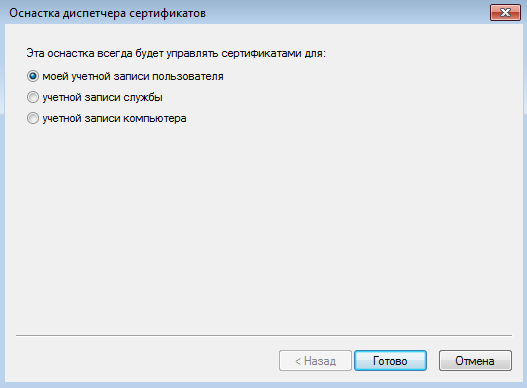
Чтобы просмотреть сертификаты для текущего пользователя
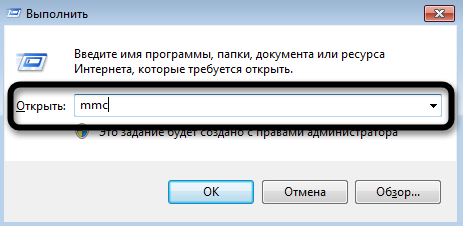
- Выберите «Выполнить» в меню «Пуск», а затем введите certmgr. msc. Появится инструмент диспетчера сертификатов для текущего пользователя.
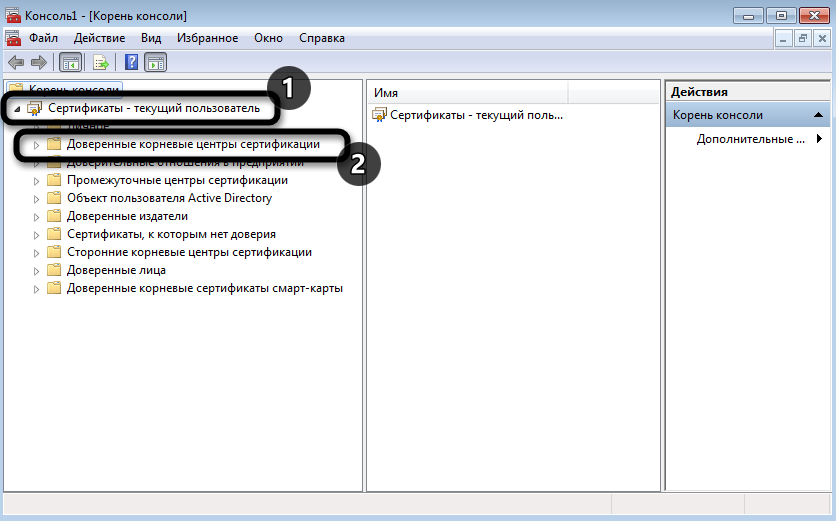
- Чтобы просмотреть свои сертификаты, в разделе «Сертификаты — текущий пользователь» на левой панели разверните каталог для типа сертификата, который вы хотите просмотреть.
25 февр. 2019 г.
Обновите сертификат, перейдя в MMC & gt; Центр сертификации (местный) Snap In. Щелкните центр сертификации правой кнопкой мыши и выберите «Обновить все задачи» & gt; Продлить сертификат ЦС. Выберите, хотите ли вы сохранить существующие ключи или создать новые.
Как доверять сертификатам в Windows 10?
Доверяйте центру сертификации: Windows
Щелкните меню «Файл» и выберите «Добавить / удалить оснастку». Нажмите «Сертификаты» в разделе «Доступные надстройки», затем нажмите «Добавить». Нажмите «ОК», затем «Учетная запись компьютера» и кнопку «Далее». Щелкните «Локальный компьютер», затем нажмите кнопку «Готово».
Как установить сертификат SSL?
Как активировать сертификат:
- Зайдите на веб-сайты & amp; Вкладка Домены.
- В разделе для доменного имени, которое вы хотите использовать, щелкните Показать еще.
- Щелкните «Настройки хостинга».
- В разделе «Безопасность» выберите «Поддержка SSL».
- Выберите созданный сертификат и нажмите OK.
20 апр. 2020 г.
Где мои сертификаты хранятся в Windows 10?
Сертификаты, хранящиеся на компьютере с Windows 10, находятся в хранилище сертификатов локального компьютера. Windows 10 предлагает диспетчер сертификатов в качестве инструмента управления сертификатами как для компьютерных, так и для пользовательских сертификатов.
Как управлять сертификатами в Chrome?
В Chrome перейдите в Настройки. На странице настроек под браузером по умолчанию нажмите Показать дополнительные настройки. В разделе HTTPS / SSL щелкните Управление сертификатами. В окне «Сертификаты» на вкладке «Личные» вы должны увидеть свой сертификат клиента.
Как развернуть сертификат SSL в Windows?
Импорт и экспорт сертификата — Microsoft Windows
- Откройте MMC (Пуск> Выполнить> MMC).
- Перейти к файлу & gt; Добавить / удалить оснастку.
- Сертификаты двойного щелчка.
- Выберите учетную запись компьютера.
- Выбрать локальный компьютер & gt; Заканчивать.
- Нажмите OK, чтобы закрыть окно Snap-In.
- Щелкните [+] рядом с пунктом «Сертификаты» & gt; Личные & gt; Сертификаты.
- Щелкните правой кнопкой мыши «Сертификаты» и выберите «Все задачи» & gt; Импортировать.
Что такое диспетчер сертификатов Windows?
Диспетчер сертификатов или Certmgr. msc в Windows 10/8/7 позволяет просматривать подробную информацию о ваших сертификатах, экспортировать, импортировать, изменять, удалять или запрашивать новые сертификаты. Корневые сертификаты — это цифровые документы, используемые для управления сетевой аутентификацией и обмена информацией.
Какие доверенные сертификаты обновляются?
Список доверенных сертификатов время от времени обновляется в случае добавления, обновления или истечения срока действия некоторых сертификатов. Эти обновления отличаются от стандартных обновлений продуктов для Acrobat или Reader, которые можно запустить, выбрав «Справка» & gt; Проверить наличие обновлений.
Как получить доверенный корневой сертификат?
Чтобы добавить сертификаты в хранилище доверенных корневых центров сертификации для локального компьютера, из меню WinX в Windows 10 / 8.1 откройте окно «Выполнить», введите mmc и нажмите Enter, чтобы открыть Microsoft Management Control. Нажмите ссылку меню «Файл» и выберите «Добавить / удалить оснастку».
Как загрузить доверенный корневой сертификат?
- Щелкните ссылку «Загрузить сертификаты доверенного корневого центра сертификации» в нижней части серого поля справа и загрузите файл.
- Измените расширение файла на. …
- Распакуйте ZIP-файл. …
- Откройте редактор управления групповой политикой Active Directory.
- Откройте Политики открытого ключа и выберите Промежуточные центры сертификации.
Что такое доверенный сертификат?
Подобно другим платформам, таким как Windows и macOS, Android поддерживает корневое хранилище системы, которое используется для определения того, является ли сертификат, выданный определенным центром сертификации (ЦС), надежным. Каждый корневой сертификат хранится в отдельном файле. …
Этот корневой сертификат ЦС не является доверенным?
Вы столкнетесь с ошибкой, что корневой сертификат не является доверенным, если сертификат Securly SSL не установлен на вашем macOS X. Следовательно, чтобы перестать получать ошибку, вам необходимо установить сертификат SSL. Перейдите в Finder & gt; Приложения & gt; Утилиты & gt; Связка ключей. Выберите «Система» в левом столбце.
Как работают корневые сертификаты?
Корневой сертификат SSL — это сертификат, выпущенный доверенным центром сертификации (CA). В экосистеме SSL любой может сгенерировать ключ подписи и использовать его для подписи нового сертификата. … Когда устройство проверяет сертификат, оно сравнивает издателя сертификата со списком доверенных центров сертификации.
Похожие сообщения:
- Вы спросили: Как мне найти доверенные корневые сертификаты в Windows 10?
- Как удалить сертификаты из Windows 10?
- Как обновить сертификаты в Windows 7?
- Где в Windows 10 хранятся все сертификаты?
- Как удалить старые сертификаты из Windows 7?
- Как управлять сертификатами в Windows 7?
.
All Windows versions have a built-in feature for automatically updating root certificates from the Microsoft websites. MSFT, as part of the Microsoft Trusted Root Certificate Program, maintains and publishes a list of trusted certificates for clients and Windows devices in its online repository. If the verified certificate in its certification chain refers to the root CA that participates in this program, the system will automatically download this root certificate from the Windows Update servers and add it to the trusted ones.
Windows updates a trusted root certificate list (CTL) once a week. If Windows doesn’t have direct access to the Windows Update, the system won’t be able to update the root certificates. So a user may have some troubles when browsing websites (which SSL certificates are signed by an untrusted CA – see the article about the “Chrome SSL error: This site can’t provide a secure connection”), or with installing/running signed scripts and apps.
In this article, we’ll try to find out how to manually update the list of root certificates in TrustedRootCA in disconnected (isolated) networks or computers/servers without direct Internet access.
Contents:
- Managing Trusted Root Certificates in Windows 10 and 11
- How to Disable/Enable Automatic Root Certificates Update in Windows?
- Certutil: Download Trusted Root Certificates from Windows Update
- Certificate Trust List (STL) in Windows
- Updating Trusted Root Certificates via GPO in an Isolated Environment
- How to Update Trusted Root Certificates in Windows 7?
- Updating Root Certificates on Windows XP Using the Rootsupd.exe Tool
Note. If your computers access the Internet through a proxy server, Microsoft recommends that you open direct access (bypass) to Microsoft Web sites to automatically renew root certificates. However, it isn’t always possible or applicable due to corporate restrictions.
Managing Trusted Root Certificates in Windows 10 and 11
How to see the list of trusted root certificates on a Windows computer?
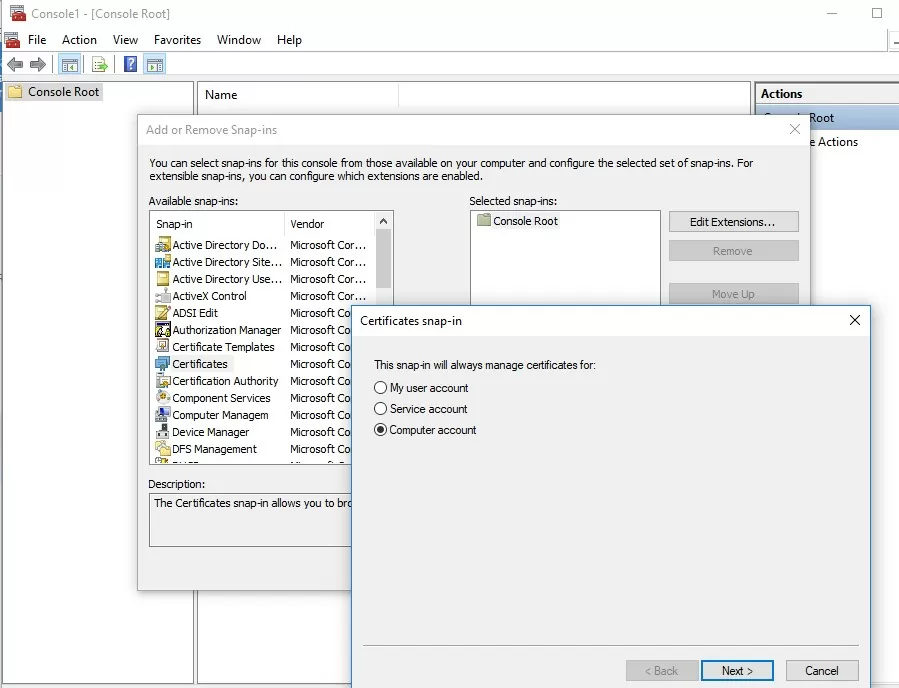
- To open the root certificate store of a computer running Windows 11/10/8.1/7 or Windows Server 2022/2019/2016, run the mmc.exe console;
- Select File -> Add/Remove Snap-in, select Certificates (certmgr) in the list of snap-ins -> Add;
- Select that you want to manage certificates of local Computer account;

- Next -> OK -> OK;
- Expand the Certificates node -> Trusted Root Certification Authorities Store. This section contains the list of trusted root certificates on your computer.
In the mmc console, you can view information about any certificate or remove it from trusted ones.
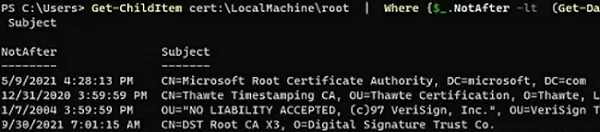
You can also get a list of trusted root certificates with their expiration dates using PowerShell:
Get-Childitem cert:\LocalMachine\root |format-list
You can list the expired certificates, or which expire in the next 60 days:
Get-ChildItem cert:\LocalMachine\root|Where {$_.NotAfter -lt (Get-Date).AddDays(60)}|select NotAfter, Subject
For security reasons, it’s recommended that you periodically check the certificate trust store on your computer for suspicious and revoked certificates using the Sigcheck tool. This tool allows you to compare the list of certificates installed on the computer with the list of root certificates on the Microsoft website (you can download an offline file with up-to-date certificates authrootstl.cab).
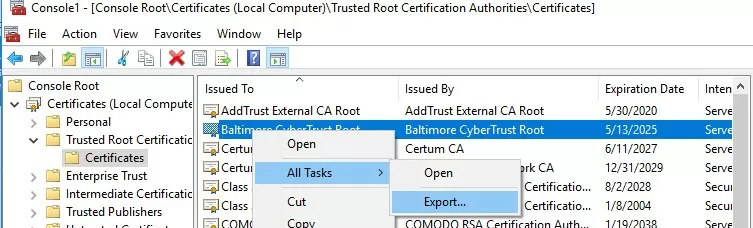
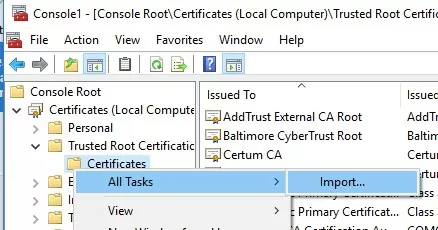
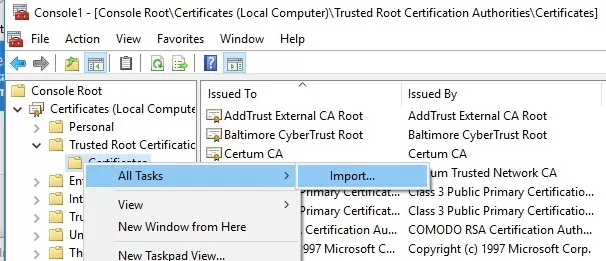
You can manually transfer the root certificate file between Windows computers using the Export/Import options.
- You can export any certificate to a .CER file by clicking on it and selecting All Tasks -> Export;

- You can import this certificate on another computer using the option All Tasks -> Import.

How to Disable/Enable Automatic Root Certificates Update in Windows?
As we mentioned, Windows automatically updates root certificates. You can enable or disable certificate renewal in Windows through a GPO or the registry.
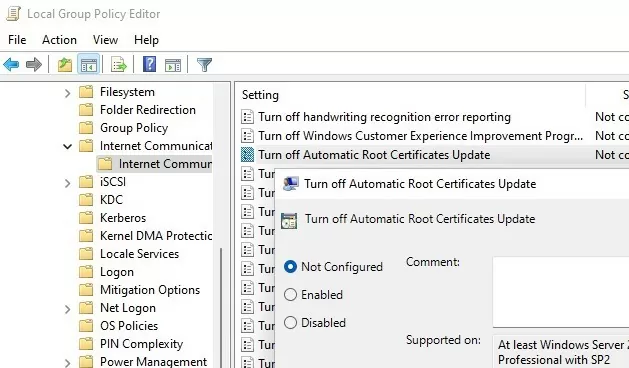
Open the Local Group Policy Editor (gpedit.msc) and go to Computer Configuration -> Administrative Templates -> System -> Internet Communication Management -> Internet Communication.
The Turn off Automatic Root Certificates Update option in this section allows you to disable automatic updating of root certificates through the Windows Update sites. By default, this policy is not configured and Windows always tries to automatically renew root certificates.
If this GPO option is not configured and the root certificates are not automatically renewed, check if this setting is manually enabled in the registry. Check the value of the registry parameter using PowerShell:
Get-ItemProperty -Path 'HKLM:\Software\Policies\Microsoft\SystemCertificates\AuthRoot' -Name DisableRootAutoUpdate
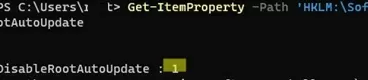
If the command returns that the value of the DisableRootAutoUpdate registry parameter is 1, then the updating of root certificates is disabled on your computer. To enable it, change the parameter value to 0.
Certutil: Download Trusted Root Certificates from Windows Update
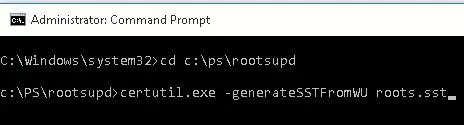
Certutil.exe CLI tool can be used to manage certificates (introduced in Windows 10, for Windows 7 is available as a separate update). It can be used to download an up-to-date list of root certificates from Windows Update and save it to an SST file.
To generate an SST file on a computer running Windows 10 or 11 and having direct access to the Internet, open the elevated command prompt and run the command:
certutil.exe -generateSSTFromWU C:\PS\roots.sst
Updated SST file.
CertUtil: -generateSSTFromWU command completed successfully.
As a result, an SST file containing an up-to-date list of root certificates will appear in the target directory. Double-click to open it. This file is a container containing trusted root certificates.
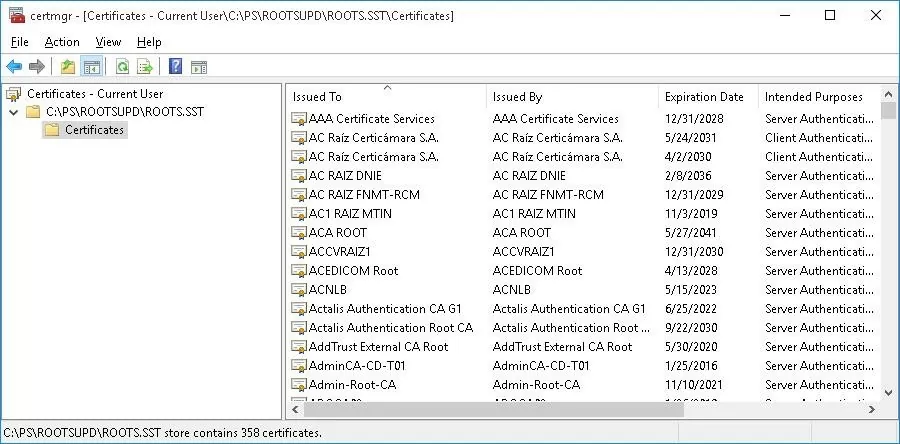
As you can see, a familiar Certificate Management snap-in opens, from which you can export any of the certificates you have got. In my case, there have been 358 items in the list of certificates. Obviously, it is not rational to export the certificates and install them one by one.
Tip. The certutil -syncWithWU command can be used to generate individual certificate files. The certificates obtained in this way can be deployed to Windows devices using GPO.
You can use PowerShell script to install all certificates from the SST file and add them to the list of trusted root certificates on a computer:
$sstStore = ( Get-ChildItem -Path C:\ps\rootsupd\roots.sst )
 $sstStore | Import-Certificate -CertStoreLocation Cert:\LocalMachine\Root
Run the certmgr.msc snap-in and make sure that all certificates have been added to the Trusted Root Certification Authority. In my example on Windows 11, the number of root certificates increased from 34 to 438.

A clean copy of Windows after installation contains only a small number of certificates in the root store. If the computer is connected to the Internet, the rest of the root certificates will be installed automatically (on demand) if your device access an HTTPS site or SSL certificate that has a fingerprint from Microsoft CTL in its trust chain. Therefore, as a rule, there is no need to immediately add all certificates that Microsoft trusts to the local certification store.
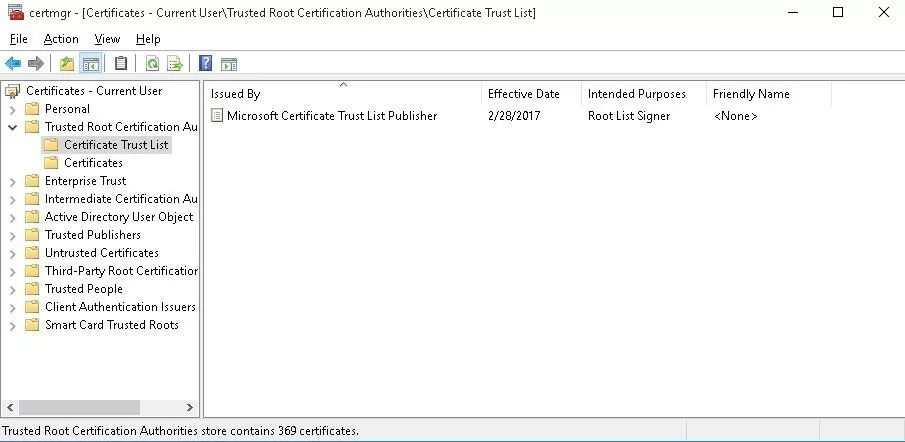
Certificate Trust List (STL) in Windows
A Certificate Trust List (CTL) is simply a list of data (such as certificate hashes) that is signed by a trusted party (by Microsoft in this case). The Windows client periodically downloads from Windows Update this CTL, which stores the hashes of all trusted root CAs. It should be understood that this CTL doesn’t contain the certificates themselves, only their hashes and attributes (for example, Friendly Name). Windows devices can download a trusted certificate from Certificate Trust List on demand.
You can manually download and install the CTL file. To do it, download the file http://ctldl.windowsupdate.com/msdownload/update/v3/static/trustedr/en/authrootstl.cab (updated twice a month). Using any archiver (or even Windows Explorer), unpack the contents of the authrootstl.cab archive. It contains a single authroot.stl file.

The Authroot.stl file is a container with a list of trusted certificate thumbprints in Certificate Trust List format.

You can install this CTL file to a Trusted Root Certificate Authority using the certutil command:
certutil -enterprise -f -v -AddStore "Root" "C:\PS\authroot.stl"

root "Trusted Root Certification Authorities"
CTL 0 added to store.
CertUtil: -addstore command completed successfully.
You can also import certificates using the certificate management console (Trust Root Certification Authorities -> Certificates -> All Tasks -> Import). Specify the path to your STL file with certificate thumbprints.
After you have run the command, a new section Certificate Trust List appears in Trusted Root Certification Authorities container of the Certificate Manager console (certmgr.msc).
In the same way, you can download and install the list of the revoked (disallowed) certificates that have been removed from the Root Certificate Program. To do it, download the disallowedcertstl.cab file (http://ctldl.windowsupdate.com/msdownload/update/v3/static/trustedr/en/disallowedcertstl.cab), extract it, and add it to the Untrusted Certificates store with the command:
certutil -enterprise -f -v -AddStore disallowed "C:\PS\disallowedcert.stl"
Updating Trusted Root Certificates via GPO in an Isolated Environment
If you have the task of regularly updating root certificates in an Internet-isolated Active Directory domain, there is a slightly more complicated scheme for updating local certificate stores on domain-joined computers using Group Policies. You can configure root certificate updates on user computers in the disconnected Windows networks in several ways.
The first way assumes that you regularly manually download and copy a file with root certificates to your isolated network. You can download the file with current Microsoft root certificates as follows:
certutil.exe –generateSSTFromWU roots.sst
Then the root certificates from this file can be deployed via SCCM or PowerShell Startup script in GPO:
$sstStore = (Get-ChildItem -Path \\fr-dc01\SYSVOL\woshub.com\rootcert\roots.sst )
 $sstStore | Import-Certificate -CertStoreLocation Cert:\LocalMachine\Root
The second way is to download the actual Microsoft root certificates using the command:
Certutil -syncWithWU -f \\fr-dc01\SYSVOL\woshub.com\rootcert\
A number of root certificate files (CRT file format) will appear in the specified shared network folder (including files authrootstl.cab, disallowedcertstl.cab, disallowedcert.sst, thumbprint.crt).

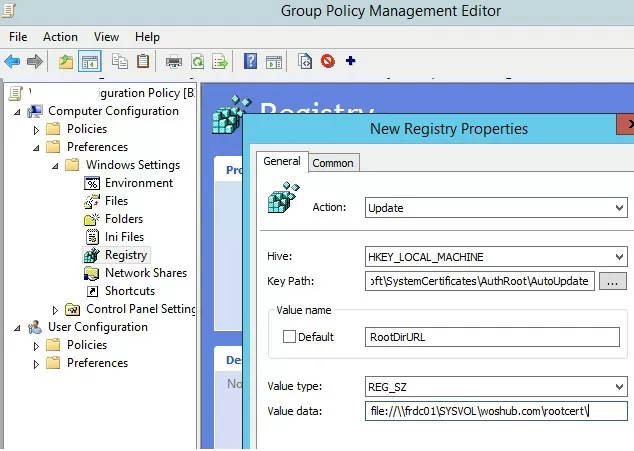
Then use the Group Policy Preferences to change the value of the registry parameter RootDirURL under HKLM\Software\Microsoft\SystemCertificates\AuthRoot\AutoUpdate. This parameter should point to the shared network folder from which your Windows computers will receive new root certificates. Run the domain GPMC.msc console, create a new GPO, switch to the edit policy mode, and expand the section Computer Configuration -> Preferences -> Windows Settings -> Registry. Create a new registry property with the following settings:
- Action: Update
- Hive: HKLM
- Key path: Software\Microsoft\SystemCertificates\AuthRoot\AutoUpdate
- Value name: RootDirURL
- Type: REG_SZ
- Value data: file://\\fr-dc01\SYSVOL\woshub.com\rootcert\
It remains to link this policy on a computer`s OU and after updating GPO settings on the client, check for new root certificates in the certstore.
The GPO parameter Turn off Automatic Root Certificates Update under Computer Configuration -> Administrative Templates -> System -> Internet Communication Management -> Internet Communication settings should be disabled or not configured.
How to Update Trusted Root Certificates in Windows 7?
Despite the fact that Windows 7 is now is at the End of Support phase, many users and companies still use it.
After installing a clean Windows 7 image, you may find that many modern programs and tools do not work on it as they are signed with new certificates. In particular, there have been complaints that .Net Framework 4.8 or Microsoft Visual Studio (vs_Community.exe) cannot be installed on Windows 7 SP1 x64 without updating root certificates.
The installer manifest failed signature validation.
Or
NET Framework has not been installed because a certificate chain could not be built to a trusted root authority.

To update root certificates in Windows 7, you must first download and install MSU update KB2813430 (https://support.microsoft.com/en-us/topic/an-update-is-available-that-enables-administrators-to-update-trusted-and-disallowed-ctls-in-disconnected-environments-in-windows-0c51c702-fdcc-f6be-7089-4585fad729d6)
After that, you can use the certutil to generate an SST file with root certificates (on current or another computer):
certutil.exe -generateSSTFromWU c:\ps\roots.sst
Now you can import certificates into trusted ones:
Run MMC -> add snap-in -> certificates -> computer account > local computer. Right click Trusted root certification authority, All Tasks -> Import, find your SST file (in the file type select Microsoft Serialized Certificate Store — *.sst) -> Open -> Place all certificates in the following store -> Trusted Root Certification Authorities.
Updating Root Certificates on Windows XP Using the Rootsupd.exe Tool
In Windows XP, the rootsupd.exe utility was used to update the computer`s root certificates. The list of root and revoked certificates in it was regularly updated. The tool was distributed as a separate update KB931125 (Update for Root Certificates). Let’s see if we can use it now.
- Download the rootsupd.exe utility using the following link http://download.windowsupdate.com/msdownload/update/v3/static/trustedr/en/rootsupd.exe. At the moment (January 2021) the link doesn’t work, Microsoft decided to remove it from the public. Today you can download the rootsupd.exe from the Kaspersky website — http://media.kaspersky.com/utilities/CorporateUtilities/rootsupd.zip;
- To install the Windows root certificates, just run the rootsupd.exe file. But we will try to examine its contents more carefully. Extract the certificates from the executable file with the command:
rootsupd.exe /c /t: C:\PS\rootsupd
- Certificates are stored in SST files, like authroots.sst, delroot.sst, etc. To remove or install certificates, you can use the following commands:
updroots.exe authroots.sst
 updroots.exe -d delroots.sst
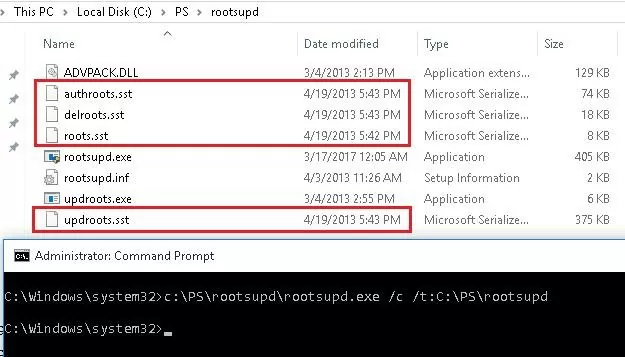
However, as you can see, these certificate files were created on April 4, 2013 (almost a year before the end of official support for Windows XP). Thus, since then the tool has not been updated and cannot be used to install up-to-date certificates.
But you can use cerutil tool in Windows 10/11 to download root.sst, copy that file in Windows XP and install the certificate using updroots.exe:
updroots.exe c:\temp\roots.sst
There is information that the updroots.exe tool is not recommended for use in modern builds of Windows 10 1803+ and Windows 11, as it can break the Microsoft root CA on a device.
In this article, we looked at several ways to update trusted root certificates on Windows network computers that are isolated from the Internet (disconnected environment).
В начале октября многие пользователи Windows 7 начали сталкиваться с проблемой, которая заключается в том, что некоторые сайты не открываются по соображениям безопасности. Ошибка касается не всех браузеров, но проявляется в большинстве.
Я расскажу, с чем это связано, а также продемонстрирую 4 способа исправить данную ошибку.
Причина появления проблем с сайтами в Windows 7
30 сентября истек срок корневого сертификата безопасности Let’s Encrypt в Windows 7, что привело к проблемам с открытием некоторых сайтов у пользователей этой ОС, а также старых версий Android и iOS. Встречается это и на компьютерах под управлением Linux, но для них пока известно только одно решение – установка приложения для подмены времени. То есть нужно поставить дату раньше 30 сентября.
Что касается мобильных операционных систем, то в этом случае ничего кроме обновления не поможет, поэтому пропустим детальное рассмотрение этого случая, а остановимся именно на Windows 7. Предлагаю начать с самых эффективных методов и закончить «Костылями».
Комьюнити теперь в Телеграм
Подпишитесь и будьте в курсе последних IT-новостей
Подписаться
Способ 1: Установка недостающих обновлений Windows 7
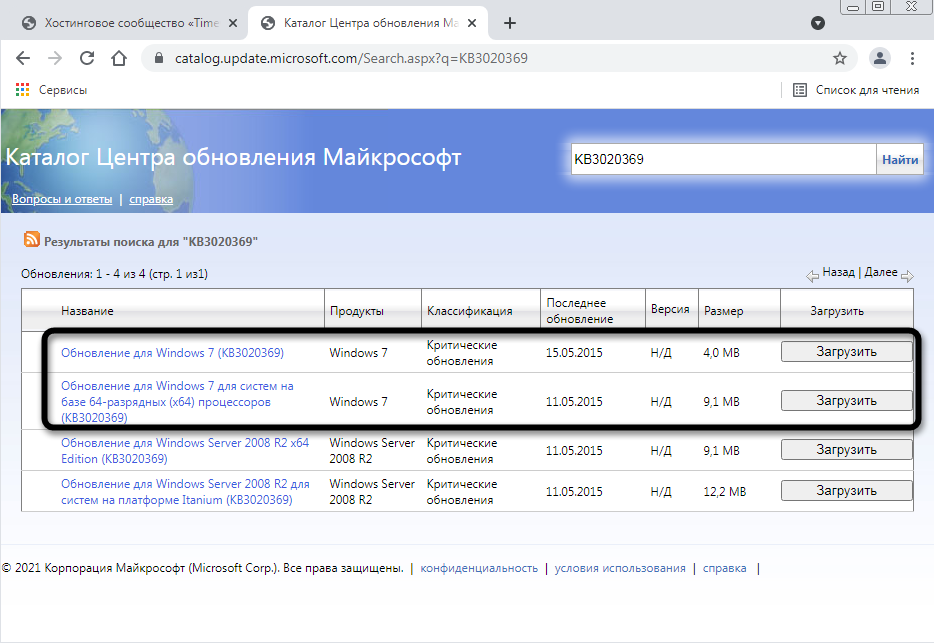
Сначала рекомендую проверить, установлены ли на компьютере обновления, связанные с этим самым сертификатом безопасности. Необходимо скачать два разных пакета, в общей сумме занимающих 500 Мб пространства. Займет это не так много времени, а осуществляется следующим образом:
-
Откройте каталог центра обновления Microsoft или просто введите в поисковике название обновления – KB3020369. Выберите версию для своей разрядности ОС и начните загрузку.

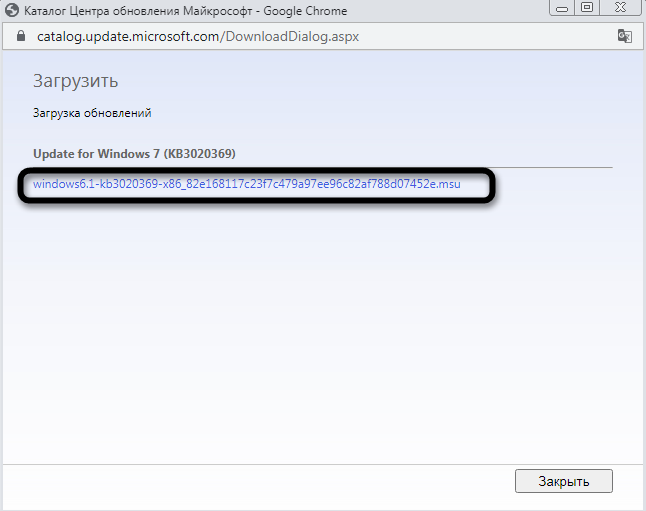
-
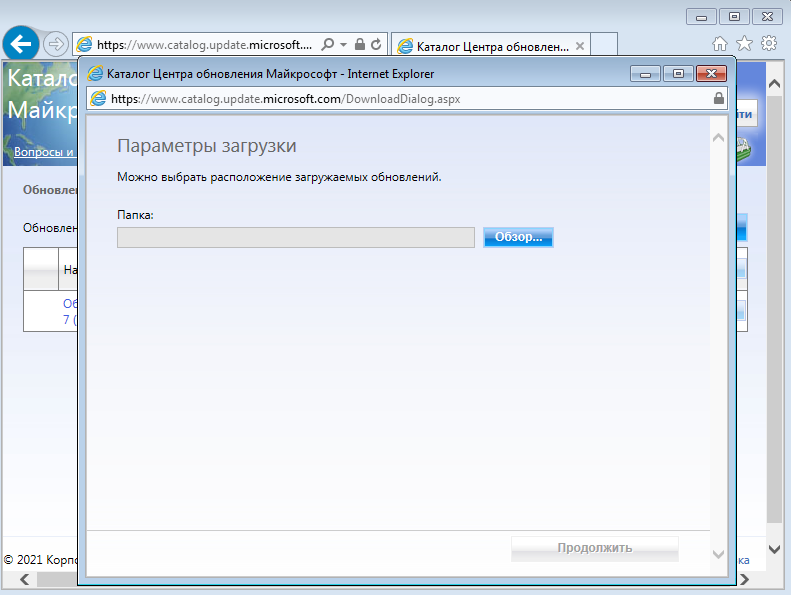
Если взаимодействие происходит с каталогом, появится новое окно, в котором нужно нажать по ссылке.
-
В некоторых браузерах содержимое отображается некорректно, поэтому предпочтительно открыть Internet Explorer и запустить загрузку оттуда.
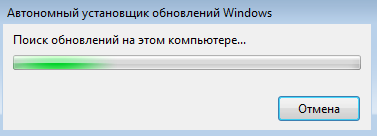
-
Откройте полученный исполняемый файл и дожидайтесь завершения поиска обновлений. Если пакет KB3020369 уже установлен, вы получите соответствующее уведомление.
-
Точно так же найдите и загрузите KB3125574, установив версию, соответствующую вашей разрядности ОС.
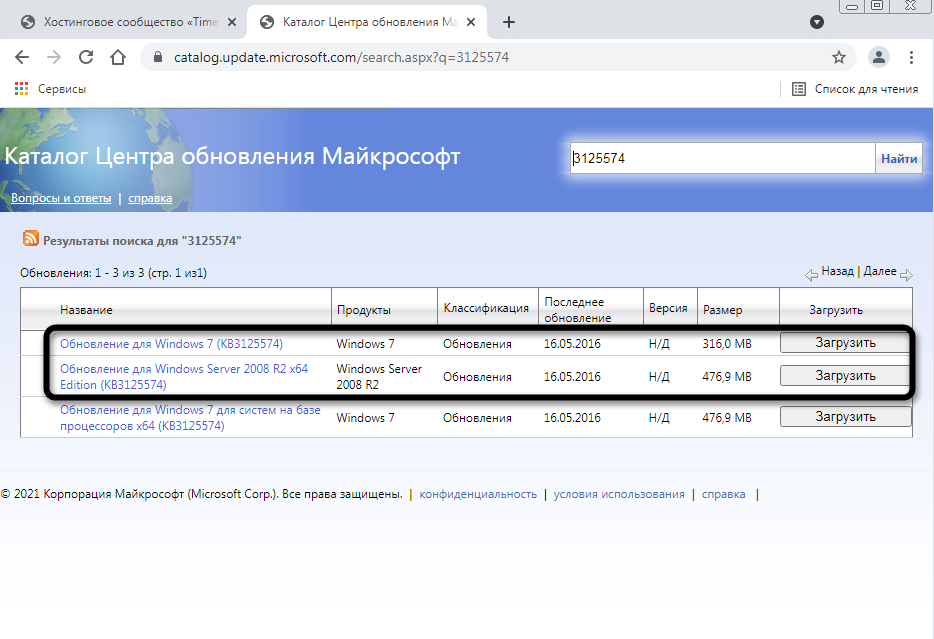
Уточню, что не на всех компьютерах работает скачивание с каталога обновлений Microsoft, поэтому я не оставляю конкретных ссылок. Вы можете ввести название обновления в браузере или на сайте разработчика, чтобы открыть официальную страницу для загрузки пакета. В этом нет ничего сложного, главное – не использовать подозрительные сайты.
По завершении установки достаточно перезагрузить компьютер и проверить работоспособность ранее недоступных сайтов. На этот раз все должно открыться корректно.
Способ 2: Ручная установка корневого сертификата
Иногда проблема с открытием сайтов возникает и на компьютерах, где уже установлены упомянутые обновления. В таком случае понадобится вручную установить корневой сертификат. Если ранее вы не сталкивались с подобным действием, процесс может показаться сложным, но вам достаточно ознакомиться со следующей инструкцией, чтобы быстро справиться с поставленной задачей.
-
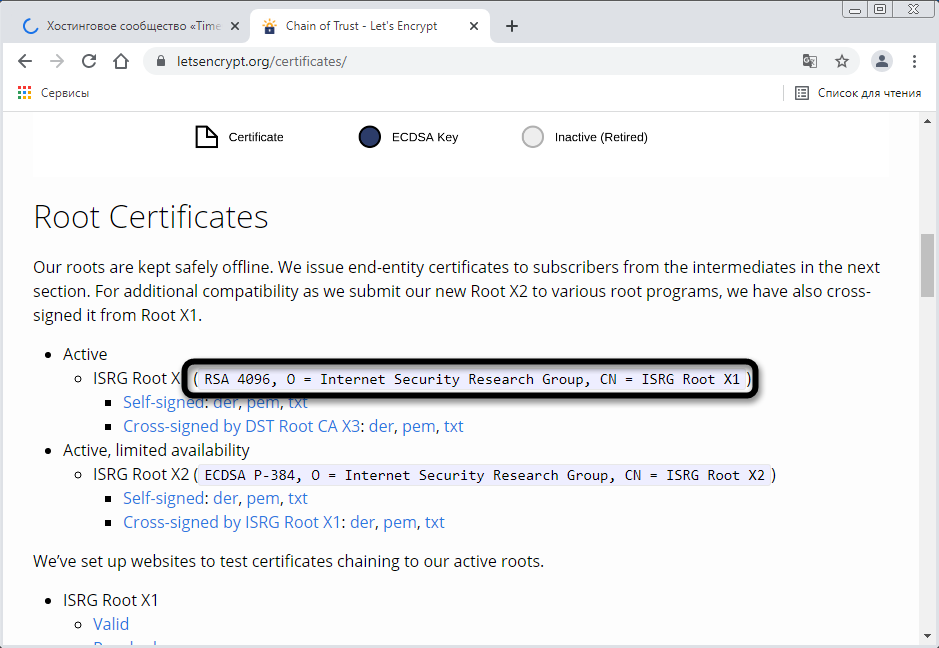
Откройте страницу https://letsencrypt.org/certificates/ и отыщите сертификат SRG Root X1 (RSA 4096, O = Internet Security Research Group, CN = ISRG Root X1). Используйте поиск по странице (Ctrl + F), вставив название в поле, чтобы быстрее отыскать необходимую строку.
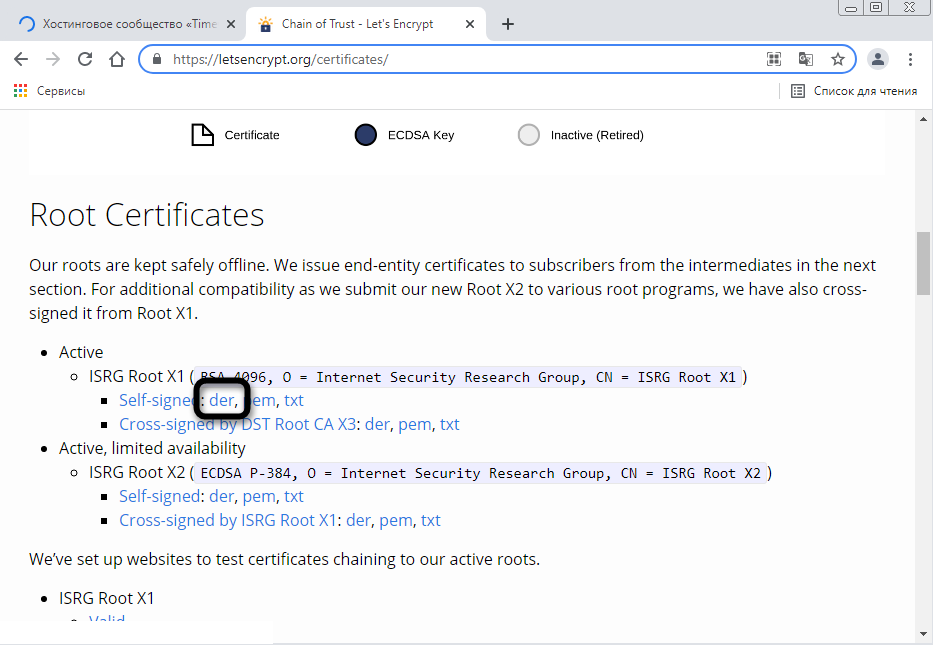
-
Выберите формат DER и нажмите по ссылке для начала загрузки.
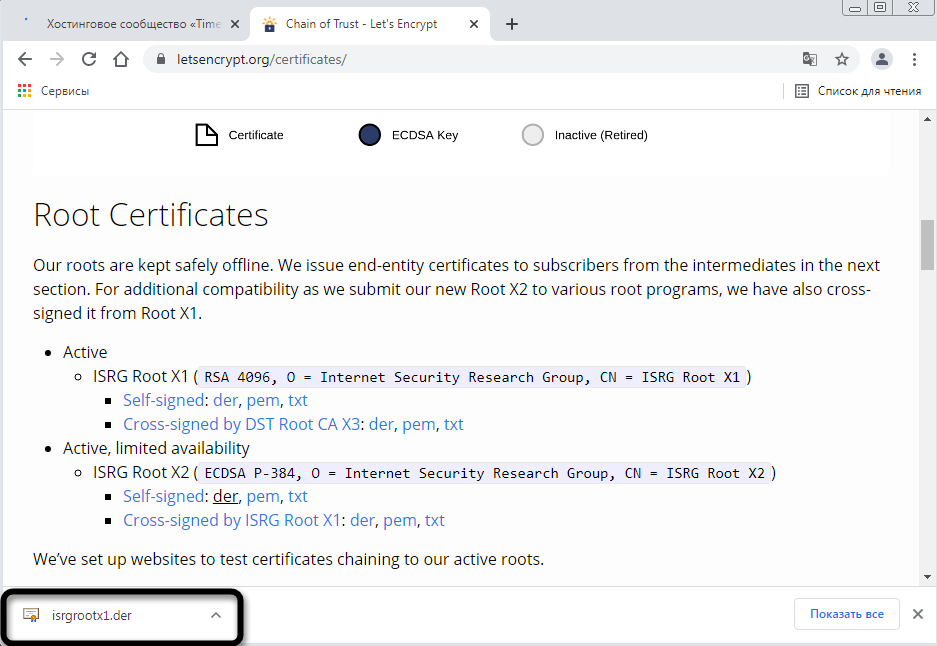
-
Ожидайте окончания скачивания сертификата и переходите к следующему шагу. Не забудьте, в какую именно папку вы его загрузили.
-
Откройте утилиту «Выполнить», используя сочетание клавиш Win + R, введите там mmc и нажмите Enter для перехода к оснастке.
-
В новом окне вызовите меню «Файл» и щелкните по строке «Добавить или удалить оснастку».
-
Выделите строку «Сертификаты» и нажмите «Добавить» для ее переноса на панель справа.
-
В появившемся меню оставьте значение по умолчанию и кликните по «Готово».
-
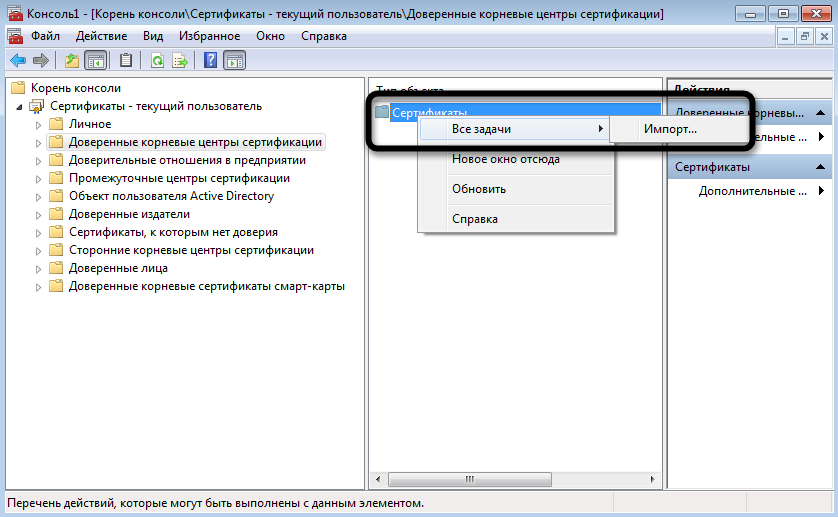
Выйдите из предыдущего окна, чтобы снова оказаться в корне консоли. Разверните «Сертификаты» и выберите папку «Доверенные корневые центры сертификации».
-
На панели справа щелкните ПКМ по папке «Сертификаты», наведите курсор на «Все задачи» и выберите пункт «Импорт».
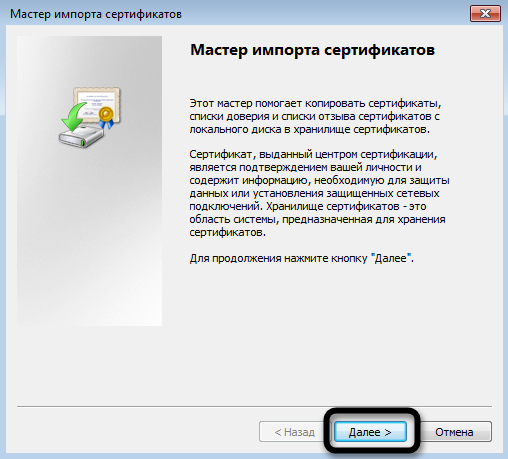
-
Отобразится окно Мастера импорта, в котором сразу переходите к следующему шагу.
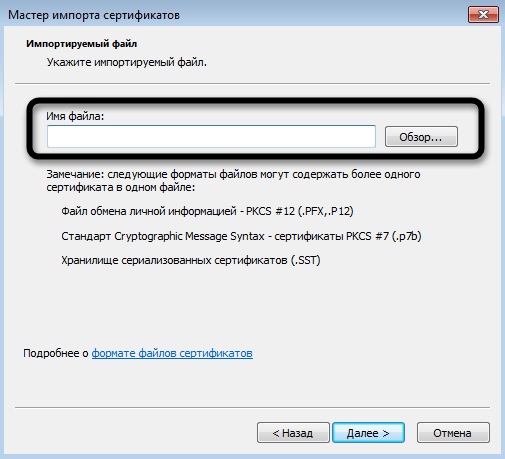
-
Напротив поля «Имя файла» нажмите «Обзор».
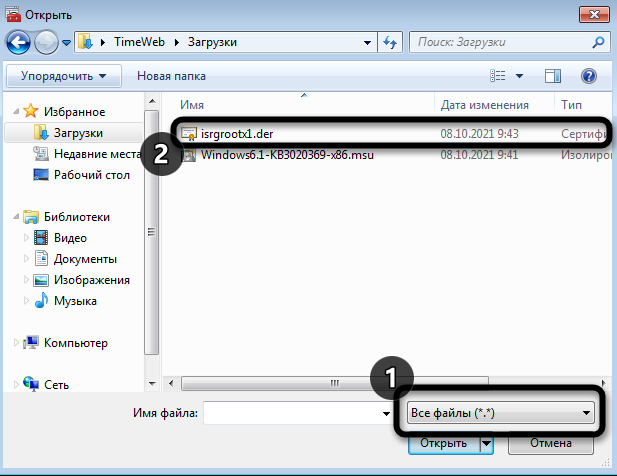
-
Отыщите тот самый файл Let’s encrypt, выбрав фильтр «Все файлы». Дважды щелкните по нему левой кнопкой мыши.
-
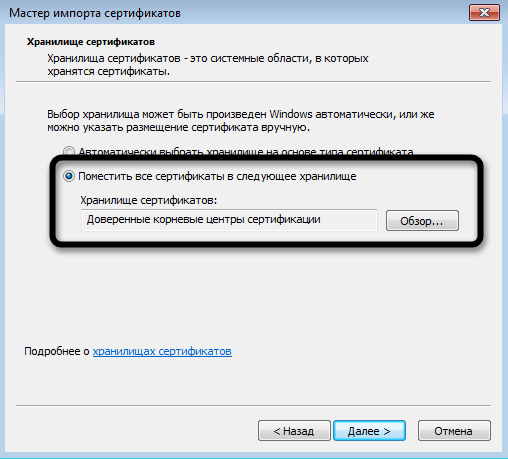
Отметьте маркером пункт «Поместить все сертификаты в следующее хранилище» и нажмите «Обзор».
-
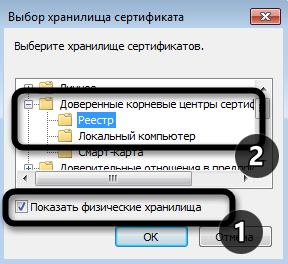
Активируйте отображение физических хранилищ, разверните папку с доверенными центрами сертификации и укажите каталог «Локальный компьютер», если хотите установить сертификат для всех пользователей. Для текущей учетной записи выберите «Реестр».
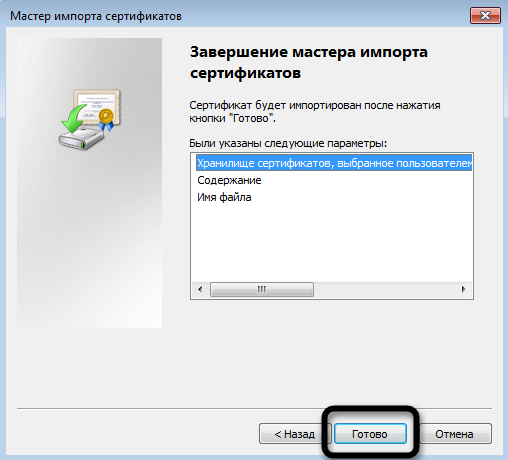
-
Остается только нажать «Готово», завершив процесс импорта.
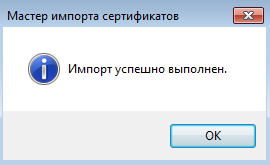
-
Вы будете уведомлены о его успешном завершении. Перезагрузите компьютер и откройте ранее недоступные сайты.

Способ 3: Переход на Mozilla Firefox
Пользователи заметили, что проблема с истечением срока корневых сертификатов безопасности не относится к браузеру Mozilla Firefox, и все сайты открываются корректно. Если вы не хотите устанавливать файлы самостоятельно или два описанных выше метода не принесли должного результата, скачайте этот веб-обозреватель, перенесите свои настройки и используйте его на постоянной основе или только в некоторых случаях.
Способ 4: Установка фейкового времени
В начале этой статьи я уже говорил о том, что подмена времени работает в Linux. В Windows 7 вы можете провернуть ту же операцию, переведя дату на 29 сентября или еще раньше. Используйте встроенные настройки или скачайте специальный софт, чтобы осуществить задуманное. Расписывать детально этот метод я не буду, поскольку он является своего рода «костылем» и подходит далеко не всем юзерам.

Хотя бы один из перечисленных методов должен помочь вам исправить ситуацию с открытием сайтов. В идеале – как можно быстрее обновиться на более новую версию Windows, поскольку со временем похожих проблем будет больше. Если же у вас нет такой возможности, остается лишь решать проблемы по мере их появления.
Use IIS 10 to create a CSR and install your new SSL certificate on your Windows server 2016
If you are looking for a simpler way to renew your SSL Certificates, see Microsoft IIS 10: Renew Your Expiring SSL Certificate (DigiCert Certificate Utility).
These instructions explain how to use IIS 10 to create your CSR, use your DigiCert account to renew your SSL certificate, and then use IIS 10 to install your certificate and to configure your Windows Server 2016 to use the new certificate.
Process for Renewing Your SSL Certificate:
-
Use IIS 10 to create your CSR.
How to Create Your CSR with IIS 10
-
Renew your SSL certificate from your DigiCert account.
How to Renew Your SSL Certificate
-
Use IIS 10 to install your new SSL certificate on your Windows server 2016 and then configure the server to use it.
How to Use IIS 10 to Install and Assign your New SSL Certificate
I. How to Create Your CSR with IIS 10
Best practices are to generate a new certificate signing request (CSR) when renewing your SSL certificate.
-
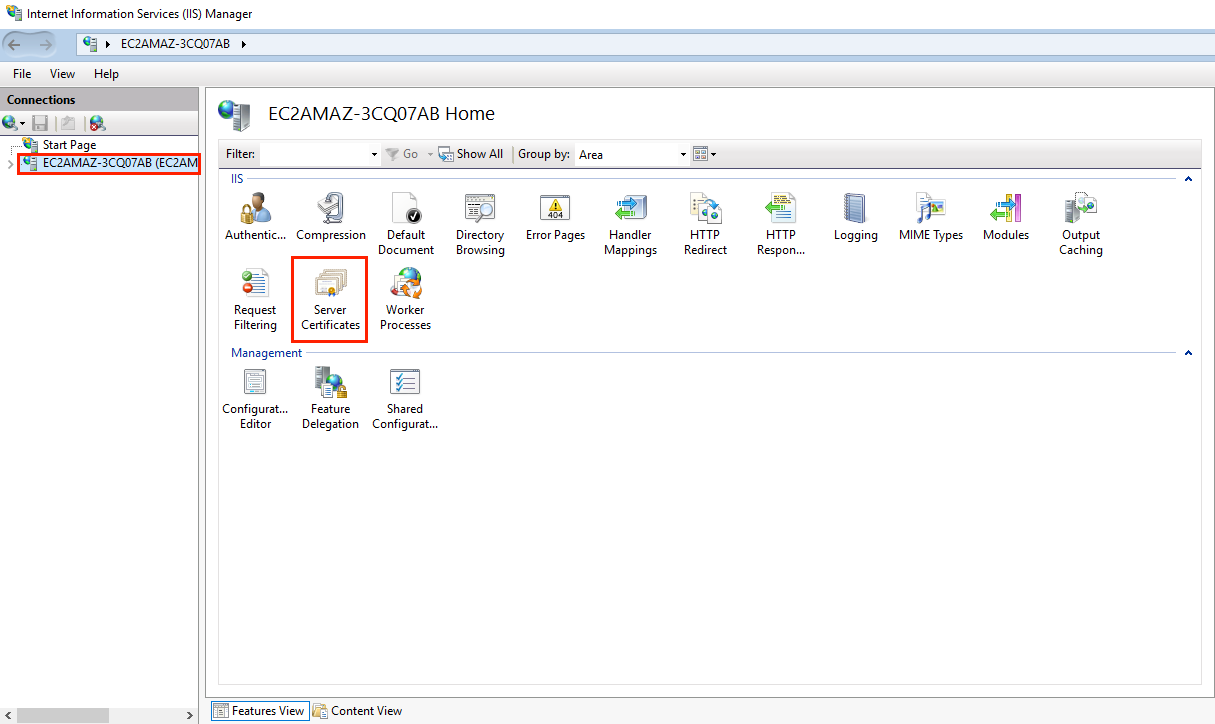
On the Windows server 2016 with the expiring certificate, open Internet Information Services (IIS) Manager.
In the Windows start menu, type Internet Information Services (IIS) Manager and open it.
-
In Internet Information Services (IIS) Manager, in the Connections menu tree (left pane), locate and click the server name.
-
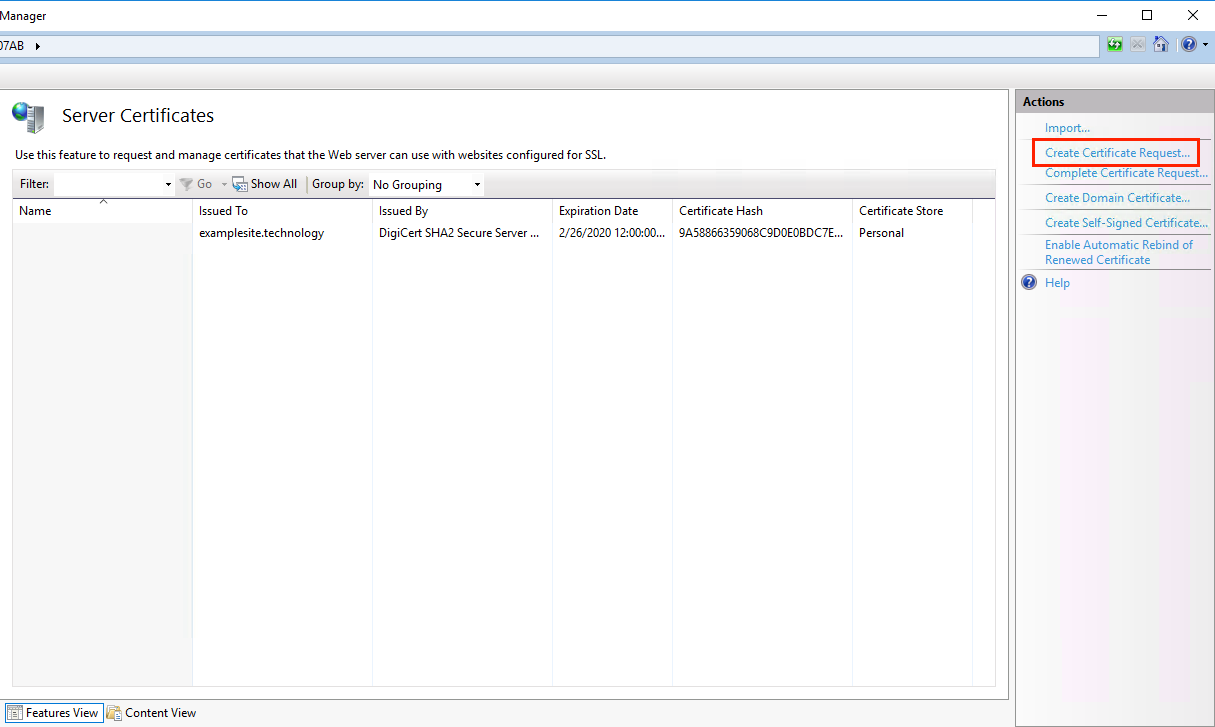
On the server name Home page (center pane), in the IIS section, double-click Server Certificates.
-
On the Server Certificates page (center pane), in the Actions menu (right pane), click the Create Certificate Request… link.
-
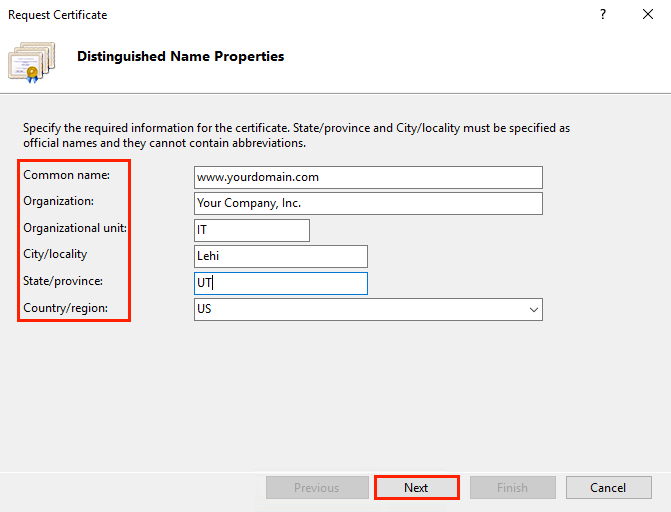
In the Request Certificate wizard, on the Distinguished Name Properties page, provide the information specified below and then click Next:
Common name: Type the fully-qualified domain name (FQDN) (e.g., www.example.com). Organization: Type your company’s legally registered name (e.g., YourCompany, Inc.). Organizational unit: The name of your department within the organization. Frequently this entry will be listed as IT, Web Security, or is simply left blank. City/locality: Type the city where your company is legally located. State/province: Type the state/province where your company is legally located. Country: In the drop-down list, select the country where your company is legally located.
-
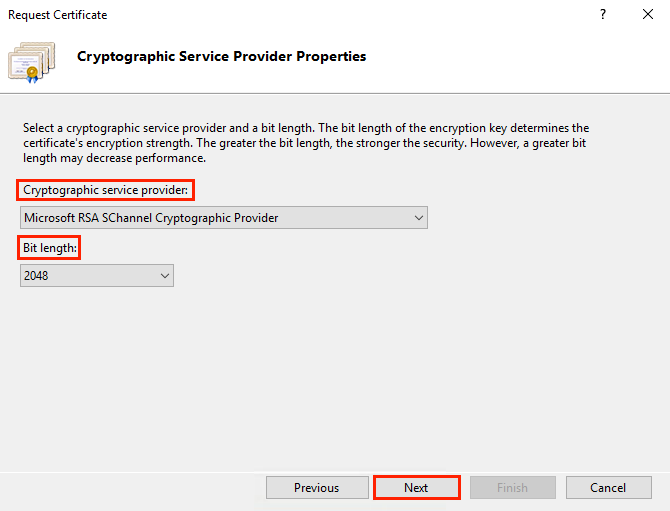
On the Cryptographic Service Provider Properties page, provide the information below and then click Next.
Cryptographic In the drop-down list, select Microsoft RSA SChannel Cryptographic Provider, service provider: unless you have a specific cryptographic provider. Bit length: In the drop-down list select 2048, unless you have a specific reason for opting for larger bit length.
-
On the File Name page, under Specify a file name for the certificate request, click the … box to browse to a location where you want to save your CSR.
Note: Remember the filename that you choose and the location to which you save your csr.txt file. If you just enter a filename without browsing to a location, your CSR will end up in C:\Windows\System32.
-
When you are done, click Finish.

II. How to Renew Your SSL Certificate
Renew your SSL certificate from inside your DigiCert CertCentral account.
Are you new to the DigiCert team? You can «replace» your certificate with a DigiCert certificate. Order your new certificate here — Purchase Your DigiCert Certificate.
-
Log into your CertCentral account.
-
In CertCentral, in the left main menu, click Certificates > Expiring Certificates.
-
On the Expiring Certificates page, next to the certificate you want to renew, click Renew Now.
A certificate doesn’t appear on the Expiring Certificates page until 90 days before it expires.
-
Follow the instructions provided inside your account to renew your SSL certificate.
-
Add your CSR
When renewing the certificate, you’ll need to include a CSR. On the «Renewal» page, under Certificate Settings, upload the CSR file you saved to the server.
You can also use a text editor (such as Notepad) to open the file. Then, copy the text, including the ——BEGIN NEW CERTIFICATE REQUEST—— and ——END NEW CERTIFICATE REQUEST—— tags, and paste it in the Add Your CSR box.
-
After you place the order to renew your certificate, DigiCert verifies your information.
-
If we need any additional information, we will promptly contact you by phone or email. If no additional information is required, we will most likely issue your certificate within an hour.
III. How to Use IIS 10 to Install and Assign your New SSL Certificate
-
On the Windows server 2016 where you created the CSR, save the SSL certificate .cer file (e.g., your_domain_com.cer).
-
Open Internet Information Services (IIS) Manager.
In the Windows start menu, type Internet Information Services (IIS) Manager and open it.
-
In Internet Information Services (IIS) Manager, in the Connections menu tree (left pane), locate and click the server name.
-
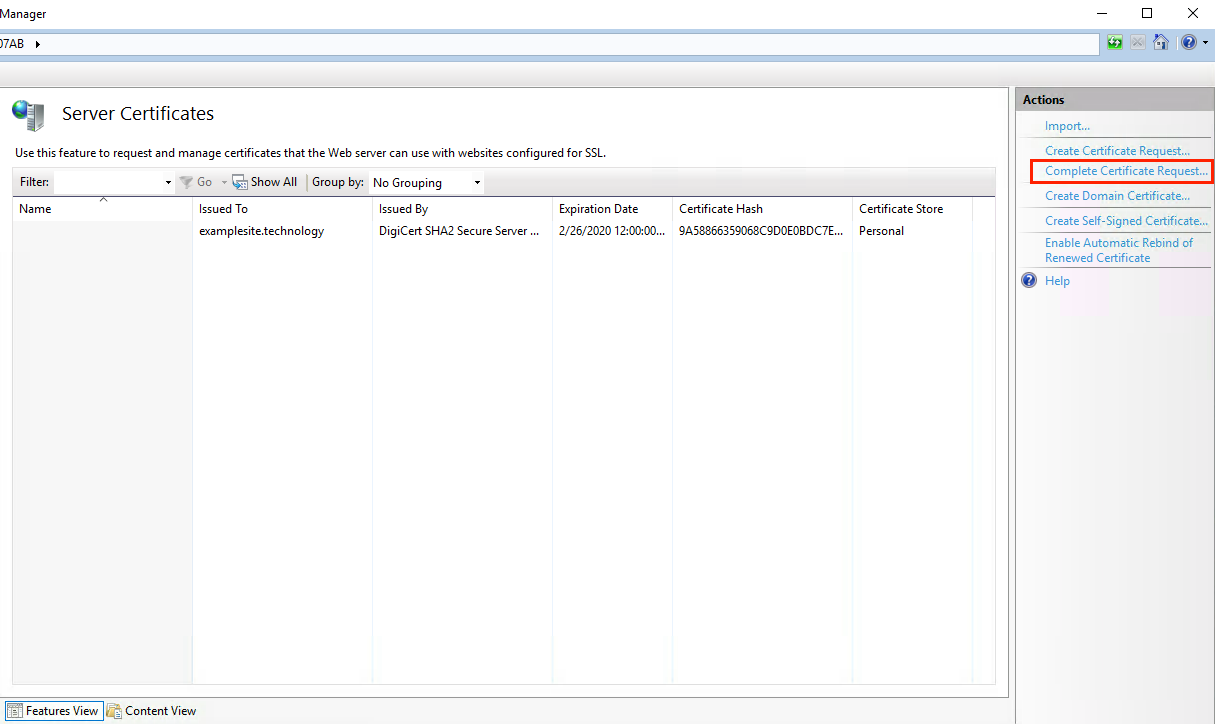
On the server name Home page (center pane), in the IISsection, double-click Server Certificates.
-
On the Server Certificates page (center pane), in the Actions menu (right pane), click the Complete Certificate Request… link.
-
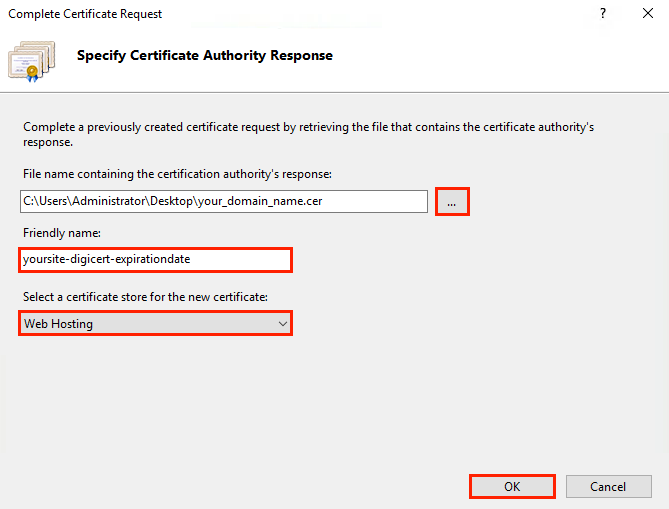
In the Complete Certificate Request wizard, on the Specify Certificate Authority Responsef page, do the following and then click OK:
File name containing the Click the … box and browse to and select the .cer file (e.g., your_domain_com.cer) that DigiCert sent to you. certificate authority’s response: Friendly name: Type a friendly name for the certificate. The friendly name is not part of the certificate; instead, it is used to identify the certificate. We recommend that you add DigiCert and the expiration date to the end of your friendly name, for example: yoursite-digicert-(expiration date). This information helps identify the issuer and expiration date for each certificate. It also helps distinguish multiple certificates with the same domain name. Select a certificate store In the drop-down list, select Web Hosting. for the new certificate:
-
Now that you’ve successfully installed your SSL certificate, you need to assign the certificate to the appropriate site.
-
Assign the SSL Certificate
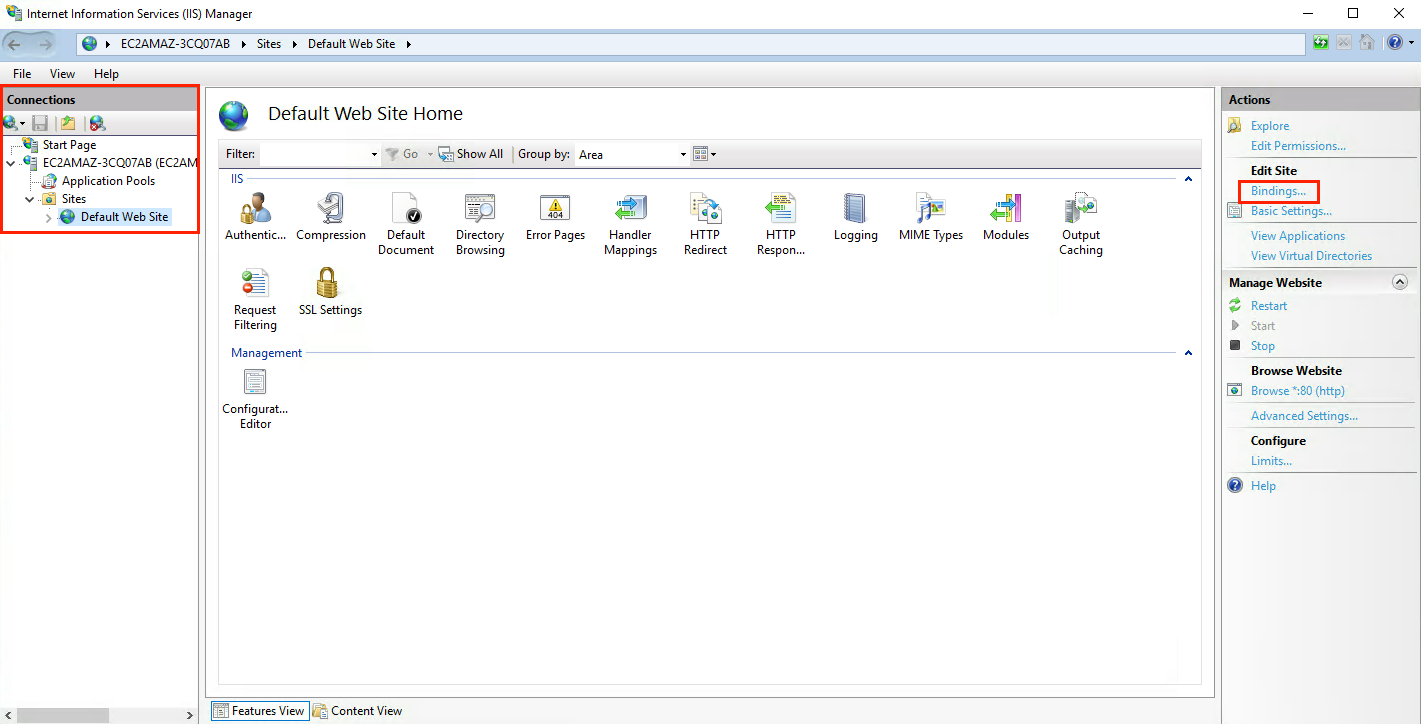
In Internet Information Services (IIS) Manager, in the Connections menu tree (left pane), expand the name of the server on which the certificate was installed. Then expand Sites and click the site you want to use the SSL certificate to secure.
-
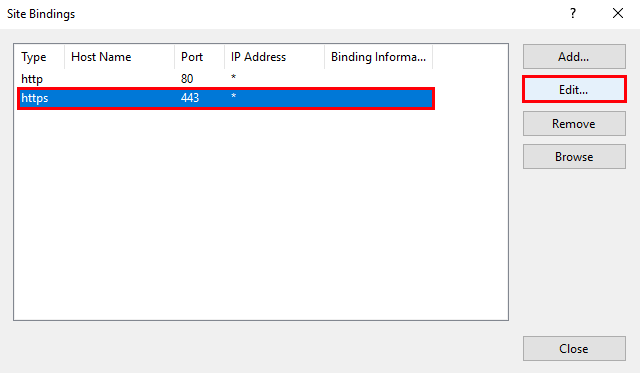
On the website Home page, in the Actions menu (right pane), under Edit Site, click the Bindings… link.
-
In the Site Bindings window, select binding for https and then click Edit.
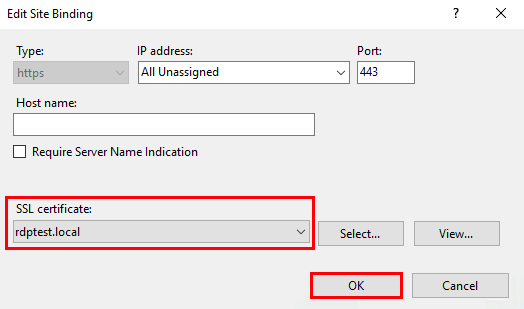
-
In the Edit Site Binding window, in the SSL certificate drop-down list, select your newly installed SSL Certificate by its friendly name and then, click OK.
-
Your new SSL Certificate is now installed to the website.
Install Your SSL Certificate
Test Your Installation
If your website is publicly accessible, you can use our DigiCert® SSL Installation Diagnostics Tool to verify that the installation is correct. On the DigiCert®SSL Installation Diagnostics Tool page, enter the DNS name of the site (e.g., www.yourdomain.com) that you are securing to test your SSL certificate.
Troubleshooting
After you’ve installed the certificate on to the Windows server, if you run into certificate errors, try repairing your certificate trust errors using DigiCert® Certificate Utility for Windows. If this does not fix the errors, contact support.
SSL Support
- PFX Export/Import Cert
- Renew DigiCert Certificates
- Code Signing Certificates
- Sign JAR files with keytool
- Windows x64 Driver Signing