| Page Navigation | Article Content |
|---|---|
| Is BIOS Update Necessary? | Then when should you update the BIOS…Full steps |
| How to Update Your Computer’s BIOS | Follow the steps to update BIOS…Full steps |
| Is it Safe to Update BIOS? | It is safe to update BIOS but you should also make backups…Full steps |
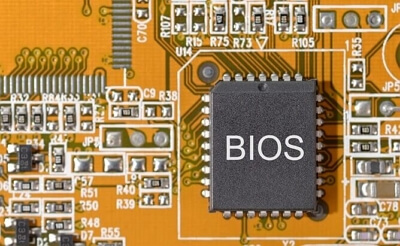
What is BIOS? If you have changed your computer’s boot order, you might think this jargon is familiar. BIOS is short for Basic Input Output System, it is pre-installed on your computer’s motherboard, and is the first piece of software that is loaded when your computer starts up.
Is BIOS Update Necessary?
For most individual users, there is no need to update the BIOS in most cases because you can barely feel anything after the update, and improper updates would cause additional problems. Then when should you update the BIOS? Basically, if you meet one of the following three situations, you will need to update the BIOS.
-
Security Update
Most of the BIOS updates are related to security updates. By updating the BIOS, you can not only meltdown security breaches but also protect your privacy from leaking. After all, your data and information are precious.
-
Bug Fixing
Some bugs on the motherboard need to be fixed regularly. Some CPU bugs may require microcode updates. And some chipset bugs may also require an update.
-
Adding Function
The motherboard needs to support higher frequency DIMMs or support CPU refresh.
How to Update Your Computer’s BIOS
There are mainly two ways to update BIOS. One is obtained before the OS boots from the BIOS interface. The other is using the BIOS flash utility provided by the motherboard manufacturer. In recent days, after the continuous efforts of motherboard manufacturers, the steps of updating the BIOS have been greatly simplified. Even the novice of the novice can easily do it. Let’s take a look!
Preparation:
Check your BIOS version and the model of your motherboard on the manufacturer’s website. Make sure there is an available BIOS update in the download center.
Step 1. Download the BIOS update file to an empty USB flash drive. The file system of the USB you prepare should be FAT32.
*How to Check and Format USB to FAT32
Step 2. Connect the USB drive to your computer. Reboot the computer, and press F2/F10/F12/DEL to enter BIOS.
Step 3. Here you could see the BIOS page, choose the BIOS update option. You should know that different motherboards would have different BIOS options. Here we take two motherboards as examples to show you how to update.
- ASUS: Select Tool > ASUS EZ Flash Utility > press the Enter button > select via Storage Device > find the download update file > press Enter again and start the update.
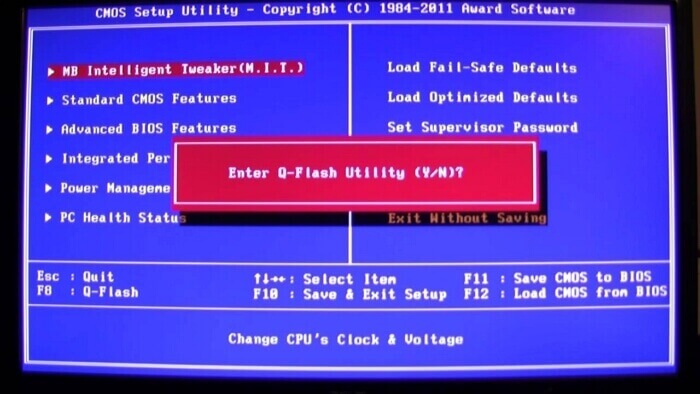
- Gigabyte: Select Q-Flash, the update BIOS option is Q-Flash. Go to Update BIOS from Drive > Flash Disk, select the USB drive you have connected. Then follow the on-screen wizard to finish the updating process.
Notice: During the updating process, do not interrupt the process, either by powering off or pressing the reset button.
Is it Safe to Update BIOS?
To be honest, you shouldn’t update BIOS that often. Because for individual users, it is not necessary to do so, and it will not affect the normal use of the computer if it is not updated. To answer the question, it is safe to update the BIOS on the premise that the update file has been downloaded correctly and the steps to update the BIOS have been followed correctly.
However, taking precautions is a wise choice. No matter you want to update BIOS, upgrade the system, or just want to make a safe copy of important files, making a backup is always the best choice. The «backup» we mentioned here is not only the file backup but also means a system backup.
All in all, there are plenty of ways to backup files, like sync to cloud drive, copy the content to an online document, but there is no good way to back up the system.
Making a system backup protects your C drive and the boot partition. In other words, it protects all the program files, configuration files, and App data of your computer. And all you need to prepare is a large enough external drive and the free software — EaseUS Todo Backup.
Download the software from the button below, and see how to backup and protect your system with it.
Step 1. Launch EaseUS Todo Backup and choose «Create Backup» on the home page, click «Select backup contents«.
Step 2. Among the four available categories, click «OS» to start back up.
Step 3. The system partition will be automatically selected, you only need to select the location.
Step 4. Local Drive, Cloud, and NAS are available for you to save the backup file. You can also connect an external hard drive to preserve the system backup files.
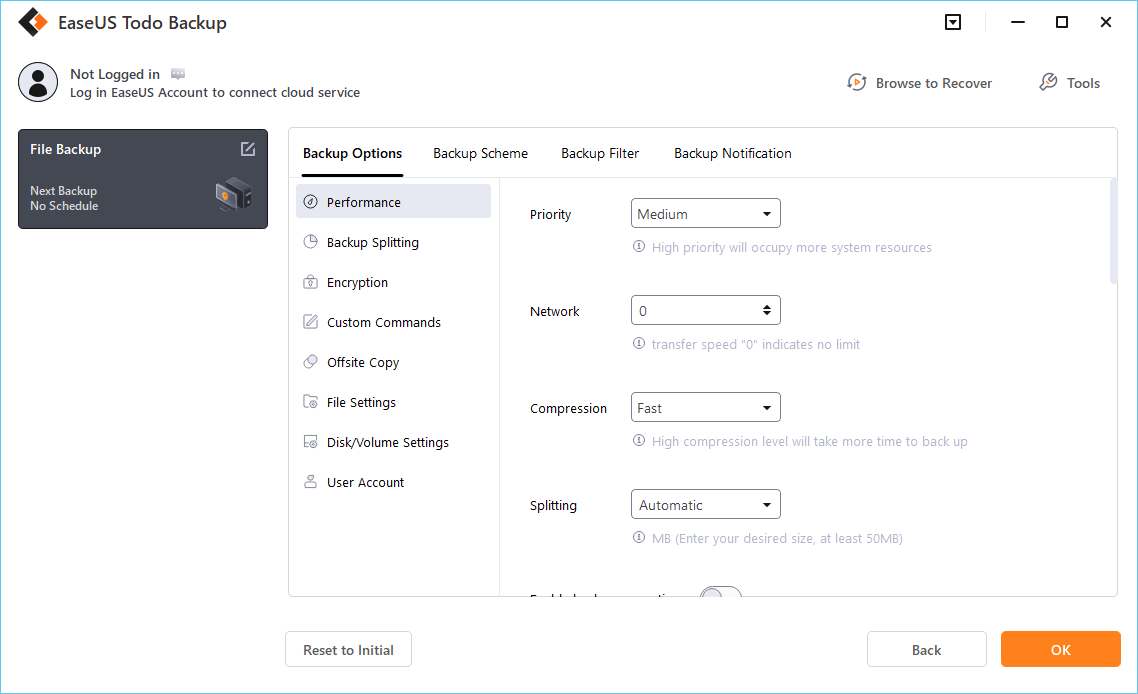
Step 5. You can customize the settings in «Options» at the left bottom. After that, click «Backup Now«, and the process will begin.
*After finishing the backup process, you can check the backup status, recover, open, or delete the backup by right-clicking the backup task on the left.
На чтение 8 мин. Просмотров 18k. Опубликовано
BIOS является важным компонентом каждого ПК, который позволяет вам изменять настройки оборудования без запуска Windows. В вашем BIOS доступно много функций, но некоторые продвинутые пользователи, как правило, обновляют свои, чтобы получить доступ к новым функциям.
Обновление BIOS может быть довольно сложной процедурой, поэтому сегодня мы собираемся показать вам, как прошить BIOS в Windows 10.
Содержание
- Нужно ли обновлять BIOS?
- Шаги для прошивки BIOS в Windows 10:
- Решение 1 – Обновление из BIOS
- Решение 2 – Создайте DOS USB-накопитель
- Решение 3 – Используйте программы для Windows
Нужно ли обновлять BIOS?
Перепрограммирование BIOS – это сложная процедура, и если вы ее не выполните должным образом, вы можете нанести серьезный ущерб вашему ПК. В большинстве случаев вам даже не нужно обновлять BIOS, если нет серьезных проблем с вашим оборудованием.
Основная проблема с BIOS заключается в том, что он расположен на микросхеме на материнской плате, и если процесс обновления идет не так, вы вообще не сможете запустить Windows.
Если вы не являетесь опытным пользователем, вам не нужно обновлять BIOS, но если у вас проблема с оборудованием, и единственный способ ее исправить – обновить BIOS, возможно, вам придется обновить его.
Чтобы успешно выполнить обновление BIOS, необходимо убедиться, что процесс обновления не прерывается из-за потери питания или неожиданного выключения. Если это произойдет, процесс обновления BIOS завершится неудачно, и вы, скорее всего, повредите материнскую плату.
Чтобы избежать каких-либо проблем, обязательно подключите ноутбук напрямую к электрической розетке или используйте ИБП для настольного ПК.
Хотя обновление BIOS может быть потенциально опасным, после обновления BIOS есть определенные преимущества. Иногда обновление BIOS обеспечивает поддержку нового оборудования, например, поддержку новых процессоров.
Еще одним преимуществом обновления BIOS является улучшенная стабильность и потенциально новые функции, такие как разгон. Как видите, нет необходимости постоянно обновлять BIOS, особенно потому, что неправильное обновление BIOS может привести к множеству других проблем.
Рекомендуется обновить BIOS, если у вас есть какие-либо проблемы с оборудованием, которые могут быть связаны с вашим BIOS. Существует несколько различных способов обновления BIOS, и сегодня мы собираемся показать вам, как это сделать.
- ЧИТАЙТЕ ТАКЖЕ . Исправлено: повреждение BIOS в Windows 10 .
Как обновить BIOS в Windows 10? Самый простой способ обновить BIOS – прямо из его настроек. Прежде чем начать процесс, проверьте версию BIOS и модель вашей материнской платы. Еще один способ обновить его – создать USB-диск для DOS или использовать программу для Windows.
Если вы хотите знать, как это сделать, проверьте шаги ниже.
Шаги для прошивки BIOS в Windows 10:
- Обновление из BIOS
- Создайте DOS USB-накопитель
- Используйте программы для Windows
Прежде чем обновить BIOS, вам необходимо выяснить, какую версию вы используете в данный момент. Самый простой способ сделать это – использовать командную строку или системную информацию.
Мы уже писали о нескольких различных методах, которые можно использовать для проверки версии BIOS в Windows 10, поэтому обязательно ознакомьтесь с этой статьей.
Помимо версии BIOS, вам также необходимо знать модель вашей материнской платы. Вы можете увидеть модель вашей материнской платы с помощью любого аппаратного информационного инструмента, такого как Speccy или CPU-Z.
После нахождения версии BIOS, которую вы используете, вам необходимо загрузить новую версию с веб-сайта производителя вашей материнской платы. Перейдите в раздел поддержки или загрузки и выберите модель своей материнской платы.
Обязательно загрузите обновление BIOS для точной модели материнской платы, которую вы используете. Установка неправильной версии BIOS на материнскую плату может привести к ее повреждению, поэтому будьте особенно осторожны при загрузке новой версии BIOS.
Практически во всех версиях BIOS имеются заметки об обновлениях, доступные на странице загрузки, чтобы вы могли легко увидеть, какие проблемы устраняет обновление.
Когда вы загрузите новую версию BIOS, она будет сохранена в архиве, поэтому вам нужно будет сначала извлечь ее. После этого проверьте доступный файл readme для инструкций и любой дополнительной информации.
Есть несколько способов обновить BIOS, и мы кратко рассмотрим их.
Решение 1 – Обновление из BIOS
Некоторые производители материнских плат позволяют вам перепрограммировать BIOS, просто открыв его и выбрав вариант обновления. Это относительно просто, и для этого вам нужно перенести загруженное обновление BIOS на USB-накопитель.
Перед перемещением обновления на USB-накопитель убедитесь, что на диске нет других доступных файлов. Теперь вам нужно подключить USB-накопитель к вашему ПК и получить доступ к BIOS.
Вы можете получить доступ к BIOS во время загрузки, нажав соответствующую клавишу. В большинстве случаев это Del или какая-либо другая клавиша F, поэтому следите за сообщением, в котором вам нужно нажать определенную клавишу для входа в SETUP.
Кроме того, вы всегда можете проверить руководство своей материнской платы, чтобы увидеть, какую клавишу нужно нажать, чтобы получить доступ к BIOS.
Если это не работает, вы можете получить доступ к BIOS, выполнив следующие действия:
- Когда Windows 10 запустится, откройте меню «Пуск» и нажмите кнопку Питание .
- Удерживая клавишу Shift , выберите вариант Перезагрузить .
-
Вы должны увидеть несколько доступных вариантов. Выберите Устранение неполадок .
-
Теперь выберите Дополнительные параметры> Настройки прошивки UEFI .
- Нажмите кнопку Перезагрузить , и ваш компьютер должен загрузиться в BIOS.
После входа в BIOS найдите параметр обновления BIOS и выберите его. Теперь вам нужно выбрать файл обновления BIOS с USB-накопителя и дождаться обновления BIOS.
Некоторые производители предлагают инструменты для создания флэш-накопителя USB со всеми необходимыми файлами, поэтому вам не придется переносить их вручную.
Имейте в виду, что процесс обновления немного отличается для каждой модели материнской платы, поэтому обязательно ознакомьтесь с инструкцией по эксплуатации, чтобы узнать, как обновить BIOS.
- Читайте также: EVGA выпускает обновления BIOS для устранения проблем с перегревом на многих картах GeForce GTX
Решение 2 – Создайте DOS USB-накопитель
Это более старый метод перепрошивки BIOS и, вероятно, самый сложный. Этот процесс требует, чтобы вы создали загрузочную флешку и скопировали на нее новую версию BIOS.
Кроме того, вам понадобится скрипт, который будет прошивать BIOS. Этот файл обычно будет доступен в архиве с вашим обновлением BIOS и будет иметь расширение .exe или .bat. В некоторых случаях этот скрипт должен быть загружен отдельно.
Чтобы создать загрузочный USB-накопитель с системой DOS, вам нужно использовать сторонние инструменты, такие как Rufus. Просто отформатируйте диск с помощью этого инструмента и обязательно установите флажок Создать загрузочный диск с помощью FreeDOS .
После этого перенесите файл обновления BIOS и сценарий установки на USB-накопитель и перезагрузите компьютер. Загрузите компьютер с USB-накопителя и запустите сценарий установки с помощью DOS.
Это сложная процедура, поэтому мы настоятельно рекомендуем вам ознакомиться с руководством по материнской плате для получения подробных инструкций о том, как это сделать.
- ЧИТАЙТЕ ТАКЖЕ. Как исправить: «Не удается обновить систему до Windows 10 из-за BIOS»
Решение 3 – Используйте программы для Windows
Если использование DOS кажется вам слишком сложным, вы можете рассмотреть возможность использования приложения для Windows.
Многие производители материнских плат имеют в своем распоряжении приложения для обновления BIOS, которые позволяют обновлять BIOS с помощью простого графического интерфейса.
Хотя это самый простой способ сделать это, есть определенные проблемы с ним. Установленное программное обеспечение может иногда мешать этому процессу и приводить к сбою обновления BIOS.
Программы безопасности часто могут мешать процессу обновления BIOS и приводить к появлению всевозможных проблем, поэтому лучше всего полностью отключить их во время обновления BIOS.
Любой сбой или зависание системы также может повлиять на процесс обновления, поэтому может быть лучше использовать другой метод для обновления BIOS.
Производители материнских плат часто рекомендуют лучший способ обновления BIOS, поэтому обязательно используйте этот метод.
Обновление BIOS не является сложным процессом, но может быть потенциально опасным, поэтому будьте осторожны, если решите обновить BIOS.
Кроме того, обязательно проверьте все перед запуском. Многие инструменты обновления BIOS дают вам возможность сохранить или сохранить резервную копию вашего текущего BIOS, поэтому обязательно используйте эту функцию.
Необязательно обновлять BIOS, тем более что вы можете нанести непоправимый ущерб вашей материнской плате, если вы не сделаете это должным образом.
Однако, если у вас возникла аппаратная проблема, и единственным решением является обновление BIOS, обязательно внимательно прочитайте инструкцию по эксплуатации материнской платы, чтобы узнать, как правильно обновить BIOS.
Некоторые производители компьютеров, такие как Asus, Lenovo или Dell, предлагают встроенный инструмент для обновления BIOS. Вы всегда можете проверить руководство вашего ПК, чтобы увидеть, предлагает ли он такой инструмент, чтобы сделать вещи немного проще.
- ЧИТАЙТЕ ТАКЖЕ: ПК не загружается после обновления BIOS? Вот как это исправить
Если у вас есть какие-либо вопросы или проблемы с процессом обновления BIOS, не стесняйтесь оставлять их в разделе комментариев ниже.
This tutorial focuses on how to update computer’s BIOS in Windows 10 ASUS, HP, Dell, Lenovo, Acer, and other PCs. It also tells how to check BIOS version.If you meet problem when updating BIOS, MiniTool Power Data Recovery can help you recover data from PC even if the PC can’t boot. MiniTool also offers MiniTool ShadowMaker to help you backup system & data before conducting a BIOS update.
- How to update BIOS in my Windows 10 ASUS computer?
- Should you update your BIOS?
- How to check BIOS version in Windows 10?
What Is a BIOS?
BIOS, short for Basic Input / Output System, controls your computer boot process. When you start your computer boot, BIOS starts the power-on self-test (POST) and passes the control over to the boot loader that boots your computer OS.
BIOS is a low-level system software and it is stored on a chip on your motherboard, unlike the operating system which is stored on computer hard drive.
Some newer computers come with UEFI firmware instead of the tradition BIOS. Its function is the same as BIOS, and it is also a low-level system software.
Also read: Discover the essential steps for successful hard drive recovery in this informative article.
BIOS Update – Do You Need to Update Your Computer’s BIOS?
Generally you shouldn’t update BIOS of your Windows 10 computer, but sometimes you may update it.
When You Shouldn’t Update BIOS
Normally BIOS updates are small updates. They may fix a bug or add support for a new model of CPU or graphics card. If your computer works well, you probably don’t need to update your BIOS and won’t see any difference after a BIOS update.
In some circumstances, updating BIOS may even bring more new problems to your computer. So it’s advised you go to your computer manufacturer site to find your computer model and check carefully the update details of new BIOS versions, thus, to determine if there is a need to update your computer BIOS.
Besides, updating BIOS is a risky practice. Be careful with BIOS update, it may cause your computer freeze, crash or lose power in the update process, and the BIOS/UEFI firmware may be corrupted. This may lead to your computer unbootable (Related: Solve PC Not Booting after BIOS Update)
When You Can Update BIOS Windows 10
We don’t know for sure whether updating BIOS can make your computer faster and run better, e.g. reduce boot time, improve computer overall performance, fix compatibility issues. In some cases, a BIOS update may fix a motherboard issue for your computer and make your computer perform better than before, but it’s not always the case.
If you are experiencing bugs in your computer that are fixed in a newer version of the BIOS after you check the BIOS update log from the manufacturer website, you may choose to update BIOS to fix those bugs. In addition, if you contact a professional tech support from your manufacturer, and they also advise you to do a BIOS update to repair Windows 10 problems, you may have a try.
In short, it’s not advised to update your BIOS/UEFI firmware unless you do find something specific you need in the newer versions of BIOS updates.
If you decide to perform a BIOS update, you have some ways to go, we’ll cover them below. If you don’t know your current BIOS version yet, you can also follow the guide below to check BIOS version at first.
One-stop Way to Back up Your Computer System, Files and Folders before BIOS Update
As stated above, updating BIOS is a risking task since it may cause your computer unable to boot or run abnormally.
Therefore, it’s highly suggested that you back up your Windows computer system and important data/files on your PC before you learn how to update BIOS in Windows 10. This can help keep your data safe, and easily restore your Windows 10 system if you meet problems in BIOS update.
To back up Windows system, files and folders, partition or disk, MiniTool ShadowMaker is professional and easy-to-use.
Key Features of MiniTool ShadowMaker:
1. Backup and restore Windows OS: Enable you to easily back up Windows 10 system to USB drive, external hard drive, etc. And restore your system to a previous healthy state from USB or external hard drive by using a previous system image backup.
2. Backup individual files and folders on PC: This free Windows backup and recovery tool also allows you to freely choose individual files and folders to back up to USB or external hard drive at fast speed.
3. Backup partition or disk: If you’d like to back up a specific partition or the whole hard disk, MiniTool ShadowMaker also allows you to do it by selecting a partition to back up, or choose the Clone Disk function under Tools tab.
4. File sync: It is also a file sync program, allowing you to sync files to other locations on local computer, other computers, external USB or hard drive, network drive, etc.
5. Advanced backup features: Schedule automatic backup, incremental backup scheme, and more.
6. Bootable media builder: Allow you to create a bootable USB/disk drive to boot your Windows computer into WinPE, and use MiniTool ShadowMaker in WinPE to backup data without booting or perform a system restore.
Free download and install this professional PC backup software – MiniTool ShadowMaker – on your Windows 10/8/7 computer, and follow the steps below to back up your system or files before you update BIOS. (MiniTool ShadowMaker Editions Comparison)
MiniTool ShadowMaker TrialClick to Download100%Clean & Safe
Step 1. Enter into main UI of MiniTool ShadowMaker
You can launch MiniTool ShadowMaker, and click Keep Trial button to use the Trial Edition.
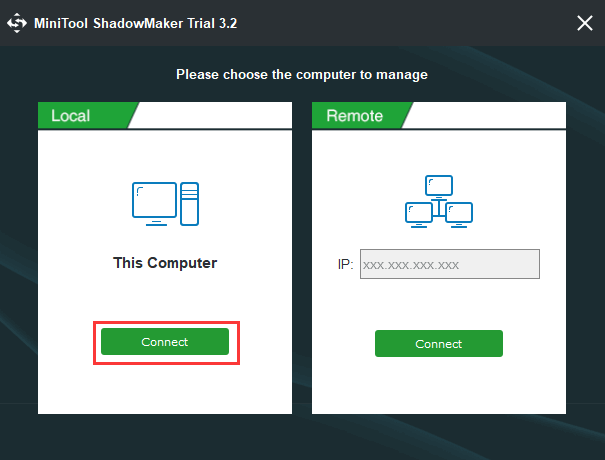
After you see the screen below, you can click Connect button under This Computer, and this will bring you to the main interface of MiniTool ShadowMaker.
Step 2. Choose the backup mode
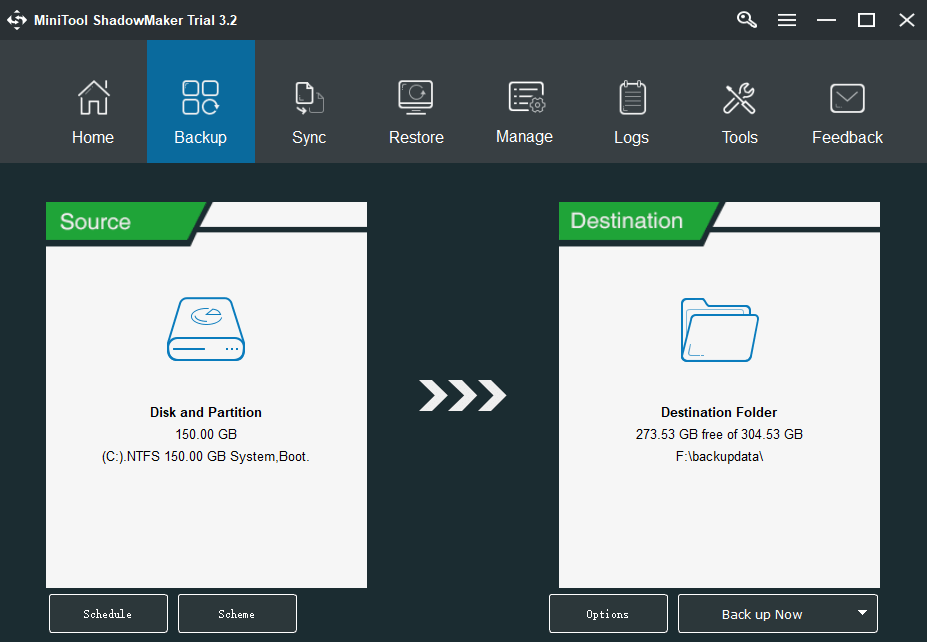
Next you can click Backup icon at the toolbar. This software has chosen the system and boot partitions as the backup resource. If you want to back up Windows 10 system, you can just leave it.
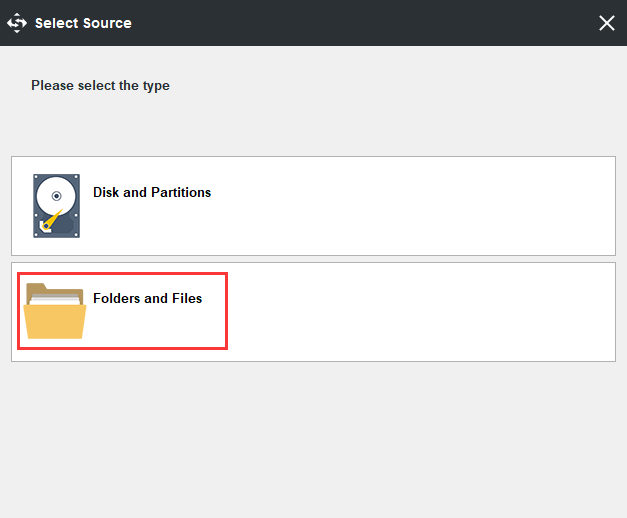
However, if you want to back up files and folders, you can click Source section, and click Folders and Files option.
Step 3. Choose destination path
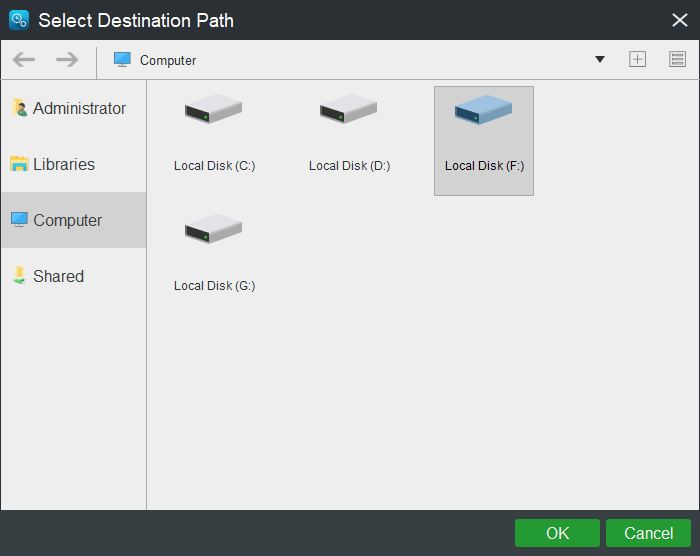
After you’ve selected the source data and files, you can click Destination section on the main UI to select a destination path to store the backup data and files.
The destination path could be other locations of computer, external USB flash drive or hard drive, etc.
Note: Since we don’t know whether the following BIOS update could be successful or not, worse still, a failed BIOS update may cause computer crash and unbootable. So here it’s advised that you back up your Windows system and important files to a safe external USB or hard drive. You can connect a USB or external hard drive to your computer and select it as the destination.
Step 4. Start to back up system or files
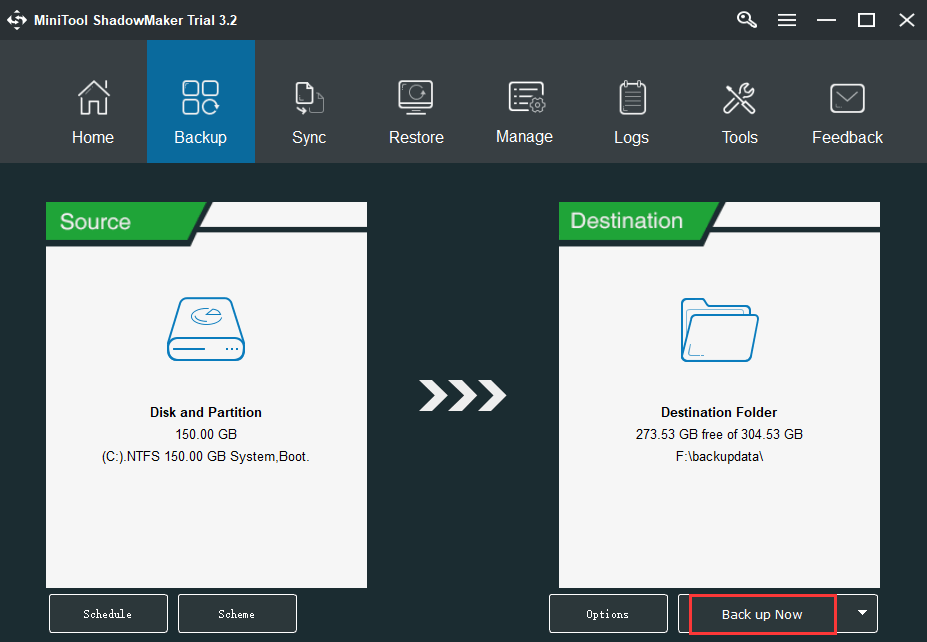
When everything is done, you can click Back up Now button on the main UI to start to back up Windows 10 OS, or backup files and folders at fast speed.
MiniTool ShadowMaker TrialClick to Download100%Clean & Safe
Now you have created a system image of your Windows 10 computer system and backed up needed files and folders, you can continue to check how to update BIOS now.
How to Check BIOS Version Windows 10?
Before you update BIOS in your Windows 10 ASUS, HP, Dell, Lenovo, Acer or other computers, you need to check the current BIOS version of your computer to see if it is already the latest version.
To identify the current version of the BIOS on Windows 10, you can check the 4 ways below.
Way 1. Check BIOS Version from System Information
Step 1. You can press Windows + R to open Windows Run dialog, type msinfo32, and hit Enter button to open Windows System Information window.
Step 2. Next you can scroll down to find BIOS Version/Date item under System Summary. Check and note down your computer current BIOS version.
Click to Tweet
Way 2. How to Check BIOS Version with CMD
You can also check BIOS version using Windows Command Prompt.
Step 1. You can also press Windows + R simultaneously to open Run window, type cmd, and hit Enter to open Command Prompt Windows 10.
Step 2. In Command Prompt window, you can type the following command line to get the BIOS version of your computer.
- wmic bios get smbiosbiosversion
- wmic bios get biosversion (this command line can get the detailed information of your current BIOS incl. BIOS version and date)
- wmic bios get version
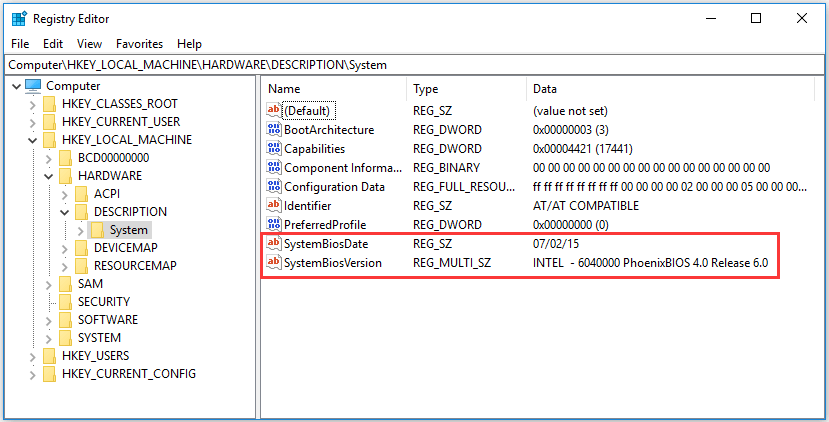
Way 3. How to Check BIOS Version from Windows Registry
You can also find your current BIOS version in Windows Registry.
Step 1. You can press Windows + R, type regedit in Run box to open Registry Editor window.
Step 2. Next you can click as follows in Registry window to find the following key:
HKEY_LOCAL_MACHINE -> HARDWARE -> DESCRIPTION -> System
Step 3. After you click System, you can find the SystemBiosDate and SystemBiosVersion keys. You can note down your computer system BIOS version.
Way 4. Check BIOS Version from Startup
Step 1. You can enter BIOS in Windows 10 by pressing F12, DEL, F10 or any other required hotkey on Windows startup screen.
Step 2. Navigate in the BIOS setup window to find if there is BIOS version information.
How to Update BIOS Windows 10
- Check Your Computer’s Model Name
- Find the Latest BIOS Update from Manufacturer Website
- Download and Unzip the BIOS File
- Copy the BIOS File to a USB Flash Drive
- Restart Your Computer to Boot into BIOS Screen
- Back up Your Computer’s Current BIOS File
- Update BIOS in Windows 10
How to Update Your Computer’s BIOS (ASUS, HP, etc.) in Windows 10
After you know the current BIOS version of your computer, you can compare it to the newest version available on your motherboard’s support page, on your computer manufacturer website.
If you decide to update BIOS of your Windows 10 ASUS/HP/Dell/Lenovo computer, check how to update BIOS below.
Step 1. Check Your Computer’s Model Name
Aside from the current BIOS version, you need to know the computer model name or the motherboard model.
You can press Windows + R, type msinfo32, and hit Enter to open System Information window.
You can find your System Model in the right window. You should record it since you will need it to search for the BIOS update file later.
If you are using an assembled computer, you need to find the motherboard model.
Step 2. Find the Latest BIOS Update from Manufacturer Website
Next, you can open your computer manufacturer official website, and find the Downloads or Support page for your specific computer model.
You should see a list of available BIOS versions incl. release date, archive zip file size, download button, and update description.
Tip: If you don’t know where to find the BIOS download page on manufacturer website, you can directly type your computer manufacturer name, your computer model or motherboard name, and BIOS into Google search box, and select a proper link to easily enter into right BIOS page.
Step 3. Download and Unzip the BIOS File
Then you can check the description of BIOS update versions to determine which one you want to download. It’s probable that you may want to download the latest BIOS version.
Download the BIOS update file to your computer. Most of the BIOS update files are Zip folders. You can unzip and extract the Zip file on Windows 10 with WinZip/WinRAR/7-Zip.
After you successfully extract the zip folder, you should see a readme.txt file in it. Read this file carefully before you continue to update BIOS since it offers detailed instructions for updating your BIOS.
Step 4. Copy the BIOS File to a USB Flash Drive
Then you need to plug in a blank USB to your computer and transfer the BIOS update file to the USB flash drive, since your BIOS can’t access your computer files.
Leave the USB plugged into your computer for later BIOS update operation.
Step 5. Restart Your Computer to Boot into BIOS Screen
Next you can click Start -> Power -> Restart to reboot your computer, and press the required key in startup process, to access the BIOS or UEFI screen.
Step 6. Back up Your Computer’s Current BIOS File
In case something goes wrong in BIOS update process, you can tap Main tab, and click the Backup or Save option to back up current BIOS settings. You can plug in another blank USB to your computer and back up BIOS to the USB flash drive. This can help you restore your BIOS settings if the BIOS update fails.
Note: Not all BIOS screens lets you back up the BIOS settings. The BIOS screen may be different in different computers.
Step 7. Update BIOS in Windows 10
At last, you can launch the BIOS/UEFI firmware update or flashing tool, and select the new BIOS update file you copied to the USB flash drive to start the BIOS update process.
To run the BIOS update tool, normally you can select Boot tab (use the arrow buttons on the keyboard to choose it), enable any “Flash” options in the menu, and select Start Flash in Advanced tab to start to update BIOS in Windows 10.
After the BIOS update process is finished, your computer will automatically restart with the new BIOS firmware version.
Tip: If the new BIOS firmware has problems, you may be able to go back to the previous or older version of BIOS from the motherboard manufacturer website by following the same guide above.
How to Recover Data After a BIOS Update Failure in Windows 10
In case you may lose some data on your Windows 10 computer because of the BIOS update, here we provide an easy way to help you recover lost data from Windows 10 computer. It works even if your Windows 10 computer won’t boot after BIOS update.
MiniTool Power Data Recovery, best data recovery software for Windows, enables you to recover lost data or deleted files from computer hard drive, external hard drive, SSD, USB drive (pen drive data recovery), SD card, etc. Extremely easy-to-use and 100% clean.
This program is also capable of recover data when PC won’t boot. You can use its Bootable Media Builder function to create a bootable drive to boot your computer and open MiniTool Power Data Recovery in WinPE to recover data from the unbootable PC. Please be noted that this function is only for advanced versions. (MiniTool Power Data Recovery Editions Comparison)
Get MiniTool Power Data Recovery and install it on your Windows 10 computer (also support Windows 8/8.1/7/Vista), and check the steps below to help you recover lost data on PC.
MiniTool Power Data Recovery TrialClick to Download100%Clean & Safe
Step 1 (Optional). If your computer can’t boot because of the BIOS update, you can download MiniTool Power Data Recovery on a normal-working computer to use it to create a bootable USB drive at first. Then you can plug in the bootable USB to your computer and boot computer from the bootable USB and launch MiniTool Power Data Recovery.
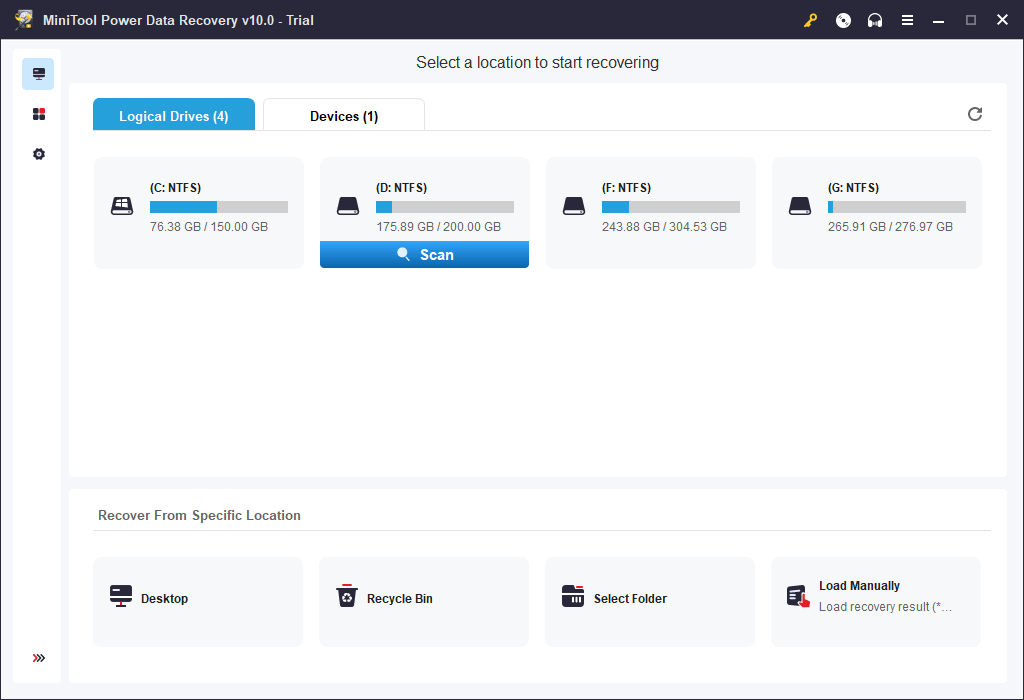
Step 2. After you launch MiniTool Power Data Recovery, you can choose a partition under Logical Drives and click Scan button to start scanning data on your PC. Or you can click Devices tab and select the whole disk to scan.
Step 3. After the scan process is finished, you can check the scan result to find needed files and folders, and click Save button to specify a new destination path to store the recovered files.
Click to Tweet
Conclusion
To sum up, it’s not necessary to update BIOS unless you really have to. If you really need to update BIOS in Windows 10 ASUS, HP, Dell, Lenovo, Acer computers, hope this tutorial gives you some clues.
Besides, it’s highly recommended that you make a backup of your Windows 10 system, files and folders before you perform a BIOS update. If you lost some important data after a BIOS update, you should use professional data recovery tools to immediately recover the lost data to avoid data overwriting and cause permanent data loss.
Still have problems with how to use MiniTool ShadowMaker and MiniTool Power Data Recovery, please contact [email protected].
How to Update BIOS FAQ
How do I update my BIOS in Windows 10?
Generally you should not update BIOS, but if you really need update your BIOS in Windows 10, you can check the part “How to Update Your Computer’s BIOS (ASUS, HP, etc.) in Windows 10” in this tutorial, it gives a detailed guide.
Can you upgrade BIOS without an OS?
You can upgrade your BIOS without an OS installed, however, you need to be able to access another computer with internet connection. You can use one of the 4 ways in this post to check the correct BIOS version of your computer, and then download the BIOS update on another computer and copy it to a removable flash drive. Then you can insert the media with the BIOS update to your computer to upgrade your BIOS without an OS.
Will updating BIOS delete my files?
Updating BIOS will not delete your files since updating BIOS has no relation with the hard drive data. However, if the installing of new version of BIOS fails, it might damage your computer and cause some data loss. This is why it’s highly recommended that you make a backup of your computer important files and system with a professional PC system and data backup software like MiniTool ShadowMaker. If you hard drive fails and lose some files, you can use MiniTool Power Data Recovery to recover lost files with ease. The data backup and data recovery guide are introduced in the tutorial above.
Is BIOS update safe?
To be frank, if you don’t know much about BIOS update, it’s not safe. The Basic Input / Output System (BIOS) is sit on a chip on your computer motherboard, and it is the first code to run when booting the computer. Updating BIOS is more dangerous than updating other components/software on your computer.
Читайте, как узнать версию BIOS вашего ПК, проверить наличие обновлений и обновить BIOS через Windows или DOS.
Обновление или выход новой версии операционной системы, выход нового процессора или добавление поддержки нового стандарта безопасности могут потребовать от вас обновления микропрограммы материнской карты. Обновление BIOS может открыть доступ к новым функциям системы, повысить безопасность или ускорить загрузку компьютера. Поэтому если производитель выпускает обновление, мы рекомендуем его ставить.
Содержание
- Поиск версии BIOS
- Проверка наличия обновления BIOS
- Обновление BIOS через Windows или DOS
- Вопросы и ответы
- Комментарии
Вы можете обновить свой BIOS как в Windows, так и в DOS. Проще это сделать из-под Windows, но в любом случае вам нужно определить вашу текущую версию BIOS. Используя номер текущей версии, вы сможете узнать доступно ли обновление на сайте производителя.
Перейти к просмотру
Как обновить BIOS ASUS, HP, Lenovo, MSI, Acer, Samsung, Dell, Gigabyte, AMI, Phenix Award 💽💻🤔
Поиск версии BIOS
Мы рассмотрим, как это сделать в ОС Windows 10, 8 или 7.
-
Запустите окно “Выполнить” нажав Windows + R.
-
Введите команду msinfo32 и нажмите Enter.
-
В окне «Информация о системе» найдите запись Версия BIOS. В этом же поле указан производитель вашей системной платы, версия BIOS и дата выпуска версии. Если ваш компьютер собран крупной компанией, например, Dell или HP, то в этом поле будет указан производитель компьютера. Запишите или запомните значение этого поля. Используя данные о производителе, вы сможете найти и проверить последнюю доступную версию BIOS у него на сайте. Если версия и дата выпуска совпадает с вашей, значит вы используете последнюю версию.
Проверка наличия обновления BIOS
К сожалению наличие обновления BIOS не получится проверить командой Windows. Не существует универсального способа проверки, который подойдет для любого компьютера или ноутбука. Мы рекомендуем проверить наличие обновлений на сайте производителя. Мы рассматривали как получить наименование производителя BIOS выше.
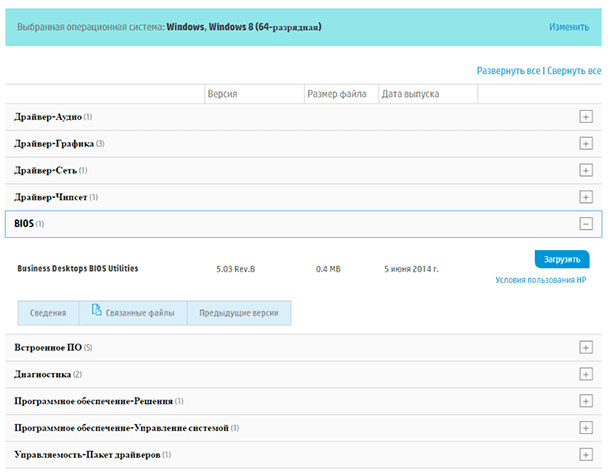
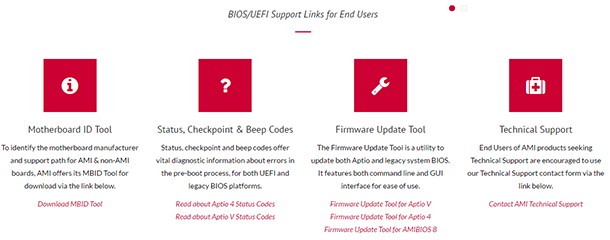
Если это производитель ноутбука или компьютера, найдите точную модель вашего устройства на его сайте. На странице продукта кроме технических характеристик будет представлен раздел загрузки драйверами и программой обновления BIOS. Если у вас указан производитель материнской карты, перейдите на сайт производителя в раздел загрузки и найдите программу для обновления BIOS.
Сверьте последнюю доступную версию с вашей, и если доступна новая версия прошивки – загрузите её.
Программа для обновления BIOS на компьютерах HP:
Программа для обновления BIOS материнских плат AMI:
Обновление BIOS через Windows или DOS
Обычно программа для обновления BIOS содержит инструкции по установке. Для ноутбуков Dell, HP и т.д. это просто EXE-файл установки, который можно запускать как любой из его файлов драйверов, и он позаботится обо всем остальном.
Перейти к просмотру
Как включить AHCI для SATA в BIOS без переустановки Windows, ошибка INACCESSIBLE BOOT DEVICE 💻🛠️🤔
Файл установки обновления как правило помещен в ZIP архив вместе с инструкцией. Извлеките его и внимательно ознакомьтесь с инструкцией. Во время обновления отключите все лишние программы, подключите ноутбук или компьютер к надежному источнику питания. Отключение или скачок электроэнергии приведет к тому, что ваш компьютер больше не сможет использоваться.
Преимуществом обновления BIOS через Windows является автоматическая проверка, которая не позволит установить ПО не совместимое с вашим железом. То есть, если вы запустите обновление, предназначенное для компьютера DELL на HP, то программа выдаст предупреждение и закроется. В случае с DOS программой вам также придётся изучить инструкцию и команды по обновлению.
FAQ
[Ноутбук/Десктоп/AIO] Как использовать Windows update в системе и как обновить BIOS через Windows update?
Пожалуйста, перейдите к соответствующей инструкции, исходя из текущей операционной системы Windows на вашем компьютере:
- Windows 11
- Windows 10
Windows 11
Пожалуйста, следуйте инструкциям ниже для запуска Windows Update:
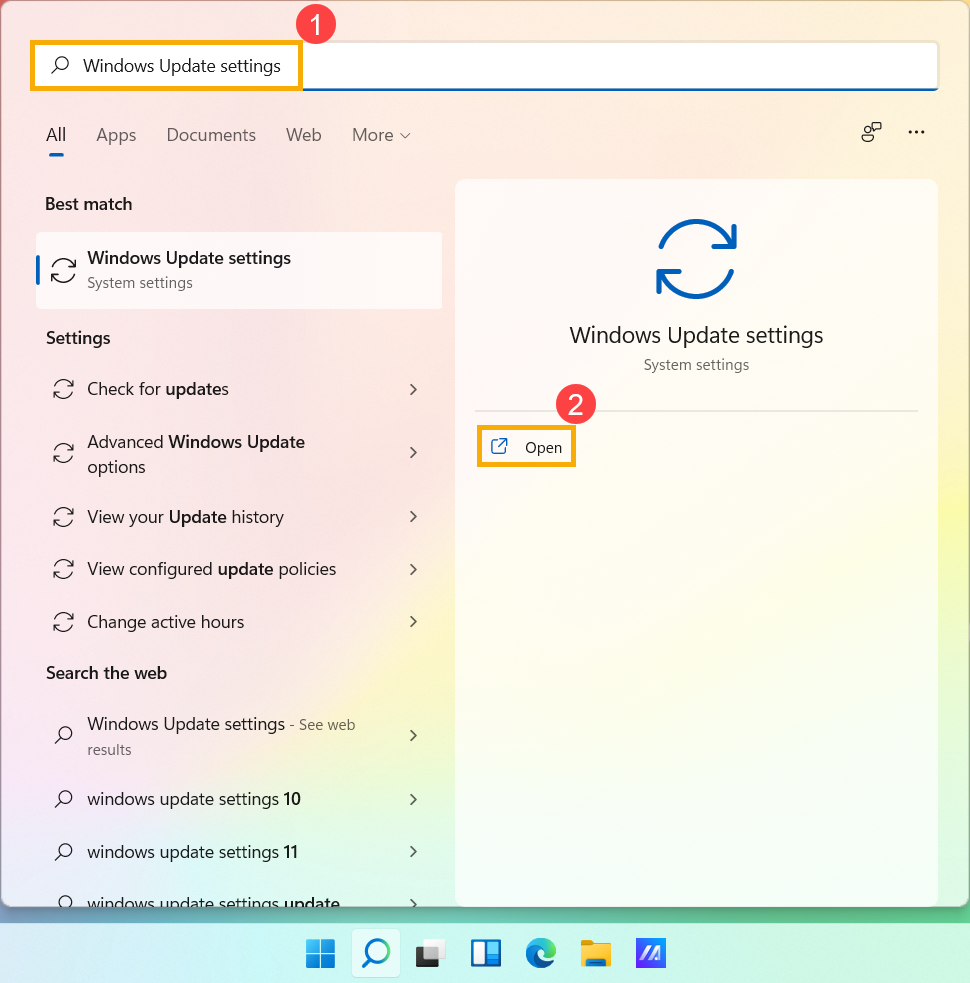
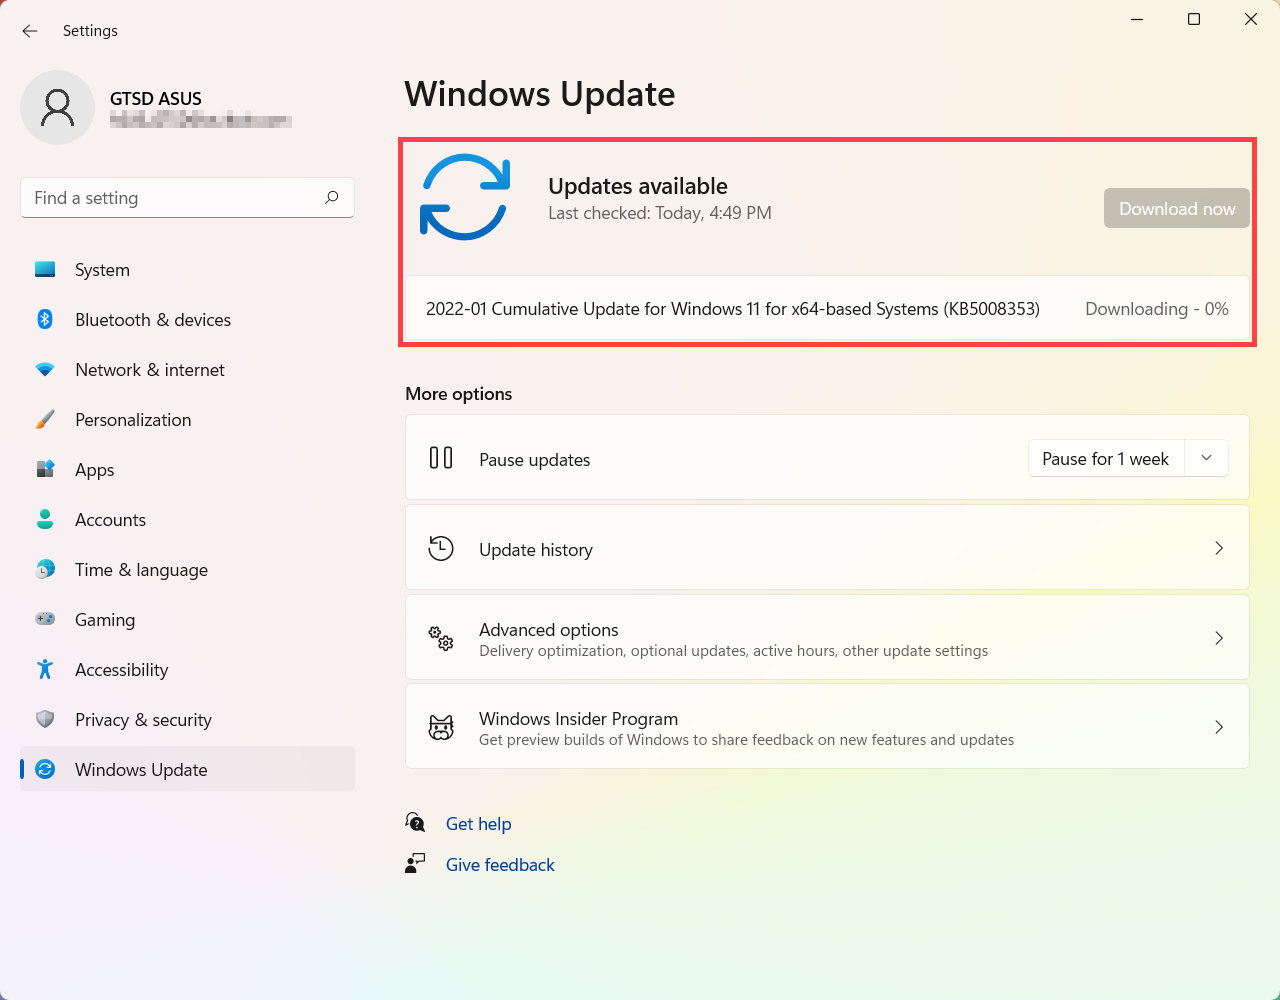
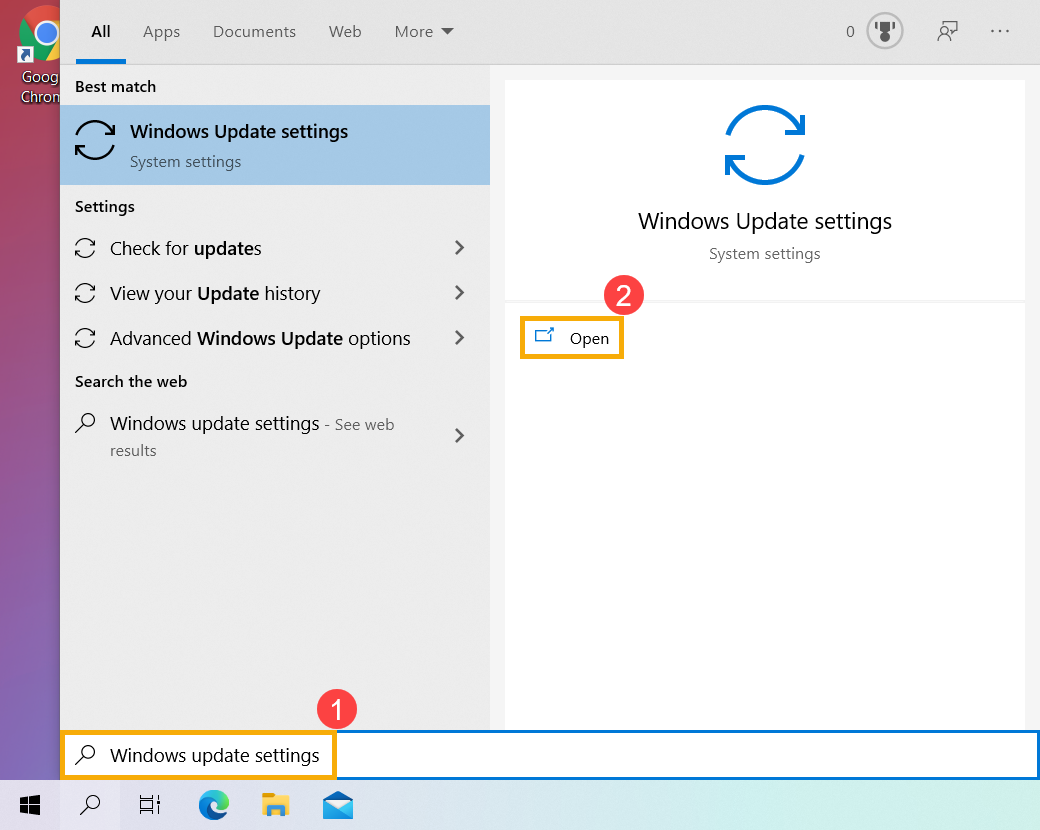
- Введите и найдите [Параметры Центра обновления Windows]① в строке поиска Windows, затем нажмите [Открыть]②.
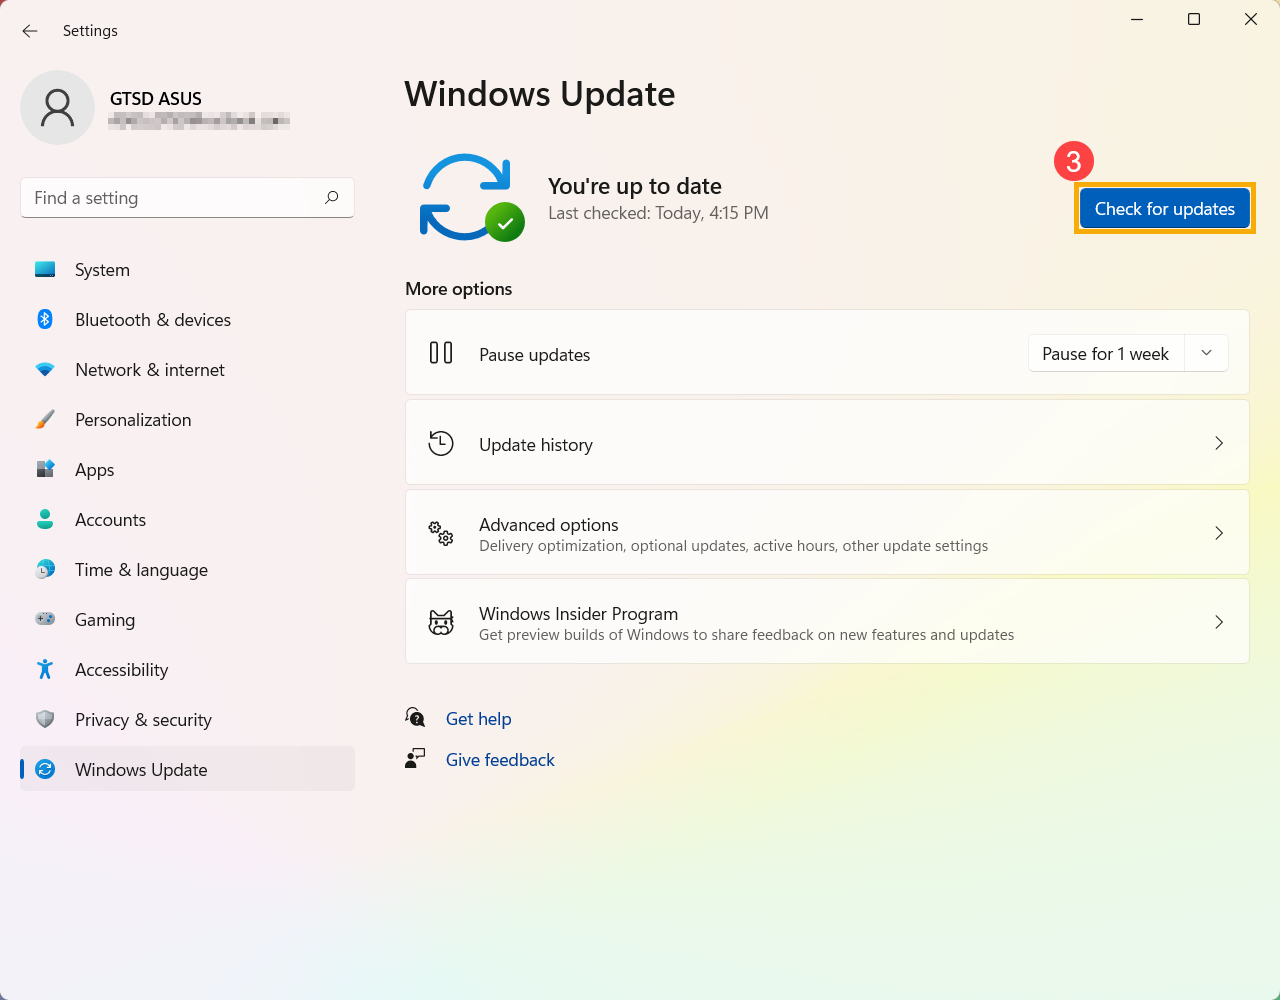
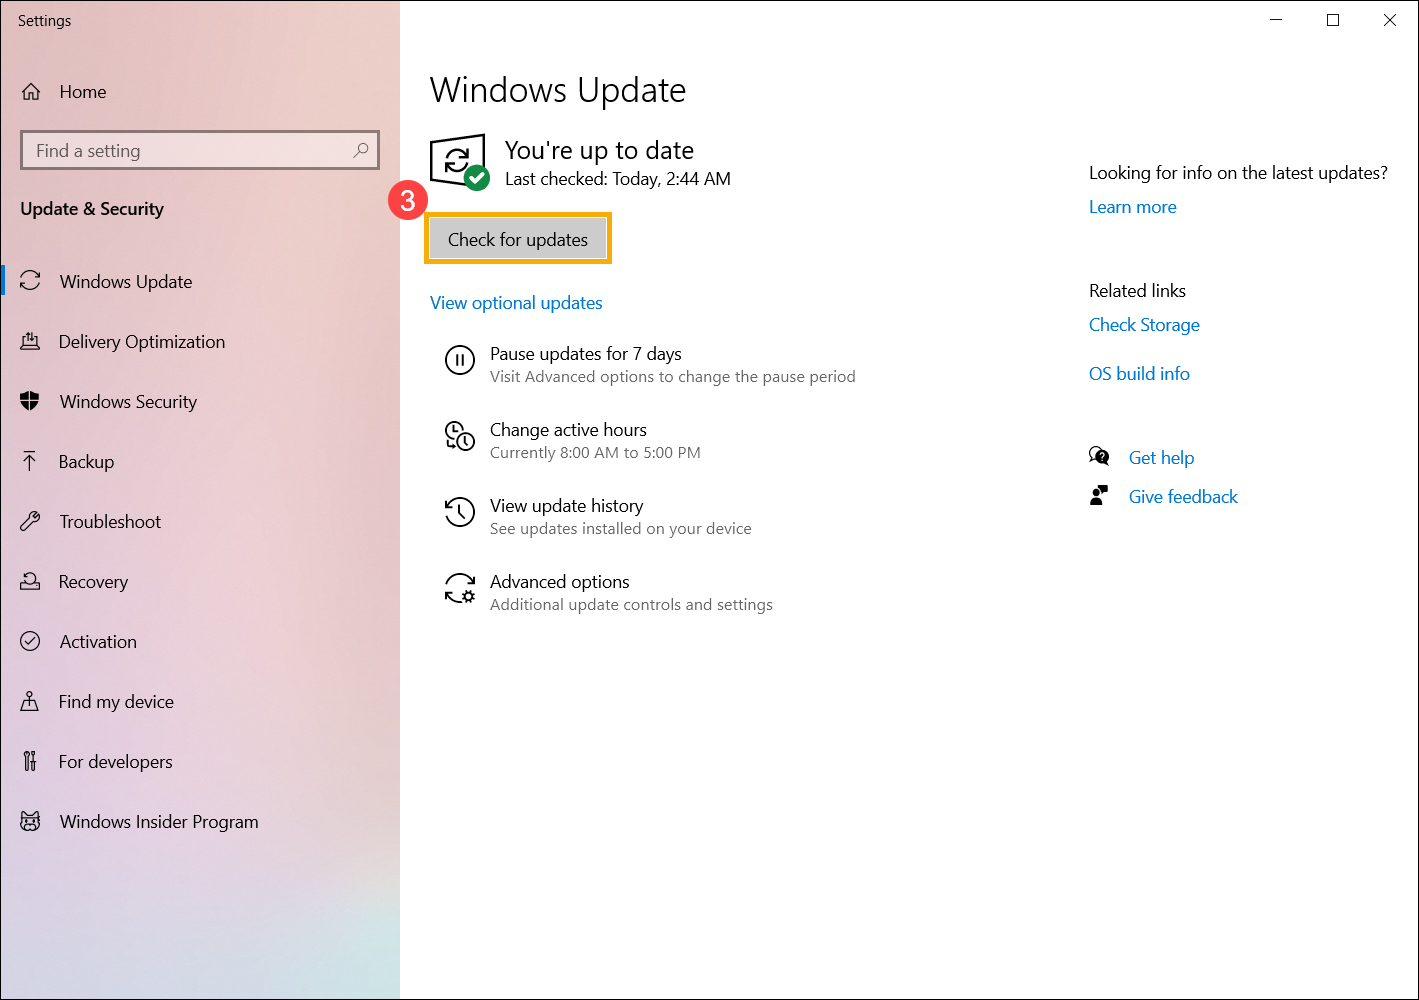
- Нажмите [Проверить наличие обновлений]③.
- Если для вашего компьютера доступно обновление, оно появится отдельно на странице Центра обновления Windows, после чего начнется загрузка и установка. Для некоторых обновлений может потребоваться дополнительное нажатие кнопки «Установить сейчас».
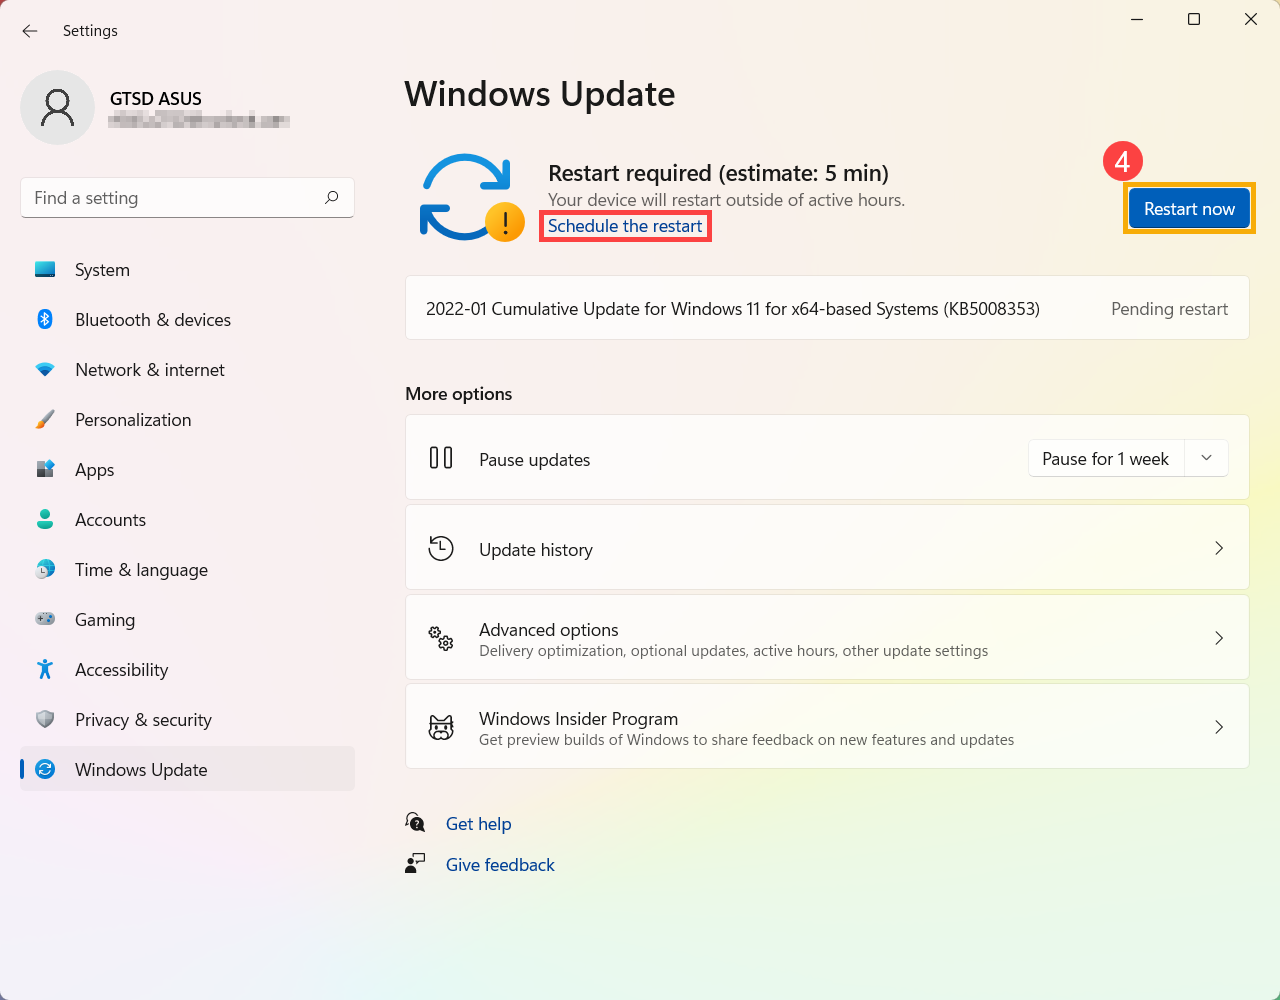
- Некоторые обновления могут потребовать перезагрузки компьютера, поэтому вы можете выбрать [Перезагрузить сейчас]④. В противном случае, если вы пока не хотите перезагружать компьютер, вы можете выбрать Расписание перезагрузки.
Примечание: Перед перезагрузкой компьютера сохраните текущую работу.
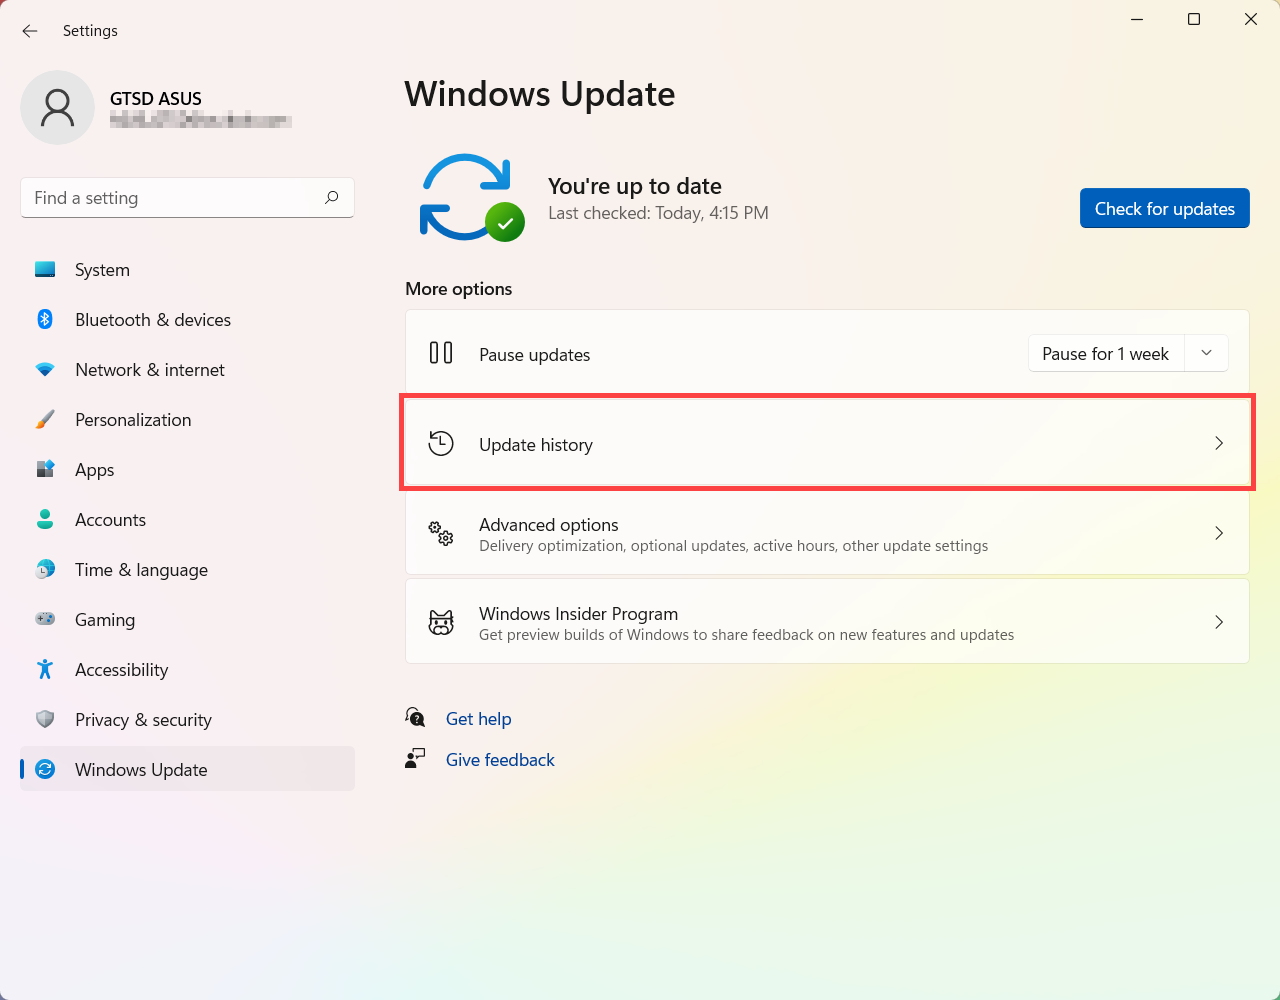
- После того, как обновления установятся, вы можете выбрать История обновлений, чтобы просмотреть информацию о предыдущих обновлениях.
Обновите BIOS через Windows update:
Более ранние версии Windows, такие как Windows 8.1, не могут автоматически обновлять BIOS, поэтому эта инструкция подойдет только для компьютеров ASUS с предустановленной Windows 10/11.
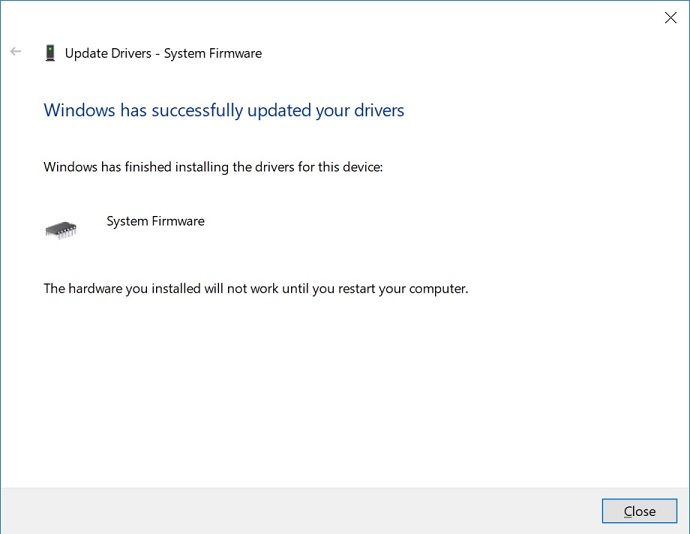
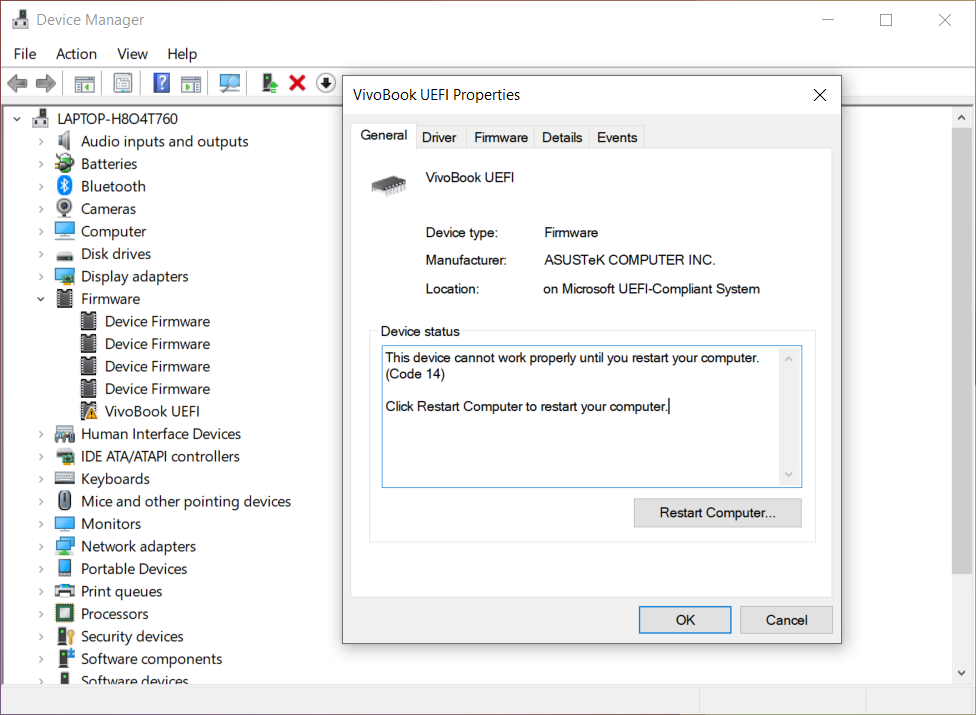
- Как только обновление BIOS будет загружено и готово к установке, появится окно Windows, похожее на изображение ниже, с сообщением о том, что систему необходимо перезагрузить перед обновлением BIOS.
Подобное сообщение вы также можете увидеть в Диспетчере устройств > Прошивка > Обновление системы > Свойства
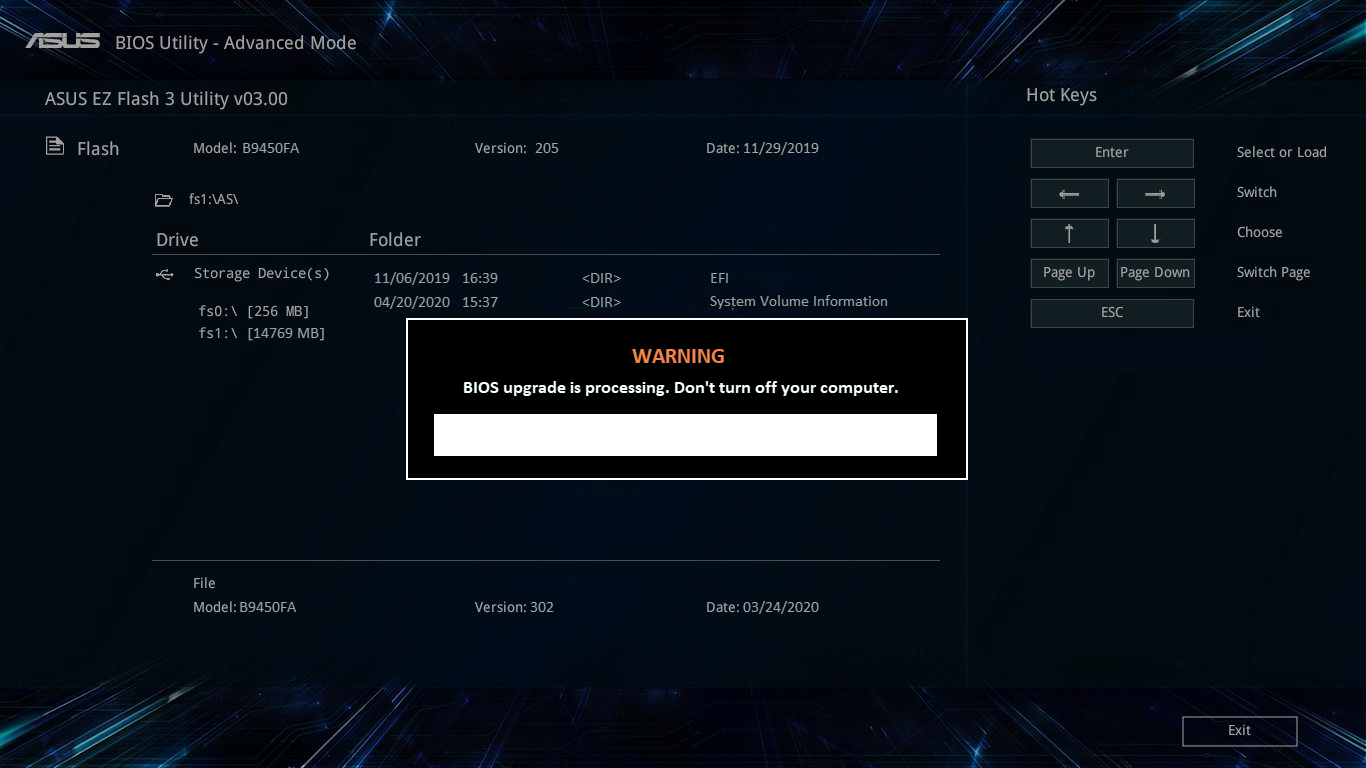
- Сохраните текущую работу и перезагрузите компьютер. Экран перепрошивки BIOS будет выглядеть, как показано ниже. (Изображения процесса обновления BIOS будут отличаться в зависимости от модели.)
Убедитесь, что адаптер переменного тока подключен в розетку, дайте системе время для прошивки биоса и не выключайте устройство во время прошивки, иначе система даст сбой и придется отправлять устройство в сервисные центры на ремонт, если процесс обновления биоса прервется!
Во время процесса обновления BIOS индикатор выполнения на экране будет перемещаться слева направо, что будет происходить автоматически без участия пользователя.
- Система загрузится, это значит, что BIOS был успешно обновлен. Здесь вы можете узнать больше о том, как проверить версию BIOS.
Если по какой-то причине процесс обновления BIOS был прерван, убедитесь, что адаптер переменного тока подключен, и попробуйте снова включить устройство, чтобы проверить, возобновит ли система автоматически перепрошивку BIOS. В противном случае необходимо будет обратиться в сервисные центры на ремонт.
Windows 10
Пожалуйста, следуйте приведенным ниже инструкциям, чтобы выполнить обновление Windows:
- Введите и найдите [Параметры Центра обновления Windows]① в строке поиска Windows, затем нажмите [Открыть]②.
- Нажмите [Проверить наличие обновлений]③.
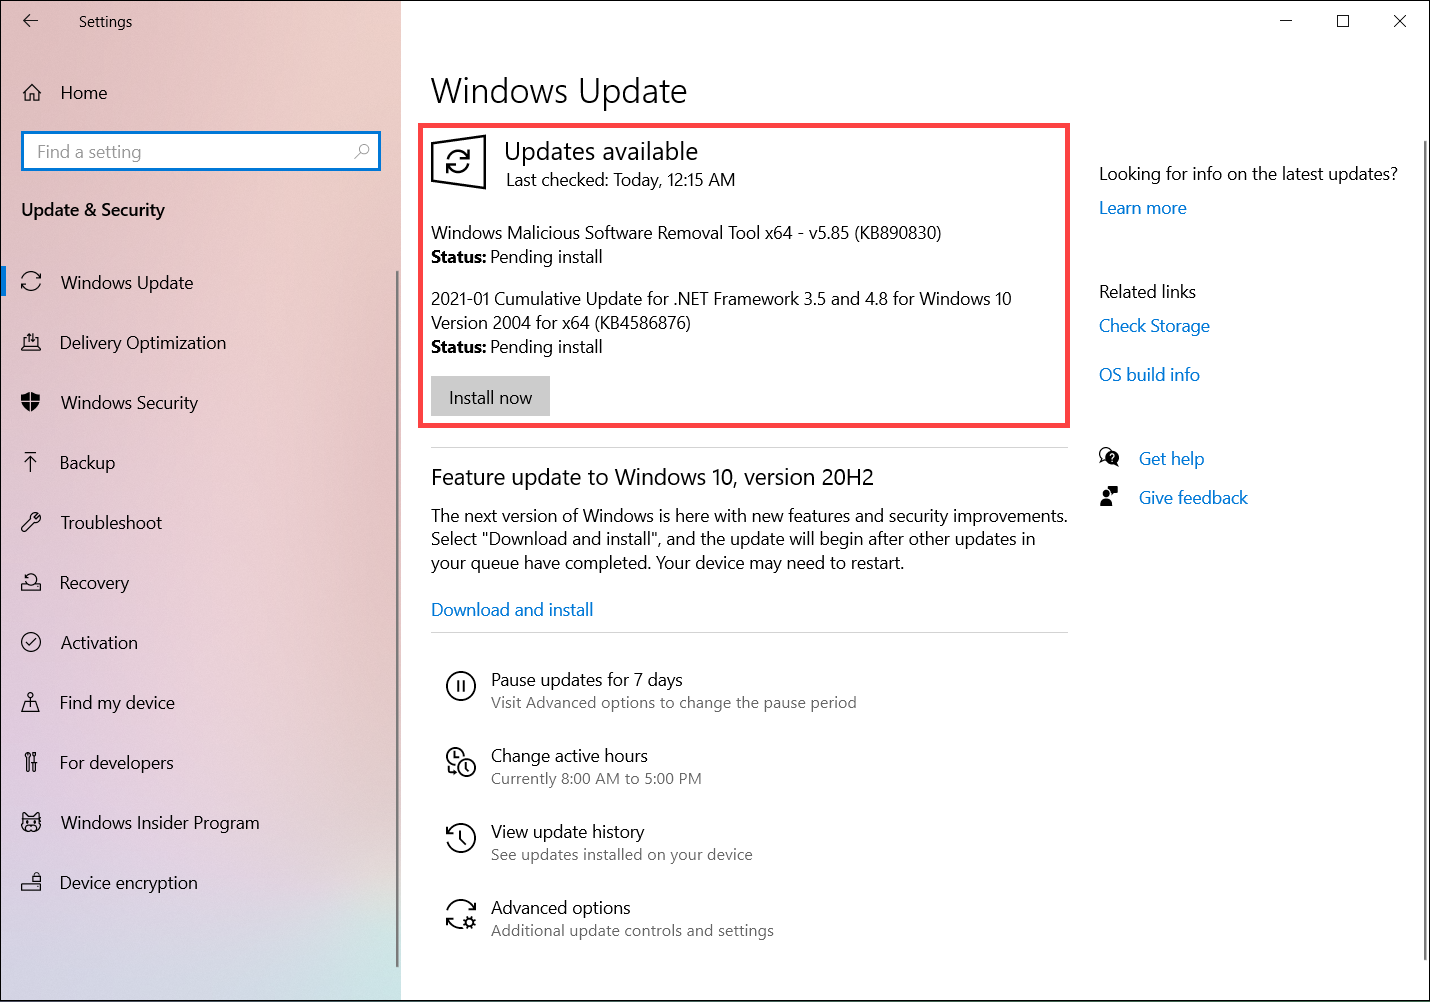
- Если для вашего компьютера доступно обновление, оно появится отдельно на странице Центра обновления Windows, после чего начнется загрузка и установка. Для некоторых обновлений может потребоваться дополнительное нажатие кнопки «Установить сейчас».
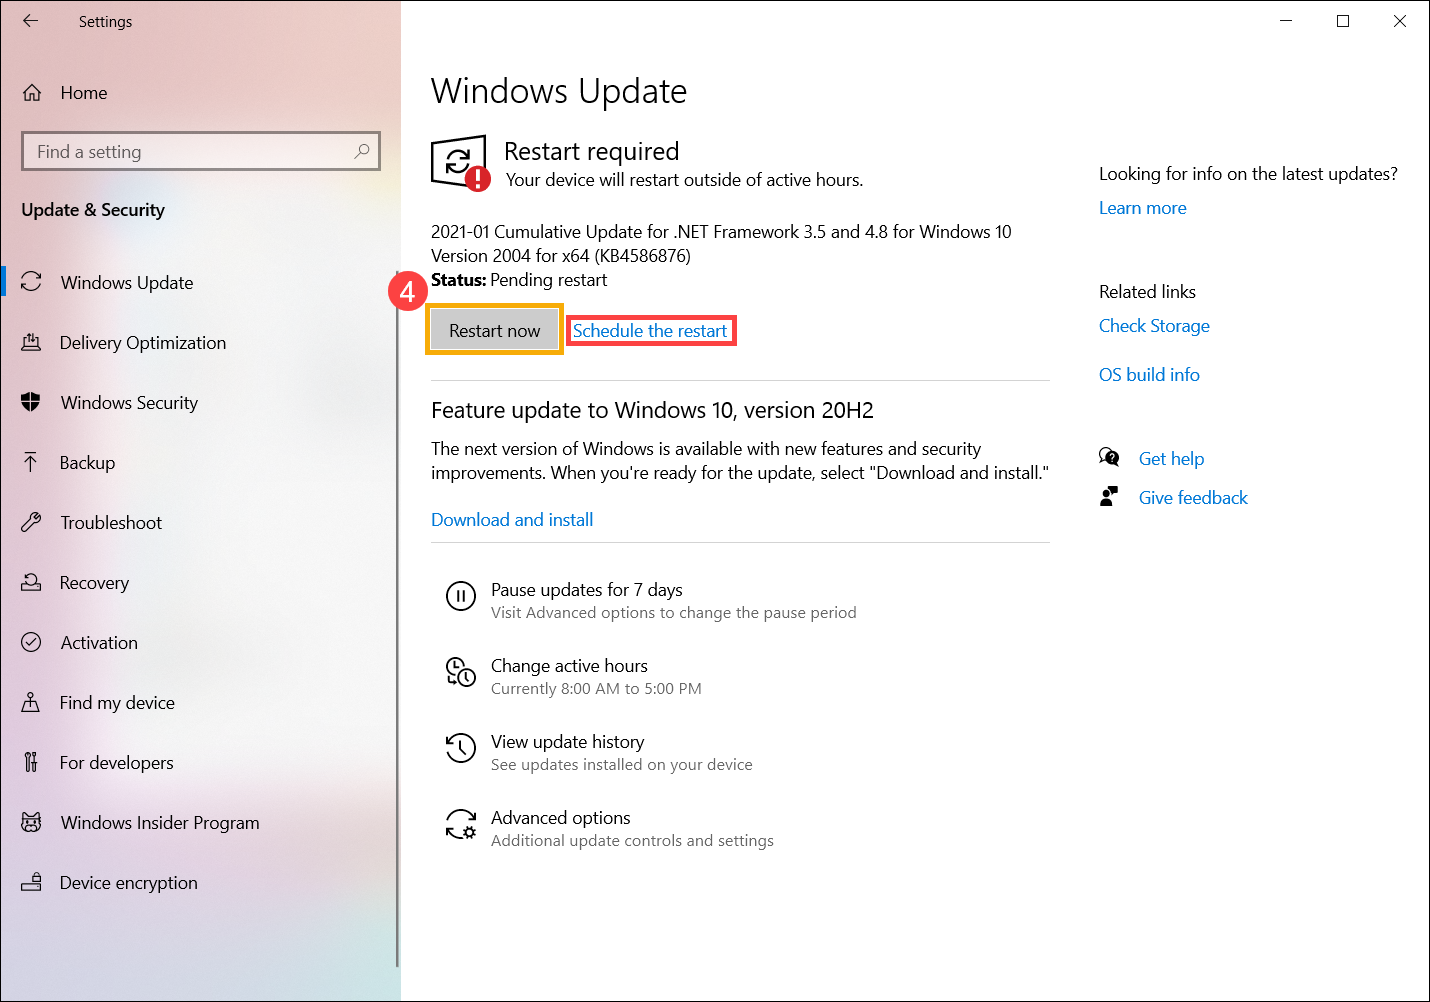
- Некоторые обновления могут потребовать перезагрузки компьютера, поэтому вы можете выбрать [Перезагрузить сейчас]④. В противном случае, если вы пока не хотите перезагружать компьютер, вы можете выбрать Расписание перезагрузки.
Примечание: Перед перезагрузкой компьютера сохраните текущую работу.
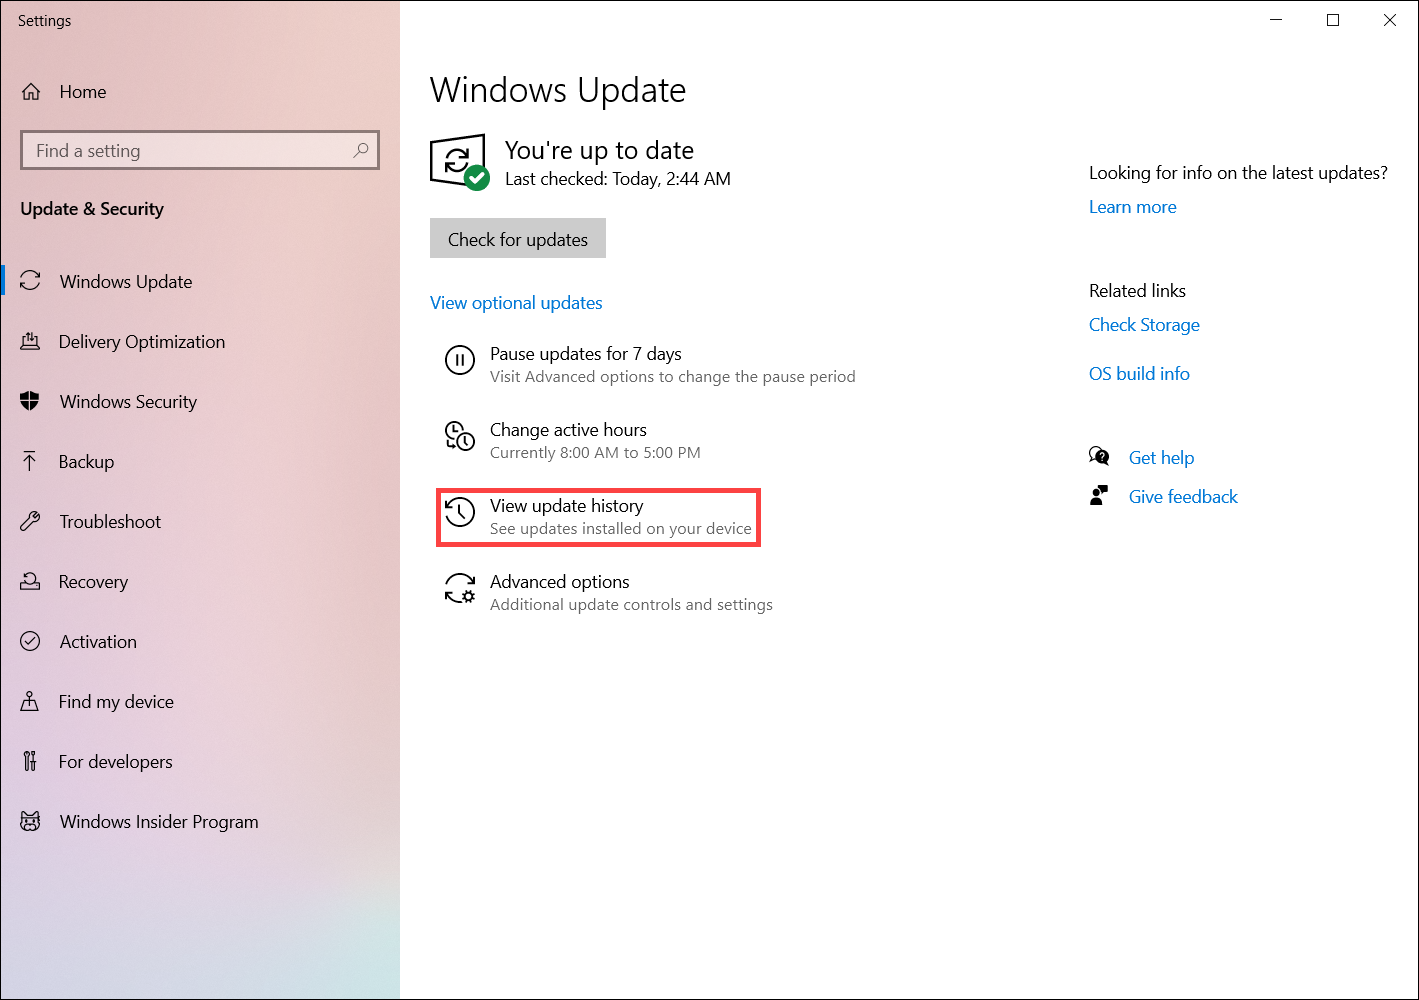
- После того, как обновления установятся, вы можете выбрать История обновлений, чтобы просмотреть информацию о предыдущих обновлениях.
Обновите BIOS через Windows update:
Более ранние версии Windows, такие как Windows 8.1, не могут автоматически обновлять BIOS, поэтому эта инструкция подойдет только для компьютеров ASUS с предустановленной Windows 10/11.
- Как только обновление BIOS будет загружено и готово к установке, появится окно Windows, похожее на изображение ниже, с сообщением о том, что систему необходимо перезагрузить перед обновлением BIOS.
Подобное сообщение вы также можете увидеть в Диспетчере устройств > Прошивка > Обновление системы > Свойства
2. Сохраните текущую работу и перезагрузите компьютер. Экран перепрошивки BIOS будет выглядеть, как показано ниже. (Изображения процесса обновления BIOS будут отличаться в зависимости от модели.)
Убедитесь, что адаптер переменного тока подключен в розетку, дайте системе время для прошивки биоса и не выключайте устройство во время прошивки, иначе система даст сбой и придется отправлять устройство в сервисные центры на ремонт, если процесс обновления биоса прервется!
Во время процесса обновления BIOS индикатор выполнения на экране будет перемещаться слева направо, что будет происходить автоматически без участия пользователя.
3. Система загрузится, это значит, что BIOS был успешно обновлен. Здесь вы можете узнать больше о том, как проверить версию BIOS.
Если по какой-то причине процесс обновления BIOS был прерван, убедитесь, что адаптер переменного тока подключен, и попробуйте снова включить устройство, чтобы проверить, возобновит ли система автоматически перепрошивку BIOS. В противном случае необходимо будет обратиться в сервисные центры на ремонт.
Эта информация была полезной?
Yes
No
- Приведенная выше информация может быть частично или полностью процитирована с внешних веб-сайтов или источников. Пожалуйста, обратитесь к информации на основе источника, который мы отметили. Пожалуйста, свяжитесь напрямую или спросите у источников, если есть какие-либо дополнительные вопросы, и обратите внимание, что ASUS не имеет отношения к данному контенту / услуге и не несет ответственности за него.
- Эта информация может не подходить для всех продуктов из той же категории / серии. Некоторые снимки экрана и операции могут отличаться от версий программного обеспечения.
- ASUS предоставляет вышеуказанную информацию только для справки. Если у вас есть какие-либо вопросы о содержании, пожалуйста, свяжитесь напрямую с поставщиком вышеуказанного продукта. Обратите внимание, что ASUS не несет ответственности за контент или услуги, предоставляемые вышеуказанным поставщиком продукта.
