Корзина – это особый объект, представляющий собой контейнер для временного хранения файлов и папок, которые были удалены с компьютера. В операционной системе Windows корзина выполняет функцию восстановления удаленных данных, а также обеспечивает защиту от непреднамеренного удаления файлов.
На английском языке этот объект называется «Recycle Bin» или «Trash», в зависимости от версии операционной системы. В русской версии Windows корзина также имеет два названия: «Корзина» и «Мусорная корзина».
Принцип работы корзины базируется на том, что файлы и папки, удаляемые пользователем, фактически не удаляются полностью с жесткого диска. Они остаются там до тех пор, пока пользователь не произведет окончательное удаление или восстановление данных из корзины.
Важно помнить, что использование корзины не гарантирует полную безопасность данных. Для обеспечения надежного хранения и защиты информации рекомендуется регулярно создавать резервные копии и использовать специализированное программное обеспечение для восстановления данных.
Содержание
- Как правильно называется корзина Windows
- Определение и цель:
- Роль в ОС Windows:
- История и развитие:
- Особенности и функции:
- Служебные действия:
Как правильно называется корзина Windows
На рабочем столе или в проводнике можно найти иконку с изображением корзины, которая позволяет легко переместить ненужные файлы внутрь нее. После перемещения файлов в корзину они остаются доступными на компьютере, но не мешают в повседневной работе.
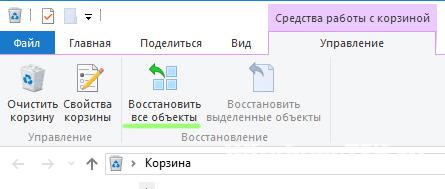
При желании можно вернуть файлы из корзины обратно на свое место в исходных папках, а также окончательно удалить все содержимое корзины. Для восстановления файлов необходимо открыть корзину и щелкнуть правой кнопкой мыши на файле или папке, а затем выбрать соответствующий пункт в меню контекста. Чтобы удалить все файлы из корзины без возможности их восстановления, можно воспользоваться опцией «Очистить корзину» в контекстном меню корзины.
Забота о правильном использовании корзины поможет предотвратить случайное удаление важных файлов и снизить риск потери данных.
Определение и цель:
Когда пользователь удаляет файлы или папки, они перемещаются в корзину, а не удаляются окончательно. Это позволяет пользователю случайно восстановить файлы, если они были удалены по ошибке. Корзина также предотвращает нежелательное удаление файлов и предоставляет возможность просмотра и восстановления удаленных файлов и папок в любое время.
Однако необходимо знать, что удаление файлов из корзины окончательное. После полного удаления файлов из корзины они нельзя будет восстановить. Поэтому всегда следует быть внимательным при удалении файлов, особенно если они важны или нужны для будущего использования.
Роль в ОС Windows:
Когда пользователь удаляет файлы или папки из операционной системы, эти объекты не удаляются окончательно, а перемещаются в корзину. Это позволяет в случае ошибочного удаления быстро восстановить удаленные данные, просто переместив их обратно из корзины в исходное место.
Для удобства пользователей, в корзине можно просмотреть список удаленных файлов и папок, а также выполнить дополнительные операции, такие как полное удаление объектов из корзины или восстановление выбранных элементов. Корзина также поддерживает функцию автоматической очистки, которая позволяет освободить место на диске, удаляя старые файлы из корзины, если они превышают установленный временной период хранения.
Таким образом, корзина в операционной системе Windows выполняет важную роль в обеспечении безопасности данных и позволяет пользователям быстро восстанавливать удаленные объекты, обеспечивая их безопасность и удобство использования.
История и развитие:
Корзина в операционной системе Windows появилась вместе с выпуском Windows 95 в 1995 году. Она стала значимым инструментом для удобного управления файлами и папками на компьютере.
В начале своей истории корзина была простым окном, в которое можно было перетаскивать ненужные файлы для последующего удаления. Однако, с появлением Windows XP в 2001 году, корзина получила дополнительные возможности.
Windows XP ввела концепцию восстановления файлов из корзины, предоставив пользователю возможность случайно удаленные файлы, восстановить их обратно на исходное место. Это было большим прорывом в удобстве использования корзины и позволило избежать потери данных.
С дальнейшим развитием операционной системы Windows, корзина стала получать новые функции и усовершенствования. Например, в Windows Vista была добавлена возможность удаления файлов без их перемещения в корзину. Также в Windows 7 была введена функция автоматического очищения корзины через определенный период времени.
С появлением Windows 10 корзина стала еще более удобной и функциональной. Он получила встроенный поиск и возможность восстановления ранее удаленных файлов на любом устройстве, подключенном к аккаунту Microsoft.
Особенности и функции:
Главной функцией корзины является сохранение удаленных файлов и папок в течение определенного времени, позволяя пользователям в любой момент вернуться к ранее удаленным данным. Каждый удаленный объект помещается в корзину, где он хранится до тех пор, пока пользователь не решит окончательно удалить его или восстановить.
В корзине предусмотрены определенные возможности для управления удаленными объектами. Пользователь может выбрать несколько файлов или папок и выполнить определенные действия над ними, такие как восстановление, окончательное удаление или переименование. Кроме того, есть возможность просмотра содержимого корзины и изменения настроек ее размера.
Корзина также оснащена функцией автоматической очистки, которая позволяет освободить место на диске, автоматически удаляя объекты, находящиеся в корзине более определенного периода времени. Пользователь может настроить этот срок хранения в настройках корзины.
Служебные действия:
- Очистить корзину — удаляет все файлы, находящиеся в корзине;
- Восстановить все элементы — перемещает все файлы обратно в исходное место после их удаления из корзины;
- Удалить все пункты из корзины и переместить их в другую папку — перемещает все файлы из корзины в указанную пользователем папку;
- Удалить все пункты и переместить их вне системы — удаляет все файлы из корзины без возможности их восстановления;
- Отменить удаление — возвращает недавно удаленные файлы из корзины в исходное положение;
Кроме того, можно открыть корзину и удалить или восстановить отдельные файлы или папки, кликнув на них правой кнопкой мыши и выбрав соответствующую команду из контекстного меню.
From Wikipedia, the free encyclopedia


In computing, the trash, also known by other names such as dustbin, wastebasket, and others, is a graphical user interface desktop metaphor for temporary storage for files set aside by the user for deletion, but not yet permanently erased. The concept and name is part of Mac operating systems, a similar implementation is called the Recycle Bin in Microsoft Windows, and other operating systems use other names.
In the file manager, the trash can be viewed by the user as a special file directory, allowing the user to browse the files and retain those still wanted before deleting the others permanently (either one by one, or via an «empty trash» command). It may still be possible using third party software to undelete those that were deleted by mistake. In Microsoft Windows and macOS, the Trash folder links to hidden folders on each mounted drive where the files are actually stored.
Within a trash folder, a record may be kept of each file and/or directory’s original location, depending on the implementation. On certain operating systems, files must be moved out of the trash before they can be accessed again.
Whether or not files deleted by a program go to the recycle bin depends on its level of integration with a particular desktop environment and its function. Low-level utilities usually bypass this layer entirely and delete files immediately. A program that includes file manager functionality may or may not send files to the recycle bin, or it may allow the user to choose between these options.
History[edit]
Bill Atkinson began developing the Apple Lisa user interface in late 1978. In March 1982 he reached the stage of changing to an icon-based file manager, and produced a mock-up with a trash can icon (including buzzing flies) for deleting files.[1][2] The release version of Lisa was launched in 1983 with a «Wastebasket»,[3] its icon «an alley-style garbage can [with] vertical lines to indicate a ribbed surface …. an open lid and a handle on the front of the can.»[4][5] Apple advertised «If you can find the trash can, you can run a computer.»[6]
Following this, the Magic Desk I ROM cartridge for Commodore 64 presented a primitive representation of office furniture, with a wastebasket or trash bin under the desk. This lacked functionality and was not taken further.[7]
In 1983 Susan Kare designed the core visual design language of Classic Mac OS System 1, launched in January 1984. This incorporated some elements of the Lisa interface, including a refined version of the icon, now labelled Trash,[8] with «a closed lid with a handle on top.»[4] An ad supplement in Newsweek introduced the Mac interface, with its «pictures of objects you’ll have no trouble recognizing … Even a trash can.»[9] A subsequent update to Lisa renamed its Wastebasket icon «Trash».[10] In «International English» localizations of Classic Mac OS, Trash was named «Wastebasket».[11]
In 1985, Amiga Workbench 1.0 was released. This took much inspiration from Mac OS, including trash bins. When formatting a floppy disk/hard drive partition, the user could select to add a bin to it. This would then appear as an icon titled «Trashcan» along with the other files. Users could drag unwanted files onto it and empty the bin later.[12]
In early versions of the Macintosh Finder, Trash contents were in volatile memory, and were lost when the computer restarted. From 1987, if anything was in Trash its icon bulged as a reminder to check the contents before shutting down. Following the 1991 introduction of System 7, the Trash folder retains its contents until the user chooses to empty the trash.[13][5]
The outcome of the lawsuit Apple Computer, Inc. v. Microsoft Corp. (filed in 1988, decision affirmed on appeal in 1994) was that graphical user interfaces similar to Apple’s did not infringe rights, but some features including Apple’s Trash icon were original and protected by copyright. Non-Apple software could use other metaphors for file deletion, such as Recycle Bin, Smart Eraser, or Shredder.[4][14]
In 1993 or 1994, Microsoft implemented its first temporary deletion system in MS-DOS 6, under the name Delete Sentry: When a file was deleted, it was moved to a hidden SENTRY folder at the root of the drive.[15][16]
Microsoft introduced its current trash system in 1995, the Recycle Bin, with Windows 95, as an area to store and review files and folders prior to deletion.[17] At default settings, the Recycle Bin auto-deletion permanently deletes files to free up disk space when it gets low, or deletes files in the Bin over 30 days.[13][18] In this version, the original location record of the file is stored, but the folder itself didn’t allow subdirectories. When a folder is deleted, its containing files are moved into the bin and mixed with other deleted files. The directory structure can only be restored if the batch of files is «undeleted». The current (revised) Recycle Bin allows for subdirectory trees to exist within folders that have been moved there. The icon shows a bin with a recycling symbol on its front.
With the new interface of Mac OS X introduced in 2001, the Trash icon moved from the desktop to a permanent place at the end of the Dock. The International English «Wastebasket» had been dropped at the end of 2009, making the name «Trash» standard.[19] In keeping with the system appearance, the Trash was a shiny wire basket, until with OS X Yosemite in 2014 it became a translucent white container.[20] With macOS Mojave, the Trash was renamed «Bin» in the Australian English localisation, and with macOS Catalina, «Bin» also appeared in the UK localisation.[21]
Implementations[edit]
Trash functionality is usually integrated into a desktop environment and its file manager. Examples include:
- Classic Mac OS and macOS, with Finder, as «Trash» (localised as «Wastebasket», later «Bin»)
- MS-DOS 6.x, with Microsoft Undelete, as «Delete Sentry»
- Microsoft Windows, with Windows Explorer (later called File Explorer starting with Windows 8), as «Recycle Bin»
- GNOME and MATE (Linux), with Nautilus and Caja, respectively
- KDE (Linux), with Konqueror and Dolphin
- Xfce (Linux), with Thunar
- Amiga, with Workbench. The Professional File System added trashcan-esque behavior at the filesystem level.
Some implementations may contain «shredding» functionality to counter data remanence.
Linux desktop environments[edit]
The KDE, GNOME[22] and Xfce implementations comply with the freedesktop.org Trash specification,[23] ensuring that any applications written with this specification in mind will be interoperable with any trash can implementation.
Although the various Linux desktop environments such as GNOME, KDE, and Xfce provide a trash mechanism, there is traditionally no simple way to trash something from the command line interface. Some third-party applications, such as trash-cli, provide commands on the command-line to use the trash, compatible with the FreeDesktop.org Trash Specification.
macOS[edit]
Using macOS, a file or folder is deleted in Finder by dragging its icon onto the Trash icon at the right hand end of the Dock, moving the item into the Trash folder, where it can be viewed but not used until it is moved out again. To restore highlighted items from the Trash to their original position, a contextual menu brings up a Put Back option. The keyboard shortcut to move highlighted items to Trash, or Put Back items, is ⌘ Command+Delete. To finally delete files, clicking on «Empty» brings up a warning that this cannot be undone, and an option to delete.[24]
Putting items in the Trash folder moves them to a hidden temporary folder: for the boot disk, a user account has this at /Users/username/.Trash/; each mounted volume such as an external drive has a hidden folder in the root folder named /.Trashes/.[25] When viewing the device’s available space the space occupied by the deleted files is shown as occupied. The Trash folder shows deleted files from external drives, including removable media.[26] This does not apply to networked drives, where trying to move an item to Trash brings up a warning that it will be deleted immediately and this cannot be undone.[27]
Since OS X El Capitan, the Trash can be bypassed by pressing ⌥ Option+⌘ Command+Delete when a file is selected.[28] Since macOS Sierra, the user can enable an option to have the Trash automatically empty after 30 days.[29]
In UK and Australian English localisations, the Trash is known as «Bin».[21]
Apps and iOS[edit]
In several macOS apps and in the iOS mobile operating system, the Trash is within apps rather than in the system as a central feature. The standard icon for the Trash is a small version of the original Classic Mac OS trash can. Files are moved to a «Recently Deleted» folder within the app where they remain available for recovery for a stated number of days, then are automatically permanently deleted. Apps where this applies include Photos and Mail.[30][31] Files may still be recoverable if a computer backup was run before they were moved to «Recently Deleted».
Microsoft Windows[edit]

Microsoft’s Recycle Bin is implemented as a special folder with columns like Date deleted and Original location. Typically only files deleted via File Explorer (but not necessarily other Windows graphical interfaces such as file selection dialogs) will be put into the Recycle Bin; files deleted via the Command Prompt are permanently deleted, as (by default) are files deleted via operating system APIs and applications other than Windows Explorer.[32] Some operating system APIs do, however, allow applications to recycle files rather than delete them.[33] In previous Windows operating systems and in MS-DOS, undeletion was the only way to recover accidentally or intentionally deleted files.
As standard, the Recycle Bin only stores files deleted from hard drives, not from removable media, such as memory cards, thumb drives, or floppy disks, nor does it store files deleted from network drives.[34] There are methods to make it work on network paths, however.[35]
The Recycle Bin has a setting to configure the amount of deleted files it can store. Free disk space allocated for this is not actually used until files are deleted from folders and stored in the Recycle Bin. In versions of Windows prior to Windows Vista, the default configuration of the Recycle Bin is a global setting for all drives to hold 10% of the total capacity of each host hard drive volume to store deleted files. For example, on a volume with a capacity of 20 gigabytes, the Recycle Bin will hold up to 2 gigabytes of deleted files. This can be changed anywhere from 0 to 100% of the drive space, but will not be allowed to exceed 3.99GB of space, even if the user-indicated % of the drive space is larger than 3.99GB. If the Recycle Bin fills up to maximum capacity, the oldest files will be deleted in order to accommodate the newly deleted files.[17] If a file is too large for the Recycle Bin, the user will be prompted to immediately and permanently delete the file instead.
The actual location of the Recycle Bin depends on the type of operating system and file system. On older FAT file systems (typically Windows 98 and prior), it is located in Drive:\RECYCLED. In the NTFS filesystem (Windows 2000, XP, NT) it is Drive:\RECYCLER. On Windows Vista and above it is Drive:\$Recycle.Bin folder.[36]
The Recycle Bin can be accessed as an shortcut from the desktop, by searching «Recycle Bin» in Windows Explorer, or by typing «shell:RecycleBinFolder» in the Run dialog box (⊞ Win+R). It is the only icon shown by default on the Windows XP desktop. When accessed from the desktop, the Recycle Bin options and information are different from those of the physical Recycle Bin folders seen on each partition in Windows Explorer. From Windows XP onwards, with NTFS, different users cannot see the contents of each other’s Recycle Bins.
Prior to Windows Vista, a file in the Recycle Bin is stored in its physical location and renamed as D<original drive letter of file><#>.<original extension>.[17] A hidden file called info2 (info in Windows 95 without the Windows Desktop Update) stores the file’s original path and original name in binary format.[17] Since Windows Vista, the «meta» information of each file is saved as $I<number>.<original extension> and the original file is renamed to $R<number>.<original extension>.
When the user views the Recycle Bin, the files are displayed with their original names. When the file is «Restored» from the Recycle Bin, it is returned to its original directory and name.[17]
In Windows Explorer, files are moved to the Recycle Bin in a number of ways:
- By right-clicking on a file and selecting delete from the menu
- Selecting the file and pressing the delete key
- Selecting delete from the Task pane in Windows XP
- Selecting the file and choosing delete from the File menu (in Windows XP Explorer)
- By dragging and dropping a file into the Recycle Bin icon
- From the Send To menu
- From a context menu command or some other function in a software application (usually configurable)
It is possible to bypass the Recycle Bin and directly delete a file by holding the SHIFT key while performing an action that would normally send a file to the trash.[37]
Other uses[edit]
The 1984 original Mac and several of its successors (up to the 1987 Macintosh SE) lacked a (then prohibitively expensive) hard drive. Instead, the system ran from a floppy disk which could be ejected (⌘ Command+E), graying out its icon (‘ghosting’) and leaving its contents in memory, ready to transfer to another disk. In Classic Mac OS, dragging the disk icon to Trash (shortcut ⌘ Command+Y) directly ejected a disk (or CD) without leaving a grayed icon.[13]
Mac OS X removed the transfer option; dragging a disk or storage volume onto Trash converted the icon to the universal Eject symbol before unmounting and ejecting the disk or volume. This does not place the disk/volume in the Trash folder, nor does it erase the disk/volume.
The GNOME Human Interface Guidelines cite using a waste basket to eject a removable disk as an example of a metaphor taken beyond its reasonable use.[38]
See also[edit]
- Xerox Alto
- File deletion
- Data erasure
- Temporary folder
References[edit]
- ^ Hertzfeld, Andy (22 February 1999). «Macintosh Stories: Busy Being Born». Folklore.org. Retrieved 26 August 2011.
- ^ Hertzfeld, Andy. «Folklore.org: Rosing’s Rascals». Folklore.org. Retrieved 21 July 2021.
- ^ «Tech Time Warp of the Week: The Apple Lisa, 1983». Wired. 25 October 2013. Retrieved 21 July 2021. Apple Invents the Personal Computer. Again., 1983
- ^ a b c «Apple Computer, Inc. v. Microsoft Corp., 821 F. Supp. 616 (N.D. Cal. 1993)». Justia Law. 25 June 2021. Retrieved 22 July 2021.
- ^ a b Giaimo, Cara (19 April 2016). «Why Only Apple Users Can Trash Their Files». Slate Magazine. Retrieved 23 July 2021.
- ^ «Lisa Trash Can — the Finder files». Put your projects on the Web. Retrieved 22 July 2021.
- ^ «Magic Desk I for Commodore 64». Put your projects on the Web. Retrieved 22 July 2021.
- ^ «Interview with Susan Kare». library.stanford.edu. 11 March 2010. Archived from the original on 11 March 2010. Retrieved 21 July 2021.
«Susan Kare on Working on the Macintosh». library.stanford.edu. 21 July 2010. Archived from the original on 21 July 2010. Retrieved 21 July 2021. - ^ «the Finder files». Introducing Macintosh (in Latin). Retrieved 22 July 2021.
- ^ «Lisa Office System 3.1 Release Date, Specs, Features, Etc.- madeApple». madeApple. 15 July 2019. Retrieved 22 July 2021.
Lineback, Nathan (13 August 2002). «Lisa Office System 3». toastytech.com. Archived from the original on 13 August 2002. Retrieved 22 July 2021. - ^ «GUIdebook > Extras > Trivia». Folklore.org. 2006. Retrieved 30 April 2012.
- ^ [1]1.1.5 Info, 1.2.1 Empty Trash [2]Photographic Evidence
- ^ a b c Panic, Major General (1 August 2006). «trash can». Everything2.com. Retrieved 22 July 2021.
- ^ Lewis, Peter H. (27 August 1991). «PERSONAL COMPUTERS; Norton Desktop for Windows». The New York Times.
- ^ «Delete Sentry Automatically Purges Files When Necessary». Microsoft Support. Microsoft Corporation. Retrieved 3 June 2010.
When Microsoft Undelete is using the Delete Sentry level of protection, files that are deleted are stored in a hidden SENTRY directory in the root of the drive.
- ^ «Now You Delete It, Now You Don’t». PC Operating Instructions, Vol.5 Issue 6. Smart Computing. June 1994. Retrieved 3 June 2010.
Delete Sentry. This is the most reliable file-recovery method. This method sets up a hidden directory named SENTRY. UNDELETE saves the contents of all deleted files in this directory. Because these files are kept in the hidden directory, it doesn’t matter whether the originals have been written over or not. UNDELETE simply restores the files you want from the SENTRY directory.
- ^ a b c d e «How the Recycle Bin Stores Files». Microsoft. 19 January 2007. Retrieved 8 September 2008.
- ^ «How to Enable & Disable Recycle Bin Auto-Deletion on Windows 10?». MiniTool. 14 July 2020. Retrieved 22 July 2021.
- ^ Smith, Tony (5 November 1999). «Apple drops British English MacOS». The Register. Retrieved 23 July 2021.
- ^ Snell, Jason (16 October 2014). «OS X Yosemite review: A new design built just for Retina Macs». Macworld. Retrieved 23 July 2021.
- ^ a b «Apple ditches Trash can name in the UK with Catalina update in favor of a boring one». iMore. 9 October 2019. Retrieved 23 July 2021.
- ^ «Bug 41850 – Trash should follow fdo trash spec (adds restoring facilities)». Bugzilla.gnome.org. Retrieved 26 August 2011.
- ^ «Trash specification». Freedesktop.org. Retrieved 3 April 2012.
- ^ Tanous, Jim (2 October 2011). «macOS: Using «Put Back» with Your Trashed Files». The Mac Observer. Retrieved 20 June 2021.
- ^ Kessler, Topher (21 September 2009). «Trash problems in OS X? Reset it!». CNET. Retrieved 20 July 2021.
- ^ Pot, Justin (14 July 2017). «How to Empty the macOS Trash on Your External Drives». How-To Geek. Retrieved 9 June 2021.
- ^ Tanous, Jim (2 October 2011). «Please Note: Mac OS X Has No Network Trash Can». The Mac Observer. Retrieved 9 June 2021.
- ^ Klein, Matt (21 March 2016). «How to Skip the Trash and Instantly Delete Files in OS X». How-To Geek. Retrieved 9 June 2021.
- ^ «Here’s Why You May Never Need to Empty Trash in macOS Sierra». TekRevue. Retrieved 9 January 2018.
- ^ «How to Empty Trash on iPhone (Step-by-Step Guides 2021)». AnySoftwareTools. 12 April 2021. Retrieved 31 July 2021.
- ^ «System Icons — Icons and Images — iOS — Human Interface Guidelines». Apple Developer. Retrieved 31 July 2021.
- ^ «Files Deleted at MS-DOS Prompt Do Not Go to Recycle Bin». Support.microsoft.com. 19 January 2007. Retrieved 9 September 2011.
- ^ «c# — How do you place a file in recycle bin instead of delete?». Stack Overflow. Retrieved 26 August 2011.
- ^ «Recycle Bin overview: Windows XP Professional Product Documentation». Microsoft.com. Retrieved 9 September 2011.
- ^ «Enable Recycle Bin on mapped network drives».
- ^ «Why does the Recycle Bin have different file system names on FAT and NTFS?». The Old New Thing. MSDN Blogs. Retrieved 26 August 2011.
- ^ «HOW TO: Bypass the Recycle Bin When You Delete Files and Folders in Windows XP». Support.microsoft.com. 26 March 2004. Retrieved 9 September 2011.
- ^ «Create a Match Between Your Application and the Real World». Library.gnome.org. Retrieved 10 October 2015.
External links[edit]
- Microsoft Knowledge Base article «How the Recycle Bin Stores Files»
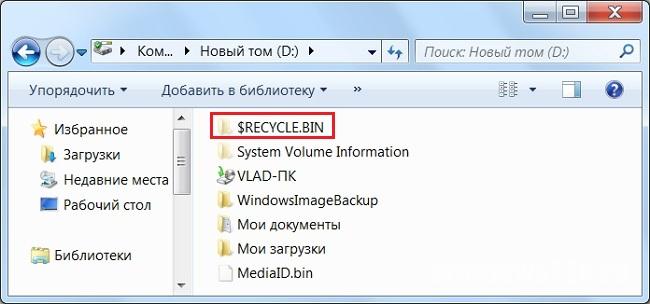
Это системная папка, которая не видна для глаз пользователей компьютера. Находится она в корневой директории каждого локального диска.
Важно! Иногда папка с таким же именем может оказаться вирусом.
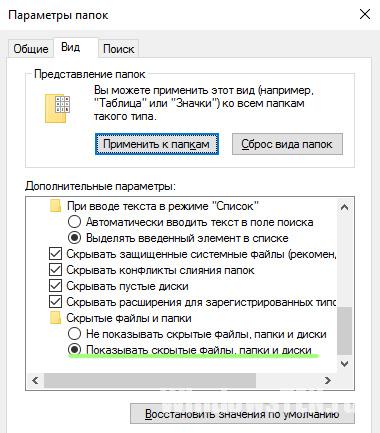
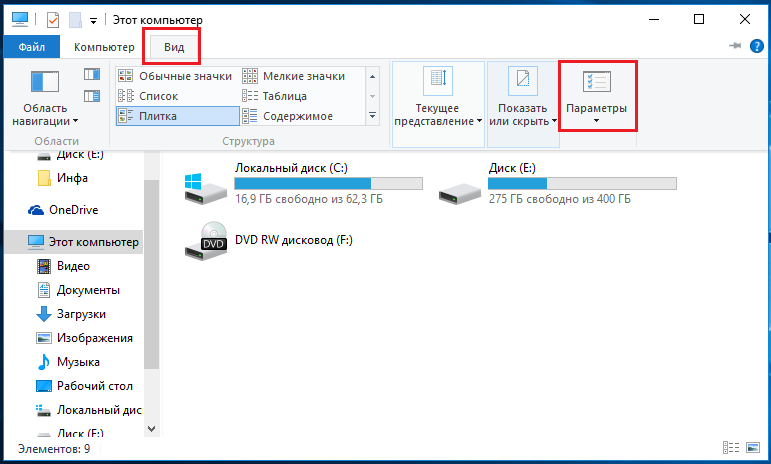
Чтобы увидеть $RECYCLE.BIN, поменяйте свойства проводника для системных папок:
- на панели инструментов вверху диска нажмите “Вид” → “Параметры”;
- в выпавшем меню кликните на строчку «Изменить параметры папок и поиска»;

- в новом открывшемся окне нажмите на вкладку «Вид»;

- активируйте пункт «Показывать скрытые файлы, папки и диски».
Теперь невидимые до этого документы выглядят в виде полупрозрачных ярлыков.

Сама Recycle Bin содержит документы, которые вы удалили. То есть – это корзина, ярлык которой отображается на рабочем столе. Такое название папки появилось в Windows Vista. В старых Windows они назывались Recycled и Recycler.
Важно! На одном жестком диске одновременно может находится несколько таких папок, если на нем неоднократно переустанавливались ОС. Ничего страшного, последняя установленная операционная система проигнорирует их.
Настройка свойств корзины
Увидеть возможные настройки можно кликнув пункт «Свойства» в контекстном меню. Это меню вызывается нажатием правой кнопкой мышки на значке корзины. В параметрах корзины можно задавать максимальный размер удаляемых файлов отдельно для каждого раздела жесткого диска. Ведь $RECYCLE.BIN есть в корневой директории каждого локального диска. А в корзине отображаются удаленные документы со всего жесткого диска.
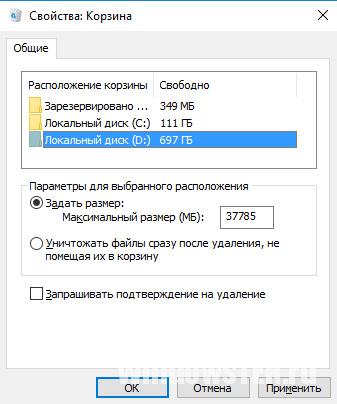
В Свойствах корзины во вкладке “Общие” есть возможность настроить мгновенное и безвозвратное удаление файлов. Активировав эту функцию и нажав клавишу Delete, файл не переместится в корзину, а будет удален навсегда. Если же эта функция неактивна, то удаленные документы можно через какое-то время восстановить. Для этого зайдите в корзину и нажмите соответствующую кнопку сверху.
Важно! Чтобы удалять файлы навсегда не включая данную функцию, используйте сочетание клавиш Shift+Del.
Вредоносные файлы
Recycle.Bin создается ОС только в директории локальных дисков. На съемных и сетевых дисках такой папки быть не должно. Если же вы увидели $RECYCLE.BIN на своей флешке, то проверьте ее антивирусом. Это распространенный хакерский метод хранения зараженных файлов на сменных носителях.
Переименование и удаление
Если вы удалите эту папку кнопкой DEL или через контекстное меню, она исчезнет. Но ОС создаст ее снова, когда появятся удаленные файлы. Вы можете сделать ее невидимой, если она вам мешает. Сделать это можно указанным выше способом, только поставить маркера на “Не показывать скрытые папки и диски”.
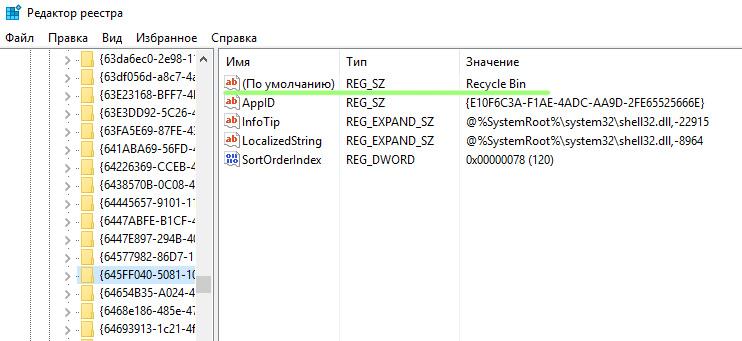
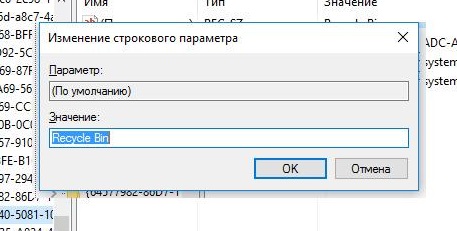
Переименовать корзину через контекстное меню не получится, там нет такого пункта. Изменить название этого ярлыка можно через редактор реестра.
Важно! Не рекомендуем переименовывать корзину, так как это может повлиять на стабильность работы Windows 10.
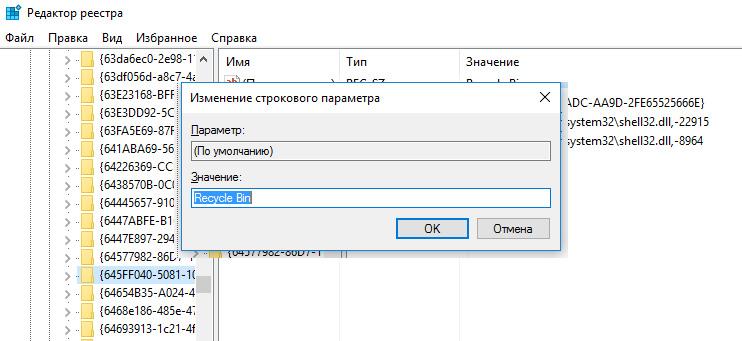
Для переименования:
- Нажмите комбинацию клавиш Win+R.
- В открывшемся окошке в строке «Открыть» пишем
regedit
- Далее выбираем строку HKEY_CLASSES_ROOT/CLSID/{645FF040-5081-101B-9F08-00AA002F954E}.

- И переименовываем значение Recycle Bin.
Если у вас остались вопросы можете задать их здесь. Опишите подробно с чем вы столкнулись и вместе мы найдем решение.
You can find and open Recycle Bin in a few simple ways:
| Workable Solutions | Step-by-step Troubleshooting |
|---|---|
| Where Is the Recycle Bin in Windows 10/11 File Explorer | Press Win + E to open File Explorer. Search recycle bin in the address bar. Press Enter to open Recycle Bin…Full steps |
| Open Recycle Bin from Run Command | Press Win +R keys to open the Run box. Type explorer.exe shell:RecycleBinFolder and click «OK»…Full steps |
| Open Recycle Bin from Using PowerShell | Click the Search button, and type PowerShell. Right-click Windows PowerShell from search results…Full steps |
| Find Recycle Bin in Windows 10/11 via Settings | Select the Start button, click «Settings» > «Personalization». Click «Themes > Desktop icon settings»…Full steps |
Windows Recycle Bin is one of the system folders in the Microsoft Windows operating system. It is mainly used to store files or folders temporarily deleted by users. The files stored in the Recycle Bin can be restored.
To restore files from Recycle Bin, you first need to know where is the Recycle Bin in Windows 10. Windows 10 Recycle is in the upper-left corner of your Desktop by default. You can find and double-click to open it easily.
However, sometimes, the Recycle Bin icon is not showing up on your Desktop, then, how to find and open Recycle Bin in this case? This tutorial solves the problem «Where is the Recycle Bin in Windows 10?», showing you a few ways to reach the Windows 10 Recycle Bin location.
What’s more, at the end of this page, we recommend advanced EaseUS Data Recovery Wizard to help you recover the data deleted from the Recycle Bin effortlessly.
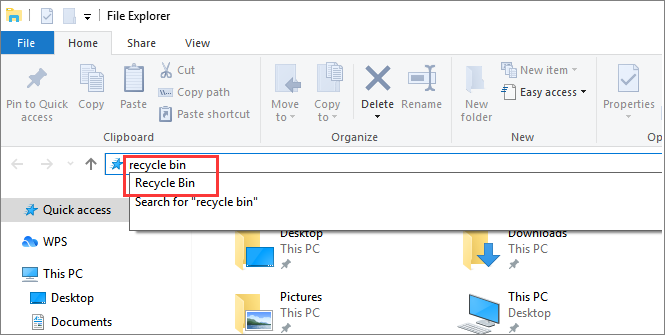
Press Win + E keys to open File Explorer. Type and search recycle bin in the address bar. Press Enter to open Recycle Bin directly.
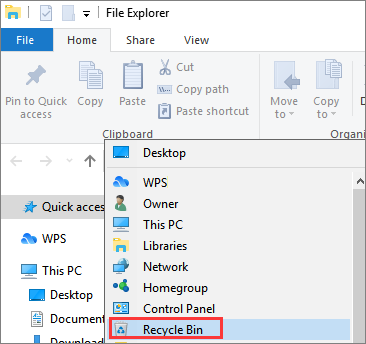
Another way is to find Recycle Bin in File Explorer is to click the > icon in the address bar. In the drop-down menu, choose «Recycle Bin».
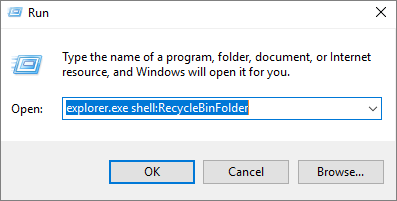
Open Recycle Bin from Run Command
Step 1. Press Win +R keys to open the Run box.
Step 2. Type explorer.exe shell:RecycleBinFolder and click «OK». Then, the Recycle Bin will pop up.
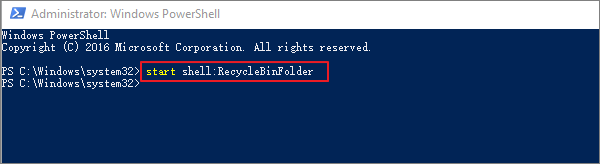
Open Recycle Bin from Using PowerShell
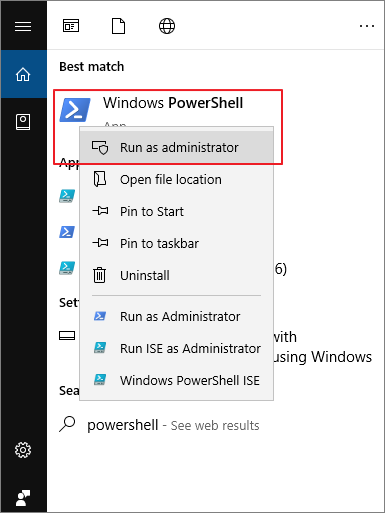
Step 1. Click the Search button, and type PowerShell.
Step 2. Right-click Windows PowerShell from search results, and choose «Run as administrator».
Step 3. Type shell:RecycleBinFolder and press Enter. Then, the Recycle Bin will open.
Related reading: How to Fix Corrupted Recycle Bin in Windows 10
How to Find Recycle Bin in Windows 10/11 via Settings
If there is no Recycle Bin icon on your desktop, follow the ways to get to desktop icon settings in Windows 10.
Step 1. Select the Start button. Then, click «Settings» > «Personalization».
Step 2. Click «Themes > Desktop icon settings».
![]()
Step 3. Check «Recycle Bin», then select «Apply > OK». Then, you should see the Recycle Bin icon displayed on your desktop.
![]()
To show Recycle Bin icon on the desktop in Windows 7, select the Start button, type desktop icons in the search box, and then select Show or hide common icons on the desktop.
How to Empty Recycle Bin in Windows 10/11
Recycle Bin keeps the all files you deleted. If you don’t clean it up in time, as time goes by, it will accumulate a lot of files and take up much space. Learn multiple how to empty Recycle Bin in Windows 10 effectively.
- Empty Recycle Bin on desktop
- Clean Recycle Bin in its Manage menu
- Empty Recycle Bin in settings
- Clean Recycle Bin in CMD or on a schedule
Bonus Tip: How to Recover Files from Emptied Recycle Bin Windows 10
If you lose important files by pressing the Delete or Shift+Delete keys, or emptying Recycle Bin, how to recover lost data efficiently?
Use EaseUS Data Recovery Wizard, a world-famous file recovery tool, to restore deleted or lost files from emptied Recycle Bin, HDD, SSD, USB flash drive, external hard drive, SD card, camera, etc.
Free download this data recovery program to recover lost Word documents, photos, video, audio, email, and other files in simple clicks.
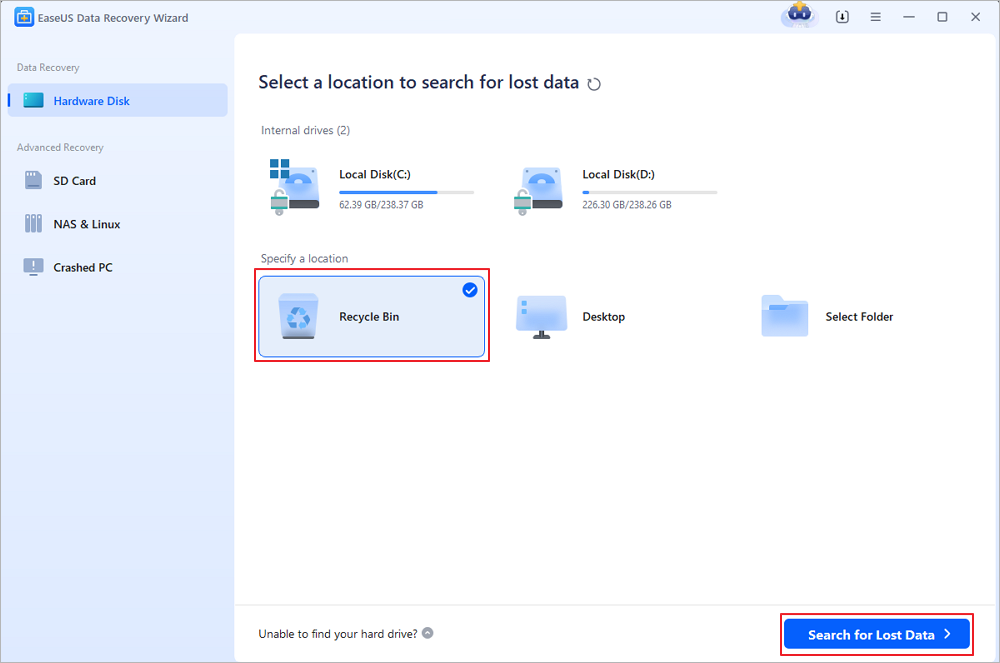
Step 1. To specifically recover files from emptied Recycle Bin on Windows 11/10/8/7, hover the mouse pointer over the «Recycle Bin» option under the «Locations» section and click «Scan».
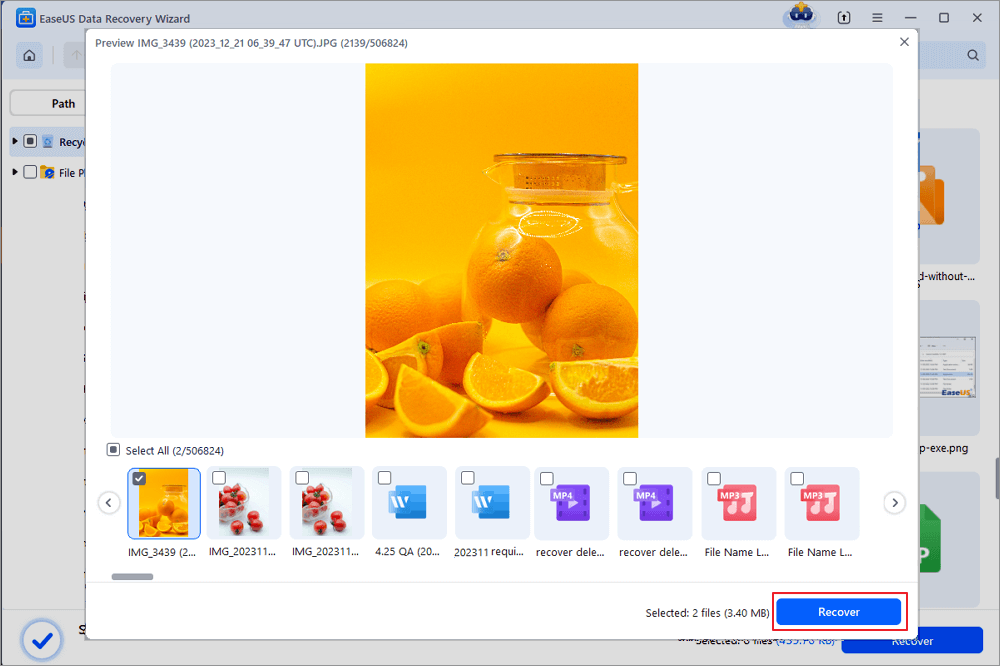
Step 2. EaseUS data recovery software will start a quick scan immediately for all deleted files, and later a deep scan will launch automatically to scan more lost files. After the scanning process, you can use the «Filter» feature to select a specific file type, such as Pictures, Word, videos, etc.

Step 3. Once you locate the files you want to restore, you can double-click it for a full preview. Then, select the target files and click «Recover». We suggest you select a different volume or an external USB drive to save the recovered files to avoid data overwriting.
Concluding Words
After reading this tutorial, we believe that you’ve known that where is the Recycle Bin on Windows 10 computer. If you don’t see Recycle Bin on your desktop, you can still access it in File Explorer, by using the Run command and Windows PowerShell. Besides, you can add the Recycle Bin to your desktop via settings.
If you accidentally clear your Recycle Bin but realize that there are some files you need, don’t worry, use EaseUS data recovery software to get files back at a high recovery rate.
Есть в Windows системная папка, которая от глаз пользователей скрыта и есть она на каждом локальном диске компьютера. Стоит заметить, что папки с подобным именем могут являться и вирусами, так что, будьте внимательны.
Так как папка является скрытой, то, чтобы ее увидеть нужно в свойствах проводника включить отображение скрытых файлов и папок.
Нажимаете для этого на панели инструментов папки «Вид», потом переходите в «Параметры».
В открывшейся папке переходите во вкладку «Вид», в самом низу активируете «Показывать скрытые файлы и папки».
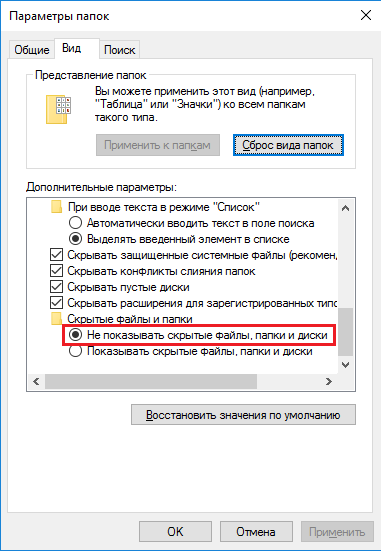
Если вы обнаружили эту папку, то знайте, что она хранит удаленные вами файлы. Другими словами – это корзина, которая обычно находится на рабочем столе. Данное название пришло еще со времен Windows Vista. Ранее она называлась Recycler или Recycled.
Интересный момент: на дисках вы можете обнаружить несколько таких папок. Это следствие переустановки системы, пугаться в этом случае не нужно, лишние папки вреда не принесут.
Свойства корзины
Итак, мы можем перейти в свойства корзины и увидеть некоторые настройки. Перейти туда очень просто: нажимаем по корзине ПКМ и выбираем «Свойства». Там мы можем задать максимальный размер корзины, для каждого диска, потому что $RECYCLE.BIN есть на каждом разделе. В корзине же, мы видим удаленные файлы со всех разделов одновременно.
Можно настроить и мгновенное удаление данных, без помещения их в корзину, для этого отмечаем соответствующую функцию.
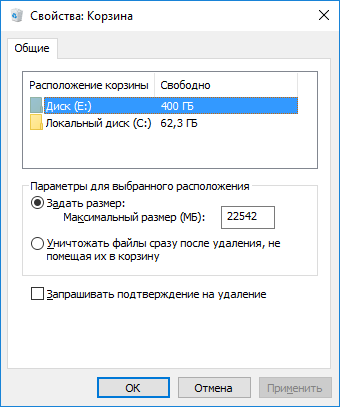
Кстати говоря, вы можете удалять файлы безвозвратно даже без активации этой функции, просто нажав Shift+Del и все.
Вирусы
Папка Recycle.bin, как я уже говорил, находится только на локальных дисках системы. Если вы обнаружили папку на переносном носителе, например, флешка, то скорее всего это вирус, так как, на таких носителях этой папки быть не должно. Срочно проверьте флешку антивирусом.
Как удалить recycle
Удалить папку можно, например, той же клавише Delete, и она исчезнет, но система потом снова ее создаст, когда вы что-то удалите. Чтобы папка не докучала своим видом, скройте ее. Как это сделать мы рассматривали выше, когда отображали скрытые файлы.
Может у кого-то возник вопрос, а можно ли переименовать корзину? Если нажать правой кнопкой мыши по корзине, то так не выйдет, а вот с помощью реестра можно.
Не рекомендую вам переименовывать корзину, так как, это может повлиять на работу Windows 10.
Если все-таки решили поэкспериментировать, то вот, что нужно сделать:
- Нажимаем Win+R.
- Вводим regedit.
- Переходим по следующему пути: HKEY_CLASSES_ROOT/CLSID/{645FF040-5081-101B-9F0800AA002F954E}.

- Переименуйте значение Recycle Bin
Вот и все. Мы узнали, что такое $RECYCLE.BIN, и как работать с корзиной. На этом все.