Installation instructions
-
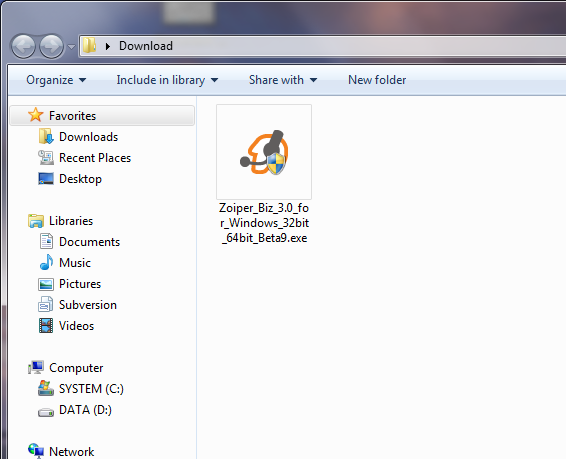
After the download prompt appears, save the file and wait for it download successfully.
-

-
-
Next go to your downloads directory and find the Zoiper installer, then execute it.
-
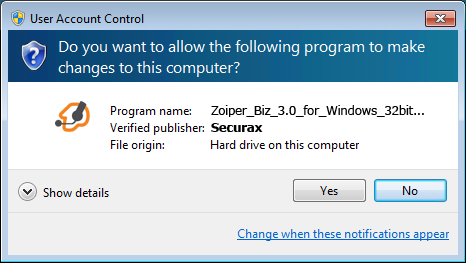
A verification prompt will appear, click «Yes».
-
The Zoiper installer will start, click «Next» on the first screen of the Setup wizard.
-
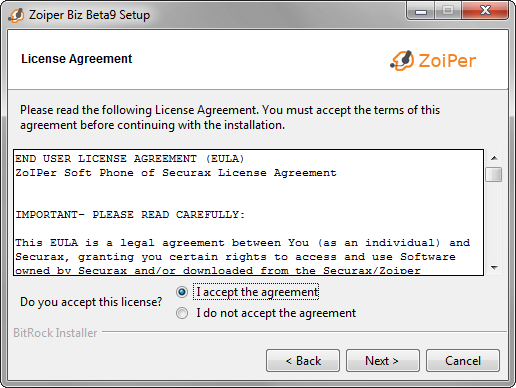
Read the license agreement and click «Next» after accepting the agreement.
-
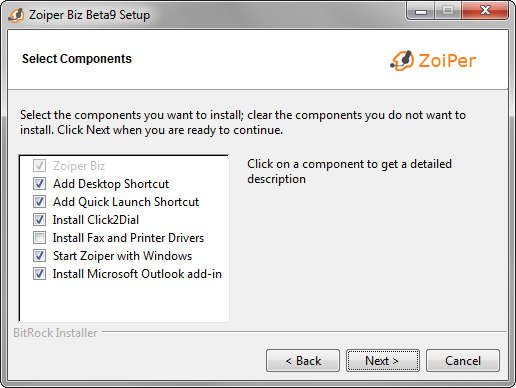
Select which components to be included.
-
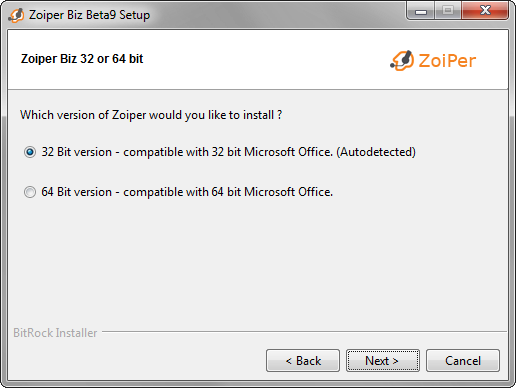
Select the version you would want to install.
-
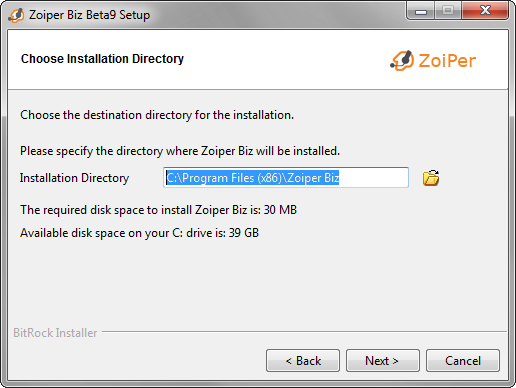
Select an installation directory (Best to keep the default one).
-
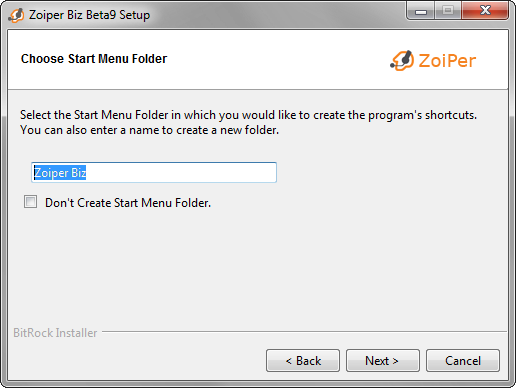
Choose a start menu folder.
-
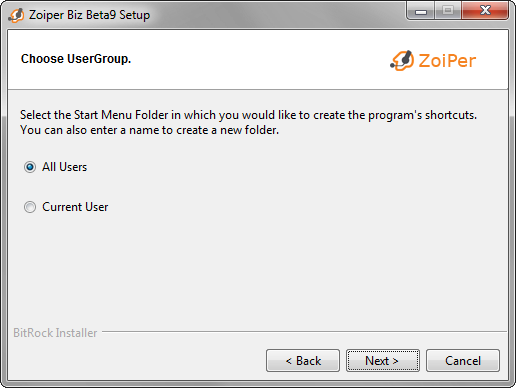
Select which users should be able to use the new Zoiper installation.
-
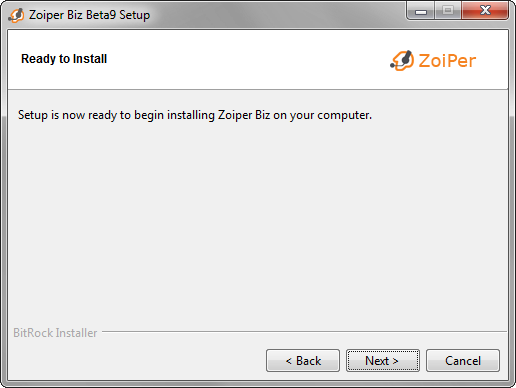
The setup is now ready to begin the installation. Click «Next» to continue.
-
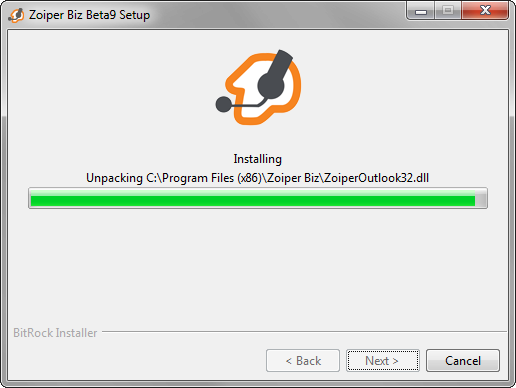
Wait while the Zoiper installation finishes.
-
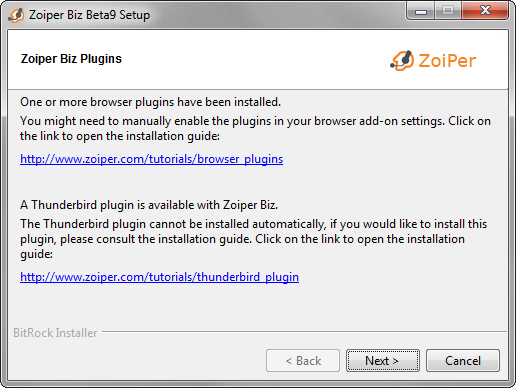
The install wizard will inform you for the Zoiper Biz Plugins which should be already installed.
-
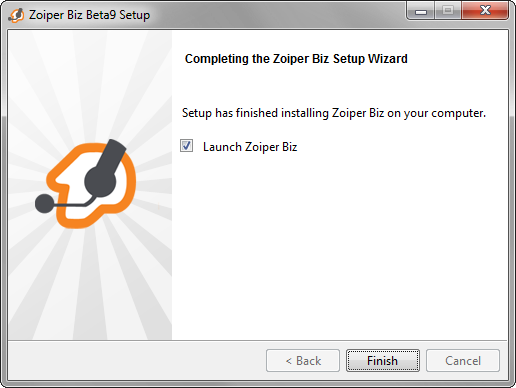
The installation is complete. Click «Finish» to launch Zoiper.


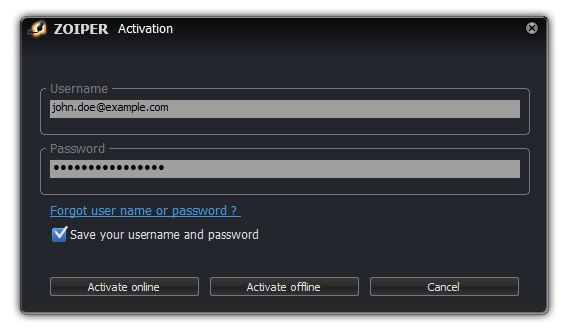
Activating the Zoiper License: (Zoiper Business Edition Only)
If you are using Zoiper Business Edition, an activation screen will appear on the first startup. Please
fill in the email address you used to purchase Zoiper as the «username field». You can find the password
in the mail that was sent to you directly after your purchase.
Activate online
If your computer is connected to the Internet, you can activate your copy of Zoiper automatically
by clicking on the Activate online button. Zoiper will contact our licensing server and
download the needed license files.
If your computer requires the use of a manually configured proxy server, zoiper will automatically
use the proxy settings used for internet explorer.
Activate offline
If your computer is not connected to the Internet or a firewall is blocking access to our licensing server,
the “Activate offline” — button can be used. Clicking on the button will generate a file that contains
some details that are unique for your computer and the version of Zoiper that you are trying to register.
The filename contains the name of your computer. It will look like this:
ZoiperCOMPUTERNAME.certificate
It can be found in the Zoiper Certificates folder.
You can find it in:
C:\ProgramData\Zoiper
Zoiper<ComputerName>.certificate is the file that should be sent to register4@shop.zoiper.com
Please open your mail client and press the «Compose new mail» button. Address the new mail to
register4@shop.zoiper.com and attach the ZoiperCOMPUTERNAME.certificate file.
You will receive a certificate file by mail in return.
Please make sure that you are saving it named:
certificate
No file extension is needed.
Keep in mind that by default Windows hides the known file extensions and there is a high possibility that
your Windows automatically puts a file extension to the certificate file while saving it.
Please right click on that file and choose «Properties». You will see the full filename in the
Properties window. You might need to remove the extension to make it work.
This file (certificate) should be placed in the folder you got ZoiperCOMPUTERNAME.certificate from.
Restart the phone, it should now be activated.
Silent installers for mass deployments.
If you would like to install Zoiper without the need for user interaction, but with a
progress indicator, use these command line options to the zoiper installer.
(You will need to adjust the name based on the installer you are using).
"zoiper_Biz_3.1_setup.exe" --mode unattended --unattendedmodeui minimal
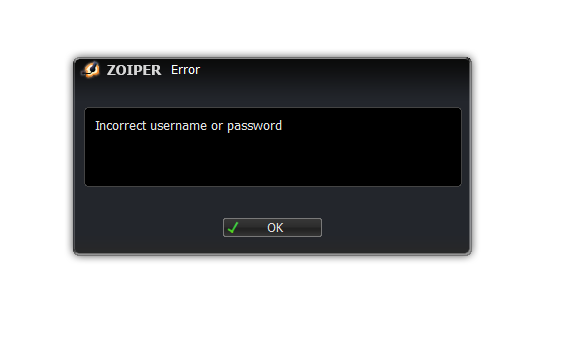
Activation errors
In case the username and or password is incorrect, an error message will be shown and the application
will exit. Please restart the application and try again.
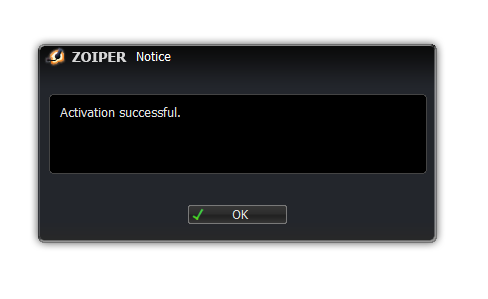
If all went fine, this notice should appear, you are now ready to use the application
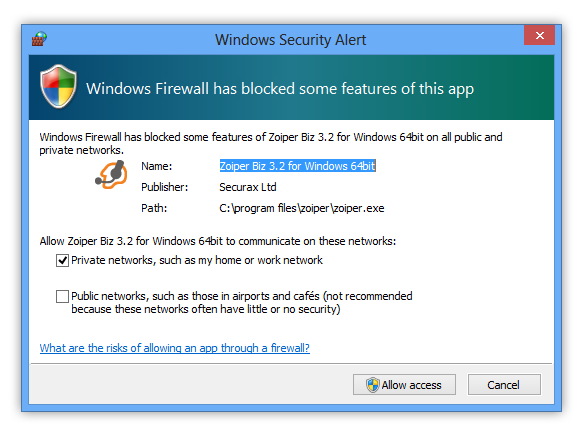
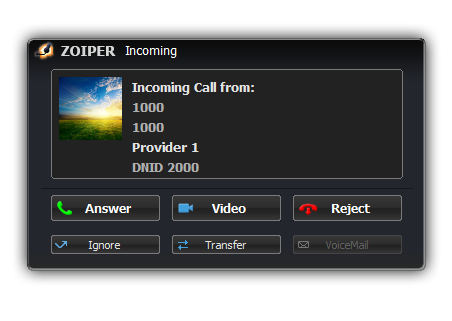
Please confirm that Zoiper is allowed to accept incoming network connections.
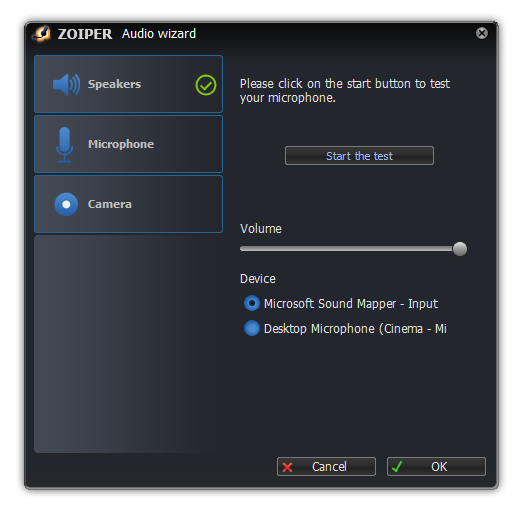
Configure Microphone and Speaker
Zoiper comes with a built-in Audio Wizard for easy configuration of your microphone and Speaker.
You may access this Audio Wizard by:
- Clicking on the speaker icon on the bottom right
- Clicking on the Settings menu in Zoiper and selecting Audio Wizard
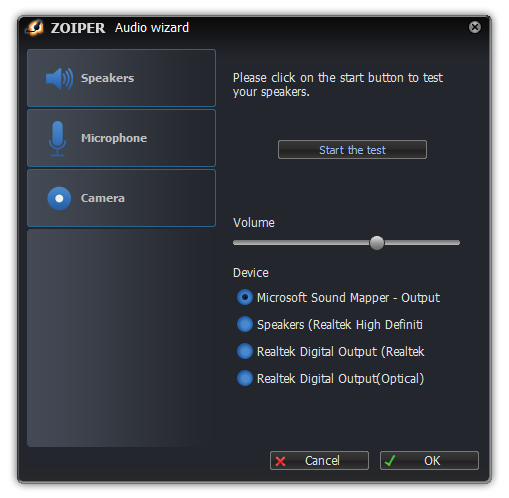
Zoiper will configure your Speakers first.
Click on the “start the test” – button.

If your speakers are configured and connected properly, you should hear a ringing sound. If you do, please
click on the Yes button and move on to the Microphone step.
If no ringing sound was heard, please make sure your speakers are connected properly and powered on and if
needed change the selected audio device on the bottom of the page to a different one and try again by
clicking on the “no” – button.
Click on the “Test your microphone” – button to start recording your voice.
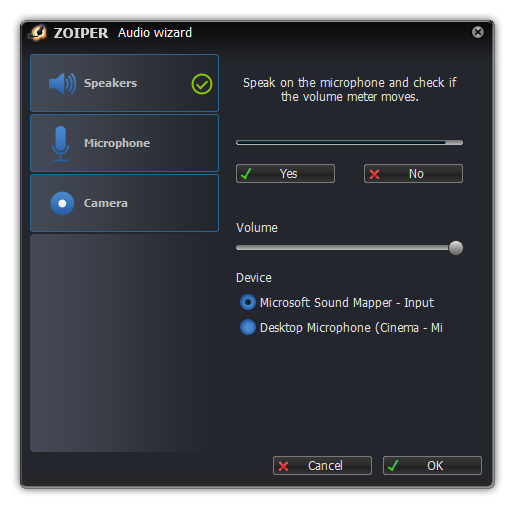
If the selected microphone is connected properly, you should see the volume meter move when speaking into
the microphone. If the volume meter is not moving, please check your cabling and make sure the proper audio
device is selected in the Device section on the bottom of the page.
Once the microphone and speaker are configured properly, click on the “yes” — and the “ok” to move on to the
webcam configuration screen.
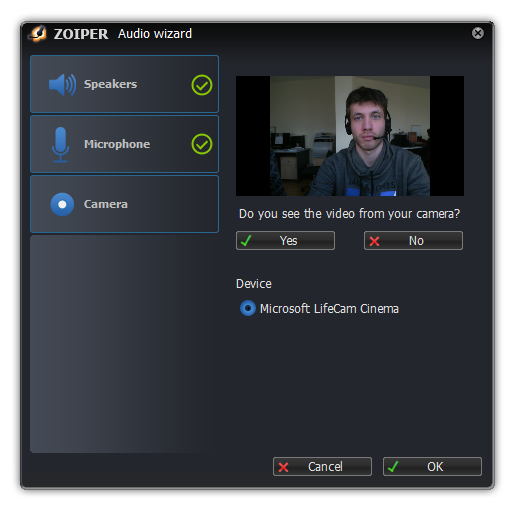
A list with webcams will appear on the bottom. Please select the webcam to use and confirm that the image
is shown by clicking on yet. If no webcams appear, please make sure that your webcam and webcam drivers
are properly installed in windows.
Clicking on ok will close the configuration panel.
Configuring a SIP, IAX or XMPP account
Now that the audio devices are configured, it is time to move on to the configuration of the server you want
to use. This could be a VoIP provider, your office PBX or a public XMPP provider such as Facebook.
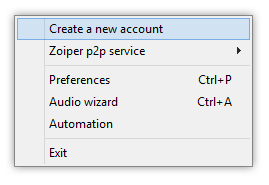
Click on the Settings menu and select “create a new account”.
Account Type
A new page will appear to select the type of account you want to make. This will usually be SIP, unless your
VoIP provider or system administrator instructed you otherwise
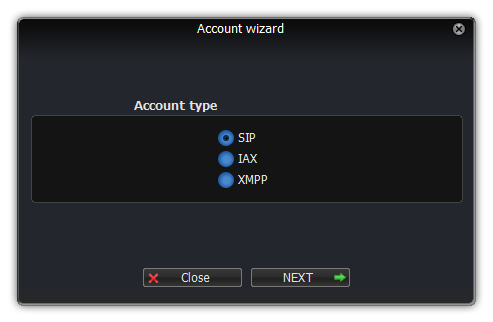
Select the type of account you want to configure and click on the “Next” – button.
Tip:
Please visit http://oem.zoiper.com for more information on how to
make things easier for your users by providing them with a preconfigured or preprovisioned Zoiper. This
will bypass all tedious configuration tasks for the end user and will allow the user to make calls
immediately after the installation.
Credentials
Your provider or system administrator should have provided you with a username, password and possibly
a hostname.
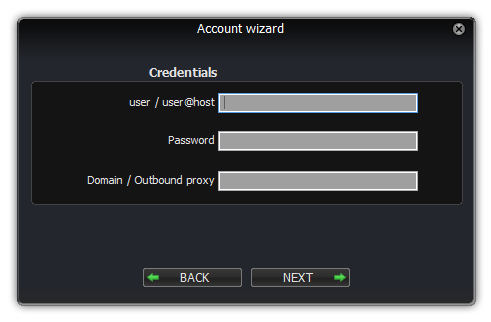
Fill in the username on the first line and the password on the second line.
If your administrator provider you with a domain, proxy, registrar, hostname, outbound proxy or server
field, please fill enter it on the last line.
Fill in the username on the first line and the password on the second line. The username could look like:
john.doe
or:
john.doe@sip.example.com
or:
john.doe@sip.example.com:5060
or:
abc123cde
The password will typically be a random string, usually with a combination of lowercase and uppercase
characters and some number like:
dHOE5NBjqmS3
This field will typically look like:
sip.example.com
or:
sip.example.com:5060
or in case of a PBX might look like:
192.168.1.20
Account name
Please enter a name to identify this account; you are free to give it any name of your liking.
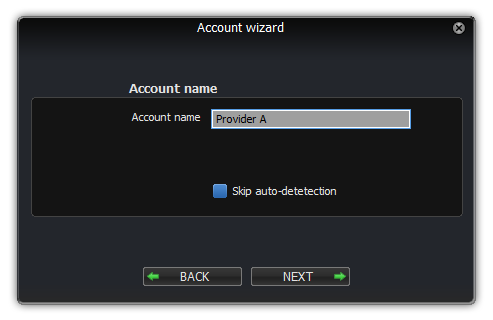
When you are done, click on the “next” – button. Zoiper will now try to figure out the best way to
connect to the VOIP server.
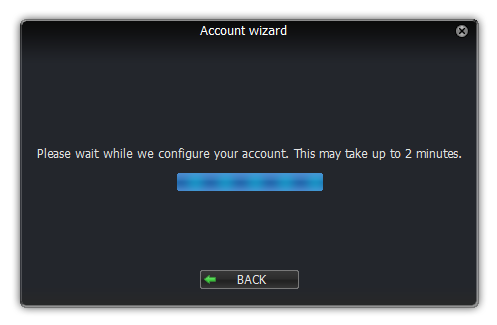
Troubleshooting
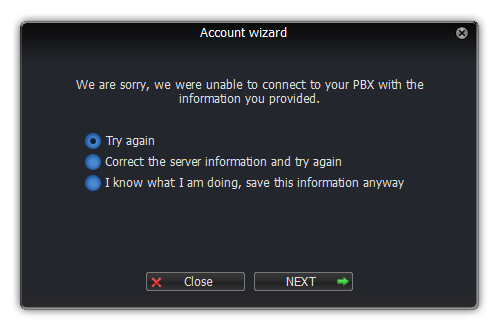
In case the account wizard is unable to automatically configure your account, this could be due to a variety
of reasons.
Most common reasons are:
- The server hostname does not exist or is incorrect.
- The username or password is incorrect.
- The server is not responding or a firewall is blocking the access.
- The account needs additional configuration to register
Please verify the information you have entered and try again.
If you are sure the information are correct and want to save the information and want to complete the
configuration manually, click on “I know what I am doing, save this information anyway”.
See also Preferences -> Accounts.
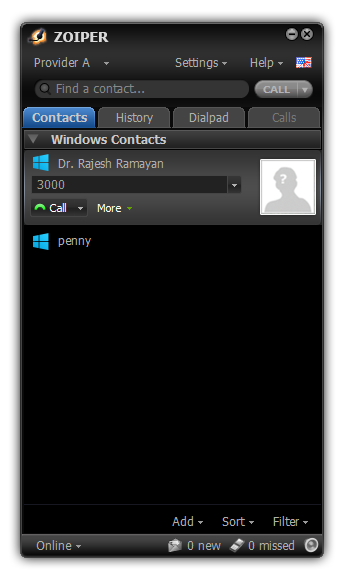
Zoiper is designed to make communications easier and more intuitive. It is a powerful tool that combines
voice, video and instant messaging in one.
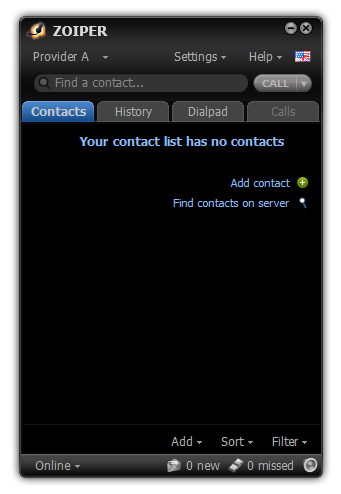
The picture above shows the basic overview of the Zoiper interface.
The menu bar consists of the Account dropdown, Settings menu, the Help menu and the language selector.
Account dropdown

The account dropdown is only present when 2 or more sip or iax2 accounts have been configured. Changing the
selected provider changes the default account used for the outgoing calls.
This selection has no effect on instant messages or contacts with a hardcoded account.

The settings menu let’s you access the Account Wizard, the Zoiper p2p service, the preferences menu, the
Audio Wizard and the Automation menu.
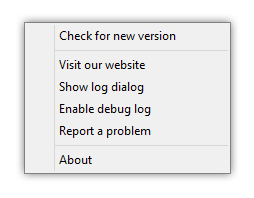
Here you can check for the latest version of Zoiper; the manual; visit our website; show the quick logs,
about box; the manual, enable or disable the debug log; report a problem to the Zoiper team or read
the about box.
This dropdown lets you change the language. Contact us on support@zoiper.com if you would like to
translate Zoiper in your language.
Search / Input field
This field can be used to
- Dial the number entered in this field
- Search for this name or number in the contact list(s)
Using the search functionality
A search may be made for phone numbers / extensions, digits or letters for names of contacts.
For example, the overview image shows a search for the first three letters of the name Peter.
Typing in just the first syllable (i.e. ‘pe’) is enough to instantly bring all results that contain this
sequence of letters. With each letter typed, the search is narrowed down to the right contact. You
do not need to type the entire name: click on the chosen contact when the results are filtered out to
just a few – give him / her a call by clicking on the call button, or send a Fax, or start an Instant
Messaging session using the functional buttons.
Note that you may perform a similar search with the matching digits of a phone number.
It is possible to also search LDAP or the native contact and aggregate the results in
the contact list. See the tutorial for using LDAP
with Zoiper.
Using the Dial functionality
You may enter any phone number / extension to make a VoIP call. Just type it in the field and click the
“Call” — button, or hit enter to dial.
Call and hang-up buttons
These buttons provide the basic phone functionality of Zoiper. Both buttons are grey and disabled by
default.
When you type something in the Search / Input field or click on a chosen contact, it becomes green.
The “Call” – button is used for dialing phone numbers / extensions. It becomes enabled (green) when you:
- Click on a contact;
- Type a contact name to call in the search / input field
- Type the phone number / extension in the search / input field
On the right side of the call button you may find a dropdown to send a fax or start an instant messaging
conversation instead of an ordinary call.
The “Hang-up” — button is to the right of the “Call” – button. It becomes red while dialing or in the middle
of an active call.
The tab bar and tabbed windows
The tabbed windows feature provides convenient access to all functionalities. The tab windows are accessible
via the Tab-bar located beneath the Call and Hang-up buttons.
The four tabs bring the relevant windows: Contacts, History, Dial pad and Active calls to the foreground.
All these windows are dockable. This means that you can drag them away from the main Zoiper window. This
is particularly useful if you want to, for example, browse your Contact list and have your Dial pad on
display at the same time.
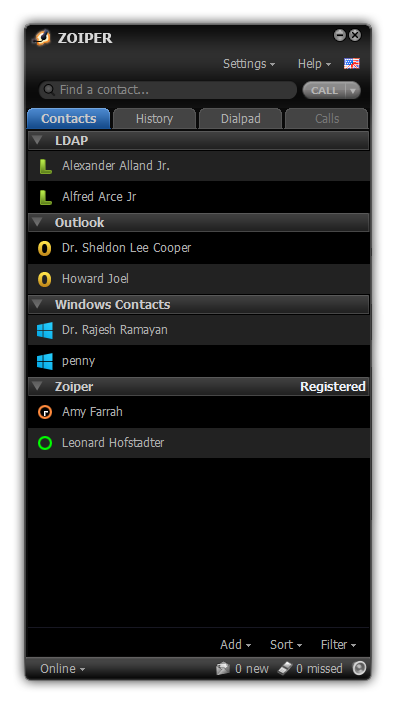
Contact tab
The contact tab shows a list with all contacts or, if a search is active, all contacts that result from
the search query in the search field,
Regardless if they were found in the Zoiper contact list, in the native address book, the outlook contacts,
on an external XCAP server or in the XMPP roster or the LDAP directory.
The contacts are ordered in subgroups, with a small triangle next to their name that
allows the user to hide or show the contacts for a given group.
Clicking on a contact results in the contact field expanding to reveal more details and options,
while at the same time enabling the green call button.
If multiple numbers are available for a contact, a dropdown will appear on the right of the telephone
number, giving access to all other numbers for that contact.
The small call button underneath lets you dial the contact, while the small dropdown triangle reveals
additional options such as The “More”-button on the right, lets you edit the contact
(if it is in the Zoiper contact list and not in an external contact source) or copy the
contact to the clipboard.
On the bottom of the tab there is a contact menu, to quickly add or import a contact from LDAP
or the native address book. The Sort button lets you sort the people based on their name or
their online status. The filter button allows filtering out the offline people.
Entering a few characters in the search field will filter the results shown below, just like
in the contacts list tab.
History tab
You can open this tab by clicking on it.
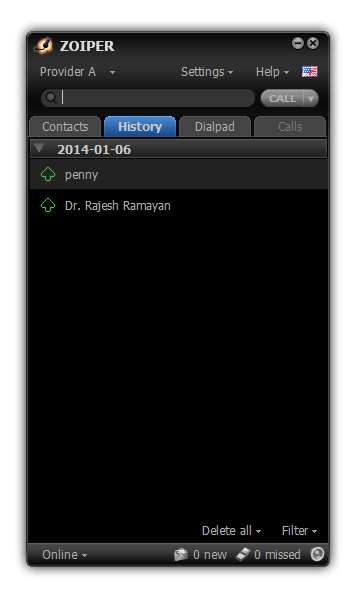
The history tab shows a list with the history of calls and faxes exchanged, In a way very similar to the
contact list tab.
The events are listed consecutively with date and time for each event.
The history stores the information about events such as:
- Incoming calls
- Outgoing calls
- Missed calls
- Incoming faxes
- Outgoing faxes
- Unanswered calls
- Rejected calls
If you have missed a call, you may dial back the caller right away. You may observe the length of calls
or the contents of messages. History also allows you to bring up faxes received, if you like to.
When Zoiper is restarted, the History from previous sessions is still present. The previous Zoiper session
(from launch to Zoiper shutdown) is saved in a History.txt text file, this file is located in the
%appdata% folder, in the Zoiper subdirectory.
Each new History is listed underneath the previous one according to its date and time.
Clicking on a contact shows more details and options.
On the bottom of the tab, a delete button lets you delete the complete history at once, the filter button
allows filtering of the contacts based on the call’s release / hangup reason and if it was an incoming
or outgoing call.
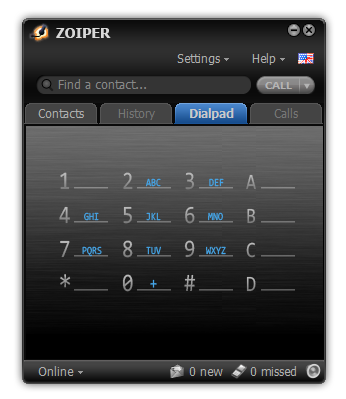
Dialpad
Clicking on the dial pad opens up a traditional dialpad, to either dial a number or to navigate an IVR
through DTMF tones.
Active call tab
When you start a call, the active call tab will become active.
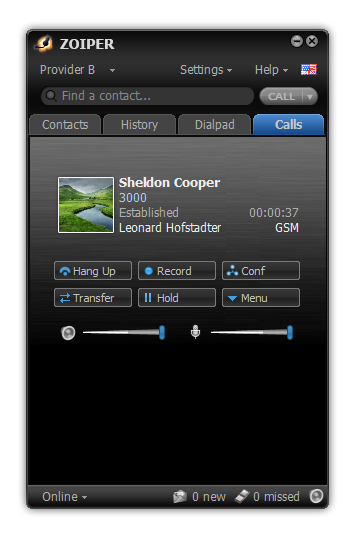
The dialed number (and name if available) are shown on the top, together with additional information on the
call such as current status (Ringing, Established), the account used, the duration of the call and the
codec used.
Underneath a series of action buttons will appear:
| Hangup | To hangup the call |
|---|---|
| Record |
This will start a call recording on the fly. The recordings will be stored in the location configured in the preferences. (Add a shortcut to this setting in the manual). When active the text on the button will change into Stop.
Please note: it is possible to always enable recordings in the settings. |
| Conf |
Add this call to a conference call. All calls in the conference will appear in a list on the bottom.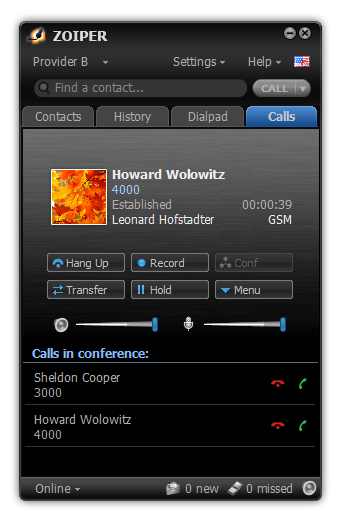
Clicking on the red hangup icon will hangup the call with the person. |
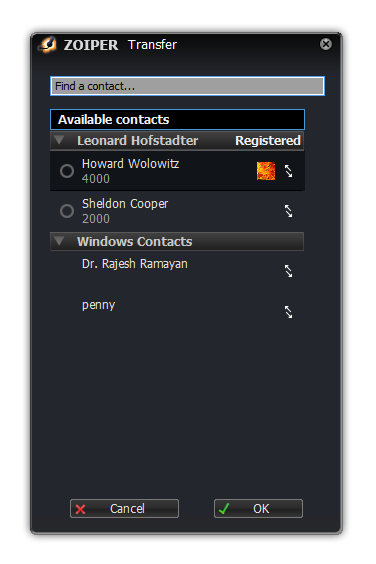
| Transfer |
Open the transfer dialog. You can transfer the call to the person in the list by clicking on the transfer button on the |
| Hold |
Hold the call, this will cause music on hold to be played from the server to the recipient. |
| Menu |
Opens a menu with additional options. Two volume sliders will appear on the bottom, the left one is for the speaker. Clicking on The microphone slider is adjusted automatically by default to automatically select the |

Bottom Bar
On the bottom of the phone, a small menu is available with easy access for changing the online status,
checking voicemail messages, showing missed calls, audio device selection and the audio wizard.

Online status
This is an indicator of the online status of your current account. The people that have added you in
their contact lists may view your online status as well. Choose the status that suits you best.
In order to change the current status, you may:
- Choose the online status you wish to use from the Online status button and click on it.
- Go to the settings > Zoiper p2p > status and click on the status you want to display.

Changing the status will affect all configured SIP and XMPP accounts with the «publish presence»
option enabled in the settings. When on an active call, the status will automatically be changed
to «on the phone».
Voicemail messages
The message-waiting indicator will light up when you have new voice messages. This requires the
support for MWI by your PBX or VoIP provider.
Clicking on the voicemail icon will dial the voicemail extension that was configured for that account.
You can configure the MWI in Settings > Preferences > { SIP account } > advanced > Subscribe for MWI.
Refer to this
link
for more information.
Missed calls
The missed calls indicator will light up when you have missed calls, a counter on the right will inform you
how many you missed.
Clicking on the icon will take you to the history tab, with the missed calls pre-filtered.
Audio icon
The audio icon provides a quick way to change the audio device or start the audio wizard.
![]()
You can access the Zoiper Preferences window, by either:
- Clicking on the Settings menu and clicking on preferences;
- Pressing CTRL+P on your keyboard while Zoiper has the focus.
In all cases the Zoiper Options screen will pop up with these sections:
Accounts
If you have one or more accounts, you will see them listen in the left column on the accounts page.
The accounts are grouped by protocol. (SIP, IAX, XMPP), an icon in front of the account informs you of the
current status: registered, failed to register or not registered.
When you click on an account, settings for this specific account will open. What settings will be shown
depends on the protocol type. (SIP, IAX or XMPP).
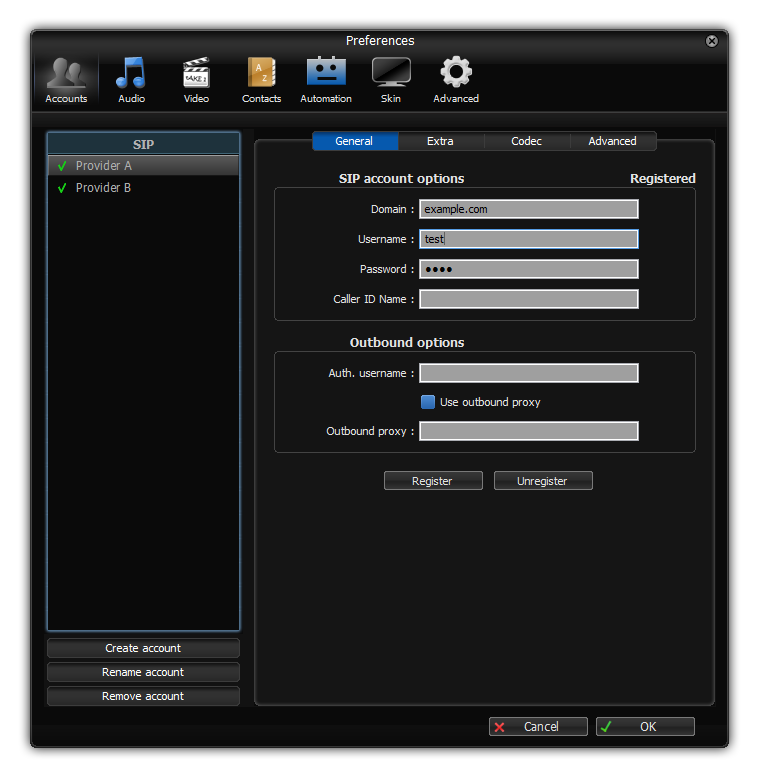
SIP Accounts
General
Sip Account options
| Domain |
This is the hostname or ip address where the server is located. |
|---|---|
| Username |
The username needed to authenticate to the server. |
| Password |
The password associated with this account Caller id name: This an optional field |
Outbound options:
| Auth. Username | This is the (optional) authentication username required by some server configurations. |
|---|---|
| Use outbound proxy |
This checkbox makes sure that Zoiper will use the outbound proxy configured on the line below. On the bottom of the page, you will find a register and unregister button, this button allows you |
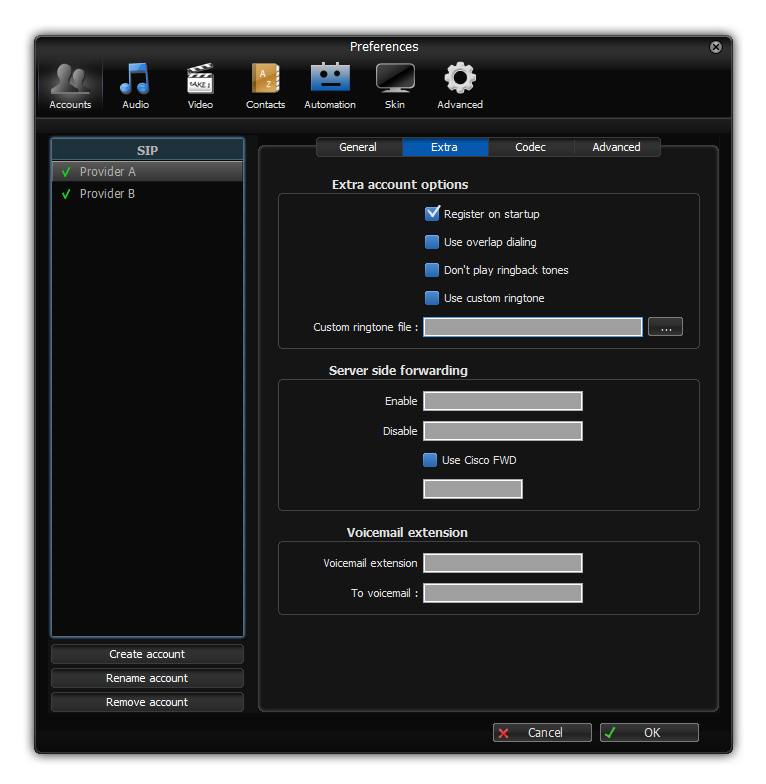
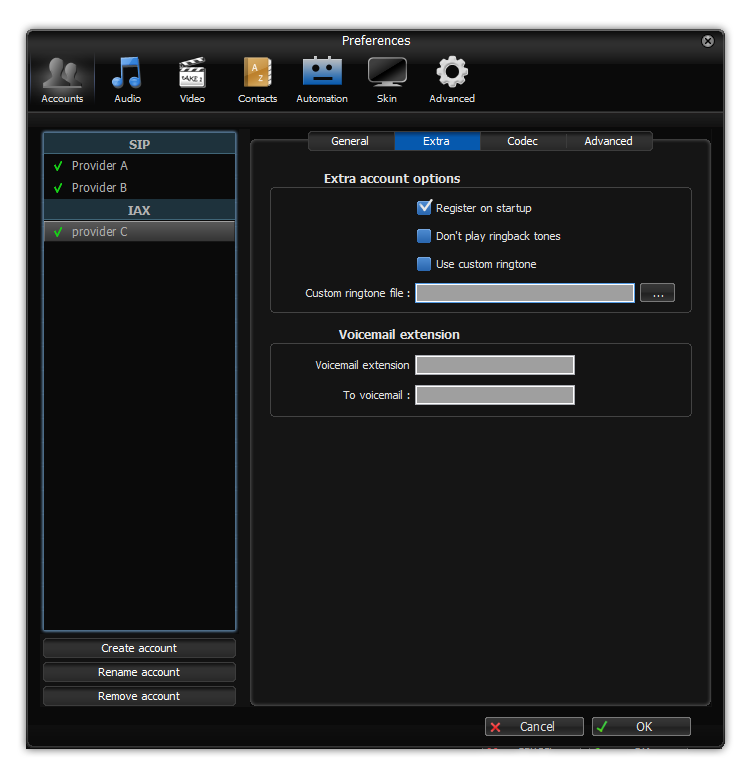
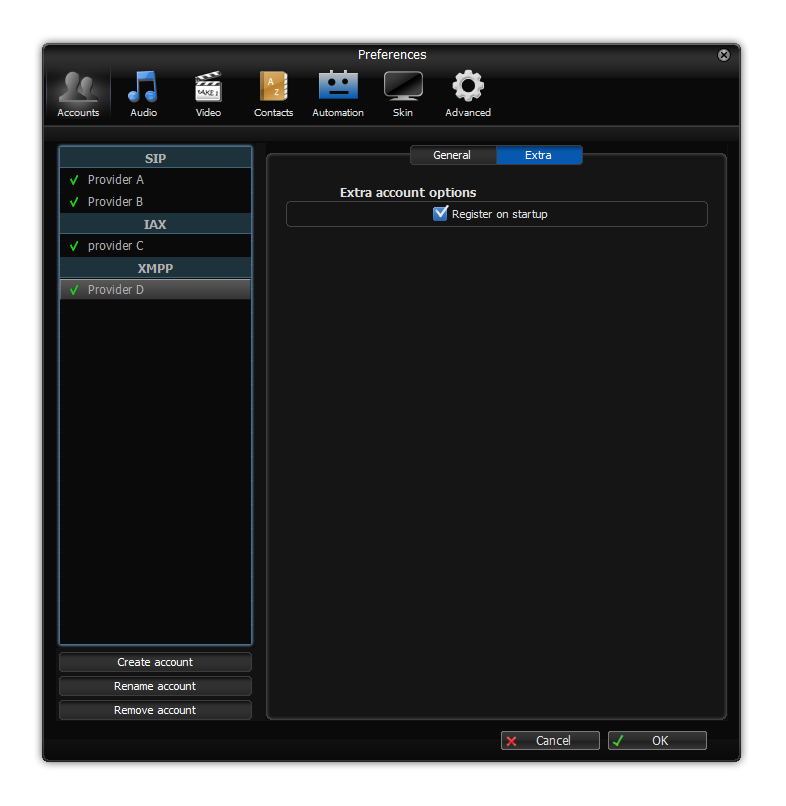
Extra account options
| Register on startup |
When checked, this account will register when Zoiper launches. |
|---|---|
| Use overlap dialing |
When ticked, Zoiper will not send the complete number to dial at once, but will |
| Don’t play ring back tones |
This setting will stop local generation of ring back tones and playback of early media |
| Use custom ringtone |
This checkbox and the field underneath let you activate and configure an alternative Clicking on the ” …” – button will open a file browser to select the file you want |
| Server side forwarding |
The enable and disable fields are used to configure two |
| Cisco FWD |
The use Cisco FWD and field underneath |
| Voicemail extension |
This is the extension on the server where you can listen to your voicemails. |
| To Voicemail |
This is the extension on your server that hosts the voicemail functionality. |
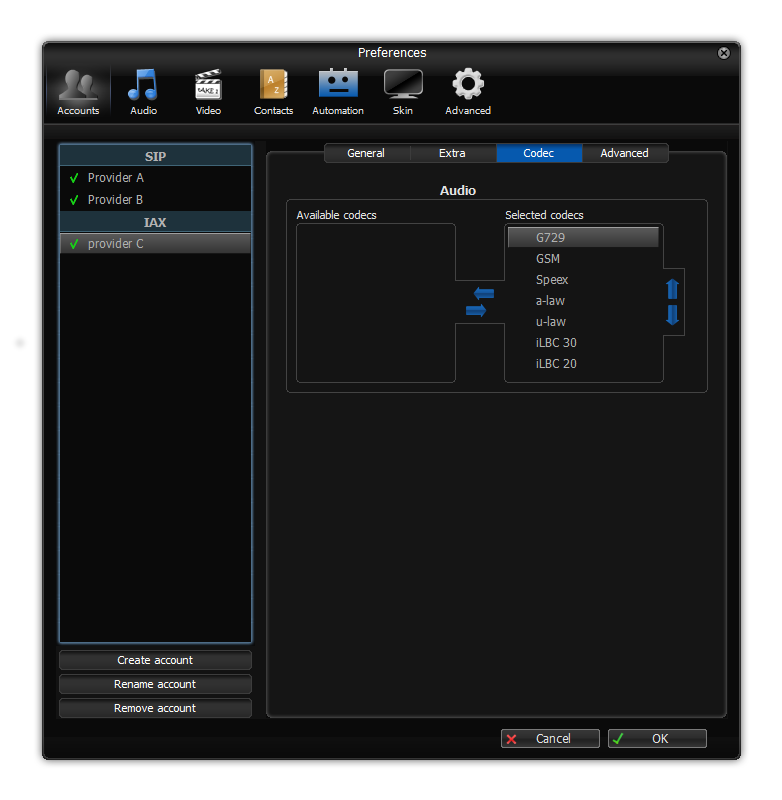
Codec

On this page you can select one or more codecs to be used for this account.
The available codecs shows the unselected codecs, when you select them and click on the right point arrow,
they will be added to the selected codecs.
Using the up and down arrow in the selected codecs column, will change the priority of the codec, the
higher in the list, the higher the priority.
Keep in mind that the codec that ends up being used will be negotiated between zoiper and the other end,
from the list of codecs available on both sides.
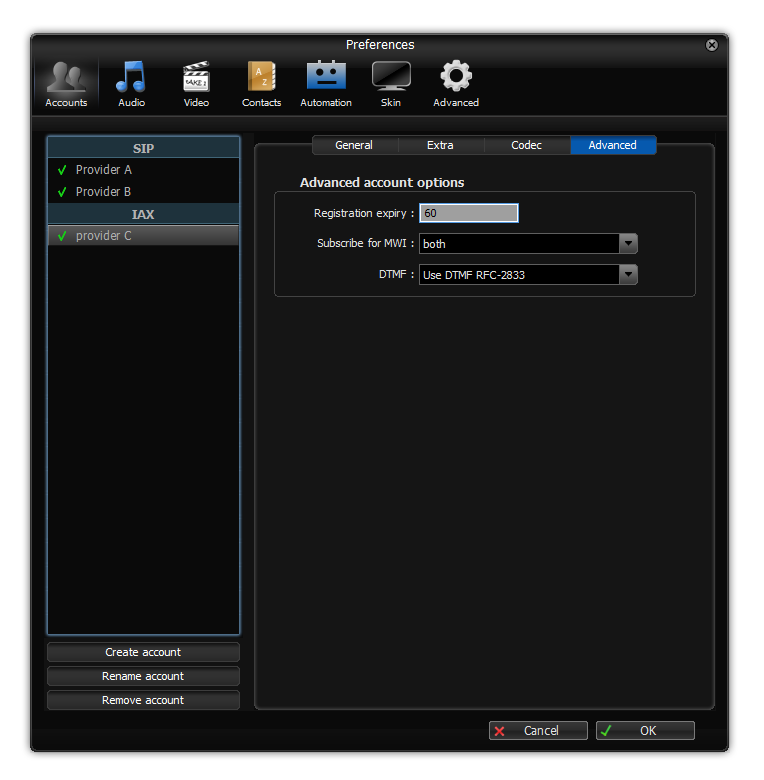
Advanced
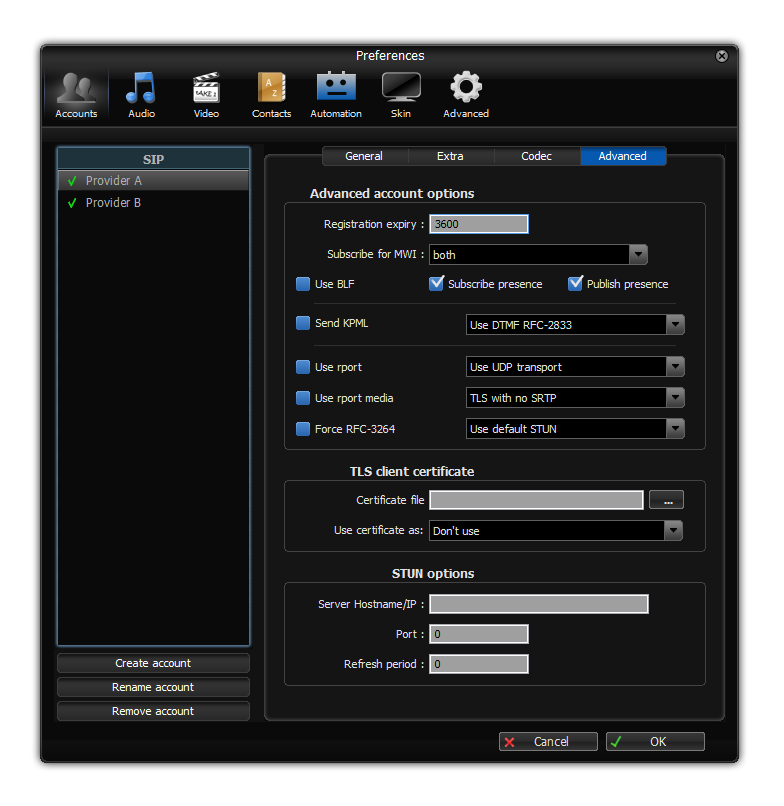
Advanced account options
| Registration expiry |
The maximum number of seconds between consecutive registrations on the server. Zoiper will The registration procedure is used to inform the server of our location to make sure |
|---|---|
| Subscribe for MWI |
A dropdown to let you configure the use of Message Waiting Indicators. This option is needed Possible options are:
Some servers will refuse the registration or the use of MWI based on the order of the |
| Use BLF |
This checkbox enabled the Busy Lamp Field functionality. When an extension with BLF |
| Subscribe presence |
Checking this box will cause Zoiper to subscribe for presence updates from the people |
| Publish presence |
Checking this box will cause Zoiper to start sending it’s presence updates to the people |
| Send KPML |
Enable this option to use KPML If the server confirms it supports it. |
| Use DTMF |
This configures which method will be used to send DTMF tones to the server when a button is The default setting is to use RFC-2833, which means sending them as a special type of RTP This last method is very unreliable and incompatible with voice compression; it will only work |
| Use rport |
Nat handling based on the rport RFC. Recommended for TCP and TLS configurations. |
| Use rport media |
Last resort for NAT related missing audio for some broken implementations |
| Transport |
This dropdown lets you select between UDP, TCP and encrypted TLS for the signaling between |
| SRTP |
This dropdown lets you enable or disable SRTP. SRTP will only work if used in combination |
| Force RFC-3264 |
This force a change in the hold and unhold packets and is a workaround for some |
| STUN |
This dropdown let’s you select the stun server you want to use, if any. The default stun server is stun.zoiper.com, If you use the custom stun option, you will need to fill it in at the bottom of the |
| User certificate |
This is the path to the user certificate used for TLS SIP connections (rarely used). |
| Stun options |
This setting lets you configure a custom stun server and port as well as how often the stun |
IAX Accounts
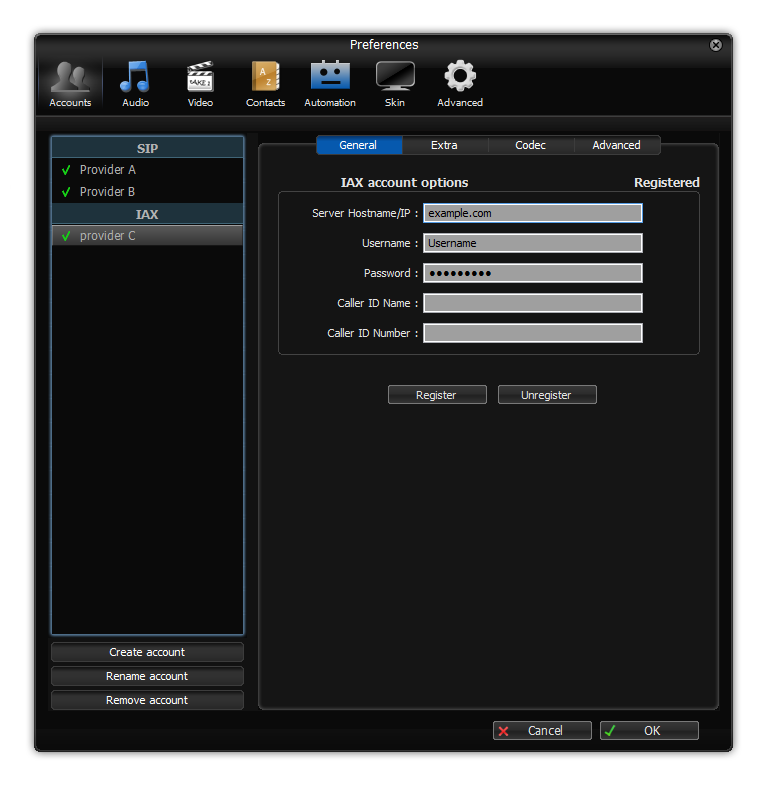
General
IAX Account options
| Server Hostname/IP |
The hostname or IP address of the VoIP server. |
|---|---|
| Username |
The username needed to authenticate to the server. |
| Password |
The password associated with this account Caller id name: This an optional field |
Extra account options
| Register on startup |
When checked, this account will register when Zoiper launches. |
|---|---|
| Don’t play ring back tones |
This setting will stop local generation of ring back tones and playback of early media |
| Use custom ringtone |
This checkbox and the field underneath let you activate and configure an alternative Clicking on the ” …” – button will open a file browser to select the file you want |
| Voicemail extension |
This is the extension on the server where you can listen to your voicemails. |
| To Voicemail |
This is the extension on your server that hosts the voicemail functionality. |
Codec
On this page you can select one or more codecs to be used for this account.
The available codecs shows the unselected codecs, when you select them and click on the right point arrow,
they will be added to the selected codecs.
Using the up and down arrow in the selected codecs column, will change the priority of the codec, the
higher in the list, the higher the priority.
Keep in mind that the codec that ends up being used will be negotiated between zoiper and the other end,
from the list of codecs available on both sides.
Advanced
Advanced account options
| Registration expiry |
The maximum number of seconds between consecutive registrations on the server. Zoiper will The registration procedure is used to inform the server of our location to make sure |
|---|---|
| Subscribe for MWI |
A dropdown to let you configure the use of Message Waiting Indicators. This option is needed Possible options are:
Some servers will refuse the registration or the use of MWI based on the order of the |
| Use DTMF |
This configures which method will be used to send DTMF tones to the server when a button is The default setting is to use RFC-2833, which means sending them as a special type of RTP This last method is very unreliable and incompatible with voice compression; it will only work |
XMPP Accounts

General
XMPP Account options
| Jabber ID (JID): |
TODO |
|---|---|
| Password |
The password associated with this account Caller id name: This an optional field |
| Full name |
TODO |
| Connect server (opt) |
TODO |
| Use legacy TLS mode |
TODO |
Extra account options
| Register on startup |
When checked, this account will register when Zoiper launches. |
|---|
Audio
General tab
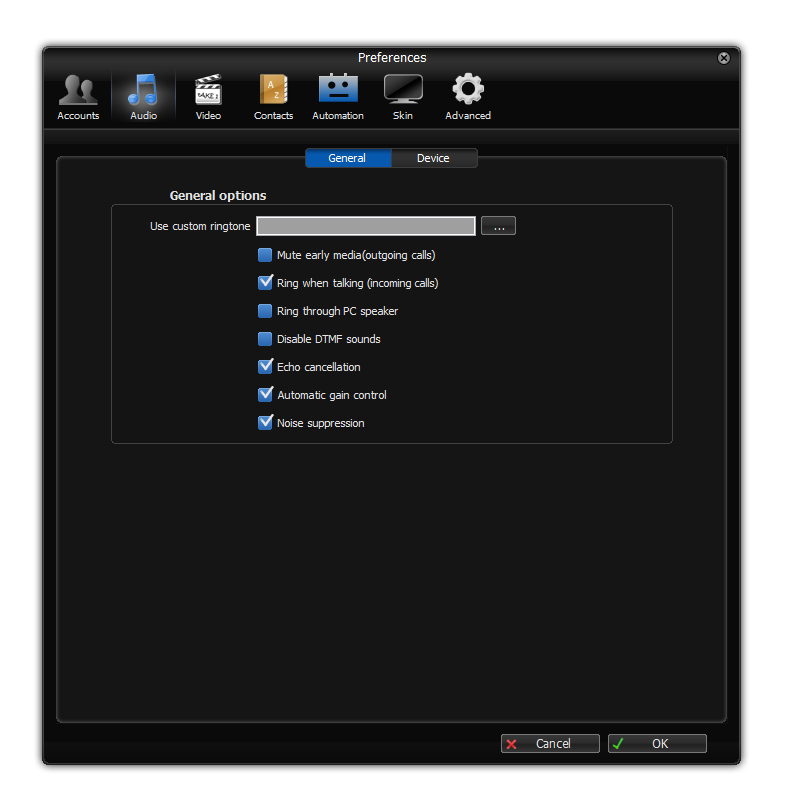
| Custom ringtone |
Here you may select a custom ringtone for all accounts. If you want a specific ringtone for |
|---|---|
| Mute early media |
This enables the muting of early media. This includes ring back tones coming from the network |
| Ring when talking |
If you unselect this checkbox, the softphone will no longer make a ringing sound when you are |
| Ring through pc speaker |
This option is commonly used for situations where the user is sometimes wearing a headset, |
| Disable DTMF sounds |
Activate this option if you want to stop the phone from playing sounds when you press the dial |
| Echo cancellation |
This will reduce or eliminate the echo that person you are calling might hear. It is recommended |
| Automatic Gain Control |
This will control the microphone levels automatically to make sure your voice is always the |
| Noise Suppression |
Noise suppression is used to eliminate annoying background noise from being sent over |
Device tab
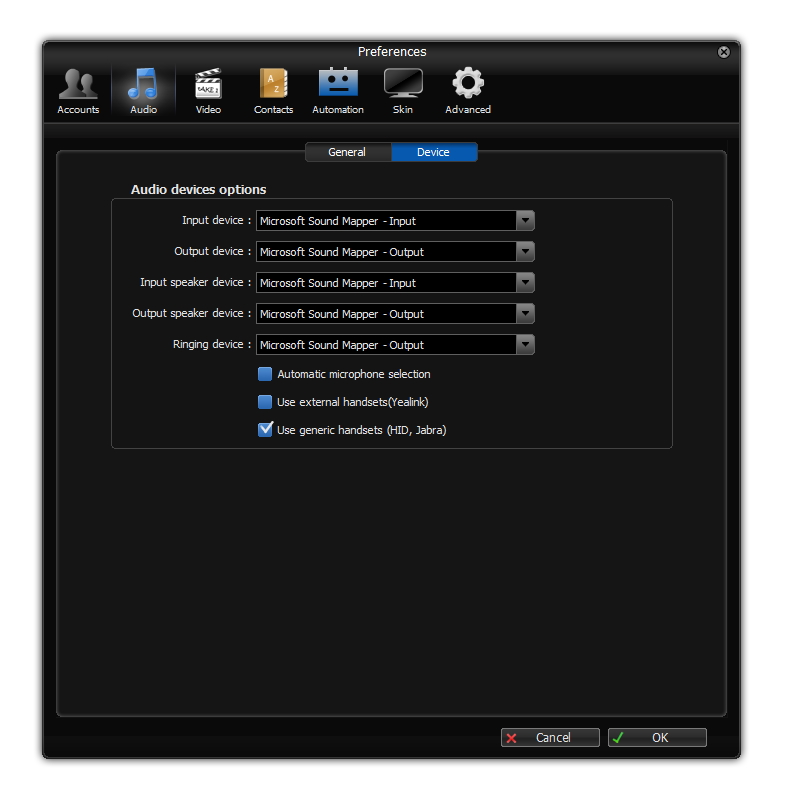
This tab lets you select and configure different audio devices.
| Input device |
This is the default microphone. If you have more than one microphone, you can select the |
|---|---|
| Output device |
This is the default speaker. If you have more than one speaker, you can select the desired one The next two options are for the “speakerphone” profile. You can switch between the headset |
| Input Speaker Device |
This is a separate audio profile. The device you select here will be treated as the device |
| Output Speaker Device |
This is a separate audio profile. The device you select here will be treated as the device |
Contacts
Search tab
This tab is for configuring how the search works in the contact list tab.
LDAP options
You can activate the LDAP search by checking the box in front of “use this server to search for contacts”.
| LDAP server |
This is the hostname or ip address where the LDAP server is located. |
|---|---|
| Password |
This is the password needed to access the server. |
| CN |
Common name |
| DC |
Domain Component |
| Result limit |
If you have a very large LDAP database with thousands of entries, you most likely will want to |
| Min. chars to search |
This is the minimum number of characters that will need to be typed in the search bar |
| Fields to search |
These are the fields to search for the string that was entered in the search field. By |
| XMPP Presence |
The name of the field in the LDAP points to the XMPP presence URI for the contact |
Advanced
Contact server options
Save contact list on Zoiper Biz server: This will save all your contacts on the Zoiper servers. This
requires you to be logged in to the zoiper service.
Save local contact list: This will save your contact list on the local filesystem
Save on this xcap server: This will save your contact list on the xcap server that is configured below.
| XCAP root |
http://xcapexample.com/xcap-root |
|---|---|
| XCAP user |
1234@xcap.example.com |
| Username |
the username for the XCAP server |
| Password |
the password for the XCAP server |
Automation
General
| Start minimized |
When this option is selected, Zoiper will automatically minimize on startup. |
|---|---|
| Minimize to tray |
When this option is selected, Zoiper will minimize to the tray instead of to the taskbar. |
| Minimize on close |
When this option is selected, closing Zoiper will result in Zoiper minimizing to the |
| Start Zoiper when you log in |
Start Zoiper when you log in to Zoiper |
| Always on top |
Keep zoiper as the top application. |
| Check for updates |
Automatically check if a new version of Zoiper is available on every startup. |
| Automatically open urls |
Open a url when one is received from the server. |
Notification
This page lets you configure when to shop a popup and configure what notifications you’d
like when you receive a chat message.
Automation
| Record path |
This lets you configure the directory where you wish to store the call recordings. The checkbox below enables or disables recording of all calls. You can at any time Several parameters are available:
Example: recorded_conversation_{YYYY}-{MM}-{DD}-{HH}_{NN}_{SS}_{account}_{number}_part{recording_part}
On this example record file name will include: year-month-day-hour_minute_second_contact phone number_account name |
||||||||||||||||||||||
|---|---|---|---|---|---|---|---|---|---|---|---|---|---|---|---|---|---|---|---|---|---|---|---|
| Open program |
On the same page you can also configure to automatically open a program on an incoming This functionality is usually used to automatically open an external program or website
|
||||||||||||||||||||||
| Strip dial characters |
This contains a list of characters that will be removed from the telephone number |
||||||||||||||||||||||
| On transfer request |
This sets the preferred way of handling incoming transfer requests. |
||||||||||||||||||||||
| Automatic popup on incoming call |
The software will move to the foreground on each incoming call. |
||||||||||||||||||||||
| Popup menu on incoming call |
Popup a menu with a request for user |
||||||||||||||||||||||
| Accept server-side auto answer |
When the server sends a special packet to answer the call, the softphone will automatically |
||||||||||||||||||||||
| Auto reject calls if status is set to |
If the status is one of the selected possibilities, reject all calls. |
Skin
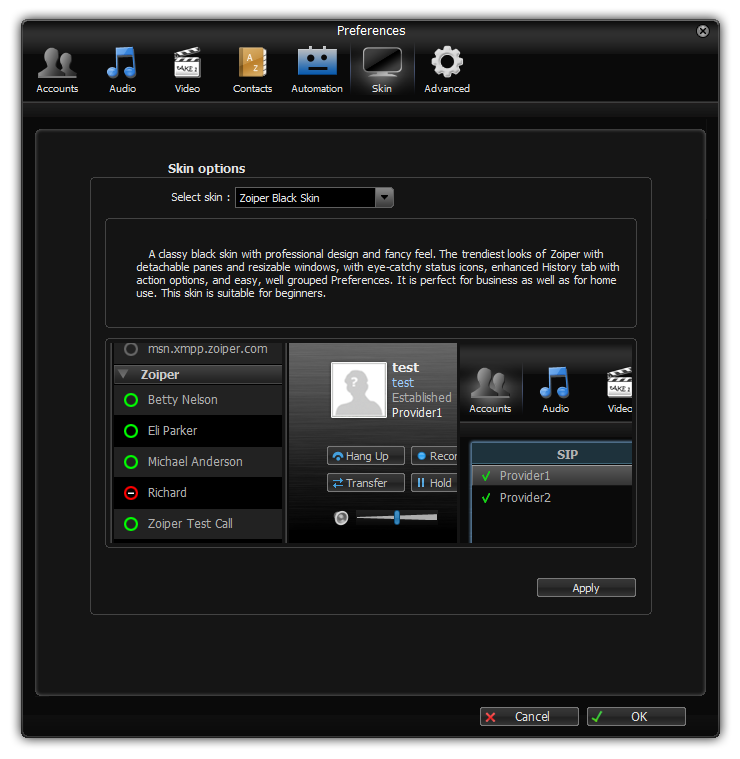
Skin
On the skin selector page you can select the skin of your liking.
Select a skin from the dropdown, click on apply and restart Zoiper.
Advanced
The advanced panel lets you configure a range of protocol settings, configure provisioning and
active some troubleshooting tools.
The provision tab:
The provisioning tab lets you store a username and password to be used in combination with
the provisioning URL that is stored in a text file in the same folder as Zoiper.
Network options
This will set some QoS (Quality of service) tags on the signaling and media packets.

Zoiper — один из самых популярных софтфонов для компьютеров и смартфонов. В статье вы узнаете, как его настроить, про достоинства и недостатки, а также стоит ли покупать платную версию.
Zoiper для Windows
Настройка
Шаг 1. Скачайте программу по ссылке или зайдите на официальный сайт www.zoiper.com в раздел загрузки.

Шаг 2. Выберите версию для Windows.

Шаг 3. При нажатии на Download предложат скачать или купить программу, там же указаны основные платные функции. Выберите Free, нажмите третий и последний раз Download, после чего начнется загрузка.

Вес программы — 171 Mb. Для сравнения вес PhonerLite — 5 Mb.
Шаг 4. При первом запуске Zoiper поможет настроить микрофон и гарнитуру.

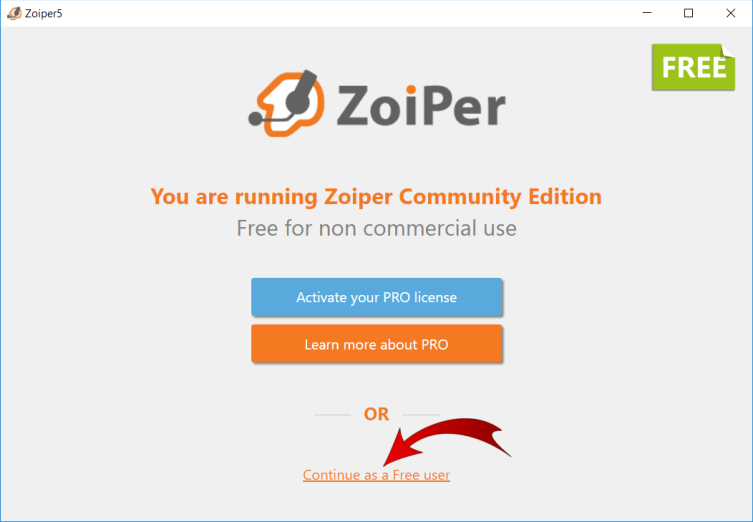
Шаг 5. После установки программа предложит активировать лицензию, узнать преимущества платной версии или запустить бесплатную. Для продолжения нажмите «Continue as a Free user».

Это окно будет появляться каждый раз при запуске программы и каждый раз потребуется нажать на «Continue as a Free user».
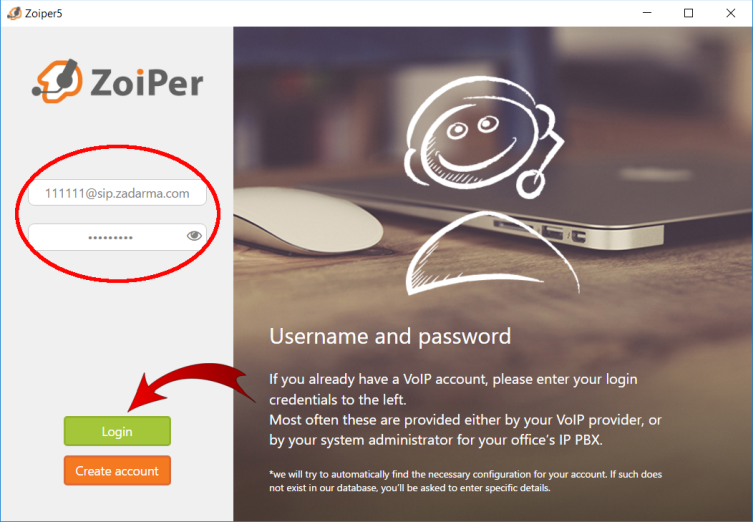
Шаг 6. После необходимо создать аккаунт, введя логин и пароль пользователя из панели управления onlinePBX > Настройка > Пользователь и нажать «Login».

Шаг 7. Далее введите домен из onlinePBX, например test.onpbx.ru и нажмите «Next». Zoiper предложит использовать прокси-сервер, но onlinePBX работает без него, поэтому просто нажмите «Skip». В следующем окне необходимо выбрать «SIP UDP» и снова нажать «Skip».

Шаг 8. В появившемся окне нажмите «Yes».

Шаг 9. Для завершения настройки нажмите «Create Account».
Вот так выглядит после установки готовый к работе Zoiper.

Включить русский язык
Несмотря на то, что сайт и первичные настройки были на английском, Zoiper имеет русский язык. Для этого зайдите в меню.

Пройдите в раздел Appearance и выберите «Русский».

Убрать неиспользуемые кодеки
Большинство операторов работают по бесплатным и самым распространённым кодекам G711 u-law и G711 a-law. Если в программе будут выбраны все доступные кодеки, то из-за этого звонки могут сбрасываться при попытке позвонить. Чтобы такого не происходило, надо убрать все неиспользуемые кодеки.
Для этого зайдите в «Учетные записи».

Выберите аккаунт и перейдите в расширенные настройки.

Чуть ниже найдите раздел «Аудио кодеки».

Уберите все кодеки, кроме G711 mu-law и G711 a-law.

Возможности во время разговора
Во время звонка можно:
- отключить микрофон;
- настроить громкость;
- показать клавиатуру для набора в тоновом режиме;
- посмотреть статистику звонка;
- поставить звонок на удержание;
- записать разговор;
- совершить видеозвонок;
- совершить перевод звонка;
- организовать конференцию.
Всё это доступно на верхней панели.

На мой взгляд выглядит симпатично, а функционал интуитивно понятен, но продолжают смущать недоступные в бесплатной версии функции, отмеченные знаком PRO. Про них мы дальше и поговорим.
Ограничения бесплатной версии
- Можно подключить только один аккаунт;
- Нельзя записать разговор. Реализовано на стороне виртуальной АТС;
- Нет видеозвонков;
- Нет перевода звонка. Реализовано на стороне виртуальной АТС;
- Звонить по клику из браузера;
- Нельзя импортировать контакты из Outlook, Mac address book, Google contacts;
- Нет шифрования по протоколам TLS, SRTP и ZRTP. Не работает с onlinePBX;
- Нет голосовой почты. Реализовано на стороне виртуальной АТС;
- Нет автоответчика. Реализовано на стороне виртуальной АТС;
- Нельзя из скопированного номера автоматически убирать лишние символы, например точки и скобки;
- Нельзя отправить текстовое сообщение собеседнику у которого также установлен Zoiper;
- Нет функции «не беспокоить»;
- Нельзя отключить звук во время параллельного звонка;
- Нельзя отключить звук набора;
- Нельзя установить собственную музыку при дозвоне. Реализовано на стороне виртуальной АТС;
- Нельзя записывать номер в телефонную книгу софтона в нужном формате. Например, звонят с +7, а записываться будет через 8. Если ваш оператор работает только через 7 или только через 8, то изменять набранный номер можно на стороне виртуальной АТС.
Как видим ограничений много, но большинство недоступных функций реализованы в onlinePBX и нужны только для прямой работы номера и софтфона без участия виртуальной АТС. Серьезных недостатков два:
- Нет перевода звонка;
- Нет функции «не беспокоить».
Но не сказал бы, что эти недостатки критичны. У нашего сервиса есть возможность сделать перевод при помощи команды — *1номер#, а вместо режима «не беспокоить» можно просто отключить регистрацию, а вернувшись поставить статус «в сети».
Более подробно про нумерацию и команды виртуальной АТС можно узнать в нашей базе знаний.

Лицензия стоит 39.95 евро, что по курсу на 07.06.2018 — 2900 рублей.
С Windows версией мы закончили, давайте посмотрим на версию для телефонов.
Zoiper для Android
В Play Маркете у Zoiper более 1 миллиона скачиваний и средняя оценка в 4.5 балла, что говорит о том, что большинство пользователей довольны софтфоном.
Преимущества:
- Низкое потребление заряда батареи.
- Не теряет связь без видимой причины.
- Слабая нагрузка на процессор, что позволит запускать даже на старых и дешёвых смартфонах.
- Простой интерфейс.
Как настроить
Шаг 1. Зайдите в Play Маркет, введите в поиск Zoiper и скачайте бесплатную или платную версию программы.
Шаг 2. После установки программа встретит картинкой со странным зелёным сотрудником колцентра и предложит принять лицензионные условия. Они стандартные, вы можете их прочитать или сразу кликнуть «Согласиться & Продолжить».
Шаг 3. Далее Zoiper расскажет о новом интерфейсе. Нажмите Skip, чтобы пропустить.
Шаг 4. После необходимо создать аккаунт, введя логин и пароль пользователя из панели управления onlinePBX > Настройка.
Шаг 5. В следующем окне введите домен из onlinePBX и нажмите «Следующий».

Шаг 6. Потом Zoiper предложит использовать прокси, но для работы с onlinePBX такая настройка не требуется, просто нажмите «пропустить».

Шаг 7. Дальше Zoiper покажет ошибку сертификата безопасности. Это происходит по причине того, что Zoiper не может найти SIP TLS. Но практически все виртуальные АТС, в том числе и onlinePBX не работают по TLS, а только по TCP и UDP. Поэтому просто нажмите «Всё равно продолжить».

Шаг 8. После выберите «SIP UDP» и нажмите «Конец».

Разрешите приложению работать в фоновом режиме, иначе при выключенном телефоне звонки не будут поступать.
После подключения Zoiper подтянет контакты из телефона.
Zoiper на Android не требует дополнительных настроек, в отличие от версии для компьютеров или других софтфонов, где приходится убирать лишние кодеки или уменьшить время перерегистрации.
Готово!
Платные функции
- Наличие платного аудиокодека G.729, который хорошо работает при медленном и нестабильном интернете (можно купить отдельно);
- Наличие видеокодека H.264 для улучшения качества изображения при видеозвонках (можно купить отдельно);
- Переадресация вызова;
- Конференц-связь;
- Бесплатные кодеки G.722, G.726, Opus, Speex.
Платная версия стоит 500 рублей. Дешевле компьютерной, но и ограничений меньше.
PRO версии для компьютера и смартфона покупаются отдельно.
Стоит ли пользоваться?
Мне Zoiper понравился как в мобильной версии, так и в версии для компьютеров.
Плюсы:
- Стабильность
- Скорость работы
- Удобный и приятный интерфейс
- Выбор темы в мобильной версии
Минусы:
- Ограничение на перевод звонка в бесплатной версии
- Навязчивость покупки программы
Если не пугает навязчивые предложения купить программу и отсутствие перевода звонка, то смело могу рекомендовать бесплатную версию Zoiper’а. А купив программу, вы получите отличный софтфон без существенных недостатков.
Стоит ли покупать? Скорее нет, чем да. Есть аналоги, которые превосходят по функционалу, но при этом бесплатные. Для смартфонов — CSIPSimple, для Windows — PhonerLite.
Настройку Zoiper для iPhone можно посмотреть в нашей базе знаний.
Ещё не пользуетесь IP-телефонией?
Зарегистрируйтесь и получите бесплатную неделю тестового периода!
Для начала необходимо установить данное программное обеспечение. Скачать Вы можете его на официальном сайте. Далее пункт «Download/Windows» и нажать кнопку Next. Затем выбрать Free версию 5, а дальше начать процесс установки, следуя инсталлятору. После успешной установки запускаем Zoiper. Открывается окно настроек программы Zoiper на английском языке (рис. 1):

Далее вводим: в поле:
* UserName – логин от Sip-Аккаунта.
* Password – пароль от Sip-Аккаунта.
Нажимаем «Авторизоваться (login)».
Открывается окно ввода сервера. Вводим – pbx1.new-tel.pro и жмем кнопку «Next (дальше)» (рис. 2):

Рис 2. Ввод адреса сервера.
В новом окне включаем галку «Optional» и вводим в поле Authentication username – вводим логин от Sip-Аккаунта. После ждем кнопку «Next (дальше)» (рис. 3):

Рис 3. Ввод данных по авторизации пользователя.
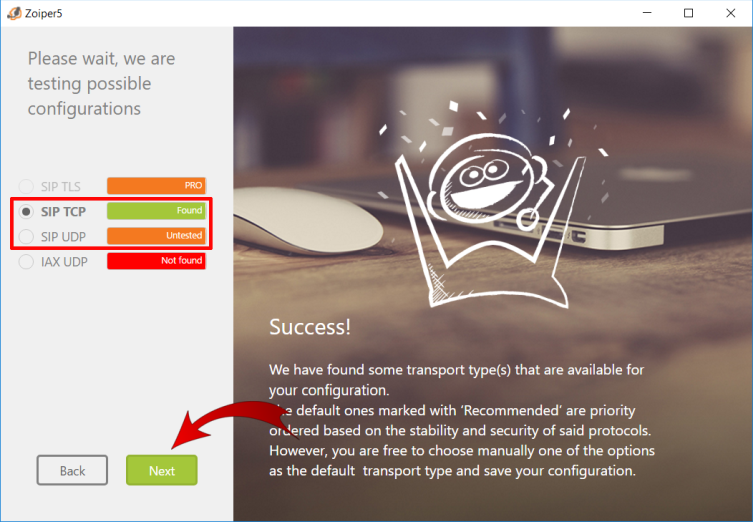
Далее идет проверка на используемый транспорт передачи данных. Выбираете либо «SIP UDP», либо «SIP TCP» (один из тех, что предложит система в зеленом поле с надписью «Found — найдено») и жмем «Next (дальше)» (рис. 4):

Рис 4. Выбор транспорта передачи данных.
В последнем окне нажимаем кнопку «Add (Добавить)» (рис. 5):

Рис 5. Подтверждение создания Sip-Аккаунта.
После закрываете все окошки и если вы все сделали правильно – ваш аккаунт становиться активен и впереди логина отображается значок Галочки. На этом процесс регистрации закончен (рис. 6):

Рис 6. Успешное регистрация Sip-Аккаунта.
Узнать данные по внутренним номерам можно в личном кабинете в пункте «настройки» и в заголовке «внутренние номера» и либо открытия определенного внутреннего номера, либо при нажатии кнопки «параметры SIP» (рис. 7 и рис. 8):

Рис 7. Данные об Sip-Аккаунте в Л.К.

Рис 8. Параметры SIP.
Чтобы установить русский язык нужно нажать на кнопку «настройки (шестеренка)» и выбрать пункт «Язык». Там выбираете язык русский (Russian) (рис. 9):

Рис 9. Выбор языка
В личном кабинете у Вас внутренний номер отображается синим цветом. Это значит, что данный SIP-Аккаунт успешно подключился к нашей системе (рис. 10):

Рис 10. Данные об Sip-Аккаунтах в л.к. 10-ый Аккаунт активен.
На этом процесс настроек и создания Sip-Аккаунта завершен и вы можете совершать исходящие звонки.
Примечание:
* Если у Вас зарегистрировано несколько Sip-Аккаунтов, то для переключения между ними в главном окне Zoiper выбираете вкладку вашего Sip-Аккаунта (слева от «настроек») и выбираете Ваш Sip-Аккаунт, которым Вы хотите пользоваться.
* Если Вы введете несколько раз неправильно пароль, то дальнейшая регистрация Sip-Аккаунта будет прекращена, так как Ваш IP-адрес попадет к нам в черный список. Для этого Вам надо будет обращаться в техническую поддержку нашей компании.
* Обратите внимание: Пароль чувствителен к регистру. Это значит, что пароли вида «qwerty» и «Qwerty» абсолютно разные пароли!
* Если теряется регистрация Sip-Аккаунта или регистрация не доступна, то попробуйте изменить Ваш текущий транспорт телефонии. Для этого зайдите в «настройки/Учетные записи/ваша учетная запись» и внизу настроек выбрать вместо UDP – TCP транспорт (или наоборот). Также попробуйте изменить «Срок регистрации» вместо 3600 значение 50.
Регистрация должна подцепиться. Жмете ОК и проверяете (рис. 11):

Рис 11. Изменения типа транспорта.
Если это не помогает, то обратитесь в тех. поддержку.
Для выбора вашей используемой гарнитуры (наушники и микрофон) выбираете «настройки/аудио», а далее настраиваете по вашему вкусу. В этом же окне можно протестировать вашу гарнитуру.
По всем вопросам обращайтесь в нашу компанию «Нью-Тел» по телефонам: 812 313-53-35 (СПБ); 495 640-44-00 (МСК)
АТС не используется
Используется АТС
1. Скачиваем и устанавливаем последнюю версию программы.
2. При запуске программы появится сообщение с предложением купить платную версию. Нажмите «Continue as a Free user» внизу страницы.
АТС не используется
Используется АТС
3. Сервер, логин и пароль используйте из раздела «Настройки-Подключение по SIP» личного кабинета.
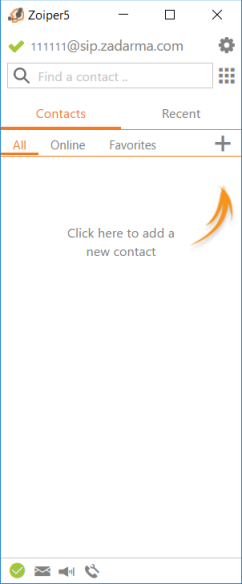
Username: 111111@sip.zadarma.com — где 111111 Ваш sip-номер из личного кабинета
Password: Ваш пароль от sip-номера, из раздела «Настройки-Подключение по SIP» личного кабинета.
После ввода данных нажмите кнопку Login
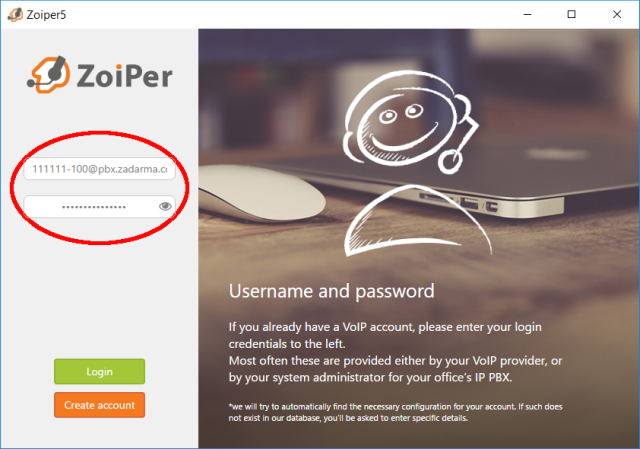
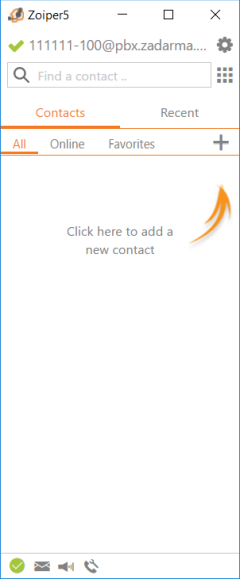
3. Сервер, логин и пароль используйте из раздела «Моя АТС — Внутренние номера» личного кабинета.
Username: 1234-100@pbx.zadarma.com — где 1234-100 Ваш внутренний номер АТС из личного кабинета
Password: Ваш пароль внутреннего номера АТС личного кабинета
После ввода данных нажмите кнопку Login
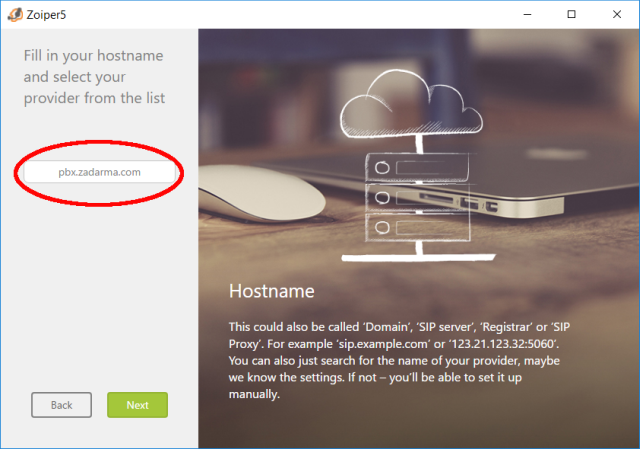
4. На следующей странице введите адрес сервера sip.zadarma.com затем нажмите Next
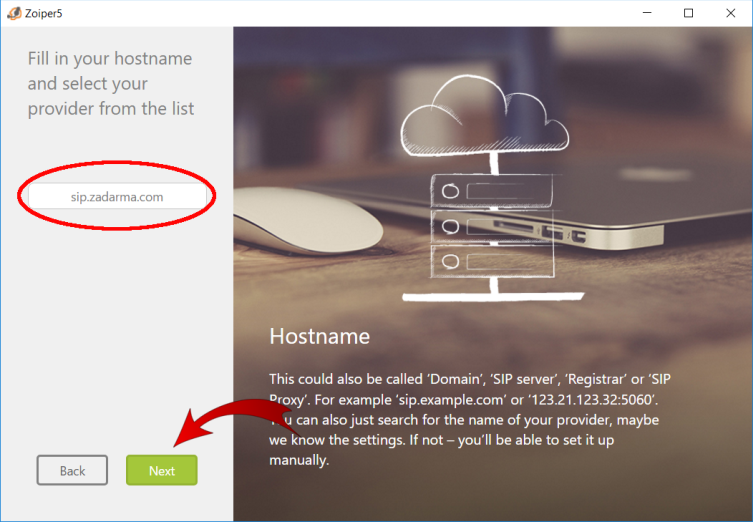
4. На следующей странице введите адрес сервера pbx.zadarma.com затем нажмите Next
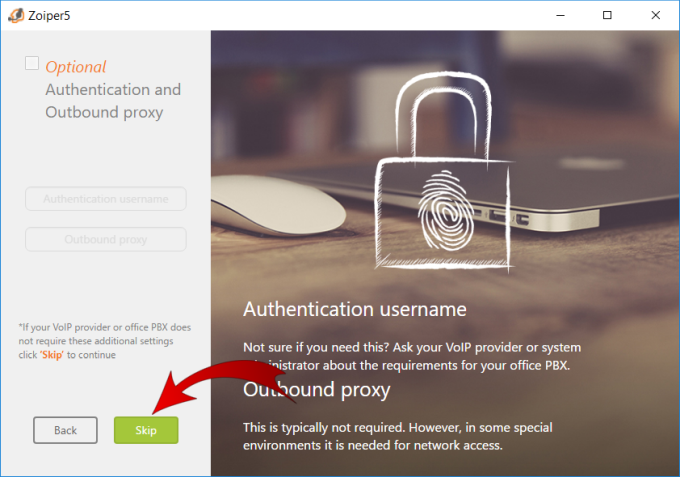
5. Нажмите кнопку Skip
6. На следующем этапе Zoiper попробует найти приоритетный транспорт для Вашей сети. Выберите SIP UDP либо выберите SIP TCP, если первый имеет статус Untested. Затем нажмите Next.
На следующей странице вы можете проверить аудиоустройства, на этом настройка завершена.
Включение шифрования
1. Пройдите в Настройки — Учетные записи — Ваш аккаунт
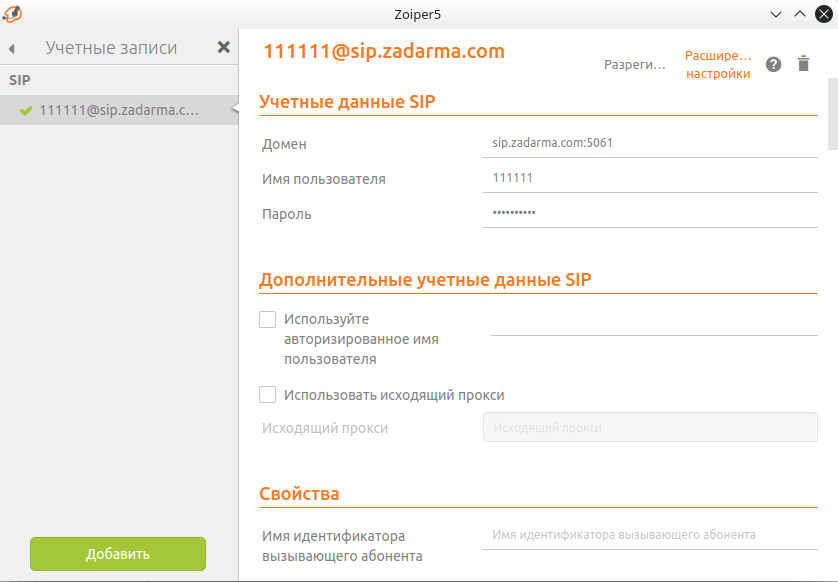
2. В поле Домен после сервера укажите :5061
3. Далее пройдите в Расширенные настройки, в разделе Связанные с сетью в поле Транспорт выберите TLS
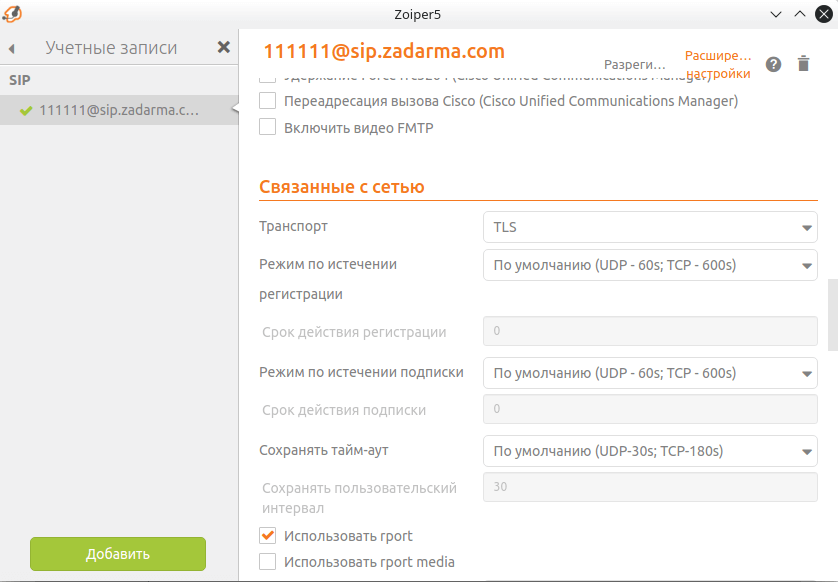
4. В разделе Шифрование в Согласование ключа SRTP выберите SDES
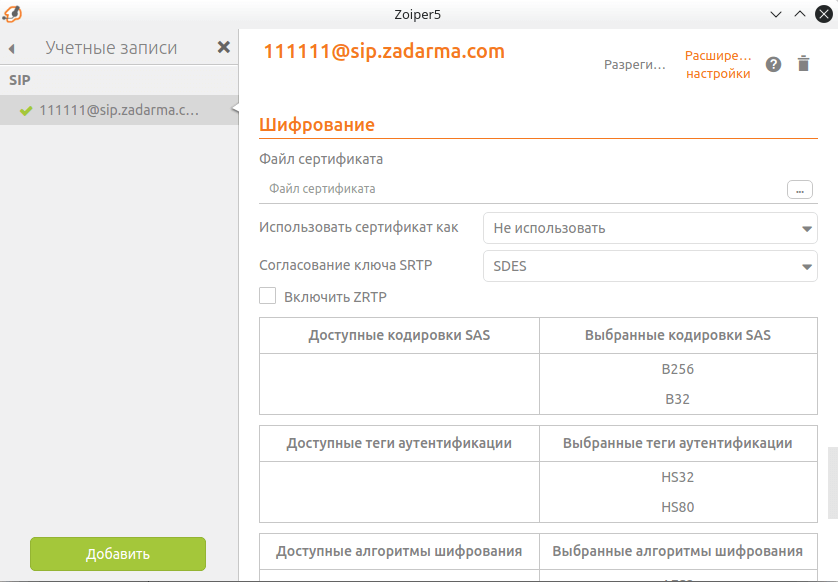
Сохраните настройки
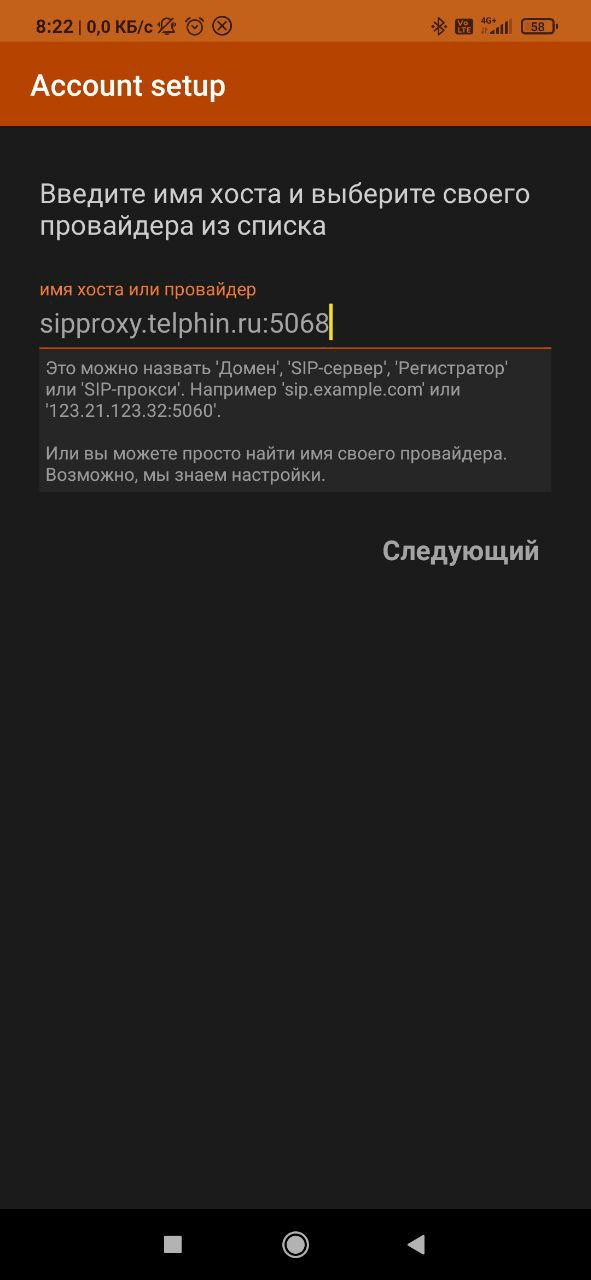
1. Вводим логин (ПРЕФИКС_АТС*ДОБАВОЧНЫЙ) и пароль (либо штатный из .pdf файла, либо из АТС «Телфин.Офис» «Данные для настройки SIP-оборудования и ПО») и нажимаем Create an account.
2. Вводим адрес сервера sipproxy.telphin.ru:5068 и нажимаем «Следующий».
3. После нажатия появляется окно — нажимаем «Использовать в».

4. Нажимаем «Пропустить».
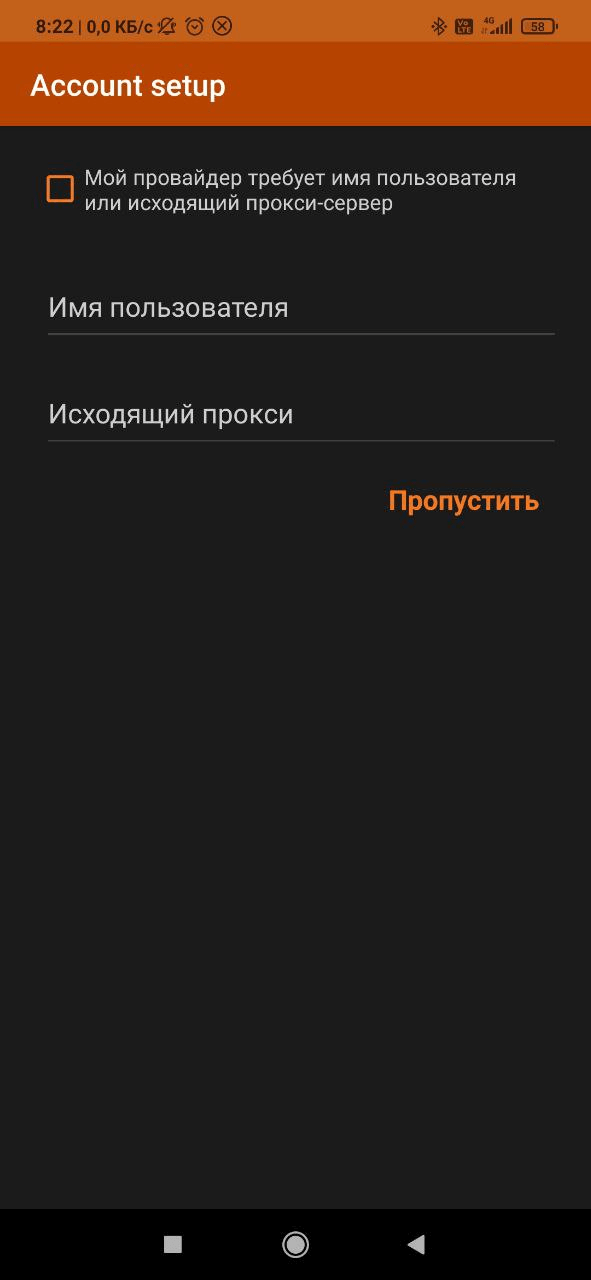
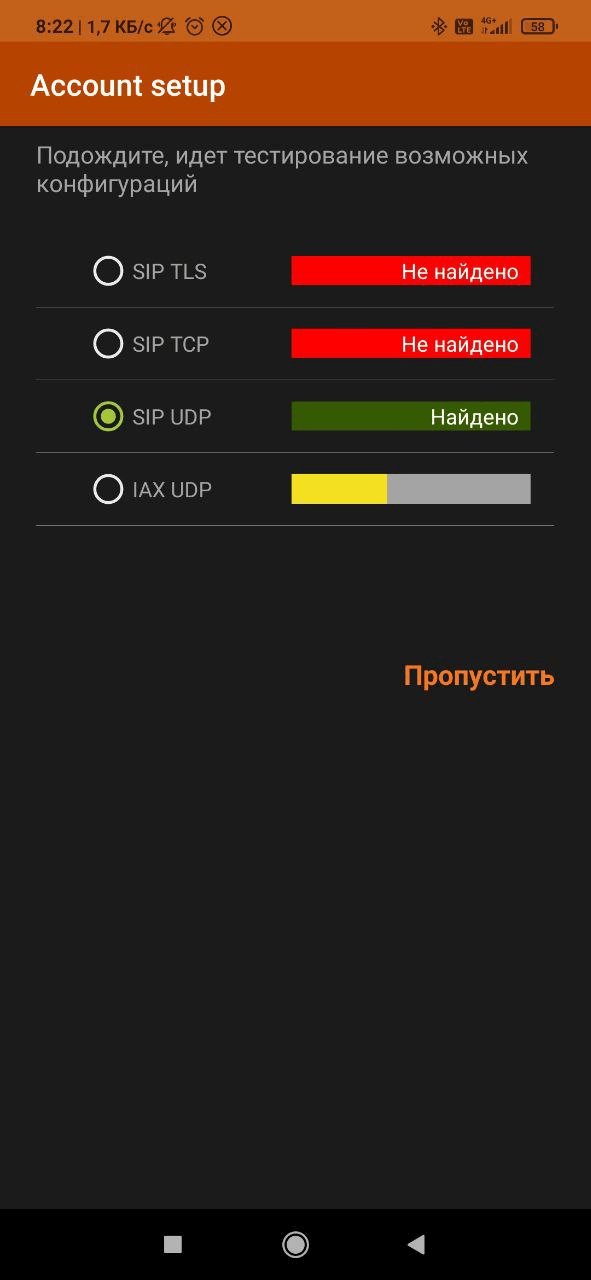
5. Выбираем SIP UDP (он должен гореть зелёным с надписью «Найдено») и нажимаем «Конец» после выбора. Регистрация закончена.
1. Для выхода из учётной записи, нужно открыть боковое меню, нажав на три полоски слева.
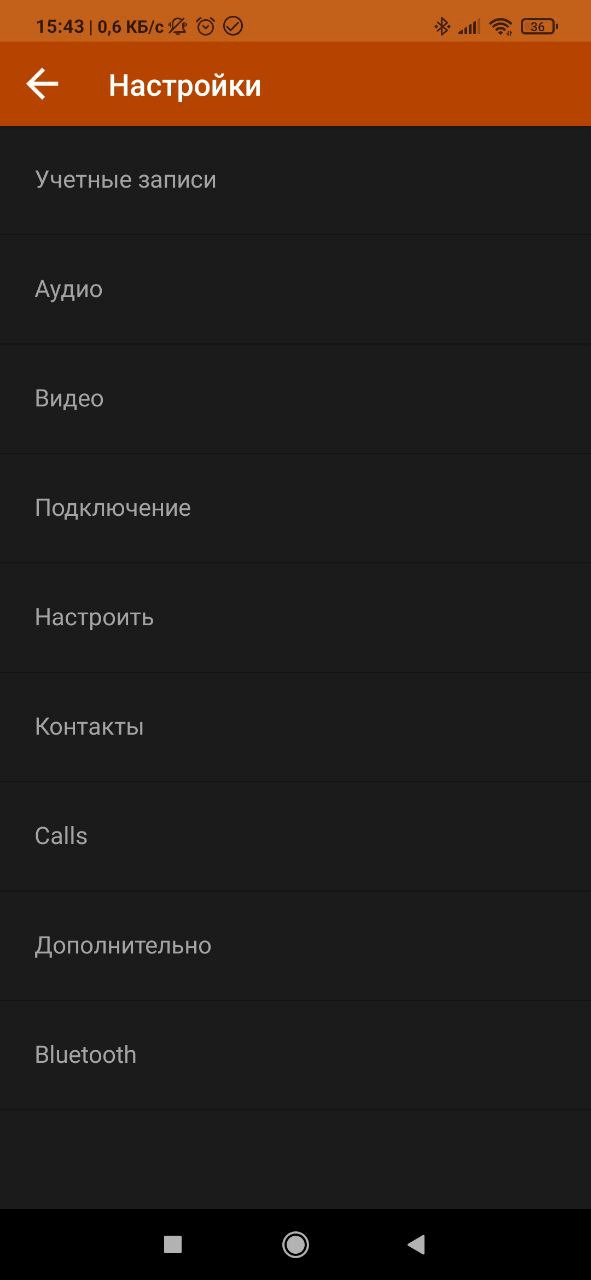
2. Переходим в раздел «Настройки» после открытия бокового меню.
3. Выбираем раздел «Учётные записи».
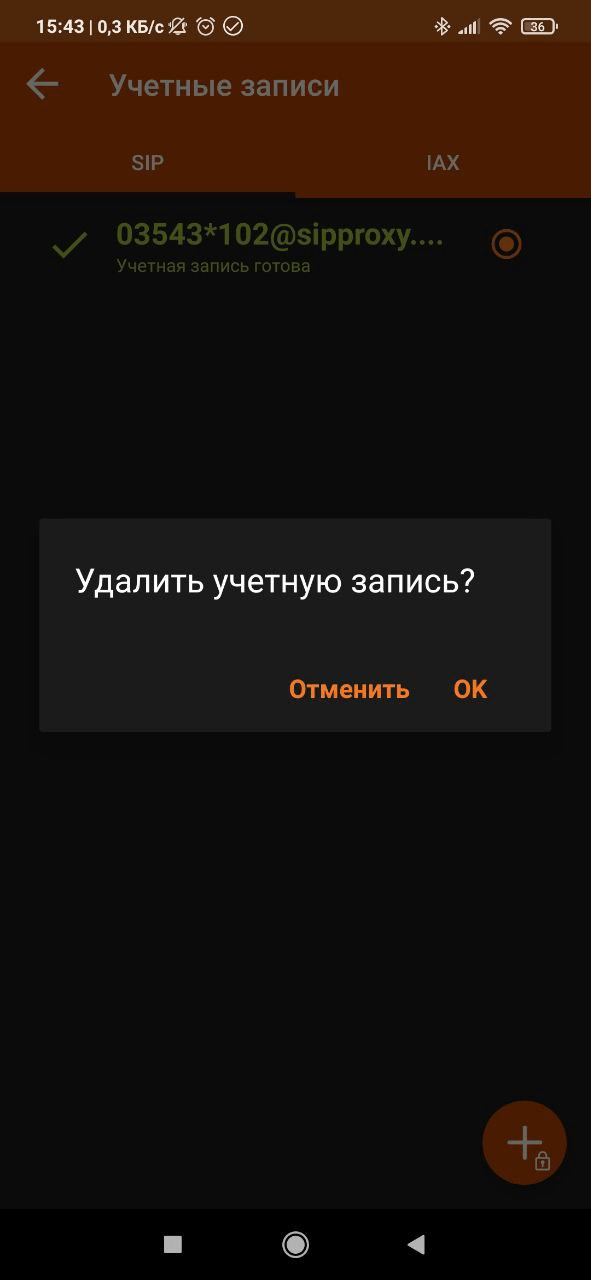
4. Осуществляем долгое нажатие на нашу учётную запись.

5. Появляется окно с подтверждением удаления — соглашаемся.
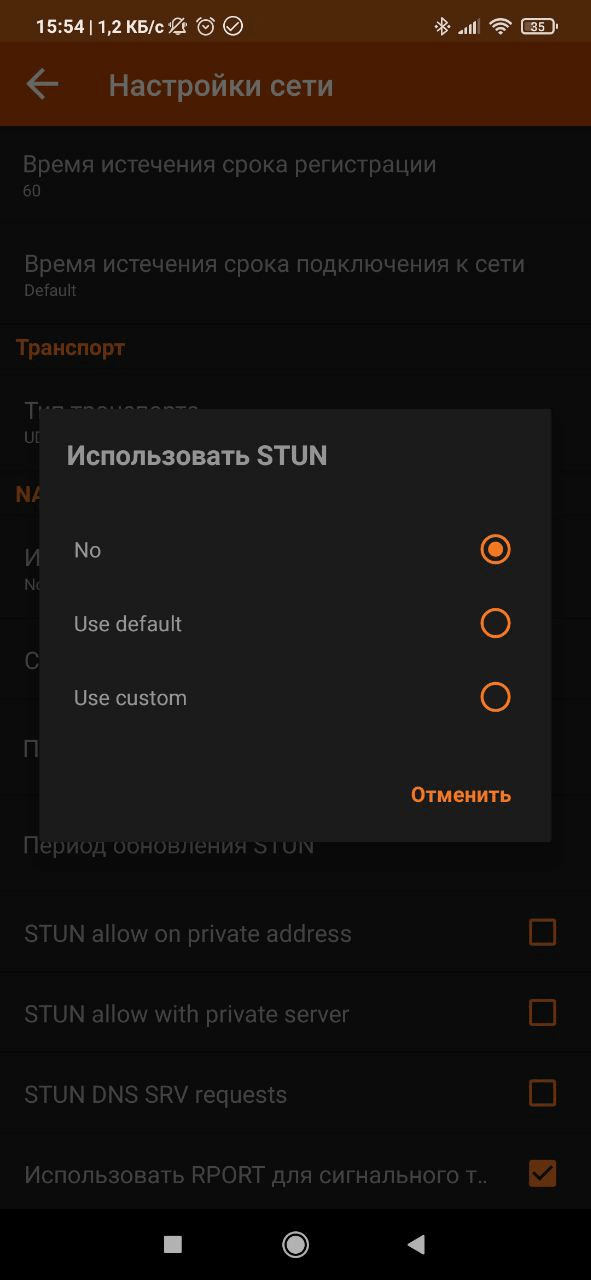
Отключение использования выбранного по умолчанию STUN сервера.
1. В настройках, в разделе «Учетные записи» делаем простое нажатие на учётную запись.
2. Спускаемся в самый низ и находим «Настройки сети».
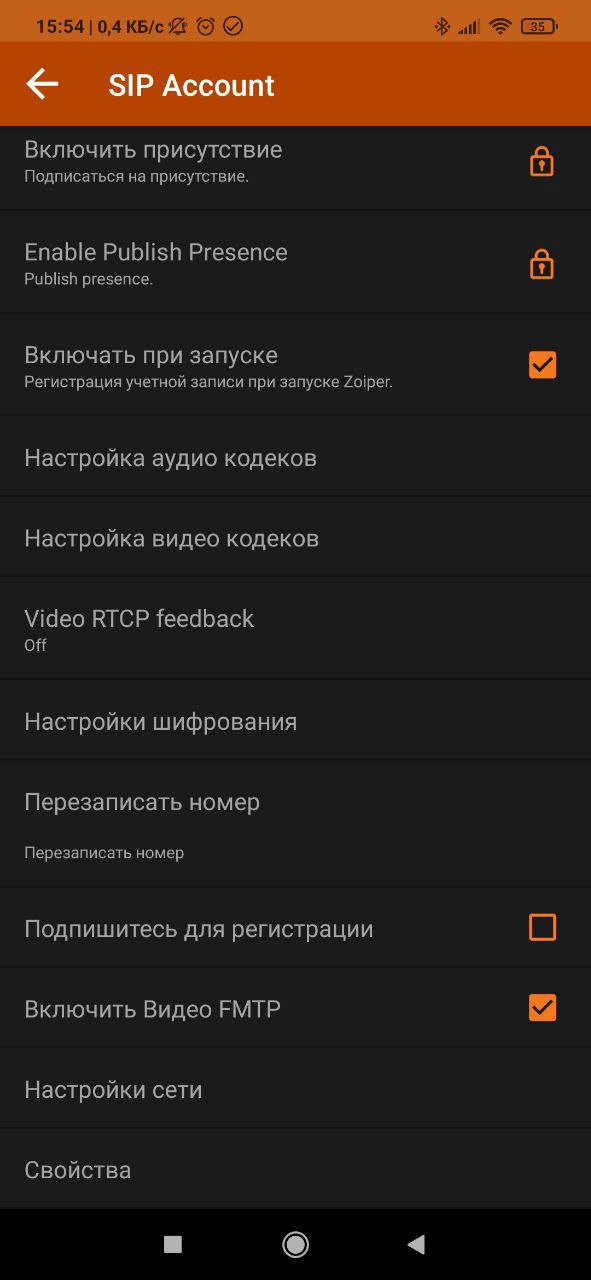
3. Находим раздел «Использовать STUN».
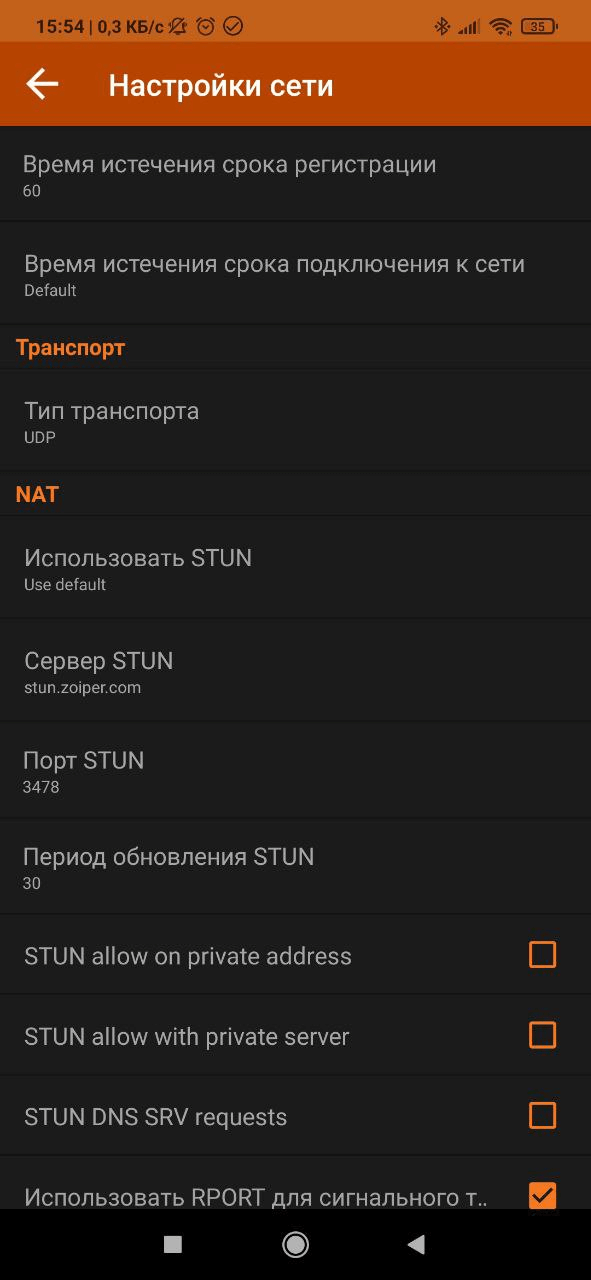
4. Нажимаем и выбираем No.