Блокировка — отличный способ предотвратить доступ посторонних лиц к нашему компьютеру
Защита ПК имеет первостепенное значение, если мы работаем с конфиденциальными данными. В данной статье рассмотрим, как задать своё время блокировки экрана, когда наш компьютер не проявляет никакой активности. Итак, приступим.
Тайм-аут блокировки экрана можно легко настроить в приложении «Параметры». Более того, можно настроить различные режимы тайм-аута, когда наше устройство подключено к сети или когда оно работает от батареи (при использовании ноутбуков).
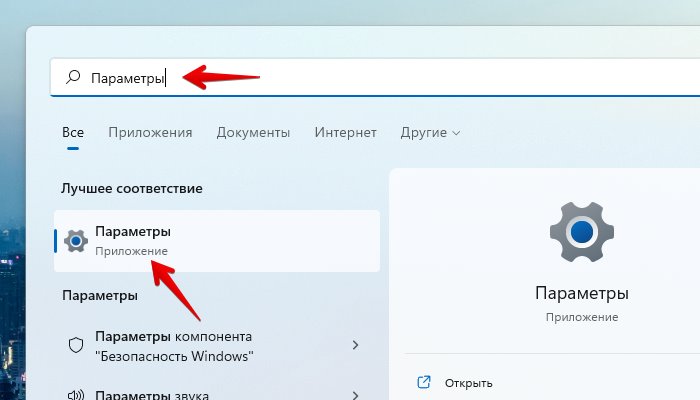
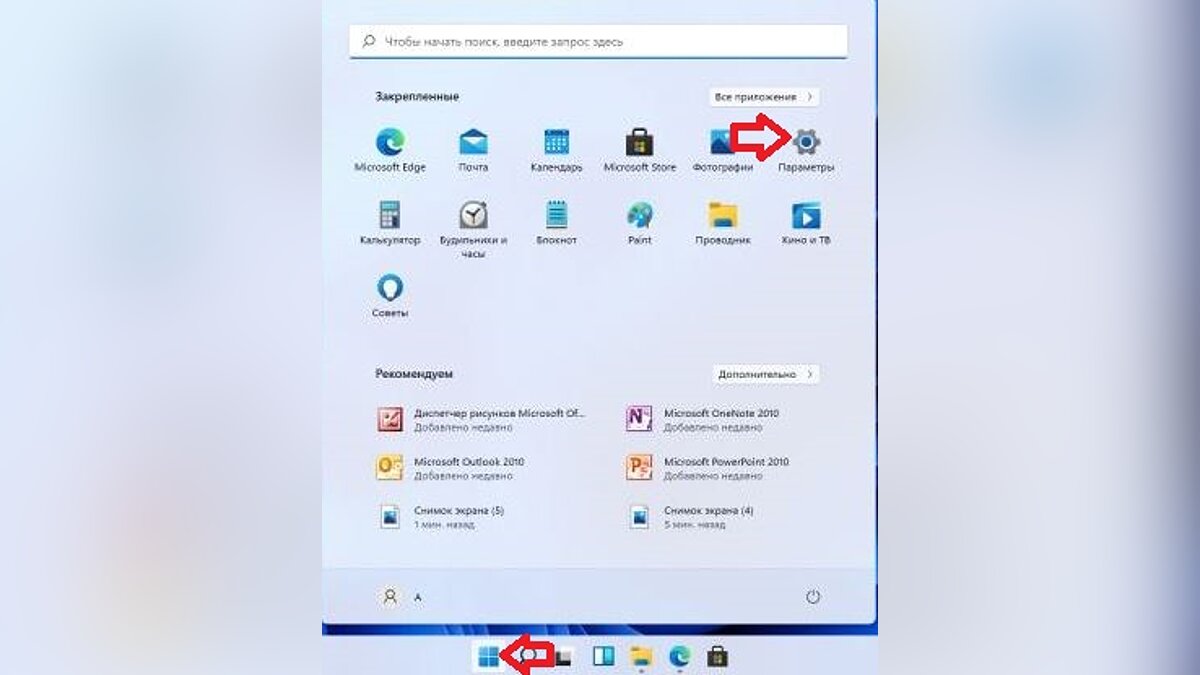
Сначала перейдем в приложение «Параметры» либо через закрепленный значок в меню «Пуск», либо выполнив поиск по нажатию клавиш «Win+S», либо используя быстрые клавиши для вызова окна параметров — «Win+I».
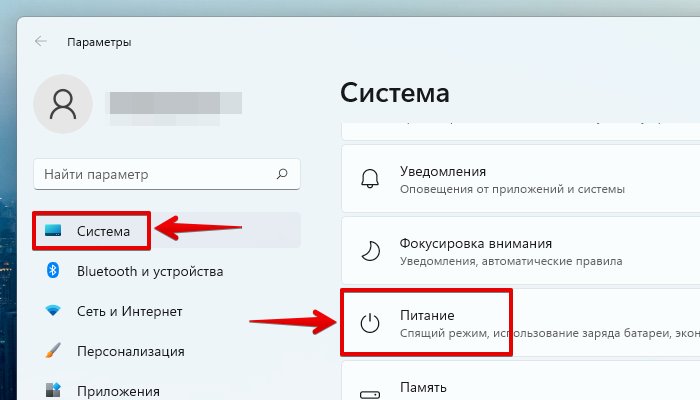
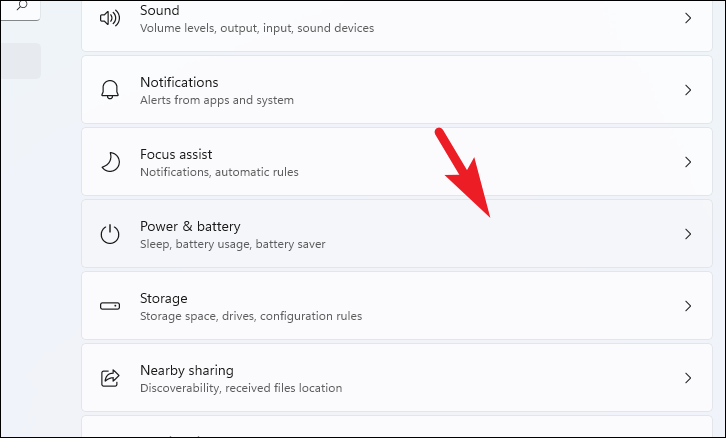
Затем выбираем вкладку «Система» на левой боковой панели окна параметров. После этого в правой части окна находим и щелкаем плитку «Питание», чтобы продолжить.
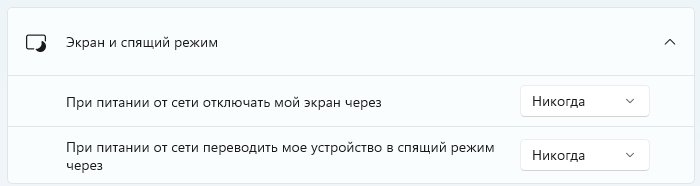
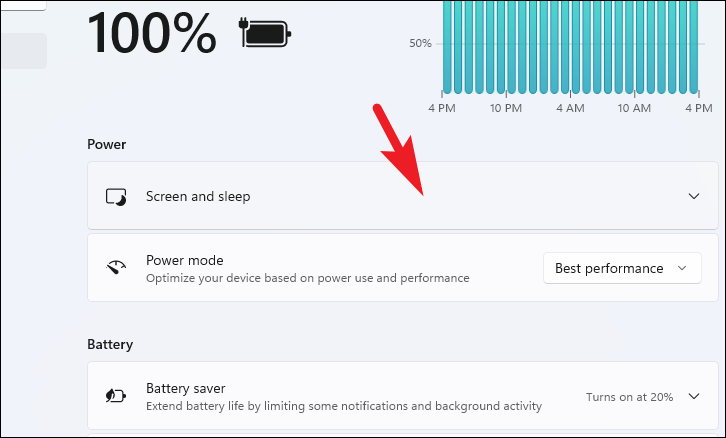
Затем на экране «Питание» щелкаем на плитку «Экран и спящий режим», чтобы развернуть дополнительные настройки.

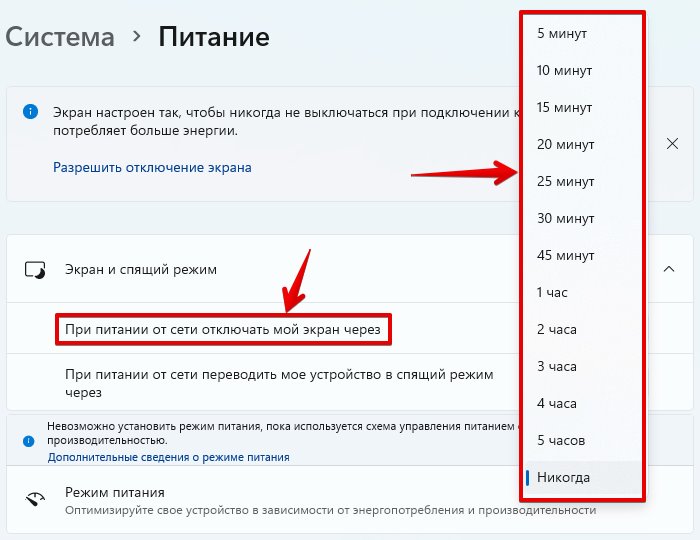
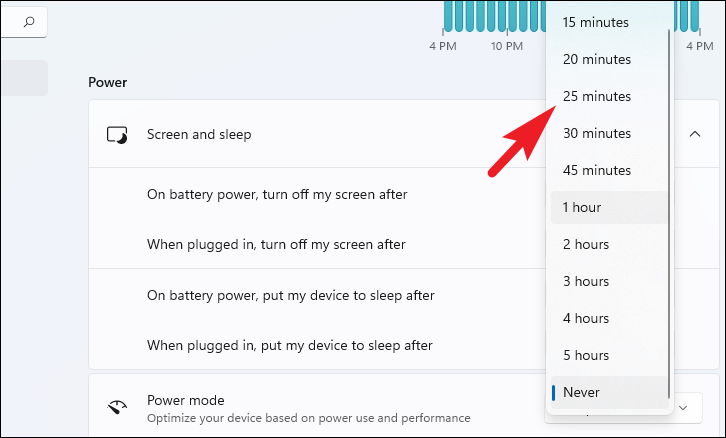
Затем щелкните раскрывающееся меню напротив параметра «При питании от сети отключать мой экран через».
И выбираем наиболее подходящее время из списка.
Устанавливаем своё время блокировки экрана через Панель управления
Если предустановленная продолжительность тайм-аута из предыдущего способа не подходит, то можно установить желаемое время при помощи панели управления.
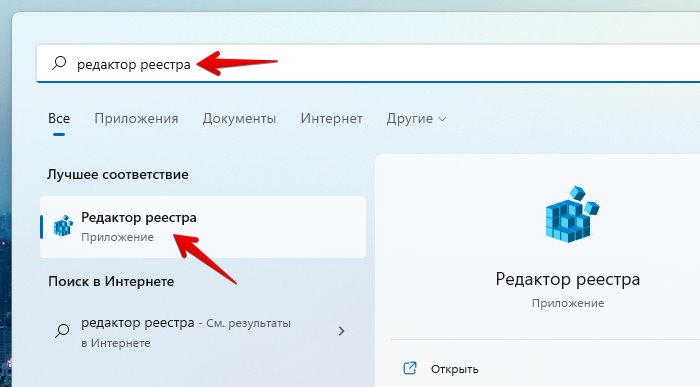
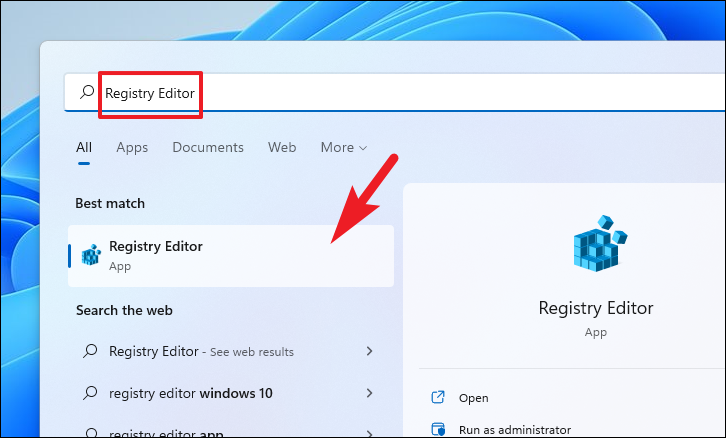
По умолчанию параметр для настройки выключения экрана скрыт, поэтому сначала необходимо включить его через редактор реестра Windows 11. Для этого перейдем в редактор реестра (можно найти через поиск в меню «Пуск»).
Перед открытием редактора реестра появится окно «Контроль учетных записей», в котором нажимаем кнопку «Да».

В окне редактора реестра переходим по следующему пути:
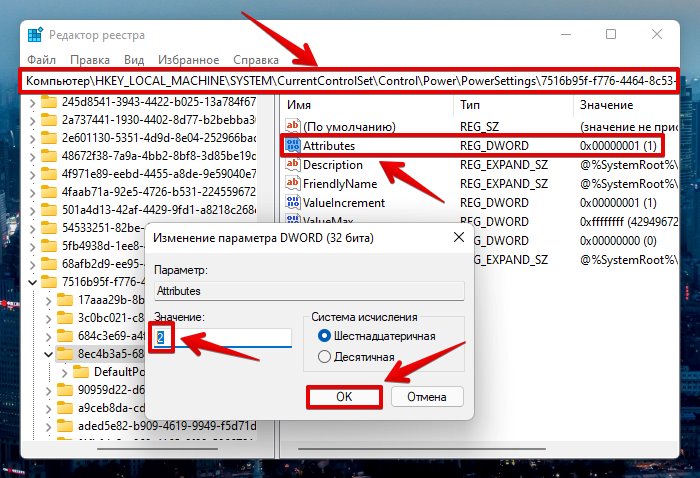
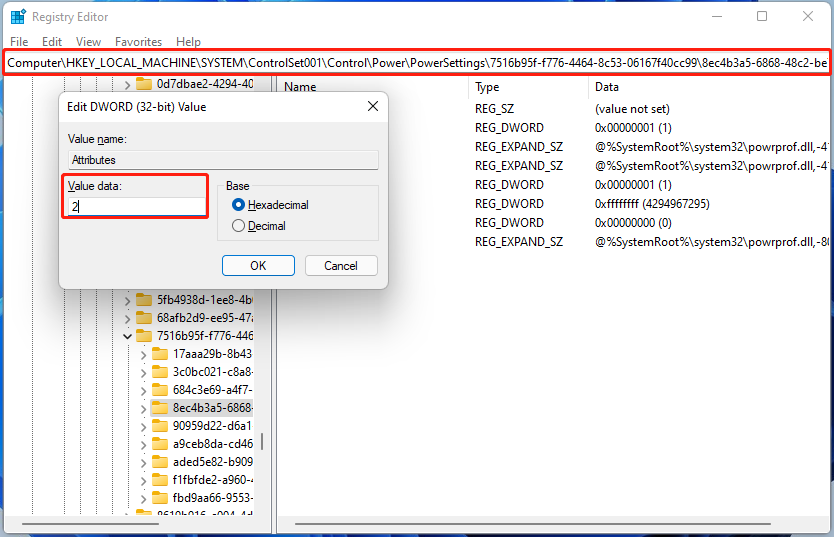
Компьютер\HKEY_LOCAL_MACHINE\SYSTEM\CurrentControlSet\Control\Power\PowerSettings\7516b95f-f776-4464-8c53-06167f40cc99\8ec4b3a5-6868-48c2-be75-4f3044be88a7
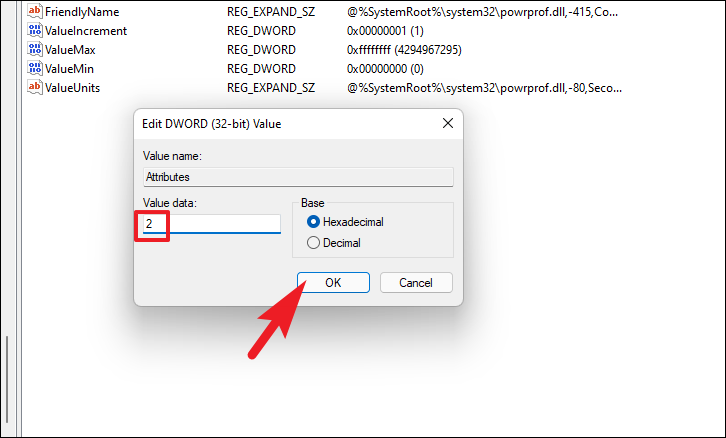
Затем дважды щелкаем по строковому параметру «Attributes» и меняем значение на «2», после чего нажимаем кнопку «ОК».
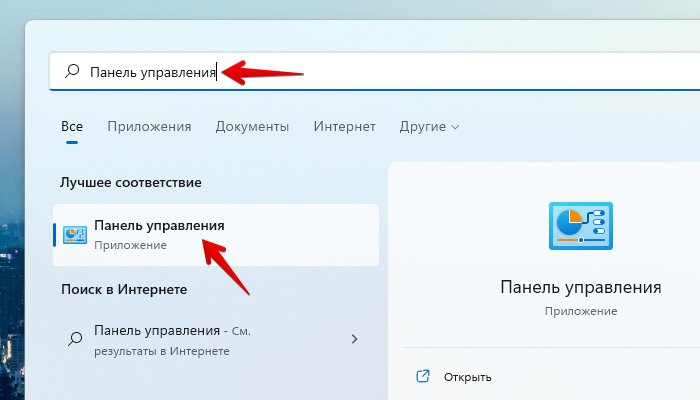
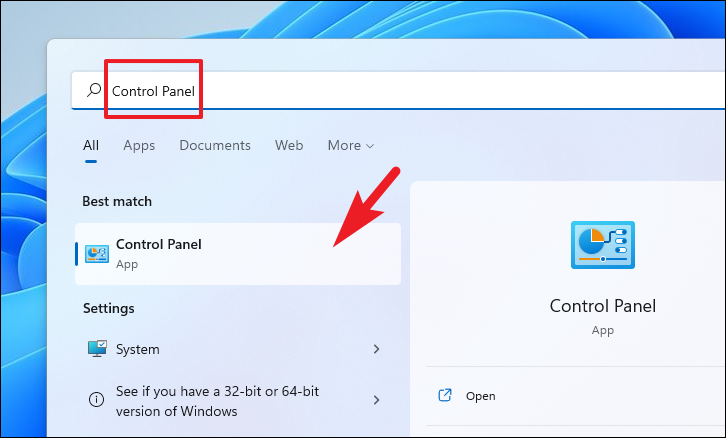
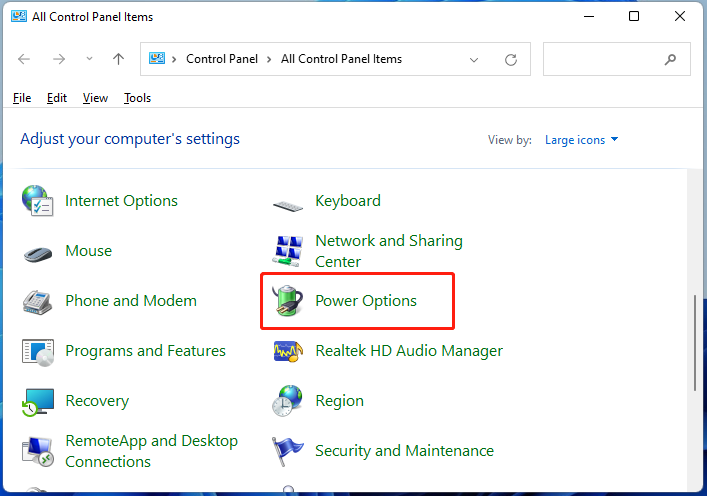
Теперь открываем «Панель управления», для этого воспользуемся поиском в меню «Пуск».
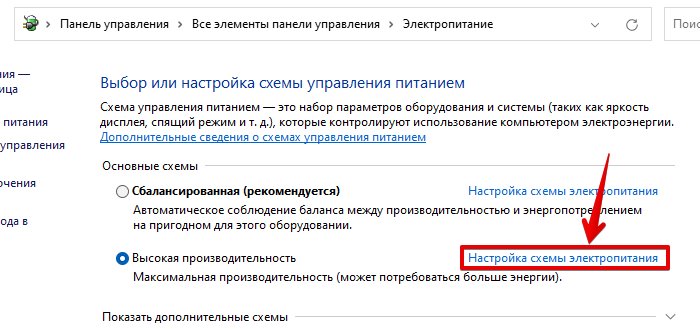
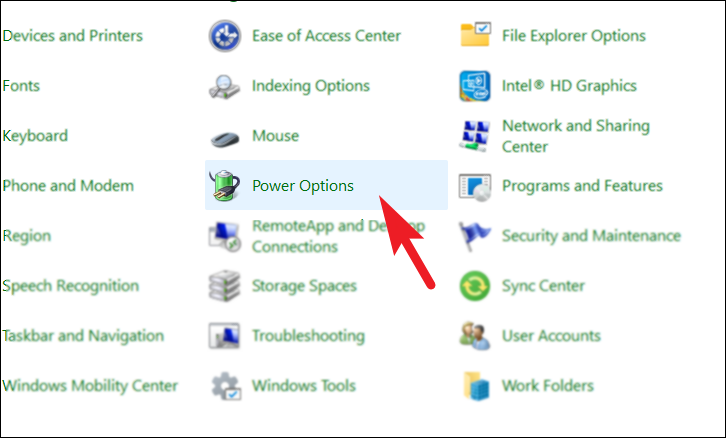
В окне панели управления нажимаем на значок «Электропитание».

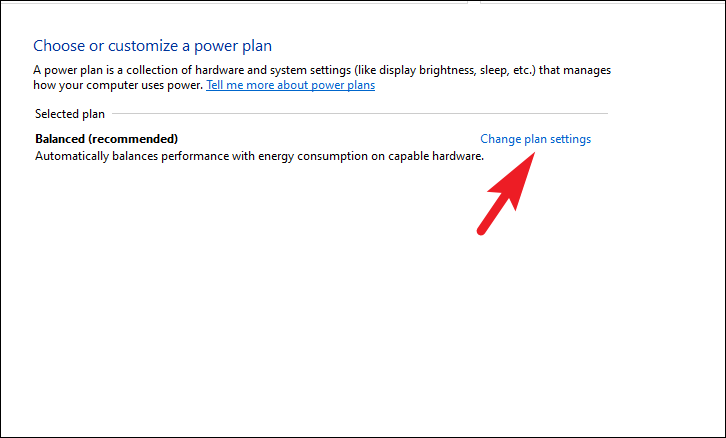
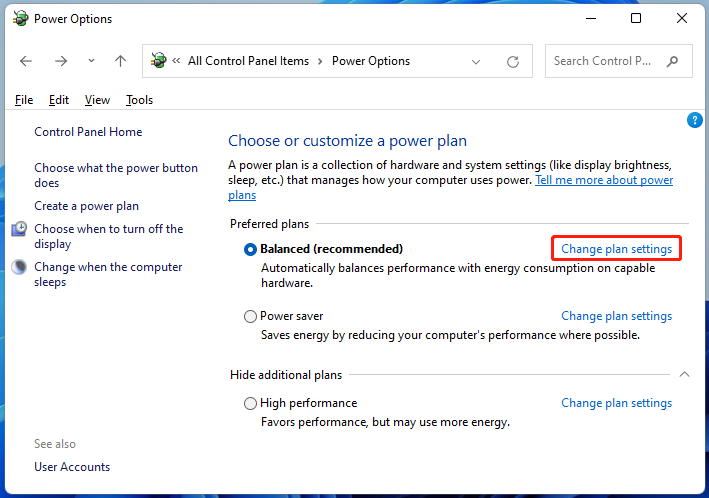
Теперь в разделе «Выбор или настройка схемы управления питанием» выбираем схему и щелкаем по ссылке «Настройка схемы электропитания».
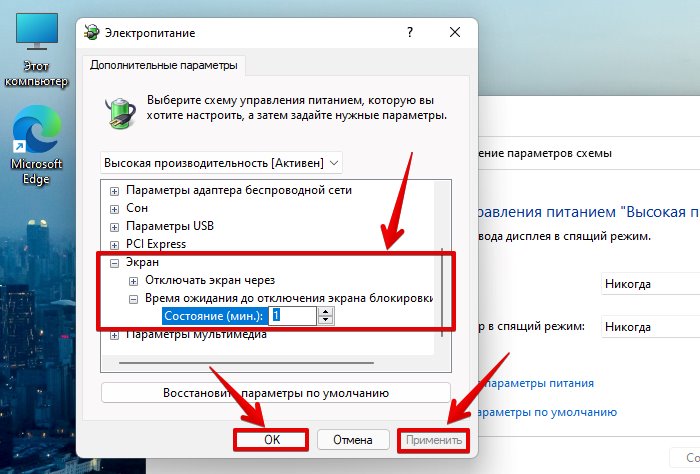
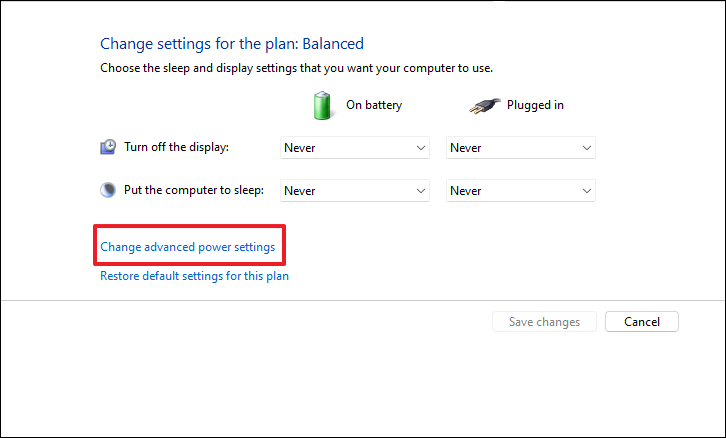
Далее, нажимаем на ссылку «Изменить дополнительные параметры питания».
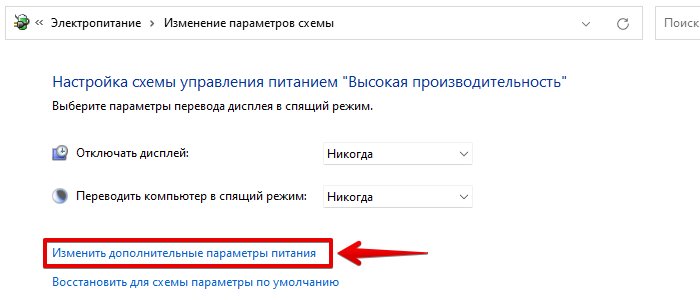
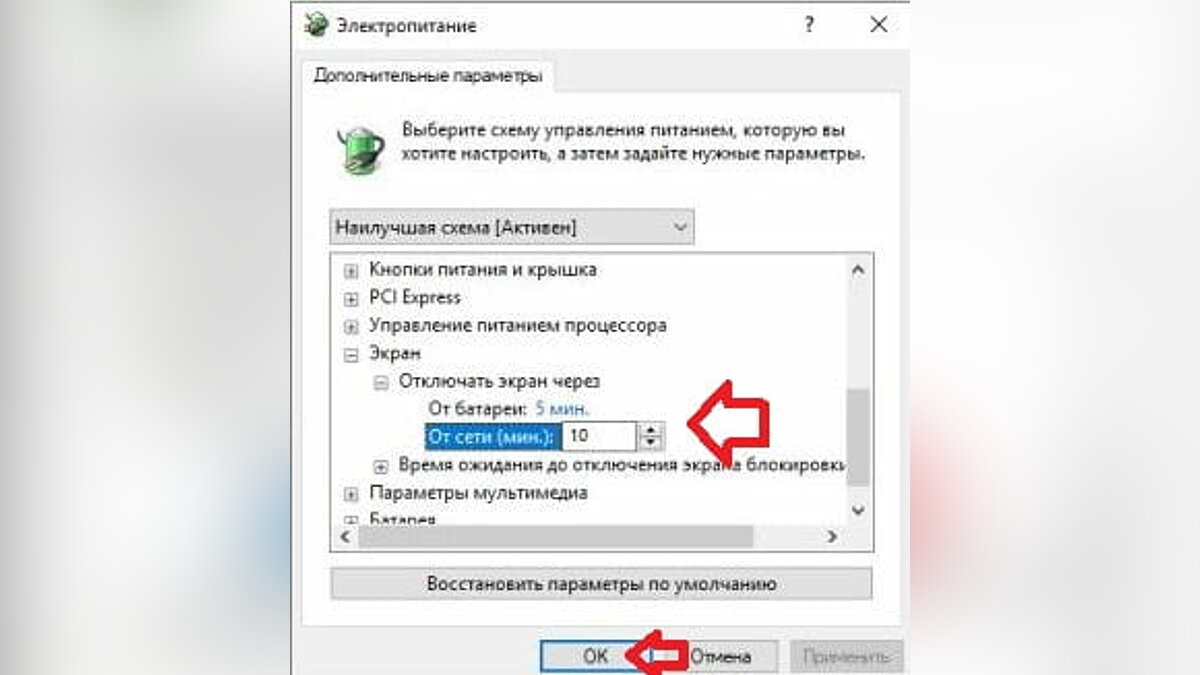
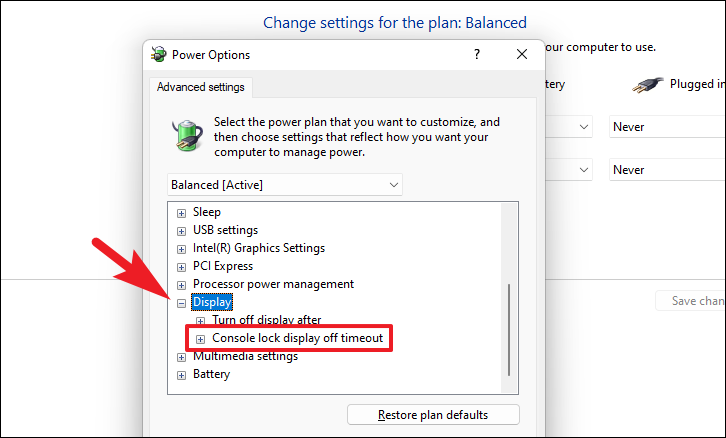
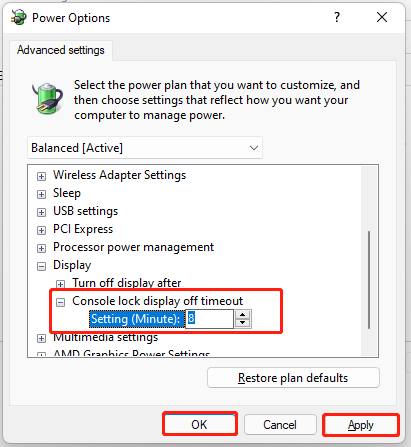
В появившемся окне «Электропитание» щелкаем по пунктам «Экран» — «Время ожидания до отключения экрана блокировки консоли». И изменяем значение «Состояние (мин)».
Операционные системы Windows спроектированы так, что по умолчанию при бездействии компьютера, они сначала отключают экран, а затем переводят его в режим сна. Это чаще всего нужно для ноутбуков, где используется аккумулятор, но и в стационарных ПК это тоже применяется. В сегодняшней статье мы рассмотрим, как можно разными способами изменить время ожидания до отключения экрана в Windows 11.
Как изменить время до отключения экрана в параметрах системы
Первый вариант самый простой — через параметры операционной системы.
- Открываем «Параметры» системы или нажимаем правой кнопкой на меню «Пуск», после чего выбираем «Управление электропитанием».

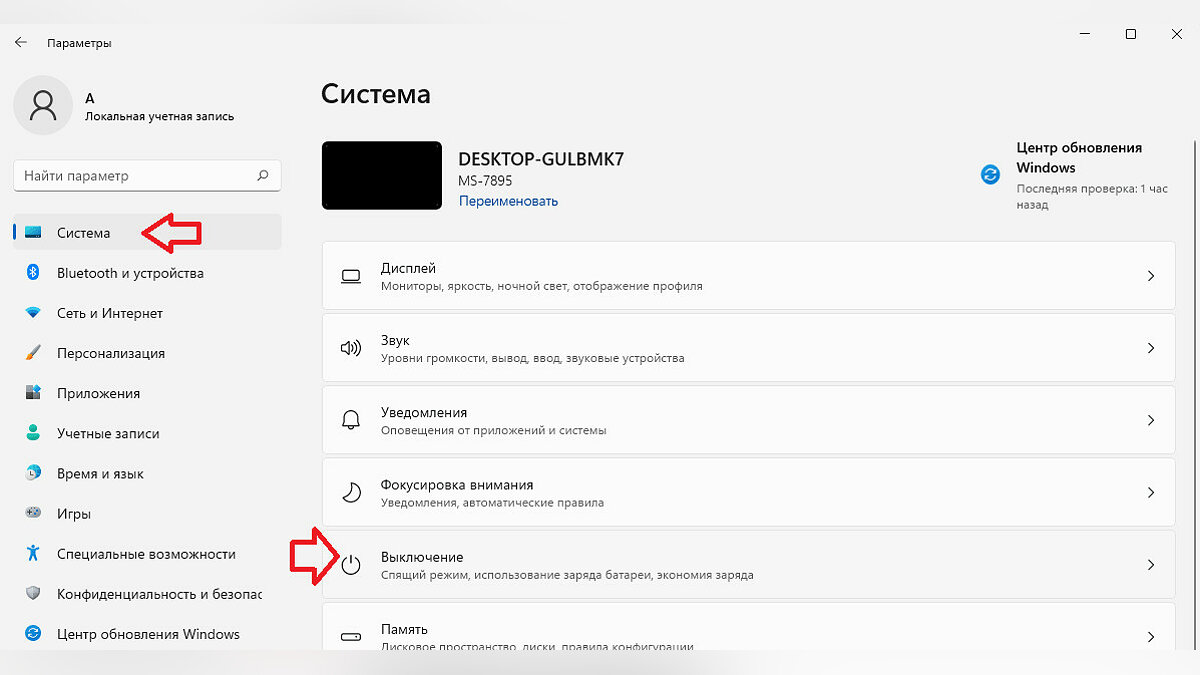
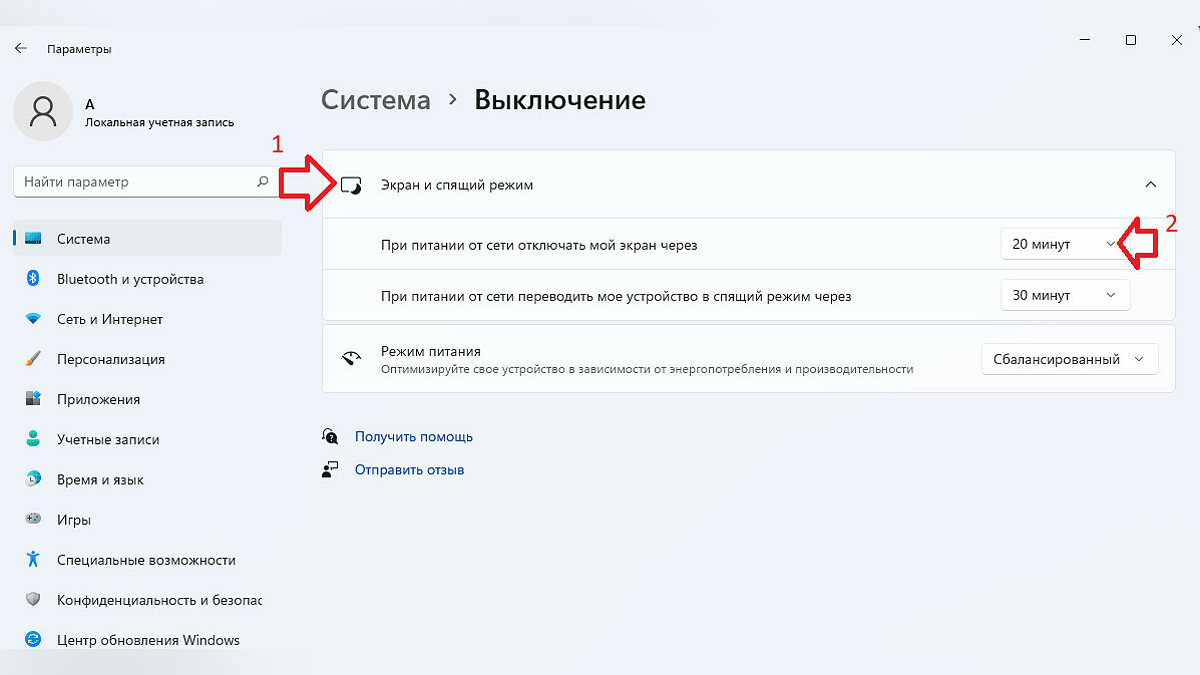
- Заходим в раздел «Система» => «Выключение».
- Выбираем пункт «Экран и спящий режим», затем выбираем необходимое значение возле «При питании от сети отключать мой экран через» и возле «При питании от батареи отключать мой экран через». Подтверждать и перезагружать систему не требуется. После этого можно закрыть окно настроек.
Как изменить время до отключения экрана в настройках питания компьютера
Как оказалось, настроить время активности экрана можно также в параметрах питания ПК.
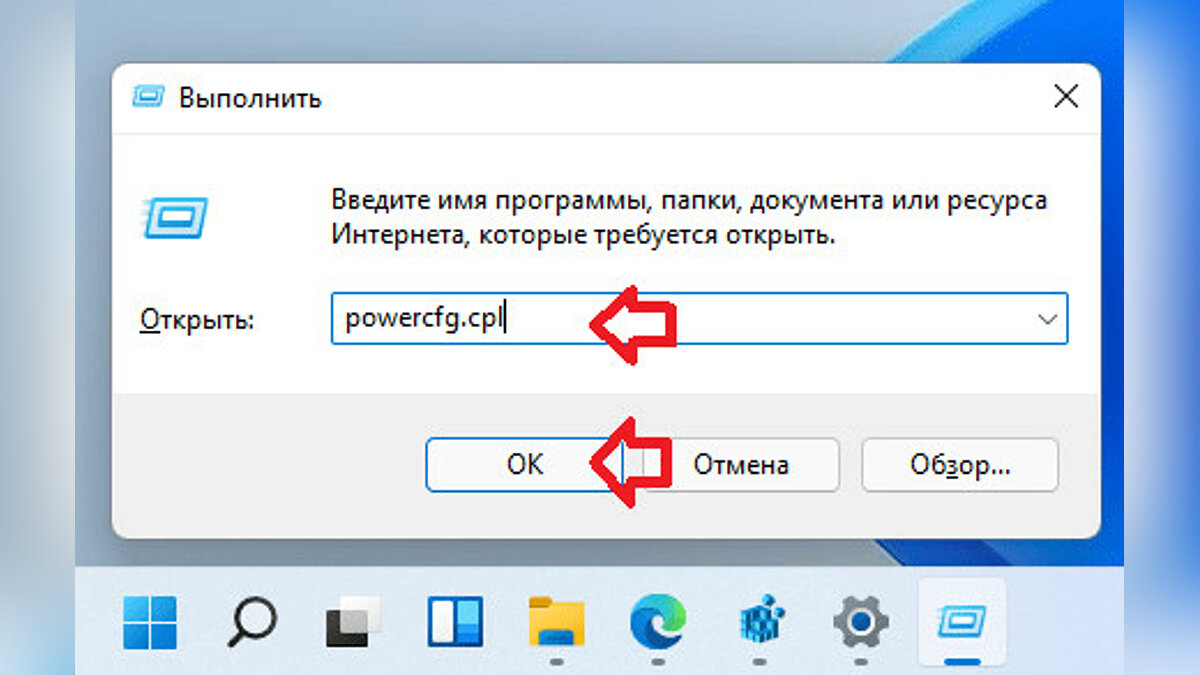
- На рабочем столе нажимаем Win+R и вводим команду «powercfg.cpl» (без кавычек). То же самое можно ввести в строке поиска. Нажимаем Enter.
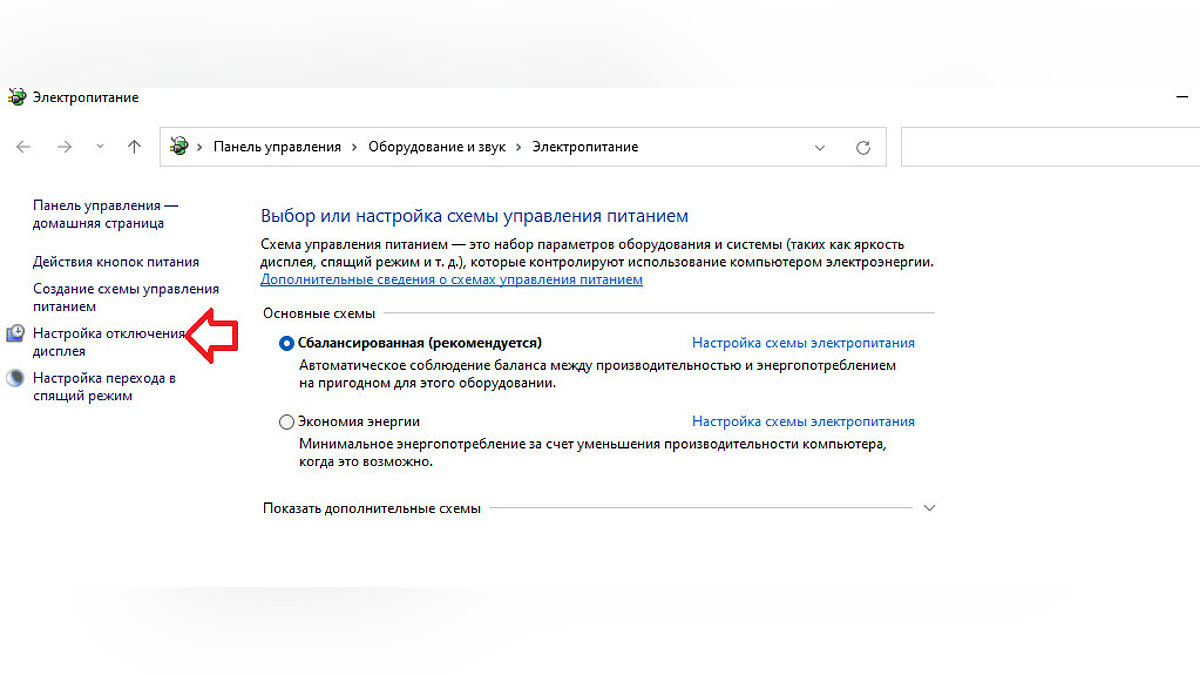
- Слева нажимаем «Настройка отключения дисплея», затем возле «Отключать дисплей» выбираем нужное значение.
- Нажимаем «Сохранить изменения» и закрываем окно настроек.
- После этого система тоже изменит время отключения экрана.

Как изменить время до отключения экрана через дополнительные параметры питания
Ещё один способ, который частично похож на предыдущий.
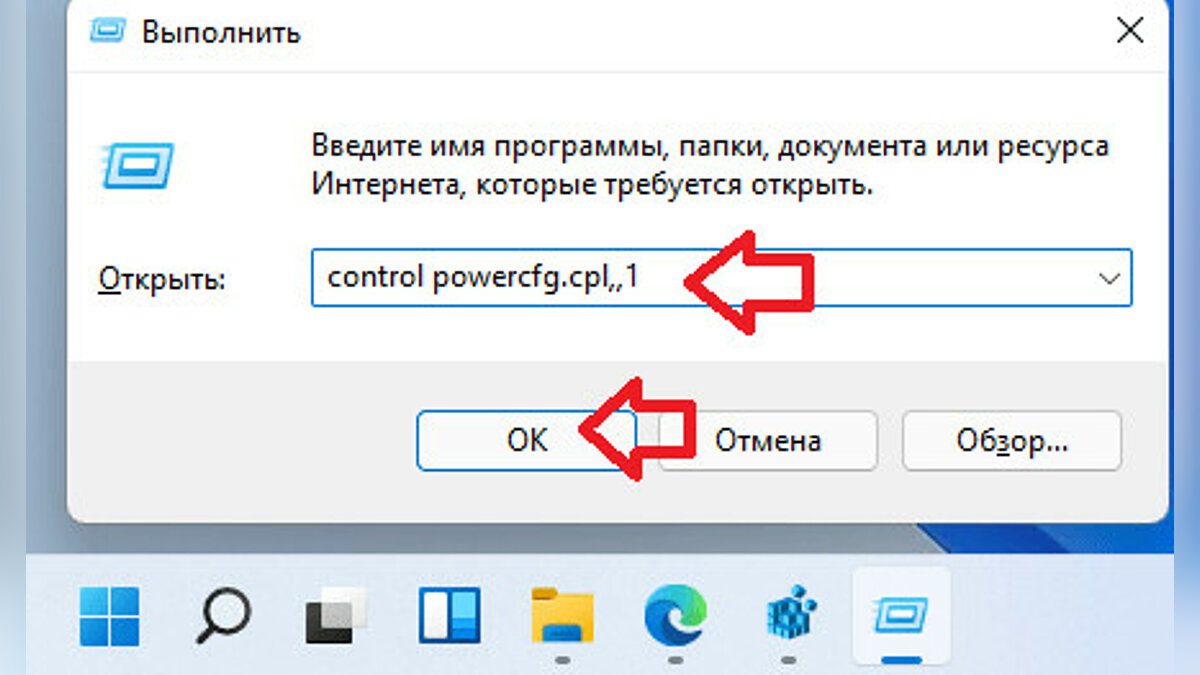
- Нажимаем на «Пуск» правой кнопкой мыши и выбираем «Выполнить», вводим команду «control powercfg.cpl,,1» (без кавычек). Нажимаем Enter.
- Заходим в раздел «Экран» => «Отключать экран через», ставим нужное значение и «ОК».
Это более тонкий вариант, поскольку позволит более гибко настроить систему.
Как изменить время до отключения экрана, используя командную строку
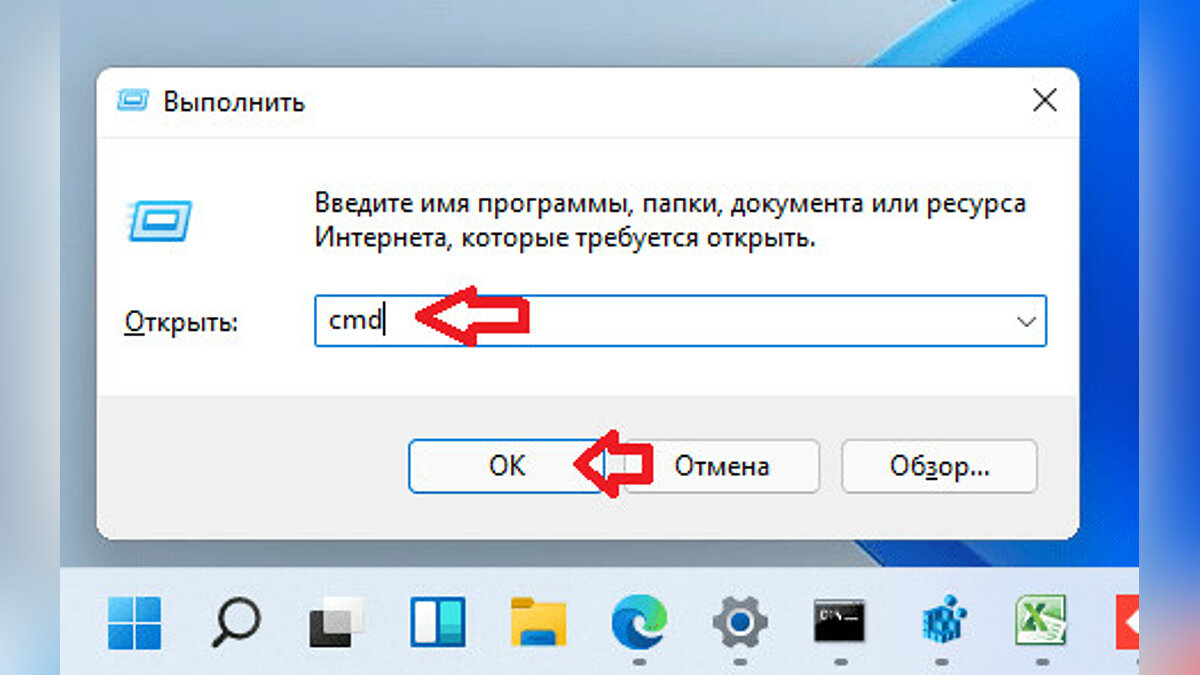
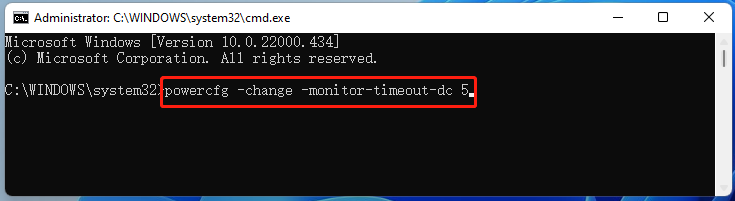
- В строке поиска или в меню «Выполнить» (Win+R) вводим cmd, запускаем на всякий случай от имени администратора.
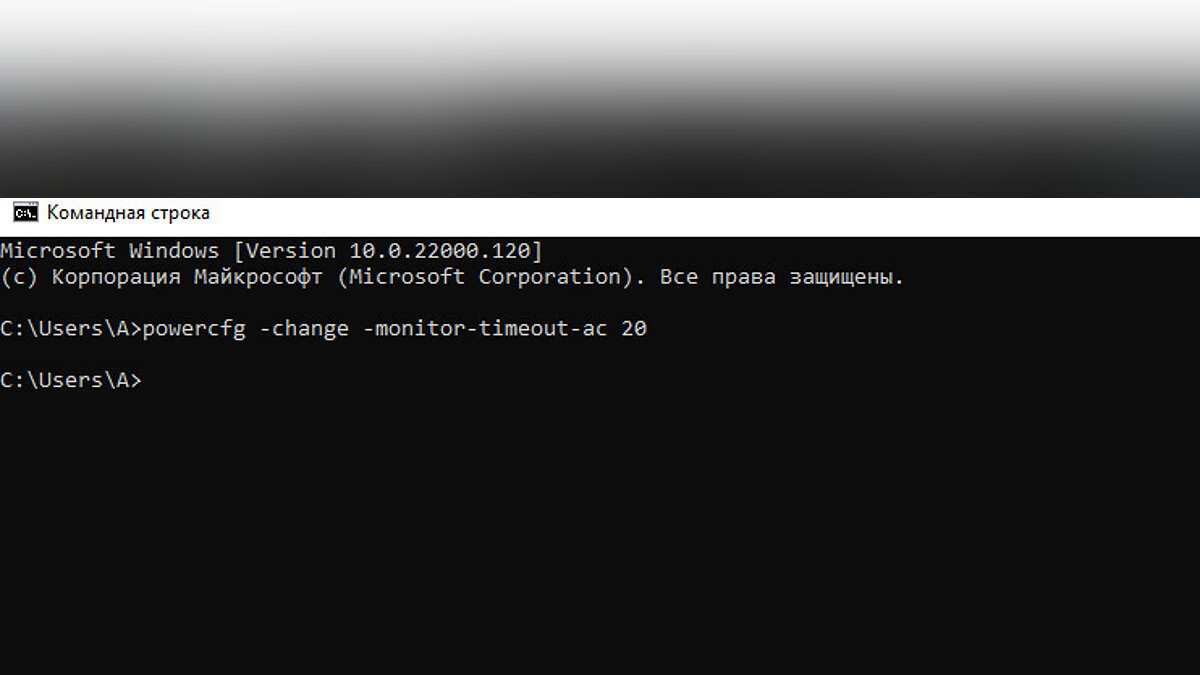
- Вводим такую команду, чтобы установить время ожидания до отключения экрана при работе компьютера от сети — «powercfg -change -monitor-timeout-ac 10» (без кавычек). Вместо 10 можете ввести цифру, которая будет обозначать минуты. Нажимаем Enter.
- Аналогично вводим «powercfg -change -monitor-timeout-dc 10» (без кавычек) и число вместо 10. Эта команда изменит время ожидания до отключения экрана при работе от батареи. Также нажимаем Enter.
Как видите, ничего сложного нет.
- Как обновиться до Windows 11 и установить систему при помощи флешки, DVD-диска и без TPM 2.0
- Как подключить сетевой диск в Windows 11
- Windows 11 не поддерживает Intel Core 7700K, но умеет работать с дискетами из 70-х
Locking your PC is a great way to make sure no unauthorized person accesses your computer. Preventing unauthorized access becomes paramount if you have a shared working space or in case you are working on sensitive and confidential data.
Now, this could have been a challenging task if you had to do this manually every time you are leaving your computer alone for a few minutes. Thankfully, that is not the case in Windows, you can set a time most suitable to you after which if there’s no activity your Windows 11 computer will lock itself.
Moreover, there are multiple ways you can choose to change the Windows 11 lock screen timeout; thus, you can choose which one suits you best. So, let’s get started.
Adjust Lock Screen Timeout from Settings
Lock screen timeout can be easily adjusted from the Settings app. Moreover, you can even set different timeout settings for when your device is plugged in, and when it is running on battery to help you save more power along with data confidentiality.
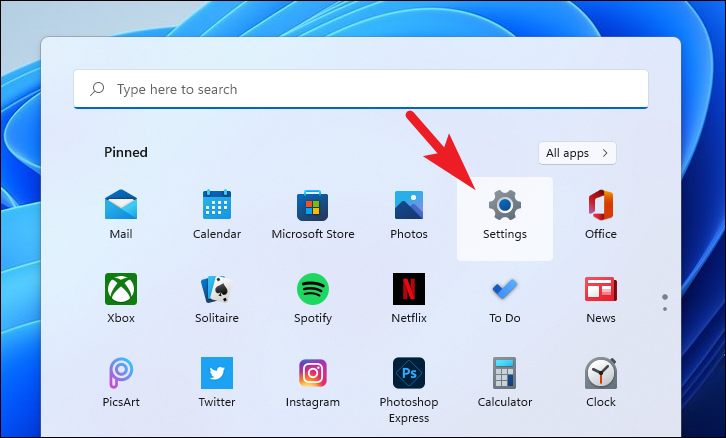
First, head to the Settings app either from the pinned apps in the Start Menu or by searching for it.
Next, make sure you have selected the ‘System’ tab from the left sidebar of the Settings window.

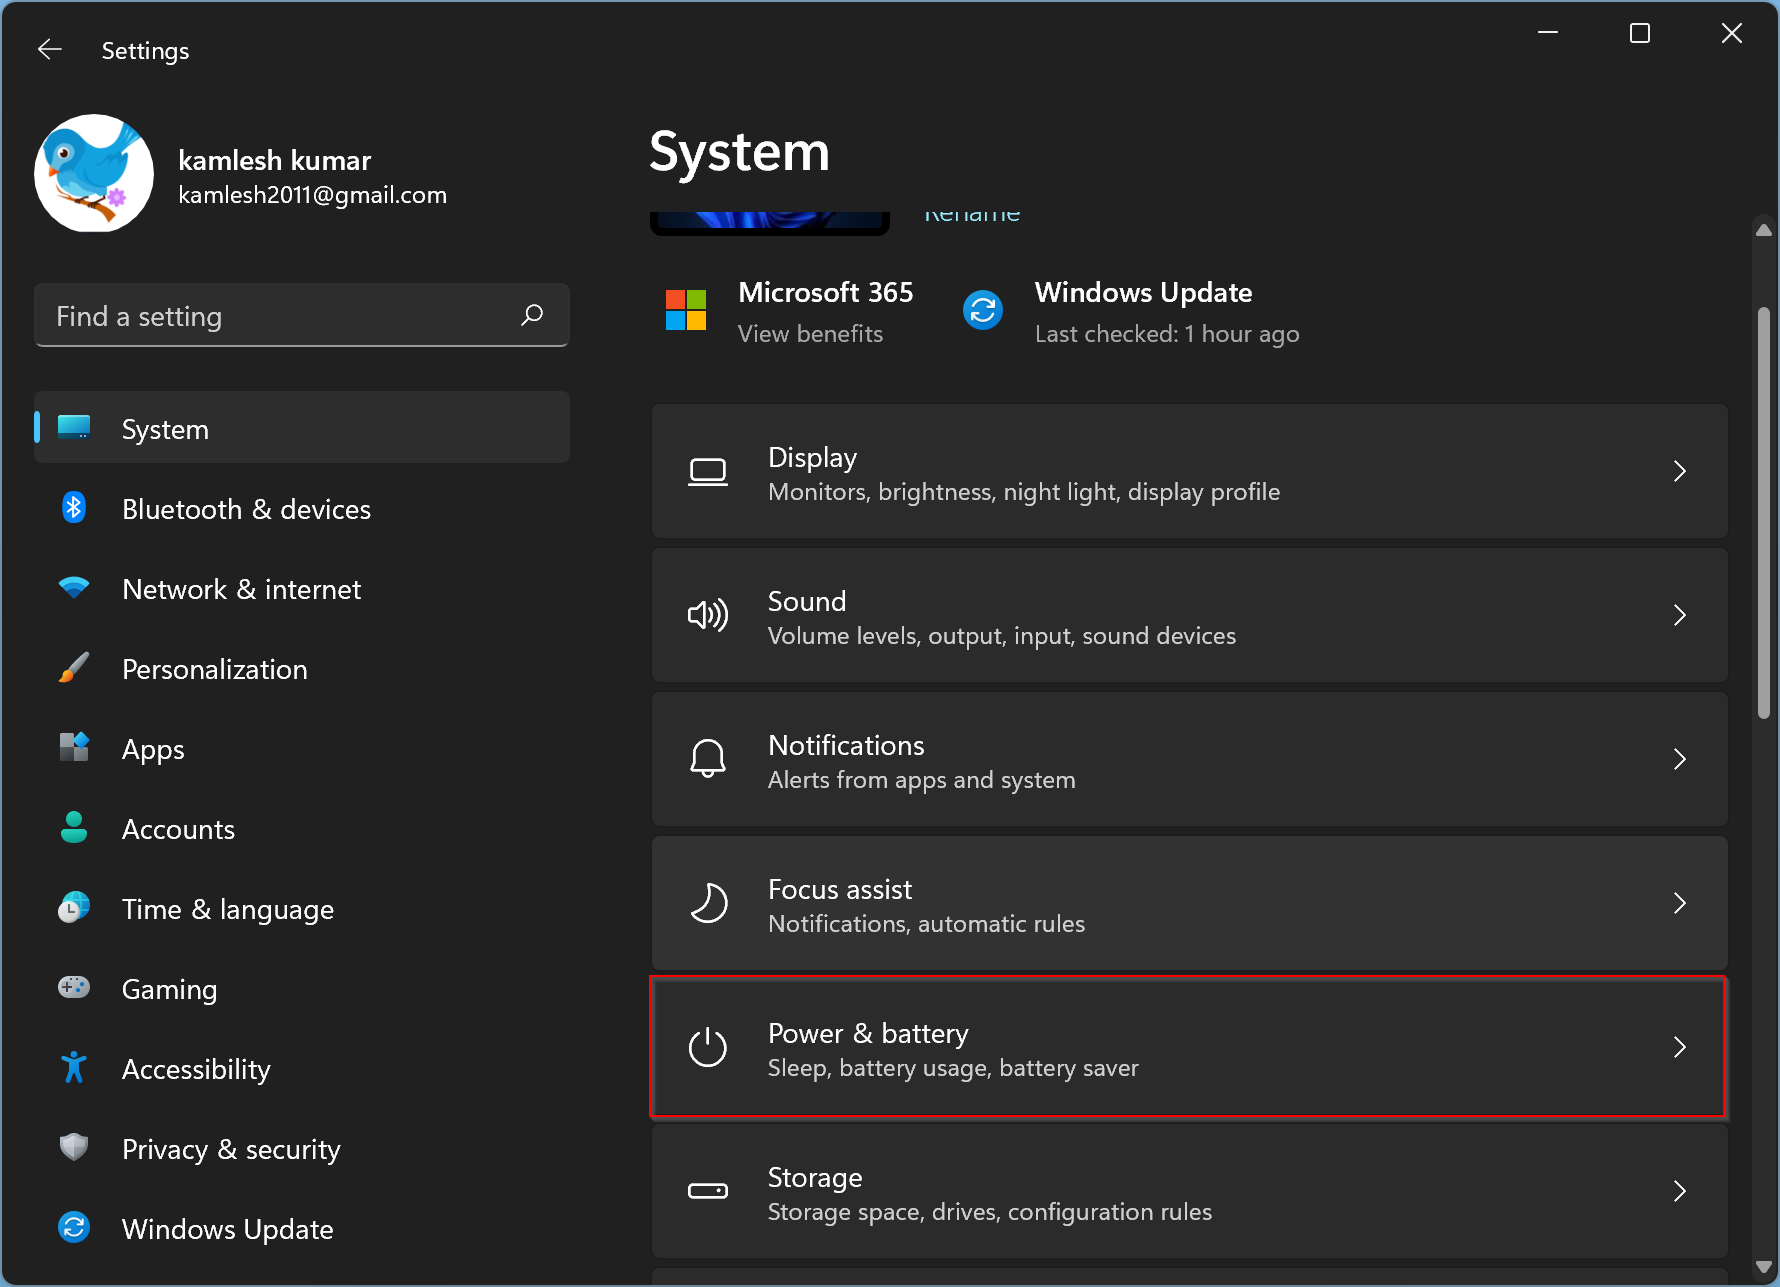
After that, from the right section of the window, locate and click on the ‘Power & battery’ tile to continue.
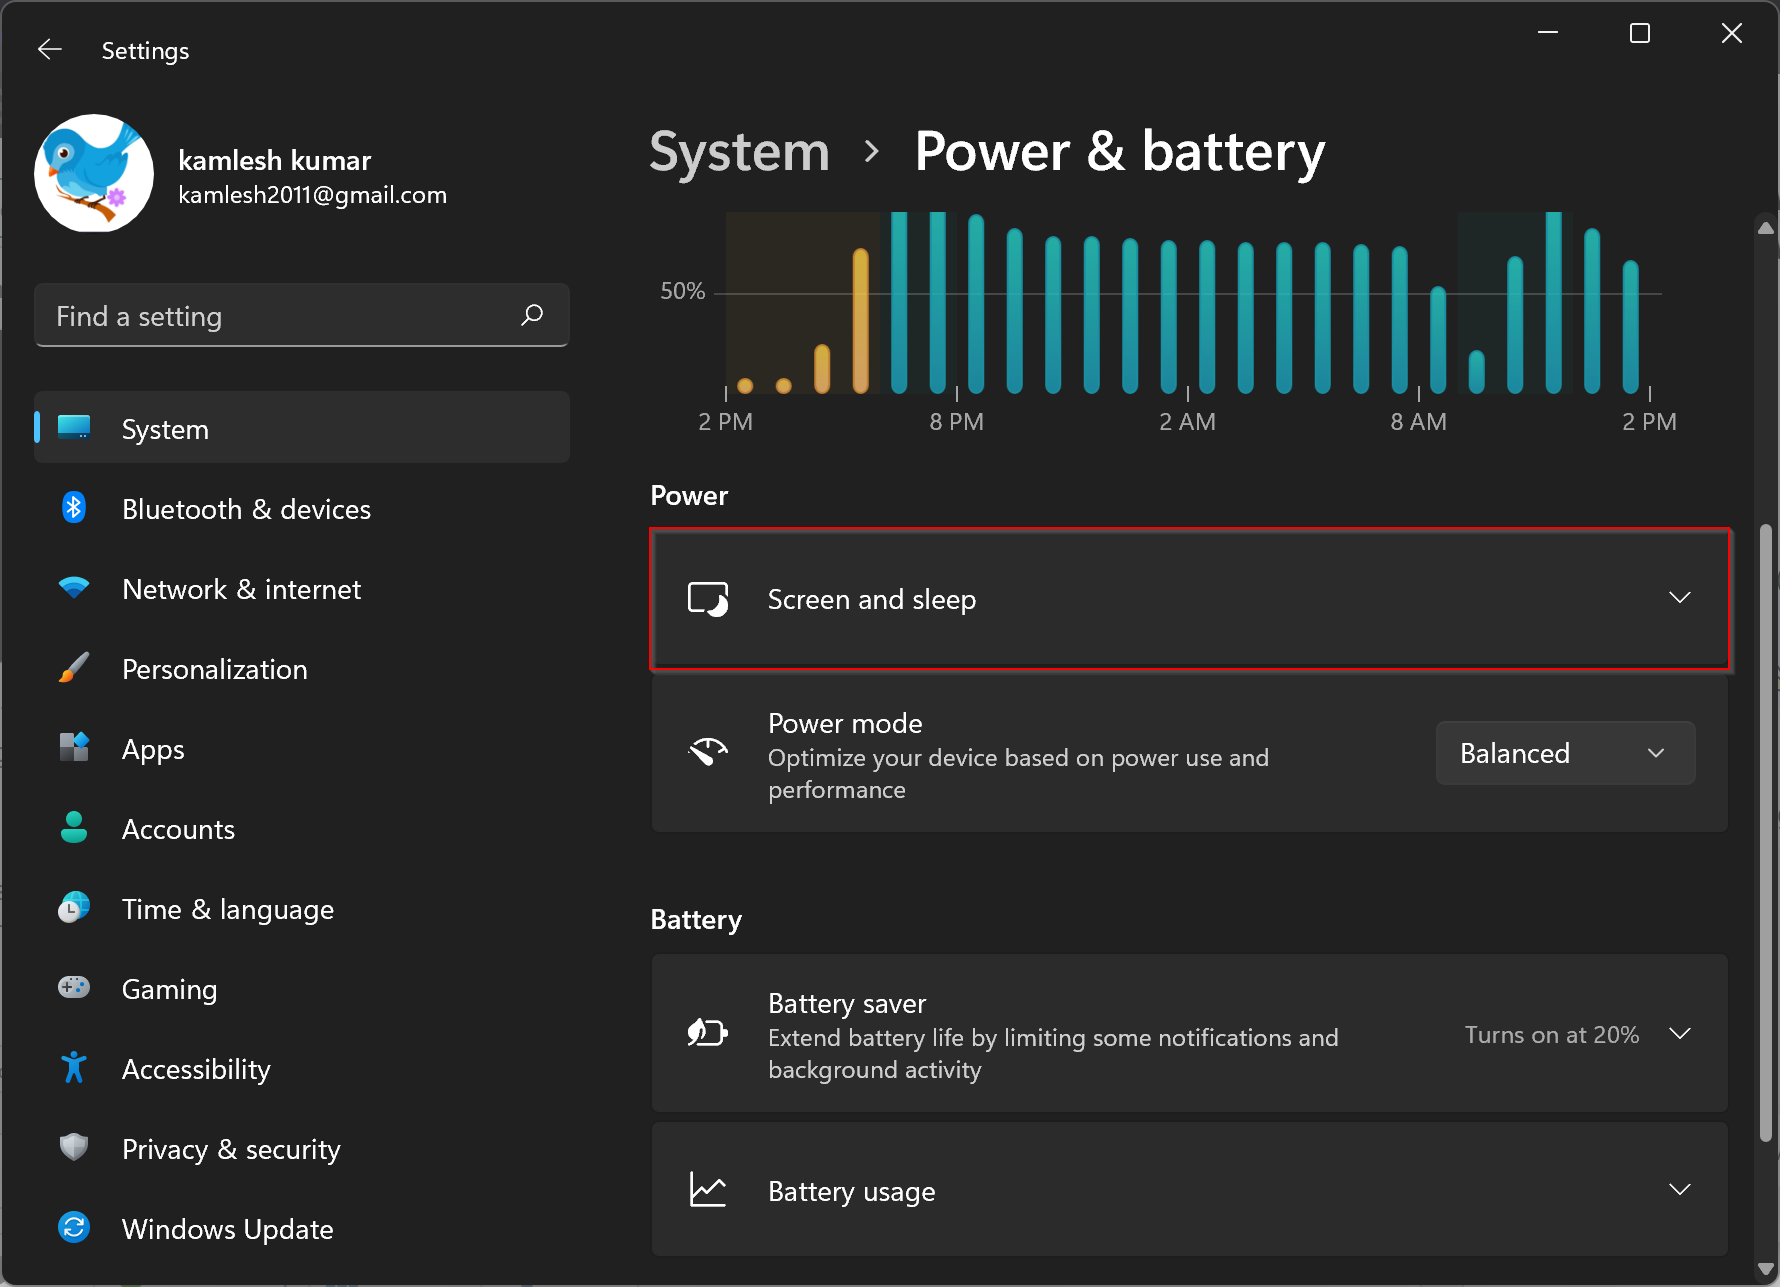
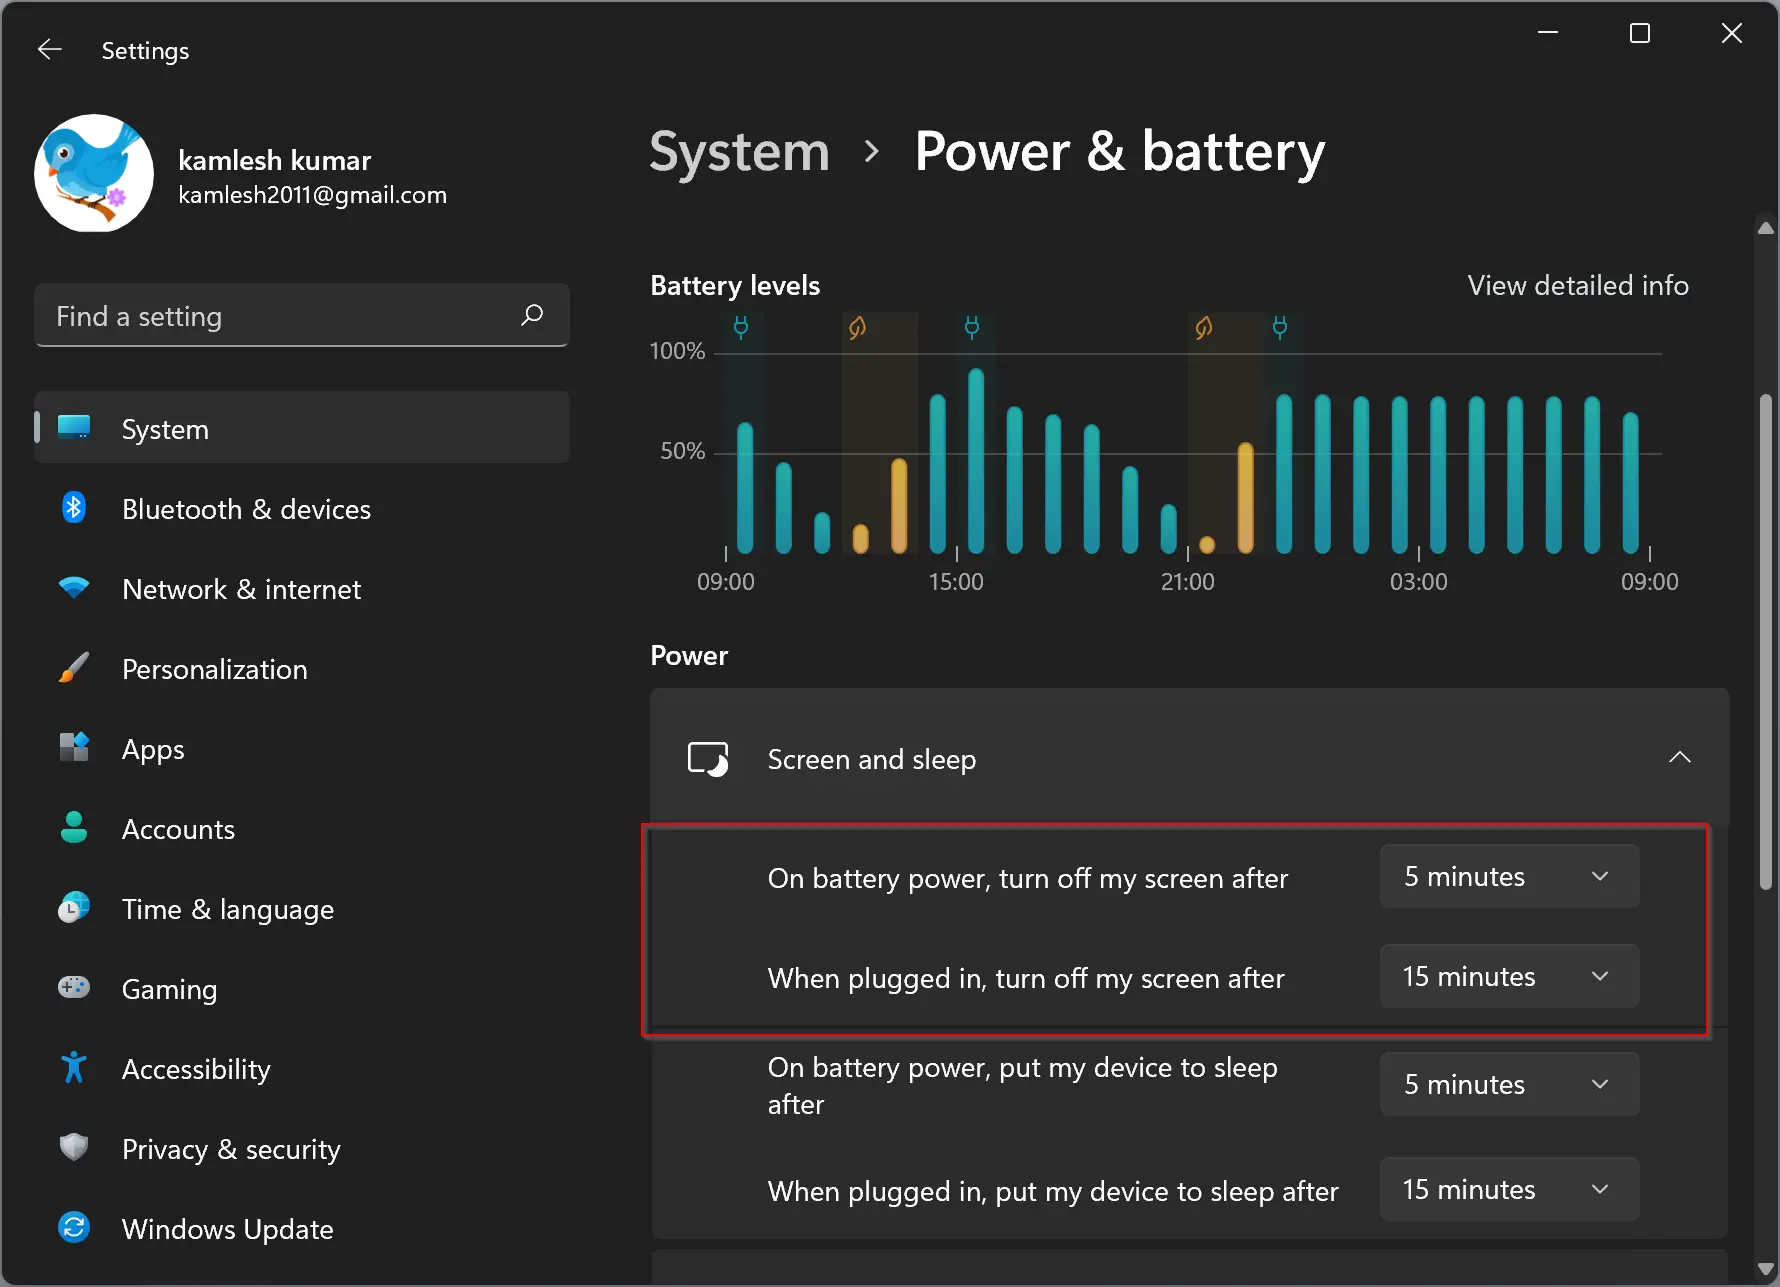
Then, on the ‘Power & battery’ screen, under the ‘Power’ section, click on the ‘Screen & sleep’ tile to expand the section.
Next, click on the drop-down menu following the ‘On battery power, turn off my screen after’ option. Then, select the time most suitable for you from the list. Do remember this setting will only apply when your machine is on battery power.

To toggle the setting when your device is plugged in, click on the drop-down menu following the ‘When plugged in, turn off my screen after’ option. Next, select the most suitable time duration to lock your PC.
Set Custom Lock Screen Timeout from Control Panel
If the preset durations for lock screen timeout aren’t suitable, you can also set your preferable custom duration from the Control Panel. Moreover, since they will be mapped with the various ‘Power Plans’ of your device, you can define the different duration for screen timeout under each plan.
First, head to the Start Menu and type Registry Editor. Then, from the search results, click on the ‘Registry Editor’ tile.
Now, navigate to the below-mentioned registry address and double-click on the ‘Attributes’ file. This will open a separate window on your screen.
Computer\HKEY_LOCAL_MACHINE\SYSTEM\CurrentControlSet\Control\Power\PowerSettings\7516b95f-f776-4464-8c53-06167f40cc99\8ec4b3a5-6868-48c2-be75-4f3044be88a7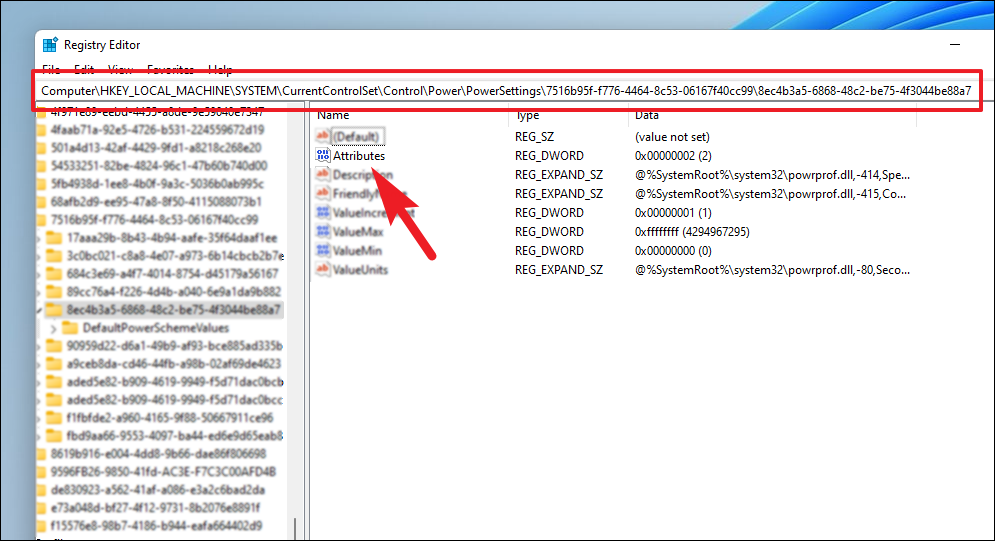
Next, from the separately opened window, locate the ‘Value’ field and type 2 in the text box present right beneath it. Then, click on the ‘OK’ button to save the changes and close the window.
Now, head to the Start Menu and type Control Panel to search for it. Then, from the search results, click on the ‘Control Panel’ tile to open it.
Then, on the Control Panel screen, click on the ‘Power Options’ tile to proceed.
After that, under the ‘selected plan’ section, click on the ‘Change plan settings’ to expand the section.
Next, from the expanded section, click on the ‘Change advanced power settings’ to continue. This will open a separate window on your screen.
Now from the separately opened window, double-click on the ‘Display’ section to expand it. Then, double-click on the ‘Console lock display off timeout’ option to expand it further.
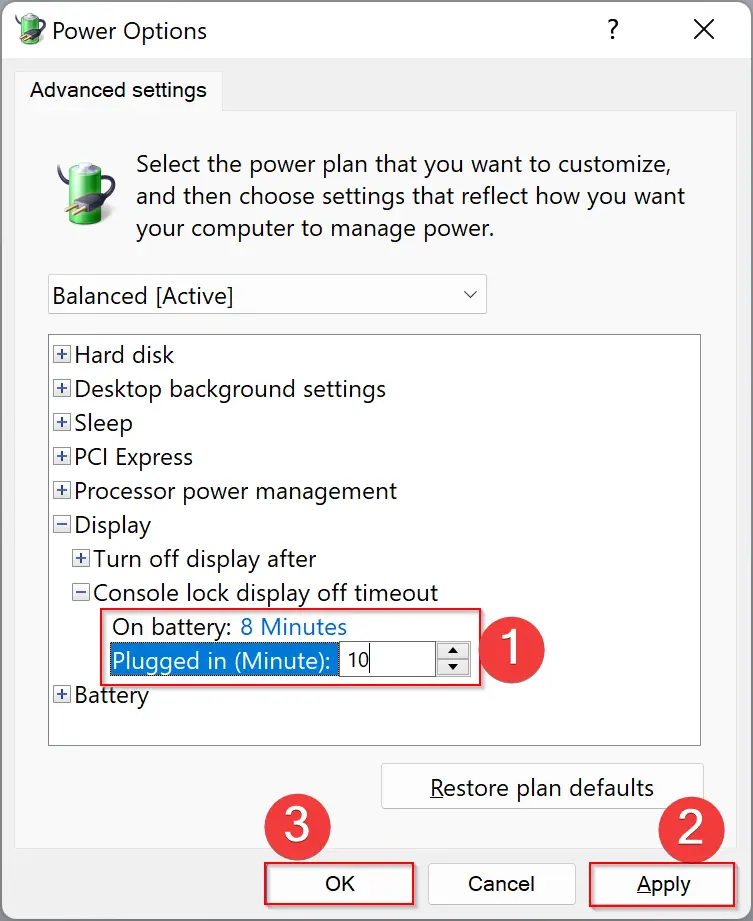
Then, click on the duration option following the ‘On battery’ option and enter your desired duration (in minutes).
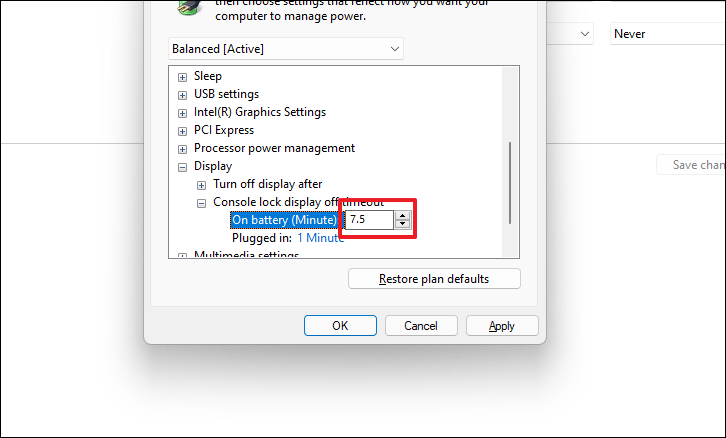
Similarly, click on the duration option following the ‘Plugged in’ option and enter your desired duration (in minutes). Then, click on the ‘Apply’ button to save the changes and click on the ‘OK’ button to close the window.

And that’s it, you have now set a custom lock screen timeout as per your need.
By default, Windows 11’s lock screen times out and switches off the monitor after just a minute. When you try to enter into your PC, you need to type in the user account password to access your desktop. It is very little time, and a lot of Windows users are not happy with this behavior. However, it is possible on Windows 11 to increase the screen time out. If you are one of those Windows users who are not happy with a one-minute screen lock, you can increase the time. In this gearupwindows article, we will guide you on increasing the Windows 11 lock screen timeout.
There are at least two ways through which you can change the lock screen timeout on Windows 11. Either use Control Panel or Settings app. Ultimately, both will do the same job.
The Control Panel does not allow you to change the lock screen timeout settings. So, you need to take the help of the Windows Registry to appear this setting under Control Panel. Then, you can increase the lock screen timeout according to your needs on your computer using Control Panel.
How do I Increase the Windows 11 Lock Screen Timeout using Control Panel?
Follow these steps to increase the Windows 11 Lock Screen Timeout through Control Panel:-
Step 1. Open Registry Editor.
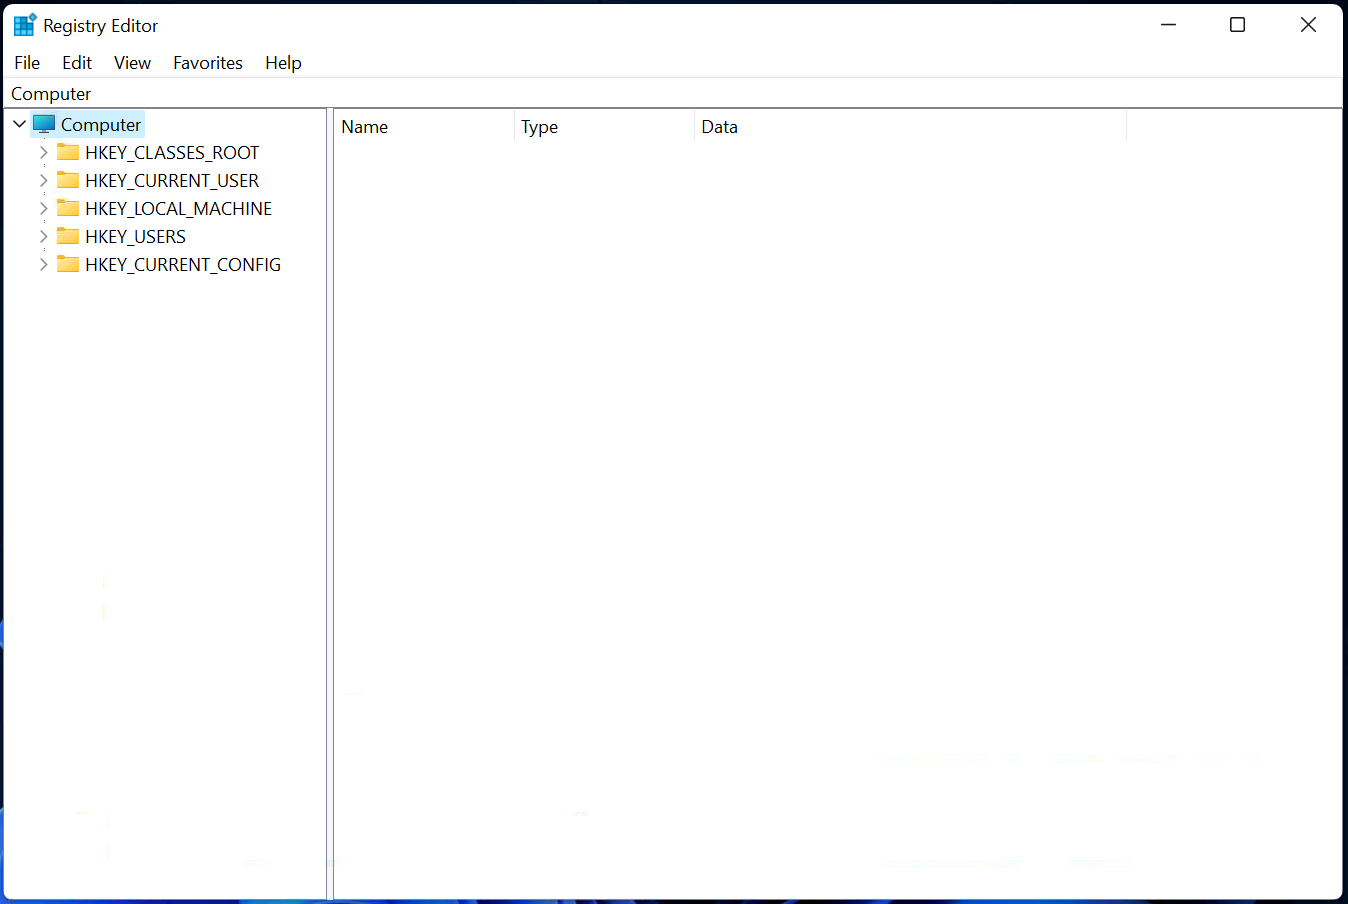
Step 2. When Registry Editor opens, navigate to the following key from the left side pane:-
Computer\HKEY_LOCAL_MACHINE\SYSTEM\CurrentControlSet\Control\Power\PowerSettings\7516b95f-f776-4464-8c53-06167f40cc99\8ec4b3a5-6868-48c2-be75-4f3044be88a7
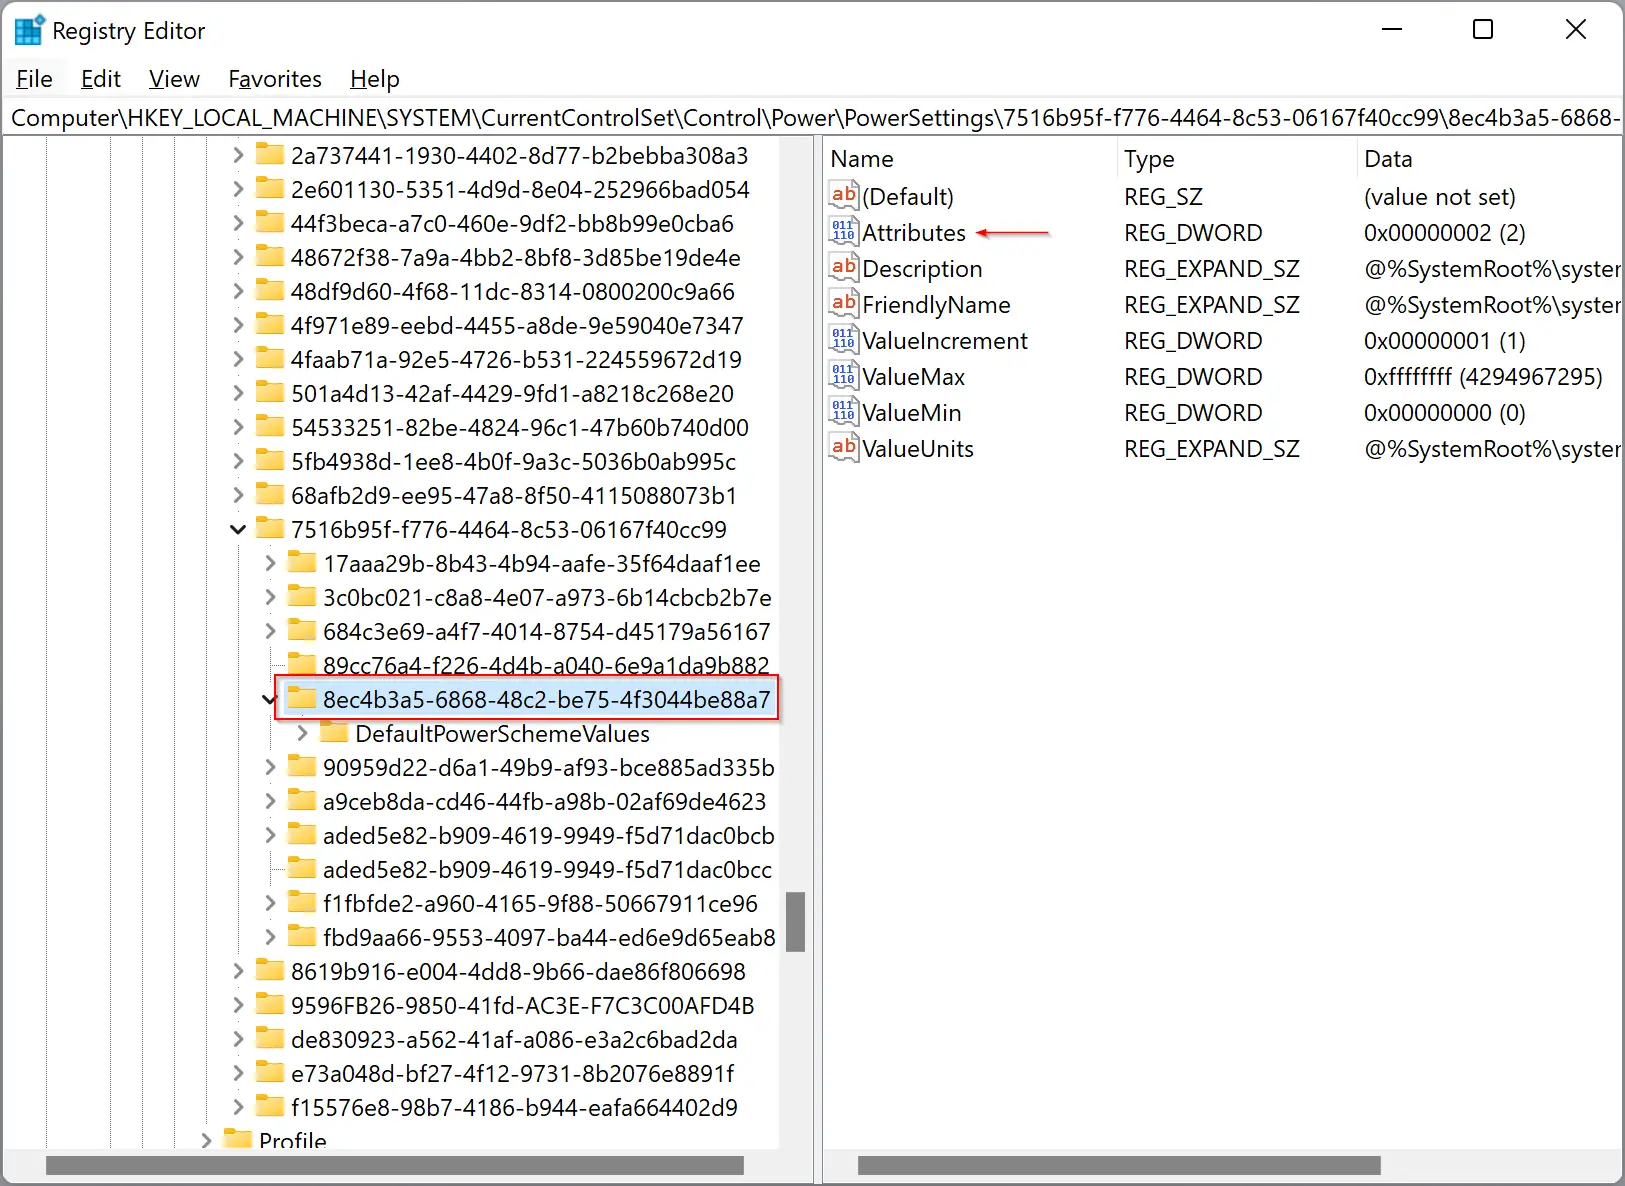
Step 3. On the right side pane, locate the Attributes DWORD (32-bit) Value and double-click to open its settings.
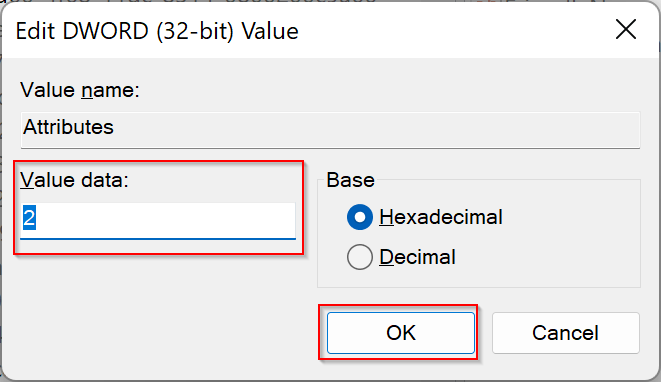
Step 4. Now enter 2 in the Value data field and then click the OK button.
That’s all. You can close the Registry Editor. Next, you need to increase the lock screen time on Control Panel.
Step 5. Open Control Panel.
Step 6. When the Control Panel window opens, click the Hardware and Sound category.
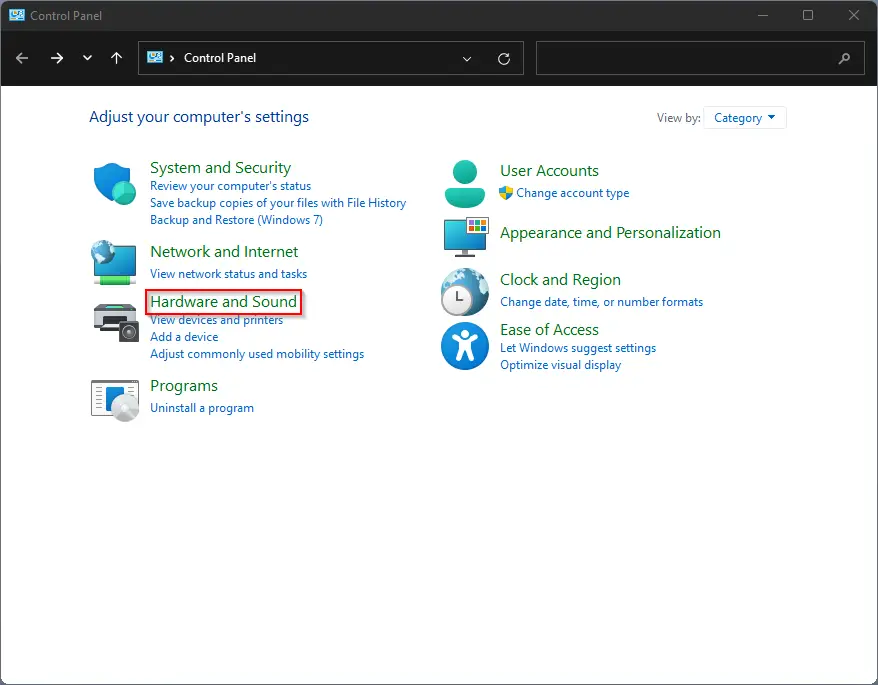
Step 7. In the next window, click the Power Options.
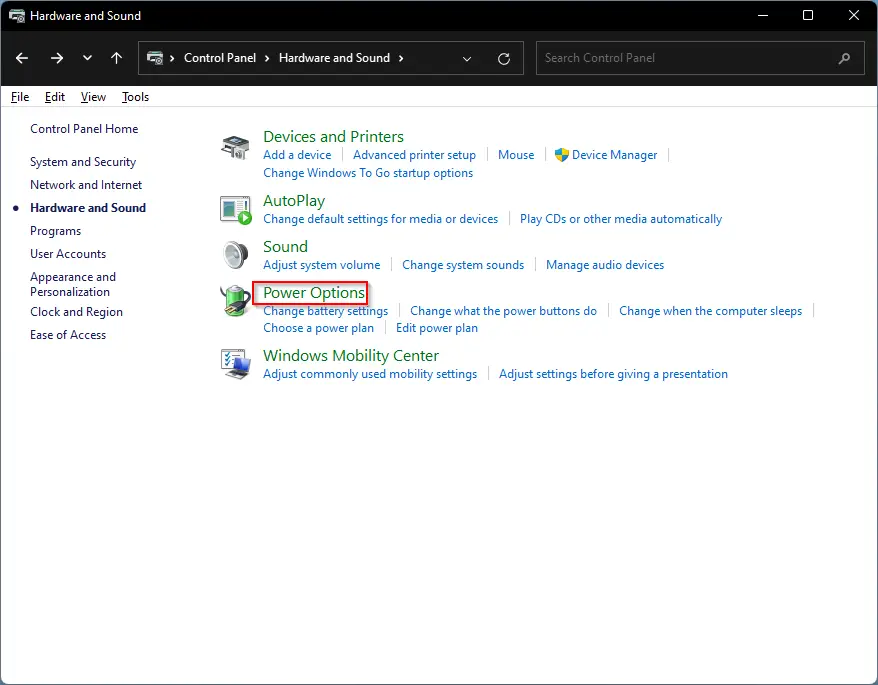
Step 8. Here, click the link labeled Change plan settings next to the Balanced option.
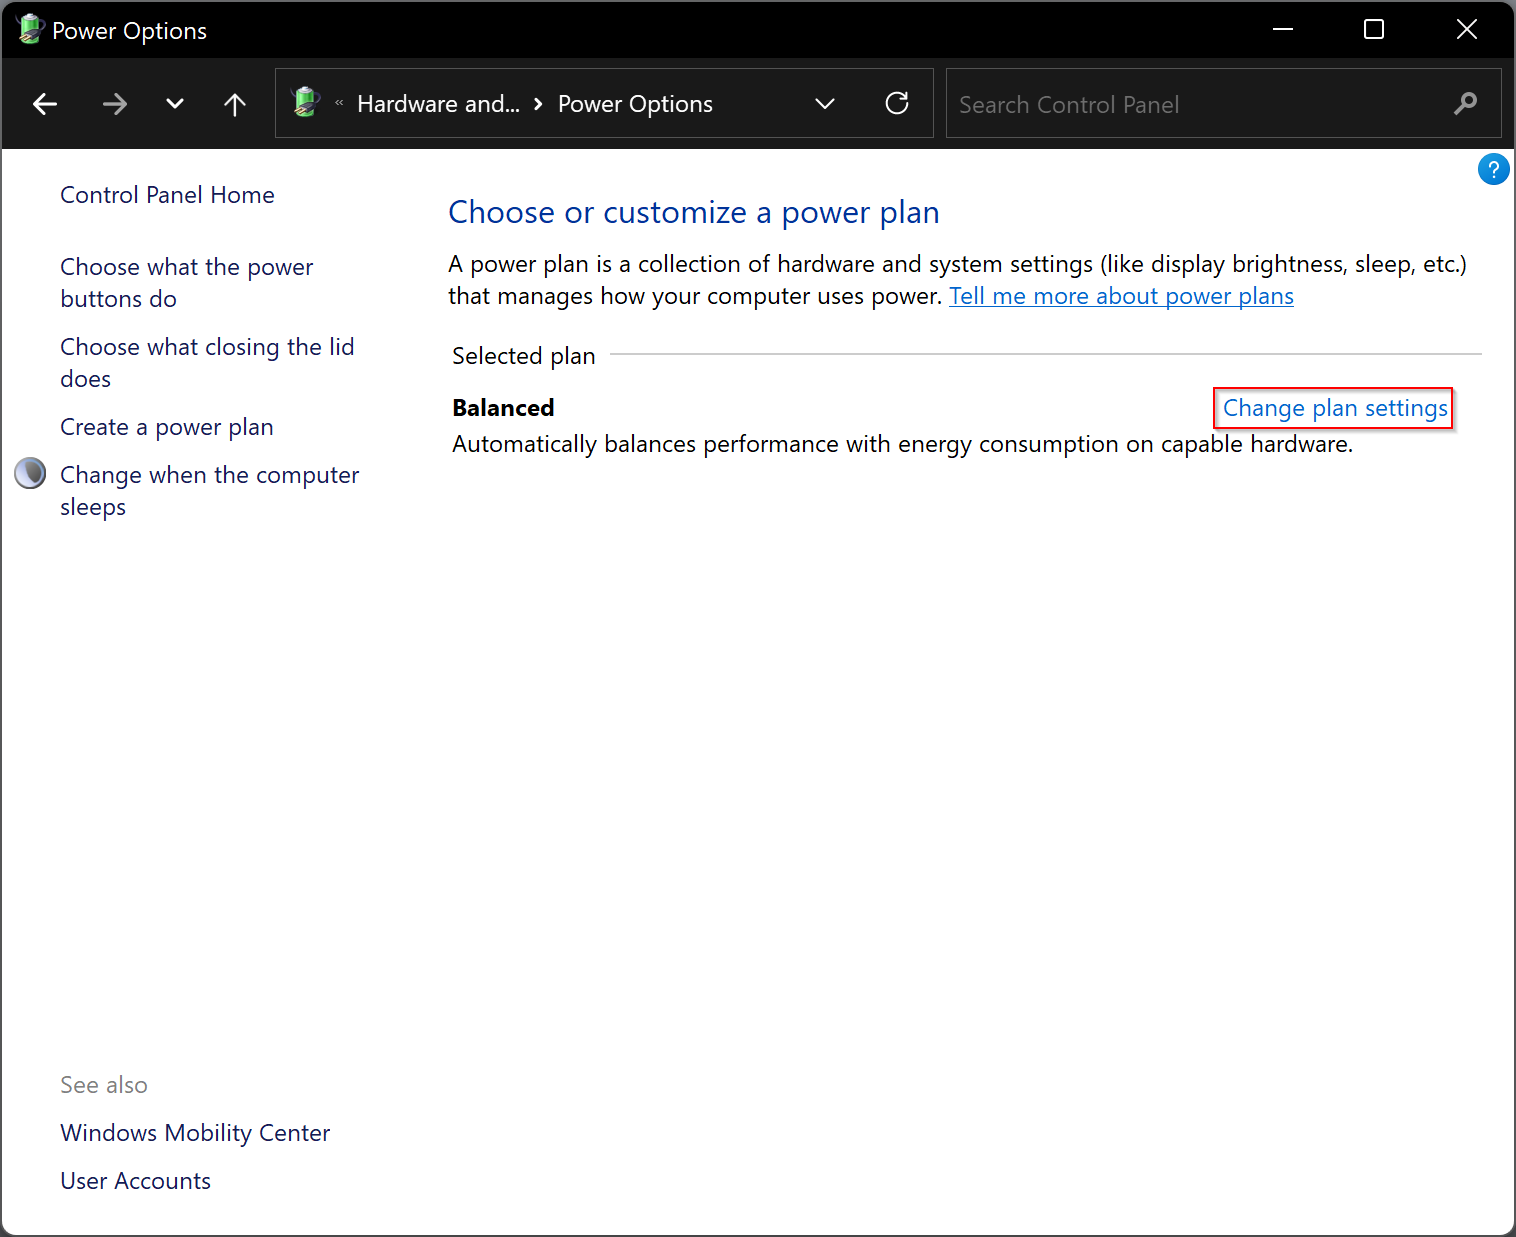
Step 9. Now, click the link Change advanced power settings.
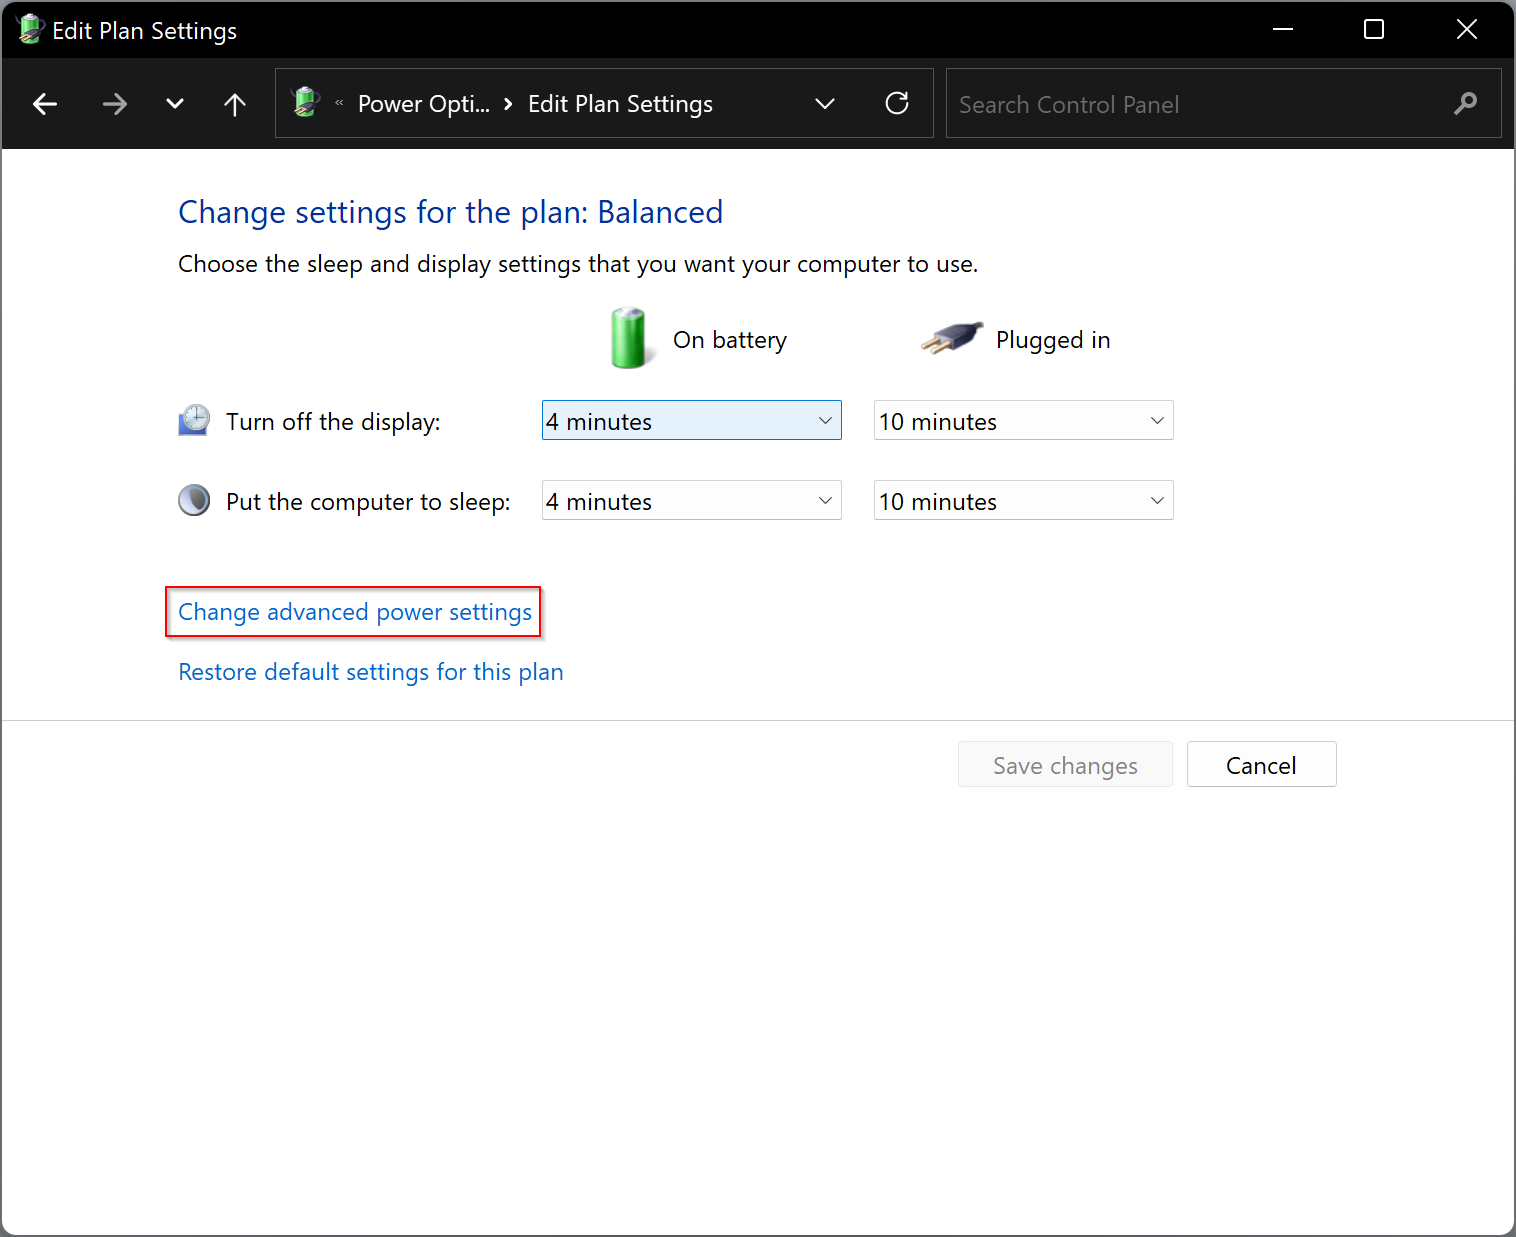
Step 10. A new pop-up window will appear. Expand the Display and then Console lock display off timeout setting.
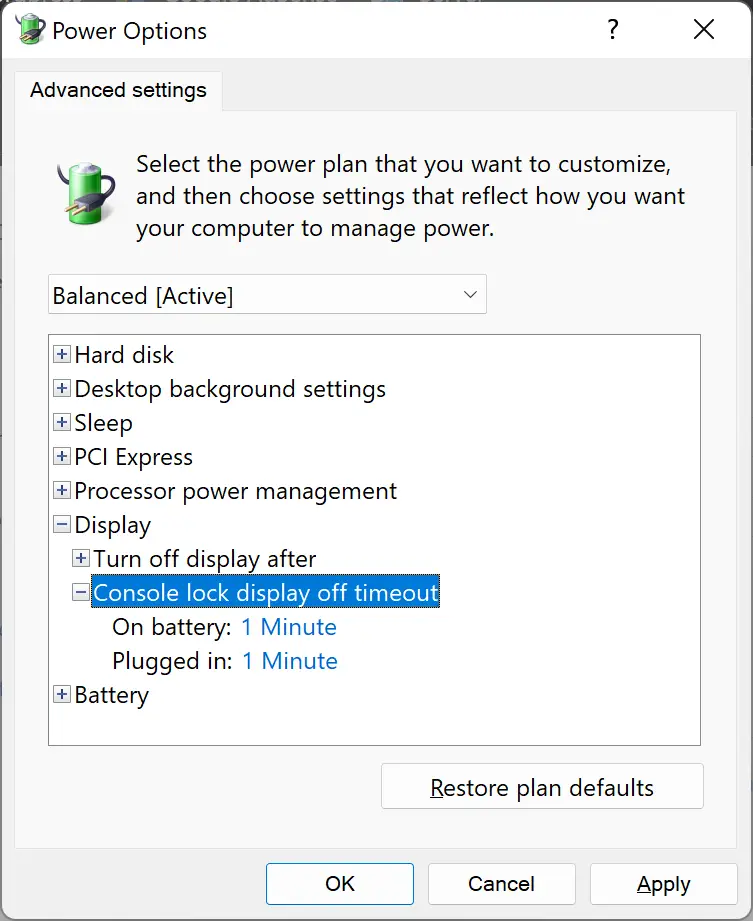
Step 11. Now, set the timeout for how many minutes you want to lock the screen.
Step 12. Click Apply.
Step 13. Click OK.
Step 14. Restart your computer.
Now, the Windows 11 Lock Screen Timeout is set by you. Your PC’s screen will lock out after the time that you have specified in the above settings.
How do I Increase the Windows 11 Lock Screen Timeout via the Settings app?
Follow these steps to increase the Windows 11 Lock Screen Timeout using the Settings app:-
Step 1. Open the Settings app by pressing Windows + I keys from the keyboard or any other method that you use.
Step 2. Select the System category from the left sidebar when Windows Settings opens.

Step 3. On the right sidebar, click on the Power & battery option.
Step 4. Now, scroll down to the Power section and then click on Screen & sleep.
Step 5. Under Screen and sleep, select the turn-off-screen time from both drop-down menus marked in the below image.
That’s it. Now you can close the settings app safely.
Conclusion
In conclusion, Windows 11 has a default lock screen timeout of just one minute, which may not be convenient for some users. However, it is possible to increase the lock screen timeout using either the Control Panel or the Settings app. The Control Panel method requires modifying the Windows Registry, while the Settings app method is more straightforward. Users can choose the method that suits them best to set a lock screen timeout that meets their needs. By following the steps provided in this gearupwindows article, Windows 11 users can easily increase the lock screen timeout and improve their user experience.
It’s important to turn off the display when you’re leaving. However, a lot of users don’t know how to change lock screen timeout in Windows 11. In this post, MiniTool writes 4 ways to change screen timeout to turn off display after in Windows 11.
Sometimes you may need to leave your computer alone for several minutes. Under this circumstance, it’s important to protect any unauthorized person from accessing your computer especially when you are dealing with sensitive and crucial data. To achieve that, you just need to set a lock screen timeout that is most suitable for you. Here comes a new question – how to change lock screen timeout in Windows 11? If you are unclear about that, try the following 4 methods.
Way 1. Change Windows 11 Lock Screen Timeout via Settings
The first and simplest way to change screen timeout to turn off display after in Windows 11 is to use the Settings app. It can save power along with protecting privacy by setting a different timeout when your device is plugged in or running on battery. Here’s how to change Windows 11 lock screen timeout via Settings.
Step 1. Press Win + I keys to open the Settings app. Also, you can right-click the Start menu and select Settings.
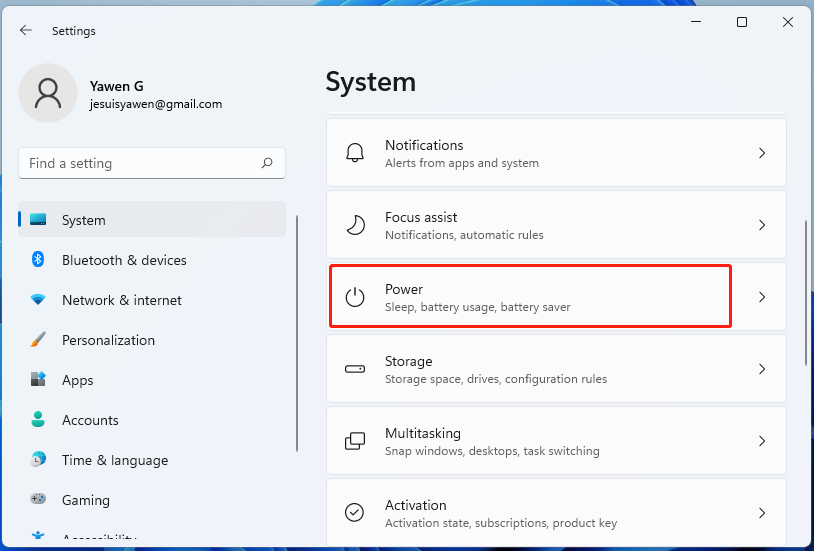
Step 2. Select System from the left vertical menu, and then scroll down the right sidebar and click on Power & battery/Power.
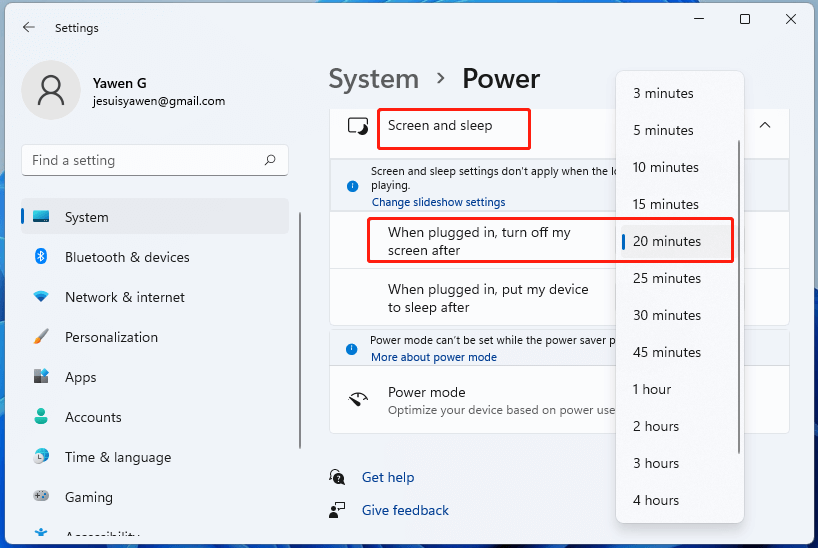
Step 3. Go to the Power section and expand the Screen and sleep category.
Step 4. Click on the drop-down menu next to “On battery power, turn off my screen after” and select a time that’s most suitable for you. Bear in mind that this option only applies when your computer is running on battery power.
Step 5. Also, you can click on the drop-down menu next to “When plugged in, turn off my screen after” and select a lock screen timeout.
Now, you can close Settings and check if you change screen timeout in Windows 11 successfully.
Way 2. Change Windows 11 Lock Screen Timeout via Control Panel
As you know, Control Panel includes many advanced options that can make changes to your power plan and other settings. Here you can use it to change screen turn off timeout in Windows 11.
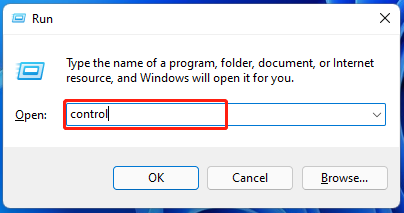
Step 1. Press Win + R keys to open the Run dialog box, and then type control in the box and hit Enter.
Step 2. In the Control Panel window, change the view by type to Large icons and click on Power Options.
Step 3. Click on the Change plan settings link next to your selected power plan.
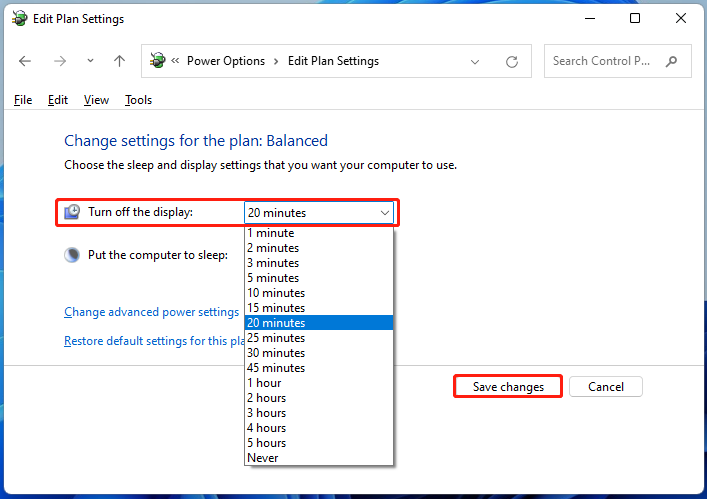
Step 4. Click on the drop-down menu next to Turn off the display and select a time that you want to use when On battery and Plugged in. Also, you can click on Put the computer to sleep and select a time.
Step 5. Click on Save changes to execute the changes. After that, you can see if you change screen timeout in Windows 11.
Way 3. Change Windows 11 Lock Screen Timeout via Registry Editor
Another simple way on “how to change Windows 11 lock screen timeout” is to use the Registry Editor. Now, follow the steps below carefully.
Step 1. Open the Run box by pressing Win + R, and then type regedit in it and hit Enter. Then click on Yes to access this app.
Step 2. In the Registry Editor window, locate the following path from the left navigation bar:
ComputerHKEY_LOCAL_MACHINESYSTEMCurrentControlSetControlPowerPowerSettings7516b95f-f776-4464-8c53-06167f40cc998EC4B3A5-6868-48c2-BE75-4F3044BE88A7
Step 3. Go to the right panel and double-click the Attributes key, change its Value data to 2, and click on OK to save the change. It will enable an option called Console lock display off timeout in Windows 11. To customize this option to change lock display timeout, proceed with the following steps.
Step 4. Open the Control Panel again, select Power Options, and click on Change plan settings next to your power plan.
Step 5. Click on Change advanced power settings, and then expand the Display category in the pop-up window.
Step 6. Now, you will see the Console lock display off timeout option, expand it, change the default time to any other lock screen timeout you want.
Step 7. Click on Apply and OK to save changes.
Way 4. Change Windows 11 Lock Screen Timeout via CMD
In addition to the above methods, you can change screen timeout to turn off display after in Windows 11 by applying certain command lines. For that:
Step 1. Type cmd in the search box on the taskbar. And then right-click the Command Prompt app and select Run as administrator. Then click Yes to confirm the operation.
Step 2. In the elevated Command Prompt window, type the following command and hit Enter to set a lock screen timeout when On battery.
Tip: The minutes/seconds command means how many minutes/seconds you want to turn off display after.
powercfg -change -monitor-timeout-dc <minutes>
or
powercfg /SETDCVALUEINDEX SCHEME_CURRENT 7516b95f-f776-4464-8c53-06167f40cc99 3c0bc021-c8a8-4e07-a973-6b14cbcb2b7e <seconds>
Step 3. If you want to set a lock screen timeout when Plugged in, you can run the following command.
powercfg -change -monitor-timeout-ac <minutes>
or
powercfg /SETACVALUEINDEX SCHEME_CURRENT 7516b95f-f776-4464-8c53-06167f40cc99 3c0bc021-c8a8-4e07-a973-6b14cbcb2b7e <seconds>
How to change lock screen timeout in Windows 11? The top 4 ways have been illustrated and you can choose the best one you think.