-
Written by
Bram Jansen -
Fact-checked by Kevin Parker -
Updated on May 9, 2023
We are reader supported and may earn a commission when you buy through links on our site.
Learn more
.
To set up Surfshark on your router, confirm whether your router is Surfshark-compatible, install it, and voila! You have Surfshark router access.
The installation process differs from router to router. But don’t worry – I’ll take you through the installation process for the Asus router and provide links to tutorials for other supported routers.
Keep reading for the juicy details!
How to Install Surfshark on a Router?
The first step to installing Surfshark on your router is finding out if it’s compatible with Surfshark. You can do this in two ways:
- Ask Surfshark support via live chat or email if your router is compatible.
- Check Surfshark’s help center to see if your router is supported.
Additionally, the installation process requires using OpenVPN, IKEv2, L2TP, or WireGuard. I recommend WireGuard or OpenVPN.
Let’s take a closer look.
How to Install Surfshark on Asus-WRT Routers?
First, grab a Surfshark subscription with this huge discount. Then, follow these instructions to install Surfshark on an Asus-WRT router using OpenVPN.
Find Your Login Details
You’ll need your Surfshark service credentials to connect to Surfshark using a manual OpenVPN configuration.
NOTE:
Surfshark service credentials are not your Surfshark account credentials (email & password).
To access these credentials,
- Login to Surfshark with your Surfshark account credentials.

- Click the “Credentials” tab to find the Surfshark service credentials. Jot them down.

Select a Surfshark Server
Every server or location has a configuration file you need to connect to Surfshark.
Feel free to download all the configuration files directly from Surfshark’s website.
Alternatively, you can
- Visit this page.
- Select the “Locations“ tab. You will now see all of Surfshark’s servers.
- Download the config file for the location you want. Click “Get OpenVPN configuration files” to download.

Configure the OpenVPN Client
Next, you need to configure the OpenVPN client on your router.
- Enter 192.168.1.1 in your URL bar to open your Asus Router control panel.

- Click the VPN tab under “Advanced settings.”

- Select “VPN Client” in the VPN tab.
- Click the “Add Profile” button at the bottom of the page.

- Select “OpenVPN“ tab. Enter the following details:
- Description (name of the connection)
- Username and password (Surfshark service credentials you saved in the previous step)
- Add a configuration file of the server you’d like to connect to. Click “Choose File.”

- Select the directory to which you downloaded the configuration files and click “Open.”

- Select “Upload,” and you should see a message stating “Complete” if the process was successful.

- Leave the “Import the CA file or edit the .ovpn file manually” unticked and click “OK.”
- Click “Activate” to connect the router to a Surfshark server. Now your router is Surfshark protected.
NOTE:
You can ONLY create one VPN connection at a time. You’ll have to add a second VPN profile to create another (“Add profile”).
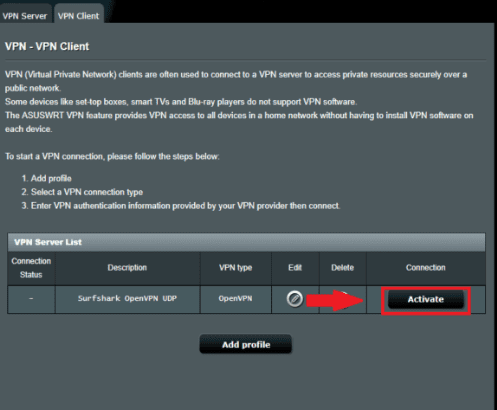
- Once the connection is successful, a blue checkmark should appear in the “Connection Status” column.
Verify Your Connection Was Successful
Conduct an IP and DNS leak test to verify your connection was successful.
You can use Surfshark’s dedicated leak tests to do so.

Congratulations! You successfully installed & configured the Surfshark VPN on your Asus router.
Other Surfshark Router Setups
Can All Routers Use Surfshark?
Not all routers can use Surfshark. Some routers don’t have support for OpenVPN, at least not with their default firmware.
For example, you can’t use the following routers with Surfshark:
- Arris
- Belkin
- Cisco
- Fritz Box
- Linksys (except Tomato-supported routers from this list)
- TRENDnet
- TotoLink
- Ubee
- Google WiFi
- Most ISP-provided routers
If your router doesn’t support OpenVPN, consider buying a new router or installing new firmware on your current router.
If you buy a new router, I recommend one with VPN functionality by default.
Here are a few examples:
- InvizBox 2 VPN router (Surfshark-ready)
- Vilfo
- Synology RT2600AC
- Asus RT-AC86U AC2900 Dual Band Gigabit WiFi Gaming Router
- GLiNet GL-MT300N-V2 Mini Smart Router “Mango”
How to Set up a Manual Surfshark Wireguard Connection on a Router?
To set up a manual Surfshark WireGuard connection on a router, you need a router with custom firmware. I recommend OpenWRT (21.02 or later), as it’s widely supported and gets frequent updates.
Follow these steps
- Log in to Surfshark using your account credentials.
- Click “VPN” and “Manual Setup.”
- Click “Router” and “WireGuard.”

- For this connection, you need a pair of public and private keys.
- If you have these keys from a previous setup, click I have a key pair, enter your public key, and click “Save.”
- If this is your first time, click I don’t have a key pair, generate a new key pair, save your key pair, and click “Save.”

NOTE:
If you fail to generate a key pair before downloading the configuration file, the file won’t have your key pair.
In such a case, you’ll need to generate a key separately and input it manually into any missing fields.
- Choose a location and download the WireGuard configuration file.

- Go to a new browser tab, enter your router’s default gateway address, and log in. If you are using OpenWRT, it’s 192.168.1.1.

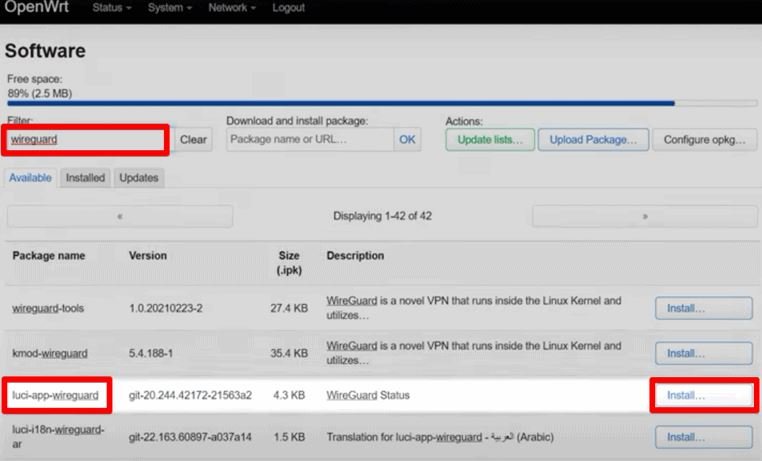
- At the top, select “System” then “Software.” It will take you to a new window where you can download a special package that you’ll use to set up the WireGuard connection.

- Type in WireGuard in the search & look for luci-app-wireguard. Click “Install.”

- Reboot the router. Click “System,” “Reboot,” and “Perform Reboot.” After, refresh the page & log in to the router’s control panel again.

- Set up the WireGuard interface. Select “Network,” “Interfaces,” and “Add New Interface.”

- For the name, type in wg0 and select “WireGuard VPN” for the protocol. Click “Create Interface.”

- Under General Settings, configure the Interface by entering the Private key from Surfshark’s config file.

- Enter the IP address, also found in the Surfshark config file.

- Under “Advanced Settings,” uncheck “DNS servers advertised by peers.”
- Enter Surfshark’s DNS addresses:
- 162.252.172.57
- 149.154.159.92.

- Assign a Firewall Zone. Click “Firewall Settings” and “Unspecified.”
- In the bottom field, enter “VPN.”

- Head to the “Peers” tab and click “Add Peer.”
- Under Description, fill in the location of the file you downloaded.

- Enter your “Public Key.” You will find it in the config file you got from Surfshark.

- In the Allowed IPs section, enter the following address: 0.0.0.0/0

- Check the “Route Allowed IPs” box.
- For the “Endpoint Host,” enter the location address from the config file. It should end with Surfshark.com.

- Enter the “Endpoint Port.” These are the last 5 numbers at the end of the address. Click “Save.”

- You will notice the message “Interface has 7 pending changes” on the WireGuard protocol. Click on the “Save & Apply” button to confirm them.

- Configure your VPN zone. Go to “Network,” then “Firewall.”
- At the bottom, you will notice three zones: lan, wan, and vpn. You need to change the input, output, forward, and masquerading options of the vpn zone to match those of the wan zone. Click “Save.”

- Lan to wan zone needs to be edited. Click “Edit” and check the box on “MSS Clamping.”

- On the “Allow forward to destination zone,” click the arrow and select VPN.
- Click “Save” and reboot the router (System >> Reboot).

The VPN is now enabled. To verify, go to “Network” and “Interfaces.”
You will notice the Wg0 interface is sending and receiving packets.

Installing Surfshark on a Router: Pros and Cons
Installing Surfshark on your router depends on your use case.
Regardless, here’s a list of pros and cons to help you make an informed decision:
Pros
-
Secures all devices connected to the network -
Works on all devices, including those that don’t support VPNs -
Removes the monotony of installing Surfshark on every device -
Ensures buffer-free & private streaming of geo-restricted content -
Protects the devices of guests in your home
Cons
-
The installation process requires technical knowledge -
Settings are harder to control compared to those in the Surfshark app -
The connection between the router and the device isn’t secure -
Router dependability is high
My recommendation is that you should always stay protected.
Going the Surfshark router way is the best way to do so.
FAQ
Can You Use Surfshark With Ethernet?
It’s possible to use Surfshark with Ethernet. However, this option requires a Windows computer, an active Surfshark subscription, and an Ethernet cable.
Conclusion
Setting up Surfshark on your router might seem intimidating.
However, it’s not difficult once you’re well-informed. The advantages of always-on protection and simultaneous device protection speak for themselves.
I recommend Surfshark, as it supports a variety of routers. Not to mention, you get 3,200 optimized servers with great speeds.
Get your Surfshark subscription at a discount today!
Protect private web traffic from snooping, interference, and censorship. All plans are covered by a no-hassle 100% money-back guarantee for your first 30 days of service.
Bram Jansen is a renowned expert in the field of cyberspace, with a wealth of knowledge and experience in online security and VPN technology. His lifelong fascination with the virtual world began with his love for science fiction, and he has spent his career exploring the intersection of technology and online security. He works with a team of experts to provide unbiased and accurate information to consumers worldwide.
[Беспроводное оборудование] Как настроить Surfshark в VPN Fusion?
Что такое VPN Fusion?
Это встроенная функция роутера ASUS, которая помогает устройствам, на которых не установлено программное обеспечение VPN, таким как смарт-телевизоры/игровые консоли, получать доступ к региональным играм, шоу, спортивным трансляциям или контенту. Пользователям больше не нужно настраивать каждое устройство, для которого требуется VPN, и они смогут управлять настройками VPN для нескольких устройств на одном маршрутизаторе ASUS.
Что такое Surfshark VPN?
Surfshark — это VPN-инструмент, которому принадлежит более 3200 серверов в 100 странах, чтобы помочь Вам разблокировать мир со всех Ваших устройств. Это позволяет Вам анонимно и безопасно выходить в Интернет из любого места, шифруя соединения. Вы можете свободно получать доступ к заблокированному контенту, сохранять свою личную информацию в безопасности, просматривать Интернет без отслеживания или пользоваться высокой скоростью соединения.
Подготовка
1. Surfshark VPN совместим только с версиями встроенного ПО более поздних версий, чем 3.0.0.4.388.23000 или 3.0.0.4.388.31900.
Пожалуйста, убедитесь, что версия прошивки вашего маршрутизатора ASUS обновлена, пожалуйста, обратитесь к FAQ [Беспроводной маршрутизатор] Как обновить прошивку Вашего роутера ASUS до последней версии через ASUS Router App?
2. Пожалуйста, сначала установите приложение ASUS router на свой смартфон. Пожалуйста, убедитесь, что Ваша версия приложения ASUS Router обновлена.
Для получения информации о том, как установить приложение ASUS router, пожалуйста, обратитесь к [Беспроводной маршрутизатор] Как настроить ASUS Wi-Fi роутер через ASUS Router App? (QIS, Быстрая настройка Интернета)
Как настроить Surfshark в VPN Fusion?
1. Создайте аккаунт Surfshark.
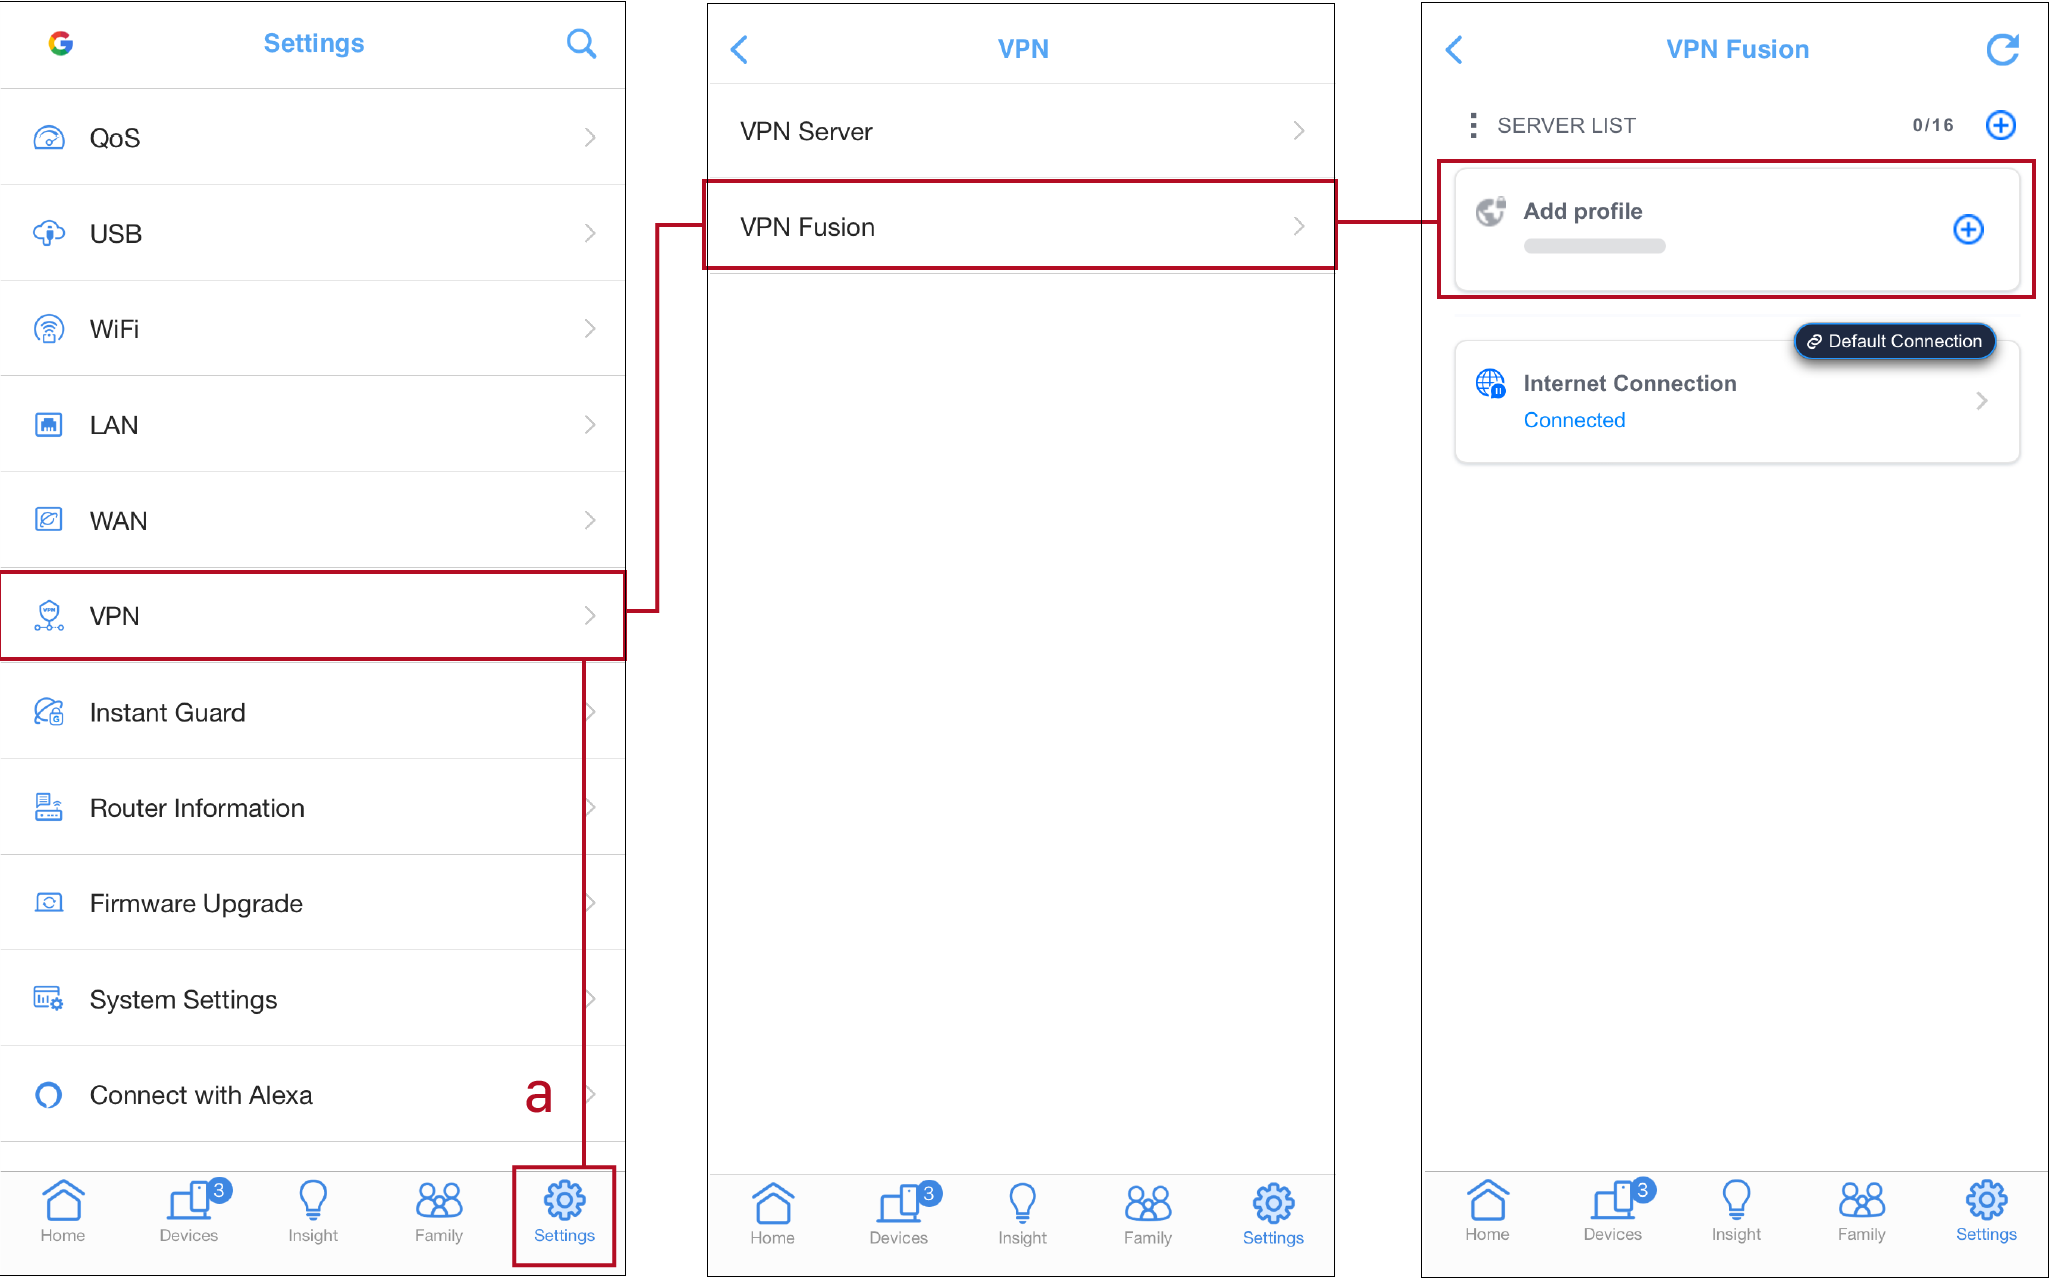
а. Откройте ASUS router app, далее «Settings» > VPN > VPN Fusion, щелкните «добавить профиль«.
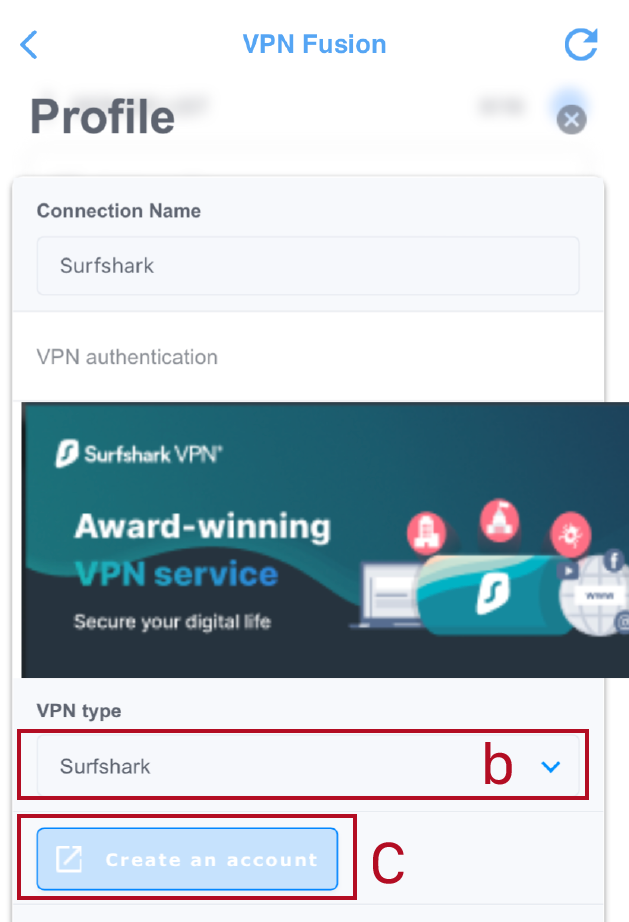
б. Найдите VPN Type и выберите «Surfshark«.
в. Щелкните «Create Account«, затем зарегистрируйте Surfshark аккаунт.
2. Сгенерируйте ключ безопасности из аккаунта Surfshark.
*Пожалуйста авторизуйтесь на сайте Surfshark для этого.
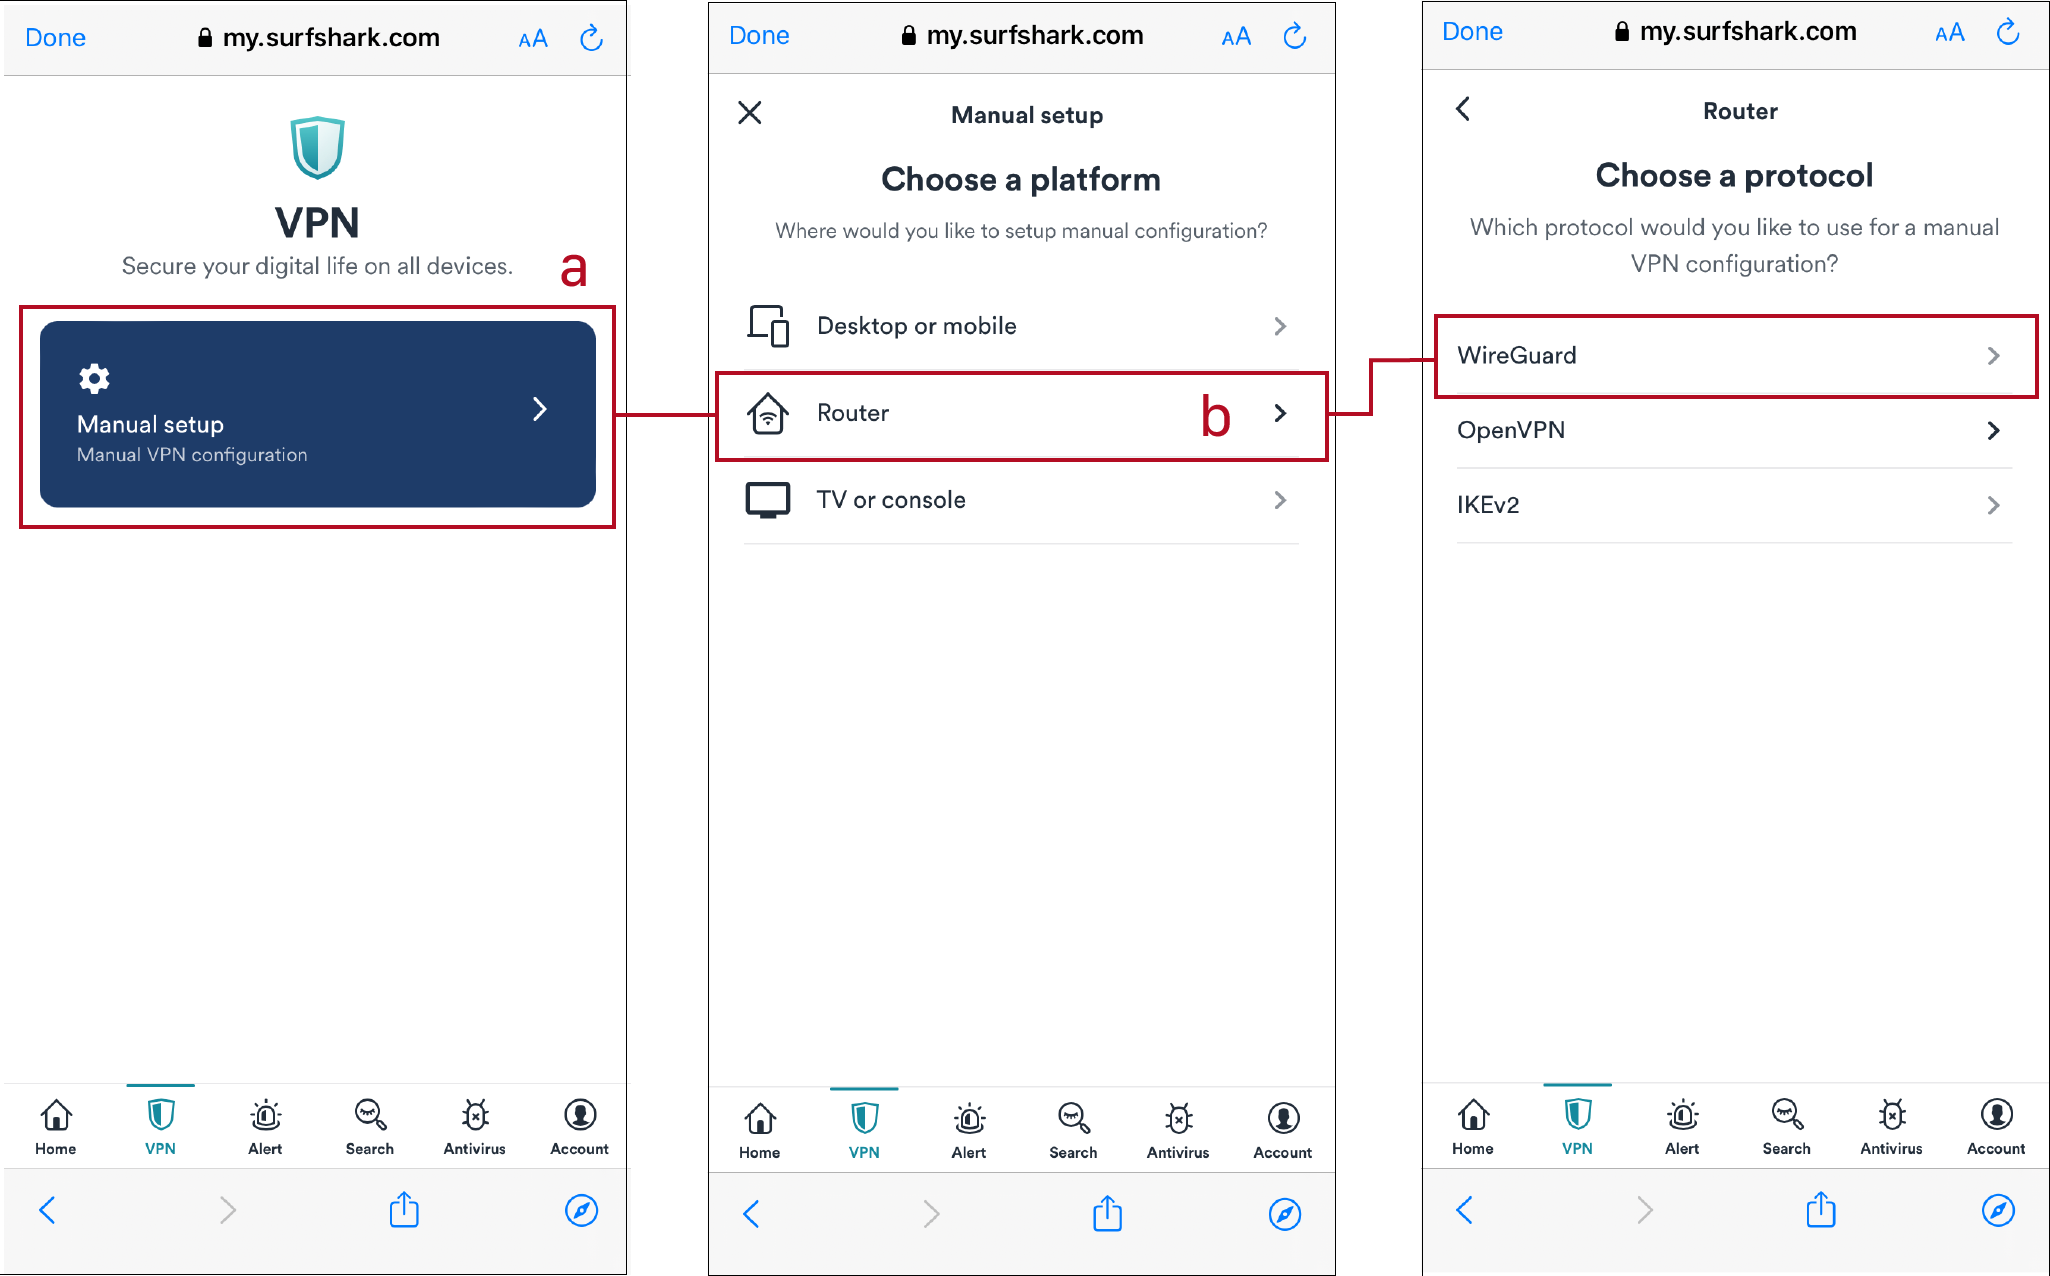
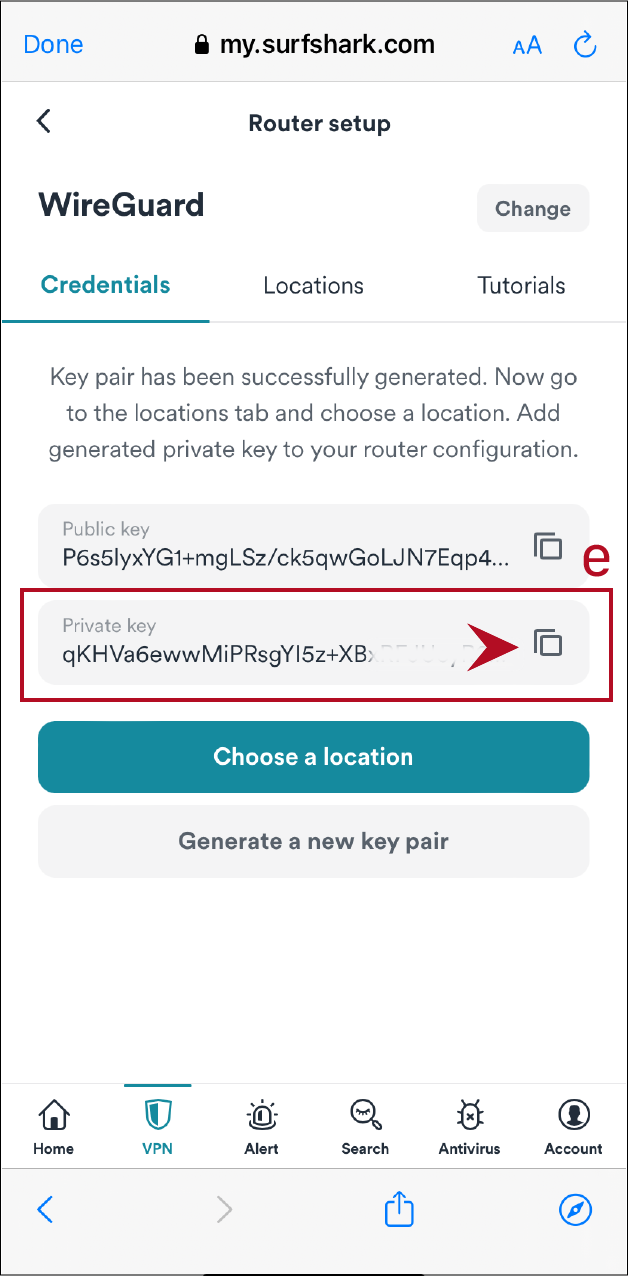
a. Откройте страницу «VPN» и щелкните «Manual setup«.
б. Выберите «Router» > «WireGuard«.
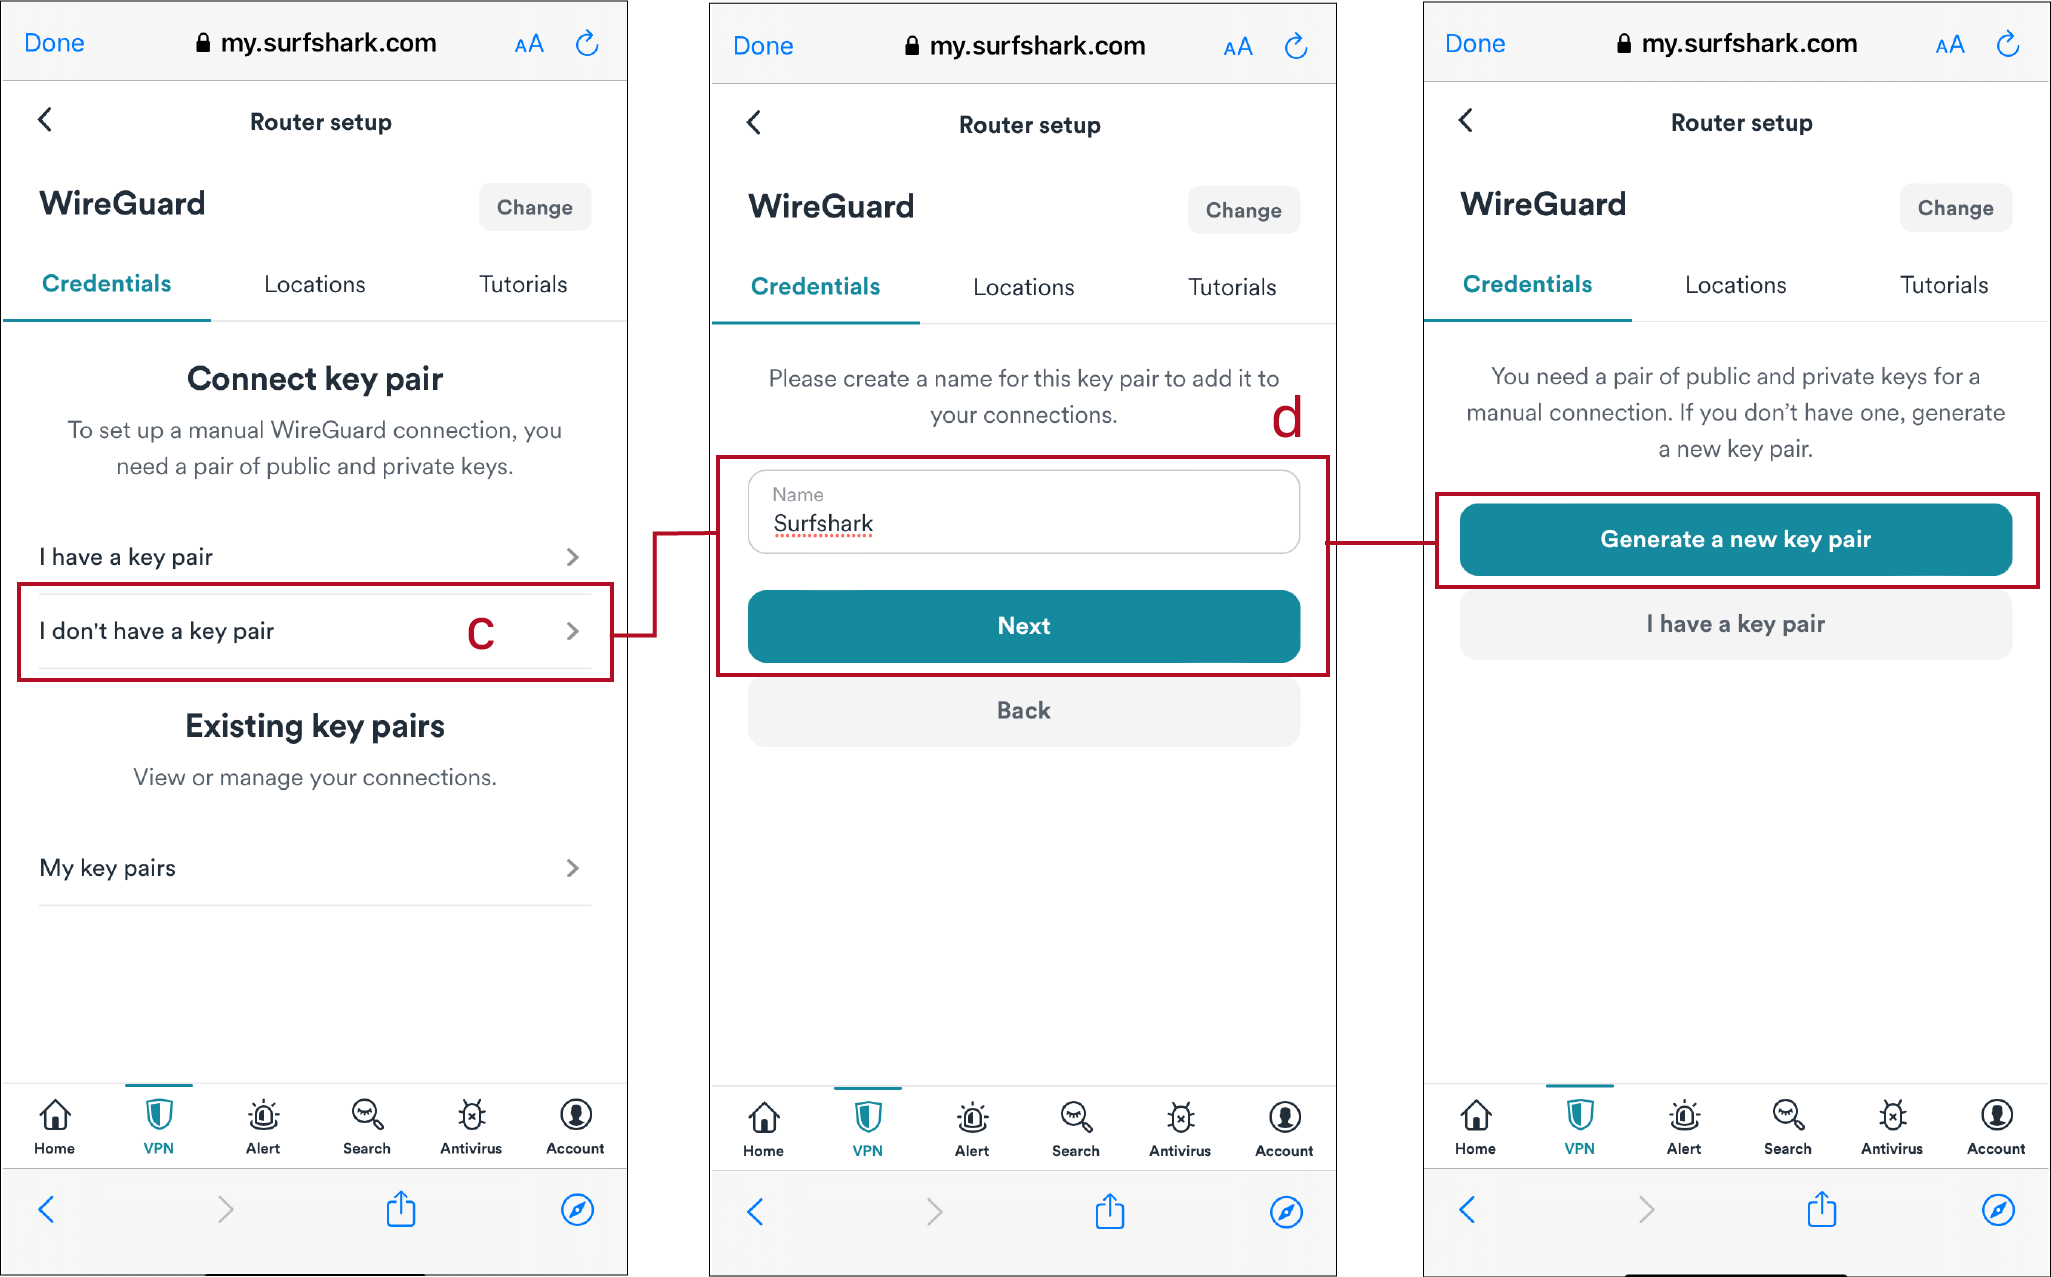
в. Найдите «I don’t have a key pair«.
г. Создайте имя и щелкните «Generate a new key pair«.
д. Скопируйте «Private key«. (Этот ключ потребуется для вставки в роутер ASUS позже)
*Примечание: Пожалуйста, сохраните ключ безопасности, он отображается один раз и не может быть извлечен из настроек.
3. Настройте VPN Fusion с ключом безопасности Surfshark
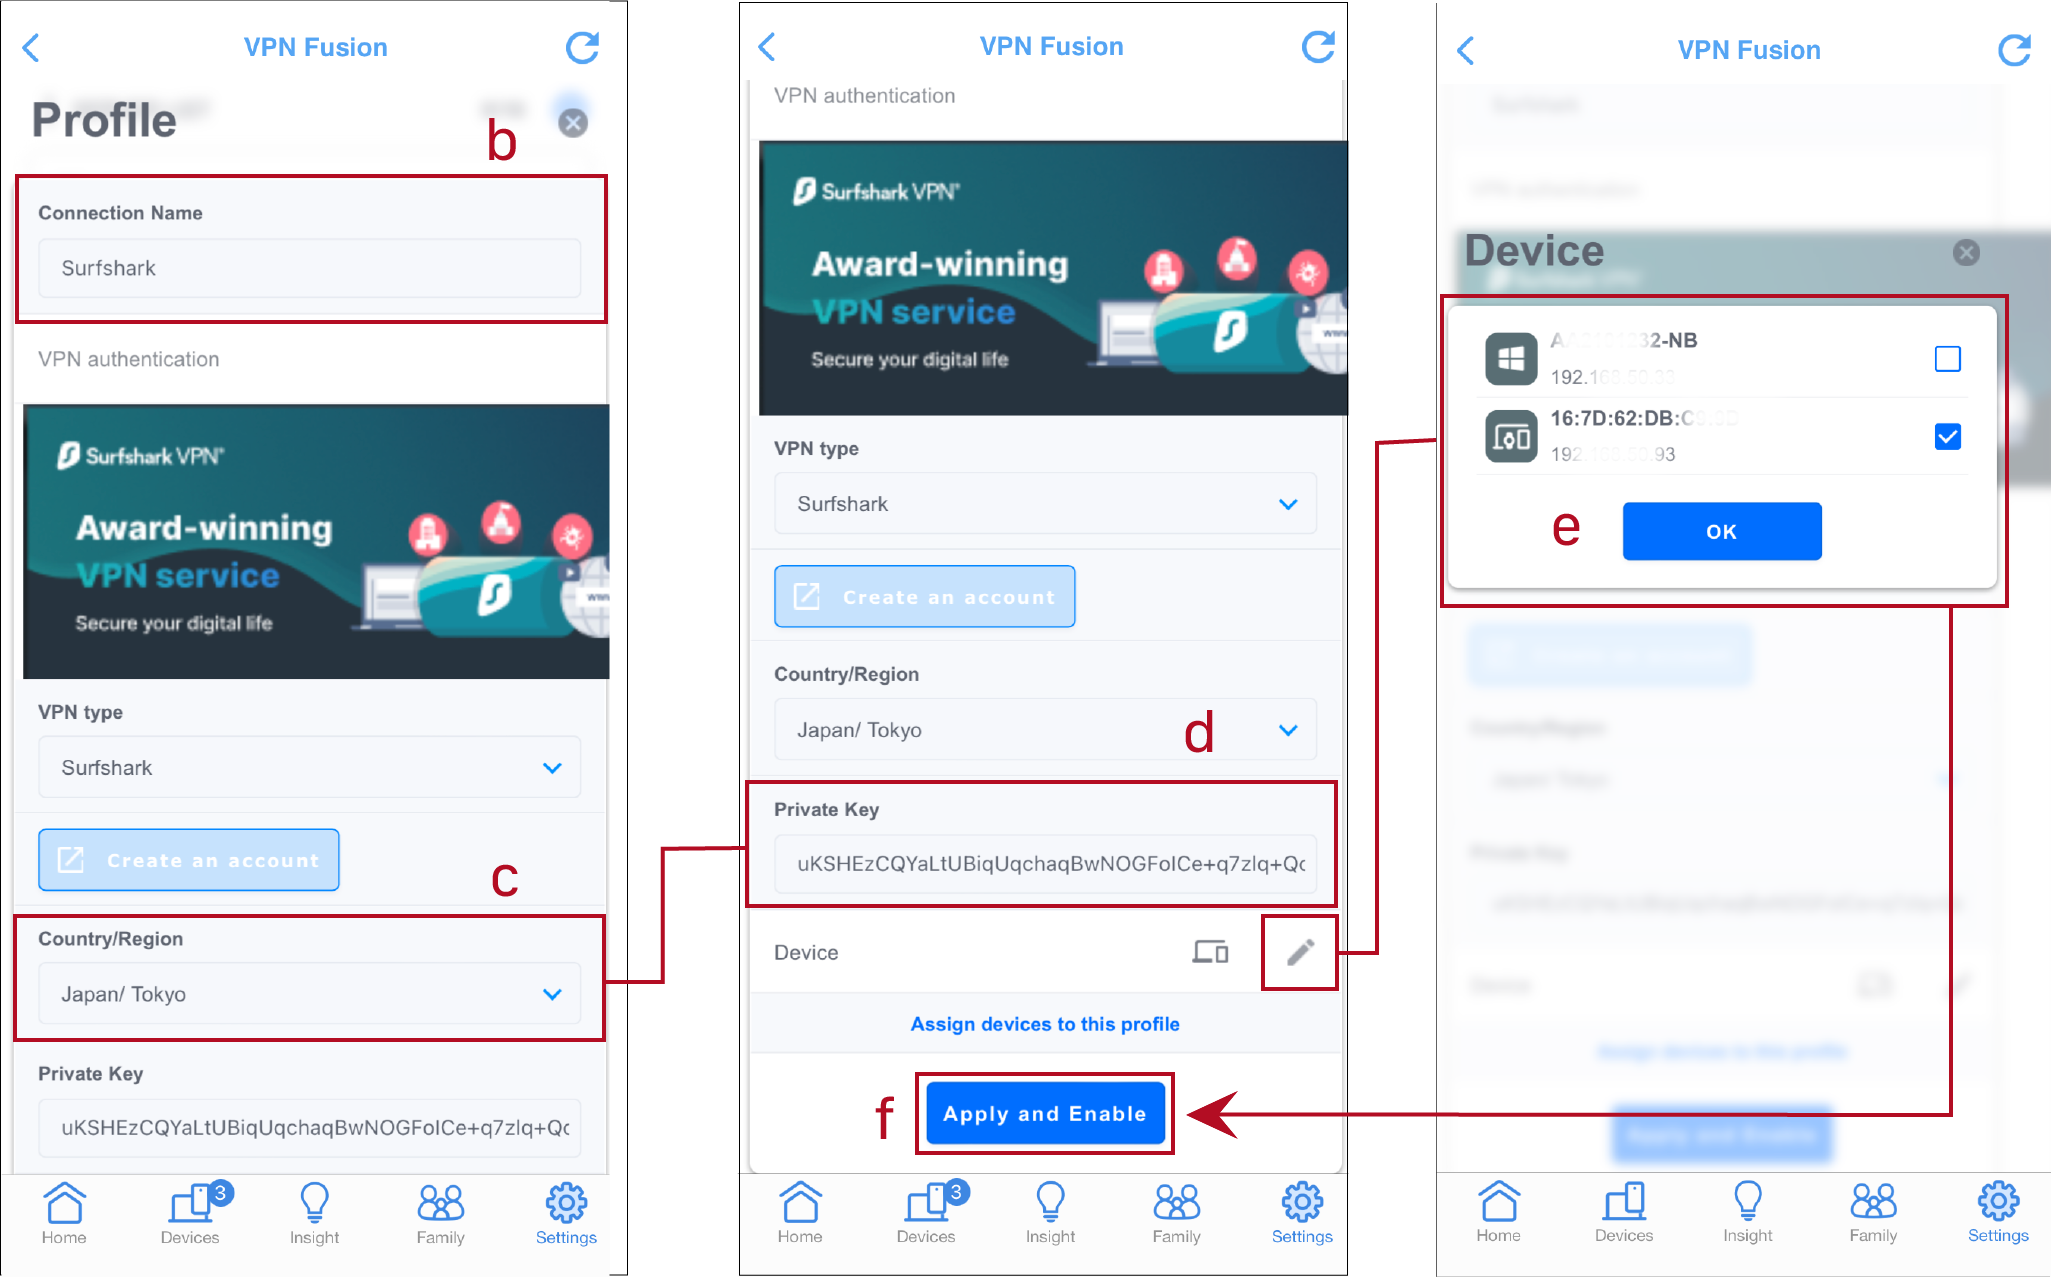
а. Откройте ASUS router app, затем «Settings» > VPN > VPN Fusion, щелкните «add profile«.
б. Заполните Имя соединения выберите Surfshark в VPN Type.
в. Выберите регион в Country/Region.
г. Вставьте Private key который был скопирован в аккаунте Surfshark.
д. Выберите устройства, которое Вы собираетесь использовать «OK«.
е. Щелкните «Apply and Enable«.
*Если Вы хотите использовать этот профиль VPN в качестве подключения к Интернету по умолчанию, пожалуйста, включите «Apply to all devices» тоже.
Как получить (Утилиты / Прошивку)?
Вы можете загрузить последние версии драйверов, программного обеспечения, встроенного ПО и руководств пользователя через Центр загрузки ASUS.
Если Вам нужна дополнительная информация о Центре загрузки ASUS, пожалуйста, перейдите по ссылке.
Installing a VPN on your router is a great way to protect all the digital devices, equipment, and gadgets in your home or office. You can ensure your devices’ online security and anonymity with Surfshark.
Once you have SurfShark on your router, all devices connected will enjoy VPN encryption and coverage. Rather than installing a VPN separately on each device, you can set up the VPN on your router and share a connection to other devices you own.
Doing this ensures the privacy of all your devices, including your smartphones, PCs, smart TVs, smart fridges, FireStick devices, monitors, gaming consoles, etc. You can use a VPN on Roku, Kodi, and other platforms that don’t support VPNs by sharing an internet connection from a VPN-enabled router.
I’m sure you know the benefits of using a VPN, especially on a router, and you are enthused about the prospect of installing it on your router. You don’t need to rack your brain about the installation processes because it is easier than you think.
I’m Frederick, a VPN and cybersecurity expert, and in this guide, I will show you how to install Surfshark on your router. Before we get started, I would prompt you to ensure that your router is VPN-compatible.
If your router is VPN-ready, we can install Surfshark on it. There are various routers out there, and the installation process for these routers varies depending on the model. Surfshark supports various router models, including DD-WRT, Tomato, and ASUS routers.
With this guide, you will never worry about installing a VPN on your router because it will show you the easiest ways to set it up.
Can we get started? Yes!
What is a VPN Router?
In order to properly explain what a VPN router means, I will explain it from the ground up.
I am sure you know what a VPN is already. VPN stands for “virtual private network”; it encrypts your web traffic and creates a secure tunnel between your device and the internet. A VPN hides your location and IP address, giving you a private and anonymous online profile.
However, a VPN router refers to a router built to support or accommodate VPN connections. Not every router can facilitate VPN connections. If your router can host and run a VPN effectively, it is a VPN router.
How Does a VPN Router Work?
A VPN router encrypts the data of every device connected to the network. Typically, when you install a VPN on your phone, your internet activity and all the data from your apps, games, browsers, and the services you use are sent and received through the VPN connection.
Rather than installing VPN apps separately on every device in your home or office, install a VPN on your router and have those devices connect to the router.
As mentioned, this can help secure your data in platforms such as smart fridges, smart TVs, and Roku TVs without native VPN support.
Do all Routers Support Surfshark?
As mentioned, not every router is built to have VPN software installed on it. Although Surfshark supports many routers, not every router can run its software. This is because some routers lack dedicated support for OpenVPN and other protocols.
If you are using a router provided by your ISP, it is better not to install Surfshark or any VPN on it. Below is a list of routers that you can’t use with Surfshark:
- Google Wi-Fi.
- Cisco.
- Arris.
- Ubee.
- Fritz Box.
- Belkin.
- Most ISP-provided Wi-Fi routers.
- TotoLink.
- TRENDnet.
- Linksys routers (except for some Tomato-supported routers, which we also listed in this guide).
You may be thinking about what next to do if your router doesn’t support SurfShark. If your router doesn’t support Surfshark or the OpenVPN protocol, you can install new firmware or buy a router that supports a VPN.
I would recommend you purchase a new router, especially one that is VPN-compatible, because you may damage your current router if you do not install the firmware correctly.
If you are looking for a router with VPN functionality, be sure to check out our recommendations below:
- Vilfo.
- InvizBox 2 VPN Router (which is great because it is Surfshark-ready).
- ASUS RT-AC86U AC2900 Wi-Fi Router.
- Synology RT2600AC.
- GLiNet GL-MT300N-V2 Mini Smart Router “Mango”.
Should You Install Surfshark On Your Router?
There are several reasons why you should install and use SurfShark on your router. We have mentioned some of these benefits in the paragraphs above.
However, I know you may be skeptical about the whole thing, so check some of the reasons below to know why you need to install Surfshark on your Wi-Fi router:
1. 24/7 Protection From External Threats and Attack
The first reason is that Surfshark keeps your devices protected from external threats. That’s the basic benefit of a VPN service in the first place.
Having Surfshark VPN installed on your router will protect your data and safeguard your privacy from hackers, ISPs, or advertisers targeting and retargeting you with adverts for their products.
2. Standby VPN Coverage
Unlike VPN apps, where you need to enable and disable the VPN when you need it, installing Surfshark on your router keeps you connected to the VPN whenever you want.
This gives you a standby VPN connection, and you won’t worry yourself by enabling and disabling the VPN connection from the Surfshark app.
3. Content Unblocking
Most people, especially cord-cutters, install Surfshark on their routers to unblock restricted streaming websites in their region. Surfshark easily bypasses geo-restrictions and unlocks streaming platforms that are censored or restricted in your country.
4. No More Compatibility Issues
Are there devices you wish would support a VPN, so you could safeguard your data while using it? Many streamers would love to install a VPN on Roku just the way they can set up a VPN on FireStick.
However, once you have Surfshark installed on your router, you won’t worry about compatibility issues again, as you will connect devices that do not directly support VPNs. For instance, Roku OS doesn’t allow VPN installations, but you can setup SurfShark on Roku once you use the installation methods provided in this guide.
5. Share VPN Connection To Multiple Devices
Although Surfshark supports unlimited simultaneous connections, if you ever use another VPN that places a limit to the number of devices you can connect to, install a VPN on it.
Once you install a VPN on the router, there is no limit to the number of devices that can enjoy the VPN connection. By installing Surfshark on your router, the VPN protects every device you connect. This VPN protection can be extended to multiple devices in your home and office.
If you don’t have a SurfShark account yet, consider subscribing to a VPN plan. A 30-day, risk-free money-back guarantee covers your Surfshark subscription, so you can cancel it if it doesn’t meet your needs and get a full refund. Surfshark also provides a free trial, which you can test to see how its VPN servers perform.
The steps below show you the way to set up Surfshark on a WiFi router:
- Step 1: Open your router’s control panel. (You can access the panel by entering your router’s IP address in your web browser)
If you still don’t know how to find your router’s IP address, see the steps below:
For Mac users:
- Go to the Apple menu.
- Click System Preferences.
- Select Network.
- Click Wi-Fi.
- Click on Advanced and select TCP/IP. This should show your router’s IP address.
For Windows 10 users:
- Press the Windows button on your keyboard.
- Search for Command Prompt.
- A console prompt will pop up on the screen. Type ipconfig and click the Enter key. That would display your router’s IP address on the Default Gateway line.
- Step 2: Locate the VPN client tab. Typically, this tab is located under the router’s advanced settings option. However, the placement of this feature varies depending on the design of the configuration panel and the router brand or model. Simply take your time to find it, but if you don’t see it, it means your router isn’t VPN-compatible.
- Step 3: Follow the instructions we will share for installing Surfshark on supported routers from Tomato, ASUS, and DD-WRT.
- Step 4: Check your router’s IP address to confirm the VPN has been installed. If your router’s location and IP address differs from your actual location, it shows the VPN has been installed.
In the subsequent sections below, we will share instructions for installing Surfshark VPN software on ASUS, DD-WRT, and Tomato Routers.
How To Install Surfshark on ASUS Routers
If you own an Asus router in your home or office, this method will help you set up Surfshark on it.
Ensure you have an active Surfshark subscription plan before getting started. If you don’t have a plan, click here to subscribe.
Also, you will need to have your Surfshark service credentials, as this will connect your router to the VPN using the OpenVPN protocol. If you don’t have it, proceed with the steps as we will tell you where to get it.
- Step 1: Go to https://my.surfshark.com/vpn/manual-setup/router to find the required details for the manual connection. If you aren’t signed into your SurfShark account, enter your email address and password to gain access.
- Step 2: Select OpenVPN as your chosen protocol once you get to the interface.
- Step 3: Click on Credentials at the top to find your Surfshark service credentials.
- Step 4: Next, you will select a server. Every VPN server location has a configuration file that must be connected to the VPN. Thankfully, Surkshark provides all configuration files to its servers, where you can access them for free download. Click on the Locations tab to see all of Surfshark’s servers.
- Step 5: You will need to get the OpenVPN configuration file for the server location you want to use. If you want to connect to a US server, for instance, you will be required to download the configuration file of any US server. You can do this by clicking on the location and selecting Download UDP at the bottom of the page to download the file.
- Step 6: Next, you must set up the OpenVPN client on your Asus router to connect to your chosen VPN server. Return to your ASUS router’s control panel and login if it requires you to enter your credentials.
- Step 7: When you open the Control panel, you will see an option for VPN in the left-hand menu. Click it.
- Step 8: Click on the VPN Client at the top and click the Add Profile button.
- Step 9: Next, click the OpenVPN option and enter the following details:
Description: Enter the name of your VPN.
Username: Type your Surfshark username.
Password: Type your Surfshark password.
- Step 10: You will be required to add the configuration files of your chosen VPN server. Simply click on Choose File. A prompt will appear on your screen afterward, and you will select the configuration file.
- Step 11: Open the location where you saved the configuration files and click the Open button. (The file must be in .ovpn format).
- Step 12: Once you see the .ovpn configuration file, click on Upload. You will see a message notifying you that the action was successful. Click the OK button and leave the “Import the CA file or edit the .ovpn file manually” option unchecked.
- Step 13: This will establish a new connection using the name you entered in the description.
- Step 14: Click the Activate button to connect your router to your chosen Surfshark server.
Note: You can only set up one connection at a time. If you need to configure another, you must create another profile for that.
- Step 15: After clicking the Activate button, you will see a blue tick in the Connection Status, meaning a successful connection.
Before you use your newly VPN-connected router, it is a great idea to check the connection status by performing an IP/DNS test.
If you have confirmed the VPN connection, you won’t worry about installing Surfshark on your router again because you have configured it successfully.
How To Setup Surfshark on DD-WRT Routers
This section will teach you how to install Surfshark on a DD-WRT router. Before you start, ensure your DD-WRT router has a minimum flash memory of 8 MBs, as that will be sufficient to maintain the VPN connection.
If you don’t have a Surfshark subscription, click here to get one. You will also need your Surfshark service credentials to configure your DD-WRT on Surfshark using the OpenVPN protocol. If you don’t know where to find these credentials, follow the steps below:
- Step 1: Visit https://my.surfshark.com/vpn/manual-setup/router. If it brings up the login prompt, enter your email address and password to login.
- Step 2: Choose OpenVPN as your protocol.
- Step 3: Click the Credentials tab to get your Surfshark service credentials. You can leave the page open or find a place to save the service credentials, as we will need it later.
- Step 4: As mentioned, every Surfshark VPN server has a hostname, which you must use on the router to connect to a particular server. Click the Locations tab to see all server locations and their hostnames.
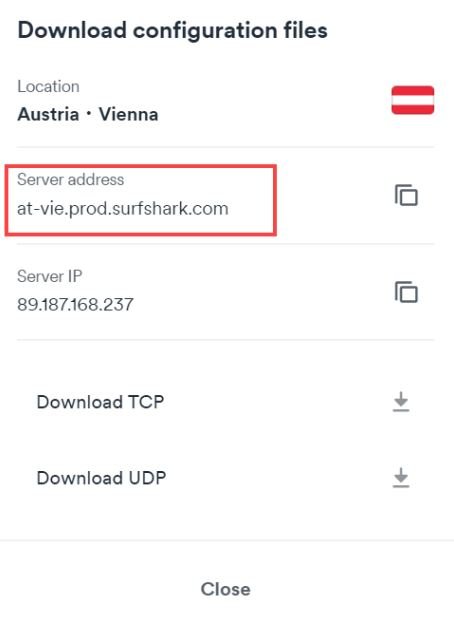
- Step 5: Copy the hostname of the server location you want to use on your router.
- Step 6: You can find the hostname by clicking on your preferred location. If you want to connect to Austria, click on Austria – Vienna location and then copy the server address as shown in the screenshot below.
- Step 7: The next thing to do is to configure the OpenVPN protocol on your router. This step must be done to connect to the VPN server. Enter your router IP address in the browser URL bar to do this.
- Step 8: After that, you must configure the Surfshark DNS servers. Open your DD-WRT router’s configuration panel, and navigate to the Setup tab.
- Step 9: Click on Network Address Server Settings (DHCP) and enter the following information:
Static DNS 1 = 162.252.172.57.
Static DNS 2 = 149.154.159.92.
Static DNS 2 = 0.0.0.0 (default).
Use DNSMasq for DHCP = Checked.
Use DNSMasq for DNS = Checked.
DHCP-Authoritative = Checked.
- Step 10: After entering these values, as shown in the screenshot above, click the Save and Apply Settings buttons, respectively.
- Step 11: Click on the Service tab.
- Step 12: Select VPN.
- Step 13: Navigate to the OpenVPN Client.
- Step 14: Click Enable and enter the details below as provided:
- Server IP/Name: Enter the server address or hostname of the previously chosen server location.
- Port: 1194.
- Tunnel Device: TUN.
- Tunnel Protocol: UDP.
- Encryption Cipher: None.
- Hash Algorithm: SHA-512.
- User Pass Authentication: Enable.
- Username: Write your Surfshark service username.
- Password: Write your Surfshark service password.
Note: if you didn’t see the username and password fields, enter the other details you find and skip to step 16.
- Advanced Options: Enable (this will enable more options).
- TLS Cipher: None.
- LZO Compression: Disabled.
- NAT: Enable.
If you see other fields we didn’t mention here, leave them unchanged. You can leave other fields that aren’t mentioned in this list.
- Step 15: If you can’t find the username and password in the setup screen, click on Administration.
- Step 16: Select Commands and enter the details below:
echo "USERNAME
PASSWORD" > /tmp/openvpncl/user.conf
/usr/bin/killall openvpn
/usr/sbin/openvpn --config /tmp/openvpncl/openvpn.conf --route-up /tmp/openvpncl/route-up.sh --down-pre /tmp/openvpncl/route-down.sh --daemon
Note: Notice the bolded USERNAME and PASSWORD above. Replace them with your Surfshark service credentials. Click on Save Startup when you are done and return to the VPN tab.
- Step 17: Type the details provided below in the Additional Config field:
auth-user-pass /tmp/openvpncl/user.conf
- Step 18: Also insert the command below in the Additional Config field:
remote-cert-tls server
remote-random
nobind
tun-mtu 1500
tun-mtu-extra 32
mssfix 1450
persist-key
persist-tun
ping-timer-rem
reneg-sec 0
cipher AES-256-GCM
auth SHA512
log /tmp/vpn.log
- Step 19: Next, copy the Certificate information below and paste it into the CA Cert field. Remember to copy all details, including the BEGIN CERTIFICATE and END CERTIFICATE lines.
-----BEGIN CERTIFICATE-----
MIIFTTCCAzWgAwIBAgIJAMs9S3fqwv+mMA0GCSqGSIb3DQEBCwUAMD0xCzAJBgNV
BAYTAlZHMRIwEAYDVQQKDAlTdXJmc2hhcmsxGjAYBgNVBAMMEVN1cmZzaGFyayBS
b290IENBMB4XDTE4MDMxNDA4NTkyM1oXDTI4MDMxMTA4NTkyM1owPTELMAkGA1UE
BhMCVkcxEjAQBgNVBAoMCVN1cmZzaGFyazEaMBgGA1UEAwwRU3VyZnNoYXJrIFJv
b3QgQ0EwggIiMA0GCSqGSIb3DQEBAQUAA4ICDwAwggIKAoICAQDEGMNj0aisM63o
SkmVJyZPaYX7aPsZtzsxo6m6p5Wta3MGASoryRsBuRaH6VVa0fwbI1nw5ubyxkua
Na4v3zHVwuSq6F1p8S811+1YP1av+jqDcMyojH0ujZSHIcb/i5LtaHNXBQ3qN48C
c7sqBnTIIFpmb5HthQ/4pW+a82b1guM5dZHsh7q+LKQDIGmvtMtO1+NEnmj81BAp
FayiaD1ggvwDI4x7o/Y3ksfWSCHnqXGyqzSFLh8QuQrTmWUm84YHGFxoI1/8AKdI
yVoB6BjcaMKtKs/pbctk6vkzmYf0XmGovDKPQF6MwUekchLjB5gSBNnptSQ9kNgn
TLqi0OpSwI6ixX52Ksva6UM8P01ZIhWZ6ua/T/tArgODy5JZMW+pQ1A6L0b7egIe
ghpwKnPRG+5CzgO0J5UE6gv000mqbmC3CbiS8xi2xuNgruAyY2hUOoV9/BuBev8t
tE5ZCsJH3YlG6NtbZ9hPc61GiBSx8NJnX5QHyCnfic/X87eST/amZsZCAOJ5v4EP
SaKrItt+HrEFWZQIq4fJmHJNNbYvWzCE08AL+5/6Z+lxb/Bm3dapx2zdit3x2e+m
iGHekuiE8lQWD0rXD4+T+nDRi3X+kyt8Ex/8qRiUfrisrSHFzVMRungIMGdO9O/z
CINFrb7wahm4PqU2f12Z9TRCOTXciQIDAQABo1AwTjAdBgNVHQ4EFgQUYRpbQwyD
ahLMN3F2ony3+UqOYOgwHwYDVR0jBBgwFoAUYRpbQwyDahLMN3F2ony3+UqOYOgw
DAYDVR0TBAUwAwEB/zANBgkqhkiG9w0BAQsFAAOCAgEAn9zV7F/XVnFNZhHFrt0Z
S1Yqz+qM9CojLmiyblMFh0p7t+Hh+VKVgMwrz0LwDH4UsOosXA28eJPmech6/bjf
ymkoXISy/NUSTFpUChGO9RabGGxJsT4dugOw9MPaIVZffny4qYOc/rXDXDSfF2b+
303lLPI43y9qoe0oyZ1vtk/UKG75FkWfFUogGNbpOkuz+et5Y0aIEiyg0yh6/l5Q
5h8+yom0HZnREHhqieGbkaGKLkyu7zQ4D4tRK/mBhd8nv+09GtPEG+D5LPbabFVx
KjBMP4Vp24WuSUOqcGSsURHevawPVBfgmsxf1UCjelaIwngdh6WfNCRXa5QQPQTK
ubQvkvXONCDdhmdXQccnRX1nJWhPYi0onffvjsWUfztRypsKzX4dvM9k7xnIcGSG
EnCC4RCgt1UiZIj7frcCMssbA6vJ9naM0s7JF7N3VKeHJtqe1OCRHMYnWUZt9vrq
X6IoIHlZCoLlv39wFW9QNxelcAOCVbD+19MZ0ZXt7LitjIqe7yF5WxDQN4xru087
FzQ4Hfj7eH1SNLLyKZkA1eecjmRoi/OoqAt7afSnwtQLtMUc2bQDg6rHt5C0e4dC
LqP/9PGZTSJiwmtRHJ/N5qYWIh9ju83APvLm/AGBTR2pXmj9G3KdVOkpIC7L35dI
623cSEC3Q3UZutsEm/UplsM=
-----END CERTIFICATE-----
- Step 20: Copy the Static Key text and paste it in the TLS Auth Key field.
-----BEGIN OpenVPN Static key V1-----
b02cb1d7c6fee5d4f89b8de72b51a8d0
c7b282631d6fc19be1df6ebae9e2779e
6d9f097058a31c97f57f0c35526a44ae
09a01d1284b50b954d9246725a1ead1f
f224a102ed9ab3da0152a15525643b2e
ee226c37041dc55539d475183b889a10
e18bb94f079a4a49888da566b9978346
0ece01daaf93548beea6c827d9674897
e7279ff1a19cb092659e8c1860fbad0d
b4ad0ad5732f1af4655dbd66214e552f
04ed8fd0104e1d4bf99c249ac229ce16
9d9ba22068c6c0ab742424760911d463
6aafb4b85f0c952a9ce4275bc821391a
a65fcd0d2394f006e3fba0fd34c4bc4a
b260f4b45dec3285875589c97d3087c9
134d3a3aa2f904512e85aa2dc2202498
-----END OpenVPN Static key V1-----
- Step 21: Click the Save and Apply Settings buttons.
Once you click the Apply Settings button, your DD-WRT router will automatically connect to your selected Surfshark server. If you want to disconnect the VPN connection, click on Services, select VPN, click the OpenVPN Client option, and click on Disable.
To reconnect the router to the VPN, visit the OpenVPN Client and click the enable button. You can check the VPN connection by navigating to Status and then clicking on OpenVPN. This will show you the status of the VPN connection, as shown in the screenshot below.
How To Setup Surfshark on Tomato Routers
Although Surfshark supports Tomato routers, these models do not enjoy maximum support on connected devices such as DD-WRT routers.
Apparently, you must have a Surfshark account and service credentials to install Surfshark on your Tomato router. These details are needed to set up the VPN connection on your router.
If you can’t find your Surfshark service credentials, log in to your Surfshark account and type this URL – https://my.surfshark.com/vpn/manual-setup/router in your browser. Select OpenVPN as your preferred protocol, and then click the Credentials tab to get your service credentials.
Now that you have gotten your Surfshark service username and password save it or leave this page open, as we will need the credentials later on.
If you want to use Surfshark on your Tomato router, you must use a VPN server for the router. To do this, we will need the hostname of the server location.
Follow the steps below to learn more:
- Step 1: Click the Locations tab to see the list of available server locations and their hostnames.
- Step 2: Once you see the hostname of the server you want to connect to your router, copy it.
- Step 3: To find the hostname, select your preferred server. If you wish to use a server in Greece, for instance, click on Greece and select a server. If you select the Greece – Athens server, copy the server address. Then click the ‘Download UDP‘ button to get its configuration file.
- Step 4: To install Surfshark, sign into your Tomato router by typing its IP address in your internet browser.
- Step 5: Click on VPN from the options in the left menu and select OpenVPN Client.
- Step 6: Click on the Basic tab at the top left corner and enter the details below:
- Start with WAN: Checked.
- Interface Type: TUN.
- Protocol: UDP or TCP.
- Server Address: Enter the server address of the VPN server you previously saved.
- Port: 1194 if you selected UDP or 1443 for TCP connection.
- Firewall: Automatic.
- Authorization mode: TLS.
- Username/Password Authentication: Checked.
- Username: Your Surfshark service username.
- Password: Your Surfshark service password.
- Username Authen. Only: Unchecked.
- Extra HMAC authorization (tls-auth): Outgoing (1).
- Create NAT on tunnel: Checked.
- Step 7: Click on Advanced at the top and enter the information below:
- Poll interval: 0.
- Redirect Internet traffic: Checked.
- Accept DNS configuration: Strict.
- Encryption cipher: None.
- Compression: Disabled.
- TLS Renegotiation Time: -1.
- Connection retry: -1.
- Verify server certificate (tls-remote): Unchecked.
- Step 8: Enter the text below in the Custom Configuration field:
remote-cert-tls server
remote-random
nobind
tun-mtu 1500
tun-mtu-extra 32
mssfix 1450
persist-key
persist-tun
ping-timer-rem
reneg-sec 0
auth SHA512
cipher AES-256-CBC
log /tmp/vpn.log
- Step 9: Click on Keys, which is the next option after the Advanced tab, and open the configuration file you downloaded in the text editor.
- Step 10: In the Static key field, enter the text from <tls-auth> to </tls-auth> area.
- Step 11: Tap the Save button to apply the changes.
- Step 12: Click on Start VPN Client 1 at the top-right corner whenever you want to connect your router to the Surfshark server. Remember to check the Status tab to know if your router is connected to Surfshark.
Most importantly, you can tighten up your security (Optional). If you want to configure the DNS addresses to prevent DNS leaks, proceed with the steps below:
- Step 13: Click on Basic Settings.
- Step 14: Select Network.
- Step 15: Click on WAN Settings.
- Step 16: Change DNS Server to Manual.
- Step 17: Enter the following addresses in the DNS 1 and DNS 2 fields, respectively:
10.8.8.1
10.8.8.2
That’s how you install Surfshark on your home or office router. You can literally access any streaming website, eCommerce shop, or online service on your device without facing geo-restrictions or worrying about your security.
We showed how to set up Surfshark on various routers, including Tomato, DD-WRT, and ASUS models. We hope our installation guides were comprehensive and easy to follow.
We highly recommend using the OpenVPN protocol, but it isn’t the only protocol available. You can also use the Wireguard protocol, but the OpenVPN protocol remains the most convenient to set up. If you don’t have a Surfshark subscription, get one today.
How To Install SurfShark on a Router Using WireGuard Protocol
While the OpenVPN client is the easiest and most convenient way to set up Surfshark on a router, the WireGuard protocol is an alternative method for most users. If you are using OpenWRT, ensure you are using 21.02 or newer updates.
Follow the steps below to setup Surfshark WireGuard connection on your router:
- Step 1: Log in to your Surfshark account.
- Step 2: Click on VPN.
- Step 3: Select Manual Setup.
- Step 4: Click Router.
- Step 5: Select the WireGuard option.
Note: You will need a pair of private and public keys to set this up.
If you have these keys, click on I have a key pair. Then enter your public key and click on Save. However, if you haven’t done a setup before or this is your first time, click on I don’t have a key pair. That will produce a new key pair, so save the key pair by clicking Save.
It is important to generate a key pair for this process because if you fail to generate it before downloading the configuration file, the file will have the key pair missing. Therefore, you must generate a key separately and manually enter the key into the missing fields.
- Step 6: Select a location to download the WireGuard configuration file.
- Step 7: Open a new tab in your browser and enter your router’s IP address.
- Step 8: Log in to your router’s configuration panel. Typically, the default IP address for OpenWRT is 192.188.1.1.
- Step 9: Click on System at the top area and select Software. Consequently, you will be redirected to a new window to download a special package required for the WireGuard connection setup.
- Step 10: Type WireGuard and search for luci-app-wireguard. Click on Install when you find it.
- Step 11: Reboot your router. You can do this by clicking System >> Reboot >> Perform Reboot.
- Step 12: Then refresh the page and log in to your router’s configuration panel again.
- Step 13: The next thing to do is to set up the WireGuard interface. Click on Network, select Interfaces, and click on Add New Interface.
- Step 14: Enter wg0 in the name field and select the WireGuard VPN option as your preferred protocol.
- Step 15: Next, click on Create Interface.
- Step 16: Go to General Settings to set up the interface. Enter the Private key you got from the Surfshark config file.
- Step 17: Enter the IP address provided in the config file.
- Step 18: Go to Advanced Settings and uncheck the “DNS servers advertised by peers” box.
- Step 19: Enter the Surfshark DNS addresses in their respective fields. Below are Surfshark’s DNS addresses:
162.252.172.57
149.154.159.92
- Step 20: Click on Firewall Settings and Unspecified to assign a firewall zone.
- Step 21: Type in VPN in the bottom field.
- Step 22: Navigate to the Peers tab and click on Add Peer.
- Step 23: Under the Description tab, enter the location of the file you previously downloaded.
- Step 24: Enter your Public Key. The public key can also be found in the Surfshark config file.
- Step 25: When you get to the Allowed IPs area, enter this address – 0.0.0.0/0
- Step 26: Mark the “Route Allowed IPs” checkbox.
- Step 27: Enter the location address from your config file in the Endpoint Host. The location address should end with Surfshark.com.
- Step 28: For the Endpoint Port, enter the last 5 numbers at the end of the address. Then click Save.
- Step 29: After clicking save, you will get a message showing “Interface has 7 pending changes” on the WireGuard protocol. Click the Save & Apply button when you get this notification to confirm them.
- Step 30: To set up your VPN zone, go to Network and click on Firewall.
- Step 31: You will see three zones at the bottom area, namely, LAN, WAN, and VPN. You must change the output, input, forward, and masquerading options of the VPN zone to correspond with the options in the WAN zone. Then click Save.
- Step 32: The LAN to WAN zone must be edited as well.
- Step 33: Click on Edit.
- Step 34: Mark the MSS Clamping box.
- Step 35: Click the arrow in the “Allow forward to destination zone” area.
- Step 36: Select VPN.
- Step 37: Click Save.
- Step 38: Reboot your router.
- Step 39: Rebooting your router will enable your VPN connection.
- Step 40: Go to Network and select Interfaces to verify the VPN connection. After that, you will see the Wg0 interface sending and receiving packets.
How To Check If Your Router Is Connected To SurfShark VPN?
You can perform an IP and DNS leak test to verify the authenticity of your VPN connection. SurfShark provides tools to check this.
If you are connected to a server and gotten a new IP address, then you have successfully installed SurfShark VPN on your router.
What To Do If Your Router Isn’t Compatible With a VPN?
You can’t install a VPN on every router because not all routers are VPN-compatible. Flashing your router’s firmware incorrectly can permanently damage or make it useless.
You can know if your router is VPN-compatible by going through the manual, contacting the manufacturer, or checking Google for relevant results.
Let’s say you are using an ISP modem; it’s highly unlikely to use this device as your PN client. If you decide to proceed with the configuration, do it at your own risk. If your router isn’t VPN-compatible, but you want to install a VPN on it, all you need to do is to configure a third-party firmware.
Follow the steps below for instructions on how to configure it:
- Step 1: Enter the IP address of your Wi-Fi router in your browser URL bar.
- Step 2: Enter your username and password to access the router’s control panel. If you haven’t changed the credentials, you can find these details in your router’s manual.
- Step 3: The next step is to get the router’s firmware. Visit the DD-WRT website, enter your router model in the search bar, and find out if it is supported. If you can’t find your router model on DD-WRT, you can check if it is compatible with OpenWRT and Tomato.
- Step 4: Download the bin files if you find your router’s model on the DD-WRT website. Pay attention to the process because a wrong move in this method can damage your router or void its warranty.
- Step 5: Location the firmware page for installation. Typically, many routers have the firmware installation page under “Administration“. If your model doesn’t have this page under this option, simply search the interface and look for it.
- Step 6: Upload the DD-WRT bin file you downloaded.
- Step 7: Enter your router IP address in your browser’s URL bar. Then, set a new username and password for it.
- Step 8: Ensure your router has a stable internet connection. If that is confirmed, proceed to install the VPN.
- Step 9: Click on Services, go to the VPN tab, and click the Enable option. You can find this option next to the Start Open VPN Client.
If you don’t want to void your router’s warranty, it’s best you purchase any Surfshark-compatible VPN router and configure Surfshark on it using the steps in this guide.
How To Get The Best Out Of Your VPN-enabled Router
You can’t afford to use your VPN router like a normal Wi-Fi router. The following tips will help you exploit your VPN-enabled router:
1. Bookmark Your Router
You don’t have to look for your router’s manual whenever you want to access the control panel. You can do yourself a huge favor by bookmarking the IP address in your web browser. This way, you can access it whenever you need.
2. Avoid Free VPNs
You may be tempted to patronize free VPN services on the internet. It is worth letting you know that free VPNs do not offer the level of security and performance offered by premium VPN services. Also, free VPNs may keep your online activity logged and sell your data to advertisers and third parties.
If you are dealing with annoying, intrusive adverts and slow internet speed, it’s high time you upgrade to a premium VPN service.
3. Use The Latest Encryption Standards
Ensure to use the latest encryption standards because they are faster and more secure than previous ones. Some of the industry’s current and top-level encryption standards are OpenVPN, WireGuard, and IKEv2.
Not every VPN router supports these protocols, so if you are going to buy or use a VPN protocol, ensure it supports any of these protocols.
4. Limit the number of connections
Sharing a VPN connection from your router on multiple devices will reduce your internet speed. Ideally, you want to remove any device you aren’t using, as the more devices connected, the lesser the internet speed.
5. Use The Nearest Vpn Server To Your Actual Location
Connecting to the server closest to your actual location assures more speed. If you experience slow speeds on any VPN server, switch to a server close to your location.
Pros and Cons
You may have heard of the possibility of securing your network of devices by connecting them to a VPN router. This section will delve into the benefits and drawbacks of installing Surfshark on your router.
Pros
- All-round VPN protection.
- Secure all devices in your home and office.
- Works on devices and gadgets that do not natively support VPN installations.
- Offers buffer-free and lag-free streaming.
- Bypasses geo-blocks and restrictions.
- Unlocks content in streaming platforms.
- Protect the devices of your household and guests.
Cons
- The installation can be difficult for beginners.
- Settings may be difficult to control.
From the pros and cons above, it’s clear that the benefits of installing Surfshark on your router outweigh the drawbacks. If you ever need to set up Surfshark on your router, follow our guidelines.
Frequently Asked Questions
Can I use a VPN on my router?
You can set up a VPN on your router if you want to protect your data and devices on the internet. A VPN-enabled router will encrypt the data of every connected device. This way, you don’t have to install a VPN on every device in your home manually.
In addition, configuring a VPN on your router will make you use a VPN on devices that do not have VPN apps or support.
Can I install Surfshark on my router?
Surfshark is one of the top VPN services to use, and they support various router models. Surfshark is a top choice for any internet user looking to install a VPN on his router.
Does Surfshark support ASUS Routers?
Surfshark works with ASUS routers. If you want to install this VPN service on your ASUS-WRT router, be sure to use the OpenVPN protocol because it is the simplest to set up. However, you can also use the WireGuard protocol if you know how to install it.
Why Should I Use Surfshark?
Surfshark provides top-notch VPN support by protecting your online activity. It can help you unblock content in the library of any geo-restricted streaming websites.
Conclusion
Installing a VPN on a router may look difficult, especially for those who haven’t done it before. Hopefully, this guide has helped you know what to do.
If you have multiple devices in your home, such as FireStick devices, laptops, Apple TV, gaming consoles, Roku TV, smart TVs, etc, you won’t need to go through the stress of setting up a VPN on each of these devices when you have a VPN installed on your router.
Surfshark will help protect the data of each of these devices and prevent your activity from being monitored or spied on by anyone. If you run into any issues during the installation, you can contact Surfshark or us, as they provide 24/7 customer support to help resolve your queries and problems.
If you want to enjoy full protection and privacy on your router and all your devices, get Surfshark VPN today.
Setting up the virtual private network (VPN) on the router is one of the best ways of improving the internet and digital security. It can be used to protect the entire network as all the devices are connected to the same internet, promising better security standards. In simpler words, connecting Surfshark VPN on the router means all your consoles, TVs, smartphones, laptops, and PCs are connected to a secure internet connection and won’t have any security compromises. So, let’s see how you can set up the router with Surfshark.
It is important to configure Surfshark VPN on the router because it’s a handy solution to secure the connection. In addition, it’s a great way of securing the connection on gaming consoles and smart TVs without having to create a separate connection. In fact, Surfshark VPN cannot be installed on some devices, which is why it’s suggested to connect it to the router to secure all the connected devices. So, in the section below, we are sharing how you can set up the VPN on the router;
- Open the internet browser on your router-connected device and use the router’s IP address to search for the router’s interface
- When the router interface turns on, you can add your account credentials to sign in
- Now, open the settings and go to the VPN tab (you might have to look in the advanced tab)
- Then, click on “add new VPN”
- Add your Surfshark VPN account details
- Click on the “save changes” option and your router will be connected to the VPN, promising a secure connection
These steps are enough to set up the Surfshark VPN on the router and make sure all the devices are connected to a secure connection. However, for the VPN to work on the router, you need to ensure that the router is compatible. In the section below, we are sharing how you can check the compatibility of your router for connecting to the Surfshark VPN;
- Go through the user manual of your internet router and you have to look for the L2TP and/or OpenVPN instructions as it’s an indication that the router can be connected to the VPN
- Look for the router’s model and search it online to check the features. The online pages usually have in-depth specifications added to show if they can be configured with a VPN
- Sign in to the internet router and look for the L2TP and OpenVPN client because it’s the simplest way of determining if the router can take on the VPN connection
- Lastly, you can call your router’s customer support to ask if it’s VPN-compatible
On the other hand, if you have checked from all these four angles and the router doesn’t seem compatible with the VPN connection, you can try the following points;
- Try updating the firmware or software of your router to make sure it’s integrated with all the advanced features and configurations. This is because the router manufacturers often add new features through a firmware update and VPN compatibility could be one of them
- Secondly, you can opt for the DD-WRT file and install it on your router to make it a VPN-compatible router
So, are you ready to configure Surfshark on the router?
Home » How To » How to set up SurfShark WireGuard VPN on the pcWRT router
-
- Posted by
- in How To, VPN
- on August 29, 2023
Download SurfShark WireGuard configuration files
- Log in to your SurfShark account.
- Under the VPN section, click on the Manual setup link.
- Choose the WireGuard protocol.
- Click on I don’t have a key pair.
- Enter a name for your new key pair and click Next.
- Click Generate a new key pair.
- Click Choose a location.
- Download the WireGuard configuration file.
Create a SurfShark WireGuard connection
- Log in the pcWRT admin console, click on the WireGuard VPN icon under Apps.
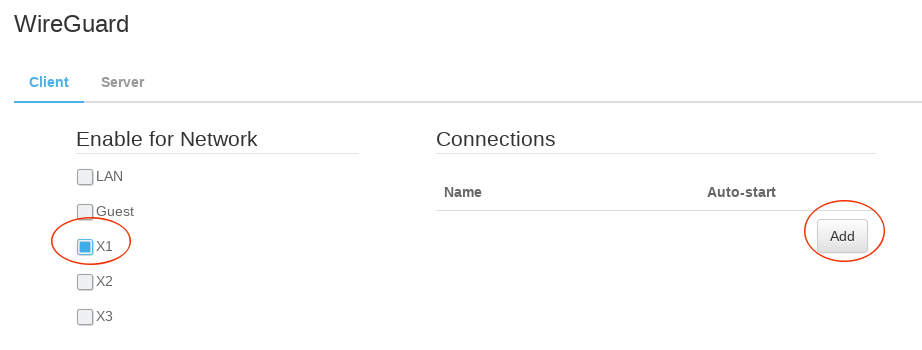
- Under the Client tab, check the network you want to enable SureShark VPN for, then click the Add button under the Connections section.
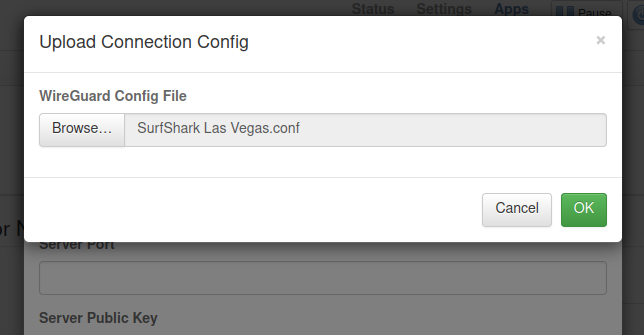
- In the popup dialog, click on Upload WireGuard Config.
- Select the WireGuard configuration you downloaded from SurfShark above, click OK.
- Enter a name for the SureShark VPN connection, then click OK to dismiss the dialog.
- Click Save to save the SurfShark WireGuard VPN connection.
Start a SurfShark WireGuard VPN connection
- Click on the blue “Play” button to start the SurfShark WireGuard VPN connection.
- If the connection is successful, a green dot will appear on the left of the connection configuration line. In case of the connection failure, click on the “log” icon to view WireGuard logs. Click on the Edit button to double check the server hostname, client and server keys, client IP address etc.
* WireGuard® is a registered trademark of Jason A. Donenfeld.

