
Наиболее частым применением Linux серверов является организация общего доступа в интернет. Это обусловлено низкой стоимостью такого решения и невысокими требованиями к железу. Во многих случаях это бывает первый Linux сервер в организации, что способно вызвать у администраторов определенные сложности. В данной статье мы пошагово рассмотрим настройку роутера (NAT + DHCP + Squid) на базе Ubuntu Server 9.04
Научиться настраивать MikroTik с нуля или систематизировать уже имеющиеся знания можно на углубленном курсе по администрированию MikroTik. Автор курса, сертифицированный тренер MikroTik Дмитрий Скоромнов, лично проверяет лабораторные работы и контролирует прогресс каждого своего студента. В три раза больше информации, чем в вендорской программе MTCNA, более 20 часов практики и доступ навсегда.
Внимание! Данный материал устарел, при настройке роутера на базе Ubuntu Server 12.04 и старше рекомендуем воспользоваться обновленной статьей.
Установка и первоначальная настройка
Ubuntu Server отличается от своей настольной версии отсутствием графической оболочки и пользовательских приложений, а также возможностью предустановки заранее выбранных ролей сервера. Несмотря на это, все сказанное будет справедливо для любой версии Ubuntu и, с некоторыми поправками, для любого Linux дистрибутива. Установка Ubuntu Server происходит в текстовом режиме на русском языке и, как правило, не вызывает сложностей. Отдельно стоит только остановится на списке ролей: из предложенного нас, пожалуй, может заинтересовать только OpenSSH, для удаленного доступа, однако воспользовавшись пунктом Manual package selection опытный пользователь может сразу установить необходимые ему пакеты.
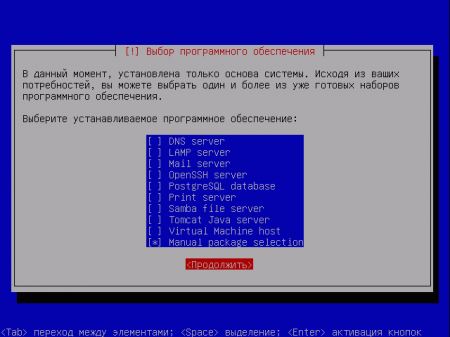
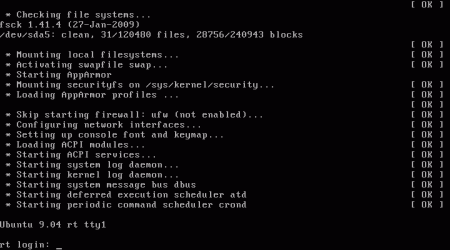
Если же это ваш первый сервер, то лучше всего продолжить не выбирая никакого варианта, все необходимые пакеты мы установим позже. Это позволит иметь более четкое представлении о назначении того или иного пакета и позволит успешно справляться с возможными неполадками. По окончании установки система перезагрузится и встретит нас черным экраном командной строки. Непривычного к консоли Windows-администратора это может неприятно удивить, однако ситуация на сегодняшний день такова, что все серверные роли Linux настраиваются исключительно через консоль и файлы конфигурации.
В первую очередь настроим сетевые соединения. Вводим в консоли:
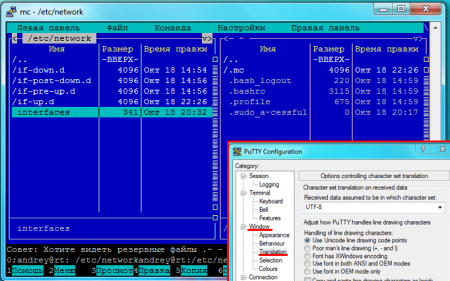
sudo nano /etc/network/interfacesЭта команда откроет в консольном редакторе nano конфигурационный файл с сетевыми интерфейсами, аналогичный рисунку ниже.
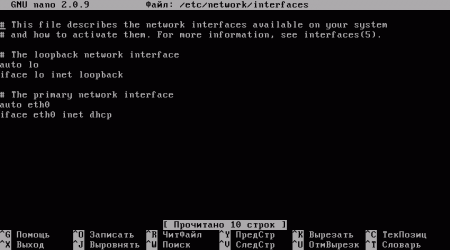
Пока там прописан единственный интерфейс eth0, настроенный на работу по DHCP. К eth0 у нас подключен ADSL модем (или любая сеть провайдера), а eth1 смотрит во внутреннюю сеть. IP адрес на внешнем интерфейсе 192.168.1.2, шлюз (ADSL модем) 192.168.1.1, внутренняя сеть лежит в диапазоне 10.0.0.1 — 254. Тогда настройки будут выглядеть следующим образом:
auto eth0
  iface eth0 inet static
    address 192.168.1.2
    netmask 255.255.255.0
    gateway 192.168.1.1auto eth1
  iface eth1 inet static
    address 10.0.0.1
    netmask 255.255.255.0
Сохраняем изменения Ctrl+O и выходим Ctrl+X. Теперь нужно настроить DNS, для этого выполняем:
sudo nano /etc/resolv.confВ этом файле необходимо указать адреса DNS серверов, лучше всего указать DNS провайдера или, как в нашем случае, OpenDNS.
#OpenDNS Servers
nameserver 208.67.222.222
nameserver 208.67.220.220
Сохраняем. Теперь нужно перезапустить сетевые службы (либо перезагрузиться):
sudo /etc/init.d/networking restartСобственно сеть настроена, можно переходить к следующему этапу, однако мы рекомендуем установить еще несколько пакетов для удобства администрирования. Сначала обновим список доступных пакетов:
sudo apt-get updateТакже рекомендуем обновить версии пакетов до актуальных:
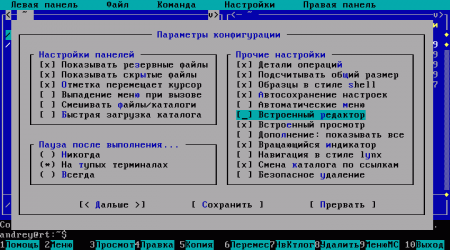
sudo apt-get upgradeТеперь установим Midnight Commander (mc), файловый менеджер по образу и подобию Norton Commander или Far:
sudo apt-get install mcДля запуска Midnight Commander достаточно набрать в консоли его краткое имя: mc. Сразу рекомендуем включить встроенный редактор, более удобный чем nano: F9 — Настройки — Конфигурация — Встроенный редактор.
Для удаленного управления сервером (не бегать же к нему каждый раз) установим OpenSSH, что позволит подключаться к нему из любого места, даже из дома, по защищенному протоколу:
sudo apt-get install sshДля подключения с Windows станций можно использовать программу PuTTY (скачать), для корректного отображения символов перед подключением необходимо на закладке Window — Translation выбрать кодировку UTF8.
Для ограничения доступа к серверу можно дописать в файл /etc/ssh/sshd_config параметр AllowUsers с указанием пользователя имеющего доступ по SSH, например для пользователя admin:
AllowUsers adminТакже можно разрешить доступ определенной группе пользователей используя параметр AllowGroups, либо запретить доступ определенным пользователям / группам использовав DenyUsers и DenyGroups.
Настраиваем NAT
Для организации общего доступа к интернет необходимо настроить трансляцию сетевых адресов (NAT), что позволит сетевым службам внутренней сети получать доступ к внешней сети. Для этого достаточно выполнить всего одну команду, но есть одна тонкость: все будет работать только для перезагрузки. На настоящий момент в Linux нет механизма, который бы сохранял настойки iptables при перезагрузке сервера или сети. Поэтому мы пойдем другим путем и вынесем эти настройки в отдельный скрипт, запускаемый при загрузке системы. Сначала создадим файл скрипта:
sudo touch /etc/natПотом откроем его в редакторе Midnight Commander (F4) и внесем следующий текст:
#!/bin/sh# Включаем форвардинг пакетов
echo 1 > /proc/sys/net/ipv4/ip_forward
# Сбрасываем настройки брандмауэра
iptables -F
iptables -X
iptables -t nat -F
iptables -t nat -X
# Разрешаем доступ из локальной сети
iptables -A INPUT -i eth1 -j ACCEPT
# Разрешаем инициированные нами подключения извне
iptables -A INPUT -i eth0 -m state --state ESTABLISHED,RELATED -j ACCEPT
# Разрешаем подключения по SSH
iptables -A INPUT -i eth0 -p tcp --dport 22 -j ACCEPT
#Запрещаем входящие извне
iptables -A INPUT -i eth0 -j DROP
# Разрешаем инициированные нами транзитные подключения извне
iptables -A FORWARD -i eth0 -o eth1 -m state --state ESTABLISHED,RELATED -j ACCEPT
# Запрещаем транзитный трафик извне
iptables -A FORWARD -i eth0 -o eth1 -j DROP
# Включаем NAT
iptables -t nat -A POSTROUTING -o eth0 -s 10.0.0.0/24 -j MASQUERADE
Сохраняем (F2), для автоматического запуска скрипта снова открываем /etc/network/interfaces и в самый конец файла дописываем:
post-up /etc/natТакже не забываем дать нашему скрипту права на исполнение:
sudo chmod +x /etc/natПерезапускаем сеть:
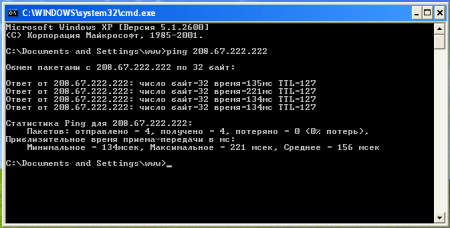
sudo /etc/init.d/networking restartЕсли нигде не допущено ошибок все должно работать. Для проверки укажем на машинах внутренней сети в качестве шлюза и DNS адрес нашего роутера: 10.0.0.1 и пропингуем любой внешний адрес, например один из OpenDNS серверов: 208.67.222.222. Но интернет пока работать не будет. Почему? Да потому, что мы указали в качестве DNS сервера наш роутер, который пока таковым не является. Можно конечно явно прописать DNS на клиентской машине,однако, это не наш метод, если вдруг DNS сервера изменятся, нам что, бегать перепрописывать?
 Одно из решений: поднять на нашем роутере полноценный DNS сервер, но в большинстве случаев это избыточно, поэтому мы ограничимся простым кеширующим DNS (а также и DHCP) сервером Dnsmasq.
sudo apt-get install dnsmasqПосле установки открываем /etc/dnsmasq.conf, находим, раскомментируем и изменяем следующим образом строку, чтобы разрешить серверу принимать DNS запросы из внутренней сети.:
listen-address=127.0.0.1, 10.0.0.1Перезапускаем DNS сервер:
sudo /etc/init.d/dnsmasq restartПосле чего на клиентских машинах должен заработать интернет.
Настраиваем DHCP
Теперь, когда наш сервер работает, нужно настроить клиентские машины. Можно, конечно, прописать все параметры вручную, но как быть если клиентских машин много и расположены они по всему зданию? Здесь нам на выручку приходит протокол DHCP, который позволяет клиентским машинам получать сетевые настройки автоматически. В качестве DHCP сервера выступит уже установленный Dnsmasq. Настроить его не просто, а очень просто, для чего снова открываем /etc/dnsmasq.conf.
Все что нам надо, это задать диапазон выдаваемых адресов (в нашем случае 10.0.0.100-150), сетевую маску и время, на которое выдается IP адрес:
dhcp-range=10.0.0.100,10.0.0.150,255.255.255.0,12hАдреса DNS сервера и шлюза сервер берет автоматически из системных настроек. Еще раз перезапускаем Dnsmasq:
sudo /etc/init.d/dnsmasq restartТеперь можно выставить на клиенте автоматическое получение IP адреса и убедиться, что все работает нормально.
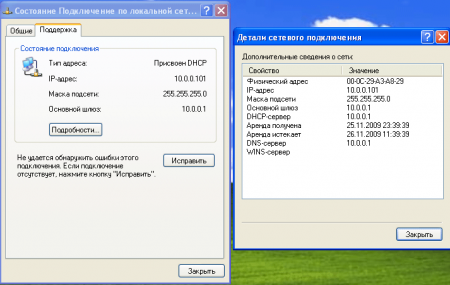
Просмотреть выданные адреса можно командой:
cat /var/log/syslog | grep DHCPOFFERВ выдаче будут перечислены выданные IP адреса и MAC адреса которым они выданы.
Настраиваем кеширующий прокси-сервер Squid
В любой большой сети определенная часть трафика повторяется от пользователя к пользователю и порой его доля доходит до 50%. Логично бы было кешировать наиболее повторяющиеся запросы и тем самым снизить нагрузку на канал, сэкономить входящий трафик и ускорить выдачу страниц конечному пользователю. Для этих задач мы используем Squid — кеширующий прокси с широчайшими возможностями.
sudo apt-get install squidОстанавливаем прокси-сервер и приступаем к настройке:
sudo /etc/init.d/squid stopОткрываем /etc/squid/squid.conf, находим и корректируем следующие строки, не забыв их раскомменитровать:
Указываем порт и адрес на котором squid будет принимать соединения:
http_port 10.0.0.1:3128 transparentНастраиваем кэш:
cache_dir ufs /var/spool/squid 4096 32 256
Указываем внутренние сети, лишние комментируем:
acl localnet src 10.0.0.0/24 # RFC1918 possible internal network
#acl localnet src 172.16.0.0/12 # RFC1918 possible internal network
#acl localnet src 192.168.0.0/16 # RFC1918 possible internal network
Разрешаем доступ из внутренних сетей (найти и раскомменитровать):
http_access allow localnetУстанавливаем лимит использования памяти:
memory_pools on
memory_pools_limit 50 MB
Задаем язык вывода ошибок для пользователя
error_directory /usr/share/squid/errors/Russian-koi8-rВажное замечание! В Ubuntu 9.10 эта строка может выглядеть так, рекомендуем проверить правильность пути: error_directory /usr/share/squid/errors/ru
Сохраняем файл конфигурации. Теперь строим кэш и запускаем:
sudo /usr/sbin/squid -z
sudo /etc/init.d/squid start
Для проверки указываем в браузере на клиентской машине использование прокси-сервера с адресом 10.0.0.1 и портом 3128, убеждаемся что все работает. Остается настроить прозрачную работу прокси-сервера, чтобы http трафик заворачивался на Squid автоматически, без прописывания прокси на клиенте. Для этого открываем /etc/nat и дописываем в конец строку:
# Заворачиваем http на прокси
iptables -t nat -A PREROUTING -i eth1 ! -d 10.0.0.0/24 -p tcp --dport 80 -j REDIRECT --to-ports 3128
Перезапускаем сеть:
sudo /etc/init.d/networking restartВсе. В нашем распоряжении рабочий сервер, позволяющий организовать общий доступ к интернет, кешируюший http трафик и DNS запросы, а также умеющий раздавать клиентским машинам необходимые для работы в сети настройки.
Дополнительные материалы:
- Linux. Настройка роутера (NAT + DHCP + Squid)
- Ubuntu Server. Настраиваем роутер NAT + DHCP + Squid3
- Ubuntu Server. Настраиваем контент-фильтр роутера (DansGuardian)
- DansGuardian. Сложности фильтрации русскоязычного контента
- Ubuntu Server. Настраиваем антивирусный фильтр роутера (ClamAV)
- Ubuntu Server. Дополняем контент-фильтр роутера антивирусом (DansGuardian + ClamAV)
- Ubuntu Server. Настраиваем форвардинг портов на роутере
- Ubuntu Server. Настраиваем аутентификацию через Squid
- Ubuntu Server. Ограничиваем скорость клиентов через Squid
- SARG — анализируем логи прокси-севера Squid
- SAMS — веб-интерфейс для управления Squid и не только
- Squid — настраиваем URL-фильтрацию по спискам
- Squid — блокируем потоковое мультимедиа
- Как устроена и работает система контроля доступа в Squid
- Настраиваем Squid для работы с Active Directory. Часть 1 — базовые настройки
- Настраиваем Squid для работы с Active Directory. Часть 2 — Kerberos-аутентификация
- Настраиваем Squid для работы с Active Directory. Часть 3 — Авторизация на основе групп AD
- WPAD или автоматическая настройка параметров прокси
- Устраняем ошибки Windows Update при работе через прокси-сервер Squid
- Настраиваем ограничение скорости для пользователей в Squid
- Сборка Squid 3.5 с поддержкой SSL из исходных кодов для Debian / Ubuntu
- Настраиваем роутер NAT + DHCP + Squid3 с поддержкой фильтрации SSL-трафика
Научиться настраивать MikroTik с нуля или систематизировать уже имеющиеся знания можно на углубленном курсе по администрированию MikroTik. Автор курса, сертифицированный тренер MikroTik Дмитрий Скоромнов, лично проверяет лабораторные работы и контролирует прогресс каждого своего студента. В три раза больше информации, чем в вендорской программе MTCNA, более 20 часов практики и доступ навсегда.
Contents
-
Setting up an Ubuntu Wired/Wireless Router
- Preface
- Scripted wired:wired router
-
Network Manager
-
Typical Example
- Quick and Dirty
-
Typical Example
- Technical Overview
-
Prerequisites
- Internet Connection
-
Router Hardware
- Use your desktop PC
- Dedicated Hardware
- Terminology
- Internal Network Information
-
Setting Up Your Network Interfaces
- Device Naming Overview
- Taking a Backup
-
Configuring the External Network Interface
-
Setting up External Network Interface
- For Dynamic IP Addresses (DHCP) Only
- For PPPoE connection with dynamic IP address only
- For Static IP Address Only
- Testing Connectivity
-
Setting up External Network Interface
-
Configuring the Internal Network Interfaces
- Wired Only
- Wireless Only
- Both Wired and Wireless
- Enable IP forwarding and Masquerading
- Firewall
- DHCP and DNS
1. Setting up an Ubuntu Wired/Wireless Router
1.1. Preface
This article is intended for intermediate and advanced users who would like to set up an Ubuntu installation acting as a router at home or in their office. The end result is a powerful router that can provide functionality similar to popular products (for example, the Linksys WRT54G).
1.2. Scripted wired:wired router
I (user id Snake_Byte) created a python script a while back that sets up a wired router for you given some basic info (check the readme).
Tested on Karmic and Lucid, let me know if you have any problems. I want to start a GUI project to make this simpler, and incorporate wireless features if anyone is interested, we can get a repo going.
[Note added: The script included in this page at the link below assumes different addresses than on the rest of the page and MUST BE EDITED to replace the assumed IP address and range for your private network, and to remover the examples, before use. Furthermore, for recent versions of Debian and Ubuntu, the assumed dhcp3-server must be replaced by a more modern server, such as isc-dhcp-server, and all references to dhcp3 and dhcp3 should be replaced by just dhcp once you do so. Thus you should LOOK OVER ALL OF THE CONTENTS of the directory tree after unpacking the tar file — so not just blindly execute it before doing so.]
You can get it here:
ubuntu router.tar
1.3. Network Manager
This tool is perfect for simple networking problems, especially for laptop users. It is not appropriate for setting up a router, even though it does have a very basic internet connection sharing capability.
1.3.1. Typical Example
Home Office
The basis is one PC connected to a broadband internet connection. Additional devices:
- network printer
- wifi PDA
- laptop
Some of these devices should be able to communicate with each other, some should be allowed to communicate with the internet. Some are wired, and some are wireless. With this guide, your PC can share the internet over additional network interfaces, such as wireless cards and ethernet cards.
University
Single PC on a university LAN. Additional devices:
- X-Box running mythbuntu
- Wifi mobile phone
- laptops
1.3.1.1. Quick and Dirty
If you would like to try to do the same thing the ‘quick and dirty’ way, see EasyRouter, a much quicker method with much less flexibility.
1.4. Technical Overview
The router that will be created is an Internet gateway for wired and/or wireless clients to share an internet connection with one IP address.
The essential components are:
-
routing of packets from your local networks to the internet, with IP_masquerading
- handling DNS requests
- providing IP addresses to devices on your local networks (DHCP)
This router can also provide:
- A firewall
- port forwarding
2. Prerequisites
2.1. Internet Connection
This is not strictly necessary, but is probably the reason you are following this article. You can set up a router in an isolated network using these instructions, but you will likely have specialist requirements, and need to make changes.
2.2. Router Hardware
2.2.1. Use your desktop PC
If you have a recent PC, bought in the last two years, it probably has enough horsepower to run all your normal applications and act as a router at the same time.
2.2.2. Dedicated Hardware
You’ll need a dedicated computer to act as the router. The computer can use old hardware and having the minimum requirements to install Ubuntu should suffice. The author of this article runs his router on a P3 600mhz processor with 256MB of RAM. You are encouraged use this as a server for other applications perhaps by installing postfix, apache, mysql, and/or samba. This guide recommends a server installation of Ubuntu, but there’s no reason why a desktop installation wouldn’t work. If you plan to be able to access the router remotely, install ssh before proceeding.
The following needs to be physically installed and recognized by the kernel on your router:
- A network adapter
-
For a wired network,
- Another network adapter, typically an ethernet port on a motherboard, or PCI card.
-
For a wireless network,
- A wireless network adapter
-
Ideally it should be able run in «master» mode, although «ad-hoc» mode might be good enough. Cards and chipsets which can work in master mode (otherwise known as access point or ap mode), are listed at the Linux Wireless Project.
-
sudo ip link set dev <interface name> down && sudo iwconfig <interface name> mode master should not return an error; but some cards take extra commands to set master mode. mac80211 compatible drivers can run cards in master mode. Pay careful attention to what hardware you buy.
-
If your wireless network adapter is not recognized by your server installation of Ubuntu, it may use the madwifi chipset (like the D-Link DWL-G520). Please visit Router/Madwifi for more information.
-
- A wireless network adapter
Running ip addr will show you what network interfaces are available.
2.2.3. Terminology
interface is used to mean the operating system’s name for a place which sends or receives data packets. It is often, but not necessarily, the same as a device. An interface may have several devices associated (e.g. a bridge), or a single device may have several interfaces. device will refer here to the bit of hardware dealing with your network connections.
3. Internal Network Information
Here are the values we’ll use to set up your internal network. Advanced users use caution when changing them as the changes will need to be reflected in all further router configuration.
Firstly, discover the IP address of your internet-connected interface. If you are plugged into a business or academic LAN, this is very likely to be given by:
ip addr show eth0
For a home broadband user, it may be a ppp interface; and a wireless user could have any number of interface names, such as ethX, wlanX, athX, where X is a digit.
Be aware that it is important to use different numbers below to the one given to your internet device. This is probably the case already, but if you are not directly connected to the internet, you may be on a LAN with the same address range. If you already have a broadband router, for example, it might have given you the 192.168.0.2 address, and kept 192.168.0.1 for itself. If so, change the third digit (0) to another number (and do so throughout the rest of this tutorial).
|
Router |
|
|
Address |
192.168.0.1 |
|
Network |
192.168.0.0/24 |
|
Broadcast |
192.168.0.255 |
|
Clients |
|
|
Addresses |
192.168.0.2 — 192.168.0.254 |
|
Prefix length |
/24 |
|
Broadcast |
192.168.0.255 |
|
Gateway |
192.168.0.1 |
4. Setting Up Your Network Interfaces
4.1. Device Naming Overview
|
Network Device |
Internal or External Network |
Description |
|
eth0 |
External |
Network adapter connected to an external network (your broadband connection) |
|
eth1 |
Internal |
Network adapter connected to a hub or switch |
|
wlan0 |
Internal |
Wireless network adapter |
|
br0 |
Internal |
Network bridge between eth1 and wlan0 that will treat the two like one device |
It is important to note that the names of the network interfaces above (eth0, eth1, and wlan0) are used as convention. It is very likely that your router will recognize its devices under different names (for example, madwifi calls its wireless device ath0). Please substitute the names of your device accordingly. For information about how to change the names of your network devices, try man iftab.
4.2. Taking a Backup
Issue the following command to take a backup of your current network configuration:
-
sudo cp /etc/network/interfaces /etc/network/interfaces.bak
4.3. Configuring the External Network Interface
4.3.1. Setting up External Network Interface
Here, we configure the Ubuntu networking system to bring the the local loopback and external network interfaces up by editing /etc/networking/interfaces. The primary goal here is to set up your external network interface (eth0, or whatever you’re using in place of it) to be brought up by the networking subsystem. The examples below are only for the most basic setups. If your setup requires additional configuration, for example you need to setup ADSL with PPPoE, adapt the following examples so that the end result is your external network interface connected to the Internet.
4.3.1.1. For Dynamic IP Addresses (DHCP) Only
Open /etc/network/interfaces with your favourite editor. Delete everything and paste in what is below. Follow the commented out instructions carefully.
-
# Set up the local loopback interface
auto lo
iface lo inet loopback

# Set up the external interface
#
# Don't forget to change eth0 to the proper name of the external
# interface if applicable.
#
auto eth0
iface eth0 inet dhcp
4.3.1.2. For PPPoE connection with dynamic IP address only
See forum.
4.3.1.3. For Static IP Address Only
Open /etc/network/interfaces with your favourite editor. Delete everything and paste in what is below. Follow the commented out instructions carefully.
-
# Set up the local loopback interface
auto lo
iface lo inet loopback

# Set up the External interface
#
# For every xxx.xxx.xxx.xxx, enter the numeric address given to you
# by your Internet provider. Don't forget to change eth0 to the proper
# name of the external interface if applicable.
#
auto eth0
iface eth0 inet static
    address xxx.xxx.xxx.xxx
    netmask xxx.xxx.xxx.xxx
    gateway xxx.xxx.xxx.xxx
Now, set up your DNS servers as given to you by your service provider in /etc/resolv.conf, which should look something like this
-
nameserver xxx.xxx.xxx.xxx
nameserver xxx.xxx.xxx.xxx
You can visit the Ubuntu Server Guide — Network Configuration documentation for more information
4.3.2. Testing Connectivity
Reload the network configuration and test for connectivity,
-
sudo /etc/init.d/networking restart
ping -c 3 -W 10 ubuntu.com
And if all goes well something similar should return:
-
PING ubuntu.com (82.211.81.166) 56(84) bytes of data.
64 bytes from signey.ubuntu.com (82.211.81.166): icmp_seq=1 ttl=43 time=99.9 ms
64 bytes from signey.ubuntu.com (82.211.81.166): icmp_seq=2 ttl=43 time=109 ms
64 bytes from signey.ubuntu.com (82.211.81.166): icmp_seq=3 ttl=43 time=100 ms

--- ubuntu.com ping statistics ---
3 packets transmitted, 3 received, 0% packet loss, time 2001ms
rtt min/avg/max/mdev = 99.982/103.450/109.419/4.254 ms
4.4. Configuring the Internal Network Interfaces
4.4.1. Wired Only
Append the following to /etc/network/interfaces and follow the commented out instructions carefully.
-
# Set up the internal wired network
#
# Don't forget to change eth1 to the proper name of the internal
# wired network interface if applicable.
#
auto eth1
iface eth1 inet static
    address 192.168.0.1
    network 192.168.0.0
    netmask 255.255.255.0
    broadcast 192.168.0.255
Your internal network interface is: eth1 (or whatever you’re using in place of it)
4.4.2. Wireless Only
If you plan on using WEP, generate a network key,
-
dd if=/dev/random bs=1 count=13 2>/dev/null | xxd -p
Append the following to /etc/network/interfaces and follow the commented out instructions carefully.
-
# Set up the internal wireless network
#
# Don't forget to change wlan0 to the proper name of the internal
# wireless network interface if applicable.
#
# If you would like to use WEP, uncomment the line 'wireless-key'
# and replace '<key goes here>' with a WEP key.
#
# You may also change the network essid and channel.
#
auto wlan0
iface wlan0 inet static
    wireless-mode master
    wireless-essid "UbuntuWireless"
    wireless-channel 1
    #wireless-key <key goes here>
    address 192.168.0.1
    network 192.168.0.0
    netmask 255.255.255.0
    broadcast 192.168.0.255
Your internal network interface is: wlan0 (or whatever you’re using in place of it)
4.4.3. Both Wired and Wireless
First install the necessary tools to create a network bridge,
-
sudo apt-get install bridge-utils
If you plan on using WEP, generate a network key,
-
dd if=/dev/random bs=1 count=13 2>/dev/null | xxd -p
Append the following to /etc/network/interfaces and follow the commented out instructions carefully.
-
# Set up the internal wireless network
#
# Don't forget to change wlan0 to the proper name of the internal
# wireless network interface if applicable.
#
# If you would like to use WEP, uncomment the line 'wireless-key'
# and replace '<key goes here>' with a WEP key.
#
# You may also change the network essid and channel.
#
auto wlan0
iface wlan0 inet manual
    wireless-mode master
    wireless-essid "UbuntuWireless"
    wireless-channel 1
    #wireless-key <key goes here>

# Set up the internal wired network
#
# It's not necessary to bring this interface up as the bridge
# we are about to create does this. Leave these lines commented.
#
#auto eth1
#iface eth1 inet manual


# Set up the internal wired/wireless network bridge
#
# Don't forget to change wlan0 and eth1 to the proper name of
# the internal wired and wireless interfaces if applicable.
#
auto br0
iface br0 inet static
    address 192.168.0.1
    network 192.168.0.0
    netmask 255.255.255.0
    broadcast 192.168.0.255
    bridge-ports eth1 wlan0
Your internal network interface is: br0
4.5. Enable IP forwarding and Masquerading
Doing the above might not be enough to make the Ubuntu machine a real router which does NAT (Network Address Translation) and IP Forwarding. The following script configures the Kernel IPTable and IP forwarding. You will have to configure at least the script’s 2 variables; the 1st is the external network interface; the 2nd is the internal network interface.
-
EXTIF="eth0"
INTIF="eth1"
The script was originally from a Ubuntu router guide forum article which has 2 internal network interfaces. What’s showing below uses only 1 internal network interface. You will have to modify the script manually or use the script in the Ubuntu router guide forum article if you need to configure 2 internal network interfaces.
-
echo -e "\n\nLoading simple rc.firewall-iptables version $FWVER..\n"
DEPMOD=/sbin/depmod
MODPROBE=/sbin/modprobe

EXTIF="eth0"
INTIF="eth1"
#INTIF2="eth0"
echo "   External Interface:  $EXTIF"
echo "   Internal Interface:  $INTIF"

#======================================================================
#== No editing beyond this line is required for initial MASQ testing ==
echo -en "   loading modules: "
echo "  - Verifying that all kernel modules are ok"
$DEPMOD -a
echo "----------------------------------------------------------------------"
echo -en "ip_tables, "
$MODPROBE ip_tables
echo -en "nf_conntrack, "
$MODPROBE nf_conntrack
echo -en "nf_conntrack_ftp, "
$MODPROBE nf_conntrack_ftp
echo -en "nf_conntrack_irc, "
$MODPROBE nf_conntrack_irc
echo -en "iptable_nat, "
$MODPROBE iptable_nat
echo -en "nf_nat_ftp, "
$MODPROBE nf_nat_ftp
echo "----------------------------------------------------------------------"
echo -e "   Done loading modules.\n"
echo "   Enabling forwarding.."
echo "1" > /proc/sys/net/ipv4/ip_forward
echo "   Enabling DynamicAddr.."
echo "1" > /proc/sys/net/ipv4/ip_dynaddr
echo "   Clearing any existing rules and setting default policy.."

iptables-restore <<-EOF
*nat
-A POSTROUTING -o "$EXTIF" -j MASQUERADE
COMMIT
*filter
:INPUT ACCEPT [0:0]
:FORWARD DROP [0:0]
:OUTPUT ACCEPT [0:0]
-A FORWARD -i "$EXTIF" -o "$INTIF" -m conntrack --ctstate ESTABLISHED,RELATED -j ACCEPT
-A FORWARD -i "$INTIF" -o "$EXTIF" -j ACCEPT
-A FORWARD -j LOG
COMMIT
EOF

echo -e "\nrc.firewall-iptables v$FWVER done.\n"
After configuring the 2 variables, save the script below as nat.sh and make it executable by doing
-
chmod a+x nat.sh
Now, test the script by running as root
-
sudo sh nat.sh
Investigate the messages from the console output to see if any error happened. If everything looks fine, use another host in the internal network to test if it can access the external network (presumably the Internet). A quick way to test is pinging Google public DNS from the console.
-
ping -c 3 -W 10 8.8.8.8
If ping responds, make our new script bootable so we don’t have to run the script every time we restart.
-
sudo cp nat.sh /etc/init.d/
sudo ln -s /etc/init.d/nat.sh /etc/rc2.d/S95masquradescript
As a final test, restart your computer and test to see if you still have the same functionality. If so then congratulations! If not then make sure you followed the above correctly so the script is bootable.
5. Firewall
See Router/Firewall
6. DHCP and DNS
Dynamic Host Configuration Protocol (DHCP)
CategoryNetworking
Краткое руководство по настройке роутера в связке iptables + dnsmasq на ОС Ubuntu Server 21.04, а также проброс портов по IP-адресам машин в локальной сети.
Исходные данные
Имеем на машине 2 сетевых интерфейса:
enp0s3 — для внешней сети 192.168.1.0/24
enp0s8 — для внутренней сети 192.168.53.0/24
Также у нас есть шлюз во внешней сети. Это маршрутизатор с IP-адресом 192.168.1.1
Наша задача — настроить доступ в Интернет для внутренней сети.
В первую очередь нам необходимо настроить сетевые интерфейсы. Для этих целей Ubuntu Server 21.04 использует netplan.
Открываем файл /etc/netplan/00-installer-config.yaml
# sudo nano /etc/netplan/00-installer-config.yaml
и приводим его к такому виду:
# This is the network config written by 'subiquity'
network:
  ethernets:
    enp0s3:
      addresses:
      - 192.168.1.53/24
      gateway4: 192.168.1.1
      nameservers:
        addresses:
        - 192.168.1.1
        search: []
    enp0s8:
      addresses:
      - 192.168.53.1/24
      nameservers:
        addresses: []
        search: []
  version: 2
Перезапускаем netplan
# sudo netplan generate
# sudo netplan apply
Переходим к настройке файрволла (правил iptables).
Создадим каталог /etc/firewall, в нём скрипт iptables.sh и открываем его
# sudo mkdir /etc/firewall
# sudo touch /etc/firewall/iptables.sh
# sudo nano /etc/firewall/iptables.sh
в нём пропишем такой код:
#!/bin/sh

sysctl -w net.ipv4.ip_forward=1

iptables -F
iptables -t nat -A POSTROUTING -o enp0s+ -j MASQUERADE
iptables -t filter -A INPUT -m state --state ESTABLISHED,RELATED -j ACCEPT
iptables -t filter -A INPUT -p icmp -j ACCEPT
iptables -t filter -A INPUT -i lo -j ACCEPT
iptables -t filter -A INPUT -i enp0s+ -j ACCEPT
iptables -t filter -A FORWARD -m state --state ESTABLISHED,RELATED -j ACCEPT
iptables -t filter -A FORWARD -p icmp -j ACCEPT
iptables -t filter -A FORWARD -i lo -j ACCEPT
iptables -t filter -A FORWARD -i enp0s+ -j ACCEPT
iptables -t filter -A FORWARD -o enp0s+ -j ACCEPT
iptables -t filter -A INPUT -j REJECT --reject-with icmp-host-prohibited
iptables -t filter -A FORWARD -j REJECT --reject-with icmp-host-prohibited
и сделаем скрипт исполняемым
# sudo chmod +x /etc/firewall/iptables.sh
Теперь создадим службу rc-local. Для этого создадим файл /etc/systemd/system/rc-local.service
# sudo touch /etc/systemd/system/rc-local.service
откроем его
# sudo nano /etc/systemd/system/rc-local.service
в внесём такой него код:
[Unit]
Description=/etc/rc.local
ConditionPathExists=/etc/rc.local

[Service]
Type=forking
ExecStart=/etc/rc.local start
TimeoutSec=0
StandardOutput=tty
RemainAfterExit=yes
SysVStartPriority=99

[Install]
WantedBy=multi-user.target
Затем создадим файл /etc/rc.local и откроем его
# sudo touch /etc/rc.local
# sudo nano /etc/rc.local
пропишем в него такой код:
#!/bin/sh -e

/etc/firewall/iptables.sh
exit 0
и сделаем его исполняемым
# sudo chmod +x /etc/rc.local
Далее перезагрузим машину
# sudo shutdown -r now
Проверим, работают ли созданные правила. Для этого выполним команду
# sudo iptables -L
и, если iptables работает корректно, получим примерно такой ответ
Chain INPUT (policy ACCEPT)
target     prot opt source               destination
ACCEPT     all  --  anywhere             anywhere             state RELATED,ESTABLISHED
ACCEPT     icmp --  anywhere             anywhere
ACCEPT     all  --  anywhere             anywhere
ACCEPT     all  --  anywhere             anywhere
REJECT     all  --  anywhere             anywhere             reject-with icmp-host-prohibited

Chain FORWARD (policy ACCEPT)
target     prot opt source               destination
ACCEPT     all  --  anywhere             anywhere             state RELATED,ESTABLISHED
ACCEPT     icmp --  anywhere             anywhere
ACCEPT     all  --  anywhere             anywhere
ACCEPT     all  --  anywhere             anywhere
ACCEPT     all  --  anywhere             anywhere
REJECT     all  --  anywhere             anywhere             reject-with icmp-host-prohibited

Chain OUTPUT (policy ACCEPT)
target     prot opt source               destination
После этого переходим к настройке dnsmasq.
Устанавливаем его
# sudo apt install dnsmasq
открываем конфиг
# sudo nano /etc/dnsmasq.conf
и в самом конце файла добавляем:
bind-interfaces
domain-needed
bogus-priv
interface=enp0s8
resolv-file=/etc/resolv.conf
dhcp-range=192.168.53.31,192.168.53.130,24h
cache-size=150
Запускаем службу dnsmasq
# sudo systemctl start dnsmasq
или лучше вообще перезагрузим машину
# sudo shutdown -r now
После этого на других машинах в сети проверяем сетевые настройки и выход в Интернет.
При необходимости в пробросе портов по IP-адресам для доступа из внешней сети, например, необходимо пробросить порт RDP 3389/TCP на IP-адрес машины 192.168.53.25, выполним такие команды:
# sudo iptables -t nat -A PREROUTING -i enp0s3 -p tcp --dport 3389 -j DNAT --to-destination 192.168.53.25:3389
# sudo iptables -t filter -A INPUT -p tcp -m state --state NEW -m tcp --dport 3389 -j ACCEPT
Для того, чтобы эти правила срабатывали после каждой загрузки системы, их необходимо прописать в файл /etc/firewall/iptables.sh
Проброс других портов осуществляется аналогичным образом.
Предисловие
Это первая статья из цикла, в котором попытаемся превратить ПК в полнофункциональный роутер.
На этой странице, ниже по тексту, будут рассмотрена базовая конфигурация интерфейсов (используя systemd-networkd).
В последующих публикациях совершим базовую настройку:
- nftables, в качестве firewall’а;
- DHCP (kea) и DNS (bind9) серверов;
- Wireguard, для организации Remote access и Site-to-Site VPN’ов;
- FRR, для создания простого сценария с установлением BGP-сессии и перенаправления интересующих нас префиксов в wg-туннель.
Рассматривать настройку WiFi Access Point не будем, т.к. у меня нет подходящих компонентов.
Выбор аппаратной платформы
Для роутера подойдёт любой компьютер с двумя сетевыми интерфейсами, на который можно установить Linux.
Я использую данный мини ПК с Aliexpress. За более чем год работы в режиме 24/7 каких-либо проблем не нашёл.
Отличными кандидатами являются Orange Pi 5 plus на ARM-архитектуре, либо VisionFive 2 на RISC-V (обе платы имеют по два интерфейса). На обе архитектуры доступен Debian, так что особых различий от x64_86 быть не должно, хотя я этого не проверял.
Выбор Linux-дистрибутива и почему systemd-networkd?
В принципе, подойдёт любой дистрибутив (так как в этой статье будет использоваться systemd-networkd для назначения адресов на интерфейсы, то дистрибутив должен быть с ним), но стоит обратить внимание на наличие драйверов для сетевых карт, в моем случае необходимый драйвер появился в ядре 5.7.
В данной статье будет использоваться Debian 12.
Почему systemd-networkd? Удобно организовывать конфигурационные файлы, не нужно ставить дополнительных пакетов для работы с интерфейсами, таких как bridge-utils, vlan, даже wireguard встроен в ядро и пакет нужен только для генерации ключей. Также конфигурация легко переносится на любой дистрибутив, вне зависимости от используемого метода для сетевых настроек. Да и просто хотелось с ним немного больше разобраться.
Установка пакетов
Необходимо определиться с ПО, которое будет использоваться для обеспечения всех необходим функций.
В этой серии, как было указано в предисловии, будем использовать nftables (firewall), kea (dhcp сервер), bind (dns сервер), wireguard (все, относящееся к vpn), frr (для динамической машрутизации).
Также добавим несколько пакетов для диагностики (tcpdump, ethtool и т.д.)
Итого, для работы с сетью:
apt install nftables bind9 bind9-doc kea-dhcp4-server kea-doc wireguard frr tcpdump conntrack ethtool whois nmap ssh snmp snmpdДля удобства администрирования ещё поставим:
apt install vim htop lm-sensors curlПереименование интефрейсов
В моем случае один из сетевых интерфейсов именовался eno1, что отличалось от схемы остальных интерфейсов.
1: lo: <LOOPBACK,UP,LOWER_UP> mtu 65536 qdisc noqueue state UNKNOWN mode DEFAULT group default qlen 1000
    link/loopback 00:00:00:00:00:00 brd 00:00:00:00:00:00
2: enp1s0: <BROADCAST,MULTICAST,UP,LOWER_UP> mtu 1500 qdisc mq state UP mode DEFAULT group default qlen 1000
    link/ether 00:e2:69:53:be:35 brd ff:ff:ff:ff:ff:ff
3: enp2s0: <BROADCAST,MULTICAST,UP,LOWER_UP> mtu 1500 qdisc mq state UP mode DEFAULT group default qlen 1000
    link/ether 00:e2:69:53:be:36 brd ff:ff:ff:ff:ff:ff
4: eno1: <BROADCAST,MULTICAST> mtu 1500 qdisc noop state DOWN mode DEFAULT group default qlen 1000
    link/ether 00:e2:69:53:be:37 brd ff:ff:ff:ff:ff:ff
    altname enp3s0
5: enp4s0: <BROADCAST,MULTICAST> mtu 1500 qdisc noop state DOWN mode DEFAULT group default qlen 1000
    link/ether 00:e2:69:53:be:38 brd ff:ff:ff:ff:ff:ff
Имена назначаются по приоритету из файла /usr/lib/systemd/network/99-default.link, который содержит данные в секции Link
[Link]
NamePolicy=keep kernel database onboard slot path
Проверить, какие значение имеет конкретный интерфейс можно командой:
udevadm test-builtin net_id /sys/class/net/eno1 2>/dev/nullВ моем случае на 3-ем порту есть значение onboard, что является приоритетным значением относительно path, при этом на других портах оно отсутствует.
ID_NET_NAMING_SCHEME=v247
ID_NET_NAME_MAC=enx00e26953be37
ID_NET_NAME_ONBOARD=eno1
ID_NET_LABEL_ONBOARD=Onboard - RTK Ethernet
ID_NET_NAME_PATH=enp3s0
Для изменения имени:
- Смотрим MAC-адрес интересующего нас интерфейса:
ip link show
4: enp3s0: <NO-CARRIER,BROADCAST,MULTICAST,UP> mtu 1500 qdisc mq master br0 state DOWN mode DEFAULT group default qlen 1000
link/ether 00:e2:69:53:be:37 brd ff:ff:ff:ff:ff:ff- Создадим файл в /etc/systemd/network/ и назовем его 90-enp3s0.link (для того, чтобы systemd-networkd вообще посмотрел внутрь файла, его имя должно стоять ранее в алфавитном порядке, чем стандартное имя 99-default.link).
В секции Match указываем MAC, в секции Link — имя.
[Match]
MACAddress=00:e2:69:53:be:37
[Link]
Name=enp3s0
После чего необходимо обновить образ и перезагрузить систему update-initramfs -u && reboot
Включение маршрутизации между интерфейсами
Для использования ОС в качестве роутера, нам необходимо включить маршрутизацию между интерфейсами.
В файле /etc/sysctl.conf находим строку net.ipv4.ip_forward=1 и раскомментируем её.
Настройка интерфейсов
Т.к. мы используем systemd-networkd, то все настройки будут храниться в текстовых файлах в директории /etc/systemd/network
Для настройки используются 3 типа файлов:
- .network — применения конфигурации на интерфейсах
- .netdev — создания виртуальных сетевых интерфейсов
- .link — в данный файл смотрит udev, при обнаружении интерфейсов
В моем примере будет использоваться 3 порта:
- enp1s0 — смотрит в сторону провайдера
- enp2s0, enp3s0 — для создания bridge интерфейса для подключения LAN-сегмента.
Имена файлов можно использовать произвольные, только необходимо помнить, что конфигурация из них читается в алфавитном порядке, т.е., к примеру, чтобы настроить IP-адрес на bridge интерфейсе, необходимо чтобы к моменту чтения конфигурационного .network файла, данный интерфейс уже был создан .netdev файлом.
По умолчанию Debian использует файлы из директории /etc/network для конфигурации сети.
Т.к. мы будем использовать systemd-networkd, то первым делом переименуем стандартный конфигурационный файл и отключим соответствующий сервис:
NOTE: Если данное действие делать удалённо, то, очевидно, доступ к устройству пропадёт. Поэтому либо сначала полностью создаём все конфигурационные systemd-networkd файлы, после чего отключаем networking, либо необходим локальный доступ.
mv /etc/network/interfaces /etc/network/interfaces.save
systemctl disable networking.service
systemctl stop networking.service
Настройка WAN-интерфейса
Мне провайдер предоставляет настройки по DHCP (IPoE с привязкой по MAC-адресу), конфигурационный 30-enp1s0.network файл будет выглядеть примерно так (т.к. ipv6 в данной статье не используется, то запретим создание Link Local адресов на интерфейсах):
[Match]
Name = enp1s0

[Network]
DHCP = ipv4
LinkLocalAddressing = no
IPv6AcceptRA = no
KeepConfiguration = dhcp
IgnoreCarrierLoss = yes

[DHCPv4]
SendRelease = no
Для более подробной информации по каждому параметру:
man systemd.networkНастройка BRIDGE, в качестве LAN-интерфейса
В качестве интерфейса, смотрящего в локальную сеть будет использоваться Bridge-интерфейс, объединяющий порты enp2s0 и enp3s0.
Для создания бриджа нам потребуется 3 файла:
- 20-bind.network, где указываем интерфейсы, которые будут использоваться в Bridge
[Match]
Name=enp[2,3]s0

[Network]
Bridge=br0- 20-bridge.netdev, в данном файле создаем уже сам интерфейс
[NetDev]
Name=br0
Kind=bridge- 20-bridge.network, где указываем сетевые настройки интерфейса (в файле настроен ещё vlan69, его создание будет в следующем пункте)
[Match]
Name = br0

[Network]
Address = 10.222.21.1/24
LinkLocalAddressing = no
VLAN=vlan69
Добавление VLAN-интерфейса
Также создадим VLAN-интерфейс и добавим на ранее созданнный br0-интерфейс.
Для этого необходимы 2 файла:
- 69-vlan69.netdev, для создания виртуального интерфейса
[NetDev]
Name=vlan69
Kind=vlan

[VLAN]
Id=69- 69-vlan69.network, для настроек на ранее созданном интерфейсе
[Match]
Name=vlan69
Type=vlan

[Network]
Description="proxmox ve"
LinkLocalAddressing = no

[Address]
Address=10.69.69.1/24
Заключение
На данном этапе настроены интерфейсы для WAN и LAN подключений, но роутер ещё не имеет доступ в интернет, т.к. не настроен NAT, настройка которого рассматривается в следующей статье.
Также отсутствуют локальные DNS и DHCP серверы, настройка которых рассматривается в третьей части.
This article is a tutorial for turning a computer into an internet gateway/router. To strengthen its security it should not run any services available to the outside world. Towards the LAN, run only gateway specific services; especially do not run httpd, ftpd, samba, nfsd, etc. as those belong on a server in the LAN since they introduce security risks.
This article does not attempt to show how to set up a shared connection between two machines using cross-over cables. For a simple internet sharing solution, see Internet sharing.
Note: Throughout the article, intern0 and extern0 are used as names for the network interfaces. The reasoning is further explained in #Persistent interface naming.
Hardware Requirements
- At least 1 GB of hard drive space. The base install will take up around 500MB of space and if you want to use a caching web proxy, you will need to reserve space for the cache as well.
- At least two physical network interfaces: a gateway connects two networks with each other (actually a router can be made using a single physical interface that underlays two VLAN interfaces and is connected to a VLAN-aware switch, so-called router-on-a-stick configuration, but it is not covered in this article). You will need to be able to connect those networks to the same physical computer. One interface must connect to the external network, while the other connects to the internal network.
- A hub, switch or UTP cable: You need a way to connect the other computers to the gateway
Network interface configuration
Persistent interface naming
Systemd automatically chooses unique interface names for all your interfaces. These are persistent and will not change when you reboot.
However you might want to rename your interfaces e.g. in order to highlight their different networks to which they connect. Throughout the following sections of this guide, the convention stated below is used:
- intern0: the network card connected to the LAN. On an actual computer it will probably have the name enp2s0, enp1s1, etc.
- extern0: the network card connected to the external network (or WAN). It will probably have the name enp2s0, enp1s1, etc.
You may change the assigned names of your devices via a configuration file using Systemd-networkd described in Systemd-networkd#Renaming an interface or by a udev-rule following Network configuration#Change interface name. Due to the example-rich nature of this article, you might want to choose the names above.
IP configuration
With netctl
Now you will need to configure the network interfaces. One way to do so, is using netctl profiles. You will need to create two profiles.
Note: If you will be connecting to the Internet only via PPPoE (you have one WAN port) you do not need to setup or enable the extern0-profile. See below for more information on configuring PPPoE.
/etc/netctl/extern0-profile
Description='Public Interface.'
Interface=extern0
Connection=ethernet
IP='dhcp'
/etc/netctl/intern0-profile
Description='Private Interface'
Interface=intern0
Connection=ethernet
IP='static'
Address=('10.0.0.1/24')
Note: The example configuration above assumes a full subnet. If you are building the gateway for a small amount of people, you will want to change the CIDR suffix to accommodate a smaller range. For example /27 will give you 10.0.0.1 to 10.0.0.30. There are many CIDR calculators, online and offline, for example sipcalc.
Tip: Use SkipNoCarrier=yes in the LAN profile to make sure the connection is enabled even when the guest on LAN is not yet up.
Next, we set up the interfaces with netctl:
# netctl enable extern0-profile
# netctl enable intern0-profile
With systemd-networkd
A straight-forward and simple way to configure network interfaces is via systemd-networkd.
- Apply a DHCP client configuration for the
extern0interface. - Apply a static IP configuration for the
intern0interface.
See systemd-networkd#Configuration files for configuration details and an overview of the available options. Run networkctl reload to apply the configuration changes.
ADSL connection/PPPoE
Using rp-pppoe, we can connect an ADSL modem to the extern0 interface of the firewall and have Arch manage the connection. Make sure to put the modem in bridged mode though (either half-bridge or RFC1483), otherwise, the modem will act as a router too. Install the rp-pppoe package.
It should be noted that if you use only PPPoE to connect to the internet (i.e. you do not have another WAN port, except for the one that connects to your modem) you do not need to set up the extern0-profile as the external pseudo-interface will be ppp0.
PPPoE configuration
You can use netctl to setup the PPPoE connection. To get started, do
# cp /etc/netctl/examples/pppoe /etc/netctl/
and start editing. For the interface configuration, choose the interface that connects to the modem. If you only connect to the internet through PPPoE, this will probably be extern0. Fill in the rest of the fields with your ISP information. See the PPPoE section in the netctl.profile(5) man page for more information on the fields.
DNS and DHCP
The following comparison table lists the available DHCP servers and their features:
| Server | DHCPv4 | DHCPv6 | IPv6 Router Advertisement | GUI | Interfaces | Storage backend(s) | Note |
|---|---|---|---|---|---|---|---|
| dhcpd | Yes | Yes | No | Glass-ISC-DHCP | ? | File | Superseded by Kea. |
| dnsmasq | Yes | Yes | Yes | No | ? | File | Also DNS, PXE and TFTP. |
| kea | Yes | Yes | No | Stork | REST, RADIUS, NETCONF | File, MySQL, PostgreSQL, Cassandra | Also DNS. Supersedes dhcpd. |
| systemd-networkd | Yes | No | Yes | No | ? | File | Installed with systemd. |
A comparison of available DNS servers can be found in Domain name resolution#DNS servers.
dnsmasq
![]() This article or section needs language, wiki syntax or style improvements. See Help:Style for reference.
This article or section needs language, wiki syntax or style improvements. See Help:Style for reference.![]()
Reason: This section predates the comparison table above and sounds like dnsmasq is the best or even only option. (Discuss in Talk:Router)
We will use dnsmasq as DNS server and optionally as DHCP daemon for the LAN. It was specifically designed for small sites. Install it with the dnsmasq package.
Dnsmasq can to be configured to be a DHCP server with a configuration similar to the following:
/etc/dnsmasq.conf
interface=intern0 # make dnsmasq listen for requests only on intern0 (our LAN)
#no-dhcp-interface=intern0  # optionally disable the DHCP functionality of dnsmasq and use systemd-networkd instead
expand-hosts      # add a domain to simple hostnames in /etc/hosts
domain=foo.bar    # allow fully qualified domain names for DHCP hosts (needed when
                  # "expand-hosts" is used)
dhcp-range=10.0.0.2,10.0.0.255,255.255.255.0,1h # defines a DHCP-range for the LAN:
                  # from 10.0.0.2 to .255 with a subnet mask of 255.255.255.0 and a
                  # DHCP lease of 1 hour (change to your own preferences)
Somewhere below, you will notice you can also add «static» DHCP leases, i.e. assign an IP-address to the MAC-address of a computer on the LAN. This way, whenever the computer requests a new lease, it will get the same IP. That is very useful for network servers with a DNS record. You can also deny certain MACs from obtaining an IP.
Now start and enable the dnsmasq.service.
systemd-networkd
To use systemd-networkd instead of dnsmasq as DHCP server, add a [DHCPServer] section to the configuration file for the intern0 interface. See Systemd-networkd#[DHCPServer] for the available options.
Connection sharing
Time to tie the two network interfaces together.
Manual
First of all, we need to allow packets to hop from one network interface to the other. For this one needs to have packet forwarding enabled in kernel via sysctl(8). See Internet sharing#Enable packet forwarding for details.
Assuming net.**forwarding is set correctly (i.e. is 1), packets still need to be properly sent and received. Hence, it is necessary to translate the IP addresses between the outward facing network and the subnet used locally. The technique is called masquerading . We also need two forwarding rules to keep connections going and enable LAN to WAN forwarding. For this task, we are going to use iptables.
Refer to the section Internet sharing#Enable NAT for how to masquerade the extern0 interface and packages from intern0 to extern0. Afterwards persist the newly added rules via iptables-save -f /etc/iptables/iptables.rules, see iptables#Configuration and usage for details.
Start and enable iptables.service. The router should now be fully functional and route your traffic. Since it is facing the public Internet, it makes sense to additionally secure it using a Simple stateful firewall.
With systemd-networkd
Amend or create the previously discussed network configuration for intern0 to include the IPMasquerade=ipv4 option in the [Network] section. This configuration will implicitly enable packet forwarding on all interfaces, see systemd.network(5). See Systemd-networkd#[DHCPServer] for an example configuration.
Connection sharing with shorewall
See Shorewall for a detailed configuration guide.
IPv6 tips
![]() This article or section is a candidate for merging with IPv6.
This article or section is a candidate for merging with IPv6.![]()
Notes: Merge into the main article, the topic is not specific to router configuration. The wording should be probably changed along the way. (Discuss in Talk:Router)
Useful reading: IPv6 and the wikipedia:IPv6.
Unique Local Addresses
You can use your router in IPv6 mode even if you do not have an IPv6 address from your ISP. Unless you disable IPv6, all interfaces should have been assigned a unique fe80::/10 address.
![]() This article or section needs expansion.
This article or section needs expansion.![]()
Reason: Add an offline method to generate an ULA. (Discuss in Talk:Router)
For internal networking the block fc00::/7 has been reserved. These addresses are guaranteed to be unique and non-routable from the open Internet. Addresses that belong to the fc00::/7 block are called Unique Local Addresses. To get started generate a ULA /64 block to use in your network. For this example we will use fd00:aaaa:bbbb:cccc::/64. Firstly, we must assign a static IPv6 on the internal interface. Modify the intern0-profile we created above to include the following line:
Address6=('fd00:aaaa:bbbb:cccc::1/64')
This will add the ULA to the internal interface. As far as the router goes, this is all you need to configure.
Global Unicast Addresses
If your ISP or WAN network can access the IPv6 Internet, you can additionally assign global link addresses to your router and propagate them through SLAAC to your internal network. The global unicast prefix is usually either static or provided through prefix delegation.
Static IPv6 prefix
If your ISP has provided you with a static prefix, then edit /etc/netctl/extern0-profile and simply add the IPv6 and the IPv6 prefix (usually /64) you have been provided
Address6=('2002:1:2:3:4:5:6:7/64')
You can use this in addition to the ULA address described above.
Acquiring IPv6 prefix via DHCPv6-PD
If your ISP handles IPv6 via prefix delegation, then you can follow the instructions in the IPv6#Prefix delegation (DHCPv6-PD) on how to properly configure your router. Following the conventions of this article, the WAN interface is extern0 (or ppp0 if you are connecting through PPPoE) and the LAN interface is intern0.
Router Advertisement and Stateless Autoconfiguration (SLAAC)
To properly hand out IPv6s to the network clients, we will need to use an advertising daemon. Follow the details of the main IPv6 article on how to set up radvd. According to this guide’s convention, the LAN-facing interface is intern0. You can either advertise all prefixes or choose which prefixes will be assigned to the local network.
Optional additions
UPnP
![]() This article or section needs expansion.
This article or section needs expansion.![]()
Reason: Mention the alternative port forwarding protocol NAT-PMP, that is supported by miniupnpd. (Discuss in Talk:Router)
The above configuration of shorewall does not include UPnP support. Use of UPnP is discouraged as it may make the gateway vulnerable to attacks from within the LAN. However, some applications require this to function correctly.
To enable UPnP on your router, you need to install an UPnP Internet Gateway Device (IGD) protocol daemon. To get it, install the miniupnpd package.
Read the Shorewall guide on UPnP for more information.
Remote administration
OpenSSH can be used to administer your router remotely. This is useful for running it in headless mode (no monitor or input devices).
Caching web proxy
See Squid for the setup of a web proxy to speed up browsing and/or adding an extra layer of security.
Time server
To use the router as a time server, see System time#Time synchronization for available Network Time Protocol (NTP) server implementations.
Then, configure shorewall or iptables to allow NTP traffic in and out.
Content filtering
Install and configure Privoxy if you need a content filtering solution.
Traffic shaping
Traffic shaping is very useful, especially when you are not the only one on the LAN. The idea is to assign a priority to different types of traffic. Interactive traffic (ssh, online gaming) probably needs the highest priority, while P2P traffic can do with the lowest. Then there is everything in between.
Traffic shaping with shorewall
See Shorewall#Traffic shaping.
See also
- Simple stateful firewall
- Internet sharing