ODBC (Open Database Connectivity) — это стандартный интерфейс, который позволяет приложениям взаимодействовать с различными базами данных, используя специальные драйверы. В Windows 7 настройка ODBC может понадобиться при установке и настройке приложений, которые используют базы данных.
Настройка ODBC в Windows 7 довольно проста и может быть выполнена несколькими шагами. Сначала необходимо открыть «Панель управления» и выбрать «Система и безопасность». Затем нужно выбрать «Административные инструменты» и открыть «Источники данных (ODBC)».
Далее необходимо выбрать вкладку «Системные источники», где можно добавить новый источник данных. Нажмите на кнопку «Добавить», чтобы открыть список доступных драйверов. Выберите нужный драйвер, введите имя и описание источника данных и нажмите «Готово».
После этого откроется окно с настройками выбранного драйвера. Здесь можно указать данные для подключения к базе данных, такие как имя сервера, имя пользователя и пароль. После введения данных нажмите «Тест подключения», чтобы убедиться, что настройка прошла успешно. Если все настроено правильно, можно сохранить настройки и закрыть окно.
Важно помнить, что некорректная настройка ODBC может привести к неправильной работе приложений, использующих базы данных. Поэтому рекомендуется следовать инструкциям и проверять правильность настроек перед сохранением.
В заключение, настройка ODBC в Windows 7 не является сложной задачей, но требует определенных знаний и внимательности. Правильная настройка позволит приложениям безопасно и эффективно взаимодействовать с базами данных, что является важным для многих пользователей.
Содержание
- Понимание ODBC и его использование в Windows 7
- Проверка наличия ODBC-драйверов в Windows 7
- Установка ODBC-драйверов в Windows 7
- Создание нового источника данных ODBC в Windows 7
- Редактирование существующего источника данных ODBC в Windows 7
- Часто возникающие проблемы и советы по их решению при настройке ODBC в Windows 7
Понимание ODBC и его использование в Windows 7
Windows 7 предоставляет встроенную поддержку ODBC, что позволяет пользователям легко настроить соединение со своей базой данных, а также использовать ее для доступа к данным из различных приложений.
Для настройки ODBC в Windows 7 следуйте этим шагам:
- Откройте «Панель управления» и выберите «Источники данных (ODBC)».
- В открывшемся окне выберите вкладку «Системные источники данных».
- Нажмите кнопку «Добавить», чтобы создать новый источник данных.
- Выберите драйвер, соответствующий вашей базе данных, и нажмите «Далее».
- Введите имя источника данных и настроить параметры подключения.
- Протестируйте подключение для проверки его работоспособности.
- Нажмите «ОК» для сохранения настроек и закрытия окна.
Теперь вы можете использовать настроенный источник данных в своих приложениях для доступа к базе данных. Просто укажите имя источника данных в настройках подключения в вашем приложении, чтобы установить соединение.
Важно помнить, что для успешного использования ODBC в Windows 7 необходимо наличие соответствующего драйвера для вашей базы данных. Если у вас нет необходимого драйвера, вам может потребоваться установить его перед настройкой ODBC.
Проверка наличия ODBC-драйверов в Windows 7
Перед тем, как начать использовать ODBC в Windows 7, необходимо убедиться, что на вашем компьютере установлены необходимые драйверы. Для этого можно выполнить следующие действия:
- Откройте меню «Пуск» и выберите «Панель управления».
- В разделе «Администрирование» найдите и выберите икону «Источники данных (ODBC)».
- Откроется окно «Источники данных (ODBC)».
- Перейдите на вкладку «Драйверы».
- В этом разделе должны быть перечислены все установленные на вашем компьютере ODBC-драйверы.
- Проверьте список драйверов на наличие нужного вам драйвера.
Если нужный драйвер отсутствует в списке, это значит, что он не установлен на вашем компьютере и требуется его установка. Вы можете скачать и установить нужный драйвер с сайта разработчика или сопровождающей вас программы, которая требует использования ODBC.
После установки драйвера вы сможете настроить ODBC и использовать его для установления соединения с вашей базой данных в Windows 7.
Установка ODBC-драйверов в Windows 7
Вот пошаговая инструкция по установке ODBC-драйверов в Windows 7:
- Скачайте драйвер: Перейдите на официальный сайт поставщика базы данных и загрузите ODBC-драйвер, соответствующий вашей операционной системе.
- Установите драйвер: Запустите загруженный файл установки и следуйте инструкциям мастера установки. Убедитесь, что выбрана правильная платформа (32 или 64 бита).
- Настройте ODBC-источник данных: Откройте «Панель управления» и найдите иконку «Источники данных (ODBC)». Щелкните по ней дважды, чтобы открыть окошко «Источники данных ODBC».
- Создайте новый источник данных: В окне «Источники данных ODBC» выберите вкладку «Системные источники данных» и нажмите «Добавить». Выберите драйвер, который вы установили на предыдущем шаге.
- Настройте параметры источника данных: Введите имя для источника данных и настройте другие параметры в соответствии с требованиями вашей базы данных.
- Проверьте подключение: Щелкните по кнопке «Проверить», чтобы убедиться, что подключение к базе данных успешно установлено.
- Сохраните изменения: После настройки источника данных нажмите «ОК», чтобы сохранить изменения и закрыть окно «Источники данных ODBC».
Теперь, после успешной установки и настройки ODBC-драйверов в Windows 7, вы можете использовать их для доступа к вашей базе данных из любого поддерживаемого приложения.
Создание нового источника данных ODBC в Windows 7
Для создания нового источника данных ODBC в операционной системе Windows 7 необходимо выполнить следующие шаги:
Шаг 1: Откройте Панель управления. Для этого щелкните правой кнопкой мыши на кнопке «Пуск» и выберите в контекстном меню пункт «Панель управления».
Шаг 2: В открывшемся окне Панели управления найдите раздел «Администрирование» и дважды щелкните на нем.
Шаг 3: В разделе «Администрирование» найдите иконку «Источники данных (ODBC)» и щелкните на ней.
Шаг 4: В открывшемся окне «Источники данных ODBC» перейдите на вкладку «Источники данных пользователя» и нажмите кнопку «Добавить».
Шаг 5: В появившемся окне выберите нужный драйвер для вашего источника данных и нажмите кнопку «Готово». В зависимости от типа источника данных, вам может потребоваться указать дополнительные параметры.
Шаг 6: В окне «Создание нового источника данных» введите имя источника данных и описание (опционально), затем нажмите кнопку «Создать».
Шаг 7: В открывшемся окне настройки драйвера укажите необходимые параметры подключения к источнику данных. Затем нажмите кнопку «Тест…». Если тест будет успешным, нажмите кнопку «ОК».
Шаг 8: Новый источник данных ODBC создан. Теперь вы можете использовать его в соответствующих приложениях.
Создание нового источника данных ODBC в Windows 7 может потребоваться для подключения к различным базам данных или другим источникам данных из ваших приложений. Отслеживайте параметры и настройки подключения, чтобы убедиться, что они соответствуют требованиям вашей базы данных или источника данных.
Редактирование существующего источника данных ODBC в Windows 7
Если у вас уже есть созданный источник данных ODBC в Windows 7 и вы хотите внести изменения, вы можете воспользоваться следующими этапами:
- Запустите «Панель управления» и выберите «Система и безопасность».
- Выберите «Административные инструменты» и дважды щелкните на значке «Источники данных (ODBC)».
- В открывшемся окне «Источники данных (ODBC)» выберите вкладку «Источники системы».
- Найдите источник данных, который вы хотите изменить, и щелкните на нем один раз.
- Нажмите кнопку «Настроить…», чтобы открыть окно «Настройка источника данных».
- В окне «Настройка источника данных» вы сможете изменить параметры источника данных. Обратите внимание, что доступные параметры будут зависеть от типа источника данных.
- После внесения необходимых изменений нажмите кнопку «ОК», чтобы сохранить изменения.
- При необходимости можно изменить другие параметры источника данных или закрыть окно «Источники данных (ODBC)».
Теперь вы знаете, как редактировать существующий источник данных ODBC в Windows 7. При необходимости вы можете изменить любые параметры источника данных, чтобы адаптировать его под ваши потребности.
Часто возникающие проблемы и советы по их решению при настройке ODBC в Windows 7
Настройка ODBC в Windows 7 может иногда вызывать определенные проблемы. В этом разделе мы рассмотрим несколько часто возникающих проблем и предложим несколько советов по их решению.
1. Ошибка доступа к драйверам ODBC.
- Убедитесь, что вы запускаете настройку от имени пользователя с административными правами.
- Проверьте, что драйверы ODBC установлены и доступны на вашем компьютере.
- Установите или обновите установленные драйверы ODBC.
2. Некорректные параметры подключения.
- Проверьте правильность введенных параметров подключения, таких как имя сервера, имя базы данных, имя пользователя и пароль.
- Убедитесь, что настройки подключения соответствуют требованиям вашего сервера и базы данных.
- Попробуйте использовать альтернативный драйвер ODBC, если доступен, для проверки соединения.
3. Проблемы с сетевым подключением.
- Проверьте, что ваш компьютер имеет доступ к серверу базы данных, используя другие сетевые приложения.
- Убедитесь, что ваш компьютер и сервер базы данных находятся в одной сети и правильно настроены.
- Проверьте настройки сетевого брандмауэра, антивирусного программного обеспечения или других сетевых устройств, которые могут блокировать подключение.
4. Неправильная версия драйвера ODBC.
- Убедитесь, что у вас установлена правильная версия драйвера ODBC для вашей операционной системы и версии программного обеспечения.
- Проверьте, что драйвер ODBC совместим с вашими приложениями и требованиями.
- Обновите драйвер ODBC до последней версии, если доступно.
5. Нехватка системных ресурсов.
- Проверьте доступность системных ресурсов, таких как оперативная память и дисковое пространство, на вашем компьютере.
- Освободите ненужные ресурсы и перезагрузите компьютер, чтобы очистить временные файлы и процессы.
- Закройте другие запущенные приложения, которые могут использовать слишком много ресурсов.
При возникновении проблем связанных с настройкой ODBC в Windows 7 следуйте этим советам и проверьте каждое решение по порядку. В случае дальнейших проблем, обратитесь к документации, форумам сообществ или технической поддержке, чтобы получить дополнительную помощь.
ODBC is basically a protocol generally used for connecting Microsoft Access Database with another outbound source like Microsoft SQL server. Open Database Connectivity (in short ODBC) is a driver permitting applications to access data from DBMS (Database Management Systems) with the help of SQL. So in this write-up today, we will show you a few most effective methods to start ODBC Data Sources in Windows 11 or 10.
Maximum number of interoperability is permissible by ODBC which eventually proves that; one program can retrieve various DBMS. It’s a significant Windows component and you may need to use it in order to create along with managing the ODBC data source.
Here is How to Start ODBC Data Sources in Windows 11 or 10 –
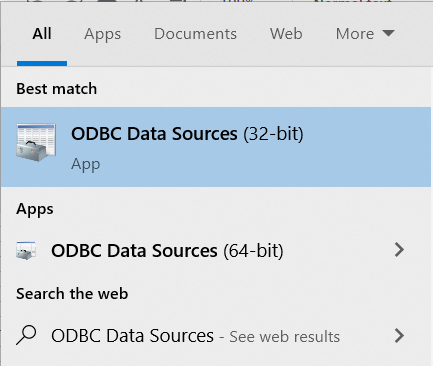
1] Use taskbar search
- Click the search icon located in the taskbar.
- Type odbc in the text bar.
- When ODBC Data Sources app for both 64-bit and 32-bit shows up in search result, click preferred one to launch.
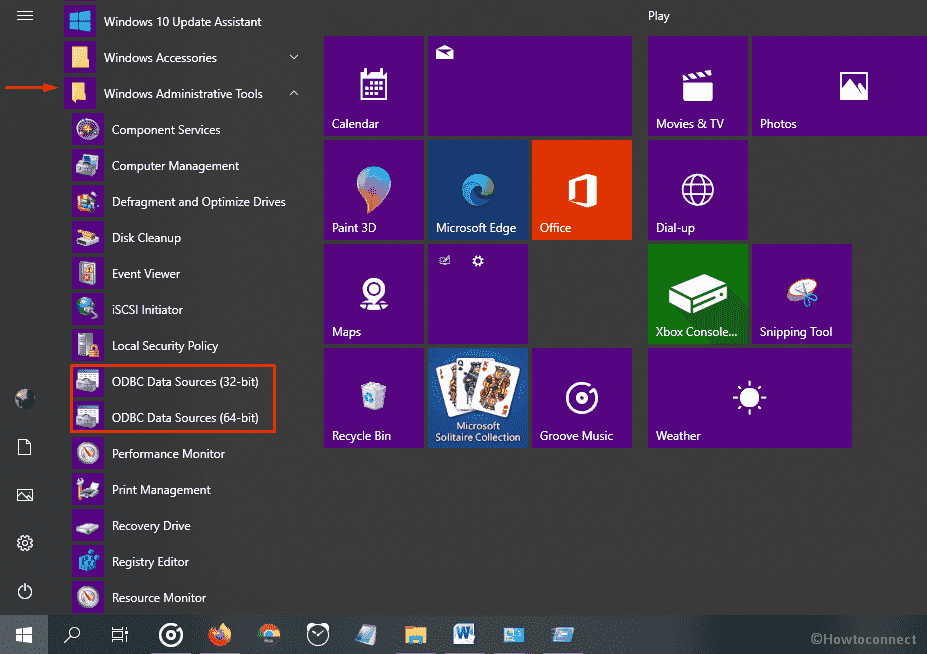
2] Start ODBC Data Sources through Start menu
- Press Windows key to invoke the Start menu.
- Reach to Windows Administrative Tools by approaching alphabetically.
- Expand the same folder.
- From available ODBC Data Source (32-bit) and ODBC Data Source (64-bit), opt for the desired one.
3] Take help of Run dialog box
- Press Win+R at one go to directly open Run dialog box.
- Insert odbcad32 in the command box and click OK button.
Note – Whether your Windows 11 or 10 device runs 64-bit or 32-bit, the command will open the right version automatically.
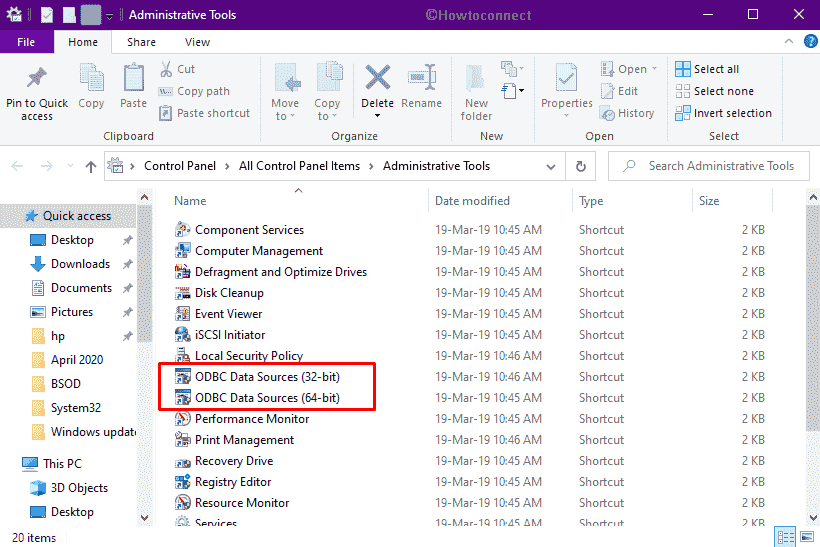
4] By means of Control panel
- Press Win+S and type in control panel and hit Enter key to launch the same.
- Set View by option to Large icons and select Administrative Tools.
- When a separate window turns up, look for ODBC Data Sources.
- The app will be available in both 32 and 64 bit, hence click the one compatible with your system.
5] Access Command Prompt to open ODBC Data Sources
- Right-click on Start button and choose Run.
- Put cmd in the text field and hit Enter.
- Insert odbcad32 after the blinking cursor followed by pressing the Enter key.
6] Navigate the directory of ODBC
- Bring forth File Explorer with hotkey Win+E.
- In its address bar, insert
C:\WINDOWS\System32\odbcad32.exeand press Enter key. This will open ODBC that is compatible with 64-bit. - In the case of running 32-bit, you need to insert
C:\WINDOWS\SysWOW64\odbcad32.exedirectory instead.
7] Create a shortcut key for ODBC Data Sources
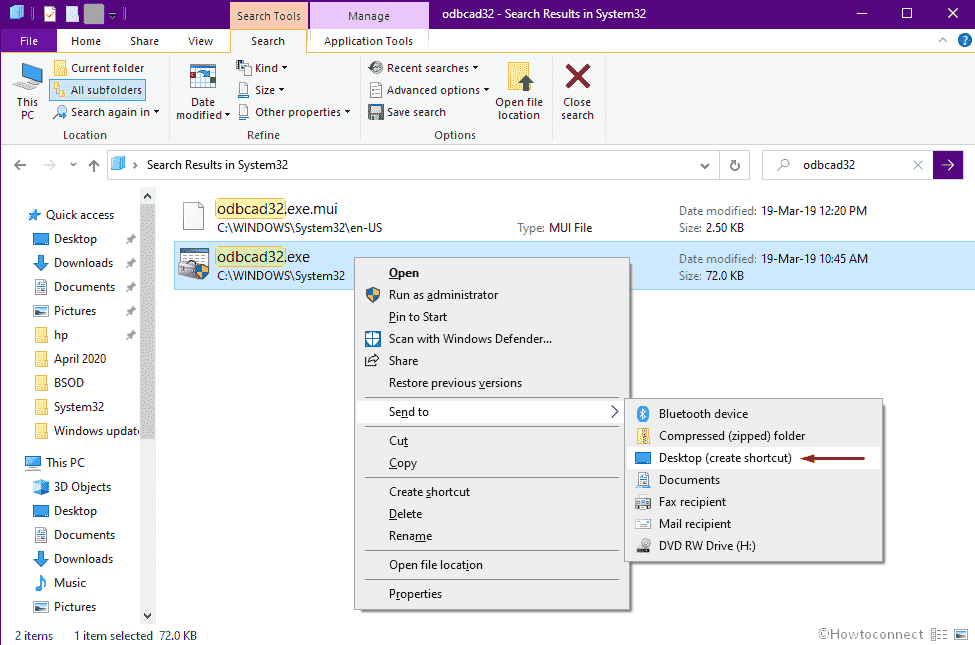
- Open File Explorer and go to the following directory –
C:\WINDOWS\System32
- After reaching there, press Ctrl+F to activate its search function.
- Type odbcad32 and press Enter key.
- When the search result appears, right-click on odbcad32.exe and choose Send to => Desktop (create shortcut).
8] With the assistance of PowerShell
- Press Win+X and select Windows PowerShell.
- Insert odbcad32.exe after the winking cursor and hit Enter.
Methods:
1] Use taskbar search
2] Open ODBC Data Sources through Start menu
3] Take help of Run dialog box
4] By means of Control panel
5] Access Command Prompt to open ODBC Data Sources
6] Navigate the directory of ODBC
7] Create a shortcut key for ODBC Data Sources
8] With the assistance of PowerShell
That’s all!!
Are you planning to install the Oracle ODBC Driver on Windows 10?
Open Database Connectivity (ODBC) is a standard interface that gives one application access to several different data sources. As a result, the Oracle ODBC can be used to access Oracle databases.
This is a great advantage for advanced users and programmers, who need access to the Oracle ODBC for running online transaction processing, data warehousing, and mixed database workloads — which Oracle is widely used for.
However, it is not as easy as installing a program, as it requires downloading and compiling files together. You may also need to input additional data the application will need to run properly. Luckily, we’re here to help.
In this article, we’ll introduce you to a structured process behind procuring and installing the Oracle ODBC Driver in Windows 10.
1. Download the Oracle Instant Client Package From the Website.
Before installing and setting up your driver, you’ll need to download three separate files from the Oracle website and place them into the appropriate folder location. These files are essential in making the software function as it should, enabling your ODBC applications to work by providing additional libraries and resources.
Additionally, you need to download the right files; they must be compatible with each other, as well as your operating system. Downloading or otherwise using the wrong version of each file may cause errors for your driver and your system.
Here’s where you can find and download the Oracle packages:
- Begin by going to the Oracle Instant Client page on your browser.
- Next, click the Instant Client for Microsoft Windows. Look for the link that matches your PC’s platform.
- Follow by choosing the Basic package download link.
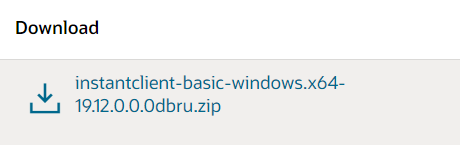
- Once it’s finished downloading, scroll down and press the SDK package hyperlink to download that archive.
- Then, click the download link for the ODBC package.
- Now that it’s on your PC, go to your File Explorer window.
- Check the C: root drive in File Explorer.
- Then, right-click a space within the C: drive and make a new folder.
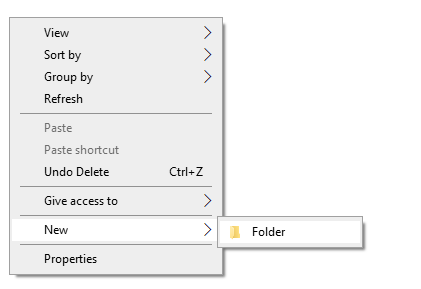
- Name your new folder Oracle and make sure that it has this path: C:\Oracle.
- After that, move the three downloaded Oracle ZIP archives into the Oracle folder and extract them there.
- Look for the extracted instantclient-basic-windows.x64-19.11.0.0.0dbru folder and open it.
- Inside, find a subfolder entitled instantclient_19_11 and move it into the Oracle folder.
- Finally, erase the instantclient-basic-windows.x64-19.11.0.0.0dbru folder.
This process ensures that the ODBC and basic ZIP archives have been extracted to the same folder by the end of this process. You can also get the SDK package and extract it to the instantclient_19_11 folder. It’s not necessary, but we recommend getting it as well.
2. Add an Oracle Client Directory to PATH Environment.
An environment variable is an editable value that other programs and applications can access within your computer. This lets the Oracle driver know where to install files, store them, and find user settings.
After extracting and setting up the necessary files for your driver to work, you’ll need to add the Oracle Client directory as an environment variable. This lets other applications and programs access your ODBC driver, allowing you to access the Oracle Database.
Here’s how to properly add the Oracle Client as an environment variable:
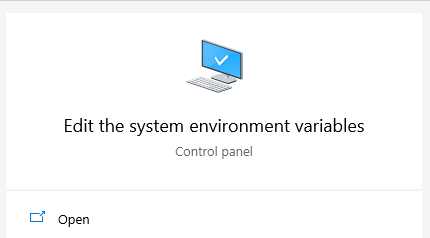
- Press the Windows+S keys. This will open the search bar.
- Type in the phrase system environment variables into the search bar.
- Next, select the Edit the system environment variables option. This should open the System Properties window.
- Select the Environment Variables... under the Advanced tab.
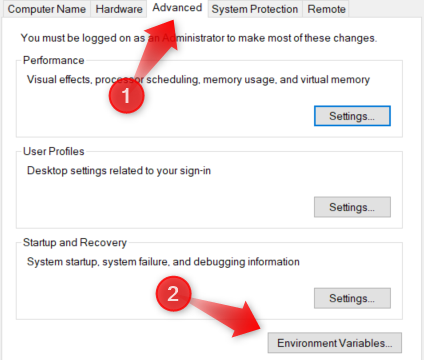
- Next, select New… under the system variables list.

- Input OCI_LIB32 into the Variable Name box.
- Under the Variable Value box, input the directory path of your Oracle folder.
- Considering you properly formatted the folders previously, your directory path should be: C:\Oracle\instantclient_19_11.
- Within the system variables list, double-click the Path variable.
- Once opened, click the New button and input the same directory path you added under the Variable Value box. (This would be C:\Oracle\instantclient_19_11).
- Click OK and exit the window.
Finishing this process should allow your Oracle Client to run its processes properly. Your previously downloaded Oracle packages can now act as an environment variable for your programs that require the Oracle driver.
3. Install the Oracle ODBC Client.
This step is fairly straightforward. We’ll be installing the Oracle client itself, which can be done in just a few moves.
Here’s how you can install the Oracle ODBC client:
- First, start by opening the instantclient_19_11 folder.
- Next, right-click the odbc_install.exe file.
- Finally, select Run as Administrator.
4. Create New ODBC Data Source.
Finally, we’ll be setting up the DSN (Data Source Name) for your newly installed Oracle driver. Note that the information you’ll be adding will be specific to the database you’re trying to connect to. Hence, this information will be different.
Your DSN will contain information that your ODBC driver will need to connect to a specific database. This will include information like the name, directory, and driver of the database. Depending on the type of DSN, it may also include the ID and password of the user.
Here is how to set up your DSN:
- Press both the Windows and S keys to open up the search bar.
- Enter ODBC Data Sources into the search box.
- Select the ODBC Data Sources to open a window.
- Click the Add button to open the Create New Data Sources
- Select your Oracle driver and click Finish.
- Open the Oracle ODBC Driver Configuration window and enter your information; such as the Data Source Name, TNS Service Name, and User ID.
- Press the OK button to exit.
After setting this up, your driver should be able to connect to the Oracle Database server directly.
That wraps it up for this tutorial on how you can install the Oracle ODBC driver in Windows 10. We hope this article has helped you in setting up your own ODBC driver. If you have concerns or inquiries, don’t hesitate to leave a comment don’t below.
If this guide helped you, please share it. 🙂
- Introduction
- Connect to Microsoft SQL Server
- Setup ODBC
- Troubleshooting
- More Information
Introduction
This article explains how to connect to Microsoft SQL Server with ODBC from Windows 10.
It covers the following topics:
- How to connect to Microsoft SQL Server (with code samples).
- How to setup ODBC:
- Configure ODBC using the ODBC Data Source Administrator:
We recommend using system DSNs (available to all users).
- Configure ODBC using the ODBC Data Source Administrator:
Connect to Microsoft SQL Server [top]
We strongly recommend using connection objects to connect to databases, and this is what we demonstrate in the code samples.
Follow these steps to connect:
- Create a new channel to try out the code:
- Create a channel like this:
- Name: DB SQL Server Connection (or similar)
- Source: From Translator
- Destination: To Channel
- Alternatively use an existing channel:
Your channel will need a From/To Translator or a Filter component.
- Create a channel like this:
- Connect to a database using ODBC:
- Paste this code into the Translator:
If your script uses connection object methods
conn:query{}orconn:execute{}to connect to a remote Microsoft SQL Server database, the location of the remote host is specified as part of the name parameter in thedb.connect{ }command. If you useconn:merge{}to connect the remote host is specified as part of the name parameter in theconn:merge{}command itself.function main() local conn = db.connect{ api=db.SQL_SERVER, name='your_odbc_server_name', user='', -- use empty string for integrated security password='', -- use empty string for integrated security use_unicode = true, live = true } conn:execute{sql='SELECT * FROM <your table>', live=true} end - The name is the name of an ODBC source that you create using the ODBC Administrator.
- Paste this code into the Translator:
- Adapt the code to your requirements.
Setup ODBC [top]
Note: Iguana may not always support the very latest version of the Microsoft SQL Server ODBC drivers, so you can simply download an earlier version if necessary. This is particularly true if you are not able to use the the latest version of Iguana.
If you need to know which versions of Microsoft SQL Server are supported by the version of Iguana you are using please contact us at support@interfaceware.com.
To set up a new ODBC data source for Microsoft SQL Server:
- Install the latest Microsoft SQL Server ODBC drivers:
- Download the latest drivers from the Microsoft ODBC download site.
- Run the installer and accept the defaults.
- Open the 64 bit ODBC Administrator:
Windows 10 (64 bit version) supports 32 and 64 bit ODBC sources — always use the 64 bit ODBC Administrator.
- Open the System DSN tab and click Add:

- Choose the latest SQL Server ODBC driver and click Finish:

- Enter the ODBC credentials:
- Use any Name and Description you prefer.
- Enter the Network Name of the SQL Server in the Server field:
Note: If you are unsure of the name ask your DBA (database administrator). - Click Finish to create the ODBC data source:

- This will open the the ODBC Microsoft SQL Server Setup dialog box that lists the chosen settings:
The ODBC source will use all the standard defaults which will work in most cases. There are two settings that you may need to change: Use Integrated Security and Database. Speak to your DBA (database administrator) about changing these if necessary.
- Use Integrated Security: Sometimes you might want to use a SQL Server user and password
- Database: You can specify the database that you want to use by default.

- Test the data source connection:


If you need to modify the ODBC source follow these steps:
- These are the two most common things to change:
- Default Database: Change to Test
- User Login: Change to user billsmith with password something-secret
- Modify the ODBC source to change Database and User:
- Change the default database:
- Select the Change the default database option:
- Choose your default database from the drop list and click Next:
- Finally test the connection to see that the changes worked.

Troubleshooting [top]
- Problems with connection settings:
Speak to your DBA (database administrator) for general connection issues like: User name and password, Database Server network name etc.
- Iguana may not always support the very latest version of the ODBC drivers:
Please contact us at support@interfaceware.com if you need to know the latest supported version of the ODBC drivers.
- Incorrect port number:
SQL Server defaults to port 1433, but a different port can be used. Speak to your database administrator (DBA) or network administrator.
- Using integrated security:
Using integrated security is the usual way to connect to a Microsoft SQL Server database. If this does not work speak to your DBA (database administrator) about the user credentials you should use to connect to the database.
If you need more help please contact us at support@interfaceware.com.
More Information [top]
- Using Database Connection Objects
- Forum thread on Windows ODBC
- Using Integrated Authentication, Microsoft SQL Server documentation (kerberos etc)
- Connect to Microsoft SQL Server from Linux or Mac with ODBC
Connecting to databases is a critical piece of data anlaysis in R. In most analytic roles the data we consume is going to be found in databases. Of these some of the most common are SQL databases like MS SQL Server, PostgreSQL, and Oracle in addition to many others. In this how-to blog, I’ll walk you through the major steps of configuring your machine and R to be able to connect to a MS SQL Server database from R on Windows. Similar steps can be followed to set up connections to other databases, however, driver installation and configuration will likely be slightly different.
Downloading and Installing the Drivers
The first step is to download the necessary odbc drivers for your database. Because most Windows installations come with the MS SQL Server drivers installed we’ll breeze over this step. If you don’t have it installed you can follow these directions here.
Setting up a DSN for your ODBC Connection
This step is not necessary, but I have found that configuring a DSN (aka. “Data Source Name”) can simplify your code configuration in R.
STEP 1: Search “ODBC” in the Start Menu search and open “ODBC Data Source Administrator (64-bit)”.
Step 2: Select “Add” under the “User DSN” tab.

Step 3: Select the corresponding ODBC driver for which you wish to set up a data source and Click “Finish”.

Step 4: Give your DSN a “Name” and “Server” name/IP address and click “Next”.

Step 5: Define your default database and click “Next”.

Step 6: Click “Next” through any remaining windows, then click “Finish”. A window should pop up to test the connection. Double check your options then click “Test Data Source”.

Step 7: If it was successful it should give you the following message. Click “OK”.

Step 8: Finally you should see your newly defined DSN listed under the “User DSN” tab. Click “OK” to exit the ODBC DSN configuration tool.

Install the odbc Package in R
In the past I have used the RODBC package but recently I have found that the odbc package plays much nicer with other database tools like DBI and dbplyr. Plus it has very similar syntax to the RJDBC package and for consistency sake I’ve made the switch.
install.packages('odbc')
Connecting to the Database from R
Alright, we are ready to make our connection… drum-roll please. To start let’s make our connection using the DNS configuration we set up earlier.
library(odbc)
library(dplyr)
library(dbplyr)
# Connect using the DSN
db <- DBI::dbConnect(odbc::odbc(), "SQL")
That was easy! Now we’re ready to roll with our data. If you opted out of creating a DSN, the below code is what you would use to connect. There are a lot more key strokes but the bonus is that there is no additional setup needed outside of R, which can be handy when you are trying to share your code with coworkers that want to connect to the database too.
# Connect without a DSN
db <- DBI::dbConnect(odbc::odbc(),
                     Driver = 'ODBC Driver 13 for SQL Server',
                     Server = 'localhost\\SQLEXPRESS',
                     Database = "master",
                     trusted_connection = 'yes',
                     Port = 1433
                     )
Okay, now that we are connected we are ready to get started on our analysis. We can read/write data to the database using the follwing commands:
# Write iris data to MS SQL Server
# DBI::dbWriteTable(db,"iris",iris)

# Read data from MS SQL Server
my.iris <- DBI::dbGetQuery(db,"SELECT * FROM IRIS")
head(my.iris)
##   Sepal.Length Sepal.Width Petal.Length Petal.Width Species
## 1          5.1         3.5          1.4         0.2  setosa
## 2          4.9         3.0          1.4         0.2  setosa
## 3          4.7         3.2          1.3         0.2  setosa
## 4          4.6         3.1          1.5         0.2  setosa
## 5          5.0         3.6          1.4         0.2  setosa
## 6          5.4         3.9          1.7         0.4  setosa
Finally, use the dbplyr package to extend the dplyr functions to our database connection.
smry <- tbl(db,"iris") %>% collect
head(smry)
## # A tibble: 6 x 5
##   Sepal.Length Sepal.Width Petal.Length Petal.Width Species
##          <dbl>       <dbl>        <dbl>       <dbl> <chr>
## 1          5.1         3.5          1.4         0.2 setosa
## 2          4.9         3            1.4         0.2 setosa
## 3          4.7         3.2          1.3         0.2 setosa
## 4          4.6         3.1          1.5         0.2 setosa
## 5          5           3.6          1.4         0.2 setosa
## 6          5.4         3.9          1.7         0.4 setosa
# Don't forget to disconnect
dbDisconnect(db)