Setting up NordVPN on a router is a straightforward process, even if your technical ability is limited.
There are a variety of benefits of installing NordVPN on your router.
These include positives like encrypting all internet traffic that passes through the connection. Yet, there are also negatives, such as not offering a user-friendly config.
For more information on how to configure NordVPN on a router, the pros and cons of doing so, and more, keep reading.
Can NordVPN Be Installed on a Router?
Yes, NordVPN can be installed onto a router, but compatibility will depend on the make and model of the router being used.
NordVPN recommends Asus as the best make of router to use with its VPN service as most of their routers support OpenVPN.
OpenVPN is a core requirement for NordVPN to function when installing directly to a router.
What Routers Are Compatible With NordVPN?
There are various routers that you can install NordVPN onto.
But which one is suitable will depend on individual circumstances.
Check out my recommended routers from the categories below to help you find a compatible router:
Best For Home Use (Includes OpenVPN Encryption)
If you need a router to encrypt your connection via VPN, the following Asus models will do the trick:
- RT-AC66U B1
- RT-AC86U
- Asus RT-AX3000
Routers That Support Custom Firmware
Need more customization options allowing you to install your own firmware?
Then you might consider a router that enables the installation of custom firmware:
- DD-WRT
- Tomato
- Padavan
- OpenWRT
- Merlin
Best Overall Performance Using OpenVPN (up to 60mbps)
If you require a top-performing router that comes with built-in OpenVPN, then you may wish to check out these router models:
- Asus: RT-AX86U, RT-AX88U (AC3100), RT-AC5300
- D-Link: DIR-885L, DIR-895L
- Linksys: EA8500, WRT1900ACS, WRT3200ACM
- Netgear: R7500, R7800, R8500, R9000
Pre-Configured Routers (With NordVPN Already Installed)
If you’re searching for an easy option where everything is ready to use out-of-the-box, then a router with nordVPN pre-installed might be the way to go.
I’d recommend one of NordVPN’s Flashrouters, which include everything you need to get started:
- NordVPN Netgear R6400 DD-WRT FlashRouter (allows up to six simultaneous device connection)
- NordVPN Linksys WRT3200ACM AC3200 DD-WRT FlashRouter (Hooks up 6-9 devices at once)
- NordVPN Asus RT-AC5300 AC5300 DD-WRT FlashRouter (connect over ten devices)
What Is the Best Router for NordVPN?
The best router to use with NordVPN will depend on your requirements.
The choice of the ‘’best’’ router will often come down to how it performs and how easy it is to use and set up.
NordVPN recommends using one of its FlashRouters which come equipped with NordVPN pre-configured. offering some of the best performance.
They also support multiple devices.
I’d personally recommend the NordVPN Asus RT-AC5300 AC5300 DD-WRT FlashRouter. This supports over ten simultaneous device connections.
This is important for those times when you have several Wifi devices connected that you need to be encrypted using VPN. Not only that, but it looks like something from an Alien movie!
How to Configure Your Router for NordVPN?
The process to configure NordVPN on a router may differ depending on the make and model of the router you are using.
The following steps are a generic guide that you can use as a basis for most compatible routers.
Step 1: Log in to Your Router
At a very base level, you will need to ensure your router is connected to the internet. You should identify the device’s IP address (often found on the back of the router). Once you have this, you’ll need to open a browser such as Chrome or Firefox, enter the IP address, and then complete your router admin username and password.
Step 2: Adjust the Settings for Your Router
Asus is the most straightforward router to set up and often comes with built-in VPN functionality. For other brands, it’ll require a little more effort to ensure your connections are routed to the NordVPN servers for encrypted traffic.
Step 3: Test Your Connection
Configuring NordVPN on a router should be a one-time effort unless you wipe your settings by resetting the router to factory settings.
Assuming you’ve configured everything correctly, you shouldn’t need to tamper with any settings going forward. All your devices that connect to your router should be routed via an encrypted VPN tunnel.
How to Install NordVPN on Your Asus Router?

To install NordVPN on an Asus router, I would recommend selecting one of the below models before you get started:
- Asus RT-N18U
- Asus RT-AC66U
- Asus RT-AC68U
- Asus RT-AC87U
- Asus RT-AC3200
Each of the above models works well with NordVPN because they support OpenVPN usage as a client instead of as a server.
If you have another model of Asus router, please check whether it supports OpenVPN. You can do this by referring to the operating manual via the manufacturer’s website or by contacting Asus support.
The process for Asus routers versus other brands is pretty straightforward:
- Sign up for a NordVPN subscription.
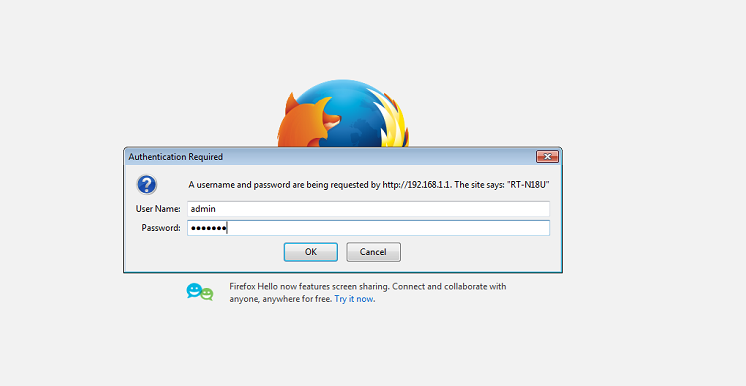
- Open a browser window (Chrome, Firefox, etc.) and type in the IP address from the back of your router. This is usually 192.168.1.1 and hit enter.
- You may be prompted for a username. This is Username: admin. Password: admin.
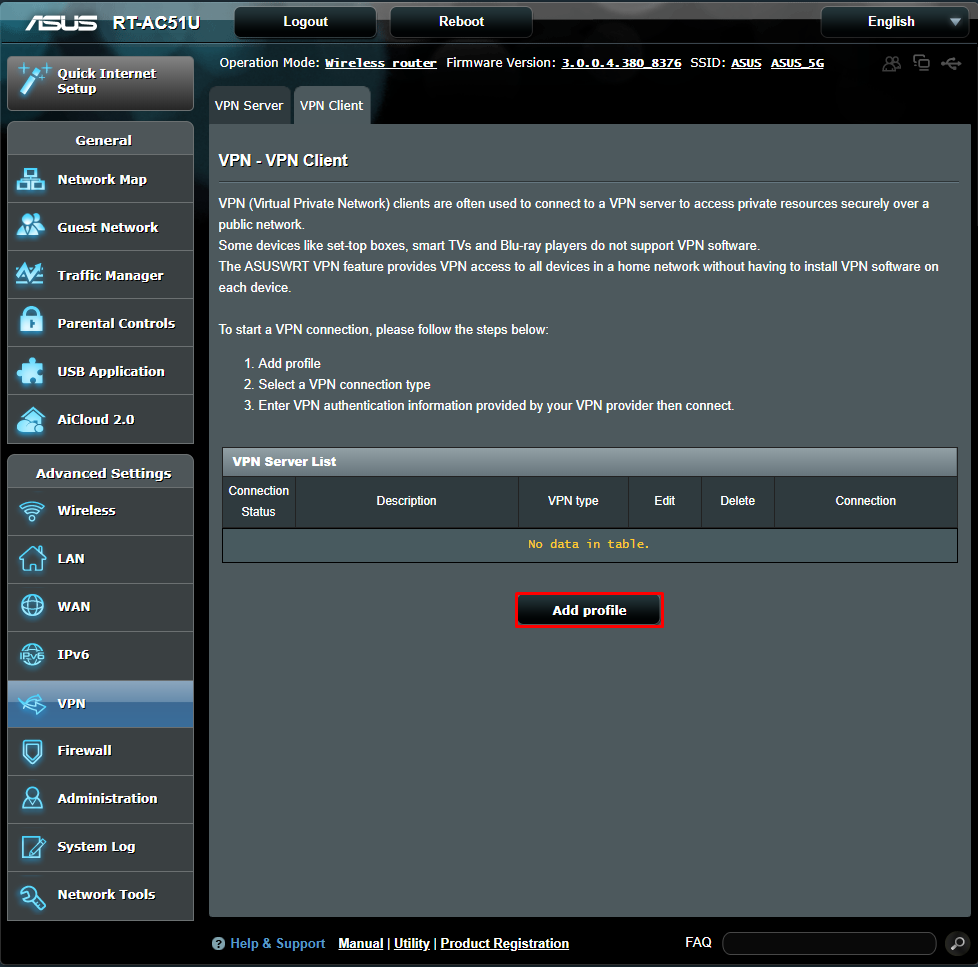
- After signing in, click on the VPN tab and select ‘’Add New profile’’ with the following settings:
- Description: A description of your choice.
- Username: Your NordVPN username you should have received in an email.
- Password: The NordVPN password you set up during the registration process.
- Head to NordVPN’s recommended server page to download the NordVPN config file. Select your preferred server, and the config file will download automatically.

- Go back to the VPN tab (which should still show in your browser) and select ‘’Choose file’’ to locate and import the .ovpn file you have just downloaded.
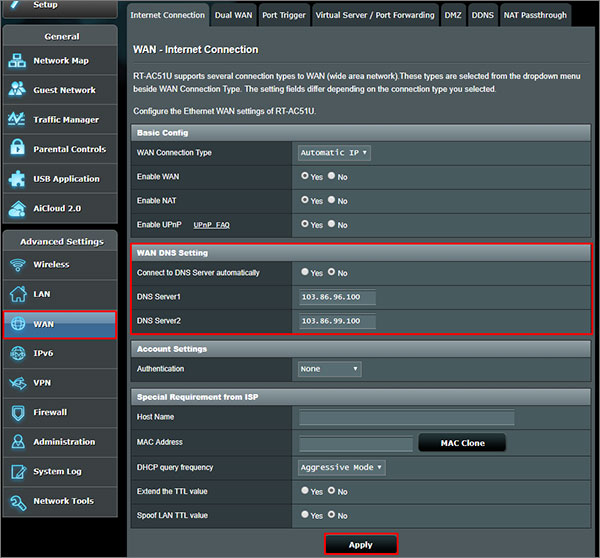
- Click on the WAN tab and choose No for the section that says ‘’Connect to DNS Server automatically’’. Enter the following addresses and then hit apply:
- DNS Server 1: 103.86.96.100
- DNS Server 2: 103.86. 99.100
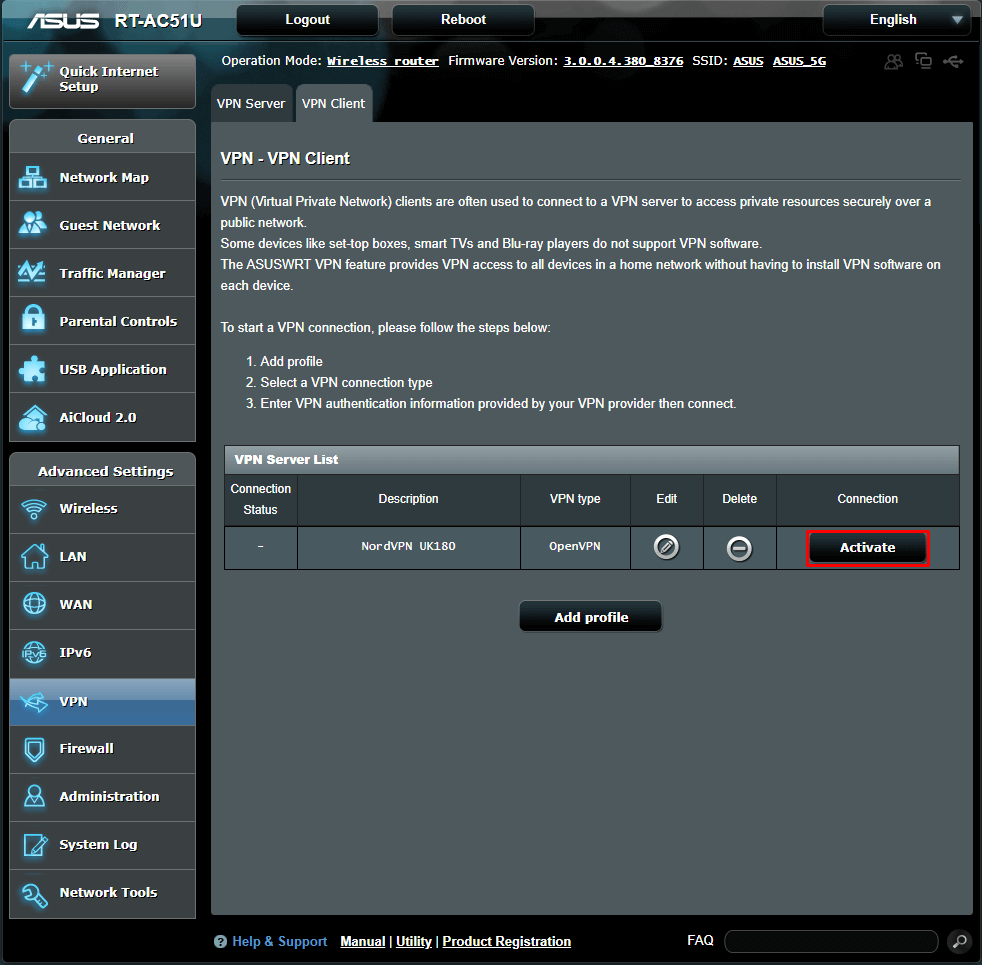
- Lastly, head back to the VPN Client tab, find your newly added profile, and hit ‘’Activate’’.

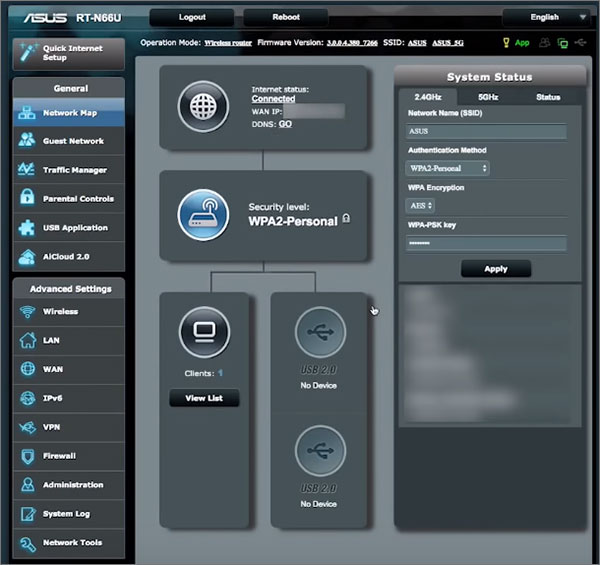
Assuming you have completed everything correctly, you should see a blue checkmark.
It should be similar to the screen below, which confirms you have successfully set up NordVPN on your Asus router.

How Do I Install NordVPN On My Netgear Router?

Netgear routers are the next best option to an Asus router. Unfortunately, they don’t support OpenVPN, which means relying on DD-WRT firmware to get connected. You can check which Netgear routers support DD-WRT here.
Before we get started, you will need to flash your Netgear router with the DD-WRT firmware.
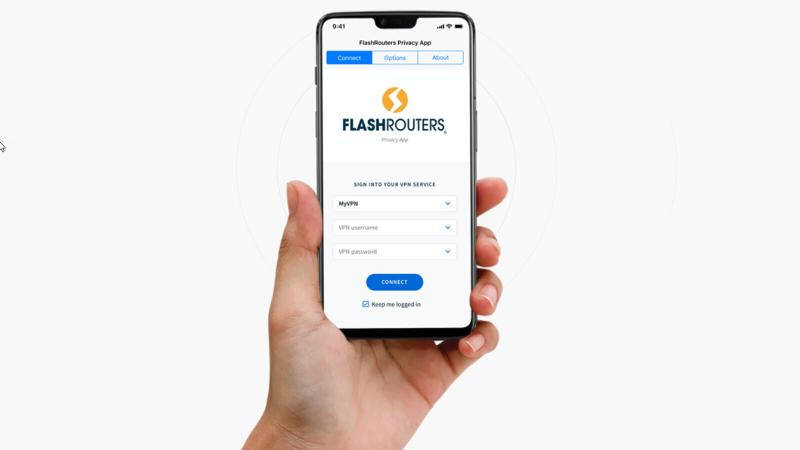
The simplest method of installing NordVPN on your Netgear router is using the FlashRouters Privacy App.
The following is a list of supported Netgear routers which will allow you to use the FlashRouters method:
- Asus RT-AC5300
- Asus RT-AC56U
- Asus RT-AC66U
- Asus RT-AC68U
- Linksys WRT1200AC
- Linksys WRT1900AC
- Linksys WRT1900ACv2
- Linksys WRT1900ACS
- Linksys WRT3200ACM
- Linksys WRT32X
- Netgear R6300v2
- Netgear R6400v2
- Netgear R7000
- Netgear R7800
- Netgear R8000
- Netgear R8500
- Netgear R9000
To install the FlashRouters Privacy app, please follow these steps:
- Connect your router to the internet. Log in to your DD-WRT admin panel via your device IP address and navigate to Administration > Commands within your DD-WRT settings.
- Paste the following command: curl –silent –retry 3 https://api.flashroutersapp.com/api/v1.0/ddwrt/group/privacy/provider/NordVPN/install | sh and then select ‘Run Command.’
- A prompt should appear saying ‘’Installation Successful’’.
- You can access the Flashrouters Privacy app while you’re still logged in to the DD-WRT admin area by heading to status>my page.
Login to NordVPN using the following steps:
- Head to the connect page of the Flashrouters Privacy app.
- Next, enter your NordVPN login credentials. These will typically be the email you registered with and the password you set up.
Choose a NordVPN server by completing the following:
- Select your preferred NordVPN server from the list of available servers.

- You can filter the available servers to find the least loaded server closest to you, and once selected, hit connect to get connected to NordVPN.
- A prompt should appear to show you are connected.

- You can verify NordVPN is working correctly by heading to the NordVPN website. You should see a message in the page header stating your IP address and the word ‘’Protected’’.
Routers Not Compatible With NordVPN
If you wish to install NordVPN on a router, you will need to check it is compatible. As a general rule, any router that uses PPTP or L2TP/IPsec is no longer supported for NordVPN use as of 2018.
The following routers using their out of the box firmware are not supported for a direct install of nordVPN:
- Arris
- Belkin
- Cisco
- D-Link
- Huawei
- Linksys (except WRT32X/WRT32XB AC3200)
- Netgear
- TP-Link
- TRENDnet
- Tenda
- TotoLink
- Ubee
Please note:
Aside from the above router brands, it is also not possible to install NordVPN on most routers provided by your ISP.
For a complete list of routers recommended to install NordVPN, please check out this article.
What to Do if NordVPN Router Is Not Connecting?
If you have successfully set up NordVPN on a router, but it’s not connecting, this could be down to a few different issues.
Please try the following steps to see if this resolves your problem in the first instance.

Check Your Router Status
Although very basic, users often miss the fact that their router status lights show connectivity problems.
They assume NordVPN is the cause.
If you are unable to connect, check for any router status lights that are unilluminated or amber.
This may indicate an issue with your internet connection.
Reset Your Router
If you are confident you have installed NordVPN or have connected before, it’s worth powering down your router.
Wait at least 2 minutes before turning it back on.
This will not clear your NordVPN settings but will refresh your router’s configuration to overcome any router errors you might not be aware of.
Update Your Router Firmware
Assuming your router is among the compatible models to use with NordVPN, it may be worthwhile checking for any firmware updates.
If you are running an older version, try updating the router firmware and test your connection again.
This may require you to re-configure/install nordVPN to align with the new firmware.
If you are still having problems connecting, I’d recommend contacting NordVPN support. Or, check with your router manufacturer to see if they can offer further advice.
Tips for Using Your VPN Router
Once you’re up and running with your NordVPN router setup, there are a few tricks to help make the most of your new config.
I’d recommend the following to make things a little easier, especially for those times when you need to adjust settings or to get the best performance.
Save Your Router Config Page in Your Bookmarks
There may be times when you need to change a VPN setting on your router. To make this easier, I’d recommend bookmarking the page instead of having to find and type your router IP address manually.
Double Coverage Can Impact Stability and Performance
There may be occasions where you forget that internet traffic going through your router is encrypted with NordVPN.
As a result, you enable the VPN app on your PC, which is known as double coverage.
Essentially this means you have two instances of nordVPN running. This can impact the speeds and stability of your connection. To avoid this happening, it is advisable to remove the VPN app from your device if you are using NordVPN on a router.
Add Another Router to Your Setup
At times you may wish to connect to the web without VPN encryption. To make this possible, you could set up a second router at home. One router would have NordVPN installed while the other uses a direct internet connection.
FAQ
Can I Install NordVPN on My Virgin Router?
No, you cannot install NordVPN on a Virgin Media router such as a Hub 3. As discussed in this Virgin Media Community post, the routers provided by Virgin Media are modems. That means they do not allow the installation of third-party applications like NordVPN.
A Virgin router merely provides an internet connection, so to use NordVPN and encrypt the traffic over your connection, you would need to install NordVPN on a compatible router, or install the NordVPN app directly on your device (smartphone, tablet, computer, etc.).
Conclusion
Installing NordVPN on a router is straightforward if you have an Asus device.
The process is lengthier with devices that need firmware flashing and extra setup steps.
Routers with OpenVPN built-in are straightforward to set up with NordVPN.
The benefit of installing NordVPN on a router instead of using an app allows all internet traffic going through the router to be encrypted.
Your ISP, local authorities, and more will be unable to track your VPN activity using NordVPN. You can take back your privacy with confidence, knowing NordVPN does not log your online activity.
Setting up NordVPN on a router is more complex than it is on a phone or PC. Routers need manual configuration, while other devices simply require you to download and install the app. Still, you can do the router setup on your own in a few steps.
I’ve put together a comprehensive step-by-step guide on how to install NordVPN on different routers. I’ve covered the setup for ASUS, DD-WRT, and OpenWRT routers, but the process is more or less similar on other brands (if you have a Netgear router, just bear in mind that you’ll need to install DD-WRT firmware before you can configure NordVPN).
While it takes a little more effort to set up NordVPN on a router, it’s worth it. It means you can protect as many devices as you want — including those that aren’t usually compatible with VPNs — just by connecting them to your router. You also get access to the VPN’s huge server network for unblocking content on any device on your home network. Plus, trying out NordVPN is free because it has a 30-day money-back guarantee.
Get NordVPN for Your Router Now
Important note: Flashing your router can cause permanent damage (bricking) if not carried out correctly. If you need to install additional firmware to make your router compatible with NordVPN, always follow an in-depth guide or ask a professional to do it for you.
Quick Guide: How to Set Up NordVPN on a Router in 3 Easy Steps
- Download the VPN. If you don’t have a subscription yet, you can try NordVPN risk-free, thanks to the 30-day money-back guarantee. Get the NordVPN router app or configuration settings from the official website.
- Set up your router. Sign in to your router control panel and enter the server settings.
- Connect devices to your router. Test your connection via a service like ipleak.net. If your IP address is hidden, you can now use NordVPN to safely access the internet and unblock geo-restricted services from any device connected to your home network.
Which Routers Support NordVPN?
| Brand | Models |
| ASUS | RT-AX86U, RT-AX88U (AX 6000, AC3100), RT AC-5300, RT-AC66U B1, RT-AC68U, RT-AC86U, RT-AC87U, RT-AC3200, RT-AX3000, RT-N18U, ASUS WRT Merlin |
| D-Link (needs flashing with DD-WRT) | DIR-885L, DIR-895L |
| Linksys (needs flashing with DD-WRT) | EA8500, WRT1900ACS, WRT3200ACM |
| Netgear (needs flashing with DD-WRT) | R6400, R7500, R7800, R8500, R9000 |
| Other Brands | GL.iNet, MikroTik, Netduma, OPNsense, Padavan, Sabai, pfSense (OpenVPN only), DrayTek Vigor, EdgeRouter and Ubiquiti, TP-Link |
NordVPN mainly works with routers that support the OpenVPN protocol. Several router models offer this feature, but most ISP routers don’t because they prefer the BGP protocol. Netgear routers also don’t have built-in OpenVPN. If your router doesn’t support OpenVPN, you can configure it with NordVPN by flashing your router with DD-WRT firmware first. Any router with Merlin, Tomato, and OpenWRT firmware can also be installed with NordVPN.
You can find out whether your router supports VPNs by logging in to your account and looking for VPN Settings (or something close to that) in the menu.
How to Set Up NordVPN on Your Router
The NordVPN setup process varies slightly depending on your router manufacturer or model. I’ve covered all the steps here but NordVPN also provides 24/7 live chat support if you need assistance at any stage.
Regardless of your router device, there are basic preparations to do before setting up. Have the following information ready:
Router IP address: This can be found at the back or bottom of your device. It should look something like this: 198.162.1.1.
Router credentials: The default username and password are sometimes shown next to the IP address information. You can use this if you haven’t changed the login information before.
NordVPN subscription: Have your VPN sign-in information ready. If you don’t have an account yet, you can use the 30-day money-back guarantee to try NordVPN for free.
Server and protocol configuration settings: Get the recommended OpenVPN settings for any server/location you want to connect to from the NordVPN server utility page.
1. How to Set up NordVPN on an ASUS Router
ASUS routers are preferred for NordVPN because of the built-in OpenVPN client. It makes the setup process seamless on any model. Here are the steps to follow:
- Open a browser on your device and enter the router IP address on the URL bar (press the “Enter” key to access). It’s a good idea to bookmark the router config page for easy adjustment later.
- Provide your router credentials on the prompt asking you to log in (your admin password can usually be found on a sticker on your router).
- Scroll down and click the VPN section, then go to VPN Client and Add Profile.
- Click OpenVPN and fill in the following required information:
Description: Give a name for your connection (NordVPN + [the name of your chosen server country] makes it easy to locate).
Username: Enter your NordVPN username.
Password: Enter your NordVPN password.
(Don’t close this window yet. We’re still going to import NordVPN OpenVPN configuration settings here.)
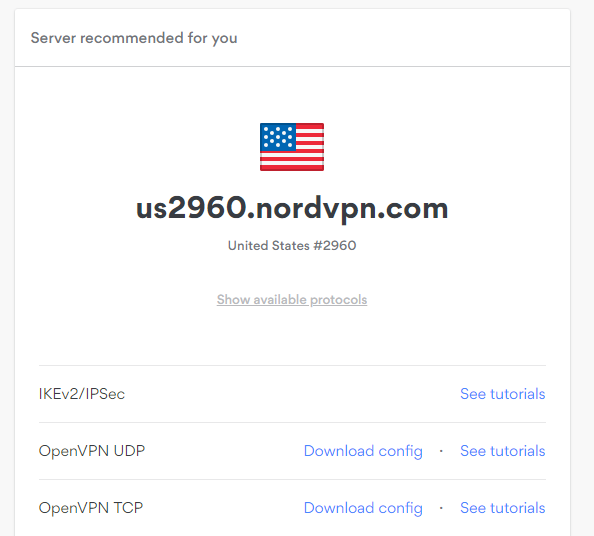
- Open the NordVPN server utility page (mentioned in our preparations above) in a new tab.
- Enable Auto-reconnection if you want the VPN to automatically restart in the event of a dropout.
- Choose your preferred server location.
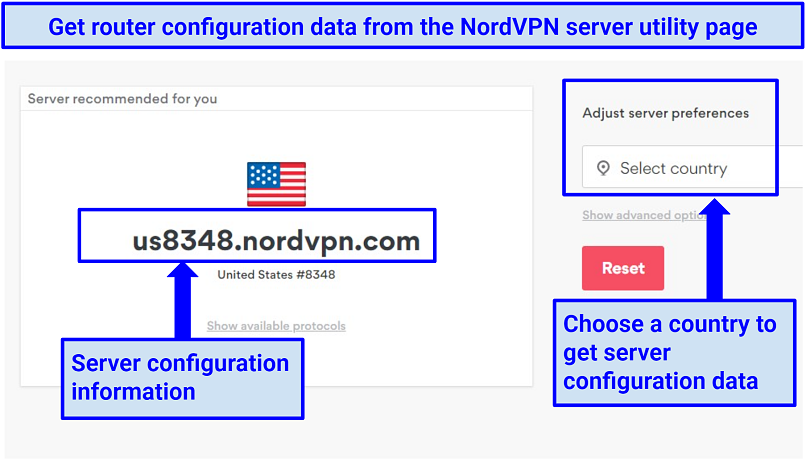 Use a recommended server or pick any location to set up your router
- Copy the server information and click show protocols.
- Download the OpenVPN config (TCP or UDP) files in a safe location.
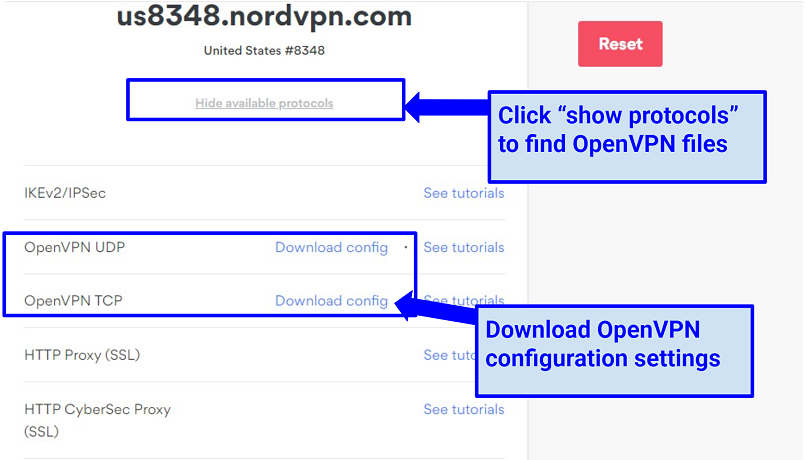 OpenVPN is the right protocol for router setup
- Return to the ASUS control panel page and click Choose file.
- Find the file you downloaded (it has a.ovpn extension) and click
- Upload the file.
- Click OK to complete the configuration (don’t check the box next to Import the CA or edit the.ovpn file manually).
- On the VPN Client window, click Activate to enable the NordVPN profile you’ve created (a blue tick on the left indicates your connection status). You can also deactivate the NordVPN connection here.
Use NordVPN on Your Router Now
2. How to Set Up NordVPN on a DD-WRT Router
DD-WRT firmware supports the OpenVPN protocol, so you can set up NordVPN if you have a DD-WRT router. Here’s how:
- Connect your laptop to the DD-WRT router via WiFi or LAN cable.
- Enter your router IP in the browser address bar and log in to the control panel.
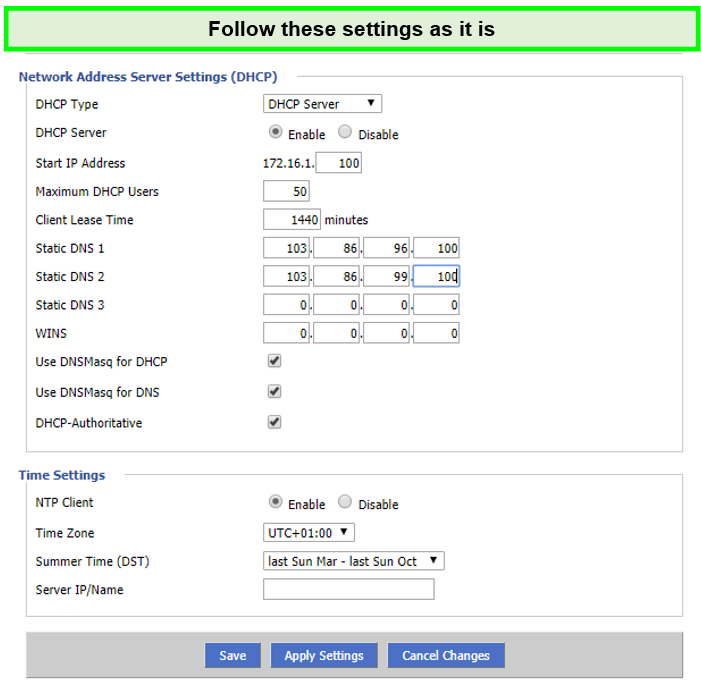
- Go to Setup > Basic Setup, then Network Address Server Settings (DHCP).
- Enter the following:
Static DNS 1: 103.86.96.100
Static DNS 2: 103.86.99.100
Static DNS 3: 0.0.0.0 (default)
UseDNSMasqforDHCP: (check the box)
UseDNSMasqforDNS: (check the box)
DHCPAuthoritative: (check the box)
- Click Save, then Apply settings.
Before proceeding any further, let’s disable IPv6 connections on the router (this prevents your real IP address from being leaked while using the VPN).
- In the Setup section, click IPv6, then check the Disable
- Save and Apply Settings
Next, we can configure the router’s OpenVPN client with NordVPN settings.
- On the Setup window, click Service > VPN.
- Scroll down to OpenVPN Client and enable the Start OpenVPN Client
The other configuration settings are:
- Server IP/Name: Enter the information you got from the NordVPN server configuration page. For example, mine is nordvpn.com
- Port: 1194 or 443
- Tunnel Device: TUN
- Tunnel Protocol: UDP (or TCP)
- Encryption Cipher: AES-256-CBC
- Hash Algorithm: SHA-512
- User Pass Authentication: Enable
- Username, Password: Your NordVPN account info
- First Data Cipher: Not set
- Second Data Cipher: Not set
- Third Data Cipher: Not set
- User Pass Authentication: Enable
- TLS Cipher: None
- LZO Compression: None
- NAT: Enable
In the Additional Config section, copy and paste this information:
remote-cert-tls server
remote-random
nobind
tun-mtu 1500
tun-mtu-extra 32
mssfix 1450
persist-key
persist-tun
ping-timer-rem
reneg-sec 0
#log /tmp/vpn.log
We are now going to use the config file you downloaded from the NordVPN utility server page (in the preparation stages).
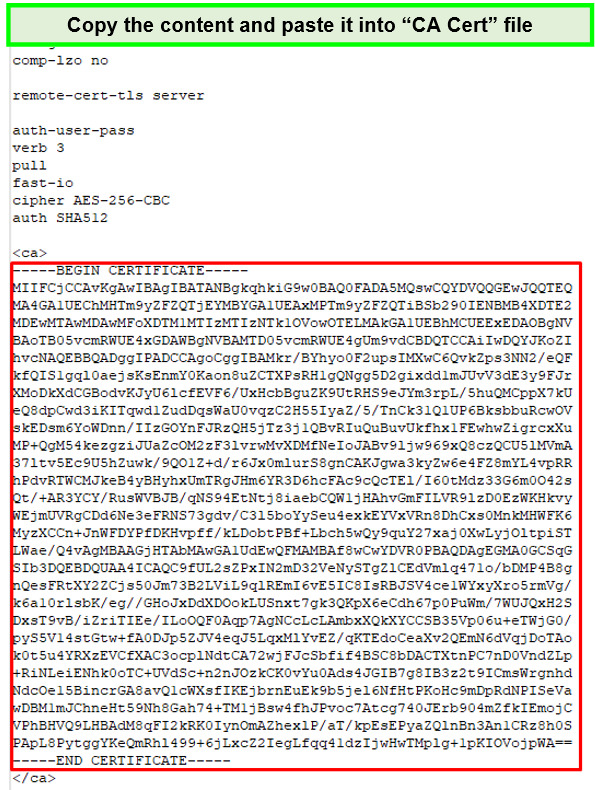
- Find the.ovpn file and open it with a text editor application like Wordpad or Notepad++.
- Copy all the text enclosed in tags (highlighted in blue below).
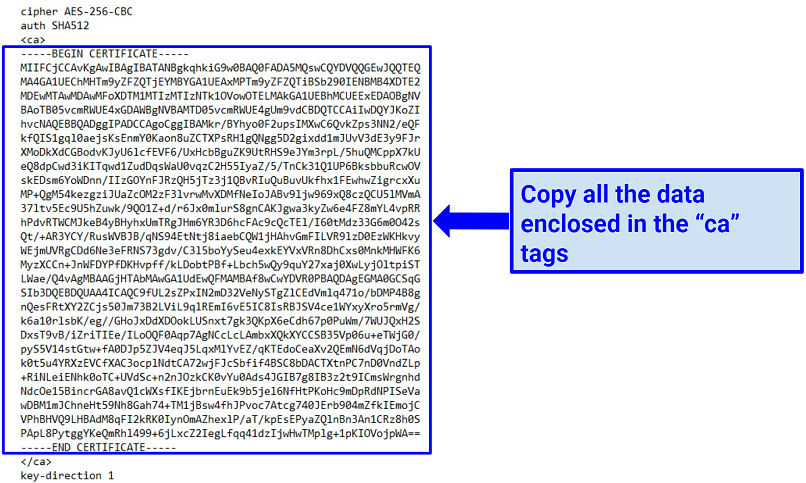 The “ca” tag section contains NordVPN root configuration data and must be accurately copied
- Paste the data into the CA Cert box of the ASUS OpenVPN client section.
- Return to the configuration file and copy the TLS Key content after the tag (highlighted below).
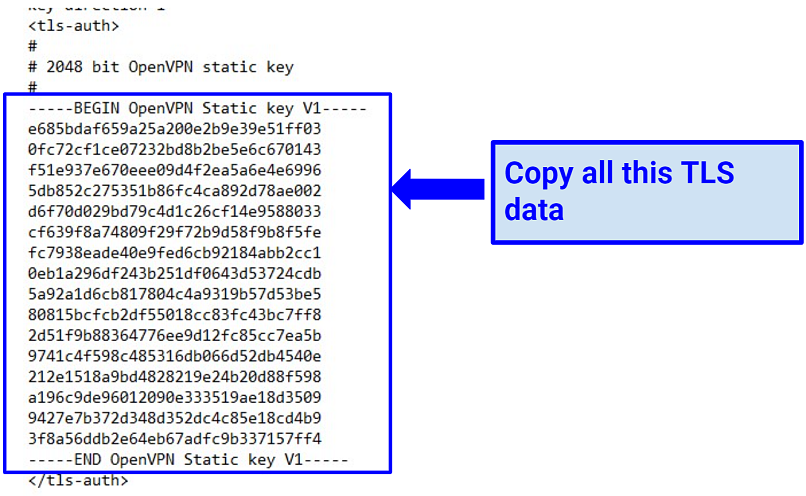 The TLS data contain authentication keys used for encryption
- Paste the information in the TLS Auth Key
- Click Save and Apply Settings.
To check if the VPN is working (on the administrative panel), go to Status > OpenVPN > State. It should show Client: CONNECTED SUCCESS.
Get a NordVPN Router Setup
3. How to Set Up NordVPN on an OpenWRT Router
Alongside the OpenWRT firmware, your router should be installed with the OpenVPN client (I’ll show you how to do this in the guide).
With that said, the OpenWRT configuration goes like this:
- Connect to the OpenWRT router WiFi on your PC or another device.
- Access your router’s command line by entering the default LAN IP address 192.168.1.1 in your browser.
- Enter root as the default password (if you’ve never changed the default settings) with the command passwd.
- You’ll be logged into a remote SSH command line.
- Install OpenVPN by entering (copy/pasting) the following command:
opkg update
opkg install openvpn-openssl
opkg install ip-full
- We can make the OpenVPN protocol launch automatically each time the router starts by using this command:
/etc/init.d/openvpn enable
- Next, find the server configuration file you downloaded from the NordVPN server utility (during the preparations). For example, mine is nordvpn.com
- Go back to the SSH command line and copy/paste the following information. However, modify the section after /servers/ by entering the server address you stored. It should look something like this:
wget -P /etc/openvpn https://downloads.nordcdn.com/configs/files/ovpn_udp/servers/us6778.nordvpn.com.udp.ovpn
The above instruction will download the OpenVPN configuration file into the directory /etc/openvpn.
Often, OpenVPN configuration requires a password wherever you use the OpenVPN connection. We can change that.
- First, use this command to install nano text editor:
opkg install nano
- Next, we can open the downloaded configuration file using the nano text editor by entering the command:
nano /etc/openvpn/us6778.nordvpn.com.udp.ovpn
- Look for the string auth-user-pass and append the word secret next to it. The string should look something like this:
auth-user-pass secret
- Save all these changes by pressing CTRL+X, Y, and Enter.
- We must also create a corresponding file named “secret” by running this command:
nano /etc/openvpn/secret
- Nano text editor will automatically open this file. You should then enter your NordVPN login credentials — username in the first line and password in the second. Save this information by pressing CTRL+X, Y, and
Next, we can do the OpenVPN client configuration process.
- Find the server configuration file you downloaded from the NordVPN server utility (during the preparations). Change its extension from .ovpn to .conf so OpenVPN can easily locate it.
Alternatively, you can use this mv command:
mv /etc/openvpn/us6778.nordvpn.com.udp.ovpn
/etc/openvpn/us6778.nordvpn.com.udp.conf
- We can specify this file in /etc/config/openvpn Copy/paste this UCI command:
uci set openvpn.nordvpn=openvpn
uci set openvpn.nordvpn.enabled=’1′
uci set openvpn.nordvpn.config=’/etc/openvpn/us6778.nordvpn.com.udp.ovpn’
uci commit openvpn
Also append the below string command to the /etc/config/openvpn directory file:
config openvpn ‘nordvpn’
option enabled ‘1’
option config ‘/etc/openvpn/us6778.nordvpn.com.udp.ovpn’
- Let’s also create a network interface. Copy-paste the following lines:
uci set network.nordvpntun=interface
uci set network.nordvpntun.proto=’none’
uci set network.nordvpntun.ifname=’tun0′
uci commit network
- Append the following strings command to the /etc/config/network file:
config interface ‘nordvpntun’
option proto ‘none’
option ifname ‘tun0’
- We can then create a firewall zone to forward LAN traffic to the VPN. Use this command:
lan
- Next, configure the router to use NordVPN DNS servers. Add them using this command:
uci set network.wan.peerdns=’0′
uci del network.wan.dns
uci add_list network.wan.dns=’103.86.96.100′
uci add_list network.wan.dns=’103.86.99.100′
uci commit
- In the file /etc/config/network, the following strings should be included in the Wan section:
config interface ‘wan’
<…>
option peerdns ‘0’
list dns ‘103.86.96.100’
list dns ‘103.86.99.100’
- Finally save these entries using CTRL+X, Y, and Enter.
Confirm if the setup is working by checking your protection status on the NordVPN homepage. You should see Protected on the top bar (before the menu bar).
Try NordVPN on Your Router
FAQs on Setting Up NordVPN with a Router
Why should I install NordVPN on my router?
It encrypts your WiFi and protects all your connected devices from cyber threats. That means hackers can’t steal your data or read your communications from your home or office network. NordVPN’s AES 256-bit encryption and secure protocols scramble your traffic, providing security and privacy for browsing.
Installing NordVPN on your router also gives you unlimited connections and lets you use the service with devices that don’t usually support VPNs (like Apple TV, Nvidia Shield, and Xbox consoles). That way, you can make the most of NordVPN’s security and unblocking features on any device connected to your WiFi. Plus, the VPN can add a layer of privacy for IoT and smart home devices on your network, like security cameras and smart speakers.
Which routers aren’t compatible with NordVPN?
Any router that doesn’t support the OpenVPN protocol won’t work with NordVPN. The service no longer accepts L2TP/IPsec and PPTP connections, meaning you can’t set it up on most ISP-issued routers (like a Virgin router). Still, there are a good number of router brands and firmware compatible with NordVPN that you can use.
Here are some of the routers you can’t set up with NordVPN (unless you flash them with custom firmware):
- Arris
- Belkin
- Cisco
- D-Link
- Huawei
- Netgear
- TRENDnet
- Tenda
- Linksys (except WRT32X and WRT32XB AC3200)
- TotoLink
- Ubee
What should I do if NordVPN is not working with my router?
You can try flashing your router with custom firmware if it isn’t compatible with NordVPN. Some of the supported firmware are Merlin, Tomato, and Padavan. That said, the process is complex and should only be done by an expert to avoid bricking your router. Alternatively, you can get a NordVPN-compatible router and do an easy manual configuration.
If you already have a NordVPN-compatible router but it’s still not working with the VPN, here are some other solutions you can try:
- Check your internet connection — You may be experiencing a general outage, rather than a VPN issue. Check your connection with your ISP.
- Check your hardware and software — Inspect your LAN cable for any loose connections. Install any important updates you’re missing and restart the router to refresh the system. Always leave your router at least 2 minutes before switching it back on again.
- Switch servers — You may have encountered a NordVPN server that’s down for maintenance or blacklisted (especially if you find you can’t unblock content with your router setup). Choose a different server configuration file during setup to switch to another VPN location.
- Check for double coverage — If you enable NordVPN on your router and then enable it on your device, you’ll get double coverage. Routing your traffic through the VPN twice can cause connectivity issues and slowdowns, so always disable the app on any device connected to your router.
Does NordVPN support OpenVPN?
NordVPN only works on routers with the OpenVPN client. Other protocols like PPTP and L2TP/IPsec aren’t supported. It’s easy to set up NordVPN on any router with a built-in OpenVPN protocol, like ASUS.
Some mesh routers work with OpenVPN, but models that only have “pass-through” support won’t work. You can check if your router supports OpenVPN in its accompanying manual. If your router firmware doesn’t support OpenVPN, you can download and install systems (like DD-WRT) that allow you to configure NordVPN manually.
Are there routers with NordVPN built in?
Yes, some flash routers are pre-configured or pre-installed with NordVPN. You don’t have to do manual configuration after buying, just a few optimization settings. You don’t need one though, most routers have a simple setup process, so you can do almost everything on your own.
How can I use NordVPN on a Netgear Nighthawk router?
You can install NordVPN on a Netgear router using DD-WRT firmware. Most Netgear routers don’t have this firmware, requiring you to flash before setting up NordVPN. If that’s too technical, get a router that’s compatible with NordVPN instead. ASUS models are recommended because the built-in OpenVPN client makes the process easier.
Can I set up a free VPN on a router?
It’s not recommended. Most free VPNs aren’t reliable because of their weak security and usage restrictions. They can’t protect you from cyber threats such as hacking and usually aren’t strong or fast enough to unblock any content. Instead, configure your router with a low-cost premium VPN that’s safe and doesn’t limit your usage — like NordVPN. That way, you get a reliable, secure connection that doesn’t put your online privacy at risk.
Some free VPNs can also deliberately violate your privacy by collecting sensitive data, such as browser searches, and selling it to third parties for a profit. Worse, others hide malware or spyware in their downloads to steal your information.
Get NordVPN on Your Router Now
Configuring NordVPN on a majority of routers is a matter of just a few minutes. After you’ve adeptly set up the VPN on your router, every device linked to your WiFi will have protection from online threats.
NordVPN is great for router devices because of its robust encryption and fast speeds. It runs many global servers, allowing you to configure your router for unblocking geo-restricted services. Plus, there are reps on standby if you need any help with setting up. You can also try NordVPN for free, thanks to its 30-day money-back guarantee. If you find it’s not right for your router, just get a refund.
Privacy Alert!
Your data is exposed to the websites you visit!
The information above can be used to track you, target you for ads, and monitor what you do online.
VPNs can help you hide this information from websites so that you are protected at all times. We recommend ExpressVPN — the #1 VPN out of over 350 providers we’ve tested. It has military-grade encryption and privacy features that will ensure your digital security, plus — it’s currently offering 49% off.
Visit ExpressVPN
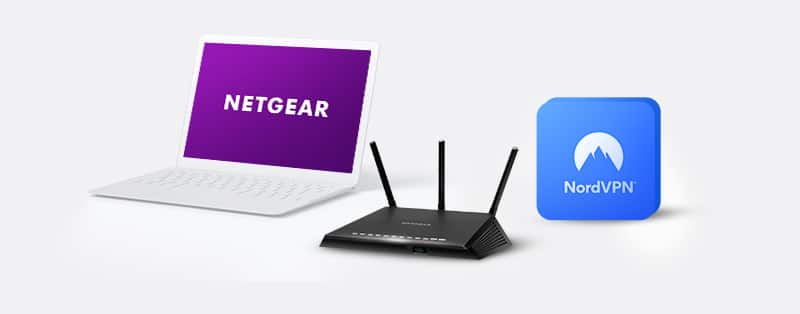
Netgear is the award-winning wireless home router and one of the fastest on the block too. As usual, to get the most out of this router, pairing it with a VPN is a wise move. You can effectively protect all your devices connected to the Netgear router by using it with a VPN.
NordVPN is one of the most secure, fastest, and privately-run VPN of our time. With a VPN, you create a secure virtual connection to the Internet.
To connect Netgear to NordVPN, you first need to set up a NordVPN account. These are the steps required to set up and install NordVPN.
How to Set Up a NordVPN Account
NordVPN is a paid subscription. However, subscription plans are relatively inexpensive.
First: Visit the official NordVPN site to register your account. In the overhead banner, click on the Pricing option to check out the various plans available. The less expensive the plan, the more you pay per month.
The most expensive plan is the premium plan at $11.95 per month, while the most affordable is the basic plan at $3.71 per month. We recommend buying an extended warranty if you can afford it.
Next: Select your membership plan and choose your preferred payment method. You can choose to pay via anonymous payment methods like credit cards or cryptocurrency.
Lastly: Check your account for an invoiced payment. Click the link to activate your NordVPN subscription.
Get NordVPN for Netgear Router
Setting Up NordVPN on Netgear Router
Many routers don’t have built-in VPN support features. For a router like Netgear to be compatible with VPNs, you can replace its firmware with one that works with VPN-supporting firmware. Installing the DD-WRT firmware on your router is one of the best ways to do this.
DD-WRT firmware on your Netgear router helps you connect as many devices as you want on the router. Also, it enables you to connect devices that are not usually compatible with VPNs to your NordVPN account.
To begin, first, install the DD-WRT firmware using this guide. After completing the installation process and have completed the configuration, continue with the following steps:
Step 1: Click on “Setup,” then “Basic Setup” on the installation page. Input the following NordVPN addresses listed below into the Network server settings (you can find it below the DHCP settings.)
Static DNS 1 as 103.86.96.100
Static DNS 2 as 103.86.99.100
Static DNS 3 as 0.0.0.0 (default)
Select [mark] for “Use DNSMasq for DNS.”
Select [mark] for “Use DNSMasq for DHCP.”
Select [mark] for “DHCP-Authoritative.”
Once you’re done, click ‘Save’ to finish your application, then ‘Apply’ to apply it to all listed addresses.
Step 2: Head to Setup, then IPv6. Disable IPv6 and apply the changes. This will keep IP leaks to the minimum.
Step 3: Click Services >> VPN. Open “OpenVPN client.” Enter the code below:
Server IP/Name is: Connect to us936.nordvpn.com or connect to the suggested server. Select “Show available protocols” and then choose either UDP or TCP.
For Port use “1194”. (To switch to TCP protocol, use 443)
For “tunnel device,” use “TUN”
For “tunnel protocol,” use “UDP” or “TCP”
For “Hash Algorithm,” use “SHA-512”
For “Cipher Encryption,” use “AES-265-CBC”
For “User Pass Authentication,” press “Enable”
> To log into NordVPN, enter your NordVPN credentials (email and password)
To access “Advanced Options” press “Enable” to enable extra functions.
For “LZO Compression,” choose “Disable”
For “TLS Cipher,” choose “None”
For “Nat,” choose “Enable”
Step 4: To insert additional configurations, copy and paste the following commands into the provided box:
remote-cert-tls server
remote-random
nobind
tun-mtu 1500
tun-mtu-extra 32
mssfix 1450
persist-key
persist-tun
ping-timer-rem
reneg-sec 0
#log /tmp/vpn.log
#auth-user-pass /tmp/openvpncl/user.conf
Step 5: This step requires that you open the downloaded configuration file in text editing software. For this purpose, we recommend using Notepad++; the most effective editor for this purpose.
Step 6: On the .ovpn server, there are two parts of the file. Do not copy the <ca> part.
Step 7: Copy the remaining text and paste it on “CA Cert.”
Step 8: Select the data configuration file and check for the part titled “tls-auth”. Copy all the TLS Key content.
Step 9: Paste the entire content into the “TLS Auth Key” box. It should start with “Begin OpenVPN Static Key V1” and end with “End OpenVPN Static Key V1”.
Step 10: After you have made all the inputs, tap “Save” and “Apply” to save the configuration.
Step 11: If you are not sure whether your VPN is connected or not, tap the “OpenVPN” option to reveal the VPN configuration status. If it’s connected, you would see a “Client: connected success” message.
Step 12: To turn on the Kill Switch, head to the Administration tab and select Commands. Input the following commands:
WAN_IF=`nvram get wan_iface`
iptables -I FORWARD -i br0 -o $WAN_IF -j REJECT –reject-with icmp-host-prohibited
iptables -I FORWARD -i br0 -p tcp -o $WAN_IF -j REJECT –reject-with tcp-reset
iptables -I FORWARD -i br0 -p udp -o $WAN_IF -j REJECT –reject-with udp-reset
Once this step is done, click “Save Firewall” > “Management” > “Reboot Router”
Why Use NordVPN for Your Netgear Router?
NordVPN is one of the top-rated VPNs on the market for good reason.
It is second only to ExpressVPN on the market and has been in a constant tussle with ExpressVPN for the top spot for many years. Dedicated users have tested this VPN and proven it to be as high-end as it claims.
Choosing NordVPN to run with your Netgear router shows that you’re ready to enjoy the best of both worlds on the internet space; privacy and speed. Many users who have tried this combo have given a litany of why they think NordVPN and Netgear make a good match.
Check out a few of the reasons why you should choose NordVPN for your Netgear router below:
1. Online freedom: Internet users who enjoy streaming and downloading content should choose NordVPN. Its services allow you to bypass any restrictions on any device from anywhere in the world.
2. Fully private experience: It’s a private alternative, secure and free from the scrutiny of government, hackers, and even the VPN provider. They maintain strict no-logs policies and use advanced DNS leak protection to protect your identity and privacy on the web.
3. Military-grade encryption: NordVPN safeguards all your web-based activities by implementing a strong encryption algorithm (AES 256). Similarly, if your VPN connection drops, its Kill Switch feature automatically shuts off your computer from the internet, which is great. With NordVPN, you are secure no matter where you are online.
4. Fast internet experience: You can maximize your Internet connection with NordVPN. This means you can stream or download or upload on the internet at an unimaginable speed. With your Netgear router, it’s swift web-surfing all day, every day.
5. Easy to use: The simplicity of NordVPN helps you navigate the VPN site seamlessly. The program predicts your needs and has features that help you find what you need when you need it so that you don’t get frustrated on the network. This gives you the best VPN experience you can imagine.
6. Cost-effective: NordVPN comes at a reasonable price and provides savings of up to 70% when you subscribe to its 3-year plan. Plans often come with a 30-day free guarantee period. With this, you can see whether you like the services they offer and cancel your subscription for a full refund within this period if you don’t.
7. Almost no logs: NordVPN takes its no-log policy seriously and avoids unnecessarily logging user data. It’s Panama-based, so it’s not under any governmental obligation to keep track of your activities online. The only information NordVPN keeps is your email address, payment details, and previous session time.
Get NordVPN for Netgear Router
How to Replace Firmware on a Netgear Router
If you want to connect to a remote server via a Virtual Private Network (VPN), your router must be firmware updated. Flashing a router can be time-consuming and can destroy your router if you don’t do it properly. These are the steps you should follow:
1. Get the built-in VPN firmware for the Netgear router you own. We suggest using a DD-WRT or Tomato-based device.
2. Open any web browser and search for Router Login
3. Enter your user account information to access the router’s administrative settings (Netgear Genie). By default, an administrator’s username is administrator, and an administrator’s password is password. If these are not correct, you must change the credentials presented.
4. Click on Advanced, then select Administration, and go to Router Update.
5. Navigate back to the firmware that you initially downloaded from Step 1 of our Set-Up guide.
6. Select Upload to flash the router.
7. Finally, reboot the router.
With the new software, you can connect to a server through a VPN.
Frequently Asked Questions on How to SetUp NordVPN on Netgear Router
Does Netgear support VPN services?
Yes, you can convert your Netgear router to a VPN. It then allows you to access the internet through your home network. So, suppose an internet service is available in your home location but unavailable in a foreign place. With your Netgear VPN service, you can access this geo-blocked material. Essentially, your Netgear router serves as the VPN server. However, you cannot connect to or unblock online content in other locations. This is why you need NordVPN.
Are Netgear Routers safe without VPNs?
Yes, Netgear routers have a significant level of security. The company consistently notices security flaws and patches them. Unfortunately, however, hackers and other cybercriminals can still exploit these security flaws. If this happens, the devices connected over the Netgear network will face a significant security risk. With NordVPN, though, you don’t have to experience these issues. Instead, your Netgear router and connected devices will be protected by NordVPN’s AES 256-bit encryption. This encryption level effectively keeps cybercriminals and data snoops away.
How many Netgear Router connections can I protect with NordVPN?
Netgear routers can support several client devices. For example, Netgear routers can support 32 to 100 devices depending on the router’s type. Fortunately, a NordVPN connection will encrypt all the devices connected to one router. NordVPN also offers six simultaneous connections. However, one router with all the connected devices counts as one connection on NordVPN. So, you can connect five other devices, including Netgear routers. Overburdening the network can cause slower browsing, though.
Should I use a free VPN for my Netgear Router?
No, it’ll be best never to use a free VPN for your Netgear router. Suppose you find a compatible free VPN; such a VPN may have other issues such as poor security. For example, many free VPNs don’t encrypt users’ networks. Therefore, the devices connected to your router will be at risk of cyber invasions. The VPN may also store and sell your connection logs to unscrupulous third parties. Worse still, many free VPNs have data and bandwidth caps that will limit your browsing capacities.
Conclusion
Summarily, using NordVPN on your router will save you time setting up Virtual Private Networks on your other devices.
The steps we have listed to help you set up NordVPN on your Netgear router are straightforward if you follow the instructions. Don’t hesitate; follow the above steps strictly, and you are ready to go.
NordVPN allows you to connect up to six devices simultaneously to its service. But if you set up a compatible router to use a VPN connection, then any device that connects to the internet through your router will be using the encrypted connection – no matter how many you have.
It also means devices that don’t support VPNs (such as games consoles, or media streamers such as the Apple TV) can get the benefits of unblocking, and all devices – such as smart speakers, security cameras and other smart home gadgets – get that extra layer of security and privacy.
Not all routers support VPN connections, so you’ll need to check first if your does. You can either check with the manufacturer – often your internet service provider – or simply
log into the router itself and have a look through the menus for VPN settings.
However, even if it does support VPN connections, NordVPN no longer supports L2TP/IPsec and PPTP connections, so if your router only supports those protocols, you’re out of luck. Instead, you’re looking for OpenVPN support.
Specifically, it needs to support OpenVPN as a client (rather than a server, though if server support is present, that’s ok). The best way to find out if it does is to search online for the make and model of your router. If you discover your router has ‘pass-through’ support for OpenVPN, that’s no good: this merely allows connections from devices and won’t block them.
Which router should I use with NordVPN?
If your current router was supplied by your ISP, chances are that it won’t support OpenVPN. And don’t forget, some mesh routers may support OpenVPN, too, not just single, standalone routers.
You may have to
buy a new router from those we recommend if your current one is incompatible, or you could head to
FlashRouters and buy a router which has special software on it that works with a companion app. That app allows you to log in with your NordVPN details, and also to manage the VPN settings more easily than in a web browser. You can get 20% off using the code NORDVPNROUTER at the checkout.
There’s also a
list of the routers which NordVPN recommends.
Note that Asus routers have a built-in OpenVPN client, which makes them ideal for NordVPN.
How to configure your router for NordVPN
The exact method of configuring your router to work with NordVPN will differ depending on the manufacturer and potentially even the model.
So while we can’t provide a definitive step-by-step guide for your specific router, here are the general steps you need to follow. Also, note that you can find instructions for various routers on
NordVPN’s website.
First, log into your router. This involves typing its IP address into your web browser. Then, to change settings you will need to enter the admin password. That’s usually on a sticker somewhere on the router itself. For more help, read our guide which explains exactly
how to connect to your router.
Next, look for the VPN settings. This will usually be under advanced settings, but do remember not every router has these: you must be using a compatible model.
Be sure to find the VPN client settings, not the server settings. Here’s how it looks on an Asus router:

Now add a profile, which will include your NordVPN username and password. You can find these in your
NordVPN dashboard.
If there’s an option, select ‘auto reconnection’, which will re-establish the VPN connection if it drops for any reason.
Enter a name for the connection. You can call it NordVPN [country], where country is the location of the server you’ve chosen.
Of course, you haven’t chosen a country yet, but you can use
this link to find the server that NordVPN recommends. Or, if you have a specific country in mind (to get around regional blocks, say) then choose one from the drop-down menu under ‘Adjust server preferences’.

Download the OpenVPN config files because as part of creating the VPN profile, you’ll need at least one of these. Preferably, use the UDP one.
When you see the option to import an .ovpn file, click the button to import it and navigate to where you downloaded the file from NordVPN’s website.
Once that’s done, you should be able to save the configuration.
Then, you should see an option to ‘activate’ that profile or connect to the VPN.
To disconnect, come back to this page in your router and click the ‘deactivate’ or ‘disconnect’ button.
How to connect to a different NordVPN server
Unfortunately, if you’re creating these profiles manually, you’ll need to make one for each server you want to use. In many cases, that will just be a local for for the best speeds, and perhaps one in another country (such as the USA) so you can watch US Netflix, for example.
Again, once these profiles are created you can log into your router and activate the profile for the country you want to appear to be in.
If you’re not already a NordVPN customer, you’ll find the latest deals for the best prices on its website.
NordVPN may not support many routers but it works perfectly on ASUS. In this guide, you’ll find detailed steps on how you can install NordVPN on your router and access its 5500+ servers worldwide.
- Updated: September 27, 2023
- 7 User Reviews
- Gerald Hunt
Even though using NordVPN is a great way to secure your online security and privacy, installing it on a router is even better. By following this guide on how to install NordVPN on router outside USA you will be able to encrypt traffic from all of your connected devices at once and benefit from features like network-wide protection and unrestricted simultaneous connections.
You can also have a VPN connection even on VPN-unsupported devices such as gaming consoles and streaming devices, you can also use NordVPN on Apple TV. However, not all routers support user-friendly settings or work with NordVPN. Check first to see if your router supports VPN connections. For that, you can simply log into the router and search the menus for VPN options, or you can ask the manufacturer (who is your ISP most of the time).
NordVPN is also one of the best VPN services tested and recommended by us. We’ll walk you through every step in this article so you can easily and smoothly set up NordVPN on your router outside USA. Let’s get started.
Which router should I use with NordVPN Outside USA?
If your ISP provided your existing router, it most likely does not support OpenVPN. A thing to remember before knowing how to install NordVPN on router outside USA is that with standalone routers, some mesh routers also support OpenVPN as well.
If your present router is incompatible, you might need to get a new one from the brands we suggest, or you might visit FlashRouters and purchase a router with specialized software that functions with a companion app. With that app, you can control your VPN settings more conveniently than in a web browser and log in using your NordVPN credentials. Use the discount code “NORDVPNROUTER“ at check out to receive 20% off.
Moreover, You can also use Asus routers, which come with an integrated OpenVPN client, making them perfect for NordVPN. You can also check out the best VPNs for routers other than NordVPN.
Here you can see the list of routers that NordVPN recommends.
Routers Supported by NordVPN Outside USA
There are two potential ways to set up a NordVPN router outside USA: Use a pre-configured router or manually configure it yourself. If you choose the latter, you must confirm that the router you are picking up should be compatible with the NordVPN app.
Only routers that support the OpenVPN protocol are compatible with the best VPN for OpenVPN service provider. You can either contact the manufacturer or simply log into the router and check the VPN settings to see if your router supports VPN connections. Here are a few routers that NordVPN suggests:
| Manufacturer | Router |
| Asus | RT-AX86U, RT-AX88U (AX6000), RT-AC66U B1, RT-AC5300, RT-AC86U, Asus RT-AX3000 |
| Netgear | R7500, R7800, R8500, R9000 |
| Linksys | EA8500, WRT3200ACM, WRT1900ACS |
| D-Link | DIR-895L, DIR-885L |
*All require a DD-WRT flashing.
Now that we have gotten that out of the way let’s check out the NordVPN Asus setup. Another big advantage of setting up a VPN connection on a router is that those devices which don’t support native NordVPN applications or manual configuration, such as a few specific models of Nvidia Shield, can now easily be protected with NordVPN.
Nevertheless, if you still wish to set up NordVPN on your NVidia device, then we recommend following the steps in our Nvidia Shield steps by NordVPN article.
How to set up NordVPN on your router Outside USA
Although many router manufacturers use a similar procedure for setting up a VPN on a router, there are several distinctions to be aware of. We’ll walk you through the process of setting up NordVPN on several routers to make things simpler for you.
These are the initial steps for installing how to install NordVPN on router outside USA:
- Get the configuration files downloaded. To achieve this, you must download the available protocols and locate the server that performs the best. Click Here to find the best-preferred server for you.
- Find the IP address of your router. The IP address of your router is often located on the bottom or rear. Here is how it will appear: 192.168.1.1
- Fill out the browser’s URL area with your IP address. You’ll need to enter your password, which is right next to the router’s IP address.
Type your password in if you have manually changed it.
Note that: This how to install NordVPN on router outside USA procedure will thereafter vary according to the routers, supported firmware, and other parameters.
How to Install NordVPN on Router (ASUS)
The Asus stock firmware is easy to navigate around and change settings. To set up the NordVPN ASUS router outside USA, follow the instructions below:
Step 1: Purchase a NordVPN subscription or go for free NordVPN with premium features for 30 days.
Step 2: Log in to your Asus router by using the appropriate URL in your browser (usually 192.168.1.1).
Step 3: Enter your Asus username and password when prompted to do so.
Step 4: Click on the VPN tab in the sidebar.
Step 5: Select the VPN client tab and click on Add profile
Step 6: Now choose the OpenVPN tab and insert the following information
- Description: Give a name to the connection as you like
- Username: Enter your NordVPN username
- Password: Enter your NordVPN password

Step 7: To import the .ovpn file, you first need to download these files from NordVPN’s server utility. Choose a server, and adjust server preferences to find its configuration files. Next, click on “download config.”
Step 8: Now import these downloaded files after clicking on “Choose file” in the dialog box shown in step 5 and click. Make sure the “Import the CA file or edit the .ovpn file manually” is left unchecked.
Step 9: When the upload is finished, click OK
Step 10: Now click on WAN in the sidebar, select no in the Connect to DNS Server automatically, and enter the DNS server addresses as DNS 1 and DNS 2, respectively:
- 8.8.8.8
- 8.8.4.4
Step 11: Click on Apply.
Step 12: Go back to the VPN client tab and click on the Activate button to initiate NordVPN on your router.
Step 13: A blue tick will appear next to the Connection Status if the connection is successful.
These steps will get NordVPN working on the ASUS router. Now you’ll never have to enable NordVPN before streaming Netflix with NordVPN. But in case something goes wrong, you can check out our NordVPN not connecting guide.
Also, setting up NordVPN on the Router allows you to skip configuring NordVPN on complicated devices such as Linux. If you still wish to know how to set up NordVPN manually on Linux, we recommend checking out our guide on NordVPN’s configuration for Linux.
How to Set up NordVPN with DD-WRT Outside USA
DD-WRT configuration may appear difficult at first, but don’t worry! You can quickly get it going if you follow this step-by-step guide:
Step 1: Navigate to “Setup” in the Administrative Interface and then select “Basic Setup.” Set the following NordVPN DNS addresses in the section titled “Network Address Server Settings (DHCP),” as mentioned in the below pic:
Step 2: Click “Save” and then “Apply Settings.”
Step 3: Disable the IPv6 protocol by going to the “Setup” tab, then finding the “IPv6” tab. Click “Save” and then “Apply Settings.”
Step 4: After “Setup,” select VPN. Set “Start OpenVPN Client” to “Enable” in the “OpenVPN Client” section. Set the following options as follows:

Step 5: Copy and paste the following commands into the Additional Config box:
remote-cert-tls server
remote-random
nobind
tun-mtu 1500
tun-mtu-extra 32
mssfix 1450
persist-key
persist-tun
ping-timer-rem
reneg-sec 0
#log /tmp/vpn.log
Step 6: Open the configuration file that was downloaded in any text editor (we recommend WordPad or Notepad++). You ought to see the relevant portion of the file after opening it.
Step 7: From the start of the command to the end of the certificate, copy the content and paste it into the “CA Cert” box.
Step 8: To find the part, return to the configuration file and scroll down. Paste it into the TLS Auth Key field after copying its contents.
Step 9: Click “Apply Settings” and “Save” after pasting.
Step 10: Navigate to “Status,” then “OpenVPN,” and search for “Client: Connected Success” to confirm the connection was successful.
Moreover, visit here to check out more VPNs for DD-WRT routers.
How to set up NordVPN with OpenWRT Outside USA
Setting up NordVPN with OpenWRT outside USA is a pretty simple process. This is how you do it:
Step 1: You should connect to the OpenWRT outside USA firmware using the IP address 192.168.1.1 since it only supports the telnet protocol. Use the “passwd” command to modify the root password. The router will then approve an SSH connection after that. Following that, you must install:
- opkg update
- opkg install openvpn-openssl
- opkg install ip-full
Step 2: Every time the OpenVPN router starts, the NordVPN OpenVPN settings will prompt you for your login and password. To automatically enter credentials, insert the word “secret” with a space before the string auth-user-pass.
The generated string should be something like “auth-user-pass” secret.
Step 3: The credentials are entered in a file called “secret” that is created in the same folder. Your username for the NordVPN service is on line one, and your password is on line two.
Step 4: There are two methods for configuring OpenVPN using the configuration file:
- Change the file’s extension from.ovpn to.conf so that OpenVPN can recognize it automatically.
- Put the file name in the /etc/config/openvpn directory. You may use uci:
uci set openvpn.nordvpn=openvpn
uci set openvpn.nordvpn.enabled=’1′
uci set openvpn.nordvpn.config=’/etc/openvpn/al1.nordvpn.com.tcp.ovpn’
uci commit openvpn
The following strings should be attached to the file as /etc/config/openvpn:
config openvpn ‘nordvpn’
option enabled ‘1’
option config ‘/etc/openvpn/al1.nordvpn.com.tcp.ovpn’
Step 5: Additionally, you can specify the file in the file /etc/config/openvpn by changing the file’s extension ovpn to.conf. In this scenario, OpenVPN will launch only once with this configuration file.
Step 6: New network interface creation. Remember that there are 2 alternative ways to accomplish this, and it is advised to use both simultaneously. The suggested interface approach is:
uci set network.nordvpntun=interface
uci set network.nordvpntun.proto=’none’
uci set network.nordvpntun.ifname=’tun0′
uci commit network
The following added strings should be present in the file as /etc/config/network:
config interface ‘nordvpntun’
option proto ‘none’
option ifname ‘tun0‘
Step 7: Add a new firewall zone and a forwarding rule from LAN to VPN:
uci add firewall zone
uci set firewall.@zone[-1].name=’vpnfirewall’
uci set firewall.@zone[-1].input=’REJECT’
uci set firewall.@zone[-1].output=’ACCEPT’
uci set firewall.@zone[-1].forward=’REJECT’
uci set firewall.@zone[-1].masq=’1′
uci set firewall.@zone[-1].mtu_fix=’1′
uci add_list firewall.@zone[-1].network=’nordvpntun’
uci add firewall forwarding
uci set firewall.@forwarding[-1].src=’lan’
uci set firewall.@forwarding[-1].dest=’vpnfirewall’
uci commit firewall
The following appended strings must be present in the file /etc/config/firewall:
config zone
option name ‘vpnfirewall’
option input ‘REJECT’
option output ‘ACCEPT’
option forward ‘REJECT’
option masq ‘1’
option mtu_fix ‘1’
list network ‘nordvpntun’
config forwarding
option src ‘lan’
option dest ‘vpnfirewall’
Step 8: Set up the DNS servers. The simplest method is to utilize NordVPN DNS for the router’s WAN interface. How to Add NordVPN DNS is as follows:
uci set network.wan.peerdns=’0′
uci del network.wan.dns
uci add_list network.wan.dns=’103.86.96.100′
uci add_list network.wan.dns=’103.86.99.100′
uci commit
The section ‘wan’ of the file /etc/config/network should include the following attachments (the three bottom strings have been added):
config interface ‘wan’
option ifname ‘eth0.2’
option force_link ‘1’
option proto ‘dhcp’
option peerdns ‘0’
list dns ‘103.86.96.100 ‘
list dns ‘103.86.99.100’
Upon completion of these instructions, everything ought to be set up, and you ought to be effectively connected. Visit the homepage of NordVPN router manager and look for Protected status at the top to confirm.
What to Do if NordVPN Router Is Not Connecting Outside USA?
There are several possible reasons why NordVPN might not be connected after a successful router setup. If you know how to install NordVPN on router outside USA and the router still fails to connect, try the following solutions to fix this:
Check the Status of Your Router
Despite being fairly basic, users frequently fail to notice connectivity issues indicated by the router status lights. They blame NordVPN for this. So, if you’re having trouble connecting, look for any amber or off status lights on your router. This could mean that there is a problem with your internet connection.
Reset Your Router
Turning off your router if you are certain that you have installed NordVPN or have connected in the past. Turn it back on after at least 2 minutes. By refreshing your router’s setup, you can resolve any router issues that you might not be aware of while still maintaining your NordVPN settings.
Update the Firmware on Your Router
Checking for firmware updates may be beneficial if your router is one of the versions that can be used with NordVPN. Try updating the router firmware if you use an older version, then refresh your connection.
You might need to reconfigure or reinstall nordVPN to work with the updated firmware. We suggest contacting NordVPN support if you are still experiencing issues connecting. Alternatively, ask the company that made your router if they have any other recommendations.
Why You Should Configure NordVPN on Router Outside USA
- 5100+ servers in 60+ countries
- Military-grade encryption (Double VPN encryption)
- CyberSec protects your device from intrusive ads
- Strict no-logs policy
- Automatic Kill Switch
- DNS leak protection
- 6 Multi-logins
- Live chat support
- Easy-to-use app
There are several reasons why having NordVPN on your router outside USA can be quite valuable. For one, it can be super helpful if you’re in a heavily restricted country like China, where you can’t risk accidentally not connecting to a VPN. By the way, NordVPN actually works in China.
Here are some of the other reasons you should know as well:
- Always Stay Connected: You will always be connected to the VPN as soon as you hook your devices to your router’s connection. This means you’ll never forget to turn on a VPN to initiate a secure browsing/streaming/torrenting session. Speaking of torrenting, you might find this NordVPN torrenting guide useful.
- Fast speeds: Since NordVPN proved to be super fast in our speed test, if you configure it on your router, you will experience speeds like never before for streaming and everything else.
- Stream without restrictions: By configuring NordVPN on your router, you get the freedom to bypass geo-blocks without worrying about enabling your VPN every time you connect to the internet. Regarding configuring NordVPN, you might also be interested in learning how to set up NordVPN on FireStick, NordVPN on Kodi in Australia, and on Roku devices. You can also easily stream popular restricted content.
- One-time setup: Setting up a VPN on a router is only a one-time process. You will simply have to connect your device to the home Wi-Fi to automatically come under VPN protection. Literally, that’s all you need to do. This way, you can use NordVPN on Smart TVs, gaming consoles, even NordVPN on LG Smart TVs, and more.
- No VPN Compatibility Issues: While NordVPN is compatible with a lot of devices, no VPN can support every other electronic gadget or device that industries are churning out every other day. But if your router is running NordVPN, then the question of compatibility with other devices becomes irrelevant. For example, setting up NordVPN on Xbox would be a lot hectic if you simply configure NordVPN on the Router first. Similarly, using a NordVPN on Router can save you from configuring NordVPN on a Raspberry Pi device.
- Works with Multiple Devices: All you need to give a VPN-enabled connection to whatever device you need a VPN for is to simply turn on its Wi-Fi. Since NordVPN tp-link router setup is installed within the router itself, your device will automatically receive an internet connection that is integrated with the VPN. You can connect as many devices to your NordVPN connection as your router can support it. For more information on how NordVPN works, you must read our full NordVPN in-depth review.
Routers Not Compatible with NordVPN Outside USA
Here is the list of following routers which are not compatible with NordVPN:
- Arris
- Belkin
- D-Link
- Netgear
- Cisco
- Huawei
- Tenda
- Linksys (excluding WRT32X/WRT32XB AC3200)
- TRENDnet
- TotoLink
- Ubee
Most of the above-mentioned routers are provided by ISPs.
If you want to know how to set up NordVPN on the router that includes one of these, then you will have first to flash the firmware and set up DD-WRT.
FAQs – How to Install NordVPN on Router Outside USA
Yes, learn how to install NordVPN on the router outside USA by following the steps below:
- Open the network-connected browser on your device.
- Enter the login information for your router (username and password).
- Find and enable the VPN option under “Advanced,” “Advanced configuration,” or a section with a similar name.
- Please be aware that the process can significantly change based on your router model.
Following are some of the top suggestions based on your requirements:
- For 2–7 devices, Netgear R6400 is more affordable and compatible with all VPNs.
- If you want to use it for 10–15 devices, then an Open-source DD-WRT router, Linksys router WRT3200ACM, is a suitable option.
- For 15+ devices, use Asus RT-AC5300; it’s an extremely quick, simple setup with a maximum Wi-Fi range.
yes, NordVPN works will almost all routers. If a Wi-Fi router supports OpenVPN, it should also support NordVPN. We advise using some of the top VPN routers found on flashrouters.com for a quick and secure experience.
We recommend you use the Asus routers for NordVPN outside USA because Asus routers have a built-in OpenVPN client that requires little effort to set up. At the same time, other routers need to have their firmware flashed, which can be difficult and is not supported by all systems.
Yes, Log in to your TP-Link VPN router’s control panel to configure a VPN connection to a NordVPN server. On most occasions, it can be reached via the internet by using one of the following IP addresses.
An OpenVPN connection is the best option if you want to set up a VPN connection on your router or have more than six devices connected simultaneously to one NordVPN account. Go to Advanced and then choose VPN Client. After enabling VPN Client, save the configuration.
Yes, NordVPN protects your router and entire hardware without running the danger of speed reduction. NordVPN will keep your online activity private and safe, whether it’s on your router or other devices.
To know how to install NordVPN on routers, you must use dd-wrt setup or other third-party firmware like OpenWRT.
Final Thoughts
NordVPN doesn’t support many router models. Nonetheless, if you are an Asus user, then you can enjoy the outstanding experience of running NordVPN on a router outside USA and bring the security of all your devices under the fold of a VPN’s protective layers. Also, as a remote worker, you prioritize securing your home office network. By setting up a VPN on your Google Nest Router using ExpressVPN or NordVPN, you establish a secure connection to your workplace, safeguarding your sensitive data and communications.
I hope this guide has helped you enough to know how to install NordVPN on router outside USA and how you can hide your online activity and mask your original IP address to another level. You can secure multiple devices at once and never worry about turning off or on your VPN connection.
Best of all, NordVPN is super affordable. But if you want to try it out or are unsatisfied with it, you can always cancel your NordVPN subscription and get fully refunded. You can also check out our Surfshark vs NordVPN comparison to see which one is the best option for routers.
You can also check out our ExpressVPN router guide for a step-by-step tutorial.