Introduction
This document describes how to configure Domain Name System (DNS) for Cisco routers.
Prerequisites
Requirements
Cisco recommends that you have knowledge of these topics:
-
Cisco IOS®Command Line Interface (CLI)
-
General DNS behavior
Components Used
This document is not restricted to specific software and hardware versions.
The information in this document was created from the devices in a specific lab environment. All of the devices used in this document started with a cleared (default) configuration. If your network is live, ensure that you understand the potential impact of any command.
Conventions
For more information on document conventions, refer to the Cisco Technical Tips Conventions.
Set Up a Router to Use DNS Lookups
Your router can be configured to use DNS lookups if you wish to use the ping or traceroute commands with a host name rather than an IP address. Use these commands to do so:
| Command | Description |
|---|---|
| ip domain lookup | Enables DNS-based host name-to-address translation. This command is enabled by default. |
| ip name-server | Specifies the address of one or more name servers. |
| ip domain list | Defines a list of domains, each to be tried in turn.
Note: If there is no domain list, the domain name that you specified with the ip domain-name global configuration command is used. If there is a domain list, the default domain name is not used. |
| ip domain name | Defines a default domain name that the Cisco IOS software uses to complete unqualified host names (names without a dotted-decimal domain name). Do not include the initial period that separates an unqualified name from the domain name. |
| ip ospf name-lookup | Configures Open Shortest Path First (OSPF) to look up DNS names for use in all OSPF show EXEC command displays. This feature makes it easier to identify a router because the router is displayed by name rather than by its router ID or neighbor ID. |

This example shows a sample configuration on a router configured for basic DNS lookup:
| Sample Basic DNS Lookup Configuration |
|---|
|
Router#ping www.cisco.com
Type escape sequence to abort.
Sending 5, 100-byte ICMP Echos to 10.37.145.84, timeout is 2 seconds:
!!!!!
Success rate is 100 percent (5/5), round-trip min/avg/max = 1/1/1 ms
Router#
Troubleshoot
Under rare conditions, you can see one of these error conditions:
Router#debug ip udp UDP packet debugging is on Router#ping www.cisco.com
*Mar 8 06:26:41.732: UDP: sent src=10.69.16.66(5476), dst=10.250.35.250(53), length=59 *Mar 8 06:26:44.740: UDP: sent src=10.69.16.66(5476), dst=10.250.35.250(53), length=59 *Mar 8 06:26:47.744: UDP: sent src=10.69.16.66(5476), dst=10.250.35.250(53), length=59 % Unrecognized host or address, or protocol not running. Router#undebug all
All possible debugging has been turned off Router#ping www.cisco.com Translating "www.cisco.com"...domain server (172.16.249.4) ¡¦ Not processRouter#ping www.cisco.com *May 12 16:48:36.302: Reserved port 43478 in Transport Port Agent for UDP IP type 1 *May 12 16:48:36.302: UDP: sent src=0.0.0.0(43478), dst=255.255.255.255(53), length=50 *May 12 16:48:37.303: Reserved port 56191 in Transport Port Agent for UDP IP type 1 *May 12 16:48:37.303: UDP: sent src=0.0.0.0(56191), dst=255.255.255.255(53), length=50 *May 12 16:48:37.304: Released port 43478 in Transport Port Agent for IP type 1 *May 12 16:48:37.304: Released port 43478 in Transport Port Agent for IP type 1%
Unrecognized host or address, or protocol not running.
Complete these steps to troubleshoot this problem:
-
Ensure the router can reach the DNS server. Ping the DNS server from the router with its IP address, and make sure that the ip name-server command is used to configure the IP address of the DNS server on the router.
-
Use these steps to ensure that the router forwards the lookup requests:
-
Define an access control list (ACL) that matches on DNS packets:
access-list 101 permit udp any any eq domain
access-list 101 permit udp any eq domain any
-
Use thedebug ip packet 101command.

Caution: Ensure that you specify the ACL. If you enable the debug ip packet command without an ACL it can produce a large amount of output to the console and affect the access to the device.
-
-
Ensure you have theip domain-lookupcommand enabled on the router.

You Can Ping a Web Server, But You Cannot View the HTML Pages
In rare cases, you can be unable to access particular Web sites by name. This problem typically results from the inaccessible sites that perform a reverse DNS lookup on the source IP address to verify that the address is not spoofed. If an incorrect entry or no entry returns (in other words, there is no associated name for the the IP range) then the HTTP request can be blocked.
When you obtain your Internet domain name, you also must apply for an inaddr.arpa domain. This special domain is sometimes called a reverse domain. The reverse domain maps numeric IP addresses into domain names. If your ISP provides your name server or your ISP assigned you an address from a block of its own addresses, you can not need to apply for an in-addr.arpa domain on your own. Check with your ISP.
Here is an example that uses www.cisco.com. This next output was captured from a UNIX workstation. The nslookup program and the dig program are used. Note the differences in the output:
sj-cse-280% nslookup www.cisco.com
Note:  nslookup is deprecated and can be removed from future releases.
Consider with the 'dig' or 'host' programs instead.  Run nslookup with
the '-sil[ent]' option to prevent this message from appearing.
Server:         172.16.226.120
Address:        172.16.226.120#53
Name:   www.cisco.com
Address: 192.168.219.25

sj-cse-280% nslookup 192.168.219.25
Note:  nslookup is deprecated and can be removed from future releases.
Consider with the 'dig' or 'host' programs instead.  Run nslookup with
the '-sil[ent]' option to prevent this message from appearing.
Server:         172.16.226.120
Address:        172.16.226.120#53
10.219.133.198.in-addr.arpa     name = www.cisco.com.
The dig program prints more detailed information from the DNS packets:
sj-cse-280% dig 192.168.219.25

; <<>> DiG 9.0.1 <<>> 192.168.219.25
;; global options:  printcmd
;; Got answer:
;; ->>HEADER<<- opcode: QUERY, status: NXDOMAIN, id: 5231
;; flags: qr aa rd ra; QUERY: 1, ANSWER: 0, AUTHORITY: 1, ADDITIONAL: 0

;; QUESTION SECTION:
;192.168.219.25.                        IN      A

;; AUTHORITY SECTION:
.                       86400   IN      SOA
A.ROOT-SERVERS.NET. nstld.verisign-grs.com.
( 2002031800 1800 900 604800 86400 )

;; Query time: 135 msec
;; SERVER: 172.16.226.120#53(172.16.226.120)
;; WHEN: Mon Mar 18 09:42:20 2002
;; MSG SIZE  rcvd: 107
Router Queries Multiple Name Servers
Dependant upon on the network activity level, the router can query multiple name servers listed in the configuration. This is an example from the output debug ip domain detail:
Router#show run | section name-server ip name-server 192.168.1.1 10.0.0.2 Router#
Router#debug ip domain detailRouter#test002 *May 12 17:56:32.723: DNS: detail: cdns_name_verify_internal: Checking if hostname is valid or not.. *May 12 17:56:32.723: DNS: info: cdns_name_verify_internal: Hostname is valid *May 12 17:56:32.723: DNS: detail: cdns_get_rr_type: converting name kind 2000 to type 28 *May 12 17:56:32.723: DNS: detail: read_forwards: Forward zone server list: *May 12 17:56:32.723: DNS: info: delegpt_log: DelegationPoint<.>: 0 names (0 missing), 2 addrs (0 result, 2 avail) parentNS *May 12 17:56:32.724: DNS: detail: val_operate: validator[module 0] operate: extstate:module_state_initial event:module_event_new *May 12 17:56:32.724: DNS: info: log_nametypeclass: validator operate: query test002. AAAA IN *May 12 17:56:32.724: DNS: detail: iter_operate: iterator[module 1] operate: extstate:module_state_initial event:module_event_pass *May 12 17:56:32.724: DNS: info: log_nametypeclass: resolving test002. AAAA IN *May 12 17:56:32.724: DNS: detail: error_response: return error response NXDOMAIN *May 12 17:56:32.724: DNS: detail: val_operate: validator[module 0] operate: extstate:module_wait_module event:module_event_moddone *May 12 17:56:32.724: DNS: info: log_nametypeclass: validator operate: query test002. AAAA IN *May 12 17:56:32.725: DNS: detail: cdns_get_rr_type: converting name kind 2000 to type 28 *May 12 17:56:32.725: DNS: detail: read_forwards: Forward zone server list: *May 12 17:56:32.725: DNS: info: delegpt_log: DelegationPoint<.>: 0 names (0 missing), 2 addrs (0 result, 2 avail) parentNS *May 12 17:56:32.726: DNS: detail: val_operate: validator[module 0] operate: extstate:module_state_initial event:module_event_new *May 12 17:56:32.726: DNS: info: log_nametypeclass: validator operate: query test002. AAAA IN *May 12 17:56:32.726: DNS: detail: iter_operate: iterator[module 1] operate: extstate:module_state_initial event:module_event_pass *May 12 17:56:32.726: DNS: info: log_nametypeclass: resolving test002. AAAA IN *May 12 17:56:32.726: DNS: info: log_nametypeclass: processQueryTargets: test002. AAAA IN *May 12 17:56:32.726: DNS: info: log_nametypeclass: sending query: test002. AAAA IN *May 12 17:56:32.726: DNS: detail: log_name_addr: sending to target: <.> 192.168.1.1#53 *May 12 17:56:32.726: DNS: detail: cdns_get_first_hop: dst 192.168.1.1, intf GigabitEthernet1 *May 12 17:56:32.726: DNS: detail: cdns_set_udp_source_interface: using source interface GigabitEthernet1 with address 192.168.1.10 *May 12 17:56:33.726: DNS: detail: cdns_get_first_hop: dst 192.168.1.1, intf GigabitEthernet1 *May 12 17:56:33.726: DNS: detail: cdns_set_udp_source_interface: using source interface GigabitEthernet1 with address 192.168.1.10 *May 12 17:56:34.726: DNS: detail: iter_operate: iterator[module 1] operate: extstate:module_wait_reply event:module_event_noreply *May 12 17:56:34.726: DNS: info: log_nametypeclass: iterator operate: query test002. AAAA IN *May 12 17:56:34.726: DNS: info: log_nametypeclass: processQueryTargets: test002. AAAA IN *May 12 17:56:34.727: DNS: info: log_nametypeclass: sending query: test002. AAAA IN *May 12 17:56:34.727: DNS: detail: log_name_addr: sending to target: <.> 192.168.1.1#53 *May 12 17:56:34.727: DNS: detail: cdns_get_first_hop: dst 192.168.1.1, intf GigabitEthernet1 *May 12 17:56:34.727: DNS: detail: cdns_set_udp_source_interface: using source interface GigabitEthernet1 with address 192.168.1.10 *May 12 17:56:35.729: DNS: detail: iter_operate: iterator[module 1] operate: extstate:module_wait_reply event:module_event_reply *May 12 17:56:35.729: DNS: info: log_nametypeclass: iterator operate: query test002. AAAA IN *May 12 17:56:35.729: DNS: info: log_nametypeclass: response for test002. AAAA IN *May 12 17:56:35.729: DNS: info: log_name_addr: reply from <.> 192.168.1.1#53 *May 12 17:56:35.729: DNS: info: processQueryResponse: query response was THROWAWAY *May 12 17:56:35.729: DNS: info: log_nametypeclass: processQueryTargets: test002. AAAA IN *May 12 17:56:35.729: DNS: info: log_nametypeclass: sending query: test002. AAAA IN *May 12 17:56:35.729: DNS: detail: log_name_addr: sending to target: <.> 10.0.0.2#53 *May 12 17:56:35.730: DNS: detail: cdns_get_first_hop: dst 10.0.0.2, intf GigabitEthernet1 *May 12 17:56:35.730: DNS: detail: cdns_set_udp_source_interface: using source interface GigabitEthernet1 with address 192.168.1.10 *May 12 17:58:35.732: DNS: error: comm_point_tcp_handle_write: tcp connect: Connection refused *May 12 17:58:35.732: DNS: detail: log_addr: remote address is ip4 10.0.0.2 port 53 (len 16) *May 12 17:58:35.732: DNS: detail: outnet_tcp_cb: outnettcp got tcp error -1 *May 12 17:58:35.732: DNS: detail: log_addr: tcp error for address ip4 10.0.0.2 port 53 (len 16) *May 12 17:58:35.732: DNS: detail: iter_operate: iterator[module 1] operate: extstate:module_wait_reply event:module_event_noreply *May 12 17:58:35.732: DNS: info: log_nametypeclass: iterator operate: query test002. AAAA IN *May 12 17:58:35.732: DNS: info: log_nametypeclass: processQueryTargets: test002. AAAA IN
This behavior is expected and occurs when the router needs to create an Address Resolution Protocol (ARP) entry for the DNS server. By default, a router maintains an ARP entry for four hours. In periods of low activity, the router needs to complete the ARP entry and then perform the DNS query. If the ARP entry for the DNS server is not in the router ARP table, then you would get a failure if it sends only one DNS query. So, two queries are sent out, one to get the ARP entry, if needed, and the second to actually do the DNS query. This behavior is common with TCP/IP applications.
Related Information
- IP Addressing Support
- IP Routing Support
- Cisco Technical Support & Downloads
There are many ways you could configure a DNS server. If you are a network engineer and wanted to build a private DNS server for a small office, you can prefer to configure a router as a DNS server than configuring a Linux or a Windows machine for the same purpose, right?
In this lab, we are going to configure the Cisco routers as a DNS server. This DNS configuration would also be useful when you wanted to run some lab or small office that requires DNS configuration.
Objective.
The lab that I am configuring is as below, if you wanted to follow along, then you can spin up this lab under GNS3 or EVE-NG. May be you have topology that not necessarily like this, that way you can just focus the DNS server configuration.
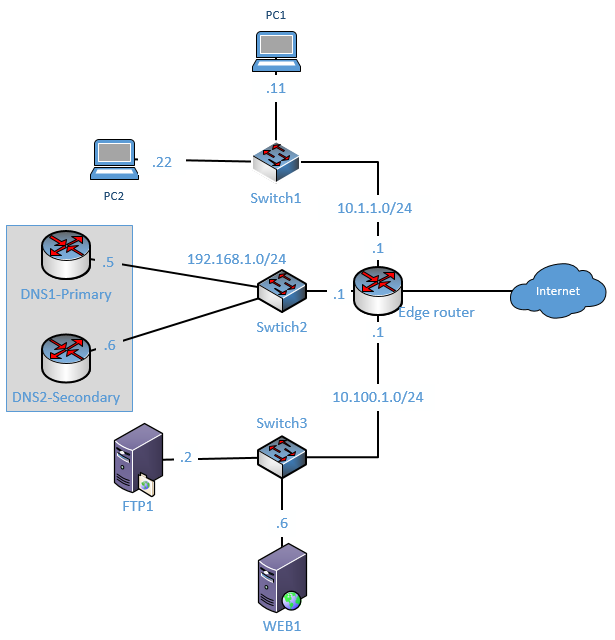
After you configured the DNS server on the router we would check the connectivity to internal hosts using the local DNS host A record and similarly we will also check the public DNS access, those public DNS request again will forward to the public DNS servers from our internal router DNS.
In the lab I have configured the below.
- Configured the IP address on each end host also the gateways.
- Make sure all the devices are connected, and it’s able to ping to each other.
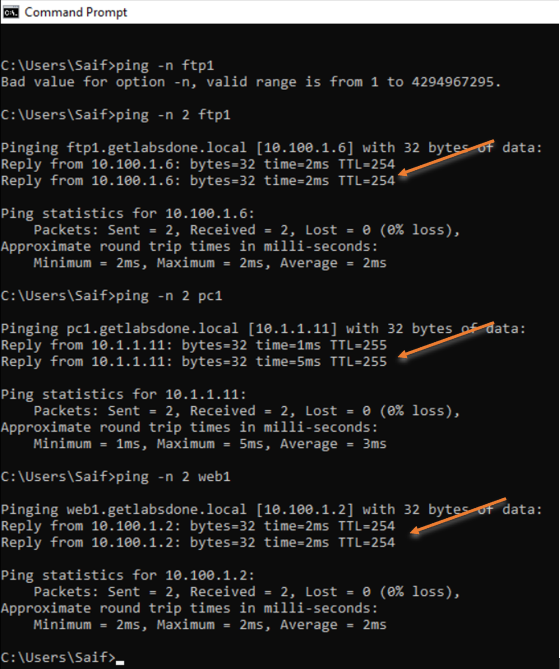
As you can see from the DNS server, I can reach all the IP’s in the network, which is good.
DNS1#ping 10.1.1.11
 Type escape sequence to abort.
 Sending 5, 100-byte ICMP Echos to 10.1.1.11, timeout is 2 seconds:
 .!!!!
 Success rate is 80 percent (4/5), round-trip min/avg/max = 32/47/56 ms
 DNS1#ping 10.1.1.22
 Type escape sequence to abort.
 Sending 5, 100-byte ICMP Echos to 10.1.1.22, timeout is 2 seconds:
 .!!!!
 Success rate is 80 percent (4/5), round-trip min/avg/max = 36/54/68 ms
 DNS1#ping 10.100.1.6
 Type escape sequence to abort.
 Sending 5, 100-byte ICMP Echos to 10.100.1.6, timeout is 2 seconds:
 .!!!!
 Success rate is 80 percent (4/5), round-trip min/avg/max = 32/46/52 ms
 DNS1#ping 10.100.1.2
 Type escape sequence to abort.
 Sending 5, 100-byte ICMP Echos to 10.100.1.2, timeout is 2 seconds:
 .!!!!
 Success rate is 80 percent (4/5), round-trip min/avg/max = 44/49/52 ms
 DNS1#ping 192.168.1.6
 Type escape sequence to abort.
 Sending 5, 100-byte ICMP Echos to 192.168.1.6, timeout is 2 seconds:
 .!!!!
 Success rate is 80 percent (4/5), round-trip min/avg/max = 40/49/52 ms
 DNS1#
Everything looks great, and our network is up and running with full reachability. Let’s go ahead and configure the DNS on the cisco routers now.
How to setup DNS on Router?
- Enable DNS Service on the Router.
- Enable DNS lookup on the Router.
- Specify the domain name.
- Configure the Internal host A record.
- Configure the External DNS Servers.
- Configure the Name server.
- The final configuration from the DNS servers.
- Point the hosts to the DNS servers.
- Router DNS verification.
- How to flush DNS cache on router?
1. Enable DNS Service on the Router.
To enable DNS service on the router you can type the command ip dns server on the configuration terminal.
DNS1#conf t
DNS1(config)#ip dns server
2. Enable DNS lookup on the Router.
When you try to ping www.google.com by default you will not get any response.
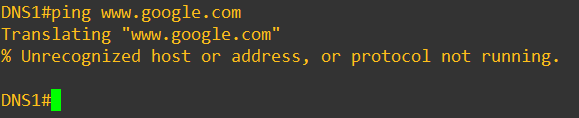
For the domain resolution to work on the cisco router you need to enable domain lookup.
DNS1#conf t
Enter configuration commands, one per line.  End with CNTL/Z.
DNS1(config)#ip domain-lookup
DNS1(config)#exit
DNS1#
3. Specify the domain name.
You may have a domain name in your mind, you will have to specify the domain name here. Since this is my local DNS server, I would just choose my domain as getlabsdone.local
To mention the domain name, you have to type the command ip domain name getlabsdone.local
DNS1(config)#ip domain name getlabsdone.local
4. Configure the Internal host A record.
We are now going to configure the internal host A record in our DNS server. To configure the host A record you can use the command IP host in the configuration terminal, I have created a host A record as below, for now, I am adding only six records. If you have to configure more records you can add them down below using the IP host command.
For the below six records, the router will be the authoritative DNS server.
ip host dns1.getlabsdone.local 192.168.1.5
ip host dns2.getlabsdone.local 192.168.1.6
ip host web1.getlabsdone.local 10.100.1.2
ip host ftp1.getlabsdone.local 10.100.1.6
ip host pc1.getlabsdone.local  10.1.1.11
ip host pc2.getlabsdone.local  10.1.1.22
5. Configure the External DNS Servers.
We are going to use the Cisco router as the internal DNS servers for the internal network and we also configured the internal host A record just so the internal users can query and get the response.
What if any of your internal users wanted to go to the internet?
By default our DNS servers will not have an entry for the external host records, hence we need to configure our internal DNS servers to talk to the external DNS servers that way any external DNS queries will be relayed to the external DNS server.
For example, if when one user tries to query www.google.com and since it is an external DNS entry, our DNS router will forward the request out to external DNS servers that we have configured. And next time when the users try to query external entries, it will not forward the request rather the internal DNS server will respond from its cache. We will further see this in action in the router DNS verification in step 8.
To configure the external DNS servers on our internal cisco router, you can enter the command below. And I am using the external servers 8.8.8.8 and 4.2.2.2.
ip name-server 8.8.8.8 4.2.2.26. Configure the Name server.
Mention the NS record known as name server record as primary and secondary.
DNS1
ip dns primary getlabsdone.local soa dns1.getlabsdone.local mailbox.getlabsdone.localDNS2
ip dns primary getlabsdone.local soa dns2.getlabsdone.local mailbox.getlabsdone.local7. The final configuration from the DNS servers.
DNS1
ip dns server
ip domain-lookup
ip domain name getlabsdone.local
ip name-server 8.8.8.8 4.2.2.2
ip dns primary getlabsdone.local soa dns1.getlabsdone.local mailbox.getlabsdone.local
ip host getlabsdone.local ns dns1.getlabsdone.local
ip host getlabsdone.local ns dns2.getlabsdone.local
ip host dns1.getlabsdone.local  192.168.1.5
ip host dns2.getlabsdone.local  192.168.1.6
ip host web1.getlabsdone.local  10.100.1.2
ip host ftp1.getlabsdone.local  10.100.1.6
ip host pc1.getlabsdone.local   10.1.1.11
ip host pc2.getlabsdone.local   10.1.1.22
DNS2
ip dns server
ip domain-lookup
ip domain name getlabsdone.local
ip name-server 8.8.8.8 4.2.2.2
ip dns primary getlabsdone.local soa dns2.getlabsdone.local mailbox.getlabsdone.local
ip host getlabsdone.local ns dns2.getlabsdone.local
ip host getlabsdone.local ns dns1.getlabsdone.local
ip host dns1.getlabsdone.local 192.168.1.5
ip host dns2.getlabsdone.local 192.168.1.6
ip host web1.getlabsdone.local 10.100.1.2
ip host ftp1.getlabsdone.local 10.100.1.6
ip host pc1.getlabsdone.local  10.1.1.11
ip host pc2.getlabsdone.local  10.1.1.22
8. Point the hosts to the DNS servers.
You now have configured the DNS servers successfully, now you will have to point all the host machines on your internal network to talk to the primary and the secondary DNS servers also enable host lookup. Enter the below commands on all the end hosts.
Normally in the production network, you would configure the DNS servers automatically using DHCP. I have also covered, how you can setup a cisco router as the DHCP server here. As I have built this network for lab purposes I need to point the DNS servers manually.
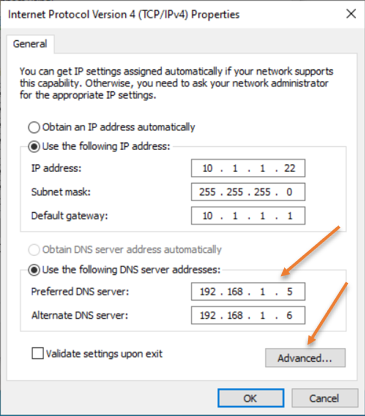
First let me configure the PC2 dns server, I am using windows 10 client as pc2.
- Click on the Start menu and type ncpa.cpl and hit enter. Alternatively, you can click start>Run>Type CMD>and type ncpa.cpl and hit enter.
- Right-click on the ethernet adapter and click on Properties.
- Choose internet protocol version 4 (TCP/IPv4) and click on properties.
- Along with the IP addresses, you can configure the primary and secondary IP addresses and click on Advanced.
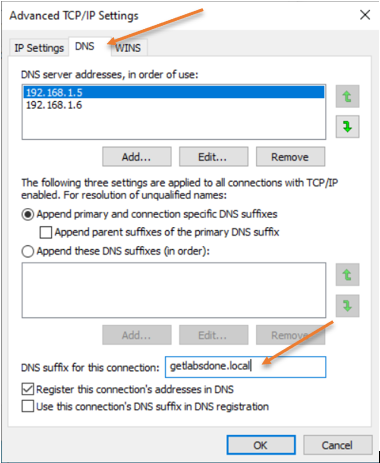
- Click on DNS tab, and in DNS suffix for this connection, type the domain name of our internal server. In my scenario it is getlabsdone.local and click on Ok.
- If you wanted to point the other cisco routers to talk to the DNS servers, you can enter the command below.
ip name-server 192.168.1.5 192.168.1.6
ip domain-lookup
ip domain name getlabsdone.local
9. Router DNS verification
How do we test the DNS configuration ?
Before we continue with the test, let me go ahead and shut down the interface on the DNS server2, that way only DNS1 will respond to DNS queries. DO NOT DO THIS IN PRODUCTION AS YOUR DNS ROUTER WILL ALSO BE CARRYING OTHER TRAFFICS SINCE THIS IS A LAB IT SHOULD BE FINE.
You can test the DNS configuration by pinging the hostname from the end-user machine or using nslookup.
So lets go to our windows hosts which is PC2, and try to ping our internal hosts.
As you can see, we are able to ping the internal hosts.
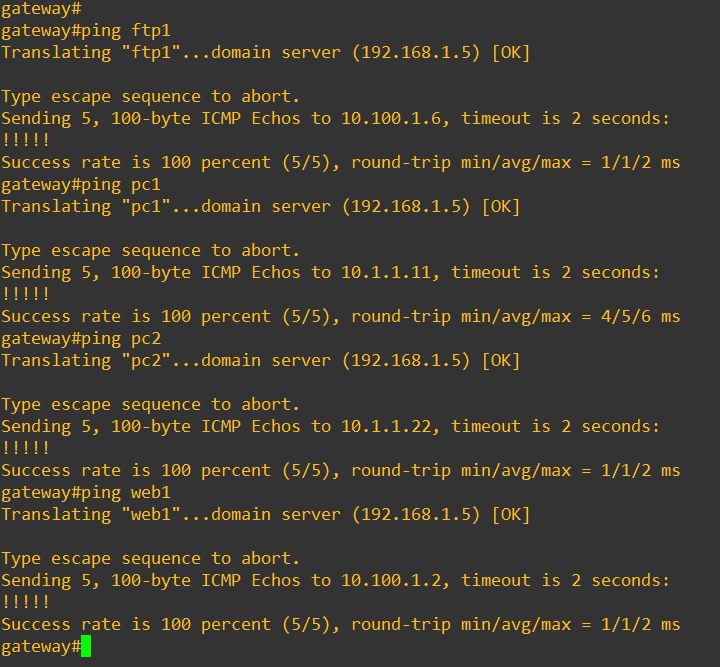
How about from our gateway router?
I have already pointed my router to talk to the DNS servers in step7, let me try to ping the internal hosts.
As you can see below, I am able to ping the internal hosts from the routers as well.
How about public DNS queries?
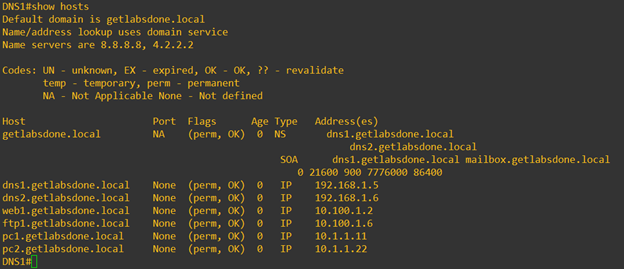
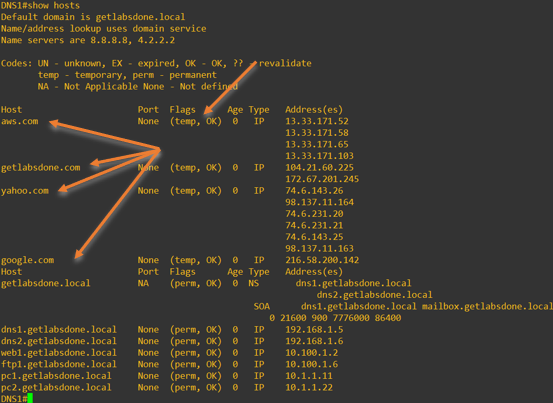
Before we start pinging the external DNS entries let’s take a look at our host entries by typing the command show hosts. We only can see, the internal host records and its flag shows as permanent.
Now, lets go ahead and ping some of the external DNS names.
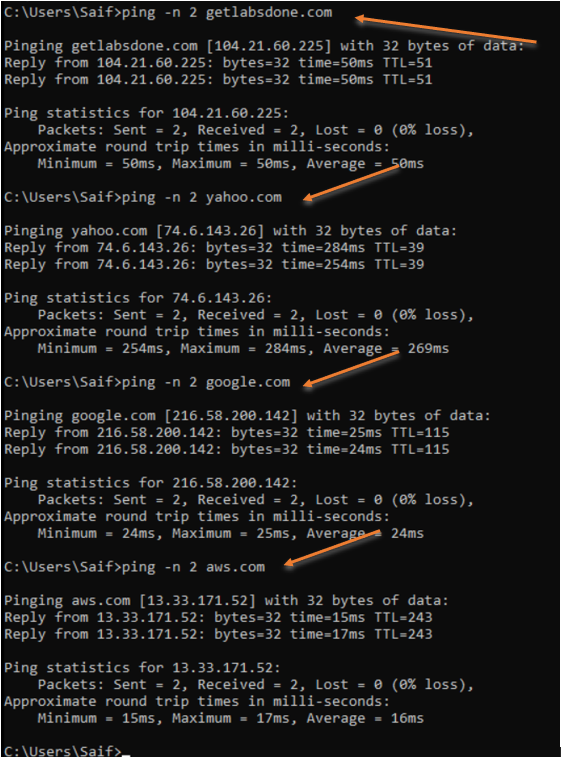
Alright, we got the response to the DNS queries for the external DNS names, so how do we check who provided the DNS resolution for the internal users?
To see that you can go back to the DNS server on our router, and type the command that we ran previously, show hosts.
This time instead of just showing our own local DNS hosts records you can also see the external DNS entries.
If you look into the flags for the external entries you can see that it is temporary, which means that external entries are cached.
10. How to flush DNS cache on router?
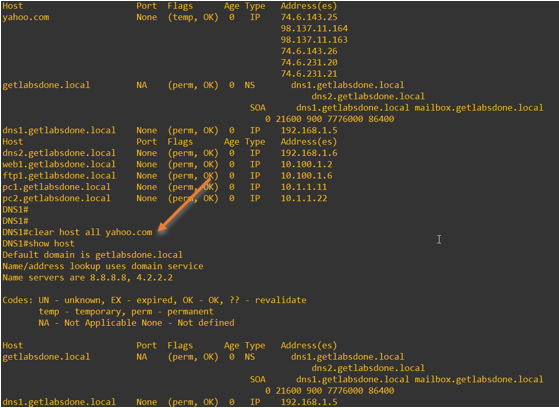
Using the show hosts command we could see the DNS cached on our router, and how long this DNS cache will be stored on the router is based on the TTL that is set on the external DNS servers. I have again taken a look at the DNS cache on my router and this time the entries for Yahoo is present. other entries are removed automatically.
Before you clear DNS cache on the Cisco router, type show hosts to see the DNS records. As you can see we have only one record for yahoo.com.

Clear Specific DNS cache on router.
Since it is a lab I have only single DNS cache that is left, however in production you will have plenty of DNS entries. So to flush the specific DNS entries, in our case yahoo.com. You can type the command clear host all yahoo.com
I have cleared them on my DNS server, and I no longer have the entries for yahoo.com.
Clear the entire DNS cache on a cisco router.
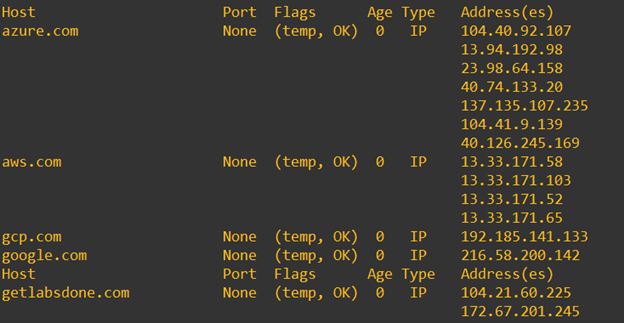
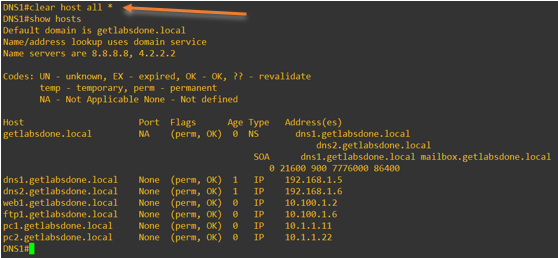
You may already have a DNS cache on your DNS server, if not you can start pinging as many external websites you can and use the below single command to flush the entire DNS cache.clear host all *
As you can see below I have some DNS cache on my DNS router.
After clear the entries you no longer have the records.
Why am I not able to see the DNS cache after clearing the cache on my router?
Just like the DNS cache on the DNS server, your end-user machine also has DNS cache enabled. So after you cleared the DNS cache on your router and when you try to ping the same IP from your windows 10 host for example, you may not see the cache on the DNS router. That is because the windows host has cached the DNS request hence it doesn’t have to send the query to the DNS server.
- To see the DNS cache on the windows host you can type the command ipconfig /dnsdisplay
- To clear the DNS cache on windows 10.
- Open CMD with Admin rights and type the command ipconfig /flushdns.
You can now go ahead and enable the interface on the DNS2 router interface so that you will have primary and secondary servers.
Conclusion.
Configuring the DNS service on a Cisco router is an easy way of enabling the DNS. However, the main functionality of a router is to route the traffic, and using a router as DNS is not the recommended method. This method would work fine for a lab, POC networks, and small networks. In a big network environment, it is recommended to use dedicated DNS servers for DNS functionality.
DNS Configuration on Cisco Routers
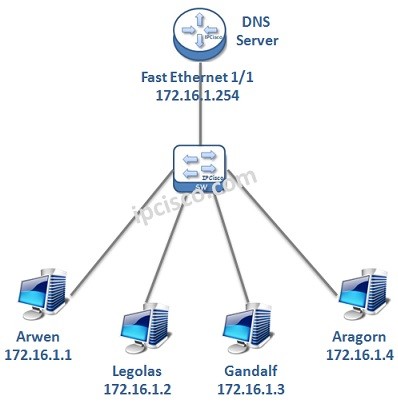
Table of Contents
How to Configure DNS on Cisco Routers?
To use DNS, firstly, we must configure a DNS Server. In a network, we can confgiure a router as a Domain Name System Server. In this lesson, we will talk about Cisco DNS Server Configuration, we will see how to configure a Cisco Router as a DNS Server in a network.
For our DNS Server Configuration Example, we will use the below topology:
To configure a Cisco Router as a DNS Server, we need to follow some basic configuration steps. These Cisco DNS Server configuration steps are below:
1. Enable DNS Server
2. Enable Domian Lookup
3. Public Name Server Configuration
4. Host / IP Address Mappings
5. Router Interface IP Configuration
6. Hosts IP Configuration
7. Configuration Verification
Now, let’s configure our Cisco Router as a DNS Server with the above steps
You can also Download Packet Tracer Labs
Enable DNS Server
To enable DNS Server on the router, we will use “ip dns server” command. With this command, our router is becoming a DNS Server.
RouterA # configure terminal
RouterA (config)# ip dns server
Enable Domain Lookup
We will define hostname-ip matchings manually. But what if there is a query different than them? At this time, router will query to an upper DNS Server that we will configure in the next step. To enable this query, we will use “ip domain lookup” command. With this command, router can query to the configured public DNS Servers if the record does not exist in it.
RouterA (config)# ip domain lookup
Public Name Servers Configuration
In this step, we will configure Public Name Servers. If the requested record is not in the host table, then router will query to these Public DNS Servers. Here, we can use one or more, any Public DNS Server addresses. To use these DNS Servers for queries, this feature must be enabled with “ip domain lookup” command.
RouterA (config)# ip name-server 1.1.1.1
RouterA (config)# ip name-server 2.2.2.2
Host / IP Address Mappings
In this step, we will give the Hostnames and their IP addresses to the DNS Server manually. With these records, DNS Server can answer to the requests.
RouterA (config)# ip host Arwen 172.16.1.1
RouterA (config)# ip host Legolas 172.16.1.2
RouterA (config)# ip host Gandalf 172.16.1.3
RouterA (config)# ip host Aragorn 172.16.1.4
We can check hosts on the router with “show hosts” command. This command will show manually configured hosts as permanent and dynamically learned hosts via Public DNS Server as temporary. Now, we have only manual permanent configurations. If there is an ip addresses learned via public DNS, it will be listed as temporary in this list.
Router# show hosts
Default domain is not set
Name/address lookup uses domain service
Name servers are 8.8.8.8Codes: UN – unknown, EX – expired, OK – OK, ?? – revalidate
temp – temporary, perm – permanent
NA – Not Applicable None – Not definedHost Port Flags Age Type Address(es)
Arwen None (perm, OK) 0 IP 172.16.1.1
Legolas None (perm, OK) 0 IP 172.16.1.2
Gandalf None (perm, OK) 0 IP 172.16.1.3
Aragorn None (perm, OK) 0 IP 172.16.1.4
Router Interface IP Configuration
Router’s Interface towards our network will be configured with an IP address in the same network with the hosts. Here, our router’s interface ip address is 172.16.1.254. This will be used as Default Gateway Address and DNS Server Address by hosts.
RouterA (config)# interface fastethernet 1/1
RouterA (config-if)# ip address 172.16.1.254 255.255.255.0
RouterA (config-if)# end
After this configuration, do not forget to save our configuration.
RouterA # copy running-config startup-config
You can also Download GNS3 Labs

Domain Name System or DNS is considered as the phonebook of the Internet. DNS servers resolve domain names to IP addresses. Google Public DNS (8.8.8.8 and 8.8.4.4) is an example of free DNS services and can replace your ISP’s default DNS server addresses.
Configuring Cisco Routers as DNS Servers
A Cisco router can act as both a Domain Name System cache name server (DNS resolver) and as an authoritative name server for local hosts. The cache name server stores the DNS queries so that it can answer requests quickly without having to query authoritative servers for each transaction.
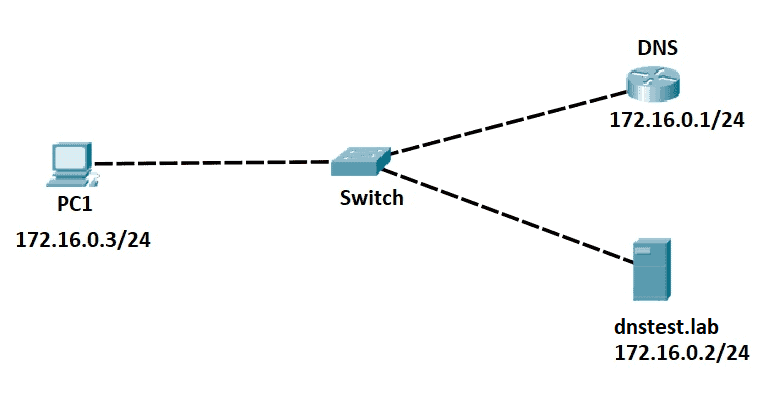
1. Using the sample network topology above, let’s configure the IP address first on each device.
Cisco Router (DNS) – 172.16.0.1/24
DNS(config)#interface GigabitEthernet0/0
DNS(config-if)#ip address 172.16.0.1 255.255.255.0
Server (dnstest.lab) – 172.16.0.2/24
#ifconfig
 eth0      Link encap:Ethernet  HWaddr 00:50:00:00:06:00
           inet addr:172.16.0.2  Bcast:172.16.0.255  Mask:255.255.255.0
           UP BROADCAST RUNNING MULTICAST  MTU:1500  Metric:1
           RX packets:136 errors:0 dropped:0 overruns:0 frame:0
           TX packets:183 errors:0 dropped:0 overruns:0 carrier:0
           collisions:0 txqueuelen:1000
           RX bytes:12343 (12.0 KiB)  TX bytes:52120 (50.8 KiB)
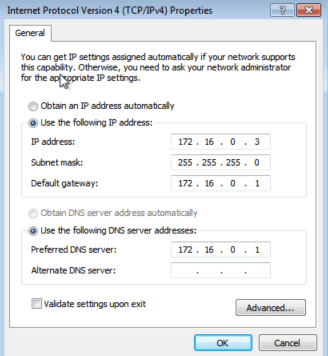
PC1 – IP address 172.16.0.3, Mask /24, Gateway 172.16.0.1
Primary DNS Server – 172.16.0.1
Let’s leave the secondary DNS server blank.
2. Enable DNS service in global configure mode on our Cisco router.
DNS(config)#ip dns server
3. Configure the Domain Name System server with the hostname of your local hosts. In this case, when any other PC wants to ping the ‘dnstest.lab’ server, the router will resolve its domain name to the appropriate IP address.
DNS(config)#ip host dnstest.lab 172.16.0.2
Domain Name System Server Verification
From the Cisco router, I can ping the domain name.
DNS#ping dnstest.lab
Type escape sequence to abort.
Sending 5, 100-byte ICMP Echos to 172.16.0.2, timeout is 2 seconds:
!!!!!
Success rate is 100 percent (5/5), round-trip min/avg/max = 2/3/4 ms
From PC1, I can ping the domain name.
C:\Users\PC1>ping dnstest.lab

Pinging dnstest.lab [172.16.0.2] with 32 bytes of data:
Reply from 172.16.0.2: bytes=32 time=9ms TTL=64
Reply from 172.16.0.2: bytes=32 time=2ms TTL=64
Reply from 172.16.0.2: bytes=32 time=2ms TTL=64
Reply from 172.16.0.2: bytes=32 time=3ms TTL=64

Ping statistics for 172.16.0.2:
    Packets: Sent = 4, Received = 4, Lost = 0 (0% loss),
Approximate round trip times in milli-seconds:
    Minimum = 2, Maximum = 9ms, Average = 4ms
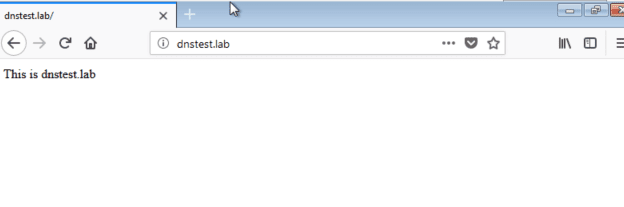
Also, I can access the web page from PC1.
NOTE
Switching DNS servers and finding the best DNS server in your area can also increase your Internet speed or provide you with more features like privacy, parental controls, and high redundancy.
Download our Free CCNA Study Guide PDF for complete notes on all the CCNA 200-301 exam topics in one book.
We recommend the Cisco CCNA Gold Bootcamp as your main CCNA training course. It’s the highest rated Cisco course online with an average rating of 4.8 from over 30,000 public reviews and is the gold standard in CCNA training:

Cisco router можно настроить в качестве кеширующего DNS сервера. Это удобно в небольших офисах, где нет серверов Windows и AD.
Общий вид команд выглядит следующим образом:
ip domain lookup
ip domain timeout 2
ip domain name office.local
ip host name1 192.168.0.11
ip host name2 192.168.0.12
ip name-server 192.168.2.3
ip name-server 178.23.144.5
ip name-server 8.8.8.8
ip name-server 8.8.4.4
ip dns server
ip domain lookup — включает трансляцию имён в ip адреса основанную на dns. Этот параметр включен по умолчанию. Часто его выключают чтобы маршрутизатор не «зависал» при вводе ошибочной команды, но для нашей цели его необходимо включить.
ip name-server — этот параметр задаёт адрес одного или нескольких серверов имён (dns). Приоритет определяется сверху вниз.
ip domain name — задаёт имя домена по умолчанию для пользователей Cisco IOS software для разрешения «неопознаных» доменных имён (имена без суффикса.
ip dns server — включаем собственно кеширующий DNS сервер на циске
Конструкция ip host name1 192.168.0.11 работает подобно файлу hosts в windows.
Проверка:
show ip dns view
DNS server для своих
Предыдущий конфиг приводит к тому, что роутер будет отвечать на все запросы DNS: как изнутри так и снаружи.
Для того, чтобы DNS сервер отвечал только на внутренние запросы у нас есть два пути:
DNS server для своих: ACL
Приведём здесь стандартный ACL, который в том числе запрещает доступ к нашему DNS через внешний интерфейс, и при этом разрешает DNS-запросы наружу:
ip access-list extended outside_acl_in
 remark --- Add anti-spoofing entries. !--- Deny special-use address sources. !--- Refer to RFC 3330 for add
 deny   ip 127.0.0.0 0.255.255.255 any
 deny   ip 192.0.2.0 0.0.0.255 any
 deny   ip 224.0.0.0 31.255.255.255 any
 deny   ip host 255.255.255.255 any
 remark --- The deny statement should not be configured !--- on Dynamic Host Configuration Protocol (DHCP) r
 deny   ip host 0.0.0.0 any
 remark --- Filter RFC 1918 space.
 deny   ip 10.0.0.0 0.255.255.255 any
 deny   ip 172.16.0.0 0.15.255.255 any
 deny   ip 192.168.0.0 0.0.255.255 any
 remark --- Explicitly permit return traffic. !--- Allow specific ICMP types.
 permit icmp any any echo
 permit icmp any any echo-reply
 permit icmp any any unreachable
 permit icmp any any time-exceeded
 deny   icmp any any
 remark --- These are outgoing DNS queries.
 permit udp any eq domain any gt 1023
 remark --- Permit older DNS queries and replies to primary DNS server.
 permit udp any eq domain any eq domain
 remark --- Permit legitimate business traffic.
 permit tcp any any established
 permit udp any range 1 1023 any gt 1023
 remark --- Deny all other DNS traffic.
 deny   udp any any eq domain
 deny   tcp any any eq domain
 remark --- Allow IPSec VPN traffic.
 permit udp any any eq isakmp
 permit udp any any eq non500-isakmp
 permit esp any any
 permit ahp any any
 permit gre any any
 remark --- These are Internet-sourced connections to !--- publicly accessible servers.
 permit tcp any any eq 22
 remark --- Explicitly deny all other traffic.
 deny   ip any any

interface Port-channel1.81
 ip access-group outside_acl_in in
DNS server для своих: Split DNS
В данном случае мы можем использовать функционал Split DNS:
ip domain lookup
ip domain timeout 2
ip domain name office.local
ip name-server 8.8.8.8
ip name-server 8.8.4.4
ip dns server

ip dns view no_dns_service_view
 no domain lookup
 no dns forwarding

ip dns view default
 domain timeout 2
 dns forwarder 8.8.8.8

ip dns view-list no_dns_service_list
 view no_dns_service_view 1

interface Port-channel1.81
 ip dns view-group no_dns_service_list
Источник:
Split DNS
http://www.cisco.com/c/en/us/td/docs/ios/12_4t/12_4t11/htspldns.html#wp1…
Просмотр и удаление кеша DNS (DNS cache)
show hosts
clear host all *