Introduction
Domain Name System (DNS) usually refers to the Phonebook of the Internet. In other words, DNS is a database that links strings (known as hostnames), such as www.mikrotik.com to a specific IP address, such as 159.148.147.196.
A MikroTik router with a DNS feature enabled can be set as a DNS cache for any DNS-compliant client. Moreover, the MikroTik router can be specified as a primary DNS server under its DHCP server settings. When the remote requests are enabled, the MikroTik router responds to TCP and UDP DNS requests on port 53.
When both static and dynamic servers are set, static server entries are preferred, however, it does not indicate that a static server will always be used (for example, previously query was received from a dynamic server, but static was added later, then a dynamic entry will be preferred).
When DNS server allow-remote-requests are used make sure that you limit access to your server over TCP and UDP protocol port 53 only for known hosts.
There are several options on how you can manage DNS functionality on your LAN — use public DNS, use the router as a cache, or do not interfere with DNS configuration. Let us take as an example the following setup: Internet service provider (ISP) → Gateway (GW) → Local area network (LAN). The GW is RouterOS based device with the default configuration:
- You do not configure any DNS servers on the «GW» DHCP server network configuration — the device will forward the DNS server IP address configuration received from `ISP` to `LAN` devices;
- You configure DNS servers on the «GW» DHCP server network configuration — the device will give configured DNS servers to `LAN` devices (also «/ip dns set allow-remote-requests=yes» must be enabled);
- «dns-none» configured under DNS servers on «GW» DHCP server network configuration — the device will not forward any of the dynamic DNS servers to `LAN` devices;
DNS configuration
DNS facility is used to provide domain name resolution for the router itself as well as for the clients connected to it.
| Property | Description |
|---|---|
| allow-remote-requests (yes | no; Default: no) | Specifies whether to allow router usage as a DNS cache for remote clients. Otherwise, only the router itself will use DNS configuration. |
| cache-max-ttl (time; Default: 1w) | Maximum time-to-live for cache records. In other words, cache records will expire unconditionally after cache-max-TTL time. Shorter TTLs received from DNS servers are respected. |
| cache-size (integer[64..4294967295]; Default: 2048) | Specifies the size of the DNS cache in KiB. |
| max-concurrent-queries (integer; Default: 100) | Specifies how many concurrent queries are allowed. |
| max-concurrent-tcp-sessions (integer; Default: 20) | Specifies how many concurrent TCP sessions are allowed. |
| max-udp-packet-size (integer [50..65507]; Default: 4096) | Maximum size of allowed UDP packet. |
| query-server-timeout (time; Default: 2s) | Specifies how long to wait for a query response from a server. |
| query-total-timeout (time; Default: 10s) | Specifies how long to wait for query response in total. Note that this setting must be configured taking into account «query-server-timeout» and the number of used DNS servers. |
| servers (list of IPv4/IPv6 addresses; Default: ) | List of DNS server IPv4/IPv6 addresses |
| cache-used (integer) | Shows the currently used cache size in KiB |
| dynamic-server (IPv4/IPv6 list) | List of dynamically added DNS servers from different services, for example, DHCP. |
|
doh-max-concurrent-queries (integer; Default: 50) |
Specifies how many DoH concurrent queries are allowed. |
|
doh-max-server-connections (integer; Default: 5) |
Specifies how many concurrent connections to the DoH server are allowed. |
|
doh-timeout (time; Default: 5s) |
Specifies how long to wait for query response from the DoH server. |
|
use-doh-server (string; Default: ) |
Specified which DoH server must be used for DNS queries. DoH functionality overrides «servers» usage if specified. The server must be specified with an «https://» prefix. |
|
verify-doh-cert (yes | no; Default: no) |
Specifies whether to validate the DoH server, when one is being used. Will use the «/certificate» list in order to verify server validity. |
[admin@MikroTik] > ip dns print
                      servers:
              dynamic-servers: 10.155.0.1
               use-doh-server:
              verify-doh-cert: no
   doh-max-server-connections: 5
   doh-max-concurrent-queries: 50
                  doh-timeout: 5s
        allow-remote-requests: yes
          max-udp-packet-size: 4096
         query-server-timeout: 2s
          query-total-timeout: 10s
       max-concurrent-queries: 100
  max-concurrent-tcp-sessions: 20
                   cache-size: 2048KiB
                cache-max-ttl: 1d
                   cache-used: 48KiB
Dynamic DNS servers are obtained from different facilities available in RouterOS, for example, DHCP client, VPN client, IPv6 Router Advertisements, etc.
Servers are processed in a queue order — static servers as an ordered list, dynamic servers as an ordered list. When DNS cache has to send a request to the server, it tries servers one by one until one of them responds. After that this server is used for all types of DNS requests. Same server is used for any types of DNS requests, for example, A and AAAA types. If you use only dynamic servers, then the DNS returned results can change after reboot, because servers can be loaded into IP/DNS settings in a different order due to a different speeds on how they are received from facilities mentioned above.
If at some point the server which was being used becomes unavailable and can not provide DNS answers, then the DNS cache restarts the DNS server lookup process and goes through the list of specified servers once more.
DNS Cache
This menu provides two lists with DNS records stored on the server:
- «/ip dns cache«: this menu provides a list with cache DNS entries that RouterOS cache can reply with to client requests ;
- «/ip dns cache all«: This menu provides a complete list with all cached DNS records stored including also, for example, PTR records.
You can empty the DNS cache with the command: «/ip dns cache flush».
DNS Static
The MikroTik RouterOS DNS cache has an additional embedded DNS server feature that allows you to configure multiple types of DNS entries that can be used by the DNS clients using the router as their DNS server. This feature can also be used to provide false DNS information to your network clients. For example, resolving any DNS request for a certain set of domains (or for the whole Internet) to your own page.
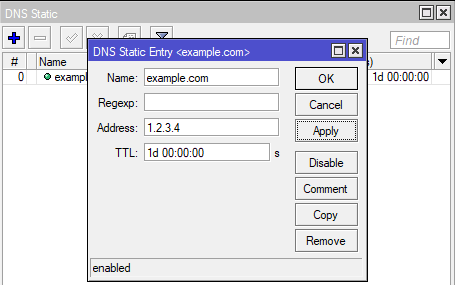
[admin@MikroTik] /ip dns static add name=www.mikrotik.com address=10.0.0.1
The server is also capable of resolving DNS requests based on POSIX basic regular expressions so that multiple requests can be matched with the same entry. In case an entry does not conform with DNS naming standards, it is considered a regular expression. The list is ordered and checked from top to bottom. Regular expressions are checked first, then the plain records.
Use regex to match DNS requests:
[admin@MikroTik] /ip dns static add regexp="[*mikrotik*]" address=10.0.0.2
If DNS static entries list matches the requested domain name, then the router will assume that this router is responsible for any type of DNS request for the particular name. For example, if there is only an «A» record in the list, but the router receives an «AAAA» request, then it will reply with an «A» record from the static list and will query the upstream server for the «AAAA» record. If a record exists, then the reply will be forwarded, if not, then the router will reply with an «ok» DNS reply without any records in it. If you want to override domain name records from the upstream server with unusable records, then you can, for example, add a static entry for the particular domain name and specify a dummy IPv6 address for it «::ffff».
List all of the configured DNS entries as an ordered list:
[admin@MikroTik] /ip/dns/static/print
Columns: NAME, REGEXP, ADDRESS, TTL
# NAME             REGEXP       ADDRESS   TTL
0 www.mikrotik.com               10.0.0.1  1d
1                  [*mikrotik*]  10.0.0.2  1d
| Property | Description |
|---|---|
| address (IPv4/IPv6) | The address that will be used for «A» or «AAAA» type records. |
| cname (string) | Alias name for a domain name. |
| forward-to | The IP address of a domain name server to which a particular DNS request must be forwarded. |
| mx-exchange (string) | The domain name of the MX server. |
| name (string) | Domain name. |
| srv-port (integer; Default: 0) | The TCP or UDP port on which the service is to be found. |
| srv-target | The canonical hostname of the machine providing the service ends in a dot. |
| text (string) | Textual information about the domain name. |
| type (A | AAAA | CNAME | FWD | MX | NS | NXDOMAIN | SRV | TXT ; Default: A) | Type of the DNS record. |
| address-list (string) | Name of the Firewall address list to which address must be dynamically added when some request matches the entry. Entry will be removed from the address list when TTL expires. |
| comment (string) | Comment about the domain name record. |
|
disabled (yes | no; Default: yes) |
Whether the DNS record is active. |
|
match-subdomain (yes | no; Default: no) |
Whether the record will match requests for subdomains. |
|
mx-preference (integer; Default: 0) |
Preference of the particular MX record. |
|
ns (string) |
Name of the authoritative domain name server for the particular record. |
|
regexp (POSIX regex) |
Regular expression against which domain names should be verified. |
|
srv-priority (integer; Default: 0) |
Priority of the particular SRV record. |
|
srv-weight (integer; Default: 0) |
Weight of the particular SRV record. |
|
ttl (time; Default: 24h) |
Maximum time-to-live for cached records. |
Regexp is case-sensitive, but DNS requests are not case sensitive, RouterOS converts DNS names to lowercase before matching any static entries. You should write regex only with lowercase letters. Regular expression matching is significantly slower than plain text entries, so it is advised to minimize the number of regular expression rules and optimize the expressions themselves.
Be careful when you configure regex through mixed user interfaces — CLI and GUI. Adding the entry itself might require escape characters when added from CLI. It is recommended to add an entry and the execute print command in order to verify that regex was not changed during addition.
DNS over HTTPS (DoH)
Starting from RouterOS version v6.47 it is possible to use DNS over HTTPS (DoH). DoH uses HTTPS protocol to send and receive DNS requests for better data integrity. The main goal is to provide privacy by eliminating «man-in-the-middle» attacks (MITM).
Currently, DoH is not compatible with FWD-type static entries, in order to utilize FWD entries, DoH must not be configured.
Watch our video about this feature.
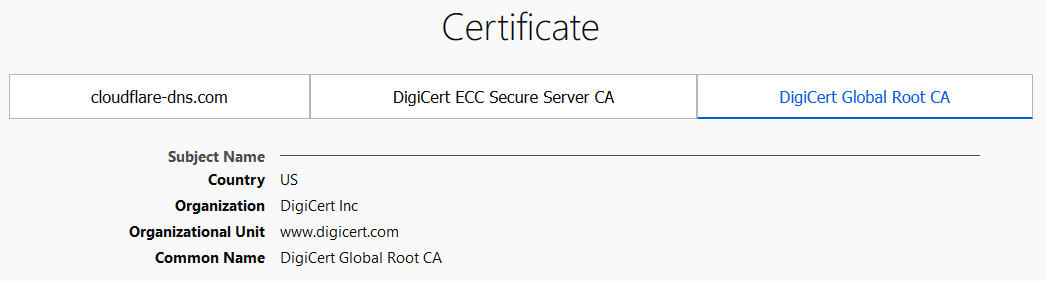
It is strongly recommended to import the root CA certificate of the DoH server you have chosen to use for increased security. We strongly suggest not using third-party download links for certificate fetching. Use the Certificate Authority’s own website.
There are various ways to find out what root CA certificate is necessary. The easiest way is by using your WEB browser, navigating to the DoH site, and checking the security of the website. Using, for example, Firefox we can see that DigiCert Global Root CA is used by the Cloudflare DoH server. You can download the certificate straight from the browser or navigate to the DigiCert website and fetch the certificate from a trusted source.
Download the certificate, upload it to your router and import it:
/certificate import file-name=DigiCertGlobalRootCA.crt.pem
Configure the DoH server:
/ip dns set use-doh-server=https://cloudflare-dns.com/dns-query verify-doh-cert=yes
Note that you need at least one regular DNS server configured for the router to resolve the DoH hostname itself. If you do not have any dynamical or static DNS server configured, add a static DNS entry for the DoH server domain name like this:
/ip dns set servers=1.1.1.1
RouterOS prioritizes DoH over the DNS server if both are configured on the device.
If /certificate/settings/set crl-use is set to yes, RouterOS will check CRL for each certificate in a certificate chain, therefore, an entire certificate chain should be installed into a device — starting from Root CA, intermediate CA (if there are such), and certificate that is used for specific service.
For example, Google DoH full chain contains three certificates, Cloudflare has three certificates, and NextDNS has four certificates.
Known compatible/incompatible DoH services
Compatible DoH services:
-
Cloudflare
-
Google
-
NextDNS
-
OpenDNS
Incompatible DoH services:
-
Mullvad

Сегодня поговорим о DNS в рамках использования на MikroTik, настроим Server да и в общем затронем немного истории этой технологии. И так начнём.
DNS – как много в этом слове. Domain Name System – система доменных имён или та штука, которая преобразует имя в IP. Представитель мамонтов в нашем мире. RFC 1034/1035 были выпущены в ноябре 1987 года. На сегодняшний день сервисов, его не использующих практически нет или что-то совсем специфическое. Он как инфраструктурный сервис — без него никуда. Он может не только преобразовать имя в IP, но и наоборот, такая запись называется PTR (в режиме кэширования).
Если вы хотите углубить свои знания по работе с роутерами MikroTik, то наша команда рекомендует пройти курсы которые сделаны на основе MikroTik Certified Network Associate и расширены автором на основе опыта . Подробно читайте ниже.
А ещё, многие компании типа Google предоставляют вам свои бесплатные DNS сервера (8.8.8.8 и 8.8.4.4) для публичного использования, взамен они собирают и продают статистику по запрашиваемым записям. С 1987 года прошло много вещей с DNS, к нему прикрутили DNSSEC – это когда ваш сервер хранит записи в зашифрованном виде у себя внутри, DoH – когда ваш запрос идёт не в открытом виде, а инкапсулируется в HTTPS, DoT – аналогично предыдущему, но только сразу в TLS, без HTTP и многое другое. Протокол работает по UDP/TCP порт 53. Сами запросы бегают по UDP, а TCP используется обычно для трансфера между основным и вторичным серверами или в терминологии Microsoft для репликации зон в Active Directory.
До версии 6.47 реализация от Mikrotik поддерживала только A статические записи. Теперь вы можете добавлять статикой следующие типы записей:
- AAAA;
- CNAME;
- FWD;
- MX;
- NS;
- NXDOMAIN;
- SRV;
- TXT.
Содержание
- Настройка DNS сервера
- Делаем DNS Mikrotik общедоступным
- Кэш DNS сервера
- Создание статических записей
Настройка DNS сервера
Сами глобальные настройки и живут в IP – DNS.
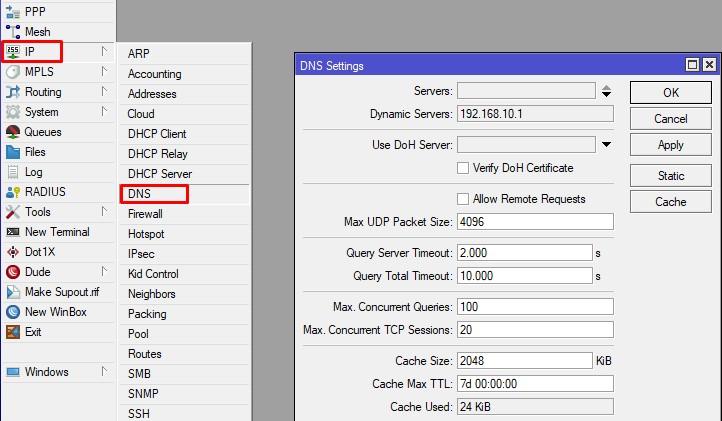
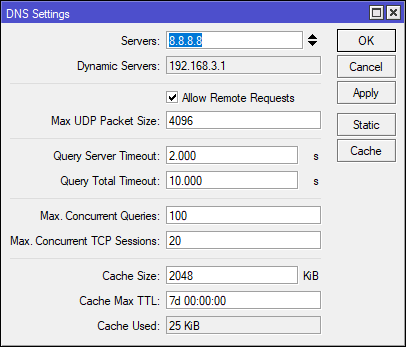
Начнём сверху вниз. Servers – это серверы имён для Mikrotik. Ему же надо имена разрешать, вот здесь мы и указываем адреса серверов. Давайте позволим Google и Cloudflare собирать наши данные.

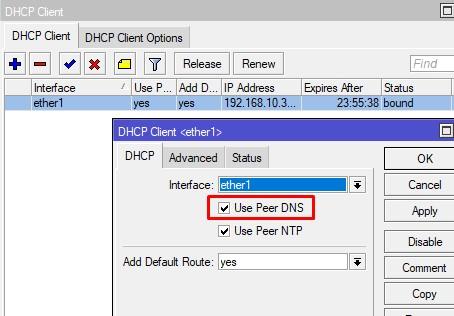
Dynamic Server – это адреса серверов которые мы получили по DHCP. Если посмотреть на интерфейс клиента DHCP, то увидим ту самую галочку, которая за это и отвечает.
Если ее снять, то IP сервера удалится из Dynamic, так и сделаем.

А что будет, если у нас указаны статические и динамические адреса имён?
Если указана статика, то она будет более предпочтительна, однако, это не означает что они будут использоваться всегда (ранее запрос был получен от динамики). Чтобы у вас была контролируемая ситуация, оставляйте одно из двух.
Делаем DNS Mikrotik общедоступным
Чтобы наш девайс мог отвечать на запросы, а не только их запрашивать у вышестоящих, нам нужно активировать галочку – Allow Remote Requests.
Однако, нужно понимать, что в глобальных настройках вы не можете указать, с каких адресов или сетей сервер будет принимать запросы. После ее активации, на всех адресах, что заданы в девайсе, включается листнинг DNS запросов по TCP/UDP. Т.е. если вы имеете публичный IP, то недоброжелатели буду использовать вас для своих целей. Чтобы этого не было, вам нужно настроить фаервол, и желательно с использованием Address List, в которые вы и укажете адреса/подсети, откуда разрешаете TCP/UDP по 53 порту.
Очень частая загрузка CPU на 100% у хозяев, кто не закрыл снаружи резолв имён. Хорошо видно в Tools – Profile.
Кэш DNS сервера
Нажав на кнопку Cache, мы увидим все за кэшированные записи, что резолвил девайс.

Если хотим его очистить, то жмём Flush Cache.
По умолчанию кэшированные записи будут иметь TTL (время жизни) в зависимости от значения в зоне прямого просмотра. Я обычно искусственно сокращаю максимальное время жизни с 7 дней на 2 часа.
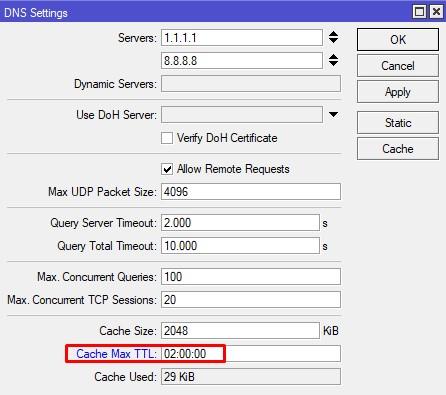
Отрегулировать размер кэша можно в Cache Size. Но зачастую его вполне хватает.
Создание статических записей
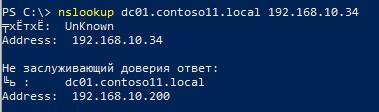
Как я говорил ранее, с версии 6.47 появилась поддержка дополнительных типов записей. У меня тут рядом завалялась виртуальная машина с домен контроллером на Windows Server, на ней есть зона contoso11.local. Предлагаю сделать перенаправление всех запросов зоны contoso11.local на адрес 192.168.10.200.

Далее делаем nslookup любой записи из зоны и смотрим на ответ
Взглянем на кэш

Аналогично во вкладке Static, вы можете создать другие типы записей, но, к сожалению, PTR пока не доступна.
На этом все, надеюсь информация по настройке DNS на Микротике была полезна, а общем то ничего сложного. Спасибо за внимание!
89 вопросов по настройке MikroTik
Вы хорошо разбираетесь в Микротиках? Или впервые недавно столкнулись с этим оборудованием и не знаете, с какой стороны к нему подступиться? В обоих случаях вы найдете для себя полезную информацию в курсе «Настройка оборудования MikroTik». 162 видеоурока, большая лабораторная работа и 89 вопросов, на каждый из которых вы будете знать ответ. Подробности и доступ к началу курса бесплатно тут.
 Со службами DHCP и DNS знакомы, пожалуй все, ведь это базовые службы для сетей любого размера. Но их настройка обычно сводится к установке базовых параметров и затем о них забывают. Действительно, ну что может быть в них интересного, особенно если это неполноценные сервера, а службы роутера. Это так, если говорить о бытовых роутерах, где пользователю стараются не давать в руки лишних инструментов, но RouterOS рассчитана на иную аудиторию и предоставляет широкий спектр возможностей, которыми глупо не воспользоваться.
Научиться настраивать MikroTik с нуля или систематизировать уже имеющиеся знания можно на углубленном курсе по администрированию MikroTik. Автор курса, сертифицированный тренер MikroTik Дмитрий Скоромнов, лично проверяет лабораторные работы и контролирует прогресс каждого своего студента. В три раза больше информации, чем в вендорской программе MTCNA, более 20 часов практики и доступ навсегда.
DNS (Domain Name System)
В отличие от DHCP считается, что свой DNS — это удел крупных сетей, а небольшие организации вполне могут жить и без нее, используя сервера провайдера или публичные сервера. Отчасти это так, но упуская из своих рук одну из ключевых сетевых служб администратор теряет многие инструменты контроля и управления в собственной сети.
Как работает система DNS мы рассказывали в одной из наших статей, рекомендуем ее к прочтению, особенно если вы не до конца разбираетесь в вопросе. Основное, на что нужно обратить внимание — это иерархичность системы. Данные зон хранятся на собственных серверах и для получения информации из них следует прибегать к рекурсии. Это достаточно затратный процесс, поэтому многие сервера кешируют запросы и отвечают на повторные обращения самостоятельно.
Скорость ответа на DNS-запрос очень важна для комфортного использования интернета. Внешне это может проявляться как «задумчивость» браузера, который некоторое время «думает», а только потом начинает грузить страницу. При этом сама скорость канала может быть высокой, а пинг к требуемому серверу небольшим. Неопытного админа такая ситуация может сильно озадачить, но все просто — это долго отвечает используемый DNS-сервер. Ведь прежде, чем начать взаимодействие с сервером, браузер должен получить от DNS-клиента его адрес, передав последнему доменное имя.
Mikrotik дает нам возможность использовать кеширующий DNS-сервер прямо на роутере и если вы настроили использование роутера в качестве DNS — то вы его уже используете. Еще раз перейдем в IP — DNS и внимательно посмотрим на настройки:
 В самом низу расположены настройки кеша: его размер (Cache Size) и максимальное время хранения записей (Cache Max TTL). Еще ниже располагается показатель использования кеша — Cache Used — который показывает его текущий размер. Если он начинает приближаться к размеру кеша, то последний следует увеличить. Просмотреть кеш можно нажав на кнопку Cache.
Глядя на значение TTL, можно подумать, что это очень много, целая неделя. Но это — максимальное время хранения записи, реальное время хранения определяется временем TTL в SOA-записи домена, причем Mikrotik использует минимальное значение — Minimum TTL. В этом несложно убедиться, мы очистили кеш и посетили один из своих сайтов, минимальный TTL которого равен 4 часам:
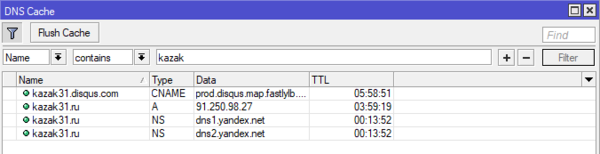 Как видим, Mikrotik использовал значение TTL из SOA-записей, ни о каких 7 днях речи не идет. Тогда для чего нужна эта настройка? Вы можете обновлять кеш чаще, чем это указано в TTL-домена. Если значение максимального TTL Mikrotik будет меньше, чем указанное в SOA-домена, то будет использоваться именно оно.
Это может быть полезным, если вы внесли какие-либо изменения во внешнюю зону и желаете быстрее обновить кеш. Как показывает практика, публичные сервера, такие как Google, OpenDNS или Яндекс тоже часто игнорируют TTL из SOA и обновляют свой кеш чаще.
Очистить кеш можно кнопкой Flush Cache в окне Cache или командой в терминале:
ip dns cache flushНо это еще не всё, изучение кеша может быть полезным для изучения сетевой активности пользователей, если они используют в качестве DNS ваш роутер — то вся их сетевая активность отразится в кеше. Говорите, никто не сидит в соцсетях?
 Поэтому, если у вас нет иных инструментов логирования и статистики, то изучение записей кеша вполне позволит получить картину сетевой активности ваших пользователей.
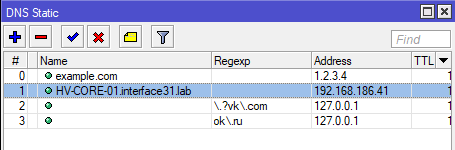
На этом закончим с кешем и перейдем к другому разделу — Static. Он позволяет создавать нам собственные записи типа A (и больше ничего кроме них). Не густо, но основную часть потребностей это перекрывает. Перенесли сайт на новый сервер? Не нужно ждать пока обновятся DNS-записи, заходим в раздел Static и создаем собственную запись:
 Проверим, как это работает. Выполним разрешение имени на клиенте:
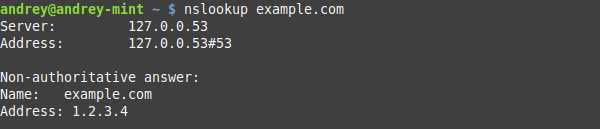 Как видим — все работает отлично.
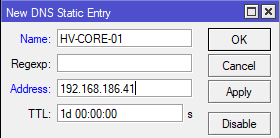
Отдельный разговор — плоские имена. В одноранговой сети часто бывает нужно указать имя узла, который не поддерживает NetBIOS, скажем ноду Hyper-V Server или машину с Linuх. Аналогично создаем запись:
 Но имейте ввиду, работать такое разрешение имен будет только на Windows машинах, на Linux вы получите ошибку:
 Но так как большинство сетей имеет преимущественно Windows ПК, то особых проблем плоские имена не доставят, и вы можете смело добавлять их записи на DNS Mikrotik вместо того, чтобы прописывать в hosts на каждой машине.
Так так, скажет внимательный читатель, это же можно использовать для блокировки нежелательных ресурсов и будет прав. Если мы не хотим, чтобы пользователи сидели в соцсетях, то добавим на сервер записи, который будут разрешать такие запросы в 127.0.0.1:
 Проверим?
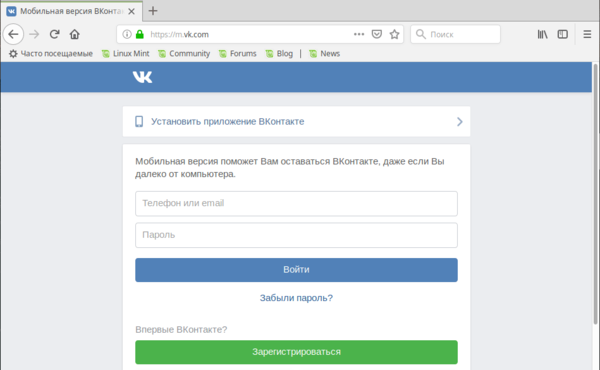
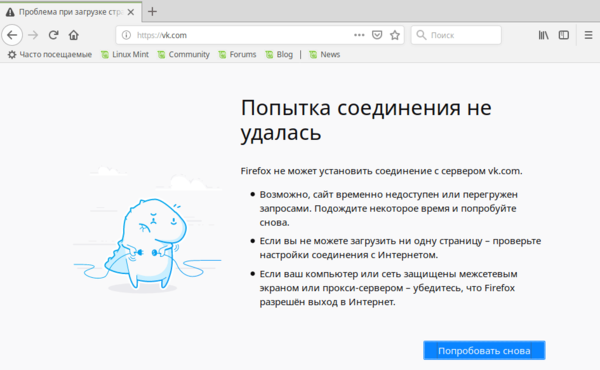 Вроде бы работает, но недостаток такого метода, что мы заблокировали только основной домен и пользователь легко сможет зайти через мобильный поддомен:
 Чтобы этого избежать следует использовать регулярные выражения. К сожалению, в большинстве инструкций в интернете приводятся неправильные выражения, с которыми фильтр работать не будет, поэтому мы советуем использовать для создания и проверки регулярных выражений ресурс regex101.com. Это избавит вас от ошибок и вопросов в стиле «я сделал все как написано в статье, но ничего не работает».
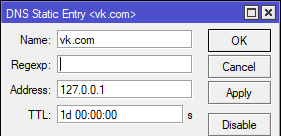
Скажем, чтобы заблокировать домен vk.com со всеми поддоменами нам потребуется выражение:
\.?vk\.comВнесем его в соответствующее поле Mikrotik:
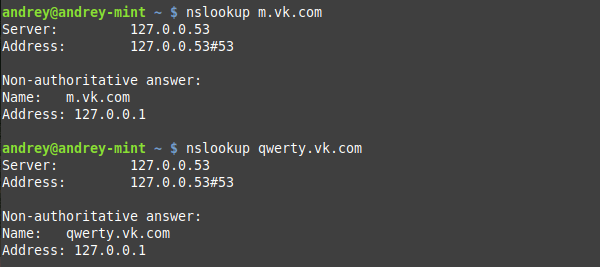
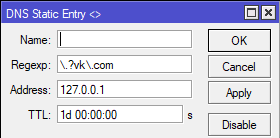 И проверим, теперь любое, даже заведомо не существующее имя в домене vk.com будет разрешаться в 127.0.0.1, что нам и требовалось.
Но это правило заблокирует также любые ресурсы, которые заканчиваются на vk.com, для того, чтобы этого избежать, нам потребуется более сложное выражение:
^([A-Za-z0-9.-]*\.)?vk\.comВ небольших сетях, где пользователи имеют достаточно прав, всю эту идиллию можно быстро перечеркнуть, вручную прописав собственные DNS. Как с этим бороться? Решение в лоб — заблокировать прохождение DNS-запросов в цепочке FORWARD, но тогда у «продвинутого» пользователя вообще перестанет работать интернет, поэтому мы поступим по-другому.
Откроем IP — Firewall — NAT и добавим правило: Chain: dstnat, protocol: udp, Dst. Port: 53 и на закладке Action выберем действие redirect.
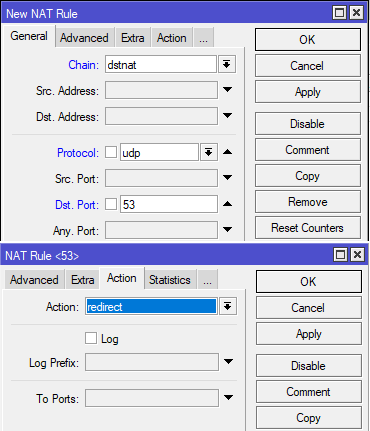 Потом создаем точно такое же правило для протокола tcp. Эти же самые действия можно быстро выполнить в терминале:
ip firewall nat
add chain=dstnat protocol=udp dst-port=53 action=redirect
add chain=dstnat protocol=tcp dst-port=53 action=redirect
Теперь любые DNS-запросы от пользователей сети будут перенаправляться на наш DNS-сервер на роутере, что сделает любые попытки обойти локальный DNS бессмысленными.
Как видим, DNS-сервер роутера Mikrotik, несмотря на кажущуюся простоту, в общем не так уж и прост и дает в руки администратора достаточно широкие возможности.
DHCP (Dynamic Host Configuration Protocol)
Когда речь заходит о DHCP, то обычно имеют ввиду автоматическое присвоение сетевых параметров, таких как IP-адрес, маска, шлюз и DNS-сервера. Но на самом деле возможности протокола намного шире и позволяют настроить очень многие сетевые параметры. Все возможности протокола описаны в RFC 2132, но мы не будем забираться столь глубоко, а рассмотрим в качестве примера только несколько наиболее популярных опций.
Прежде всего это Option 15 (DNS Domain Name) — которая позволяет автоматически настроить DNS-суффикс подключения, что позволяет снять определенный ряд проблем, связанный с использованием плоских имен.
Чтобы создать любую DHCP опцию потребуется перейти в IP — DHCP Server — Options и добавить там новую запись:
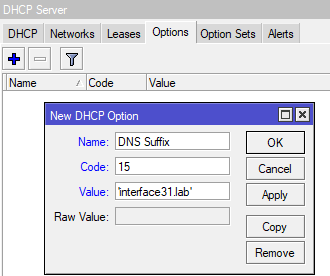 Поле Name содержит имя опции, можем задать его произвольно, так чтобы нам потом было понятно, что это такое и для чего нужно. Code — код опции, в нашем случае 15, Value — значение, в нашем случае это строка, поэтому обрамляем ее одиночной кавычкой. Тоже самое можно быстро сделать в терминале:
ip dhcp-server option
add name="DNS Suffix" code=15 value="'interface31.lab'"
Обратите внимание, что значение value берется в кавычки два раза, в двойные и одинарные.
Опции можно (и нужно) объединять в наборы — Option Set, даже несмотря на то, что во многих сценариях их можно указывать непосредственно. Если в будущем вы надумаете что-то поменять, то достаточно будет просто изменить состав набора, в противном случае вам нужно будет вспомнить все места, где вы использовали некую опцию и заменить ее на новую (или удалить / добавить). Перейдем на одноименную закладку и создадим новый набор. Пока в него будет входить только одна опция:
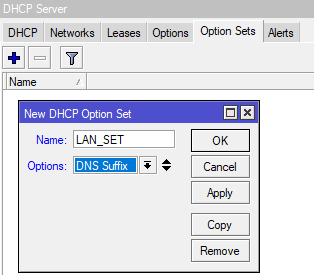
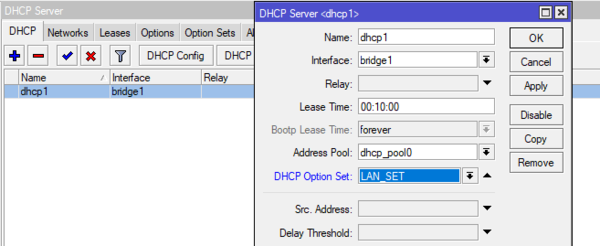
Наборам желательно давать осмысленные названия, чтобы впоследствии вы легко могли понять для чего он предназначен. Теперь назначим его для применения на всю область DHCP-сервера. Перейдем на закладку DHCP и откроем запись нашего сервера, в поле DHCP Option Set укажем имя созданного нами набора.
Теперь обновим параметры DHCP и сразу увидим полученный DNS-суффикс:
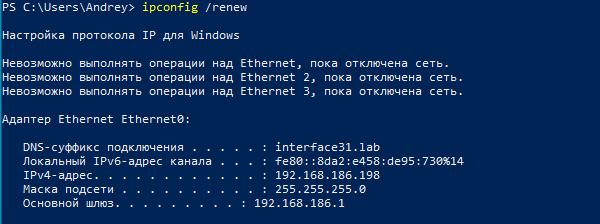 После этого все плоские имена, которые вы добавили на DNS-сервер следует дополнить до FQDN, т.е. вместо HV-CORE-01 написать hv-core-01.interface31.lab (регистр записи значение не имеет).
 Проверим:
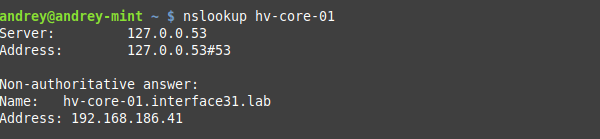 Как видим, одной проблемой стало меньше, плоские имена нормально дополняются до FQDN и нормально разрешаются на нашем DNS вне зависимости от используемой ОС.
Также довольно часто используются опции: 42 (NTP Servers), 60, 66 (TFTP Server Name), 67 (Bootfile-Name). Имейте ввиду, что ОС Windows не запрашивает у DHCP-сервера опцию 42 и для нее установить таким образом сервер времени не удастся.
Отдельно коснемся того, как указывать IP-адреса. Протокол предусматривает передачу значений в шестнадцатеричном (Hex) формате, но RouterOS позволяет использовать и строковые значение, для этого значение Value должно содержать привычное написание адреса, взятое в одинарные кавычки:
'192.168.186.1'или его шестнадцатеричное значение, которое должно начинаться с префикса 0х:
0xc0a8ba01Если адресов несколько, то указываем каждый, взяв в одинарные кавычки, без пробелов между ними:
'192.168.186.1''192.168.186.2'В шестнадцатеричном виде мы добавляем второе значение в конец строки, также без пробелов:
0xc0a8ba01c0a8ba02В терминале это будет выглядеть так:
ip dhcp-server option
add name="NTP1" code=42 value="'192.168.186.1'"
или
add name="NTP1" code=42 value="0xc0a8ba01"Для перевода значений IP-адреса в шестнадцатеричное значение, можно использовать любой онлайн-калькулятор, мы при подготовке данного материала использовали этот.
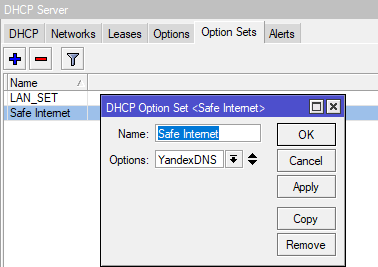
Еще одна интересная возможность открывается в выдаче отдельным узлам своего набора опций. Следующий сценарий подойдет домашним пользователям, как достаточно простой и эффективный способ обеспечить безопасность ребенка в интернет.
Суть ее состоит в следующем: мы выборочно изменяем DNS-сервера детских сетевых устройств на безопасные DNS, например, Яндекс Семейный, SkyDNS, AdGuard и т.д. Тем, кто захочет реализовать этот сценарий в сети предприятия следует иметь ввиду, что в этом случае таким клиентам будут недоступны возможности собственного DNS-сервера, т.е. все то, о чем мы говорили в первой части статьи.
Итак, сначала создадим новую DHCP опцию с кодом 6 и укажем в значении сервера Яндекс Семейного:
ip dhcp-server option
add name="YandexDNS" code=6 value="'77.88.8.7''77.88.8.3'"
или
add name="YandexDNS" code=6 value="0x4d5808034d580807"Теперь создадим новый набор опций и добавим туда опцию YandexDNS.
 Теперь перейдем на закладку Leases, где находится список выданных в аренду адресов и найдем там детское устройство, после чего откроем запись и выполним резервирование адреса, нажав Make Static:
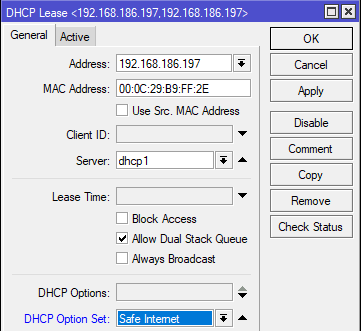
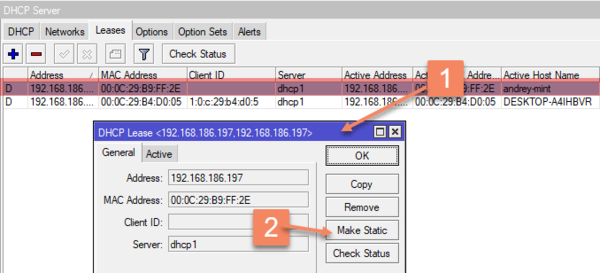 Закроем и заново откроем эту запись и в поле DHCP Option Set укажем созданный нами набор с безопасными серверами:
 Теперь проверим на клиенте, какие DNS-сервера он получил:
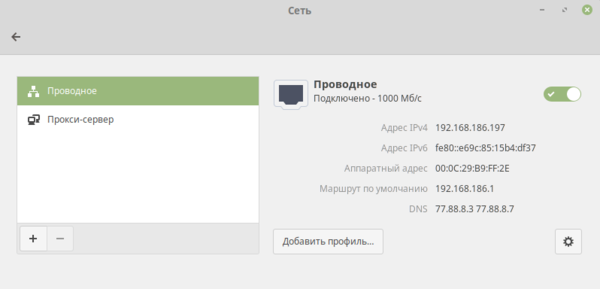 Все верно, это семейные сервера Яндекса. Попробуем посетить какой-нибудь сайт «для взрослых»:
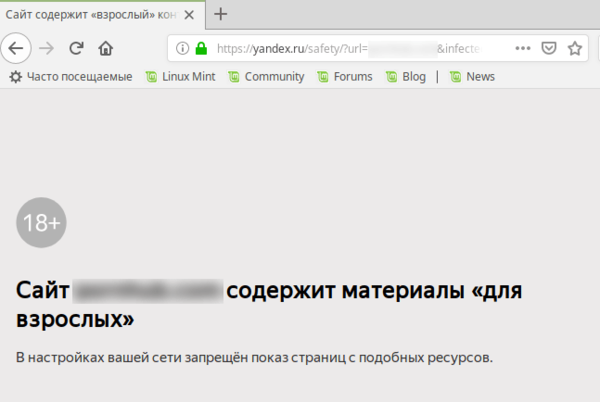 Отлично, фильтрация работает, теперь можно гораздо меньше переживать, что ребенок увидит неподобающий контент, в тоже время взрослые члены семьи могут использовать интернет без ограничений.
В прошлой части статьи мы рассказывали, как предотвратить подмену DNS на клиентском ПК, данное решение совместно с этими правилами работать не будет. Можно, конечно, добавить исключение, но мы подойдем с другой стороны. Наша основная цель в этом сценарии — это оградить ребенка от посещения ненадлежащих ресурсов, поэтому при попытке подмены DNS мы должны направлять все запросы не на роутер, а на безопасные DNS, в противном случае попытка обхода фильтрации достигнет своей цели.
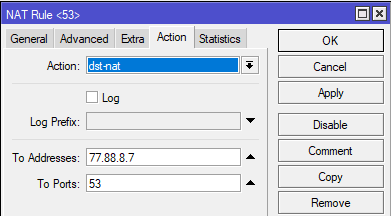
Поэтому заменим в правилах действие redirect на действие dst-nat, в поле To Addresses указываем один из серверов семейного Яндекса, а в поле To Ports — порт 53.
 Также можно быстро добавить нужные правила командой:
ip firewall nat
add chain=dstnat protocol=udp dst-port=53 action=dst-nat to-addresses=77.88.8.7 to-ports=53
add chain=dstnat protocol=tcp dst-port=53 action=dst-nat to-addresses=77.88.8.7 to-ports=53
Напоследок рассмотрим опции 121 (Classless Static Routes) и 249 (MS Routes), которые предназначены для передачи статических маршрутов. Первая опция предусмотрена RFC 2132, вторая является «художественной самодеятельностью» Microsoft, поэтому следует указывать обе из них с одинаковым содержимым.
Во избежание ошибок мы советуем задавать маршруты в HEX-формате, синтаксис предусмотрен следующий:
[маска сети назначения][сеть назначения][шлюз]Если маршрутов несколько — добавляем значения к конец строки, без пробелов. Допустим, мы хотим добавить маршрут в сеть 192.168.4.0/22 через 192.168.186.92 и в сеть 10.8.0.0/24 через 192.168.186.94. Чтобы правильно получить шестнадцатеричное значение маски следует использовать такое представление: 0.0.0.22 или 0.0.0.24, забьем все значения в онлайн калькулятор и получим:
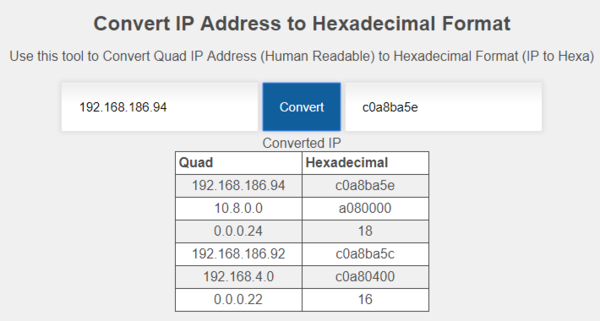
А вот теперь начнется небольшая магия, прежде всего обратим внимание на то, что количество символов в шестнадцатеричном числе всегда должно быть четным, но в строке, соответствующей 10.8.0.0 — нечетное количество символов, так как калькулятор отбросил ведущий ноль, поэтому вместо a080000 мы должны использовать 0a08000. Имеем это ввиду, так как разные калькуляторы могут по-разному обрабатывать ведущий ноль.
Затем от адреса сети, мы должны отбросить столько нулевых октетов, сколько нулей содержится в маске, в HEX-значении это по два нуля. Проще говоря для сетей /24 — /17 мы должны убрать в HEX-значении сзади два нуля, для сетей /16 — /9 — четыре нуля, для сетей /8 — /1 — шесть нулей. Таким образом 0a08000 должно превратиться в 0a0800, а c0a80400 в c0a804.
Таким образом первый маршрут должен выглядеть так:
16c0a804c0a8ba5cа второй так:
180a0800c0a8ba5eИтоговое значение будет (не забываем про 0x вначале):
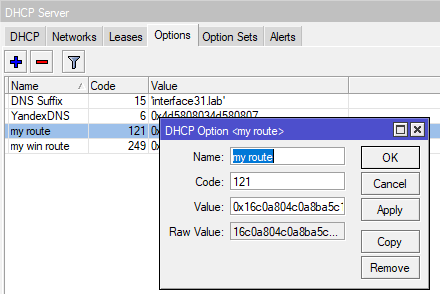
0x16c0a804c0a8ba5c180a0800c0a8ba5eДобавим опции командами:
ip dhcp-server option
add name="my route" code=121 value="0x16c0a804c0a8ba5c180a0800c0a8ba5e"
add name="my win route" code=249 value="0x16c0a804c0a8ba5c180a0800c0a8ba5e"
или через графический интерфейс:
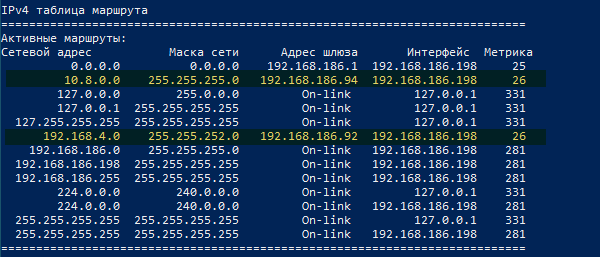
 Обновим параметры DHCP и проверим таблицы маршрутизации на клиентах. Windows-клиент:
 Linux-клиент:
 Как видим — все работает, маршруты добавились и еще одной заботой у администратора стало меньше.
В заключение хочется добавить, что данная статья не должна рассматриваться вами как догма, все пункты которой требуется обязательно применить. Данный материал имеет цель показать те скрытые возможности привычных сервисов, которые обычно не затрагиваются в руководствах по базовой настройке. После чего уже сам администратор должен решать, что он будет применять в своей сети и зачем. К сожалению, объем статьи не позволяет нам охватить все возможности DHCP, что-то из них мы отразим в будущих статьях, а что-то вам придется изучать самостоятельно. Но надеемся, что данный материал окажется вам полезен и даст дополнительный стимул к изучению всех возможностей используемых протоколов.
Научиться настраивать MikroTik с нуля или систематизировать уже имеющиеся знания можно на углубленном курсе по администрированию MikroTik. Автор курса, сертифицированный тренер MikroTik Дмитрий Скоромнов, лично проверяет лабораторные работы и контролирует прогресс каждого своего студента. В три раза больше информации, чем в вендорской программе MTCNA, более 20 часов практики и доступ навсегда.
Инструкция содержит описание по настройке DNS сервера в MikroTik, общие сведения о работе с DNS серверами: динамическими и Active Directory.
- Настройка DNS сервера
- Отключение динамического DNS
- Добавление DNS записей
- Очистка кэша
- Задать вопрос по настройке DNS сервера
Нужна настройка DNS сервера в MikroTik?
Настройка сервисов на маршрутизаторах MikroTik: подключение интернета, DHCP, brige, VLAN, WiFi, Capsman, VPN, IpSec, PPTP, L2TP, Mangle, NAT, проброс портов, маршрутизация(routing), удаленное подключение и объединение офисов.
До настройки MikroTik DNS сервера
Разные конфигурации как локальной сети так и интернет подключений обязывают рассматривать подводные камни и проходить к неким ограничениям по настройке и использованию MikroTik в качестве DNS сервера. Подчеркнем самые распространенные случаи:
- В локальной сети присутствует Active Directory. В этом случае роль DNS сервера лучше передать DNS серверу, который работает в связке с AD. Это конфигурация будет обеспечивать обработку DNS запросов на одном сервере, без переадресации или промежуточного кеширования.
- Маршрутизатор(роутер) MikroTik имеет несколько Интернет подключений WAN. Нужно контролировать список DNS серверов, с которыми синхронизируется MikroTik и маршрутизацию, чтобы исключить ситуацию, когда обращение к DNS серверу провайдера №1 происходит по каналу интернет провайдера №2.
- Удаленные запросы. Этот пункт больше связан с настройкой FireWall, но упуская его из виду, можно значительно повысить нагрузку на маршрутизатор(роутер). Речь идет о запросах: гостевой сети с интерфейсов LAN и цепочки input на WAN интерфейсах.
Как настроить DNS сервер в MikroTik
Настройка находится в IP→DNS

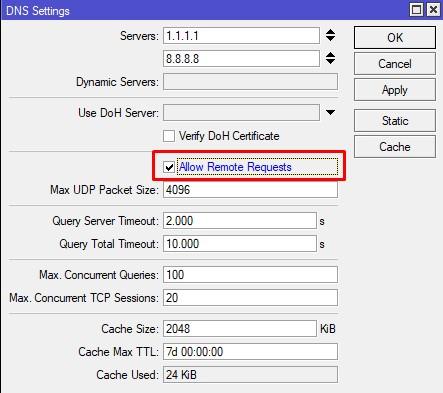
/ip dns
set allow-remote-requests=yes servers=8.8.8.8,8.8.4.4
Allow remote requests – разрешение на обработку удаленных DNS запросов. Т.е. если указать MikroTik в качестве DNS сервера, он обработает все поступающие запросы.
Отключение Dynamic DNS серверов в MikroTik
Подключение типа dhcp client, pppoe client, LTE имеют активный параметр Use Peer DNS. Таким образом запись, которая доступна при подключении такого соединения передаёт динамический DNS сервер в соответствующий раздел RouterOS роутера MikroTik. Чтобы этого избежать, нужно отключить соответствующие опции в параметрах подключений, к примеру:
Отключение динамического DNS для DHCP клиента

Отключение динамического DNS для PPPOE соединения

Добавление в MikroTik DNS записей типа A, TXT, CNAME, MX
На роутере MikroTik функционирует полноценная служба DNS сервера, функционал которого включает использование статических записей.
Настройка находится в IP→DNS→Static

Очистка DNS кэша в MikroTik
При работе с любым сервером DNS, а в частности изменением старых записей, требуется очистить кэш DNS, чтобы клиент получил свежие записи. Данная очистка совершается через кнопку Flush Cache.
Настройка находится в IP→DNS→Cache→Flush Cache

Есть вопросы или предложения по настройке DNS сервера в MikroTik? Активно предлагай свой вариант настройки! Оставить комментарий →
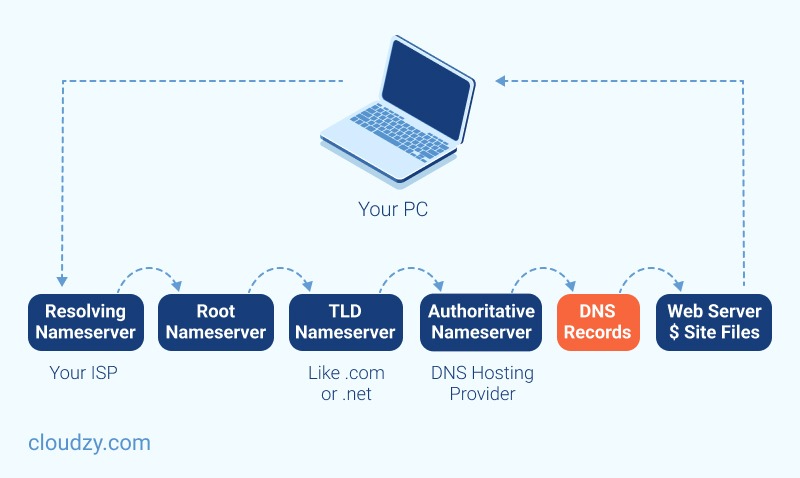
Have you ever wondered how exactly hostnames are linked to IP addresses? Like, how is this process happening? Or, even more specifically, how do we avoid memorizing long IP addresses and complex alphanumerics in the IPV6 system? In a nutshell, DNS Server is the answer to these questions. This article will introduce essential concepts and discuss the MikroTik DNS server and its setup. So, You can use this step-by-step tutorial to understand how to do DNS configuration on MikroTik.
What is DNS & How Does It work?
Domain Name Server (DNS) is essential for a computer network, meaning that there is no possibility of web communication without its presence.
A Domain Name System (DNS) converts domain names into IP addresses, allowing browsers to access different websites and other internet resources. You can use IP Addresses to locate every device on the internet. But instead of memorizing a long list of IP addresses, you can enter the website’s name, and then the DNS gets its IP address for you. MikroTik Router has both DNS Client and DNS Server features. The Mikrotik DNS Server has features that provide domain name resolution for the clients connected to it.
A user types a domain name such as www.mikrottik.com in the browser’s navigation bar; then, the browser sends a request to the DNS server to get the IP Address of that domain name. The DNS server responds with the associated IP address of the domain. The browser can communicate with the Web Server to get the requested information by getting the IP address. You should pay attention that if you use a public DNS server, every time a user requests for different domains, the request goes through your WAN connection, using paid bandwidth and causing latency.
However, if you use the DNS feature of MikroTik Router, it will cache the DNS information from the root DNS Server and reply to DNS queries to the connected clients. This technique provides you with faster solutions and saves paid bandwidth.
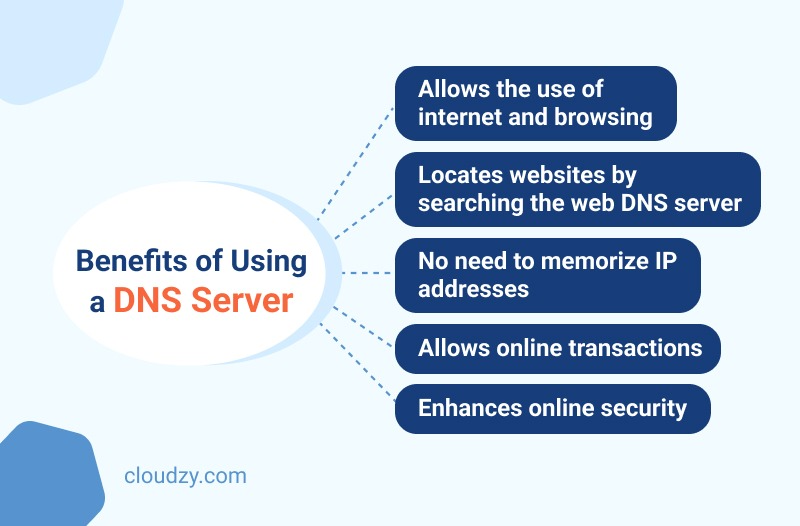
What are the benefits of using a DNS server?
A Domain Name System is a centralized utility that gives the IP addresses a domain name.
Here’s a list of the advantages of DNS servers:
- DNS is the only system that allows online users to browse and use the internet.
- Only by typing the name of websites DNS servers help you in finding the website using your web browser (like Chrome, Safari, Firefox, and Internet Explorer)
- You don’t need to memorize numbers. Meaning that, Instead of IP addresses or a string of numbers, you enter the domain name or URL; this makes searching through the internet easier for you.
- DNS servers make online transactions possible.
- DNS servers let you identify the data service’s technical functionality, defining the DNS protocol, detailed data structures specification, and data communication exchanges. Moreover, DNS adds an extra layer of security, making the process much safer.
- DNS enhances the security of DNS infrastructure, which is an essential factor for dynamic, secure updates.
- When customers visit your website, they will experience more reliable, secure, and faster online transactions.
The question that you probably have in mind right now is How to configure the Mikrotik DNS server?
Do I need to get a Mikrotik DNS Server? Before moving on to the tutorials, you need to configure DNS on Mikrotik, I want to give you some insights on using a VPS as your Mikrotik DNS server.
VPS and MikroTik — Do I need One?
A Virtual Private Server is a virtual machine created on a powerful physical server. Each VPS owns a dedicated part of the host server’s resources like RAM, CPU, and storage. You can choose whatever OS you like for your VPS, including the RouterOS. The benefit of having a VPS as your router is that you don’t have to dedicate a whole computer to it. You can use your own home laptop and connect to your MikroTik VPS and use it as your Router. Unlike your home computer, this VPS will be online and working 24/7, with internet connection and power provided by the data center, meaning that you wouldn’t need an expensive internet provider, do not need to keep your home computer on all the time, and no extra cost will be billed for electricity.
Cloudzy is a VPS provider with services exclusively offered for MikroTik. With Cloudzy’s MikroTik VPS, you can get everything you need for your router at a fraction of cost. You get 99.95% uptime, 1 Gbps network connection, minimum latency, and a minimum of 15 global locations to choose from. Don’t worry about setting your system up as Cloudzy’s MikroTik VPS comes with pre-installed Router OS and instant setup.
If you are new to the world of routers, don’t risk using your own computer. Get a MikroTik VPS from Cloudzy and create an environment for yourself to learn and work with MikroTik.
DNS configuration on MikroTik step-by-step tutorial
The following steps will show you how to configure the DNS service in MikroTik Router.
Step 1: Open Winbox and connect to your MikroTik
Winbox is a useful utility that allows the administration of MikroTik RouterOS using a fast and simple GUI.
Quick Tip:
You might come across a term called ”MikroTik RouterOS DNS,” this is referred to as a feature that allows you to store DNS cache, i.e., particular domain names, and server them to DNS clients under much less DNS resolution time. Also, with RouterOS DNS, you can provide false DNS information to your clients, redirecting every DNS request to your own page.
You will see the DNS Settings window on the screen by doing so.

Step 3: Adjust your DNS settings and filling the necessary info
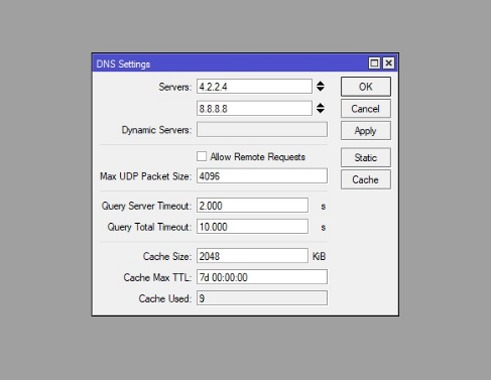
You have to put your ISP-provided DNS Server IP in that input box at this point of the Mikrotik DNS Server configuration. Notice that you can also use Google public DNS server IPs like 8.8.8.8 and 8.8.4.4.
Moreover, we will list all of your options in the following to help you understand each one:
- Servers: you should enter the IP address of a DNS service on the internet or your network here.
- Dynamic Server: the Dynamic Server’s name must be here if you use one.
- Allow Remote Request: Choosing this option will let you use MikroTik as a DNS server and respond to users. Since this option is essential, we will discuss it more in the next step.
- Max UDP Packet Size: This field is for specifying the final UDP packet size.
- Query Server Timeout: MikroTik waits for a server to respond to its request; this field sets this waiting time.
- Query Total Timeout: Entering the entire waiting time for a DNS response.
- Cache Size: Entering the amount of cache space and cache of DNS records.
- Cache max TTL: DNS TTL (time to live) is a setting that tells the DNS resolver how long to cache a query before requesting a new one.
- Cache Used: This value will be specified by the MikroTik router.
Step 4: enabling caching feature for MikroTik DNS server
If you click on the Allow Remote Requests checkbox, as shown below, you can use the caching DNS feature of MikroTik Router. Additionally, it enables you to put a custom measure for the cache size if you want. (The default cache size is 2048 KB or 2 MB.)
Step 5: Click on Apply and then OK
Now you know how to config a MikroTik DNS server using Winbox. Some people prefer to use a command-based configuration since it is more straightforward.

Linux Hosting Simplified
Want a better way to host your websites and web apps? Developing something new? Simply don’t like Windows? That’s why we have Linux VPS.
Get your Linux VPS
How to Configure DNS in MikroTik using the terminal?
How to Configure DNS in MikroTik using the terminal?
Setting up the MikroTik DNS server configuration with the terminal is pretty simple. Here is what you should do:
- Step 1: First, you must connect to your MikroTik by SSH or console.
- Step 2: Then, you should enter the following command to enable DNS and its configuration.
ip dns set servers=8.8.8.8,8.8.4.4 allow-remote-requests=yes max-udp-packet-size=4096 query-server-timeout=2.000 query-total-timeout=10.000 cache-size=2048 cache-max-ttl=7d
After going through the previous steps of configuring the Mikrotik DNS Server, MikroTik Caching DNS is now enabled to use your MikroTik IPs as DNS IPs for your network client. If everything is done correctly, your client will receive a response from the MikroTik cache DNS Server. You can check your DNS cache by going to IP > DNS menu item and clicking on the Cache button. Your cached domain name will be in the DNS Cache window. To flush cached objects, you should click on the Flush Cache button.
How to Put Static DNS Entry in MikroTik Cache DNS?
Whenever MikroTik cache DNS gets a new domain, it dynamically stores DNS entry. But occasionally, you may want to put static host entries like your local servers or even printers. To address this, MikroTik cache DNS enables you to enter static hosts. The following steps will describe putting static host entry in MikroTik DNS Server.
- Click on Static button, From DNS Settings window.
- Click on PLUS SIGN (+). A new DNS Static Entry window will appear.
- Put your hostname (like FTP) in the Name input field and the host’s IP Address in the Address input field.
- Finally, Click Apply and OK button.
You can put as many host entries as possible with the above steps.
How to Block DNS Request from WAN Interface?
If you turn your MikroTik router into a DNS server, all of your MikroTik IP addresses can be used as DNS servers. You can even use WAN IP (a public IP), which is a problem. Because if people outside of your LAN use your WAN IP as a DNS IP, your MikroTik will provide them DNS solutions, and it would be consuming your paid bandwidth.
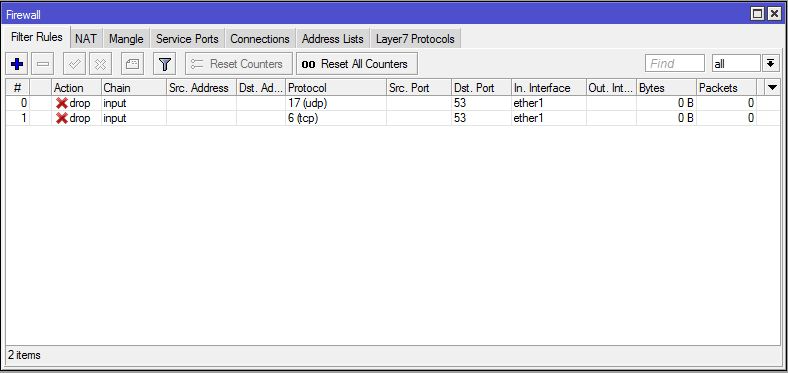
So, you have to stop DNS requests from outside of your LAN. To stop DNS requests outside of your LAN, you should apply firewall rules. Firewall rules can help you drop all DNS requests from your WAN interface. The following steps will guide you on how to block DNS requests from the WAN interface:
- Go to IP > Firewall menu and click on PLUS SIGN (+).
- From General tab, select input from the Chain drop-down menu, choose UDP from the Protocol drop-down menu and put 53 in Dst. Port input box and then choose your WAN Interface (like ether1) from In. Interface drop-down menu.
- Click on Action tab and choose drop option from Action drop-down menu.
- Click on Apply and OK button.
- Again, click on PLUS SIGN (+), choose input from the Chain drop-down menu, choose TCP from the Protocol drop-down menu, and put 53 in Dst. Port input box and then choose your WAN Interface from In. Interface drop-down menu.
- At last, click Apply and OK button.
What Is MikroTik Dynamic DNS & How to Set It Up?
MikroTik Dynamic DNS, or MikroTik DDNS, is an IP updating tool that allows you to connect to your server, website, device, etc., regardless of how many times your IP address changes. Since most ISPs assign a DHCP (Dynamic Host Configuration Protocol) server to their clients, it’s a good idea to enable MikroTik DDNS for your home router so you can access your device without having to update your IP records each time your IP address changes.
Here is how you can set up MikroTik Dynamic DNS Using Winbox:
Step 1: Connect to MikroTik RouterOS
Step 2: System > Scheduler > Add
Step 3: Choose a name for your scheduled task
Step 4: Start Time = startup
Step 5: Set your preferred Interval.
Step 6: Enter the following in the On Event section and click OK:
/tool fetch url="https://ipv4.cloudns.net/api/dynamicURL/\?q=your-string-here" mode=https
If you need to configure MikroTik Dynamic DNS for multiple interfaces, in Step 6, type in the following in the On Event section and click OK:
/tool fetch url="https://ipv4.cloudns.net/api/dynamicURL/\?q=your-string-here&ip=X.X.X.X" mode=https
Note: (Check the following policy boxes: FTP, Read, Policy, Password, Sensitive, Reboot, Write, Test, Sniff, Romon.)
Set Up MikroTik Dynamic DNS Using Console:
To configure MikroTik DDNS using console, enter the following command:
/ system scheduler add name="cloudns" on-event="/tool fetch url=\"https://ipv4.cloudns.net/api/dynamicURL/\?q=your-string-here\" mode=https" start-date=jan/01/1970 start-time=startup interval=1h comment="" disabled=no
(The start-date is an example.)
MikroTik DNS Forwarding for Faster Browsing
MikroTik DNS forwarding allows you to redirect unresolved DNS queries to your DNS server. It’s best to use MikroTik DNS forwarding to resolve external DNS requests for two reasons: security and optimized traffic.
If you use MikroTik DNS forwarding for both internal and external DNS queries, you’re creating two problems for your infrastructure:
- Leaving your internal DNS information vulnerable on the open Internet.
- DNS cache cannot be filled with internal and external DNS information; as a result, whenever there is a request for external DNS data, network bandwidth is consumed heavily, affecting overall speed and performance.
Summary + 1 Solution to MikroTik Problems
In this guide, we discussed multiple fundamental concepts of the MikroTik DNS server and its advantages, plus a step-by-step configuration tutorial. MikroTik has many features, but if you have ever experienced difficulties such as bandwidth limitation or available routing marks, we’ve got the solution.
At Cloudzy, we offer various MikroTik VPS Hosting services in more than 15 global locations. You can use our MikroTik VPS Hosting solutions to set up a VPN network or even use it to integrate your other servers. (To learn more about MikroTik L2TP VPN setup, click here.)
Cloudzy MikroTik VPS is also the best solution to your networking problems. To master networking, you will need a router, but why buy a physical one that costs at least $100 when you can use our MikroTik VPS for as little as $10?
With robust infrastructure and ultrafast NVMe storage, our MikroTik VPS can deal with heavy workloads even if many devices use its resources simultaneously.
Please contact our support team if you have any questions to make sure you choose the best VPS plan.
FAQ
What is MikroTik DNS?
Domain Name System (DNS) is usually knowns as the Phonebook of the Internet. In other words, DNS is a database that links hostnames such as to a specific IP address, making it easier for you to access different websites.
Why is configuring Mikrotik DNS server important?
DNS translates domain names to IP addresses so browsers can load and show you Internet resources. Every device connected to the Internet has a unique IP address that other machines use to find the device. Configuring Mikrotik DNS servers eliminate the need for humans to memorize IP addresses.
What is MikroTik RouterOS?
MikroTik RouterOS is the stand-alone Linux-based operating system that powers MikroTik RouterBOARD hardware, helping to modify the computer system into a reliable network router.
How many types of DNS are there?
There are three main kinds of DNS Servers, called primary servers, secondary servers, and caching servers.