In this DHCP Cisco Packet Tracer router example, we will focus on DHCP Configuration in Cisco Packet Tracer. In other words, we will see how to configure a DHCP Server with Packet Tracer Router. Before start up I want to give some basic information about DHCP.
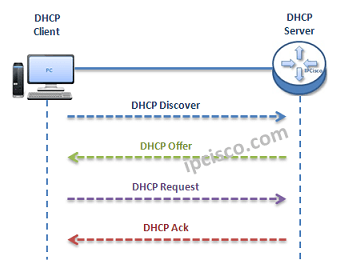
As you know DHCP uses UDP 67 and UDP 68 ports. It has a messaging system for the communication between DHCP Server and DHCP Client. These messaging system’s messages and their types are mentined below:
- DHCP Discover (broadcast)
- DHCP Offer(broadcast)
- DHCP Request (broadcast)
- DHCP Ack (broadcast)
- DHCP Nak (unicast)
- DHCP Release (unicast)
- DHCP Decline (unicast)
- DHCP Inform (unicast)
 DHCP Messages
You can Reach All Cisco Packet Tracer Labs and DOWNLOAD the Packet Tracer Examples with .pkt format.
You can DOWNLOAD this lessons Packet Tracer Example with .pkt format HERE.
- Firstly, a client sends a broadcast “DHCP Discovery” message that mentions that it need an ip address.
- Then, the DHCP servers reply with configuration offers to the client by “DHCP Offer” unicast message
- After that DHCP client sends a broadcast “DHCP Request” message to the network with the “Transaction ID” of the first DHCP Server that send Offer. The other servers understand that client wants to use the server that has the related “Transaction ID”.
- Lastly, the Server sends a unicast “Acknowledgement” message to the client that mentions the ip assignment is successfully done or it send a refuse messaged named “DHCP-NACK”.
To configure a Packet Tracer Router ’s DHCP, we must follow some basic steps. For this configuration the important point is broadcast domains. If we have only one broadcast domain in our topology, our work is simpler, else we must get help from “ip-helper address” command.
What is ip helper address command? Ip helper address command is the command that helps us to convince the router and make it pass the broadcast packets.
Now, let’s go to our two different configuration topology and see how to configure a server in packet tracer for DHCP, how to configure a DHCP Server in packet tracer.
Table of Contents
DHCP Packet Tracer Config For One Broadcast Domain
Our one broadcast domain topology is like below. There is a router that will carry our DHCP server role beside its routing functionalities. And there is a switch for PCs.
 DHCP Example Topology (One Broadcast Domain)
Firstly, let’s see How to Configure a DHCP Server on a Packet Tracer Router for One Broadcast Domain. For this first case of our DHCP Cisco packet tracer example, the One Broadcast Domain topology that we will use, is like below. There is a router that will carry out Server role beside its routing functionalities. And there is a switch for PCs.
On routerA, firstly we will give an ip address to the router interface that is connected to the switch.Secondly that we will create a DHCP pool named IPD. In this pool we will mention ip addresses that will be given to the DHCP clients. After that we will assign the router’s interface address as a default-router address for clients. And in the last part, we will exclude some addresses with “ip dhcp excluded address” command, that we don’t want to use during this dynamic ip assignments. With “ip dhcp excluded address” command, the mentined addresses will not used in the pool.
RouterA# config terminal
RouterA(config)# interface fastEthernet 1/0
RouterA(config-if)# ip address 192.168.10.1 255.255.255.0
RouterA(config-if)# no shut

%LINK-5-CHANGED: Interface FastEthernet1/0, changed state to up
%LINEPROTO-5-UPDOWN: Line protocol on Interface FastEthernet1/0, changed state to up<
RouterA(config-if)# exit
RouterA(config)# ip dhcp pool IPD
RouterA(dhcp-config)# network 192.168.10.0 255.255.255.0
RouterA(dhcp-config)# default-router 192.168.10.1
RouterA(dhcp-config)# exit
RouterA(config)# ip dhcp excluded-address 192.168.10.1 192.168.10.10
RouterA(config)# ip dhcp excluded-address 192.168.10.12 192.168.10.14
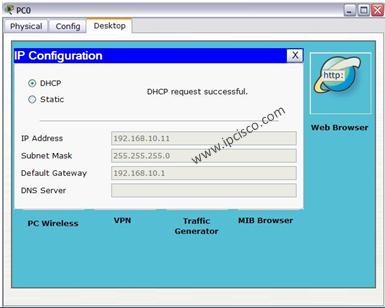
After this configuration, when we check the ip address of PC0, we will see the ip address 192.168.10.11 . Because it is the first available address in DHCP pool.
 We can also check the pool information with Cisco “show ip dhcp pool” command.
Packet Tracer DHCP Config For Multiple Broadcast Domains
Our second case is how to enable DHCP on router for multiple broadcast domains. In our second Cisco packet tracer example, we will use ip helper, cisco command “ip helper-address“. So, what is ip helper address?
Many CCNAs learn that routers do not pass broadcasts. But progress in CCIE, network engineers learn that it is not true. Because you can pass broadcast traffic for many protocols as DHCP by “ip-helper address” command. Here we will refer only the broadcast of DHCP requests. We can use a router as a DHCP Server again, but I use a separate DHCP Server instead of router in this topology.
") DHCP Example Topology (Multiple Broadcast Domains)
DHCP Example Topology (Multiple Broadcast Domains)
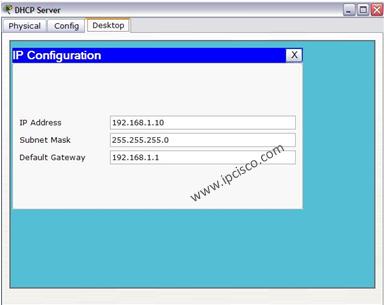
In the first place we will configure the DHCP Server for its DHCP pools and its ip configuration. The ip address is 192.168.1.10 and the default gateway will be the routers interface’s ip address that is face to DHCP server.
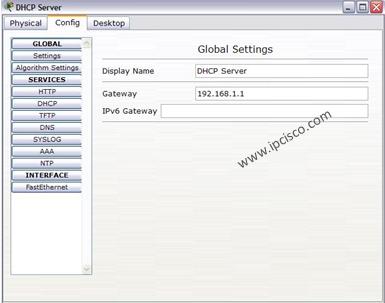
For the subnets 192.168.1.0 and 10.10.0.0 there must be two DHCP pool.The below screenshot is showing how these assignments will be done in DHCP Server.
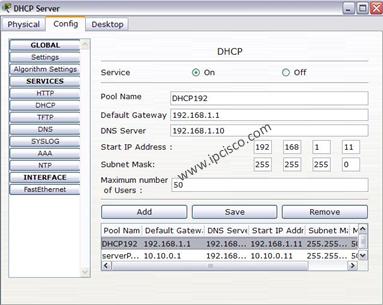
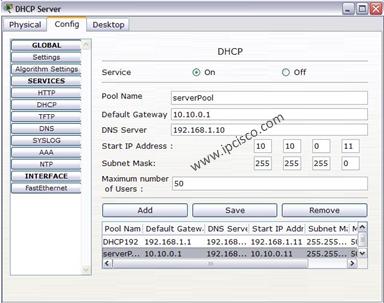
In the Packet Tracer router the following configuration will be done for two different subnet DHCP achivement:
RouterC # config terminal
RouterC(config)# interface fa0/0
RouterC(config-if)# ip address 10.10.0.1 255.255.255.0
RouterC(config-if)# ip helper-address 192.168.1.10
RouterC(config-if)# no shutdown
RouterC(config-if)# exit
RouterC(config)# interface fa1/0
RouterC(config-if)# ip address 192.168.1.1 255.255.255.0
RouterC(config-if)# ip helper-address 192.168.1.10
RouterC(config-if)# no shutdown
RouterC(config-if)# end
RouterC# copy run start
After this configuration, we can try dynamic ip assignment on PC by selecting the dynamic option on ip configuration screen like below.
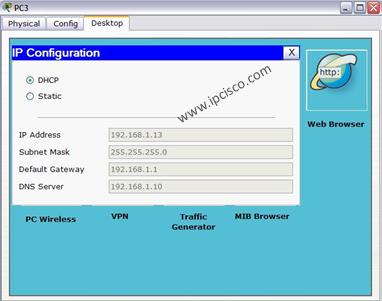
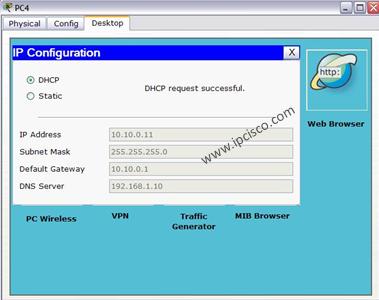
As you can seee, our PCs get their IP configuration from DHCP Server. The IP assignment is done automatically.

DHCP Messages
Packet Tracer Router Configuration Basics
Here, I would like to give you some information about how to configure a Cisco router on Packet Tracer basically. This is not a part of DHCP Configuration, but they are essentials for router configuration. So, here, we will learn how to set our laptop to connect a router, how to change a router’s name, how to set passwords on the Cisco routers, how to set console Access and basic static routing configuration step by step.
Laptop Configuration to Connect a Router
In Cisco Packet Tracer, you can directly click routers and connect them. But if you would like to do this via Console connection with a laptop with console cable as in real world, you can do it with a laptop and router. To do this, you need to set laptop terminal software setting and then a console cable to connect laptop and router.
When you click laptop on cisco packet tracer, you will see some tabs. In the desktop tab, there is a terminal configuration. When you click it, you will see the terminal settings. If you would like to connect to a router, you should set the settings as below:
Bits Per Second: 9600
Data Bits: 8
Parity : None
Stop Bits : 1
Flow Control : None
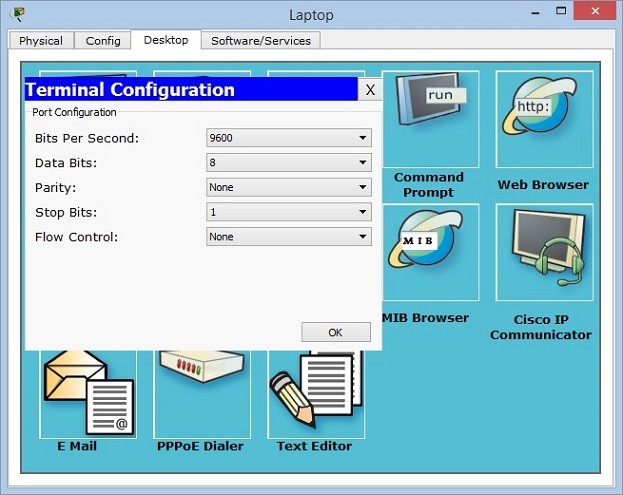
After setting these configurations, you will be ready to connect your router in packet tracer.
How to start configuration on a Cisco router?
In all routers, there are special configuration commands to start the router configuration. In Cisco routers this is also a standard. To start to configure a router on packet tracer, we should use firstly “enable” command. This will give us an administrator privilege and then we will use “configure terminal” to start our packet tracer router configuration. You can use this long version or you can use even “conf t” to do this.
Router> enable

Router# configure terminal
Enter configuration commands, one per line.  End with CNTL/Z.

Router(config) #
How to Configure Router Name?
All routers have a default name. But generally, this name is changed to have more meaningful router names. These router names can show the location of a router, its level, importance etc. With one or more word, we can give a special name to the routers on packet tracer.
To give a router name to a Cisco router on packet tracer, we use “hostname” commands. We can use this command in configuration mode of Cisco routers. Here, we can set our router’s name as XYZ
Router(config)# hostname XYZ
How to Configure Enable Secret Password?
To secure our router, firstly we should give a password to this router. There are different passwords used in Cisco routers. One of the basic passwords used in routers is “enable password”. This is the password that keeps the password as clear text. But there is also another password called “enable secret password”. This password keeps passwords with MD5 and it is more secure. You can see the value of enable password clearly in configuration, but you can not see enable secret password in configuration.
Here, let’s configure our enable secret password as abc123.
XYZ (config)# enable secret password abc123
By the way the command to encrypt passwords is “service password-encryption”. We will use this command to encrypt our passwords.
XYZ (config)# service password-encryption
How to Configure Console Access on Cisco Routers?
Console connection is need to be done before your connection. It is the basic router configuration that is required to connect to the router with a laptop.
We use “line console 0” command to access console configuration. We will determine a password, let’s do it as abcdef. After that we will use “login” keyword.
XYZ (config)# line console 0

XYZ (config-line) # password abcdef

XYZ (config-line) # login
Beside this basic console configuration, there are also some other configuration steps under this console access that will help you during our packet tracer router configuration a lot. These commands are:
- logging synchronous
- exec-timeout
- history size
With logging synchronous, we can set console synchronization to avoid command corruption. If we do not use this command, router can print some outputs during we are entering the commands and after a while this can be annoying.
XYZ (config-line) # logging synchronous
Exec timeout is the command that is used to adjust router timeout. This can be set with minutes and seconds. If you do not want any timeout, you can use 0 with this command. Here, we will use 3 minutes 30 seconds. After this period, if there is no action, router will go to the timeout. By the way the default timeout time is 10 minutes for Cisco routers.
XYZ (config-line) # exec-timeout 3 30
The last command is related with the command history. We can set the last remembered commands with history command. Here, we will set is as 20 commands.
XYZ (config-line) # history 20
How to Set Interface IP Addresses on Cisco Routers?
One of the most important and mostly done configuration is interface configurations on the routers. So, how to give an ip address and activate an interface of a Cisco router? We will use “ip address” command with the name of the interface on the routers. Here, let’s configure GigabitEthernet 0/0 of the router with the ip address 192.168.0.5/24.
XYZ (config) # interface GigabitEthernet 0/0
XYZ (config-if) # ip address 192.168.0.5 255.255.255.0
XYZ (config-if) # no shutdown
All the interfaces of the routers are shutdown by default. So, to open these ports, we should use “no shutdown” command.
After this configuration, our port can be up or down according to the other end. If there is no problem at the other end and there is configuration, then our port will be up.
How to Configure Static Routing on Cisco Routers?
Static Routing is the simplest and most used routing type on routers. Sometimes we need to use static routing in packet tracer router configurations. So, here, we will see how to configure static routing basically.
For static routing we will use “ip route” command with the destination network, subnet mask and the gateway that we will go firstly to access this network. Think about that, we should access 10.0.0.0/24 network and our gateway to access this network is 172.16.0.1. So, our static routing configuration will be like below:
XYZ (configf) # ip route 10.0.0.0 255.255.255.0 172.16.0.1
Basic Packet Tracer Router Verification Commands
After basic configurations, you can check your configurations with basic router verification commands. Some of these commands are given below:
- show startup-config
- show running-config
- show interfaces
- show ip route
show startup-config shows the beginning configuration that is stored in NVRAM.
show running-config shows current configuration. It is stored in RAM.
With show interfaces command, you can check the status and the configurations of the interfaces.
With show ip route command, you can see the routing information both static routing and dynamic routing.
There are many other show commands used in routers. You will be familiar with all of these with more practice on Cisco Packet Tracer. In the following lessons, we will see all these commands one by one.

Протокол DHCP позволяет производить автоматическую настройку сетевых устройств. Настройка DHCP сервера на маршрутизаторе выгодна тем, что позволяет по максимум задействовать работающий маршрутизатор, повесив на него максимальное количество функционала (интернет, NAT, DHCP и т.п.). DCHP позволит маршрутизатору автоматически настраивать на клиентах следующие основные параметры:
- IP адрес
- Основной шлюз
- Маска подсети
- DNS сервера
- Имя домена
Ниже мы приводим для вас сразу несколько разных инструкций по настройке DHCP на оборудовании Cisco.
СОДЕРЖАНИЕ:
- Видеоурок по работе с Cisco Packet Tracer. Курс молодого бойца по настройке DHCP
- Настройка централизованного DHCP сервера с помощью Cisco Packet Tracer
- Листинг команд настройки маршрутизатора R1, на котором «поднят» DHCP сервер
- Настройка DHCP сервера на маршрутизаторе Cisco, возможные причины неработоспособности сети
- Полезные команды настройке DHCP Cisco
Видеоурок по работе с Cisco Packet Tracer. Курс молодого бойца по настройке DHCP
Настройка централизованного DHCP сервера с помощью Cisco Packet Tracer
В этой видео инструкции рассматривается процесс настройки централизованного DHCP сервера в программе Cisco Packet Tracer.
Показано:
- как настроить пулы динамических IP адресов для различных сегментов локальной сети,
- как настроить рабочую станцию на получение динамического IP адреса,
- как проверить наличие получения динамического IP адреса рабочей станцией.
Новые команды для настройки маршрутизатора для получения пула динамических IP адресов у централизованного DHCP сервера.
Для примера рассматривается роутер R1
Настройки производятся в режиме глобальной конфигурации:
R1(config)#interface fastEthernet 0/1 — заходим в настройки интерфейса к которому подключен компьютер получающий динамический IP адрес
R1(config-if)#ip helper-address 192.168.30.11 указывается IP адрес централизованного DHCP сервера.
R1(config-if)#do wr
Building configuration…
Листинг команд настройки маршрутизатора R1, на котором «поднят» DHCP сервер, следующий:
R1#conf t
R1(config)#interface Ethernet 0/1/0
R1(config-if)#ip address 172.33.56.1 255.255.255.0
R1(config-if)#no sh
R1(config-if)#exit
R1(config)#ip dhcp excluded-address 172.33.56.1
R1(config)#ip dhcp excluded-address 172.33.56.254
R1(config)#ip dhcp pool R1SW6
R1(dhcp-config)#default-router 172.33.56.1
R1(dhcp-config)#network 172.33.56.0 255.255.255.0
R1(dhcp-config)#dns-server 192.168.40.11
R1(dhcp-config)#do wr
Building configuration…
[OK]
R1(dhcp-config)#exit
R1(config)#do sh ip prot
Routing Protocol is «bgp 1»
Outgoing update filter list for all interfaces is not set
Incoming update filter list for all interfaces is not set
R1(config)#router bgp 1
R1(config-router)#do sh ip route
(фрагмент ответа)
172.33.0.0/24 is subnetted, 1 subnets
C 172.33.56.0 is directly connected, Ethernet0/1/0
R1(config-router)#network 172.33.56.0 mask 255.255.255.0
R1(config-router)#do wr
Настройка DHCP сервера на маршрутизаторе Cisco, возможные причины неработоспособности сети
Рассматривается настройка DHCP сервера на маршрутизаторе Cisco, показаны возможные причины неработоспособности сети, связанные с работой протоколов маршрутизации и варианты устранения данных неполадок.
Полезные команды настройке DHCP Cisco
- Исключим из раздачи адрес 192.168.1.254 и адреса с 192.168.1.1 по 192.168.1.9
Router(config)# ip dhcp excluded-address 192.168.1.254
Router(config)# ip dhcp excluded-address 192.168.1.1 192.168.1.9
- Настройка DHCP пула
Настройка DHCP сервера включает в себя определение пула адресов, которые будут раздаваться. Для создания пула используется команда ip dhcp pool [название_пула]. После этого необходимо ввести две обязательные команды – network [адрес_сети][маска/длина_префикса] для указания сети из которой будут раздаваться адреса и default-router[адрес_default_gateway] для указания шлюза по умолчанию (можно ввести до 8 адресов).
- команда show ip dhcp binding показывает список всех IP адресов и сопоставленных с ними MAC адресов, которые были выданы DHCP сервером.
- команда show ip dhcp server statistics покажет статистику DHCP сервера, включая информацию об отправленных и полученных DHCP сообщениях
- Ретрансляция DHCP (DHCP RELAY)
Команда ip helper-address [адрес_DHCP-сервера] на маршрутизаторе в режиме конфигурации интерфейса укажет ему перенаправлять broadcast сообщения от DHCP клиентов уже в виде unicast к DHCP серверу, находящемуся в другой сети.
- Настройка роутера DHCP клиента
Иногда роутер сам должен получить IP адрес по DHCP, например от интернет-провайдера. Для этого нужно в режиме конфигурации интерфейса ввести команду ip address dhcp, после чего интерфейс будет пытаться получить адрес от DHCP сервера.
Hello and welcome! This tutorial will guide you on how to configure a DHCP server both on a router and on a generic server in Cisco Packet Tracer. In both cases, configuration is simple as long as you have a basic knowledge of IP addressing. On to it then!
Configuring DHCP server on a Router.
- Build the network topology:

2. On the router, configure interface fa0/0 to act as the default gateway for our LAN.
Router>enable
Router#config terminal
Router(config)#int fa0/0
Router(config-if)#ip add 192.168.1.1 255.255.255.0
Router(config-if)#no shutdown
Router(config-if)#exit
3. Configure DHCP server on the Router. In the server we will define a DHCP pool of IP addresses to be assigned to hosts, a Default gateway for the LAN and a DNS Server.
Router(config)#
Router(config)#ip dhcp pool MY_LAN
Router(dhcp-config)#network 192.168.1.0 255.255.255.0
Router(dhcp-config)#default-router 192.168.1.1
Router(dhcp-config)#dns-server 192.168.1.10
We can add ip dhcp excluded-address command to our configuration so as to configure the router to exclude addresses 192.168.1.1 through 192.168.1.10 when assigning addresses to clients. The ip dhcp excluded-address command may be used to reserve addresses that are statically assigned to key hosts.
So add the above command under the global configuration mode.
Router(config)#ip dhcp excluded-address 192.168.1.1 192.168.1.10
4. Now go to every PC and on their IP configuration tabs, enable DHCP. Every PC should be able to obtain an IP address, default gateway and DNS server, as defined in step 2.
For example, to enable DHCP on PC1:
Click PC1->Desktop->IP configuration. Then enable DHCP:

Do this for the other PCs.
You can test the configuration by pinging PC2 from PC1. Ping should succeed.
It’s that simple!
Now let’s do the same thing using a Generic server in place of a router:
Configuring DHCP service on a generic server in Packet Tracer.
1. Build the network topology in packet tracer

2. Configure static IP address on the server (192.168.1.2/24).
3. Now configure DHCP service on the generic server.
To do this, click on the server, then click on Services tab. You will pick DHCP on the menu. Then proceed to define the DHCP network parameters as follows:
Pool name: MY_LAN
Default Gateway: 192.168.1.1
DNS Server: 192.168.1.2
Start IP Address: 192.168.1.0
Subnet Mask: 255.255.255.0
Maximum Number of users: 256
Click on add then Save.The DHCP entry is included in the list.
Here are the configurations on the server:

Once you’ve configured everything, turn ON the DHCP service.
4. Finally, enable DHCP configuration on each PC. The three PCs should get automatically configured.
As an example, here is the DHCP configuration on PC1:

Addendum: You can define a DHCP server on one broadcast domain to serve hosts in a different broadcast domain. If you want to do this, then you should consider using ip helper-address command. To learn more about this, you can read my article on IP helper address configuration.
Success! Success!
Hope you found this post helpful. Comment to help improve it.
You may also like to read:
- Configuring DHCPv6 (both stateless and stateful) in Packet Tracer.
- Basic IPv6 configuration in Packet Tracer.
- DNS server configuration in Packet Tracer.
- HTTP server configuration in Packet Tracer.
- Mail server configuration in Packet Tracer.
DHCP is an Internet control protocol used to assign an IP address to any appliance, or node, on an internet network so they can transmit data using IP. DHCP automatically handles these configurations rather than requiring network administrators to manually set IP addresses to all network devices. DHCP can be executed on small local networks, as well as large company networks.
To know more about DHCP you may refer to the article Dynamic Host Configuration Protocol (DHCP).
Steps:
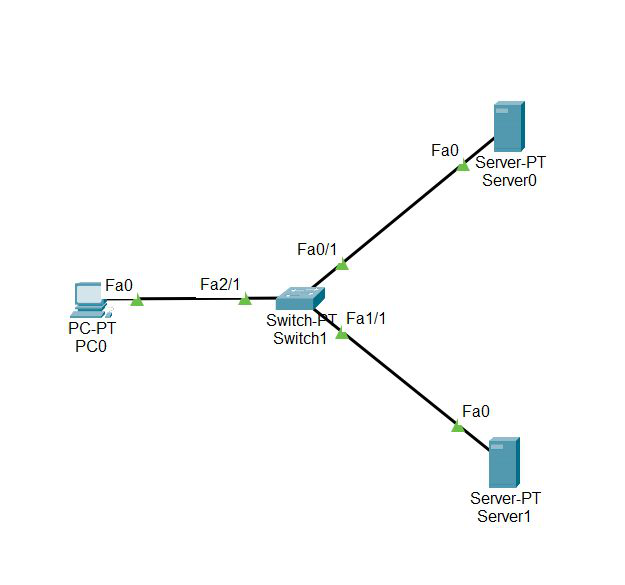
Step 1: First, open the cisco packet tracer desktop and select the devices given below:
| S.NO | Device | Model Name | Qty. |
|---|---|---|---|
| 1. | PC | PC | 1 |
| 2. | switch | PT-switch | 1 |
| 3. | server | Server-PT | 2 |
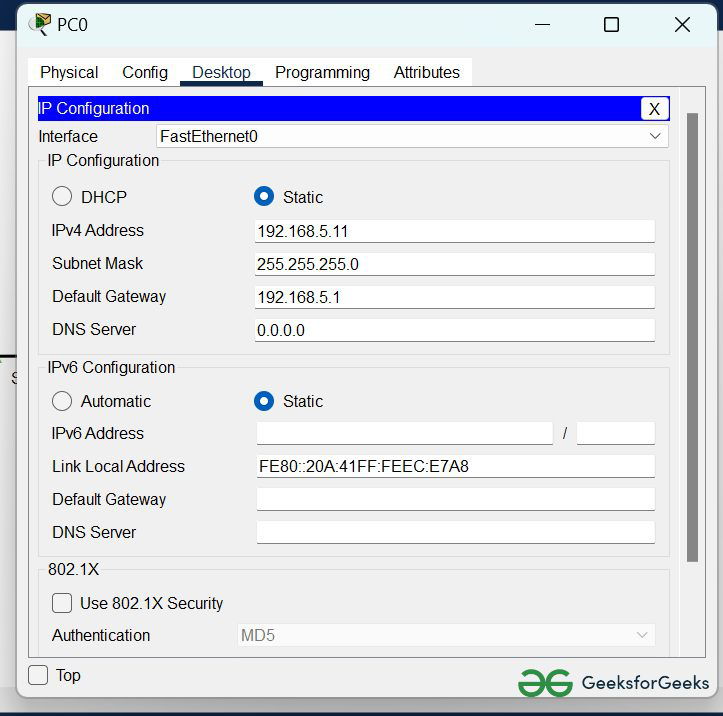
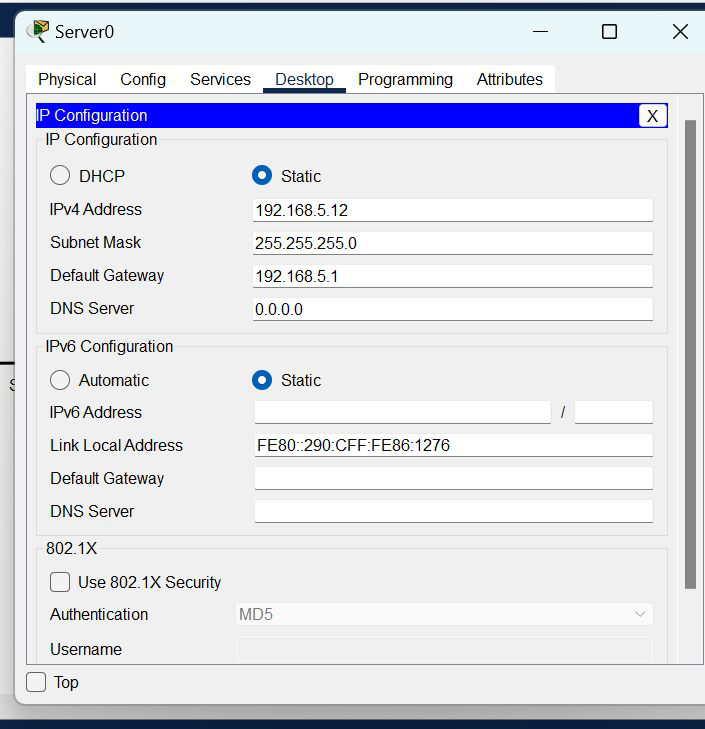
IP Addressing Table
| S.NO | Device | IPv4 Address | Subnet Mask | Default Gateway | DNS |
|---|---|---|---|---|---|
| 1. | PC0 | 192.168.5.11 | 255.255.255.0 | 192.168.5.1 | nil |
| 2. | server0 | 192.168.5.12 | 255.255.255.0 | 192.168.5.1 | nil |
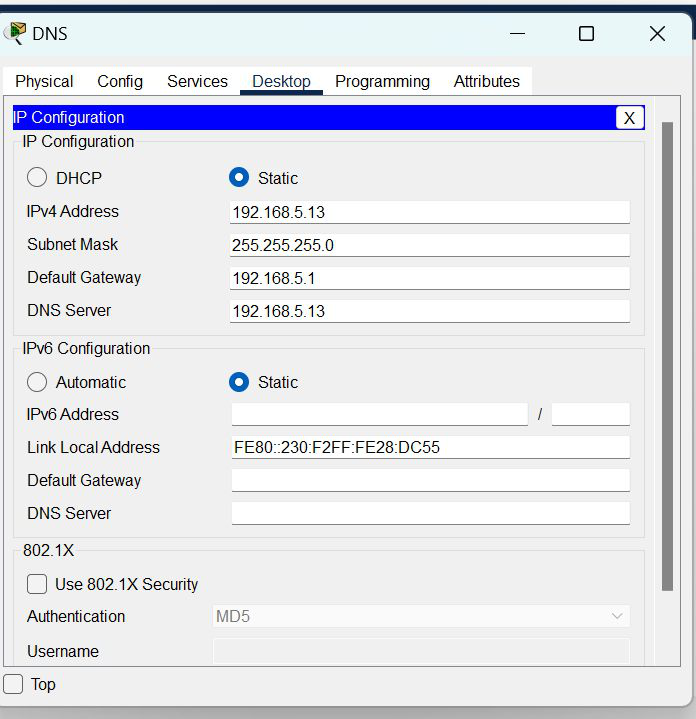
| 3. | DNS | 192.168.5.13 | 255.255.255.0 | 192.168.5.1 | 192.168.5.13 |
- Then, create a network topology as shown below the image.
- Use an Automatic connecting cable to connect the devices with others.
Step 2: Configure the PCs (hosts) Server0 and DNS with IPv4 address and Subnet Mask according to the IP addressing table given above.
- To assign an IP address, click on the device.
- Then, go to desktop and IP configuration and there you will find IPv4 configuration.
- Fill IPv4 address and subnet mask and other inputs.
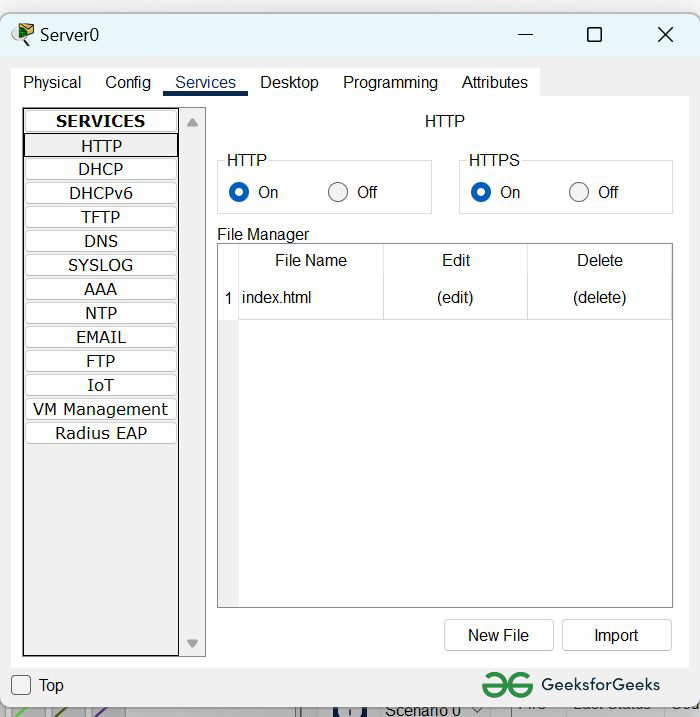
Step 3: Configure the HTTP sever0
- To configure the HTTP server.
- Go to services then click on HTTP
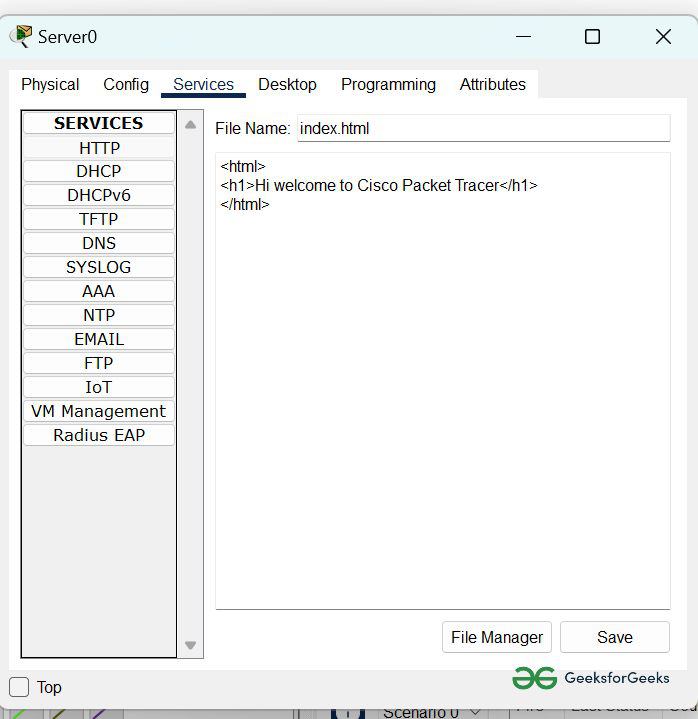
- Then delete all of the files except the index.html and edit it.
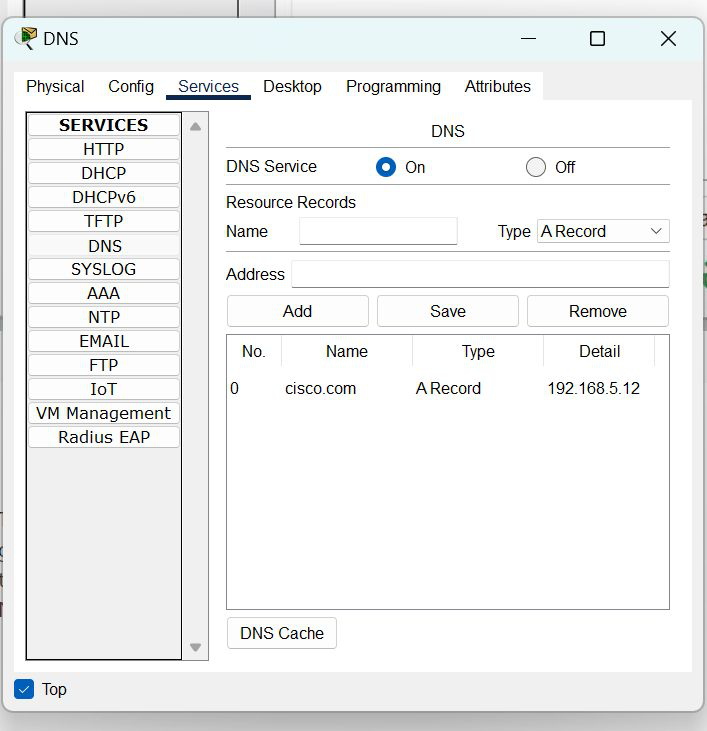
Step 4: Configure the DNS server
- To configure the DNS server.
- Go to services then click on DNS.
- Then turn on the DNS services.
- Name the server cisco.com and type address 192.168.5.12
- And add the record.
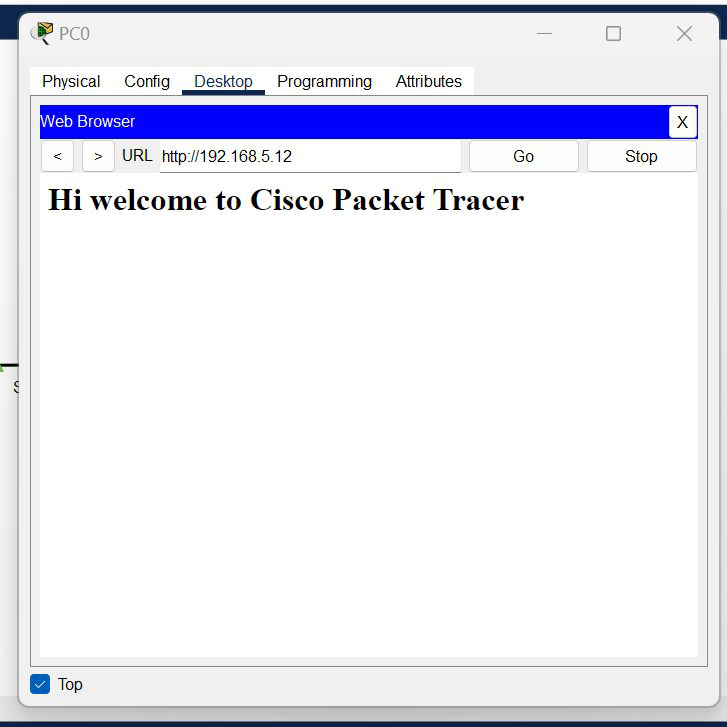
Step 5: Verify the server by using the web browser in the Host.
- Enter the IP address of server0 and click on GO.
- It will show the results.
Last Updated :
24 Jun, 2022
Like Article
Save Article
Привет, привет! Вспомнил я тут вдруг, что мы с вами разбирали настройку DHCP сервера в различных ОС, но как то совсем упустили процесс настройки DHCP на маршрутизаторах и коммутаторах фирмы Cisco. Вот сегодня об этом и поговорим.
Как обычно процесс настройки мы рассмотрим на примере. Сразу хочется отметить, что пример данной статьи выполнялся и проверялся на работоспособность в Cisco Packet Tracer 5.3.3.0019, работоспособность данного примера на реальном оборудование будет зависеть от поддержки функций DHCP сервера используемой вами версии Cisco IOS (Например однажды ко мне в руки попал старенький маршрутизатор, серии Cisco 1600, с древней версией Cisco IOS порядка 11 который не имел поддержки функций DHCP сервера, хотя уже мог выступать в качестве клиента DHCP).
 |
| Тестовая сеть, в качестве DHCP сервера Cisco 2811 |
И так начнем. Произведем предварительную настройку тестовой сети, выполнив следующие команды на маршрутизаторе:
Router(config)#interface fastEthernet 0/0
Router(config-if)#ip address 192.168.1.1 255.255.255.0
Router(config—if)#no shutdown
Коммутатор в данной сети можно не конфигурировать, так как в данной сети он «только для галочки». А вот хост, подключенный к коммутатору, придется настроить в соответствии с рисунками:
 |
| Указываем что адрес DNS сервера и шлюза нужно получать от DHCP сервера |
 |
| Указываем что IP адрес так же нужно получать от DHCP сервера |
С помощью настроек представленных на рисунке мы указываем хосту, что он должен получать IP адрес версии 4, адрес основного шлюза и адрес DNS сервера от DHCP сервера.
После того как предварительная настройка выполнена можно перейти к непосредственной конфигурации DHCP сервера на маршрутизаторе. Для этого на нем необходимо выполнить следующие команды:
Router(config)#ip dhcp pool TEST
Router(dhcp-config)#network 192.168.1.0 255.255.255.0
Router(dhcp-config)#default-router 192.168.1.1
Router(dhcp-config)#dns-server 8.8.8.8
Router(dhcp-config)#exit
Router(config)#ip dhcp excluded-address 192.168.1.100
Router(config)#ip dhcp excluded-address 192.168.1.1
Здесь с помощью первой команды мы создаем пул IP адресов для DHCP сервера. В качестве названия данного пула в данном случае выбрано имя TEST, для своего пула вы можете выбрать любое другое удобное вам имя.С помощью второй команды мы указываем из какой сети мы будем раздавать IP адреса, первый параметр этой команды задает адрес данной сети, а второй параметр ее маску. Третьей командой мы указываем адрес основного шлюза, который будет рассылать в сообщениях DHCP. В четвертой команде мы указываем адрес DNS сервера, который так же будет рассылаться хостам в сообщениях DHCP. Так же в данном примере показывается, что с помощью команды ip dhcp excluded—address можно исключить некоторые ip адреса из описанных выше DHCP пулов, то есть ни один из хостов нашей сети никогда не получит от DHCP сервера адрес, указанный в параметре команды ip dhcp excluded—address.
Далее проверим работоспособность нашего DHCP сервера. Для этого перейдем на хост и выполним на нем команду ipconfig /all.
 |
| Хост получил IP адрес от DHCP сервера |
Как легко заметить из рисунка, хост успешно получил IP адрес и все дополнительные параметры (адрес шлюза и адрес DNS сервера) от DHCP сервера.
Как вы наверное помните когда мы рассматривали процесс конфигурирования DHCP сервера под различными ОС, мы говорили о возможности резервирования ряда IP адресов за хостами с определенными MAC адресами, спешу вас обрадовать устройства фирмы Cisco не лишены такой возможности. Опять же рассмотрим ее на примере. Пусть мы хотим чтобы наш хост с MAC адресом 0001.6305.94E2 (Рисунок выше) всегда получал от DHCP сервера именно адрес 192.168.1.77. Что для этого необходимо сделать? Все очень просто для реализации данного функционала необходимо добавить к конфигурации DHCP сервера следующие строки:
Router(config) #ip dhcp pool my_best_host
Router(dhcp-config)#host 192.168.1.77 255.255.255.0
Router(dhcp-config)# сlient-identifier 0100.0163.0594.E2
Тут с помощью первой команды мы создаем отдельный DHCP пул только для одного адреса. С помощью второй команды указываем какой адрес необходимо выдавать в данном пуле. А с помощью третьей команды указываем MAC адрес компьютера который должен получить IP адрес из данного пола. Но тут есть один нюансик, в команде сlient—identifier указывается не MAC адрес устройства, а именно идентификатор клиента. Обычно идентификатор клиента можно получить из MAC адреса путем добавления впереди него 00 или же 01 и приведя его к виду указанному в команде. Но иногда такой способ не срабатывает (например, при работе в GNS3 идентификатор интерфейса маршрутизатора, работающего в качестве клиента DHCP, имея MAC адрес c001.122c.0000 имел идентификатор клиента 0063.6973.636f.2d63.3030.302e.3132.3263.2e30.3030.302d.4661.302f.30), но не стоит волноваться отловить идентификатор подключаемого клиента на DHCP сервере можно с помощью команды debug ip dhcp server packet – данный отладчик отобразит реальный идентификатор клиента, в тот момент когда он отправит запрос к вашему DHCP серверу.
К сожалению, работу данного примера не получится проверить в Packet Tracer, так как он не поддерживает команды host и сlient—identifier в режиме конфигурирования DHCP пула, но вы можете легко проверить их в GNS3 или же на реальном устройстве.
Ну и в заключение этой статьи еще разберем как сконфигурировать интерфейс маршрутизатора фирмы Cisco в качестве DHCP клиента. Делается это очень просто:
Router(config) #interface FastEthernet0/0
Router (config-if)# ip dhcp client hostname 777
Router (config-if)# ip address dhcp
Если вы сконфигуририруете интерфейс вашего маршрутизатора как показано в примере выше, то при включении этого интерфейса он будет обращаться к DHCP серверу с запросом о получение IP адреса и дополнительных параметров.
На сегодня это все. До новых встреч.