On Windows, CLion toolchains include the build tool, C and C++ compilers, debugger executable, and the environment. You can select one of the pre-defined toolchain setups (MinGW, Cygwin, Microsoft Visual C++, or WSL), Remote Host, Docker) or configure a custom toolchain (System):

Watch this video for an overview of Windows toolchain options:
For more information about Remote Host toolchains, refer to Remote with local sources. If you are working with a Docker container, refer to Docker toolchain.
MinGW
CLion bundles a version of the MinGW toolset for quick setup. The exact version bundled is MinGW-w64 11 with languages=c,c++, posix threads, and seh exceptions. You can use this bundled toolchain or switch to a custom MinGW installation.
Install MinGW (optional)
-
Download and run the MinGW-w64 installer. It provides both 64- and 32-bit options.
-
In the MinGW-w64 installation wizard, make sure to select the required architecture. Note that the default suggested option is 32-bit.

-
Wait for installation to finish.

Although MinGW-w64 provides both 64- and 32-bit options, you can also install MinGW, the 32-bit-only version.
-
In the MinGW installation wizard, select the following packages from the Basic Setup list: mingw-developer-tool, mingw32-base, mingw32-gcc-g++, mingw32-msys-base.

-
Wait for installation to finish.

Configure a MinGW toolchain
-
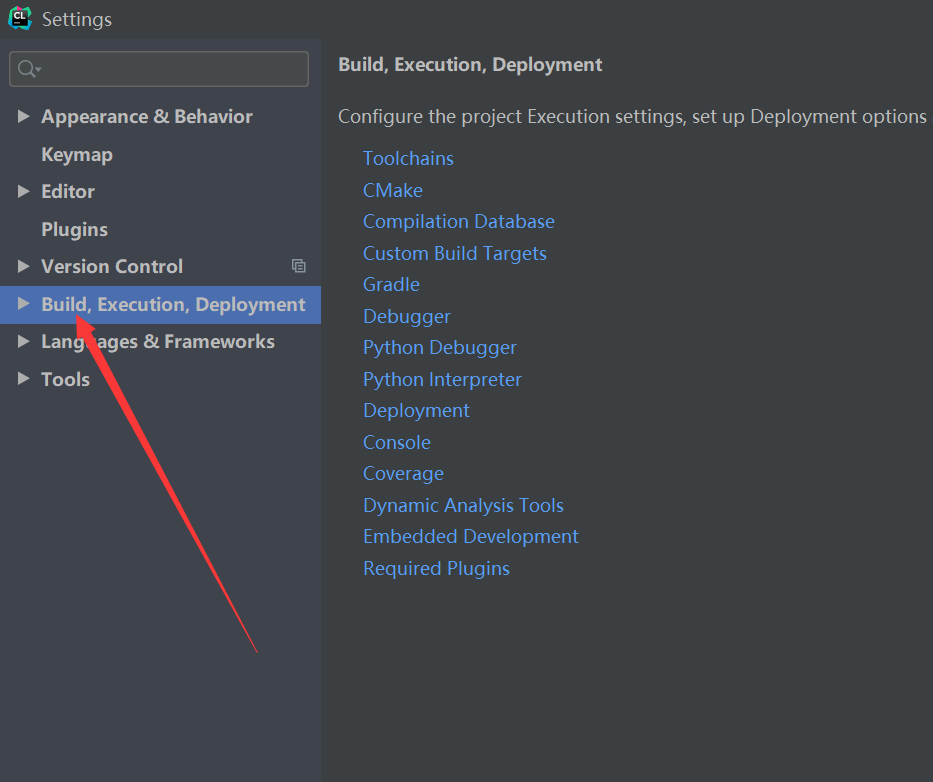
Go to .
Click
 and select MinGW to add a new MinGW toolchain.
 -
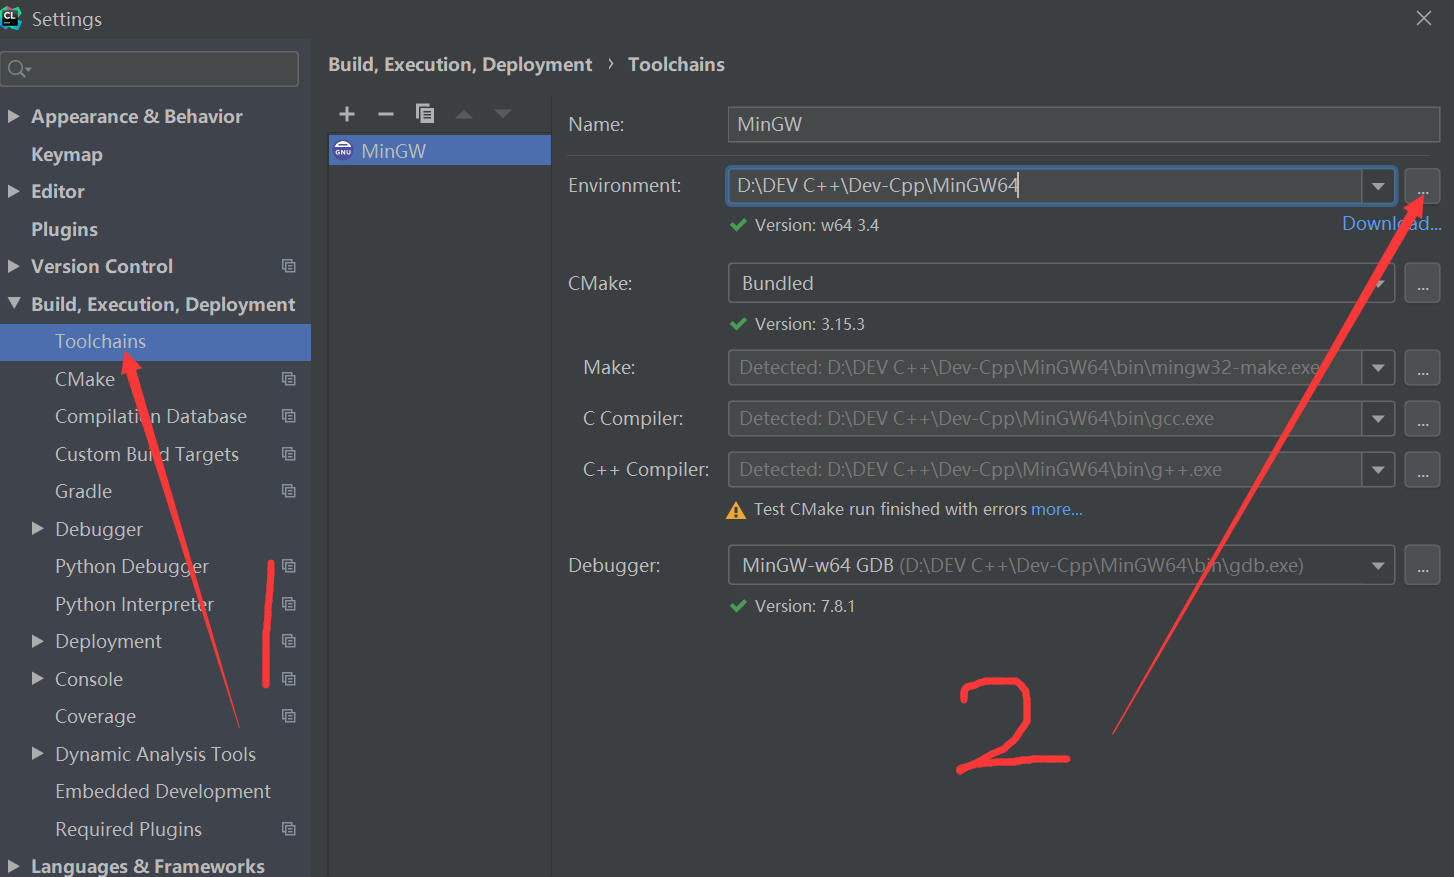
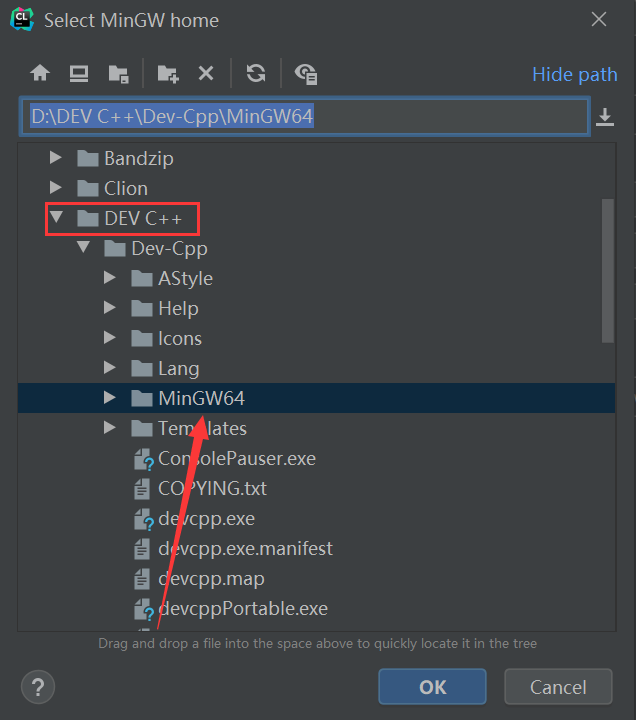
In the Toolset field, you will see Bundled MinGW, which is the default option. If required, open the field to select from the list of other available installations:

-
Wait until the tools detection finishes.
-
Select the Debugger: you can use either bundled GDB, your MinGW GDB, or a custom GDB binary.
-
If required, specify the script to initialize the environment.
-
Click Apply when all the tools are set correctly.
 and select

Cygwin
-
Download the Cygwin installer, version 2.8 or later.
-
Run the installer and select the following packages:
-
gcc-g++
-
gdb
To select a package, type its name in the Search field and set the version in the New column:

-
-
Once the installation is finished, open CLion and go to .
-
Click
and select Cygwin to add a new Cygwin toolchain.CLion will attempt to detect the Cygwin installation automatically. Check the Toolset field, and specify the path manually if required.
-
Wait until the tools detection finishes, and click Apply.

-
If required, specify the script to initialize the environment.


Windows Subsystem for Linux
You can use WSL, Windows Subsystem for Linux, as your working environment in CLion on Windows 10 (starting the Fall Creators Update version 1709, build 16299.15).
WSL toolchain enables you to build projects using CMake and compilers from Linux and run/debug on WSL without leavCLionLion running on your Windows machine.

Microsoft Visual C++
-
Install Visual Studio 2013, 2015, 2017, 2019, or 2022 on your system.
-
In CLion, go to .
-
Click
and select Visual Studio from the list of toolchain templates. -
Check the Toolset field. CLion will attempt to automatically detect the installed Visual Studio distribution. If the detection fails, set the path to Visual Studio manually.
-
If required, specify the Architecture (x86, amd64, x86_arm, or another), Platform (store, uwp, onecore, or leave it blank), and Version. To build your project for the selected architecture, CLion will call the script to configure the environment with the specified parameters.
-
Wait until the tools detection is finished:

-
If required, specify the script to initialize the environment.
 and select
MSVC compiler
CLion supports the Microsoft Visual C++ compiler that ships with Visual Studio 2013, 2015, 2017, 2019, and 2022.
For the case when your code includes MSVC extensions, CLion provides the support for:
-
__uuidof,__forceinline,__unaligned, and__alignofkeywords; -
pointer type attributes:
__ptr32,__ptr64,__uptr,__sptr; -
MSVC built-in data types:
(unsigned) __int8,(unsigned) __int16,(unsigned) __int32,(unsigned) __int64,__wchar_t; -
additional format specifiers, such as
%I32and%I64; -
the clang’s
-fms-extensionsflag.
Clang-cl compiler
As an alternative compiler, you can use clang-cl — the MSVC-compatible compiler driver for Clang. CLion supports clang-cl version 8.0 and later.
-
Install clang-cl from the LLVM site or along with the Visual Studio tools.
When installed from the LLVM site, the clang-cl binary can be found at the standard location C:\Program Files\LLVM\bin\clang-cl.exe for the 64-bit version or C:\Program Files (x86)\LLVM\bin\clang-cl.exe for the 32-bit version.
-
In CLion, go to and select the Visual Studio toolchain that you want to configure, or create a new one.
-
Point the C Compiler and C++ Compiler fields to clang-cl.exe. CLion will suggest the paths detected automatically.


Note that currently the -T clangcl options can’t be picked up if the bundled CMake is in use along with the Visual Studio toolchain setup (CPP-18848).
MSVC debugger
The MSVC toolchain debugger is implemented on top of LLDB, and it can work with native visualizers from the Visual Studio installation or from your project.
To enable native visualizers support and set the desired diagnostics level, select the Enable NatVis renderers for LLDB checkbox in :

CLion automatically generates one-line summaries for all structures not covered by Natvis and highlights them to increase readability. Also, the built-in formatters provide visualization for wide/Unicode strings (wchar_t, char16_t, char32_t).
If you have custom native visualizers in your project, CLion will use them as well.

CLion supports most of the Natvis customization features, such as ArrayItems, IndexListItems, LinkedListItems, TreeItems, Inheritable attribute, Format specifiers, and CustomListItems.
When using the MSVC toolchain debugger, you can enable symbol servers support which will help the debugger resolve library symbols correctly. For more information, refer to Using symbol servers when debugging on Windows.
System toolchain
The System toolchain on Windows allows configuring the build tool, compilers, and debugger without selecting a predefined toolset or environment, similarly to Linux and macOS. Use this toolchain option for embedded development cases like using ARM or for other custom setups.
-
Go to .
-
Click
and select System to add a new System toolchain. -
Configure the tools and provide an environment script if required:


Initializing the toolchain environment via a script
Instead of setting the environment manually, you can point CLion to an environment file — a script that initializes the environment for your project. This is helpful, for example, when you need to initialize compiler variables, add custom ones, or modify the PATH.
For all toolchains except Docker, environment sourcing only happens once, the first time the toolchain in used in a CMake profile, or upon loading a Makefile.
If you make changes in the script, it will be re-sourced automatically. There is also a feature request for manual script reload.
For the case of the Docker toolchain, sourcing happens each time the toolchain is used.
-
In the toolchain settings, click Add environment, then click From file:

-
In the Environment file field, specify the path to the script:

-
You will get notifications in case of script loading issues. CLion also checks the script loading time and terminates the execution if it takes too long.


Clang compiler on Windows
With CMake 3.15, it has become possible to use the Clang compiler on Windows with the MinGW-w64/MinGW toolchain.
However, the LLVM Clang for Windows is built using Microsoft Visual Studio, and all the built-in macros and include search paths are set up for use with Visual Studio. So if you take Clang from the LLVM repository, it will not work correctly when configured with the MinGW toolchain. One of the possible workarounds is described below.
Set up the Clang compiler for MinGW
-
Install MSYS2.
-
In the MSYS terminal, run the following pacman command to download the complete set of packages built with clang:
pacman -S mingw-w64-clang-x86_64-toolchain
Run one more command to get the MinGW-w64 GDB debugger:
pacman -S mingw-w64-clang-x86_64-gdb
-
Go to and create a MinGW toolchain.
Set the Toolset to C:\msys64\clang64. Set other paths manually in case they are not detected automatically.


GDB on Windows
In the case of MinGW, CLion includes the bundled GDB (version 13.1). For Cygwin, you need to install the GDB package in the Cygwin Package Manager, as described in the Cygwin section of this guide.
You can also switch to a custom GDB binary. In this case, the supported GDB versions are 7.8.x-13.1.
Note that for GDB 8.0 and later, debugger output is redirected to CLion console by default. To enable opening an external console window for application input/output, go to Help | Find Action or press Control+Shift+A, search for Registry, and set the following key: cidr.debugger.gdb.workaround.windows.forceExternalConsole.
Last modified: 07 September 2023
Установка и настройка Clion
Каталог статей
- Введение
- Два, инструменты
- Три, установка и активация
- Четыре, горячие клавиши
- 5. Создайте проект и программу отладки.
- Шесть, скомпилируйте несколько файлов
- Семь, конец
Введение
Я не знаю, с какими артефактами разработки контактировали мои друзья. По сравнению с компиляторами, с которыми я сейчас общаюсь, существует множество компиляторов, таких как DEV C ++, EditPlus, Eclipse, Pycharm, Vistual Stdio, Vistual Code. Для программистов, разрабатывающих C / C ++, один Хороший компилятор — это мощный инструмент для начала вашего эффективного обучения и работы.Установка хорошего компилятора может сделать вашу разработку более эффективной.
Сегодня я рекомендую очень хорошую IDE разработчикам C / C ++, то есть CLion, недавно выпущенный Jetbrains (Чешская Республика) для разработки C / C ++. Разработанная кроссплатформенная среда IDE основана на IntelliJ, а также содержит множество интеллектуальных функций для повышения продуктивности разработчиков и повышения эффективности их работы. Кроме того, JetBrains имеет множество отличных IDE, таких как упомянутый выше Pycharm, который очень подходит для разработки. Далее я объясню методы установки и настройки, а также использование сочетаний клавиш.
Два, инструменты
Адрес загрузки Clion:кликните сюда
Три, установка и активация
-
Дважды щелкните исполняемый файл после загрузки, появится следующий интерфейс

-
После завершения распаковки войдите в приветственный интерфейс.
-
Выберите путь установки, нажмите Далее (PS: постарайтесь не выбирать установку под файлом диска C)
-
В это время выберите три верхних и нижнюю панель, пожалуйста, выберите нужный вам элемент. После выбора щелкните Далее.
-
Тогда просто подожди
-
Дождавшись запроса о завершении установки, нажмите Finsh, появится следующий интерфейс.
-
После завершения установки на рабочем столе появится ярлык Clion, нажмите, чтобы войти
-
Нажмите кнопку Enter (посередине), а затем вставьте ключ ниже, чтобы войти в CLion.


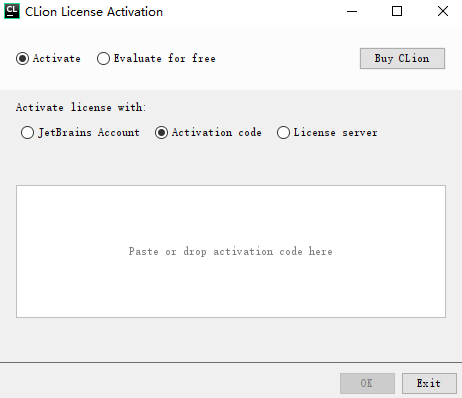
Здесь вам необходимо получить ключ активации, и это рекомендуется тем, кто может купить законные авторские права!
Лицензию IntelliJ IDEA можно получить следующими способами:
1. Получить через студенческий билет, идентификатор учителя или почтовый ящик edu;
2. Вы также можете подать заявку через собственный проект с открытым исходным кодом;
3. У продукта есть 30-дневный пробный период, вы можете сначала попробовать его, а затем выбрать, нужно ли вам его покупать.
Конкретные сведения: вы можете посетить официальный веб-сайт приложения. https://www.jetbrains.com/idea/buy/
В-третьих, установите отладчик компилятора
-
После завершения активации наиболее важным шагом является то, что на компьютере не установлен отладчик компилятора CMake / MinGW.Если компилятор DEV C ++ был установлен, вы можете совместно использовать отладчик компилятора MinGW.
-
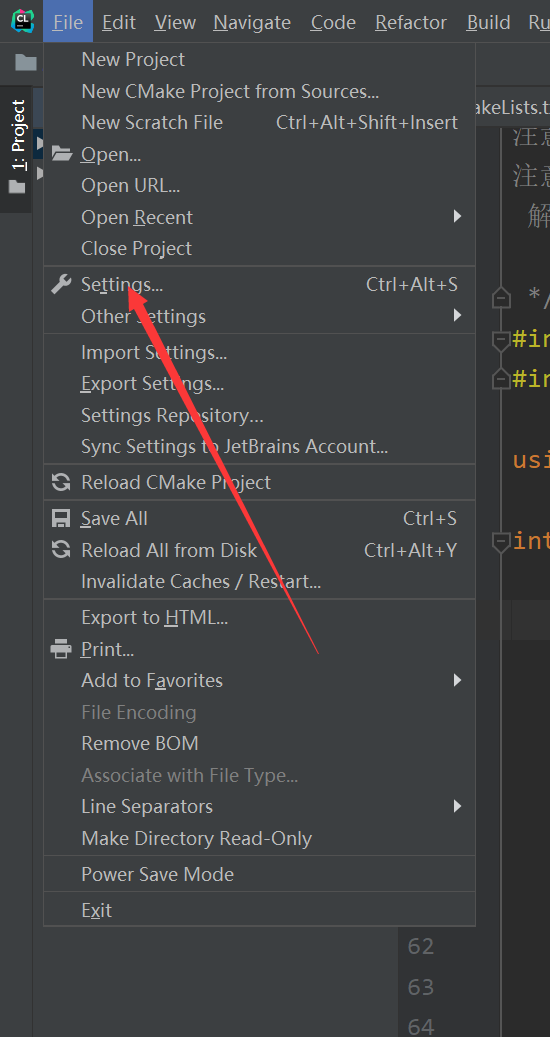
Щелкните Файл, затем выберите Настройки, появится следующий интерфейс.
-
Выберите Toolchains в разделе Build, Execution, Deployment, а затем выберите Environment справа.
-
Выберите файл MinGW под файлом DEV C ++, и настройка выполнена успешно!
Четыре, горячие клавиши
Ctrl + влево стрелка влево назад
Ctrl +  вправо стрелка вправо вперед
ALT + 1 							 Показать и скрыть панель проекта
Ctrl + / 							 Добавить или удалить заметки
Ctrl + Alt +  Код формата L
Alt + F7 							Find Usages
Ctrl +  R заменить
Ctrl +  B Переход от определения к объявлению
Ctrl + Shift +  Возврат к месту последнего редактирования
Ctrl +  N класс поиска
Ctrl +  O выберите метод, который нужно переписать
Ctrl +  F12 Быстро просмотреть участников класса
Ctrl +  Q Быстрый просмотр документа
Ctrl +  Информация о параметрах подсказки P
Ctrl +  H Просмотр дерева наследования
Ctrl +  E Просмотр недавно просмотренных файлов
Ctrl + Alt +  B Просмотр классов реализации интерфейсов и абстрактных классов
Ctrl +  F Поиск в текущем файле Примечание:Нажмите Esc, и поле поиска исчезнет.
Ctrl + Shift +  F Поиск по всему проекту или в указанном каталоге Примечание:Дважды нажмите Esc, и поле поиска исчезнет.
Ctrl + Shift +  N Найти файлы
Ctrl +  F7 Найдите место, где в тексте используются класс, переменная, функция и т. Д.
Shift +  Сдвиг глобального поиска
Ctrl + Alt + 7 						 Просмотр того, где используются классы, объекты и переменные
Ctrl + Alt + -/+ 					 Развернуть и свернуть текущую функцию и класс
Ctrl + Shift + -/+ 					 Развернуть и свернуть все функции и классы
Shift +  F6 Переименовать переменную
Alt +  insert Добавить информацию об автоматической генерации кода (вставить набор*()/get*()/Конструктор, равно, хэш-код и т. Д.)
Ctrl + Shift +  космическая подсказка (newЗатем напрямую войдите в конструктор и предоставьте информацию о конструкции в конструкторе)
5. Создайте проект и программу отладки.
- Создать пустой проект
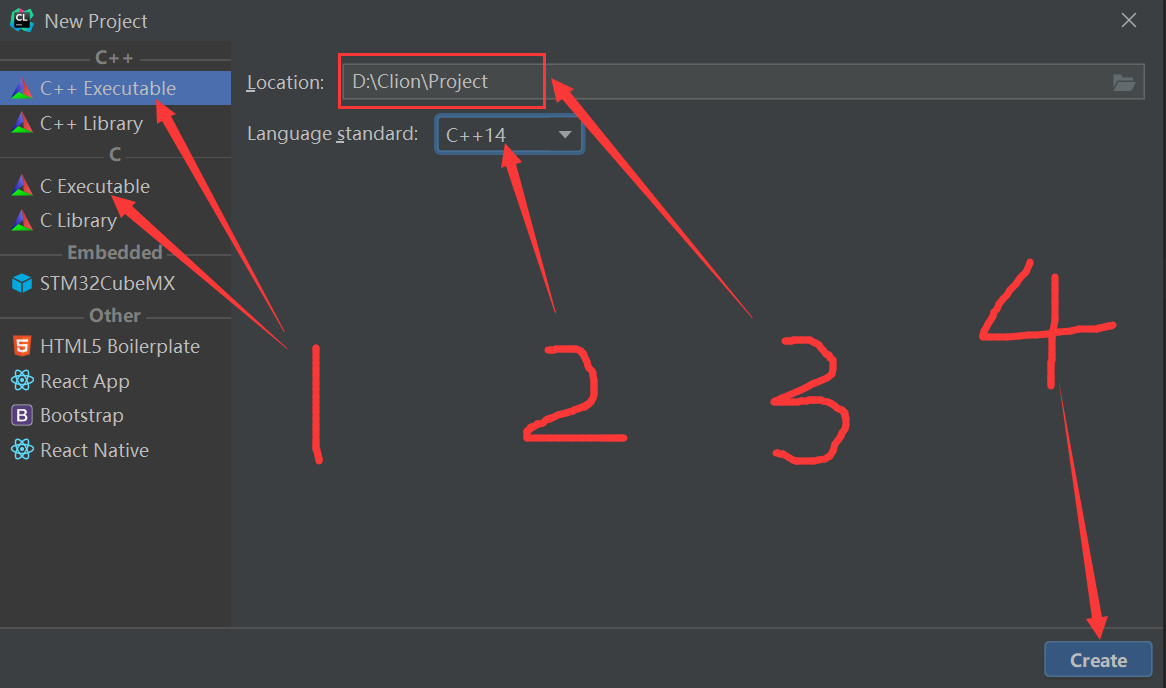
- Выберите место хранения и языковой стандарт проекта и действуйте в соответствии с рисунком.Первый шаг — выбрать тип создаваемого проекта — C или C ++, второй шаг — выбрать языковой стандарт, третий шаг — выбрать место хранения файла, а четвертый шаг — щелкнуть Создайте.
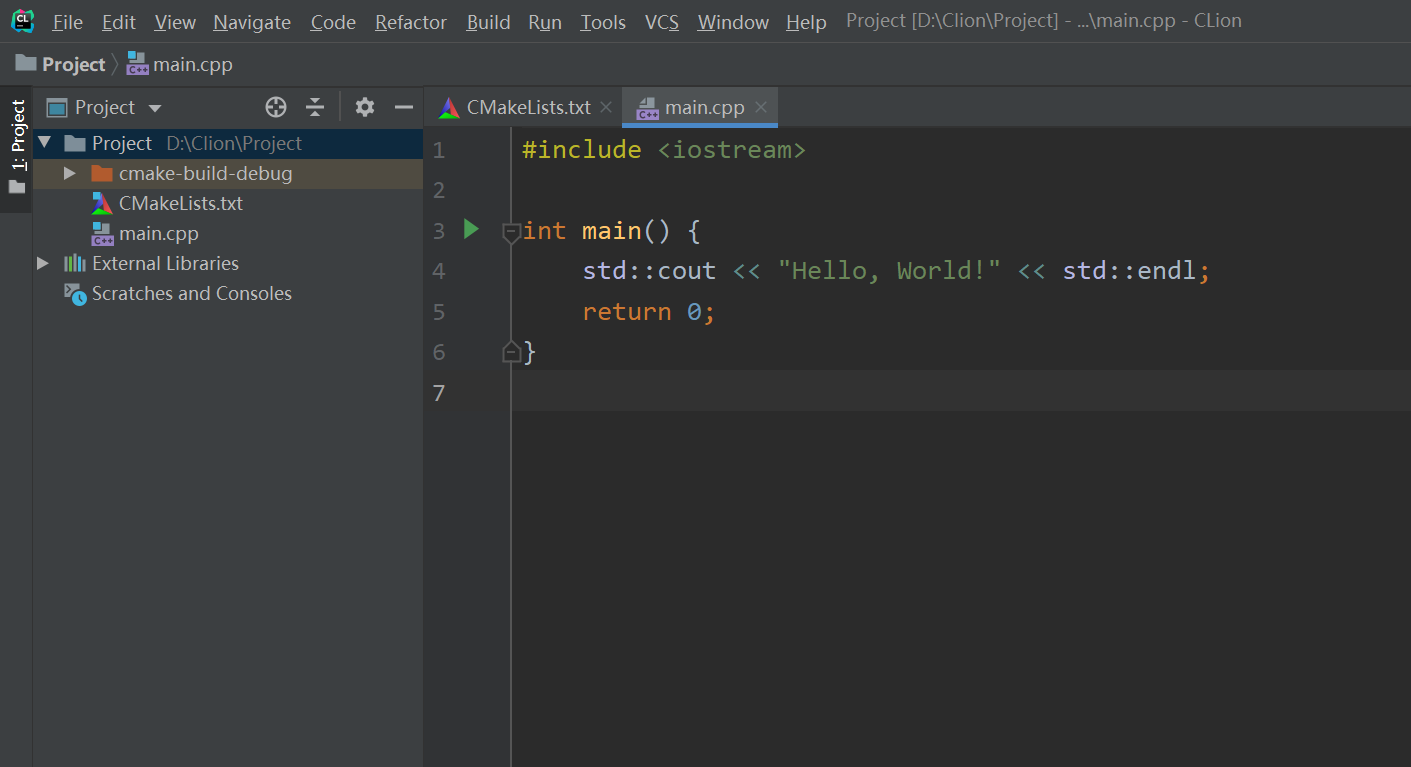
- Когда файл проекта создается так
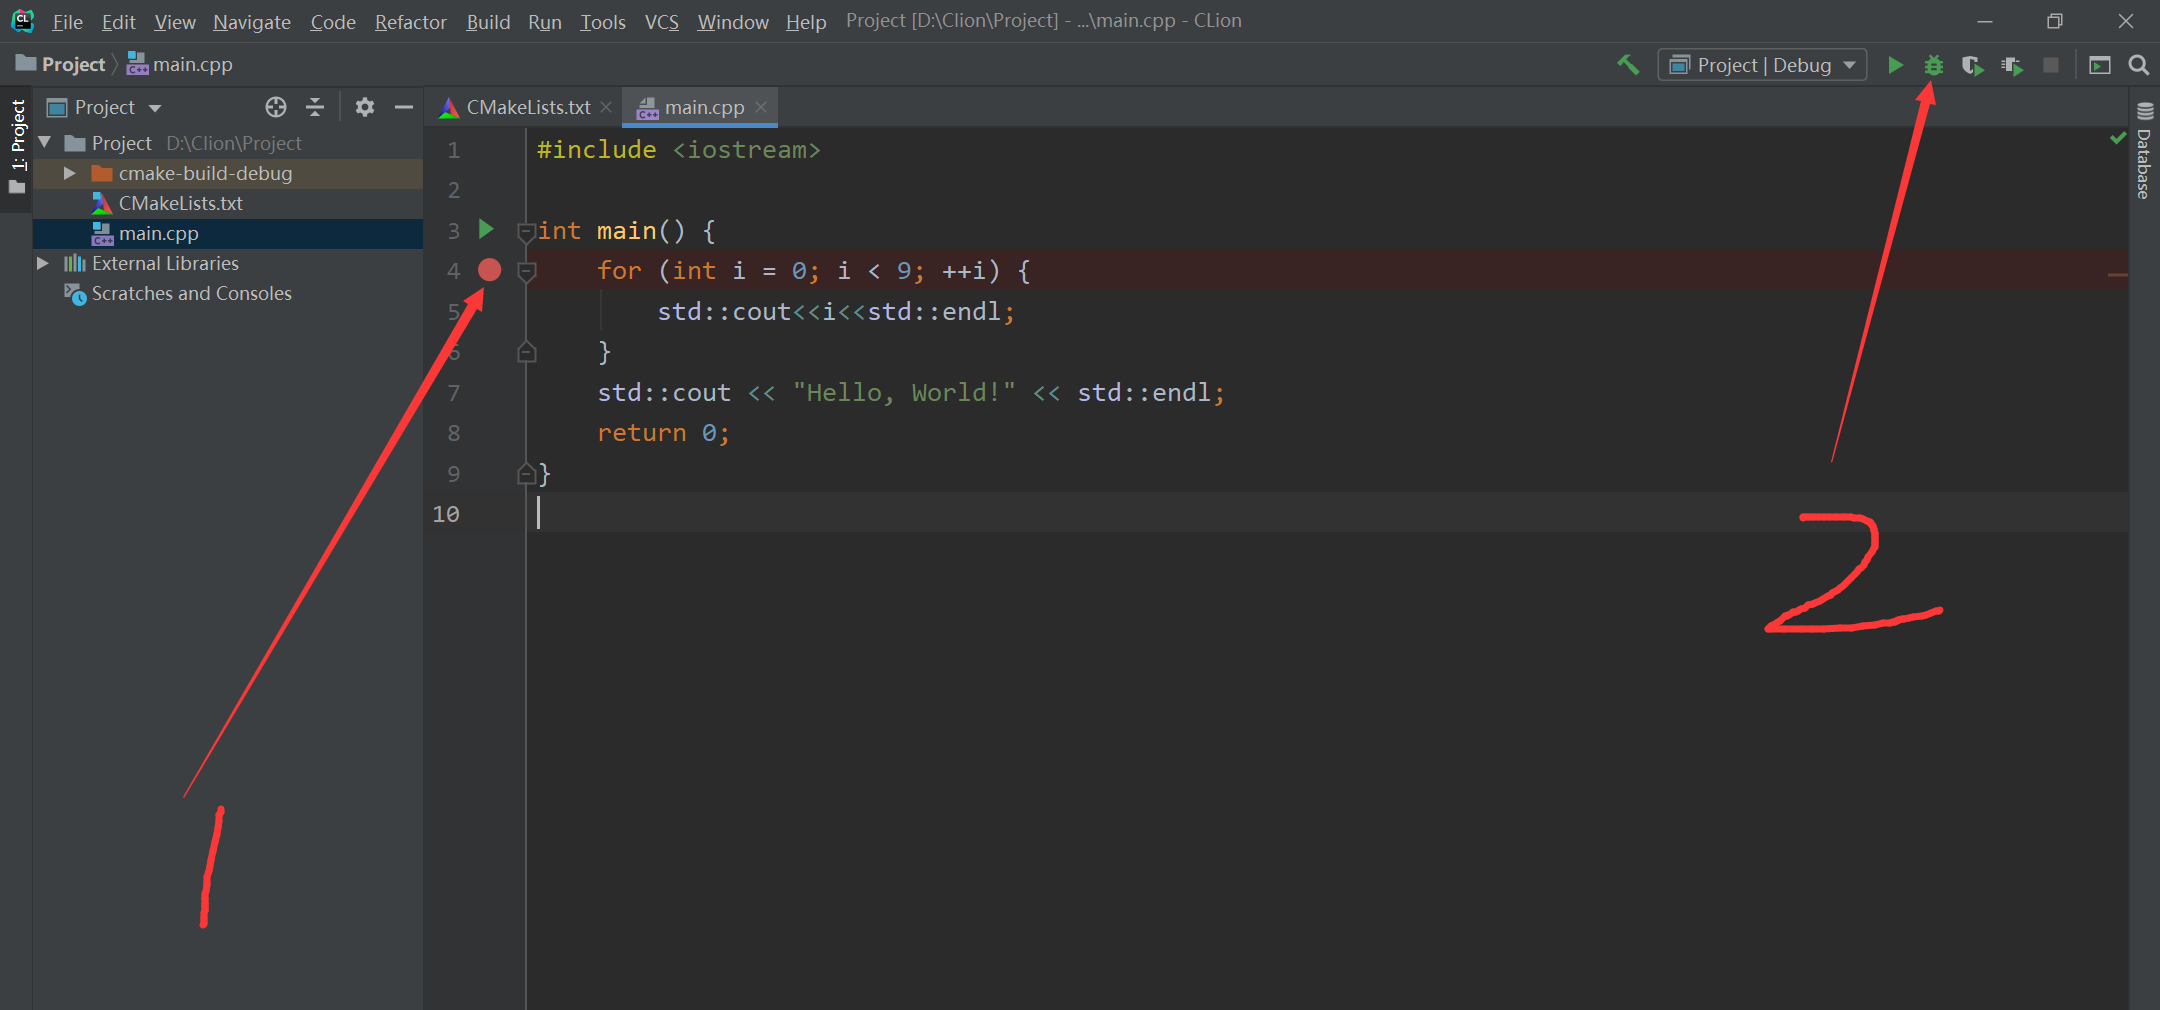
- Напишите простую программу и отлаживайте ее. Добавляем в программу точку останова, выбираем DEBUG
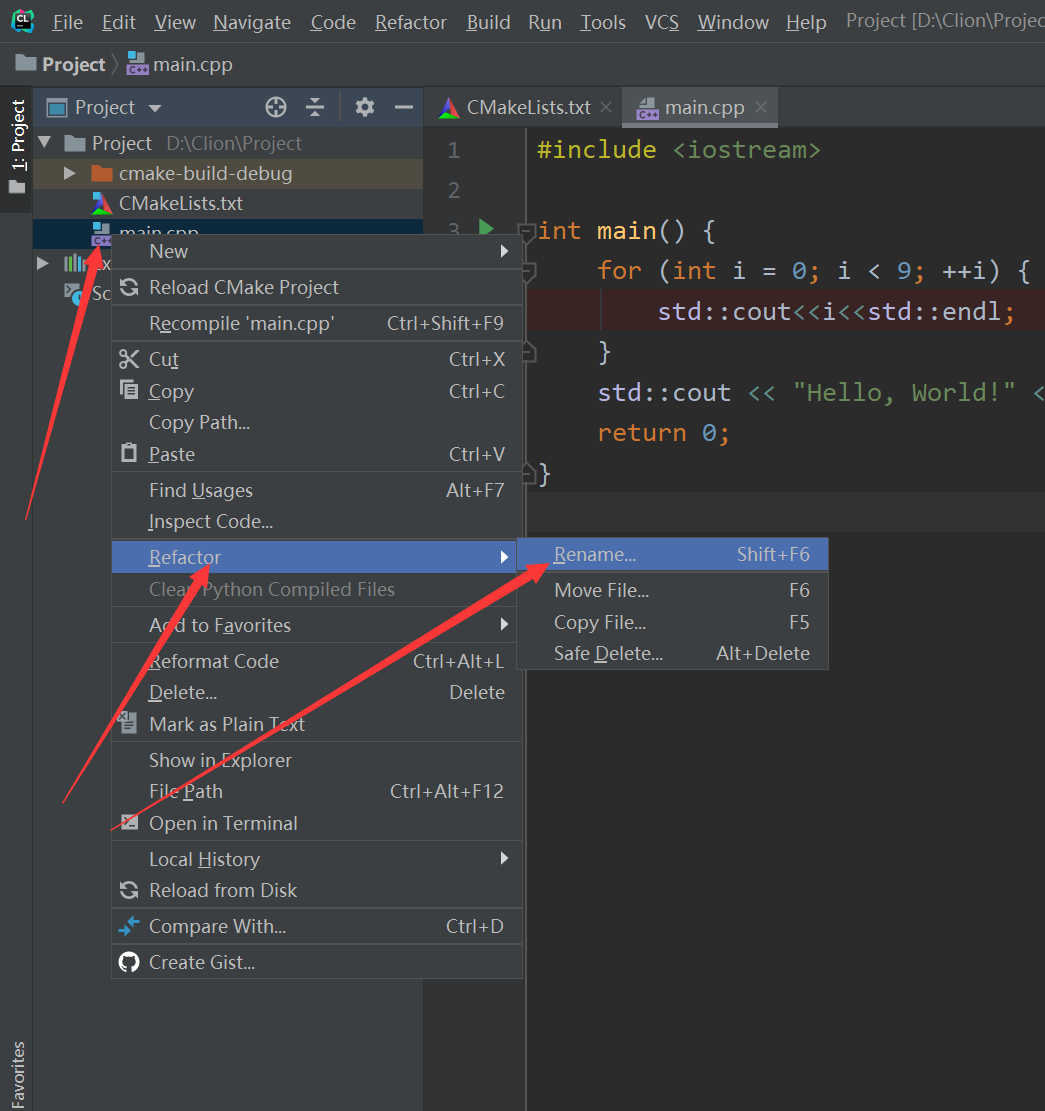
- Если вы хотите создать несколько исходных файлов в одном файле проекта, вам необходимо изменить имя исходного файла и изменить информацию в CMakeLists (выберите исходный файл, нажмите Refactor, а затем выберите Rename)
Примечание: не называйте исходный файл на китайском языке.
Шесть, скомпилируйте несколько файлов
Добавьте несколько исходных файлов в проект. Как мы все знаем, в проекте разрешена только одна основная функция. Если основных функций несколько, функция не будет запущена, и будет сообщено об ошибке. Итак, что нам делать, чтобы создать несколько исходных файлов для компиляции и отладки в рамках проекта?
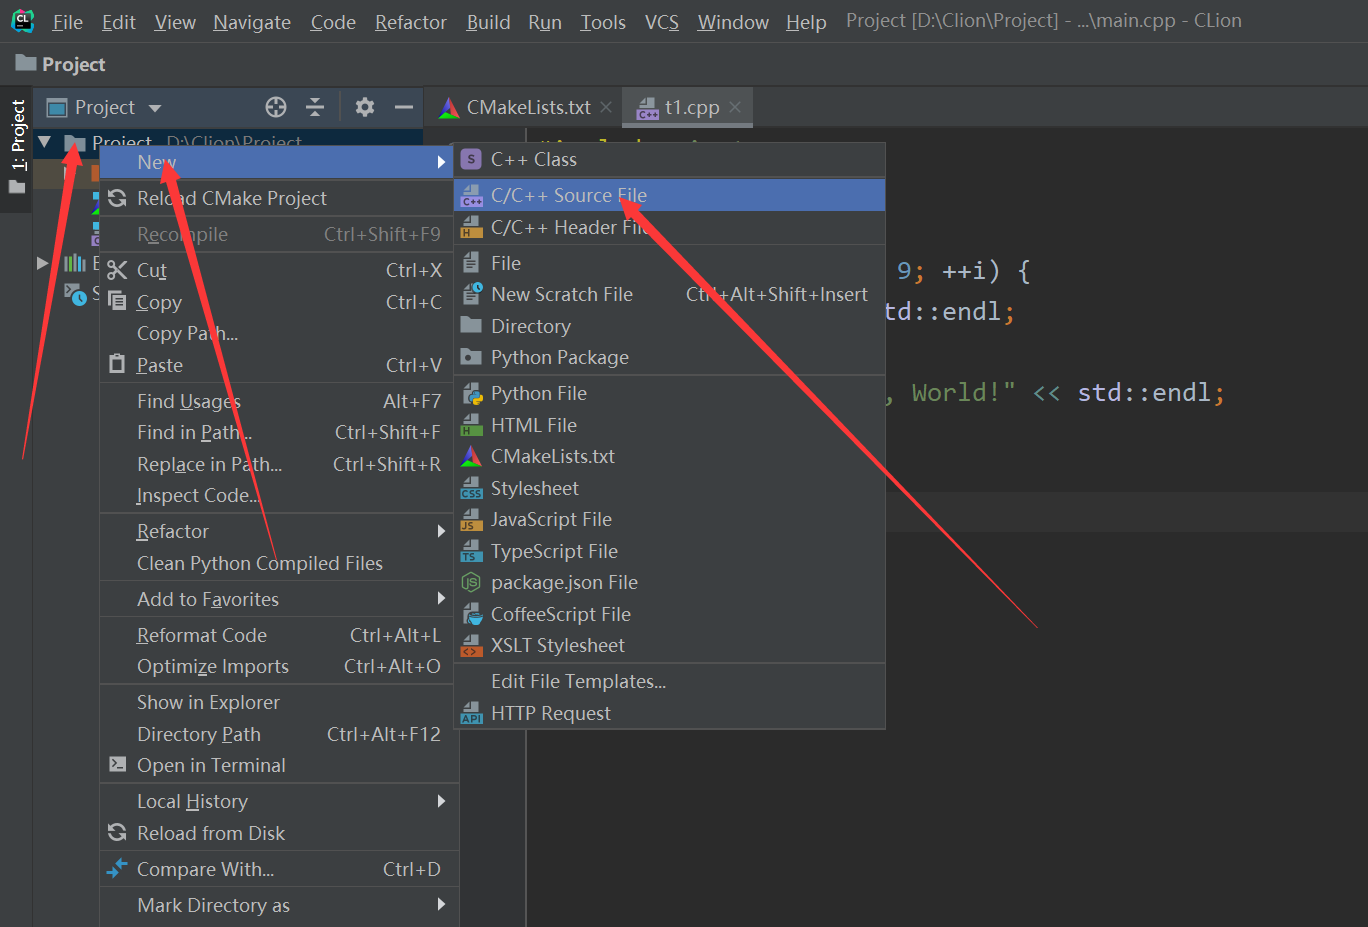
- Щелкните Project, выберите New, а затем выберите C / C ++ Source File.
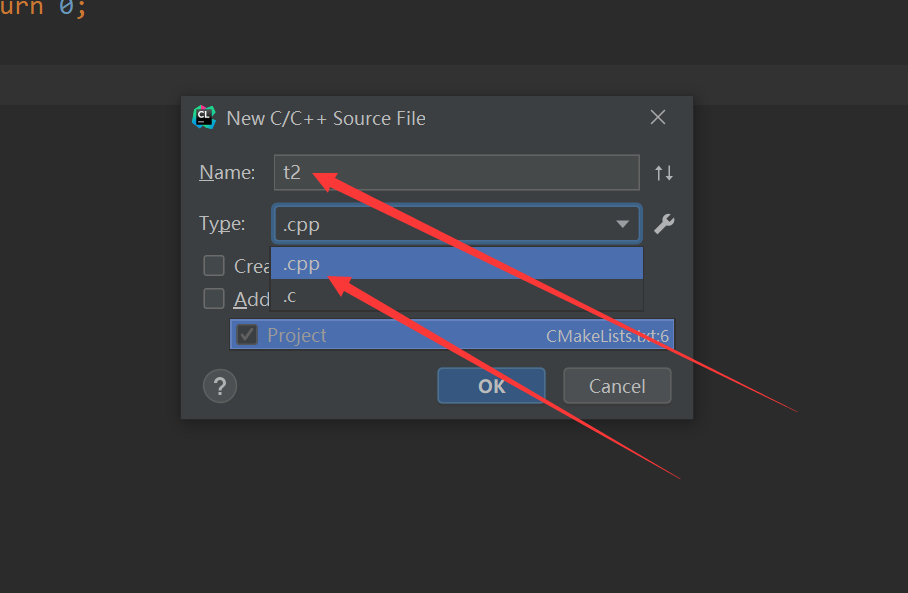
- Выберите имя и тип исходного файла, нажмите ОК.
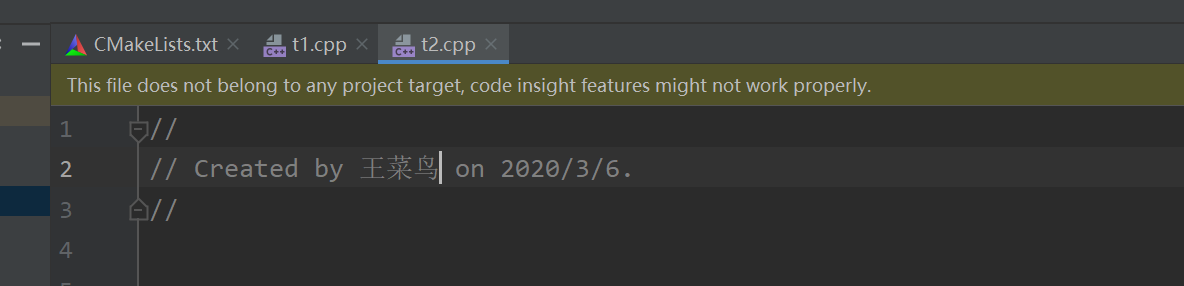
- На этом этапе вновь созданный исходный файл предложит
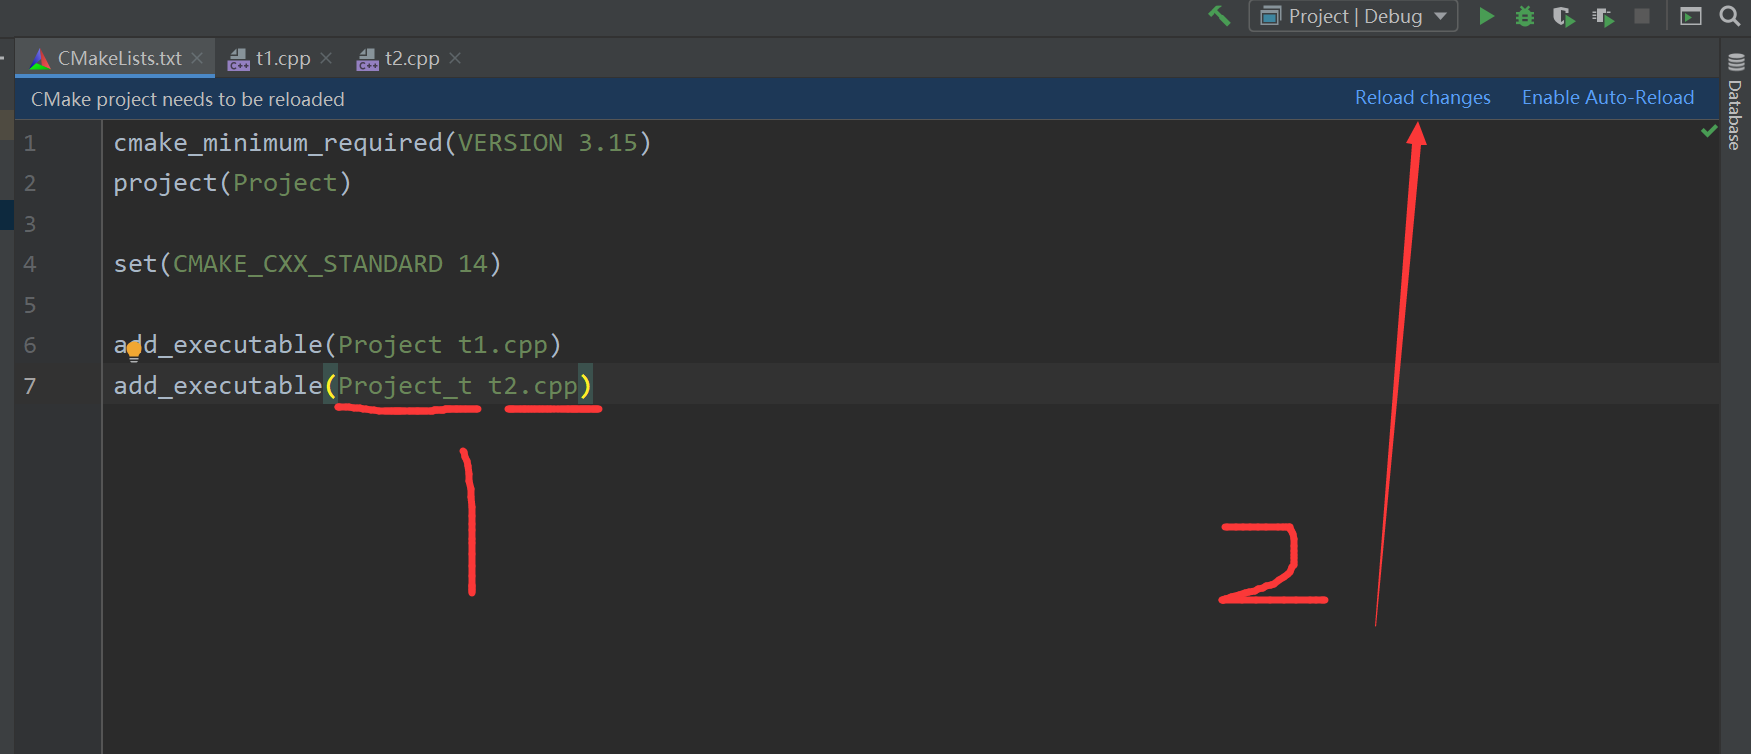
- Откройте файл CMakeLists и добавьте информацию о компиляции
Первым шагом является добавление скомпилированного проекта. Вам не нужно добавлять созданный проект Project. Вы можете изменить его. Ниже приведен только что созданный исходный файл.
Второй шаг — нажать «Обновить изменения», и изменения будут успешными! !
- Отредактируйте второй файл программы!
Семь, конец
На этом мы завершили всю настройку, и следующая работа по разработке остается за вами! Посыпать ~
Время на прочтение
5 мин
Количество просмотров 32K
Перед примером моей настройки немного лирики.
Давно хотел попробовать себя в микроконтроллерах, вернее были идеи с их использованием, которые очень хотелось реализовать. Сначала начал с PIC32 — огонь контроллеры. Так получалось, что поначалу и коротил их порты, и с питанием завышал — неубиваемые (не совсем конечно, порт правда однажды сгорел, но сам контроллер продолжал работу). IDE MplabX неплоха, подкупал графический блок с отображением занимаемой RAM/Flash на выбранном МК — удобно, но сам NetBeans как IDE это жесть, ну не удобно ни разу после Idea. Но проблема была не в этом — как потом оказалось, PIC’и тяжело достать, мало кто их возит, а если и возит, то по относительно высокой цене.
Дальше решил копнуть в сторону STM32 — они в больших количествах, за базовую периферию просят не много, но главное — это доставаемость. (Но кодогенератор STM’а хуже Microchip’a — весь файл загажен комментами и функциями, это конечно сильно огорчило. У Microchip’а все сгенеренные функции вынесены в отдельные файлы и main.c практически чист — прелесть).
(UPD: вот тут признаюсь ошибался, спасибо golf2109, он подсказал, что от заваливания комментами и функциями файла main.c можно избавиться, достаточно включить в настройках опцию для вынесения сгенерированного кода в отдельные файлы, но я все же в недоумении, почему это не дефолтная настройка, вроде логично было бы)
Теперь об IDE для STM32.
Попробовал хваленый Keil — конечно получше блокнота, но ужасно не удобный (ни нормальных подсказок, ни нормального форматирования, после Idea в общем не то пальто, особенно я так и не понял как создавать пакеты, почему нельзя просто в окошке ткнуть создать пакет и продолжить — матюгаться хочется).
Потом попробовал CooCox — гораздо лучше и приятнее интерфейс, хорошо настраивается форматирование (прям порадовала настройка переноса параметров в методах, да и другие настройки очень кстати), но опять же не хватало многих плюшек от Idea и опять же проблемы с организацией пакетов.
Clion почти та же Idea только для C/C++ и сразу захотелось ее прикрутить, но как оказалось довольно проблематично (особенно для человека, который с плюсами-то не силен, особенно со всякими сборщиками и компиляторами, парой сотен опций компиляции). Начал с блога JetBrains. Довольно подробно описано, но это для прошлых версий STM32CubeMX, в новой немного поменялась структура каталогов, в результате чего я некоторое время не понимал почему не компилится. Потом разобрался — изменил пути, для cortex-m3 убрал параметры -mfpu. Но опять не компилился. Дальше оказалось, что я не тот компилятор установил, вернее просто скачал его, но не указал путь к нему в файле сборки (ну сложновато поздно вечером думать).
Главное в Clion’е поставить галочку в настройках ‘Automaticaly Reload Cmake Project on Edit’ (Settings -> Build, Execution, Deployment -> Cmake), тогда после правок не нужно ничего очищать вручную.
Еще из изменений — дебаггер, упомянутый в блоге, переименовали в Ozone, его еще не тестил, позже отпишусь.
И последняя проблема, сверлившая мозг. Очень хотелось ООП, но не компилился проект если я добавлял C++ файл, куча ошибок с не найденными функциями (например, _exit, _sbrk и пр.). Здесь проблем было 2:
- в файле CMakeLists.txt в блоге JetBrains не был выставлен флаг CXX в директиве project (нужен для файлов C++)
- для исправления ошибок в файле из блога не хватало опций -specs=nosys.specs -specs=nano.specs после опции -gc-sections. Они как раз создают эти прототипы или наоборот игнорят эти методы (тут не могу точно сказать)
После этого проект нормально стал компилиться и размер его стал в пределах нормы (без опции -specs=nano.specs размер был в 10 раз больше для пустого проекта примерно 110 кб., с опцией — 18 кб.)
Итак, что я сделал:
- ставим Clion
- заходим в настройки (Settings -> Build, Execution, Deployment -> Cmake) и ставим галочку ‘Automaticaly Reload Cmake Project on Edit’
- здесь же вписываем в поле Cmake options параметр -DCMAKE_TOOLCHAIN_FILE=STM32L1xx.cmake и в поле Generation path ставим build (если поменять, то в файлах CMakeLists.txt и STM32L1xx.cmake нужно его тоже будет поменять)
- ставим ARM компилятор (здесь брал)
- импортируем проект (который предварительно сгенерировали в STM32CubeMx), говорим, что можно создать CMakeLists.txt
- отсюда или из моего репозитория копируем содержимое CMakeLists.txt в созданный в Clion’e и добавляем файл STM32L1xx.cmake (можно обозвать как угодно)
- в STM32L1xx.cmake правим имя проекта в директиве project и можно убрать CXX если не нужен C++
- заменить в файле CMakeLists.txt в директиве add_definitions(-DSTM32L100xC) на свой контроллер
- для надежности можно сделать: Tools -> Cmake -> Reset Cache and Reload project и потом Tools -> Cmake -> Reload Cmake Project
- теперь можно сбилдить
Файл CMakeLists.txt
project(Skeleton C CXX ASM)
cmake_minimum_required(VERSION 3.5.0)

add_definitions(-DSTM32L100xC)

set(FREERTOS_DIR Middlewares/Third_Party/FreeRTOS/Source/)

file(GLOB_RECURSE USER_SOURCES "Src/*.c")
file(GLOB_RECURSE HAL_SOURCES "Drivers/STM32L1xx_HAL_Driver/Src/*.c")
file(
    GLOB_RECURSE
    FREERTOS_SOURCES
    "${FREERTOS_DIR}/*.c"
    "${FREERTOS_DIR}/CMSIS_RTOS/*.c"
    "${FREERTOS_DIR}/portable/GCC/ARM_CM3/*.c"
)

add_library(
    CMSIS
    Src/system_stm32l1xx.c
    startup/startup_stm32l100xc.s
)

include_directories(Inc)
include_directories(Src/gps/parser/nmea)
include_directories(Drivers/STM32L1xx_HAL_Driver/Inc)
include_directories(Drivers/CMSIS/Include)
include_directories(Drivers/CMSIS/Device/ST/STM32L1xx/Include)

include_directories(${FREERTOS_DIR})
include_directories(${FREERTOS_DIR}/CMSIS_RTOS)
include_directories(${FREERTOS_DIR}/include)
include_directories(${FREERTOS_DIR}/portable/GCC/ARM_CM3/)
include_directories(${FREERTOS_DIR}/portable/GCC/MemMang)

add_executable(${PROJECT_NAME}.elf ${USER_SOURCES} ${HAL_SOURCES} ${LINKER_SCRIPT} ${FREERTOS_SOURCES})

target_link_libraries(${PROJECT_NAME}.elf CMSIS)

set(CMAKE_EXE_LINKER_FLAGS "${CMAKE_EXE_LINKER_FLAGS} -Wl,-Map=${PROJECT_SOURCE_DIR}/build/${PROJECT_NAME}.map")
set(HEX_FILE ${PROJECT_SOURCE_DIR}/build/${PROJECT_NAME}.hex)
set(BIN_FILE ${PROJECT_SOURCE_DIR}/build/${PROJECT_NAME}.bin)
add_custom_command(TARGET ${PROJECT_NAME}.elf POST_BUILD
        COMMAND ${CMAKE_OBJCOPY} -Oihex $<TARGET_FILE:${PROJECT_NAME}.elf> ${HEX_FILE}
        COMMAND ${CMAKE_OBJCOPY} -Obinary $<TARGET_FILE:${PROJECT_NAME}.elf> ${BIN_FILE}
        COMMENT "Building ${HEX_FILE} \nBuilding ${BIN_FILE}")
Файл STM32L1xx.cmake:
INCLUDE(CMakeForceCompiler)

SET(CMAKE_SYSTEM_NAME Generic)
SET(CMAKE_SYSTEM_VERSION 1)

# Specify the cross compiler. arm-none-eabi-gcc and arm-none-eabi-g++ are full path required
CMAKE_FORCE_C_COMPILER(arm-none-eabi-gcc GNU)
CMAKE_FORCE_CXX_COMPILER(arm-none-eabi-g++ GNU)

SET(LINKER_SCRIPT ${PROJECT_SOURCE_DIR}/STM32L100RCTx_FLASH.ld)
SET(COMMON_FLAGS "-mcpu=cortex-m3 -O2 -mthumb -ffunction-sections -fdata-sections -g -fno-common -fmessage-length=0")
SET(CMAKE_CXX_FLAGS_INIT "${COMMON_FLAGS} -std=c++11")
SET(CMAKE_C_FLAGS_INIT "${COMMON_FLAGS} -std=gnu99")
SET(CMAKE_EXE_LINKER_FLAGS_INIT "-Wl,-gc-sections -specs=nosys.specs -specs=nano.specs -T ${LINKER_SCRIPT}")
Работать стало приятно, но пока заливаю прошивку через STM’овскую утилиту, позже попробую накрутить OZONE. На вопросы отвечу (если смогу).
Студенты могут бесплатно получить лицензию на CLion и другое ПО компании JetBrains, подав заявку. Нужна почта МЭИ, фотография студенческого билета или карта ISIC.
Установка и настройка GCC и CLion в Windows
Инструкция по развертыванию такой же среды разработки, как в лаборатории.
Внимание: в путях установки и в именах файлов проектов недопустимы пробелы, а в Windows — и кириллические символы.
Требования
- Windows 7 x64 и выше;
- 2 ГБ оперативной памяти.
Инструкция
- Скачать и установить компилятор MinGW-w64. При установке выбрать путь C:MinGW-w64 . В случае проблем можно скопировать этот каталог из лаборатории или у коллег.
- Скачать и установить среду CLion.
- Скачать архив настроек CLion ( ) и импортировать настройки: пункт меню Configue →Import Settings стартового диалога или через пункт меню File →Import Settings. окна CLion.
- Установить CMake. Нужна ссылка в таблице Binary distributions!
Наладка среды разработки для OS X (macOS)
Студентов, которым это нужно, у нас мало, но особых проблем у них не было. Если хотите поделиться здесь своим опытом, обратитесь к Дмитрию Козлюку.
- JetBrains AppCode — предшественница/альтернатива CLion.
- Apple XCode — стандартная среда разработки для ОС Apple.
- Среда разработки на основе Code::Blocks, доступна в ОС Apple, хотя преимуществ у этого решения мало.
Наладка среды разработки в Linux
Студентов, которым это было бы нужно, у нас еще не было. Но Вадиму Никитину и Дмитрию Козлюку — каждый день.
- Нужен GCC и CMake, обычно это пакеты gcc и cmake .
- CLion работает под Linux, его можно скачать там же, где и для Windows.
- Вадим пользуется CodeLite.
Если CLion не устраивает
Как и всё остальное, CLion несовершенен, например, требователен к ресурсам и версии ОС. Вот несколько альтернатив.
- Microsoft Visual Studio Community Edition очень хороша, но требовательна к ресурсам и только для Windows. Включает собственный компилятор.
- Среда разработки на основе Code::Blocks, которая использовалась в 2013—2016 годах на Windows XP. Вместо Code::Block можно взять более продвинутую CodeLite.
- Редактор Geany очень легковесный. Компилятор и систему сборки нужно устанавливать отдельно (можно тот же MinGW-w64).
- Eclipse CDT: мощная, кроссплатформенная, но непростая в настройке среда. Компилятор и система сборки в комплект не входят.
© кафедра Управления и информатики НИУ «МЭИ», 2014—2016 г. г.
Install CLion
CLion is a cross-platform IDE that provides consistent experience on Windows, macOS, and Linux (for setup on FreeBSD, refer to this instruction).
System requirements
2 GB of free RAM
8 GB of total system RAM
Multi-core CPU. CLion supports multithreading for different operations and processes making it faster the more CPU cores it can use.
2.5 GB and another 1 GB for caches
SSD drive with at least 5 GB of free space
Officially released 64-bit versions of the following:
Microsoft Windows 8 or later
macOS 10.14 or later
Any Linux distribution that supports Gnome, KDE , or Unity DE * .
Pre-release versions are not supported.
Latest 64-bit version of Windows, macOS, or Linux (for example, Debian, Ubuntu, or RHEL)
* CLion is not available for some Linux distributions, such as RHEL6/CentOS6, which do not include glibc version 2.14 required by JBR 11.
You do not need to install Java to run CLion because JetBrains Runtime is bundled with the IDE (based on JRE 11).
Toolchain requirements
When using bundled MinGW, no additional tools are required
In case of Cygwin, install the version 2.8 or later with the gcc-g++ and gdb packages
In case of using the MSVC compiler: Visual Studio 2013, 2015, 2017, 2019, or 2022
In case of using WSL: Windows 10 Fall Creators Update (least version 1709, build 16299.15) and the tools required in WSL (see the Linux tab)
Xcode command line developer tools (to install, run the xcode-select —install command)
the make utility (run sudo apt-get -y install make to install it)
Install using the Toolbox App
The JetBrains Toolbox App is the recommended tool to install JetBrains products. Use it to install and manage different products or several versions of the same product, including Early Access Program (EAP) and Nightly releases, update and roll back when necessary, and easily remove any tool. The Toolbox App maintains a list of all your projects to quickly open any project in the right IDE and version.
Install the Toolbox App
Download the installer .exe from the Toolbox App web page.
Run the installer and follow the wizard steps.
After you run the Toolbox App, click its icon in the notification area and select which product and version you want to install.
Log in to your JetBrains Account from the Toolbox App and it will automatically activate the available licenses for any IDE that you install.
Install the Toolbox App
Download the disk image .dmg from the Toolbox App web page.
There are separate disk images for Intel and Apple Silicon processors.
Mount the image and drag the JetBrains Toolbox app to the Applications folder.
After you run the Toolbox App, click its icon in the main menu and select which product and version you want to install.

Log in to your JetBrains Account from the Toolbox App and it will automatically activate the available licenses for any IDE that you install.
Install the Toolbox App
Download the tarball .tar.gz from the Toolbox App web page.
Extract the tarball to a directory that supports file execution.
For example, if the downloaded version is 1.17.7391, you can extract it to the recommended /opt directory using the following command:
Execute the jetbrains-toolbox binary from the extracted directory to run the Toolbox App and select which product and version you want to install. After you run the Toolbox App for the first time, it will automatically add the Toolbox App icon to the main menu.
Log in to your JetBrains Account from the Toolbox App and it will automatically activate the available licenses for any IDE that you install.
You can use this shell script that automatically downloads the tarball with the latest version of the Toolbox App, extracts it to the recommended /opt directory, and creates a symbolic link in the /usr/local/bin directory.
Standalone installation
You can install CLion manually and have the option to manage the location of every instance and all the configuration files. This is useful, for example, if you have a policy that requires specific install locations.
Run the installer and follow the wizard steps.
On the Installation Options step, you can configure the following:
Create a desktop shortcut for launching CLion.
Add the directory with CLion command-line launchers to the PATH environment variable to be able to run them from any working directory in the Command Prompt.
Add the Open Folder as Project action to the system context menu (when you right-click a folder).
Associate specific file extensions with CLion to open them with a double-click.
To run CLion, find it in the Windows Start menu or use the desktop shortcut. You can also run the launcher batch script or executable in the installation directory under bin .
Extract the archive to the desired folder.
To run CLion, use the launcher batch script or executable in the extracted directory under bin .
There are separate disk images for Intel and Apple Silicon processors.
Mount the image and drag the CLion app to the Applications folder.
Run the CLion app from the Applications directory, Launchpad, or Spotlight.
Unpack the downloaded CLion-*.tar.gz archive. The recommended extract directory is /opt :
Do not extract the tarball over an existing installation to avoid conflicts. Always extract to a clean directory.
Execute the CLion.sh from bin subdirectory to run CLion:
To create a desktop entry, do one of the following:
On the Welcome screen, click Configure | Create Desktop Entry
From the main menu, click Tools | Create Desktop Entry
When you run CLion for the first time, you can take several steps to complete the installation, customize your instance, and start working with the IDE.
Silent installation on Windows
Silent installation is performed without any user interface. It can be used by network administrators to install CLion on a number of machines and avoid interrupting other users.
To perform silent install, run the installer with the following switches:
/S : Enable silent install
/CONFIG : Specify the path to the silent configuration file
/D : Specify the path to the installation directory
This parameter must be the last in the command line and it should not contain any quotes even if the path contains blank spaces.
To check for issues during the installation process, add the /LOG switch with the log file path and name between the /S and /D parameters. The installer will generate the specified log file. For example:
Silent configuration file
You can download the default silent configuration file for CLion at https://download.jetbrains.com/cpp/silent.config
The silent configuration file defines the options for installing CLion. With the default options, silent installation is performed only for the current user: mode=user . If you want to install CLion for all users, change the value of the installation mode option to mode=admin and run the installer as an administrator.
The default silent configuration file is unique for each JetBrains product. You can modify it to enable or disable various installation options as necessary.
It is possible to perform silent installation without the configuration file. In this case, omit the /CONFIG switch and run the installer as an administrator. Without the silent configuration file, the installer will ignore all additional options: it will not create desktop shortcuts, add associations, or update the PATH variable. However, it will still create a shortcut in the Start menu under JetBrains .
Install as a snap package on Linux
You can install CLion as a self-contained snap package. Since snaps update automatically, your CLion installation will always be up to date.
To use snaps, install and run the snapd service as described in the installation guide.
On Ubuntu 16.04 LTS and later, this service is pre-installed.
CLion is distributed via two channels:
The stable channel includes only stable versions. To install the latest stable release of CLion, run the following command:
The —classic option is required because the CLion snap requires full access to the system, like a traditionally packaged application.
The edge channel includes EAP builds. To install the latest EAP build of CLion, run the following command:
When the snap is installed, you can launch it by running the clion.sh command.
To list all installed snaps, you can run sudo snap list . For information about other snap commands, see the Snapcraft documentation.
IAR + Clion = дружба

Карантин заставил меня проводить все свое время дома, в том числе и свободное время, и хотя дома есть куча дел, я умело спихнул их на сына, а сам решил наконец-то доизучать среду разработки Clion от JetBrains, тем более, что в релизе 2020.1 появилась поддержка IAR toolchain.
Все кому интересен пошаговый гайд и куча картинок велком.
Введение
В своей работе, для разработки программного обеспечения различных датчиков я использую C++ IAR Workbench компилятор. У него есть свои недостатки, например поздняя поддержка новых стандартов С++, у него есть несколько критичных багов, которые не позволяют создавать удобные конструкции и оптимальные вещи, но в целом я люблю его.
Всегда можно обратиться за поддержкой к IAR, попросить добавить какую-нибудь функциональность или сделать улучшения, а также, что немаловажно, компилятор имеет сертификат безопасности, а это означает, что я могу положиться на этот компилятор и во время сертификации ПО к нему не будет претензий.
Последние мои исследования (когда я вызвал внутренний assert у IAR компилятора и он выдал мне простыню из отладочной информации) говорят о том, что собственно этот компилятор сделан на основе Clang, что радует своей перспективой.
Но есть у IAR одна очень напрягающая вещь — это редактор. Он конечно развивается, в него добавился кривенький интелисенс, подсветка синтаксиса и другие фишки из прошлого, но в целом редактор можно описать фразой — «Powered by notepad».
Поэтому для работы и для студентов я искал что-то более современное, модное, молодежное, недорогое (а для студентов и подавно бесплатное).
Мой выбор пал на Clion от JetBrains.
Общая информация
Clion это среда для разработки на С/С++. Но я не буду описывать все его прелести, они довольно хорошо описаны в руководстве. Вместо этого, я покажу, как подключить IAR компилятор и как проводить отладку. Описать словами как все это настроить очень сложно, поэтому я просто буду вставлять картинки с небольшими пояснениями.
Как я уже сказал, в версии 2020.1 была добавлена поддержка IAR компилятора. Огромное спасибо за это Илье Моторному ака Elmot, потому что до версии 2020.1 работа с IAR была немного загадочной и не совсем понятной.
Он уже выкладывал здесь статью про свой плугин для поддержки разработки встроенного ПО с использованием ST Cube, а сейчас еще приложил руку и голову к поддержке IAR. Он также вкратце описал, как подружить Cube, IAR и Clion здесь.
Создание проекта
В основе работы Clion лежит система сборки CMAKE, и любой проект настраивается на основе файлов настроек дя CMAKE. Поэтому чтобы создать проект, достаточно просто указать папку где будут лежать ваши исходники. Можно создать проект уже из существующих исходников, в таком случае, Clion автоматически прошерстит указанную папку с исходниками, найдет все c и cpp файлы и добавит их в список (CMAKELIST) для сборки.
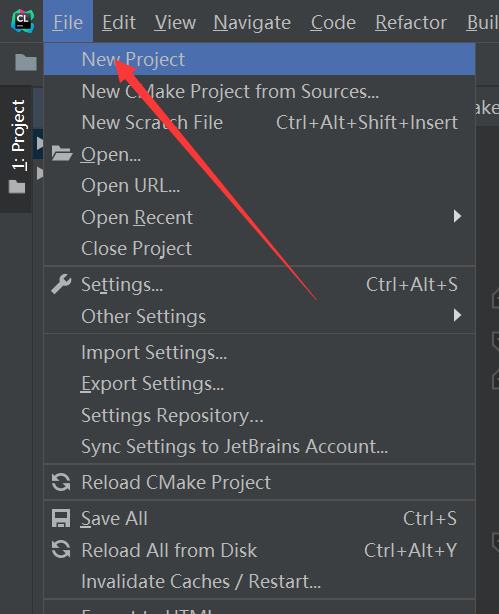
Но давайте создадим проект с нуля, чтобы было понятно, как оно настраивается руками. Для этого необходимо выбрать пункт меню File->NewProject

В появившемся окне указываем путь к проекту, выбираем язык, тип выходного файла, версию языка и жмем кнопку Create . Конечно все это потом можно руками поменять в настройках CMAKE.
Нас интересует С++17 и тип выходного файла C++ Executable. На данном этапе ничего больше не надо.

Если вы заметили в настройках проектах уже сть опция Embedded->STM32CubeMX , она позволяет вам создать файл .ioc, в который затем можно добавить настройки из STM32CubeIDE. А поскольку Clion может работать с .ioc файлом, то все изменения в нем экспортируется в проект Clion.
Но это не наш вариант, мы хотим работать с IAR компилятором и микроконтроллерами по брутальному без всяких там Cubов. Итак, мы создали пустой проект, который содержит только один исходных файл main.cpp .

Как я уже говорил, вся концепция сборки с Clion построена на использовании CMAKE, поэтому основным файлом сборки будет являться CMakeList.txt, содержащий настройки целей для сборки, списки подключаемых директорий, списки исходных файлов и многие другие вещи, необходимы для сборки.
На данный момент файл выглядит вот так:

Как видите в нем указана только минимально требуемая версия CMAKE +
Собственно имя проекта +
Стандарт С++, который мы выбрали при настройке+
И единственный исходный файл для сборки — main.cpp
Скоро мы добавим сюда немного настроек, а пока необходимо установить toolchain
Выбор и установка Toolchain
Clion в теории может работать с любым toolchain.
Toolchain — это набор инструментов для сборки программ из исходного кода. Обычно туда входит, стандартные библиотеки, компилятор, линковщик, ассемблер, отладчик и другие полезные вещи.
Но стандартно Clion поддерживает популярные тулчейны — MinGW, CygWin, Visual Studio
В списке нет IAR toolchain, но это не беда, можно установить любой стандартный, я пробовал с MinGW и Visual Studio с обоими работает прекрасно.
Поэтому для начала необходимо установить один из стандартных toolchain, которые поддерживает Clion.
C Visual Studio все понятно, нужно просто скачать установщик у Microsoft и установить С++ пакет (поставить галочку, потому что по умолчанию устанавливается только C#).
Поэтому сразу давайте разберемся с MinGW, скачать его можно отсюда http://www.mingw.org/.
Для полного понимания: нужен installer, его можно обнаружить справа на ссылках Popular или All time :

Далее запускаем MinGW и указываем путь, куда это все дело поставить:

После копирования файлов, жмем Continue, запуститься Менеджер Инсталляции. Все что нам нужно это GNU C++ Compiler (собственно и он то не нужен, но нужно, чтобы, что-то было установлено) и Базовая инсталляция. Выбрали — жмем ApplyChanges .

Все это дело превосходно установится в течении минуты. Установка MinGW toolchain завершена. Перейдем теперь к настройкам.
Настройка
Сразу скажу, настроек в Clion немерено, я не будут рассказывать про все, цель статьи показать, как работать с IAR toolchain.
Итак, для начала идем в настройку Clion — File->Settings->Build, Execution, Deployment -> Toolchain и жмем на плюсик.

Выбираем из списка стандартных toolchain MinGW, ну или Visual Studio, если вы установили его. И ждём пока Clion сам определит местоположение компилятора, make утилиты, и отладчика.
Вообще ждать не обязательно, мы все равно это заменим своим 🙂

Теперь заменим все на нужный нам компилятор и отладчик. Для компиляции С и С++ файлов IAR использует тот же самый компилятор, поэтому просто в обоих случаях указываем один и тот же компилятор.
А вот отладчик нужно поменять либо на поставляемый (Bundled) с Clion, либо на отладчик из комплекта GNU ARM (можно скачать отсюда https://developer.arm.com/tools-and-software/open-source-software/developer-tools/gnu-toolchain/gnu-rm/downloads)
Самое простое использовать отладчик поставляемый с Clion:

Можно сразу переименовать ваш toolchain в IAR, чтобы отличать его от стандартного MinGW.

Утилиту make можно использовать из комплекта MinGW, но если очень хочется, то можно поменять её на любую другую, например, я использую clearmake, поставляемый с системой контроля версий ClearCase (не спрашивайте, почему — так исторически сложилось)
Вы также можете поменять make сборку на какую-нибудь другую, например на ninja, более подробно об этом можно прочитать здесь.
Базовая Настройка CMAKE
Перед тем как собирать проект, необходимо выполнить базовые настройки CMAKE, для различных вариантов сборок, например, Release или Debug. Создадим обе.
Для этого идем в File->Settings->Build, Executiion, Deployment -> CMake

И жмем на «+» плюсик

Автоматически у вас создастся конфигурация сборки для Debug. Здесь можно добавить кое какие опции для CMake, поменять папку для сборки, и добавить опции для make или другого сборщика (Build Options). По умолчанию, стоит ключ -j 16( у вас может быть и больше), что означает задействовать все 16 ядер для параллельной компиляции модулей. Такой параллелизм хорошо работает, кода весь код лежит на локальной машине, но если он лежит где-нибудь в сети или удалённой системе контроля версии (моя история) и этот доступ осуществляется медленно, через VPN, то лучше поставить компиляцию на одно ядро.
Для выбора типа сборки Debug или Release нужно использовать выпадающий список Build Type.
Точно также создаём еще один тип сборки Release.
После нажатия на кнопку Apply Clion должен будет пересобрать проект CMAKE, и если вы нигде не допустили ошибок, то после пересборки у вас должен появиться вот такой выбор в списке возможных сборок:

В принципе уже сейчас можно компилировать, жмем на молоток и видим что компиляция происходит успешно, а вот линковка нет, требуется метод __write() , который вызывается оператором вывода в main.cpp.

Все потому что мы не настроили ключи для компилятора и линковщика. Переходим к настройку CMake.
IAR выложил пример с настройками для CMake, он лежит здесь.
Все что я сделал, это добавил две ветки настроек для двух типов сборок Debug и Release.
Да еще поменял имя выходного файла на *.elf установив переменную set(CMAKE_EXECUTABLE_SUFFIX «.elf»)
Осталось добавить нашу настройку в CMakelist.txt:
Каждый раз когда вы меняете Cmakelist.txt или настройку toolchanin необходимо запускать пересборку Cmake проекта. Можно настроить, чтобы она делалась автоматически, но лучше просто руками нажимать на кнопку Reload Cmake, а вот для того, чтобы жестко пересобрать Cmake проект, лучше пойти в toolbox Cmake и выбрать там пункт Reset Cache and Reload Project

Теперь можно снова попробовать пересобрать проект, нажав на молоток. Если вы опять все сделали правильно — ваш простой проект должен собраться.
Настройка отладчика
Для отладки я буду использовать OpenOCD gdb сервер, но вы можете использовать Jlink gdb сервер или ST-Link gdb сервер.
Скачаем стабильную версию, на момент написания статьи это была версия 0.10.0: https://sourceforge.net/projects/openocd/files/openocd/0.10.0/ можно её собрать самому. Но если лень с этим возиться, то можно использовать неофициальную сборку под Windows: http://www.freddiechopin.info/en/download/category/4-openocd.
Итак, для настройки отладчика нужно сделать следующие шаги:
Убедитесь, что в настройках стоит gdb клиент из поставки File->Settings->Build,Execution,Deployment->Toolchains->Debugger: Bundled GDB
Переходим в настройки отладчика Run -> Edit Configurations -> Templates
И находим там Embedded GDB Server

В шаблоне нет настроек и можно для каждого проекта использовать пустой шаблон и каждый раз его настраивать, а можно сразу настроить шаблон, чтобы в следующем проекте переиспользовать настройки.
Настроим сразу шаблон:
В опции Download executable поставим галочку, на Update Only — позволит загружать в микроконтроллер образ программы только в том случае, если были были какие-то изменения, в противном случае прошивки не будет.
OpenOCD по умолчанию работает по tcp протоколу, т.е. вы можете подключаться к серверу удалённо по IP адресу и порту по умолчанию 3333 (порт можно менять, но нам это не нужно). Так как запускаться OpenOCD будет на локальном компьютере, то и в опции target remote args нужно установить в значение tcp:127.0.0.1:3333
В опции GDB Server прописываем путь к OpenOCD, туда куда вы уже его скопировали на предыдущих шагах.
В GDB Server args прописываем строку запуска OpenOCD сервера с аргументами. Так как я использую китайский клон Nucleo, который называется XNucleo, то я немного подредактировал конфигурацию st_nucelo, прописав идентификационный номер вендора китайского отладчика (hla_vid_pid — The vendor ID and product ID of the adapter) и поменял имя файла настроек. В итоге моя строка для аргументов OpenOcd выглядит следующим образом:
-f ../scripts/board/st_xnucleo_f4.cfg -c «reset_config none separate» -c «init» -c «reset halt»
Здесь ключ -f задаёт имя конфигурационного файла, вместо моего st_xnucleo_f4.cfg, поставьте вашу плату, либо если у вас нет платы, то прописать нужно конфигурацию для процессора и для отладчика в отдельном файле и уже подключить этот файл.
Ключ -с задаёт команду, которая следуют за ключем в кавычках.
-c «reset_config none separate» — означает, что сброс производится через SWD без использования отдельной ножки сброса (а у меня как раз такой китайский отладчик).
-c «init» — запускает команду «init», которая запускает загрузочные OpenOCD скрипты под ваш целевой процессор
-c «reset halt»_ — выполняет немедленный сброс микроконтроллера после инициализации
В принципе все. Больше ничего не нужно. У вас должен получиться вот такой шаблон

Осталось на основе этого шаблона создать конфигурацию:
- Снова переходим в Run -> Edit Configurations
- Жмем на «+»

и выбираем наш Template. Переименовываем как-то по человечьи

И собственно теперь можно запускать на проверку, жмем на жука и смотрим, как все работает.
В опциях Advanced GDB Server options можно дополнительно установить команды выполняющиеся после загрузки кода. Я поставил перезагрузку и перенаправление потока вывода через отладочный интерфейс — monitor arm semihosting enable . Только не забудьте поставить галочку Download executable: Always иначе загрузки не будет и команды не выполнятся.
Теперь все обращения к потоку вывода будут отражаться у вас в окне Debug: Console . Выводиться будет медленно, но для отладки пойдет.
Также вы можете просмотреть все регистры для вашего микроконтроллера но нужно будет их подключить, используя .svd файл.
Завершающий этап
Чтобы наш проект заработал вообще как надо, добавим в него файл startup.cpp , в котором будет происходить инициализация стека, инициализация статических переменных, fpu и храниться таблица векторов прерывания и собственно переход на точку входа программы main() .
Для этого нам достаточно скопировать файл startup.cpp в папку проекта и добавить его в сборку.

Теперь наш проект готов и вы можете скачать его здесь: Постой проект с настройками для IAR
Для открытия в Clion достаточно зайти в меню File->Open и выбрать папку в которую вы его разархивировали.
Да остался один момент:
Статический анализатор, проверяющий код на лету, на основе Clang пока не работает для IAR, так как не понимает ключи компилятора, поэтому его придется отключить, через меню File->Settings -> Languages&Frameworks -> C/C++ -> Clangd .
Убрать галочку Enable clangd server.

Заключение
В качестве заключения хотелось бы сказать, что работать в IAR IDE после Clion как то не очень хочется. Хотя для детальной отладки все таки придется использовать IAR, так как средства отладки там явно обширнее. С другой стороны к отладке я вообще редко обращаюсь, разве что проверить код студентов, когда он не работает.
Clion бесплатен для студентов и поэтому проблем с его установкой у них быть не должно, но и в принципе лицензия тоже не дорогая. Думаю, что студентам Clion серьезно облегчит жизнь и привнесет песчинку радости в их угрюмую жизнь, потому что сейчас больно смотреть на их муки написания кода. Да, что таить и на работе тоже.
А еще работать в Clion приятно, потому что все в одном. Например, эту статью я пишу тоже в Clion и сразу вижу её отображение.

А ведь есть еще куча всяких других плюшек, про которые я рассказывать не буду, они описаны на сайте JetBrains. Просто завершающий гифчик, показывающий скорость работы:
The definitive guide of setting up C/C++ development environment on Windows
I know a lot of you are having troubles of getting it to work on Windows and complaining a shiton.
I will admit, that most C++ programming books do NOT actually tell you how to set things up.
And I think that’s hilarious, because how are you supposed to program without a working development environment?
Although some books do mention it, they usually target Unix operating systems.
You can just use Visual Studio, which is the best and beginner-friendly solution and has really good documentation from Microsoft, but for some reason you are just a boomer and don’t want to use it and you are dumb to set up the alternatives.
Now, you have found the right guide!
This guide aims to provide the fullest list of every possible main-stream IDEs/text editors you might want to use and its respective configuration on Windows.
Follow the guide and screenshot carefully.
The screenshot are from Windows Sandbox, which is a clean install of Windows 10.
If you followed everything, and can’t get it work, open an issue. Let me see how that’s even possible!!
A visual summary of this guide:
flowchart TD
    A[Start]
    A-->Compiler{Compiler}
    A-->VisualStudio
    Compiler-->MSYS2{MSYS2}
    MSYS2--->GCC
    MSYS2--->Clang
    Compiler-->MSVC

    GCC-->CMake
    Clang-->CMake
    MSVC-->CMake

    CMake-->IDE{IDE}
    IDE-->VisualStudio
    IDE-->QtCreator
    IDE-->CLion

    CMake-->Editor{Text Editor}
    Editor-->Vim
    Editor-->VSCode[Visual Studio Code]

    GTest[Google test & Doxygen]-. integrate .->VisualStudio
    GTest[Google test & Doxygen]-. integrate .->VSCode
    GTest[Google test & Doxygen]-. integrate .->CLion
    GTest[Google test & Doxygen]-. integrate .->CMake

    subgraph tooling
    Additional[Additional tooling]---ReSharper
    Additional---ClangTidy
    Additional---ClangFormat
    Additional---Incredibuild
    end
- The definitive guide of setting up C/C++ development environment on Windows
- Setting up development environment
- Download & Install a C++ compiler
- GCC & Clang
- Download & Install MSYS2
- Install GCC
- Install Clang
- What is MSYS2 and Why?
- What’s the difference between
/usr/binand/mingw64/bin
- MSVC
- GCC & Clang
- Download & Install CMake
- What is CMake and Why?
- IDEs
- Setting up CLion
- Setting up QT creator
- Setting up Visual Studio
- Full package
- Standalone IDE
- Text editors
- Setting up VSCode
- Setting up Vim
- Using MSYS2
- Standalone
- Optional plugins
- Download & Install a C++ compiler
- Debugging
- Debugging in VSCode
- Debugging in CLion
- Debugging in Visual Studio
- Debugging in QT
- Using libraries
- Setting up vcpkg
- Finding and Installing a library
- Using a library
- Unit Testing
- Google Test
- Integration with Visual Studio
- Integration with CLion
- Integration with VSCode
- Microsoft Unit Test
- CTest
- Google Test
- Documentation
- Setting up doxygen
- Integrate doxygen with CMake
- Source control
- Setting up a system-wide package manager
- Winget
- Chocolatey
- Scoop
- Setting up WSL
- Addtional Tooling
- Resharper
- Clang-tidy
- Integration with Visual Studio
- MSBuild Project
- CMake Project
- Integration with CLion
- Integration with VSCode
- Integration with Visual Studio
- ClangFormat
- Integration with Visual Studio
- Integration with VSCode
- Incredibuild
- C/C++ include guard (proud contributor)
- include-info (proud maker)
- VSCode Font switcher (proud contributor)
- Setting up development environment
Setting up development environment
This section describes the steps to
- Download & Install a C++ compiler
- Download & Install CMake
- Download & Install an IDE/text editor
- Create a project in various IDEs/text editors and start writing code
Download & Install a C++ compiler

This guide will cover the installation of GCC, Clang and MSVC.
GCC & Clang
Download & Install MSYS2
Download here
Just launch the installer and keep clicking «Next»
Install GCC
If you also want to install clang, skip this part and go directly to Install Clang, because GCC is a dependency of Clang (on MSYS2) and will be automatically installed when you install clang.
- Run MSYS2, type the following command:
pacman is the package manager used by MSYS2. -S means «sync». -y means «download fresh package databases from the server». -u means «upgrade installed packages».
This command will update the packages info, so you get the latest packages. It will prompt you like this, and you type y and hit enter.

- Then it will prompt you
To complete this update all MSYS2 processes including this terminal will be closed. Confirm to proceed [Y/n], typeyand hit enter, and it will close the window after the update is done. - Relaunch MSYS2 from your start menu. Type:
pacman -S mingw-w64-x86_64-gcc
like this, type y and hit enter to install gcc

And then type:
pacman -S mingw-w64-x86_64-make
And type y to also install make.
And then type:
pacman -S mingw-w64-x86_64-gdb
And type y to also install gdb.
-
Now search for
environment variableand open it
-
Click
Environment Variables, findPathinSystem variables, double click to open the setting.
-
Click
Newand copyC:\msys64\mingw64\binto the new entry.
-
Click
OKto close all windows. Now you finished installing GCC. Open any shell such ascmdand type ingcc --versionand you shall see the following:


Install Clang
Installing Clang will also automatically install GCC (on MSYS2).
- Run MSYS2, type the following command:
pacman is the package manager used by MSYS2. -S means «sync». -y means «download fresh package databases from the server». -u means «upgrade installed packages».
This command will update the packages info, so you get the latest packages. It will prompt you like this, and you type y and hit enter.
-
Then it will prompt you
To complete this update all MSYS2 processes including this terminal will be closed. Confirm to proceed [Y/n], typeyand hit enter, and it will close the window after the update is done. -
Relaunch MSYS2 from your start menu. Type:
pacman -S mingw-w64-x86_64-clang mingw-w64-x86_64-clang-tools-extra
like this, type y and hit enter to install clang

And then type:
pacman -S mingw-w64-x86_64-make
And type y to also install make.
And then type:
pacman -S mingw-w64-x86_64-gdb
And type y to also install gdb.
-
Now search for
environment variableand open it
-
Click
Environment Variables, findPathinSystem variables, double click to open the setting.
-
Click
Newand copyC:\msys64\mingw64\binto the new entry.
-
Click
OKto close all windows. Now you finished installing clang. Open any shell such ascmdand type inclang --versionand you shall see the following:

(9. Optional): If you want to get clang’s implementation of the C++ standard library (ie. the STL), type this command:
pacman -S mingw-w64-x86_64-libc++
When invoking clang++, add the flag -stdlib=libc++.
The header files of libc++ will be stored at C:\msys64\mingw64\include\c++\v1.
Note: Clang and GCC is installed to the same directory, eg. under C:\msys64\mingw64\bin. Don’t be confused by the directory C:\msys64\clang64. It is an empty folder.
What is MSYS2 and Why?
MSYS2 is a collection of tools and libraries providing you with an easy-to-use environment for building, installing and running native Windows software.
But basically, we use its implementation of MingW(Minimalist GNU for Windows), which is a collection of common developing tools seen on GNU/Linux operating systems.
Warning
Please DO NOT follow this guide on Vscode’s official tutorial, because the Mingw-w64 project provides an out-dated GCC toolchain. 
MSYS2 (in this guide) is actively maintained and provides an up-to-date GCC toolchain as well as many others, is the prefered choice.
What’s the difference between /usr/bin and /mingw64/bin
Copied from this stackoverflow answer
The GCC compiler in /usr/bin produces executables that use msys-2.0.dll as a runtime dependency. That DLL is basically a fork of Cygwin, and it provides emulation of POSIX commands not normally available on Windows. That environment is mainly for running programs from the Linux world (like bash) which need POSIX commands and cannot be easily ported to a native Windows environment.
The GCC compilers in /mingw32/bin and /mingw64/bin produce native Windows executables targeting the 32-bit or 64-bit versions of Windows respectively. The 32-bit executables can actually run on 32-bit or 64-bit Windows. These executables are easier to distribute; you generally just copy all the DLLs that they depend on from the /mingw*/bin folder to the same directory as your executable, and then you have something that will run successfully on other computers. Since the main purpose of MSYS2 is to help write native Windows software, you’ll find a much wider variety of libraries in the MinGW environments than in the msys-2.0.dll environment.
MSVC
MSVC is Microsoft Visual C++ compiler. And you know what? You do NOT have to install Visual Studio in order to get MSVC. However, if you also want Visual Studio, skip to setting up visual studio directly.
- Download MSVC, select
Build Tools for Visual Studio 2019 - Launch the installer and select these workflows
- You have finished installing MSVC. Click
Launchand typecland you should see this:


Do NOT try to add MSVC directly to system PATH because each compiler toolchain for different architecture has its own version.
This command prompt is specific to 64bit Windows architecture and has set some temporary environment variables. You can find it in Start -> Visual Studio 2019 -> Developer Command Prompt for VS 2019 like this: 
After MSVC is installed, cmake can detect it as a compiler.


Download & Install CMake
You can either install CMake by using the official installer or using a package manager like MSYS2,
which you used to install GCC and Clang.
- Using the installer:
-
Download here, choose the
Windows win64-x64 Installeroption -
Launch the insatller, when you see this screen, choose
Add CMake to the system PATH for all users
Now you finished installing cmake.
-
- Using
MSYS2:- Run
MSYS2and type this command and typeYto install
pacman -S mingw-w64-x86_64-cmake- Search for
environment variableand open it ->Environment Variables, findPathinSystem variables, double click to open the setting -> clickNewand copyC:\msys64\usr\binto the new entry.
- Run


What is CMake and Why?
CMake is a cross-platform build-system generator, which generates build files (some files dictating how your source files should be built) for your platform.
For example, on Windows by default, it generate Visual Studio Solutions (which is some files dicating how your source files should be built, native to Visual Studio) if you have Visual Studio installed. On Linux by default, it generates Unix Makefiles (which is some files dictating how your source files should be built, native to make).
And because:
It is a bug if your C/C++ project does NOT provide CMake support.
In reality, some of the most loved IDEs/text editors really just provide good CMake support out-of-the-box. So don’t argue that Meson is better or some nonsense. To be considered «better», you really have to get good tool chain support.
IDEs

This guide will cover setting up Visual Studio, CLion, QtCreator, Cevelop (based on Eclipse) and Eclipse.
Setting up CLion
-
Download clion
-
Launch the installer, keep clicking «Next». When you see the following screen, I strongly recommend you to select
Add "Open Folder as Project".
-
Run clion, set up the appearance as you like, login your account or free trial.
-
After those, it will prompt this window for setting up compilers, it should be all correct and no need to change.
-
Create a new C++ executable or C executable on the left
-
Clion will auto generate a «Hello world» project and everything should be working.


Setting up QT creator
- Download QT installer here
- Launch the installer and you will need to either sign in or create a qt account
- When you see this, click
Custom Install.
- When you see this, click
Deselect All, because we only intend to use it as a standalone IDE, akaQt Creator. If you want to do Qt development, select the component to your need.
- After the installation, run
Qt Creator->New File or Project->Non-Qt Project->Plain C++ Application(this actually doesn’t matter, you can always change to a C application in theCMakeLists.txtfile) -> ChooseCMakeas the build system -> selectall kits(this will include the different build types in CMake).Qt Creatorshould create a simple «Hello world» program for you, like this:
- Click the
Runbutton, and it should run


Note: If there is error during CMake’s configure, go to Tools -> Options -> Kits -> Desktop(default), and make sure the C and C++ compiler is in C:\msys64\mingw64\bin instead of C:\msys64\usr\bin.


If you installed Clang you shall see it in the compiler selection menu:

Setting up Visual Studio
You can install Visual Studio as a standalone IDE or as a whole package including compiler, toolchain and windows sdk.
Full package
-
Download Visual studio. Choose the
Communityoption. -
Run the installer, select these workflows
-
After installation, you are prompt to restart your computer. And then you will need to register a Microsoft Account to continue using Visual Studio.
-
Run Visual Studio, select
Create a new project->Empty Project/Console App, and selectPlace solution and project in the same directory.
The only difference betweenEmpty ProjectandConsole Appis the latter will provide you with a «Hello world» program and that’s it! All the default include directories and default linked runtime libraries are the same!


-
If you choose to create
Empty Project, right click on the<Project Name>->Add->New item->C++ source file->Add, like this:
Then write a simple «Hello world» program and hitctrl+f5to compile and run it, and you shall see this:
-
If you choose to create
Console App, you shall see the already created «Hello world». Hitctrl+f5to compile and run the program and you shall see this:

Standalone IDE
If you install Visual Studio as a standalone IDE without installing MSVC compiler toolchains, you can use it with CMake. If you have installed MSVC compiler toolchain, you can use it with Visual Studio solution just as it’s a full install like above. Here I introduce how to use it with CMake, without MSVC.
-
Download Visual studio. Choose the
Communityoption. -
Run the installer, select these workflows and deselect all the optionals on the right, like this
-
After installation, you need to register a Microsoft Account to continue using Visual Studio.
-
Run Visual Studio, select
Create a new project->CMake Project-> selectPlace Project under the same directory->Create, like this:
-
Visual Studio will auto generate a «Hello world» project for you, and it can successfully configure the project and compile because CMake can detect the installed
GCC. However, it will have incorrect include errors.
-
To solve this error, click on the configuration menu ->
Manage Configurations-> click the add button -> selectMingw64-Debug-> click on the previous old configuration and click delete button
-
Hit
ctrl+sto save this configuration, then the include error should go away.


Note: If for some reason, Visual Studio doesn’t detect the right MingW version, you will still get include errors. You need to edit the CMakeSettings.json and correct the MingW version, like this:


Text editors
Setting up VSCode
-
Download vscode
-
Launch the installer, when you see this screen, I strongly recommend you follow this setting
-
Run vscode, in the
extensiontab, search and install the following extensions

-
Go to settings, search
generator. And setCmake:GeneratortoMinGW Makefiles, like this:
-
Create a folder, open it in vscode. Use
ctrl + shift + pto open the command menu, typecmakeand chooseCMake: Quick Start, like this:
-
The cmake tool will scan the kits and there will be 2 kits. Select the first one.
-
Type a name for your project, select
Executable, CMake tool will automatically generate a helloworld project for you. And you probably don’t want to enable ctest for now, so delete everything excpet the following 3 lines:


Rememeber to click Allow when cmake want to configure the intellisense.
- And now you can run it and debug it, and have everything working (syntax highlighting, auto complete, header files…).


Setting up Vim
Using MSYS2
- If you install
viminMSYS2, your.vimrcfile should be placed inC:\msys64\home\<UserName>\.vimrc - Create new folders along this path
C:\msys64\home\<UserName>\.vim\autoloadand then open
powershellhere. - Type the following command to install
vim-plug, a simple vim plugin manageriwr -useb https://raw.githubusercontent.com/junegunn/vim-plug/master/plug.vim |` ni plug.vim -Force
Standalone
Download and install Vim here. It can be installed by keep clicking «Next» in the installer. (Note: Recommended method to install vim is through a package manager, see here)
- Install
vim-plug
iwr -useb https://raw.githubusercontent.com/junegunn/vim-plug/master/plug.vim |`
    ni $HOME/vimfiles/autoload/plug.vim -Force
Open .vimrc, add these following lines:
filetype plugin indent on
set tabstop=4 " show existing tab with 4 spaces width
set shiftwidth=4 " when indenting with '>', use 4 spaces width
set expandtab " On pressing tab, insert 4 spaces
syntax on
set nu " Enable line numbers
set smartindent

call plug#begin('~/.vim/plugged') " List all the plugins to be installed

Plug 'neoclide/coc.nvim'

call plug#end() " End of plugins
-
Install
coc-clangd, the C++ language client extensionOpen whatever C++ file, and type command
:CocCommand clangd.install -
Install
clangd, the actual C++ language server.Type command
:CocCommand clangd.install. -
Now you should have auto-complete working.

Optional plugins
All the plugins listed below can be installed by adding Plug '<plugin-repo>' betweeen the call plug and call plug lines in the .vimrc file.
- vim-airline
An enhanced status line.
Plug 'vim-airline/vim-airline'
Plug 'vim-airline/vim-airline-themes'

2. nerd-tree
A file explorer.
Plug 'preservim/nerdtree'
Plug 'Xuyuanp/nerdtree-git-plugin'
Plug 'tiagofumo/vim-nerdtree-syntax-highlight'
Plug 'ryanoasis/vim-devicons'

- startify
A welcome screen for quick opening recent folders and projectsPlug 'mhinz/vim-startify'

Debugging
This section describes how to debug in various IDEs/text editors.
Debugging in VSCode
To launch the debugger in VSCode, click the cmake project menu -> right click on the <target name> -> Debug like this: 
See more documentation for VSCode’s debugging UI here, except for the part that sets launch.json because the CMake tools already handles everything 
Debugging in CLion
Click here 
For more, see documentation here
Debugging in Visual Studio
Click here 
For more, see documentation here
Debugging in QT
Click here 
Using libraries
Setting up vcpkg
vcpkg is a C/C++ package manager, which makes using libraries much easier (almost as easy as using pip in python).
You HAVE TO install MSVC or Visual Studio on Windows to use vcpkg.
(Mingw GCC CAN NOT be used to build vcpkg on Windows at the time being).
After MSVC is installed, you can follow the guide here
to set it up.
Starting from this commit, vcpkg binary can be
directly downloaded by running bootstrap-vcpkg.bat, you no longer need to install MSVC to build it!
- Open a shell(
cmd) and go to the directory where you wantvcpkgto be installed. (Something likeC:\orC:\dev) - Type this command:
git clone https://github.com/microsoft/vcpkg - Type this command:
.\vcpkg\bootstrap-vcpkg.bat - Type this command:
.\vcpkg\vcpkg.exe integrate install
Finding and Installing a library
- To find a library, use
vcpkg search <library> - To install a library, use
vcpkg install <library>:x64-windowsorvcpkg install <library>:x86-windows
Note
vcpkg will build 32 bit libraries by default on Windows (although it’s 64 bit on Linux by default,Microsoft fix it please), which is NOT probably what you want, so you want to speficy the architecture by adding :x64-windows.
Using a library
After you install the library in vcpkg, you either:
- Use
Visual Studiowithout ANY ADDITIONAL CONFIGURATION - Use
cmakewith the instruction provided byvcpkgwhen you install the library.
Below is a complete example of using vcpkg to install and use the boost library.
-
Install the library in
vcpkgwithvcpkg install <Library Name>, like this:vcpkg install boost:x64-windowsAnd you should see the following
-
Note that on Windows,
vcpkgbuilds libraries usingMSVC, so you should also useMSVCin order to link sucessfully. Header-only libraries likeboostmay be used with other compilers likeGCC.

Afrer the library finishes installing, you can either:
-
Use it in Visual Studio without doing any additional configuration
Note: Configure the solution achitectural target correctly according to your library. Visual Studio empty project defaults tox86but you may installedx64library. -
Or use it in VSCode/CLion with cmake and cmake tool chain file. See the docs here

Unit Testing
What is unit testing?

Google Test
google test is a famous and widely supported by IDEs/text editors unit testing framework for C++.
You can get google test by these ways
-
Using
vcpkg: Following setting upvcpkg, we can easily install the library byvcpkg install gtest:x64-windowsNote that if your application is targeted to 32 bit, use this command instead
-
Using
MSYS2: Note that this can only be used withGCC & Clangcompiler fromMSYS2.pacman -S pacman -S mingw-w64-x86_64-gtest
After installing the library,
-
If you use Visual Studio (MSBuild Project), you just need to
#include <gtest/gtest.h>like a normal C++ source file and either:-
Provide a
mainfunction at the bottom of your source fileint main(int argc, char **argv) { ::testing::InitGoogleTest(&argc, argv); return RUN_ALL_TESTS(); }
-
Don’t provide a
mainfunction, then you need to link additional libraries in the linker settings.- Right click on your project ->
Properties->Linker->AdditionalDependencies,
Make sure this configuration isDebugandx64
(or x86 depend on the architect or your installed Gtest library)
and add these 2 lines
gtestd.lib $(VcpkgRoot)installed\$(VcpkgTriplet)\debug\lib\manual-link\gtest_maind.lib- Click the configuration menu to
Releaseand also add these 2 lines, like this
gtest.lib
$(VcpkgRoot)installed\$(VcpkgTriplet)\lib\manual-link\gtest_main.lib
Then you should be able to write the test source file without the
mainfunction, and build in both configurations like this - Right click on your project ->
-
-
If you use CMake, regardless of whether you installed
Google Testlibrary fromvcpkgorMSYS2,
you can make use ofCTestbuilt-in to Cmake as a test runner to run your google test,
which is supported by most IDE/editors you will see below.
A minimumCMakeLists.txtis like:


cmake_minimum_required(VERSION 3.10.0)

project(<project name> VERSION 0.1.0)

find_package(GTest CONFIG REQUIRED)
enable_testing()
include(GoogleTest) #for gtest_discover_tests() function

add_executable(<test target name> test.cpp) #This is the testing executable
target_link_libraries(<test target name> PRIVATE GTest::gtest GTest::gtest_main) #Link it to the google test library
gtest_discover_tests(<test target name>)  #integrate google test with ctest to this testing executable
- Or you simply want a testing executable, so you don’t bother with
CTest.
cmake_minimum_required(VERSION 3.10.0)

project(<project name> VERSION 0.1.0)

find_package(GTest CONFIG REQUIRED)
add_executable(<test target name> test.cpp) #This is the testing executable
target_link_libraries(<test target name> PRIVATE GTest::gtest GTest::gtest_main) #Link it to the google test library

Integration with Visual Studio
Integration with CLion
CLion has test adaptors built-in so it should automatically detect the test whether you are using CTest as runner or just simply compiling a testing executable.
You can click the run button on the left of each TEST() macro to run individual test, or click ctrl+shift+f10 to run all test.
See here for more documentation.
Integration with VSCode
You need to use CTest (the first version of the minimum CMakeLists.txt) as your test runner to get the integration working.
- Install the CMake Test Explorer extension (proud contributor)
- Open VSCode settings, go to
Extension->CMake Test Explorersection, and change these following settings:- Build Config:
${buildType} - Build Dir:
${buildDirectory} - Select Cmake Integration
- Build Config:
- After that, build your project once and then click the
refresh testbutton, this plugin should find all the testing suites and test cases in your test files.
- Then you can easily manage or debug all your test cases or each individual test in this panel.


Microsoft Unit Test
CTest
Documentation
Setting up doxygen
Writing good documentation is also an essential part of development. The most commonly used documentation generator is doxygen. Download the binary distribution for Windows and then install it. After it is installed, there will be a GUI frontend called doxywizard, which looks like this:

To write good documentation, install these plugins:
- For VSCode (proud contributor)
- For Visual Studio
Learn the syntax for documentation here
After you documment your code, any decent IDEs/text editors should be able to show the documentation, helping you better understand your own code as well as others.


Using doxygen is straight-forward using the GUI, just specify the root directory of your project, configure some settings to your liking, then run it.

Doxygen generated documentation too ugly?
Follow the guide here
to use doxygen with sphinx for a more beautiful documentation.
Integrate doxygen with CMake
You can set up an automatic documentation generation step within CMake, so that each time you build your cmake project,
the docs would be generated or updated.
To do that, assuming you have a doc directory in your project, something like this
MyProject
|--doc
|--README.md
|--CMakeLists.txt
|...
add the following snippet to your root CMakeLists.txt
find_package(Doxygen)
if(DOXYGEN_FOUND)
    set(DOXYGEN_USE_MDFILE_AS_MAINPAGE "${CMAKE_SOURCE_DIR}/README.md")
    set(DOXYGEN_OUTPUT_DIRECTORY "${CMAKE_SOURCE_DIR}/doc")
    set(DOXYGEN_EXCLUDE_PATTERNS "<your binaries or other files generated by your IDE>")
    doxygen_add_docs(doc ${CMAKE_SOURCE_DIR} ALL) #this will create a target called "doc"
    #You can either manually run the target or it will automatically run when "cmake --build ." is called
endif()
Source control
Most if not all of the development workflow involves using Git.
Also, some of CMake’s functionalities requires Git to be installed.
And you also need Git to install vcpkg.
You can install Git either by using the installer or using a package manager,
like MSYS2 which we just used above to install GCC and Clang.
- Install by using the installer
- Download the installer here and then it can be installed by keep clicking
Next.
- Download the installer here and then it can be installed by keep clicking
- Install by using a package manager
- chocolatey:
choco install git - scoop:
scoop install git - winget:
winget install git
- chocolatey:

Setting up a system-wide package manager
Package manager makes it easier to install and update softwares,
allowing you to use one single command to update all installed softwares.
On Windows, there is built-in winget on a reasonably new build of Windows 10.
I recommend installing those frequently updated software that doesn’t have a built-in updater
(like cmake, vim…)
using a package manager.
Winget
Install and docs here
Chocolatey
Install and docs here
Scoop
Install and docs here
Setting up WSL
Setting up WSL is the same as setting up a pure linux environment, therefore it is not discussed here.
Addtional Tooling
Resharper
is a non-free extension for Visual Studio that can greatly benefit your productivity. Download here.
Clang-tidy
Clang-tidy is a C++ «linter» that provides extra warnings and style checks to your C++ compiler.
Integration with Visual Studio
Clang-Tidy support is available starting in Visual Studio 2019 version 16.4.
It’s included automatically when you choose a C++ workload in the Visual Studio Installer.
More info.
MSBuild Project
- Right click on project ->
Properties->Code Analysis->Clang-tidy
- In
Checks to Enable or Disable, you can configure checks to be enabled or disabled using supported flags.
To enable a check, add the flag name directly. To disable a check, prefix with a-.
Flags are separated by comma.
For example:*enables all checks.
-clang-analyzer-*disables all checks namedclang-analyzer.... - Build your project, and you should see warnings provided by clang-tidy.


CMake Project
- Click on build configuration menu ->
Manage Configuration->Edit JSON
- Add a key named
enableClangTidyCodeAnalysisand set value totrue.
Optionally control which checks to be enabled or disabled by adding a key namedclangTidyChecks
- Save and exit. Now you should see warnings provided by clang-tidy.


Integration with CLion
Integration with VSCode
Install this plugin.
ClangFormat
ClangFormat is a code formatting tool to help your code follow some pre-defined formatting rules.
In all IDE/editors, the actual ClangFormat executable needs to be installed first.
Integration with Visual Studio
- Install this plugin at the bottom «Visual Studio plugin installer»
- Then you can find settings in
Tools->Options->LLVM/Clang->ClangFormat

Integration with VSCode
ClangFormat is supported by VSCode C++ extension out-of-the-box.
ClangFormat settings can be found in C++ extension settings.

Incredibuild
is a free-for-personal-use build tool that accelerate visual studio’s project building.
It also provides a nice graph to visualize the building process and time consumption of individual files.

It can be installed when installing visual studio.
Download the license here.
C/C++ include guard (proud contributor)
is a VSCode extension that automatically add include guard for you so that you no longer need to remember it.
Download here.
include-info (proud maker)
is a VSCode extension that shows the included header file size
and provide a fast way to jump to those included files.
Download here
VSCode Font switcher (proud contributor)
is a VSCode extension that provide a fast way to switch between different fonts.
Download here.