|
HershE 3 / 3 / 3 Регистрация: 18.11.2014 Сообщений: 32 |
||||
|
1 |
||||
Нарисовать прямоугольник на форме08.11.2015, 15:44. Показов 8298. Ответов 2 Метки нет (Все метки)
Здравствуйте, подскажите пожалуйста, нужно в форме сделать программу, которая рисует прямоугольник.
0 |

|
EvilFromHell 978 / 873 / 350 Регистрация: 26.04.2012 Сообщений: 2,647 |
||||
|
08.11.2015, 16:20 |
2 |
|||
|
Чтобы на форме что-то нарисовать, надо переопределить метод OnPaint. Иначе все, что вы пытаетесь на ней нарисовать пропадет при первой же перерисовке. А 0 0 выводит потому, что вы создаете 2 переменные x и y, не присваиваете им значения и выводите на лейбел. Поскольку у int значение по умолчанию 0, то 0 и выводится. Зачем вообще эти переменные-неясно, если все равно прямоугольник вы задаете константами.
1 |
|
3 / 3 / 3 Регистрация: 18.11.2014 Сообщений: 32 |
|
|
08.11.2015, 17:36 [ТС] |
3 |
|
спасибо за помощь!
0 |
See how you can draw shapes, use colors, and render images in a WinForms app.

Windows Forms is a framework that lets you build desktop applications. You can click and drag components like buttons onto a visual user interface. It also helps you manually create various shapes within your code.
This article will show you how to add lines, shapes, and images to your application. This tutorial uses the Visual Studio 2019 Community Edition to show examples.
What Are the Built-In Classes Used for Drawing Graphics?
Windows Forms uses the C# programming language. Its built-in classes and methods allow you to draw various shapes onto a Windows Form canvas. These include the Graphics, Pen, Color, and Brush classes.
|
Class |
Description |
|---|---|
|
Graphics |
The Graphics class allows you to draw shapes and lines onto the canvas. It includes methods such as:
|
|
Pen |
The Pen class allows you to specify the properties of a ‘pen’ tip which you can use to draw your shapes. You can specify properties such as color, thickness, or dash style. Methods include:
|
|
Color |
A color object made up of R (red), G (green), and B (blue) values. You will need a color object for many of the built-in methods that create shapes. |
|
SolidBrush, HatchBrush, TextureBrush |
These brush classes derive from the «Brush» interface. These classes allow you to color in blank spaces on the canvas. You can also choose to fill the spaces using different patterns or textures. You can specify properties such as the color. |
|
Rectangle, Line, Polygon, Ellipse |
You can create objects based on these shapes, and use them when calling methods such as DrawRectangle(). Instead of passing the x, y, width, and height as arguments, you can choose to pass an existing Rectangle object instead. |
To view the source code for a running example of the above tutorial, visit the GitHub repository. You can try out the following examples once you’ve created a Winforms application.
How to Add a Paint on Form Load Event Handler
First, add an event handler to draw shapes when the canvas loads.
- Add a Paint function for the form.
 private void Form1_Paint(object sender, PaintEventArgs e)
{
    // Code goes here
} - Go into the Design View Tab.
- In the Properties window, select the lightning icon to open the «Events» tab.
- In «Paint», under «Appearance», select the Form1_Paint function. This will execute the function when you run the application.

How to Draw Lines Onto a Windows Form Canvas
You can use a Color, Pen, and the DrawLine() method to draw lines on a canvas.
- Inside the Form1_Paint() function, create a Color object with the color you want the line to be. Then, create a Pen object to draw the line with.
 Color black = Color.FromArgb(255, 0, 0, 0);
Pen blackPen = new Pen(black); - The DrawLine() method from the Graphics class will draw a line using the pen. This will start drawing a line from an x, y position to another x, y position.
e.Graphics.DrawLine(blackPen, 300, 200, 800, 200); - You can modify the properties for the pen object to change its width, dash style, and start or end cap.
 blackPen.Width = 20;
blackPen.DashStyle = System.Drawing.Drawing2D.DashStyle.Dash;
blackPen.StartCap = System.Drawing.Drawing2D.LineCap.ArrowAnchor;
e.Graphics.DrawLine(blackPen, 300, 200, 800, 200); - Press the green play button at the top of Visual Studio to see the changes.


How to Draw Shapes Such as Rectangles and Circles
You can use the shapes classes for different shapes, or draw shapes manually onto the canvas.
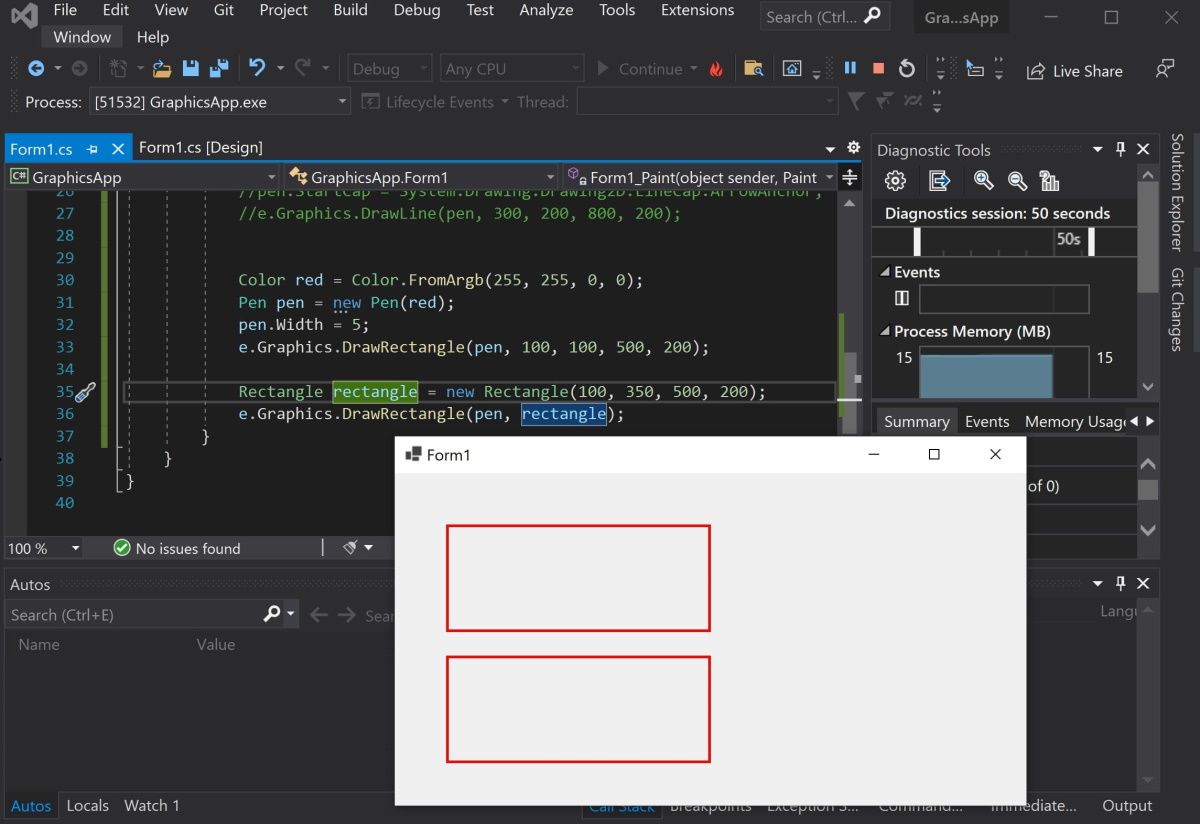
- Create a Color and Pen object as shown in the previous steps. Then, use the DrawRectangle() method to create the rectangle. The arguments are the x and y coordinates for the top-left of the rectangle, along with its width and height.
 Color red = Color.FromArgb(255, 255, 0, 0);
Pen redPen = new Pen(red);
redPen.Width = 5;
e.Graphics.DrawRectangle(redPen, 100, 100, 500, 200); - You can also create a rectangle using the Rectangle Class. First, create a Rectangle object. The arguments are also the x and y coordinates for the top-left corner, width, and height.
Rectangle rectangle = new Rectangle(100, 350, 500, 200); - Use the DrawRectangle() function to draw the rectangle. Instead of passing the x, y, width, and height like before, you can use the Rectangle object instead.
e.Graphics.DrawRectangle(redPen, rectangle); - Press the green play button at the top of Visual Studio to see the changes.

- Go back to the code to draw other shapes. Use the DrawEllipse() function to draw a circle.
 Color green = Color.FromArgb(255, 0, 255, 0);
Pen greenPen = new Pen(green);
greenPen.Width = 5;
e.Graphics.DrawEllipse(greenPen, 400, 150, 400, 400);
When you draw a circle, the x and y coordinates (x=400, y=150) refer to the top-left corner of the circle, not the center of the circle.

- To draw other shapes such as triangles or hexagons, use the DrawPolygon() method. Here you can specify a list of coordinates to represent the points of the shape.
 Color blue = Color.FromArgb(255, 0, 0, 255);
Pen bluePen = new Pen(blue);
bluePen.Width = 5;PointF[] coordinatesForTriangle = new PointF[] {
    new PointF(400, 150),
    new PointF(300, 300),
    new PointF(500, 300)
};e.Graphics.DrawPolygon(bluePen, coordinatesForTriangle);
The DrawPolygon() method will draw lines between the points specified.


How to Use the Brush Class to Fill In Shapes With Color
You can use the FillRectangle(), FillEllipses() or FillTriangle() methods to create shapes with a solid color.
- First, create a brush object.
 Color purple = Color.FromArgb(255, 128, 0, 0);
SolidBrush solidBrush = new SolidBrush(purple); - Use the FillRectangle(), FillEllipses() or FillTriangle() methods. They work the same way as the draw functions above, except instead of a Pen, they use a Brush object.
 e.Graphics.FillRectangle(solidBrush, 50, 50, 200, 250);
e.Graphics.FillEllipse(solidBrush, 300, 50, 200, 200);
e.Graphics.FillPolygon(solidBrush, new PointF[] { new PointF(700, 150), new PointF(600, 300), new PointF(800, 300) });
- You can also input a shape object directly instead of providing coordinates.
 Rectangle rectangle = new Rectangle(100, 350, 500, 200);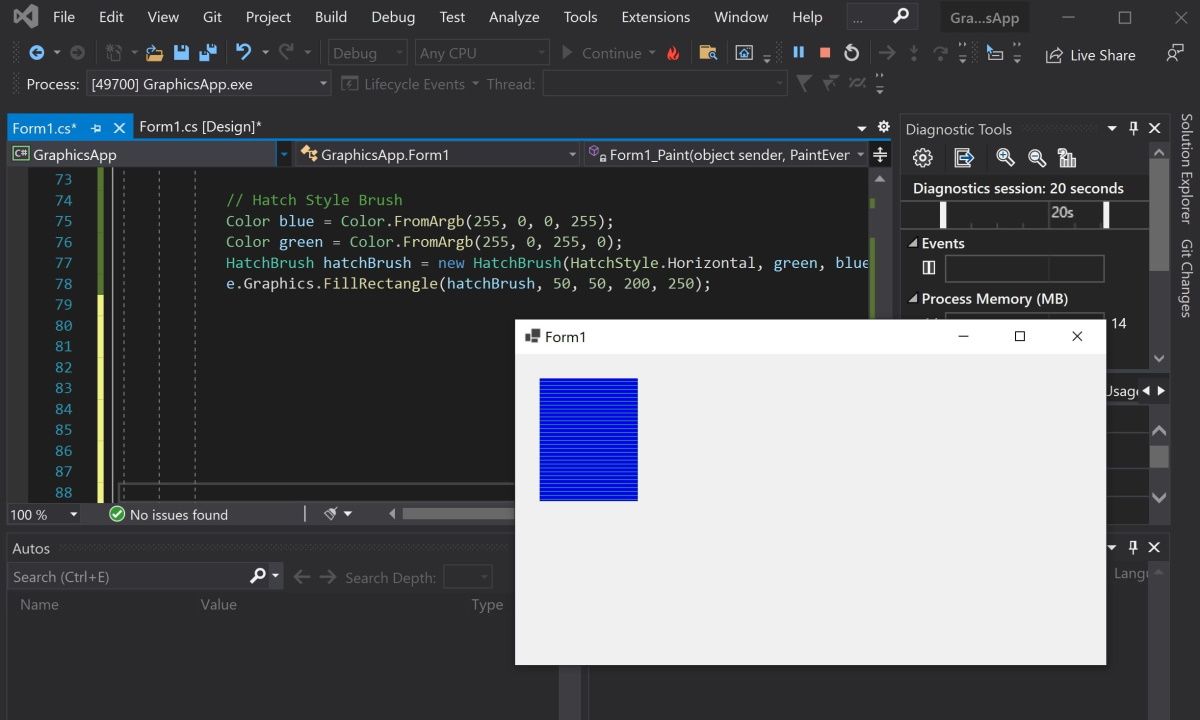
e.Graphics.FillRectangle(solidBrush, rectangle); - Use the HatchBrush to fill the shape using a different fill style, such as a horizontal or vertical pattern.
 Color blue = Color.FromArgb(255, 0, 0, 255);
Color green = Color.FromArgb(255, 0, 255, 0);
HatchBrush hatchBrush = new HatchBrush(HatchStyle.Horizontal, green, blue);
e.Graphics.FillRectangle(hatchBrush, 50, 50, 200, 250);
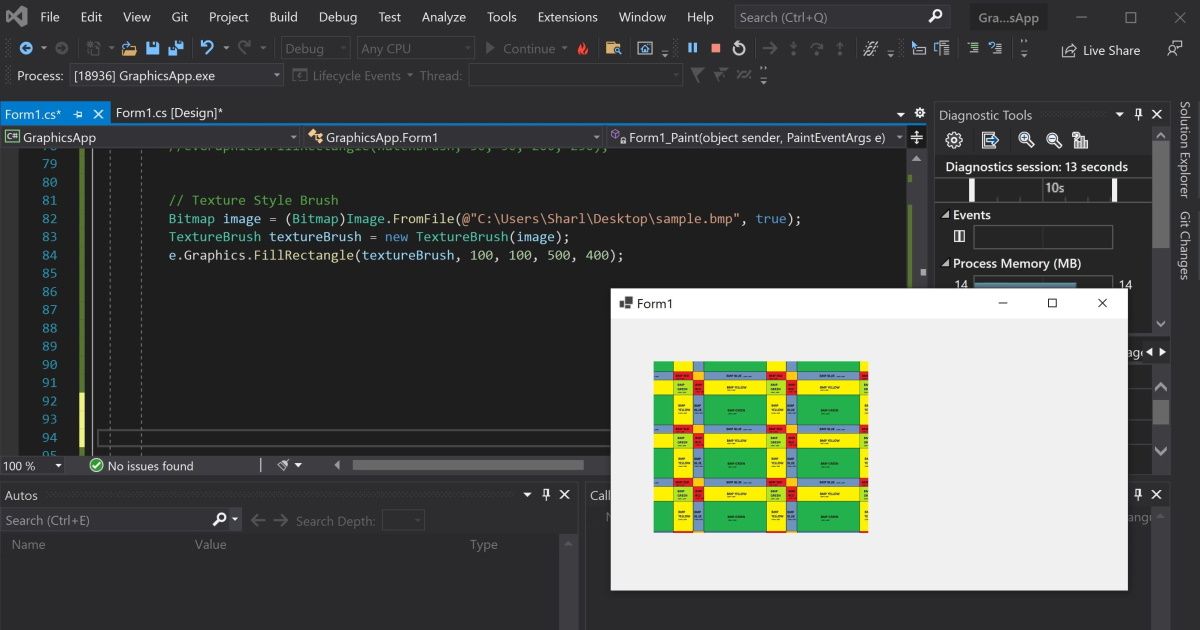
- You can use the TextureBrush to fill a shape using an image. Here, create a bitmap by pointing to an image file. Instead of creating a brush using a color, create it using the image.
 Bitmap image = (Bitmap)Image.FromFile(@"C:\Users\Sharl\Desktop\flag.bmp", true);
TextureBrush textureBrush = new TextureBrush(image);
e.Graphics.FillRectangle(textureBrush, 100, 100, 500, 400);

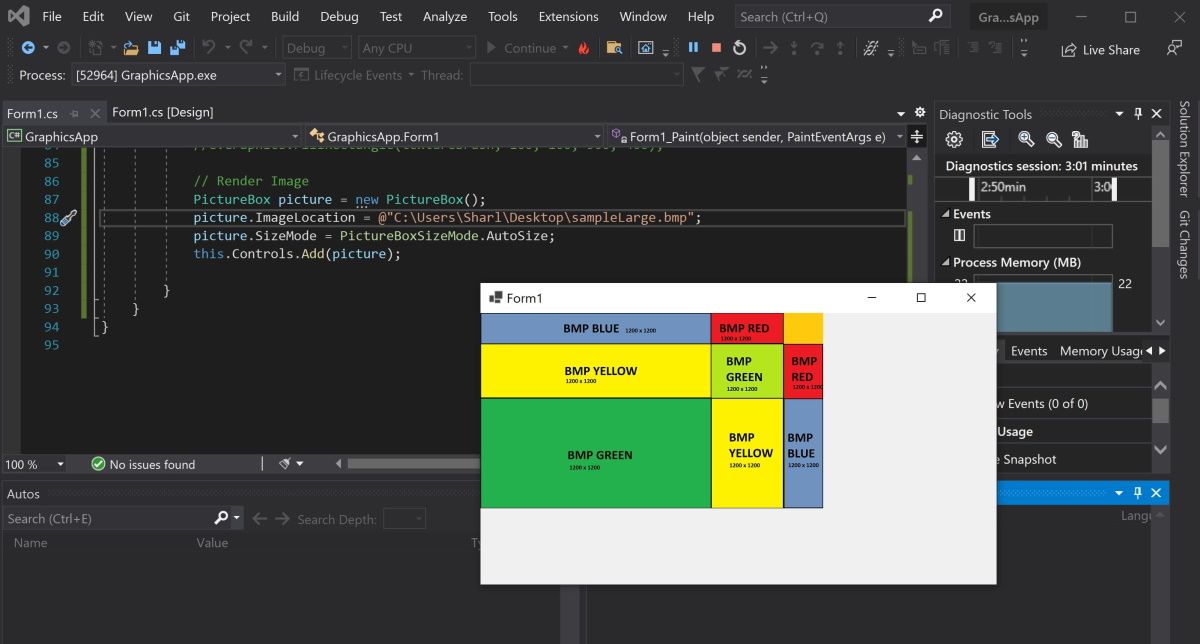
How to Render Images Onto the Form
To render an image, create a PictureBox control object and add it to the form.
- Create a PictureBox control object using an image file.
 PictureBox picture = new PictureBox();
picture.ImageLocation = @"C:\Users\Sharl\Desktop\flagLarge.bmp"; - Set the size of the image and add it onto the form so it renders.
 picture.SizeMode = PictureBoxSizeMode.AutoSize;
this.Controls.Add(picture); - Press the green start button at the top to view the image.

Adding More Shapes to Your Windows Form
You should now understand how to add lines, shapes, and images to your Windows form. You can combine shapes to create new shapes. You can also play around with the built-in functions to create more complex shapes.
I have many images and coordinates of them with width and height. A picture is put in a picturebox and I send the coordinates to draw the rectangle on it. There are many pictureboxes on a panel.
I send their paths to a PicturePanel class also with some coordinates and width/height properties to draw a rectangle. However, my problem is that, it draws it, and immediately deletes it. If I don’t put a messagebox after each image, i don’t see the rectangles. Here is the code;
if (IsRun())
{
    MessageBox.Show("rontool true");

    Rectangle ee = drawARectangle(xCoor, yCoor, MainScreen.tempR.wid / ratioOfx, MainScreen.tempR.heig / ratioOfy); // I wrote this, it only creates and returns the rectangle.
    //MessageBox.Show("x : " + xCoor + " y: " + yCoor + " width : " + (MainScreen.tempR.wid / ratioOfx) + " height: " + (MainScreen.tempR.heig / ratioOfy));
    using (Pen pen = new Pen(Color.Red, 2))
    {
        pictureBox.CreateGraphics().DrawRectangle(pen, ee);
       // e.Graphics.DrawRectangle(pen, ee);
    }
}
This is in
private void PictureBox_Paint(object sender, PaintEventArgs e).
A for loop is in another class, creates a picturebox, and initializes its x, y etc. however, it draws and immediately deletes it. or sometimes it doesn’t even draw.
If I don’t put a messagebox after each image, I don’t even see the rectangles. Can you help me?
First of all, I’d like to present my first tutorial about C++ / CLI CLR .NET Programming. This time it’s about Graphical User Interface in C++ .NET (in this case, I don’t want to use native C++). Okay, I assume that you have a little knowledge about C++ .NET GUI and of course, I also assume that you understand how to program in C++ CLR behaviour. So, here we go the tutorial!
I almost forgot, before we start this kind of tutorial, I’d like to tell you about what IDE that I used. Maybe you already know, I use Microsoft Visual Studio 2008 Professional Edition. You don’t have it? Then maybe you could use the Express edition, or you can use the old version such as Visual Studio 2005. Okay, Let’s start the tutorial.
Step 1
Create a new project. Press File → New → Project…. Choose C++ → CLR → Windows Forms Application and name your project Draw2DObjectForBaka.

Step 2
What to do next? Take a break, you’ve successfully create a new Windows Form. Congratulations! Now, let’s try to make some 2D Objects on this Form. How to make it? It’s easy. First, choose Paint event and make a function to handle this event.

Step 3
Now, let’s create some 2D objects onto the Form. First, let’s try to make a circle, a rectangle, and an ellipse. It’s easy, Just copy the following code:
private: System::Void Form1_Paint(System::Object^ sender,
System::Windows::Forms::PaintEventArgs^ e) {
  Graphics^ g = e->Graphics;

  //create an ellipse with
  // Black color
  // start position = (10, 10)
  // (start position is always Top Left of the object)
  // width = 75 px, height = 50 px
  g->DrawEllipse(Pens::Black, 10, 10, 75, 50);

  //create an ellipse with
  // Red color
  // start postion = (90, 10)
  // width = 75 px, height = 75 px
  //or you can say create a circle with
  // Red color
  // start position = (90, 10)
  // diameter = 75 px
  g->DrawEllipse(Pens::Red, 90, 10, 75, 75);

  //create a rectangle with
  // Blue color
  // start position = (170, 10)
  // width = 75, height = 75
  g->DrawRectangle(Pens::Blue, 170, 10, 75, 75);
}
Step 4
Try to run your program. Press F5 or Debug - Start Debugging and you’ll see something like this:

You did it! Now, let’s see the objects. Feel boring right? So, how about we try to fill the color inside the object? Let’s go to the next step.
Step 5
Now, let’s try to make the objects filled with color. Edit your code until become like the following code:
private: System::Void Form1_Paint(System::Object^ sender,
System::Windows::Forms::PaintEventArgs^ e) {
  Graphics^ g = e->Graphics;

  //fill an ellipse with
  // White color
  // start position = (10, 10)
  // (start position is always Top Left of the object)
  // width = 75 px, height = 50 px
  g->FillEllipse(Brushes::White, 10, 10, 75, 50);

  //create an ellipse with
  // Black color
  // start position = (10, 10)
  // (start position is always Top Left of the object)
  // width = 75 px, height = 50 px
  g->DrawEllipse(Pens::Black, 10, 10, 75, 50);

  //fill a circle with
  // Yellow color
  // start position = (90, 10)
  // diameter = 75 px
  g->FillEllipse(Brushes::Yellow, 90, 10, 75, 75);

  //create an ellipse with
  // Red color
  // start postion = (90, 10)
  // width = 75 px, height = 75 px
  //or you can say create a circle with
  // Red color
  // start position = (90, 10)
  // diameter = 75 px
  g->DrawEllipse(Pens::Red, 90, 10, 75, 75);

  //fill a rectangle with
  // Pink color
  // start position = (170, 10)
  // width = 75, height = 75
  g->FillRectangle(Brushes::Pink, 170, 10, 75, 75);

  //create a rectangle with
  // Blue color
  // start position = (170, 10)
  // width = 75, height = 75
  g->DrawRectangle(Pens::Blue, 170, 10, 75, 75);
}
Then, try to run your program one more time, and you’ll see something cool like this:

Step 6
Looks great, right? But, if you see the picture, it’s not smooth enough. Now, let’s add a line of code g->SmoothingMode = Drawing2D::SmoothingMode::HighQuality; to make the image looks smooth (or you can say, High Quality image).
private: System::Void Form1_Paint(System::Object^ sender,
System::Windows::Forms::PaintEventArgs^ e) {
  Graphics^ g = e->Graphics;

  //make the image become High Quality
  g->SmoothingMode = Drawing2D::SmoothingMode::HighQuality;

  //fill an ellipse with
  // White color
  ...
  ...
  ...
  ...
}
Try run your program and compare it with the result before.
Step 7
Now, how can I draw the objects onto the Panel? It’s an easy task. First, create a Panel onto your form, and choose Paint event of the Panel object.


Step 8
Copy the Code from Form1_Paint into panel1_Paint. Try to run your program, and see the result.

Okay, I think that’s all about how to draw 2D objects onto Form and Panel. Hope this simple kind of tutorial gives you a good knowledge.
Downloads
Fork or download the completed project on GitHub.
Cover Photo by Jess Watters on Unsplash.
Basic overview of drawing in C#
How to use the Graphics class to draw to the screen in C#
The Graphics class is one of the fundamental classes used in programming with Windows Forms and GDI+. Through the Graphics class, you gain access to information about the display resolution and device capabilities. In this article, you’ll learn about the Paint event and how it supplies you regarding an adequately initialized Graphics object. This article also covers the most common operations performed using the Graphics object.
The first thing we will do is open Visual Studio and click “Create a new project” to get started. We are going to create a new Windows Form in C#. You could choose any project name you would like and its destined location on your desktop/pc.

A blank project will be generated to serve as your canvas. You could change the width and height based on your preference. The next thing we need to handle is the paint event for the form. When the form is drawing itself, it will call this paint event, and then inside of that, we will get a handle to the graphics object. Afterward, we could paint the form ourselves. It is a step-by-step process that we need to accomplish.

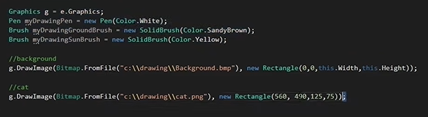
Declare a new graphics object with this syntax above. With this step, we could make new shapes like rectangles.
How to draw a rectangle
To draw rectangles and squares in C#, the GraphicsObject provides the DrawRectangle() method. There are two ways to use the DrawRectangle() method. We will begin by drawing a rectangle without a pre-created Rectangle object.

- The first step is to create a new brush. The syntax above is the code that you can use to alter the color and name of the brush.


- It also needs the coordinates of the rectangle you want to create. To do that, you can encode the x, y coordinates like in the syntax attached.

- Since we’ve used 100×100 as the coordinates, it came out as square, but you could change the coordinates to generate your desired shape.
For the second method

- To draw a rectangle, you will draw four lines. We will make a drawing pin and set that equal a new pen in this method. You could also set the color for your rectangle. The syntax above is the example that will generate your rectangle.
How to draw a circle
Ellipses and circles are drawn in C# using the DrawEllipse() method of the GraphicsObject class.
We made a drawing scene representing the “sun,” a circle in one of our examples.

- You could declare a “new brush” to create the round object. The syntax above shows the various brushes for different objects: the ground and the sun in the said scene.

- An ellipse will be generated using the declared sun brush and filled with this syntax in the next step.
How to draw a line
Lines are drawn in C# using the DrawLine() method of the Graphics Object. This method takes a pre-instantiated Pen object and two sets of x and y coordinates (the start and endpoints of the line) as arguments.

A “ground” was made to complete the drawing scene in the example. A straight line represents it.

Coordinates were also filled up to determine the width, height, and length to set up the ground.
The next step in this project is to try drawing a person! A stickman person, to be exact. It will be composed of a circle for its head, a line for its limbs and body.

- We added another drawing pen to change its color, white.

In the syntax above, we tried to make a whole component to make a stickman. With various lines and objects, it resulted in the image below.
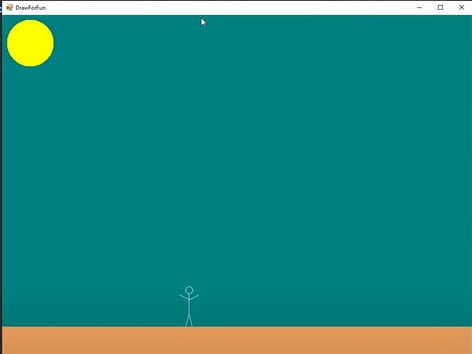
The background is also changed to the color blue! And there you go, a scene with a stickman was made using simple objects and lines.
How to draw an image
To draw an image, it will require creating a bitmap from the file. To do this, the syntax below will help to run the image. We will use the image above as the background for our generated image.

The syntax above draws the image, but the problem is that our form and image aren’t the exact sizes. We could stretch the image to fit the form by doing a new rectangle.


The image will be stretched to fit the form better with this code.

We will also try to attach some images to the scene. We will do next to draw an image bitmap from the file again.
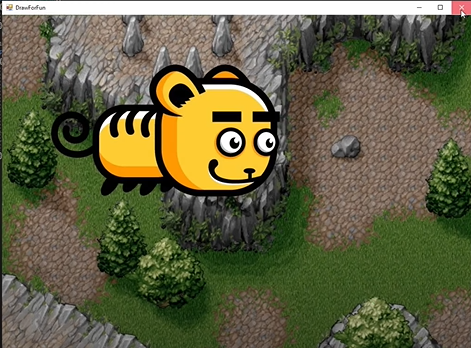
The attached image is quite big, so you could opt for a smaller size of the image you want.

This is the revised image of the cat once you’ve scaled it correctly.
Here is the complete syntax for the background and the cat. Make sure to layer your drawings correctly to make them appear in the correct order. After the cat image, we will draw the bird.

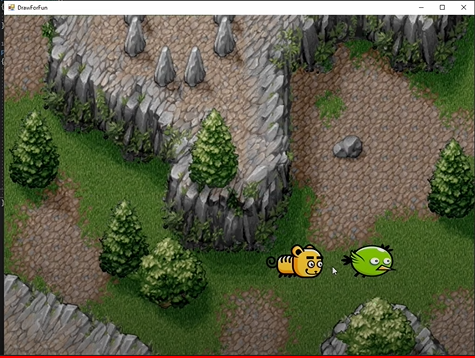
Here is the image after the code for the bird image is generated and run.
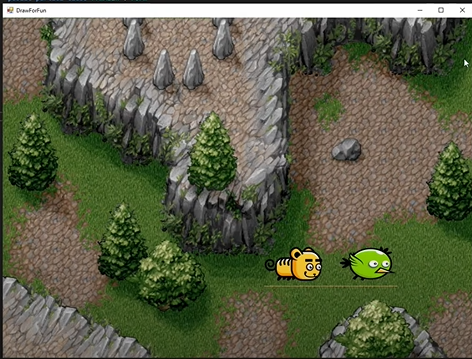
To add an extra effect, we will add a line object in the scene.

The last thing that we will add to this project is text. To include text in your image, follow this syntax below. Make sure to set a font style first!


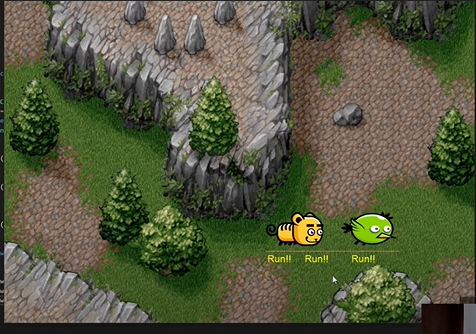
The text is added and repeated three times. The project is done!
This article shows how various graphical objects can be drawn within a drawing programmatically using C#. It may be quite challenging, but first but with troubleshooting, patience, and creativity, you could also finish a project in no time!