Locate your large files with the help of a third-party tool
by Claire Moraa
Claire likes to think she’s got a knack for solving problems and improving the quality of life for those around her. Driven by the forces of rationality, curiosity,… read more
Updated on
- Large files can be hard to find on your PC, especially if you don’t know what you want.
- You probably already know that the built-in search tools in Windows are pretty limited. A third-party tool is a great start to finding these files.

Large files are often stored on your hard drive and can take up a lot of space. Sometimes, you may want to find large files on your PC to free up some hard drive space or move them elsewhere. Other times, files and folders have disappeared, and you want to locate them.
Large files commonly cause slow speeds and performance issues in a PC. When you have large files on your computer, it takes longer for programs to load and for your hard drive to access the data. So, if you’ve been looking for a way to locate them, we show you several ways to find them.
How do I find large files on my PC?
1. Use File Explorer
1.1 Use the search filter
- Hit the Windows + E keys to open File Explorer.
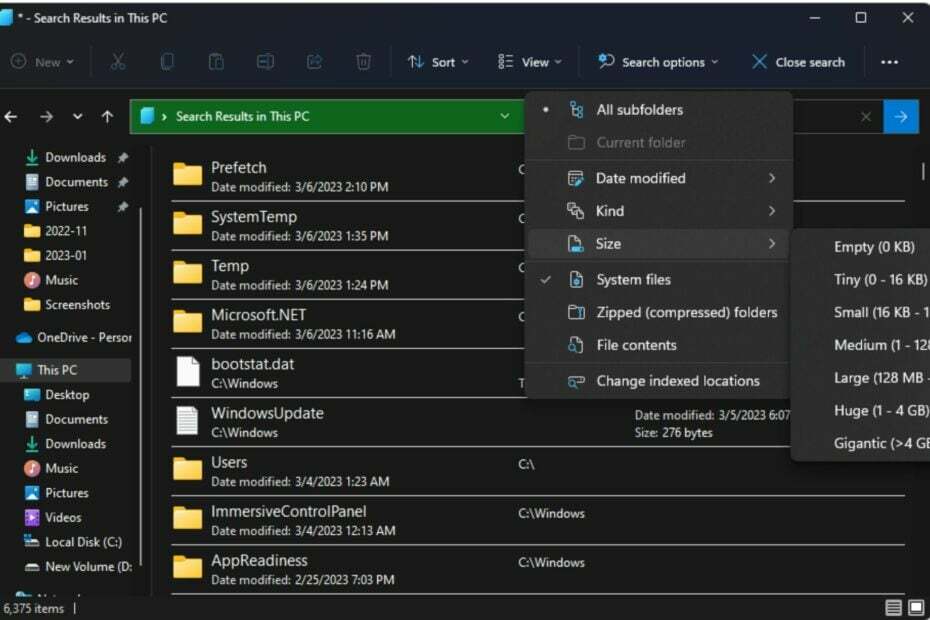
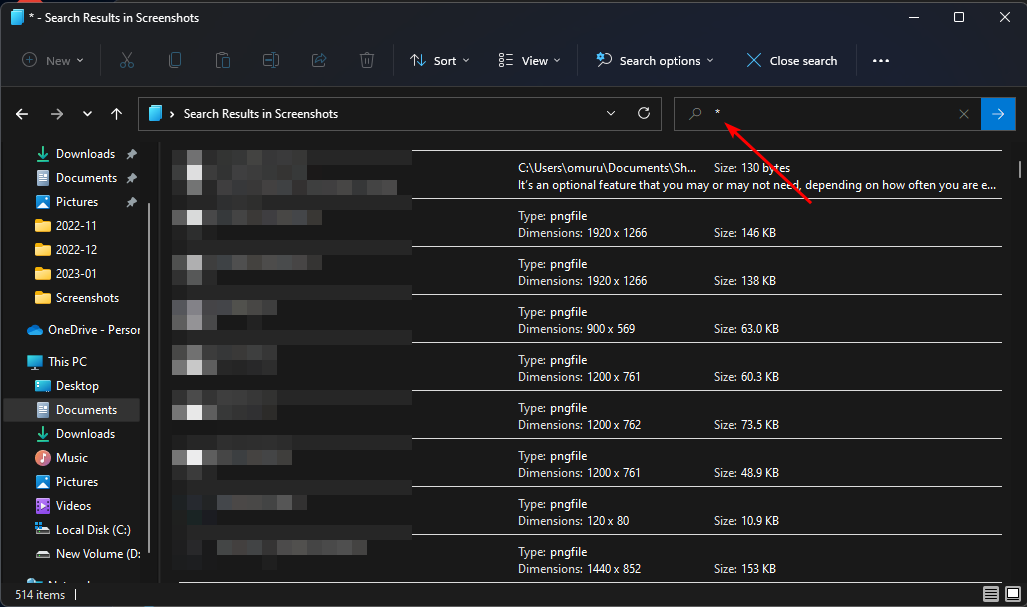
- Navigate to This PC and enter the asterisk * on the search bar.

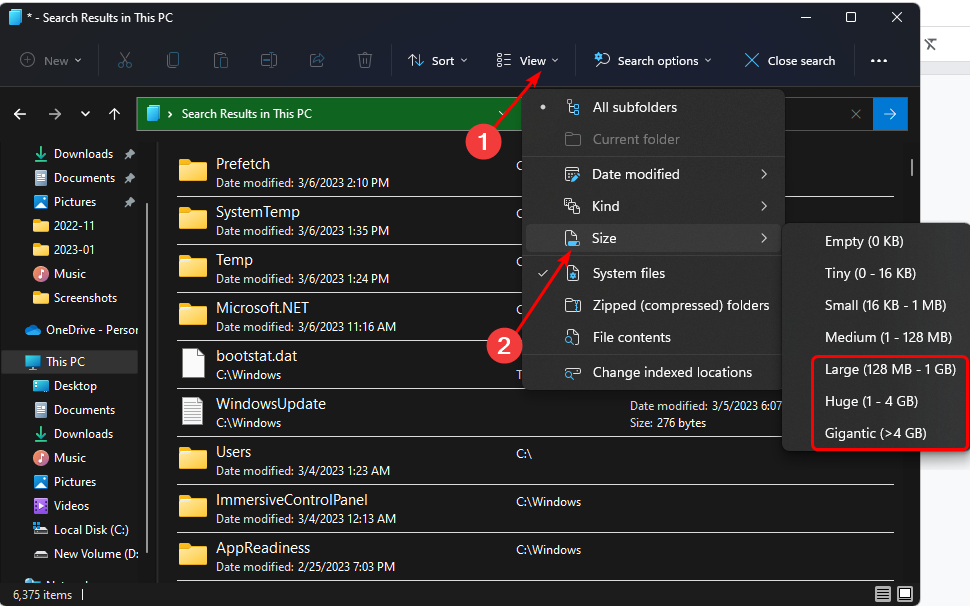
- Once the search is complete, click Search options to sort by size. You can now select the size of the large files you’d like to find, ranging from large to gigantic.


1.2 Use the hidden files feature
- Hit the Windows + E keys to open File Explorer.
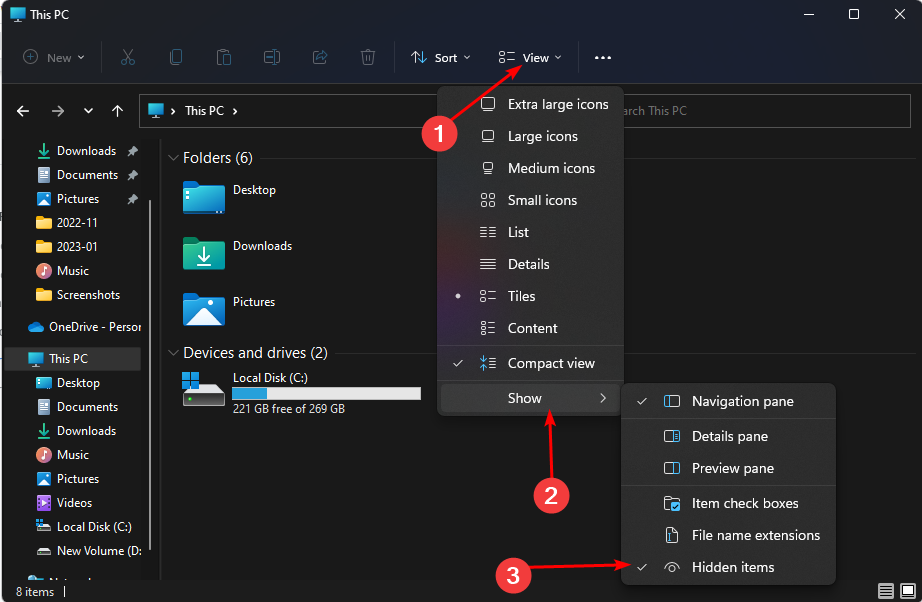
- Click on View, select Show from the drop-down menu, and ensure the Hidden items has a checkmark next to it.

- Proceed to repeat the steps in 1.0 above and see if you can find more files.

You can also check out File Explorer’s comprehensive feature list and find out how to expand its functionality to make it work.
How we test, review and rate?
We have worked for the past 6 months on building a new review system on how we produce content. Using it, we have subsequently redone most of our articles to provide actual hands-on expertise on the guides we made.
For more details you can read how we test, review, and rate at WindowsReport.
2. Use third-party tools
Most of the time, these files are located elsewhere in your computer, and they might be hidden somewhere. File finder software can help you find large files. These programs can scan your computer for all the files larger than a certain size and then list them for you.
Copernic Desktop Search is one such tool. It is a powerful program that can help you identify and locate large files on your PC. This search engine searches your entire hard drive and finds all kinds of files, including photos, videos, and documents.
⇒ Get Copernic Desktop Search
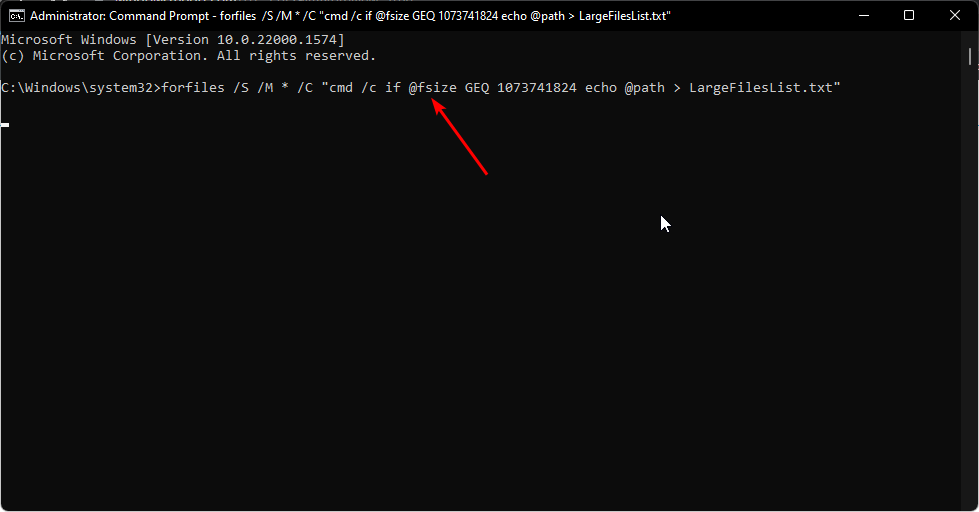
3. Use Command Prompt
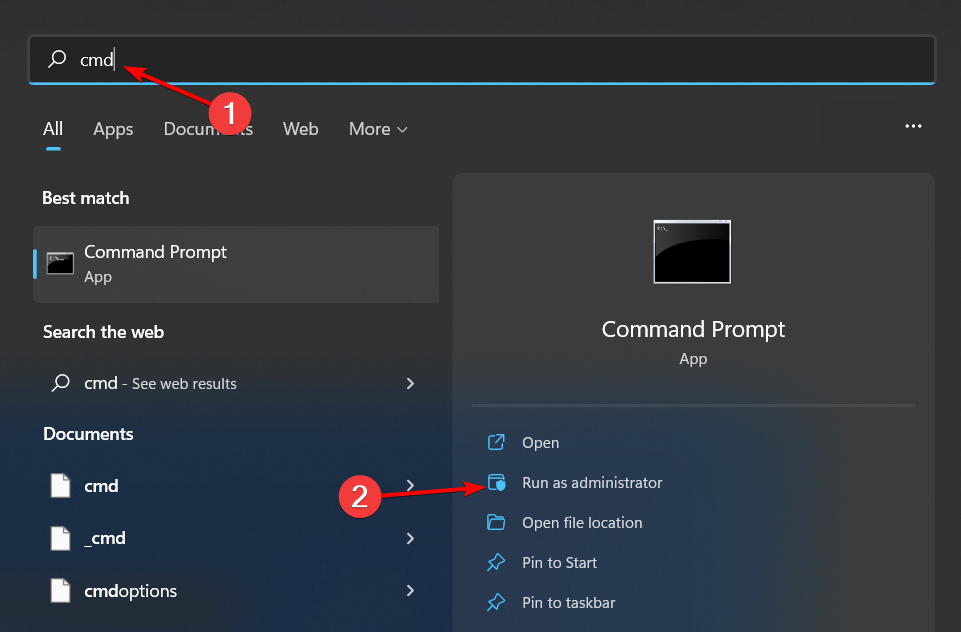
- Hit the Windows key, type cmd in the search bar, and click Run as administrator.

- Type the following command prompt to specify the location you want to find the large files. You can replace the drive letter with the corresponding one for your PC where your files are stored:
cd C:\ - Next, type the following command and hit Enter. Remember to replace size (bytes) with the size of the file you’re looking for. For instance, if you’re looking for files larger than 1GB, your command should be:
forfiles /S /M * /C "cmd /c if @fsize GEQ <size (bytes)> echo @path > largefiles.txt"forfiles /S /M * /C "cmd /c if @fsize GEQ 1073741824 echo @path > LargeFilesList.txt"
- Windows will create a .txt file where all the large files will be listed.

- Fix: Can’t Disable Background Blur on Windows 11
- How to Type Accents on Windows 11
- How to Disable the Insert Your Security Key Into the USB Port popup
- DTS Sound Unbound for Windows 11: Download & Install
Finding large files on Windows 11 can be frustrating if you don’t know where to look. Hopefully, you’ve been able to use one or more of our recommended methods above to locate them. If you’re in the same predicament but on Windows 10, we also have a similar article on how to find large files.
Also, if you want to find and get rid of duplicate files, we have amazing tools to remove duplicates. You may also find File Manager software a must-have to keep your files and folders well organized. This will help you save time as you already know where the large files will be.
Let us know your preferred method to locate your large files in the comment section below.
![]()

КБрайан Берджесс
Опубликовано

Если на вашем компьютере тысячи и тысячи файлов, вам может понадобиться простой способ найти большие файлы в Windows 11. В этом руководстве объясняется, как это сделать.
Если вам нужно сэкономить место на диске вашего ПК или найти определенный файл, вы можете использовать функция поиска для поиска больших файлов в Windows 11. Как только вы найдете большие файлы, вы можете переместить их на другой диск, чтобы освободить место на локальном диске.
Самыми большими файлами обычно являются игры, мультимедиа или большие базы данных. Однако поиск по имени может не дать желаемых результатов.
Вместо этого вы можете искать большие файлы в Windows 11. с помощью Проводника, командную строку или стороннее приложение.
Как найти большие файлы в Windows 11 с помощью проводника
Использование функции поиска в проводнике — отличный способ найти файлы по их размеру с использованием простых параметров.
Вы можете использовать различные параметры, чтобы найти определенные размеры файлов, от больших до гигантских.
Чтобы найти файлы по размеру в проводнике:
- Нажимать Клавиша Windows + E открыть Проводник и перейдите к диску, который вы хотите найти.
- в Поиск поле, тип Размер: Большой для обнаружения файлов между 128 МБ и 1 ГБ по размеру.
- Тип Размер: Огромный показывать только файлы между 1 ГБ и 4ГБ по размеру.
- Введите Размер: Гигантский отображать только те файлы, которые 4ГБ или больше.

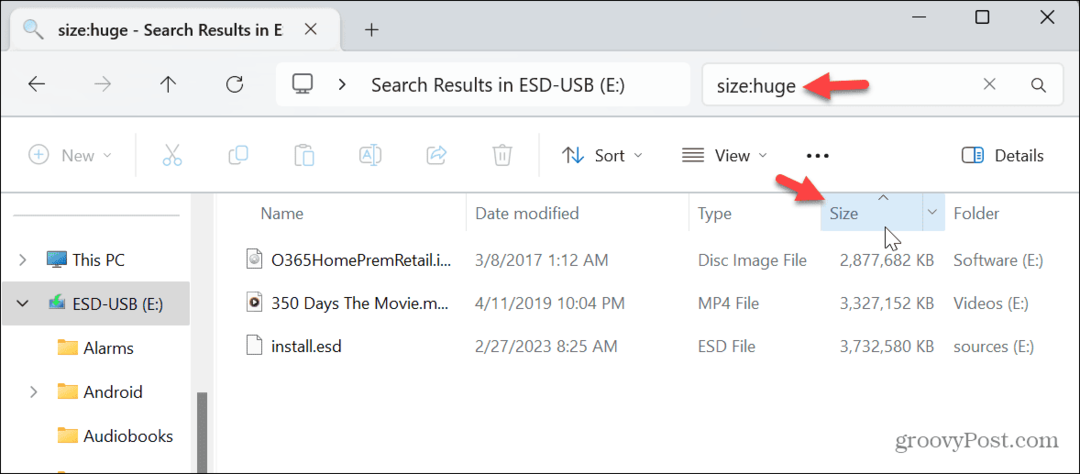
После того, как размеры файлов, которые вы ищете, будут загружены, вы можете отсортировать их по возрастанию или убыванию, щелкнув значок Размер вкладка
Как найти большие файлы по типу файла в Windows 11
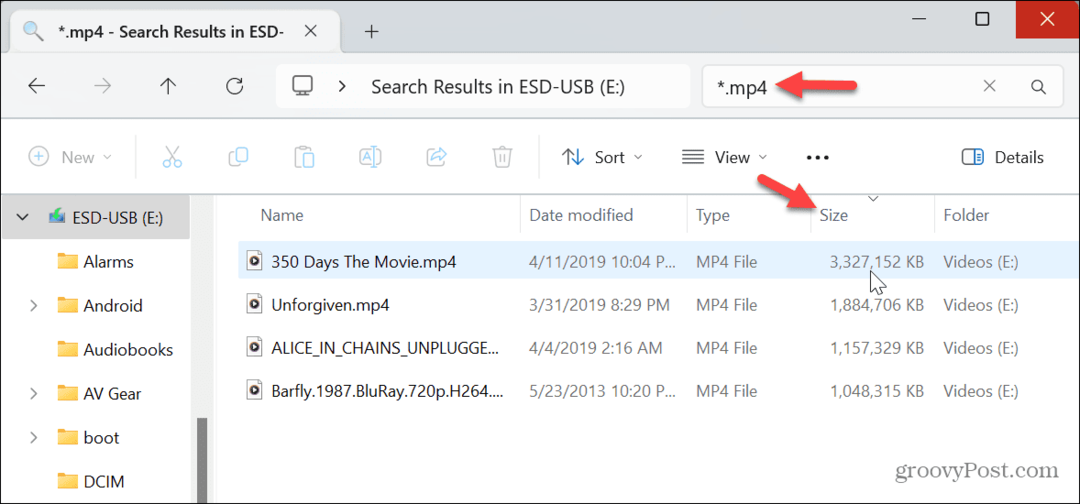
Медиафайлы и определенные программные файлы (такие как образы ОС или игры) обычно имеют большой размер, и вы можете найти файлы по типу, чтобы обнаружить большие. Например, у вас может быть большие файлы ISO или Видео MP4 или MKV файлы, к которым вам нужен доступ.
Чтобы найти файлы по их типу в Windows 11:
- Нажимать Клавиша Windows + E к открыть проводник.
- В поле поиска введите *.ИСО (или расширение файла, которое вам нужно найти, например *.mp4), и нажмите Входить.
- * указывает на «подстановочный знак» и не извлекает определенные файлы по имени, а показывает все типы файлов.
- Отобразятся большие файлы, и вы сможете открыть их с помощью совместимой программы или переместить на другой диск, чтобы освободить место на диске.
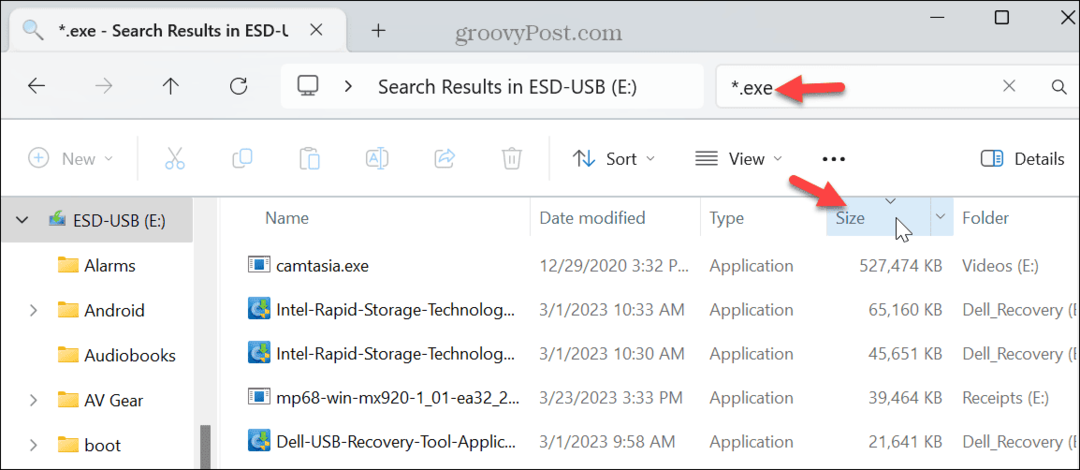
- Вы можете сделать это для любого расширение типа файла, даже если они не большие. После отображения вы можете отсортировать их по возрастанию или убыванию размера. Например, если вы ищете приложение для установки, введите *.Exe и нажмите Входить.
Как найти большие файлы в Windows 11 с помощью PowerShell
Если вы предпочитаете выполнять вычисления из командной строки, вы можете использовать Терминал Windows чтобы отобразить нисходящий список самых больших файлов в вашей системе.
Чтобы найти большие файлы в Windows 11 с помощью PowerShell:
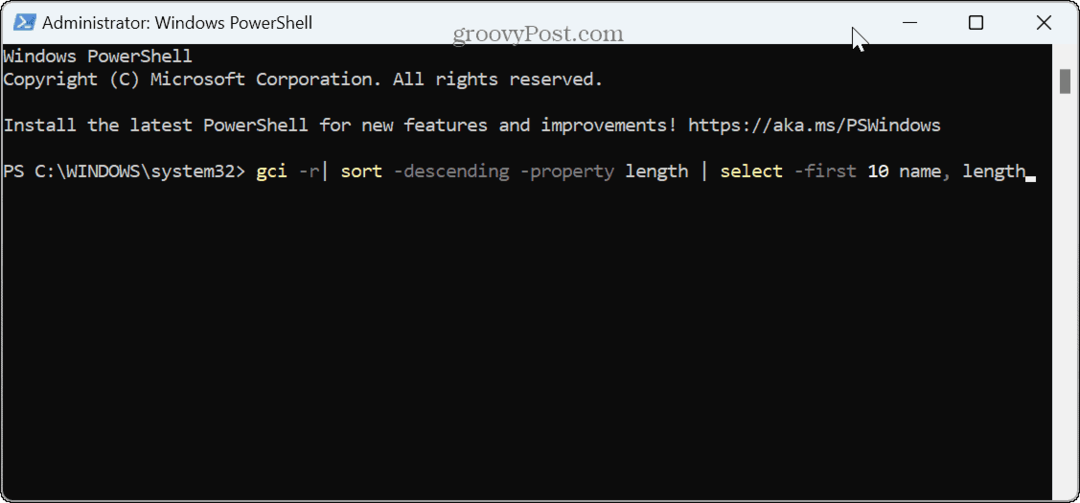
- Откройте новое окно PowerShell.
- Когда Терминал откроется, введите следующую команду и нажмите Enter:
gci -r| сортировать по убыванию -длина свойства | select - первые 20 имен, длина
- Список из 20 самых больших файлов будет указан в порядке убывания. Обратите внимание, что если вы хотите увидеть другую сумму, измените число 20 к 10 или другое количество файлов, которые вы хотите отобразить с помощью команды.
Используйте WinDirStat для поиска больших файлов в Windows 11
Еще один способ найти большие файлы, занимающие больше всего места на диске, — это бесплатная программа с открытым исходным кодом. Приложение WinDirStat. Это дает вам графическое представление вашего локального диска и того, что занимает место.
Чтобы использовать WinDirStat для поиска больших файлов:
- Запустите приложение, выберите диск, который хотите просканировать, и нажмите ХОРОШО.
- Вы получите представление с цветовой кодировкой того, что использует дисковое пространство.
- Нажмите на расширение файла в правом верхнем углу, выберите цветовой код, и он отобразит файл, занимающий место, и его расположение на диске.
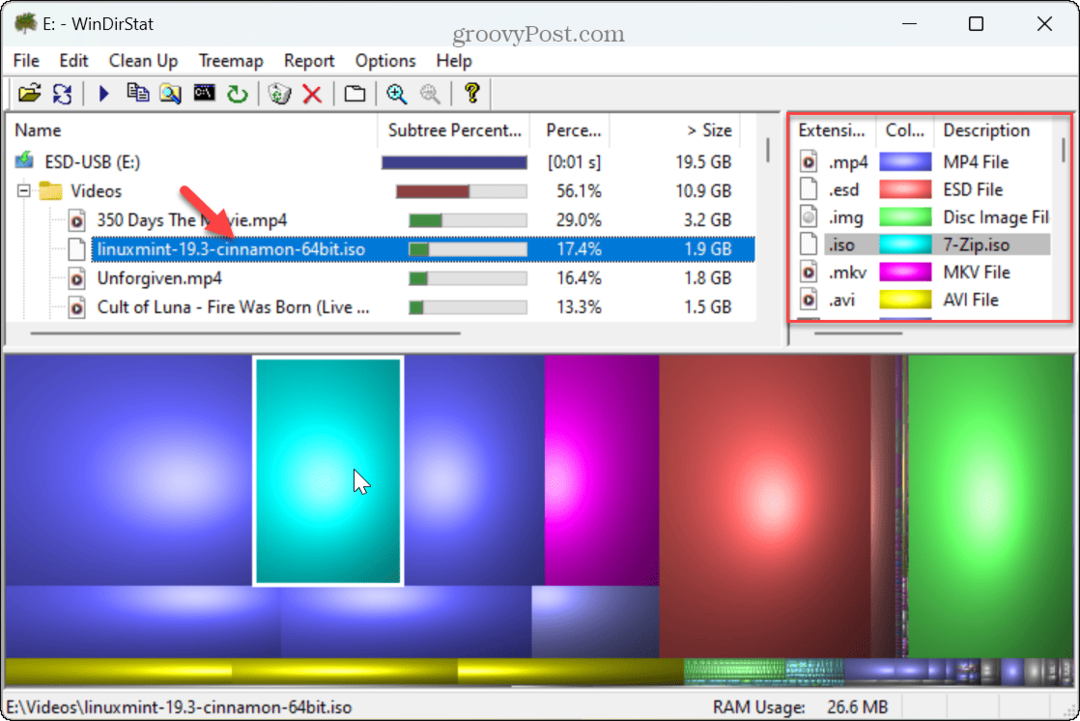
После того, как вы определили большие файлы, у вас есть различные варианты, такие как открытие файла с помощью совместимого приложения или удаление его для экономии места на диске.
Управление дисковым пространством в Windows 11
Если вам нужно быстро найти большие файлы, используйте показанные выше параметры File Explorer. А если у вас есть полный диск, использование стороннего приложения, такого как WinDirStat, может упростить идентификацию больших файлов и управление ими.
Есть и другие способы управления большими файлами и освобождения места на диске в Windows 11. Например, вы можете ограничить количество дисковое пространство, используемое корзиной или освободите место на диске в Windows 11 с помощью Функция рекомендаций по очистке.
Еще один способ освободить место на диске — удалить файлы без корзины в Windows 11. Кроме того, вы можете захотеть удалить дубликаты файлов в Windows 11 чтобы освободить место на диске. И не забудьте настроить контроль памяти для автоматической очистки места на диске.
Storage space is one of the essential components of your system, and like it or not, you will most likely run out of it in the future. A good way to free up your storage space is by managing your largest files. You can move them to a different drive, cloud storage, or even delete them if they are no longer needed.
In some cases, you can even compress your files if you don’t wish to use them anytime soon. But how do you find large files? Going through each folder manually can be tedious and using a cleaner is simply not efficient enough. Thankfully there are some neat ways to find large files on your system in Windows 11. Use the guides below to get you started.
Sorting large files can be done based on type, kind, date, and more. The best way to do this is by using Windows Search in file explorer. You can use dedicated terms to define the files you are looking for and filter them based on their size. You can then use the file explorer sorting options to find the largest ones in your search results.
Consequently, if this does not fit your criteria or you are unable to find the files that you are looking for, then you can use one of the other methods listed in this guide.
Related: How to Change the Taskbar Color on Windows 11
Method #01: Using Search in explorer (Recommended)
We will now search for large files based on your criteria.
Press Windows + E on your keyboard to open the file explorer and click on the search box in the top right corner. Search for the following term.
size:gigantic

The results will now be filtered and the files larger than 4GB will now be displayed on your screen. Select the unnecessary files that you do not need on your PC and simply delete them to free up some space. If you wish to use a smaller minimum file size, then replace ‘gigantic’ with one of the terms below depending on the size you prefer.

- Large: Files between 128MB and 1GB
- Huge: Files between 1GB to 4GB
- Medium: Files between 1MB to 128MB
And that’s it! You can use Windows Search this way to filter files by their size and find the largest ones currently on your PC.
Note: In case your PC indexes and shows system files as well then we recommend you double check files before deleting them to avoid deleting any vital system files from your system.
You will now have found large files on your PC using Windows Search.
1.1 What if the search does not work for you: Tips to try
If typing in ‘size:gigantic’ does not work for you, then you will need to switch to the old file explorer from Windows 10. Use the guide below to get you started.
Once you switch back to the old file explorer, use the guide above to search for large files. Once found, use the subsequent guide below to get the new Windows 11 file explorer back on your system.
1.1.1 Switch to the old file explorer
Press Windows + S on your keyboard and search for ‘Regedit’. Click and launch the app from your search results.

Navigate to the following directory or copy-paste the address below in your address bar.
HKEY_LOCAL_MACHINE\SOFTWARE\Microsoft\Windows\CurrentVersion\Shell Extensions

Click on the folder named ‘Blocked’.

Right-click on an empty area on your right, select ‘New’, and then click on ‘DWORD (32-bit) value’.

Enter the following name and press Enter on your keyboard. We recommend you copy-paste the same to avoid any naming errors.
{e2bf9676-5f8f-435c-97eb-11607a5bedf7}

Close the registry editor and press Ctrl + Shift + Esc to open the Task Manager. Switch to the ‘Details’ tab.

Click on ‘Explorer.exe’ and hit Del on your keyboard.

Click on ‘End process’ to confirm your choice.

Click on ‘File’ and select ‘Run new task’.

Enter the following in the text box and click on ‘Ok’.
explorer.exe

Windows File Explorer will now restart on your system and it should be reverted to the Windows 10 File Explorer. You can open a random folder to check the same. Confirm that you have gone back to the old file explorer and use the guide above to find large files on your system.
1.1.2 Switch back to the new file explorer
We can now revert to the old file explorer. Follow the guide below to get you started.
Press Windows + S on your keyboard and search for Regedit. Click and launch the app once it shows up in your search results.
Navigate to the following path below or copy-paste it in your address bar.
HKEY_LOCAL_MACHINE\SOFTWARE\Microsoft\Windows\CurrentVersion\Shell Extensions

Simply click on the DWORD (32-bit) value we had created earlier and hit Del on your keyboard. Click on ‘Yes’ to confirm your choice.

Press Ctrl + Shift + Esc on your keyboard and switch to the ‘Details’ tab.
Click on ‘explorer.exe’ and hit Del on your keyboard.
Click on ‘End process’.
Click on ‘File’ and select ‘Run new task’.
Type in ‘explorer.exe’ and hit Enter on your keyboard.
You can close the task manager and registry editor on your PC now.
And that’s it! You will now have gone back to the new File Explorer on Windows 11. Apart from the size parameter, you can also use the commands below to search different files on your PC and sort them by size. This way you can find the largest ones on your system.
1.2 Find by file types
Similar to the command above, you can use the ‘kind:’ parameter to find certain files in the current directory. The ‘kind’ parameter will allow you to look for calendar files, text documents, pictures, videos games, and more.
When using the kind parameter this way you are not restricted to Windows’s predefined categories, instead you can define specific file extensions as well to find them on your PC as shown below.
kind:.exe

The command above will help you look for executables in the current directory.

Similarly using the command below will help you find PDF files in the selected directory.
kind:.pdf

And that’s it! You can use these commands to find certain files on your PC using Windows Search.
1.3 Find files by date
You can also use the ‘date:’ parameter to look for files created on a certain date. Additionally, this command can be used in conjunction with Boolean filters below to find files created or modified before or after a certain date on your PC. For example, if looking for a file created on the 1st of January 2020, then you can use the following command below.
date: 1/1/2020

Similarly if looking for a file created on the 1st January 2021, then you can use the following command.
date: 1/1/2021
1.4 Use Boolean Filters
Boolean filters can help you search multiple terms simultaneously or in conjunction with each other. Use the filters below that best suit your current requirements.
1.4.1 The ‘AND’ parameter
You can use the AND parameter to search for two search terms together. This way you can look for a file containing both the terms and not either one of them which should help you filter out unwanted results containing either of the terms.
For example, if looking for a file containing the words ‘Samsung and ‘galaxy’ in its name then I can use the following term to search for your file.
Samsung AND galaxy

This will filter out files with only ‘Samsung’ and ‘Galaxy’ in their name. Files with either term will be filtered out.
The ‘OR’ parameter
The OR parameter is opposite to the AND parameter and allows you to search for files containing either of the terms in your search term. For example, if I wish to search for files with either ‘Apple’ or ‘Airpods’ in their name, then I can use the following search term.
apple OR airpods

Similarly, if I am looking for PDF and EXE files in a particular directory, then I can use the following command below.
kind:.exe OR .pdf

And that’s how you can use the OR parameter to look for multiple search terms in a single file name.
1.4.2 The ‘NOT’ parameter
If you are looking to filter out a certain search term or a filet type then you can use the NOT parameter. The NOT parameter will exclude the desired file type, kind, size, or name depending on your choice.
For example, if in a folder full of .docx files you are looking for other file types and wish to filter them all out, then you can use the following command.
kind: NOT .docx

Similarly, if I am looking for a file that does not have ‘Apple” in its name then I can use the following search term.
NOT apple

1.4.3 Parentheses
Parentheses is a Boolean filter that is usually used when you are searching file contents as well. Anything included between the parentheses () is searched for and files with either or all of the terms are displayed on your screen.
For example, if looking for a file containing either ‘Apple, Samsung, Mi, Microsoft, and Dell’ or all of these terms, then you can use the following term.
(Apple Samsung Mi Microsoft Dell)

Similarly, you can use the following command if looking for multiple file types.
kind:(.exe .pdf .txt)

And that’s it! You will now have used parentheses to your advantage to look for multiple search terms in a particular file.
1.4.4 ‘>’ and ‘<‘ parameter
These two Boolean filters are usually used when looking for file types or when sorting your results based on a parameter.
The greater than and less than parameters can be used to filter your results based on a number. For example, if looking for files dated after 1st January 2021 then you can use the following command.
date: >1/1/2021

Similarly, if looking for files less than 10GB then you can use the following command.
size: < 10GB

You can use the greater than and less than parameters to your advantage this way and find the desired files on your system.
Advanced methods to find large files on Windows
Some other ways in which you can find large files on your system have been listed below. Follow the guides to get you started.
Method #02: Using CMD
CMD can also help you find large files on your system. Use the guide below to get you started.
Press Windows + E on your keyboard and navigate to a location where you wish to search for large files and click on the address bar at the top.

Type in CMD and press Enter on your keyboard.

CMD will now be launched in the particular folder. Type in the following command and replace ‘PATH’ with the path we copied to your clipboard.
forfiles /S /M * /C “cmd /c if @fsize GEQ 1073741824 echo @path > largefiles.txt

The above command will look for files larger than 1GB on your PC. If you wish to define a larger minimum size, then replace ‘1073741824’ with one of the following options below.
- 2GB: 2147483648
- 5GB: 5368709120
- 10GB: 10737418240
Execute the command with your desired variables and a text file will be created in the same location with a list of all the large files found on your system based on your criteria. You will also find the path for each file on your local storage in the text file.

You can use this list to identify the largest files in the current location and then delete them at your discretion to free up some disk space on your system.
Method #03: Using PowerShell
You can also find large files on your system using PowerShell. Just like the command for CMD, PowerShell will scour your local files based on a minimum size and display all the files larger than it. Use the guide below to get you started.
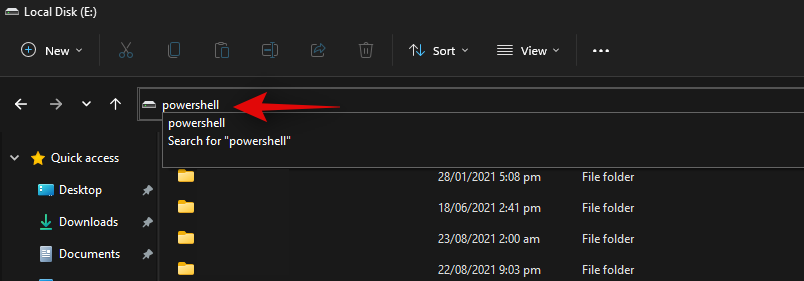
Press Windows + E on your keyboard and navigate to the location where you wish to look for large files. Click on the address bar at the top and type in ‘PowerShell’. Press Enter on your keyboard once you are done.
Copy-paste the command below in the PowerShell window and press Enter on your keyboard.
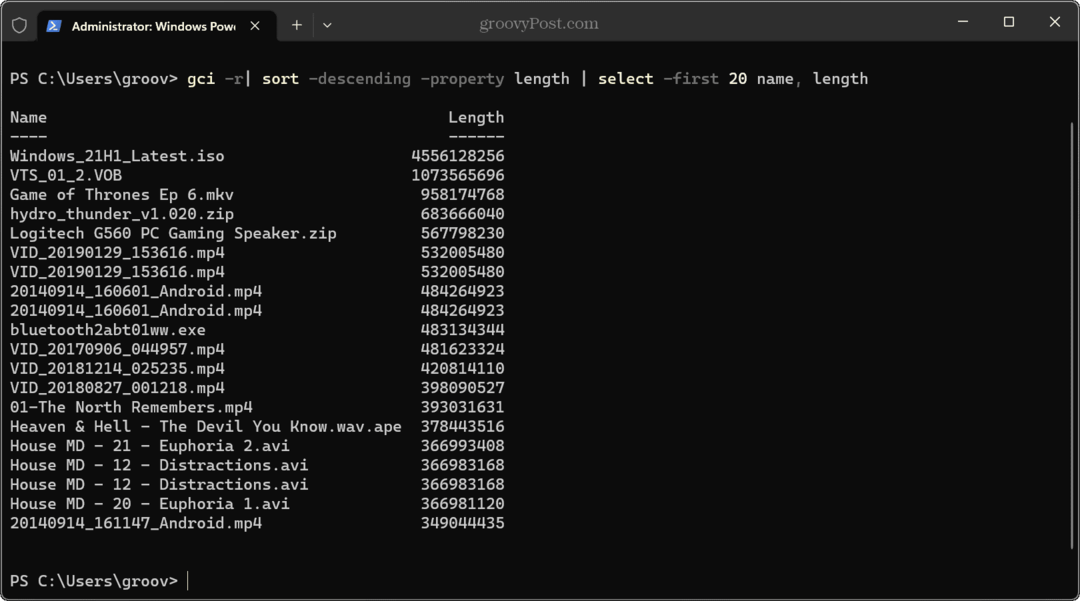
gci -r| sort -descending -property length | select -first 10 name, length
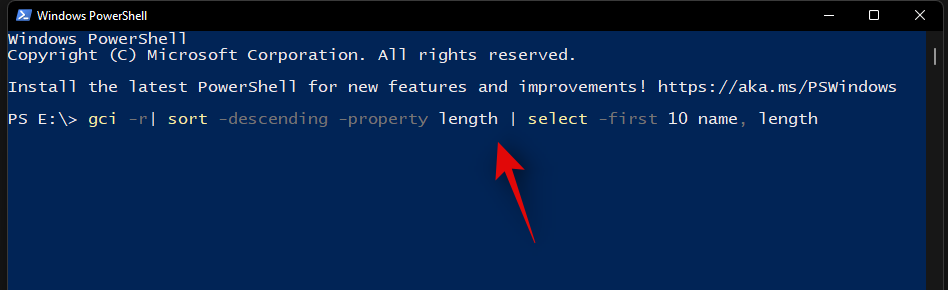
You will now get a list of the top 10 largest files currently taking the most disk space on your system. If you wish to view the top 20 files, then replace ‘select-first 10’ with ‘select-first 20’.
PowerShell will now find and display the 20 largest files on your system along with their size. The file size will be in bytes which can make it a bit difficult to judge the size of files in terms of gigabytes.
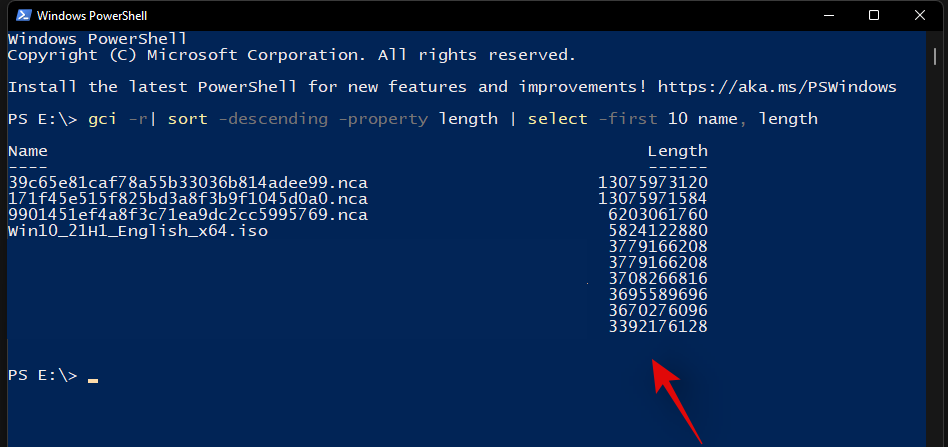
And that’s it! You will now have found the largest files on your PC using PowerShell in Windows 11.
2 Best apps to find large files on Windows
Many third-party tools allow you to view a visual representation of your PC’s disk usage.
This makes it much easier for you to identify large chunks of files taking significant space on your hard drive. Our recommended tools would be SpaceSniffer and WinDirStat. Use one of the guides below depending on the tool that you wish to use.
Method #04: Using SpaceSniffer
Space Sniffer is another popular third-party utility used to analyze disk space usage on Windows 11. SpaceSniffer can help you identify large files using huge amounts of space on your system. You can also find hidden files taking huge disk space on your PC using the SpaceSniffer. Use the guide below to get you started.
- SpaceSniffer | Download Link
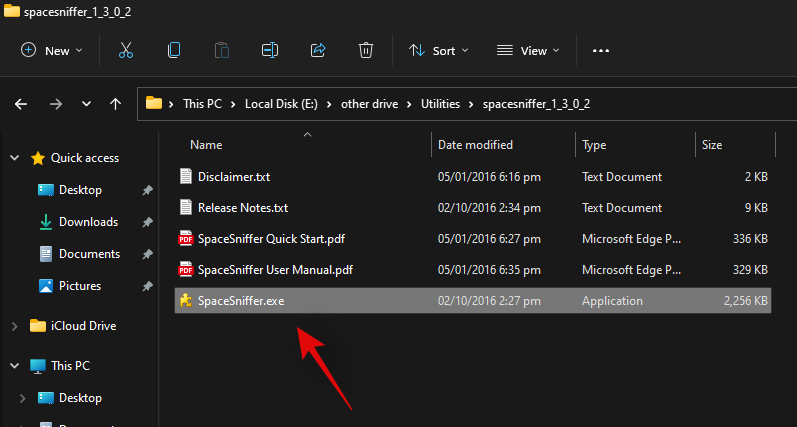
Download SpaceSniffer to your PC using the link above. A portable .exe will be downloaded to your system. Extract the archive and right-click on the .exe file.
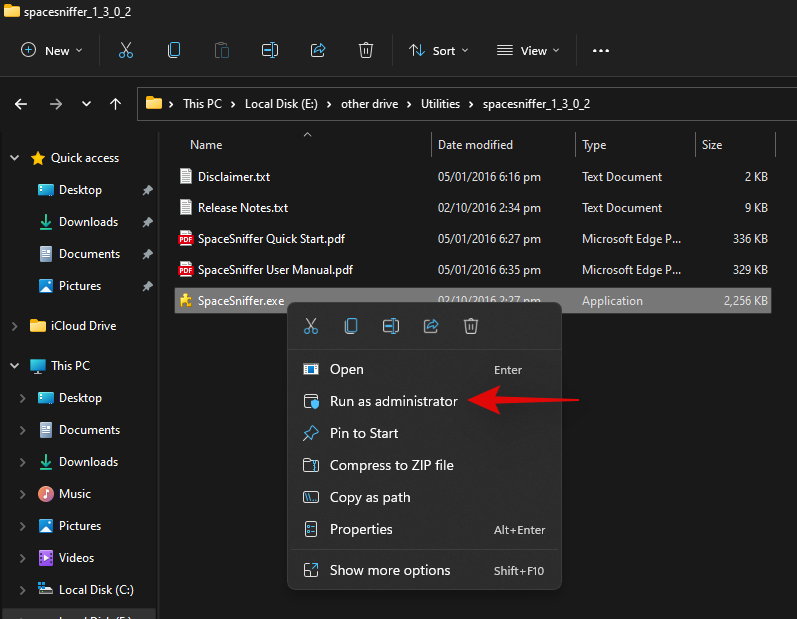
Select ‘Run as administrator’.
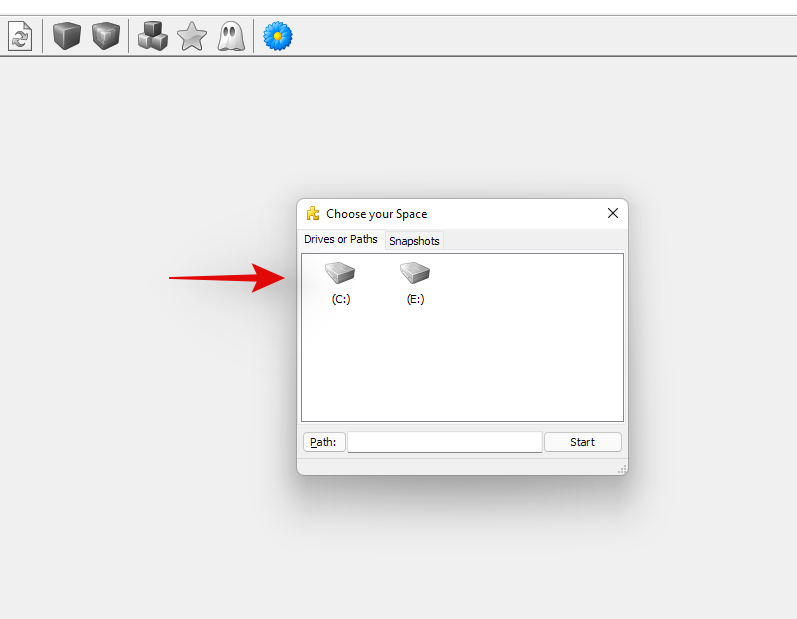
Now select the drive you wish to scan. If you wish to analyze and find large files in a particular directory, then you can enter its path in the text box below.
You will now be shown a graphical representation of your disk space usage on your screen. Simply hover over the largest chunk and you will be shown the name of the folder or file occupying that space.
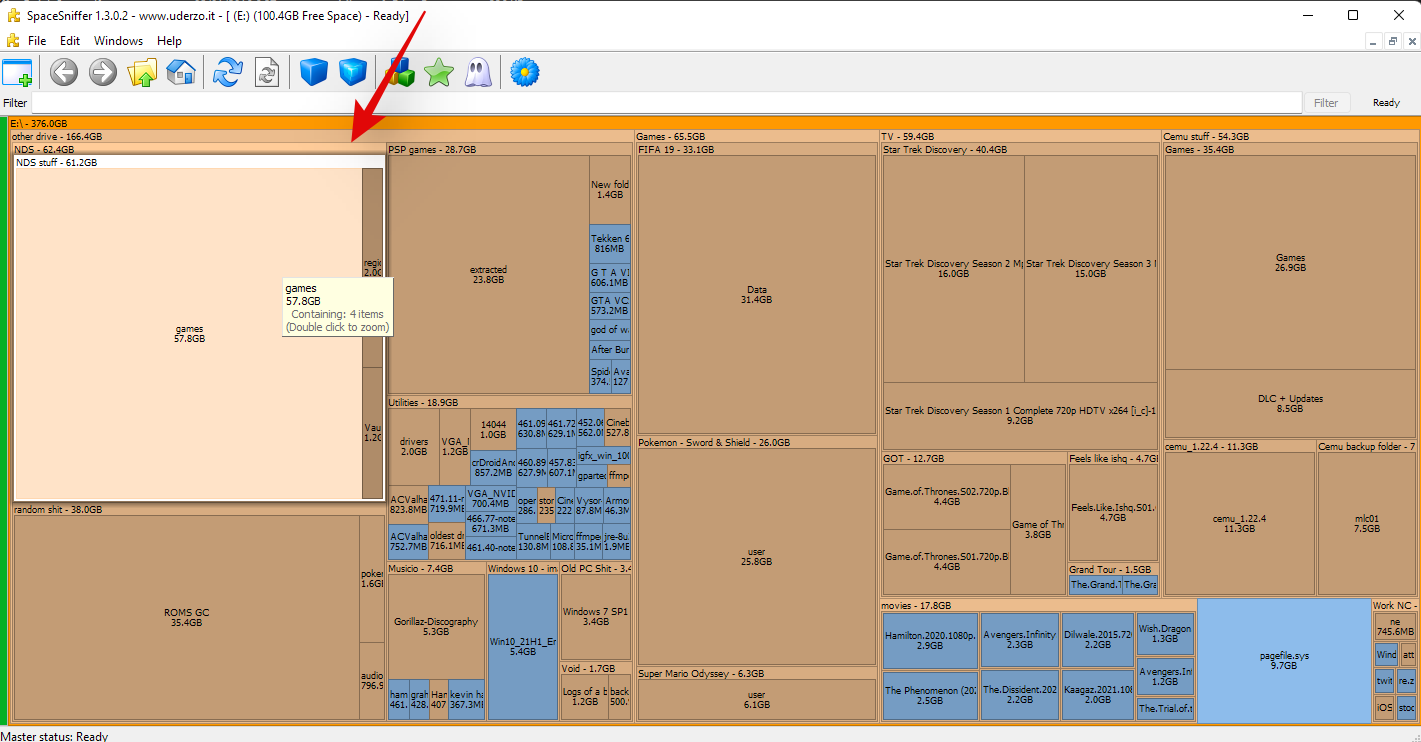
And that’s it! You can use SpaceSniffer this way to identify the largest files on your system by simply looking at the largest chunks on your screen.
Method #05: Using WinDirStat
WinDirStat is a popular open-source utility often used to generate a graphical representation of your local storage space in a user-friendly manner. This makes it easier to identify large chunks of your disk space occupied by a single file, folder, or archive, which in turn will make it easier for you to free up some space on your PC. Use the guide below to identify what is taking up space on your Windows 11 PC.
- WinDirStat | Download Link
Download and install WinDirStat on your PC using the link above. Once installed, launch the app.

Now select one of the options that best suit your needs. If you only have a single drive installed on your system with a single partition, then you can skip this step. Click on ‘Ok’ once you are done.
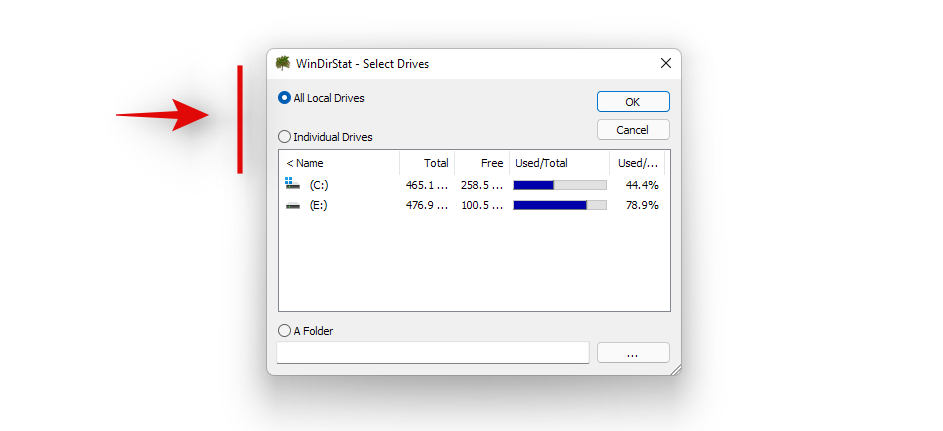
- All Local Drives: This will make WinDirStat analyze all your disks and display their data graphically.
- Individual Drives: Select one of your installed drives to be analyzed for disk space usage. You can select this option and then select the drive you wish to use.
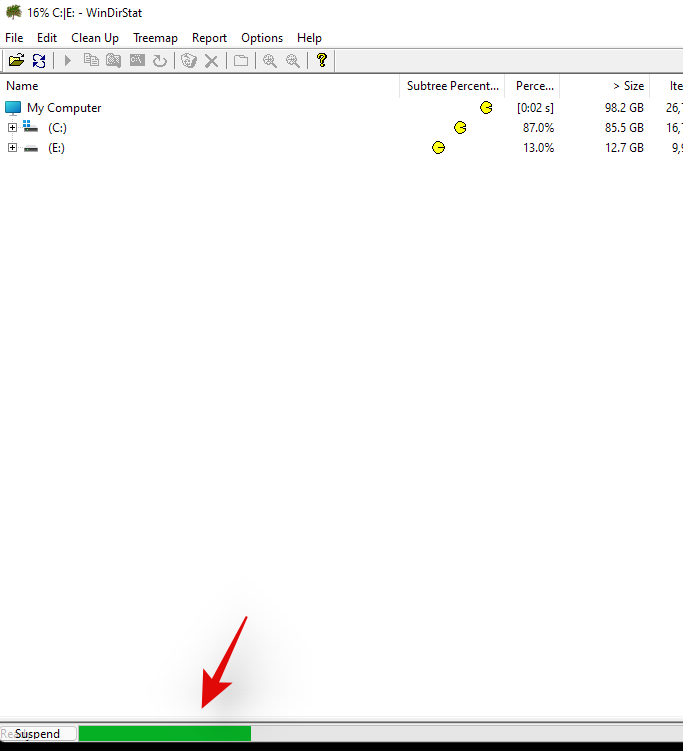
Your drives will now be analyzed and you can track the progress for the same at the bottom of the window.
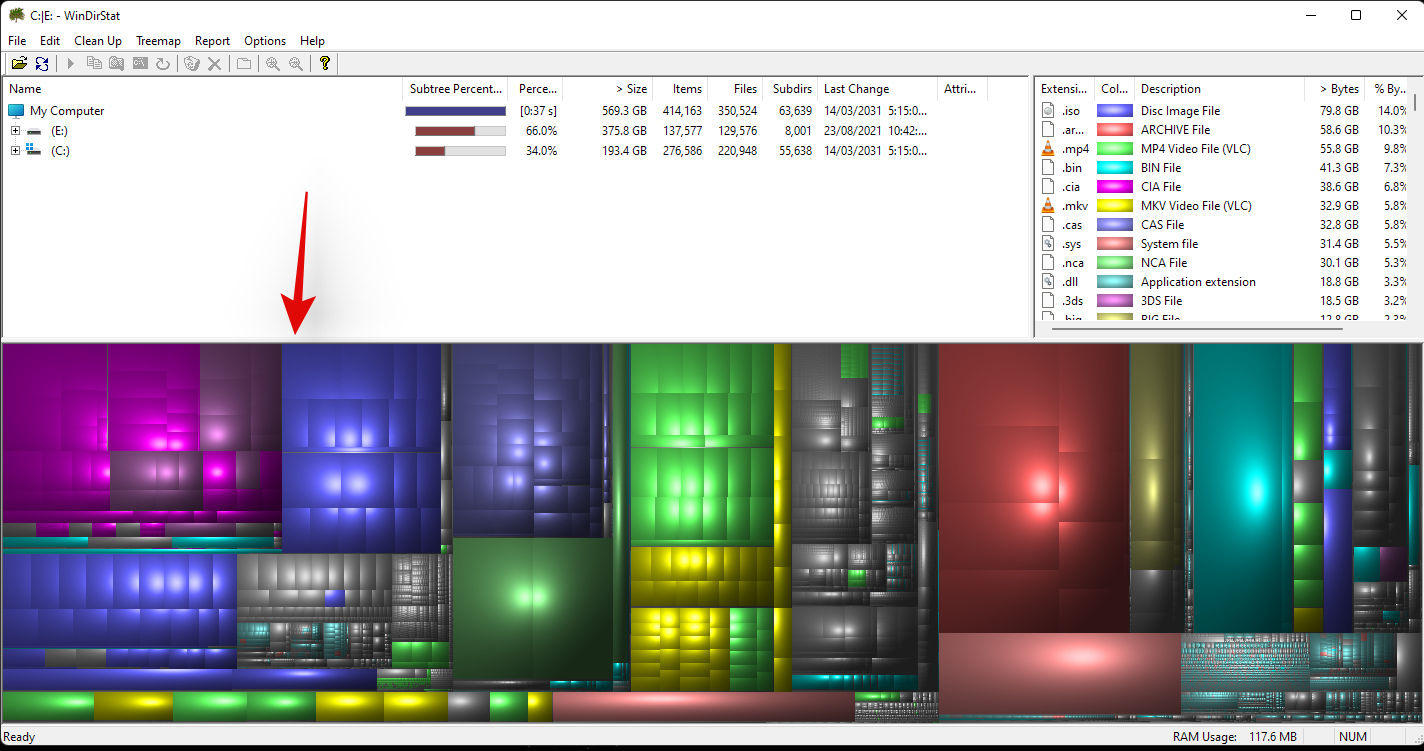
Once analyzed, a color-coded graphical representation of the disk space usage on the selected drive(s) will be shown on your screen. Simply click on the largest chunks to identify the largest files.
Press Del on your keyboard to delete the file. This will send it to your recycle bin and you can decide its fate when reviewing your recycle bin items. Alternatively, you can use Shift + Del to permanently delete the item from your system.
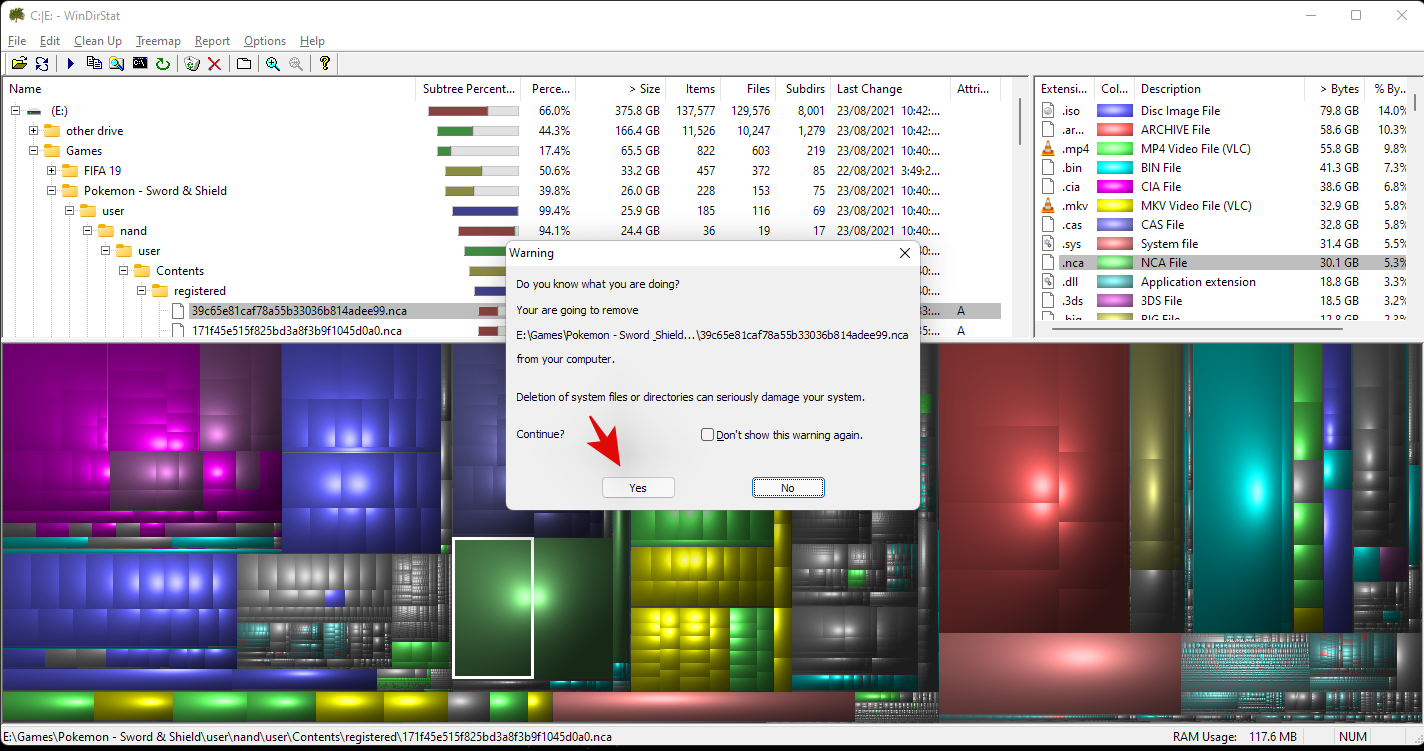
And that’s it! You can repeat the last steps to delete more of the largest files from your system.
Other Third-Party apps as alternative
The world of third-party alternatives is a huge one and thus, the above-mentioned tools are not the only ones that you can use to analyze your disk usage. Here are some alternatives with unique features that might be more suited for your current needs and requirements.
- TreeSize Free | Download Link | Freemium model
- JDiskReport | Download Link | Freeware model
- SpaceMonger | Download Link | Freemium model
- RidNacs | Download Link | Freeware model
- FolderSize | Download Link | Open-Source model
More ways to clear storage on Windows 11
If you’re looking to reclaim your storage space then there are tons of more things that you can do besides clearing or moving your largest files. You can clear caches, stop programs, reduce dedicated storage space, clear temporary files, remove leftover files, and much more. Refer to this dedicated guide by us that should help you clear space on Windows 11 in every way possible.
Should you use disk space analyzers?
Disk Space Analyzers have long been the ultimate utility to identify where exactly your disk space is being used. Most of them stem from long-standing communities while others have over decades of experience. If you’re divided on using disk space analyzers, then your best bet would be to opt for something that is open source.
The modern world of the internet is centered around data collection and like it or not, every service is gathering and collecting some type of data from your usage of their tool. Hence most disk analyzers nowadays, also have the option to share your usage data and more. Additionally, if you decide to opt for something new and untested then the risks are even higher.
Hence, we recommend you use disk space analyzers but do verify their origin and reputation before running them on your system. If you do not wish to go through the hassle of reading reviews, we recommend you simply try an open-source alternative from a trusted source.
We hope this guide helped you easily find the largest files using disk space on your system. If you face any issues or errors during the process, feel free to reach out to us using the comments section below.
Место для хранения данных является одним из важнейших компонентов вашей системы, и, нравится вам это или нет, в будущем оно у вас, скорее всего, закончится. Хороший способ освободить место для хранения — это управлять самыми большими файлами. Вы можете переместить их на другой диск , в облачное хранилище или даже удалить, если они больше не нужны.
В некоторых случаях вы даже можете сжать свои файлы, если не хотите их использовать в ближайшее время. Но как найти большие файлы? Просматривать каждую папку вручную может быть утомительно, а использование очистителя просто недостаточно эффективно. К счастью, есть несколько изящных способов найти большие файлы в вашей системе в Windows 11. Используйте приведенные ниже руководства, чтобы начать работу.
СОДЕРЖАНИЕ
- Найдите большие файлы в Windows 11: советы
- Метод № 01: Использование поиска в проводнике (рекомендуется)
- 1.1 Что делать, если поиск не работает для вас: советы, которые стоит попробовать
- 1.2 Поиск по типам файлов
- 1.3 Поиск файлов по дате
- 1.4 Использование логических фильтров
- Расширенные методы поиска больших файлов в Windows
- Метод # 02: Использование CMD
- Метод # 03: Использование PowerShell
- 2 Лучшие приложения для поиска больших файлов в Windows
- Метод # 04: Использование SpaceSniffer
- Метод # 05: Использование WinDirStat
- Другие сторонние приложения в качестве альтернативы
- Дополнительные способы очистки хранилища в Windows 11
- Стоит ли использовать анализаторы дискового пространства?
Найдите большие файлы в Windows 11: советы
Сортировка больших файлов может выполняться по типу, виду, дате и т. Д. Лучший способ сделать это — использовать Windows Search в проводнике файлов. Вы можете использовать специальные термины, чтобы определять файлы, которые вы ищете, и фильтровать их по размеру. Затем вы можете использовать параметры сортировки файлового проводника, чтобы найти самые большие в результатах поиска.
Следовательно, если это не соответствует вашим критериям или вы не можете найти файлы, которые ищете, вы можете использовать один из других методов, перечисленных в этом руководстве.
Связанный: Как изменить цвет панели задач в Windows 11
Метод № 01: Использование поиска в проводнике (рекомендуется)
Теперь мы будем искать большие файлы на основе ваших критериев.
Нажмите Windows + Eна клавиатуре, чтобы открыть проводник, и щелкните поле поиска в правом верхнем углу. Найдите следующий термин.
size:gigantic

Теперь результаты будут отфильтрованы, и файлы размером более 4 ГБ будут отображаться на вашем экране. Выберите ненужные файлы, которые вам не нужны на вашем компьютере, и просто удалите их, чтобы освободить место. Если вы хотите использовать меньший минимальный размер файла, замените слово «гигантский» одним из приведенных ниже терминов в зависимости от того, какой размер вы предпочитаете.

- Большой: файлы размером от 128 МБ до 1 ГБ.
- Огромный: файлы от 1 до 4 ГБ
- Средний: файлы от 1 МБ до 128 МБ
И это все! Вы можете использовать Windows Search таким образом, чтобы фильтровать файлы по размеру и находить самые большие из них на вашем компьютере.
Примечание. Если ваш компьютер также индексирует и показывает системные файлы, мы рекомендуем вам дважды проверить файлы перед их удалением, чтобы избежать удаления каких-либо важных системных файлов из вашей системы.
Теперь вы найдете на своем компьютере большие файлы с помощью Windows Search.
1.1 Что делать, если поиск у вас не работает: советы, которые стоит попробовать
Если ввод «size: gigantic» вам не подходит, вам нужно будет переключиться на старый файловый менеджер из Windows 10. Используйте приведенное ниже руководство, чтобы начать работу.
После того, как вы вернетесь в старый файловый менеджер, используйте приведенное выше руководство для поиска больших файлов. После обнаружения используйте следующее руководство ниже, чтобы вернуть новый проводник файлов Windows 11 в вашу систему.
1.1.1 Переключитесь на старый файловый менеджер
Нажмите Windows + Sна клавиатуре и найдите «Regedit». Щелкните и запустите приложение из результатов поиска.

Перейдите в следующий каталог или скопируйте и вставьте адрес, указанный ниже, в адресную строку.
HKEY_LOCAL_MACHINE\SOFTWARE\Microsoft\Windows\CurrentVersion\Shell Extensions

Щелкните папку с названием «Заблокировано».

Щелкните правой кнопкой мыши пустую область справа, выберите «Создать», а затем щелкните «Значение DWORD (32-разрядное)».

Введите следующее имя и нажмите Enter на клавиатуре. Мы рекомендуем вам скопировать и вставить то же самое, чтобы избежать ошибок именования.
{e2bf9676-5f8f-435c-97eb-11607a5bedf7}

Закройте редактор реестра и нажмите Ctrl + Shift + Esc, чтобы открыть диспетчер задач. Перейдите на вкладку «Подробности».

Щелкните «Explorer.exe» и нажмите «Del» на клавиатуре.

Нажмите «Завершить процесс», чтобы подтвердить свой выбор.

Щелкните «Файл» и выберите «Запустить новую задачу».

Введите следующее в текстовое поле и нажмите «ОК».
explorer.exe

Проводник Windows перезапустится в вашей системе, и он должен вернуться в проводник Windows 10. Вы можете открыть случайную папку, чтобы проверить то же самое. Подтвердите, что вы вернулись в старый файловый менеджер и воспользуйтесь приведенным выше руководством, чтобы найти большие файлы в вашей системе.
1.1.2 Вернуться к новому файловому проводнику
Теперь мы можем вернуться к старому файловому проводнику. Следуйте приведенному ниже руководству, чтобы начать работу.
Нажмите Windows + Sна клавиатуре и найдите Regedit. Щелкните и запустите приложение, как только оно появится в результатах поиска.
Перейдите по следующему пути ниже или скопируйте и вставьте его в адресную строку.
HKEY_LOCAL_MACHINE\SOFTWARE\Microsoft\Windows\CurrentVersion\Shell Extensions

Просто щелкните значение DWORD (32-битное), которое мы создали ранее, и нажмите Del на клавиатуре. Щелкните «Да», чтобы подтвердить свой выбор.

Нажмите Ctrl + Shift + Esc на клавиатуре и перейдите на вкладку «Подробности».
Щелкните «explorer.exe» и нажмите «Del» на клавиатуре.
Щелкните «Завершить процесс».
Щелкните «Файл» и выберите «Запустить новую задачу».
Введите «explorer.exe» и нажмите Enter на клавиатуре.
Теперь вы можете закрыть диспетчер задач и редактор реестра на своем ПК.
И это все! Теперь вы вернетесь в новый проводник в Windows 11. Помимо параметра размера, вы также можете использовать приведенные ниже команды для поиска различных файлов на вашем ПК и сортировки их по размеру. Таким образом вы сможете найти самые большие в вашей системе.
1.2 Поиск по типам файлов
Как и в приведенной выше команде, вы можете использовать параметр kind: для поиска определенных файлов в текущем каталоге. Параметр kind позволит вам искать файлы календаря, текстовые документы, изображения, видеоигры и многое другое.
При использовании параметра kind таким образом вы не ограничены предопределенными категориями Windows, вместо этого вы можете определить определенные расширения файлов, а также найти их на своем ПК, как показано ниже.
kind:.exe

Приведенная выше команда поможет вам найти исполняемые файлы в текущем каталоге.

Аналогичным образом, использование приведенной ниже команды поможет вам найти файлы PDF в выбранном каталоге.
kind:.pdf

И это все! Вы можете использовать эти команды для поиска определенных файлов на вашем ПК с помощью Windows Search.
1.3 Поиск файлов по дате
You can also use the ‘date:’ parameter to look for files created on a certain date. Additionally, this command can be used in conjunction with Boolean filters below to find files created or modified before or after a certain date on your PC. For example, if looking for a file created on the 1st of January 2020, then you can use the following command below.
date: 1/1/2020

Similarly if looking for a file created on the 1st January 2021, then you can use the following command.
date: 1/1/2021
1.4 Use Boolean Filters
Boolean filters can help you search multiple terms simultaneously or in conjunction with each other. Use the filters below that best suit your current requirements.
1.4.1 The ‘AND’ parameter
You can use the AND parameter to search for two search terms together. This way you can look for a file containing both the terms and not either one of them which should help you filter out unwanted results containing either of the terms.
For example, if looking for a file containing the words ‘Samsung and ‘galaxy’ in its name then I can use the following term to search for your file.
Samsung AND galaxy

This will filter out files with only ‘Samsung’ and ‘Galaxy’ in their name. Files with either term will be filtered out.
The ‘OR’ parameter
The OR parameter is opposite to the AND parameter and allows you to search for files containing either of the terms in your search term. For example, if I wish to search for files with either ‘Apple’ or ‘Airpods’ in their name, then I can use the following search term.
apple OR airpods

Similarly, if I am looking for PDF and EXE files in a particular directory, then I can use the following command below.
kind:.exe OR .pdf

And that’s how you can use the OR parameter to look for multiple search terms in a single file name.
1.4.2 The ‘NOT’ parameter
If you are looking to filter out a certain search term or a filet type then you can use the NOT parameter. The NOT parameter will exclude the desired file type, kind, size, or name depending on your choice.
For example, if in a folder full of .docx files you are looking for other file types and wish to filter them all out, then you can use the following command.
kind: NOT .docx

Similarly, if I am looking for a file that does not have ‘Apple” in its name then I can use the following search term.
NOT apple

1.4.3 Parentheses
Parentheses is a Boolean filter that is usually used when you are searching file contents as well. Anything included between the parentheses () is searched for and files with either or all of the terms are displayed on your screen.
For example, if looking for a file containing either ‘Apple, Samsung, Mi, Microsoft, and Dell’ or all of these terms, then you can use the following term.
(Apple Samsung Mi Microsoft Dell)

Similarly, you can use the following command if looking for multiple file types.
kind:(.exe .pdf .txt)

And that’s it! You will now have used parentheses to your advantage to look for multiple search terms in a particular file.
1.4.4 ‘>’ and ‘<‘>
These two Boolean filters are usually used when looking for file types or when sorting your results based on a parameter.
The greater than and less than parameters can be used to filter your results based on a number. For example, if looking for files dated after 1st January 2021 then you can use the following command.
date: >1/1/2021

Similarly, if looking for files less than 10GB then you can use the following command.
size: <>

You can use the greater than and less than parameters to your advantage this way and find the desired files on your system.
Advanced methods to find large files on Windows
Some other ways in which you can find large files on your system have been listed below. Follow the guides to get you started.
Method #02: Using CMD
CMD can also help you find large files on your system. Use the guide below to get you started.
Press Windows + E on your keyboard and navigate to a location where you wish to search for large files and click on the address bar at the top.

Type in CMD and press Enter on your keyboard.

CMD will now be launched in the particular folder. Type in the following command and replace ‘PATH’ with the path we copied to your clipboard.
forfiles /S /M * /C “cmd /c if @fsize GEQ 1073741824 echo @path > largefiles.txt

The above command will look for files larger than 1GB on your PC. If you wish to define a larger minimum size, then replace ‘1073741824’ with one of the following options below.
- 2GB: 2147483648
- 5GB: 5368709120
- 10GB: 10737418240
Execute the command with your desired variables and a text file will be created in the same location with a list of all the large files found on your system based on your criteria. You will also find the path for each file on your local storage in the text file.

You can use this list to identify the largest files in the current location and then delete them at your discretion to free up some disk space on your system.
Method #03: Using PowerShell
You can also find large files on your system using PowerShell. Just like the command for CMD, PowerShell will scour your local files based on a minimum size and display all the files larger than it. Use the guide below to get you started.
Press Windows + E on your keyboard and navigate to the location where you wish to look for large files. Click on the address bar at the top and type in ‘PowerShell’. Press Enter on your keyboard once you are done.

Copy-paste the command below in the PowerShell window and press Enter on your keyboard.
gci -r| sort -descending -property length | select -first 10 name, length

You will now get a list of the top 10 largest files currently taking the most disk space on your system. If you wish to view the top 20 files, then replace ‘select-first 10’ with ‘select-first 20’.
PowerShell will now find and display the 20 largest files on your system along with their size. The file size will be in bytes which can make it a bit difficult to judge the size of files in terms of gigabytes.

And that’s it! You will now have found the largest files on your PC using PowerShell in Windows 11.
2 Best apps to find large files on Windows
Many third-party tools allow you to view a visual representation of your PC’s disk usage.
This makes it much easier for you to identify large chunks of files taking significant space on your hard drive. Our recommended tools would be SpaceSniffer and WinDirStat. Use one of the guides below depending on the tool that you wish to use.
Method #04: Using SpaceSniffer
Space Sniffer is another popular third-party utility used to analyze disk space usage on Windows 11. SpaceSniffer can help you identify large files using huge amounts of space on your system. You can also find hidden files taking huge disk space on your PC using the SpaceSniffer. Use the guide below to get you started.
- SpaceSniffer | Download Link
Download SpaceSniffer to your PC using the link above. A portable .exe will be downloaded to your system. Extract the archive and right-click on the .exe file.

Select ‘Run as administrator’.

Now select the drive you wish to scan. If you wish to analyze and find large files in a particular directory, then you can enter its path in the text box below.

You will now be shown a graphical representation of your disk space usage on your screen. Simply hover over the largest chunk and you will be shown the name of the folder or file occupying that space.

And that’s it! You can use SpaceSniffer this way to identify the largest files on your system by simply looking at the largest chunks on your screen.
Method #05: Using WinDirStat
WinDirStat is a popular open-source utility often used to generate a graphical representation of your local storage space in a user-friendly manner. This makes it easier to identify large chunks of your disk space occupied by a single file, folder, or archive, which in turn will make it easier for you to free up some space on your PC. Use the guide below to identify what is taking up space on your Windows 11 PC.
- WinDirStat | Download Link
Download and install WinDirStat on your PC using the link above. Once installed, launch the app.

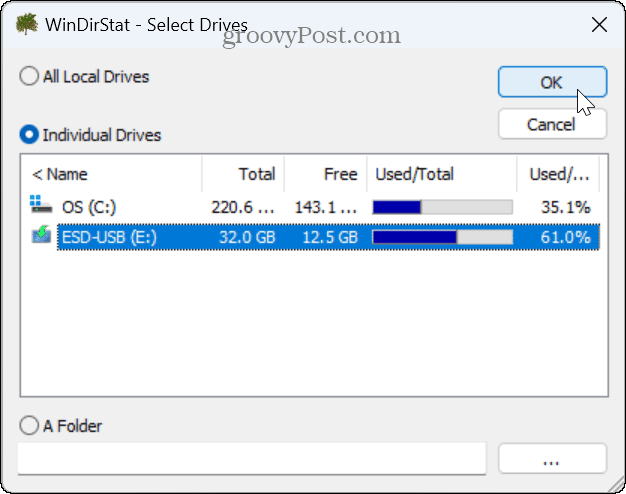
Now select one of the options that best suit your needs. If you only have a single drive installed on your system with a single partition, then you can skip this step. Click on ‘Ok’ once you are done.

- All Local Drives: This will make WinDirStat analyze all your disks and display their data graphically.
- Individual Drives: Select one of your installed drives to be analyzed for disk space usage. You can select this option and then select the drive you wish to use.
Your drives will now be analyzed and you can track the progress for the same at the bottom of the window.

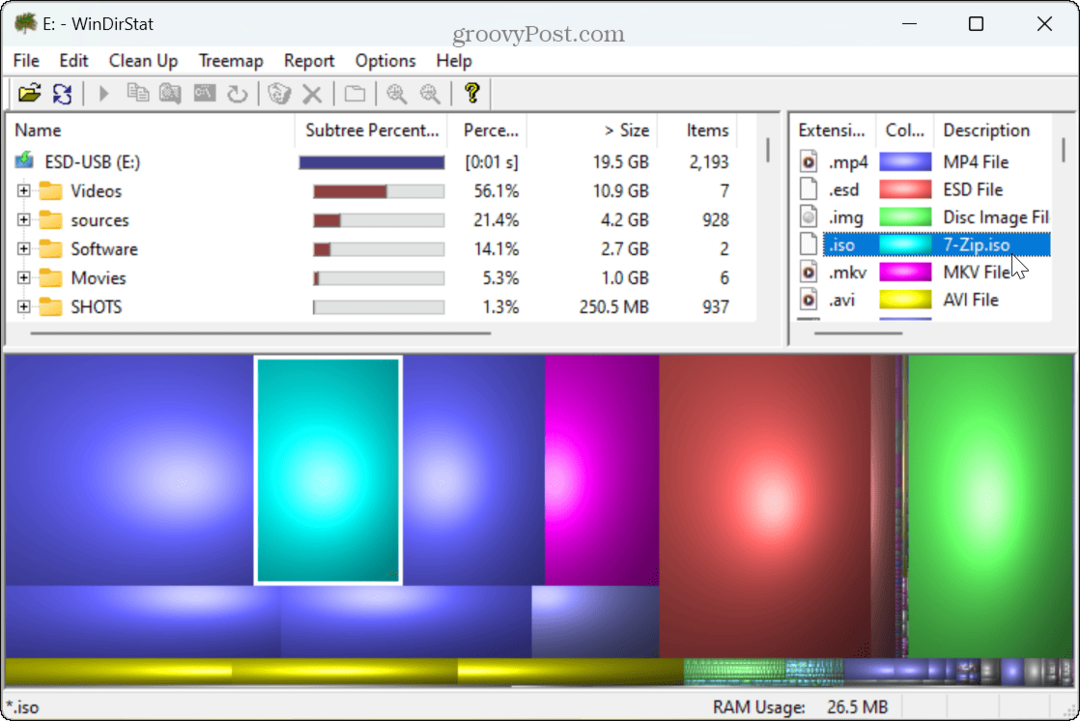
Once analyzed, a color-coded graphical representation of the disk space usage on the selected drive(s) will be shown on your screen. Simply click on the largest chunks to identify the largest files.

Press Del on your keyboard to delete the file. This will send it to your recycle bin and you can decide its fate when reviewing your recycle bin items. Alternatively, you can use Shift + Del to permanently delete the item from your system.

And that’s it! You can repeat the last steps to delete more of the largest files from your system.
Other Third-Party apps as alternative
The world of third-party alternatives is a huge one and thus, the above-mentioned tools are not the only ones that you can use to analyze your disk usage. Here are some alternatives with unique features that might be more suited for your current needs and requirements.
- TreeSize Free | Download Link | Freemium model
- JDiskReport | Download Link | Freeware model
- SpaceMonger | Download Link | Freemium model
- RidNacs | Download Link | Freeware model
- FolderSize | Download Link | Open-Source model
More ways to clear storage on Windows 11
If you’re looking to reclaim your storage space then there are tons of more things that you can do besides clearing or moving your largest files. You can clear caches, stop programs, reduce dedicated storage space, clear temporary files, remove leftover files, and much more. Refer to this dedicated guide by us that should help you clear space on Windows 11 in every way possible.
Should you use disk space analyzers?
Disk Space Analyzers have long been the ultimate utility to identify where exactly your disk space is being used. Most of them stem from long-standing communities while others have over decades of experience. If you’re divided on using disk space analyzers, then your best bet would be to opt for something that is open source.
The modern world of the internet is centered around data collection and like it or not, every service is gathering and collecting some type of data from your usage of their tool. Hence most disk analyzers nowadays, also have the option to share your usage data and more. Additionally, if you decide to opt for something new and untested then the risks are even higher.
Hence, we recommend you use disk space analyzers but do verify their origin and reputation before running them on your system. If you do not wish to go through the hassle of reading reviews, we recommend you simply try an open-source alternative from a trusted source.
We hope this guide helped you easily find the largest files using disk space on your system. If you face any issues or errors during the process, feel free to reach out to us using the comments section below.
Найдите большие файлы с помощью стороннего инструмента.
- Большие файлы может быть сложно найти на вашем компьютере, особенно если вы не знаете, чего хотите.
- Вы, наверное, уже знаете, что встроенные инструменты поиска в Windows довольно ограничены. Сторонний инструмент — отличное начало для поиска этих файлов.
ИксУСТАНОВИТЬ НАЖМИТЕ НА СКАЧАТЬ ФАЙЛ
Исправьте ошибки ОС Windows 11 с помощью Fortect:
СПОНСОРИРОВАННЫЙ
Этот инструмент исправляет распространенные ошибки компьютера, заменяя проблемные системные файлы исходными рабочими версиями. Он также защищает вас от системных ошибок, BSoD и устраняет повреждения, нанесенные вредоносными программами и вирусами. Устраните проблемы с ПК и устраните повреждения, причиненные вирусами, за 3 простых шага:
- Загрузите и установите Фортект на вашем компьютере.
- Запустите инструмент и Начать сканирование чтобы найти поврежденные файлы, вызывающие проблемы.
- Щелкните правой кнопкой мыши Начать ремонт для устранения проблем, влияющих на безопасность и производительность вашего компьютера.
- Fortect был скачан пользователем 0 читателей в этом месяце с рейтингом 4,4 на TrustPilot
Большие файлы часто хранятся на жестком диске и могут занимать много места. Иногда вам может потребоваться найти на вашем компьютере большие файлы, чтобы освободите место на жестком диске или переместите их в другое место. В других случаях, файлы и папки исчезли, и вы хотите их найти.
Большие файлы обычно вызывают медленная скорость и проблемы с производительностью на ПК. Если на вашем компьютере хранятся большие файлы, программам требуется больше времени для загрузки и доступа к данным на жестком диске. Итак, если вы искали способ их найти, мы покажем вам несколько способов их найти.
Как найти большие файлы на моем компьютере?
1. Используйте проводник
1.1 Используйте фильтр поиска
- Ударь Окна + Э ключи для открытия Проводник файлов.
- Перейдите к Этот компьютер и введите звездочка * в строке поиска.
- После завершения поиска нажмите Параметры поиска сортировать по размеру. Теперь вы можете выбрать размер больших файлов, которые хотите найти, от больших до гигантских.
- Ударь Окна + Э ключи для открытия Проводник файлов.
- Нажмите на Вид, выбирать Показывать из раскрывающегося меню и убедитесь, что Скрытые предметы рядом с ним стоит галочка.
- Продолжайте повторять шаги версии 1.0 выше и посмотрите, сможете ли вы найти больше файлов.
Вы также можете проверить Полный список функций Проводника и узнайте, как расширить его функциональность, чтобы он заработал.
- Изменить шрифт, стиль и размер блокнота в Windows 11
- 3 способа заблокировать доступ в Интернет для определенных приложений в Windows 11
- Как полностью удалить нежелательный язык отображения в Windows 11
2. Используйте командную строку
- Ударь Окна ключ, тип cmd в строке поиска и нажмите Запустить от имени администратора.
- Введите следующую командную строку, чтобы указать место, где вы хотите найти большие файлы. Вы можете заменить букву диска на соответствующую вашему ПК, где хранятся ваши файлы:
cd C:\ - Затем введите следующую команду и нажмите Входить. Не забудьте заменить размер (в байтах) на размер файла, который вы ищете. Например, если вы ищете файлы размером более 1 ГБ, ваша команда должна быть такой:
forfiles /S /M * /C "cmd /c if @fsize GEQ echo @path > largefiles.txt"forfiles /S /M * /C "cmd /c if @fsize GEQ 1073741824 echo @path > LargeFilesList.txt"
- Windows создаст файл .txt, в котором будут перечислены все большие файлы.

Большую часть времени эти файлы расположены в другом месте вашего компьютера и могут быть где-то спрятаны. Программа для поиска файлов может помочь вам найти большие файлы. Эти программы могут сканировать ваш компьютер на наличие всех файлов размером больше определенного, а затем отображать их для вас.
Copernic Desktop Search — один из таких инструментов. Это мощная программа, которая поможет вам идентифицировать и найти большие файлы на вашем компьютере. Эта поисковая система просматривает весь ваш жесткий диск и находит все виды файлов, включая фотографии, видео и документы.
⇒Получить Copernic Desktop Search
Поиск больших файлов в Windows 11 может оказаться неприятным, если вы не знаете, где искать. Надеемся, вы смогли использовать один или несколько из рекомендованных выше методов, чтобы найти их. Если вы находитесь в том же затруднительном положении, но в Windows 10, у нас также есть аналогичная статья о том, как найти большие файлы.
Кроме того, если вы хотите найти и избавиться от дубликатов файлов, у нас потрясающе инструменты для удаления дубликатов. Вы также можете найти Программное обеспечение файлового менеджера необходим для того, чтобы ваши файлы и папки были хорошо организованы. Это поможет вам сэкономить время, поскольку вы уже знаете, где будут находиться большие файлы.
Сообщите нам о предпочитаемом вами методе поиска больших файлов в разделе комментариев ниже.