Сканирование представляет из себя процесс переноса информации с физических носителей в электронный вид при помощи периферийных устройств — сканеров.
Для оцифровки используют специальные программы для сканирования. В данной статье рассмотрим, при помощи каких приложений можно отсканировать документ в Windows 11.
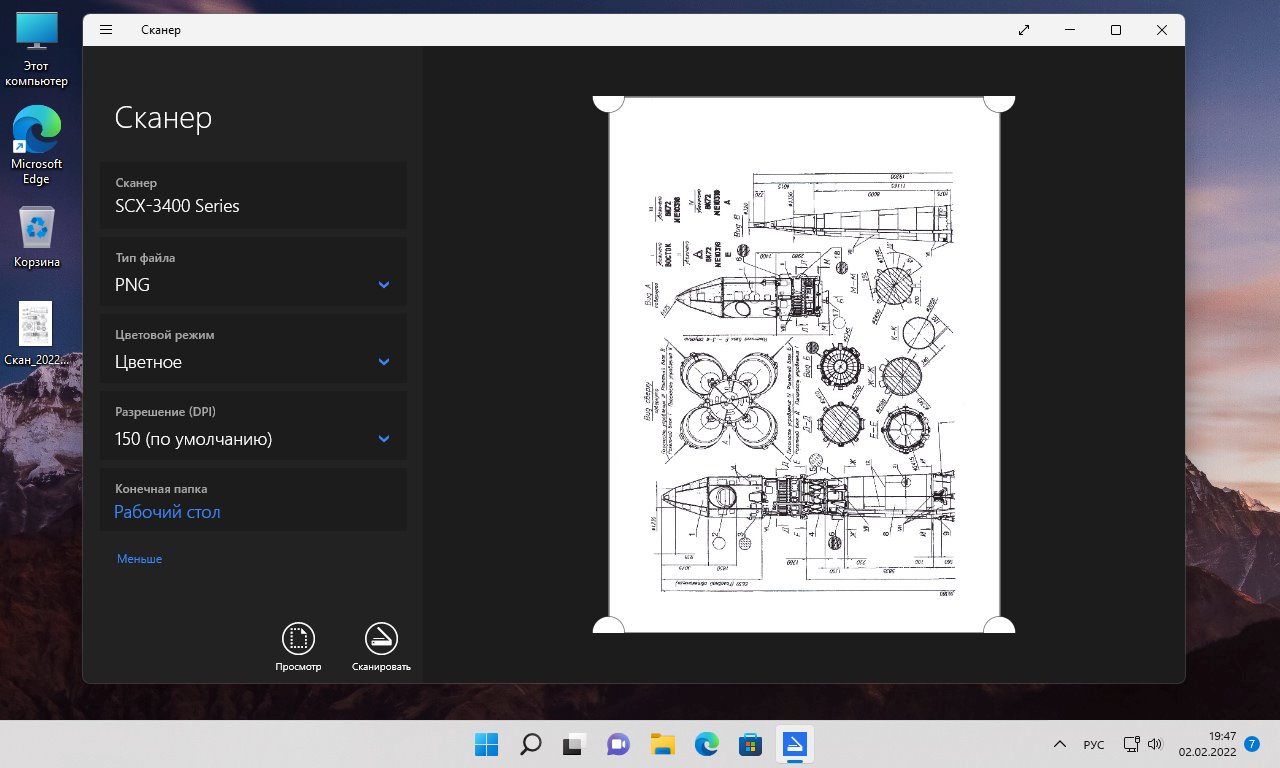
«Сканер» (или Windows Scan) — стандартное приложение в Windows 11. Если по каким либо причинам оно недоступно, его можно скачать и установить через Microsoft Store.
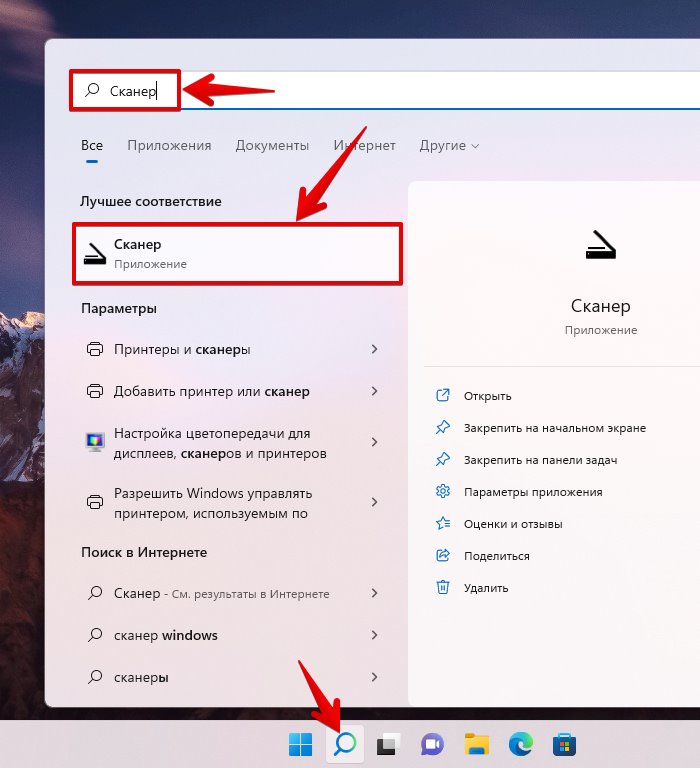
Для запуска приложения используем поиск, щелкаем кнопку поиска на панели задач или нажимаем клавиши быстрого вызова «Win+S». Затем в поисковой строке вводим запрос «Сканер» и щелкаем по приложению в разделе «Лучшее соответствие», либо нажимаем ссылку «Открыть».
Откроется окно приложения «Сканер» с минимальным набором настроек. В примере используем МФУ «Samsung SCX-3405W», который отображается в разделе «Сканер» на правой боковой панели.
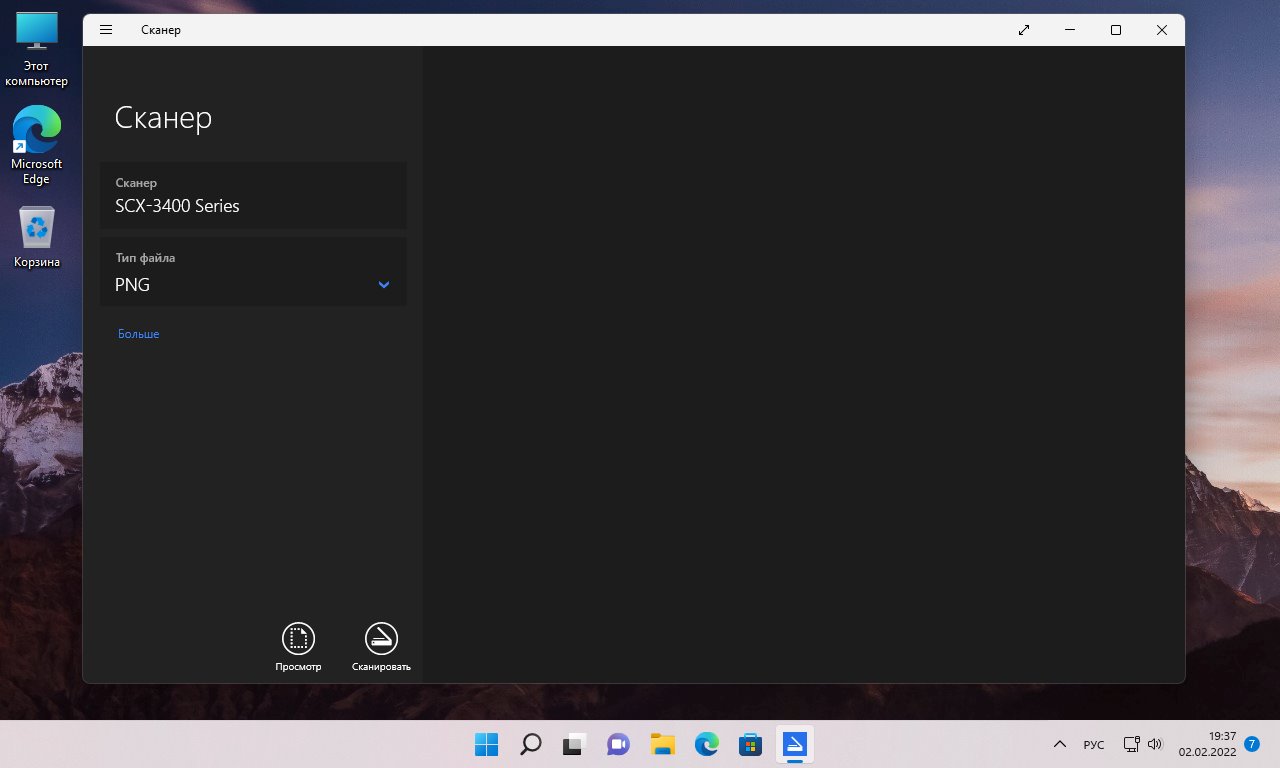
Здесь же на боковой панели доступна настройка «Тип файла».
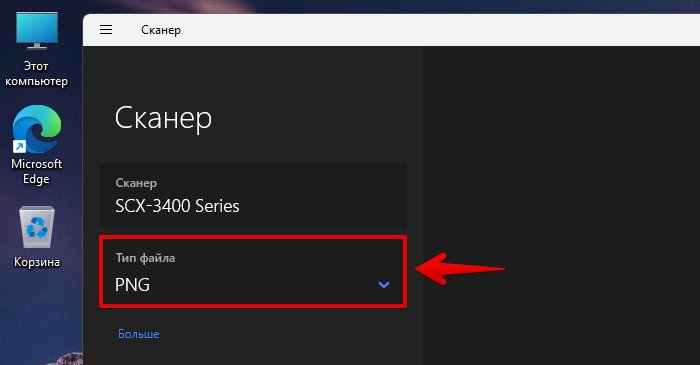
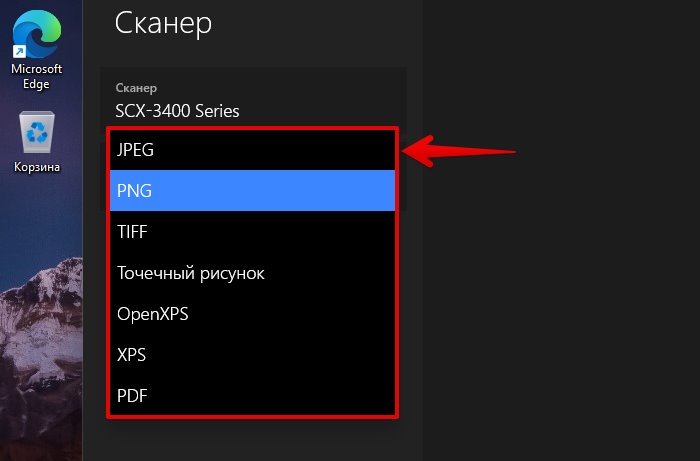
Щелкнув по данной настройке можно выбрать конечное расширение, в котором будет сохранено изображение после сканирования. Доступно семь типов файлов:
- JPEG
- PNG
- TIFF
- Точечный рисунок
- OpenXPS
- XPS
В приложении доступны еще настройки, которые можно отобразить, нажав на кнопку «Больше».

Настройка «Цветовой режим» включает в себя:
- Цветное
- Оттенки серого
- Черно-белое
Настройка «Разрешение (DPI)» содержит значения — от 75 до 600.
Настройка «Конечная папка» — папка, в которую будет сохранено изображение.

Настроив приложение, приступаем к сканированию. Для предварительного просмотра цифрового изображения нажимаем кнопку «Просмотр», результат мы увидим в правой части окна. А для сканирования кнопку «Сканировать».
Это не единственный способ сканирования в Windows 11, переходим к следующему способу.
Приложение «Факсы и сканирование»
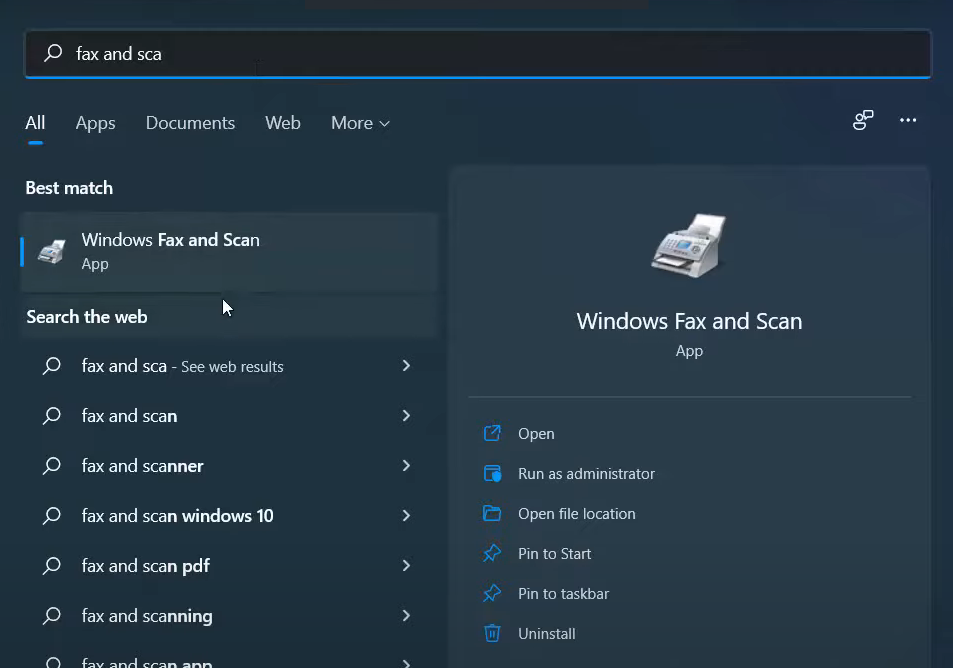
Найти приложение можно так же как и в предыдущем способе — через поиск Windows 11, набрав «Факсы и сканирование» в поисковой строке.

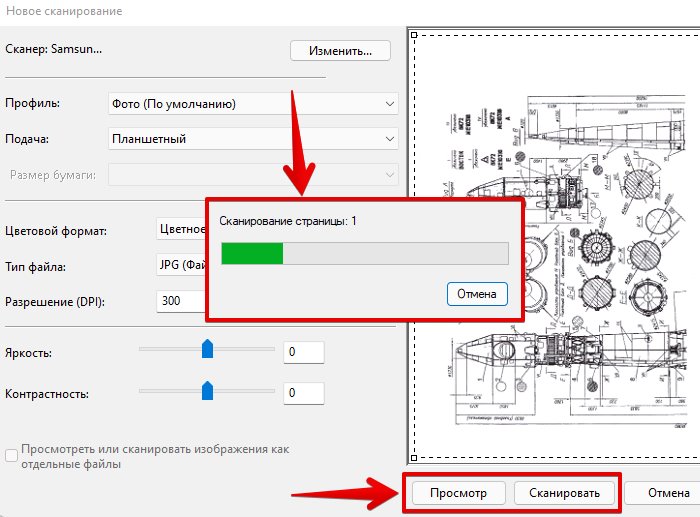
Откроется приложение «Факсы и сканирование», на панели инструментов которого нажимаем кнопку «Новое сканирование».
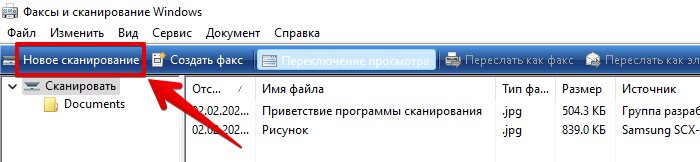
Появится одноименное окно с различными настройками для сканирования.

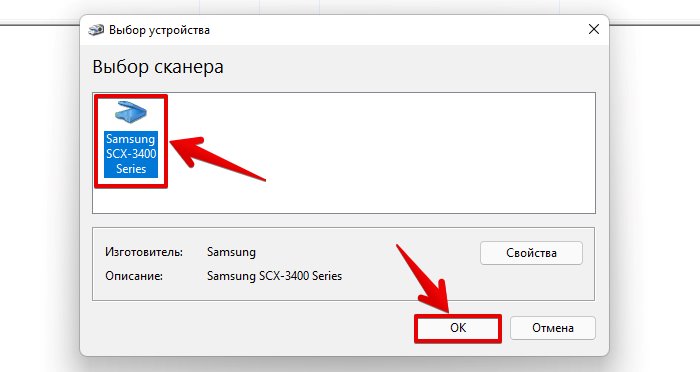
Убедимся, что выбран нужный сканер. Для этого в разделе «Сканер» нажимаем кнопку «Изменить».

И во всплывающем окне «Выбор устройства» выбираем сканер или МФУ и нажимаем кнопку «ОК».
В разделе «Профиль» щелкаем по раскрывающемуся списку и выбираем нужный профиль для сканирования («Документы», «Последние использовавшиеся параметры», «Фото»), по умолчанию установлен профиль «Фото». Для создания собственного профиля со своим набором настроек, выбираем вариант «Добавить профиль…».

В разделе «Подача» будет доступен только один вариант — «Планшетный», а раздел бумаги будет недоступен, если используется планшетный сканер для сканирования. Однако, если используется МФУ или поточный сканер и в зависимости от модели устройств, эти настройки могут быть расширены.
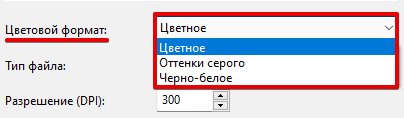
Еще ниже доступна настройка «Цветовой формат», щелкнув по выпадающему списку будут доступны следующие варианты:
- Цветное
- Оттенки серого
- Черно-белое
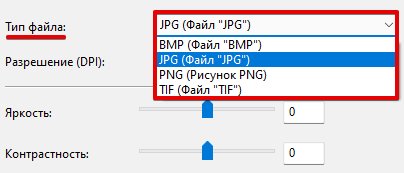
В настройке «Тип файла» доступны четыре типа:
- BMP
- JPG
- PNG
- TIF
Настроив параметры сканирования, нажимаем кнопку «Просмотр» для предварительного просмотра изображения, либо сразу нажимаем кнопку «Сканировать».
Альтернативный вариант для вызова окна «Новое сканирования» без перехода в приложение «Факсы и сканирование» — набрать в поиске Windows 11 запрос «wiaacmgr».
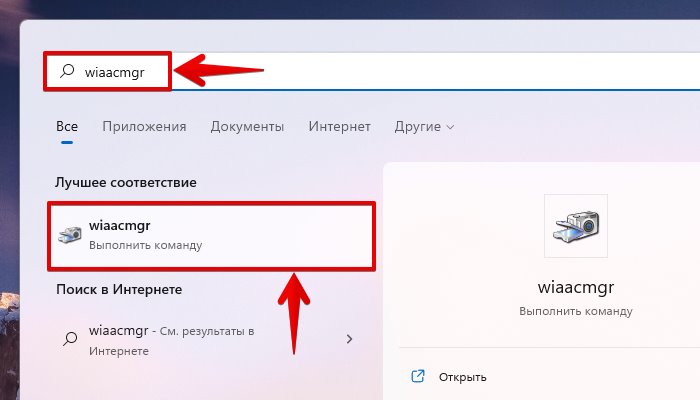
Еще один способ вызова окна «Новое сканирования» — нажимаем горячие клавиши «Win+R», вводим команду «wiaacmgr» в поле «Открыть» и нажимаем клавишу ввода.

Приложение «Paint»
Запускаем приложение «Paint», через меню «Пуск», либо используя поиск. Приложение «Paint» является стандартным приложением в Windows 11.

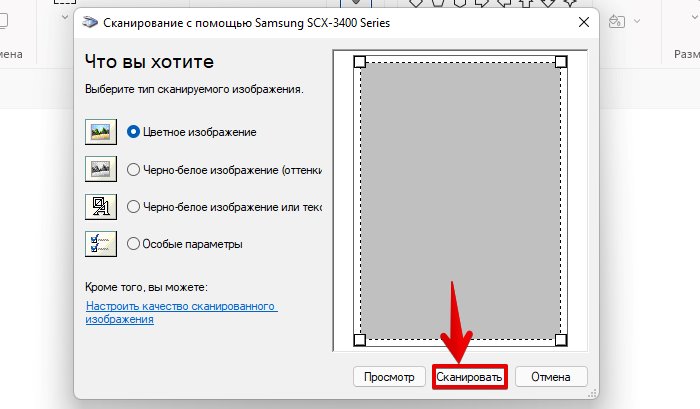
В открывшемся окне кликаем мышью по меню «Файл», а в открывшемся контекстном меню щелкаем по пункту «Со сканера или камеры».

Появится окно «Сканирование с помощью..», в котором нажимаем на кнопку «Сканировать».
You’ll need 2 things installed on your PC:
-
A scanner you’ve connected using a wired, wireless, or network connection.
-
An app for scanning files, such as Windows Scan, available for free from Microsoft Store.
The Windows Scan app can help you scan pictures or documents and save them to your PC as JPEG, bitmap, or PNG files. For more info, see Install and use a scanner in Windows.
Get Windows Scan
Need more help?
Want more options?
Explore subscription benefits, browse training courses, learn how to secure your device, and more.
Communities help you ask and answer questions, give feedback, and hear from experts with rich knowledge.
by Vlad Turiceanu
Passionate about technology, Windows, and everything that has a power button, he spent most of his time developing new skills and learning more about the tech world. Coming… read more
Updated on
- Scanning makes the storage of photos and other files more flexible and offers the option to access them anywhere. Your printer must have a scanner to use.
- Many users complain that their printer is unable to scan to the computer after upgrading to Windows 11. Altering the compatibility mode of the scanner may solve it.
- Some of our readers also claimed Microsoft tech support told them Windows 11 will not recognize all printers. Downloading the latest driver from the manufacturer’s platform may fix it.
XINSTALL BY CLICKING THE DOWNLOAD
FILE
Are you in search of information on how to enable scan to a computer in Windows 11? Well, the OS is enabled to scan an image, document, and any other compatible files to your computer.
They can then be saved anywhere you prefer and probably uploaded to the cloud, hence, accessible from anywhere you want.
Dedicated software controls most scanners. They are made available by their manufacturers.
It is also possible to control them using an application provided by Microsoft itself or one of the best scanner apps for Windows 11. But then, users have complained that they experience some problems while trying to scan.
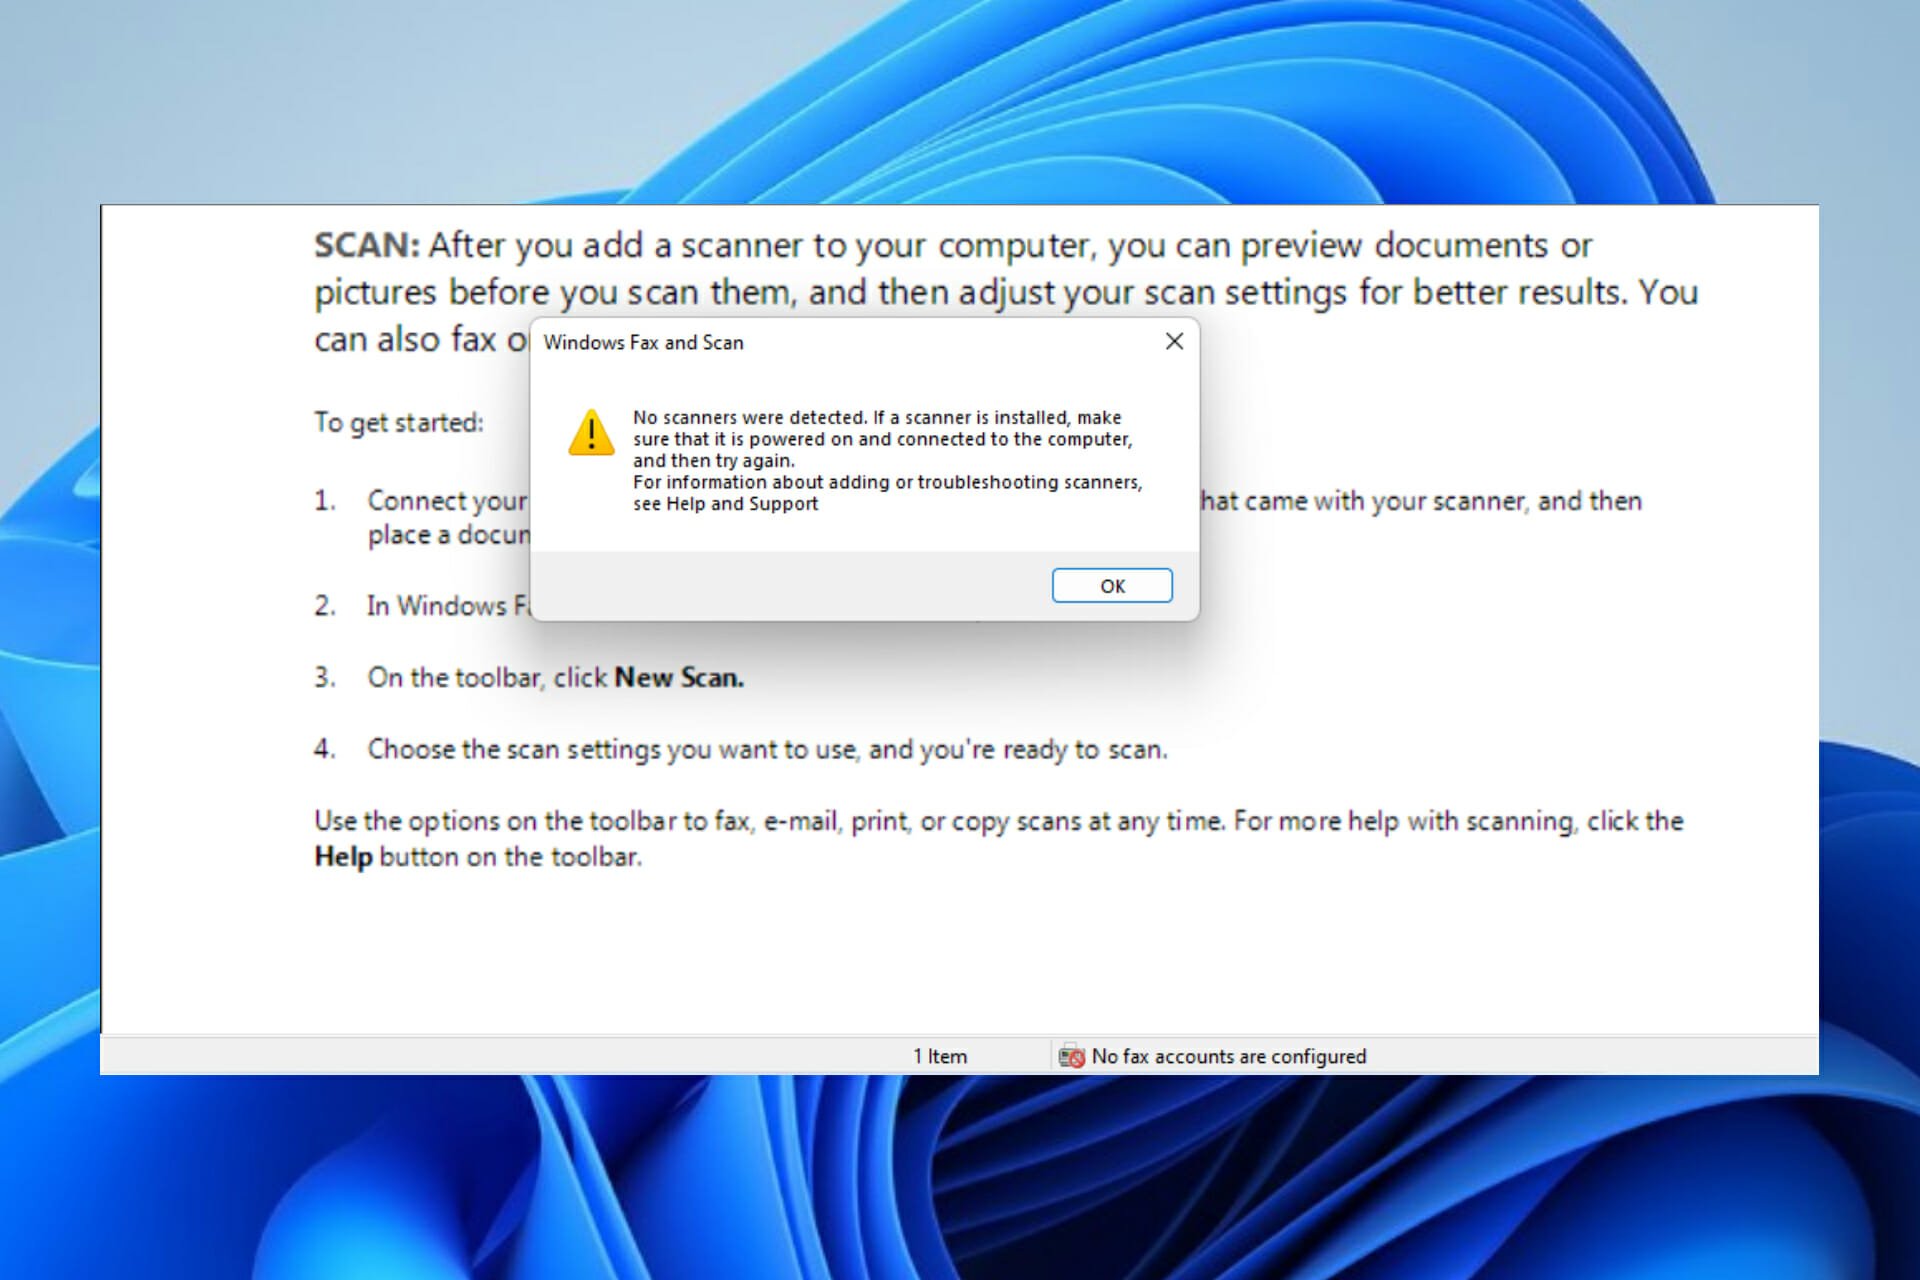
Why will my printer not scan to the computer?
Generally, the reason for Windows scanners not being detected can be broadly categorized into two: situations when the computer does not detect the printer at all, and instances when the printer is detected but scanning does not work.
These issues especially the latter can be caused by one of the following reasons:
- Faulty cable connection – Using a bad or incompatible cable would prevent a successful connection between a computer and the printer. This will inevitably hinder the scan from working.
- Error in wireless connection – The use of non-cable connections such as WiFi doesn’t guarantee there will be no error. Issues with the connection will automatically affect the ability to scan.
- Outdated printer driver – Whenever peripheral hardware like a printer is connected to a computer, a driver is responsible for smooth communication. Any problem with the driver will directly tamper with scanning.
- Insufficient memory on the system – If you have a low memory space on your computer, scanning may not be possible if the expected result would exceed the available storage.
- Disabled Windows Image Acquisition (WIA) Service – This is a special service on the Windows Operating System designed to support the optimal function of scanning. Disabling it will prevent the scan from effectively executing.
- Disabled Shell Hardware Detection Services – The ShellHWDetection manages Autoplay hardware events in Windows. This feature allows the computer to detect images and triggers needed applications to display them. It has to be enabled for the scan to work.
How do I enable scan to computer?
1. Setup the scanner
- Connect the printer to the computer using cable or WiFi.
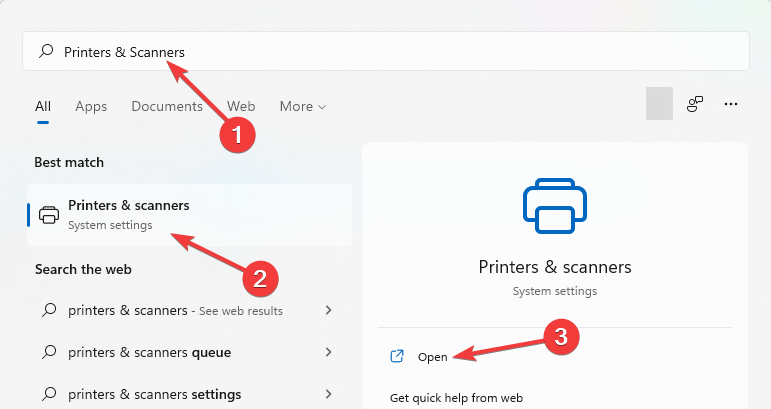
- Press the Windows key to open Windows Search.
- Type Printers & Scanners. Select Printers & scanners under the Best match result(s) and choose Open.

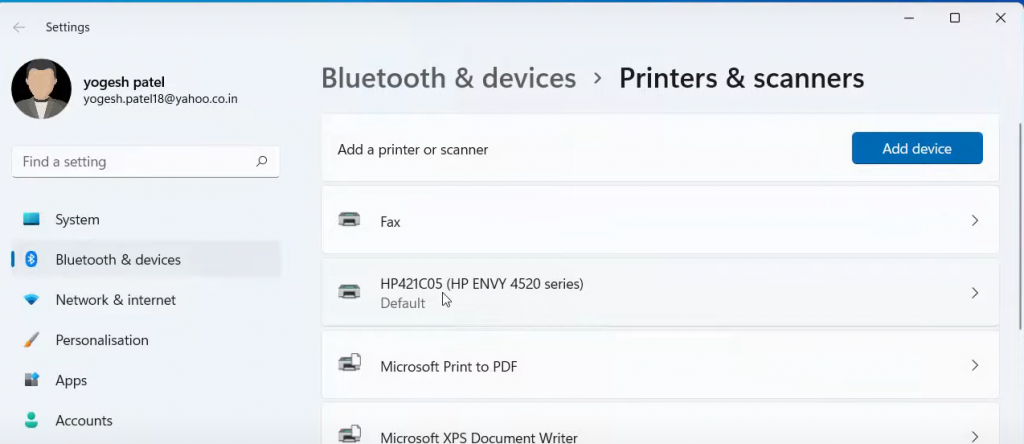
- Select Add device.

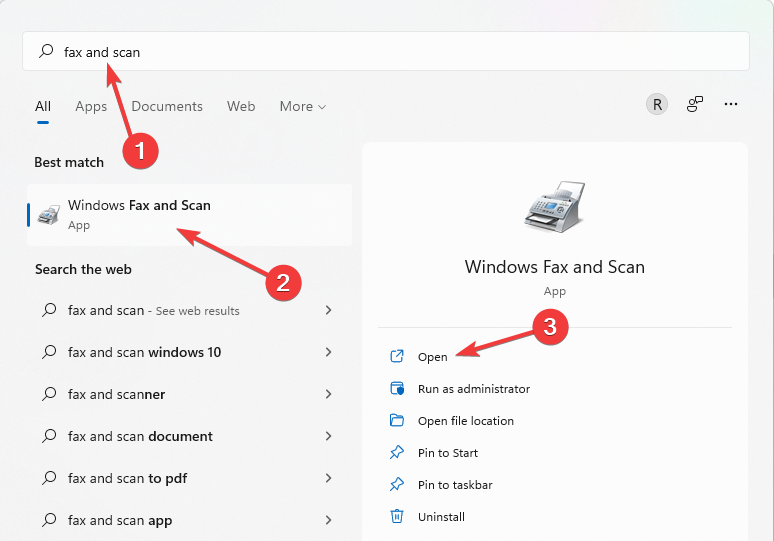
- After successfully adding the printer device, go back to Windows search by tapping the Windows key.
- Input Fax and Scan in the Search box. Select Windows Fax and Scan. Then click, Open.

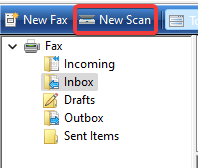
- Choose New Scan.

- Put the document you want to scan in the printer scanner section. Select Preview to assess the final result and adjust if need be after which you can click Scan.

2. Check the wireless connection
Here are some of our recommendations:
How we test, review and rate?
We have worked for the past 6 months on building a new review system on how we produce content. Using it, we have subsequently redone most of our articles to provide actual hands-on expertise on the guides we made.
For more details you can read how we test, review, and rate at WindowsReport.
- Make sure the WiFi, computer, and printer are all within range. If this is not the case, adjust the location and, if impossible, switch to an alternative by connecting using cable instead. You can check out wireless printers compatible with Windows.
- For the wireless connection to function, you might need to restart the WiFi.
- It is also recommended that you check if the printer is wireless compatible to enable scan to a computer.
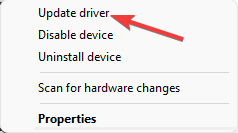
3. Update printer drivers
- Right-click on the Windows logo icon in the Taskbar.
- Pick Device Manager.

- Check and click on the small drop-down arrow beside Printer.
- Right-click on the connected printer and then select Update driver.


Instead of updating drivers manually, you can use another method to manage all your drivers more efficiently.
With a dedicated driver updater, you have full support to install or update old drivers on your system. Not only this, you can handle drivers’ errors and repair them right away.
The software will scan your Windows 11 PC for outdated driver files and detect them rapidly. Afterward, you can choose one driver or many others to start the update.
⇒ Get Outbyte Driver Updater
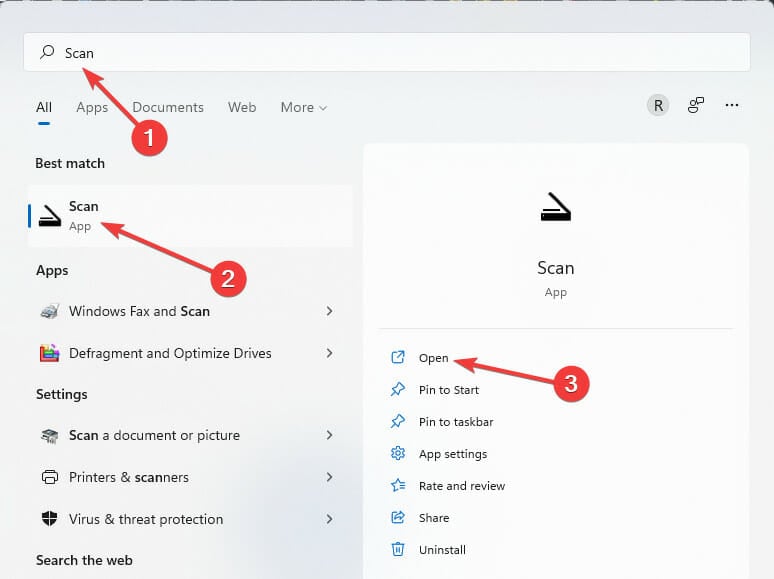
4. Reduce scan resolution
- Download Windows Scan from Microsoft Store.
- Press the Windows key and type Scan in the Search box.

- Change File Type.
- Set Resolution to low. Then start Scan.
This method is recommended in case your PC is low on can device memory. It would also work for readers in search of solutions on how to enable scan to computer on Windows 10.
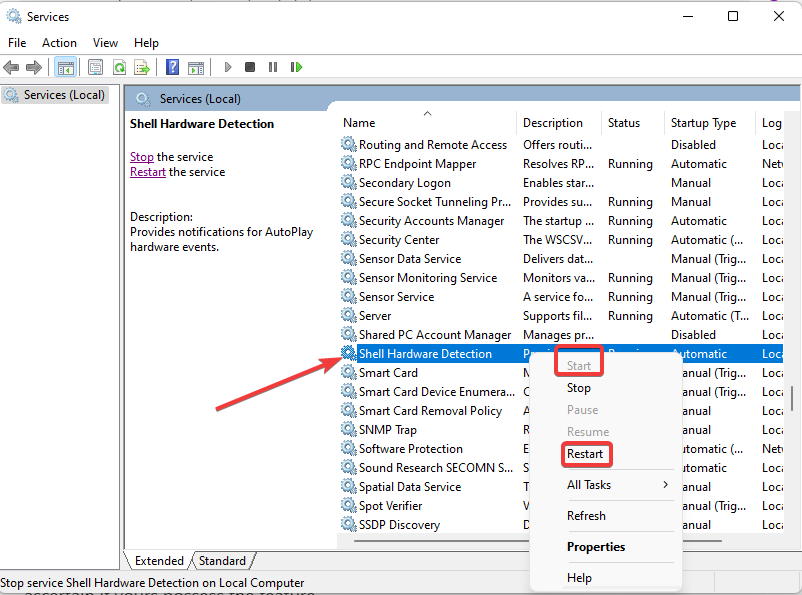
5. Activate Shell Hardware Detection Services
- Tap Windows Key + R simultaneously.
- Enter the command below and then press Shift + Enter.
services.msc - Locate Shell Hardware Detection. Now, right-click on it and select Restart or Start.

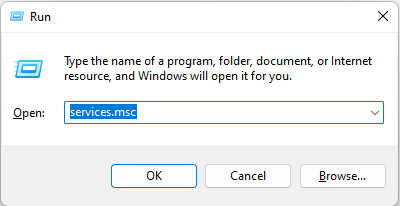
6. Enable Windows Image Acquisition service
- Press Windows key + R to open Run.
- Type this command and press Enter:
services.msc
- Scroll to locate Windows Image Acquisition; the options are arranged in alphabetical order.
- When found, right-click on it and then choose Start.

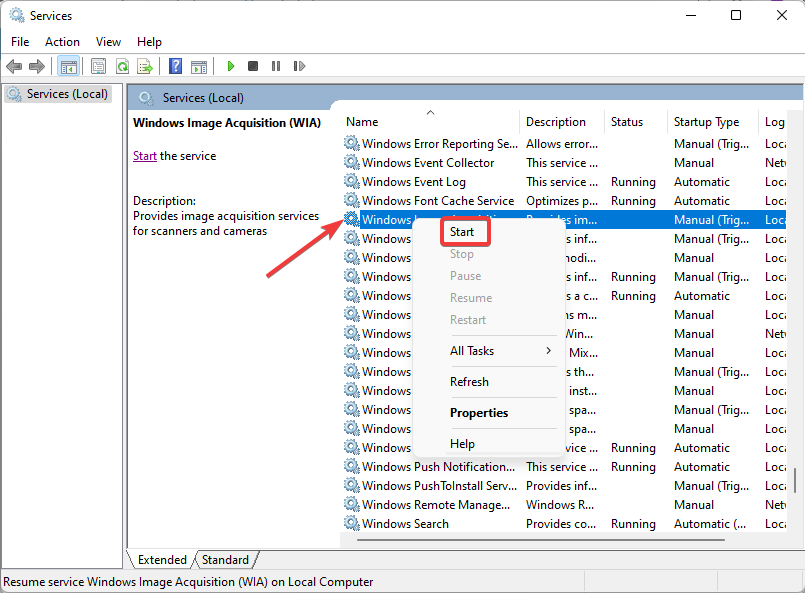
Windows Image Acquisition (WIA) enables unhindered communication between graphic software on the computer and imaging hardware like scanners. The solution above can also work for readers looking for guides on how to scan to a computer in Windows 7.
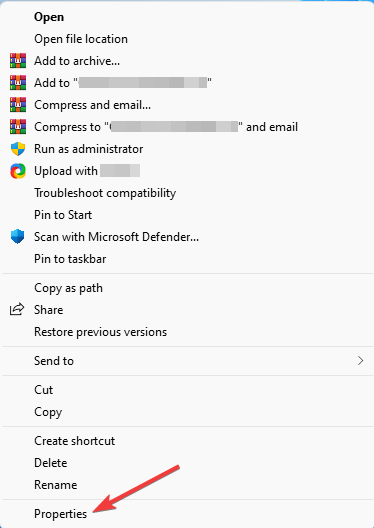
7. Tweak Compatibility Mode
- Right-click on the printer/scanner icon on Home Screen.
- Choose Properties.

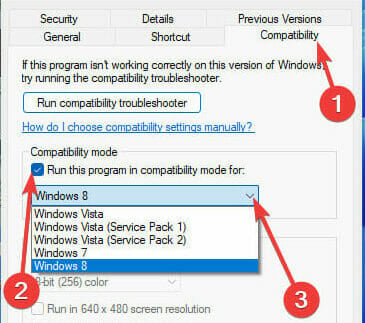
- Select Compatibility. Tick Run this program in compatibility mode for: then select the Windows version you prefer.

- Select Apply. Next, restart your system and retry scanning.
Why is my computer not detecting my scanner?
In the second section of this solution guide, we listed the common reasons why Windows may not enable scan to computer in Windows 11. Also, not all printers are designed with scanners, so, it is important to ascertain if yours possess the feature.
Users who have just upgraded their Windows 11 usually face hiccups with scanning. Sometimes, to fix this, you will need to go and download the official software for the scanner on the manufacturer’s website.
Another thing that could make your computer not detect the scanner is when the scanner software is not compatible with the PC.
- How to Type Accents on Windows 11
- How to Disable the Insert Your Security Key Into the USB Port popup
- DTS Sound Unbound for Windows 11: Download & Install
- How to Remove Windows Copilot on Windows 11
- How to Use Your iPhone as a Webcam on Windows 11
What can I do if my Windows scanner is not detected?
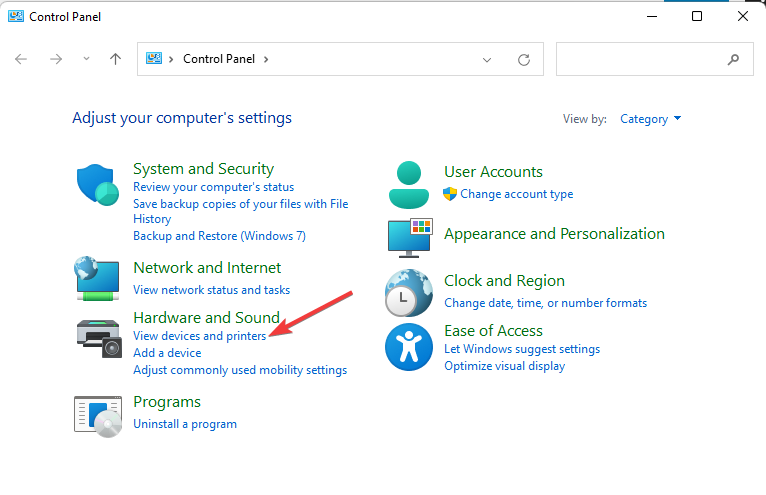
1. Troubleshoot printer
- Open Run by pressing Windows key + R.
- Type Control Panel and then press Enter.

- Click View devices and printers.

- Right-click on the affected printer and then choose Troubleshoot.

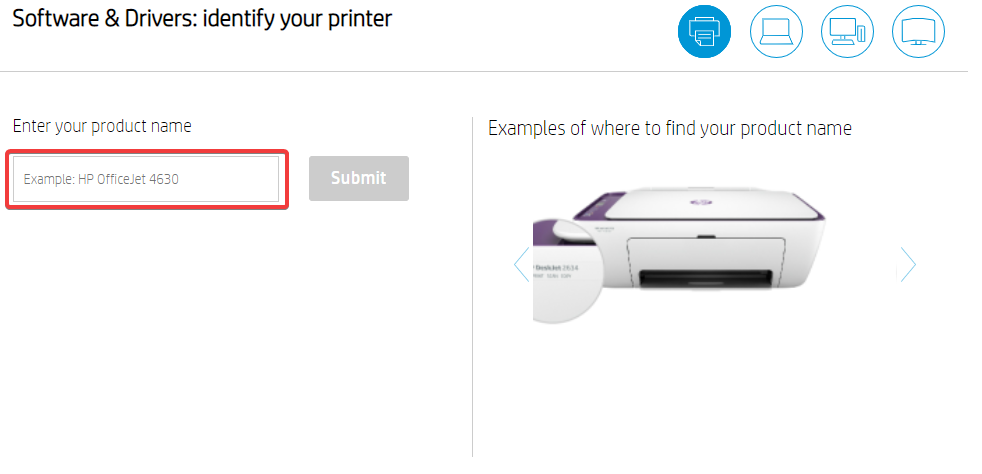
2. Download scanning software from the manufacturer
- Visit the printer manufacturer’s website.

- Enter your product name to get the most compatible driver download link.

- Download and Install the software on the computer.
- Retry scanning.
Make sure that your VPN is disconnected when visiting your printer manufacturer’s official website to get the best recommendation for your need.
Meanwhile, there are lots of free scanning software tools for Windows 11 on the market today that work seamlessly with any computer with the required compatibility.
One of them is the Windows scan developed by Microsoft and available for download in the Microsoft Store.
If you are looking for alternatives that are both effective and free, we have a review on free scanning software for Windows 11/10 to help you decide which to choose.
What scanners are compatible with Windows 11?
Literally, all printers with scanners are expected to be compatible with Windows 11, but some of our readers have reported that after contacting Microsoft Support when they had issues, they were told the latest Windows OS version is not compatible with all printers.
The reason for this is many, but one specific one is that the manufacturer hasn’t updated their drivers to synergize with Windows 11. This is a move many big boys in the printing industry don’t hesitate to act upon.
When searching for scanners that are compatible with Windows 11, check out our review of the best printers with feeder scanners to make an informed decision.
Experiencing any issue with scanning all because you updated Windows is something that could be frustrating. We hope any of the solutions discussed so far has helped you fix the problem. If not, also take a look at our article on what to do if the HP scanner is not working on Windows 11.
Let’s know how you were able to enable scan to a printer on Windows 11 after reading through this guide. Don’t hold back from sharing any other useful tips you discovered in the comments section below.
![]()
Сканер может сканировать данные и сохранять их на ПК в формате документа или изображения. Это может быть простой способ легко сохранять документы и делиться ими. Все хорошо, пока вы не начнете сталкиваться с проблемами со сканером. Иногда может случиться так, что вы не сможете сканировать через сканер.
Часто проблема может возникать, когда ваш компьютер не может сканировать документы, что может быть связано с тем, что ПК не распознает сканер. Другие причины, по которым может возникнуть эта проблема, включают неправильное кабельное соединение, устаревшие драйверы принтера, нехватку оперативной памяти, проблему с беспроводным соединением, отключенную службу обнаружения оборудования оболочки, отключенную службу WIA и другие.
Если вы столкнулись с проблемой сканирования документов в Windows 11, знайте, что устранить эту проблему не составит труда; все, что вам нужно, это правильное руководство, которое поможет вам в этом. В этой статье мы обсудим, как вы можете включить сканирование на компьютер в Windows 11.
Существуют различные способы включения сканирования в Windows 11, которые вы можете найти в статье ниже:
1. Подключите сканер к ПК
Первый способ включить функцию сканирования на компьютер в Windows 11 — настроить сканер. Для этого выполните шаги, указанные ниже:
- Перейти к Стартовое менюпоиск Принтеры и сканерыи откройте его.
- Здесь нажмите на Добавить устройство вариант. Теперь следуйте инструкциям на экране, чтобы добавить сканер на свой компьютер.
- Затем снова откройте меню «Пуск», найдите и откройте Факсы и сканирование Windows.
- Выберите Новое сканирование вариант сверху.
- Теперь выберите тот документ, который вы хотите отсканировать, и нажмите кнопку Предварительный просмотр чтобы увидеть, каким будет отсканированный документ.
- Наконец, нажмите на Сканировать для сканирования документа.
2. Запустите сканер в режиме совместимости
Много раз проблема может возникать из-за проблем с совместимостью. Если программное обеспечение сканера несовместимо с вашей версией Windows, вы, скорее всего, столкнетесь с этой проблемой.
Вы должны попробовать запустить сканер в режиме совместимости, а затем проверить, возникает ли проблема или нет. Вы можете сделать это, выполнив шаги, указанные ниже:
- На рабочем столе щелкните правой кнопкой мыши Принтер/сканер значок, а затем нажмите на Характеристики.
- Здесь отправляйтесь в Совместимость вкладка Под Режим совместимости, установите флажок, говоря Запустите эту программу в режиме совместимости.
- Затем выберите версию Windows в соответствии с вашими предпочтениями.
- Нажмите на Применять а потом дальше ХОРОШО чтобы сохранить изменения. После этого перезагрузите компьютер, и проблема не должна возникнуть.
3. Убедитесь, что беспроводное соединение стабильно
Если у вас возникли проблемы с беспроводной сетью, это также может помешать вашему сканеру сканировать документы на вашем ПК. Эта проблема обычно возникает при использовании беспроводного принтера. Убедитесь, что ваш принтер и компьютер находятся рядом с сетью Wi-Fi.
Если компьютер и принтер находятся в непосредственной близости от вашего Wi-Fi, но по-прежнему сталкиваются с проблемой, попробуйте перезапустить Wi-Fi. Вы можете подключиться к другой сети Wi-Fi, если столкнулись с этой проблемой.
4. Обновите драйверы принтера
Обновление драйверов принтера также может помочь решить проблему. Шаги по обновлению драйверов принтера следующие:
- Нажимать Виндовс + Х комбинация клавиш, а затем нажмите Диспетчер устройств.
- Развернуть принтер раздел, дважды щелкнув по нему.
- Затем щелкните правой кнопкой мыши принтер/сканер и выберите Обновить драйвер вариант.
- Теперь нажмите на Автоматический поиск драйверов для обновления ваших драйверов.
5. Уменьшите разрешение сканирования
Если пользователь сталкивается с проблемой сканирования из-за памяти устройства, он может уменьшить разрешение сканирования. Это уменьшит размер файла, и устройство легко просканирует его при нехватке памяти. Шаги для этого следующие:
- Перейти к Магазин Майкрософти загрузите Сканер Windows на Windows 11 оттуда.
- Затем нажмите Окна ключ, поиск Сканировать и откройте его.
- Теперь измените Тип файла а затем изменить Разрешение низко.
- Попробуйте выполнить сканирование сейчас и проверьте, устранена ли проблема.
6. Включите основной сервис
Если служба не работает должным образом, это также может вызвать эту проблему. Попробуйте запустить службу Shell Hardware Detection и Windows Image Acquisition. Это, скорее всего, поможет решить проблему. Чтобы включить эти основные службы, выполните следующие действия:
- Открыть Стартовое менюискать Услугии откройте его.
- Здесь ищите Обнаружение оборудования оболочки услуга. Щелкните правой кнопкой мыши службу, а затем щелкните Начинать.
- Теперь сделайте то же самое для Получение образа Windows услуга.
Примечание- Начинать опция будет недоступна, если служба уже запущена. Если это так, вы должны нажать на кнопку Перезапуск вариант.
Как только вы это сделаете, проблема должна быть исправлена. Теперь вы сможете сканировать документы в Windows 11.
Заключение
Скорее всего, проблемы со сканером вызваны проблемами с драйверами или отключением основных служб. Если вы столкнулись с этой проблемой, то описанные выше шаги помогут вам ее решить. Однако, если вы все еще сталкиваетесь с этим, попробуйте проверить наличие проблем, связанных с оборудованием, и обратитесь в службу поддержки вашего сканера, чтобы решить проблему.
In this blog post, I will give a detailed view of scanning a document or photo on your Windows 11 Operating System. To make this work, your printer or scanner should be connected to your Windows 11 Operating System.
1. Click on the search icon and search for Printers & scanners.
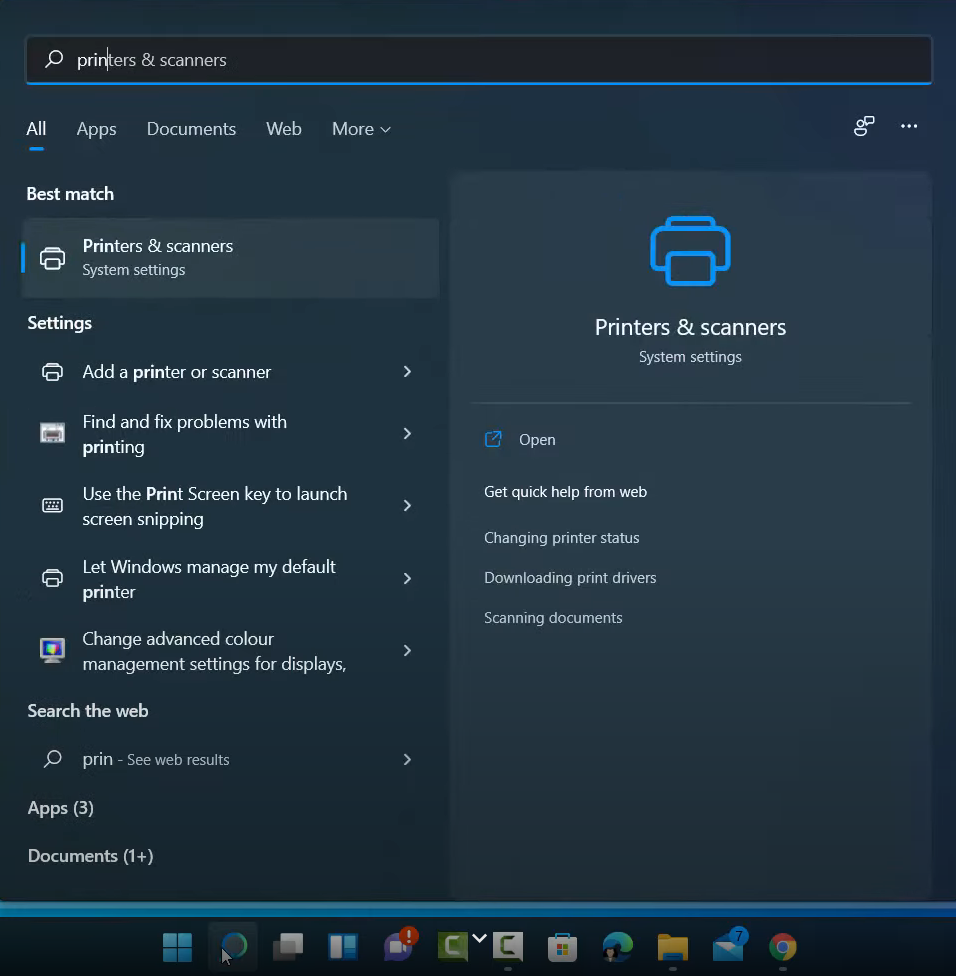
2. Once it opens, you will be able to see your default printer in the list. If your printer is not visible, you can search for that printer using Add device.
3. Once your printer is connected, click on the search icon once again and search for Fax and scan. Click on that option.
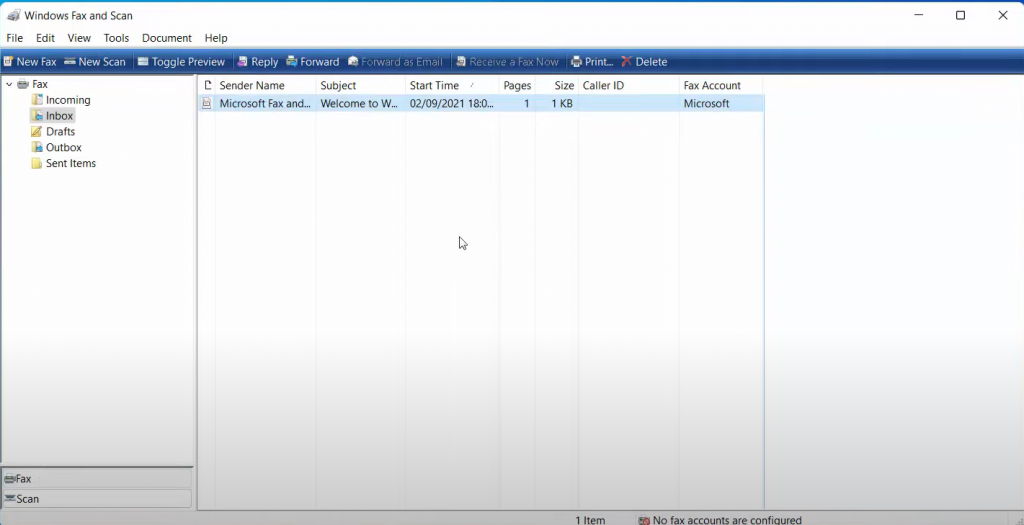
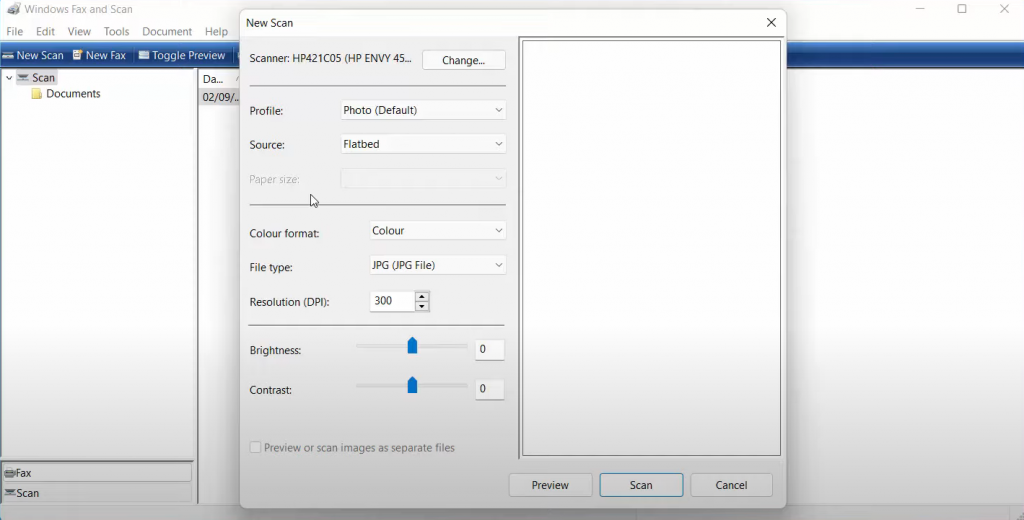
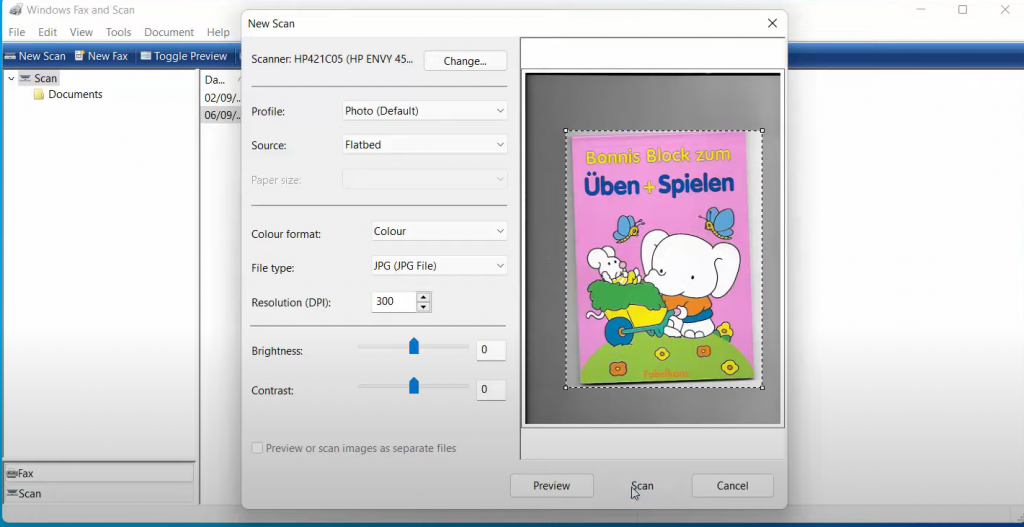
4. It will open this kind of window. At the bottom, you will be able to see the Fax option.
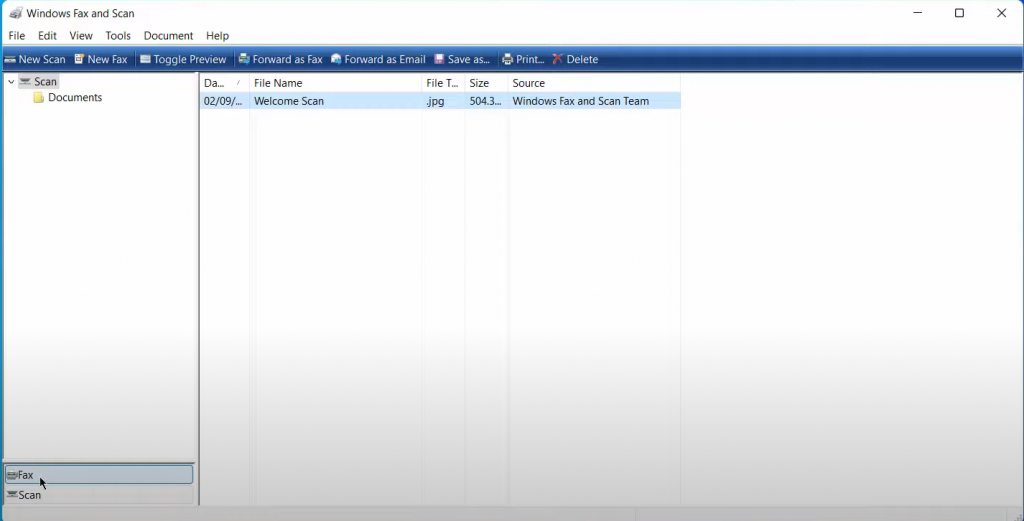
5. When you click on it, it will open this kind of window.
6. When you click on Scan, it will open the scan window. Make sure you select the scan option.
7. Click on the New scan option. You will be able to see your default scanner.
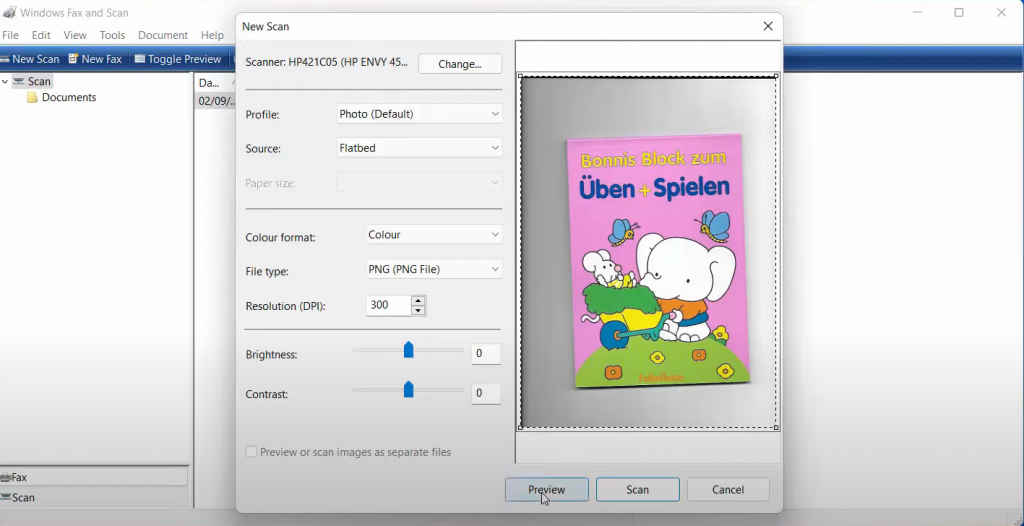
8. Now you have to select the document that you want to scan. Just put any document under the scanner. Then click on Preview.
9. The scanner will start to scan the document. The scan has been finished.

10. Now, I can save the scanned document. On the left-hand side, you can choose what kind of document that you want. You can also change the color format, file type, resolution, brightness, and contrast according to your choice.
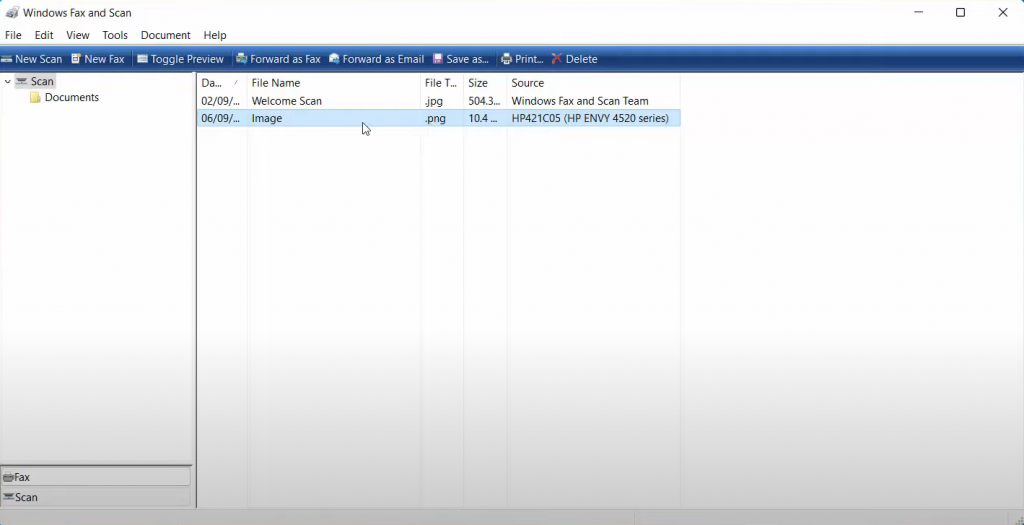
11. Once you have made all the changes, click on Scan. It will save the document.
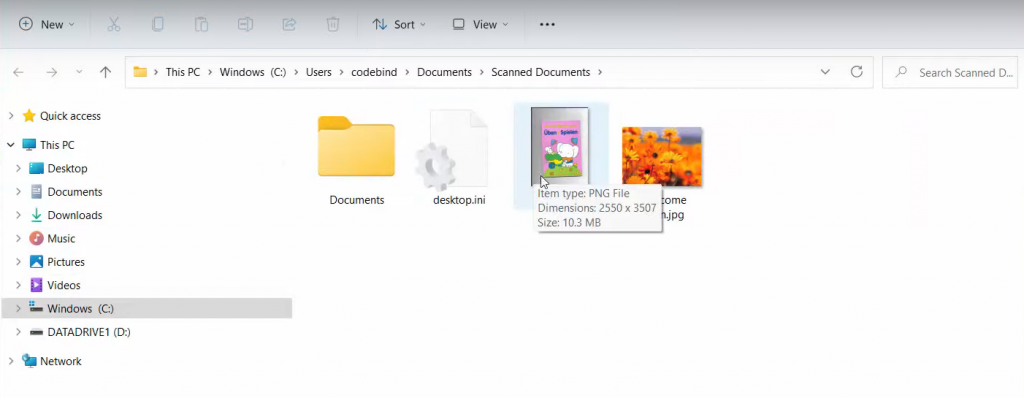
12. After the scan is finished, you can see the scanned document.
13. Click on the search bar and search for Scanned documents. This is the default folder where your scan will be saved.
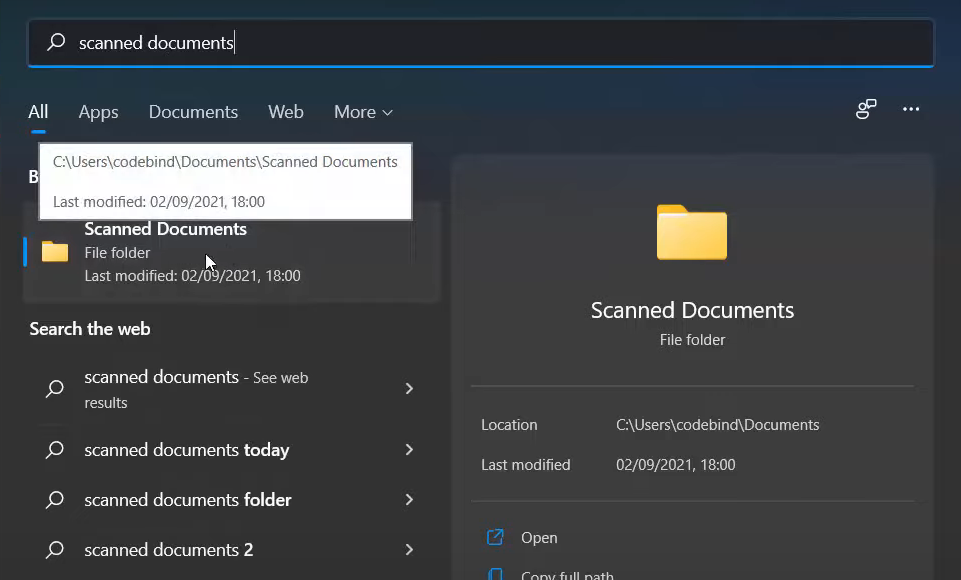
14. Click on that folder. You will be able to see the scanned image.
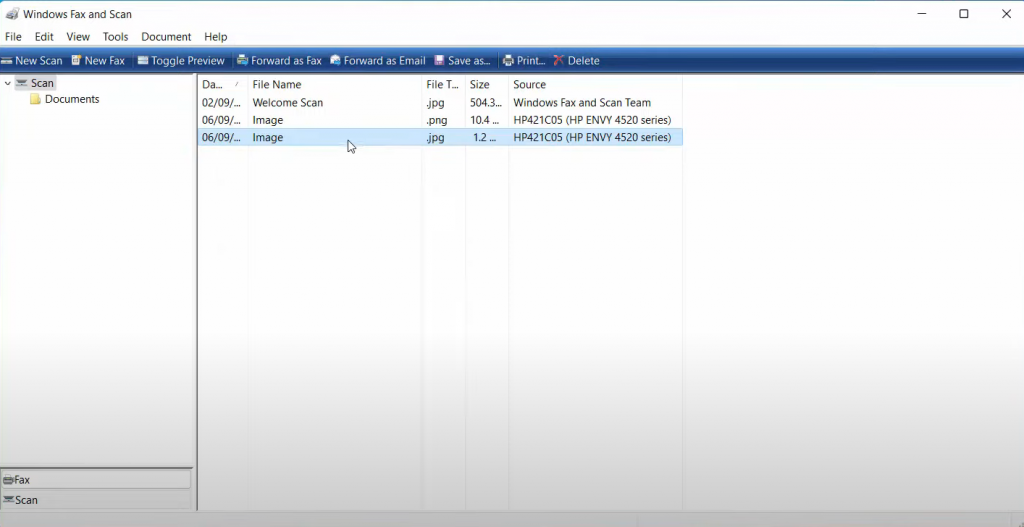
15. Let’s see how we can resize and change the default location of the scan. Once again click on New scan. I am going to choose the jpg option. Then, click on the Preview option. It will show the preview. You can realize this image by moving the arrow. Then click on Scan.
16. Now you can see the scanned document has been added.
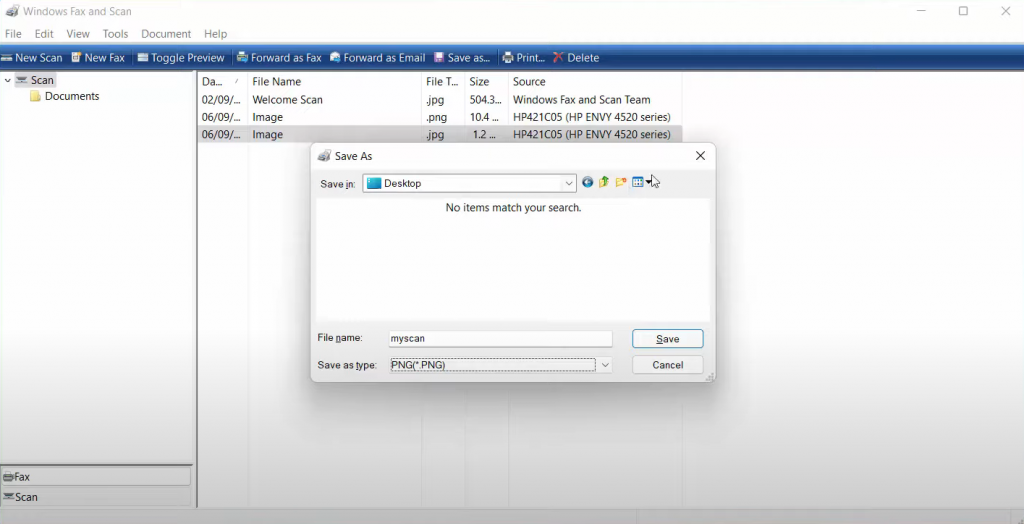
17. You can also save this image. Right-click on this image and click Save as. You can choose this image in the folder of your choice. I am going to select the desktop and going to save it as myscan. You can also choose the file type here. Once you have selected everything, click on Save. It will be saved in the specified location.
These are the steps for scanning a document or photo on your Windows 11 Operating System.