Очень частый вопрос у обладателей маршрутизаторов Циско начального и среднего уровня, например, Cisco 811, 819, 877, 881 — это как настроить проброс портов, то есть так называемый port forwarding. Эта функция может использоваться для того, чтобы открыть доступ из вне к web-серверу или регистратору, который находится за роутером.
Сделать это не сложно. Чтобы сконфигурировать port forwarding на Cisco будем использовать Static NAT.
Синтаксис команды выглядит следующим образом:
ip nat inside source static <внутренний ip-адрес> <внешний ip-адрес> extendable
В качестве примера настроим проброс порт TCP 8081 для http-сервера с внешнего IP: 88.147.164.1 на внутренний узел: 192.168.1.2.
Телнетимся и авторизуемся на роутере. Затем, входим в режим «Enable»:
Router> enable
Затем переходим в режим конфигурации:
Router# configure terminal
Прописываем проброс порта на Cisco:
Router(config)# ip nat inside source static tcp 192.168.1.2 88.147.164.1 8081 extendable
Готово. Набираем команду end или exit для выхода из режима конфигурации и сохраняем конфиг.
Думаю понятно, что если надо будет открыть UDP-порт, то нужно указать этот протокол в команде вместо TCP.
Static NAT позволяет полностью открыть порты для определённого узла в сети. Для этого используем команду:
ip nat inside source static 192.168.1.2 88.147.164.1 extendable
Port Forwarding будет осуществляться для всех портов внутреннего узла без привязки к протоколу.
Lesson Contents
NAT port forwarding is typically used to allow remote hosts to connect to a host or server on our private LAN. A host on the outside (for example on the Internet) will connect to the outside IP address of a router that is configured for NAT. This NAT router will forward traffic to host on the inside. Here’s an example:
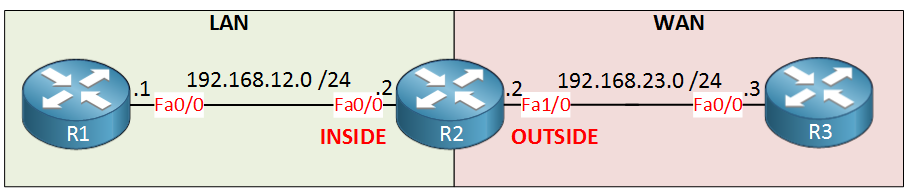
Above we have three routers, we’ll use these to demonstrate NAT port forwarding. Imagine R1 is a HTTP server on our LAN and R3 is some host on the Internet that wants to reach our HTTP server. R2 will make sure that the HTTP server is reachable on an IP address on the outside. Let’s take a look at the configuration…
Configuration
First we will configure a static route on R1 so it knows how to reach the outside world:
R1(config)#ip route 0.0.0.0 0.0.0.0 192.168.12.2Now we can worry about the NAT commands. Let’s configure the inside and outside interfaces:
R2(config)#interface FastEthernet 0/0
R2(config-if)#ip nat inside

R2(config)#interface FastEthernet 1/0
R2(config-if)#ip nat outside
Now we can try some different NAT rules.
Port forwarding using the outside IP address
We will start with the most common scenario. When someone connects to TCP port 80 on the outside interface of R2 then it should be forwarded to R1. Here’s how to do it:
R2(config)#ip nat inside source static tcp 192.168.12.1 80 192.168.23.2 80 extendableThe NAT rule above is pretty straight forward. Whenever someone tries to connect on TCP port 80 with destination IP address 192.168.23.2 then it will be forwarded to 192.168.12.1. Let’s see if it works:
- Home
- Devices
- Cisco
- Настройка проброса портов — port mapping (forwarding) в Cisco
Поговорим о настройке проброса портов (port mapping, port forwarding) на оборудование Cisco.
Для проброса используем static nat. Общий формат команды будет следующим.
ip nat inside source static x.x.x.x(внутренний ip-address) y.y.y.y (внешний ip-address) extendable
Пример 1: Проброс всх портов c адреса 212.26.230.101 на внутренний адрес 192.168.1.101
Router-Cisco>
Router-Cisco> enable
Router-Cisco# configure terminal
Router-Cisco(config)# ip nat inside source static 192.168.1.101 212.26.230.101  extendable
Router-Cisco(config)# exit
Router-Cisco# copy running-config startup-config
Пример 2: Проброс 21-ого tcp порта для ftp-сервера с адреса 212.26.230.100 на внутренний адрес 192.168.1.100
Router-Cisco>
Router-Cisco> enable
Router-Cisco# configure terminal
Router-Cisco(config)# ip nat inside source static tcp 192.168.1.100 21 212.26.230.100 21 extendable
Router-Cisco(config)# exit
Router-Cisco#copy running-config startup-config
Аналогично можно прокинуть и udp порт (заменив tcp на udp).
На этом все. Всем пока.
Table of Contents
- Objective
- Applicable Devices | Firmware Version
- Introduction
- Configure Port Forwarding
- Configure Port Triggering
Objective
The objective of this article is to show you how to configure port forwarding and port triggering on the RV160 and RV260 Routers.
Applicable Devices | Firmware Version
-
RV160 | 1.0.00.13
-
RV260 | 1.0.00.13
Introduction
Port forwarding and port triggering are features that allow some internet users to have access to specific resources on your network, while protecting the resources that you want to keep private.
Port forwarding allows public access to services on network devices on the Local Area Network (LAN) by opening a specific port or port range for a service, such as file transfer protocol (FTP). Port forwarding opens a port range for services such as internet gaming that uses alternate ports to communicate between the server and the LAN host.
Port triggering allows a specified port or port range to open for inbound traffic after user sends outbound traffic through the trigger port. Port triggering allows the device to monitor outgoing data for specific port numbers. The device recalls the IP address of the client that sent the matching data. When the requested data returns through the device, the data is sent to the proper client using the IP addressing and port mapping rules.
For more information on port forwarding and port triggering, click here.
Configure Port Forwarding
To configure port forwarding, follow these steps:
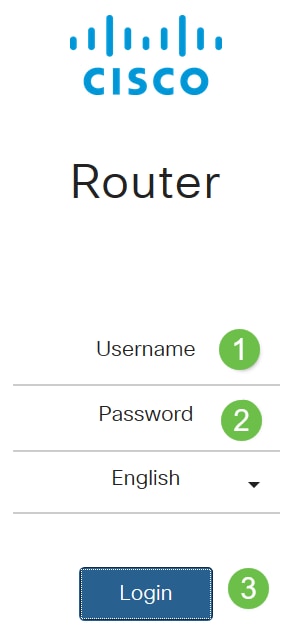
Step 1. Log in to the web configuration utility. Enter the username and password for the router and click Login. The default username and password is cisco.
In this article, we will be using the RV260 to configure port forwarding. The configuration may vary depending on the model you use.
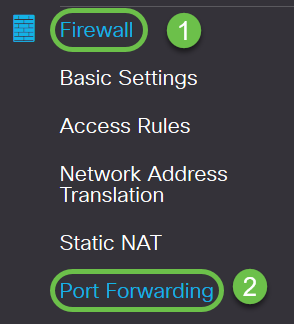
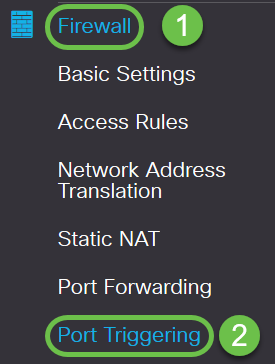
Step 2. Click Firewall > Port Forwarding.
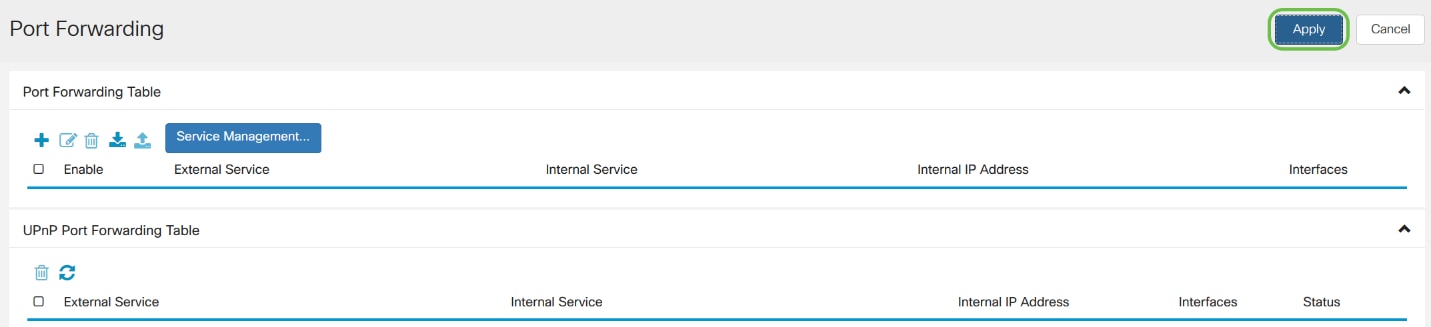
Step 3. In the Port Forwarding Table, click add icon or select the row and click edit icon) and configure the following:
| Enable | Check Enable to enable port forwarding |
|---|---|
| External Service | Select an external service from the drop-down list. (If a service is not listed, you can add or modify the list by following the instructions in the Service Management section) |
| Internal Service | Select an internal service from the drop-down list. (If a service is not listed, you can add or modify the list by following the instructions in the Service Management section) |
| Internal IP Addresses | Enter the internal IP addresses of the server |
| Interfaces | Select the interface from the drop-down list, to apply port forwarding on |

To add or edit an entry on the Service list, follow these steps:
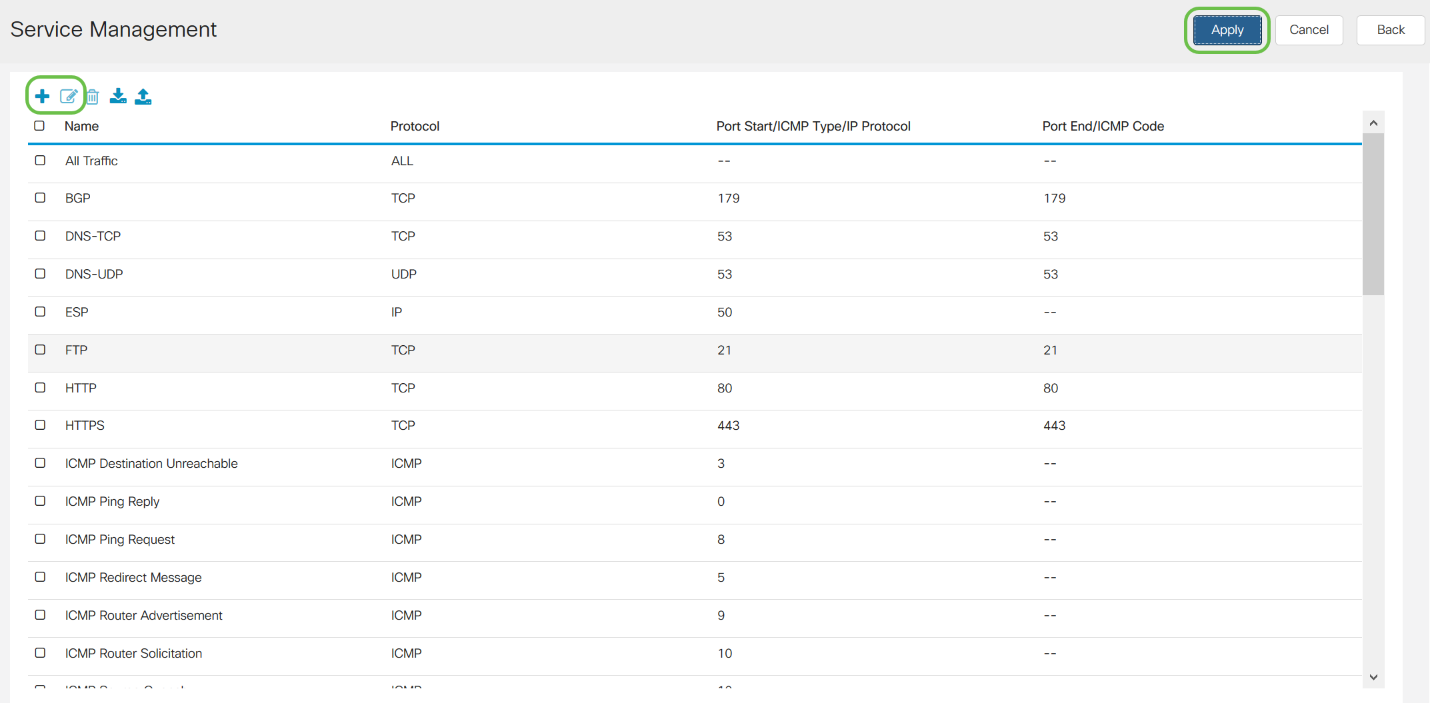
Step 4. Click Service Management.

Step 5. In the Service Management click Add icon or select a row and click Edit icon.
Configure the following:
-
Application Name — Name of the service or application.
-
Protocol — Required protocol. Refer to the documentation for the service that you are hosting.
-
Port Start/ICMP Type/IP Protocol — Range of port numbers reserved for this service.
-
Port End — Last number of the port reserved for this service.
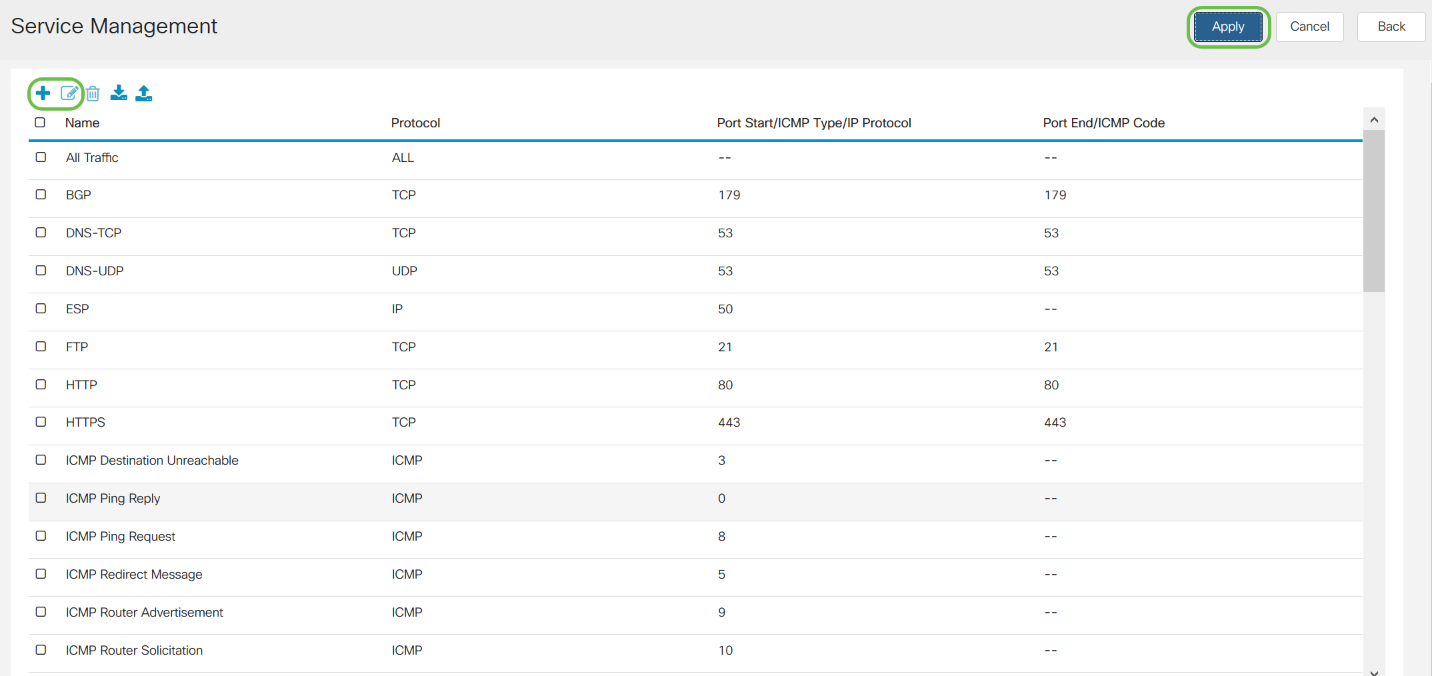
To add a service, click on the plus icon and configure Name, Protocol, Port Start/ICMP Type/IP Protocol and Port End/ICMP Code.
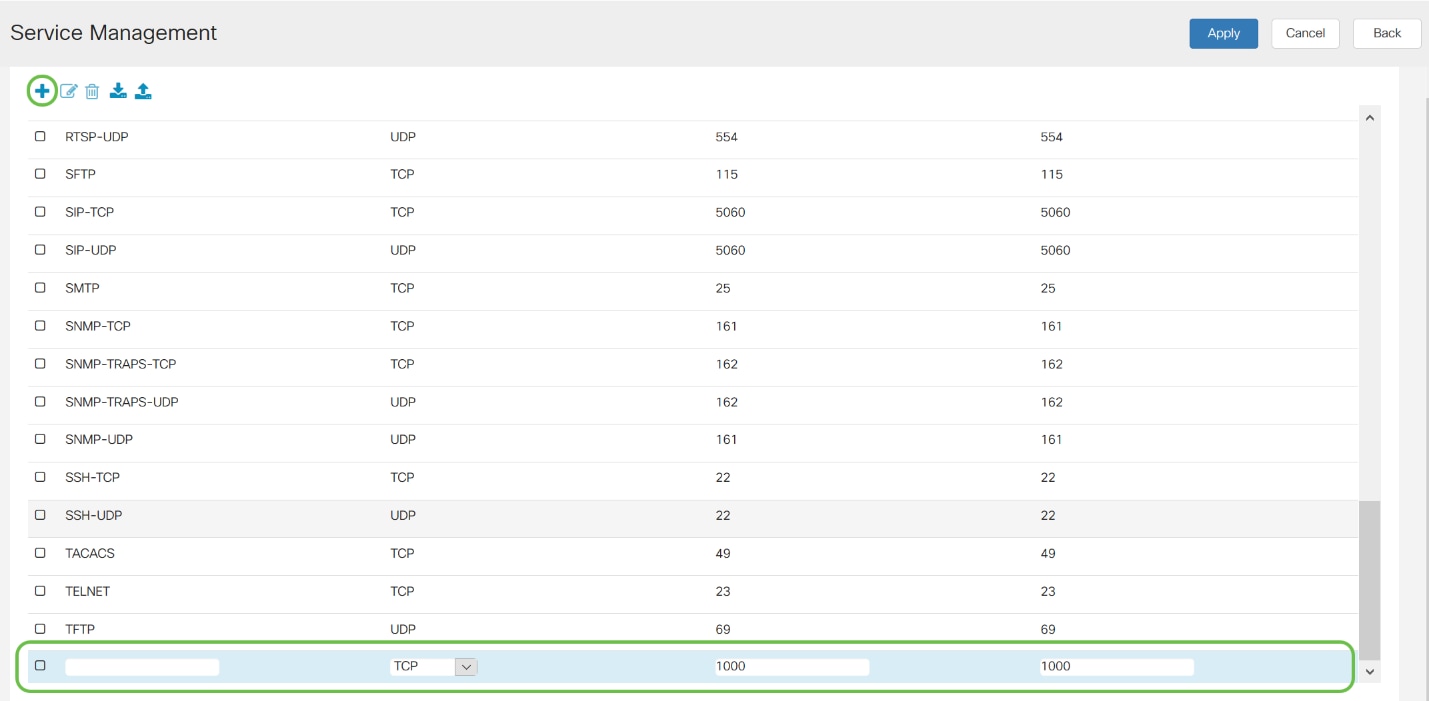
To edit a service, select a row and click on the edit icon to configure the fields as shown below.
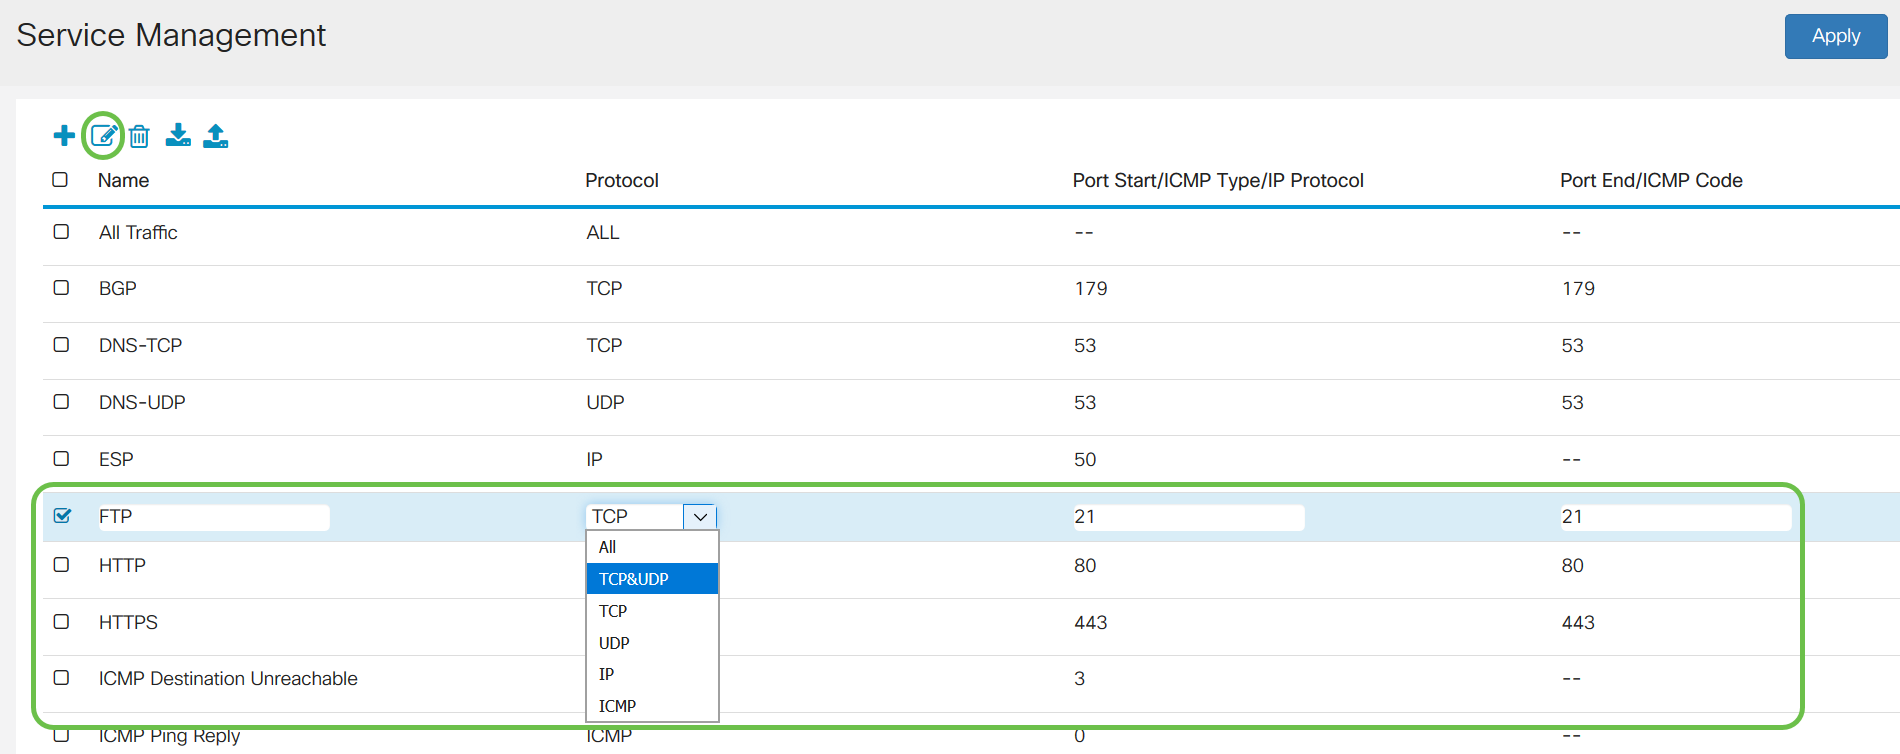
In this example, FTP service is selected.
Step 6. Click Apply.
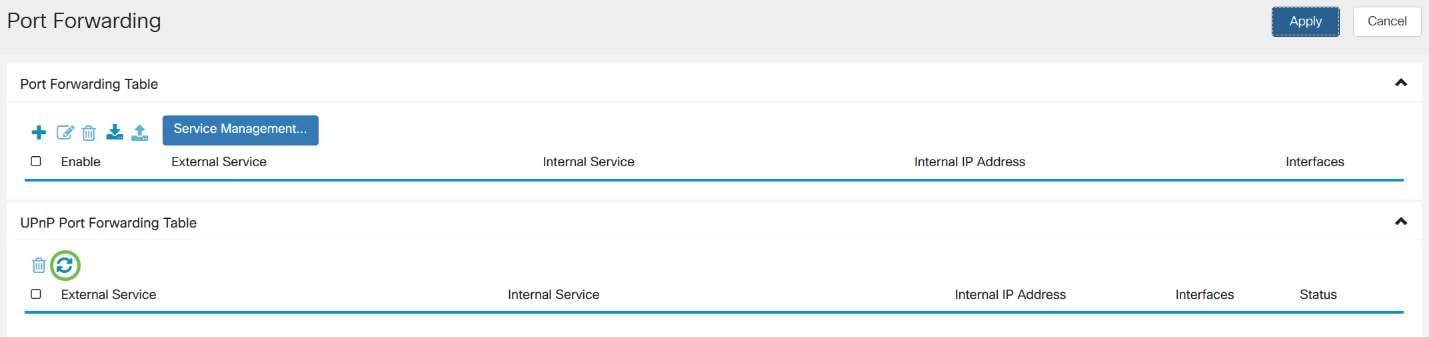
Step 7. In the Universal Plug and Play (UPnP) Port Forwarding Table, click the refresh icon to refresh the data. The port forwarding rules for UPnP are dynamically added by the UPnP application.
Configure Port Triggering
To configure port triggering, follow these steps:
Step 1. Log in to the web configuration utility. Enter the username and password for the router and click Login. The default username and password is cisco.
In this article, we will be using the RV260 to configure port triggering. The configuration may vary depending on the model you use.
Step 2. Click Firewall > Port Triggering.
Step 3. To add or edit a service to the port triggering table, configure the following:
Click add icon (or select the row and click edit icon and enter the information:
| Enable | Check to enable port triggering |
|---|---|
| Application Name | Enter the name of the application |
| Trigger Service | Select a service from the drop-down list (If a service is not listed, you can add or modify the list by following the instructions in the Service Management section) |
| Incoming Service | Select a service from the drop-down list (If a service is not listed, you can add or modify the list by following the instructions in the Service Management section) |
| Interfaces | Select the interface from the drop-down list |

Step 4. Click Service Management to add, or edit an entry on the Service list.

Step 5. In the Service Management, click add icon or select the row and click edit icon.
Configure the following:
-
Application Name — Name of the service or application.
-
Protocol — Required protocol. Refer to the documentation for the service that you are hosting.
-
Port Start/ICMP Type/IP Protocol — Range of port numbers reserved for this service.
-
Port End — Last number of the port reserved for this service.

To add a service, click on the plus icon and configure Name, Protocol, Port Start/ICMP Type/IP Protocol and Port End/ICMP Code.
To edit a service, select a row and click on the edit icon to configure the fields as shown below.
In this example, FTP service is selected.
Step 6. Click Apply.

You have now successfully configured port forwarding/port triggering on the RV160 and RV260 Routers.
В этой инструкции мы будем открывать порты на роутере Linksys. Сделать переадресацию портов не сложно, но разобраться в некоторых нюансах все же придется. Если вы зашли на эту страницу, то уже скорее всего знаете, какой порт (или диапазон портов) и вам нужно открыть, и для какой программы, сервера, игры и т. д.
На любом роутере, не только на Linksys, проброс портов делается для того, что бы пакеты, которые приходят с интернета на определенный порт, были перенаправлены на нужный порт определенного компьютера. Проще говоря, это нужно для того, что бы отдельные программы, игры, серверы могли напрямую принимать пакеты с интернета через роутер.
Мы когда выходим в интернет через роутер, то у нас один внешний IP адрес, который собственно получает сам маршрутизатор. А компьютеры, которые подключаться к роутеру, получают уже локальные IP. Поэтому, при использовании таких программ как DC++, разные торренты, онлайн игры и т. д., нужно открывать порты. Правда, множество программ умеют это делать самостоятельно, с помощью функции UPnP.
Мы же рассмотрим сейчас как все это сделать вручную. В панели управления наши маршрутизатором Linksys. У меня есть Linksys E1200, поэтому, показывать буду на его примере.
Открываем порт в настройках роутера Linksys
Первым делом, нам нужно зайти в веб-конфигуратор нашего маршрутизатора. Достаточно подключиться к роутеру по кабелю, или по Wi-Fi, и в браузере перейти по адресу 192.168.1.1. Более подробная информация по доступу к странице настроек есть в этой инструкции.
Прежде чем приступить к перенаправлению портов, нужно для нашего компьютера зарезервировать статический IP-адрес. Я имею введу компьютер, для которого мы будем настраивать проброс портов. Этот компьютер должен быть подключен к роутеру.
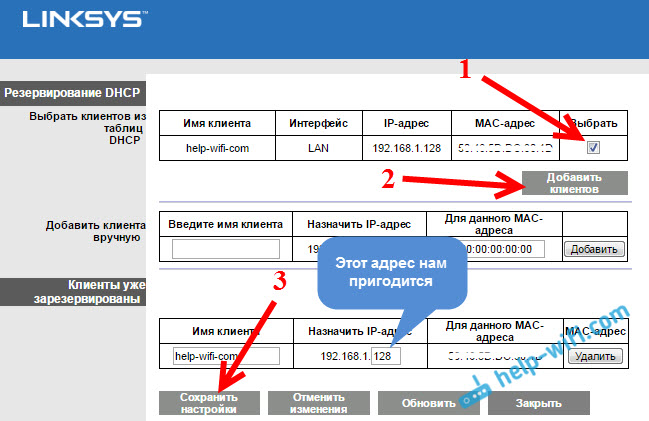
На главной странице настроек, напротив пункта «Настройки DHCP-сервера» нажмите на кнопку «Резервирование DHCP».

Откроется еще одно окно, в котором напротив нашего компьютера нужно поставить галочку, и нажать на кнопку «Добавить клиентов». Наш компьютер появится снизу, в разделе «Клиенты уже зарезервированы». Нам понадобится IP-адрес, который указан в таблице, в поле «Назначить IP-адрес». Запомните его. Это статический адрес, который роутер всегда будет выдавать для этого компьютера.
Нажмите на кнопку «Сохранить настройки».
Переходим к переадресации портов
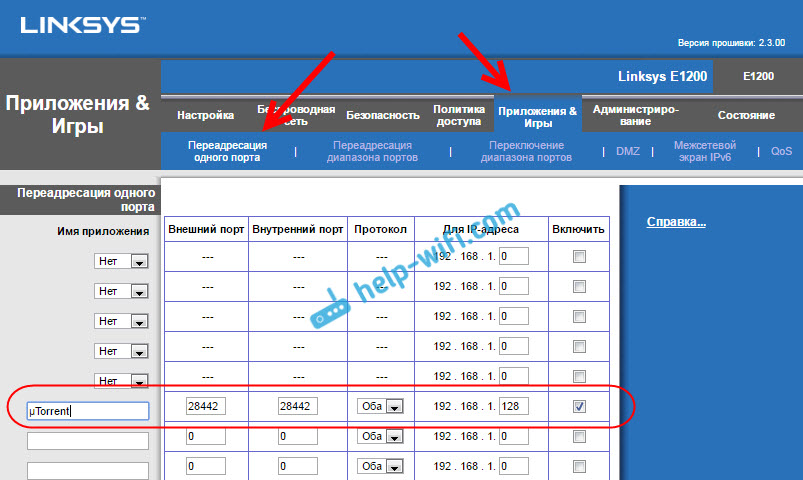
Перейдите на вкладку «Приложения & Игры». Если нам нужно открыть только один порт, то перейдите на вкладку «Переадресация одного порта». Там есть два варианта.
Есть несколько полей, где можно просто выбрать нужный протокол (telnet, FTP, DNS, TFTP и т. д.), и роутер сам подставит нужные порты. Как внешний, так и внутренний. Нам нужно только задать IP-адрес нашего компьютера (который мы резервировали выше) в поле «Для IP-адреса», и поставить галочку в поле «Включить». Ну и не забудьте сохранить настройки в самом низу, нажав на кнопку «Сохранить настройки».

Если вам нужно задать настройки вручную, то ниже в одном из полей достаточно задать имя приложения (произвольное, для которого вы выполняете настройки), дальше задать внешний и внутренний порт, выбрать проколол TCP, или UDP (можно оба), прописать IP-адрес компьютера, и поставить галочку «Включить».
Сохраняем настройки, и все готово. Смотрите скриншот для примера.
С этим разобрались. Но, часто бывает, когда нужно открыть не один порт, а диапазон портов.
Для этого открываем вкладку «Приложения & Игры» – «Переадресация диапазона портов».
Точно так же задаем название для приложения, выбираем протокол, указываем IP-адрес компьютера для которого настраиваем, и ставим галочку «Включить». Только здесь нам нужно указать уже не внешний и внутренний порт, а начальный и конечный. Смотрим скриншот:

Не забудьте нажать на кнопку «Сохранить настройки» снизу страницы.
Но это еще не все. Нам нужно этот диапазон внешних портов перенаправить на внутренние порты. Для этого откройте вкладку «Переключение диапазона портов».
Там нам нужно снова же указать имя, затем указать диапазон портов который хотим пробросить (которые задавали выше), и указываем диапазон портов на который нужно их перенаправить. Ставим галочку в поле «Включить», и сохраняем настройки.

На этом все. Если что, пишите в комментариях.