Windows Installation Options
Dependencies
Swift has the following general dependencies:
- Git (used by Swift Package Manager)
- Python1 (used by the debugger — LLDB)
Swift on Windows has the following additional platform specific dependencies:
- Windows SDK (provides the Windows headers and import libraries)
- Visual Studio (provides the Visual C++ SDK/Build Tools for additional headers)
Developer Mode
In order to develop applications, particularly with the Swift Package Manager, you will need to enable developer mode. Please see Microsoft’s documentation for instructions about how to enable developer mode.
Installation via Windows Package Manager
Windows Package Manager (aka WinGet) comes pre-installed with Windows 11 (21H2 and later). It can also be found in the Microsoft Store or be installed directly.
-
Install required dependencies:
winget install --id Git.Git -e
winget install --id Python.Python.3.9 -e
winget install --id Microsoft.VisualStudio.2022.Community --exact --force --custom "--add Microsoft.VisualStudio.Component.Windows11SDK.22000 --add Microsoft.VisualStudio.Component.VC.Tools.x86.x64"
Start up a new command-line shell (eg. Command Prompt, Windows PowerShell) and install the Python library
six. -
Install Swift:
winget install --id Swift.Toolchain -e
Installation via Scoop
Scoop is a command-line installer for Windows. It can be installed through the following PowerShell commands.
# Optional: Needed to run a remote script the first time
Set-ExecutionPolicy RemoteSigned -Scope CurrentUser
# Command for installing Scoop
Invoke-RestMethod get.scoop.sh | Invoke-Expression
-
Install general dependencies:
scoop bucket add versions
scoop install python310
Start up a new command-line shell (eg. Command Prompt, Windows PowerShell) and install the Python library
six. -
Install platform dependencies:
The platform dependencies cannot be installed through Scoop as the install rules cannot install all required components. They will be installed through the Visual Studio installer.
This code snippet must be run in a traditional Command Prompt (
cmd.exe).curl -sOL https://aka.ms/vs/17/release/vs_community.exe start /w vs_community.exe --passive --wait --norestart --nocache --add Microsoft.VisualStudio.Component.Windows11SDK.22000 --add Microsoft.VisualStudio.Component.VC.Tools.x86.x64 del /q vs_community.exe -
Install Swift:
Traditional Installation
The traditional installation process is required for Swift older than 5.4.2.
Swift has been tested with Visual Studio 2019. You will need to install Visual Studio with the following components. The installer for Swift is available in the Download section. The toolchain on Windows is typically installed to %SystemDrive%\Library\Developer\Toolchains.
The following Visual Studio components are required:
| Component | Visual Studio ID |
|---|---|
| MSVC v142 — VS 2019 C++ x64/x86 build tools (Latest) | Microsoft.VisualStudio.Component.VC.Tools.x86.x64 |
| Windows 10 SDK (10.0.17763.0)2 | Microsoft.VisualStudio.Component.Windows10SDK.17763 |
The following additional Visual Studio components are recommended:
| Component | Visual Studio ID |
|---|---|
| Git for Windows | Microsoft.VisualStudio.Component.Git |
| Python 3 64-bit (3.7.8) | Component.CPython.x64 |
The following additional Visual Studio component is suggested:
| Component | Visual Studio ID |
|---|---|
| C++ CMake tools for Windows | Microsoft.VisualStudio.Component.VC.CMake.Project |
After Visual Studio and the required components are installed:
-
Download a latest Swift release (5.9) or development snapshot installer.
-
Run the package installer.
Support Files
This is only required for versions older than 5.4.2.
You must run the following commands using x64 Native Tools for VS2019 Command Prompt as administrator.
The x64 Native Tools for VS2019 Command Prompt sets up the necessary environment variables to find the system headers.
Administrator permission is required to modify the Visual Studio installation.
In order to make the Windows SDK accessible to Swift, it is necessary to deploy a few files into the Windows SDK.
copy /Y %SDKROOT%\usr\share\ucrt.modulemap "%UniversalCRTSdkDir%\Include\%UCRTVersion%\ucrt\module.modulemap"
copy /Y %SDKROOT%\usr\share\visualc.modulemap "%VCToolsInstallDir%\include\module.modulemap"
copy /Y %SDKROOT%\usr\share\visualc.apinotes "%VCToolsInstallDir%\include\visualc.apinotes"
copy /Y %SDKROOT%\usr\share\winsdk.modulemap "%UniversalCRTSdkDir%\Include\%UCRTVersion%\um\module.modulemap"
Because it is installing the files into the Visual Studio image, the files will need to be copied each time Visual Studio is updated.
Repairing after Visual Studio Updates
This is only required for versions older than 5.9.0.
If Visual Studio is updated, you may have to repair the installation. For versions older than 5.4.2, reinstall support files as mentioned above. For newer versions, see Microsoft’s instructions for repairing installed programs.
Code Signing on Windows
The following commands must be run in PowerShell.
-
Install GPG from GnuPG.org
-
If you are downloading Swift packages for the first time, import the PGP keys into your keyring:
$ gpg.exe —keyserver hkp://keyserver.ubuntu.com `
          —receive-keys `
          'A62A E125 BBBF BB96 A6E0  42EC 925C C1CC ED3D 1561' `
          '8A74 9566 2C3C D4AE 18D9  5637 FAF6 989E 1BC1 6FEA'
or:
$ wget https://swift.org/keys/all-keys.asc -UseBasicParsing | Select-Object -Expand Content | gpg.exe —import -Skip this step if you have imported the keys in the past.
-
Verify the PGP signature.
The
.exeinstaller for Windows are signed using GnuPG with one of the keys of the Swift open source project. Everyone is strongly encouraged to verify the signatures before using the software.First, refresh the keys to download new key revocation certificates, if any are available:
$ gpg.exe —keyserver hkp://keyserver.ubuntu.com —refresh-keys SwiftThen, use the signature file to verify that the archive is intact:
$ gpg.exe —verify swift-<VERSION>-<PLATFORM>.exe.sig
...
gpg: Good signature from "Swift Automatic Signing Key #3 <swift-infrastructure@swift.org>"
If
gpgfails to verify because you don’t have the public key (gpg: Can’t check signature: No public key), please follow the instructions in Active Signing Keys below to import the keys into your keyring.You might see a warning:
gpg: WARNING: This key is not certified with a trusted signature!
gpg:          There is no indication that the signature belongs to the owner.
This warning means that there is no path in the Web of Trust between this key and you. The warning is harmless as long as you have followed the steps above to retrieve the key from a trusted source.
If gpg fails to verify and reports “BAD signature”, do not run the downloaded installer. Instead, please email swift-infrastructure@forums.swift.org with as much detail as possible, so that we can investigate the problem.
Уровень сложности
Простой
Время на прочтение
6 мин
Количество просмотров 2.9K

Привет, Хабр!
Сегодня я поделюсь своим опытом страданий установки языка программирования Swift под Windows в форме небольшого рассказа и постараюсь описать те проблемы, с которыми я столкнулся при попытке развернуть детище Apple на платформе конкурента.
Начну издалека. Я являюсь мобильным разработчиком под Андроид и периодически люблю развлекать себя различными экспериментами. Совсем недавно ко мне в руки попал Mac Mini на Apple Silicon — в офисе был бесхозный компьютер от яблочной корпорации и в один момент я захотел собрать свой пет-проект на KMP (бывш. КММ) под айос, посмотреть, как оно будет работать. (И будет ли работать вообще) Плюсом меня давно тянуло к макоси, было интересно за что ее кто-то обожает, а кто-то терпеть не может. Забавно, что нейтрального мнения я не встречал ни разу.
Установка Swift
В первую очередь, я решил зайти на официальный сайт Swift и посмотреть, поддерживает ли он ОС от Майкрософт. К моему счастью, добрые дяди (или тети) программисты уже попотели за меня и добавили поддержку ЯПа в винду, начиная с 10ки.

Переходим в инструкции для нужной нам ОС и видим это:

Нас просят изначально поставить некоторый список зависимостей. Ставим сначала Visual Studio (в моем случае 2022). При установке выбираем «Разработка классических приложений на С++». Как только поставилось, листаем чуть ниже.
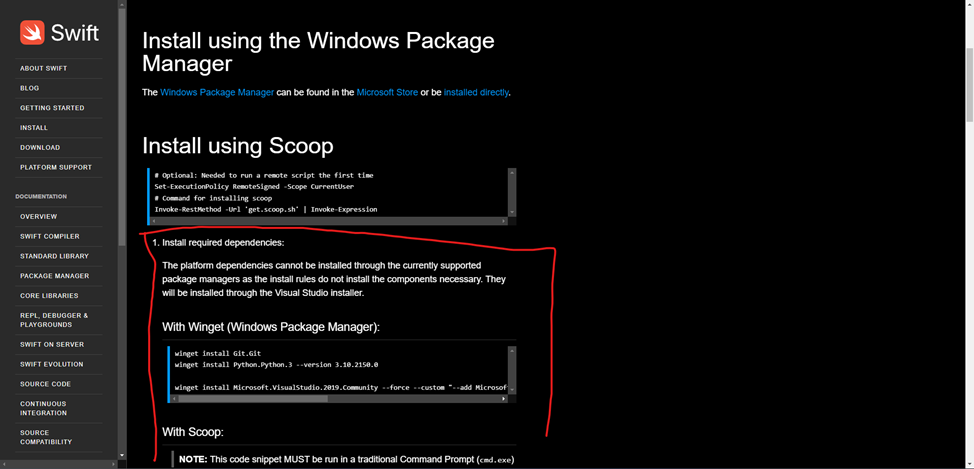
И вот тут лично у меня было некоторое смятение. К чему относиться блок ниже? К scoop? winget? Почему он так оформлен, будто является частью большого заголовка? Может, я придираюсь, но, честно говоря, это совсем неочевидно.
Хорошо. Будем действовать одним из самых древних методов познания – методом тыка.
Пробуем сначала поставить winget и запустить указанные скрипты, предварительно немного их изменив:
winget install Git.Git

winget install Python.Python.3 --version 3.10.2150.0

winget install Python.Python.3.9

winget install Microsoft.VisualStudio.2022.Community --force --custom "--add Microsoft.VisualStudio.Component.Windows10SDK.19041 --add Microsoft.VisualStudio.Component.VC.Tools.x86.x64"
В чем разница? Сразу же можно заметить, что мы устанавливаем кроме Python 3.10 еще и Python 3.9. Это потребуется нам, когда мы будем собирать наш проект. Так же я просто поменял версию студии, так как скрипт написан для 2019, а у меня 2022.
Будем считать, что первый шаг сделан. Листаем инструкцию дальше.
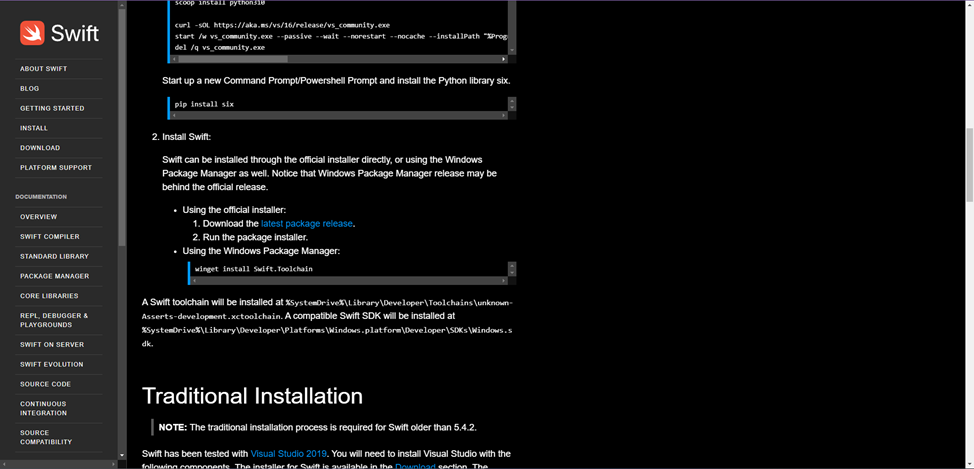
Видим, что теперь нас просят установить сам свифт, я предпочитаю скачать exe-шник, поэтому поставлю его.
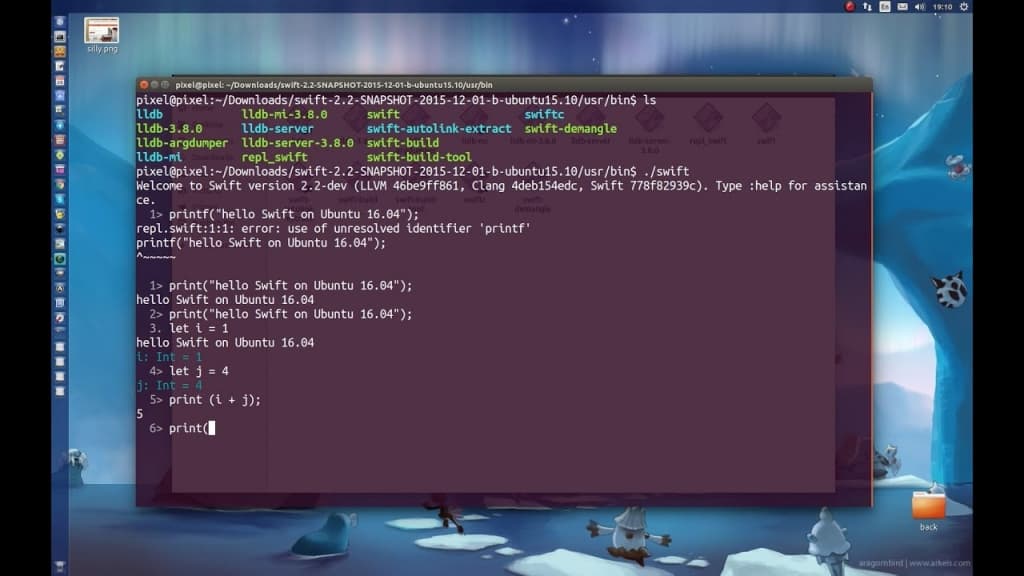
На этом казалось бы все. Свифт стоит у вас на компьютере и можно даже что нибудь написать и запустить. Ведь можно же, да? Нет. На самом деле компилятор и все тулзы у вас действительно установлены, но вот нет никакой инфраструктуры, чтобы можно было хоть что то написать и запустить. Сейчас кто-то может возразить, мол, есть же Swift REPL, интерактивный редактор кода, который идет в комплекте со свифтом, в нем же тоже можно писать код. Безусловно можно, но лично у меня возникла такая проблема:
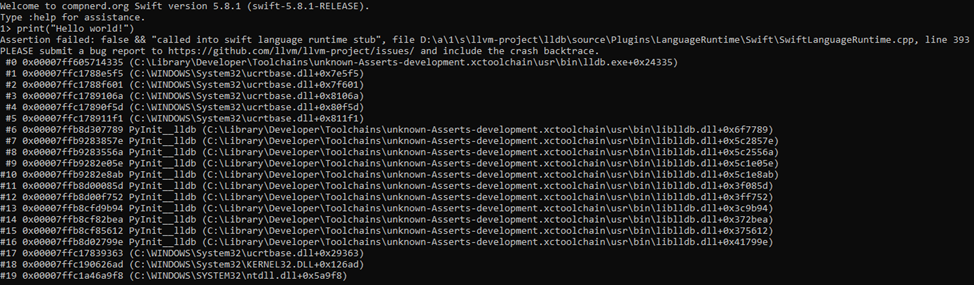
Это вынудило меня искать обходной путь.
Установка инструментов разработки
Буквально сразу в мою голову закралась мысль: «А что, если мы будем использовать VS Code?». Иногда мне кажется, что в этом простеньком редакторе можно или вскоре будет можно даже программировать ядерные реакторы, достаточно будет лишь доставить необходимые плагины для работы. Конкретно сейчас мы ядерные реакторы не программируем, но гибкость VS Code нам так же очень пригодится.
Ставим сначала редактор, после того как поставили ставим плагин для свифта. В нем есть: подсветка кода, дебаггинг, автодополнение, запуск .swift файлов (об этой функции мы поговорим чуть позже) и много чего еще, полный список можно найти в карточке плагина.
После того как поставили, пробуем наконец таки запустить наш простенький код на свифте:
print(“Hello world!!!”)Жмем Ctrl + Shift + P и выбираем «Swift: Run swift script». И тут лично меня ждало еще одно разочарование:

Пораскинув мозгами, я пришел к единственно верному решению – отобрать у VS Code его работу и собирать и компилировать скрипты самостоятельно, вводя команды в cmd. Не самый приятный исход, но вполне себе терпимый.
Создаем папку под на будущий проект, после чего, находясь внутри созданной нами директории, прописываем в cmd следущее:
swift package initДалее переходим в папку Sources/<PROJECT NAME> и создаем там файл с именем main и расширением .swift (Обязательно файл должен иметь имя main, так как пакету нужна входная точка для исполнения кода). Итого файл должен называться так: main.swift.
После всего этого открываем наш main.swift в VS Code и пробуем запустить все тот же код.
Кажется, что это все и теперь мы можем спокойно выполнить наш код, но не тут-то было:

Оказывается, у нас беды с конфигурацией пакета, поэтому, в первую очередь, необходимо устранить эту проблему. Поднимаемся наверх по директориям, пока не дойдем до корневой папки пакета, где лежит файл Package.swift. Открываем его.
Меняем
let package = Package(

    name: <PROJECT NAME>,

    products: [

        // Products define the executables and libraries a package produces, making them visible to other packages.

        .library(

            name: <PROJECT NAME>,

            targets: [<PROJECT NAME>,])

    ],

    targets: [

        // Targets are the basic building blocks of a package, defining a module or a test suite.

        // Targets can depend on other targets in this package and products from dependencies.

        .target(

            name: <PROJECT NAME>,),

        .testTarget(

            name: <PROJECT NAME TESTS>,

            dependencies: ["<PROJECT NAME>,"])

    ]

)
На
let package = Package(

    name: <PROJECT NAME>,

    products: [

        // Products define the executables and libraries a package produces, making them visible to other packages.

        .executable(

            name: "main",

            targets: ["<PROJECT NAME>"])

    ],

    targets: [

        // Targets are the basic building blocks of a package, defining a module or a test suite.

        // Targets can depend on other targets in this package and products from dependencies.

        .target(

            name: <PROJECT NAME>,

            dependencies: []),

        .testTarget(

            name: <PROJECT NAME TESTS>,

            dependencies: [<PROJECT NAME>])

    ]

)
Сохраняем изменения. Находясь в директории, где лежит файл main.swift запускаем команду:
swift runВуаля, код заработал, можно открывать шампанское.

Стоит отметить, что, возможно вы столкнетесь с такой проблемой, когда компилятор просто соберет готовый исполняемый файл, но не запустит его. Чтобы это решить перейдите сначала в корневую директорию проекта (папка .build/x86_64-unknown-windows-msvc\debug), там найдите файл main.exe и запустите его. Если он будет сразу же закрываться после запуска, то добавьте в конце всего кода функцию readLine() и тогда консоль не будет закрываться сразу же, а будет ждать ввод любой клавиши.
Когда я устанавливал все это дело в первый раз, я столкнулся с проблемой, которую не мог решить, после нескольких дней своих изысканий было решено забить на установку свифта прямо на винду и сделать все через WSL. Я проследовал всем инструкциям, что были указаны на сайте для установки свифт под Линукс, но опять забрел в тупик и решил бросить это дело в принципе. Но в тот же день я заметил, что ни один из установленных компиляторв C++ не может собрать простейший проект. Каждый как под копирку твердил, что не может найти необходимые файлы при линковке, естественно я начал свое расследование, что же послужило причиной выхода из строя линковщика. Искал я очень упорно, но результатов все не было, я удалил свифт с винды, переустановил начисто Visual Studio 3 раза, но ничего не помогало. И, наконец, на третий день я вспомнил про wsl и снес все пакеты, что я поставил во время той злосчастной установки. Каково же было мое счастье, что после всех попыток разобраться, я в кой то веке нашел ответ. Как уже стало ясно из рассказа, установка свифта из под wsl ломает линковщик компиляторов С++ (в частности, MSVC и GCC). Поэтому, никогда ни за что, ни при каких обстоятельствах, не совершайте этой ошибки. Она может стоить слишком дорого.
После этого, на удивление, я снова захотел поставить свифт, только теперь более основательно подойти к процессу. Результатом этого желания стала данная статья.
Заключение
Напоследок, хочу сказать, что это был крайне незабываемый опыт. Можно отметить, что документация в некоторых местах оставляет желать лучшего и хотелось бы более понятной инструкции к установке, так же, конечно, сказывается отсутствие нормального инструментария.
Надеюсь, эта ситуация изменится в лучшую сторону.
Learn how to get started with the Swift Programming Language in Windows.
To be honest, although may not want to work totally with this language on this environment to create applications or something like that, you may find very useful the fact of programming in this language in a Windows environment just for learning purposes of the language itself and its syntax. It’s worth to mention that not everyone can afford the purchase of an apple device to work with this language, so if you are one of those that work in a windows environment and you may like to introduce yourself to the Swift Language, then you have found the correct article to get started with.
The Swift Language is a high-performance system programming language with a very clean and modern syntax, that offers seamless access to existing C and Objective-C code and frameworks, being memory safe by default. Although inspired by Objective-C and many other languages, Swift is not itself a C-derived language. As a complete and independent language, Swift packages core features like flow control, data structures, and functions, with high-level constructs like objects, protocols, closures, and generics. Swift embraces modules, eliminating the need for headers and the code duplication they entail. The open source SwiftForWindows project provides an easy-to-use development environment for Swift programming for Windows applications. The project works with the Swift compiler for Cygwin, MSVC, MinGW.
In this article, we’ll show you an easy way to get started with the programming with the Swift Language in a Windows Environment.
1. Download SwiftForWindows compiler
As first step, you need to download the installer of Swift For Windows from the releases page of the project at Github here. The installer file size is around 110MB and you will be the one who decides where to install it. By default, it’s installation path is at C:/Swift. Now you need to understand how the project works, after installing Swift For Windows, you will basically have at your disposition an executable that works as a compiler, it offers a graphical user interface that allows you to select the swift source file that you want to compile:
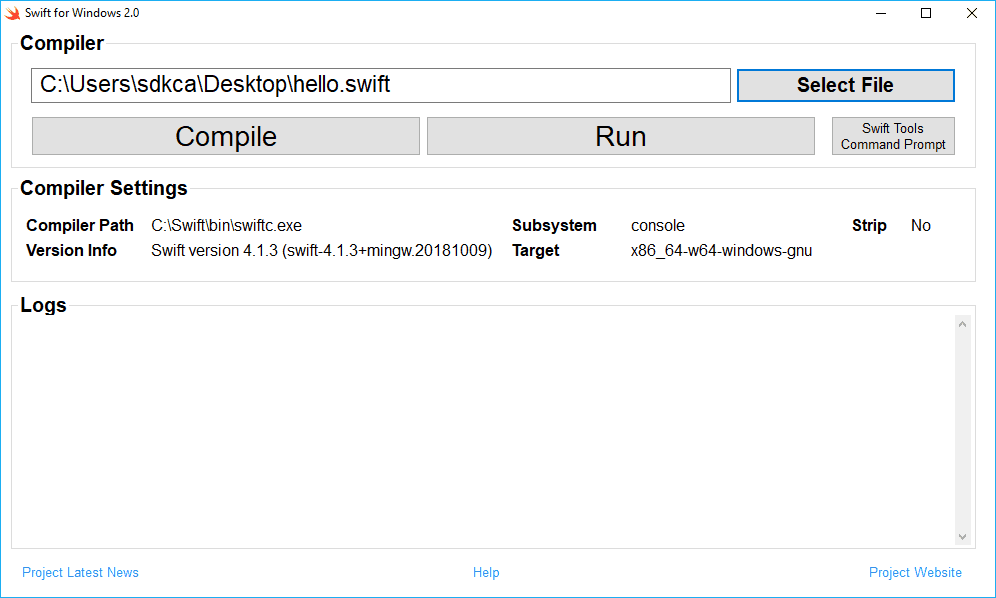
You need to compile the file before running it, so if your code is valid and you click on Compile, you will be able to run it with the Run button, which normally will open a command prompt with the output of your code if there’s any of course. For more information about this project, please visit the official repository at Github here.
2. Testing the compiler
To get started with the compiler, let’s write some code ! Create a file somewhere on your system namely hello.swift. This file will have the following code inside:
print("Hello World !")To define the file that the compiler should compile, click on Select File. This will open the system filebrowser and will allow you to select a file, select the file we’ve just created. The steps to run your Swift code on this environment is the following:
- Click on Compile
- If the compilation succeeds, click on Run
With the code that we wrote on our hello.swift file, the output will be:
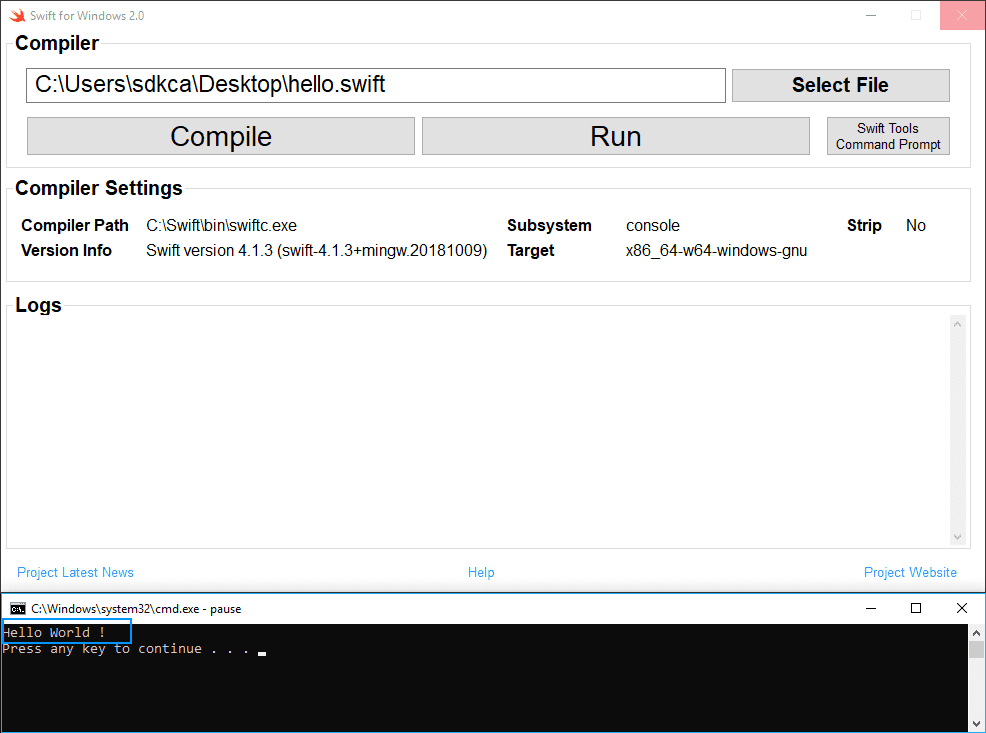
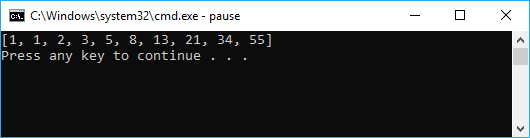
Note that while the command prompt with the output of your Swift Code is opened, the compiler tool will be blocked, so be sure to close the cmd window before trying to compile again. However, not everything in the life is printing hello world on every new programming language that you learn! You may want to get started with more complex code, for example the fibonacci series. Create a new file namely fibonacci.swift and paste the following code:
class FibIterator : IteratorProtocol {
var (a, b) = (0, 1)
func next() -> Int? {
(a, b) = (b, a + b)
return a
}
}
let fibs = AnySequence{FibIterator()}
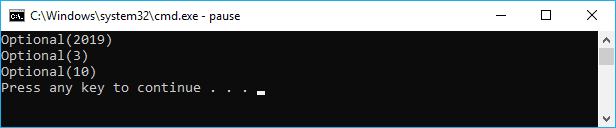
print(Array(fibs.prefix(10)))Compile it and run it. As expected, the output will be:
About the logs
During the compilation, the compiler will have a log that is displayed directly in the application. This log contains the warnings, notes or errors of the code that is being compiled. You will not always get a Successfully compiled message in the output, so you will need to pay attention to the other kind of messages in the log. Note that once you Run the compiled code (which means your application compiled succesfully, as long as there’s not an older version of your program), the log will be removed, so check it immediately after trying to compile. As on every sane compiler, you will get the line and character where the exception/warning occurs.
Errors
The compiler will be able to deal with errors during the compilation, for example with the following code that should display the date in the output:
let date = Date()
let calendar = Calendar.current
let components = calendar.dateComponents([.year, .month, .day], from: date)

let year =  components.year
let month = components.month
let day = components.day

print(year)
print(month)
print(day)
Will throw the following errors (error: use of unresolved identifier 'Calendar' and 'Date'):
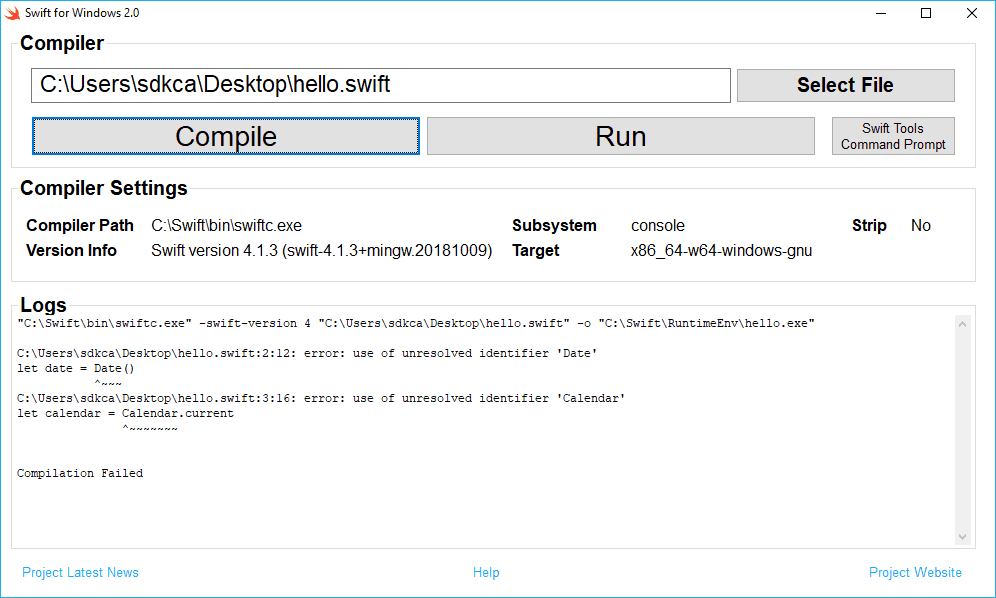
This error in our code is cause by the missing import statement at the beginning of our code ‘import Foundation‘, the functional snippet is shown in the warnings area.
Warnings
The compiler will display warnings as well, if we fix our previous snippet importing the Foundation namespace, our code will compile succesfully:
import Foundation

let date = Date()
let calendar = Calendar.current
let components = calendar.dateComponents([.year, .month, .day], from: date)

let year =  components.year
let month = components.month
let day = components.day

print(year)
print(month)
print(day)
However, we’ll get some warnings and notes:
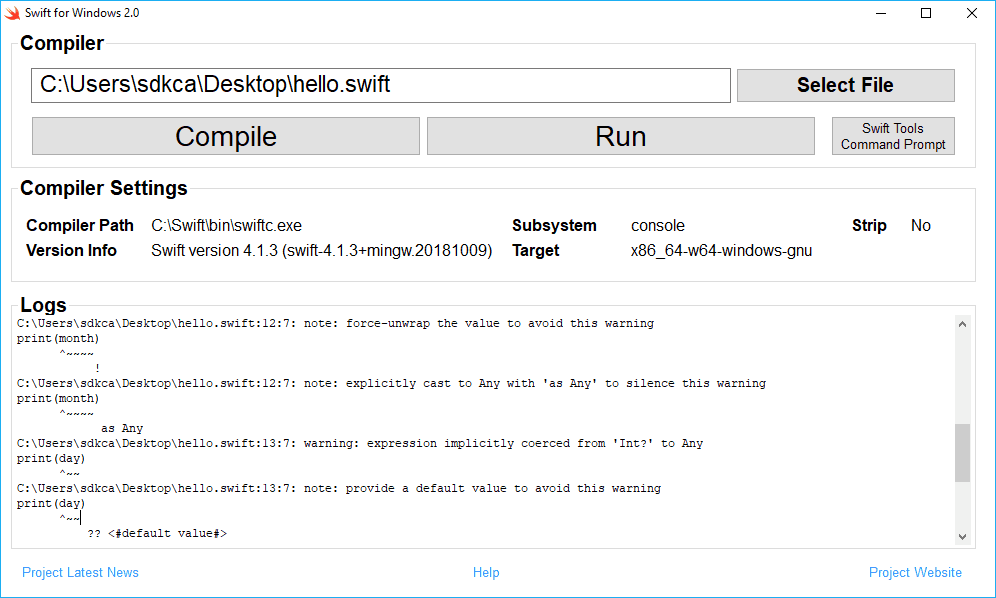
- warning: expression implicitly coerced from ‘Int?’ to Any. This warnings is triggered cause of the print function, that requires a set of Any parameters. String is a Any. In this case the compiler is telling you that it implicitly coerced the optional string into an Any object (by transforming the String value in Optional(value)).
- note: force-unwrap the value to avoid this warning. When an object is optional and you want to access one of its methods or properties, you will need to ‘unwrap’ it.
The output of our running code will be:
In conclusion, you can see how easily it is to get started with the Swift programming language or at least with its syntax in Windows. Notice that as there’s no official API that exposes how to do specific things in Windows, like opening a File browser, a program or related, this project is made entirely for strict learning purposes of the language in a different environment.
Happy coding !
В нынешнем мире программирования большую популярность набирает — объектно-ориентированный язык программирования, составленный под узкий профиль применения, для написания на нем приложений под iOS, macOS, tvOS, watchOS. Достаточно молодой Swift, разработанный компанией Apple, если Вы хотите начать изучать данный язык программирования, то Вам для начала, необходимо установить его на свой ПК, и мы рассмотрим, как это сделать в нашей статье.
Для начала давайте разберемся что же это за Swift и с чем его едят. Swift – это язык программирования, разработанный и выпущенный в 2014 году фирмой Apple. Изначально предназначен для разработки приложений под macOS и справляется со своей задачей и сейчас! Достаточно быстрый, безопасный и интерактивный язык программирования, написанный на основе C и Objective-C. Он дает возможность создавать приложения для десктопов, телефонов и серверов.

Swift очень популярный язык программирования. Уже спустя 3 года, после выпуска, встал на 11 место в рейтинге самых признанных языков программирования в TIOBE. Привлекает айтишников своей простотой, безопасностью и быстротой. Swift оптимизирован для разработки без компромиссов, с низким уровнем вхождения. Понятен даже для новичков в программировании.
У хороших Swift разработчиков должны быть хорошо развиты нестандартное и техническое мышление, креативность. Чтобы стать успешным Swift разработчиком, необходимо уметь создавать и тестировать программы, обновлять программы и создавать к ним документацию. Важно знать Английский язык, Вы должны быть способны решить спорные вопросы ориентируясь на результат, требуемый заказчиком.
Если Вы хотите выучиться Swift, то можете воспользоваться учебником от Apple, который компания выпустила сразу с самим языком программирования. Пускай книга и бесплатная, но она на Английском языке, что может затруднить начинающих разработчиков. Все же есть решение, многие опытные разработчики сами выпускают руководство по Swift, все книги находятся в свободном доступе, однако лучше подтянуть английский и прочесть официальный учебник.
Выучив Swift и потренировавшись в его использовании, Вы можете претендовать на достойную заработную плату. Так джуны программирующие на Swift получают от 60000 до 80000 тысяч рублей. В среднем же зарплата Swift разработчиков в России колеблется от 100 000 до 300 000 тысяч рублей.
Устанавливаем Swift на macOS
Начнем с компании производителя данного языка программирования и их платформы, для которой и был предназначен данный язык программирования. Macintosh Operating System – или же macOS. Это операционная система для ЭВМ выпускаемых Apple. Изначально под операционки Apple использовался Objective-C, который получился путем скрещивания C и Smalltalk, однако для упрощения работы, Apple решила создать Swift. Swift начали разрабатывать в 2010 году компанией Apple и предназначен для разработки приложений под ее ОС. Swift изначально был проприетарным языком программирования. Теперь же это язык с открытым исходным кодом. Ну и если это язык программирования, созданный Apple, то и идет он вместе с тем же mac’ом в комплекте. То есть для запуска программы нам достаточно установить playground – это Xcode, который можно скачать бесплатно с App Store.

После установки, запускаем Xcode и нажимаем Get started with playground. Вписываем название нашего проекта и указываем путь где будем его хранить. Вписываем команду print(“Hello world”) и запускаем нашу программу, во второй рабочей области интерпретатор выведет результат нашего кода. Playground автоматически выполняет введенный Вами код и интерпретирует его, достаточно удобно, не правда ли? Поздравляем, Вы написали свою первую программу на Swift и можете познавать его на практике.
Устанавливаем Swift на Linux
Linux – это бесплатная операционная система с множеством дистрибутивов. Один из самых популярных – Ubuntu. На Linux работает большая часть серверов всего мира (70% — 90%) и не только, Linux используется в смартфонах и компьютерах. Ubuntu – дистрибутив с графическим интерфейсом и набором офисных программ, предназначенный для повседневного использования. Linux имеет ряд достоинств, которые могут переманить пользователей.

Данная операционная система поможет облегчить жизнь Вашего старенького ПК не поддерживающего современные версии ОС. По сравнению с Windows и macOS, Linux бесплатная и поставляемые с ней программы тоже. Это жирный плюс, как и то, что она не требовательная и Вы можете спокойно загрузить ее себе на флешку. Терминал. Это очень полезная и удобная штука. С помощью терминала можно управлять ПК всего лишь зная нужные команды и вводя их в командную строку. По началу будет непривычно, но с практикой, Вы оцените ее достоинства. К тому же, если Вы хотите расширить свой IT-кругозор, Вам просто необходимо освоить командную строку Линукса, ведь сейчас практически все устроено на данной операционке. Как уже было отмечено, Ubuntu – это дистрибутив Linux, на который будет производиться Swift установка. Swift установить можно скачав его с официального сайта, но мы будем использовать лишь терминал, который можно открыть с помощью сочетания клавиш ctrl+alt+t. В командной строке вписываем следующее:
— wget https://swift.org/builds/swift-3.1.1-release/ubuntu1604/swift-3.1.1-RELEASE/swift-3.1.1-RELEASE-ubuntu16.04.tar.gz
Далее произведем распаковку скачанного файла и переместим все содержимое в папку /opt:
— tar xvf swift-3.1.1-RELEASE-ubuntu16.04.tar.gz
— mv swift-3.1.1-RELEASE-ubuntu16.04 /opt/swift
Следующими командами добавим переменную PATH и обновим ее:
— echo ‘export PATH=/opt/swift/usr/bin:$PATH’ >>~/.profile
— source ~/.profile
Осталось создать clang:
— sudo apt-get update
— sudo apt-get install clang
Давайте проверим правильно ли мы все сделали, для этого запросим у терминала версию нашего Swift:
— swift –version
Если мы все сделали правильно, то Ubuntu вернет нам текущую версию языка программирования. Теперь давайте напишем простую программу и запустим ее в терминале. Для этого создадим файл с расширением swift и впишем известную нам строку:
print(“Hello world!”)Сохраняем файл под именем program. Открываем командную строку и вводим следующее:
— swiftс program.swift
Данная команда компилирует наш код, чтобы интерпретировать его, используем строку:
— ./program
Теперь Вы можете спокойно постигать Swift на Вашем Linux, без каких-либо ограничений.
Устанавливаем Swift на Windows
Программировать на Swift в Windows изначально было нельзя, так как Swift имел закрытый исходный код. Но совсем недавно Apple решили открыть исходники и открыли доступ ко всей экосистеме для Windows. Теперь на Windows можно создавать программы на языке Swift, но доступен он только на Windows 10. Чтобы начать программировать на Swift, достаточно скачать сам язык программирования с официального сайта. Установив Swift на свой персональный компьютер, Вам необходим будет редактор кода с интерпретатором. VS Code – интерпретатор языка Swift для Windows и Linux. Visual Studio Code бесплатный с множеством расширений, консолью отладки, терминалом и интерпретатором. Популярный и мощный редактор кода для любой платформы. Facebook установил его как основной редактор кода в компании. После установки Swift на свой ПК, скачайте VS Code с официального сайта и также установите его. Как только установка закончится, откройте редактор и создайте файл с именем project.swift, после чего вводим известную всем команду print(“Hello world”) и нажимаем Run. Все работает? Отлично! Теперь можем программировать на Swift на Windows, благо Apple дала такую возможность.
Но что если у Вас нет Windows 10? Тогда Вы можете просто обновиться под 10 винду, заплатив за ключ активации и проделать все действия, описанные выше. Возможен такой вариант, что Вы устанавливаете виртуальную машину и загружаете на нее macOS. Но это тоже муторно. А как же Linux? Можете просто перейти на Ubuntu и установить Swift, редактор кода (тот же VS Code или Notepad++) и радоваться жизни, ведь все ПО под Linux бесплатное, как и сама операционная система. Это основные способы установки Swift на Ваш ПК.
Заключение
Мы разобрали все основные способы установки языка программирования Swift Ubuntu, на Windows и macOS. Теперь Вы можете спокойно практиковаться и писать крутые приложения под Apple на своем устройстве!
В студии AppFox можно подать заявку на программирование, создание игр или заказать разработку приложений https://appfox.ru/ и получить бесплатную консультацию по ценам и услугам.
I am wondering if I can write iOS applications on windows using runswiftlang.com. This website enables me to write Swift apps and run the apps on it. Can I write code like the following on the website and save it to a .swift file?
func anyMultipleOf(value: Int, numbers: [Int]) -> Bool {
    return numbers.reduce(false) {
        any, number in
        return any || ((value % number) == 0)
    }
}

let sum = [Int](1..<1000).filter() { anyMultipleOf($0, [3, 5]) }.reduce(0) { $0 + $1 }
println(sum)
If not I want to know what programming languages enable me to develop iOS apps.
![]()
asked Apr 28, 2015 at 12:18
![]()
No, you need a Mac machine to build (native or hybrid) iOS apps. Aside from Objective C or Swift, there are a couple of other options (mostly multi-platform solutions that target Android and/or Windows Phone as well), like Xamarin (based on C#), PhoneGap/Cordova (based on HTML/JavaScript) and Appcelerator (based on HTML/Javascript).
answered Apr 28, 2015 at 12:21
![]()
GlorfindelGlorfindel
22k13 gold badges81 silver badges109 bronze badges
Swift is apple only and so is Objective-C however there are a few tools that let you make Mobile Apps on windows I still think that the actual creation of the application package for iOS has to happen on a mac.
answered Apr 28, 2015 at 12:20
![]()
James CampbellJames Campbell
3,5214 gold badges33 silver badges51 bronze badges
0
Swift language is used for developing iOS/Mac apps. You can write small programs and execute it using online tools (such as http://www.runswiftlang.com/ as mentioned by you) but in order to create apps its mandatory to have a MacBook/Mac Mini/iMac. Since apps can only be developed in Xcode (IDE) using Swift/Objective-C language.
Also, in order to test your app you need simulator which is embedded with Xcode only. If you want to put an app on the App Store then you need to test app on real device (iPad or iPhone).
Conclusion : You can write small programs on Windows system using online tools but in order to develop full-fledged app you need to have the following:
- Apple developer account (Paid account)
- Workstation for writing code (MacBook/iMac/Mac mini etc)
- Apple device for testing app (iPhone/iPad etc)
![]()
answered Apr 28, 2015 at 12:37
![]()
Jayprakash DubeyJayprakash Dubey
35.8k18 gold badges170 silver badges177 bronze badges
2
As of 2020, yes!
There’s a swift toolchain and runtime for compiling Swift and running natively on Windows. At this point it is mature enough to provide all the expected types from standard, plus the core libraries including Foundation, dispatch, and XCTest. REPL works too.
Get the Windows toolchain and get started here: https://www.swift.org/getting-started/
There’s also some community driven efforts to extend Swift’s obj-C interoperability to a more generic C++ interface.
answered Aug 16, 2022 at 12:47
![]()