
Язык не меняется на Windows 11 Single Language,софт на английском что мне теперь делать?
Комментарии
35

Если у вас редакция Windows 11 Single language — это означает, что официально вам недоступна стандартная смена языка интерфейса. С Windows 11 SL вам доступно только добавление новой клавиатуру или язык для ввода, но не изменение языка интерфейса Windows 11. Ниже описан способ русификации, который протестирован на английском, китайском, корейском и турецком языках.
Как сменить язык интерфейса в Windows 11 Single Language через PowerShell
Чтобы поменять язык будем использовать нестандартные (неофициальные) способы.
1. Для смены языка скачайте языковой пакет (ссылка для скачивания)
2. Откройте от имени администратора программу PowerShell (можно найти через поиск Windows 11)
3. Скопируйте путь к файлу Microsoft-Windows-Client-Language-Pack_x64_ru-ru.cab (Выделите Microsoft-Windows-Client-Language-Pack_x64_ru-ru и нажмите Ctrl+Shift+C) (или выберите «copy as path» в контекстном меню)
4. Выполните последовательно команды:
1. dism.exe /online /Add-Package /PackagePath: путь до вашего файла.cab
2. reg add HKLM\SYSTEM\CurrentControlSet\Control\Nls\Language /v InstallLanguage /t REG_SZ /d 0419 /f
3. reg add HKLM\SYSTEM\CurrentControlSet\Control\Nls\Language /v Default /t REG_SZ /d 1049 /f
4. cd
5. После этого перезагрузите систему и попробуйте изменить язык интерфейса стандартным способом этой инструкции.
Подробная инструкция https://itmen.help/blog/windows-11/shange-language.html
Развернуть ответы 4

Развернуть ответы 11
1 год назад
Изменено автором
Напишите подробно что у вас не меняется. У вас не меняется раскладка клавиатуры? Т.е вы при установке установили только русскую? Или что-то другое. Непонятно о чем идет речь.
Свернуть ответы 2
Раскладка меняется,не меняется язык в целом всего меню на компьютере, не слова по русски,при установке был китайский и английский, пакет русского скачивается но не устанавливается,ю
Свернуть ответы 1
2 месяца назад
Изменено автором
пакет русского скачивается но не устанавливается
Это версия SL и MUI пакет не установится. Переустановите систему.
Скачайте дистрибутив ОС с сайта микрософт и при установке SL выберите русский язык.
Как вариант выучить язык.
Спасибо, обязательно попробую.

1 год назад
Изменено автором
Свернуть ответы 3
Свернуть ответы 2
А как именно оно не помогло? Мне на 10-ке всегда помогало.
Свернуть ответы 1
Может я конечно что то неправильно сделал, но не помогло,делал всё по шагово,я сегодня конечно обращусь в магазин ,компьютеру несколько дней думаю это их проблемы должны быть

Конкретнее , в чем проблема
1 год назад
Изменено автором
как вариант переустановить на Windows 11 Single Language (Русскую Версию)
ваш вариант Windows 11 Домашняя для одного языка (64-bit)


Развернуть ответы 7
Обсуждение товара
Зелёный экран при запуске игры
Обновила все драйверы до последней версии не помогло, все равно выбивает зелёный экран при запуске игры. Игра не особо ресурсная, даже не онлайн игра чтобы был какой то особый вес на видеокарту. Кто сталкивался с подобной проблемой?
This question has been asked before for Windows 10, however, the solution provided for Windows 10 does not appear to be working for Windows 11.
The problem is simple. I bought a new Laptop in Thailand. It came with Windows 11 Home Single Language Edition. 21H2. 22000.708. It is installed with English US (en-US, 0409). When I tried the procedure as described for Windows 10 and changed the language from English-US (en-US, 0809) to English-UK (en-UK, 0409) and restarted my laptop the display language had changed from English-US (en-US, 0809) to Thai (th-TH, 041E).
Does someone know of a solution for Windows 11 or is it possible that it is not possible to change the language to English-UK, and that it can only be changed from Thai to English-US and Vice Versa?
asked Jun 7, 2022 at 11:31
![]()
6
The code for en-UK is 0809, not 0409. Try changing both Default and InstallLanguage to this number.
answered Aug 17, 2022 at 17:48
![]()
montwmontw
111 silver badge3 bronze badges
This website just helped me out to change from Portuguese-BR to English-US: https://leoguides.com/how-to-add-or-change-language-of-windows-11-home-single-language/
In case the website ever stops working, here are the cmd prompt instructions it gives for English-UK:
curl -o %TEMP%\Microsoft-Windows-Client-Language-Pack_x64_en-gb.cab "https://filedn.com/lOX1R8Sv7vhpEG9Q77kMbn0/Windows11/LanguagePacks/Microsoft-Windows-Client-Language-Pack_x64_en-gb.cab"
dism /online /Add-Package /PackagePath:%TEMP%\Microsoft-Windows-Client-Language-Pack_x64_en-gb.cab
reg add HKLM\SYSTEM\CurrentControlSet\Control\Nls\Language /v InstallLanguage /t REG_SZ /d 0809 /f
reg add HKLM\SYSTEM\CurrentControlSet\Control\Nls\Language /v Default /t REG_SZ /d 2057 /f
answered Sep 20, 2022 at 0:50
![]()
2
Arthur’s answer worked for me, just had to change %TEMP% in given commands to full path to Temp folder like this:
curl -o C:\Users\<userName>\AppData\Local\Temp\Microsoft-Windows-Client-Language-Pack_x64_en-gb.cab "https://filedn.com/lOX1R8Sv7vhpEG9Q77kMbn0/Windows11/LanguagePacks/Microsoft-Windows-Client-Language-Pack_x64_en-gb.cab"
dism /online /Add-Package /PackagePath:C:\Users\<userName>\AppData\Local\Temp\Microsoft-Windows-Client-Language-Pack_x64_en-gb.cab
reg add HKLM\SYSTEM\CurrentControlSet\Control\Nls\Language /v InstallLanguage /t REG_SZ /d 0809 /f
reg add HKLM\SYSTEM\CurrentControlSet\Control\Nls\Language /v Default /t REG_SZ /d 2057 /f
cd
Be sure to run the command in administrator mode
answered Feb 24 at 10:38
![]()
You must log in to answer this question.
Not the answer you’re looking for? Browse other questions tagged
.
Not the answer you’re looking for? Browse other questions tagged
.
To manage all aspects of the input and display language settings on your Windows 11 PC, use the following methods.
To switch the keyboard layout you’re using, press and hold the Windows key and then repeatedly press the Spacebar to cycle through all your installed keyboards. (If this doesn’t do anything, it means you have only one installed.)
You can also select the language abbreviation in your taskbar then choose the language or input method you want to use.
Note: In the input field, press the Windows logo key + period (.) to access the Emoji & more keyboard, if your language supports it.
If you can’t find the keyboard layout you want, you may have to add a new keyboard.
Adding an input language lets you set a language-preference order for websites and apps, as well as change your keyboard language.
-
Select the Start > Settings > Time & language > Language & region.
-
Select the language that has the keyboard you want, then select Options.
-
Select Add a keyboard and choose the keyboard you want to add. If you don’t see the keyboard you want, you may have to add a new language to get additional options. If this is the case, go on to step 4.
-
Return to the Language settings page, go to Preferred languages, then select Add a language.
-
Choose the language you want to use from the list, then select Next.
-
Review any language features you want to set up or install, and select Install.
«Add a keyboard» shortcut
The display language you select changes the default language used by Windows features like Settings and File Explorer.
-
Select Start > Settings > Time & language > Language & region.
-
Choose a language from the Windows display language menu.
«Change your display language» shortcut
If a language is listed under Preferred languages but doesn’t appear on the Windows display language list, you’ll first need to install its language pack (if it’s available).
-
Select Start > Settings > Time & language > Language & region.
-
In Preferred languages, select Add a language, enter the language you want, then select Next.
-
Select Download from the Download language pack option.
-
After the language pack is installed, select Back.
-
Choose a language from the Windows display language menu.
«Install a language pack» shortcut
If you receive an «Only one language pack allowed» or «Your Windows license supports only one display language» message, you have a single language edition of Windows 10. Here’s how to check your Windows 10 language edition:
-
Select Start > Settings > About, and then go to the Windows specification section.
-
If you see Windows 11 Home Single Language next to Edition, you have a single language edition of Window 11, and you can’t add a new language unless you purchase an upgrade to either Windows 11 Home or Windows 11 Pro.
Upgrade to Windows 11 Home or Windows 11 Pro
-
Select Start > Settings > Time & language > Language & region.
-
Under Preferred languages, select the language you want to remove, and then select Remove.
-
To remove an individual keyboard, select the language (see step 2), select Options, scroll down to the Keyboards section, select the keyboard you want to remove, and select Remove.
To manage all aspects of the input and display language settings on your Windows 10 device, use the following methods.
To switch the keyboard layout you’re using in Windows 10, press and hold the Windows key and then repeatedly press the Spacebar to cycle through all your installed keyboards. (If this doesn’t do anything, it means you have only one installed.)
You can also select the language abbreviation on the far right of the taskbar and then choose the language or input method you want to use.
Note: In the input field, press Windows +period (.) to access the emoji keyboard, if your language supports this.
If you can’t find the keyboard layout you want, you may have to add a new keyboard.
Adding an input language lets you set a language-preference order for websites and apps, as well as change your keyboard language.
-
Select the Start button, then select Settings > Time & Language > Language.
-
Under Preferred languages, select the language that contains the keyboard you want, and then select Options.
-
Select Add a keyboard and choose the keyboard you want to add. If you don’t see the keyboard you want, you may have to add a new language to get additional options. If this is the case, go on to step 4.
-
Return to the Language settings page, and select Add a language.
-
Choose the language you want to use from the list, and then select Next.
-
Review any language features you want to set up or install, and select Install.
«Add a keyboard» shortcut
Some languages require additional language features
For some languages to work properly, you need an admin on your PC to install the language features. Here’s a list of the languages that are affected:
-
Microsoft IME – Primary keyboard of Japanese
-
Microsoft Pinyin – Primary keyboard of Chinese (Simplified, China), Primary keyboard of Chinese (Simplified, Singapore)
-
Microsoft Wubi – Secondary keyboard of Chinese (Simplified, China), Secondary keyboard of Chinese (Simplified, Singapore)
-
Microsoft Bopomofo – Primary keyboard of Chinese (Traditional, Taiwan), Secondary keyboard of Chinese (Traditional, Hong Kong SAR), Secondary keyboard of Chinese (Traditional, Macao SAR)
-
Microsoft ChangJie – Secondary keyboard of Chinese (Traditional, Taiwan), Secondary keyboard of Chinese (Traditional, Hong Kong SAR), Secondary keyboard of Chinese (Traditional, Macao SAR)
-
Microsoft Quick – Secondary keyboard of Chinese (Traditional, Taiwan), Primary keyboard of Chinese (Traditional, Hong Kong SAR), Primary keyboard of Chinese (Traditional, Macao SAR)
-
Bangla Phonetic – Secondary keyboard of Bengali (India)
-
Gujarati Phonetic – Secondary keyboard of Gujarati
-
Hindi Phonetic – Secondary keyboard of Hindi
-
Kannada Phonetic – Secondary keyboard of Kannada
-
Malayalam Phonetic – Secondary keyboard of Malayalam
-
Marathi Phonetic – Secondary keyboard of Marathi
-
Odia Phonetic – Secondary keyboard of Odia
-
Punjabi Phonetic – Secondary keyboard of Punjabi (Gurmukhi)
-
Tamil Phonetic – Secondary keyboard of Tamil (India)
-
Telugu Phonetic – Secondary keyboard of Telugu
The display language you select changes the default language used by Windows features like Settings and File Explorer.
-
Select the Start button, then select Settings > Time & Language > Language.
-
Choose a language from the Windows display language menu.
«Change your display language» shortcut
If a language is listed under Preferred languages but doesn’t appear on the Windows display language list, you’ll first need to install its language pack (if it’s available).
-
Select the Start button, then select Settings > Time & Language > Language.
-
Choose a language from the Add a language list under Preferred languages, and then select Options.
-
Select Download from the Download language pack option.
-
After the language pack is installed, select Back .
-
Choose a language from the Windows display language menu.
«Install a language pack» shortcut
If you receive an «Only one language pack allowed» or «Your Windows license supports only one display language» message, you have a single language edition of Windows 10. Here’s how to check your Windows 10 language edition:
-
Select the Start button, select Settings > About, and then scroll down to the Windows specification section.
-
If you see Windows 10 Home Single Language next to Edition, you have a single language edition of Window 10, and you can’t add a new language unless you purchase an upgrade to either Windows 10 Home or Windows 10 Pro.
Upgrade to Windows 10 Home or Windows 10 Pro
-
Select the Start button, then select Settings > Time & Language > Language.
-
Under Preferred languages, select the language you want to remove, and then click Remove.
-
To remove an individual keyboard, select the language in question (see step 2), select Options, scroll down to the Keyboards section, select the keyboard you want to remove, and click Remove.
Need more help?
Want more options?
Explore subscription benefits, browse training courses, learn how to secure your device, and more.
Communities help you ask and answer questions, give feedback, and hear from experts with rich knowledge.
Find solutions to common problems or get help from a support agent.
На ноутбуке стоит Windows 11 Single Language. Язык интерфейса — русский. И поменять на другой нельзя. Так же в настройках под выбором языка интерфейса написано «Ваша лицензия Windows поддерживает только один язык интерфейса». Однако ещё ниже я вижу два языка — английский и русский. Насколько я понимаю — это языки ввода, а не интерфейса:

Возникла необходимость добавить ввод на китайском языке. Нажимаю кнопку «Добавить язык». Нахожу китайский. Нажимаю «Далее». Он выдает надпись «Ваша лицензия Windows поддерживает только один язык интерфейса». Но мне не нужен язык интерфейса! Мне нужна раскладка клавиатуры!
Подскажите пожалуйста, как можно добавить ещё одну раскладку клавиатуры?
задан 16 авг в 7:57
![]()
3
Разобрался. Оказывается надо было выключить все флажки в окне добавления языковых компонентов (распознавание речи, текст в речь, рукописный ввод). В этом случае добавление происходит успешно:

ответ дан 16 авг в 9:12
![]()
Users can change system language on Windows 11. You are allowed to add multiple language keyboards, language packs, and regional layouts to the system. However, you need to know a few points about it and it is related to your product key. Do not miss a beat in the tutorial and I have covered important points only.
What is the Shortcut to Changing Language in Windows?
Microsoft designed the user interface for beginners, so you don’t have to scratch your head during customizations. I have shown you how to change the system language in Windows 11 Pro and Windows 11 Home Single Language.
Users can set the language permanently in the Microsoft account and you can manage the preferences. The latest Windows 11 requires an MS account and it is part of the ecosystem now. Follow the tutorial and make sure to read every step till the end.
Change System Language in Windows 11
You don’t need an activated Windows copy and it works flawlessly on the free version. My desktop is running on the free version and I didn’t attempt to register the product key. Follow my lead to change the system language in the latest Microsoft operating system.
OS: Windows 11 Pro
Step 1: Press Windows Key and I to reveal the Settings app.
Step 2: Click on “Time & language” in the main menu.

Step 3: Select “Language & region” to reveal more options.

Step 4: Click on the “Add a language” option.

Step 5: Find your preferred language from the search bar.

Step 6: I searched for English (India).

Step 7: Click to select the pack then click on “Next” to proceed further.

Step 8: Select the “Set as my Windows display language” option.

Step 9: The software begins downloading the package from the Microsoft servers.
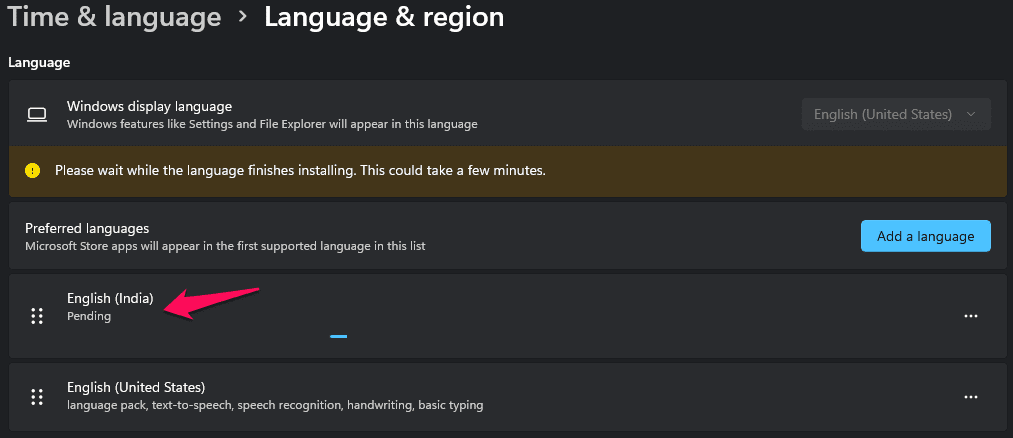
You have to wait patiently and the internet download speed matters here.
Step 10: The language package has started downloading in the system.

Step 11: Click on “Sign out”, when the package is saved in the machine.
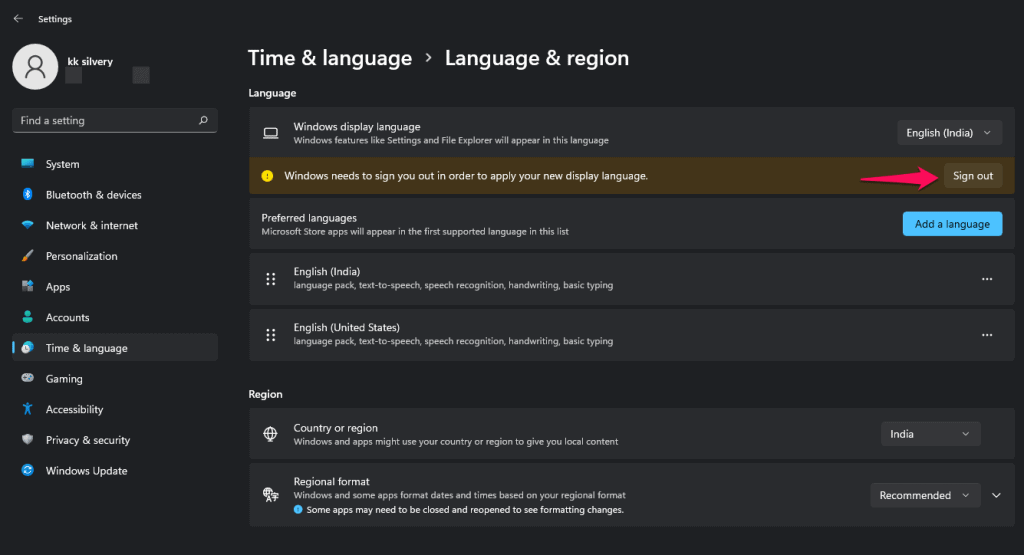
Step 12: Log in to the computer and go back to the settings that I have shown above.

Step 13: Windows display language is changed to English (India).

The entire process takes a couple of minutes and the package download part depends on your internet speed. You have no restrictions in the language department and install any package available in the library. Of course, I’m on Windows Pro (unactivated version), and I have shown you how to install a language pack on Single Language (OEM) machine.
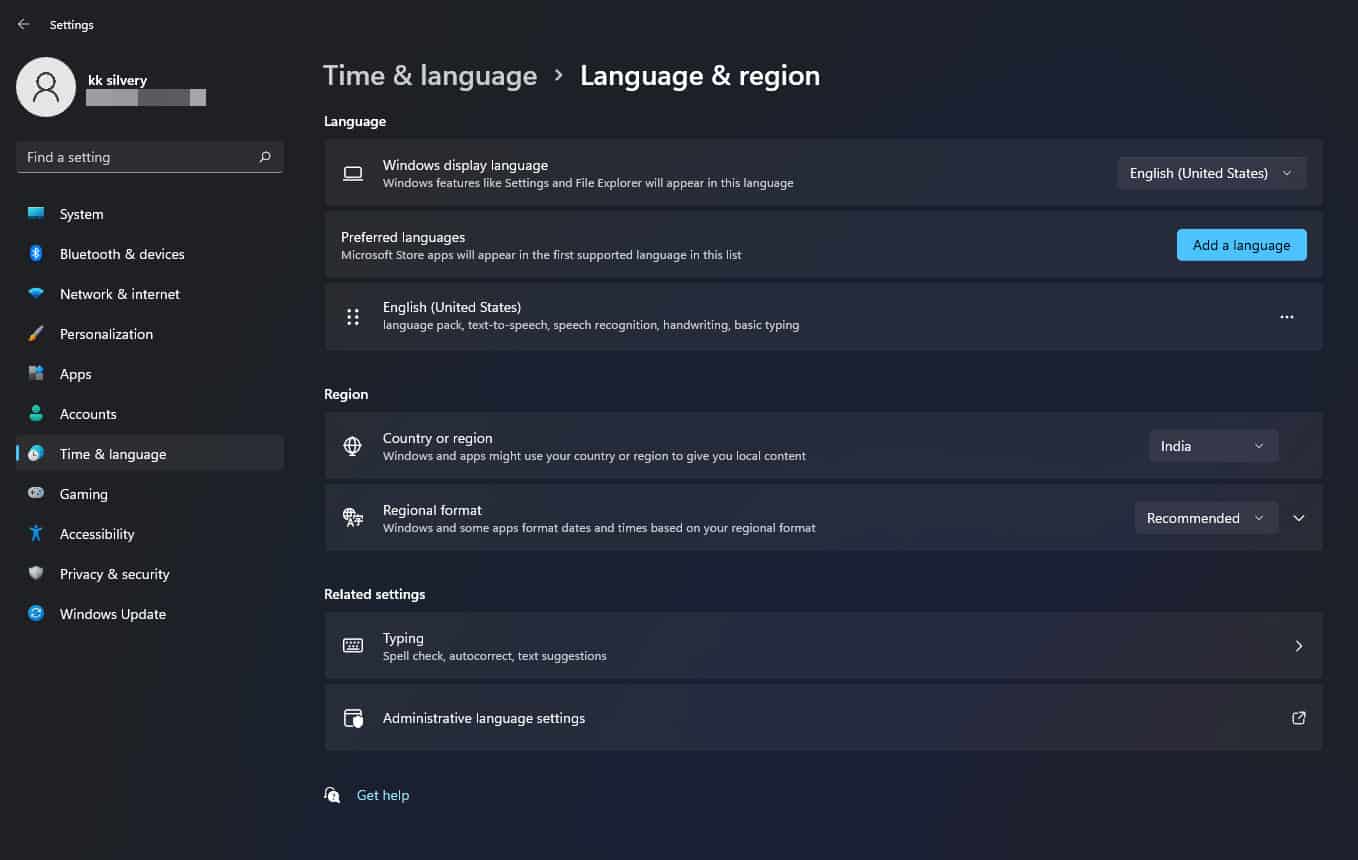
Change System Language in Windows 11 Home Single Language?
My Windows 11 laptop has a Home edition and it is a Single Language version. It’s intimidating to have an operating system that falls under a category and we don’t know what sort of limitations it has in the software. It’s an OEM product key and came activated out-of-box, so I’m sure you are in the same boat.
OS: The software is upgraded from Windows 10 Home Single Language to Windows 11 Home Single Language.
- Press Windows Key and I to reveal the Settings app.
- Click on “Time & language” in the main menu.
- Select “Language & region” to reveal more options.

- Click on the “Add a language” option.

- Find your preferred language from the search bar.

- This time I searched for my native language Hindi.

- Select the language and click on the “Next” button to proceed further.

- Select the “Set as my Windows display language” option.

The operating system didn’t download the package because the laptop has the language saved in the system from the beginning.
- Regional languages are saved in the software, so you don’t have to download them over the internet.

- Click on the “Sign out” option.

- Windows has changed to regional Hindi language.

Fortunately, you don’t have to worry about the Home edition limitations and you can save multiple languages in the system.
How do I Change My Computer Settings back to English?
Many users experiment with the machine and end up choosing a language that they don’t see fit in the ecosystem. Let me show you how to change the settings back to English and remove them permanently. Follow my lead and don’t skip a single step because you don’t want to make mistakes.
- Press Windows Key and I to reveal the Settings app.
- Click on “Time & language” in the main menu.
- Select “Language & region” to reveal more options.
- Click on the “Windows display language” option.

- Choose the English (United States), then click on the “Sign out” button.
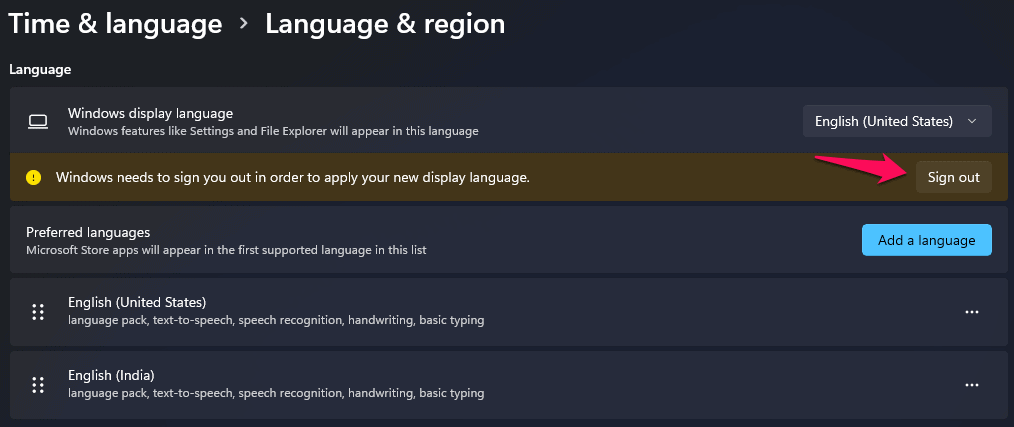
The system will land on the Lock Screen and go back to the system language section.
- Click on the three-dot settings that you want to remove.
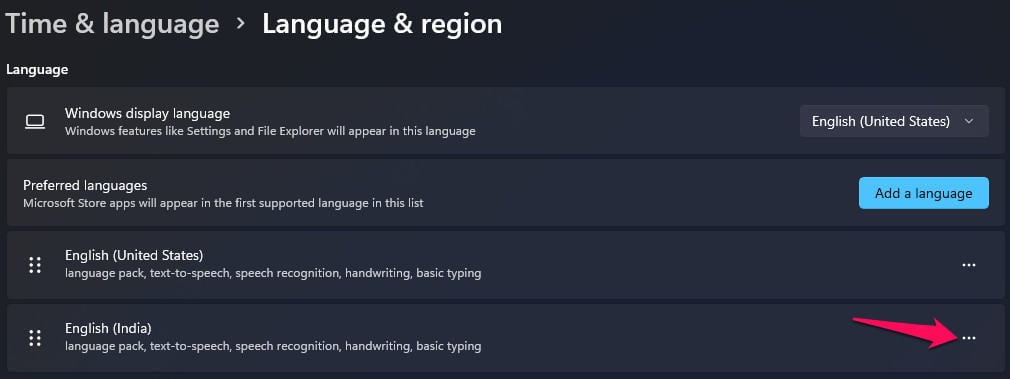
- Click on “Remove” to delete it from the system.
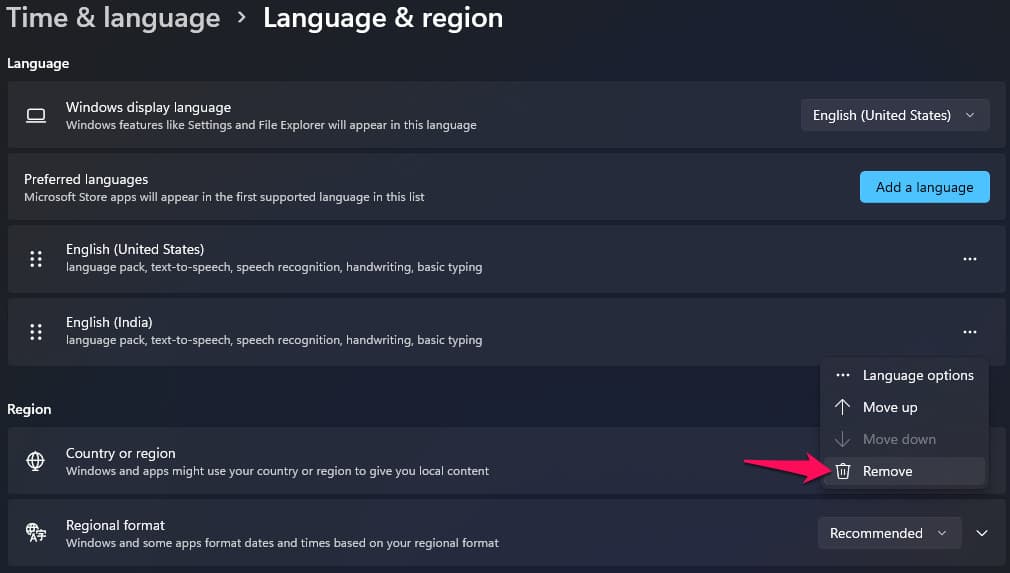
- The language pack is removed from the selection.
You have full control over what you want to add to the system and what you want to remove, so don’t worry about playing around with the language packs.
Choose your Language Preferences in Microsoft account
Microsoft account is part of the products and they are replicating the Apple ecosystem here. There is an option to choose the default language in the MS account and you can set your regional or preferred language in it. I couldn’t remove the preferred language from the account, so you should consider it a permanent change.
- Press Windows Key and me to reveal the Settings app.
- Choose “Accounts” then click on “Your info” to reveal more options.
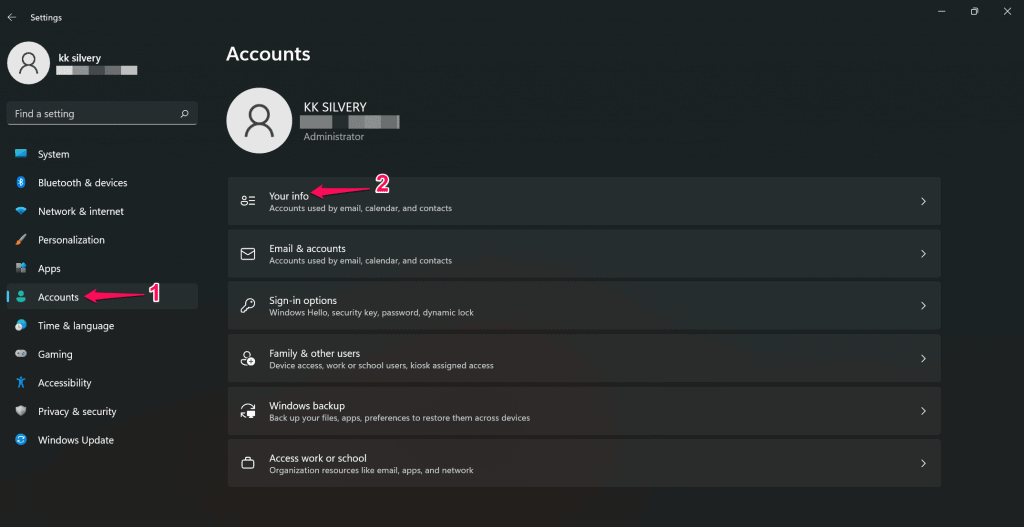
- Scroll down and click on “Accounts” to manage it.

- The default shows up on the screen with the Microsoft site and clicks on the “Sign in” button.

- Enter the email address then click on the “Next” button.

- Enter the password then click on the “Sign in” button.

- Make sure the connected devices are on the list.

- Click on “Your info” located at the top menu.

- Scroll down and find the “Language info” section.

- Select “Preferred language” then click on the “Add a language” button.

- Enter the language name or your country name in the search bar.

- I selected English (India) then click on the “Add language” option.

- My account has set English (India) as the default language.

- Click on “Done” to finish the task.
MS account users can add multiple languages in the language section and there are no limitations here. Your Windows PC will set the default language next time you install the operating system.
RELATED GUIDES:
- How To Fix Windows 11 Blue Screen of Death Errors
- How To Check GPU Temperature in Windows 11
- How To Change MAC Address on Windows 11
- Fix Ethernet Doesn’t Have a Valid IP Configuration Error
Conclusion
Users can change the system language in Windows 11 and it is possible in all editions. You have complete control over the language settings in the software, so don’t worry about getting trapped in the language. You can switch between multiple languages in the system and it will be available in the keyboard layout as well. Let us know what do you think about the Windows 11 language system in the comment section below.