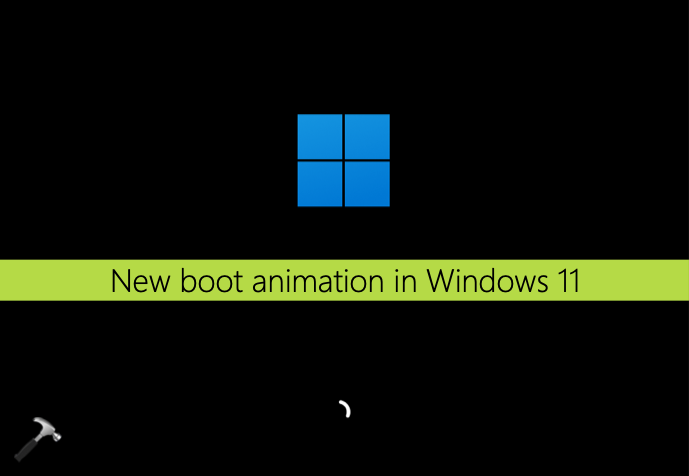
Заменив логотип Windows на загрузочном экране Windows 11, Microsoft почему-то оставила старую загрузочную анимацию — вращающиеся по кругу точки, хотя новая анимация, используемая в так и не увидевшей свет Windows 10X, в одиннадцатой версии системы имеется. Новая загрузочная анимация имеет вид сплошной закруглённой вращающейся линии, в стиле WinUI, если кто помнит название дизайна Windows 10X.

Так вот, вы можете ее включить прямо сейчас, не дожидаясь момента, когда это сделают, а может и не сделают разработчики.
Активируется новая анимация простым твиком реестра.
Откройте редактор Regedit одноименной командой и разверните ветку:
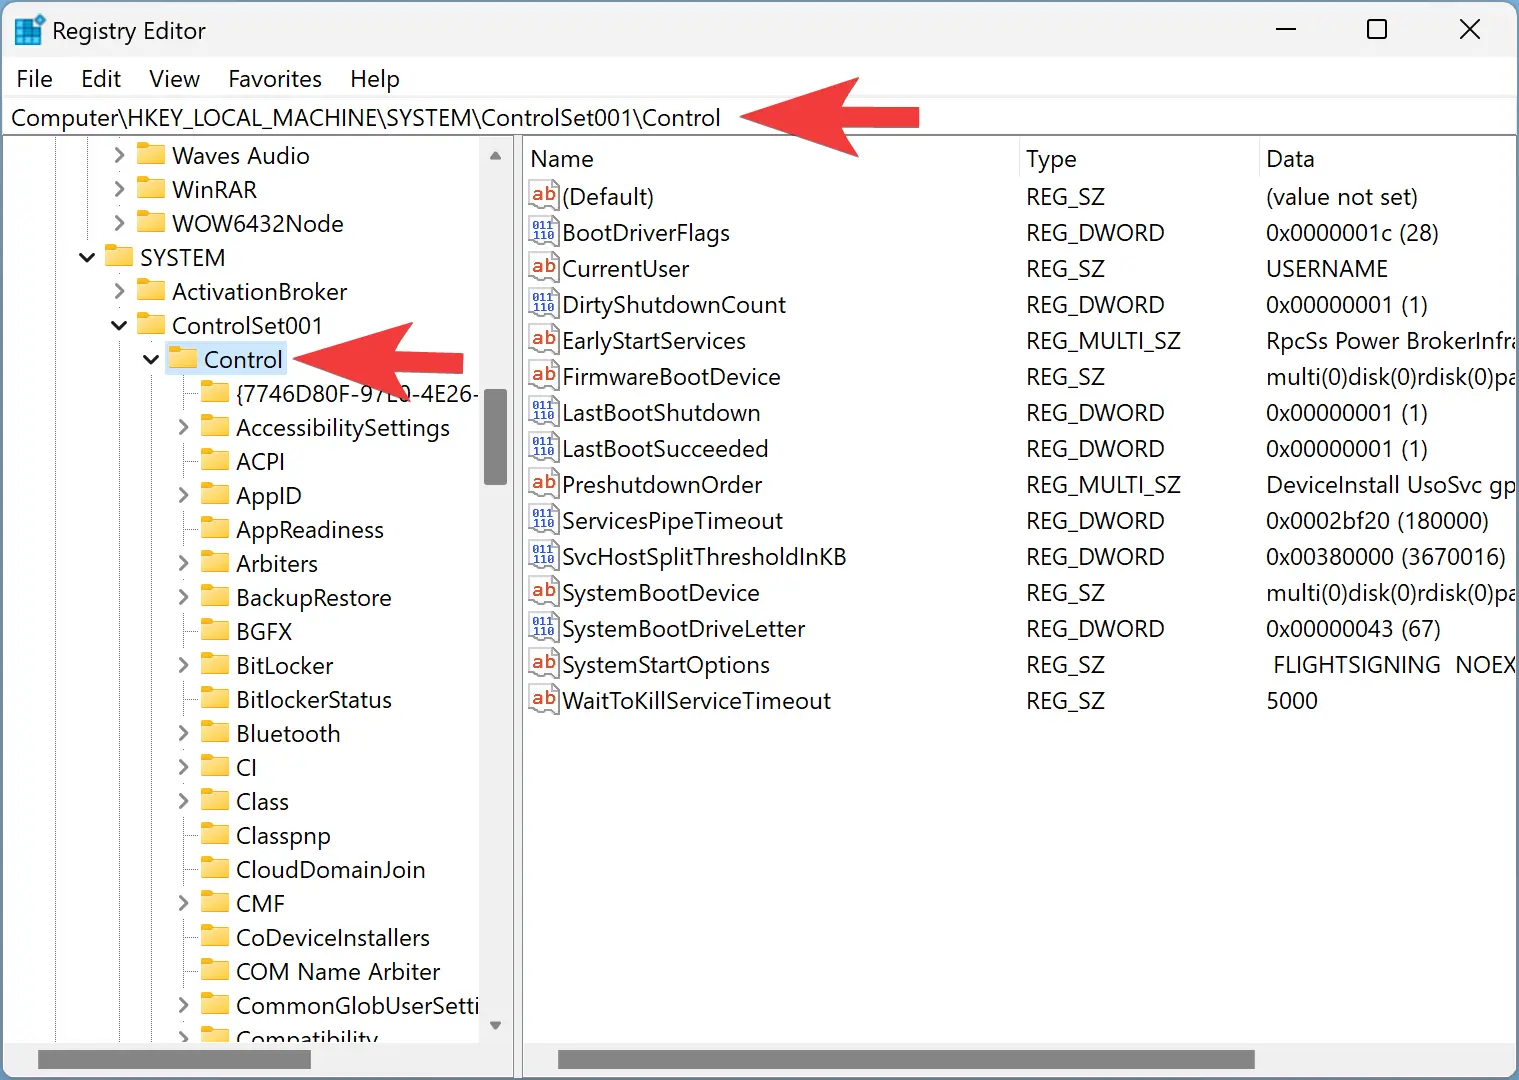
HKLM\SYSTEM\ControlSet001\Control
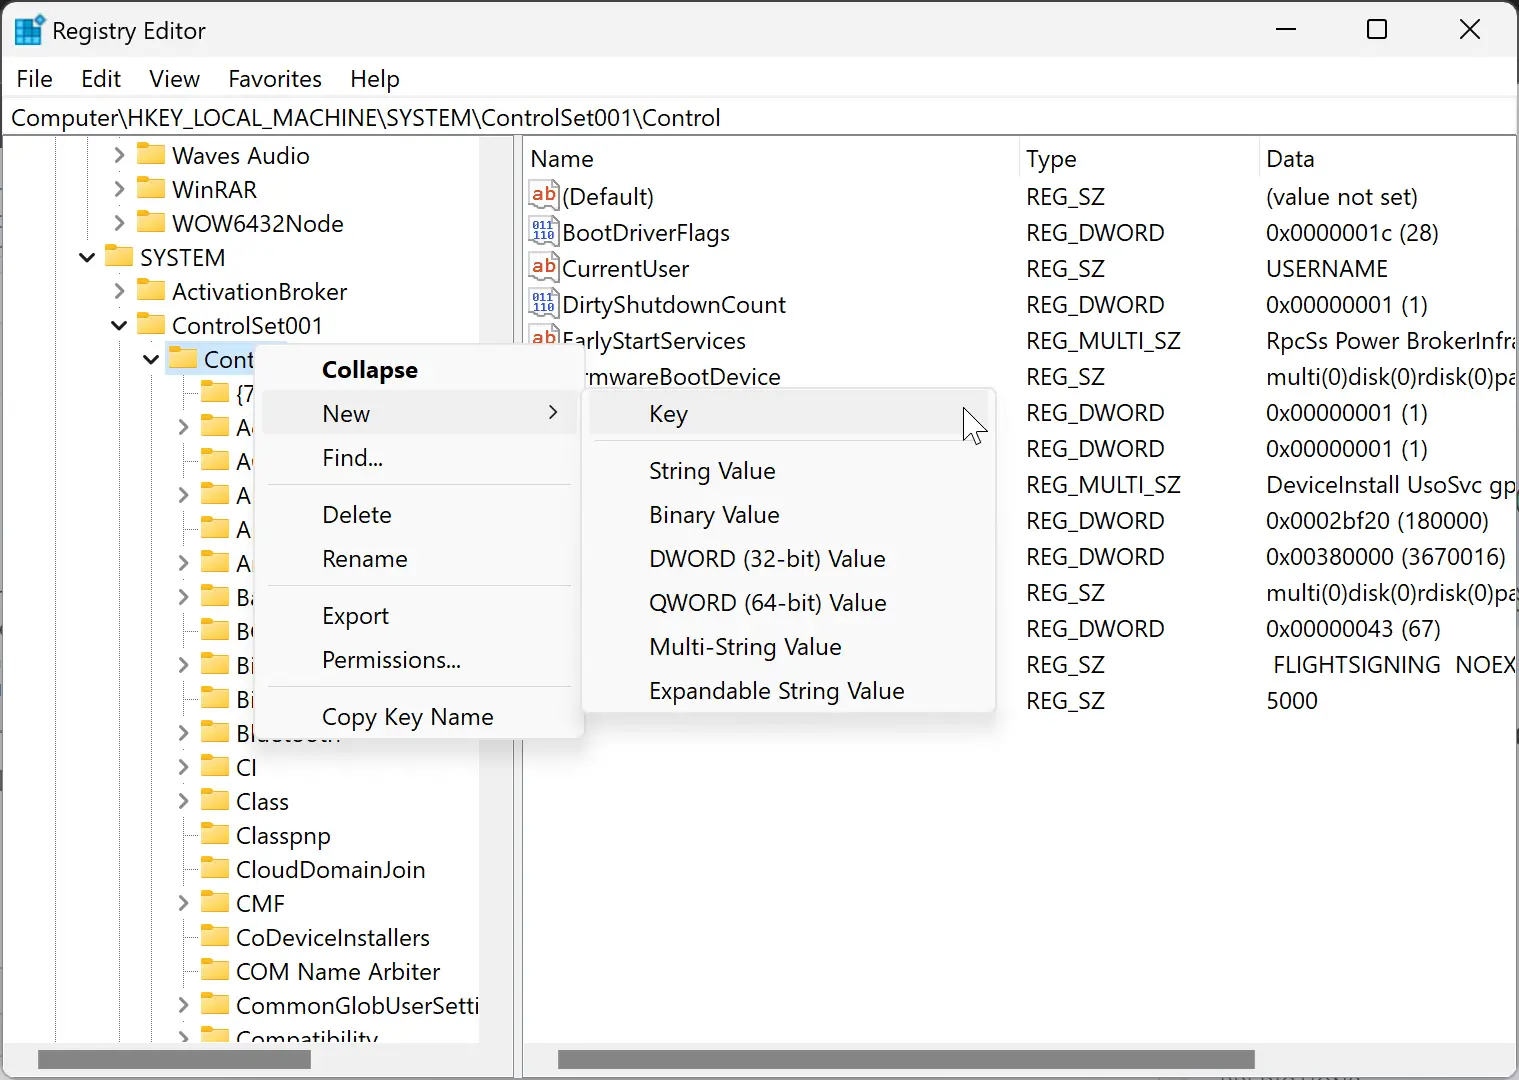
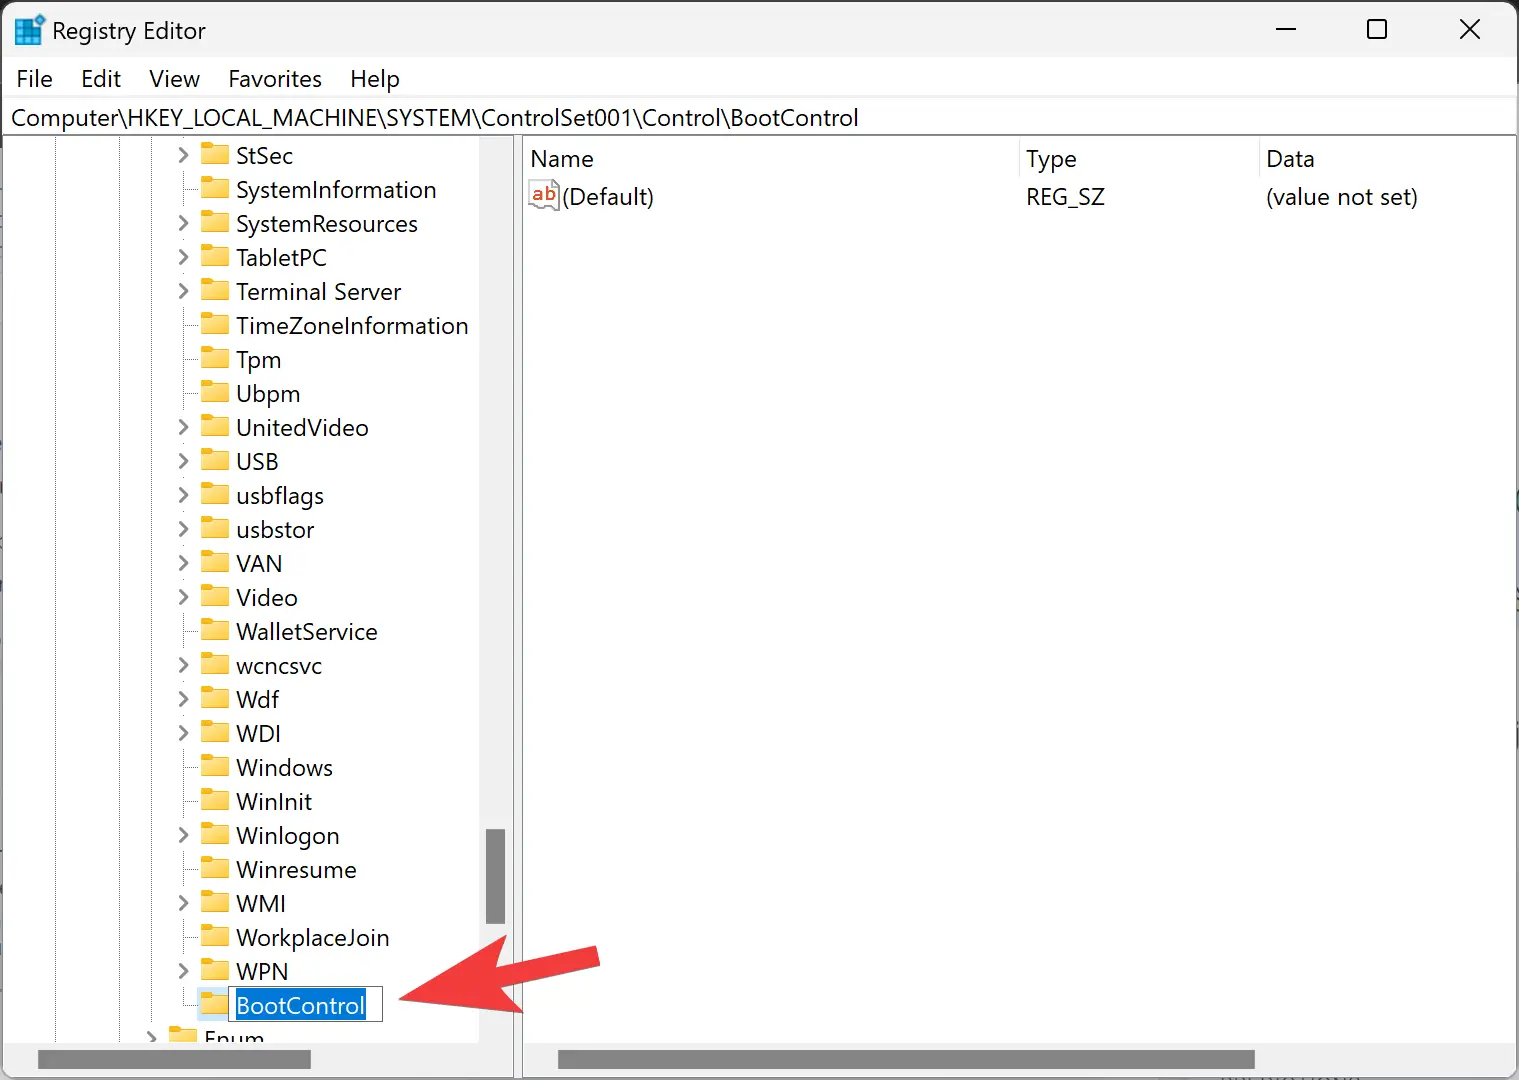
В последнем каталоге вам нужно будет создать еще один подраздел с именем BootControl,
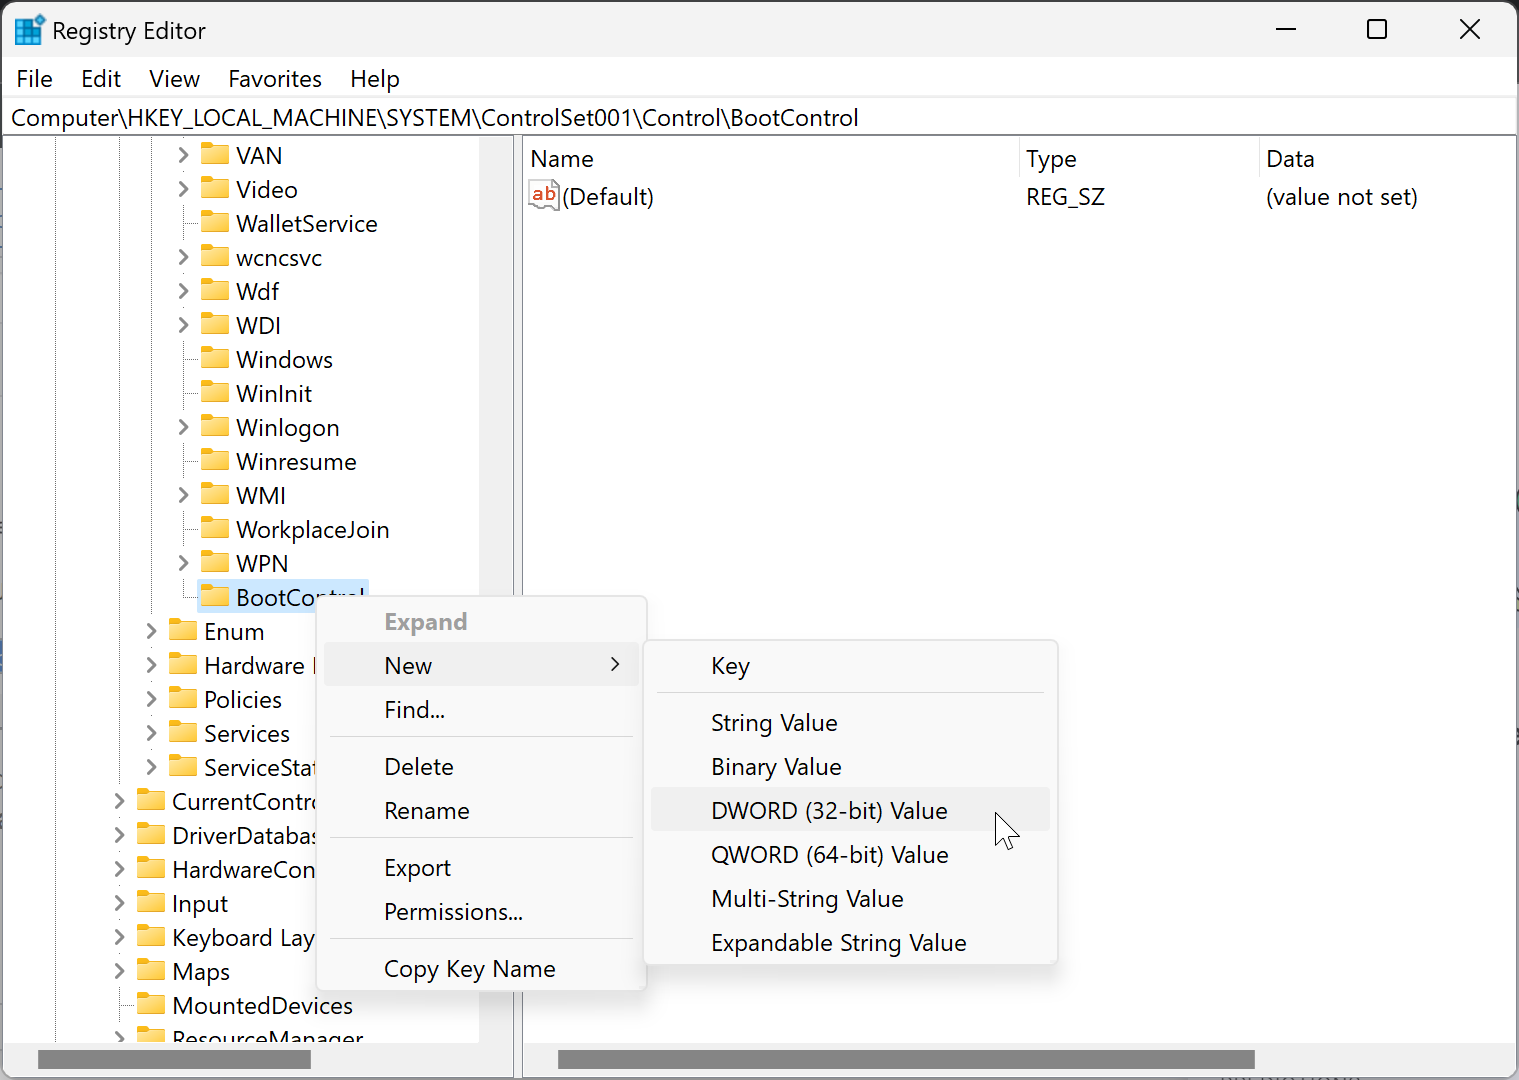
в нём же в свою очередь создать параметр типа DWORD.
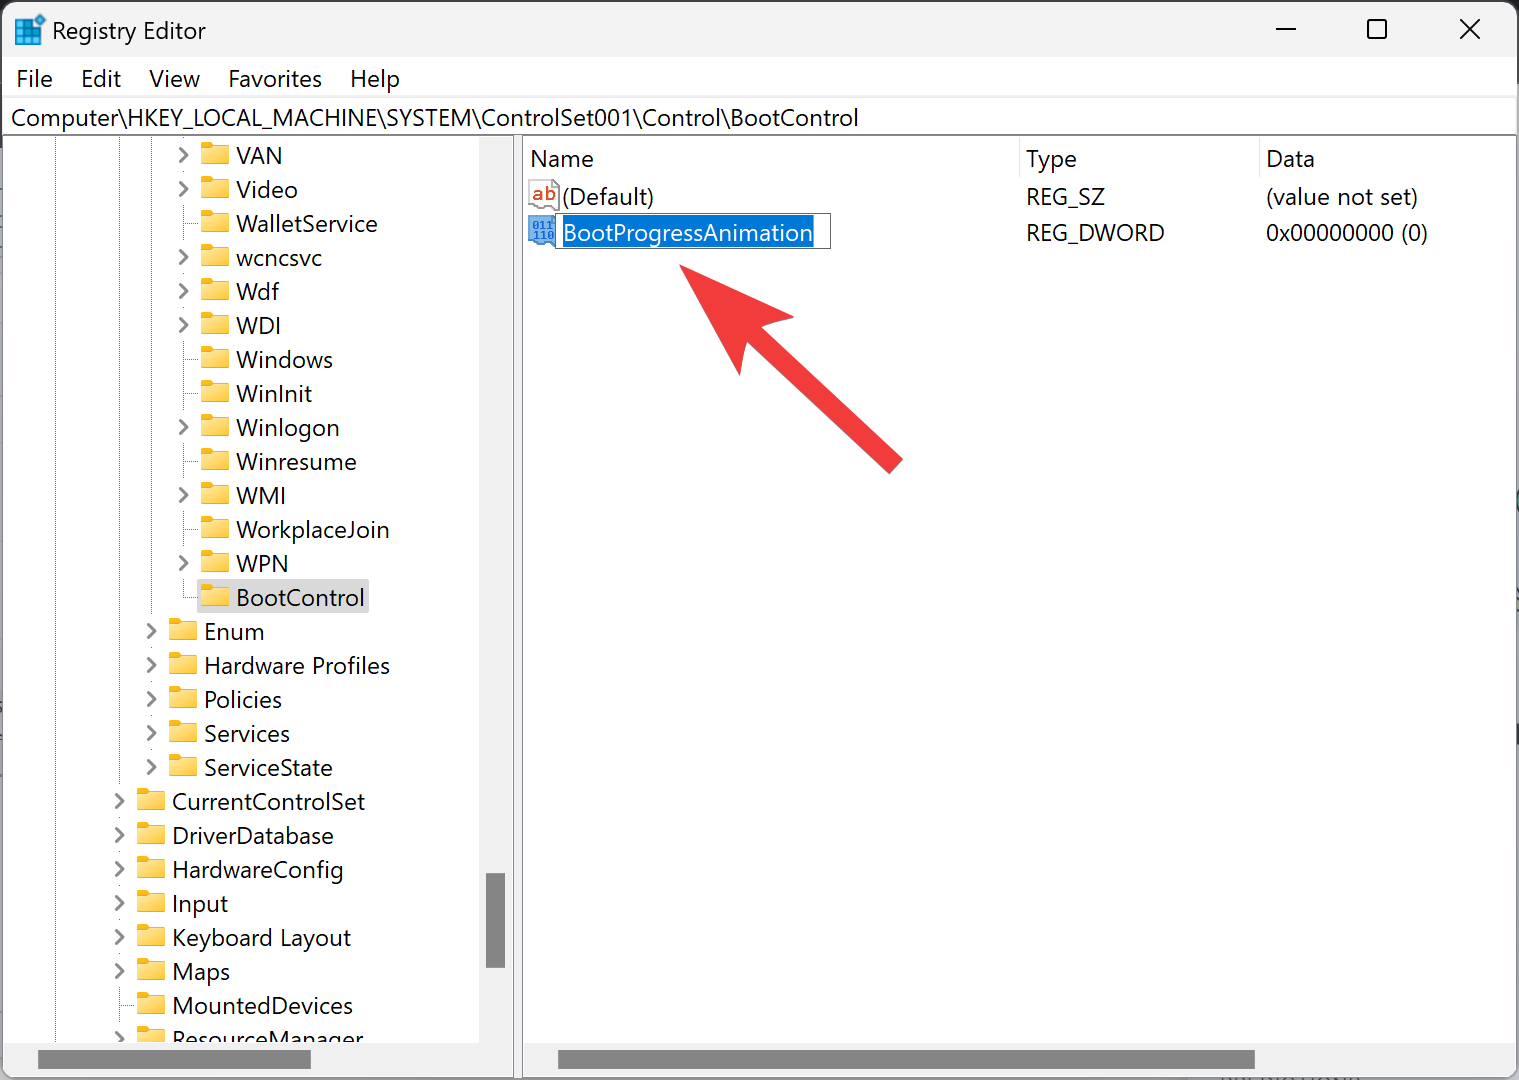
И дать ему название BootProgressAnimation.
В качестве значения новосозданного параметра устанавливаем 1, если хотим включить новую анимацию или 0, если желаем восстановить анимацию старого вида.
Изменения вы должны увидеть уже после первой же загрузки операционной системы.
К слову, твик этот должен работать и в Windows 10, по крайней мере, он успешно работал еще в сборке 19587.
![]() Загрузка…
Загрузка…
Give your Windows 11 a unique touch with a custom boot animation.
There was much speculation Microsoft would release a Windows 10X build, which had a progressive ring boot animation. That animation is an alternative to the dotted ring you see during Windows 11’s boot sequence. However, the big M has scrapped 10X.
Nevertheless, Microsoft’s latest desktop OS has retained some design features from 10X. You can still activate 10X’s alternative ring animation in Windows 11 even though there’s no visible option for enabling it. This is how you can change Windows 11’s boot animation to a progressive ring alternative.
How to Change the Boot Animation by Manually Editing the Registry
Windows 11’s progressive boot animation can be considered a hidden design feature. To enable it, a registry tweak needs to be applied that creates a new BootControl key with a BootProgressAnimation DWORD. That’s a pretty straightforward registry tweak you can apply as follows:
- Press the Win + R Run shortcut and input Regedit inside the Open box.
- Then select OK to view Registry Editor.
- Place the cursor inside Registry Editor’s address bar to select and clear the current location.
- Open the Control key by inputting this path and pressing Return:
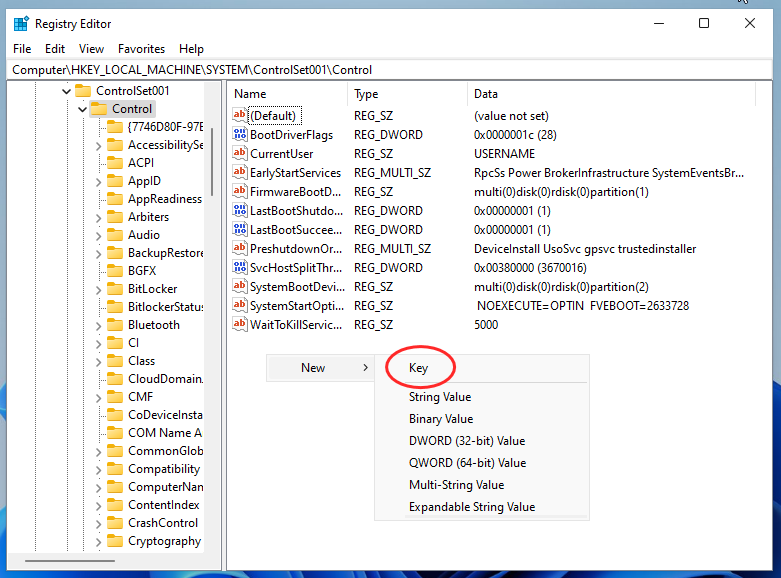
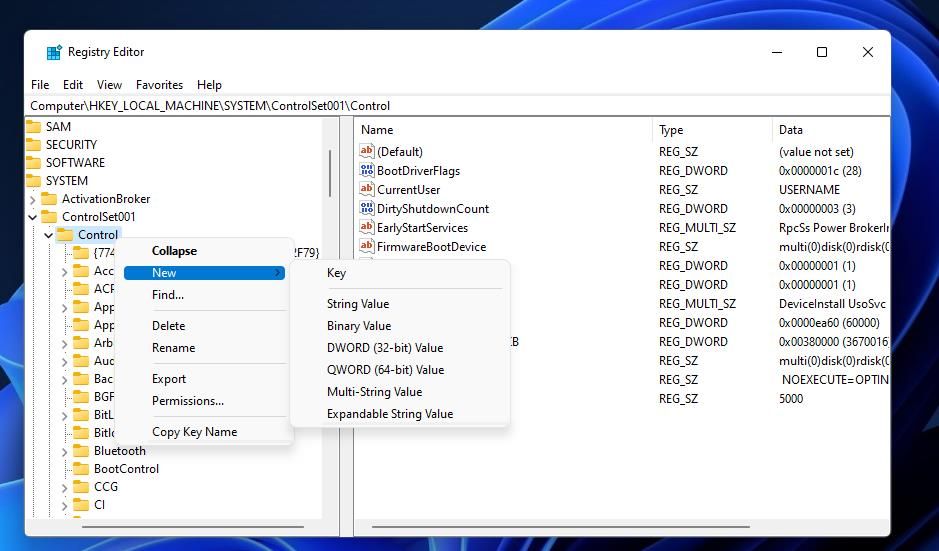
HKEY_LOCAL_MACHINE\SYSTEM\ControlSet001\Control - Next, right-click Control and select the New context menu option.

- Select the Key option to add a new registry entry.
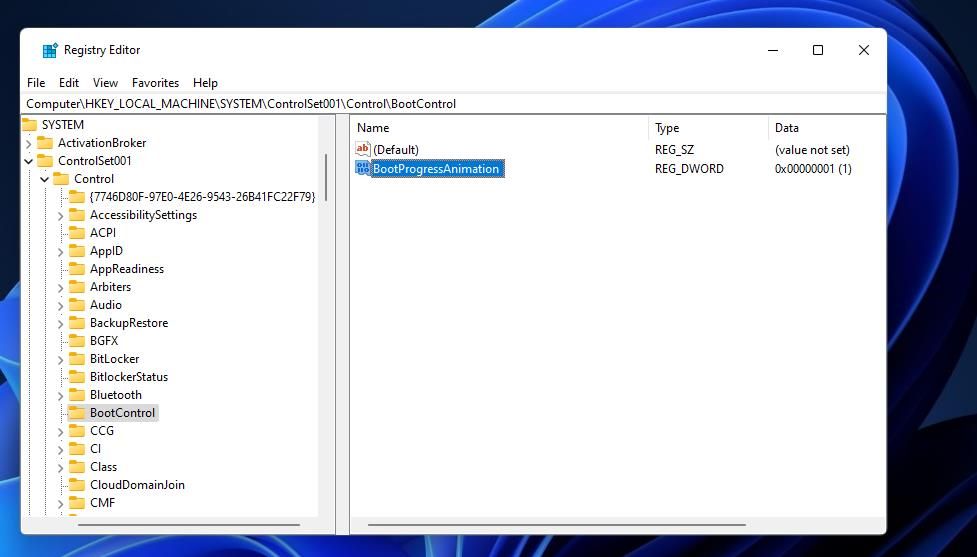
- Type BootControl to be the new subkey’s title.
- Select the BootControl key.
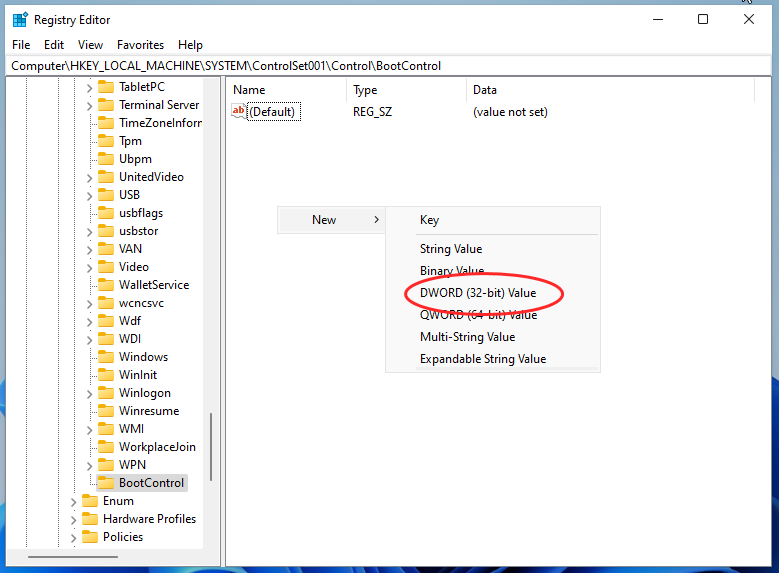
- Right-click inside the Registry Editor’s right pane and select New > DWORD (32-bit).
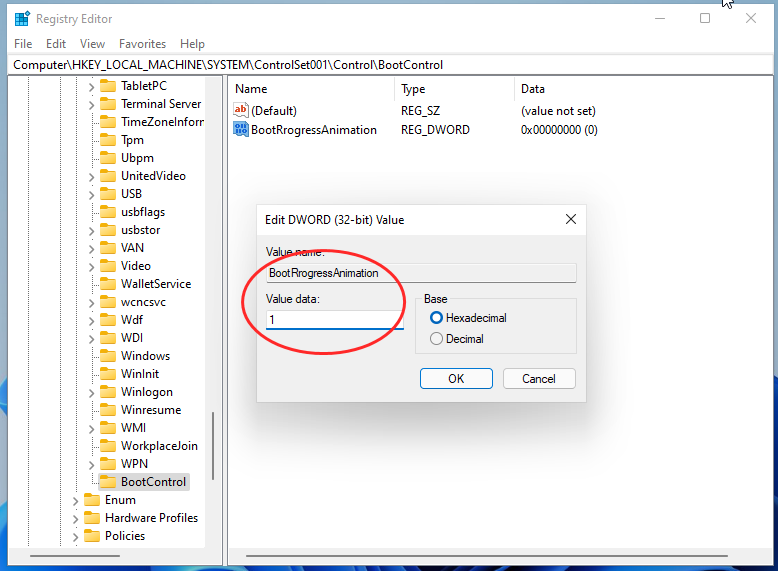
- Enter BootProgressAnimation in the text box for the DWORD.

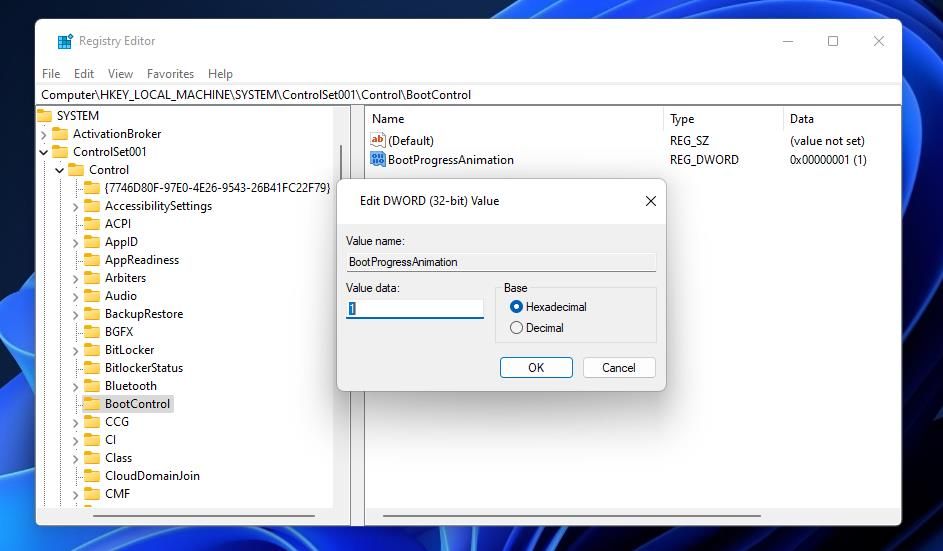
- Double-click the BootProgressAnimation DWORD to view a value window for it.
- Erase 0 and input 1 in the Value data box.

- Select the OK option to save the new value.
- Click the Registry Editor’s window X button to close.
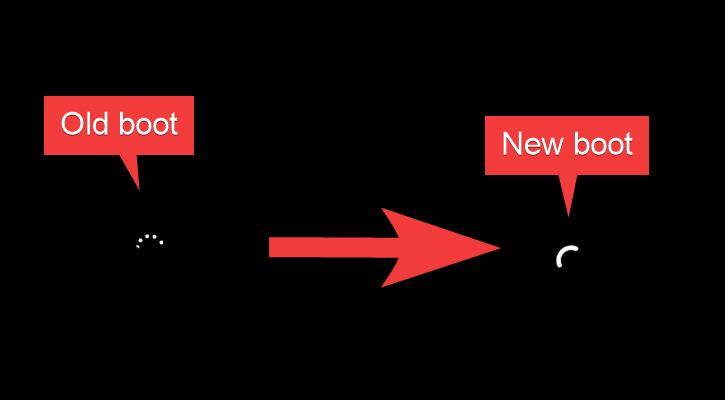
Now it’s time to see Windows 11’s new progressive ring boot animation. Click the Restart Start menu option. When Windows restarts, you’ll see a different ring, shown in the screenshot below.

The difference between them is that the new animation is a solid ring. The default Windows 11 boot ring is a dotted one. The solid ring from 10X is a slightly clearer and bolder boot animation.
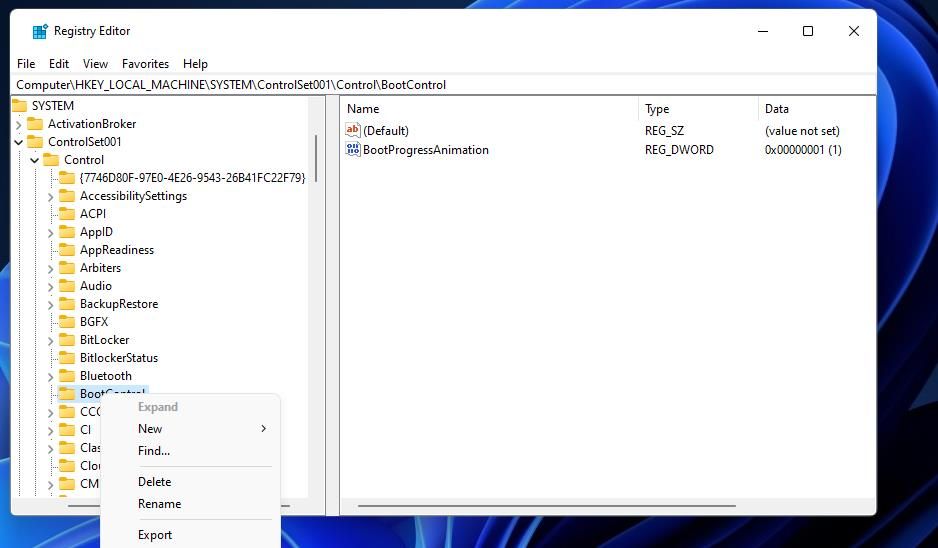
However, you can restore Windows 11’s original boot animation if you prefer it. Open the Control key, as covered in steps one to four above. Then right-click the BootAnimation key you added and select Delete. Click Yes to confirm you’re sure about erasing that registry entry.
How to Change the Boot Animation With a Registry Script
A registry script is a file that applies registry modifications. You can set up a registry script that enables the progressive ring animation in Windows 11, which is a slightly more automated method. This is how to set up a script that changes the boot animation:
- Press the taskbar button that has a magnifying glass icon.
- Open Notepad by right-clicking the search result for that text editor and selecting Run as administrator.
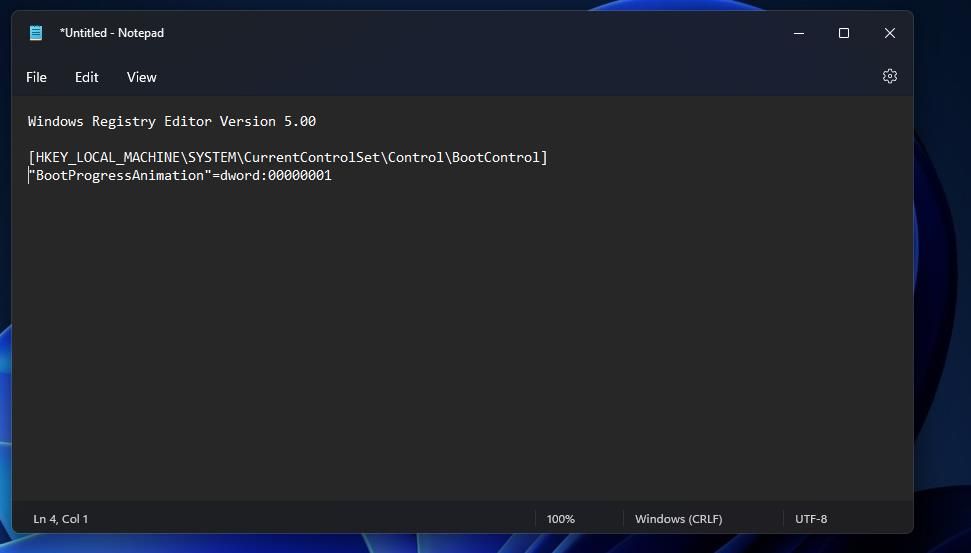
- Select the script text below, and press the Ctrl + C key combination for copying.
Windows Registry Editor Version 5.00[HKEY_LOCAL_MACHINE\SYSTEM\CurrentControlSet\Control\BootControl]
"BootProgressAnimation"=dword:00000001 - Click Notepad’s Edit menu, and select a Paste option from there.

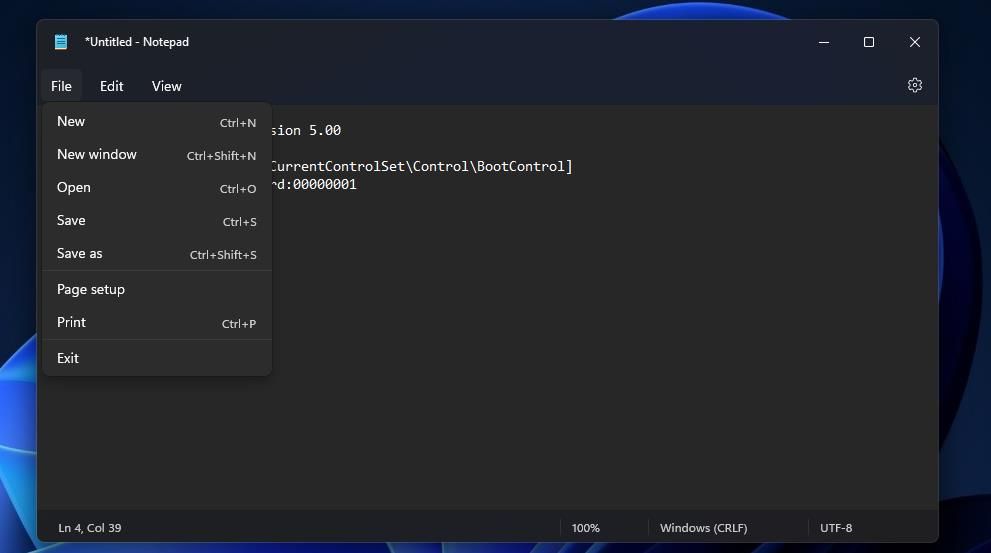
- Then select the File menu.
- Click Save As to view options for saving.

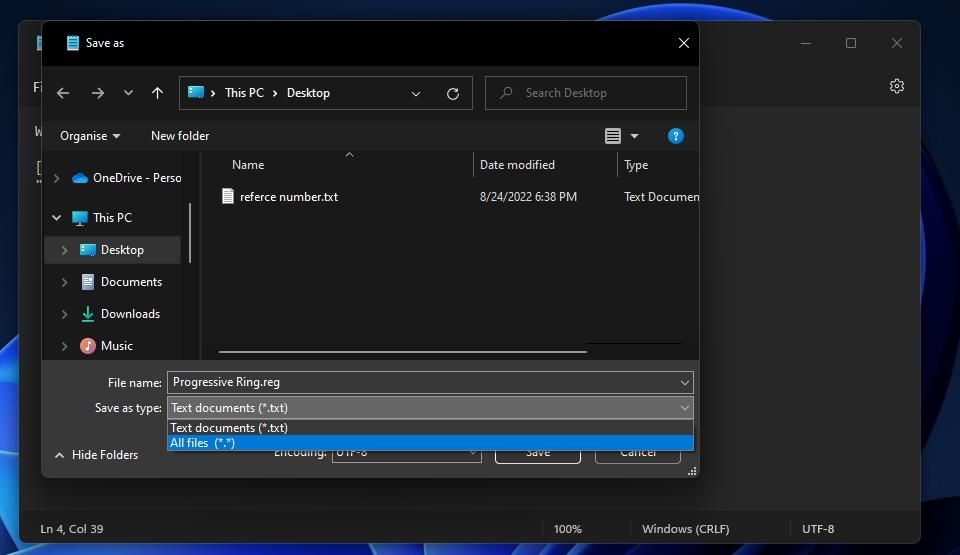
- Next, click anywhere along the Save as type drop-down menu to open it. Select the All files option from there.
- Type Progressive Ring.reg in the File name text box. You can add a different file name there, but the .reg extension must be included at the end.

- Save the script in the Desktop folder so it’s easy to find.
- Click Notepad’s Save option.
- Then close the Notepad app to view the desktop.
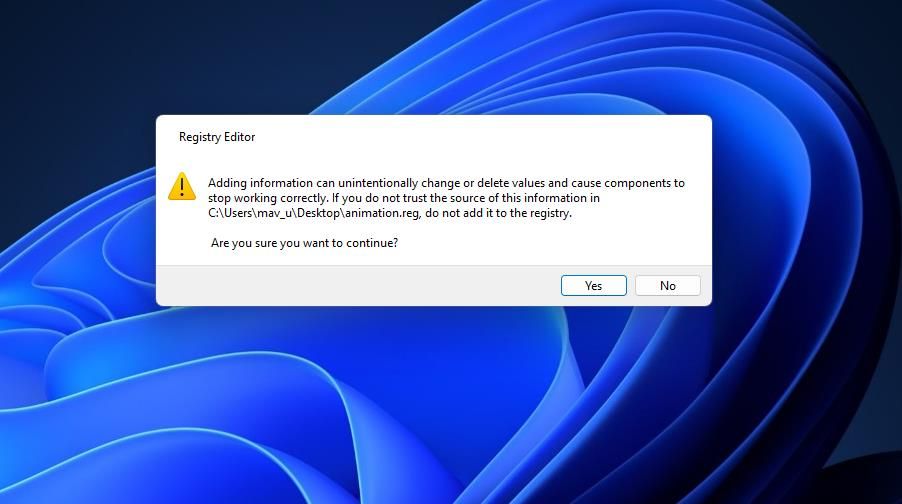
- Double-click the Progressive Ring.reg file on your desktop.
- Press the Yes button when asked to continue.

- Finally, click OK on the Registry Editor window.
Now you’ll see the progressive ring animation when you restart Windows 11. You can disable that animation by deleting its key as covered at the end of method one. Or you can set up a registry script to do it for you. Create a registry script with the same steps above, but paste this code into Notepad instead:
 Windows Registry Editor Version 5.00[HKEY_LOCAL_MACHINE\SYSTEM\CurrentControlSet\Control\BootControl]
"BootProgressAnimation"=-
How to Change the Boot Animation With Winaero Tweaker
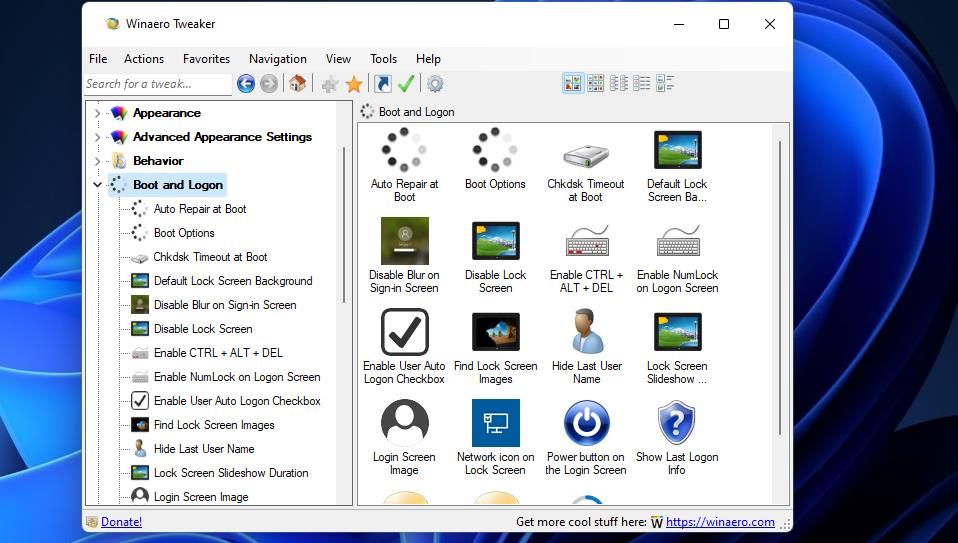
Winaero Tweaker is customization software with which you can change Windows 11’s boot animation. That freeware software incorporates numerous options for customizing the boot and login, among which is a Windows 10X Boot Animation setting. These are the steps for changing the boot animation with Winaero Tweaker:
- First, you’ll need to download and install Winaero Tweaker. You can download the ZIP archive for that software from the Winaero Tweaker website.
- Select the Download Winaero Tweaker link on that website.
- Extract the Winaero Tweaker archive, and install the software with its setup wizard. Our Winaero Tweaker guide for customizing Windows includes full instructions for installing the software.
- Bring up the Winaero Tweaker window.
- Double-click Boot and Logon in the navigation sidebar.

- Select Windows 10X Boot Animation at the bottom of the Boot and Logon category.
- Click the Enable Boot Animation from Windows 10X checkbox to select that setting.

- Then restart your Windows 11 desktop or laptop to see a new ring animation.
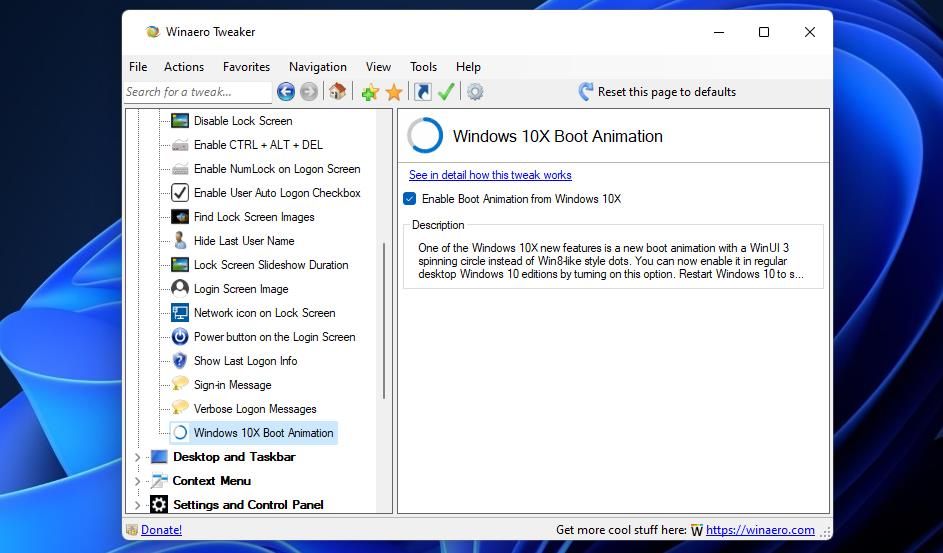
If you decide you don’t want a progressive ring circle, you can restore the default animation with Winaero Tweaker’s settings. Deselect the Enable Boot Animation from Windows 10X checkbox. Or you can click the Reset this page to defaults button.
Winaero Tweaker also includes some other interesting boot and login options worth noting. For instance, you can disable the boot animation ring altogether. To do that, click Boot Options to view the settings below. Unchecking the Enable loading circle checkbox will disable that animation. You can also remove the Windows 11 logo from the boot sequence by deselecting the Enable Windows logo box above that setting.
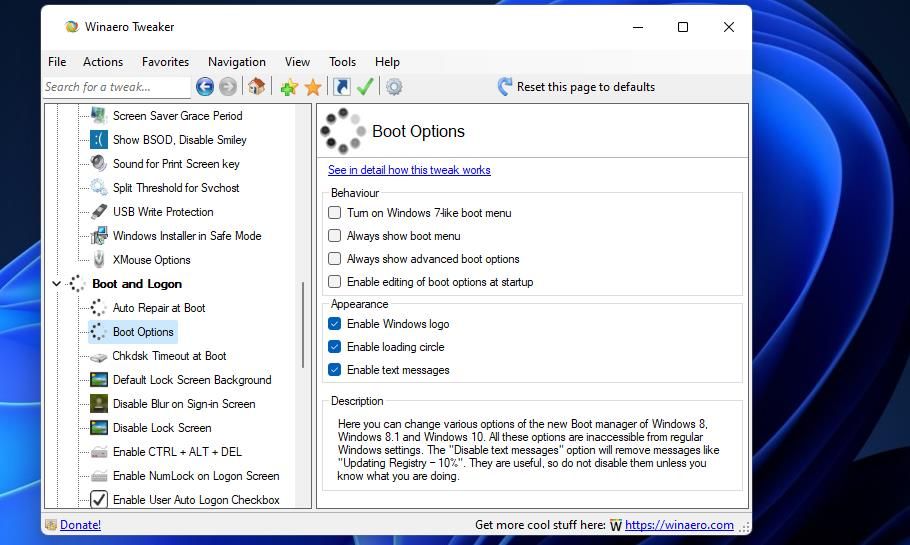
There you can also select four boot behavior settings. You can set Windows 11 to always display startup settings during startup by selecting the Always show advanced boot menus checkbox. Or select Always show boot menu to view the Windows Boot Manager when you start up your PC.
Add a Stylish New Boot Animation to Windows 11
So, how do you like the new 10X progressive ring boot animation in Windows 11? Some users will probably love the more stylish ring, but others may prefer the old one. Try enabling the progressive ring animation with one of the methods above to see which one you prefer.
When Windows 11 starts or boots, the default boot screen (startup screen) displays that contain the animated circle of dots. A few Windows users know that Windows 11 also comes with an alternate vibrant boot screen called progressive ring animation.
By default, you see doted boot when you start your computer, and progressive ring animation remains hidden. Microsoft has added this new secret boot screen animation in an older build of Windows 11 (build 22449) and later stable builds of Windows 11.
As mentioned above, by default, the new boot animation remains disabled, and you see the classic circle of dots animation on the Windows 11 boot screen. However, if you need, you can tweak the Registry to activate and enable the new progressive ring animation on Windows 11 boot screen.
Initially, the progressive ring animation was proposed for Windows 10, but due to some reason, the plan was dropped. It is still hidden on Windows 11, but you can enable it using a registry tweak if you need it.
How to Enable New Progressive Ring Boot Animation in Windows 11?
To enable and use the new progressive ring boot animation in Windows 11, do the following steps:-
Step 1. First, open the Registry Editor.
Step 2. Then, navigate to the following key in the left sidebar of Windows Registry:-
HKEY_LOCAL_MACHINE\SYSTEM\ControlSet001\Control
Step 3. After that, right-click the Control folder and select New > Key.
Step 4. Rename the newly created key BootControl.
Step 5. After that, right-click on the BootConrol folder and select New > DWORD (32-bit) Value.
Step 6. Rename the newly created REG_DWORD as BootProgressAnimation.
Step 7. Double-click the BootProgressAnimation and set its Value data to 1 to enable the progressive ring animation.
Note: If you want to see dotted animation in the boot screen, set the Value data to 0.
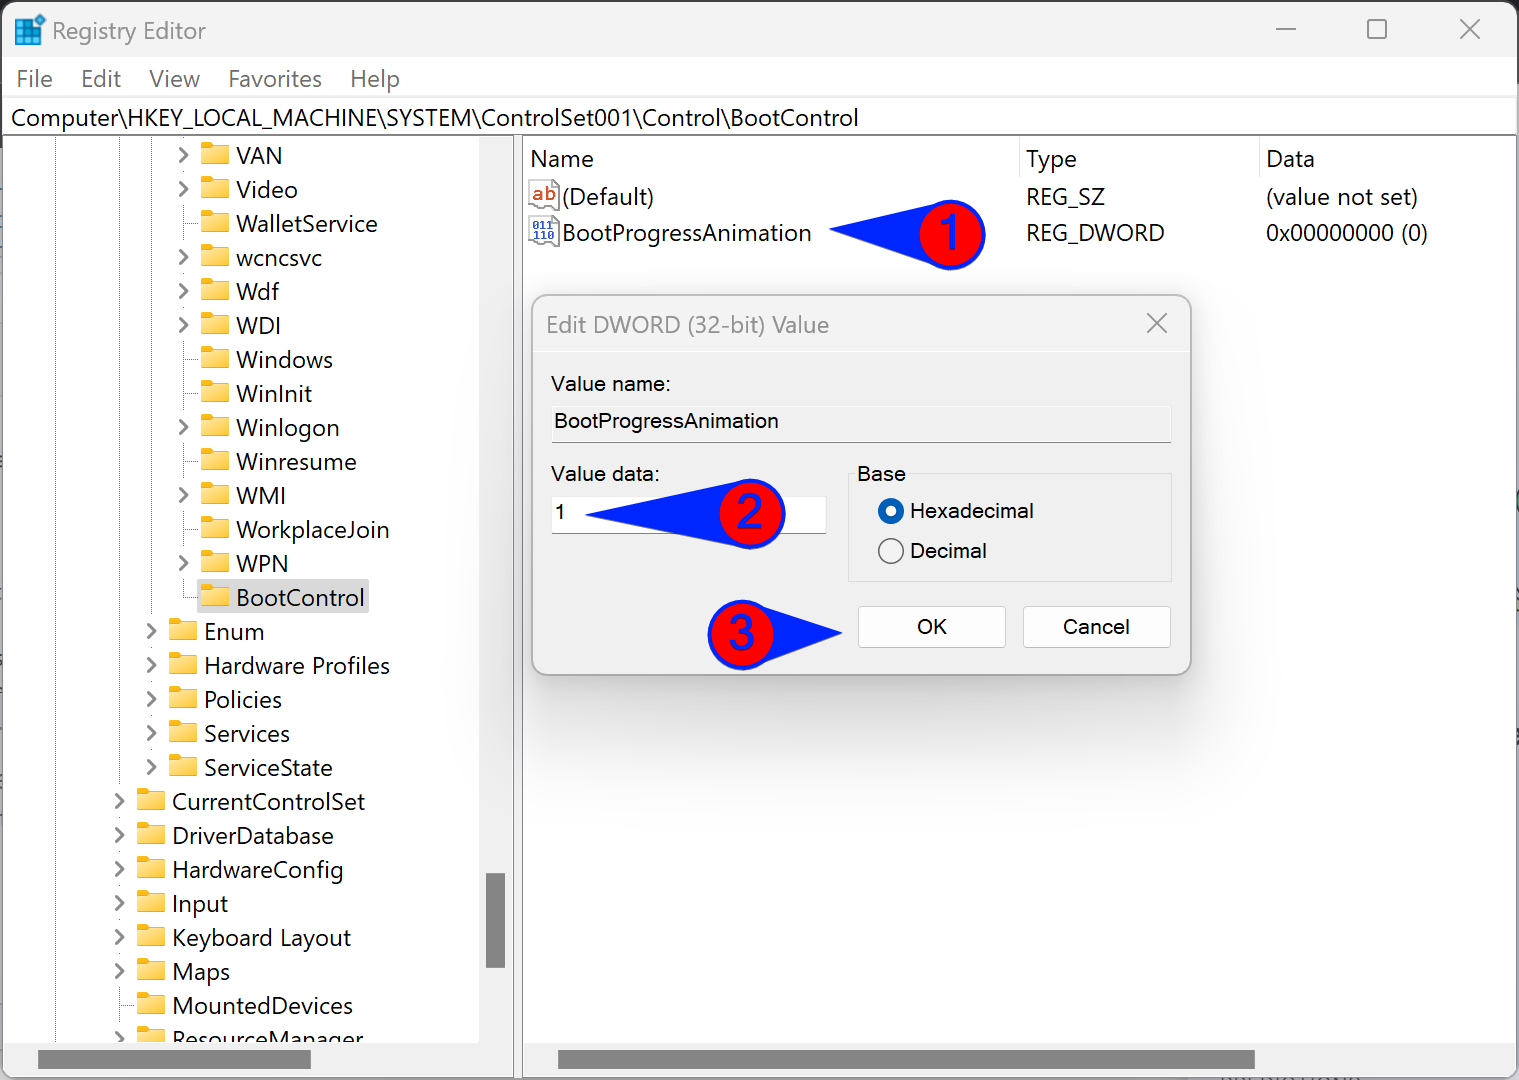
Step 8. Hit the OK button.
Step 9. Restart your computer to see the progressive ring animation on the boot screen.
That’s it.
Conclusion
In conclusion, Windows 11 comes with a new and vibrant boot screen animation called the progressive ring animation that remains hidden by default. However, with a simple registry tweak, you can enable and activate it. This new animation was initially planned for Windows 10 but was dropped. Enabling this new boot screen animation can add a refreshing change to your Windows 11 boot experience. Just follow the easy steps mentioned above to activate the progressive ring animation and enjoy a new boot screen animation on your Windows 11 PC.
When you start your Windows 11, first thing you will see the boot animation on screen. In earlier Preview Builds of Windows 11, we have a spinner animation which is there since Windows 8. If you are trying the new Preview Builds of Windows 11, with some recent builds, you might have noticed that Microsoft introduced new boot animation. This new animation looks really nice to me. However, there are some users who are used to with the older spinner animation. This article is for those users. In this guide, we’ll see how to change boot animation in Windows 11.
So here is the new boot animation with Windows 11. Since Windows 11 uses secure boot, you may not be able to see the Windows 11 logo on boot screen. Instead, you will be seeing your device manufacturer’s logo. However, the boot animation will still appears on such a screen.
You can try the following registry manipulation in order to change or restore older spinner boot animation.
How to change boot animation in Windows 11
 Registry Disclaimer: The further steps will involve registry manipulation. Making mistakes while manipulating registry could affect your system adversely. So be careful while editing registry entries and create a System Restore point first.
1. Run regedit command to open Registry Editor.
2. In left pane of Registry Editor window, navigate to following registry key:
HKEY_LOCAL_MACHINE\SYSTEM\ControlSet001\Control
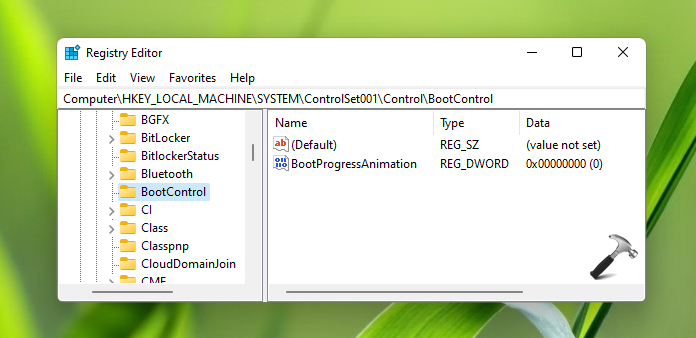
3. In the right pane of Control registry key, create a new registry key named BootControl. Now come to the right pane of newly created registry key. In the empty space, right click and select New > DWORD Value. Name this newly created registry DWORD as BootProgressAnimation.
4. Let the registry DWORD set its Value data as 0.
5. Close Registry Editor.
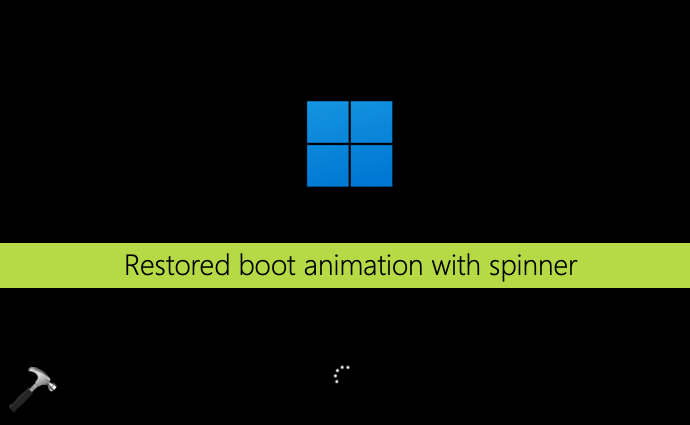
After restarting your system, you will see that the older spinner animation is now available on the boot screen.
If you ever wish to restore newer boot animation later, you can simply set BootProgressAnimation registry DWORD (REG_DWORD) to 1.
You can also check out following video for live illustration of above method:
That’s it!
READ THESE ARTICLES NEXT
- Fix: Total Identified Windows Installations 0 on Windows 11
- FIX: ‘bootrec /fixboot’ Access Is Denied In Windows 11
- How to disable disk checking at Windows 11 startup
- Fix: Error code 0xc0000225 on Windows 11
- Backup and restore Boot Configuration Data on Windows 11
- Fix: The boot configuration data store could not be opened
- Fix: No bootable device on Windows 11 PC
- How to change boot time in Windows 11/10
- Fix: BOOTMGR is missing error in Windows 11/10
- Fix: Can’t re-enable UEFI plus secure boot in Dell laptops
Hello everyone, today in this article we will show you how to change the startup animation of Windows 11. When you turn on your laptop or restart it, a dotted circle animation is always displayed. These white dots are the startup animation, which moves around the circle and indicates that Windows is loading. If you want it to look more progressive, you can change it to a ring animation. Let’s find out how to do it! So, without further ado, let’s get started.
When you boot a Windows 11 device, you see the default boot screen (also known as the start screen) containing an animated circle of dots. Did you know that Windows 11 also has an alternate start screen that displays a new animation called a progressive loop animation? It appears that your version of Windows 11 boots with the old startup animation instead of the new one (also called the 10X startup animation). The improved startup animation is much more eye-catching than the old one, and it appears that Microsoft is slowly incorporating motion graphics into the Windows interface. Before proceeding, we recommend you to update windows
How to Change Boot Animation on Windows 11
Step 1: Press the Win + R Run shortcut and input Regedit inside the Open box.
Step 2: Then select OK to view Registry Editor.
Step 3: Place the cursor inside Registry Editor’s address bar to select and clear the current location.
Step 4: Open the Control key by inputting this path and pressing Return:
HKEY_LOCAL_MACHINESYSTEMControlSet001Control
Step 5: Next, right-click Control and select the New context menu option.
Step 6: Select the Key option to add a new registry entry.
Step 7: Type BootControl to be the new subkey’s title.
Step 8: Select the BootControl key.
Step 9: Right-click inside the Registry Editor’s right pane and select New > DWORD (32-bit).
Step 10: Enter BootProgressAnimation in the text box for the DWORD.
Step 11: Double-click the BootProgressAnimation DWORD to view a value window for it.
Step 12: Erase 0 and input 1 in the Value data box.
Step 13: Select the OK option to save the new value.
Step 14: Click the Registry Editor’s window X button to close.
Final Words
We hope you enjoyed our article on how to change the startup animation in Windows 11. As mentioned earlier, by default the new startup animation remains disabled and the classic dot circle is displayed on the Windows 11 startup screen. However, if necessary, you can modify the registry to enable and enable the new progressive loop animation on the Windows 11 start screen. If you liked our article, please share it with others.
I hope you understand this article, How to Change Boot Animation on Windows 11.
James Hogan
James Hogan is a notable content writer recognized for his contributions to Bollyinside, where he excels in crafting informative comparison-based articles on topics like laptops, phones, and software. When he’s not writing, James enjoys immersing himself in football matches and exploring the digital realm. His curiosity about the ever-evolving tech landscape drives his continuous quest for knowledge, ensuring his content remains fresh and relevant.