В этой инструкции подробно о том, чем может быть вызвана неожиданная ошибка ввода-вывода 0xc00000e9 и как её исправить в зависимости от причин возникновения. Если ошибка с этим кодом сообщает о том, что «не удалось загрузить операционную систему, так как файл системного реестра отсутствует или содержит ошибки», используйте методы из этой статьи, лучше — точки восстановления при их наличии: Восстановление реестра Windows 10.
Возникла неожиданная ошибка ввода-вывода 0xc00000e9 — как исправить
Наиболее частой причиной появления ошибки 0xc00000e9 во время загрузки или установки Windows является проблема с работой SATA-устройств или ошибки/неисправности жесткого диска. Чаще всего речь идет о системном жестком диске, но это не всегда так: например, неисправность второго физического диска или DVD-привода также может приводить к такому же результату.
В зависимости от того, при каких условиях возникает «Неожиданная ошибка ввода-вывода» или что предшествовало её появлению, возможны следующие подходы к решению:
- Если ошибка возникает однократно после завершения работы, а при повторном включении не появляется, а на компьютере или ноутбуке установлена Windows 10 или 8.1, попробуйте отключить быстрый запуск, см. Быстрый запуск Windows 10 (тот же метод подойдет и для 8-ки).
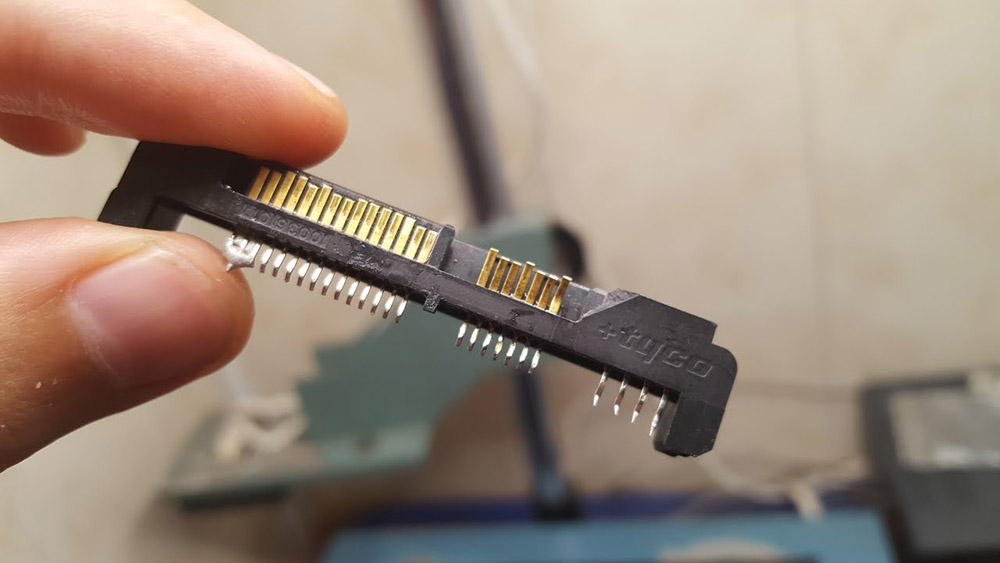
- Попробуйте отключить все накопители, кроме системного диска (включая привод DVD, флешки, карты памяти), а если внутри ПК или ноутбука проводились какие-либо работы (например, после чистки от пыли, установки нового оборудования или просто в тех случаях, когда корпус ПК всегда открыт) — перепроверить подключение системного жесткого диска или SSD (при SATA-подключении — как со стороны самого диска, так и со стороны материнской платы, при возможности также следует попробовать использовать другой кабель и разъем SATA на материнской плате).
- На экране с ошибкой вам будет предложено нажать F8 для того, чтобы открыть параметры загрузки. Нажмите F8 (или Fn+F8) и проверьте, загружается ли компьютер в безопасном режиме. Если загрузка прошла успешно, откройте свойства «Диска C» и выполните проверку на вкладке «Сервис».
- Если безопасный режим не запускается, можно попробовать загрузиться с загрузочной флешки с Windows, нажать клавиши Shift+F10 (или Shift+Fn+F10 на некоторых ноутбуках) и использовать командную строку для проверки жесткого диска на ошибки с помощью chkdsk (учитывайте, что при загрузке диск может иметь букву, отличающуюся от C, используйте Diskpart, чтобы определить текущую букву системного раздела диска, также в некоторых случаях может быть необходимым выполнить проверку скрытых разделов). Также вы можете использовать утилиты проверки жестких дисков с какого-либо LiveCD.
- Попробуйте использовать загрузочную флешку с вашей версией Windows для восстановления загрузчика системы, см.: Восстановление загрузчика Windows 10, Восстановление загрузчика Windows 7.
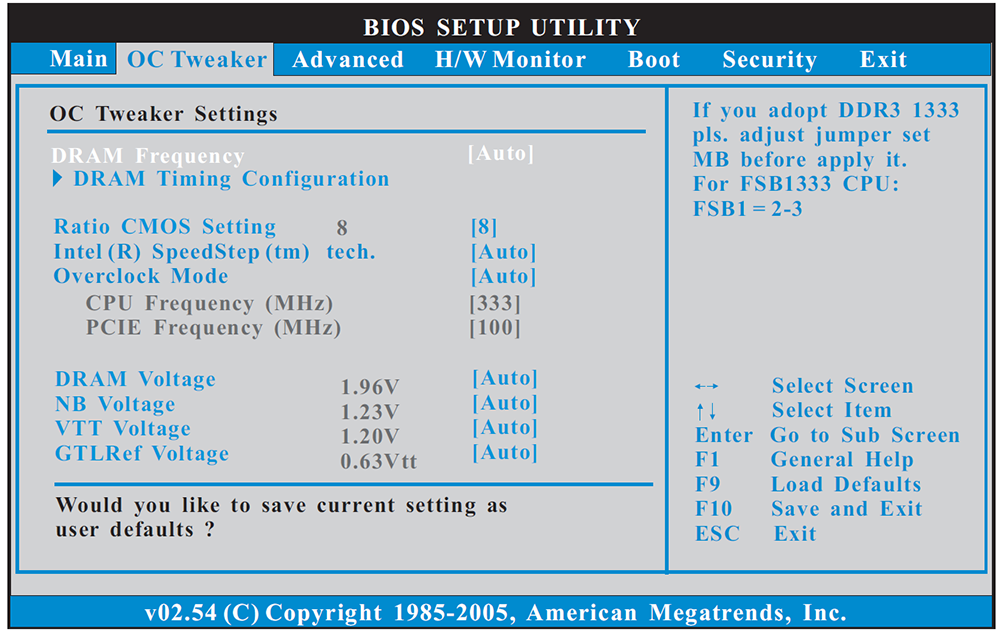
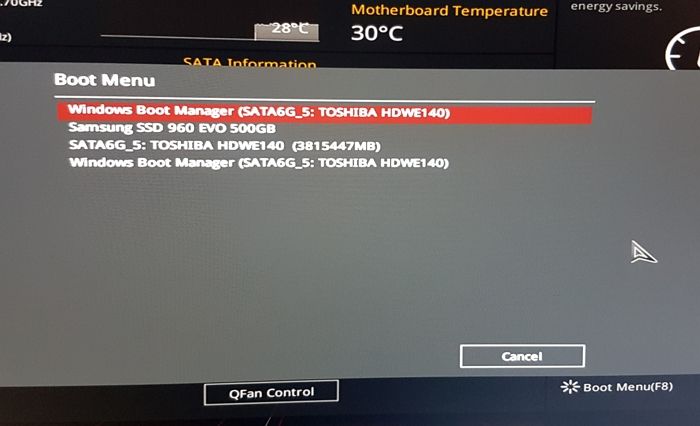
- Перепроверьте параметры БИОС, в частности, режим работы SATA (обычно — AHCI) и режим загрузки (ошибка может быть вызвана переключением из режима UEFI в Legacy или наоборот, когда система на диске установлена в ином режиме).
- По сообщению в комментариях, иногда помогает сброс модуля TPM в БИОС компьютера или ноутбука. Важно: при включенном шифровании Bitlocker и отсутствии ключей восстановления это может сделать недоступными данные на диске.
Обычно, что-то из перечисленного помогает в решении проблемы, однако, если в вашем случае этого не произошло, возможно, имеет смысл попробовать переустановить Windows на компьютере.
Также учитывайте тот факт, что ошибка может быть и следствием аппаратных проблем с жестким диском, особенное если вы роняли ноутбук, жесткий диск в последнее время часто издавал странные звуки или вам регулярно приходилось экстренно выключать компьютер (из розетки или кнопкой питания) во время работы.
В случае, если описанные сценарии появления ошибки 0xc00000e9 — это не то, что происходит в вашем конкретном случае, опишите, как, в какой системе и при каких условиях проблема проявилась у вас, а я постараюсь подсказать возможное решение.
Are you facing error 0xc00000e9 now? Don’t worry. This post will give you 9 solutions to solve this issue. You can adopt one of them according to your situation to boot up your computer. Please read on to get them!
What Is 0xc00000e9?
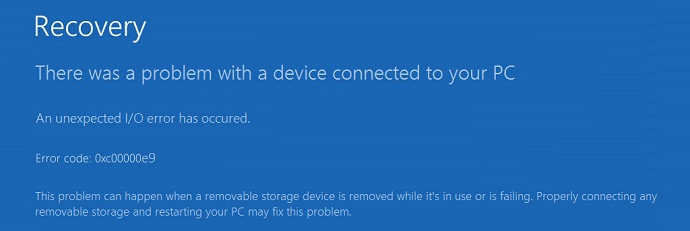
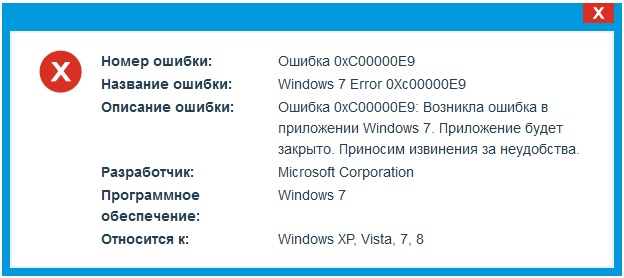
Some users may encounter error code 0xc00000e9 when they power on computers. This error will prevent the computer from booting up. They may receive messages shown like the following pictures. Sometimes, “File: Boot BCD” will appear above the error code 0xc00000e9.
Many people will search how to fix 0xc00000e9 boot BCD in Google or seek help in forums. Fortunately, the status 0xc00000e9 will indicate the causes of the BSOD problem. The error code 0xc00000e9 may be caused by an unexpected I/O error that is related to storage devices, a missing or corrupt system registry file, or something else.
Then, how many factors will cause error code 0xc00000e9? Here are some of them:
- Loose or damaged connection of removable storage devices.
- Missing or corrupt system files such as the registry file.
- Out-of-date drivers.
- Hard drive problems such as corrupted MBR, bad sectors, hard drive failure, etc.
- Problematic Windows update.
- Virus attack.
How to fix error code 0xc00000e9 Windows 10? This may be a question for many of you. If so, please read on to get solutions.
Tip: These methods are only applied when the Automatic Repair fails to fix your computer.
Method 1. Run SFC and DISM
If 0xc00000e9 boot BCD error is caused by missing or corrupt system files, you can run SFC and DISM to replace or repair them.
SFC (System File Checker) is a Windows built-in tool used for replacing damaged, lost, or changed system files with good system files. DISM (Deployment Image Servicing and Management) is a tool used to restore system files.
Here is a tutorial for running the SFC command.
Step 1: Enter WinRE. You can enter it through two consecutive failed attempts to start Windows.
Step 2: Navigate to Troubleshoot>Advanced options>Command Prompt.
Step 3: Type “sfc /scannow” and press the Enter key. Then, wait until the procedure ends.
If SFC fails to repair system files, you can run DISM.To run DISM, you should type the following commands one by one.
- exe /Online /Cleanup-image /Scanhealth
- exe /Online /Cleanup-image /Restorehealth
Finally, you can close the Command Prompt window after the procedure ends and test whether the error is solved.
Method 2. Uninstall Incompatible Windows Update
It is possible that status 0xc00000e9 is caused by a problematic Windows update. If so, you can uninstall it in Safe Mode.
Here is the tutorial for uninstalling Windows update in Safe Mode.
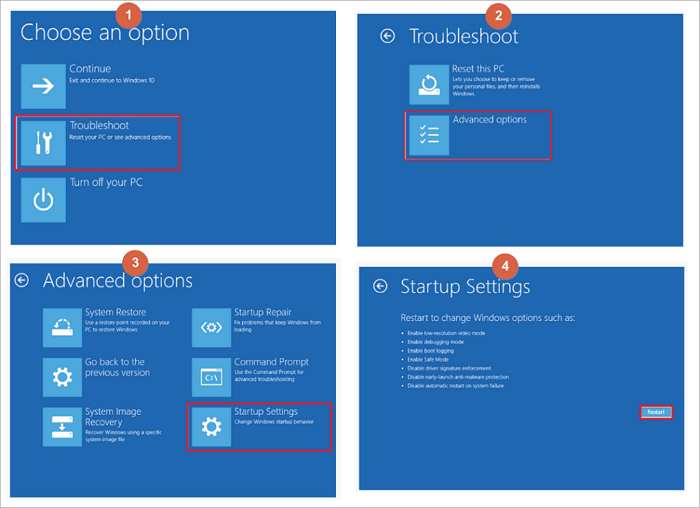
Step 1: Enter WinRE and navigate to Troubleshoot>Advanced options>Startup Settings.
Step 2: Click F5 key to choose Enable Safe Mode with Networking option, thus booting into Safe Mode with networking.
Step 3: Open File Explorer. Right-click on This PC and choose Properties.
Step 4: Click Control Panel Home at upper the left corner of the pop-up window. Then, select Programs and Features in the next pop-up window.
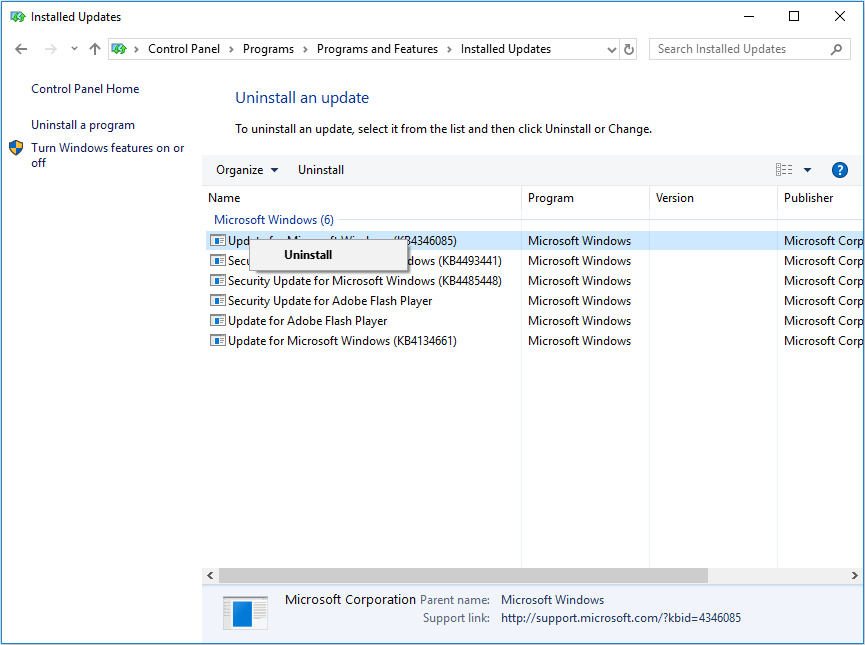
Step 5: Click View installed updates on the program uninstalling interface.
Step 6: Right-click a problematic update to uninstall.
Method 3. Update Drivers
A device driver is a special program that allows computers and devices to communicate. The operating system can only control the operation of the hardware device through this interface. Ifdrivers of hard drivesare not properly installed, they will not work properly.
So, you can try updating disk drivers to fix 0xc00000e9 Windows 10.This method is available when users can boot in Safe Mode. You can refer to the following tutorial.
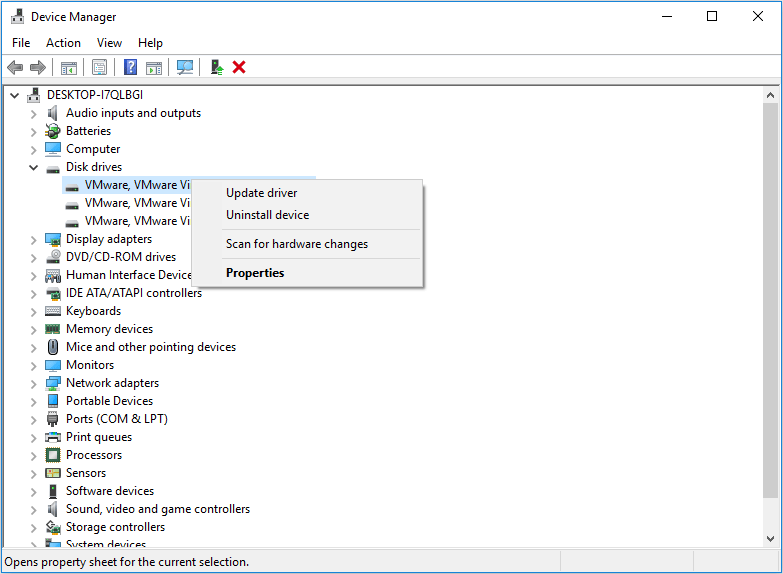
Step 1: Press “Windows + X” keys and select Device Manager in the pop-up menu.
Step 2: Expand Disk drivers directory and right-click on these hard drive drivers one by one to select Update driver.
Step 3: Select Search automatically for updated driver software in the pop-up window.
Tip: If Windows can’t find a new driver, you can find a proper driver on the device manufacturer’s website and follow its instruction to perform the operation.
Method 4. System Restore
System restore can revert your computer’s state to that of a previous point in time with a restore point created before. Restore points contain Windows system files, installed applications, Windows Registry, and system settings. You can use it to delete problematic changes you have made to your computer.
This feature won’t affect your personal files, so it won’t cause data loss. If you find your data is lost after system restore, it must be caused by Windows errors.
Click How to Restore Computer to Earlier Date in Windows 10/8/7 to get a detailed tutorial.
Method 5. Check the Connection of Removable Storage Devices
As mentioned above, error 0xc00000e9 may be caused by the loose or damaged connection of removable storage devices. So, you should make sure the storage devices are properly connected to your PC.
You can refer to the following tutorial.
Step 1: Remove all external storage devices like USB drives, external hard drives, RAID, etc.
Step 2: Enter into BIOS or use the DiskPart command to check the number of hard drives connected to the PC.
Check the connection in BIOS:
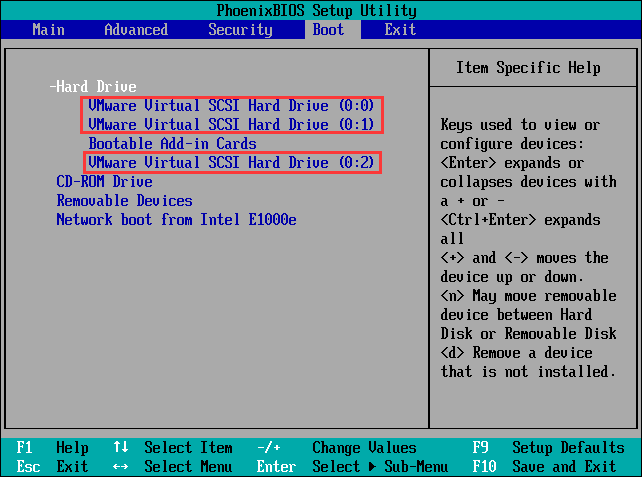
- Follow the wizard that appears on the screen when you power on the system to enter BIOS.
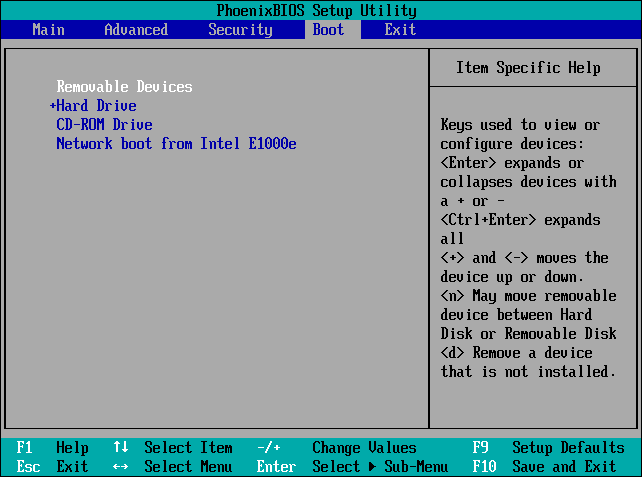
- Skip to Boot Expand Hard Drive directory to see how many disks your PC can detect.
Check connection with DiskPart:
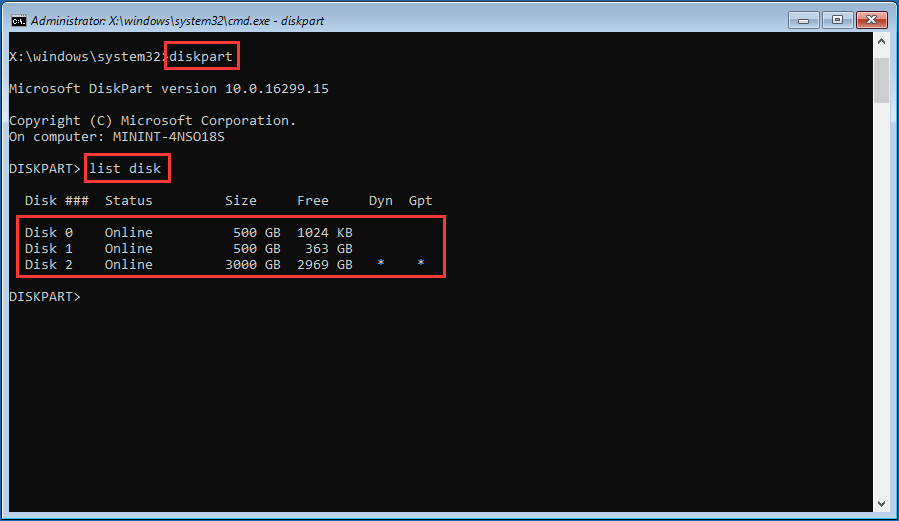
Open the Command Prompt window from WinRE and enter the following commands one by one. Then, you can see the number of hard drives detected by your PC.
- Diskpart
- List disk
Step 3: Remove the internal hard drives and plug them in correctly if the hard drives can’t be detected by your PC. If the hard drives still can’t be detected by your PC after you reconnect them, you should check whether there are problems with cables or the hard drives.
If there is a problem with your hard drives, but they are still detected by your computer, you can get them repaired through method 6 to 7.
Note: If the hard drive fails to be repaired, you can apply method 9 to recover data and replace the problematic disk.
If your computer can’t detect the hard drive, you should send it to a data recovery lab to get your data back.
Method 6. Rebuild MBR
MBR (Master Boot Record) is the first sector on the hard drive accessed by a computer in booting process. MBR records the relevant information about the hard disk itself and the size and location information of each partition on the hard disk.
If it is destroyed, the basic data structure information on the hard disk will be lost. Error 0xc00000e9 may happen and the computer won’t start. Fortunately, you can rebuild MBR through Bootrec.exe. This tool allows you to repair the Master Boot Record (MBR) issue, boot sector issue, and Boot Configuration Data storage issue (including 0xc00000e9 boot BCD error).
Here is the tutorial on how to rebuild MBR.
Note: This method is only applied to a bootable disk. You can make a Windows installation media or a MiniTool Partition Wizard bootable disk. However, MiniTool Partition Wizard is recommended because you need to use it to scan for bad sectors.
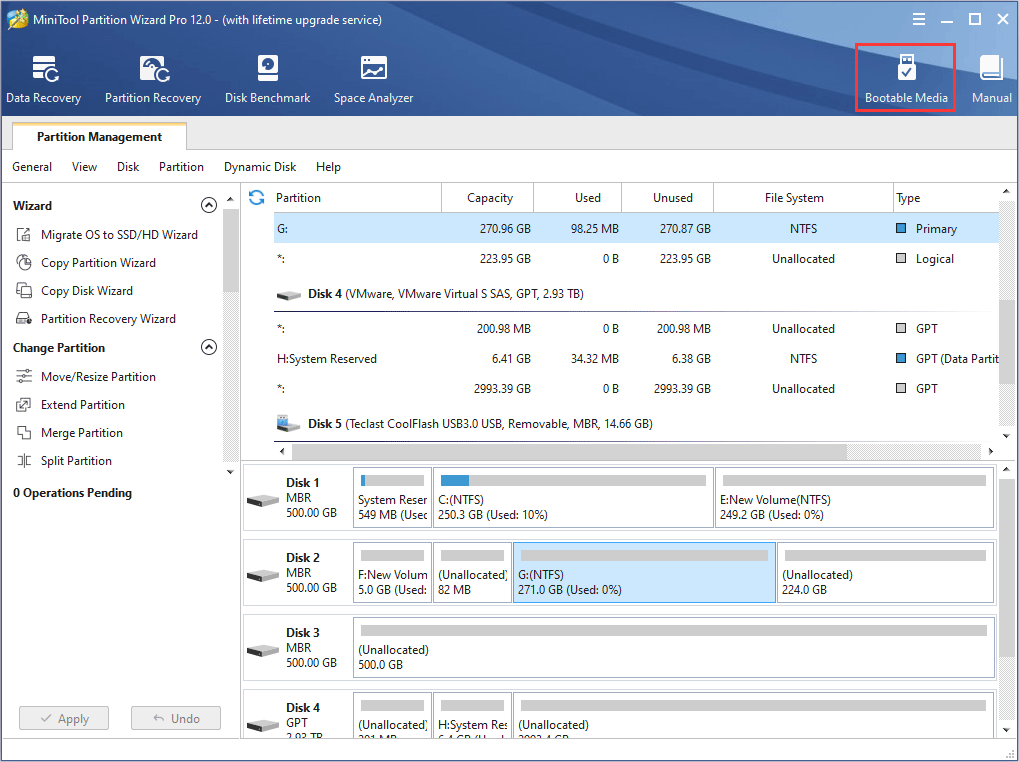
Step 1: Buy MiniTool Partition Wizard and launch it on a normal running computer.Click Bootable Media on the toolbar.
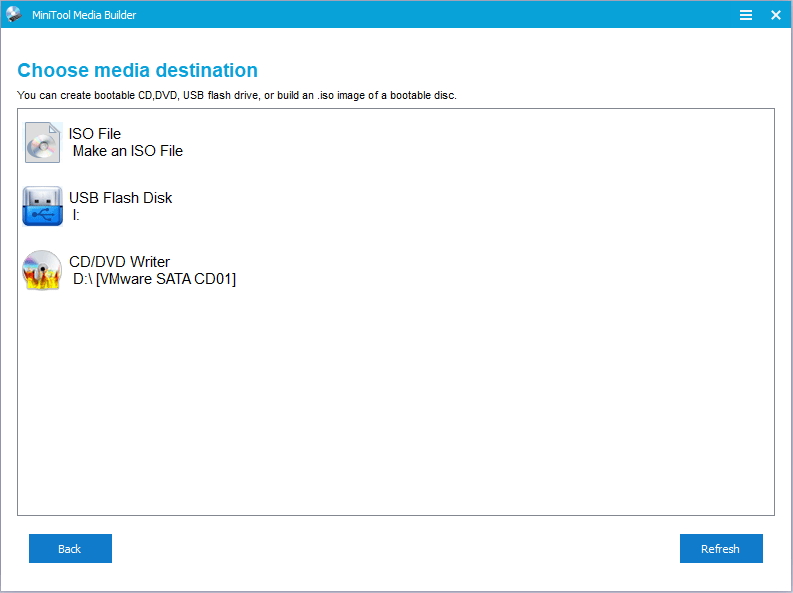
Step 2: Follow the wizard and choose USB Flash Drive as the media destination. The boot.iso file will be burnt into the USB drive directly to complete a bootable disk.
Step 3: Set the Firmware to make the computer boot from the bootable disk.
- Plug the bootable disk into the computer that can’t boot.
- Enter BIOS.
- Set Removable Devices at the first place of the boot sequence. Then, boot the computer.
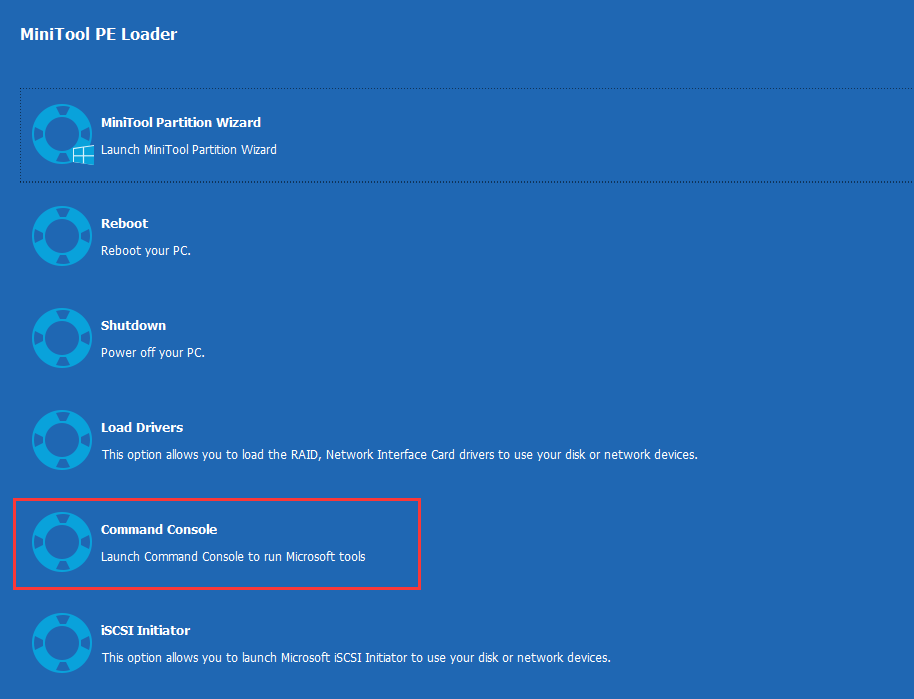
Step 4:Wait a few secondswithout any operations and go to the following interface. Click Command Console to open Command Prompt input windows.
Step 5: Execute the following command lines one by one.
- bootrec /fixmbr
- bootrec /fixboot
- bootrec /rebuildbcd
Method 7. Scan for Bad Sectors
If a hard disk serves for a long time, it may generate bad sectors, which will probably cause error 0xc00000e9, making the computer not bootable. If so, you can use MiniTool Partition Wizard to scan for bad sectors. If there are many bad sectors on the hard drive, replacing it is recommended.
Here is the tutorial on how to scan for bad sectors.
Step 1: Make a bootable disk of MiniTool Partition Wizard.
Step 2: Boot the computer with the MiniTool Partition Wizard bootable disk.
Step 3: Wait a few secondswithout any operations to make MiniTool Partition Wizard open automatically. Then, click Partition & Disk Management to go to its main interface.
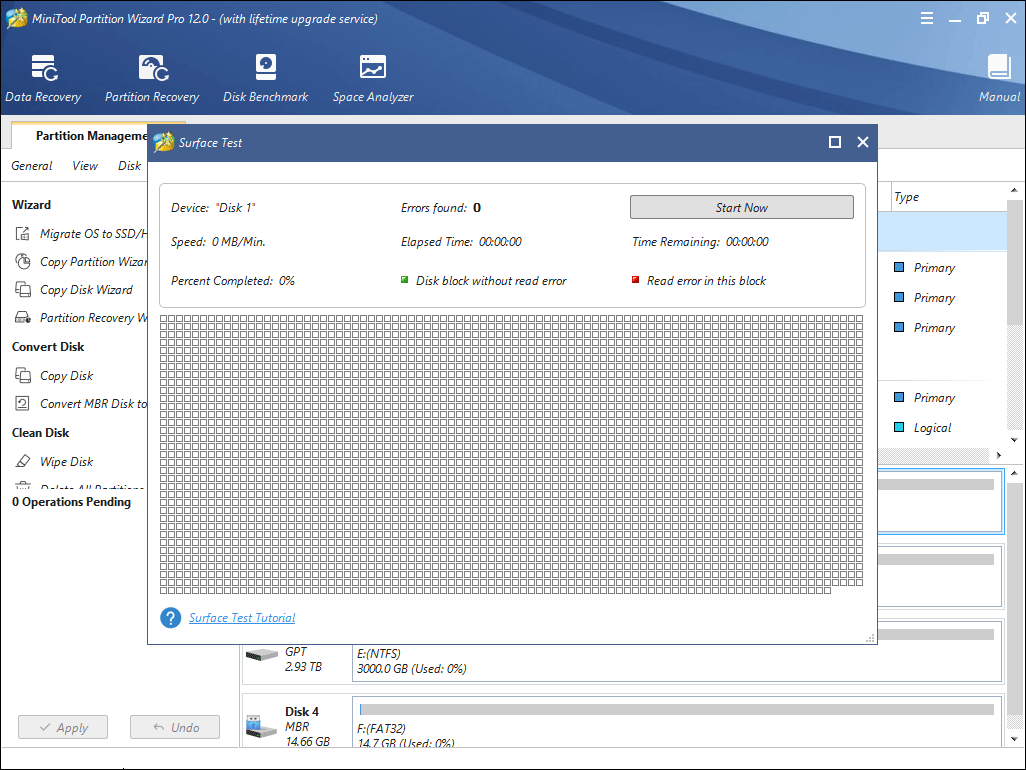
Step 4: Right-click the system disk and choose Surface Test.
Step 5: Click Start Now to begin. If there are bad sectors, they will be marked with red blocks.
Method 8. Replace Hard Drive
If the above methods can’t repair your hard drive, you should consider replacing it. Before you replace the hard drive, you may want to recover data first.
As for data recovery software, you should choose a reliable one, which also allows you to recover data when the computer fails to boot.
MiniTool Partition Wizard is such a piece of software. I will show you how to recover data with it. Of course, if there are no important files on your computer, you can skip the data recovery work.
Here is the tutorial on how to recover data when the computer can’t boot.
Step 1: Boot the computer with MiniTool Partition Wizard bootable media.
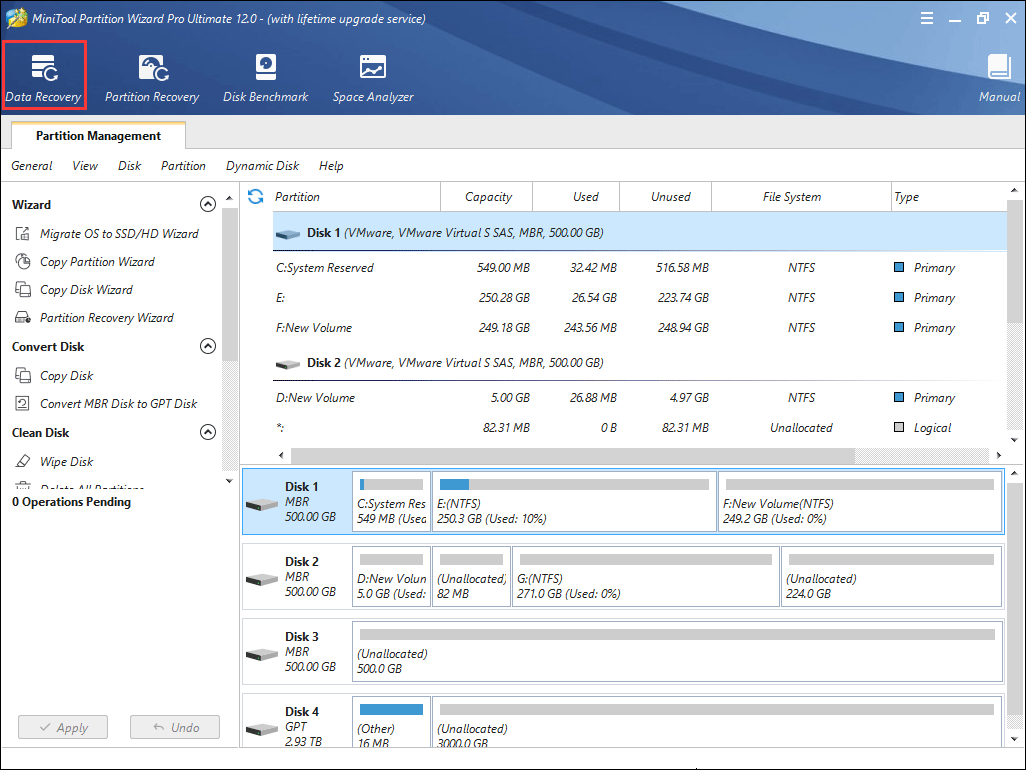
Step 2: Go to its main interface and click Data Recovery.
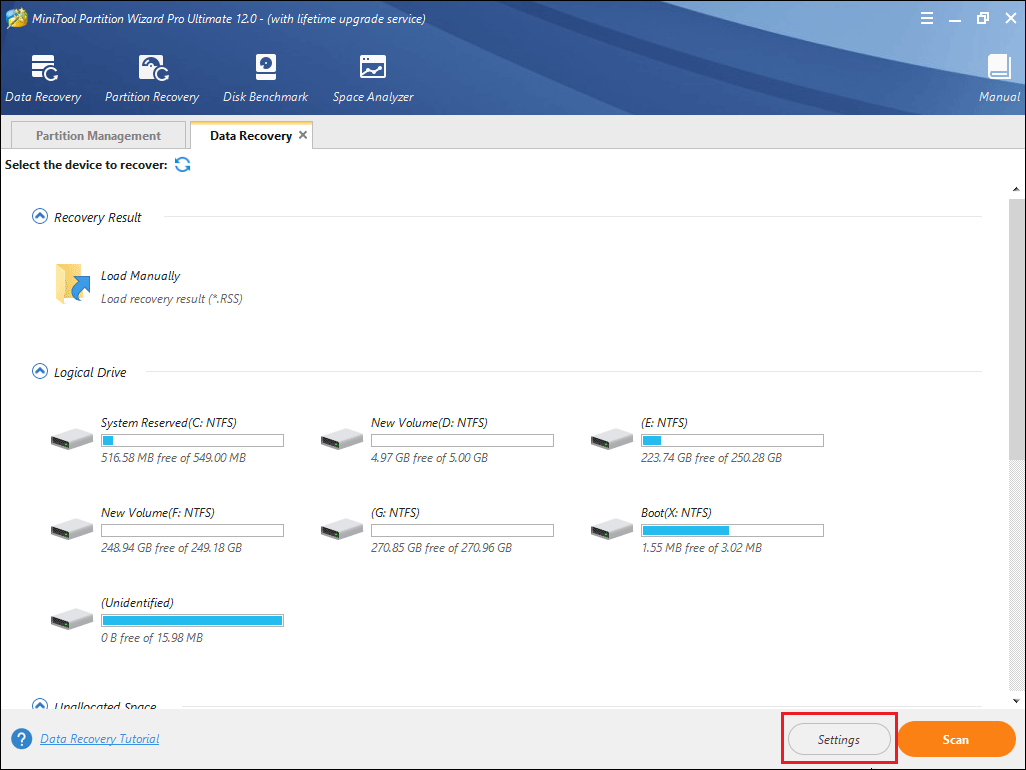
Step 3: Choose the system disk and then click Scan.
Settings: This feature allows you to limit the scanning range by selecting file systems and file types.
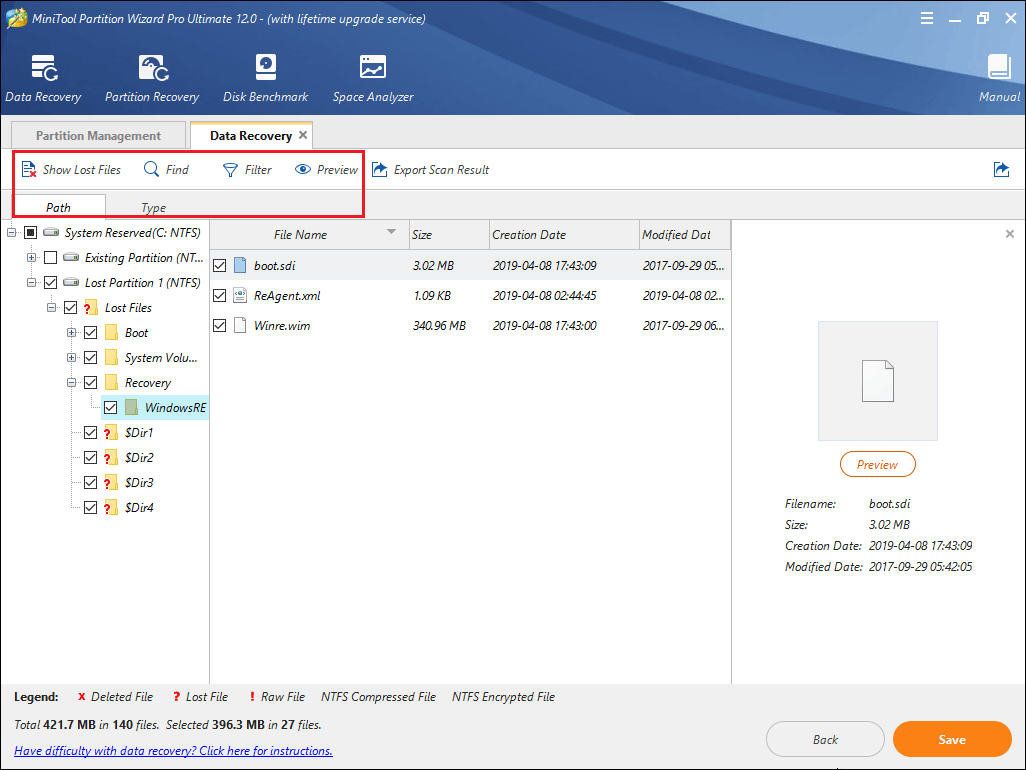
Step 4: Find the lost files with built-in tools.
- You can find files according to their paths, and file types.
- Show Lost Files feature only displays the lost files.
- Find feature allows you to find files by typing continuous parts of their file names.
- Filter feature allows you to find files through narrowing down the files range according to filename/extension, file size, creation/modification date, etc.
- Preview allows you to preview the files that don’t exceed 100 MB before the data is recovered.
Step 5: Select files and then Save them into a safe position.
Then, you can replace your hard drive. Please click How to Install Windows 10 on a New Hard Drive (with Picture) to get a detailed guide.
Method 9. Kill Virus
The error code 0xc00000e9 may be caused by a virus. If so, you can run an antivirus to fix this problem. But, please note that a virus attack may cause data loss. You should recover important files first. Then, you should make a bootable antivirus disk and kill the virus according to its instruction.
0xc00000e9 FAQ
What is 0xc00000e9?
0xc00000e9 is a Windows error preventing your computer from booting up. This error may be caused by loose or damaged connection of removable storage devices, missing or corrupt system files, out-of-date drivers, hard drive problems, problematic Windows update, virus attack, etc.
What is an unexpected I/O error?
An unexpected I/O error is one of the causes of the error 0xc00000e9. The error message may be shown like the following: “Windows has encountered a problem communicating with a device connected to your computer; File BootBCD; Error code: 0xc00000e9; An unexpected I/O error has occurred.”
This error is usually related to storage devices. Click What Is I/O Device Error to know more.
How do I fix error 0xc00000e9?
- Run SFC and DISM.
- Uninstall incompatible Windows update.
- Update drivers.
- Restore system.
- Check the connection of removable storage devices.
- Rebuild MBR.
- Scan for bad sectors.
- Replace hard drive.
- Kill virus.
Here are 9 solutions to error code 0xc00000e9. If your computer won’t boot due to this error, this article will help you out.Click to Tweet
Bottom Line
Has this article been helpful for you? We need your feedback. If you have problems in performing any of the above methods, you can leave a comment below or email us at [email protected]. We will reply to you as soon as possible. If you have any better solutions, please also leave a comment below to share.
Ошибка 0xc00000e9 при загрузке windows 10 наиболее часто появляется при сбоях работы жестких дисков. Начиная от плохого контакта в шлейфе (разъеме) и заканчивая повреждением файлов и даже секторов. Не исключены неправильные настройки SATA в БИОСе или сбой от режима быстрого запуска, давайте разбираться по порядку.
Метод 1: Выключить «БыстрыйЗапуск»
Ошибка 0xc00000e9 появляется при сбоях режима быстрого запуска. Следует выключить его и проверить, исчезла ли ошибка. Находится он в настройке питания, для выключения сделайте так:
- Используйте кнопочки «Win+R»;
- Далее впишите в появившейся строчке «powercfg.cpl»;
- Эта команда раскрывает настройки электропитания;
- Слева кликните строчку «ДействиеКнопокПитания»;
- Откроется новое окошко, там кликните «ИзменениеПараметров…»;
- Это разблокирует подраздел «ПараметрыЗавершенияРаботы»;
- Уберите галку возле строчки «ВключитьБыстрыйЗапуск (рекомендуется)»;
Недостатком способа является замедление загрузки ОС, зато ошибка исчезает.
Метод 2: Проверить подключение диска
Когда выскочил сбой 0xc00000e9 при загрузке, следует осмотреть на ПК шлейфы идущие к жесткому диску, особенно SATA. Проверьте контакт не только шлейфа с диском, но и с материнкой. Убедитесь в сохранности разъемов на обоих концах соединения. Если есть возможность, подключите другой шлейф (дублирующий), используйте иной разъем SATA на материнке (их несколько). Пробуйте заменить шлейф.
Такой сбой часто происходит после вмешательства в устройство ПК – различные апгрейды, чистка блока питания или кулеров и радиаторов, отключения устройств или их замены. Стоит проверить соединения всех затронутых в процессе работы устройств, но особенно жесткого диска.
Метод 3: Отключить все подключенные носители
Код ошибки 0xc00000e9 может появиться по причине подключения через USB неисправного носителя. Поэтому отсоедините все флешки, внешние диски, карты памяти телефона или планшета выньте из картридера. Отсоедините любые подключенные посредством USB приборы, оставив клавиатуру либо мышку.
Метод 4: Перенастроить БИОС
Ошибка 0xc00000e9 может появиться при сбое настроек БИОСа или смене жесткого диска, который требует иных настроек. Поэтому следует переключить режим для SATA-контролеров. Либо сбросить настройки до заводских.
ВАЖНО: Учитывайте, что разные модели BIOS имеют отличающееся меню и саму опцию. Рекомендую изучить настройки для своей версии БИОСа в Интернете.
Теперь откройте БИОС на вашем устройстве, далее:
- Перейдите ко вкладочке «Main»и там найдите настройку «SATAMode» либо «ConfigureSATAas»;
- Если нет таких настроек, откройте вкладочку «Advanced»и там найдите строчку «SystemConfiguration» → «SATAControllerMode»;
- Рекомендую установить режим «AHCI» либо «Compatibility», они годятся для большинства случаев;
- Если не помогает, пробуйте включить «IDE»;
- Откройте вкладочку «Boot» либо «BootMenu»;
- Отыщите строчку «SecureBoot» и установите режим «Enabled» либо «Disabled» (нужно поменять один режим на другой, в зависимости от того, какой был включен);
- Иногда опции переключения режимов загрузки расположена в подразделе «Startup»;
- Тогда вам следует в этом подразделе найти настройку «UEFI/LegacyBoot»;
- Установить значение «LegacyOnly»;
- Нажать «F10» и перезагрузить ОС;
- Если это не помогло, выполните сброс БИОСа до заводских настроек;
Метод 5: Проверить состояние диска
Реже сбой 0xc00000e9 при загрузке windows 10 происходит из-за неполадок с дисками. Следует запустить проверку дисков, как внутренних, так и внешних на ошибки и «битые» сектора. Рекомендую (по возможности, разумеется) подключить проблемный диск к другому ПК и проверить встроенной функцией «chkdsk». Для проверки нужно:
- Запустить «КоманднуюСтроку» либо «WindowsPowerShell»с правом администратора;
- Вписать туда «chkdsk /f /r X», вместо Х вы должны указать букву поврежденного тома, с которым возникла проблема;
Если проверка на ином ПК не доступна (чаще всего так и есть), стоит попытаться выполнить загрузку ПК/ноутбука в «БезопасномРежиме». При удачном запуске выполните пункты, описанные выше в этом же параграфе.
Когда устройство загружаться в любом режиме отказывается, используйте установочный диск или флешку. Возможно, придется создать установочную флешку на другом ПК/ноутбуке. Затем:
- Вставляете флешку в USB, запускаете БИОС и в разделе «Boot» либо «BootMenu» устанавливаете первым при загрузке USB-накопитель;
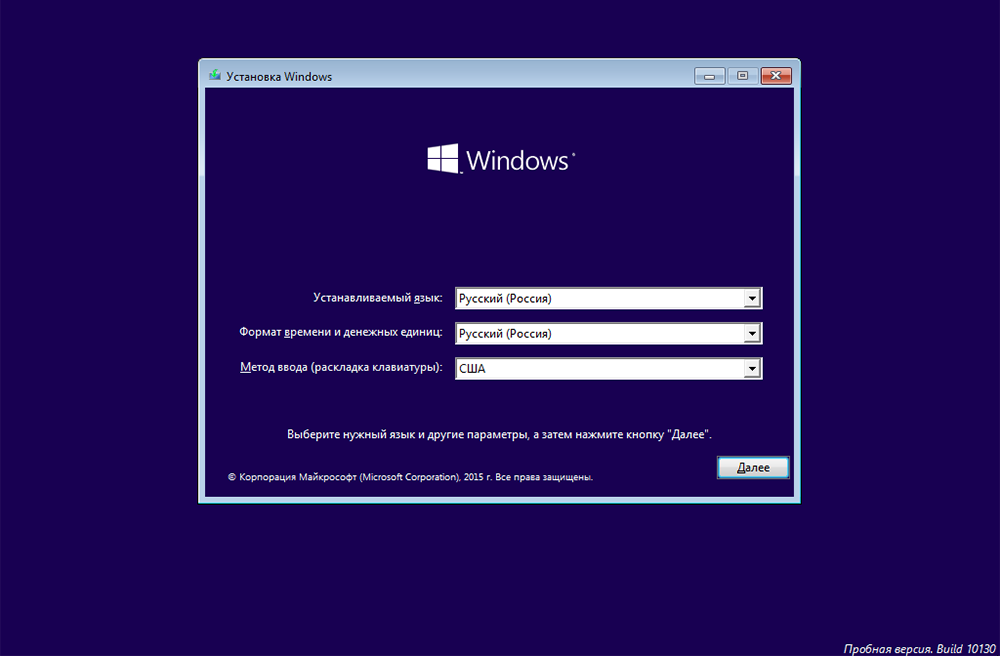
- После запуска фиолетового окошка установки нажмите Shift+F10, чтобы запустить «КоманднуюСтроку»;
- Чтобы определить букву нужного раздела, последовательно наберите команды: diskpart, list volume и exit.
- Затем «chkdsk /f /r X», букву Х замените на буквы тома, который определили как проблемный;
Вы можете применить утилиту для реанимации поврежденных носителей «Victoria». Работает она не только в системе виндовс 10, но и с диска реаниматора или загрузочной флешки, если ее туда установить.
Метод 6: Откатить систему
Еще один способ борьбы с ошибкой 0xc00000e9 – попытаться выполнить откат системы на точку восстановления. Работает, если опция включена и точки периодически создаются системой. Шаги такие:
- Выполнить загрузку с установочного флеш-носителя;
- Перейти в фиолетовом окошке к «Далее» → «ВосстановлениеСистемы»;
- Кликните «ПоискИисправлениеНеисправностей»;
- Затем клик по «ВосстановлениеСистемы»;
- Выберите систему из списка (если она одна, то и будет одна);
- Остается следовать рекомендациям программы восстановления;
Когда выше перечисленные способы не помогают, остается только полная переустановка системы.
Разношёрстные «экраны смерти» и прочие ошибки всегда доставляют неудобства и говорят о неисправностях различного характера, но в большинстве случаев с возникшими трудностями можно справиться своими силами, не привлекая специалистов сервиса. С ошибками BSOD сталкиваются пользователи любой из версий Windows и причины этого неприятного явления могут быть самыми разными. Сбои, появляющиеся при различных условиях, сопровождаются сообщением с кодом и описанием проблемы. От содержания текста во многом зависит, в каком направлении следует двигаться при решении задачи и важным моментом для быстрого устранения неприятности является определение причины. Один из таких сбоев возникает под кодом 0xc00000e9 и может свидетельствовать как о программных проблемах, так и аппаратных неисправностях устройства. «Непредвиденная ошибка ввода-вывода» или ошибка 0xc00000e9 – не редкое явление, с которым пользователи Windows могут «познакомиться» при установке, обновлении системы или уже во время её эксплуатации. Способов решения проблемы несколько, каждый из них будет эффективен в различных условиях, поэтому конкретнее помочь в поисках источника неисправности поможет отслеживание предшествующих сбою событий.
Методика устранения ошибки 0xc00000e9 на Windows.
Причины появления 0xc00000e9
Возникший сбой BSOD, отображающий состояние 0xc00000e9 с соответствующим уведомлением на экране сопровождается сообщением о некорректности взаимодействия с устройством, которое было подключено к ПК или ноутбуку, при этом совсем не факт, что к девайсу в действительности что-либо подключалось. Текст ошибки говорит о возможных причинах в проблемном подключении накопителей (внешних устройств USB и прочих), при их использовании или сбоях в функционировании оборудования, например, жёсткого диска или дисковода, в связи с чем, рекомендуется проверить корректность подключений и выполнить перезагрузку. В сведениях о сбое будет констатация этого факта – возникла неожиданная ошибка ввода-вывода. Больше ни о чём конкретном нам текст на экране не говорит, но можно сделать вывод, что это скорее аппаратная проблема. Не исключено и, что мы имеем дело с программным сбоем. Причин, по которым появляется ошибка с кодом 0xc00000e9, предостаточно, наиболее вероятны следующие из них:
- Некорректное отключение или подключение внешнего накопителя информации.
- Плохой контакт SATA или других разъёмов, в том числе из-за неисправности разъёма, шлейфа.
- Повреждение секторов жёсткого диска, файловой системы.
- Неисправность контроллера HDD.
- Выход из строя жёсткого диска, привода.
- Изменение, повреждение файлов системного реестра.
- Конфликт, возникший в процессе установки системы.
- Некорректные обновления.
- Влияние вирусов.
Ошибка взаимодействия с устройством, обнаруженная ввиду отсутствия контакта жёсткого диска с материнской платой, появляется при установке Windows 7, 8, 10. В такой ситуации следует воспользоваться рекомендацией проверить корректность подключения. В случае повреждений жёсткого накопителя или выхода из строя его контроллера система информирует об ошибке 0xc00000e9 при каждом запуске Windows 7 (или другой версии операционной системы). Сбой будет появляться снова, пока пользователь не примет соответствующие меры, поэтому с решением вопроса затягивать не стоит. Ошибка 0xc00000e9 при загрузке Windows 7, возникшая вследствие конфликта в процессе установки дистрибутива характерна для ноутбуков. В связи с наличием нескольких «подозреваемых», способных спровоцировать проблему, чтобы точнее определить источник неприятности, важно учитывать условия появления сбоя.
Как исправить ошибку 0xc00000e9
Поскольку частыми виновниками сбоя при загрузке системы являются подключённые периферийные устройства, их следует отключить от компьютера или ноутбука и выполнить перезагрузку. Если ОС запустилась нормально, устройство можно подключить снова, но в дальнейшем оно не должно быть подключено на момент старта Windows. Это самое простое, что можно сделать при возникшей неисправности в таких условиях, и если источником сбоя является другой фактор, он может быть устранён одним из методов, рассмотренных далее. Чаще всего пользователь не может с ходу определить, в чём конкретно причина неполадки, поэтому приходится пробовать несколько способов, решающих проблему в том или ином случае. Рассмотрим, как можно решить проблему средствами Windows и сторонними инструментами, а также путём физического вмешательства.
Программный способ решения поставленной задачи
Вариант устранения ошибки, имеющей код 0xc00000e9, подойдёт в зависимости от её первоисточника, так что если вы столкнулись с данным сбоем и его причина неясна, выполните следующие действия:
- Сканирование устройства на вирусы. Даже хороший антивирус может пропустить вредоносный софт на компьютер, пользователи и сами частенько грешат тем, что помогают вирусам проникнуть в систему, скачивая сомнительные программы или выполняя пакетную установку из ненадёжных источников. Так, первое, что делать, когда система Windows 7, 8 или 10 выдаёт на экране состояние 0xc00000e9, – это проверить устройство на вирусы установленным антивирусов, а также сторонними утилитами.
- Использование другой загрузочной флешки или диска. Ошибка 0xc00000e9, возникающая при установке ОС Windows 7, нередко исправляется посредством записи дистрибутива другой программой или сменой загрузочного накопителя. Попробуйте записать образ снова, затем установить систему, и если не получится, тогда используйте иной носитель.
- Проверка и исправление записей реестра. Вручную редактировать реестр рекомендуется только при наличии специальных знаний и навыков. Если вы не имеете подобного опыта работы, лучше для этих целей воспользоваться специальной утилитой, которая просканирует реестр и внесёт необходимые коррективы в автоматическом режиме. Заодно не лишним будет очистить систему от мусора, удалив временные файлы, cookies, кэш и пр. Удобный инструмент для такого рода работ – утилита Ccleaner. Вручную выполнять процедуру намного дольше.
- Сброс настроек БИОС. Если проблема в boot bcd, то помочь в её решении сможет возврат к первоначальным настройкам BIOS. Для этого нужно перезагрузить устройство и, не дожидаясь старта ОС, перейти к утилите. В БИОСЕ следует вернуть конфигурацию, предусмотренную по умолчанию.
- Проверка состояния жёсткого диска. Ошибка 0xc00000e9 нередко возникает по причине повреждений секторов HDD. Чтобы просканировать винчестер и исправить логические ошибки (физические повреждения не подлежат программному лечению), нужно загрузиться в «Безопасном режиме» (перезагружаемся и жмём соответствующую кнопку или сочетание клавиш, для разных версий BIOS могут применяться различные варианты, например F2, F12 или Del). После загрузки через Пуск идём в раздел «Все программы», каталог «Стандартные» и открываем Командную строку от имени администратора, в интерфейсе службы пишем команду chkdsk /f /r и жмём клавишу ввода. Система предложит запланировать задачу, с чем необходимо согласиться и перезагрузить устройство, после чего процесс проверки жёсткого диска системной утилитой начнётся автоматически. При обнаружении проблем, они будут исправлены, если это возможно. Процедуру сканирования винчестера можно также осуществить при помощи специализированного стороннего софта.
- Проверка целостности системных данных. Если ОС загрузится без ошибок, чтобы исключить вероятность проблем с системными файлами, стоит выполнить сканирование встроенной утилитой System File Checker. Инструмент позволяет проверить системные данные на предмет повреждений и по возможности восстановить их. Для этого следует запустить командную строку на правах администратора, например, через консоль «Выполнить» (Win+R). Прописав команду cmd (Enter при этом не нажимаем, а вместо этого зажимаем клавиши Ctrl+Shift+Enter), открываем окно командной строки, где вводим sfc /scannow и жмём Enter. Сканирование выполняется в автоматическом режиме.
- Восстановление системы. Один из эффективных способов избавиться от ошибки 0xc00000e9 – это выполнить восстановление ОС. Для этого следует подключить загрузочный накопитель с Windows 10 (или другой подходящей версией операционной системы). В том случае, если загрузка с него не произошла, следует поменять приоритет старта (в разделе Boot, Boot Options, Boot Order или пр. – зависимо от версии прошивки БИОС). В параметрах загрузки нужно выбрать нужный вариант (диск или флешка), сохранить изменения и перезагрузиться. Загрузившись с накопителя, запускаем восстановление системы.
Доступ к возможностям восстановления системы у Windows 10 проще, чем у Семёрки, хотя меню при запуске с загрузочного накопителя вначале не слишком отличается. В режиме восстановления здесь нужно выбрать раздел «Поиск и устранение неисправностей», перейдя в который мы получим целый арсенал инструментов для реанимации Windows. Можно выбрать командную строку, восстановление при загрузке и прочие варианты, можно также вернуться к предыдущей сохранённой точке и откатить операционную систему на тот момент, когда всё работало без сбоев. Если ОС загружается, отправить ОС в «прошлое» можно, используя службу Windows. В случае с «Десяткой» рекомендуется также установить последние обновления системы.
- Удаление софта из автозагрузки. Если речь идёт о программном конфликте, следует убрать из автозагрузки подозреваемые в этом программы. Чтобы выполнить процедуру потребуется загрузиться в безопасном режиме, после чего через консоль «Выполнить» командой msconfig открыть окно «Конфигурация системы», где во вкладке «Автозагрузка» снять галочки с ненужного софта.
- Деинсталляция программ. Возможно, и убрать из автозагрузки будет мало и потребуется удалить приложения, вызывающие конфликт. Сделать это можно с помощью штатной службы Windows (Панель управления – Программы и компоненты) или сторонних инструментов.
- Удаление обновлений. Когда другие методы не оказались эффективны, и вы связываете проблему с недавно установленными обновлениями, имеет смысл откатить их.
- Чистая установка Windows. В случае, когда ни один из методов не решил вопрос и дело точно не в аппаратной части, придётся пойти на крайние меры и переустановить Windows. Этот вариант решает программные сбои, не связанные с неисправностями на уровне «железа», но если и он не принёс результата, то причина скорее аппаратная. Если вы не имеете возможности самостоятельно выполнить работу, то лучше обратиться в сервис.
Физический способ
Ошибка с кодом 0xc00000e9 независимо от того, какая на устройстве стоит ОС, 7 или 10 версии, часто возникает по аппаратным причинам. Рассмотрим, как исправить сбой в таком случае.
- Сначала необходимо заглянуть под крышку корпуса вашего устройства. Если с компьютером всё просто, мы откручиваем боковую панель и получаем доступ к «внутреннему миру» системного блока, то с ноутбуком в этом плане придётся повозиться (потребуется отключить ноутбук от питания, вынуть батарею, открутить и отсортировать винтики для облегчения сборки и т. д.). Перед тем как предпринимать действия по разборке следует ознакомиться с мануалом к модели вашего девайса. После того, как нам стали доступны «внутренности» устройства начинаем исправлять error code 0xc00000e9.
- Нередко всё дело в плохом контакте с материнкой. На ней расположены порты для подключения элементов, посредством одного из них плата соединяется с HDD. Разъём мог засориться, повредиться или полностью выйти из строя. Иногда исправление ошибки 0xc00000e9 заключается в подключении к иному свободному порту SATA.
- Другая причина – проблема в SATA-шлейфе. Контакты можно почистить, но в большинстве случаев приходится менять элемент, так как со временем SATA-кабель просто приходит в негодность.
- В случае плохого контакта платы контроллера HDD с контактами гермоблока, нужно снять контроллер и почистить от загрязнений и окислов контактные области на элементе.
В большинстве случаев вышеперечисленные способы помогают устранить проблему, но если ни один из них не оказался эффективным, вероятно, что жёсткий диск имеет сильные физические повреждения, которые уже не исправить и полный выход устройства из строя теперь лишь вопрос времени. Поэтому как можно скорее следует скопировать важные данные со старого HDD на исправный накопитель.
| Workable Solutions | Step-by-step Troubleshooting |
|---|---|
| Boot Into Safe Mode | Restart Windows by long-pressing the Shift key on the keyboard and clicking the…Full steps |
| Perform a Startup Repair | Choose Restart from the power icon while holding the SHIFT key…Full steps |
| Scan the PC | It is simple and can take several minutes or longer to scan your PC for viruses…Full steps |
| Other Workable Methods | Change the Boot Order > Update the Volume Boot Code > Re-install Windows 10…Full steps |
Error Code 0xc00000e9: What Does It Mean
Windows error code 0xc00000e9 is a typical Windows Boot Manager error that can occur during the boot process and denotes either a hardware failure or a corrupted system file. It displays shortly after the PC turns on but before the Windows login screen: An unexpected I/O error has occurred. Error code: 0xc00000e9.
The Windows boot procedure is constantly involved with error code 0xc0000e9. When the system cannot access the drive or disk, which prevents it from reading or copying data, I/O (input/output) issues happen. Error 0xc0000e9, therefore, has a wide range of potential causes, such as:
- Damaged system files or a lack of specific files or drivers.
- The motherboard’s hard drive connector is defective or broken.
- A sudden break in communication between a computer and a removable storage device. For instance, if you attempt to install Windows and your PC unexpectedly loses contact with the installation disk.
- Faulty registry files.
- Defective installation media; a damaged hard drive or its controller. For instance, the disk itself may be faulty or specific files may be missing, corrupt, or damaged.
- Incorrect Windows 10 installation ISO.
- Malware attack.
How to Fix Windows 10 Error Code 0xc00000e9
Want to know how to fix the Windows 10 error code 0xc00000e9 on your PC? Check out these six methods given below.
- Boot Into Safe Mode and Scan Windows for Errors
- Perform a Windows Startup Repair
- Scan the PC for Malware or Other Issues
- Change the Boot Order to Fix Error 0xc00000e9
- Update the Volume Boot Code to Use BOOTMGR
- Re-install Windows 10 to Fix Error 0xc00000e9
Before explaining these methods, let us check out the video below on how to fix error code 0xc00000e9 in Windows 11 and 10.
- 0:17 Restart your PC
- 0:45 Access BIOS setting
- 2:19 Load optimize default
Now, let us explain the methods and their solutions mentioned above.
Method 1. Boot Into Safe Mode and Scan Windows for Errors
You can access Windows in safe mode when it does not boot normally. If it succeeds, you can try several troubleshooting procedures and scan Windows to check for errors. Safe Mode is also called the diagnostic startup mode.
How to start Windows in safe mode?
Restart Windows by long-pressing the Shift key on the keyboard and clicking the Restart button in the Power button in the lower-right corner.
Once Windows boots up, you will get an Advanced Recovery Screen. Here click on the following option one after the other to boot into Safe Mode.
Troubleshoot> Advanced Options> Startup Settings> Restart on the following screen.
After your PC restarts, you’ll see a list of options. Select 4 or press F4 to start your PC in Safe Mode. Or if you’ll need to use the internet, select 5 or press F5 for Safe Mode with Networking.
Once Windows boots into Safe Mode, you can use the built-in Windows Error Checking tool and the SFC scannow command. It will check the hard drive and system files for issues that can cause boot issues.
Let us see how to go about it:
Step 1: On your Windows PC, right-click on the Windows logo on the bottom left corner of your screen and choose Windows Terminal (Admin).
Step 2: Press Yes on the User Account Control pop-up window.
Step 3: Type sfc /scannow and press Enter to begin scanning.
Every protected operating system file on your PC will now be checked for integrity by System File Checker. It can take some time to complete. If errors are discovered and fixed, you will get a message. You can restart your PC after that.
Method 2. Perform a Windows Startup Repair
I will explain how to perform a Windows Startup Repair in this method that may eliminate the error code. This is how you go about it:
If Windows won’t let you log in, use a Windows disk or a prepared USB device with the Windows automated repair tools. This problem might occasionally appear due to missing or corrupt system files, registry errors, or other issues that can be resolved with a startup repair.
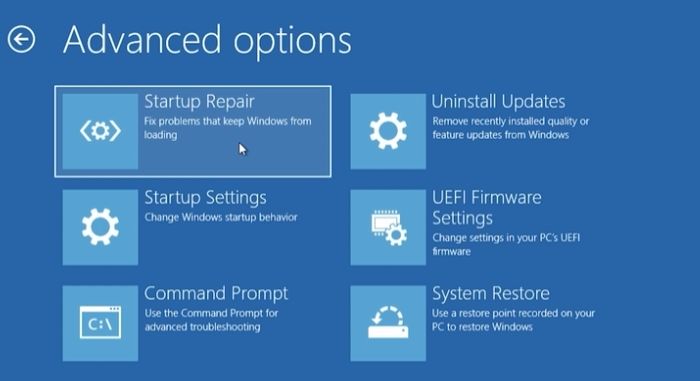
Startup Repair is available from the Advanced Startup Options menu.
Step 1: Choose Restart from the power icon while holding the SHIFT key.
Step 2: On the Choose an option screen, click on Troubleshoot > Advanced Options
Step 3: Click on Startup Repair to begin the Windows Startup Repair.
During the process, you will need to provide your account details and other related things to help the troubleshooter fix the problem.
Method 3. Scan the PC for Malware or Other Issues
Use a bootable antivirus program if a virus stops Windows from starting. Download an antivirus program for Windows on a different PC, then copy it to a bootable drive. A bootable rescue tool that scans a system from a Windows Terminal is typically included in virus tools.
It is simple and can take several minutes or longer to scan your PC for viruses and other spyware properly. The length of the scan will increase with the number of files you have and the speed of your PC.
Run the Microsoft Windows Malicious Software Removal Program after downloading it. Depending on whether you are using a 32-bit or 64-bit version of Windows, there are two versions to choose from: (Check out which one your PC has) MSRT 32-bit or MSRT-64bit.
Microsoft’s free malware removal program may not find everything, but it will search for particular, prevalent malware, which is a decent place to start. Use Windows Update to update the tool if you already have it so that it can scan for the most recent threats.
Method 4. Change the Boot Order to Fix Error 0xc00000e9
If you added a new hard disk, plugged in an external drive, or attached a USB device, the boot order might have been altered. The system BIOS upgrade may also cause it. Verify that the hard disk that Windows is installed on is listed at the top of the boot sequence by accessing the PC’s BIOS or UEFI settings.
To change the BIOS boot order, follow the procedures given below. The order in which devices boot will change if the boot sequence is altered.
Step 1: As your PC turns on or restarts, watch for a notification mentioning a key (typically Del or F2) that must be pressed to enter the BIOS setup program. As soon as you see the message, press this key.
Note: The details of changing the boot order options vary from PC to PC because every BIOS setup program is unique. The menu choice or configuration setting may be identified by Boot Options, Boot, Boot Order, etc. A broad menu item like Advanced Options, Advanced BIOS Features, or Additional Options may contain the option.
Step 2: Find the option to change the boot order using the directions for accessing your BIOS tool. The modifications are made in the Boot menu of the BIOS.
The order in which the devices are listed determines the boot order or the order in which your PC will look for operating system information. The integrated hard disk that is in the PC is often what BIOS refers to as a hard drive and will attempt to boot from first from the order on your screen.
Select the right hard disk or SSD on which your Windows is installed, and press the Enter key.
Step 5: Save your BIOS settings before your option becomes effective. To accomplish that, navigate to the Exit or Save and Exit menu using the guidance provided by your BIOS utility.
Step 6: Verify your changes and then close BIOS. You should choose Yes if you get a confirmation message.
Any modifications to the boot sequence and any other BIOS settings you may have made are now saved, and your PC will restart and follow the new boot order.
Method 5. Update the Volume Boot Code to Use BOOTMGR
If a boot loader other than the Windows default BOOTMGR is used, the volume boot code may get corrupted or linked to it. This issue should be resolved by updating the volume boot code. To boot to Command Prompt and perform the required command, follow these steps:
Step 1: Go to Advanced Startup Options.
Step 2: Choose the Command Prompt.
Step 3: Type the following command and press Enter:
bootsect /nt60 SYS
This will change the volume boot code on the partition used to boot Windows to BOOTMGR, compatible with Windows operating systems.
Step 4: Remove the Windows flash drive from its USB port or the Windows disk from your optical drive before closing the Command Prompt window.
Step 5: Choose either Continue or Restart from the list of options. Windows should now launch usually.
Note: After attempting to start Windows normally once more, if you get any errors or this does not work, try the command bootsect /nt60 ALL.
The ALL option updates the boot code on volumes that can be used as Windows boot volumes, excluding any dynamic volumes not connected with an underlying disk partition.
The only catch is that if you dual boot your machine, you could unintentionally create a problem with any previous operating systems you boot to that is similar but the opposite.
Method 6. Re-install Windows 10 to Fix Error 0xc00000e9
All system modifications are wiped out when Windows is reinstalled. As a result, corrupted or missing system files are recovered and put back in working order. A clean install of Windows is achieved during the Windows setup process by removing the existing Windows installation (assuming there is one) before installing a new operating system or reinstalling the old one. Here is how to go about it:
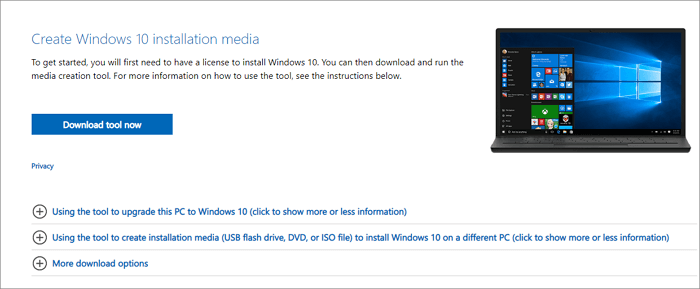
Step 1: Navigate to the Windows Downloads page and click the Download Now button under Windows Installation Assistant.
Step 2: Launch the executable file you downloaded for Windows 10 Installation Assistance.
Step 3: Click Accept and Install on the terms of the agreement window.
Note: Before continuing, you might be asked about using the PC Health Check app. Installing that will allow you to determine whether your PC qualifies for the upgrade.
Step 4: The download of Windows will begin instantly. Allow the installation time to finish.
Step 5: After downloading, your PC will restart to install Windows 10 Or, you may choose Restart now to start the installation immediately. Windows 10 will be set up and installed automatically.
How to Recover Windows 10 Data After Fixing Error 0xc00000e9
Windows users may lose data after fixing error code 0xc00000e9. So, I recommend EaseUS Data Recovery Wizard, where you can recover Windows 10 data that you lost after fixing the error code 0xc00000e9.
So, what are the highlights of using the EaseUS Data Recovery Wizard tool?
- It can recover deleted files, photos, videos, music files, documents, and other files with simple clicks.
- This software supports file recovery from a hard drive, SSD, USB flash drive, and pen drive.
- Recovery of files from a corrupted Windows operating system is possible through this tool. To boot your PC and retrieve list data, EaseUS offers a WinPE boot device.
- Attacks from viruses can make your PC malfunction, which is very frustrating. Your data can be quickly and securely recovered using this tool.
- This data recovery software makes restoring a partition’s data simple, even if it has been completely lost or the system cannot recognize it.
So these are the features of EaseUS Data Recovery Wizard, and you can easily download them from the official website.
Note: To guarantee a high data recovery chance, install EaseUS data recovery software on another disk instead of the original disk where you lost files.
Step 1. Launch EaseUS Data Recovery Wizard on your Windows 11, Windows 10, Windows 8, or Windows 7 computer. Select the disk partition or storage location where you lost data and click «Scan».
Step 2. This recovery software will start scanning the disk to find all lost and deleted files. When the scan process completes, click «Filter» > «Type» to specify lost file types.
Step 3. Preview and restore lost Windows files. You can double-click to preview the scanned files. Then, select the target data and click the «Recover» button to save them to another safe spot in the PC or an external storage device.
Conclusion
So, do not panic if your system does not start when you encounter error 0xc00000e9. By following the above instructions, you can quickly fix the unexpected error without causing any harm to your Windows PC. Reinstall Windows if nothing else works, but be aware that this will erase all the data on your system drive. Replace your drive with another if the issue reappears. A bad or damaged HDD or SSD may bring on error 0xc00000e9.
So, if you lost any data while reinstalling Windows, you can always download and use EaseUS free data recovery software to recover your lost files. So, that’s it! I hope this article helped you!
An Unexpected I/O Error Has Occurred (0xc00000e9) FAQs
Do you have more questions about the unexpected error code 0xc00000e9 showing up on your Windows PC? Check out the frequently asked questions and their answers given below:
1. What Is Problem Status 0xc000009e?
A typical Windows Boot Manager issue, Windows error code 0xc00000e9, indicates a hardware failure or a corrupt system file detected during the boot process. Before the Windows login screen, it appears immediately after the PC turns on and looks like this: An unexpected I/O error has occurred.
2. How to do Windows Startup Repair?
This is how you perform Windows Startup Repair: Click the Windows Start icon and the power button icon. Press and hold down the Shift key and then click Restart. On the blue screen, select Troubleshoot. Next, go to Advanced Options > Startup Repair. After the startup repair process is complete, reboot the computer.
3. How to repair Windows 10 without a boot?
To repair Windows 10: Launch the Windows Advanced Startup Options menu. Go to Troubleshoot > Advanced options > Startup Repair. Wait a few minutes, and Windows will fix the startup problem without boot.
4. How to fix MBR in Windows 10 without a disk?
Restart your PC, and after each time the Windows logo appears during boot, force a hard shutdown. You should enter the Windows Recovery Environment (WRE) to perform a system restore after doing this three times. Choose «Automatic Repair» from the Advanced settings menu if that does not work. If all else fails, choose Command Prompt and execute the following commands:
bootrec /fixmbr bootrec /fixboot bootrec /rebuildbcd sfc /scannow
If you find it helpful, share this post to help more people.

