What does WGET Do?
Once installed, the WGET command allows you to download files over the TCP/IP protocols: FTP, HTTP and HTTPS.
If you’re a Linux or Mac user, WGET is either already included in the package you’re running or it’s a trivial case of installing from whatever repository you prefer with a single command.
Unfortunately, it’s not quite that simple in Windows (although it’s still very easy!).
To run WGET you need to download, unzip and install manually.
Install WGET in Windows 10
Download the classic 32 bit version 1.14 here or, go to this Windows binaries collection at Eternally Bored here for the later versions and the faster 64 bit builds.
Here is the downloadable zip file for version 1.2 64 bit.
If you want to be able to run WGET from any directory inside the command terminal, you’ll need to learn about path variables in Windows to work out where to copy your new executable. If you follow these steps, you’ll be able to make WGET a command you can run from any directory in Command Prompt.
Run WGET from anywhere
Firstly, we need to determine where to copy WGET.exe.
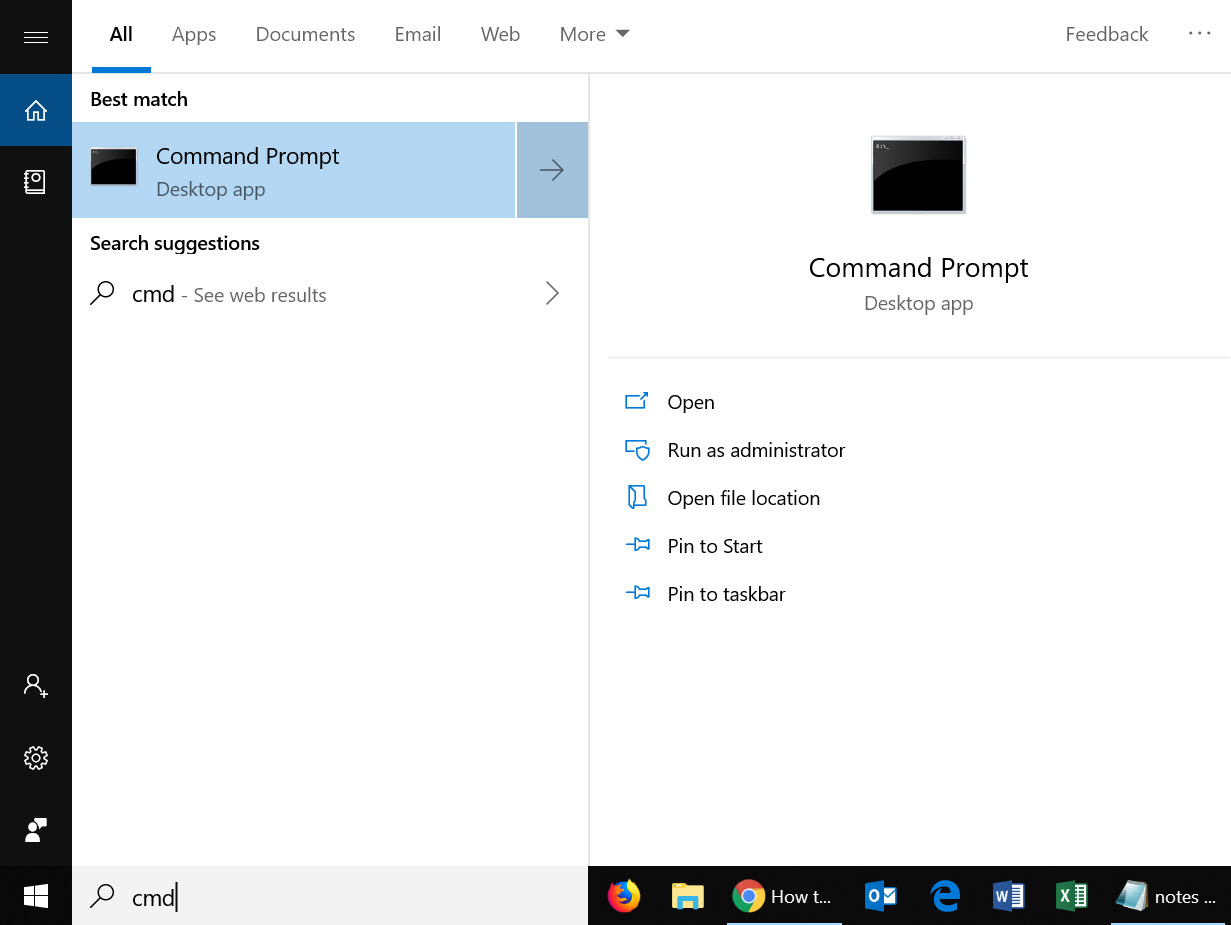
After you’d downloaded wget.exe (or unpacked the associated distribution zip files) open a command terminal by typing “cmd” in the search menu:
We’re going to move wget.exe into a Windows directory that will allow WGET to be run from anywhere.
First, we need to find out which directory that should be. Type:
path
You should see something like this:
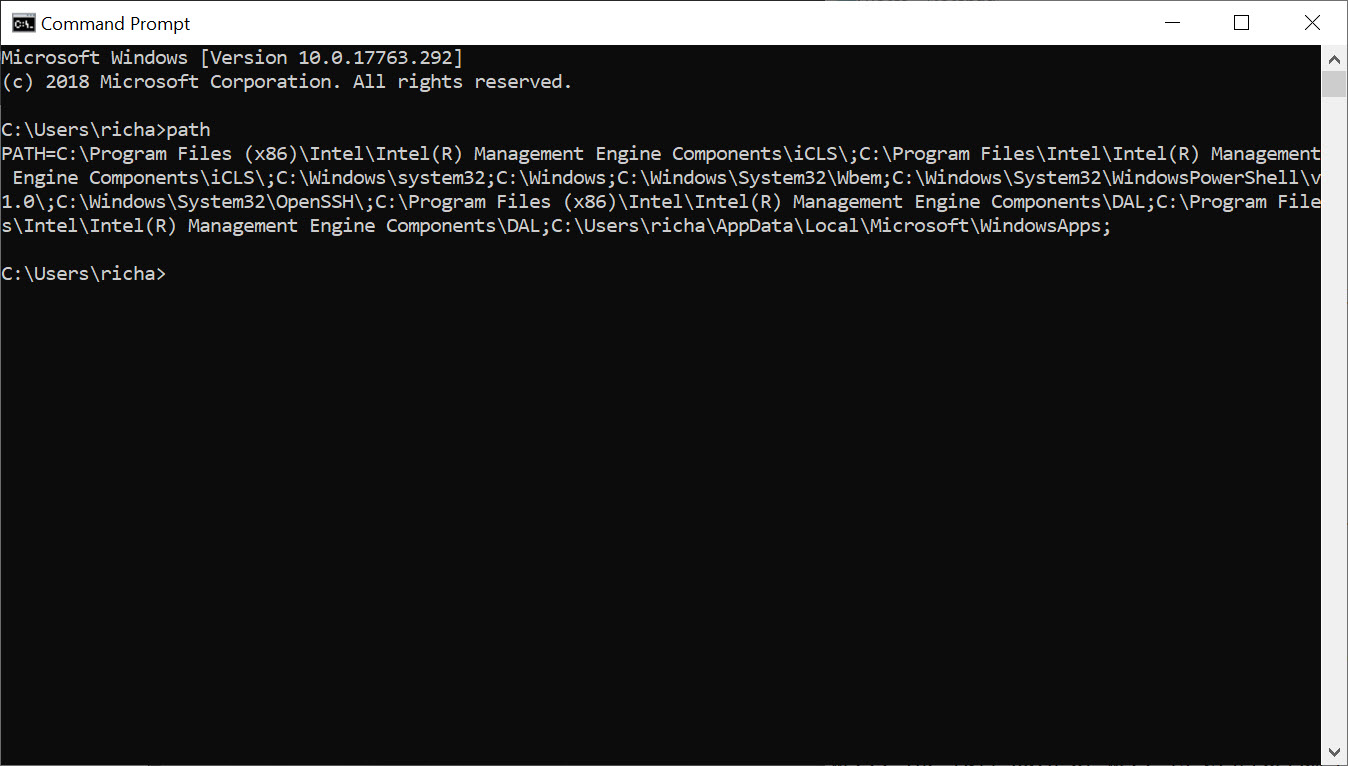
Thanks to the “Path” environment variable, we know that we need to copy wget.exe to the c:\Windows\System32 folder location.
Go ahead and copy WGET.exe to the System32 directory and restart your Command Prompt.
Restart command terminal and test WGET
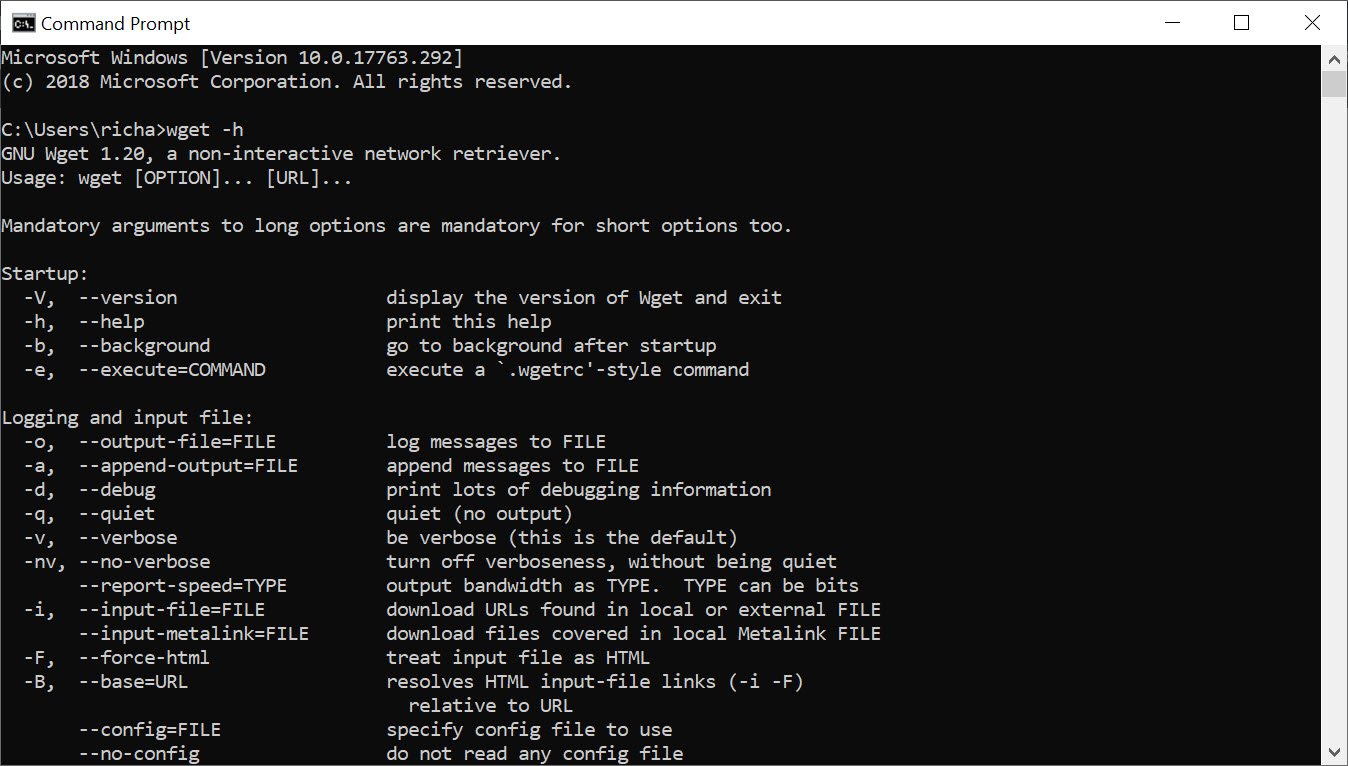
If you want to test WGET is working properly, restart your terminal and type:
wget -h
If you’ve copied the file to the right place, you’ll see a help file appear with all of the available commands.
So, you should see something like this:
Now it’s time to get started.
Get started with WGET
Seeing that we’ll be working in Command Prompt, let’s create a download directory just for WGET downloads.
To create a directory, we’ll use the command md (“make directory”).
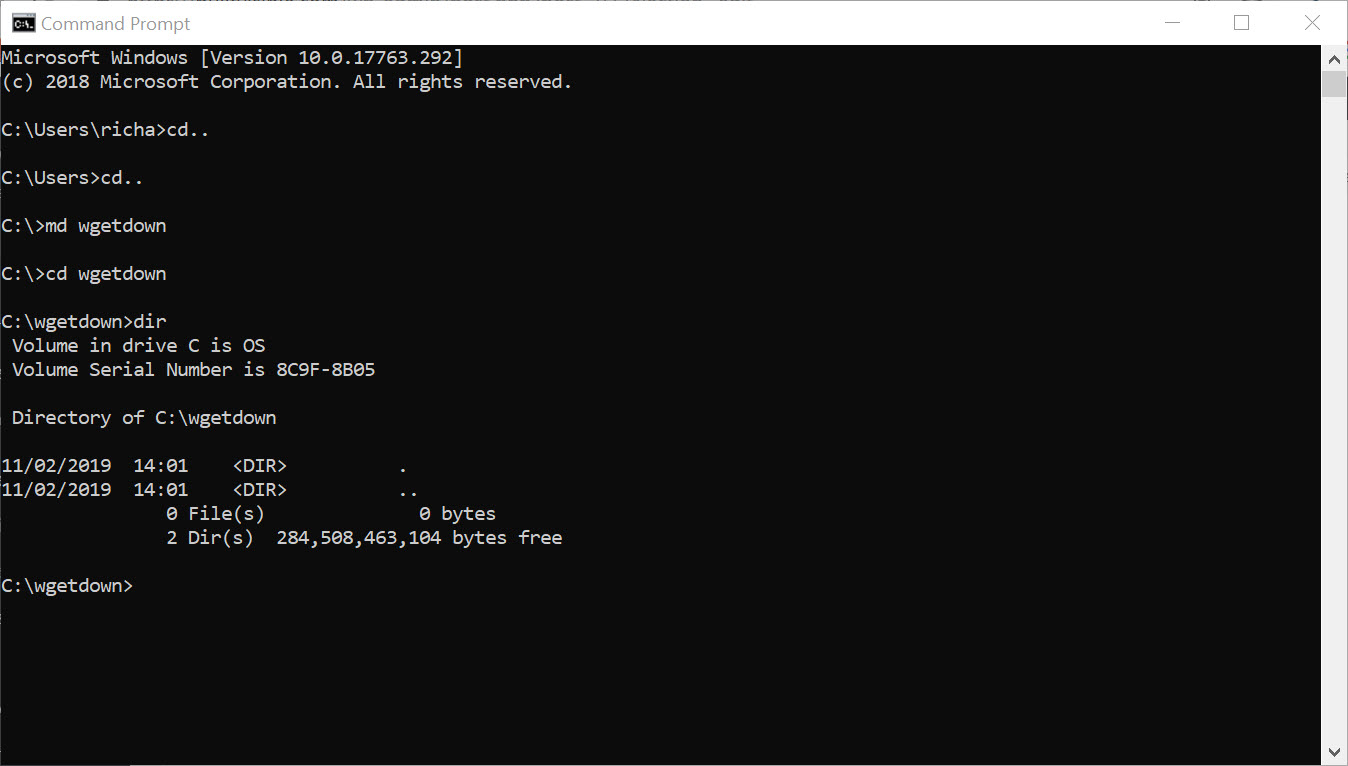
Change to the c:/ prompt and type:
md wgetdown
Then, change to your new directory and type “dir” to see the (blank) contents.
Now, you’re ready to do some downloading.
Example commands
Once you’ve got WGET installed and you’ve created a new directory, all you have to do is learn some of the finer points of WGET arguments to make sure you get what you need.
The Gnu.org WGET manual is a particularly useful resource for those inclined to really learn the details.
If you want some quick commands though, read on. I’ve listed a set of instructions to WGET to recursively mirror your site, download all the images, CSS and JavaScript, localise all of the URLs (so the site works on your local machine), and save all the pages as a .html file.
To mirror your site execute this command:
wget -r https://www.yoursite.com
To mirror the site and localise all of the urls:
wget --convert-links -r https://www.yoursite.com
To make a full offline mirror of a site:
wget --mirror --convert-links --adjust-extension --page-requisites --no-parent https://www.yoursite.com
To mirror the site and save the files as .html:
wget --html-extension -r https://www.yoursite.com
To download all jpg images from a site:
wget -A "*.jpg" -r https://www.yoursite.com
For more filetype-specific operations, check out this useful thread on Stack.
Set a different user agent:
Some web servers are set up to deny WGET’s default user agent – for obvious, bandwidth saving reasons. You could try changing your user agent to get round this. For example, by pretending to be Googlebot:
wget --user-agent="Googlebot/2.1 (+https://www.googlebot.com/bot.html)" -r https://www.yoursite.com
Wget “spider” mode:
Wget can fetch pages without saving them which can be a useful feature in case you’re looking for broken links on a website. Remember to enable recursive mode, which allows wget to scan through the document and look for links to traverse.
wget --spider -r https://www.yoursite.com
You can also save this to a log file by adding this option:
wget --spider -r https://www.yoursite.com -o wget.log
Enjoy using this powerful tool, and I hope you’ve enjoyed my tutorial. Comments welcome!
What is wget?
Wget is a free GNU command-line utility tool used to download files from the internet. It retrieves files using HTTP, HTTPS, and FTP protocols.
It serves as a tool to sustain unstable and slow network connections. If a network problem occurs during a download, this helpful software can resume retrieving the files without starting from scratch.
Another important aspect is its capability of recursive downloads, with which it mirrors websites. It transfers parts of a website by following links and directory structure, thus creating local versions of webpages.
The wget command is also highly flexible and can be used in terminals, scripts, and cron jobs. During the download, the user does not have to be active nor logged in. As wget is non-interactive, it can independently run in the background.
Read this article to learn how to use some of the most common wget commands.
How to Check if wget is Installed?
Most likely, the wget package is already on your system as it now comes pre-installed on most Linux distributions.
To check, open the terminal window and type in:
wget
If you have the wget software, the output tells you that the wget command is missing a URL, as shown in the image below:

wget Command Not Found
If the output displays wget command not found you need to download and install the tool manually. Below you will find the installation instructions for Ubuntu/Debian, CentOS, and Windows.
How to Install wget on Ubuntu/Debian?
To install wget on Ubuntu or Debian releases, use the command:
sudo apt-get install wget
How to Install wget on CentOS/Fedora?
To install wget on CentOS or Fedora, type the following command:
sudo yum install wget
How to Install wget on Windows?
To install and configure wget for Windows:
- Download wget for Windows and install the package.
- Add the wget bin path to environment variables (optional). Configuring this removes the need for full paths, and makes it a lot easier to run wget from the command prompt:
- Open the Start menu and search for “environment.”
- Select Edit the system environment variables.
- Select the Advanced tab and click the Environment Variables button.
- Select the Path variable under System Variables.
- Click Edit.
- In the Variable value field add the path to the wget bin directory preceded by a semicolon (;). If installed in the default path, add
C:Program Files (x86)GnuWin32bin.
- Open the command prompt (cmd.exe) and start running
wgetcommands.
Introduction to wget Syntax
The wget syntax has the following pattern:
wget [option][URL]
Each [option] has its long and short form which are conveniently interchangeable. This attribute specifies what to do with the URL that follows.
[URL] is the address of the file or directory you wish to download.
wget Command Examples
Download File from Web
To download a file from the web use:
wget [URL]
For example, to install Tomcat 9, first you need to download the package with wget using the command:
wget http://apache.cs.utah.edu/tomcat/tomcat-9/v9.0.20/bin/apache-tomcat-9.0.20.tar.gz
Download File and Save Under Specific Name
To download a file and save it under a specified name run:
wget -O [file_name] [URL]
The wget command allows you to rename files prior to downloading them on your computer.
For instance, you may want to install Terraform. To download the package and rename it terraform.zip use the following command:
wget -O terraform.zip https://releases.hashicorp.com/terraform/0.12.2/terraform_0.12.2_linux_amd64.zip
Download File to Specific Directory
By default wget downloads a file in the directory the user is in. To save the file in a different location, add the -P option:
wget -P [wanted_directory] [URL]
For example, while installing Git on Ubuntu, you can download the package in the /temp directory with the command:
wget -P /temp https://github.com/git/git/archive/master.zip
Set Download Speed
You can set the download speed when downloading a big file, so it does not use the full available bandwidth. The download speed is defined in kilobytes (k) and megabytes (m). Use the command:
wget --limit-rate [wanted_speed] [URL]
For example, if you are installing NVIDIA TESLA drivers on Linux and want to limit the download speed to 1 megabyte, would use the command:
wget --limit-rate 1m http://us.download.nvidia.com/tesla/396.37/nvidia-diag-driver-local-repo-ubuntu1710-396.37_1.0-1_amd64.deb
Continue Download After Interruption
Instead of having to start from scratch, wget can resume downloading where it stopped before the interruption. This is a useful feature if there is a lost of connection while downloading a file.
wget -c [URL]
For instance, you may want to install a Mumble Server on Linux and suddenly lose internet connection while downloading the installation file. To continue downloading, type in the command:
wget -c https://github.com/mumble-voip/mumble/releases/download/1.2.19/murmur-static_x86-1.2.19.tar.bz2
Download Multiple Files
wget allows downloading multiple files at the same time using the command:
wget -i [file_name]
To do so, follow the steps outlined below:
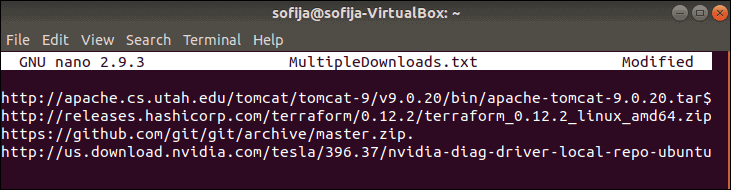
1. First, create and open a file under the name MultipleDownloads.txt (or a name of your choice), using a text editor. In this case, we used Nano:
nano MultipleDownloads.txt
2. Once in the editor, add the URLs of the packages you want to download, one per line.
3. Save and exit the file.
4. Run the following wget command in the terminal window:
wget -i MultipleDownloads.txt
This prompts wget to download from each URL in the text file.
Download Web page (Mirror Web page)
With wget you can download an entire website from the internet, using the -m option. It prompts wget to create a mirror of the specified webpage. The basic command for doing so is:
wget -m [URL]
For example:
wget -m <a href="https://phoenixnap.com/" target="_blank" rel="noreferrer noopener">https://phoenixnap.com</a>
Download via FTP
To download via FTP, type in the username and password of the FTP server, followed by the ftp address:
wget --ftp-user=[ftp_username] --ftp-password=[ftp_password] ftp://...
For instance:
wget --ftp-user=sofiftp --ftp-password=TopSecretPassword ftp://123.456.7890
Download in Background
You can download in the background, a practical feature when dealing with a large file:
wget -b [URL]
You can check the status of the download with the command:
tail -f wget -log
To download the RPM package manager in the background, type:
wget -b http://some_website/sample_file.rpm
Increase Retry Attempts
You can set how many times wget attempts to download a file after being interrupted by a bad network with:
wget --tries=[number_of_tries] [URL]
By default, the number of retry attempts is set to 20.
You can also set the number to infinity with the values 0 or inf, as in the following example:
wget --tries=inf http://download.virtualbox.org/virtualbox/rpm/rhel/virtualbox.repo
Skip Certificate Check
By default, wget checks whether the server has a valid SSL/TLS certificate. If it does not identify an authentic certificate, it refuses to download.
The --no-check-certificate option is used to avoid certificate authorities checking for a server certificate. However, utilize it only if you are sure of the website’s credibility or are not worried about security issues it may cause.
wget --no-check-certificate [URL]
If http://enteratonerisk.com has an untrusted certificate, but will not harm the system, you can download it with:
wget --no-check-certificate http://enteratonerisk.com
Change User Agent
When downloading a webpage, wget essentially emulates a browser. In some cases, the output might say you don’t have permission to access the server, or that the connection is forbidden. This may be due to a website blocking client browsers that have a specific “User-Agent.”
“User-Agent” is a header field that the browser sends to the server it wants to access. Therefore, to download from a server that is refusing to connect, try to modify the user agent.
Find a database of all user agents online, search for the one you need and run the command:
wget --user-agent="User Agent Here" "[URL]"
or
wget -U "User Agent Here" "[URL]"
For example, to emulate Chrome (version 74), you would change the user agent with the command:
wget --user-agent=" Mozilla/5.0 (Windows NT 10.0; Win64; x64) AppleWebKit/537.36 (KHTML, like Gecko) Chrome/74.0.3729.169 Safari/537.36" "https://phoenixnap.com"
Note: Make sure you always download from a trusted source because wget can instruct a download of a script from a malicious source. We outline this and many other dangerous commands in our article 14 Dangerous Linux Terminal Commands.
Conclusion
This article sums up why wget is such a powerful tool for downloading files over the internet. It also serves as a good reference for beginners with its list of 12 essential wget commands and examples.
Credit: phoenixnap.com/kb/wget-command-with-examples
Have you ever lost an essential asset at a crucial moment on your website? It is frightening to even think about it, isn’t it? Perhaps if you have used Linux, then you might have heard of WGET. Yay! WGET is also available for Windows. Thank GNU for coming up with a compatible version of WGET for Windows 10. From the starting of this article, you will understand how to download and install WGET for Windows 10. Also, you will learn how to use WGET command with examples provided for improving your understanding. Keep on reading to gain comprehensive knowledge about WGET.

Table of Contents
WGET has been available for Linux users for a long time. Learners can even refer to the different articles and guides available on the web to better their comprehension. But when it comes to the Windows version, even the scarce amount of articles cannot give you the information you need. However, do not lose hope. From this point on, you will know things about WGET on Windows that you’ve never heard or read. So why not start with answering the most asked question: What is WGET?
What is WGET?
WGET is a free tool to download files and crawl websites using the command line. Before learning to download WGET and how to use WGET command with examples, check out the points given below to know more about its features:
- WGET can retrieve contents from web pages.
- It even allows you to download from any web pages (FTP, HTTP) in any format (PDF, XML).
- It’s known to provide operational anonymity to keep users’ location or activities a secret.
- WGET works perfectly in bad network conditions too.
- Apart from these features, WGET can overwrite correct domain name in links.
- Moreover, it can perform recursive downloads, where the link present in the downloading document gets automatically downloaded further.
Also Read: What is a Command Line Interpreter?
How to Install WGET for Windows 10
Using WGET for Windows 10 will seamlessly download and extract information from any webpage by using commands. Implement the steps below to download GnuWin first to create a Windows environment and use WGET.
1. Download GnuWin WGET from here. The download process will start and finish automatically in a few seconds.
2. Click the downloaded WGET setup.exe folder to open it, as shown below.

3. Click Yes when prompted.
Note: Make sure to close already running applications before starting WGET installation.
4. To install WGET for Windows, click on Next, as depicted below.

5. Select the I accept the agreement radio button and click the Next option as highlighted below to continue the installation process.

6. Click on Browse to select the Destination Location. Choose a folder where you want to set up WGET and click on Next as shown.
Note: It is recommended to use default path: C:\Program Files (x86)\GnuWin32\bin

7. Select the components you want to install among Binaries and Documentation. Click Next to proceed further.

8. Here, click on Browse and select a Destination Folder to create the program shortcut in the start menu. Then, click on Next.
Note: If you don’t want to create a shortcut, select the checkbox Don’t create a Start Menu folder.

9. Select the Additional icons you need and click Next as illustrated below:
- Create document shortcuts in Start Menu folder
- Download Sources
![]()
10. Scroll down the review tab and check if all the desired options are present. Click Install to begin installing WGET on your system.
Note: You can select Back to change any setting you need to modify.

11. Wait for the WGET installation process to complete in your Windows 10 desktop/laptop and click Finish to exit the setup.

Also Read: Fix error 1500 Another Installation is in Progress
How to Use WGET for Windows 10
There are two ways to use WGET on your system.
- First, it is accessed directly via Command Prompt using a single path.
- Second, you need to manually go to the directory page where the app is present, and then proceed to the command prompt procedure.
You can implement any of these methods to use WGET on your system at your convenience. So, now you will see both methods in action below:
Method 1: Add CD to WGET Path
Once you install WGET for Windows 10, ensure that the wget.exe folder exists in the path given in this method.
Note: If not, copy and paste the respective folder in the location shown in the below File Explorer navigation, as you are about to use only this path.
1. Press Windows + E keys simultaneously to open File Explorer.
2. Navigate to C:\Program Files (x86)\GnuWin32\bin and copy the location.

3. Type Command Prompt in the Windows search bar and click Open to launch it, as shown below.

4. Type cd C:\Program Files (x86)\GnuWin32\bin and press Enter.
5. Then type wget and hit Enter. If the command is executed, it shows that WGET is running properly.

6A. Type the required WGET for Windows 10 command to download any file in the given format:
wget [OPTION] … [URL]…
6B. Or, view help from WGET by typing ‘wget –help’
Also Read: Fix File Explorer Not Responding in Windows 10
Method 2: Add Environment Variable
Once you download WGET for Windows 10, you must change the environmental variable set in the system settings. This is a long process. Follow the steps below carefully to set up WGET for Windows 10:
1. Press the Windows key from the keyboard and type Control Panel. Click the Open option to launch it.

2. Choose View by: Large icons from the top right corner. Click on the System option.
![]()
3. Scroll down and click on the Advanced system settings as illustrated below.

4. In the Advanced tab, click the Environment Variables button as shown.

5. Environmental Variables pop-up window will appear. Select the Path under the User variables for GREEN category and click on Edit as depicted below.

6. In the Edit environmental variable window, select the Browse option.

7. Select C:\Program Files (x86)\GnuWin32\bin path and click OK as shown.

8. Then, click OK as shown.

9. Again, click OK in the System Properties window.

10. Now, open Command Prompt as explained in Method 1.
11. Type wget and press Enter on the keyboard. Once the Environment Variable is set, you will be able to run WGET regardless of any folder you are currently in.

Also Read: How to Fix Git Merge Error
How to Check the Functioning of WGET App and Commands
To check if you can access WGET for Windows 10 regardless of any folder or directory that is present, follow the steps given below:
1. Type Command Prompt on the start menu search bar and click Open to launch it.

2. Type wget and press Enter to check whether the application runs.
Note: If you receive unrecognized command error, you have downloaded the WGET Setup from the wrong source. So, ensure to use only the link given above for the download process and try again.

3A. If the test worked, then it’s great. You have done a good job!
3B. If it is not working, do not worry. Check if you have followed the steps in an orderly manner, from downloading GnuWin, installing WGET Setup, then adding WGET environment variable. Try once again and restart the command line.
Also Read: Fix ERR_EMPTY_RESPONSE in Google Chrome
How to Use WGET Command with Examples
There are thousands of WGET commands to perform specific tasks. Run WGET for Windows 10 using any of the methods given above and type any of the commands listed below in Command Prompt.
Note: You need to enter the command correctly to obtain desired results.
1. To get list of commands, use the command wget -h.

2. To download a single file, use the command wget [URL]. For instance, enter the command wget https://wordpress.org/latest.zip. Here, WordPress is chosen as an example.
3. To download to a specific folder, use the command wget ‐P [wanted directory] [URL]. For instance, wget -P /temp https://github.com/git/git/archive/master.zip.
4. To resume an interrupted download, use the command wget ‐c [URL]. For instance, wget -c https://wordpress.org/latest.zip.
5. To set the download speed, use the command wget ‐‐limit-rate [wanted speed] [URL]. For instance, wget –limit-rate 1m https://wordpress.org/latest.zip.
6. To mirror a single webpage, use the command wget -m [URL]. For instance, wget -m https://cereal.guru/.
7. To know the version of installed WGET, then use the command wget -V.

8. To download and save under a specific name, use the command wget -o [file name] [URL]. For instance, wget -o file.docx https://cereal.guru/.
9. To download a web page in the background, use the command wget -b [URL]. For instance, wget -b https://cereal.guru/.
10. To download multiple URLs, use the command wget -i [File name]. For instance, wget -i URL.txt. Before executing this command, place all the URLs in one file and include that file name in the command.
11. To download via FTP, use the command wget –ftp-user=[ftp_username] –ftp-password=[ftp_password] ftp://… For instance, wget –ftp-user=sofiftp –ftp-password=TopSecretPassword ftp://123.456.7890.
12. To change the number of retry attempts, use the command wget –tries=[number_of_tries] [URL]. For instance, wget –tries=inf https://cereal.guru/. In this example, inf denotes infinity. The default number of retries is 20.
This is how to use WGET command with examples. Click here to know about more commands and their uses.
Recommended:
- Fix Windows 10 Update Error 0x80070103
- How to Enable Telnet in Windows 10
- Complete List of Windows 11 Run Commands
- Discord Commands List
We hope that this guide was helpful and you could learn how to download, install & use WGET for Windows 10. If you have any queries or suggestions, feel free to drop them in the comments section below.
GNU Wget — консольная программа для загрузки файлов по сети. Поддерживает протоколы HTTP, FTP и HTTPS, а также работу через HTTP прокси-сервер. Программа включена почти во все дистрибутивы Linux. Утилита разрабатывалась для медленных соединений, поэтому она поддерживает докачку файлов при обрыве соединения.
Для работы с Wget под Windows, переходим по ссылке и скачиваем файл wget.exe. Создаем директорию C:\Program Files\Wget-Win64 и размещаем в ней скачанный файл. Для удобства работы добавляем в переменную окружения PATH путь до исполняемого файла.
Давайте попробуем что-нибудь скачать, скажем дистрибутив Apache под Windows:
> wget https://home.apache.org/~steffenal/VC15/binaries/httpd-2.4.35-win64-VC15.zip
--2018-09-14 10:34:09--  https://home.apache.org/~steffenal/VC15/binaries/httpd-2.4.35-win64-VC15.zip
Resolving home.apache.org (home.apache.org)... 163.172.16.173
Connecting to home.apache.org (home.apache.org)|163.172.16.173|:443... connected.
HTTP request sent, awaiting response... 200 OK
Length: 17856960 (17M) [application/zip]
Saving to: 'httpd-2.4.35-win64-VC15.zip'

httpd-2.4.35-win64-VC15.zip   100%[=================================================>]  17,03M  8,50MB/s    in 2,0s

2018-09-14 10:34:12 (8,50 MB/s) - 'httpd-2.4.35-win64-VC15.zip' saved [17856960/17856960]
Если утилита ругается на сертификаты при скачивании по HTTPS, нужно использовать дополнительную опцию --no-check-certificate.
Примеры
Загрузка всех URL, указанных в файле (каждая ссылка с новой строки):
> wget -i download.txt
Скачивание файлов в указанный каталог:
> wget -P /path/for/save ftp://ftp.example.org/image.iso
Скачивание файла file.zip и сохранение под именем archive.zip:
> wget -O archive.zip http://example.com/file.zip
Продолжить загрузку ранее не полностью загруженного файла:
> wget -c http://example.org/image.iso
Вывод заголовков HTTP серверов и ответов FTP серверов:
> wget -S http://example.org/
Скачать содержимое каталога archive и всех его подкаталогов, при этом не поднимаясь по иерархии каталогов выше:
> wget -r --no-parent http://example.org/some/archive/
Использование имени пользователя и пароля на FTP/HTTP:
> wget --user=login --password=password ftp://ftp.example.org/image.iso
> wget ftp://login:password@ftp.example.org/image.iso
Отправить POST-запрос в формате application/x-www-form-urlencoded:
> wget --post-data="user=evgeniy&password=qwerty" http://example.org/auth/
Сохранение cookie в файл cookie.txt для дальнейшей отправки серверу:
> wget --save-cookie cookie.txt http://example.org/
Сохраненный файл cookie.txt:
# HTTP cookie file.
# Generated by Wget on 2018-09-14 11:40:37.
# Edit at your own risk.

example.org    FALSE    /    FALSE    1570196437    visitor    71f61d2a01de1394f60120c691a52c56
Отправка cookie, сохраненных ранее в файле cookie.txt:
> wget --load-cookie cookie.txt http://example.org/
Отправка заголовков:
> wget --header="Accept-Language: ru-RU,ru;q=0.9" --header="Cookie: PHPSESSID=....." http://example.org/
Справка по утилите:
> wget -h
GNU Wget 1.11.4, программа для загрузки файлов из сети в автономном режиме.
Использование: wget [ОПЦИЯ]... [URL]...
Запуск:
  -V,  --version          вывод версии Wget и выход.
  -h,  --help             вывод этой справки.
  -b,  --background       после запуска перейти в фоновый режим.
  -e,  --execute=КОМАНДА  выполнить команду в стиле .wgetrc.

Журналирование и входной файл:
  -o,  --output-file=ФАЙЛ    записывать сообщения в ФАЙЛ.
  -a,  --append-output=ФАЙЛ  дописывать сообщения в конец ФАЙЛА.
  -d,  --debug               вывод большого количества отладочной информации.
  -q,  --quiet               молча (без выходных данных).
  -v,  --verbose             подробный вывод (по умолчанию).
  -nv, --no-verbose          отключение подробного режима, но не полностью.
  -i,  --input-file=ФАЙЛ     загрузка URL-ов, найденных в ФАЙЛЕ.
  -F,  --force-html          считать, что входной файл - HTML.
  -B,  --base=URL            добавление URL в начало относительных ссылок в файле -F -i.

Загрузка:
  -t,  --tries=ЧИСЛО              установить ЧИСЛО повторных попыток (0 без ограничения).
       --retry-connrefused        повторять, даже если в подключении отказано.
  -O,  --output-document=ФАЙЛ     записывать документы в ФАЙЛ.
  -nc, --no-clobber               пропускать загрузки, которые приведут к загрузке уже существующих файлов.
  -c,  --continue                 возобновить загрузку частично загруженного файла.
       --progress=ТИП             выбрать тип индикатора выполнения.
  -N,  --timestamping             не загружать повторно файлы, только если они не новее, чем локальные.
  -S,  --server-response          вывод ответа сервера.
       --spider                   ничего не загружать.
  -T,  --timeout=СЕКУНДЫ          установка значений всех тайм-аутов в СЕКУНДЫ.
       --dns-timeout=СЕК          установка тайм-аута поиска в DNS в СЕК.
       --connect-timeout=СЕК      установка тайм-аута подключения в СЕК.
       --read-timeout=СЕК         установка тайм-аута чтения в СЕК.
  -w,  --wait=СЕКУНДЫ             пауза в СЕКУНДАХ между загрузками.
       --waitretry=СЕКУНДЫ        пауза в 1..СЕКУНДЫ между повторными попытками загрузки.
       --random-wait              пауза в 0...2*WAIT секунд между загрузками.
       --no-proxy                 явно выключить прокси.
  -Q,  --quota=ЧИСЛО              установить величину квоты загрузки в ЧИСЛО.
       --bind-address=АДРЕС       привязка к АДРЕСУ (имя хоста или IP) локального хоста.
       --limit-rate=СКОРОСТЬ      ограничение СКОРОСТИ загрузки.
       --no-dns-cache             отключение кэширования поисковых DNS-запросов.
       --restrict-file-names=ОС   ограничение на символы в именах файлов, использование которых допускает ОС.
       --ignore-case              игнорировать регистр при сопоставлении файлов и/или каталогов.
  -4,  --inet4-only               подключаться только к адресам IPv4.
  -6,  --inet6-only               подключаться только к адресам IPv6.
       --prefer-family=СЕМЕЙСТВО  подключаться сначала к адресам указанного семейства, может быть IPv6, IPv4 или ничего.
       --user=ПОЛЬЗОВАТЕЛЬ        установить и ftp- и http-пользователя в ПОЛЬЗОВАТЕЛЬ.
       --password=ПАРОЛЬ          установить и ftp- и http-пароль в ПАРОЛЬ.

Каталоги:
  -nd, --no-directories            не создавать каталоги.
  -x,  --force-directories         принудительно создавать каталоги.
  -nH, --no-host-directories       не создавать каталоги как на хосте.
       --protocol-directories      использовать имя протокола в каталогах.
  -P,  --directory-prefix=ПРЕФИКС  сохранять файлы в ПРЕФИКС/...
       --cut-dirs=ЧИСЛО            игнорировать ЧИСЛО компонентов удалённого каталога.

Опции HTTP:
       --http-user=ПОЛЬЗОВАТЕЛЬ   установить http-пользователя в ПОЛЬЗОВАТЕЛЬ.
       --http-password=ПАРОЛЬ     установить http-пароль в ПАРОЛЬ.
       --no-cache                 отвергать кэшированные сервером данные.
  -E,  --html-extension           сохранять HTML-документы с расширением .html.
       --ignore-length            игнорировать поле заголовка Content-Length.
       --header=СТРОКА            вставить СТРОКУ между заголовками.
       --max-redirect             максимально допустимое число перенаправлений на страницу.
       --proxy-user=ПОЛЬЗОВАТЕЛЬ  установить ПОЛЬЗОВАТЕЛЯ в качестве имени пользователя для прокси.
       --proxy-password=ПАРОЛЬ    установить ПАРОЛЬ в качестве пароля для прокси.

       --referer=URL           включить в HTTP-запрос заголовок Referer: URL.
       --save-headers          сохранять HTTP-заголовки в файл.
  -U,  --user-agent=АГЕНТ      идентифицировать себя как АГЕНТ вместо Wget/ВЕРСИЯ.
       --no-http-keep-alive    отключить поддержание активности HTTP (постоянные подключения).
       --no-cookies            не использовать кукисы.
       --load-cookies=ФАЙЛ     загрузить кукисы из ФАЙЛА перед сеансом.
       --save-cookies=ФАЙЛ     сохранить кукисы в ФАЙЛ после сеанса.
       --keep-session-cookies  загрузить и сохранить кукисы сеанса (непостоянные).
       --post-data=СТРОКА      использовать метод POST; отправка СТРОКИ в качестве данных.
       --post-file=ФАЙЛ        использовать метод POST; отправка содержимого ФАЙЛА.
       --content-disposition   Учитывать заголовок Content-Disposition при выборе имён для
                               локальных файлов (ЭКСПЕРИМЕНТАЛЬНЫЙ).
       --auth-no-challenge     Отправить базовые данные аутентификации HTTP
                               не дожидаясь ответа от сервера.

Опции HTTPS (SSL/TLS):
       --secure-protocol=ПР    выбор безопасного протокола: auto, SSLv2, SSLv3 или TLSv1.
       --no-check-certificate  не проверять сертификат сервера.
       --certificate=FILE      файл сертификата пользователя.
       --certificate-type=ТИП  тип сертификата пользователя: PEM или DER.
       --private-key=ФАЙЛ      файл секретного ключа.
       --private-key-type=ТИП  тип секретного ключа: PEM или DER.
       --ca-certificate=ФАЙЛ   файл с набором CA.
       --ca-directory=КАТ      каталог, в котором хранится список CA.
       --random-file=ФАЙЛ      файл со случайными данными для SSL PRNG.
       --egd-file=ФАЙЛ         файл, определяющий сокет EGD со случайными данными.

Опции FTP:
       --ftp-user=ПОЛЬЗОВАТЕЛЬ  установить ftp-пользователя в ПОЛЬЗОВАТЕЛЬ.
       --ftp-password=ПАРОЛЬ    установить ftp-пароль в ПАРОЛЬ.
       --no-remove-listing      не удалять файлы файлы .listing.
       --no-glob                выключить маски для имён файлов FTP.
       --no-passive-ftp         отключить "пассивный" режим передачи.
       --retr-symlinks          при рекурсии загружать файлы по ссылкам (не каталоги).
       --preserve-permissions   сохранять права доступа удалённых файлов.

Рекурсивная загрузка:
  -r,  --recursive         включение рекурсивной загрузки.
  -l,  --level=ЧИСЛО       глубина рекурсии (inf и 0 - бесконечность).
       --delete-after      удалять локальные файлы после загрузки.
  -k,  --convert-links     делать ссылки локальными в загруженном HTML.
  -K,  --backup-converted  перед преобразованием файла X делать резервную копию X.orig.
  -m,  --mirror            короткая опция, эквивалентная -N -r -l inf --no-remove-listing.
  -p,  --page-requisites   загрузить все изображения и проч., необходимые для отображения HTML-страницы.
       --strict-comments   включить строгую (SGML) обработку комментариев HTML.

Разрешения/запреты при рекурсии:
  -A,  --accept=СПИСОК               список разрешённых расширений, разделённых запятыми.
  -R,  --reject=СПИСОК               список запрещённых расширений, разделённых запятыми.
  -D,  --domains=СПИСОК              список разрешённых доменов, разделённых запятыми.
       --exclude-domains=СПИСОК      список запрещённых доменов, разделённых запятыми.
       --follow-ftp                  следовать по ссылкам FTP в HTML-документах.
       --follow-tags=СПИСОК          список используемых тегов HTML, разделённых запятыми.
       --ignore-tags=СПИСОК          список игнорируемых тегов HTML, разделённых запятыми.
  -H,  --span-hosts                  заходить на чужие хосты при рекурсии.
  -L,  --relative                    следовать только по относительным ссылкам.
  -I,  --include-directories=СПИСОК  список разрешённых каталогов.
  -X,  --exclude-directories=СПИСОК  список исключаемых каталогов.
  -np, --no-parent                   не подниматься в родительский каталог.
Дополнительно
- WGet — программа для загрузки файлов
Поиск:
CLI • Cookie • FTP • HTTP • HTTPS • Linux • POST • Web-разработка • Windows • wget • Форма
Каталог оборудования
Lorem ipsum dolor sit amet, consectetur adipiscing elit, sed do eiusmod tempor incididunt ut labore et dolore magna aliqua.
Производители
Lorem ipsum dolor sit amet, consectetur adipiscing elit, sed do eiusmod tempor incididunt ut labore et dolore magna aliqua.
Функциональные группы
Lorem ipsum dolor sit amet, consectetur adipiscing elit, sed do eiusmod tempor incididunt ut labore et dolore magna aliqua.
Skip to content
Wget is a command line tool for downloading files from the internet. It supports downloading using well known protocols such as FTP, HTTP and HTTPS. It employs the powerful OpenSSL library to establish encrypted connections to HTTPS servers. It supports recursive downloads from both HTTP and FTP sites. It can continue unfinished downloads from the last position. If the remote server is password protected, then it also supports logging in to the remote server using a username and a password.
It is easy to install Wget on a Windows PC through Chocolatey. Here is how:
- First of all you have to install Chocolatey on your PC. Basically this requires running a PowerShell command as explained on https://chocolatey.org/install.
- Once Chocolatey has been installed, you can open an elevated PowerShell or cmd.exe Command Prompt and give the following command : choco install wget -y
- Chocolatey will download and finish installation in seconds. Then you can start using Wget from anywhere on your PC.


Using Wget is the easiest thing in the world. If you download a file from the internet, you can open a command prompt or PowerShell and give the command wget [URL]. For example, if you want to download 7-Zip for Windows 64-bit, then you can give the command wget https://www.7-zip.org/a/7z2106-x64.exe. It will download the file and place in the current directory.
If you want to save the file with a different name, then you have to use the -O parameter followed by the file name. For example, wget -O 7-zip-x64.exe https://www.7-zip.org/a/7z2106-x64.exe. This will save the 7-Zip installer for Windows as the local file 7-zip-x64.exe.

Wget can also be used to download multiple files in just one command. For this, you have to create an input plain text file and copy all the links in that file. Ideally, there should be one link per line. Then you can give the command wget -i input-file.txt and it will batch download all the files.
If you do not want to use Chocolatey for installing Wget on your Windows PC, then you can download an older Wget binary from http://gnuwin32.sourceforge.net/packages/wget.htm. But this is very old version and does not download files using today’s HTTPS and FTPS protocols.
We use cookies on our website to give you the most relevant experience by remembering your preferences and repeat visits. By clicking “Accept”, you consent to the use of ALL the cookies.