Если вы из Windows 10 или 11 не можете открыть сетевые папки на других сетевых устройствах (NAS, Samba сервера Linux) или на компьютерах со старыми версиями Windows (Windows 7/ XP /2003), скорее всего проблема связана с тем, что в вашей версии Windows отключена поддержка устаревших и небезопасных версий протокола SMB (используется в Windows для доступа к общим сетевым папкам и файлам). В современных версиях Windows 10 и в Windows 11 по-умолчанию отключен протокол SMBv1 и анонимный (гостевой) доступ к сетевым папкам по протоколу SMBv2 и SMBv3.
Microsoft планомерно отключает старые и небезопасные версии протокола SMB во всех последний версиях Windows. Начиная с Windows 10 1709 и Windows Server 2019 (как в Datacenter так и в Standard редакциях) в операционной системе по умолчанию отключен протокол SMBv1 (помните атаку шифровальщика WannaCry, которая как раз и реализовалась через дыру в SMBv1).
Конкретные действия, которые нужно предпринять зависят от ошибки, которая появляется в Windows при доступе к общей сетевой папке и от настроек удаленного SMB сервера, на котором хранятся общие папки.
Содержание:
- Вы не можете получить гостевой доступ к общей папке без проверки подлинности
- Вашей системе необходимо использовать SMB2 или более позднюю
- Нет доступа к сетевой папке, у вас нет прав доступа
- Дополнительные способы проверки доступа к сетевой папке в Windows
Вы не можете получить гостевой доступ к общей папке без проверки подлинности
Начиная с версии Windows 10 1709 (Fall Creators Update) Enterprise и Education пользователи стали жаловаться, что при попытке открыть сетевую папку на соседнем компьютере стала появляться ошибка:
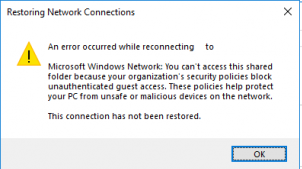
Вы не можете получить доступ к этой общей папке, так как политики безопасности вашей организации блокируют гостевой доступ без проверки подлинности. Эти политики помогают защитить ваш компьютер от небезопасных или вредоносных устройств в сети.
An error occurred while reconnecting Y: to
\\nas1\share Microsoft Windows Network: You can’t access this shared folder because your organization’s security policies block unauthenticated guest access. These policies help protect your PC from unsafe or malicious devices on the network.
При этом на других компьютерах со старыми версиями Windows 8.1/7 или на Windows 10 с билдом до 1709, эти же сетевые каталоги открываются нормально. Причина в том, что в современных билдах Windows 10 (начиная с 1709) по умолчанию запрещен сетевой доступ к сетевым папкам под гостевой учетной записью по протоколу SMBv2 (и ниже). Гостевой (анонимный) доступ подразумевают доступ к сетевой папке без аутентификации. При доступе под гостевым аккаунтом по протоколу SMBv1/v2 не применяются такие методы защиты трафика, как SMB подписывание и шифрование, что делает вашу сессию уязвимой против MiTM (man-in-the-middle) атак.
При попытке открыть сетевую папку под гостем по протоколу SMB2, в журнале клиента SMB (Microsoft-Windows-SMBClient) фиксируется ошибка:
Log Name: Microsoft-Windows-SmbClient/Security Source: Microsoft-Windows-SMBClient Event ID: 31017

Rejected an insecure guest logon.
Данная ошибка говорит о том, что ваш компьютер (клиент) блокирует не аутентифицированный доступ под аккаунтом guest.
Чаще всего с этой проблемой можно столкнуться при использовании старых версий NAS (обычно для простоты настройки на них включают гостевой доступ) или при доступе к сетевым папкам на старых версиях Windows 7/2008 R2 или Windows XP /2003 с настроенным анонимным (гостевым) доступом (см. таблицу поддерживаемых версий SMB в разных версиях Windows).
Microsoft рекомендует изменить настройки на удаленном компьютере или NAS устройстве, который раздает сетевые папки. Желательно переключить сетевой ресурс в режим SMBv3. А если поддерживается только протокол SMBv2, тогда нужно настроить доступ с аутентификацией. Это самый правильный и безопасный способ исправить проблему.
В зависимости от устройства, на котором хранятся сетевые папки, вы должны отключить на них гостевой доступ.
- NAS устройство – отключите гостевой доступ в настройках вашего NAS устройства (зависит от модели);
- Samba сервер на Linux — если вы раздаете SMB папку с Linux, добавьте в в секции [global] конфигурационного файла smb.conf строку:
map to guest = never
А в секции с описанием сетевой папки запретить анонимный доступ:
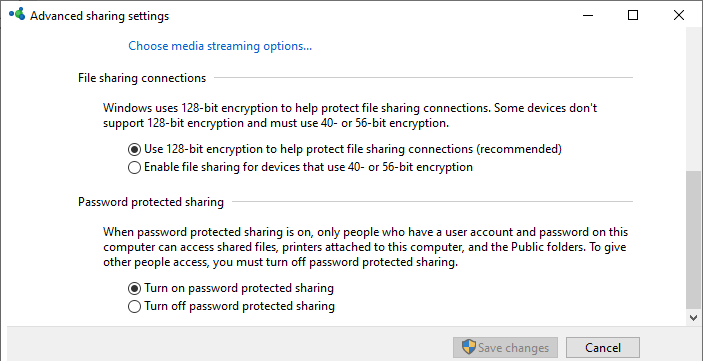
guest ok = no - В Windows вы можете включить общий доступ к сетевым папкам и принтерам с парольной защитой в разделе Control Panel\All Control Panel Items\Network and Sharing Center\Advanced sharing settings. Для All Networks (Все сети) в секции “Общий доступ с парольной защитой” (Password Protected Sharing) измените значение на “Включить общий доступ с парольной защитой” (Turn on password protected sharing). В этом случае анонимный (гостевой) доступ к папкам будет отключен и вам придется создать локальных пользователей, предоставить им доступ к сетевым папкам и принтерам и использовать эти аккаунты для сетевого доступа к общим папкам на этом компьютере..

Есть другой способ – изменить настройки вашего SMB клиента и разрешить доступ с него на сетевые папки под гостевой учетной записью.
Этот способ нужно использовать только как временный (!!!), т.к. доступ к папкам без проверки подлинности существенно снижает уровень безопасности ваших данных.
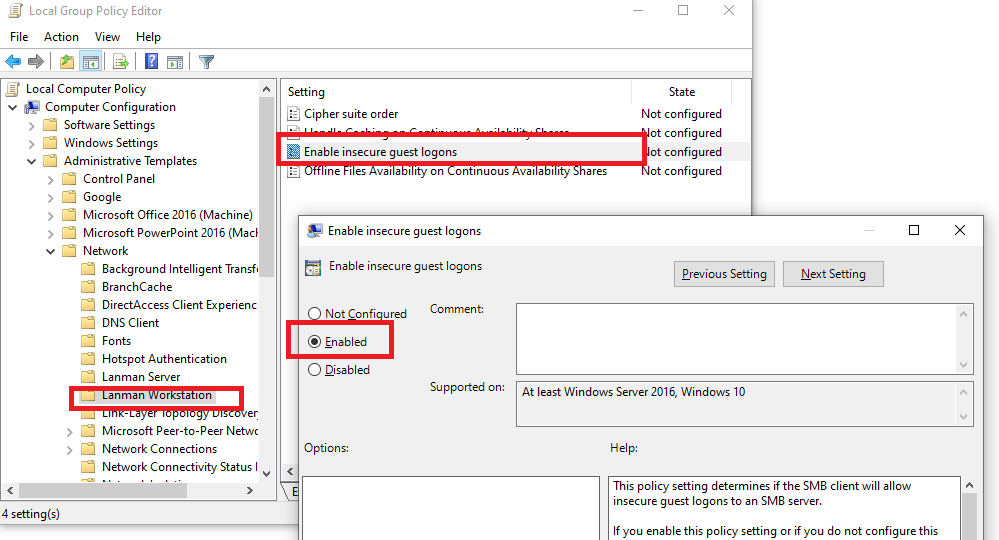
Чтобы разрешить гостевой доступ с вашего компьютера, откройте редактор локальных групповых политик (gpedit.msc) и перейдите в раздел: Конфигурация компьютера -> Административные шаблоны -> Сеть -> Рабочая станция Lanman (Computer Configuration ->Administrative templates -> Network (Сеть) -> Lanman Workstation). Включите политику Enable insecure guest logons (Включить небезопасные гостевые входы).
Обновите настройки групповых политик в Windows с помощью команды:
gpupdate /force
В Windows 10 Home, в которой нет редактора локальной GPO,вы можете внести аналогичное изменение через редактор реестра вручную::
HKLM\SYSTEM\CurrentControlSet\Services\LanmanWorkstation\Parameters “AllowInsecureGuestAuth”=dword:1
Или такими командами:
reg add HKLM\SYSTEM\CurrentControlSet\Services\LanmanWorkstation\Parameters /v AllowInsecureGuestAuth /t reg_dword /d 00000001 /f
reg add HKLM\Software\Policies\Microsoft\Windows\LanmanWorkstation /v AllowInsecureGuestAuth /t reg_dword /d 00000001 /f
Вашей системе необходимо использовать SMB2 или более позднюю
Другая возможная проблема при доступе к сетевой папке из Windows 10 – поддержка на стороне сервера только протокола SMBv1. Т.к. клиент SMBv1 по умолчанию отключен в Windows 10, то при попытке открыть шару или подключить сетевой диск вы можете получить ошибку:
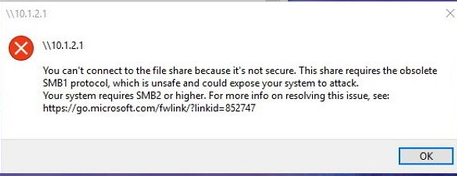
Не удалось выполнить сопоставление сетевого диска из-за следующей ошибки.
Вы не можете подключиться к общей папке, так как она небезопасна. Эта общая папка работает по устаревшему протоколу SMB1, который небезопасен и может подвергнуть вашу систему риску атаки.
Вашей системе необходимо использовать SMB2 или более позднюю версию.
You can’t connect to the file share because it’s not secure. This share requires the obsolete SMB1 protocol, which is unsafe and could expose your system to attack. Your system requires SMB2 or higher.
При этом соседние устройства SMB могут не отображаться в сетевом окружении и при открытии сетевых папок по UNC пути может появляться ошибка 0x80070035.
Сообщение об ошибки явно указывает, что сетевая папка поддерживает только SMBv1 для доступа к файлам. В этом случае нужно попытаться перенастроить удаленное SMB устройство для поддержки как минимум SMBv2 (правильный и безопасный путь).
Если сетевые папки раздает Samba сервер на Linux, вы можете указать минимально поддерживаемую версию SMB в файле smb.conf так:
[global]
server min protocol = SMB2_10
client max protocol = SMB3
client min protocol = SMB2_10
encrypt passwords = true
restrict anonymous = 2
В Windows 7/Windows Server 2008 R2 вы можете отключить SMBv1 и разрешить SMBv2 так через реестр:
Set-ItemProperty -Path "HKLM:\SYSTEM\CurrentControlSet\Services\LanmanServer\Parameters" SMB1 -Type DWORD -Value 0 –Force
Set-ItemProperty -Path "HKLM:\SYSTEM\CurrentControlSet\Services\LanmanServer\Parameters" SMB2 -Type DWORD -Value 1 –Force
В Windows 8.1 отключите SMBv1, разрешите SMBv2 и SMBv3 и проверьте что для вашего сетевого подключения используется частный или доменный профиль:
Disable-WindowsOptionalFeature -Online -FeatureName "SMB1Protocol"
Set-SmbServerConfiguration –EnableSMB2Protocol $true
Если ваше сетевое устройство (NAS, Windows XP, Windows Server 2003), поддерживает только протокол SMB1, в Windows 10 вы можете включить отдельный компонент SMB1Protocol-Client. Но это не рекомендуется!!!
Если удаленное устройство требует использовать SMBv1 для подключения, и этот протокол отключен в вашем устройстве Windows, в Event Viewer появляется ошибка:
Log Name: Microsoft-Windows-SmbClient/Security
Source: Microsoft-Windows-SMBClient
Event ID: 32000
Description:  SMB1 negotiate response received from remote device when SMB1 cannot be negotiated by the local computer.
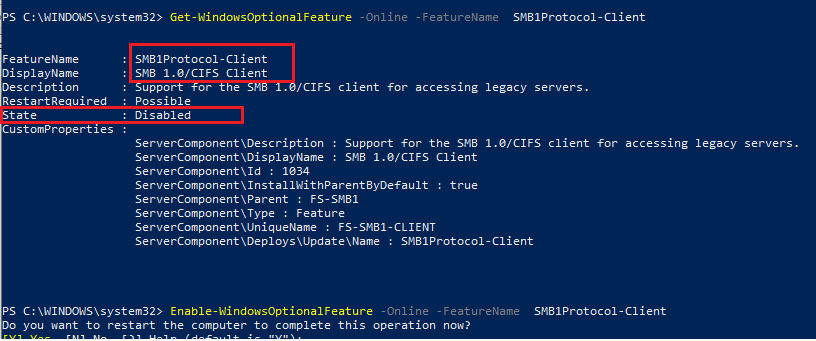
Запустите консоль PowerShell и проверьте, что SMB1Protocol-Client отключен (
State: Disabled
):
Get-WindowsOptionalFeature -Online -FeatureName SMB1Protocol-Client
Включите поддержку протокола SMBv1 (потребуется перезагрузка):
Enable-WindowsOptionalFeature -Online -FeatureName SMB1Protocol-Client
Также вы можете включить/отключить SMBv1 в Windows 10 и 11 из меню
optionalfeatures.exe
-> SMB 1.0/CIFS File Sharing Support –> SMB 1.0/CIFS Client.
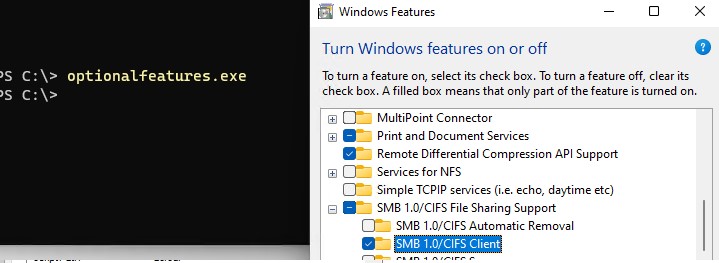
В Windows 10 1709 и выше клиент SMBv1 автоматически удаляется, если он не использовался более 15 дней (за это отвечает компонент SMB 1.0/CIFS Automatic Removal).
В этом примере я включил только SMBv1 клиент. Не включайте компонент SMB1Protocol-Server, если ваш компьютер не используется устаревшими клиентами в качестве сервера для хранения общих папок.
После установке клиента SMBv1, вы должны без проблем подключиться к общей сетевой папке или принтеру. Однако, нужно понимать, что использование данного обходного решения не рекомендовано, т.к. подвергает снижает уровень безопасности.
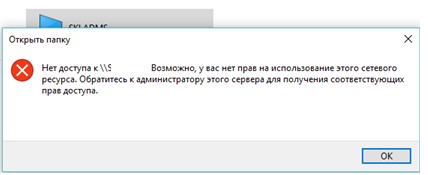
Нет доступа к сетевой папке, у вас нет прав доступа
При подключении к сетевой папке на другом компьютере может появится ошибка:
Нет доступа к \\ComputerName\Share. Возможно у вас нет прав на использование этого сетевого ресурса. Обратитесь к системному администратору этого сервера для получения соответствующих прав доступа.
Network Error
Windows cannot access \\PC12\Share
You do not have permissions to access \\PC12\Share. Contact your network administrator to request access.
При появлении это ошибки нужно:
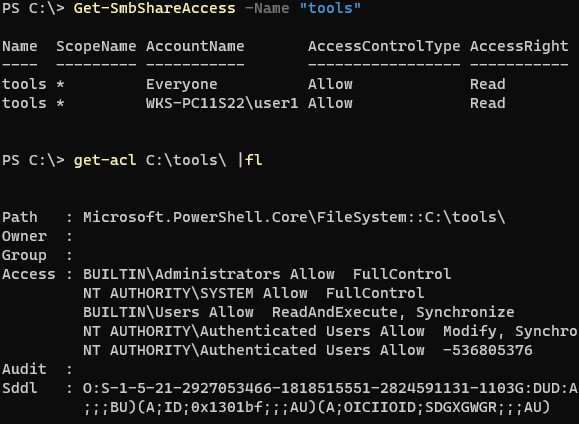
- Убедиться, что пользователю, под которым вы подключаетесь к сетевой папке, предоставлены права доступа на сервере. Откройте свойства общей папке на сервере и убедитесь что у вашего пользователя есть права доступа.
Проверьте разрешения сетевой шары на сервере с помощью PowerShell:
Get-SmbShareAccess -Name "tools"
Затем проверьте NTFS разрешения:
get-acl C:\tools\ |fl

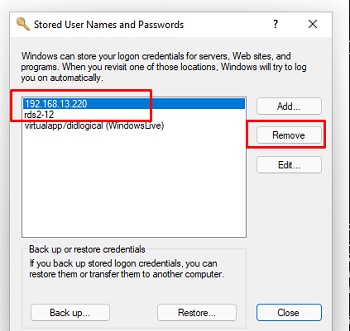
Если нужно, отредактируйте разрешения в свойствах папки. - Проверьте, что вы используете правильные имя пользователя и пароль для доступа к сетевой папки. Если имя и пароль не запрашиваются, попробуйте удалить сохраненные пароли для доступа к сетевой папке в диспетчере учетных записей Windows. Выполните команду
rundll32.exe keymgr.dll, KRShowKeyMgr
и удалите сохраненные учетные данные для доступа к сетевой папке.
При следующем подключении к сетевой папки появится запрос имени и пароля. Укажите имя пользователя для доступа к папке. Можете сохранить его в Credential Manager или добавить вручную.
Дополнительные способы проверки доступа к сетевой папке в Windows
В этом разделе указаны дополнительные способы диагностики при проблема с открытием сетевые папок в Windows:
Блок сообщений сервера или SMB – это протокол, используемый для обмена файлами. Он обеспечивает операции Чтение и запись на сетевых устройствах. Это широко используется, когда пользователь обращается к серверу на базе Linux. Последней версией этого протокола является SMB2 , которая заменяет SMB 1. SMB 2 содержит больше исправлений уязвимостей, к которым был склонен SMB 1. SMB 1 был уязвим, являясь шлюзом для различных современных вымогателей, и поэтому по умолчанию был отключен Microsoft, начиная с Windows 10 v1709.

Вы можете увидеть следующую ошибку при попытке поделиться:
Для этого общего ресурса требуется устаревший протокол SMB1, который небезопасен и может подвергнуть вашу систему атаке. Ваша система требует SMB2 или выше.
Содержание
- Ваша система требует SMB2 или выше
- Как проверить, можно ли установить версию SMB 2.0 на Windows 10?
- Как включить протокол SMB 2 в Windows 10
Ваша система требует SMB2 или выше
Мы рассмотрим все аспекты этого процесса. Итак, начнем.
Как проверить, можно ли установить версию SMB 2.0 на Windows 10?
Прежде всего, нажмите комбинацию кнопок WINKEY + X .
Затем нажмите Windows PowerShell (Admin).
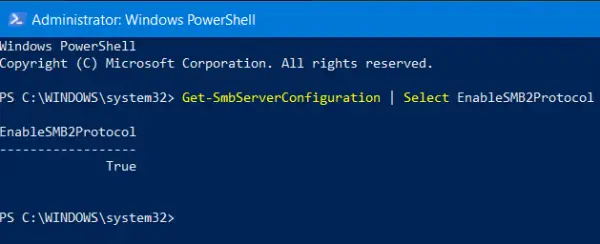
Введите следующее и нажмите Enter:
Get-SmbServerConfiguration | Выберите EnableSMB2Protocol
Теперь он покажет вам сообщение. Если в приведенном ниже фрагменте написано true , значит, ваш компьютер поддерживает протокол SMB 2.

Иначе, вы не можете запустить протокол SMB 2 на вашем ПК.
Читать . Как проверить версию SMB в Windows.
Как включить протокол SMB 2 в Windows 10
Для этого вам нужно сначала включить протокол SMB 1, а затем обновить его до SMB 2.
Начните с нажатия комбинаций кнопок WINKEY + I , чтобы запустить приложение настроек Windows 10.
Теперь в области поиска введите Панель управления и выберите соответствующий результат . Откроется окно панели управления на вашем компьютере.
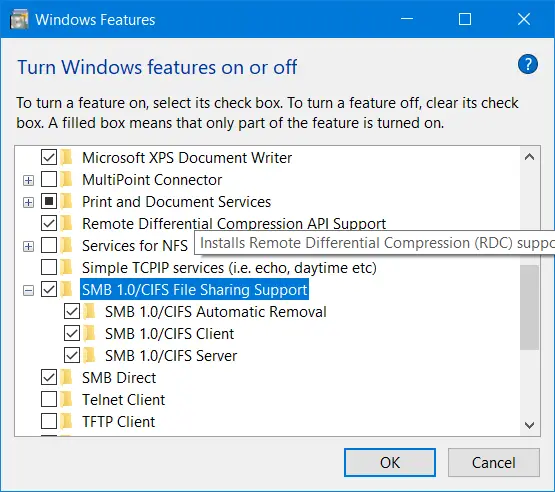
Нажмите на Программы. Затем в расширенном меню Программы и компоненты выберите Включить или отключить функции Windows.
Функции Windows теперь появятся.

Убедитесь, что вы выбрали SMB 1.0/CIFS File Sharing Support. Теперь нажмите ОК.
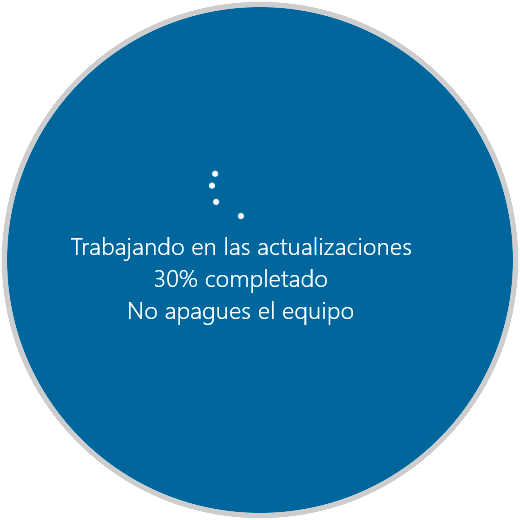
Позвольте ему установить все необходимые файлы и перезагрузить ваш компьютер, чтобы изменения вступили в силу.
Это включит поддержку SMB 2 на вашем компьютере.
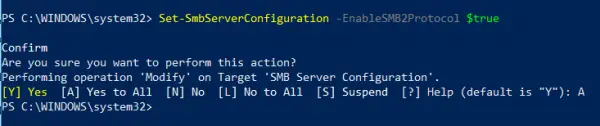
Кроме того, вы также можете ввести следующую команду в окне Windows PowerShell с правами администратора на уровне, чтобы включить ее,

Set-SmbServerConfiguration –EnableSMB2Protocol $ true
Это оно!
Связанное чтение . Как отключить SMB 1 на компьютере с Windows 10.
Download Windows Speedup Tool to fix errors and make PC run faster
Server Message Block or SMB is a protocol used for file sharing. It provides the Read and Write operations on network devices. This is widely used while a user is accessing a Linux-based Server. The latest version of this protocol is SMB2 which succeeds SMB 1. SMB 2 contains more fixes to vulnerabilities that SMB 1 was prone to. SMB 1 was vulnerable being a gateway to various modern ransomware and hence has been disabled by default by Microsoft in Windows 11/10.

You may see the following error when you try to share:
This share requires the obsolete SMB1 protocol, which cis unsafe and could expose your system to attack. Your system requires SMB2 or higher.
We will cover every aspect of this process. So, let’s get started.
How to check if SMB 2.0 version can be installed on your Windows 11/10
First of all, start by hitting the WINKEY + X button combinations.
Then click on Windows PowerShell (Admin).
Type in the following and hit Enter:
Get-SmbServerConfiguration | Select EnableSMB2Protocol
It will now show you a message. If it says true like in the snippet below, then your PC is capable of running SMB 2 protocol.
Else, you can not run SMB 2 Protocol on your PC.
Read: How to check SMB version on Windows.
How to enable SMB 2 Protocol on Windows 11/10
For this, you need to first enable SMB 1 protocol and then upgrade it to SMB 2.
Start by hitting the WINKEY + I button combinations to launch the Windows Settings App.
Now, in the search area, type in Control Panel and select the appropriate result. This will launch the Control Panel window on your computer.
Click on Programs. Then under the larger menu of Programs and Features, select Turn Windows features on or off.
Windows Features will now pop up.
Make sure that you select SMB 1.0/CIFS File Sharing Support. Now click on OK.
Let it install all the required files and Reboot your computer for the changes to take effect.
This will enable SMB 2 support on your computer.
Alternatively, you can also enter the following command in the Windows PowerShell window with Administrator Level right to enable it,
Set-SmbServerConfiguration –EnableSMB2Protocol $true
That’s it!
Related read: How to disable SMB 1 on your Windows computer.
What is SMB in Windows?
SMB is also known as Server Message Block, is a protocol for network file sharing. Any application or process which needs to share files has to use t his protocol to request services from server programs in a computer network.
How does SMB works?
Since it’s a client-server interaction protocol, the services are provided to the client whenever a client sends a request. It allows users to create, modify, and delete the shared files, folders, and other resources.
What happens if I disable SMB?
If an IT admin decides to turn off the SMB protocol, it will break almost everything between the users and shared resources. Users will be denied of the resources; there will be authentication failure, and so on.
Ayush has been a Windows enthusiast since the day he got his first PC with Windows 98SE. He is an active Windows Insider since Day 1 and has been a Windows Insider MVP.
В Windows 10 версии 1709, Windows 10 версии 1903, Windows Server версии 1709, Windows Server версии 1903 и более поздних версиях Windows клиент SMB2 больше не поддерживает следующие действия:
- Доступ гостевой учетной записи к удаленному серверу
- Переключение на гостевую учетную запись после ввода недопустимых учетных данных
SMBv2 в этих версиях Windows ведет себя следующим образом:
- Windows 10 Корпоративная и Windows 10 для образовательных учреждений больше не позволяют пользователю подключаться к удаленному общему ресурсу с помощью учетных данных гостя, даже если удаленный сервер запрашивает учетные данные гостя.
- Windows Server 2016 Datacenter и Standard Edition больше не позволяют пользователю подключаться к удаленному общему ресурсу с помощью учетных данных гостя, даже если удаленный сервер запрашивает учетные данные гостей.
- Версии Windows 10 Home и Professional не изменились по сравнению с предыдущим поведением по умолчанию.
С данной проблемой можно столкнуться при использовании старых версий NAS или при доступе к сетевым папкам на старых версиях Windows7/2008 R2 или Windows XP /2003 при использовании анонимного гостевого доступа.
Изменения при использовании протокола SMB связаны с тем, что при доступе под гостевым аккаунтом по протоколу SMBv1/v2 не применяются такие методы защиты трафика, как SMB подписывание и шифрование, что делает вашу сессию уязвимой против MiTM (man-in-the-middle) атак.
Решение со стороны сервера SMB
В данном случае Microsoft рекомендует изменить настройки на удалённом компьютере или NAS устройстве, которое раздаёт сетевые папки. Рекомендуется использовать сетевой пртокол SMBv3, в случае если устройство поддерживает только SMBv2, настроить доступ с аутентификацией.
- NAS устройство — отключите гостевой доступ в настройках устройства
- Samba сервер на Linux — в конфигурационном файле smb.config в разделе [global] необходимо добавить строку
map to guest = never
в разделе с описанием сетевой папки запретить анонимный доступguest ok = no - Windows — включаем общий доступ к сетевым папкам и принтерам по паролю. В разделе Control Panel\ All Control Panel Items\ Network and Sharing Center\ Advanced sharing settings, для All Networks в разделе Password Protected Sharing (Общий доступ с парольной защитой) изменить значение на «Turn on password protected sharing» (Включить общий доступ с парольной защитой). При этом анонимный (гостевой) доступ к папкам будет отключен. Будет необходимо создать локальных пользователей, предоставить права к сетевым папкам и принтерам и использовать данные учётные записи для подключения к общим папкам.
Решение со стороны клиента SMB (не рекомендуется к использованию, только как временное решение)
Для разрешения гостевого доступа с Вашего компьютера необходимо выполнить следующее: открыть редактор групповых политик gpedit.msc, перейти в следующий раздел Computer Configuration ->Administrative templates -> Network -> Lanman Workstation (Конфигурация компьютера -> Административные шаблоны -> Сеть -> Рабочая станция Lanman), включите политику Enable insecure guest logons (Включить небезопасные гостевые входы)
При использовании Windows 10 Home (в нем нет редактора GPO) для внесения изменений необходимо произвести редактирование реестра:
HKLM\SYSTEM\CurrentControlSet\Services\LanmanWorkstation\Parameters “AllowInsecureGuestAuth”=dword:1
или через команду:
reg add HKLM\SYSTEM\CurrentControlSet\Services\LanmanWorkstation\Parameters /v AllowInsecureGuestAuth /t reg_dword /d 00000001 /f
Использование протокола старше SMBv2
Клиент SMBv1 по умолчанию отключен начиная с Windows 10 1709. В сетевом окружении данные сетевые папки \сетевые устройства неотображаются и при открытии по UNC пути появляться ошибка 0x80070035. Данная ошибка чётко указывает, что сетевая папка поддерживает только SMBv1 протокол доступа. В этом случае нужно перенастроить удаленное SMB устройство для поддержки как минимум SMBv2 (правильный и безопасный путь).
Если сетевые папки раздает Samba на Linux, вы можете указать минимально поддерживаемую версию SMB в файле smb.conf так:
[global]
server min protocol = SMB2_10
client max protocol = SMB3
client min protocol = SMB2_10
encrypt passwords = true
restrict anonymous = 2
В Windows 7/Windows Server 2008 R2 вы можете отключить SMBv1 и разрешить SMBv2 так:
Set-ItemProperty -Path "HKLM:\SYSTEM\CurrentControlSet\Services\LanmanServer\Parameters" SMB1 -Type DWORD -Value 0 –Force
Set-ItemProperty -Path "HKLM:\SYSTEM\CurrentControlSet\Services\LanmanServer\Parameters" SMB2 -Type DWORD -Value 1 –Force
Если ваше устройство (NAS, компьютер под управлением Windows XP, Windows Server 2003), поддерживает только протокол SMBv1, в Windows 10 Вы можете включить отдельный компонент SMB1Protocol-Client. (Крайне не рекомендуется)
Запустите консоль PowerShell и проверьте, что SMB1Protocol-Client отключен (State: Disabled):
Get-WindowsOptionalFeature -Online -FeatureName SMB1Protocol-Client
Включите поддержку протокола SMBv1 (потребуется перезагрузка):
Enable-WindowsOptionalFeature -Online -FeatureName SMB1Protocol-Client
Также вы можете включить/отключить дополнительные компоненты Windows 10 (в том числе SMBv1) из меню optionalfeatures.exe-> SMB 1.0/CIFS File Sharing Support
В Windows 10 1709 и выше клиент SMBv1 автоматически удаляется, если он не использовался более 15 дней (отвечает компонент SMB 1.0/CIFS Automatic Removal).
File transfer has been one of the characteristics of Windows operating systems since its inception and during this time and the new updates that have been released we have seen how new options have been defined to perform this task from the SMB protocol to the group in home..
Precisely the SMB protocol has been one of the most used and practical to carry out this action due to its functionalities, but with the passage of new technologies these protocols have been updated and certain security flaws have been detected that may put at risk the integrity and information hosted in the system .
The SMB (Server Message Block) protocol has been present for more than 20 years starting with its SMB1 version, but currently we have the SMB3 version with greater security and reliability features..
SMB is a network file sharing protocol also called Microsoft’s SMB protocol, this protocol consists of a set of message packets whose mission is to define a particular version of the protocol whose name is dialect, the common system protocol of Internet files (CIFS) is a dialect of SMB.
Functionalities
The main objective of SMB is to share files, but we have some additional features such as:
- Dialectal Negotiation
- Print on a local network
- Determination of other Microsoft SMB protocol servers in the network or network scanning
- Extended handling of file attributes
- File, directory and shared access authentication in multiple elements
- File and lock log
- File and directory change notification
- Unicode support
In the traditional OSI network model, the SMB protocol is used as an application layer or a presentation layer protocol, and is based on lower level protocols for packet transport on the network. The Microsoft SMB protocol has been developed as a client-server implementation and consists of a set of data packets, where each one contains a request sent by the client or a response sent by the server..
Types of packages
These packages are categorized as follows:
- Session control packets: This establishes and discontinues a connection to server shares.
- File access packages: is responsible for accessing and manipulating files and directories on the remote server.
- General message packages: This package sends data to print queues, mailing lists and provides data on the status of print queues.
Starting with Windows 10 Fall Creators Update and Windows Server, version 1709 (RS3), the Server Message Block network protocol version 1 (SMBv1) will no longer be installed by default since it was replaced by SMBv2 and other subsequent protocols As of 2007, it is ideal to know that Microsoft publicly declared the SMBv1 protocol deprecated in 2014 for different reasons.
SMB1 Features
Some of the features of SMB1 in Windows 10 are as follows:
- SMBv1 has other interesting features to know in order to take advantage of the client and server. Keep in mind that they can be installed separately depending on the needs of each one.
- The Windows 10 Home and Windows 10 Professional editions no longer have SMBv1 for the client or server by default after a clean installation.
- Another detail to keep in mind is that if you have SMBv1 on client and it is not used for 15 days in total (except when the computer is turned off), it will be uninstalled automatically. It is important to know this so that we are not left behind in it.
- Direct updates and Windows Insider versions of Windows 10 Home and Windows 10 Professional do not remove the SMB1 protocol automatically from the start.
- The features of SMB version 2.02, 2.1, 3.0, 3.02 and 3.1.1 are compatible.
Possible error messages
From now on, when trying to access from a device using the SMB1 protocol we will receive one of the following error messages:
- Unable to connect to file shares because it is not secure. This share requires the obsolete SMB1 protocol, which is not secure and could expose your system to attacks.
- Your system requires SMB2 or higher. For more information on how to solve this problem, we visit the following link:
Microsoft
- The specified network name is no longer available.
- Unspecified error 0x80004005
- System Error 64
- The specified server cannot perform the requested operation.
- Error 58
As we see, Microsoft opted to move SMB1 and set SMB2 or SMB3 in Windows 10 for better performance.
The SMBv2 protocol was first included in Windows Vista and in Windows Server 2008 while the SMBv3 protocol was first included in Windows 8 and in Windows Server 2012.
SMB2 Features
When using the SMB2 protocol we will have features such as:
- Broader readings and writes that allow better use of faster networks, even those with high data latency.
- Capitalization request, which allows multiple SMB 2 requests to be sent as a single network request.
- General improvements focused on better network utilization.
- Caching of folder and file properties, where customers keep local copies of folders and files for much faster access to them.
- Support for symbolic links
- Message signing was improved thanks to better configuration and interoperability (HMAC SHA-256 replaces MD5 as hash algorithm).
- Enhanced scalability for file sharing
- Oplock client lease model
- Broader MTU support
- Enhanced energy efficiency for client computers
- Support for previous versions of SMB
Now, one point that TechnoWikis wishes to clarify is that currently some earlier versions of Windows and many other applications running on Android and Linux are not compatible with the latest versions of SMB (2 and 3), so it will be impossible to connect a Windows equipment to such devices if only the most recent versions of SMB are enabled, in this case we must temporarily activate the SMB1 protocol to allow file transfer and now we will see how to activate it and how to deactivate it more ahead of some practical ways .
To keep up, remember to subscribe to our YouTube channel! SUBSCRIBE
1. Activate the SMB1 protocol using Windows 10 features
Step 1
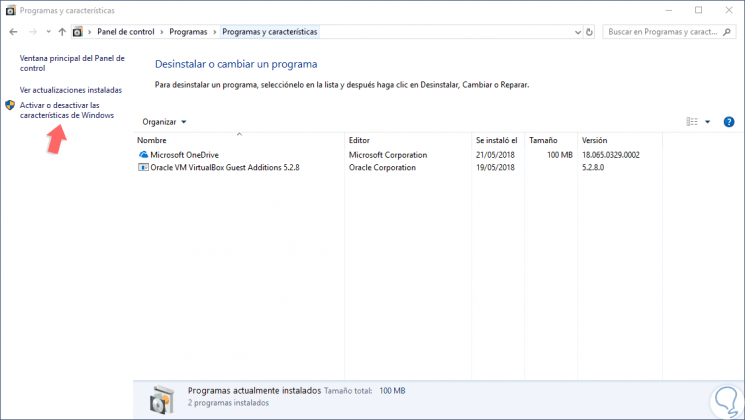
To use this method we will go to the next route. There we click on the line «Activate or deactivate Windows features».
- Control Panel
- Programs
- Programs and characteristics
Step 2
Another more direct option to access is using the following keys and run the following line:
+ R
optionalfeatures.exe
Step 3
We will see the following window where we will go to the section “Compatibility with the protocol for sharing SMB 1.0 / CIFS filesâ€:
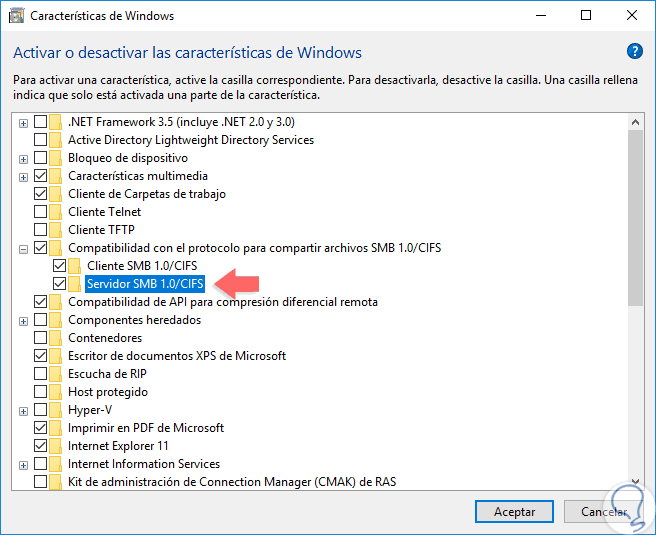
Step 4
There we activate the “SMB 1.0 / CIFS Client†boxes and optionally the “SMB 1.0 / CIFS Server†box. Click on Accept and the activation process will begin:
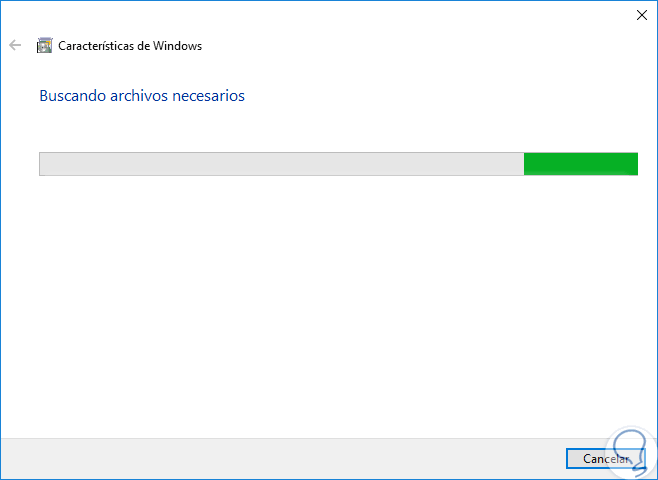
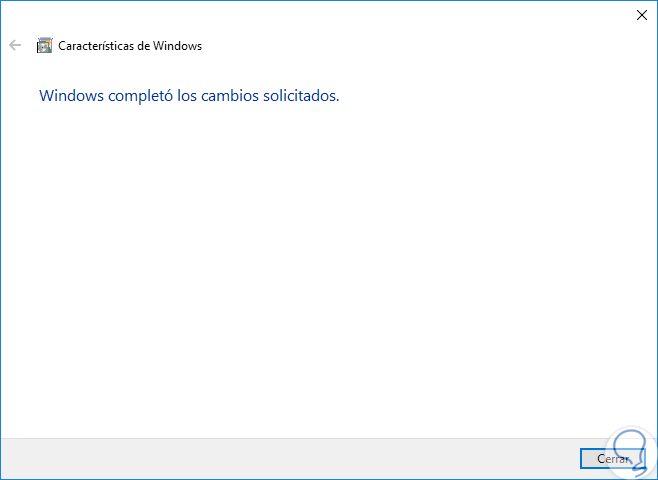
Step 5
Once finished we will see the following. Click on «Close» to exit the wizard and in this way we have activated SMB1 using the Windows 10 features.
2. Disable the SMB1 protocol using Windows 10 features
Step 1
For this process we will go back to the next route.
- Control Panel
- Programs
- Programs and characteristics
Step 2
There we click on «Activate or deactivate Windows features» and now uncheck the boxes «SMB Client 1.0 / CIFS and SMB Server 1.0 / CIFS» (If it has been enabled): 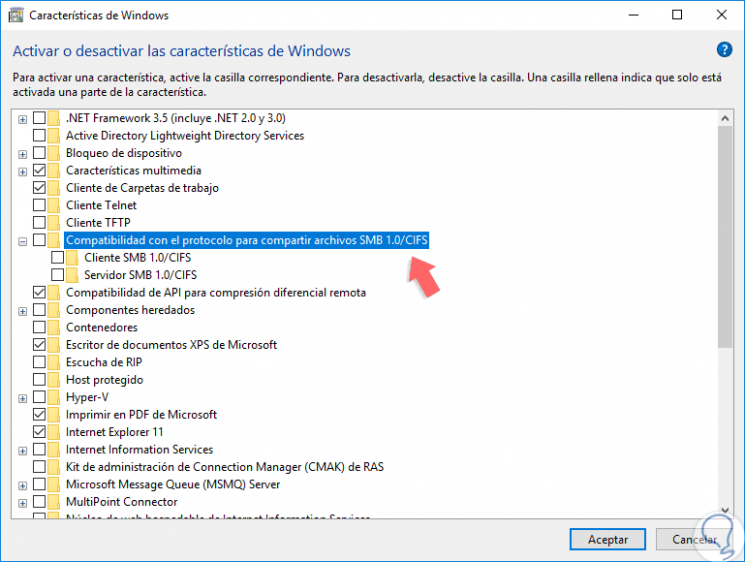
Step 3
Click on OK to apply the changes and finally we will see the following:
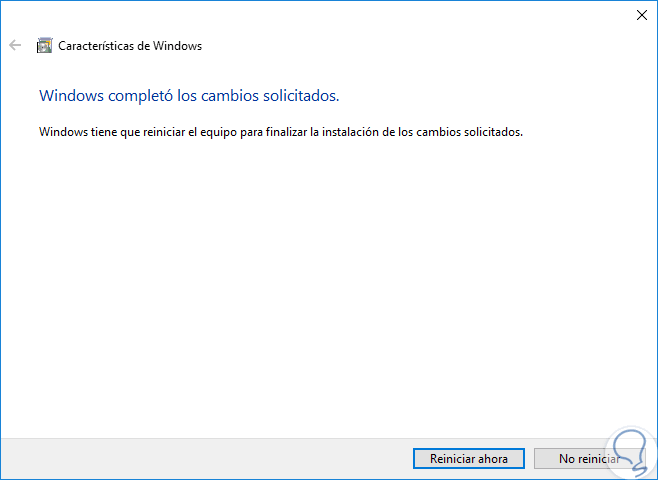
Step 4
Click on the «Restart now» button so that all changes are applied to Windows 10. Remember that the activation of SMB1 must be temporary for compatibility reasons.
3. Activate the SMB1 protocol using Windows PowerShell Windows 10
Windows PowerShell is an ideal option to check, enable or disable these SMB protocols in a secure and fully functional way. For this we must perform all these actions as Windows PowerShell administrators.
Detect the SMB1 protocol using PowerShell
To carry out this task we will execute the following:
Get-WindowsOptionalFeature -Online -FeatureName SMB1Protocol
The result will be as follows. There is the name of the feature, its description, whether or not it requires a reboot and more. 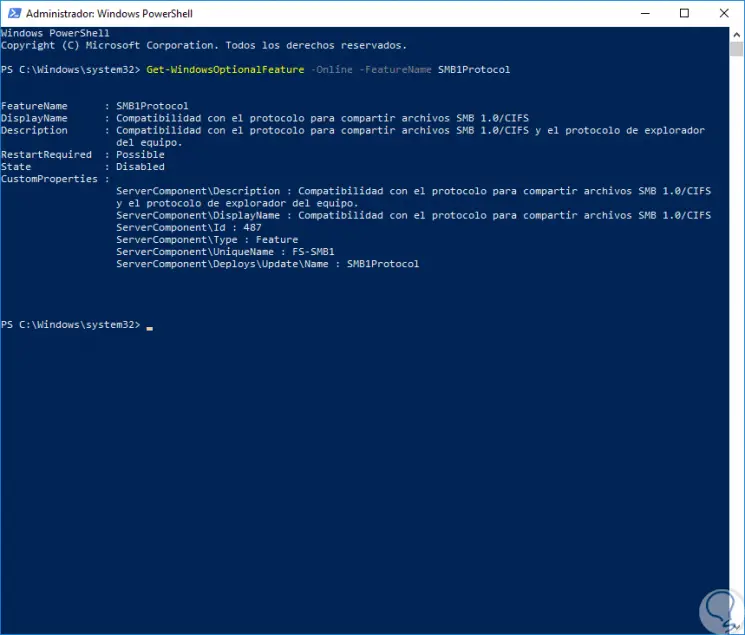
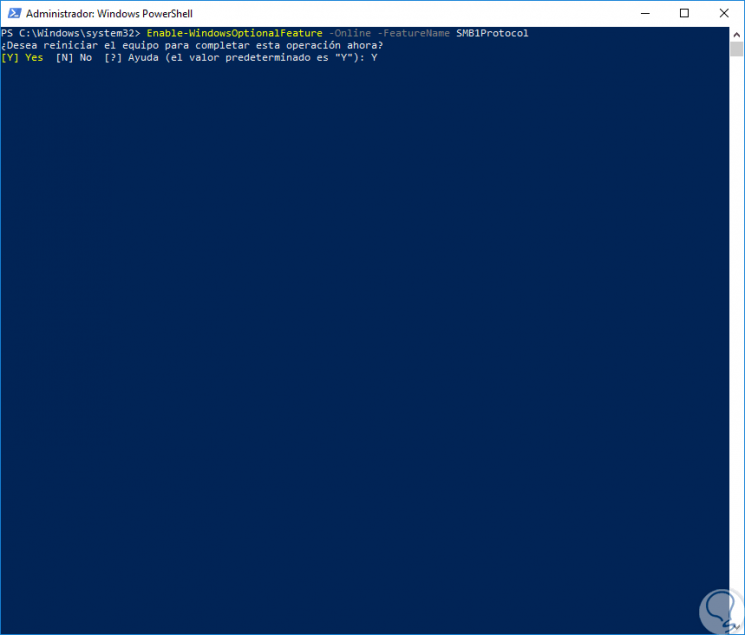
Enable SMB1 using PowerShell
To carry out the process of enabling SMB1 in Windows 10 using this method we will run the following cmdlet:
Enable-WindowsOptionalFeature -Online -FeatureName SMB1Protocol
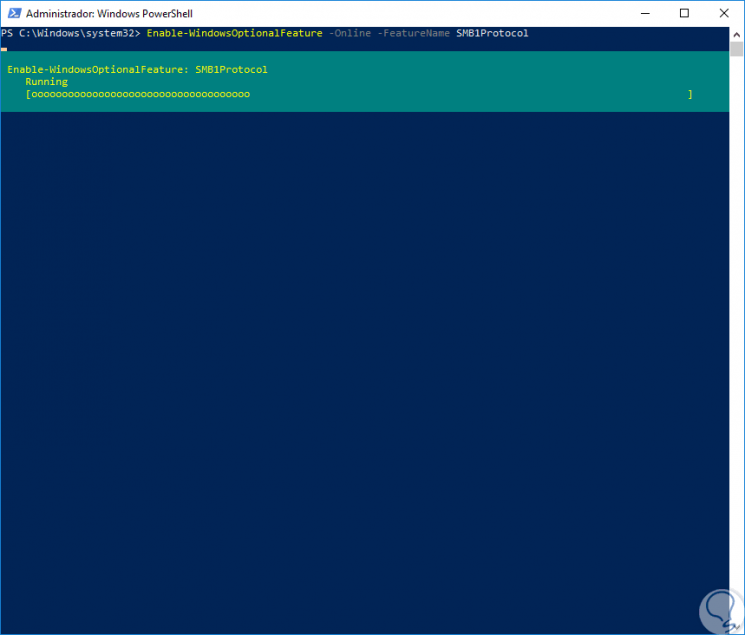
Once this process is completed, the following will be displayed. There we enter the letter Y to restart the operating system and apply the changes.
4. Disable the SMB1 protocol using Windows PowerShell Windows 10
Step 1
Now, when it is not necessary to use more SB1, we proceed to disable it in PowerShell by executing the following:
Disable-WindowsOptionalFeature -Online -FeatureName SMB1Protocol
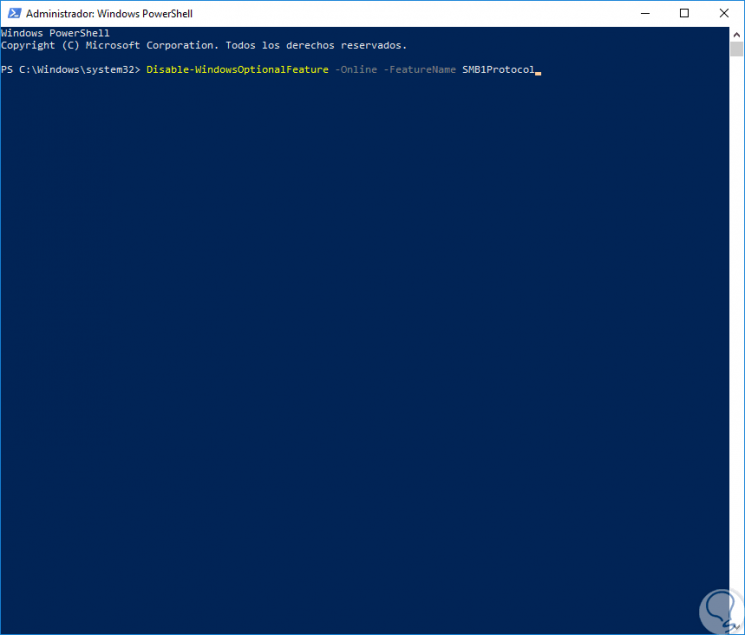
Step 2
Press Enter and the disabling process will begin: 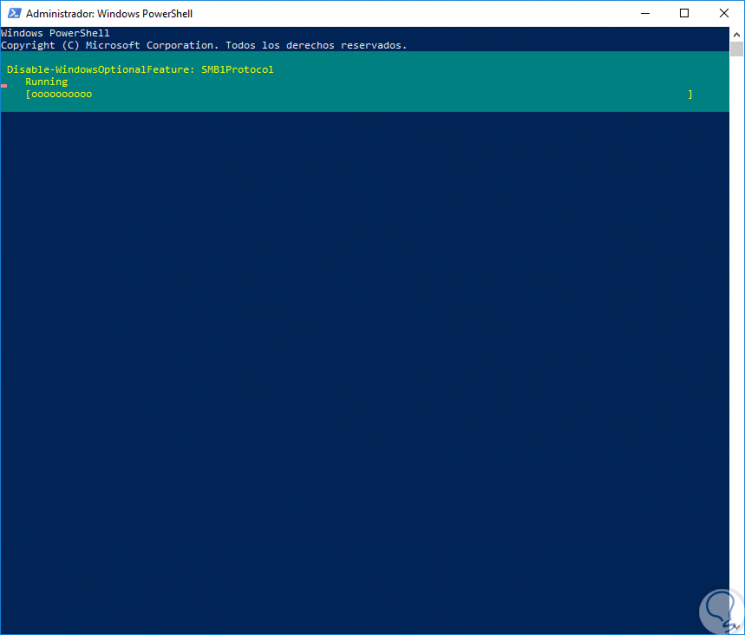
Step 3
Once finished it will be necessary to restart the system to complete the task. In this way we have managed SMB1 using Windows PowerShell. 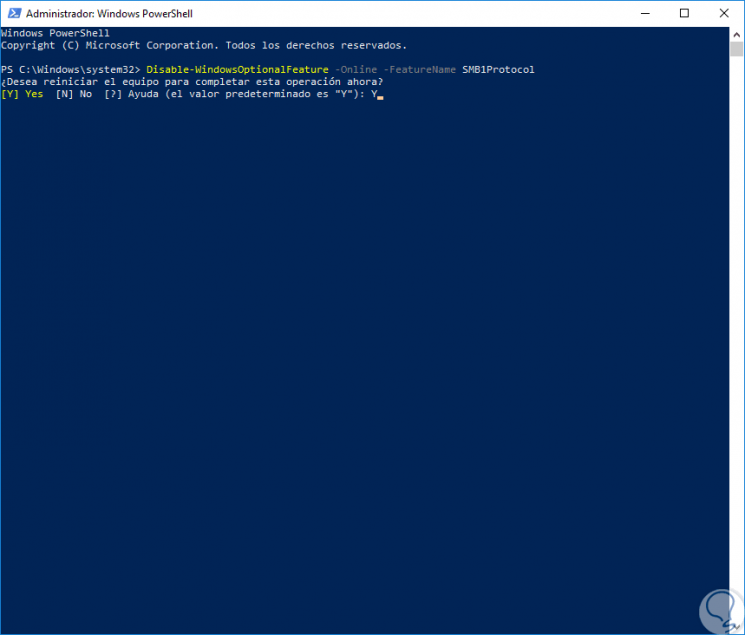
5. Activate the SMB2 protocol using Windows PowerShell Windows 10
Now, we will use the PowerShell console again to manage the SMB2 protocol in Windows 10.
Detect the SMB2 protocol using PowerShell
To perform this action we will execute the following cmdlet. We can see that the result is valid.
Get-SmbServerConfiguration | Select EnableSMB2Protocol
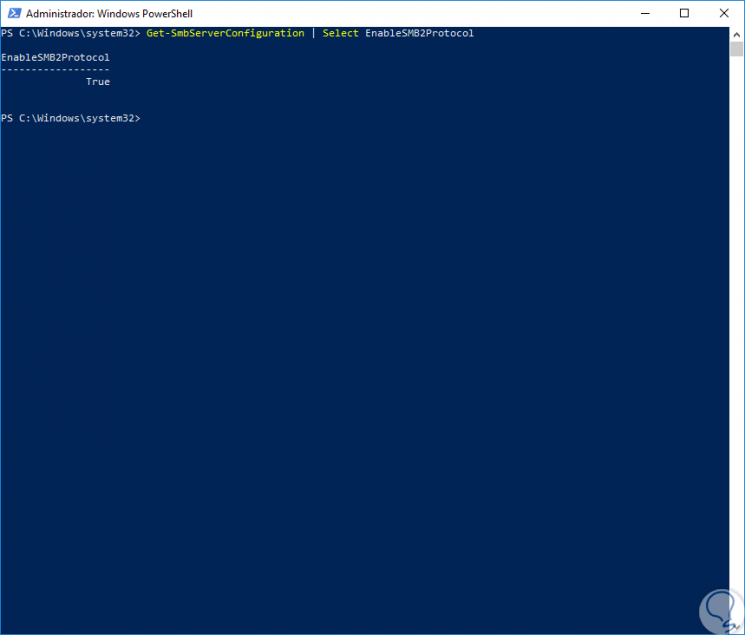
Enable SMB2 using PowerShell
To enable the SMB2 protocol in Windows 10 we will execute the following:
Set-SmbServerConfiguration –EnableSMB2Protocol $ true
There we enter the letter S and press Enter to complete the action. 
Disable SMB2 using PowerShell
If we want to disable this SMB2 protocol for some reason, just run the following cmdlet:
Set-SmbServerConfiguration –EnableSMB2Protocol $ false
We also enter the letter S to confirm and press Enter. We can see that SMB is composed of two elements that are Client and Server, in this tutorial we have based on the Client which is the ideal for file transfer, but TechnoWikis in its idea of ​​providing the best information will explain some ways to manage SMB at the server level which is used in both Windows 10 and Windows Server. 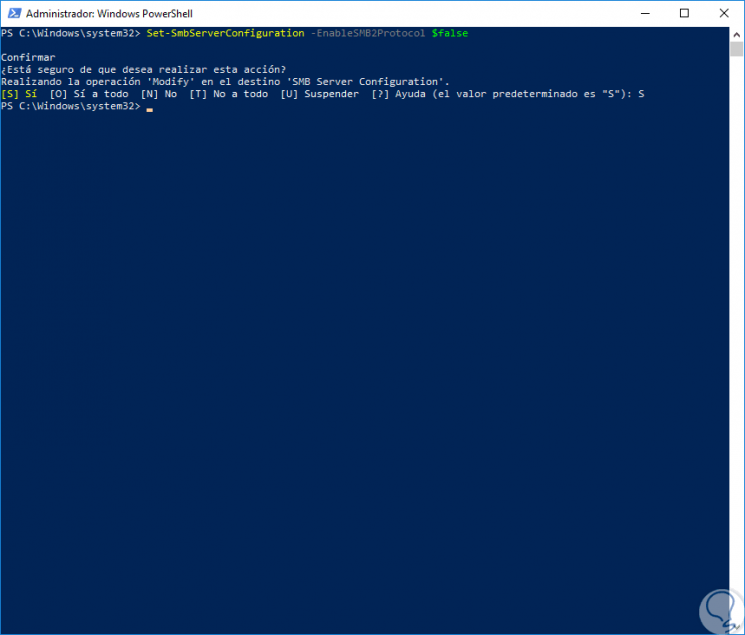
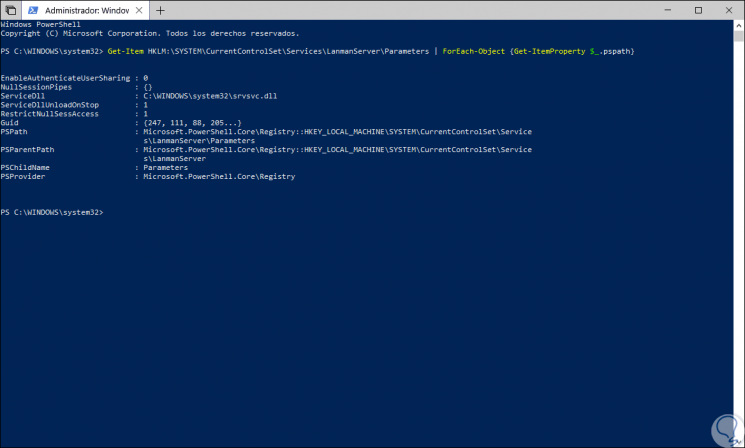
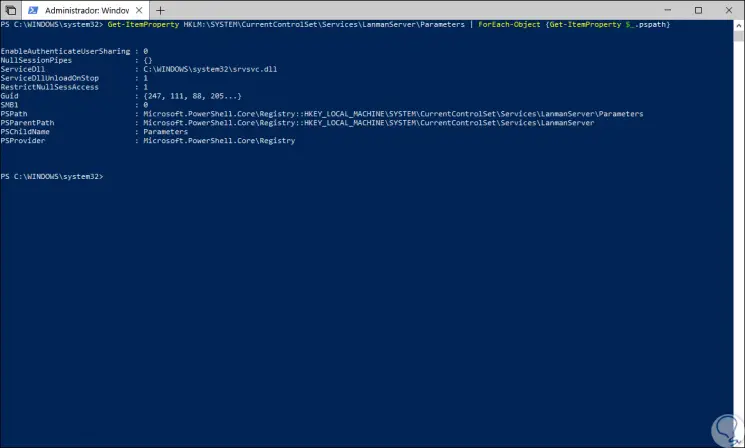
Detect SMB1 server with PowerShell
To detect the SMB1 server using PowerShell we will execute the following:
Get-Item HKLM: \ SYSTEM \ CurrentControlSet \ Services \ LanmanServer \ Parameters | ForEach-Object {Get-ItemProperty $ _. Pspath}
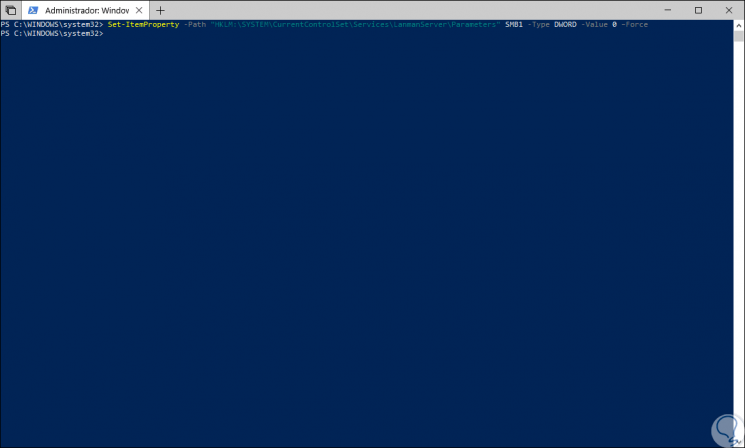
To enable the SMB1 server we will execute the following:
Set-ItemProperty -Path "HKLM: \ SYSTEM \ CurrentControlSet \ Services \ LanmanServer \ Parameters" SMB1 -Type DWORD -Value 1 –Force

To disable the SMB1 server we will run the following cmdlet:
Set-ItemProperty -Path "HKLM: \ SYSTEM \ CurrentControlSet \ Services \ LanmanServer \ Parameters" SMB1 -Type DWORD -Value 0 –Force
Detect SMB2 or SMB3 server with PowerShell
To detect SMB2 or SMB3 on a server we will execute the following:
Get-ItemProperty HKLM: \ SYSTEM \ CurrentControlSet \ Services \ LanmanServer \ Parameters | ForEach-Object {Get-ItemProperty $ _. Pspath}
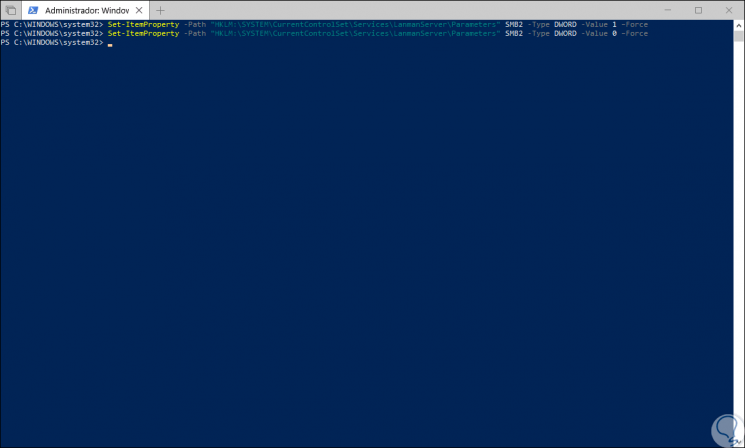
To enable it, we execute:
Set-ItemProperty -Path "HKLM: \ SYSTEM \ CurrentControlSet \ Services \ LanmanServer \ Parameters" SMB2 -Type DWORD -Value 1 –Force
To disable it we will execute. It is recommended to restart the system to apply the changes.
Set-ItemProperty -Path "HKLM: \ SYSTEM \ CurrentControlSet \ Services \ LanmanServer \ Parameters" SMB2 -Type DWORD -Value 0 –Force
6. Enable or disable SMB1 and SMB2 using Windows 10 Registry Editor
Another alternative to enable or disable the SMB1 and SMB2 protocol in Windows 10 and Windows Server is using the registry editor, but it is recommended to create a backup before making any changes to the editor.
Step 1
To access we will use the following key combination and execute the regedit command, press enter and in the displayed window we will go to the following route:
+ R
HKEY_LOCAL_MACHINE \ SYSTEM \ CurrentControlSet \ Services \ LanmanServer \ Parameters
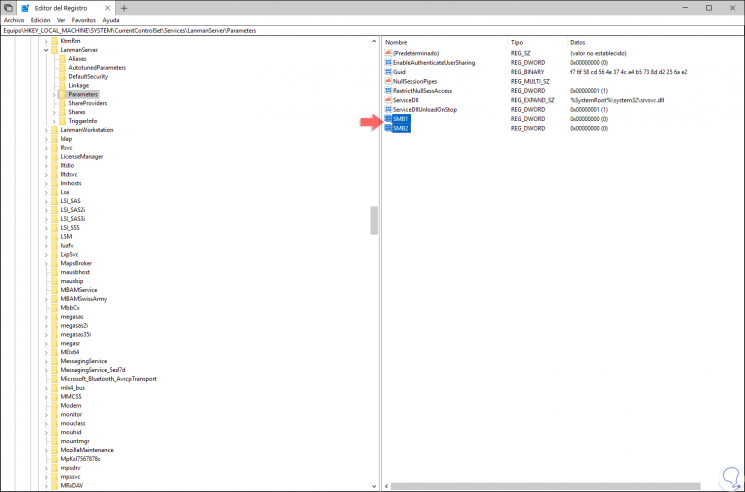
Step 2
There we find the SMB1 and SMB2 values ​​which we can edit by double clicking on them and assigning the following as required in the “Value information†field:
REG_DWORD: 0 = disabled REG_DWORD: 1 = enabled

7. Enable or disable SMB1 and SMB2 using Windows 10 Command Prompt
The CMD or command prompt also becomes an integral solution to manage the SMB protocol in Windows.
Step 1
In the case of SMB1 we can execute the following in the command prompt as administrators:
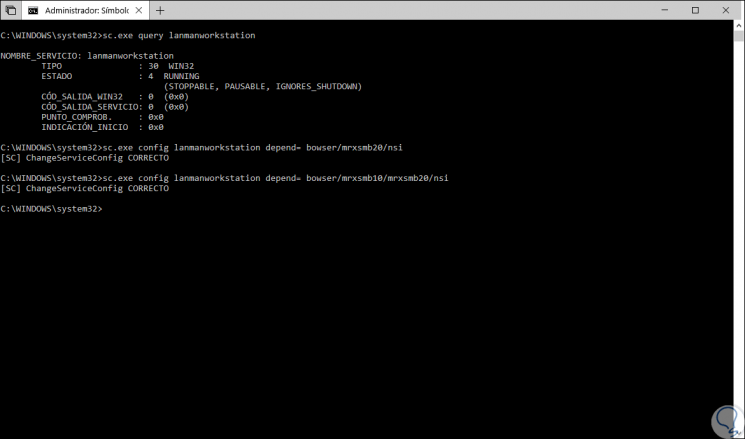
Detect SMB1
sc.exe query lanmanworkstation
Disable SMB1
sc.exe config lanmanworkstation depend = bowser / mrxsmb20 / nsi sc.exe config mrxsmb10 start = disabled
Enable SMB1
sc.exe config lanmanworkstation depend = bowser / mrxsmb10 / mrxsmb20 / nsi sc.exe config mrxsmb10 start = auto
Step 2
In the case of SMB2 we will use the following:
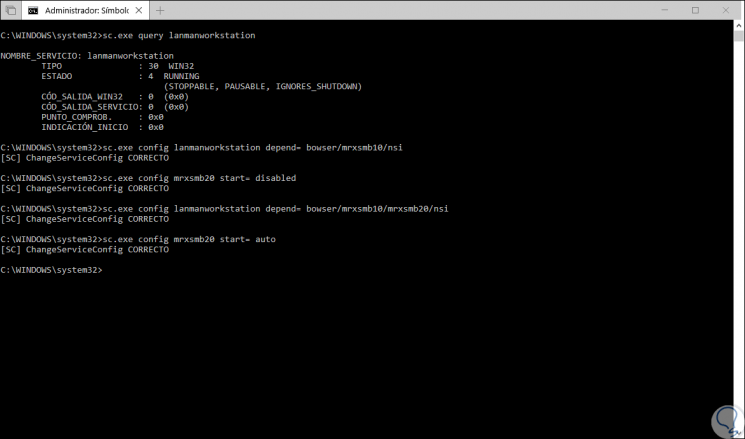
Detect SMB2
sc.exe query lanmanworkstation
Enable SMB2
sc.exe config lanmanworkstation depend = bowser / mrxsmb10 / mrxsmb20 / nsi sc.exe config mrxsmb20 start = auto
Disable SMB2
sc.exe config lanmanworkstation depend = bowser / mrxsmb10 / nsi sc.exe config mrxsmb20 start = disabled
We have tested various methods to fully manage the SMB protocol remembering that SMB1 is deprecated for the reasons already indicated.