This guide discusses how to install packages using pip and
a virtual environment manager: either venv for Python 3 or virtualenv
for Python 2. These are the lowest-level tools for managing Python
packages and are recommended if higher-level tools do not suit your needs.
Note
This doc uses the term package to refer to a
Distribution Package which is different from an Import
Package that which is used to import modules in your Python source code.
Installing pip
pip is the reference Python package manager. It’s used to install and
update packages. You’ll need to make sure you have the latest version of pip
installed.
Unix/macOS
Debian and most other distributions include a python-pip package; if you
want to use the Linux distribution-provided versions of pip, see
Installing pip/setuptools/wheel with Linux Package Managers.
You can also install pip yourself to ensure you have the latest version. It’s
recommended to use the system pip to bootstrap a user installation of pip:
python3 -m pip install --user --upgrade pip
python3 -m pip --version
Afterwards, you should have the latest version of pip installed in your
user site:
pip 21.1.3 from $HOME/.local/lib/python3.9/site-packages (python 3.9)
Windows
The Python installers for Windows include pip. You can make sure that pip is
up-to-date by running:
py -m pip install --upgrade pip
py -m pip --version
Afterwards, you should have the latest version of pip:
pip 21.1.3 from c:\python39\lib\site-packages (Python 3.9.4)
Installing virtualenv
Note
If you are using Python 3.3 or newer, the venv module is
the preferred way to create and manage virtual environments.
venv is included in the Python standard library and requires no additional installation.
If you are using venv, you may skip this section.
virtualenv is used to manage Python packages for different projects.
Using virtualenv allows you to avoid installing Python packages globally
which could break system tools or other projects. You can install virtualenv
using pip.
Unix/macOS
python3 -m pip install --user virtualenv
Windows
py -m pip install --user virtualenv
Creating a virtual environment
venv (for Python 3) and virtualenv (for Python 2) allow
you to manage separate package installations for
different projects. They essentially allow you to create a “virtual” isolated
Python installation and install packages into that virtual installation. When
you switch projects, you can simply create a new virtual environment and not
have to worry about breaking the packages installed in the other environments.
It is always recommended to use a virtual environment while developing Python
applications.
To create a virtual environment, go to your project’s directory and run
venv. If you are using Python 2, replace venv with virtualenv
in the below commands.
The second argument is the location to create the virtual environment. Generally, you
can just create this in your project and call it env.
venv will create a virtual Python installation in the env folder.
Note
You should exclude your virtual environment directory from your version
control system using .gitignore or similar.
Activating a virtual environment
Before you can start installing or using packages in your virtual environment you’ll
need to activate it. Activating a virtual environment will put the
virtual environment-specific
python and pip executables into your shell’s PATH.
You can confirm you’re in the virtual environment by checking the location of your
Python interpreter:
It should be in the env directory:
Unix/macOS
Windows
...\env\Scripts\python.exe
As long as your virtual environment is activated pip will install packages into that
specific environment and you’ll be able to import and use packages in your
Python application.
Leaving the virtual environment
If you want to switch projects or otherwise leave your virtual environment, simply run:
If you want to re-enter the virtual environment just follow the same instructions above
about activating a virtual environment. There’s no need to re-create the virtual environment.
Installing packages
Now that you’re in your virtual environment you can install packages. Let’s install the
Requests library from the Python Package Index (PyPI):
Unix/macOS
python3 -m pip install requests
Windows
py -m pip install requests
pip should download requests and all of its dependencies and install them:
Collecting requests
  Using cached requests-2.18.4-py2.py3-none-any.whl
Collecting chardet<3.1.0,>=3.0.2 (from requests)
  Using cached chardet-3.0.4-py2.py3-none-any.whl
Collecting urllib3<1.23,>=1.21.1 (from requests)
  Using cached urllib3-1.22-py2.py3-none-any.whl
Collecting certifi>=2017.4.17 (from requests)
  Using cached certifi-2017.7.27.1-py2.py3-none-any.whl
Collecting idna<2.7,>=2.5 (from requests)
  Using cached idna-2.6-py2.py3-none-any.whl
Installing collected packages: chardet, urllib3, certifi, idna, requests
Successfully installed certifi-2017.7.27.1 chardet-3.0.4 idna-2.6 requests-2.18.4 urllib3-1.22
Installing specific versions
pip allows you to specify which version of a package to install using
version specifiers. For example, to install
a specific version of requests:
Unix/macOS
python3 -m pip install 'requests==2.18.4'
Windows
py -m pip install "requests==2.18.4"
To install the latest 2.x release of requests:
Unix/macOS
python3 -m pip install 'requests>=2.0.0,<3.0.0'
Windows
py -m pip install "requests>=2.0.0,<3.0.0"
To install pre-release versions of packages, use the --pre flag:
Unix/macOS
python3 -m pip install --pre requests
Windows
py -m pip install --pre requests
Installing from source
pip can install a package directly from source, for example:
Unix/macOS
cd google-auth
python3 -m pip install .
Windows
cd google-auth
py -m pip install .
Additionally, pip can install packages from source in
development mode,
meaning that changes to the source directory will immediately affect the
installed package without needing to re-install:
Unix/macOS
python3 -m pip install --editable .
Windows
py -m pip install --editable .
Installing from version control systems
pip can install packages directly from their version control system. For
example, you can install directly from a git repository:
google-auth @ git+https://github.com/GoogleCloudPlatform/google-auth-library-python.git
For more information on supported version control systems and syntax, see pip’s
documentation on VCS Support.
Installing from local archives
If you have a local copy of a Distribution Package’s archive (a zip,
wheel, or tar file) you can install it directly with pip:
Unix/macOS
python3 -m pip install requests-2.18.4.tar.gz
Windows
py -m pip install requests-2.18.4.tar.gz
If you have a directory containing archives of multiple packages, you can tell
pip to look for packages there and not to use the
Python Package Index (PyPI) at all:
Unix/macOS
python3 -m pip install --no-index --find-links=/local/dir/ requests
Windows
py -m pip install --no-index --find-links=/local/dir/ requests
This is useful if you are installing packages on a system with limited
connectivity or if you want to strictly control the origin of distribution
packages.
Using other package indexes
If you want to download packages from a different index than the
Python Package Index (PyPI), you can use the --index-url flag:
Unix/macOS
python3 -m pip install --index-url http://index.example.com/simple/ SomeProject
Windows
py -m pip install --index-url http://index.example.com/simple/ SomeProject
If you want to allow packages from both the Python Package Index (PyPI)
and a separate index, you can use the --extra-index-url flag instead:
Unix/macOS
python3 -m pip install --extra-index-url http://index.example.com/simple/ SomeProject
Windows
py -m pip install --extra-index-url http://index.example.com/simple/ SomeProject
Upgrading packages
pip can upgrade packages in-place using the --upgrade flag. For example, to
install the latest version of requests and all of its dependencies:
Unix/macOS
python3 -m pip install --upgrade requests
Windows
py -m pip install --upgrade requests
Using requirements files
Instead of installing packages individually, pip allows you to declare all
dependencies in a Requirements File. For
example you could create a requirements.txt file containing:
requests==2.18.4
google-auth==1.1.0
And tell pip to install all of the packages in this file using the -r flag:
Unix/macOS
python3 -m pip install -r requirements.txt
Windows
py -m pip install -r requirements.txt
Freezing dependencies
Pip can export a list of all installed packages and their versions using the
freeze command:
Which will output a list of package specifiers such as:
cachetools==2.0.1
certifi==2017.7.27.1
chardet==3.0.4
google-auth==1.1.1
idna==2.6
pyasn1==0.3.6
pyasn1-modules==0.1.4
requests==2.18.4
rsa==3.4.2
six==1.11.0
urllib3==1.22
This is useful for creating Requirements Files that can re-create
the exact versions of all packages installed in an environment.
Edit this page
Toggle table of contents sidebar
Usually, pip is automatically installed if you are:
-
working in a
virtual environment -
using Python downloaded from python.org
-
using Python that has not been modified by a redistributor to remove
ensurepip
Supported Methods#
If your Python environment does not have pip installed, there are 2 mechanisms
to install pip supported directly by pip’s maintainers:
-
ensurepip -
get-pip.py
ensurepip#
Python comes with an ensurepip module[1], which can install pip in
a Python environment.
Linux
$ python -m ensurepip --upgrade
MacOS
$ python -m ensurepip --upgrade
Windows
C:> py -m ensurepip --upgrade
More details about how ensurepip works and how it can be used, is
available in the standard library documentation.
get-pip.py#
This is a Python script that uses some bootstrapping logic to install
pip.
-
Download the script, from https://bootstrap.pypa.io/get-pip.py.
-
Open a terminal/command prompt,
cdto the folder containing the
get-pip.pyfile and run:
More details about this script can be found in pypa/get-pip’s README.
Standalone zip application#
Note
The zip application is currently experimental. We test that pip runs correctly
in this form, but it is possible that there could be issues in some situations.
We will accept bug reports in such cases, but for now the zip application should
not be used in production environments.
In addition to installing pip in your environment, pip is available as a
standalone zip application.
This can be downloaded from https://bootstrap.pypa.io/pip/pip.pyz. There are
also zip applications for specific pip versions, named pip-X.Y.Z.pyz.
The zip application can be run using any supported version of Python:
If run directly:
Linux
$ python -m pip.pyz --help
MacOS
$ python -m pip.pyz --help
Windows
then the currently active Python interpreter will be used.
Alternative Methods#
Depending on how you installed Python, there might be other mechanisms
available to you for installing pip such as
using Linux package managers.
These mechanisms are provided by redistributors of pip, who may have modified
pip to change its behaviour. This has been a frequent source of user confusion,
since it causes a mismatch between documented behaviour in this documentation
and how pip works after those modifications.
If you face issues when using Python and pip installed using these mechanisms,
it is recommended to request for support from the relevant provider (eg: Linux
distro community, cloud provider support channels, etc).
Upgrading pip#
Upgrade your pip by running:
Linux
$ python -m pip install --upgrade pip
MacOS
$ python -m pip install --upgrade pip
Windows
C:> py -m pip install --upgrade pip
Compatibility#
The current version of pip works on:
-
Windows, Linux and MacOS.
-
CPython 3.7, 3.8, 3.9, 3.10, 3.11, 3.12, and latest PyPy3.
pip is tested to work on the latest patch version of the Python interpreter,
for each of the minor versions listed above. Previous patch versions are
supported on a best effort approach.
Other operating systems and Python versions are not supported by pip’s
maintainers.
Users who are on unsupported platforms should be aware that if they hit issues, they may have to resolve them for themselves. If they received pip from a source which provides support for their platform, they should request pip support from that source.
In this tutorial, we will identify PIP for Python, when we use it, how to install it, how to check its version, how to configure it on Windows, and how to upgrade (or downgrade) it.
What Is PIP for Python?
PIP stands for «PIP Installs Packages», which is a recursive acronym (the one that refers to itself) coined by its creator. In more practical terms, PIP is a widely used package-management system designed to install libraries that aren’t included in the standard distribution of the Python programming language on our local machine — and then manage them from the command line.
By default, PIP fetches such libraries from Python Package Index (PyPI), which is a central online repository containing a vast collection of third-party packages for various applications. If necessary, PIP can also connect to another local or online repository as long as it complies to PEP 503.
How to Install PIP on Windows
Before proceeding to PIP installation on Windows, we need to make sure that Python is already installed and PIP is not installed.
Check If Python Is Available
To verify that Python is available on our local machine, we need to open the command line (in Windows search, type cmd and press Enter to open Command Prompt or right-click on the Start button and select Windows PowerShell), type python, and press Enter.
If Python is properly installed, we will see a notification like the one below:
Python 3.10.2 (tags/v3.10.2:a58ebcc, Jan 17 2022, 14:12:15) [MSC v.1929 64 bit (AMD64)] on win32 Type "help," "copyright," "credits," or "license" for more information.
In the opposite case, we will see the following notification:
'python' is not recognized as an internal or external command, operable program or batch file.
This means that Python is either not installed on our local machine or is installed incorrectly and needs setting system variables. If you need further guidance on how to properly install Python on Windows, you can use this article in the Dataquest blog: Tutorial: Installing Python on Windows.
Check If PIP Is Already Installed
Now that we verified that Python is installed on Windows (or, if it was not, have installed it), let’s check if PIP is already installed on our system.
The latest releases Python 3.4+ and Python 2.7.9+, as well as the virtual environments virtualenv and pyvenv, automatically ship with PIP (we can check our Python version by running python --version or python -V in the command line). However, the older versions of Python don’t have this advantage by default. If we use an older Python release and cannot upgrade it for some reason (e.g., when we have to work with the projects made in old versions of Python incompatible with the newer versions), we may need to manually download and install PIP on Windows.
To check if PIP is already installed on Windows, we should open the command line again, type pip, and press Enter.
If PIP is installed, we will receive a long notification explaining the program usage, all the available commands and options. Otherwise, if PIP is not installed, the output will be:
'pip' is not recognized as an internal or external command, operable program or batch file.
This is exactly the case when we have to manually install PIP on Windows.
Download PIP
Before installing PIP, we have to download the get-pip.py file. We can do this two ways:
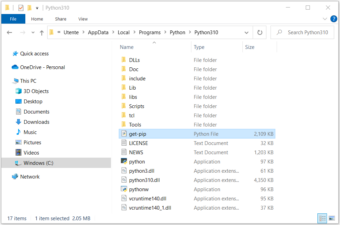
- Go to https://bootstrap.pypa.io/get-pip.py and save this file as
get-pip.pyin the same folder where Python is located.
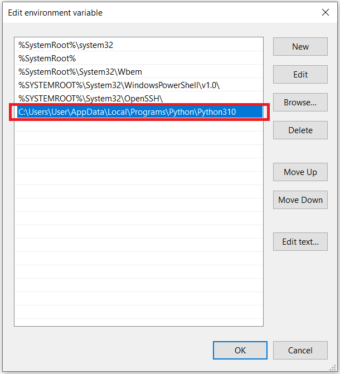
By default, the Python installation is stored in the folderAppData. The entire path could look like the following:
C:\Users\User\AppData\Local\Programs\Python\Python310
The folder User can be called differently on a particular machine, and also the final folder in the above path depends on the version of Python. In our case – Python 3.10:
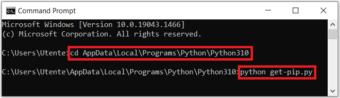
- Open the command line and navigate to the folder where Python is stored using the
cdcommand (see the previous point if you are not sure about Python’s location).
Now, run the following curl command:
curl https://bootstrap.pypa.io/get-pip.py -o get-pip.py

Install PIP on Windows
Now that we downloaded the get-pip.py file, we need to complete the followings steps.
- Open the command line
- Navigate to the folder where Python and the
get-pip.pyfile are stored using thecdcommand - Launch the installer by running the following command:
python get-pip.py
After a quick installation process, a message appears with all the details of the installation, and the final line appears as follows:
Successfully installed pip-22.0.1 wheel-0.37.1
PIP is now successfully installed on Windows.
Verify the PIP Installation Process and Check the PIP Version
To double-check if PIP has been installed properly and check its version, we need to run one of these commands in the command line:
pip --version
or
pip -V
If PIP is installed correctly, we will see a message indicating the version of PIP and its location on the local system, like the following:
pip 22.0.2 from C:\Users\Utente\AppData\Local\Programs\Python\Python310\lib\site-packages\pip (python 3.10).
If instead, an error is thrown, it is necessary to repeat the installation process.
Add PIP to Windows Environment Variables
To be able to run PIP without issues from any folder in the command line (rather than navigating every time to the folder where the PIP installer is stored, as we did earlier), we have to add the path to the folder with the get-pip.py file to Windows environment variables. This is especially important in that rare case when, we have installed several versions of Python, including old ones. In this situation, to avoid installing PIP separately for each old version of Python, we should install it only for one of them and then perform the following steps:
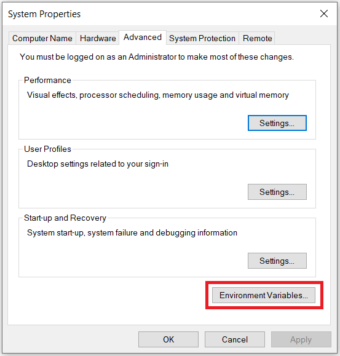
- Open
Control Panel(typing it in Windows search), selectSystem and Security, then selectSystem. - Go to the end of the opened window and select
Advanced system settings:

- Click
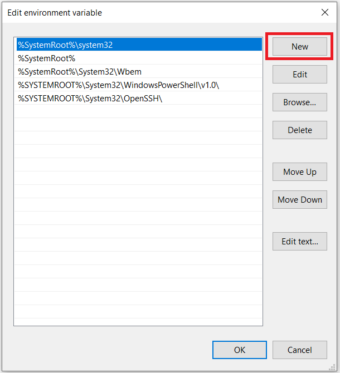
Environment Variables:
- In the
System variablessection, find and double-click the variablePath:
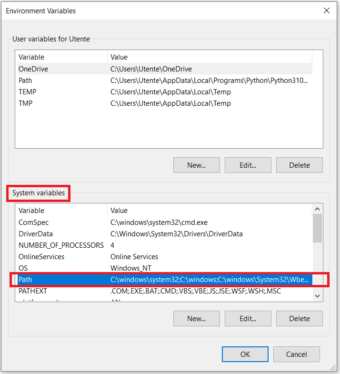
- Click
Newand add the path to the folder where the PIP installer is stored:
- Click
OKto confirm modifications.
Upgrade PIP on Windows
Sometimes, we may need to update PIP on Windows to the latest version to keep it up-to-date and working flawlessly. For this purpose, we can run the following command in the command line:
python -m pip install --upgrade pip
As a result, the old version of PIP will be uninstalled and the most recent release will be installed.
Downgrade PIP on Windows
We can also want to downgrade PIP to a specific older version. This operation may be necessary in certain cases, for example, if a new version works with some compatibility issues. To downgrade PIP on Windows, we need to open the command line and run a command with the following syntax:
python -m pip install pip==<version>
Let’s say, we want to downgrade it to v20.3. Then the exact command will be:
python -m pip install pip==20.3
After downgrading PIP, we can verify that we now have the necessary version of it by running python -V.
Conclusion
In this tutorial we covered various topics regarding the installation of PIP on Windows:
- How PIP works
- How to check if Python and PIP are already installed
- When it may be necessary to manually install PIP on Windows
- How to download and install PIP on Windows
- How to verify if PIP has been successfully installed and check its version
- How to configure PIP on Windows and when it may be necessary
- When and how to upgrade or downgrade PIP on Windows
Now that we have PIP properly installed on Windows, we can begin using it to manage Python libraries. Let’s start with running pip help in the command line and exploring the available commands and options for this program.
Pip — консольный менеджер пакетов для Python. Рассказываем как его установить, и какие возможности управления пакетами он предоставляет.
Pip — менеджер пакетов для Python, работа с ним осуществляется через командную строку. Pip не нужно устанавливать отдельно, если вы пользуетесь Python версии 2.7.9 и новее или версии 3.4 и новее. Если pip установлен, то можно ввести в командную строку:
Команды статье указаны для Windows, работа с pip в Linux может отличаться.
Вы получите справку по основным командам.
Установка pip для Python
Если pip не установлен, то нужно скачать скрипт. Выбирайте папку с номером вашей версии Python. После этого в командной строке перейдите в папку со скриптом и выполните команду:
Если pip установлен в папку ProgramFiles, то вам нужно запускать командную строку от администратора.
Если вы установили pip, но все равно получаете ошибку в консоли, нужно указать путь к файлу pip.exe в переменной Path. Для этого зайдите в свойства компьютера>Дополнительные параметры системы>Переменные среды. Здесь (в зависимости о версии Windows) либо добавьте путь к уже существующему через точку с запятой, либо просто нажмите создать и скопируйте путь в новое поле.
Если вам нужно обновить pip напишите в командной строке:
python -m pip install --upgrade pip
Управление пакетами
Чтобы выполнить установку пакета с сайта pypi.org введите в консоли:
python -m pip install ИмяПакета
Если вам нужно использовать несколько версий pip, то нужную можно указать так (начиная с версии pip 0.8):
pip-0.8 install ИмяПакета
Таким же образом можно выбирать версию Python:
python-3.6 -m pip install ИмяПакета
Pip версии 1.5 и выше следует указывать так:
Чтобы обновить пакет введите:
python -m pip install --upgrade ИмяПакета
Для удаления пакета используйте команду uninstall:
python -m pip uninstall ИмяПакета
Флаг -m используется для того чтобы запустить установленный модуль, как скрипт (если написать pip без -m вы можете получить ошибку).
Вывести список всех установленных пакетов в файл можно с помощью :
pip freeze > requirements.txt // название файла может быть любым
При наличии такого файла, можно устанавливать пакеты группами:
pip install -r requirements.txt// версии пакетов в файле указывать не обязательно
Необходимые пакеты можно найти не заходя на сайт pyPi.org (в данный момент недоступно):
pip search строка для поиска
Чтобы узнать подробности об установленном пакете введите:
Проверить установлены ли все зависимости для ваших пакетов можно так:
Теперь, с этими знаниями, вы можете самостоятельно скачать пакет cowsay, зайти в python, и ввести этот текст:
			>>> import cowsay
>>> cowsay.cow('Я умею работать с pip! Му!')
Готово! У вас есть говорящая консольная корова:
Содержание:развернуть
- Pip или pip3?
- Если pip не установлен
-
Windows
-
Linux (Ubuntu и Debian)
-
MacOS
- Как обновить PIP
- Команды PIP
- Пример работы с пакетами
PIP — это менеджер пакетов. Он позволяет устанавливать и управлять пакетами на Python.
Представьте себе ситуацию: вы собираете проект и подключаете множество сторонних библиотек для реализации своей задачи. Если это делать вручную, процесс выглядит примерно так:
- вы заходите на сайт, выбираете нужную версию пакета;
- скачиваете ее, разархивируете, перекидываете в папку проекта;
- подключаете, прописываете пути, тестируете.
Вполне вероятно, что эта версия библиотеки вообще не подходит, и весь процесс повторяется заново. А если таких библиотек 10? Устанавливать их вручную?
Нет 🙅🏻♂️
Менеджер пакетов PIP — решает данную проблему. Весь процесс установки пакета сводится к выполнению консольной команды pip install package-name. Несложно представить, сколько времени это экономит.
Если вы работали с другими языками программирования, концепция pip может показаться вам знакомой. Pip похож на npm (в Javascript), composer (в PHP) или gem (в Ruby).
Pip является стандартным менеджером пакетов в Python
Pip или pip3?
В зависимости от того, какая версия Python установлена в системе, может потребоваться использовать pip3 вместо pip.
Если вы не знаете какая версия Python установлена на вашей системе, выполните следующие команды:
python --version— для Python 2.xpython3 --version— для Python 3.xpython3.8 --version— для Python 3.8.x
Советуем использовать версию Python 3.6 и выше
Если команда «python» не найдена, установите Python по инструкции из предыдущей статьи.
Далее нужно убедиться, что сам PIP установлен и работает корректно. Узнать это поможет команда:
pip --version
Команда отобразит в консоли версию pip, путь до pip и версию python, для которой в дальнейшем будут устанавливаться пакеты:
pip 19.2.3 from /usr/local/lib/python3.8/site-packages/pip (python 3.8)
☝️ Важный момент: в зависимости от того, какую версию Python вы будете использовать, команда может выглядеть как pip , pip3 или pip3.8
Альтернативный вариант вызова pip:
python3.7 -m pip install package-name
Флаг -m сообщает Python-у запустить pip как исполняемый модуль.
Если pip не установлен
Pip поставляется вместе с Python, и доступен после его установки. Если по какой-то причине pip не установлен на вашей системе, установить его будет не сложно.
Windows
- Скачайте файл get-pip.py и сохраните у себя на компьютере.
- Откройте командную строку и перейдите в папку, в которой сохранен
get-pip.py. - В командной строке выполните команду:
python get-pip.pyилиpython3 get-pip.py. - PIP установлен 🎉!
Linux (Ubuntu и Debian)
Прежде, чем перейти к непосредственному описанию, хотим отметить, что все команды, описанные ниже, используются от имени root пользователя. Если же вы являетесь обычным пользователем на компьютере, то потребуется использовать команду sudo, чтобы получить привилегии root.
Для Питона 2-й версии, выполните команду:
apt-get install python-pip
Для Питона 3-ей версии:
apt-get install python3-pip
MacOS
- скачайте файл
get-pip.pyкомандойcurl https://bootstrap.pypa.io/get-pip.py -o get-pip.py; - запустите скачанный файл командой:
python get-pip.pyилиpython3 get-pip.py.
Должна появиться запись Successfully Installed. Процесс закончен, можно приступать к работе с PIP на MacOS!
Как обновить PIP
Иногда, при установке очередного пакета, можно видеть сообщение о том, что доступна новая версия pip.
WARNING: You are using pip version 19.2.3, however version 19.3.1 is available.
А в следующей за ней строке
You should consider upgrading via the 'python -m pip install --upgrade pip' command.
указана команда для обновления pip:
python -m pip install --upgrade pip
Команды PIP
Синтаксис pip выглядит следующим образом: pip + команда + доп. опции
pip <command> [options]
Со всеми командами pip можно ознакомиться, выполнив pip help . Информацию по конкретной команде выведет pip help <command>.
Рассмотрим команды pip:
pip install package-name— устанавливает последнюю версию пакета;pip install package-name==4.8.2— устанавливает пакет версии 4.8.2;pip install package-name --upgrade— обновляет версию пакета;pip download— скачивает пакеты;pip uninstall— удаляет пакеты;pip freeze— выводит список установленных пакетов в необходимом формате ( обычно используется для записи вrequirements.txt);pip list— выводит список установленных пакетов;pip list --outdated— выводит список устаревших пакетов;pip show— показывает информацию об установленном пакете;pip check— проверяет установленные пакеты на совместимость зависимостей;pip search— по введенному названию, ищет пакеты, опубликованные в PyPI;pip wheel— собирает wheel-архив по вашим требованиям и зависимостям;pip hash— вычисляет хеши архивов пакетов;pip completion— вспомогательная команда используется для завершения основной команды;pip help— помощь по командам.
Пример работы с пакетами
PIP позволяет устанавливать, обновлять и удалять пакеты на компьютере. Ниже попробуем разобраться с работой менеджера pip на примере парсинга названий свежих статей на сайте habr.com.
- установим нужные пакеты;
- импортируем пакет в свой скрипт;
- разберемся, что такое
requirements.txt; - обновим/удалим установленные пакеты.
Приступим 🙎🏻♂️
Шаг #1 Установка.
Для начала, нам необходимо установить beautifulsoup4 — библиотеку для парсинга информации с веб-сайтов.
pip3 install beautifulsoup4
pip найдет последнюю версию пакета в официальном репозитории pypi.org. После скачает его со всеми необходимыми зависимостями и установит в вашу систему. Если вам нужно установить определенную версию пакета, укажите её вручную:
pip3 install beautifulsoup4==4.8.2
Данная команда способна даже перезаписать текущую версию на ту, что вы укажите.
Также для работы beautifulsoup нам понадобится пакет lxml:
pip install lxml
☝️ Важный момент: по умолчанию pip устанавливает пакеты глобально. Это может привести к конфликтам между версиями пакетов. На практике, чтобы изолировать пакеты текущего проекта, создают виртуальное окружение (virtualenv).
Шаг #2 Импортирование в скрипте.
Для того чтобы воспользоваться функционалом установленного пакета, подключим его в наш скрипт, и напишем простой парсер:
from urllib.request import urlopen

from bs4 import BeautifulSoup
# скачиваем html
page = urlopen("https://habr.com/ru/top/")
content = page.read()
# сохраняем html в виде объекта BeautifulSoup
soup = BeautifulSoup(content, "lxml")
# Находим все теги "a" с классом "post__title_link"
all_a_titles = soup.findAll("a", { "class" : "post__title_link" })
# Проходим по каждому найденному тегу и выводим на экран название статьи
for a_title in all_a_titles:
print(a_title.text)
Шаг #3 requirements.txt.
Если вы просматривали какие-либо проекты Python на Github или где-либо еще, вы, вероятно, заметили файл под названием requirements.txt. Этот файл используется для указания того, какие пакеты необходимы для запуска проекта (в нашем случае beautifulsoup4 и lxml).
Файл requirements.txt создается командой:
pip freeze > requirements.txt
и выглядит следующим образом:
beautifulsoup4==4.8.2

lxml==4.4.2

soupsieve==1.9.5
Теперь ваш скрипт вместе с файлом requirements.txt можно сохранить в системе контроля версий (например git).
Для работы парсера в новом месте (например на компьютере другого разработчика или на удаленном сервере) необходимо затянуть файлы из системы контроля версий и выполнить команду:
pip install -r requirements.txt
Шаг #4 Обновление/удаление установленных пакетов.
Команда pip list --outdated выведет список всех устаревших пакетов. Обновить отдельно выбранный пакет поможет команда:
pip install package-name --upgrade
Однако бывают ситуации, когда нужно обновить сразу все пакеты из requirements.txt. Достаточно выполнить команду:
pip install -r requirements.txt --upgrade
Для удаления пакета выполните:
pip uninstall package-name
Для удаления всех пакетов из requirements.txt:
pip uninstall -r requirements.txt -y
Мы разобрали основы по работе с PIP. Как правило, этого достаточно для работы с большей частью проектов.