Компьютерная мышь была бы неполноценной, если бы в ней отсутствовал такой важный элемент как колесико, основной задачей которого является вертикальная прокрутка. По умолчанию, если крутить колесико от себя, окна будут прокручиваться вверх, а если на себя, то вниз, что вполне логично. Но что, если вдруг пользователь пожелает изменить направление прокрутки? Некоторое время в Windows 10 была доступна опция изменения направления прокрутки, но затем разработчики таки решили ее убрать.
Тем не менее, вы можете ею воспользоваться, внеся изменения в системный реестр, но для начала вам нужно узнать идентификатор мыши.
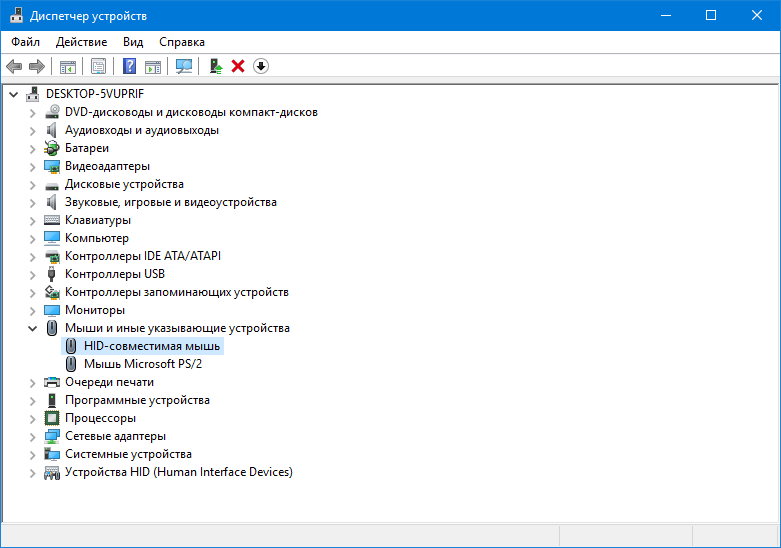
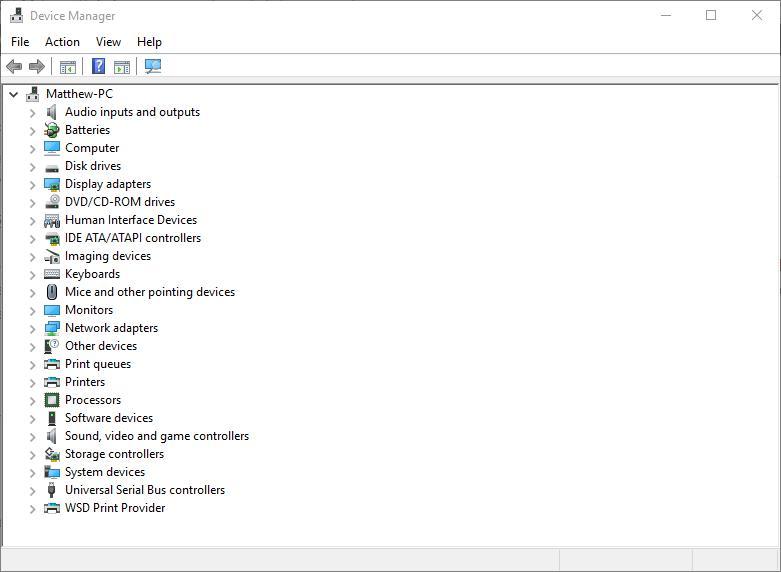
Откройте Диспетчер устройств, разверните пункт «Мыши и иные указующие устройства» и выберите вашу мышь (если устройство подключается по USB, это будет HID-совместимая мышь).
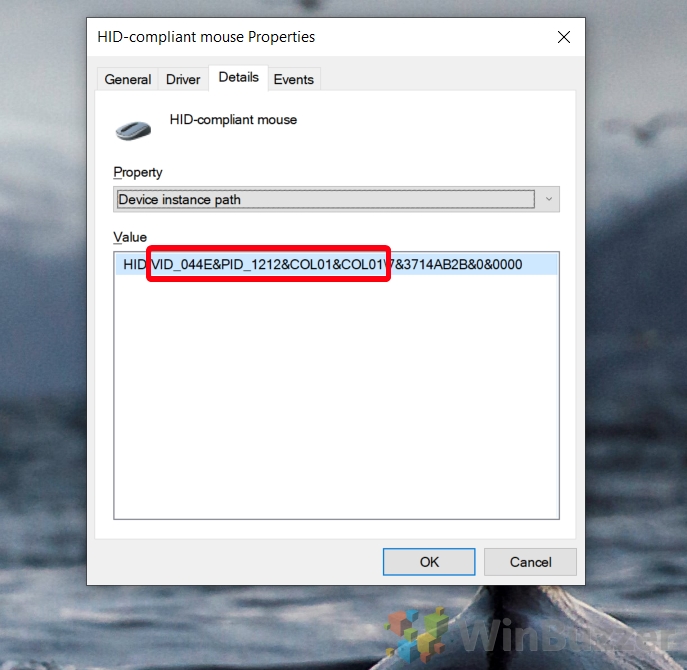
Переключитесь в открывшемся окошке на вкладку «Сведения».
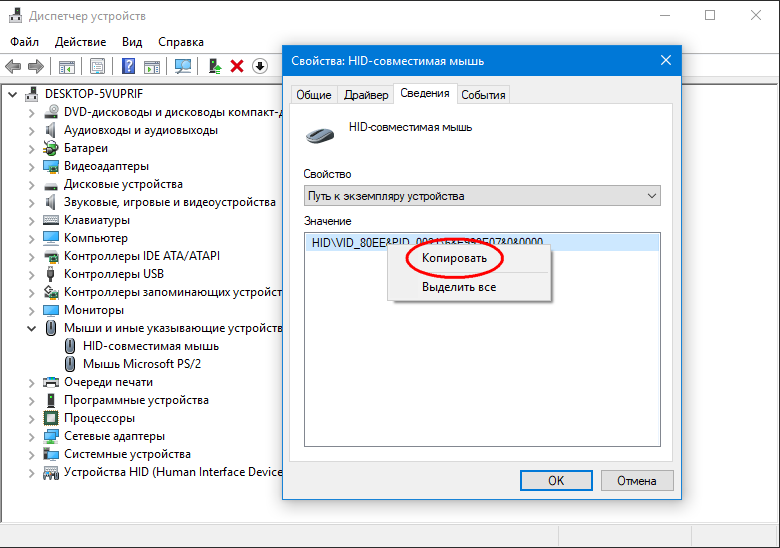
Выберите в выпадающем меню «Путь к экземпляру устройства», скопируйте полученное значение и вставьте его в Блокнот.

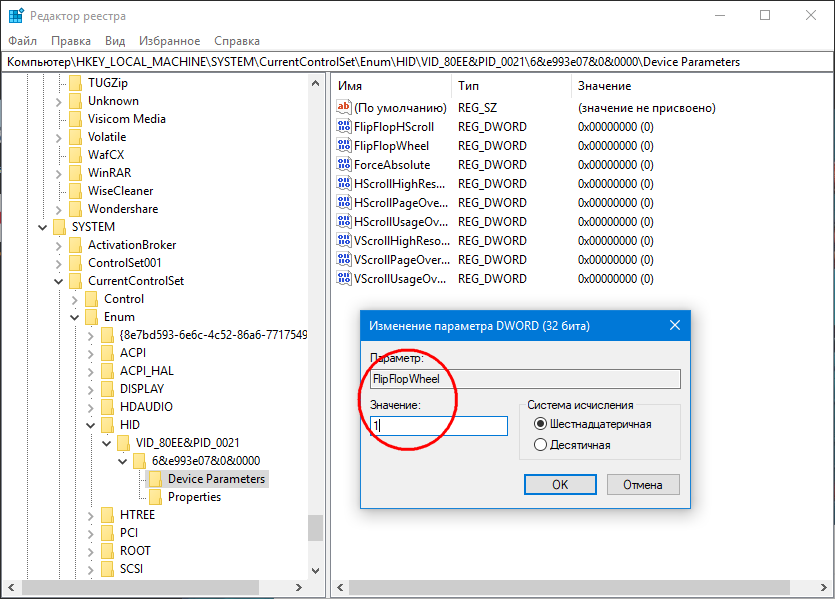
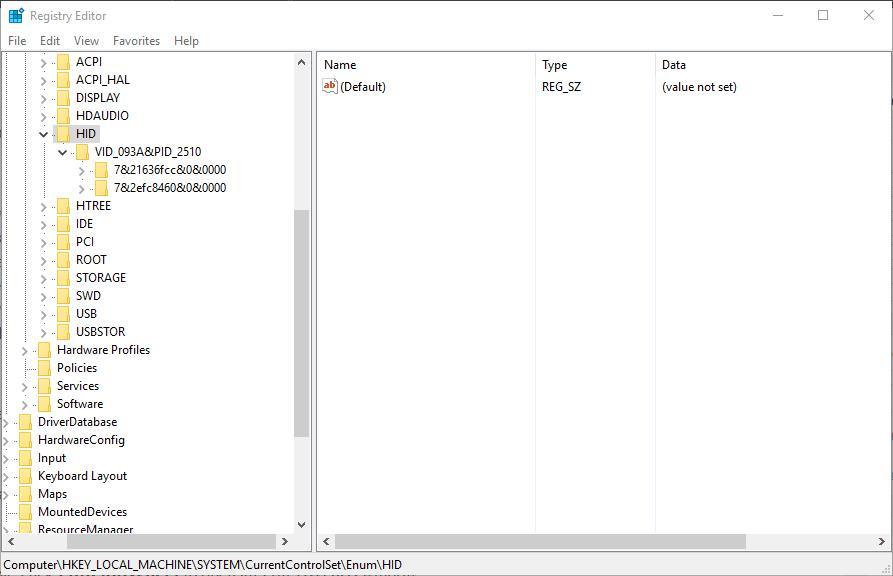
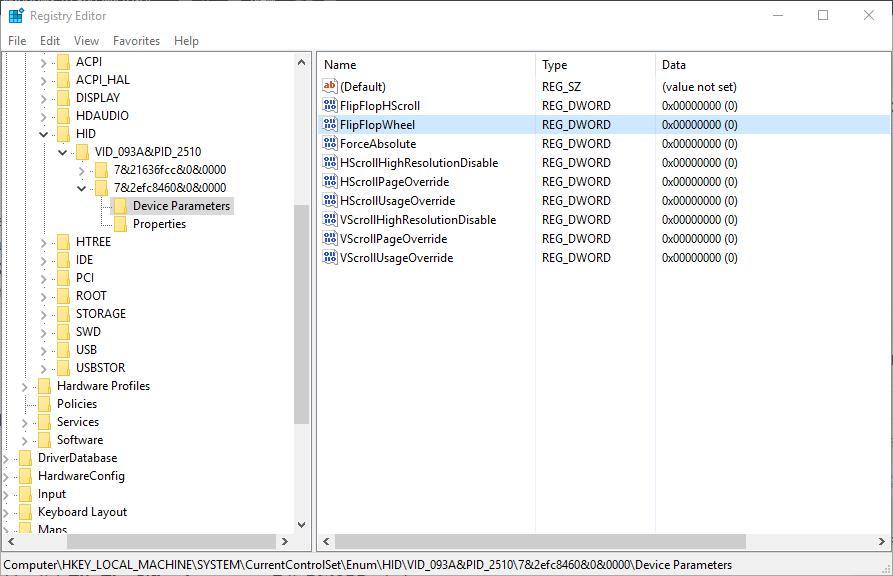
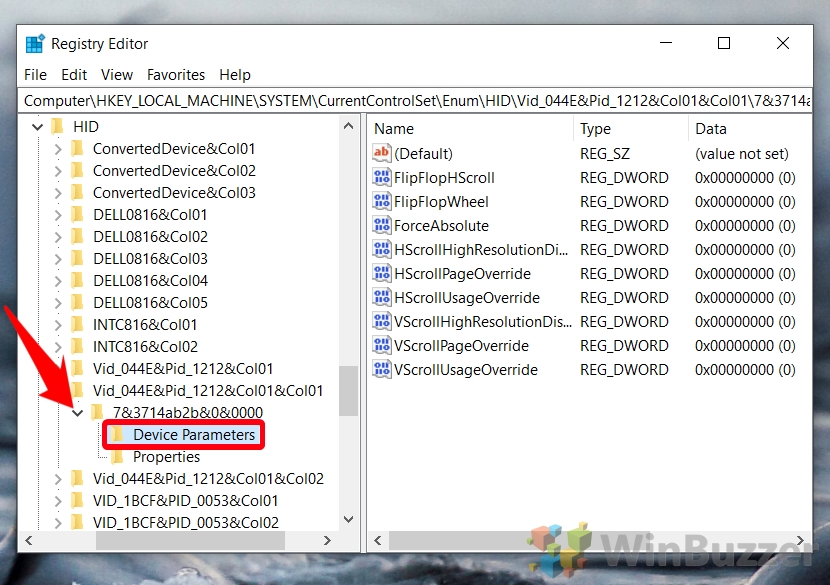
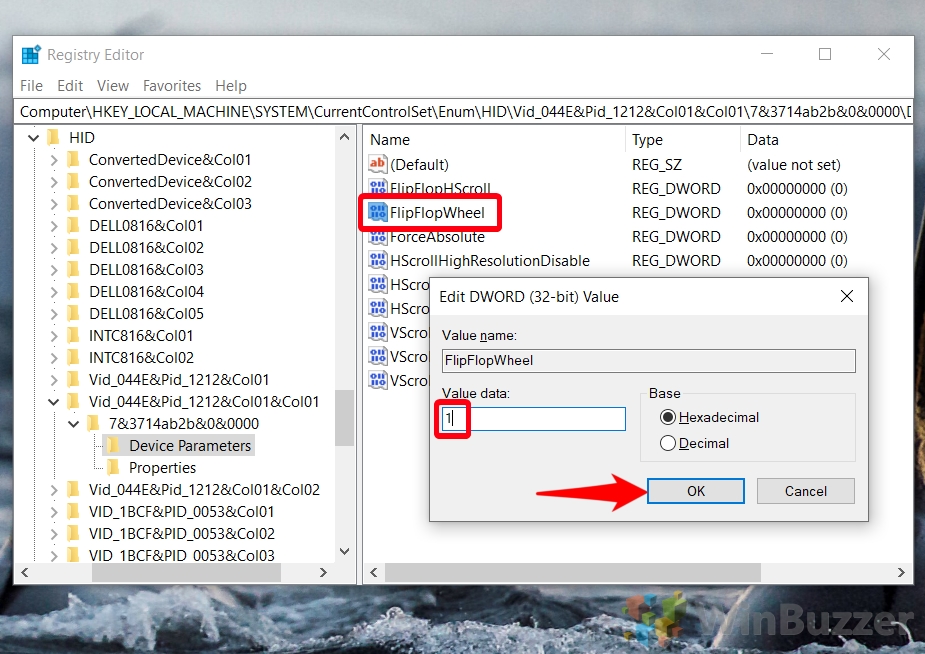
За сим откройте редактор реестра и перейдите к ключу HKLM\SYSTEM\CurrentControlSet\Enum\HID. Разверните элемент, название которого соответствует VID мыши вплоть до вложенного подраздела Device Parameters. Справа у вас будет DWORD-параметр FlipFlopWheel, кликните по нему два раза и замените его текущее значение 0 на 1.
Чтобы изменения вступили в силу, перезагрузите компьютер.
С помощью AutoHotkey
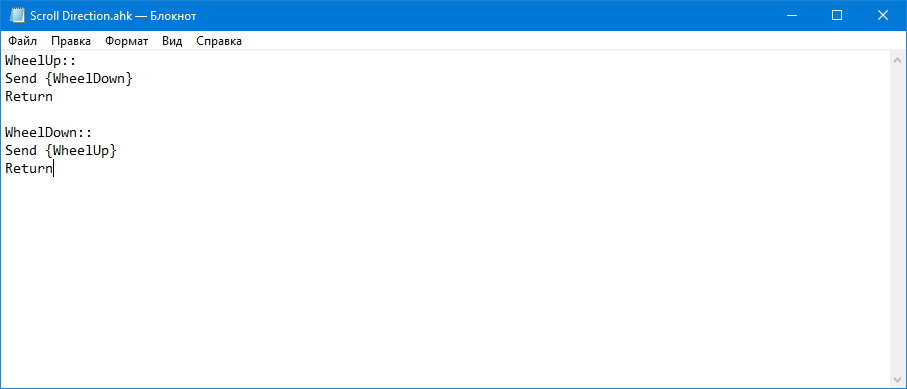
Если твик реестра не сработает, в качестве альтернативы можно воспользоваться утилитой AutoHotkey, предназначенной для переназначения действий, выполняемых аппаратными кнопками. Скачав и установив утилиту, создайте в Блокноте текстовый файл и пропишите в него этот код:
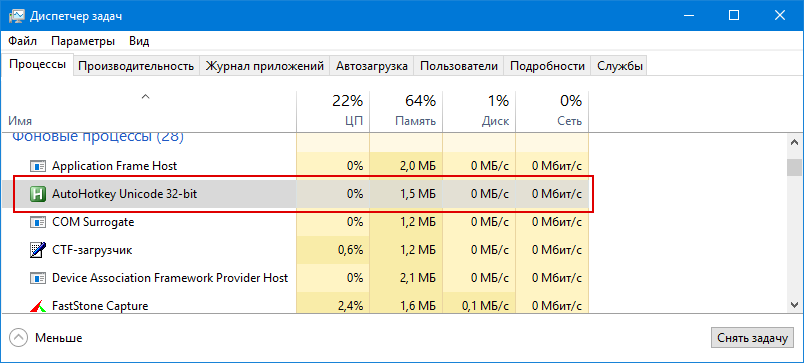
Сохраните файл с расширением ahk на рабочем столе и запустите, что изменит направлении прокрутки колесика мыши в обратном направлении. Новые настройки вступят в силу немедленно и будут действовать до тех пор, пока вы не перезагрузите Windows или не завершите запущенный процесс скрипта принудительно из Диспетчера задач.
![]() Загрузка…
Загрузка…
A comprehensive guide on adapting a mouse to your needs
by Matthew Adams
Matthew is a freelancer who has produced a variety of articles on various topics related to technology. His main focus is the Windows OS and all the things… read more
Updated on
- Mice and touchpads are essential input devices for your PC.
- Many users prefer to customize their mouse in different ways, such as changing their scroll direction.
- Windows 10 used to have a built-in option to reverse the mouse scroll’s direction, but now you need to apply other methods to accomplish this.

Scrollbars are ubiquitous in all types of computers and by default, rolling the mouse wheel down scrolls down a page. But some users want to reverse the scroll direction in Windows 10.
Read on to find out what options you have to change the mouse scroll’s direction on your device.
Windows 10 used to have a Settings option that you could use to configure the scrolling direction with.
However, an update removed the Reverse scrolling direction setting. So how can we now configure the mouse wheel’s scroll direction in Windows 10?
Well, there are two easy alternatives you can try out, as you will see from the guides below.
1. Edit the Registry
Even if there’s no longer a Reverse scrolling direction option via Settings in Windows 10, you can still customize the mouse wheel’s scroll direction with a registry edit.
For that, you’ll need the mouse VID ID which is listed in Device Manager.
1. Press the Win + S keys at the same time on your keyboard to open the search box.
How we test, review and rate?
We have worked for the past 6 months on building a new review system on how we produce content. Using it, we have subsequently redone most of our articles to provide actual hands-on expertise on the guides we made.
For more details you can read how we test, review, and rate at WindowsReport.
2. Type device manager in it and click on the first result to open the app.
3. Select Mice and other pointing devices and double-click your mouse.
4. Click on the Details tab, which includes the drop-down menu shown directly below.

5. Select Device instance path from the drop-down menu.
6. Right-click the value in the Value box and select Copy.
7. Press OK and close the Device Manager window.
8. Open Notepad and paste the VID ID in Notepad.
9. Press the Win + R keys to open the Run dialog.
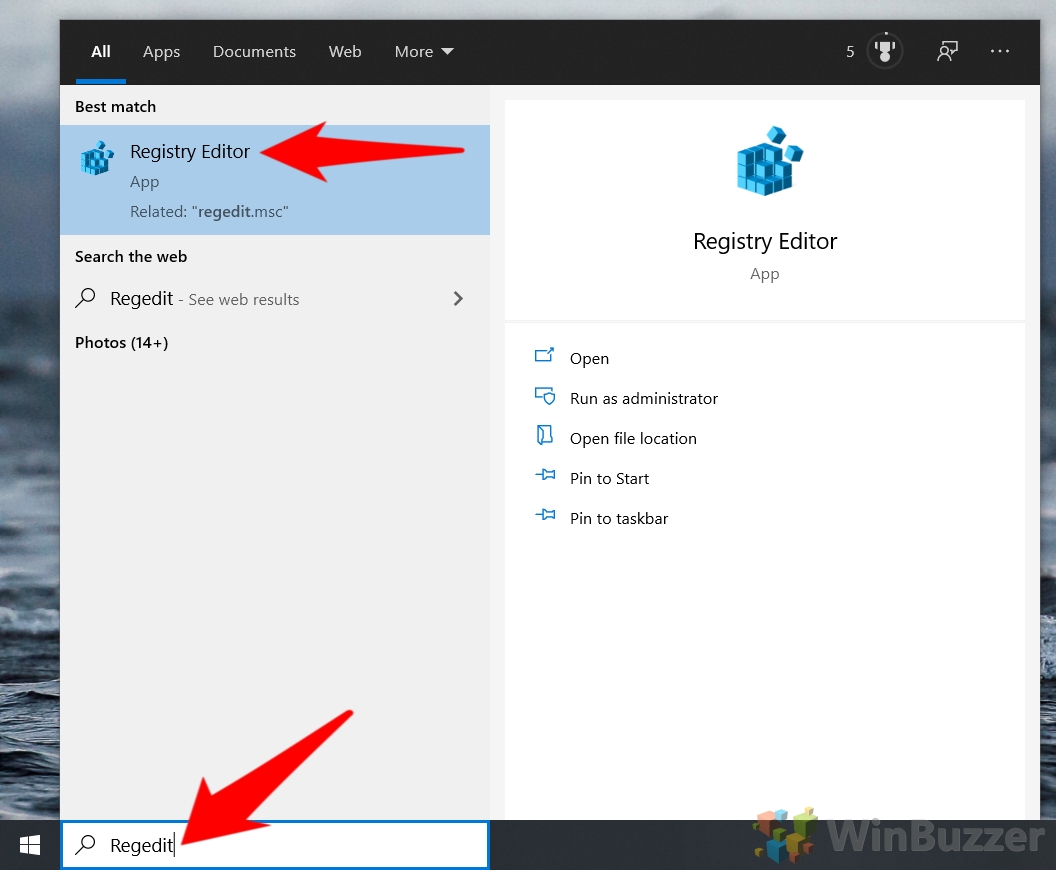
10. Enter regedit in Run’s text box to open the Registry Editor app.
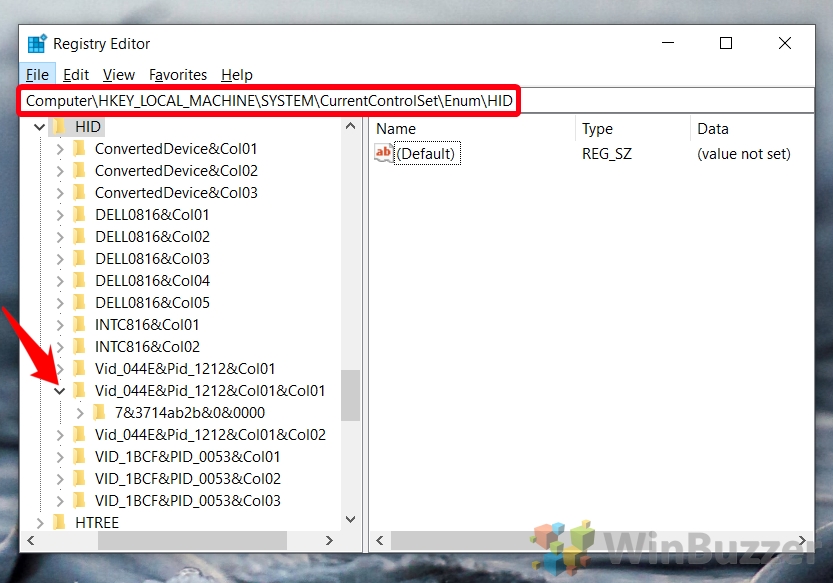
11. Open this registry location: HKEY_LOCAL_MACHINESYSTEMCurrentControlSetEnumHID
12. This is where the VID ID comes in handy. Click the key that matches the VID ID in Notepad.
13. Now you can select a Device Parameters key that has a FlipFlopWheel DWORD as shown below.
14. Next, double-click FlipFlopWheel to open an Edit DWORD window.
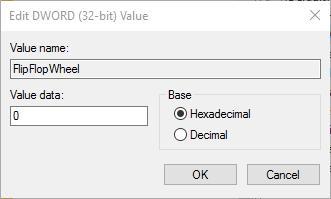
15. Enter 1 in the Value data text box and press OK.
16. Close the Registry Editor window (You’ll need to restart Windows for the changes to take effect).
17. Click the Start button and roll your mouse wheel up. That will scroll the Start menu’s bar slider down. Roll the mouse wheel down to scroll back up the menu.
18. To revert back to the default setting, select the FlipFlopWheel DWORD in Registry Editor window and enter 0 in the Value data box.
Did you know that you can improve your scrolling experience significantly with the smooth scrolling feature? Learn more from our dedicated article.
- 3+ best tools to automate mouse clicks online and in games
- How to use Apple keyboard and mouse on Windows 10
- Mouse settings reset/keep changing [Full Fix]
2. Set up an AutoHotkey Script
AutoHotkey is software that users can set up macro scripts with and with which they reverse the scroll direction.
This is freeware software you can add to Windows by pressing the Download button on the program’s website. Set up a reverse scroll direction script as follows:
- Press the Cortana button and enter Notepad in the search box. Select to open Notepad.
- Now you can enter the script in Notepad. Copy and Paste this script in Notepad:
WheelUp::
Send {WheelDown}
Return
WheelDown::
Send {WheelUp}
Return
- Click File > Save as to open the Save as window and select All Files from the Save as type in the drop-down menu.
- Enter a file title for the script and make sure to include .ahk at the end of it. For example, you could save it as Scroll Direction Script.ahk.
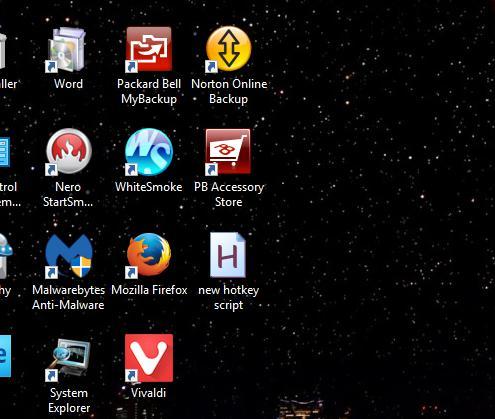
- Select to save the script to Desktop and press the Save button. That should add an AutoHotkey script icon to the desktop as shown below.

- Close Notepad and double-click the AutoHotkey script shortcut on the desktop to run it.
- Click the Start button and roll the mouse wheel up to scroll down the menu.
- To close the script, right-click the taskbar and select Task Manager. Select AutoHotkey Unicode on the Processes tab and press its End task button.

These are two ways that you can reverse the mouse wheel’s scroll direction in Windows 10. Now, the scrollbar slider will move down when you roll the mouse wheel up and vice versa.
Let us know if you found this guide helpful and write down any questions you have in the comments section below.
![]()

Contents
- 1 How to Reverse Touchpad Scrolling in Windows 10
- 2 How to Invert Mouse Scroll in Windows 10
- 3 How to Adjust Windows 10 Precision Touchpad Gestures and Change Mouse Sensitivity
Your touchpad or mouse scroll direction is something that quickly becomes muscle memory. As a result, using Windows 10 with mouse settings you’re not used to can seriously hamper your productivity and cause frustration.
In such cases, it’s necessary to know how to reverse scrolling direction in Windows 10.
You can reverse touchpad scrolling the easy way
Thankfully, Microsoft knows that there are two camps when it comes to scrolling: those who scroll up to go up, and those who scroll down to go up. As a result, it’s quite easy to reverse touchpad scrolling in Windows 10.
To invert mouse scrolling is more difficult
If your mouse wheel is scrolling the wrong way, however, it’s less intuitive. You’ll have to poke around in the registry and change an entry there to invert your mouse scroll. Not to worry though – today we’ll show you step-by-step how to reverse scrolling in Windows 10 for both types of input devices. Let’s get started:
As mentioned earlier, the process to reverse touchpad scrolling in Windows 10 is quite simple. You won’t need any special tools, just your trusty settings app and about thirty seconds of your time:
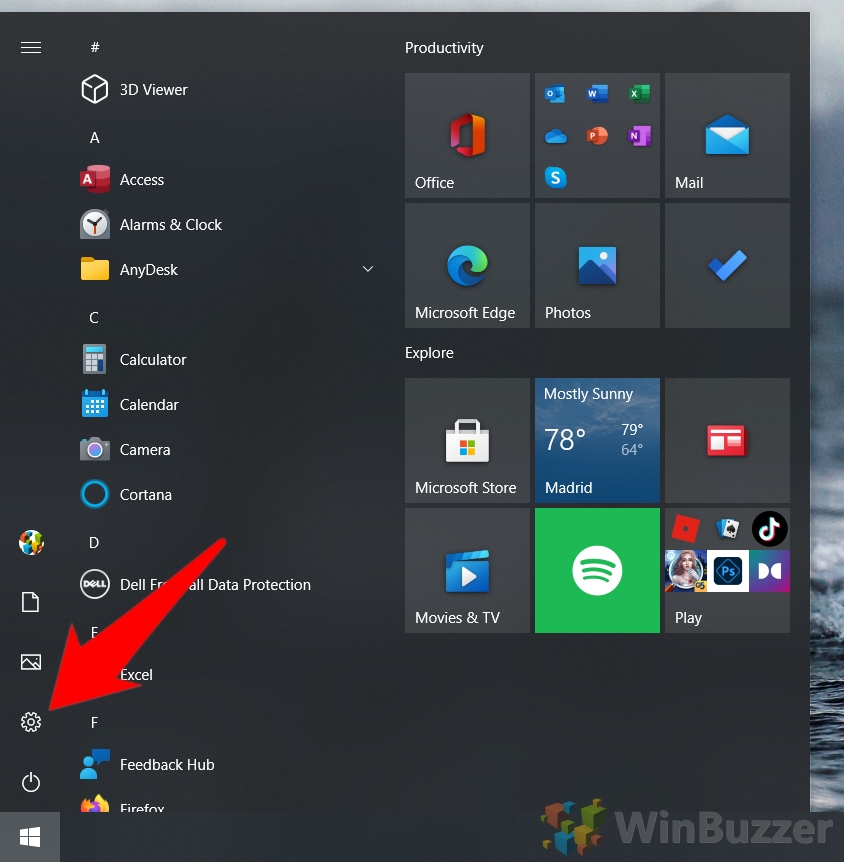
- Open Settings
Press the Start button, then click the settings cog, above the power button. Alternatively, press Windows + I.

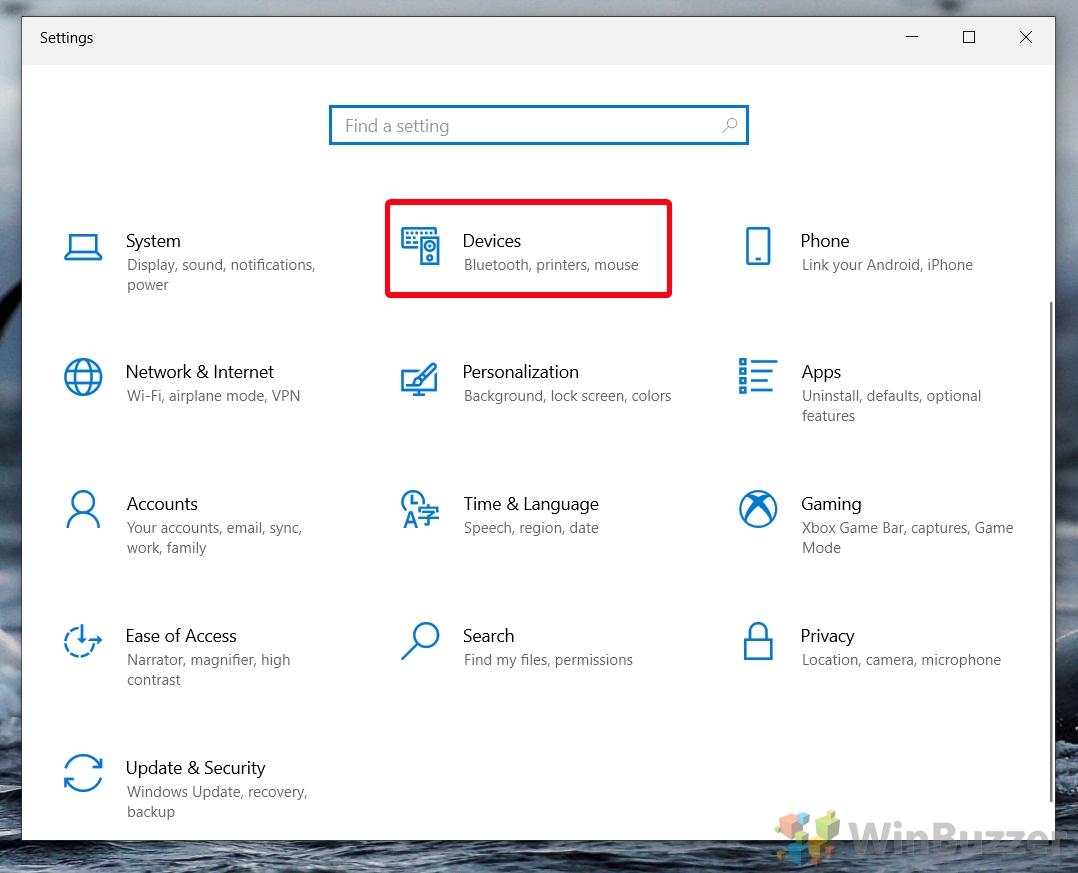
- Click “Devices”

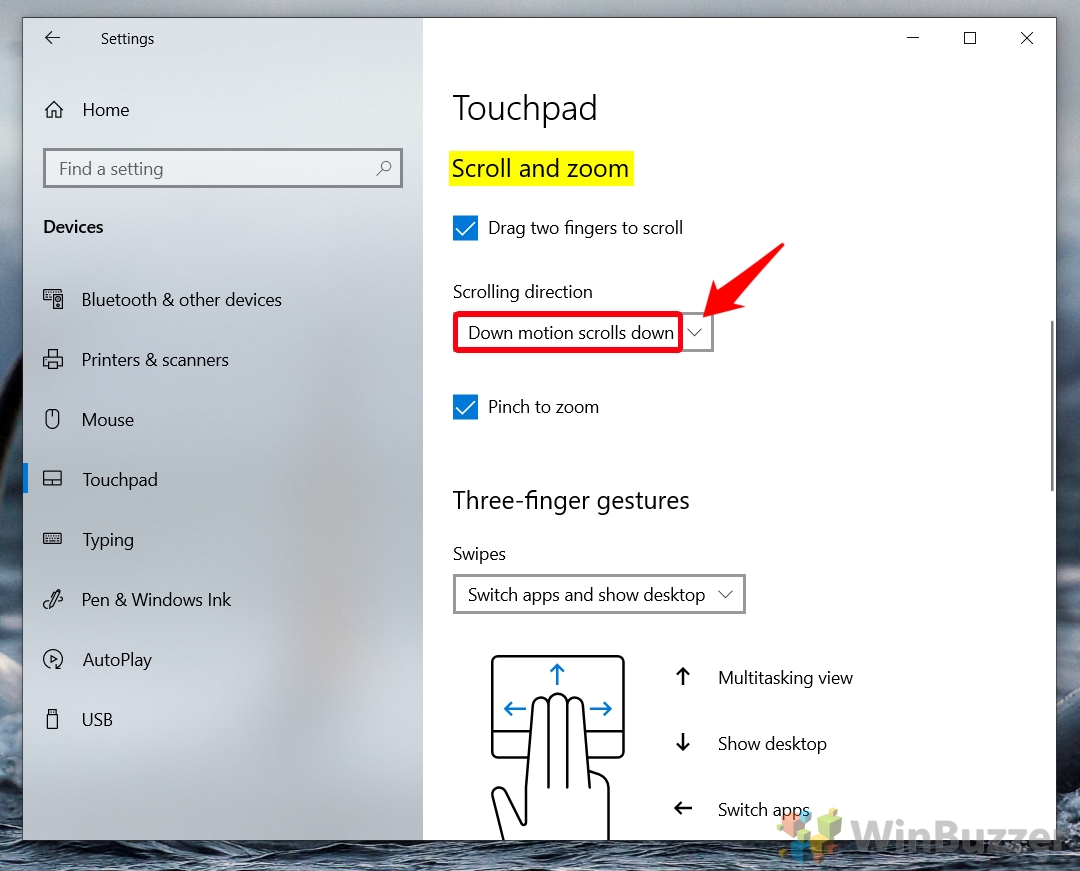
- Click “Touchpad” on the sidebar and reverse scrolling direction in the main pane
Your touchpad scrolling direction will take the form of a dropdown menu under the “Scrolling direction” heading. You can choose between two options: “Down motion scrolls down” and “Down motion scrolls up”. Picking one or the other will determine whether your scroll is inverted or not.

How to Invert Mouse Scroll in Windows 10
As mentioned earlier, to reverse mouse scroll in Windows 10 you’ll need to use the registry. That is, unless your mouse comes with its own driver software. If you have a Logitech, Steelseries, Razer, or other gaming mouse, there’s a good chance this will be the case, so check there first. If not, the editing the Registry is likely your best choice.
Before you do so, we recommend you give our safe registry editing guide a read and create a backup of your Registry. The chances of anything going wrong if you follow our instructions are slim, but it’s better to be safe than sorry.
Before you can start editing your registry, though, you’ll need to get the device instance path for your mouse. This is necessary to find the correct device in your Registry Editor. We’ll show you how to do so below:
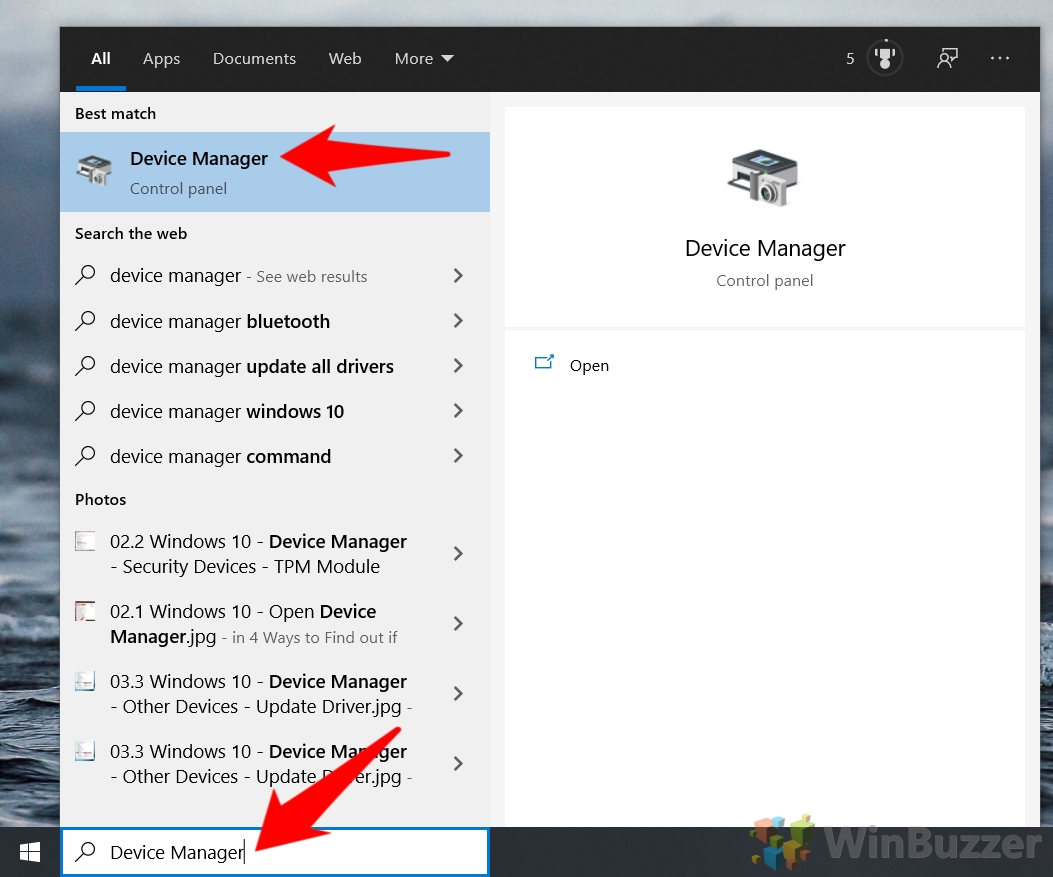
- Open Device Manager
Press Start and then type “Device Manager”. Click the top result.

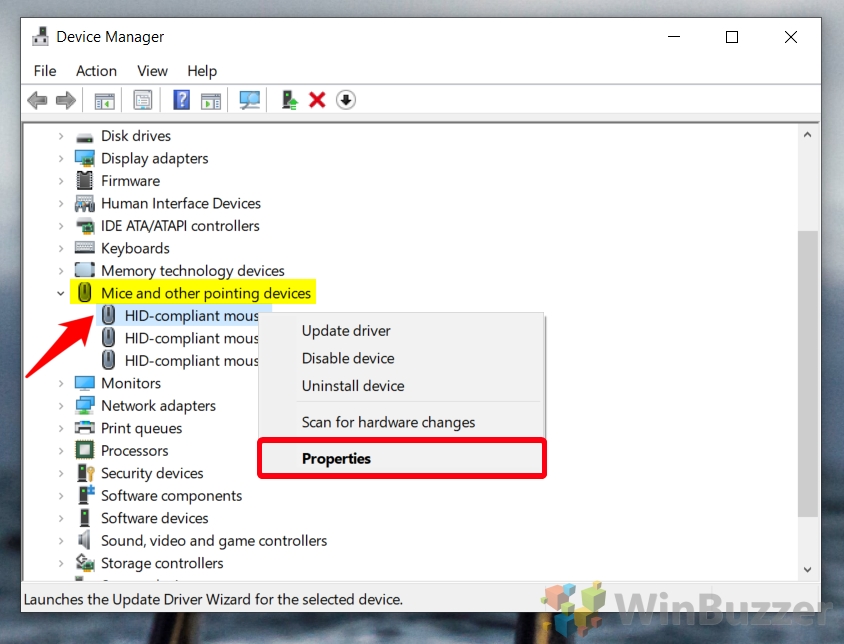
- Open your mouse’s properties window
ng>Scroll down the list in Device Manager until you find the “Mice and other pointing devices” section. Expand it, then right-click your mouse and press “Properties”.
If there are multiple mice listed with the same name, “HID-compliant mouse”, check the “Manufacturer” and “Location” fields in the properties menu. Your device’s brand/manufacturer should show there.

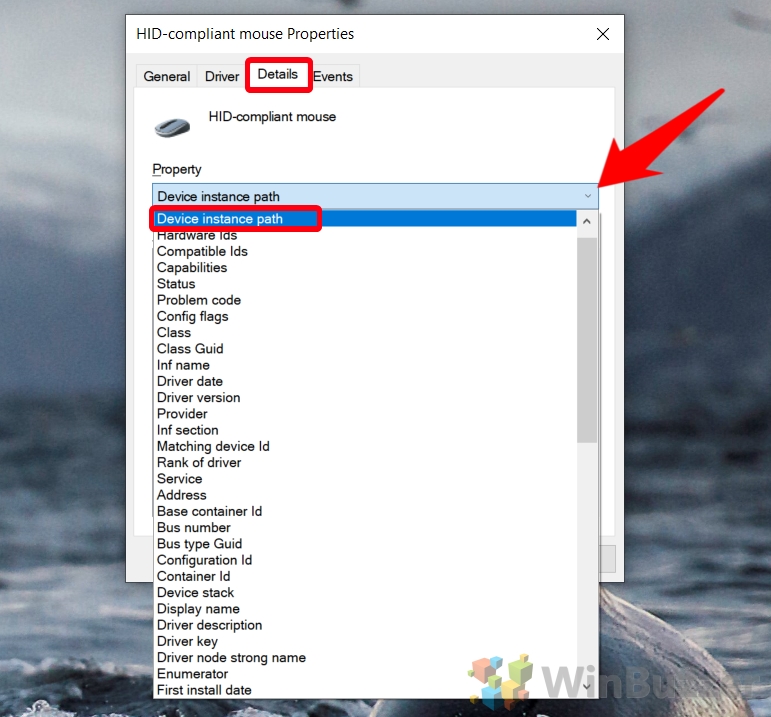
- Open the “Details” tab and select “Device instance path”

- Note down your device instance path (starting from “VID”)

- Open the Registry Editor
Press Start and then type “Regedit”. Click the top result.

- Navigate to the HID key and locate your device by instance path
In the navigation bar of your Registry Editor, paste the following:
Computer\HKEY_LOCAL_MACHINE\SYSTEM\CurrentControlSet\Enum\HID.Expand the HID key and scroll down the list until you see that a key that starts with VID and contains the instance path you noted down earlier. Click the down arrow next to its folder icon to expand the folder.

- Expand the next key and select “Device Parameters”

- Double-click the “FlipFlopWheel” entry in the main pane and change its value data to 1
Changing the value data will reverse mouse scroll direction in Windows 10 once you press “OK” and restart your PC. If it doesn’t work after a restart, you likely changed the scroll direction of the wrong mouse –check your instance path again.

How to Adjust Windows 10 Precision Touchpad Gestures and Change Mouse Sensitivity
Now that you know how to change your Windows 10 mouse/touchpad scrolling direction, you may want to dial in other settings. Our previous guides will show you how to customize Windows 10 Prevision Touchpad settings and your mouse sensitivity and speed.
Skip to content
На чтение 4 мин. Просмотров 5.7k. Опубликовано
Полосы прокрутки распространены повсеместно на всех типах компьютеров, и по умолчанию прокручивание колесика мыши вниз прокручивает страницу или окно и наоборот. В частности, в Windows 10 была опция «Настройки», с помощью которой можно было настроить направление прокрутки. Однако в результате обновления был удален параметр Обратное направление прокрутки . Так как же теперь мы можем настроить направление прокрутки колесика мыши в Windows 10?
Изменить реестр, чтобы изменить направление прокрутки
Даже если больше нет опции Обратное направление прокрутки , вы все равно можете настроить направление прокрутки колесика мыши с помощью редактирования реестра. Для этого вам понадобится VID ID мыши, который указан в диспетчере устройств.
- Сначала откройте Устройство Менеджер , нажав кнопку Кортана и войдя в «Диспетчер устройств».
- Выберите Устройство Менеджер , чтобы открыть окно непосредственно ниже.

- Выберите Мыши и другие указывающие устройства и дважды щелкните мышью.
- Перейдите на вкладку Подробности , которая содержит раскрывающееся меню, показанное непосредственно ниже.

- Выберите Путь к экземпляру устройства в раскрывающемся меню.
- Нажмите правой кнопкой мыши значение в поле Значение и выберите Копировать .
- Нажмите ОК и закройте окно Устройство Менеджер .
- Откройте Блокнот и вставьте VID ID в Блокнот с помощью сочетания клавиш Ctrl + V.
- Нажмите клавишу Win + R, чтобы открыть Run. Введите «regedit» в текстовом поле «Выполнить», чтобы открыть редактор реестра.
- Откройте это местоположение реестра: HKEY_LOCAL_MACHINE \ SYSTEM \ CurrentControlSet \ Enum \ HID .

- Здесь вам пригодится VID ID . Нажмите клавишу, соответствующую идентификатору VID в Блокноте .
- Теперь вы можете выбрать ключ параметров устройства, который имеет FlipFlopWheel DWORD, как показано ниже.

- Затем дважды нажмите FlipFlopWheel , чтобы открыть окно «Редактировать DWORD».

- Введите «1» в текстовое поле «Значение» и нажмите ОК .
- Закройте окно редактора реестра. (Вам нужно перезапустить Windows, чтобы изменения вступили в силу.)
- Нажмите кнопку «Пуск» и поверните колесо мыши вверх. Это прокрутит ползунок панели меню «Пуск» вниз. Прокрутите колесико мыши вниз, чтобы прокрутить меню вверх. Направление прокрутки колеса мыши теперь обратное!
- Чтобы вернуться к настройкам по умолчанию, выберите FlipFlopWheel DWORD в окне редактора реестра и введите «0» в поле «Значение».
Установите скрипт AutoHotkey
AutoHotkey – это программное обеспечение, с помощью которого пользователи могут устанавливать макропрограммы и с помощью которых можно изменять направление прокрутки. Это бесплатное программное обеспечение, которое вы можете добавить в Windows, нажав кнопку Загрузить на веб-сайте программы. Настройте сценарий обратной прокрутки следующим образом:
- Нажмите кнопку Cortana и введите «Блокнот» в поле поиска. Выберите, чтобы открыть Блокнот .
- Теперь вы можете ввести скрипт в Блокнот . Скопируйте (Ctrl + C) и вставьте (Ctrl + V) этот скрипт в Блокнот:
WheelUp ::
Отправить {WheelDown}
Возврат
WheelDown ::
Отправить {WheelDp}
Возврат

- Нажмите Файл > Сохранить как , чтобы открыть окно Сохранить как, и выберите Все файлы в раскрывающемся меню Тип файла как.
- Введите заголовок файла для скрипта и обязательно добавьте .ahk в его конец. Например, вы можете сохранить его как Scroll Direction Script.ahk.
- Выберите, чтобы сохранить сценарий на рабочем столе, и нажмите кнопку Сохранить . Это должно добавить иконку скрипта AutoHotkey на рабочий стол, как показано ниже.

- Закройте Блокнот и дважды щелкните ярлык сценария AutoHotkey на рабочем столе, чтобы запустить его.
- Нажмите кнопку «Пуск» и поверните колесико мыши вверх, чтобы прокрутить меню вниз.
- Чтобы закрыть сценарий, щелкните правой кнопкой мыши панель задач и выберите Диспетчер задач . Выберите AutoHotkey Unicode на вкладке “Процессы” и нажмите кнопку Завершить задачу .
Это два способа изменения направления прокрутки колесика мыши в Windows 10.Теперь ползунок полосы прокрутки будет двигаться вниз, когда вы поворачиваете колесико мыши вверх, и наоборот.
How-to Guide for Reverse Scrolling Windows 10 for any laptop touchpad and mouse.

If you are one of those like me, who does not like windows default touchpad & mouse scrolling direction i.e. when you scroll down it moves up and vice versa. the reason you are reading this post that you want to know how to Invert/reverse scrolling touchpad or mouse in windows 10? Then let’s go straight to the solution
![]()
Note: Reverse Scrolling option in touchpad settings, only available in devices with a precision touchpad.
We have explained the steps in detail with instructions and screenshots further in this post. We will advise you to read this complete post to understand the touchpad and mouse settings which may be helpful for you customize as per your need.
Reverse scrolling windows 10: Overview
Many windows 10 users want to Invert/reverse scrolling touchpad or mouse as they find it more natural in operation. In this post, we will cover how to reverse scrolling in windows 10 for touchpad and mouse as well. Making touchpad reverse scrolling is relatively easier than a mouse as to make mouse reverse scroll you need to change registry settings of windows.
In this post, we will cover all the touchpad & mouse settings and queries related to reverse scrolling windows 10 as mentioned below.
- How to reverse scrolling mouse
- No reverse scrolling option windows 10
- How to reverse scrolling touchpad
- Synaptics touchpad reverse scrolling windows 10
- No reverse scrolling option windows 10
- Change scroll direction windows 10, Windows 7
- windows 10 reverse scrolling direction not available
- reverse mouse scroll windows 10 registry
- Invert/reverse scrolling windows 10 Bootcamp
Reverse Scrolling Windows 10: For Touchpad
As we mentioned earlier that reverse scrolling for the touchpad is an easy task. You just need to change the touchpad settings to get it done but your device or laptop should have a precision touchpad. This option is only available with a precision touchpad. Otherwise, you may invert scrolling through your device manufacturer software. To reverse scrolling your touchpad, follow the steps below.
- Type Touchpad settings in the search box on the taskbar.
- Open touchpad settings
- Under touchpad settings, look for scroll & zoom section
- Under scroll & zoom, you will find scrolling direction
- You need to select “Down motion scrolls down”
Now you can check. Your touchpad scrolling direction has been changed.
Reverse Scrolling Windows 10: For Mouse
Reverse scrolling your mouse is not as easy as a touchpad because you do not get a reverse scrolling option in Windows 10 settings for the mouse. Still, we can do it but it needs more technical steps. We will have to modify the registry. If you have not done anything like this then it could be a little tricky as it is for advanced users.
Caution:-Modify or edit the registry of the Windows system can lead to system failure if you do not do it properly as guided here. It is advisable to create a restore point or complete system backup before making changes.
To continue further the first step is to obtain Device instance path of the mouse. Every USB device has a unique ID in the windows to identify it easily. This unique ID we can obtain from the device instance path. To get the ID, let’s find the Device instance path. Follow the step below.
- Right Click on Windows Start and select Device Manager.

- Under Device Manager, Double click on Mice and other pointing devices.

- Right Click on the mouse you are using and click on properties.
- Under properties, Click on details Tab.

- Select the Device instance path from the drop-down menu.
- Now note Down the VID Value.


Now we have your mouse VID now we can go further. Follow the steps below. To edit the registry.
- Press Windows Key + R.

- Run Box will open.
- Type regedit and hit ok to open registry editor.

- Now doble click on HKEY_LOCAL_MACHINE > SYSTEM > CurrentControlSet > Enum > HID.
- Find your noted VID.
- Double click on it and expand the available key.
- Click on the Device parameter.
- On the right-side window find “FlipFlopWheel” and double click on it.

- Now Change your value data from 0 to 1.

- Restart your system.


When your system will be restarted, you will find that your mouse scroll direction has reversed. If you wish to revert this change back to default, you have to follow the same process and changed the value data from 1 to 0
frequently asked questions (FAQs)
No reverse scrolling option in windows 10
If your device or laptop has not precision touchpad then you will not get reverse scrolling option, although you can do it through manufacturer software if available.
If you are using a mouse and looking for a scrolling option then also you will not find it as it is not available as default. But you can reverse scrolling your mouse as we explained above.
Synaptics touchpad reverse scrolling windows 10
If your system has Synaptics touchpad and you want reverse scrolling then you can follow the steps as mentioned above but as explained earlier your touchpad should be the precision touchpad.
Change scroll direction windows 7
As we have used all the screenshot in this post is of Windows 10 but you can use these steps for Windows 7 as well. You can change the Scroll direction in windows 7 as explained above.
How to reverse scrolling windows 10 when using Bootcamp
If you are a mac user and using Windows 10 through Boot Camp then also you can use this guide and follow the steps to reverse scrolling your touchpad or mouse.
How to reverse mouse scroll windows 10 through the registry
If you want to reverse your mouse scroll in windows 10 there is 1way to do it is through windows registry only. we have explained the steps in detail above on how to change registry value.
Final Word: Conclusion
Hopefully, this post helps you to understand How to reverse scrolling windows 10? We have explained all information related to reverse scrolling for Touchpad and mouse and tried to explain all the steps in detail so that you can perform it easily. We have covered all the required & related information for reverse scrolling
Do let us know, how helpful was this post to solve your problem?