User interface
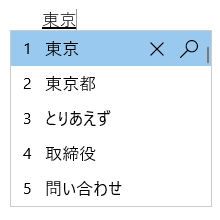
The Prediction candidate window offers typeahead candidates.
General operations
|
At this state |
Press this key |
To do this |
|---|---|---|
|
Before focus enters the candidate window |
Tab |
Enter the prediction candidate window. |
|
Shift + Tab |
Enter the prediction candidate window. |
|
|
Down arrow |
Enter the prediction candidate window. |
|
|
Up arrow |
Enter the prediction candidate window. |
|
|
With focus inside the candidate window |
Tab |
Move the selection down. |
|
Shift + Tab |
Move the selection up. |
|
|
Down arrow |
Move the selection down. |
|
|
Up arrow |
Move the selection up. |
|
|
Number |
Select the corresponding candidate. |
|
|
Enter |
Select the focused candidate. |
Other features
-
Suggested candidates can be customized under IME settings > General > Predictive Input.
-
Use input history
-
Use system dictionary
-
Use suggestion services (by turning this on, what you write will be encrypted and sent to Microsoft to get text suggestions from Bing.)
-
-
You can click the cross icon or press Ctrl + Delete to remove the selected candidate.
Note: Some candidates can’t be removed (e.g., dates).
-
You can click the magnifier icon or press Ctrl + B to search the selected candidate on the internet.
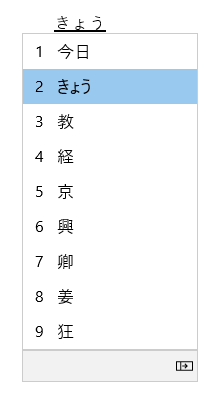
The Conversion candidate window offers candidates whose reading matches what you type.
General operations
|
At this state |
Press this key |
To do this |
|---|---|---|
|
Before focus enters the candidate window |
Space |
1st press: Convert what you type. 2nd press: Open the conversion candidate window. |
|
Shift + Space |
1st press: Convert what you type. 2nd press: Open the conversion candidate window. |
|
|
With focus inside the candidate window |
Space |
Move the selection down. |
|
Shift + Space |
Move the selection up (Microsoft IME template) / down (ATOK template). |
|
|
Down arrow |
Move the selection down (Microsoft IME template) / Select the focused candidate. (ATOK template) |
|
|
Up arrow |
Move the selection up. |
|
|
Tab |
Expand to table view. |
|
|
Number |
Select the corresponding candidate. |
|
|
Enter |
Select the focused candidate. |
Other features
-
IME can improve input accuracy based on what you type. This can be turned off / on with the Improve input accuracy based on what I type on this PC setting in IME settings > Learning and Dictionary.
-
You can manually add a new word to the IME dictionary from below.
-
Open the user dictionary tool in IME settings > Learning and Dictionary.
-
Add Word in the context menu (right-click menu) of the IME mode icon in the notification area.
-
-
You can turn on / off system dictionaries at System dictionaries in IME settings > Learning and Dictionary.
Keyboard shortcuts
IME offers keys or combinations of keys to use IME functions.
|
Press this key |
To do this |
|---|---|
|
Hankaku/Zenkaku |
Turn on / off Japanese input. |
|
Eisu (Caps lock) |
Toggle between Hiragana and Alphanumeric mode. |
|
Hiragana |
Enter Hiragana mode. |
|
Alt + Hiragana |
Switch between Kana input and Romaji input. Prerequisite: Turn on the Switch Kana/Romaji input with Alt + Katakana Hiragana Romaji key setting in IME settings > General. |
|
Shift + Hiragana |
Enter Katakana mode. |
|
Convert |
Reconversion |
|
Ctrl + Convert |
Open IME context menu (right-click menu). |
|
NonConvert |
Toggle among Hiragana, Full-width Katakana, and Half-width Katakana. |
|
Shift + NonConvert |
Toggle between Half-width Alphanumeric and Full-width Alphanumeric mode. |
|
ImeOn (あ key) *1 |
Enter Hiragana mode. |
|
Alt + ImeOn (あ key) *1 |
Switch between Kana input and Romaji input. Prerequisite: Turn on the Switch Kana/Romaji input with Alt + Katakana Hiragana Romaji key setting in IME settings > General. |
|
Ctrl + ImeOn (あ key) *1 |
Reconversion |
|
Shift + ImeOn (あ key) *1 |
Enter Full-width Katakana mode. |
|
ImeOff (A key) *1 |
Enter Half-width Alphanumeric mode. |
|
Ctrl + ImeOff (A key) *1 |
Toggle among Hiragana, Full-width Katakana, and Half-width Katakana. |
|
Shift + ImeOff (A key) *1 |
Toggle among un-capitalized, all-capitalized, and first-character-capitalized full-width alphanumeric characters. |
*1: The ImeOn (あ) key and ImeOff (A) key are available on specific Japanese hardware keyboards. The ImeOn key and the ImeOff key work on the following operating systems.
-
Windows 10 Version 1903 (OS build 18362.1049 or later)
-
1909 (OS build 18363.1049 or later)
-
2004 (OS build 19041.388 or later)
-
Versions of Windows 10 later than 2004
-
Windows 11
For developers, please refer to Keyboard Japan — ImeOn / ImeOff Implementation | Microsoft Docs for more details.
|
Press this key |
To do this |
|---|---|
|
Hankaku/Zenkaku |
Turn on / off Japanese input. |
|
Eisu (Caps lock) |
Toggle between Hiragana and Alphanumeric mode. |
|
Hiragana |
Toggle between Hiragana and Alphanumeric mode. |
|
Alt + Hiragana |
Toggle between Kana input and Romaji input. Prerequisite: Turn on the Switch Kana/Romaji input with Alt + Katakana Hiragana Romaji key setting in IME settings > General. |
|
Shift + Hiragana |
Enter Katakana mode. |
|
Convert |
Turn on / off Japanese input. |
|
Shift + Convert |
Reconversion |
|
NonConvert |
Toggle between Hiragana and Half-width Alphanumeric mode. |
|
Ctrl + NonConvert |
Toggle among Hiragana, Full-width Katakana, and Half-width Katakana. |
|
Shift + NonConvert |
Toggle between Hiragana, Full-width Alphanumeric, and Half-width Alphanumeric mode. |
|
ImeOn (あ key) *1 |
Enter Hiragana mode. |
|
Alt + ImeOn (あ key) *1 |
Switch between Kana input and Romaji input. Prerequisite: Turn on the Switch Kana/Romaji input with Alt + Katakana Hiragana Romaji key setting in IME settings > General. |
|
Ctrl + ImeOn (あ key) *1 |
Reconversion |
|
Shift + ImeOn (あ key) *1 |
Enter Full-width Katakana mode. |
|
ImeOff (A key) *1 |
Enter Half-width Alphanumeric mode. |
|
Ctrl + ImeOff (A key) *1 |
Toggle among Hiragana, Full-width Katakana, and Half-width Katakana. |
|
Shift + ImeOff (A key) *1 |
Toggle among un-capitalized, all-capitalized, and first-character-capitalized full-width alphanumeric characters. |
*1: The ImeOn (あ) key and the ImeOff (A) key are available on specific Japanese hardware keyboards. The ImeOn key and the ImeOff key work on the following operating systems.
-
Windows 10 Version 1903 (OS build 18362.1049 or later)
-
1909 (OS build 18363.1049 or later)
-
2004 (OS build 19041.388 or later)
-
Versions of Windows 10 later than 2004
-
Windows 11
For developers, please refer to Keyboard Japan — ImeOn / ImeOff Implementation | Microsoft Docs for more details.
|
Press this key |
To do this |
|---|---|
|
Ctrl + Delete |
Remove the selected candidate from the prediction candidate window. |
|
Ctrl + B |
Search the selected candidate in the prediction candidate window. |
|
Tab |
Expand / collapse the table view in the conversion candidate window. |
|
Windows logo key + period (.) |
Open Emoji picker. |
|
Ctrl + Shift + F10 |
Turn on / off IME private mode. |
|
F6 |
Convert input string to Hiragana. |
|
F7 |
Convert input string to Full-width Katakana. |
|
F8 |
Convert input string to Half-width Katakana. |
|
F9 |
Convert input string to Full-width Alphanumeric. |
|
F10 |
Convert input string to Half-width Alphanumeric. |
|
Press this key |
To do this |
|---|---|
|
Alt + Backquote (`) |
Turn on / off Japanese input. |
|
Ctrl + Caps lock |
Equivalent to Hiragana key on a Japanese keyboard (106/109 key). |
|
Alt + Caps lock |
Equivalent to Shift + Hiragana key on a Japanese keyboard (106/109 key). |
|
Shift + Caps lock |
Equivalent to Eisu key on a Japanese keyboard (106/109 key). |
|
Press this key |
To do this |
|---|---|
|
Ctrl + Delete |
Remove the selected candidate from the prediction candidate window. |
|
Ctrl + B |
Search the selected candidate in the prediction candidate window. |
|
Tab |
Expand / collapse the table view in the conversion candidate window. |
|
Windows logo key + period (.) |
Open Emoji picker. |
|
Ctrl + Shift + F10 |
Turn on / off IME private mode. |
|
F6 |
Convert input string to Hiragana. |
|
F7 |
Convert input string to Full-width Katakana. |
|
F8 |
Convert input string to Half-width Katakana. |
|
F9 |
Convert input string to Full-width Alphanumeric. |
|
F10 |
Convert input string to Half-width Alphanumeric. |
IME settings
Find IME settings in Windows 11
-
Select Start , then select Settings > Time & language > Language & region.
-
In the Japanese row, select > Language options.
-
In the Microsoft IME. row, select > Keyboard options.
Note: You can also search “Japanese IME settings” in the Search on the taskbar.
Find IME settings in Windows 10
-
Select Start , then select Settings > Time & language > Language.
-
Scroll down and select Japanese > Options.
-
Scroll down and select Microsoft IME, then select Options.
Note: You can also search “Japanese IME settings” in the Search on the taskbar, or press Settings in the context menu (right-click menu) of the IME mode icon in the notification area.
Key customization
With IME, you can change a specific key function in IME settings > Key and touch customization.
-
Key template: Key template is a set of key configurations. For Windows 11 and Windows 10 as of the October 2020 Update, IME offers the following templates. See keyboard shortcuts for more details.
-
Microsoft IME
-
ATOK
-
-
Key assignment: If you want to customize a specific key function within the selected template, you can customize several keys at Key assignment.
How can I give feedback?
If you encounter any problems or have suggestions regarding Microsoft IME, please give us feedback through the Feedback Hub. You can open the Feedback Hub from Send feedback in the context menu (right-click menu) of the IME mode icon in the notification area or click here. Your feedback goes directly to our engineers working to improve IME. For more on steps for providing feedback, please refer to Send feedback with the feedback hub app.
Compatibility
Microsoft Japanese IME was renewed as of Windows 10 October 2020 Update (Version 2004) and is also available with Windows 11. IME supports a compatibility setting in IME settings > General. If you encounter issues with the new IME, you can enable the previous version of IME by turning on Use previous version of Microsoft IME. We’ll continue to improve the new IME, so please consider filing feedback to help us deliver a great input experience to you.
Need more help?
Want more options?
Explore subscription benefits, browse training courses, learn how to secure your device, and more.
Communities help you ask and answer questions, give feedback, and hear from experts with rich knowledge.
Find solutions to common problems or get help from a support agent.
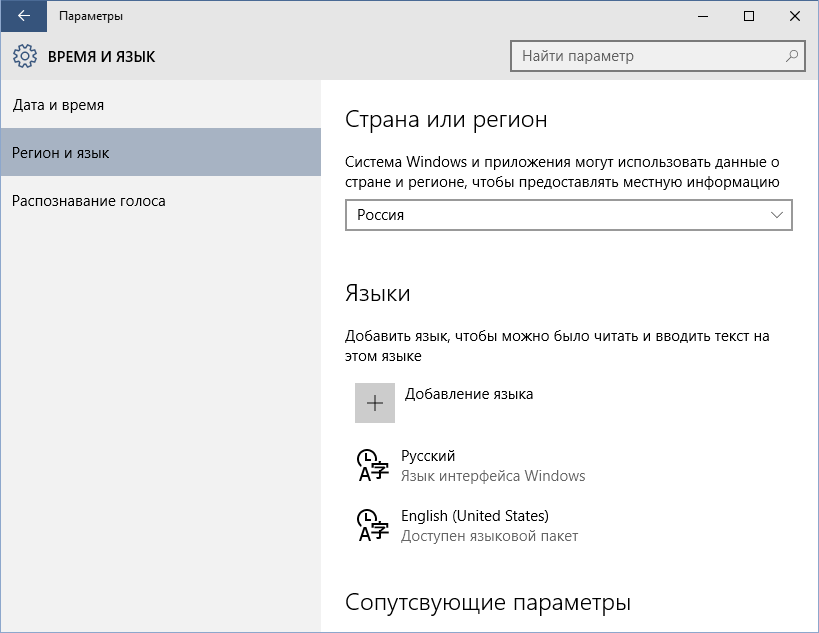
Многие пользователи должны использовать иностранный язык на своем компьютере. Если вы один из тех, кто хочет установить японскую клавиатуру в Windows 10 , вот наше руководство. Процесс прост и не требует установки через внешние источники. После установки вы сможете переключаться между родным, языком и японской клавиатурой.
Содержание
- Установите японскую клавиатуру на Windows 10
- Как печатать на японском с использованием английской клавиатуры
- Как использовать японскую физическую клавиатуру в Windows
Установите японскую клавиатуру на Windows 10
Есть три способа сделать это:
- Установите японскую клавиатуру, используя время и язык
- Печатайте на японском языке, используя родную клавиатуру
- Используйте физическую японскую клавиатуру в Windows 10
Возможно, у вас есть английская или родная клавиатура. Если вы планируете использовать это с японской клавиатурой на вашем компьютере, убедитесь, что вы знаете, как правильно ее использовать. Следуйте инструкциям по установке японской клавиатуры Windows 10.

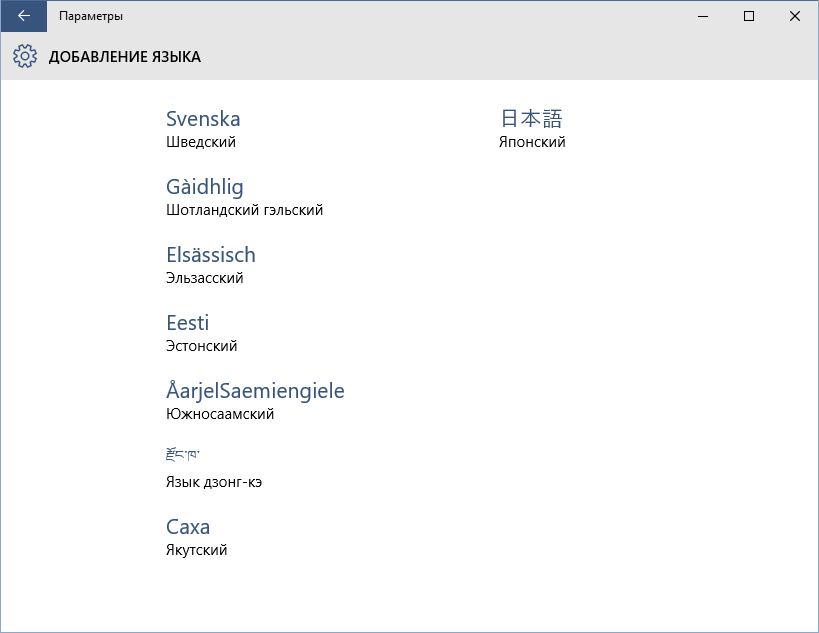
- Откройте Настройки> Язык> Добавить язык
- Во всплывающем окне введите «Японский», и появится список с клавиатурой.
- Выберите его и нажмите «Далее». Будьте осторожны с опциями в следующих окнах.
-
В окне Установить язык и функции
- Снимите флажок с опции «Установить языковой пакет и установить мой дисплей Windows».
- Если вы планируете использовать голос и почерк для японской работы, обязательно оставьте выбранные параметры.
- Нажмите на кнопку установки.
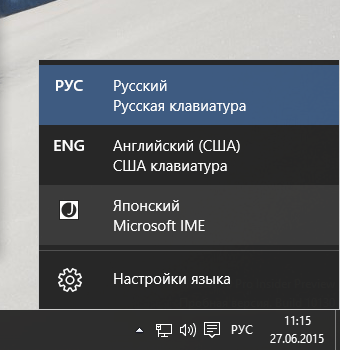
Опубликовать это; он загрузит пакеты и установит их. В опциях у вас будет возможность скачать и установить языковые пакеты, но мы этого не делаем. Если вы это сделаете, он изменит общесистемный язык на японский. Наконец, если вы щелкнете по значку языка на панели задач или используете кнопку Windows + пробел, вы можете переключаться между клавиатурами.
Как печатать на японском с использованием английской клавиатуры

Microsoft предлагает « Microsoft IME », который позволяет печатать на японском языке. Когда вы щелкнете по языку на панели задач и выберете японский, вы также должны увидеть алфавит А. Это означает, что вы все еще печатаете на английском. Нажмите на него, и он изменится на японский.

Щелкните правой кнопкой мыши на значке, и вы можете изменить клавиатуру на разные варианты. Вы можете выбрать между катакана или хирагана , что подходит лучше всего. Это японская слоговая программа для тех, кто не знает. Инструмент ввода также предлагает панель IME . На этом вы можете нарисовать символы, которые вы помните, и он узнает это для вас.
Напишите, что где бы вы ни печатали на клавиатуре, он будет предсказывать и печатать на японском шрифте. Если вы переключитесь на что-либо еще, кроме текста, оно изменит язык обратно на английский. Чтобы настроить IME, выберите «Настройки»> «Время и язык»> «Выбрать японский язык»> «Параметры»> « Microsoft IME >».
Параметры позволяют добавлять слова, настраивать сенсорную клавиатуру, включать предложения по облачным вычислениям и т. Д. Если вы настраиваете это на сенсорной клавиатуре , рекомендуется настроить способ ввода с клавиатуры Kana 10 . Обычно используемый на смартфонах, этот метод позволяет пользователям проводить пальцем от клавиши в определенном направлении, чтобы получить желаемый символ.

Вы можете выбрать между Flik и Ввод с несколькими касаниями или Ввод Flick . Они помогут вам печатать быстрее. Также обязательно отключите ввод кана. Когда он включен, буквы отображаются как отдельные буквы, и будет сложно набирать длинные предложения.
Как использовать японскую физическую клавиатуру в Windows

Если у вас есть японская физическая клавиатура, вы можете подключить ее к существующей установке Windows. Выберите «Настройки»> «Время и язык»> «Выбрать японский язык»> «Параметры»> «Изменить раскладку клавиатуры».
В моем случае у вас будет возможность переключаться между японским (106/109 клавиш) и английским (101/12 клавиш). Если вы уверены в своем выборе, нажмите кнопку перезагрузки, чтобы клавиатура была распознана системой.
Тем не менее, есть несколько комбинаций, чтобы понять, как именно вы хотите печатать на японском языке.
В этом посте было показано, как установить язык и использовать его либо с реальной японской клавиатурой, либо с помощью родной клавиатуры для ввода текста на японском языке. Дайте нам знать, если это помогло.
Many users need to use a foreign language on their computer. If you are one of those, who want to install the Japanese keyboard on Windows 11/10, here is our guide. The process is straightforward, and there is no need to install through external sources. Once installed you will be able to switch between your native, language and the Japanese keyboard.
Windows has always been an easy-to-use OS, hence to install a Japanese Keyboard on Windows 11, you don’t have to be a technical expert. You will be able to write Japanese from your computer with the help of this article.
Windows 11に日本語キーボードをインストールする方法
To install Japanese Keyboard on Windows 11, follow the given steps.
- Open Settings from the Start Menu.
- Click Type & language > Language & region and then Add a language from Prefered languages.
- Now, type “Japanese” in the Search Bar.
- Select the Japanese Keyboard and click Next.
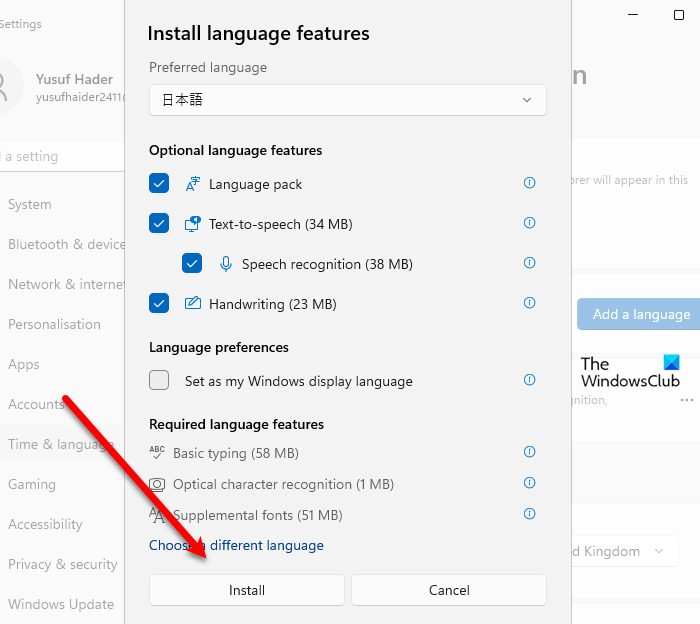
- Then you will be greeted with an Install language and features window.
- Now, untick the Install language pack and set as my Windows display language (you can enable it, but since we are just installing the keyboard, we are not doing that).
- Finally, click Install and wait for a few minutes for the process to complete.
Change Keyboard Layout in Windows 11
If you have an English keyboard, then it is recommended to change the Keyboard Layout.
- So, open Settings.
- Click Time and Language > Language and Region.
- Go to the language that you want to change the layout of, click on the three horizontal dots, select Language options.
- Now, click Add a keyboard from the Keyboard section.
- Finally, you can select the one you want to use.
How to enable Japanese On-screen Keyboard in Windows 11
If you want to have a touch keyboard to write in Japanese, you can do that in Windows 11.
- Open Settings by Win + I.
- Go to Time & Language and then Language and region.
- Go to Region Format settings.
- Search and choose Japanese from there.
Install Japanese Keyboard on Windows 10
there are three ways you can do this:
- Install Japanese Keyboard using Time and Language
- Type in Japanese using native Keyboard
- Use Physical Japanese Keyboard in Windows 10
It is possible that you have an English or a native keyboard. If you are planning to use this with Japanese keyboard on your computer, make sure you know how to use it properly. Follow the steps to install Windows 10 Japanese keyboard.

- Open Settings > Language > Add a Language
- In the popup window, type Japanese and the keyboard listing will show up.
- Select it, and click Next. Be careful of the options in the next windows.
- In the Install language and features window
- Uncheck the option which says “Install Language Pack and set as my Windows Display.”
- If you plan to use Voice and handwriting for Japanese work, make sure to keep the options selected.
- Click on the install button.
Post this; it will download the packages, and install it. In the options, you will have the opportunity to download and install language packs, but we are not doing it. If you do, it will change the system-wide language to Japanese. Lastly, if you click on the language icon on the system tray, or use the Windows button + spacebar, you can switch between keyboards.
How to Type in Japanese using English Keyboard

Microsoft offers “Microsoft IME” which allows you to type in Japanese. When you click on the language option on the system tray and select Japanese, you should see the alphabet A as well. It means you are still typing in English. Click on it, and it will change to Japanese.

Right-click on the icon, and you can change the keyboard to different variants. You can choose between Katakana or Hiragana to what fits best. These are Japanese syllabi for those who don’t know. The input tool also offers IME pad. On this, you can draw characters you remember, and it will recognize them for you.
Post that anywhere you type on the keyboard, it will predict and type in Japanese font. If you switch to anything else which is not text, it will change the language back to English. To configure IME, you can go to Settings > Time and Language > Select the Japanese language > Options > Microsoft IME > Options.
The options allow you to add words, configure touch keyboard, turn on cloud suggestions and so on. If you are configuring this on a touch keyboard, it’s a good idea to configure Kana 10 key input method. Usually used on smartphones, this method allows users to swipe from the key in a certain direction to produce the desired character.

You can choose between Flik and Multi-tap input or Flick input. They will help you type faster. Also, make sure to turn off Kana input. When its toggled on, the letters show as an individual letter, and it will be difficult to type long sentences.
How to use Japanese Physical Keyboard in Windows

If you have a Japanese physical keyboard, you can connect it to existing Windows Installation. Go to Settings > Time and Language > Select the Japanese language > Options > Change hardware keyboard layout.
You will have the option to switch between Japanese (106/109 keys) and English (101/12 keys) in my case. Once you are sure of your selection, click on the restart button for the keyboard to be recognized by the system.
That said, there are multiple combinations to get how you exactly want to type in Japanese.
This post showed you how to install the language and use it either with an actual Japanese keyboard or use your native keyboard to type in Japanese. Let us know if it helped.
Also read: How to type in Korean in Windows?
Время чтения: 2 мин.
См. также: Windows Vista/7, Windows 8
Настроить Windows 10 так, что бы можно было печатать на японском, крайне просто.
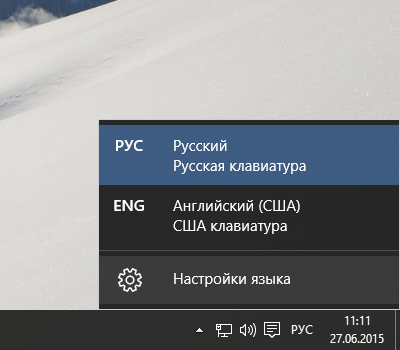
- В панели задач щелкаем левой кнопкой мыши по языковой панели (индикатор текущей раскладки клавиатуры) и выбираем «Настройки языка».

- В открывшемся окне нажимаем «Добавление языка».
- Находим в списке языков японский и щелкаем на него.
- Японский язык должен появиться в списке. Закройте окно.
-
Теперь вы можете переключаться на японскую раскладку как обычно переключаетесь между английской и русской раскладками, используя клавишу Windows+Пробел. Не удивляйтесь: по умолчанию в японской раскладке вводятся те же латинские буквы. Переключение на ввод каны и обратно происходит по нажатию на Alt+~ (тильда).
Японская клавиатура может быть очень полезной для тех, кто работает с японским языком или интересуется японской культурой. Но как настроить японскую клавиатуру в операционной системе Windows 10? В этой пошаговой инструкции мы расскажем о том, как активировать и настроить японскую клавиатуру на вашем компьютере.
Первым шагом является открытие «Настроек» Windows. Для этого нажмите правой кнопкой мыши на значок «Пуск» в левом нижнем углу экрана и выберите «Настройки».
В окне «Настройки» найдите раздел «Время и язык» и щелкните на нем. Затем выберите «Язык» в левой части окна и найдите раздел «Предпочитаемые языки» в правой части окна.
Далее нажмите кнопку «Добавить язык» и найдите «Японский» в списке языков. Выберите его и нажмите «Далее». Теперь вы можете выбрать японскую клавиатуру для использования на вашем компьютере.
Чтобы настроить японскую клавиатуру, нажмите на японский язык в списке «Предпочитаемые языки» и выберите «Параметры». В открывшемся окне выберите «Добавить метод ввода» и найдите «Японский» в списке методов ввода.
Теперь вы можете писать на японском языке, используя японскую клавиатуру в Windows 10. Просто переключайтесь между японским и вашим основным языком, нажимая комбинацию клавиш «Alt + Shift». Удачи в изучении японского и наслаждайтесь использованием японской клавиатуры!
Содержание
- Открыть “Параметры” Windows
- Найти раздел «Время и язык» и выбрать его
- Откройте «Регион и язык» в левой панели и выберите язык по умолчанию
- Добавить японскую раскладку клавиатуры
- Настроить японскую раскладку клавиатуры по своему усмотрению
Открыть “Параметры” Windows
Для начала процесса настройки японской клавиатуры в Windows 10 вам понадобится открыть “Параметры” Windows. Следуйте этим шагам:
- Нажмите на кнопку “Пуск” в левом нижнем углу экрана или нажмите клавишу с логотипом Windows на клавиатуре.
- В открывшемся меню “Пуск” найдите и выберите иконку “Настройки”. Она обозначена значком шестеренки.
- После открытия окна “Настройки” выберите пункт “Система”.
- В левой части окна “Настройки” выберите вкладку “Клавиатура”.
После выполнения этих шагов вы будете находиться в разделе “Клавиатура” в окне “Настройки” Windows 10. Теперь вы готовы продолжить процесс настройки японской клавиатуры.
Найти раздел «Время и язык» и выбрать его
Для настройки японской клавиатуры в Windows 10 необходимо найти соответствующий раздел в настройках операционной системы. Чтобы это сделать, следуйте следующим инструкциям:
1. Кликните на кнопку «Пуск» в левом нижнем углу экрана или нажмите клавишу Win.
2. В открывшемся меню найдите и кликните на значок «Настройки» (значок шестеренки).
3. В открывшемся окне «Настройки» выберите раздел «Время и язык».
4. В левой панели выберите вкладку «Регион и язык».
5. В разделе «Предпочитаемые языки» кликните на кнопку «Добавить язык».
6. В списке доступных языков найдите японский язык и кликните на него, чтобы выделить его.
7. После выделения японского языка нажмите кнопку «Далее».
8. В открывшемся окне выберите вариант «Установить японский языковой пакет».
9. Кликните на кнопку «Скачать» и дождитесь завершения загрузки пакета.
10. После завершения загрузки японского языкового пакета, он будет автоматически установлен на ваш компьютер.
Теперь вы успешно настроили японскую клавиатуру в Windows 10 и можете использовать ее для ввода текста на японском языке.
Откройте «Регион и язык» в левой панели и выберите язык по умолчанию
1. Щелкните на кнопке «Пуск» в левом нижнем углу экрана Windows 10 и выберите «Настройки».
2. В открывшемся окне «Настройки» выберите пункт «Время и язык».
3. В левой панели окна «Время и язык» найдите и щелкните на пункте «Регион и язык».
4. В разделе «Предпочтительные языки» нажмите на кнопку «Добавить язык».
5. В открывшемся окне выберите японский язык и нажмите кнопку «Добавить».
6. Прокрутите вниз до раздела «Язык по умолчанию» и выберите японский язык из списка.
Примечание: Если японский язык не отображается в списке доступных языков, вам может потребоваться скачать и установить языковой пакет для японского языка.
7. После выбора японского языка по умолчанию нажмите кнопку «Перезагрузить сейчас», чтобы изменения вступили в силу.
Теперь вы успешно настроили японскую клавиатуру в Windows 10 и можете использовать ее для ввода японских символов и знаков.
Добавить японскую раскладку клавиатуры
Чтобы добавить японскую раскладку клавиатуры в Windows 10, следуйте этим шагам:
- Откройте «Панель управления» из меню «Пуск».
- Выберите раздел «Язык и регион».
- В разделе «Предпочтительные языки» нажмите на «Изменение языка ввода».
- Нажмите на ссылку «Опции» рядом с языком, который вы уже используете (например, русский).
- В открывшемся окне выберите «Добавить язык» и найдите японский язык в списке.
- Выберите «Японский» и нажмите «Добавить».
- В меню «Язык и регион» выберите язык «Японский» в качестве предпочтительного языка ввода.
- Нажмите «Применить» и закройте все окна.
Теперь японская раскладка клавиатуры будет доступна на вашем компьютере под языком «Японский». Чтобы переключиться между японской и другими раскладками клавиатуры, используйте сочетание клавиш Alt + Shift.
Настроить японскую раскладку клавиатуры по своему усмотрению
Windows 10 предлагает широкие возможности для настройки японской раскладки клавиатуры, позволяя адаптировать ее под свои предпочтения и потребности. Вот несколько важных шагов, которые помогут вам настроить японскую клавиатуру так, как вам удобно.
1. Откройте «Параметры» Windows 10, нажав на значок «Пуск» в левом нижнем углу экрана и выбрав пункт «Параметры».
2. В «Параметрах» выберите пункт «Время и язык».
3. В разделе «Язык» выберите «Язык и регион» и затем нажмите на кнопку «Добавить язык».
4. На странице выбора языка найдите и выберите японский язык. Затем нажмите на кнопку «Далее».
5. После выбора японского языка, вернитесь в раздел «Язык» и найдите японский язык в списке языков. Нажмите на него правой кнопкой мыши и выберите «Настройка».
6. В разделе «Параметры» японского языка выберите вкладку «Клавиатура» и нажмите на кнопку «Изменить клавиатуру».
7. В появившемся окне «Добавить язык добавьте японскую раскладку клавиатуры, которую вы хотите использовать. Вы можете выбрать раскладку «Кана», «Ромадзи» или «Скрытая».
8. После выбора нужной раскладки, нажмите на кнопку «ОК» и закройте окно «Добавить язык».
9. Теперь вы можете изменить японскую клавиатуру по своему усмотрению. Нажмите на кнопку «Параметры» японской клавиатуры и ознакомьтесь с доступными настройками.
Примечание: Если вы хотите использовать какую-то особую раскладку, вы можете найти ее на сторонних сайтах и установить ее согласно инструкциям, предоставленным на сайте.
Настройка японской раскладки клавиатуры по своему усмотрению позволит вам работать более эффективно и удобно на японском языке. Следуйте этой пошаговой инструкции и настройте японскую клавиатуру так, как вам удобно!