Довольно странно читать, как на вопрос про «ставить Линукс» отвечают примерно «а нафига тебе, ставь через виртуалку».
1. Линукс стоит на основном рабочем лаптопе уже 4 года. В заводскую Винду перезагружаюсь в среднем раз в месяц, чтоб открыть какой-нибудь cad-овский файл. Дистрибутив — Arch, обновляет пакеты постоянно, работает как хорошие часики. Иногда подключаю док-станцию и второй монитор. Нет, не ломался ни разу, драйверы в ручную не ковырял.
2. Не пользуюсь Грабом давно, просто потому что смысла нет. Записываю загрузчик или напрямую через efibootmgr, или же создаю отдельный загрузчик через bootctl (systemd-boot) и записываю там элементы загрузки. Основное отличие — меню выбора никогда не всплывает (все доступные ОС не высвечиваются), загружается всегда запись №1 из UEFI, очередность можно менять там же. Выбрать одноразово можно при загрузке через специальное меню UEFI, которая всплыват по нажатию одной из F кнопок (зависит от производителья МП) примерно в том же промежутке загрузки, когда еще можно открыть основное меню UEFI/BIOS.
When the Linux distribution is installed on the computer along with the Windows, the Grub bootloader is set as the default for booting the operating system on the computer. It allows you to select the operating system which you want to boot on the computer in the first 30 seconds else it will boot the default set operating system.
To add Linux to the bootloader of Windows, we can follow two approaches discussed in this blog.
- Using the EasyBCD
- Changing the Boot Priority Order in UEFI Menu
Let’s get into the first method.
Method 1: How to Add Linux to Windows 10 Bootloader Using EasyBCD?
EasyBCD is the software that can be installed on Windows 7, Windows 8, Windows 10, and Windows 11 to manage the computer’s bootloader. The EasyBCD comes in two different variants:
- Non-Commercial: limited features, and can be downloaded on the computer without paying a single penny.
- Commercial: Advanced features and charges us $ 39 (at the time of writing this blog).
You can easily download the version of the EasyBCD according to your convenience from the link mentioned. After downloading the “exe” file of the EasyBCD, you can run it to install the EasyBCD.
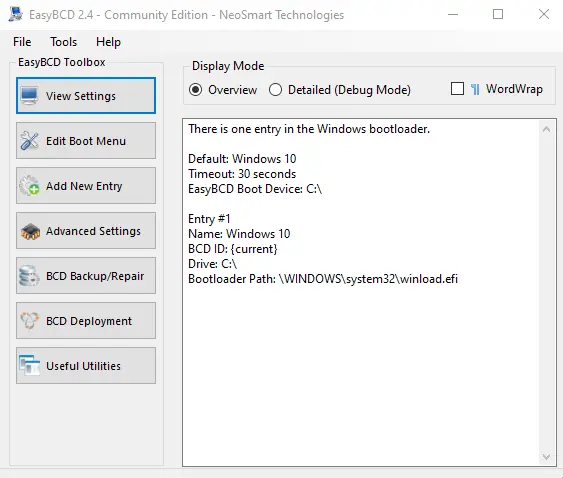
When EasyBCD is installed, launch the application. You will see the screen:
Now, to add Linux to Windows 10 Bootloader, you have to click the “Add New Entry” in the EasyBCD options:
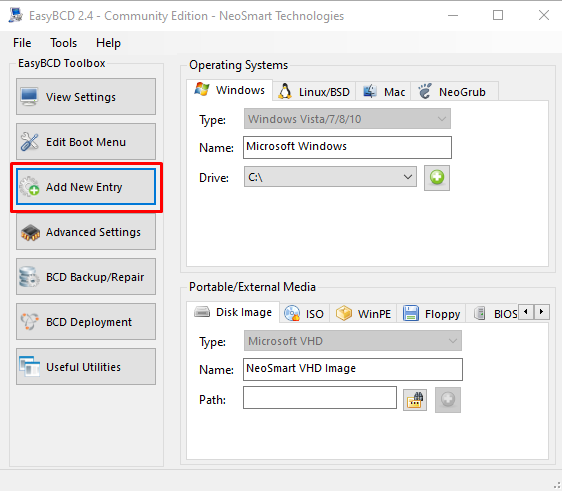
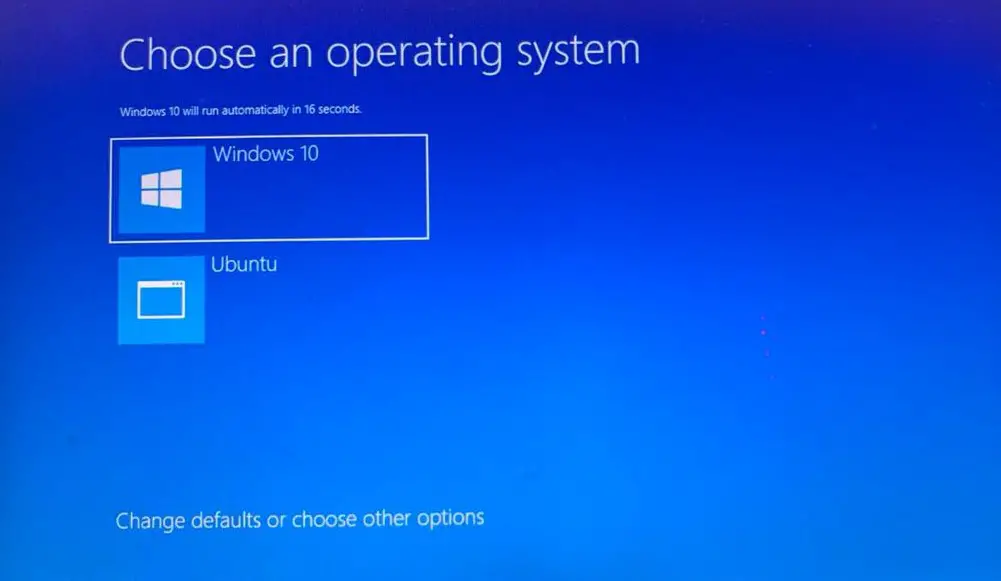
Under the “Operating System”, choose “Linux/BSD” and fill in all the details below. Then, in the “Portable/External Media”, choose the location where the Linux Distribution has been downloaded. And close the EasyBCD to save the settings and then restart the machine; the following interface will be displayed on the screen:
Note: These options will be available on the “Commercial” version of the EasyBCD.
How to Change the Boot Priority Order in UEFI Menu?
Another option to add Linux to Windows 10 bootloader is changing the priority order in the UEFI menu. Open the UEFI menu after restarting the computer and pressing the F2 key from the keyboard. The common keys to open the UEFI menu in different manufactured laptops are Esc, Delete, F1, F2, F10, F11, or F12. The following interface will appear on the screen:

Click on the “Advanced” option from the left menu of the screen and then click on the “Change Boot Order”:
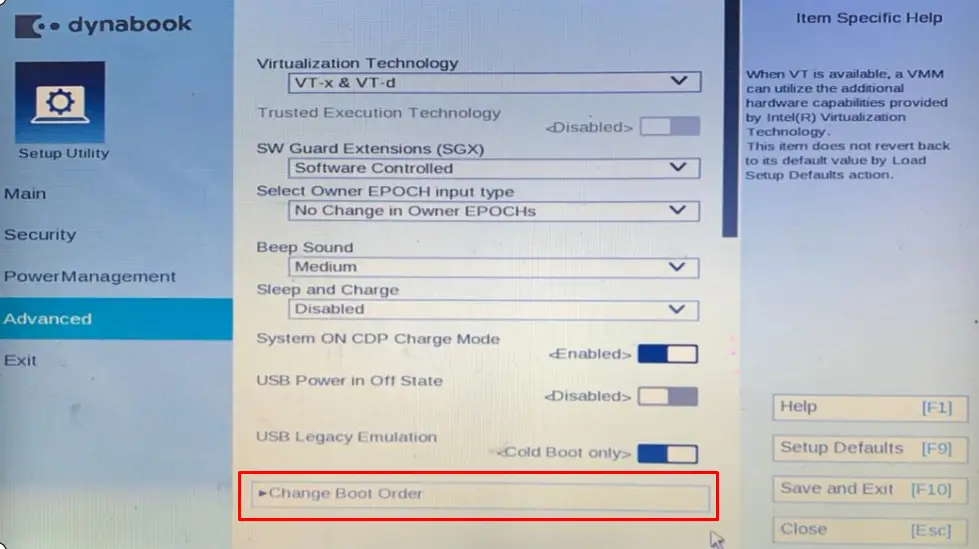
Then, set the boot priority order using the “Move Up” and “Move Down” options:
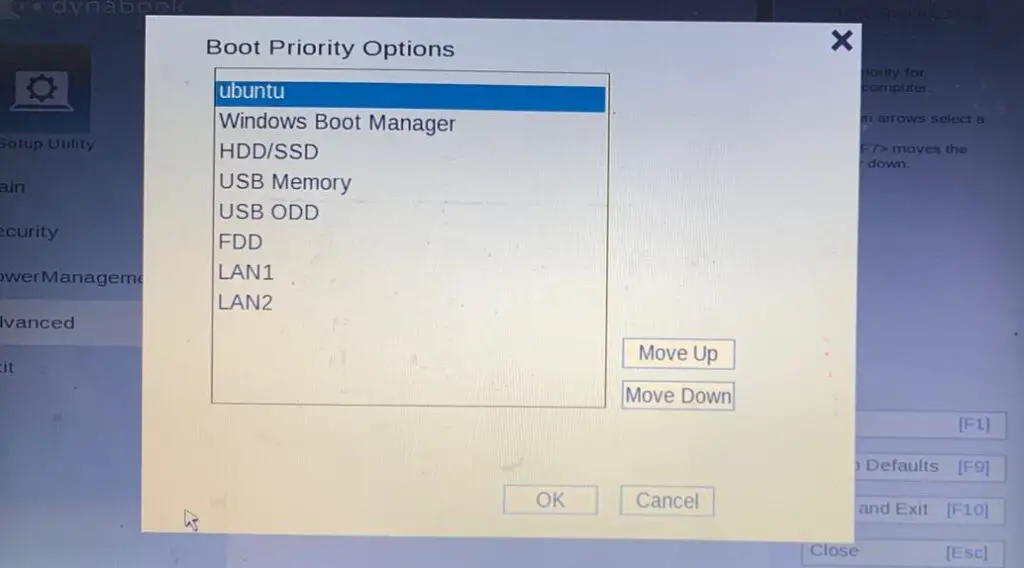
And then, click on the “OK” button to save the priority order and close the UEFI menu by saving the changes with the F10 key. Restart the computer, and Ubuntu will be booted by default.
That’s how Linux has been added to the Windows 10 bootloader.
Conclusion
To add Linux to Windows 10 Bootloader, install the “Commercial” version of the EasyBCD or change the boot priority order of the UEFI menu. In this blog, both the mentioned methods have been explained in detail. You should use the Grub bootloader on the dual boot as it is easy and reliable. Else you can also use the methods explained in this blog.
You can easily install Linux using a live disk. But unfortunately, i did not had a pendrive or cd drive when I really needed to install it. Also, softwares like Unetbootin were giving errors and it did not install. So, here is a complete guide to install Linux directly from hard-drive. I already had Windows 7 installed and I added Ubuntu 16.04 for dual boot.
Step 1:
First of all, you need to create atleast a 10 GB partition in your hard-drive. Follow this link to do so. Also give a label to the partition to make the things easier.
Then download two files from the Ubuntu Archive
Click here to know the names of all versions of Ubuntu. Decide your version to download and go to version-updates in the Ubuntu Archive.
For example, to download Ubuntu 16.04, go to xenial-updates in Ubuntu archive. Then go to main folder. Here you will get installer-amd64 (for 64-bit) and installer-i386 (for 32-bit). Select your architecture and then the rest of the path remains the same for both. ie-
/current/images/netboot/ubuntu-installer/amd64(or i386)/
Click on initrd.gz and linux (for 64-bit) or vmlinuz (for 32-bit) to download these files.
Create a new folder and name it boot in the newly created partition. Put these 2 files in the boot folder.
Step 2:
Install EasyBCD from Here. Click on Add new entry and in the Operating System, open NeoGrub tab and click on install.
Step 3:
Restart your computer and choose NeoGrub Bootloader from the available options. Simply write this commands one by one.
grub> root = (hd0,
[Press Tab to list all the volumes available on your primary hard disk. Write 1 instead of 0 if you created partition in second hard-disk]
grub> root = (hd0,n)
[Replace n with the number of the new partition.]
Then type these commands in order
kernel /boot/linux [Note: type vmlinuz instead of linux for 32-bit]
initrd /boot/initrd.gz
boot
Now it will take you to installer (Mouse won`t work. You need to control with keyboard).
Solutions for a few common errors
I faced a few problems while installing.Here is a list for you.
-
Mount Point — When you select your partition while installation, you need to format the partition as Ext4 journaling file system and select the Mount Point as
/
You won`t get such nice GUI but you will know what I mean to say -
SWAP Partition — It will ask you to create a swap partition for linux. Select No for now. You can create another patition for
linux-swaplater. -
Incomplete installation — Firstly, I had created only 6 GB partition for Ubuntu. So the installer crashed during the installation (it had already completed 64%) and then I needed to start from step 1. So, I recommend creating a pertition of atleast 15 GB.
-
Extra Softwares — During installation, it asked me whether I want to install extra softwares or not. It included Blender, GIMP, etc. Skip it for now. The installation of OS requires 5 GB, but installing these softwares were also one of the reasons why the installation crashed before.
-
GNOME Desktop — You want the nice looking Ubuntu UI, then you must include GNOME Desktop during installation of extra softwares. It will ask the type of desktop environment, gdm3 or lightdm. Choose anyone you want. But I recommend lightdm for computers with low RAM as it is faster than gdm3.
-
grub rescue — I formatted the partition where I installed Ubuntu 16.04 32-bit as I wanted to install 64-bit OS. Then on next boot, I got this error of grub rescue. It was not easy for me solve this problem because it now required an installation disk for repair but I didn`t had any. Follow this link to solve your problem.
Although I had given a very long explanation about installation process, I can guarantee that you will be using Ubuntu in just 3 hours if you get no extra errors.
Forum rules
Before you post read how to get help. Topics in this forum are automatically closed 6 months after creation.
-
druid
How do I add Linux Mint to a Windows Boot Loader?
Hi.
My laptop came with Windows 8 and all these UEFI things.
I installed Linux Mint. After installation Windows 8 was started. But it seems that Linux Mint installed grub and efi entries successfully. So now when I switch on a computer with pressed F2 key I can choose Windows or Ubuntu boot manager. But BIOS doesn’t allow to change the order. So if F2 is not pressed Windows boot manager will be loaded. I am ok with that. But I would like to add Linux Mint to a menu.
I read a few articles but I wasn’t able to achieve that.
I tried to add an entry as below:
Code: Select all
bcdedit /create /d "Linux Mint" /application bootsector
bcdedit /set {ID} device partition=\Device\HarddiskVolume2
bcdedit /set {ID} path /EFI/ubuntu/grubx64.efi
It didn’t work. Windows boot manager fails to load Linux Mint. Actually I think bootsector is a wrong application type. But what should I put instead?
I read that you can install grub to a Linux partition then create linux.bin with something like this dd if=/dev/sda3 of=/tmp/linux.bin bs=512 count=1 and copy it to C:\ and run bcdedit again. But I believe it shouldn’t be done because Linux Mint already installed grub to \Device\HarddiskVolume2. So the only thing I should do is just to find out how to properly call bcdedit.
Has anyone done it?
Last edited by LockBot on Wed Dec 28, 2022 7:16 am, edited 1 time in total.
Reason: Topic automatically closed 6 months after creation. New replies are no longer allowed.
-

Derek_S
- Level 6

- Posts: 1279
- Joined: Sat Dec 28, 2013 5:36 pm
- Location: Long Island, N.Y.


Re: How do I add Linux Mint to a Windows Boot Loader?
Post
by Derek_S »
Hello druid — I’m not familiar enough with every syntax of the bcdedit command to say whether the first two commands are valid or not. But I can definitely tell you that the last command is incorrect. It should look like this:
bcdedit /set {bootmgr} path EFI\ubuntu\grubx64.efi
Basically, you’re telling Windows «I want to use the Linux bootmanager grubx64.efi instead of the Windows bootmanager bootmgfw.efi and here is the path where you will find it». The next time you boot the system after entering this command, you will not have to press the F2 key to access the Windows bootloader options. Instead, you will see the grub boot menu appear and it should contain choices to boot either Linux Mint or Windows.
Just to be 100% certain on this, please be aware that this command is run from an elevated Command Prompt (right-click and «Run as Administrator») from the Windows operating system. Also note that in Windows, when you designate a path to a particular folder or file, you must use the backslash( \ ) and not the forward slash ( / ) as you did.
«When you rise in the morning, give thanks for the light, for your life, for your strength. Give thanks for your food and for the joy of living. If you see no reason to give thanks, the fault lies in yourself.» — Tecumseh
-
druid
Re: How do I add Linux Mint to a Windows Boot Loader?
Post
by druid »
Hi.
Thanks for response. I read about
Code: Select all
bcdedit /set {bootmgr} path EFI\ubuntu\grubx64.efi
As you said it would replace Windows Boot Manager. I will do if I don’t find a solution for my question. But I wanted to preserve Windows Boot Manager and just add Linux Mint as the second item to the Windows boot manager menu.
It seems to me that the problem is in /application type and in EFI\ubuntu\grubx64.efi file. This file is a boot manager and not a Linux Mint loader.
-
Lessss
- Level 2
- Posts: 94
- Joined: Thu Oct 03, 2013 3:11 pm

-
Derek_S
- Level 6
- Posts: 1279
- Joined: Sat Dec 28, 2013 5:36 pm
- Location: Long Island, N.Y.
Re: How do I add Linux Mint to a Windows Boot Loader?
Post
by Derek_S »
Hello druid — Now that I have a better understanding of exactly what you want to do, I apologize for what I suggested in my previous post. It would work, but it’s not what you actually wanted.
You really should watch the video that Lessss has posted. I think it’s exactly what you’re looking to do.
The link to the software mentioned in the video is here: https://neosmart.net/EasyBCD/
You can get the freeware version by clicking «Register» at the bottom of the page, but don’t let the word «Register» stop you. On the next page, you’ll find that you can download the program without registering.
«When you rise in the morning, give thanks for the light, for your life, for your strength. Give thanks for your food and for the joy of living. If you see no reason to give thanks, the fault lies in yourself.» — Tecumseh

You don’t have to have two different computers to use Linux and Windows 10. It’s possible to have a Linux distro installed on a computer with Windows 10 preinstalled.
In this article, I will show you how to dual boot Windows 10 and the popular Ubuntu Linux distro. But before that, you have to install Ubuntu on your Windows 10 PC.
Before you go through this process, you must backup your files. That’s because installing an OS is a risky process. Sometimes it can overwrite the existing OS and delete all your files.
N.B.: Most of the processes in this article take time to get done, so you need to be patient.
What We’ll Cover – A step-by-step Guide to Dual-Booting Windows 10 and Linux
- Prerequisites
- How to Partition your Hard Drive for Ubuntu
- How to Optimize your Hard Drive for More Partition Space (Optional)
- How to Download Ubuntu in ISO Image Format
- How to Make an Ubuntu (Linux) Bootable USB Drive
- How to Install Ubuntu Linux Distro along with Windows 10
- Now You Can Dual Boot Ubuntu and Windows 10
- Conclusion
Prerequisites
Most importantly, there are some things you must have in place if you want to use (and dual boot) Ubuntu and Windows 10 on the same PC:
- A computer preinstalled with Windows 10
- A partitioned hard drive
- A BIOS in UEFI mode (Unified Extensible Firmware Interface)
- An empty USB drive of at least 4Gig for creating a bootable disk
- An internet connection to download Ubuntu ISO image (the Linux distro) and Rufus (a bootable drive creation tool)
How to Check If Your PC BIOS is in UEFI Mode
To check if your PC BIOS comes in UEFI mode, search for “system information” and hit ENTER.
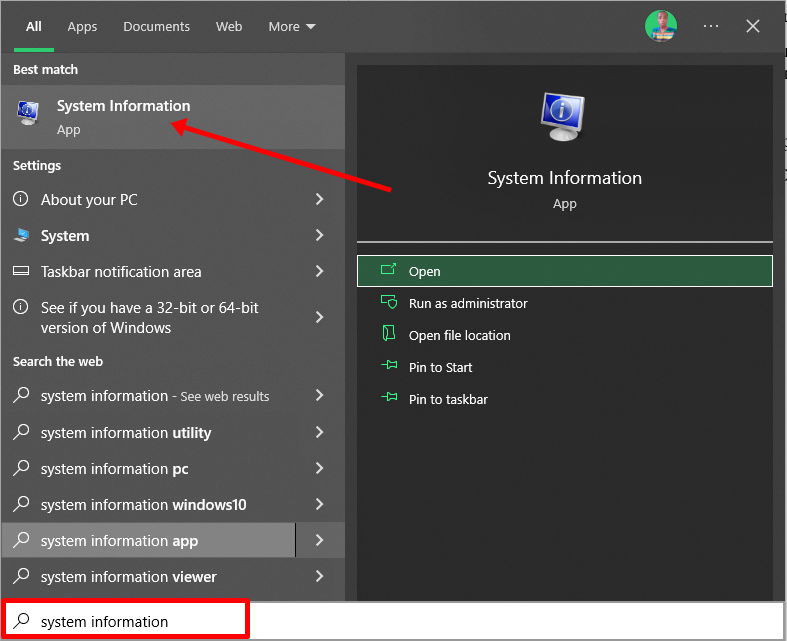
Look under BIOS mode to confirm that your PC BIOS mode comes as UEFI.
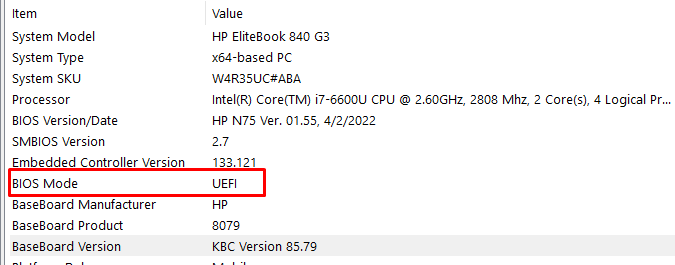
If your PC BIOS is not in UEFI mode, the two operating systems won’t see each other. You can learn more about the difference between these two modes here.
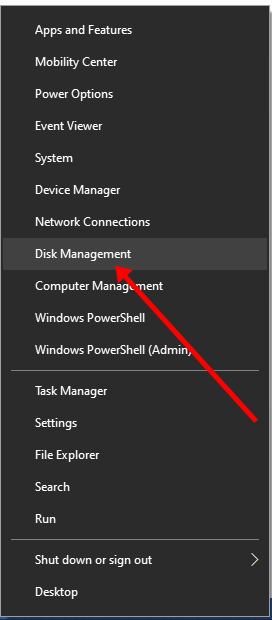
How to Partition your Hard Drive for Ubuntu
You have to partition your hard drive because you must set aside at least 20Gig for Ubuntu to live in and boot from.
To partition your hard drive, follow the steps below:
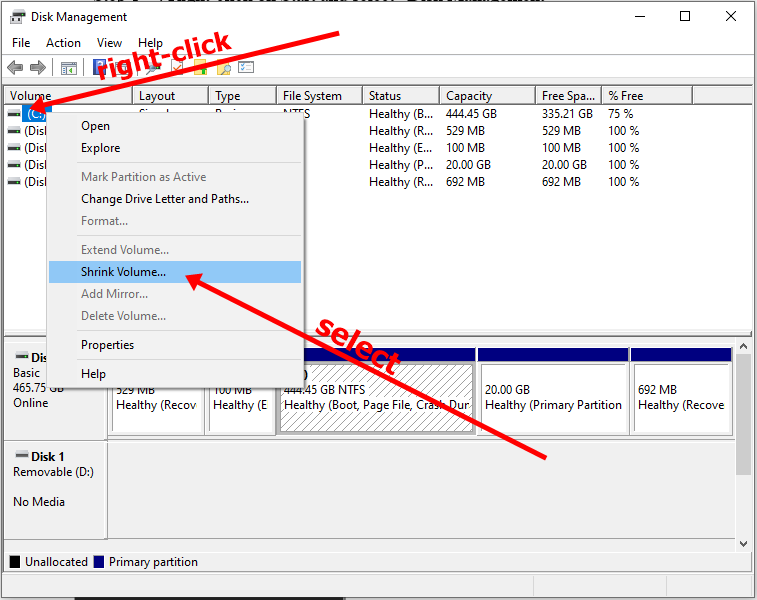
Step 1: Right-click on Start and select “Disk Management”.
Step 2: Right-click on your C drive and select shrink volume.
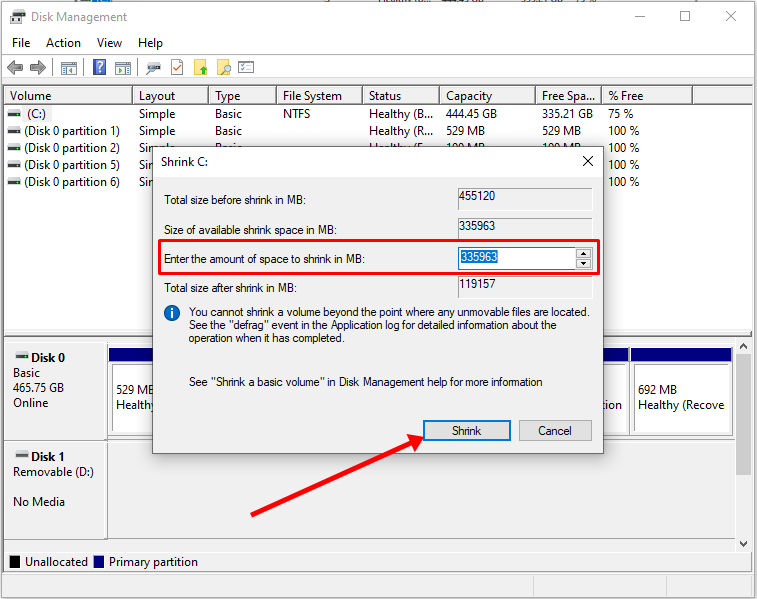
Step 3: Select at least (20000) 20Gig for Ubuntu and click “Shrink”. IT can take some time to complete, so be patient.
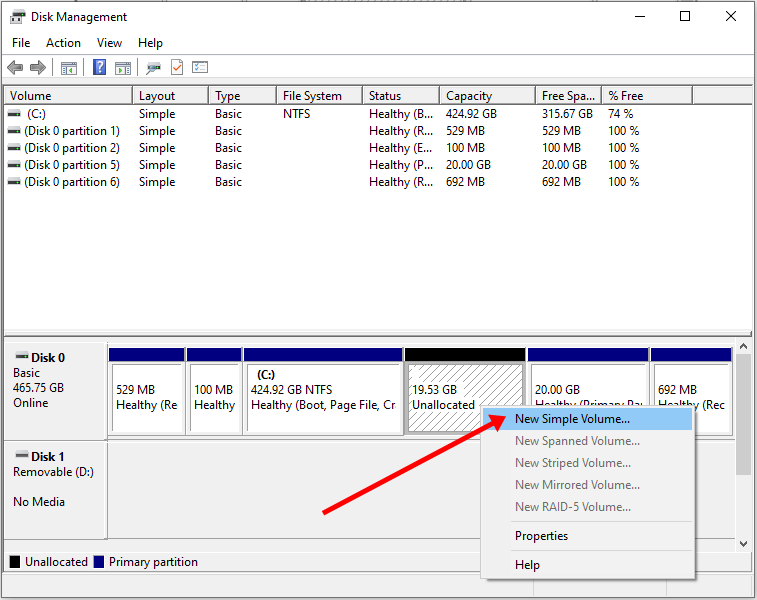
Step 4 (optional): You can go ahead and assign a letter to the new volume. Right-click on the unallocated space and select “New Simple Volume”.
Step 5: Follow the wizard and assign a letter to the drive, then follow the rest of it.
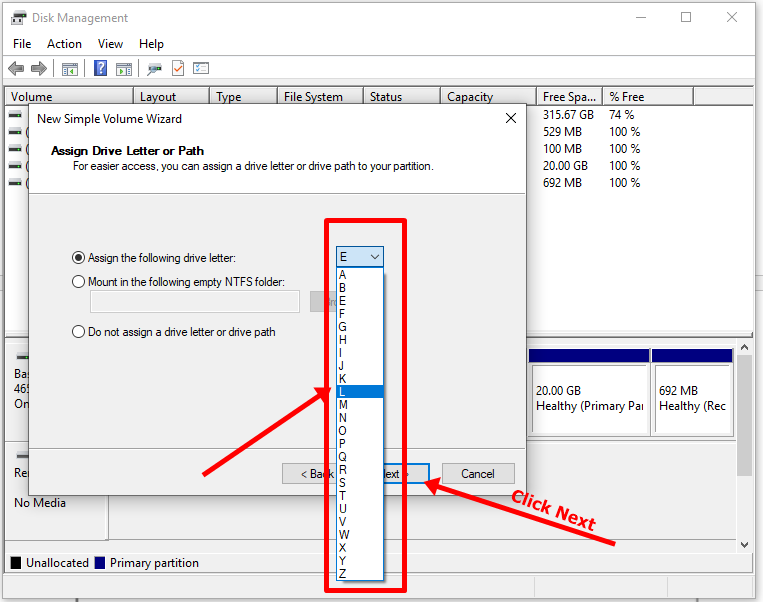
After completing the wizard, the drive should be listed on your computer.
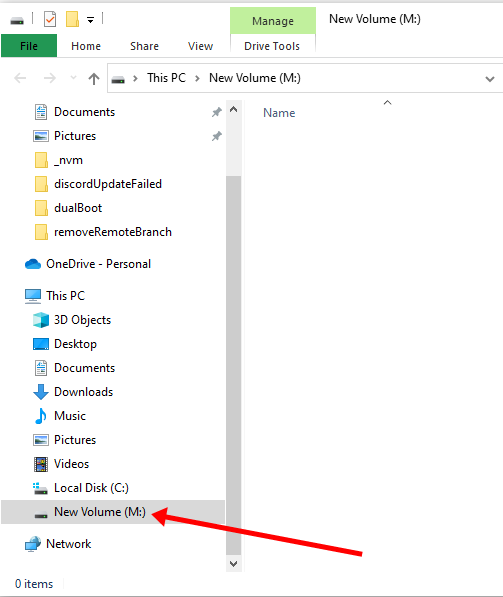
Congrats! You’ve successfully partitioned your hard drive.
N.B.: If you have a lot of free space in your hard drive but your PC still didn’t give you up to 20Gig partition space, then you need to optimize your PC’s hard drive. Proceed to the next section of this article to do that.
How to Optimize your Hard Drive for More Partition Space (Optional)
The common purpose of hard disk optimization is to speed up your computer during boot time and make it run smoother.
At the same time, the process will defragment the hard disk and make free space more available for partitioning.
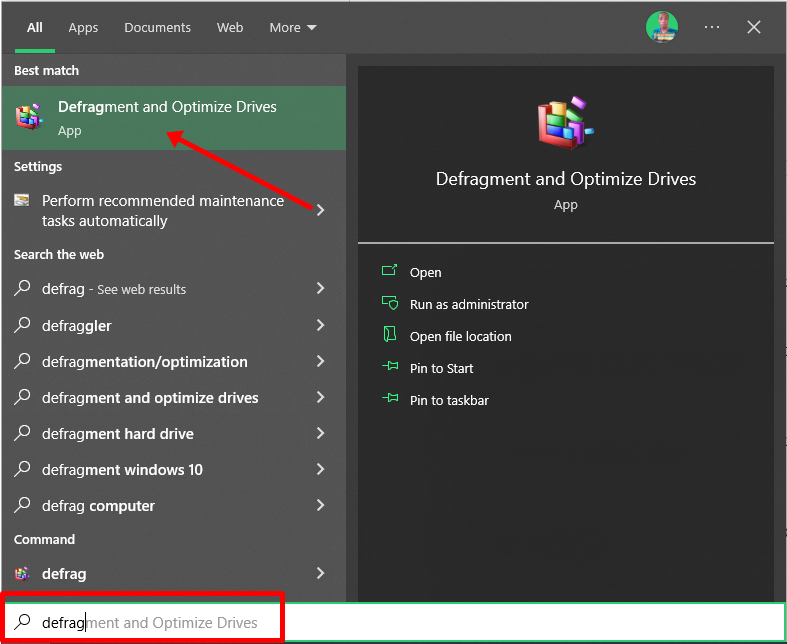
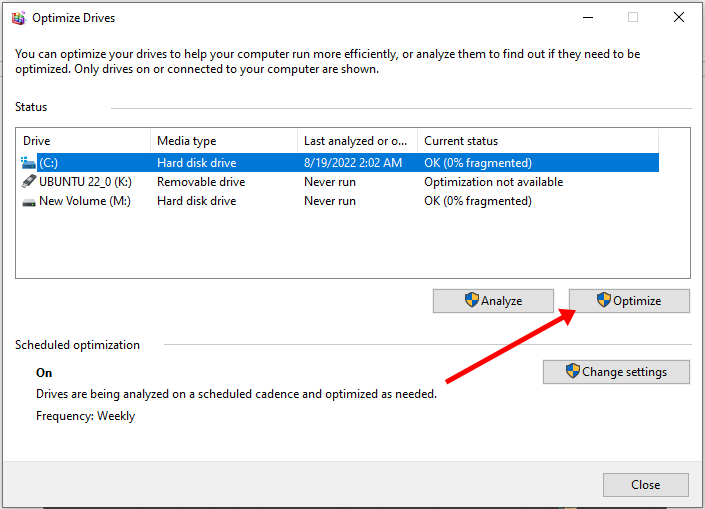
To optimize your hard drive, click Start (Windows logo key), search for “defrag” and select “Defragment and Optimize Drives”.
Make sure your C drive is highlighted, then click “Optimize”.
After you’ve been able to set aside at least 20Gig for Ubuntu by partitioning your hard drive, then it’s time to download Ubuntu and make a bootable USB.
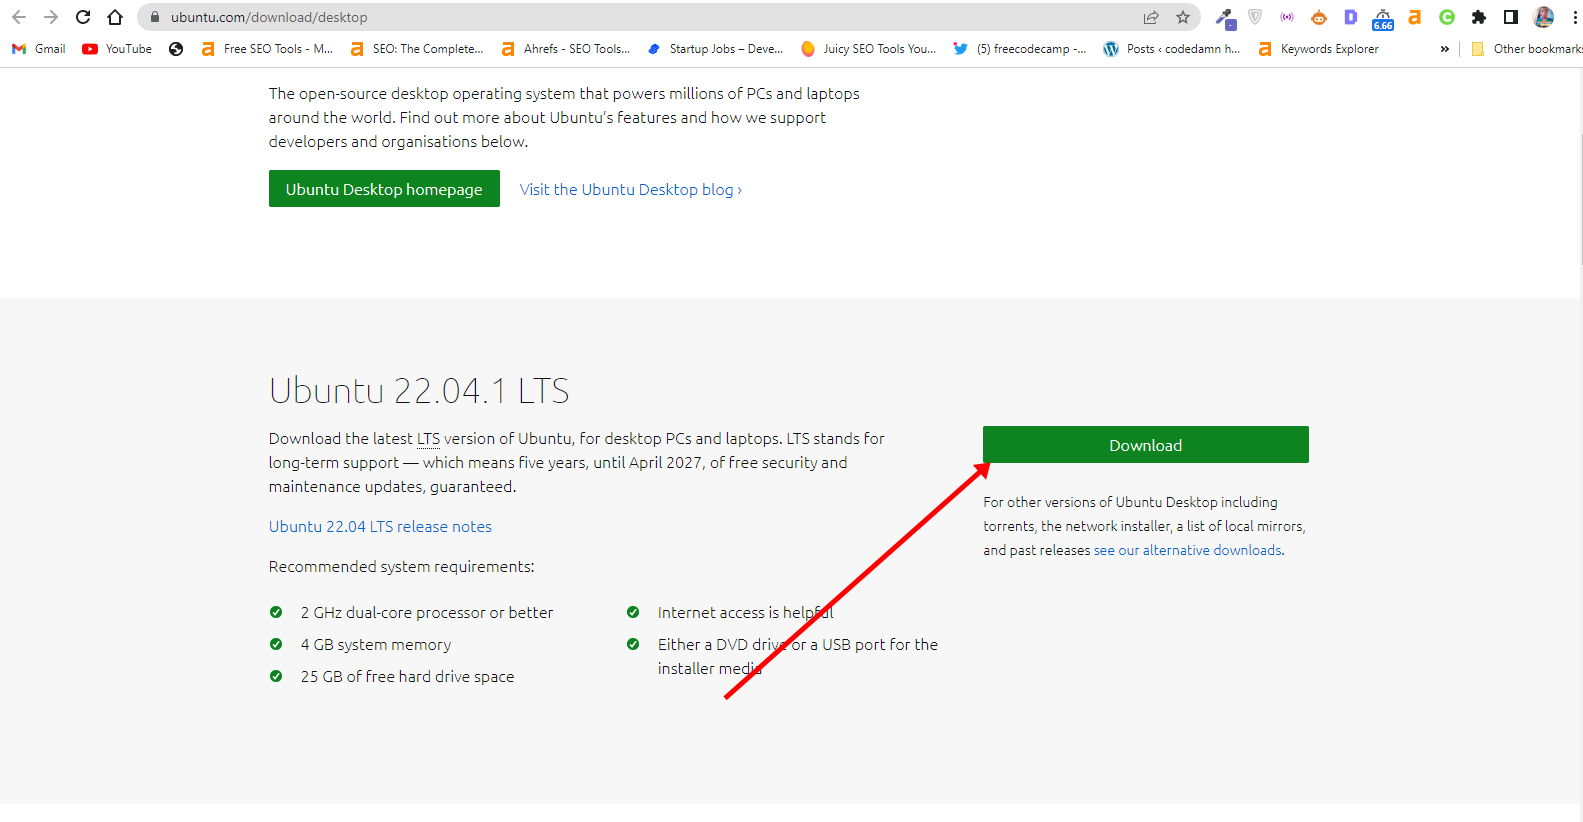
How to Download Ubuntu in ISO Image Format
The next thing is to download Ubuntu in ISO image format so you can install Ubuntu. You can download it from the Ubuntu distro website.
After downloading Ubuntu, don’t do anything with it yet. You need to make a bootable USB and put it in there. That’s how you’ll be able to use it.
The reason you can’t install Ubuntu just like that is that it doesn’t come as an executable. It comes in form of ISO (optical disk image). That means you have to find a disk to put it in before it can work.
The next part of this guide shows how you can put the downloaded Ubuntu ISO on a USB stick.
How to Make an Ubuntu (Linux) Bootable USB Drive
You won’t be able to make a bootable USB drive for Ubuntu by just placing the downloaded ISO image in it. Follow these steps to get it done:
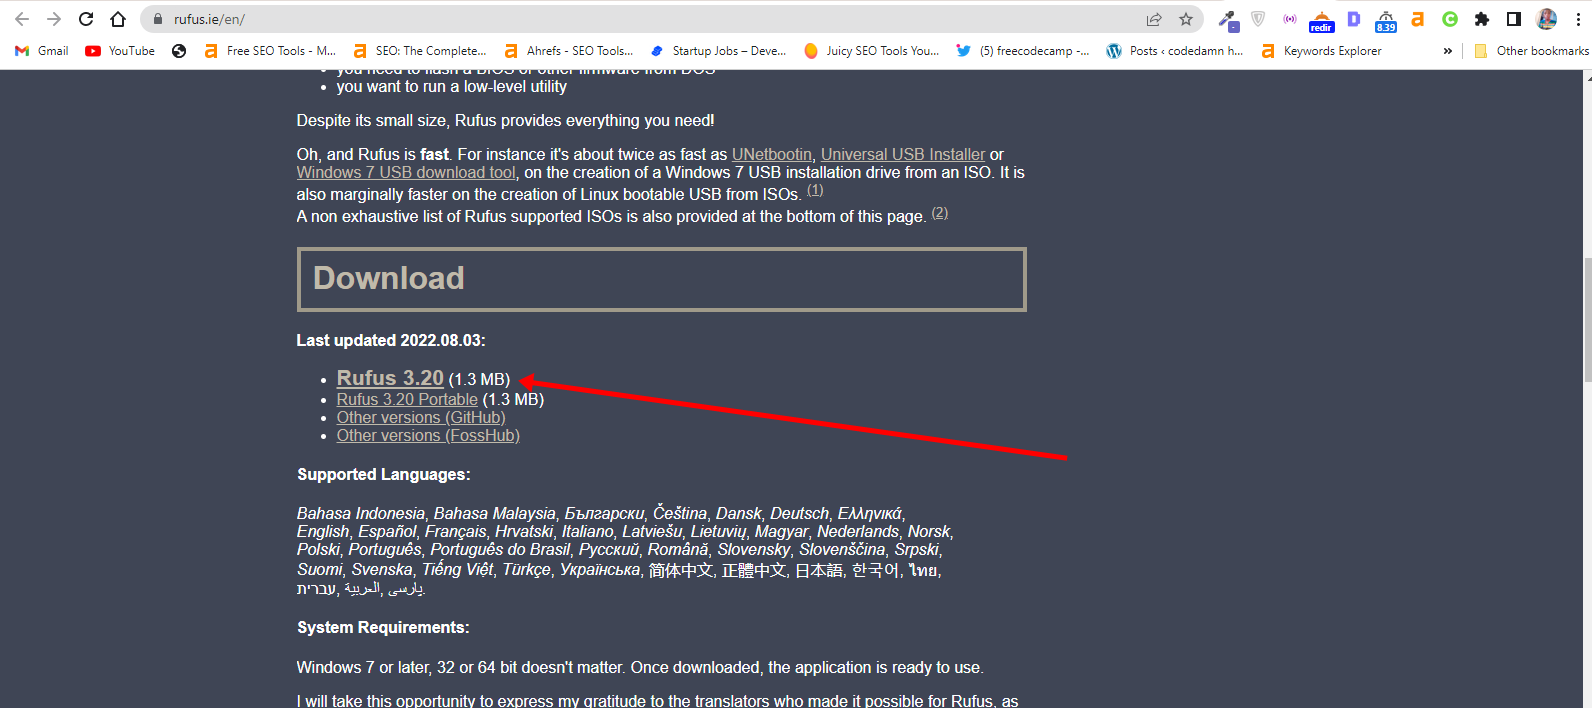
Step 1: You need to download a bootable USB drive creation tool like Rufus. You can download Rufus from their website.
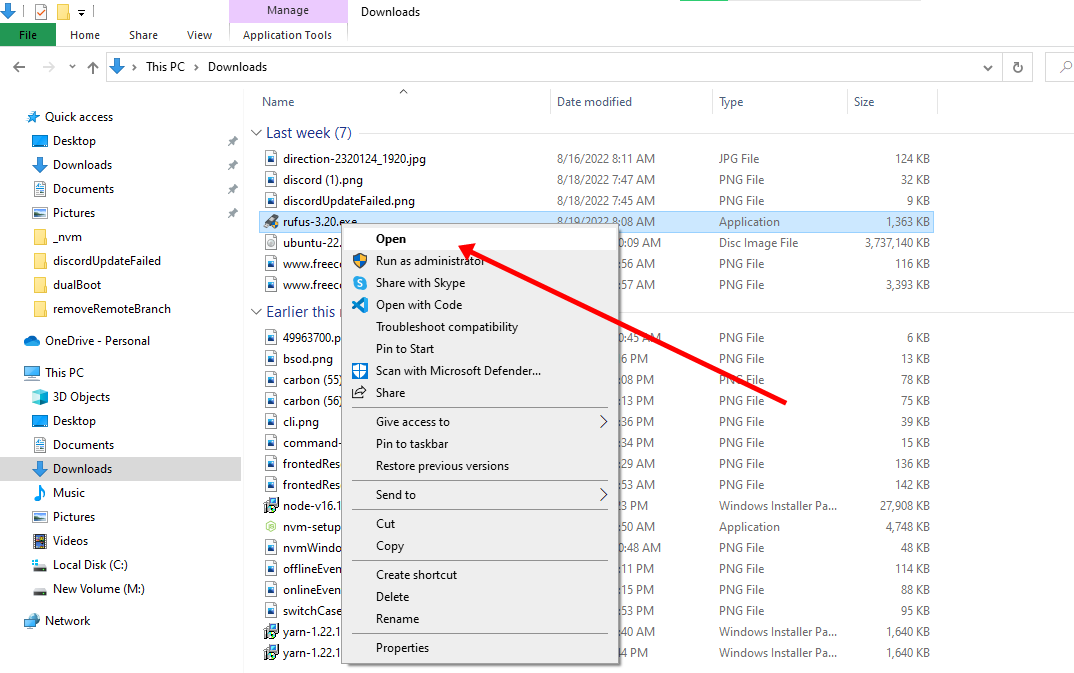
Step 2: Insert the empty USB drive into your Windows 10 PC. Right-click on Rufus and select “Open”.
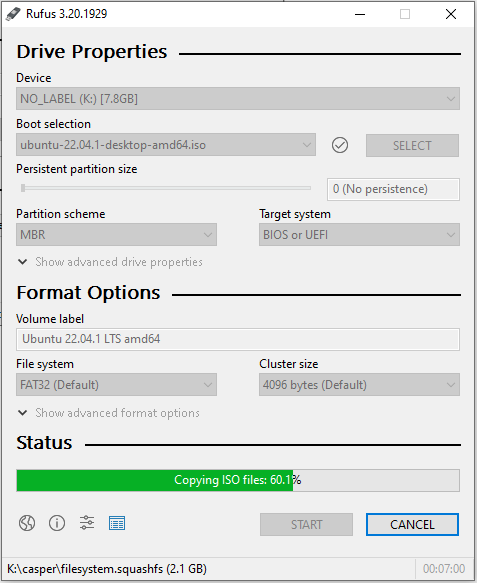
Step 3: Under “Device”, select your USB drive. And under “Boot selection”, click the “Select” button and select the Ubuntu ISO file you downloaded
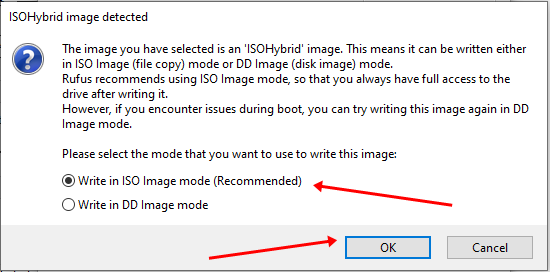
Step 4: Leave every other thing as default and click the “START” button to start burning the Ubuntu distro to the drive.

Step 5: Click OK to start the process.
Once the process is done, you should see “READY” on a green background. Click the Close button. Its time to install Ubuntu.
Congrats! Now you have a bootable drive with which you can install Linux.
The next step is to install the Ubuntu distro on your Windows 10 PC. To do this, you have to boot your PC from the bootable USB drive you created.
How to Install Ubuntu Linux Distro along with Windows 10
Step 1: Ensure the bootable drive is inserted into your Windows 10 PC
Step 2: Right-click on Start, hold SHIFT, and select Restart.
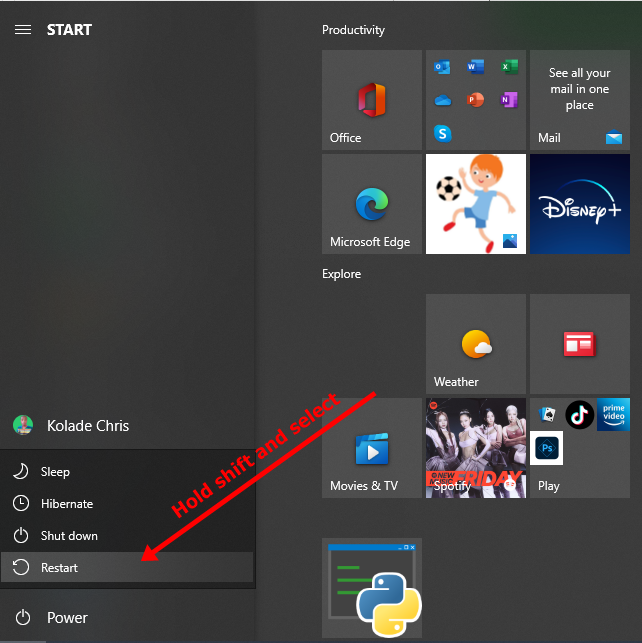
Step 2: Select “Use a Device”.
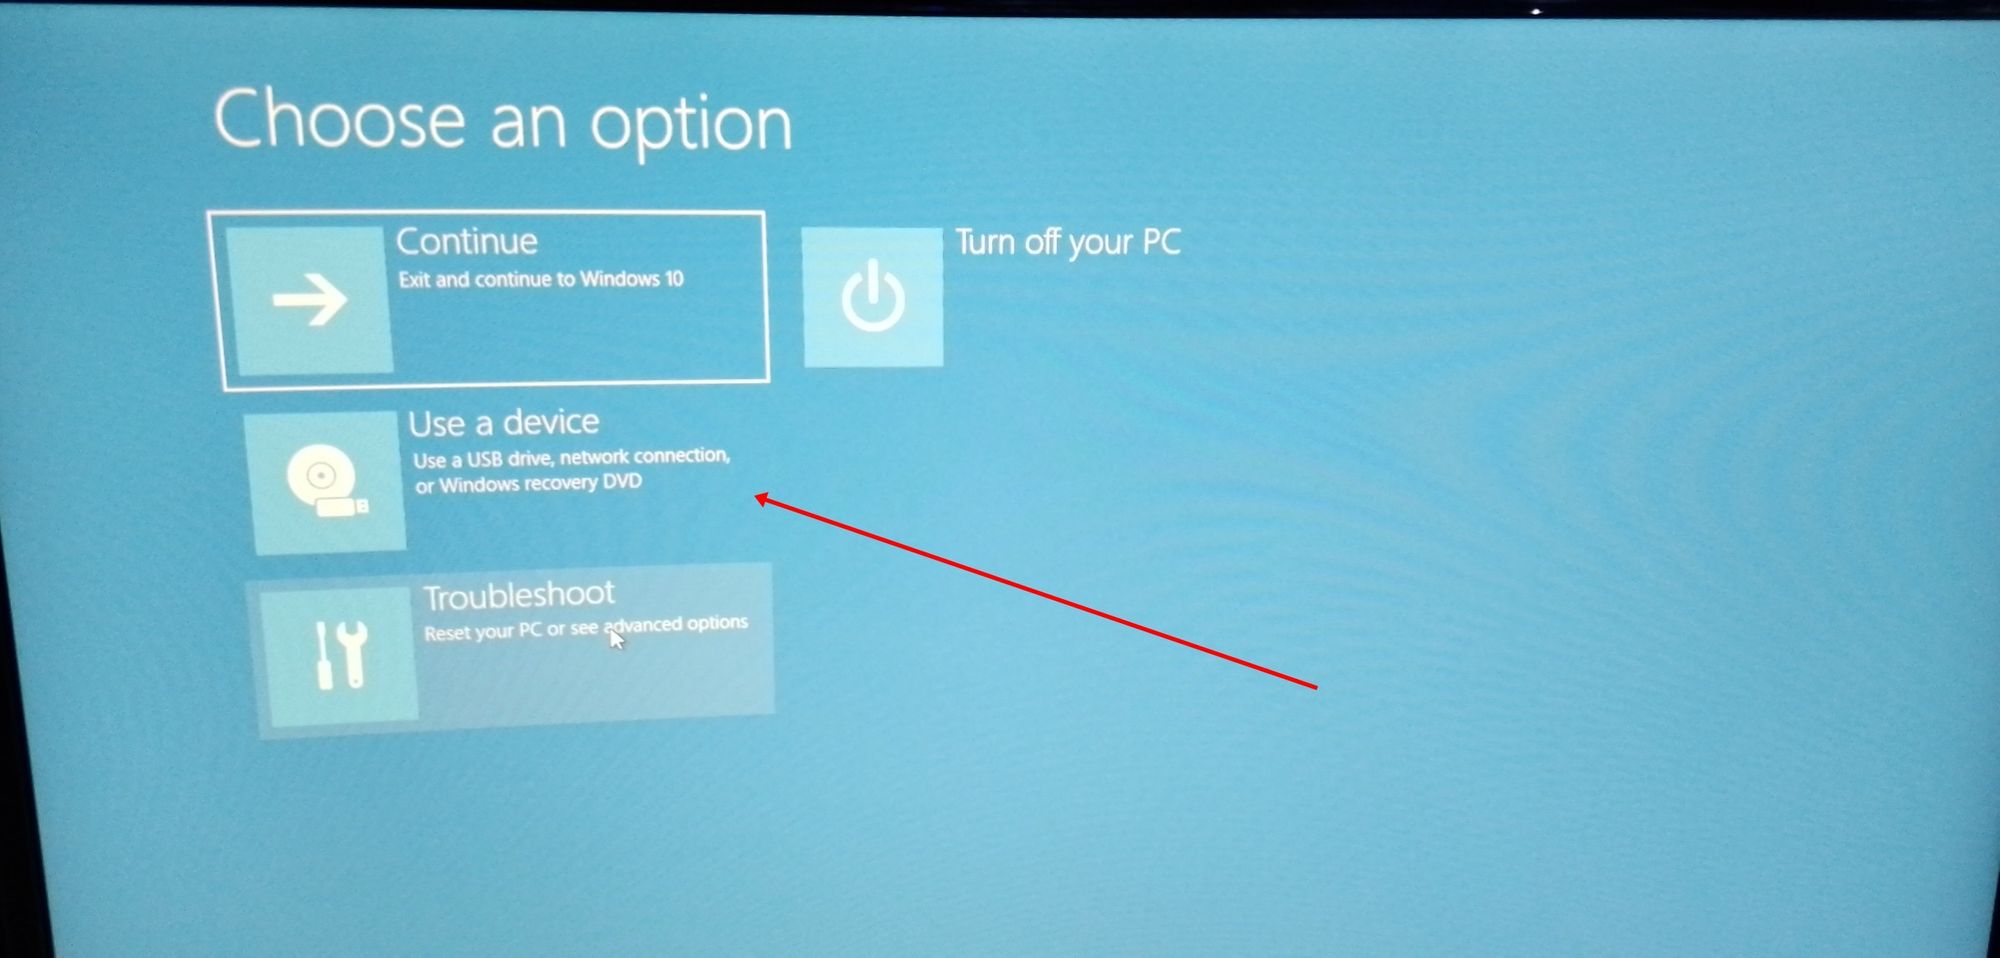
Step 3: On the next screen, you should see several devices you can boot from.
You may see the bootable drive as the name of the USB brand.
It’s possible to see it as “Ubuntu” too. Some other times, you might not see it, so you need to click on “See more devices».
If you still cannot see your bootable drive, head over to your boot menu by getting into BIOS. You will see it there.
N.B.: You should be very careful while making changes in BIOS. Whatever you do there has a lasting effect on your computer. If you are not sure of what you’re doing there, you should contact an IT professional.
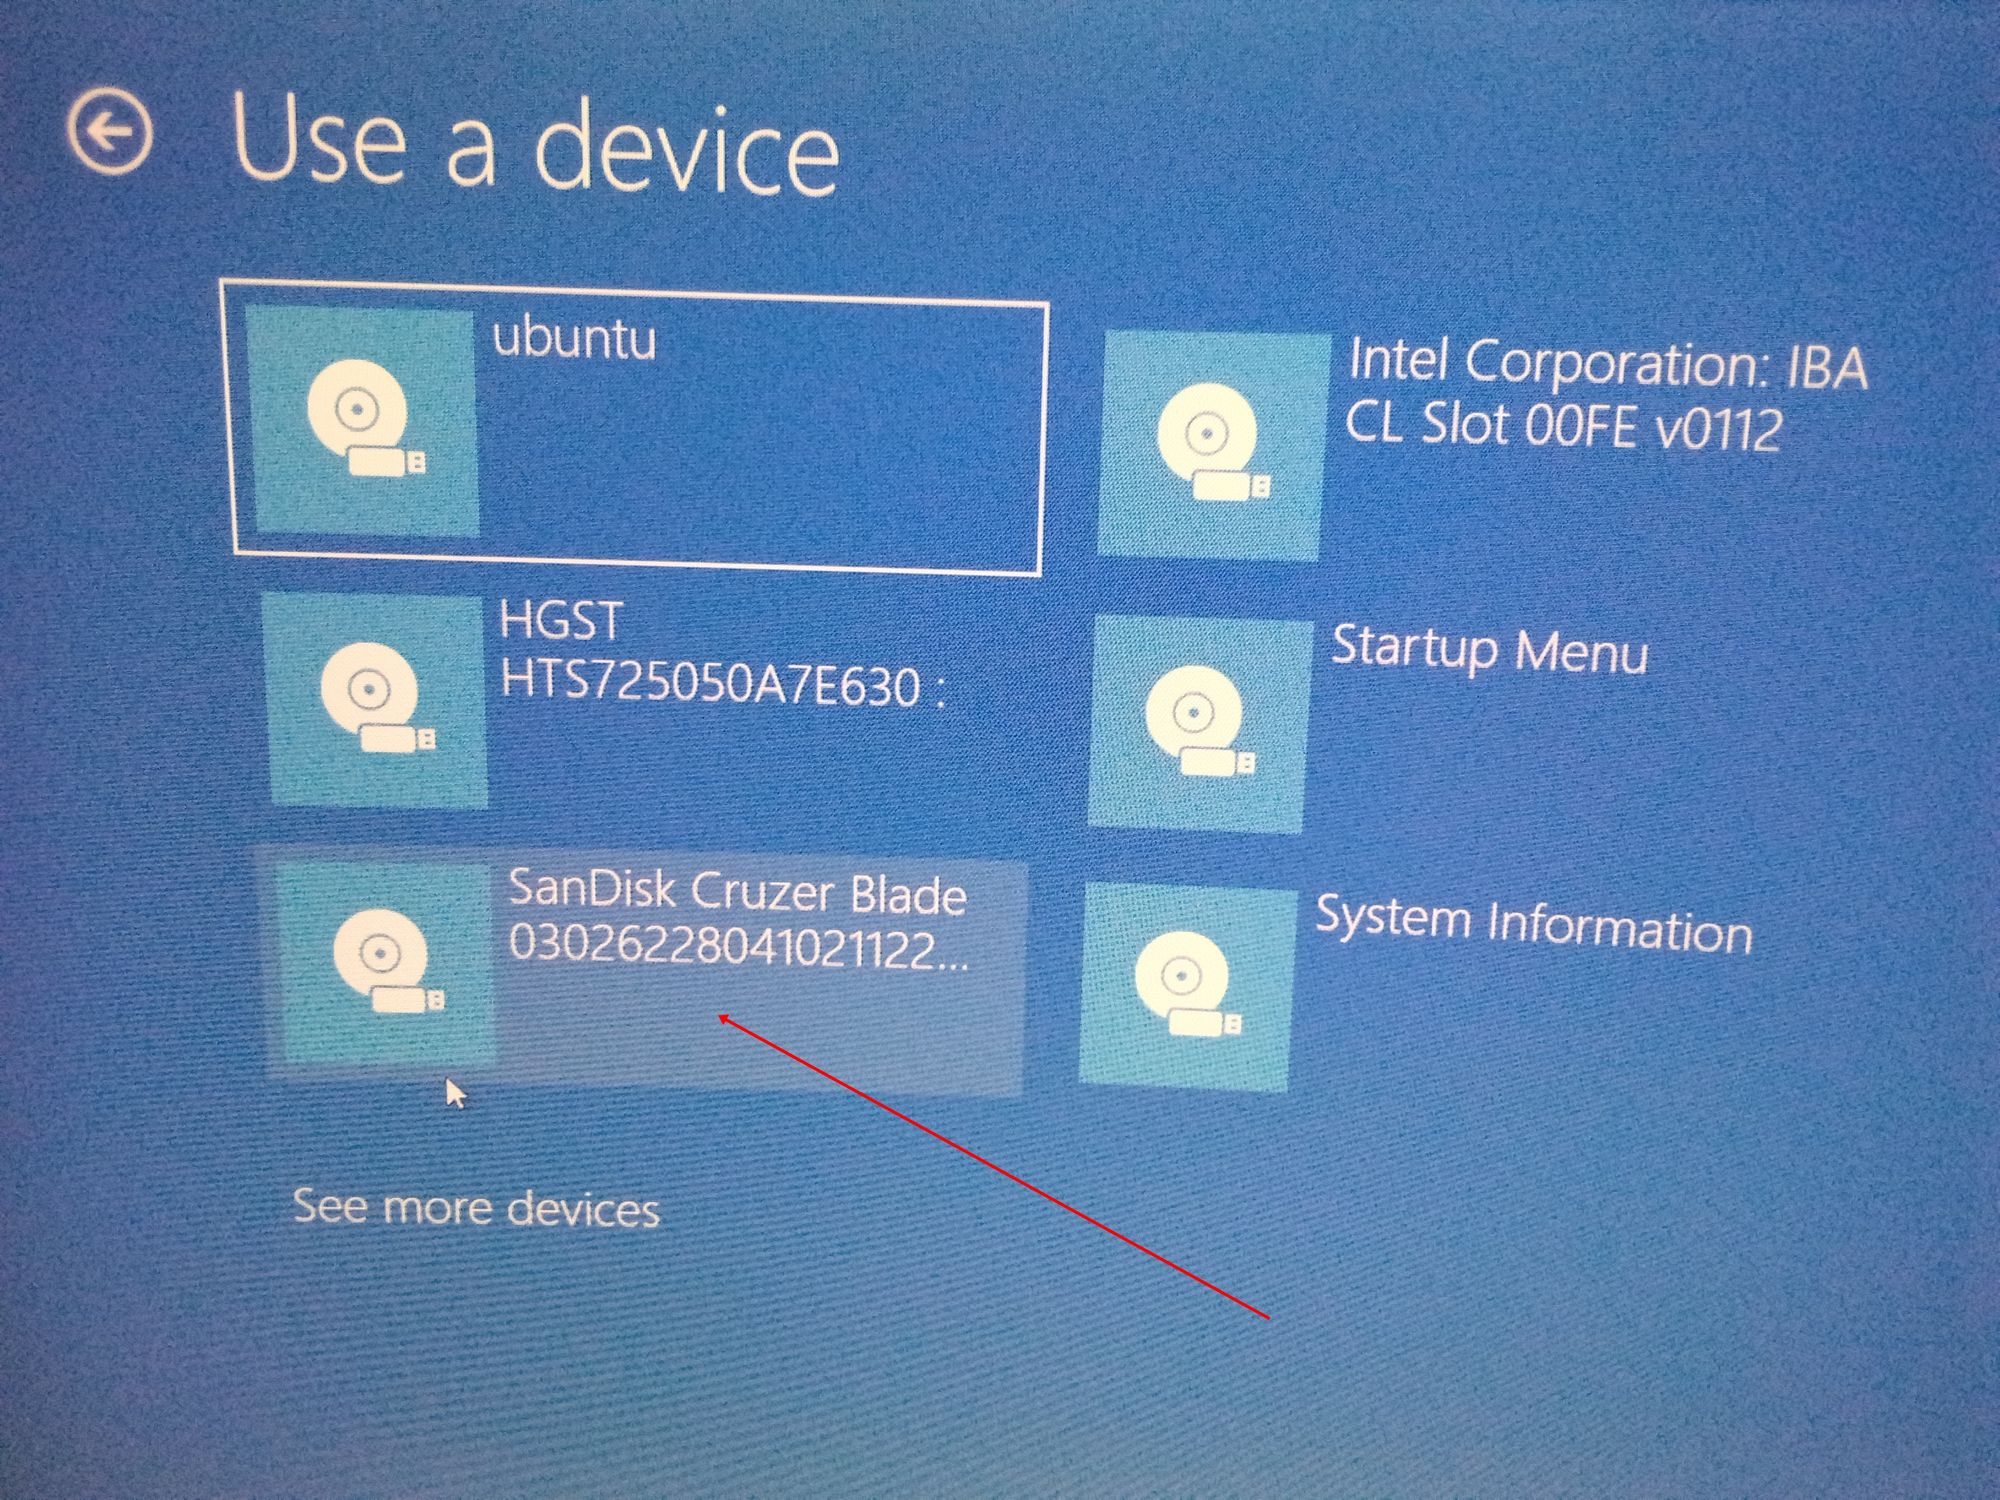
Step 4: Choose «Install Ubuntu». You can also try it before installing it.
Follow other prompts of the installation wizard and make sure you don’t replace your Windows 10 OS installation with Ubuntu. This is why I suggested you back up all your files.
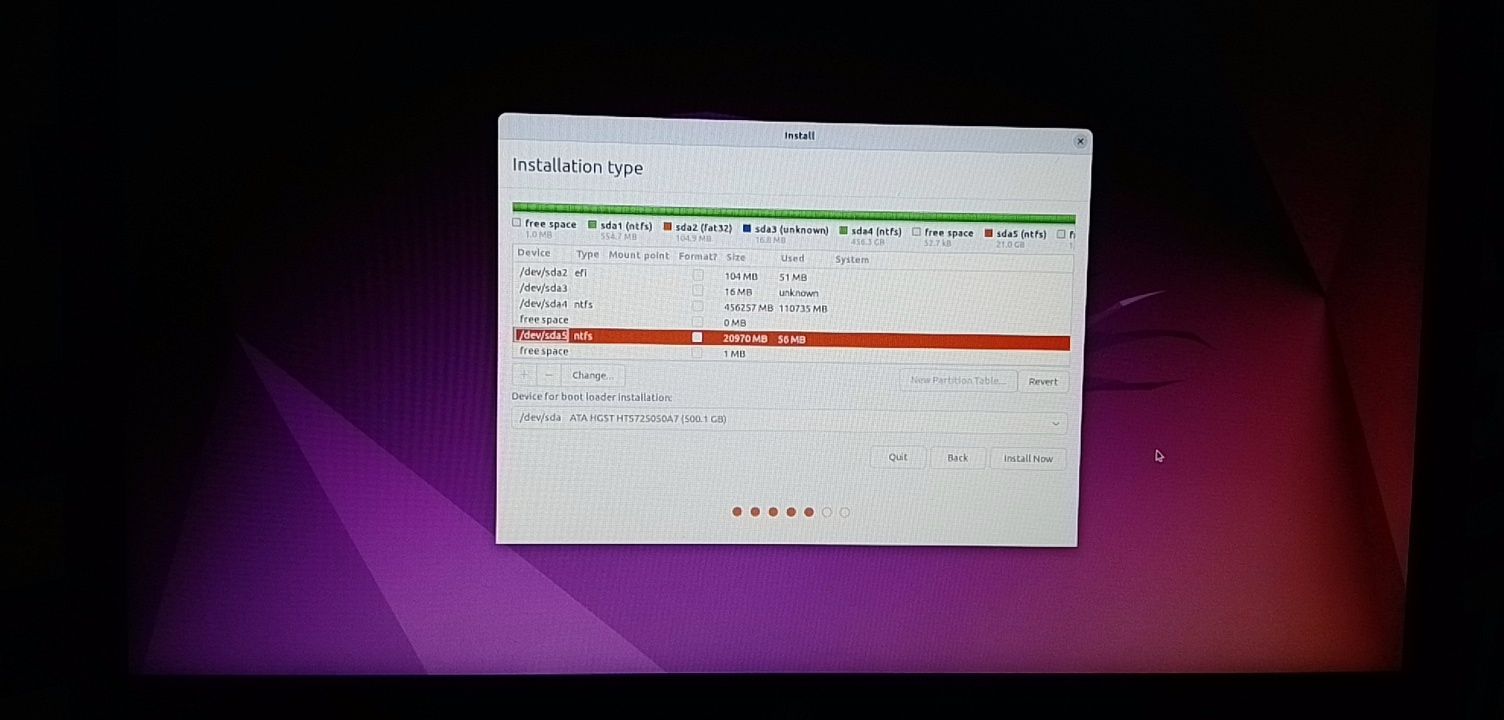
When you get to the point to select the partition you made, scroll to the partition you made earlier and press ENTER.
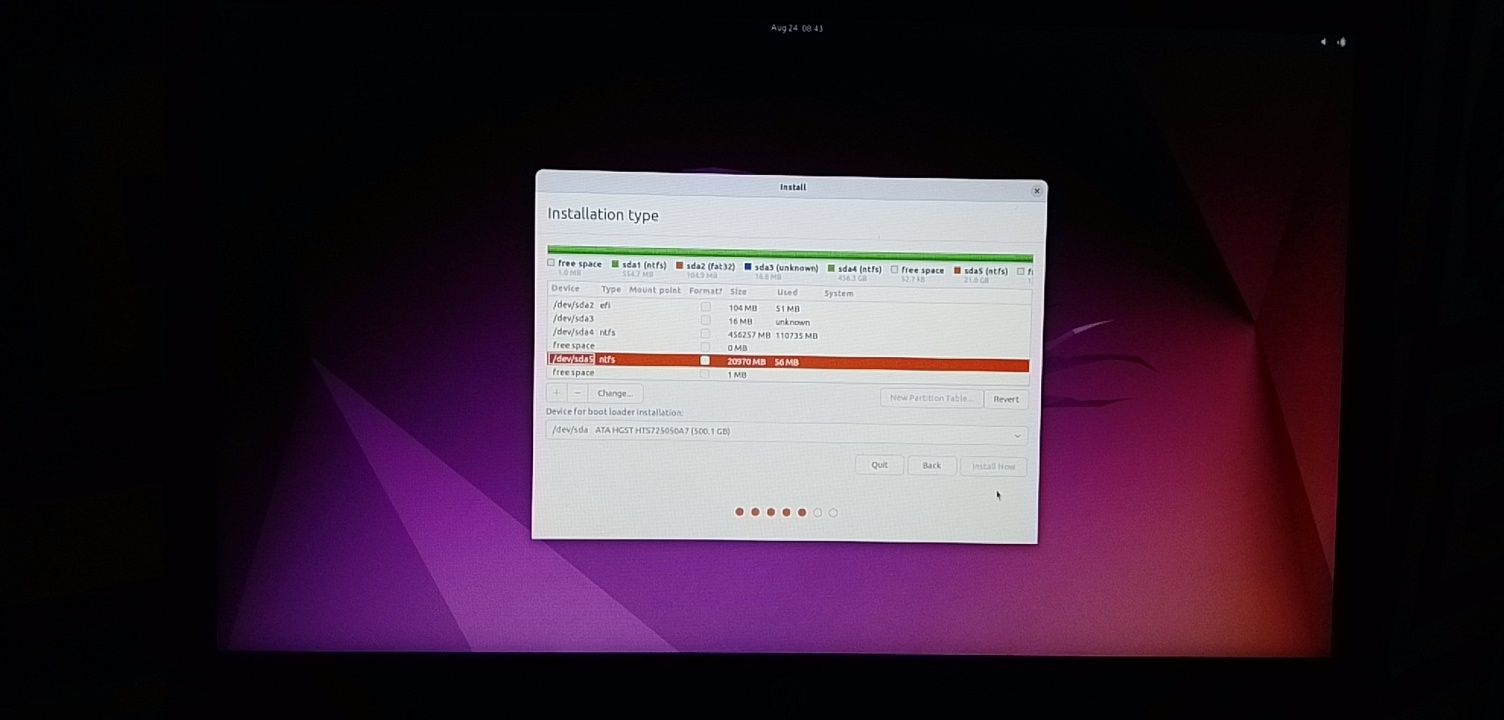
Click OK to select all the space in the partition.
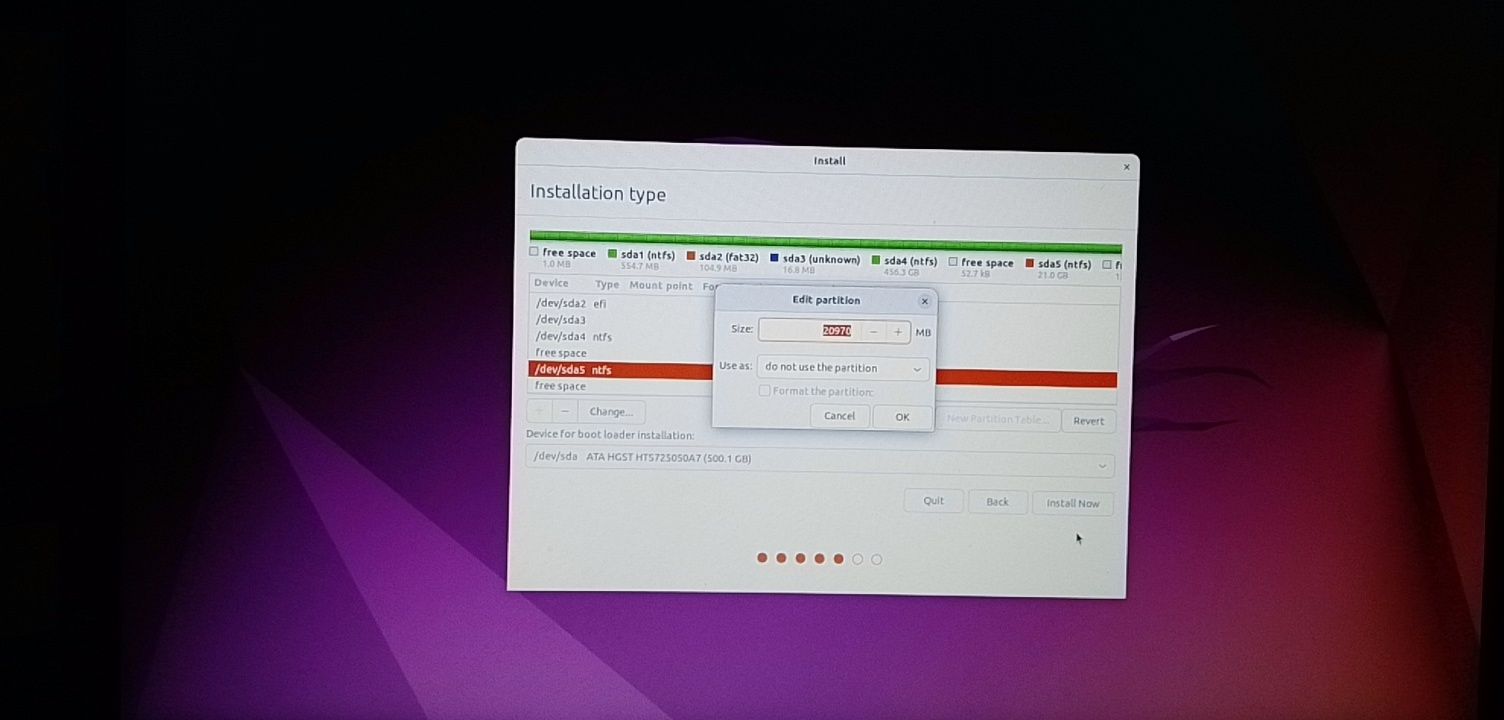
This time around, the “Install now” button will not be greyed out anymore.
Follow other prompts until Ubuntu starts installing.
After the installation is done, Ubuntu will prompt you to remove the bootable drive and press ENTER to reboot your Computer.
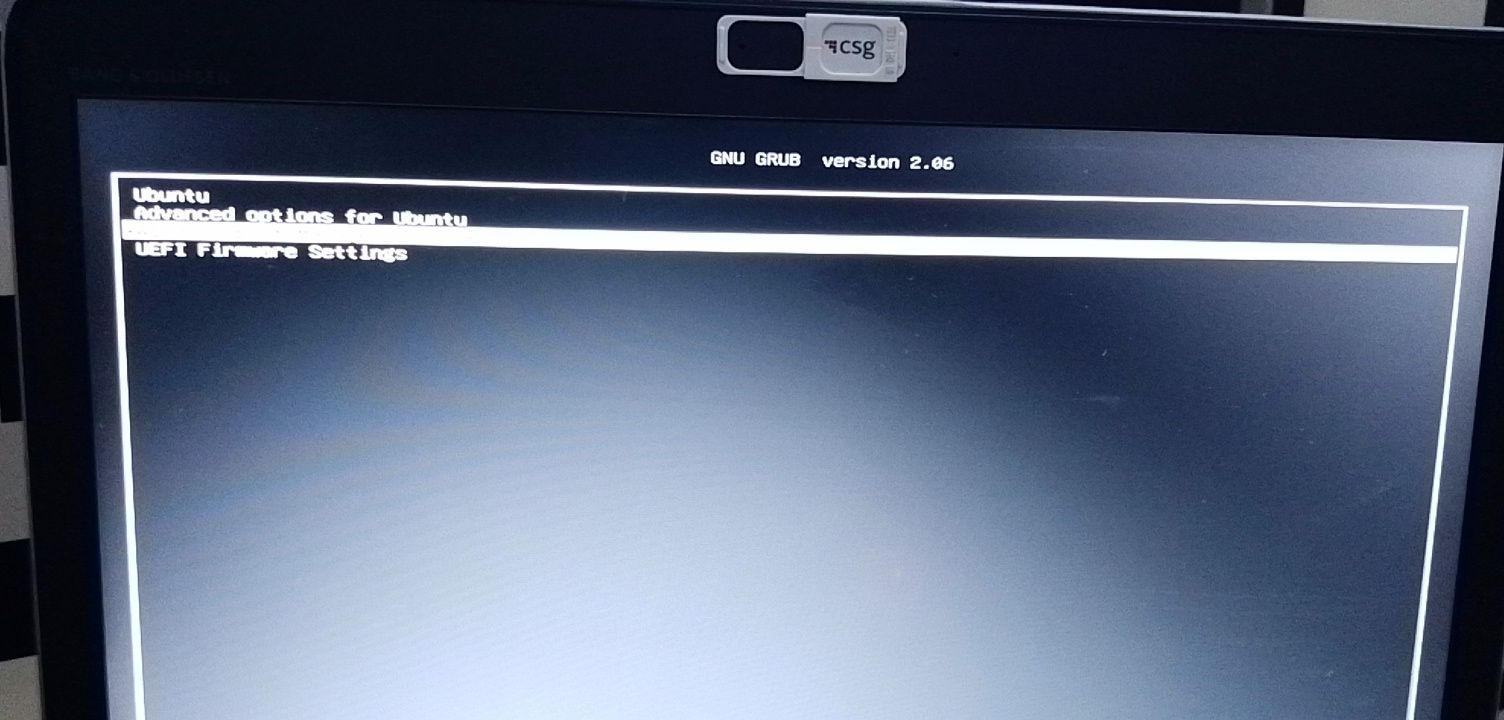
Now You Can Dual Boot Ubuntu and Windows 10
Immediately after you reboot the computer, you should see a screen that looks as shown below:
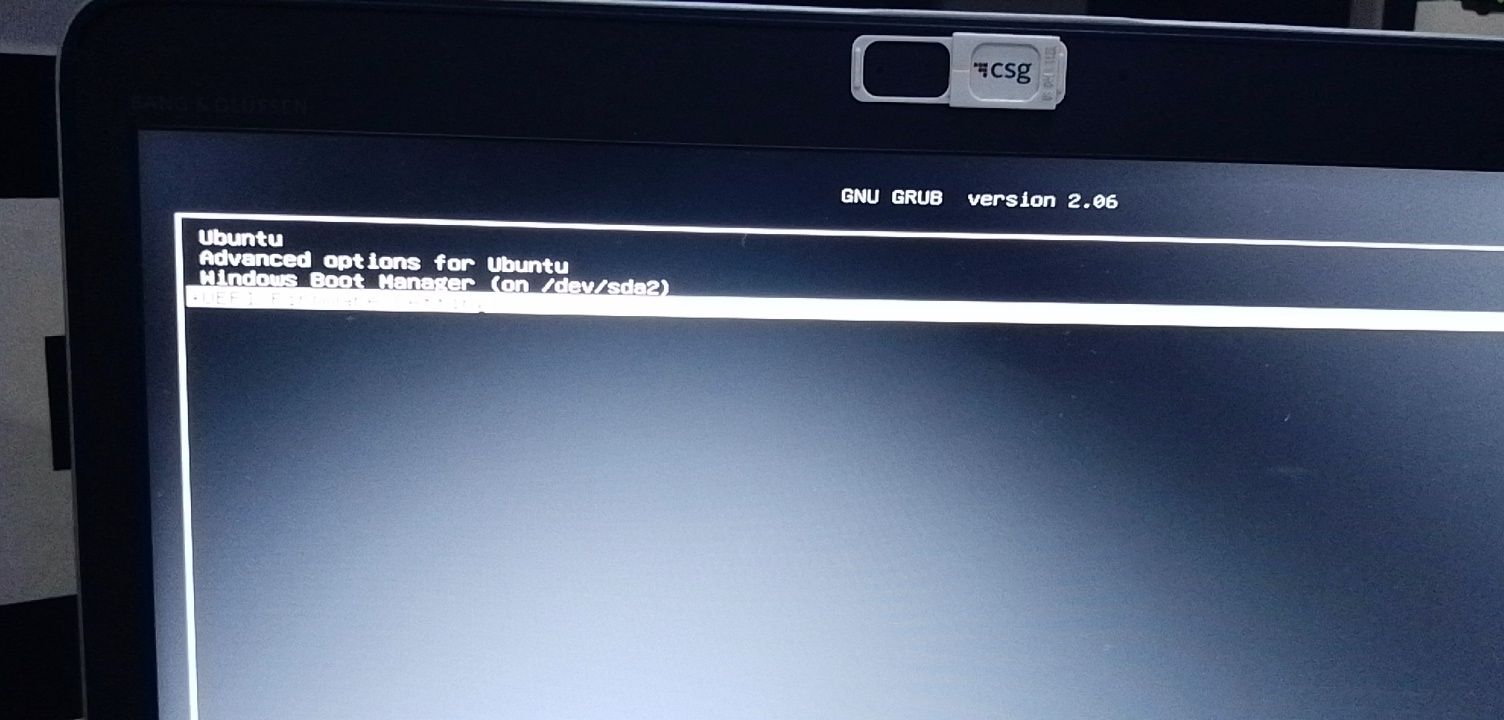
Now, you can select which one to boot into between Ubuntu and Windows 10.
To boot into Ubuntu, select Ubuntu. And to boot into Windows 10, select Windows boot manager.
You can also get into your BIOS from the same place by choosing UEFI Firmware Settings.
Conclusion
I hope this article helps you dual boot Ubuntu and Windows 10 on your computer.
The ultimate aim of this article was to show you how to dual boot Ubuntu and Windows 10.
But the article went beyond that to show you how to:
- check if your PC’s BIOS is in UEFI mode
- partition your hard drive
- optimize your hard drive
- make a bootable USB drive
- install Ubuntu Linux Distro along with Windows on your Windows 10 PC.
If you find this article helpful, kindly share it with your friends and family.
Learn to code for free. freeCodeCamp’s open source curriculum has helped more than 40,000 people get jobs as developers. Get started