Содержание
- Способ 1: Редактирование реестра
- Способ 2: Удаление проблемного обновления
- Способ 3: «Командная строка»
- Способ 4: Удаление принтера
- Вопросы и ответы
Способ 1: Редактирование реестра
Ошибка 0x0000011b, как правило, появляется тогда, когда происходит попытка установки сетевого принтера или подключение к уже установленному. Для закрытия уязвимости в очереди печати компания Microsoft выпустила несколько патчей («KB5005627», «KB5005652», «KB5005563», «KB5005573», «KB5005565» и «KB5005613»), после инсталляции которых может происходить данная проблема. Чтобы действительно закрыть уязвимость, пользователю, являющемуся администратором, нужно было вручную создать дополнительный ключ в системном реестре. Но после инсталляции апдейта параметр создается автоматически, что приводит к рассматриваемой ошибке в Windows 10.
В большинстве актуальных версий Windows 10 патчи недоступны для удаления (но такой вариант мы также рассмотрим ниже), поэтому рекомендуем вручную отключить защиту от уязвимости в очереди печати с помощью редактирования системного реестра:
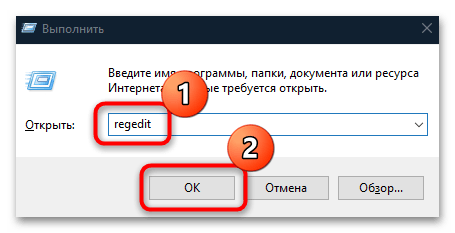
- Одновременно нажмите на клавиши «Win + R», затем введите команду
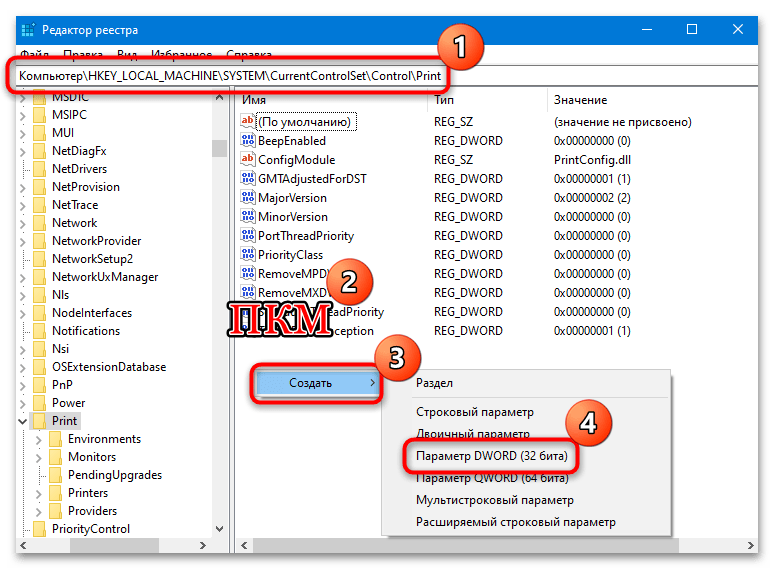
regeditв текстовом поле и нажмите на кнопку «ОК», чтобы запустить штатное средство «Редактор реестра». - В открывшемся окне перейдите по пути
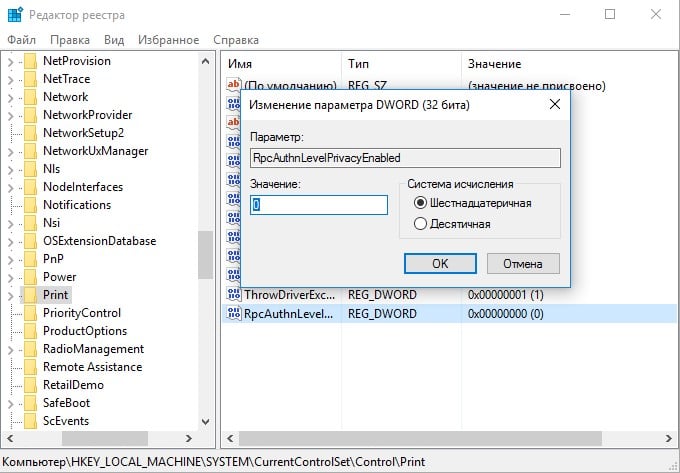
HKEY_LOCAL_MACHINE\SYSTEM\CurrentControlSet\Control\Print. В центральной части окна системного реестра кликните правой кнопкой мыши, затем выберите «Создать» и пункт «Параметр DWORD (32 бита)». - Созданному ключу задайте следующее имя –
RpcAuthnLevelPrivacyEnabled. - Дважды кликните по новому параметру правой кнопкой мыши и в строке «Значение» введите «0». Нажмите на кнопку «ОК» для сохранения настроек.

После проделанных манипуляций перезагрузите компьютер и попытайтесь вновь подключиться к виртуальному принтеру. Скорее всего, ошибка будет исправлена, но если нет, то переходите к следующим способам.
Способ 2: Удаление проблемного обновления
Этот способ, правда, доступный не во всех Виндовс 10, предполагает ручное удаление проблемного патча, который может вызывать ошибку 0x0000011b. Такой вариант не слишком предпочтителен, поскольку все уязвимости, которые были закрыты данными обновлениями, будут снова открыты.
Как мы уже писали, проблемы с подключением или установкой виртуального принтера связаны с апдейтами под кодами «KB5005627», «KB5005652», «KB5005563», «KB5005573», «KB5005565» и «KB5005613». С помощью встроенных средств системы проверьте, доступны ли такие к удалению, и если да, то деинсталлируйте патчи самостоятельно:
- С помощью системного поиска в главном меню отыщите штатное средство «Панель управления».
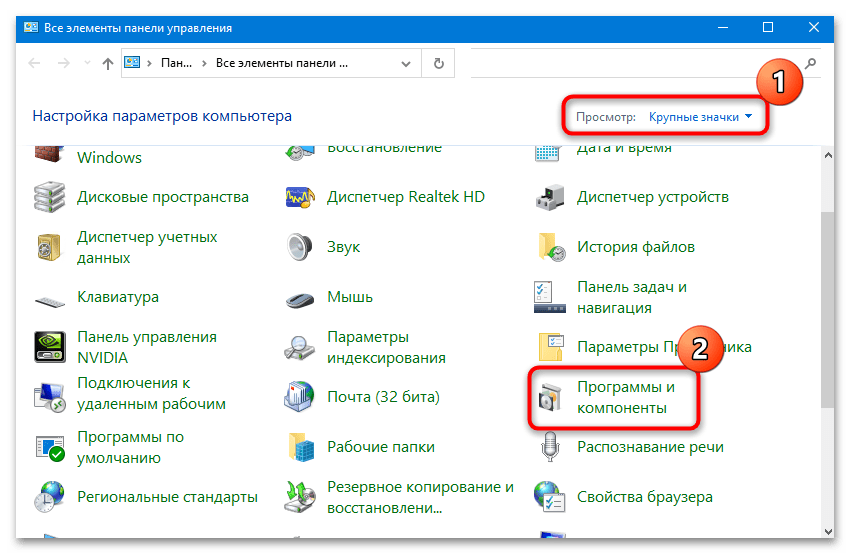
- Нажмите на меню «Просмотр» и выберите пункт «Крупные значки». В основной части окна кликните по разделу «Программы и компоненты».
- На панели слева нажмите на строку «Просмотр установленных обновлений».
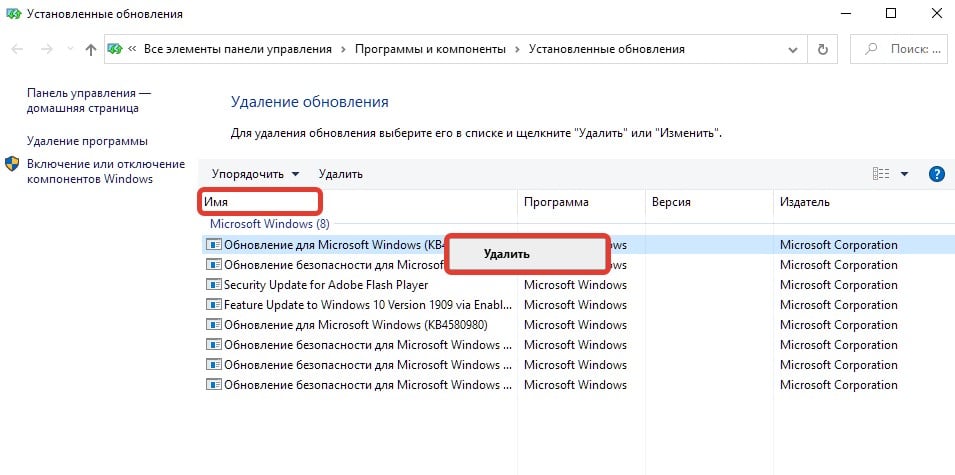
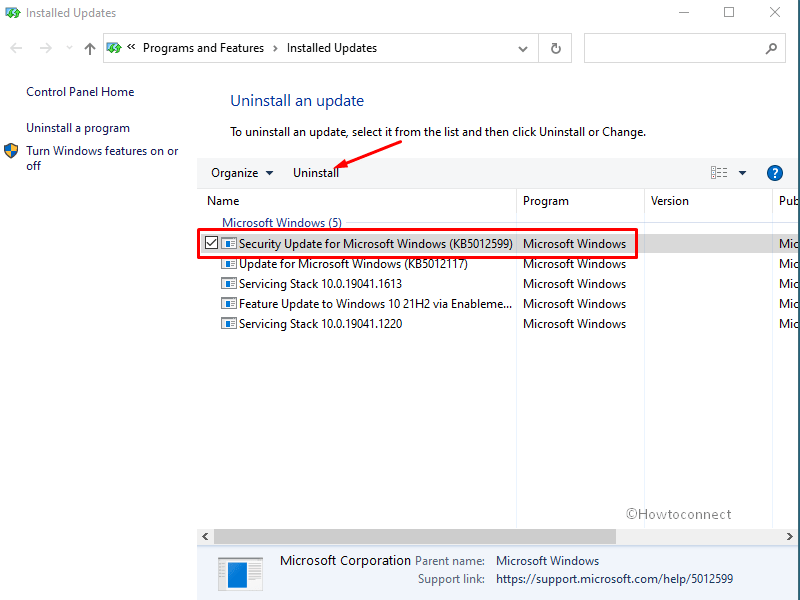
- В новом окне в списке апдейтов посмотрите, есть ли среди установленных патчей те, что были перечислены выше. Если да, избавьтесь от их, выделив нажатием левой кнопкой мыши и нажав на кнопку «Удалить» вверху.
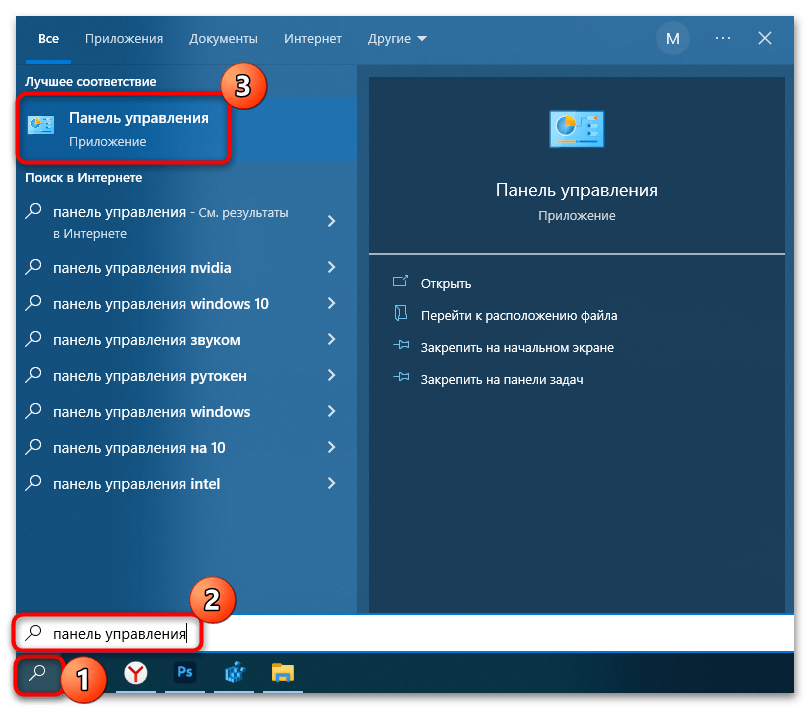
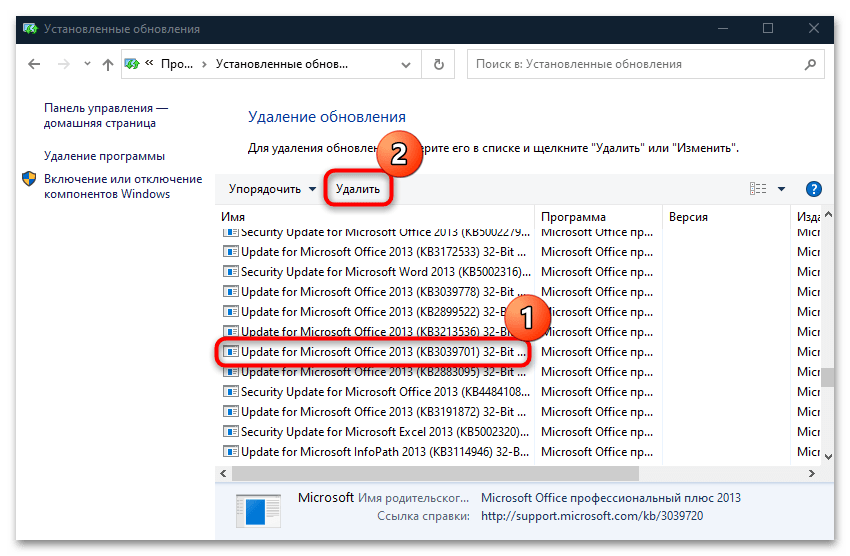
После удаления проблемных обновлений потребуется также перезагрузить систему, чтобы новые параметры вступили в силу, после чего можно проверить, была ли устранена ошибка.
Способ 3: «Командная строка»
В некоторых случаях может помочь создание еще одного параметра в системном реестре. Он может помочь в том случае, если пользователи в сети не могут устанавливать виртуальные принтеры с помощью драйверов на удаленном компьютере или обновлять эти драйверы. Можно снять ограничения через сам реестр или консоль, и мы покажем второй вариант:
- Откройте «Командную строку» от имени администратора. Для этого можете использовать поиск Windows и соответствующий тип запуска.
- Вставьте команду
reg add "HKEY_LOCAL_MACHINE\Software\Policies\Microsoft\Windows NT\Printers\PointAndPrint" /v RestrictDriverInstallationToAdministrators /t REG_DWORD /d 1 /fи нажмите на клавишу «Enter» для ее выполнения.
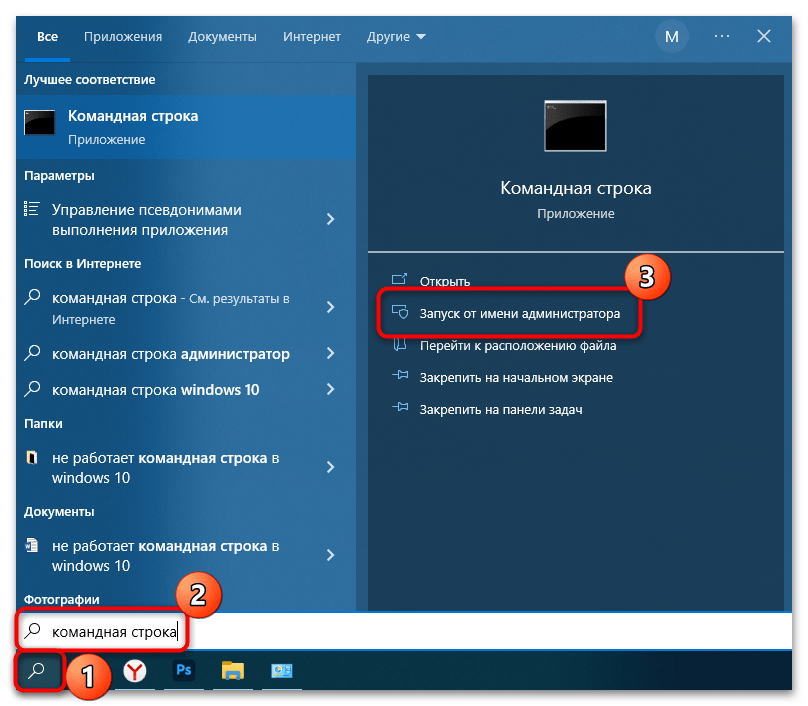
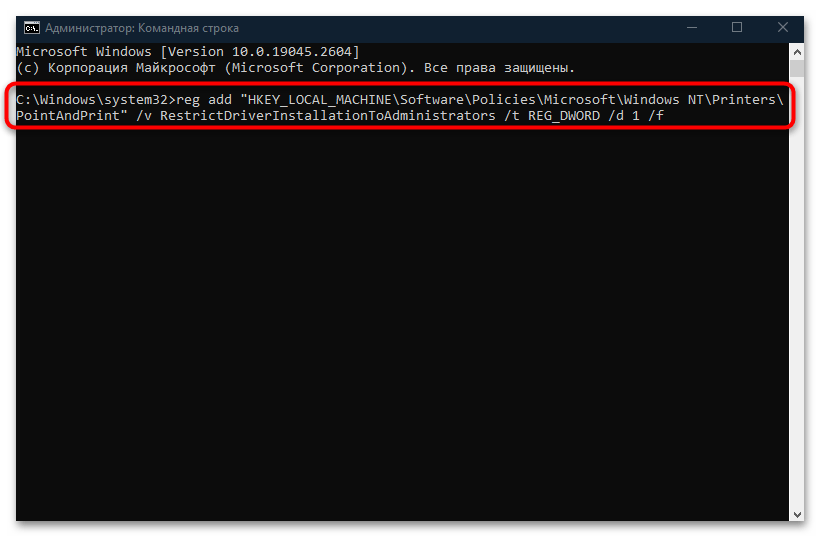
Вы также можете запустить «Редактор реестра» и проверить там отсутствие каких-либо подразделов и параметров в одной из веток. Для этого перейдите по пути
HKEY_LOCAL_MACHINE\SOFTWARE\Policies\Microsoft\Windows NT\Printersи посмотрите, есть ли там данные, которых, по идее, быть не должно. Если да, то их нужно удалить, но рекомендуем сначала сделать экспорт куста реестра или создать точку восстановления системы.
Читайте также: Инструкция по созданию точки восстановления Windows 10
Способ 4: Удаление принтера
Если у вас уже установлен виртуальный принтер, но подключения к нему не происходит и появляется ошибка 0x0000011b, то можете попытаться удалить его из списка устройств, а затем заново установить. Делается это с помощью «Панели управления» и соответствующего раздела:
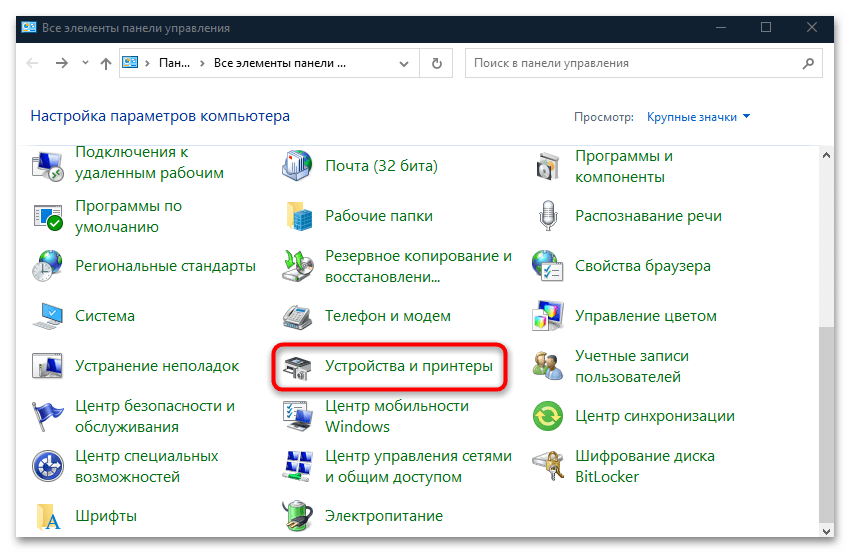
- Запустите системное средство так же, как в Способе 2, потом выберите раздел «Устройства и принтеры».
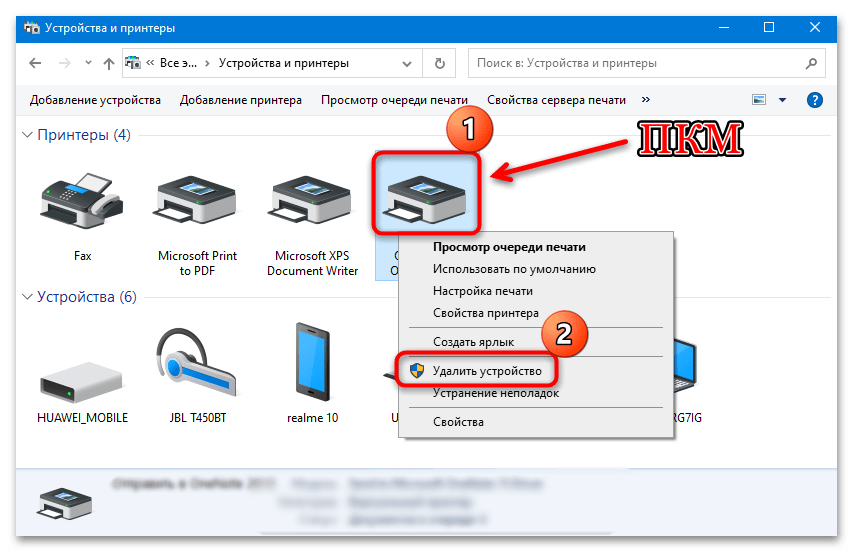
- В списке установленного оборудования найдите виртуальный принтер и щелкните по нему правой кнопкой мыши. Из контекстного меню выберите пункт «Удалить устройство».
- Подтвердите действие в системном окне.
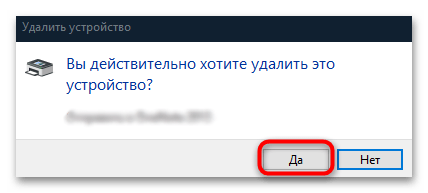
Как уже мы говорили, после удаления попробуйте заново установить виртуальное оборудование и выполнить подключение.
Еще статьи по данной теме:
Помогла ли Вам статья?
При установке либо подключении к уже установленному сетевому принтеру вы можете столкнуться с ошибкой 0x0000011b, являющейся на данный момент одной из самых распространенных проблем, с которыми приходится сталкиваться при работе с сетевыми устройствами печати. В последних сборках Windows 10 и 11 наиболее вероятной причиной этой неполадки являются выпущенные Microsoft обновления безопасности KB5005565, KB5005652 и KB5006670.
В задачу которых входит закрытие уязвимости CVE-2021-1678, более известной под названием Windows Print Spooler Spoofing Vulnerability.
Устранить вызываемую обновлениями ошибку можно их удалением, однако в списке установленных патчей безопасности они отсутствуют. При желании удалить их, конечно, можно, но есть более избирательное и тонкое решение — отключение защиты от CVE-2021-1678 в реестре.
Откройте редактор реестра командой regedit и разверните ветку:
HKLM\SYSTEM\CurrentControlSet\Control\Print
Создайте в правой колонке новый параметр типа DWORD,
назовите его RpcAuthnLevelPrivacyEnabled, а в качестве его значения установите 0 (оставьте по умолчанию).
Перезагрузите компьютер и попробуйте подключиться к сетевому принтеру.
Если ошибка была вызвана защитой от указанной выше уязвимости, соединение с устройством установится в штатном режиме.
В случае отсутствия результата попробуйте такое дополнительное решение.
Перейдите в редакторе реестра к ветке HKLM\SOFTWARE\Policies\Microsoft\Windows NT\Printers и посмотрите, имеются ли в последнем подразделе какие-либо параметры или вложенные подразделы. Если имеются, удалите их, не забыв перед этим создать на всякий случай точку восстановления системы.
Как вариант, в разделе Printers можно создать подраздел PointAndPrint с DWORD-параметром RestrictDriverInstallationToAdministrators и значением 0. Не забываем, что после внесения изменений в реестр нужно перезагружать систему.
Если применением твиков ошибку 0x0000011b при подключении принтера устранить не удается, удалите указанные патчи безопасности, выполнив в запущенной от имени администратора командной строке команду wusa /uninstall /kb:xxxxxxx, где xxxxxxx — номер пакета обновления.
Нельзя исключать, что ошибка 0x0000011b может быть вызвана и другими причинами, на что косвенно укажет отсутствие положительного результата от предпринятых действий. В таких случаях рекомендуется выполнить переустановку принтера, а также проверить сетевые настройки на компьютере.
Загрузка…
Ошибка 0x0000011B появляется при попытке использовать сетевой принтер с компьютера с Windows 7, 10, 11. При чем может возникать как на отдельных устройствах, так и на всех параллельно. Ошибка появилась после очередного обновления системы безопасности, которое недавно выпущено Microsoft. Причиной является серия изменений в системе безопасности, призванные закрыть уязвимость подмены диспетчера очереди печати в Windows. После последнего патча (от 14 сентября) для устранения проблемы, возникла другая проблема на уровне аутентификации TPC в сетевых принтерах.
Причины ошибки 0x0000011B
На текущий момент главная причина проблемы – новые сценарии обеспечения безопасности для Windows. Логично, что исправить ошибку 0x0000011B можно путем удаления проблемного обновления. Вот только появляется другая проблема – известные уязвимости системы. Однако есть способ одновременно и защититься от хакерских атак, и получить доступ к сетевым принтерам.
Что делать для исправления ошибки?
Сегодня есть 2 известных и действенных исправления ошибки 0x0000011B:
- Изменить проблемное значение в реестре.
- Удалить проблемное обновление.
Также есть большая вероятность, что Microsoft уже выпустила исправление ошибки к тому моменту, когда вы будете читать данную статью. Поэтому первым делом стоит проверить наличие обновлений и установить их. Если все еще не вышел фикс данного бага, следуйте приведенным ниже инструкциям.
Способ 1: отключить защиту от CVE-2021-1678
Именно попытка защиты от CVE-2021-1678 и привела к появлению ошибки 0x0000011b. Благо, изменив один из параметров реестра, удастся добиться сразу двух целей: защититься от уязвимости «Призрачного принтера» и MSHTML, а также исправить сбой подключения к принтеру.
Что же нужно сделать:
- Жмем правой кнопкой мыши по «Пуску» и выбираем элемент «Выполнить».
- В новую строку вводим regedit и кликаем по «Ок».
- Последовательно открываем следующие папки HKEY_LOCAL_MACHINE\System\CurrentControlSet\Control\Print.
- В конечном каталоге переходим в правое окно и ищем параметр с названием RpcAuthnLevelPrivacyEnabled. Если его здесь нет, следует создать новый 32-разрядный параметр DWORD.
- Устанавливаем для него значение 0.
Примечание! Это и другие исправления из данной инструкции применимы для устранения ошибки 0x0000011b как в Windows 10, так и в Windows 11.
Способ 2: удалить проблемное обновление
Чтобы убрать корень текущей ошибки, нужно всего лишь удалить обновление, которое и вызвало появление сбоя. Его код — KB5005565. По нашему мнению, это не лучшее решение, так как оно не только исправляет ошибку 0x0000011b, но и делает компьютер уязвимым к PrintNightmare и MSHTML. Учитывая потенциальную опасность процедуры, лучше выбрать первый способ. Однако, если вы здраво оцениваете риски (они действительно не очень большие) и готовы подождать выхода более стабильного исправления, можно приступать к процедуре удаления обновления.
Инструкция:
- Нажимаем комбинацию Win + X и выбираем из меню Пуска – «Программы и компоненты».
- Переходим на вкладку «Просмотр установленных обновлений».
- Ищем то, что имеет код KB5005565, нажимаем по нему правой кнопкой мыши и выбираем «Удалить».
- Перезагружаем компьютер, чтобы система работала более стабильно.
Полезно! Если ошибка появилась на Windows 7, она ей несвойственна, на подобные заявления встречались, следует попробовать переподключить принтер. У многих данное решение сработало.
На этом все, мы перечислили все известные исправления ошибки 0x0000011B в Windows 7, 10, 11. До сих пор они помогали, надеемся, сработают и в вашем случае.
Even though we are living in the digital era, it is impossible to deny the significance of printers. For the same reason, we know how frustrating it is to see a message like the operation failed with error 0x0000011b when trying to print something or add a shared network printer.
Full message that shows up during the issue is, “Windows cannot connect to the printer operation failed with an error 0x0000011b”. If you want to know what is 0x0000011b then this is an error code that appears when you try to add a printer to your computer or run a print job and it fails. The causes of this shared network printer problem are Windows updates such as KB5005627, Printer Spooler service, and Dynamic IP Address. You know the problem appears when you try to connect to a printer over the internet. That means the issue may be associated with either the host (to which the printer is directly attached) or the client (from where you want to access the printer over the web). We will give you nine solutions. Do not rush into one or two to declare the problem is unsolvable. Just go through each one and follow the steps in the given manner.
Shared Network Printer Error 0x0000011b
Here is How to Fix Printer Error 0x0000011b in Windows 11 or 10 –
Way-1: Uninstall Recent Updates
You may not care about the updates getting installed in the background because they generally strengthen the security and enhances the features on the computer. However, many people have confirmed that patches like KB5007189, KB5006738, KB5006670, KB5005565, KB5005573, and KB5005568 (vary according to your Windows version) harm network printers. In case, you have installed any of these Windows updates you will undergo the printer error 0x0000011b. Therefore, uninstall them using the below steps –
For Windows 10 –
- Press Windows and I.
- Select – Update & Security.
- On the next Settings page, click on Update history from the right pane.
- Select – Uninstall updates.
- A window opens from Control panel; find and right-click on the Installed update (Showing as KB123456)
- Click on – Uninstall.
- Choose Yes on the confirmation dialog.
For Windows 11 –
- Press – Win+I.
- Select – Windows update.
- Go to the right and click on – Update history.
- Scroll down to the bottom and click – ‘Uninstall updates’.
- Locate the update and select – Uninstall.
- Click on Yes on the confirmation dialog box.
You can uninstall the update using command prompt in both Windows 10 and 11 –
- Click – Search from the taskbar.
- Type – CMD.
- Select – Run as an administrator.
- On the UAC dialog, click on OK.
- On Administrator: Command Prompt, type
wusa /uninstall /KB:123456(Replace 12345 with your update KB number) - Press Enter.
- When you are asked to confirm; click on Yes.
Further, you should pause or block the update for the time being – Windows 10 Update Disable Tool [Download]
Way-2: Restart Printer Spooler Service
Oops, did the previous fix not work for you? Don’t worry, restarting the spooler service may do the trick to solve Windows cannot connect to the printer 0x0000011b error.
We have already given you a small introduction about the printer spooler (when talking about the causes). If the issue pertains to the same, following the steps mentioned below is the best thing you can do –
- Press Windows key+R to get the run dialog box.
- Enter services.msc into the text field.
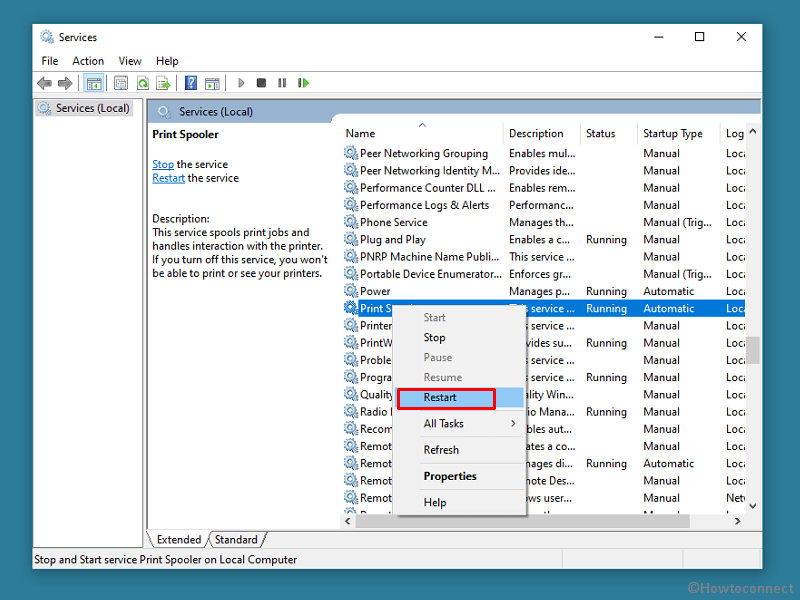
- You will get a list of services on the main panel. Just locate Printer Spooler.
- Right-click on it and select Restart.
- Wait for a minute to finish the stopping procedure.
- Restart the computer to be on the safe shore.
Way-3: Add Printer Manually Using its IP Address or hostname
If the 2 solutions didn’t work, you must try adding the printer through the manual method. We hope it will solve the Printer operation failed with error 0x0000011b on Windows 11 or 10. For this method to work, you must know the IP address of the printer. See – How to Find Printer’s IP and MAC Address in Windows 10. Now follow the steps –
For Windows 10 –
- Open Windows Settings (Winkey+I).
- Select – Devices.
- From the left pane on the next page, click on – Printers & Scanners.
- Click on Add a printer or scanner from the right.
- After a while, select – The printer that I want isn’t listed.
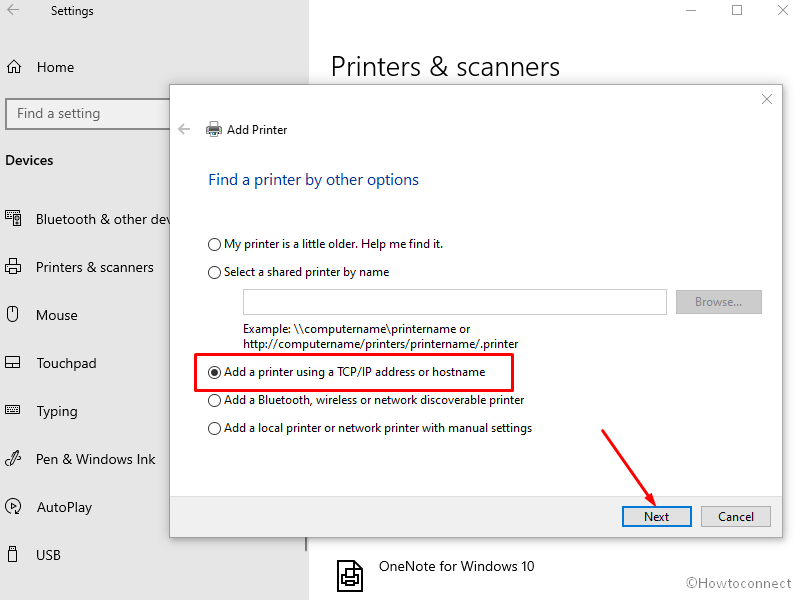
- A window named Add Printer will appear.
- Here, you will see half a dozen options, of which the third one (Add a printer using a TCP/IP or hostname) should be your pick. Click on Next.
- Go with the prompts on the screen. You need to enter the IP address on a given field along the way.
- Hit Next and try printing the test page.
For Windows 11 –
- Click on Start and select Settings.
- Select Bluetooth & devices on the Settings window.
- Go to the right pane and click – Printers & Scanners
- Now click the button for – Add device.
- After a while, beside ‘The printer that I want isn’t listed’, select – Add manually.
- Follow from Step 6 to 9 as for Windows 10.
Way-4: Deactivate Print Spooler RPC Encryption
Having print spooler RPC encryption enabled may be a caveat on some computers. So, we are going to disable the same on both the host and the client.
- Click – Start.
- Type – regedit.
- Press – Enter.
- Select Yes on User account control.
- Once Registry Editor opens, navigate to –
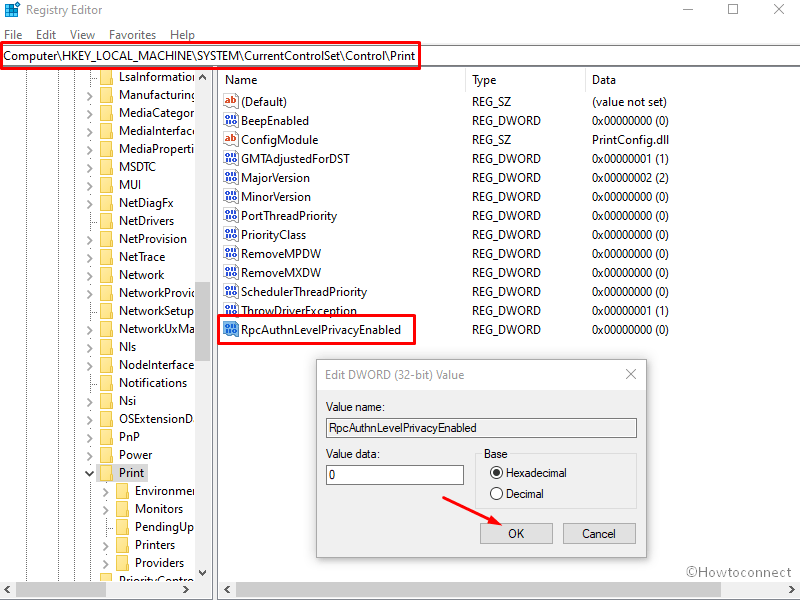
HKEY_LOCAL_MACHINE\System\CurrentControlSet\Control\Print
- Right-click on the Print folder and follow New >> DWORD (32-bit) Value.
- Name it RpcAuthnLevelPrivacyEnabled.
- Give the Value data as 0 (zero).
- Click on OK.
- Don’t forget to restart the system for the recent changes to take effect.
Source – Microsoft support.
Way-5: Modify Registry
This method is a Microsoft recommended solution to deal with printnightmare problem and the company suggests adding a new value to Registry. Printnightmare bug has been one of the reasons of 0x0000011b Windows cannot connect to printer error in Windows 11 or 10. However, this method will involve Registry Editor to repair the bug but you can perform the same task using command prompt more easily –
- Press Windows+R.
- Type – cmd.exe.
- Hit – Ctrl + Shift +Enter.
- Click Yes on the verification dialog.
- Copy the following command and paste it into command prompt –
reg add "HKEY_LOCAL_MACHINE\Software\Policies\Microsoft\Windows NT\Printers\PointAndPrint" /v RestrictDriverInstallationToAdministrators /t REG_DWORD /d 1 /f- Now, press Enter.
- Reboot the system and check if 0x0000011b still persists.
Way-6: Update printer driver
Operation failed with error 0x0000011b might also befall because of obsolete printer driver. Once after getting outdated the driver software becomes buggy and incompatible with the current Windows version and instead of assisting the hardware it starts fighting the system files. Result is Windows cannot connect to the printer error in Windows 11 or 10 that can be only fixed by updating the driver. So, follow the steps to do this –
- Right click on ‘Start’ located on the taskbar.
- Select – Device Manager.
- Once the Windows tool loads on the screen, look for Printer in the list.
- If not found click on View from the top menu bar.
- Choose – Show hidden devices.
- Now go to Printer and double click on it.
- Right-click on the problematic device and select Update driver.
- Select – Search automatically for drivers.
- There may be a chance where the printer is not getting updated by this method. In this case, go to the manufacturer’s website.
- Match the model number of your printer there to reach the software download page.
- Download the correct and most recent driver.
- From the download location double click on the Setup.
- Follow the onscreen instructions and complete the installation.
- Restart the PC to solve the Windows cannot connect to the printer error.
Way-7: Uninstall and Reinstall printer driver
Sometimes, mere updating the printer driver is not enough to rescue shared network printer error 0x0000011b in Windows 11 or 10 but you need to uninstall and reinstall it. Despite everything being fine with the driver, system might not support it to be perfectly installed. Reason may be power surges, glitches in system files, buggy updates, etc. Therefore, uninstall and reinstall the printer driver using the below guidelines –
- Press Winkey and R.
- Type devmgmt.msc.
- Hit ‘Enter’.
- On the Device Manager, expand Printer by double-clicking on it.
- Right-click on the culprit driver and select – Uninstall device.
- On the warning pop-up, click on “Uninstall”.
- Reboot the machine and check the status of the error.
See – How to Reinstall Printer Driver in Windows 11 or 10.
Way-8: Reset print spooler
Corrupted or incorrectly configured Print spooler services on of the root causes of error code 0x0000011b. This is the main component to control the printing jobs on WIndows which oftentimes causes issues. Luckily, you have the ability to repair the spooler by resetting it –
- Press – Windows and R.
- Copy the path for the following folder location without quotes – “%WINDIR%\system32\spool\printers”.
- Now paste it into the Run dialog box.
- Hit – Enter.
- Once a folder opens, select all the items there (Ctrl+A).
- Press – “Delete”.
- Reboot and see if the error code no longer occurs.
Read the method in detail – How to Reset the Print Spooler in Windows 11 or 10.
Way-9: Run Printer Troubleshooter
In case, the issue still persists, you must try opening up the printer troubleshooter which automatically finds issues and repairs them in a few clicks. This is a default Fixit tool and you can solve the error using the below steps –
For Windows 10 –
- Press Windows+S.
- Type – troubleshooter.
- Press – Enter.
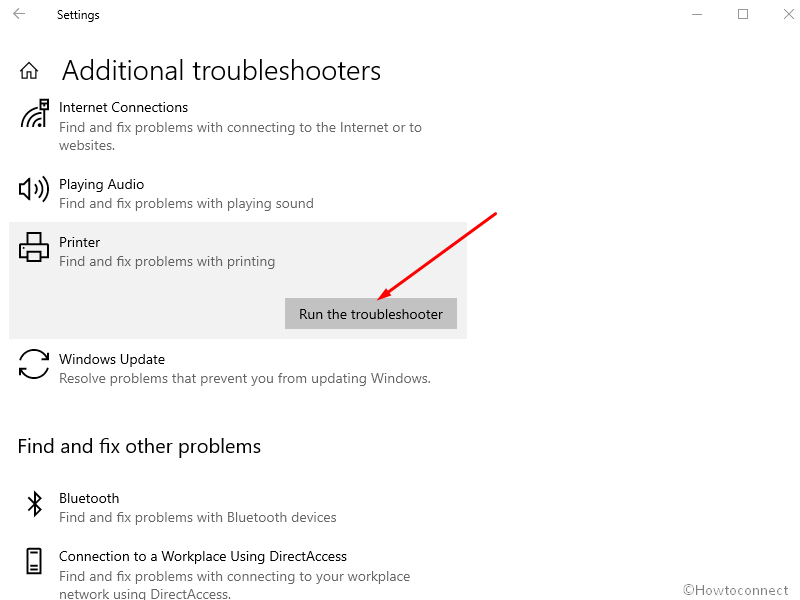
- On the Settings page that appears, click on – Additional troubleshooters.
- Click on Printer.
- Select – Run the troubleshooter.
For Windows 11 –
- Press Win+I.
- Select Troubleshoot from the right side.
- Click on – Other troubleshooters.
- In the Printer section, click on – Run.
- Finally, the tool will start detecting problems and print spooler then repair them if needed.
See – Download Printing Troubleshooter Windows 10.
Methods list:
Way-1: Uninstall Recent Updates
Way-2: Restart Printer Spooler Service
Way-3: Add Printer Manually Using its IP Address
Way-4: Deactivate Print Spooler RPC Encryption
Way-5: Modify Registry
Way-6: Update printer driver
Way-7: Uninstall and Reinstall printer driver
Way-8: Reset print spooler
Way-9: Run Printer Troubleshooter
That’s all!!
Repair any Windows problems such as Blue/Black Screen, DLL, Exe, application, Regisrty error and quickly recover system from issues using Reimage.
Written by on
How to Fix Error 0x0000011b “Windows cannot connect to the printer” on Windows 11/10
Printing documents on Windows 11/10 is usually a breeze, but error 0x0000011b may prevent you from connecting to your printer. If you’re getting this error, follow our troubleshooting instructions in this article to fix it.
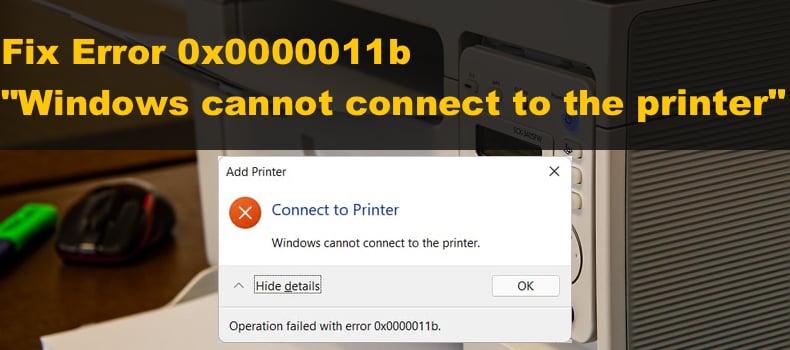
The entire error message text reads as follows:
Windows cannot connect to the printer.
Operation failed with error 0x0000011b.
What is Error 0x0000011b?
Error 0x0000011b usually occurs when trying to print something using a network-shared printer.
According to user reports, error 0x0000011b started occurring on Windows 10 after installing security updates KB5005568, KB5005566, and KB5005565, which are aimed at protecting from Windows Print Spooler Spoofing. Several users have reported getting this error after installing KB890830.
These updates interfere with the TPC authentication level for network printers and trigger the error. Uninstalling the updates usually solves the issue but will leave your network vulnerable to the PrintNightmare and MSHTML vulnerabilities.
Video on How to Fix Error 0x0000011b «Windows cannot connect to the printer»
Table of Contents:
- Introduction
- Disable Print Spooler RPC Encryption On the Host Computer
- Video on How to Fix Error 0x0000011b «Windows cannot connect to the printer»
Disable Print Spooler RPC Encryption On the Host Computer
If you can’t print documents on a network-shared server, disable the print spooler privacy settings on the client and print server. Setting the RpcAuthnLevelPrivacyEnabled value to 0 disables the RPC communication encryption with network printers and print servers. This method will work for Windows 11 and Windows 10 computers.
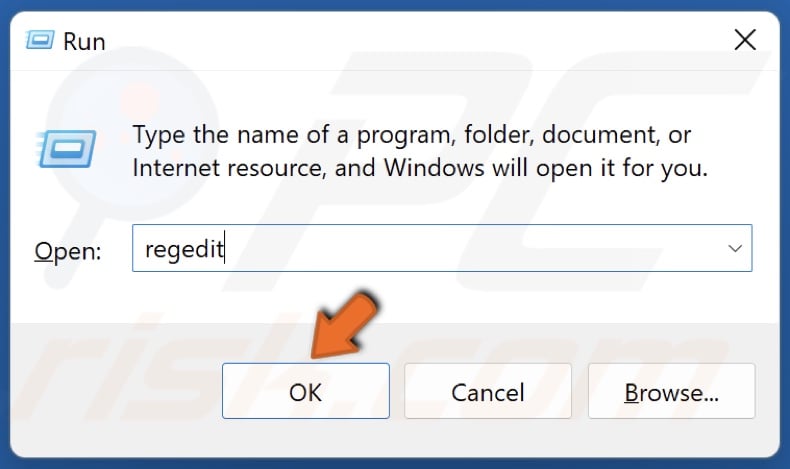
1. On the host computer, hold down Windows+R keys to open Run.
2. In the Run dialog box, type in regedit and click OK.
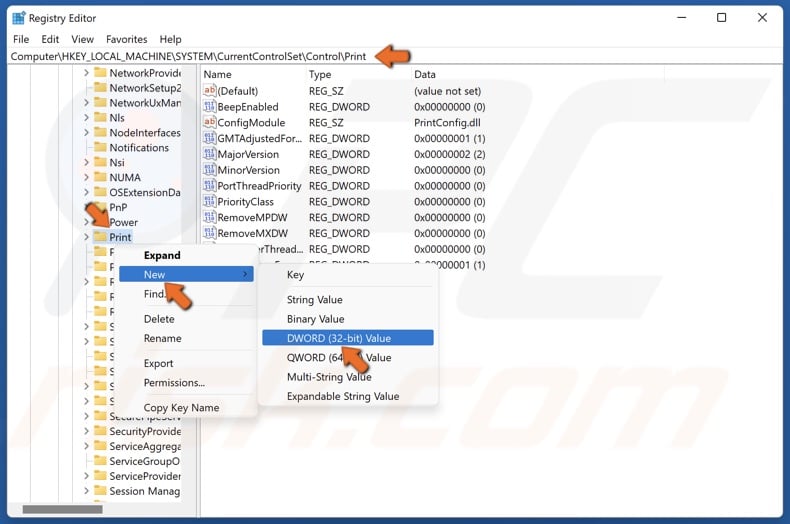
3. In the Windows Registry Editor, navigate to
HKEY_LOCAL_MACHINE\System\CurrentControlSet\Control\Print
4. Right-click the Print registry key, select New, and click DWORD-32 bit Value.
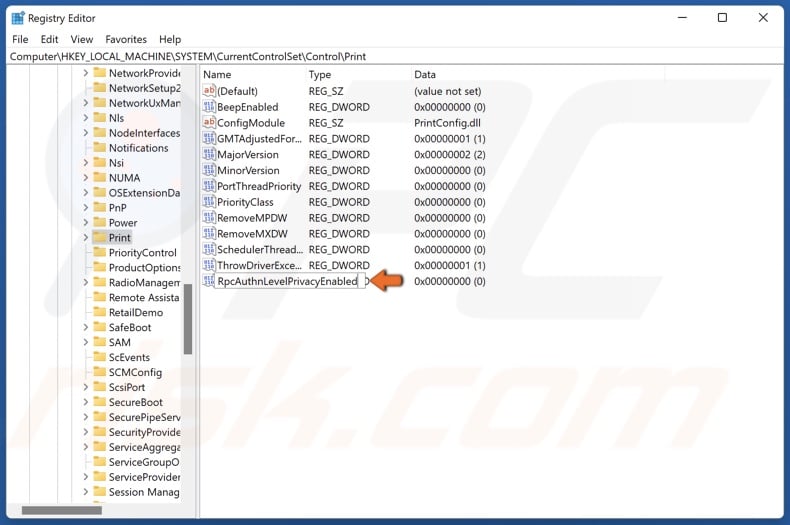
5. Name the new key RpcAuthnLevelPrivacyEnabled
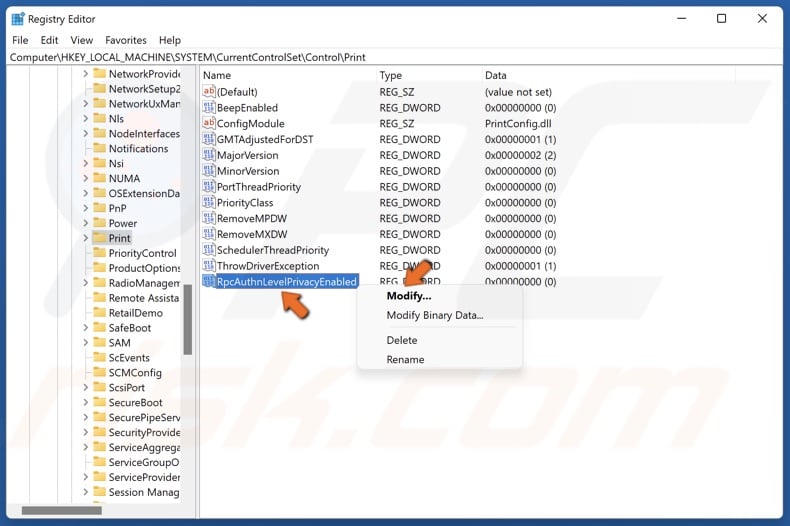
6. Right-click RpcAuthnLevelPrivacyEnabled and click Modify.
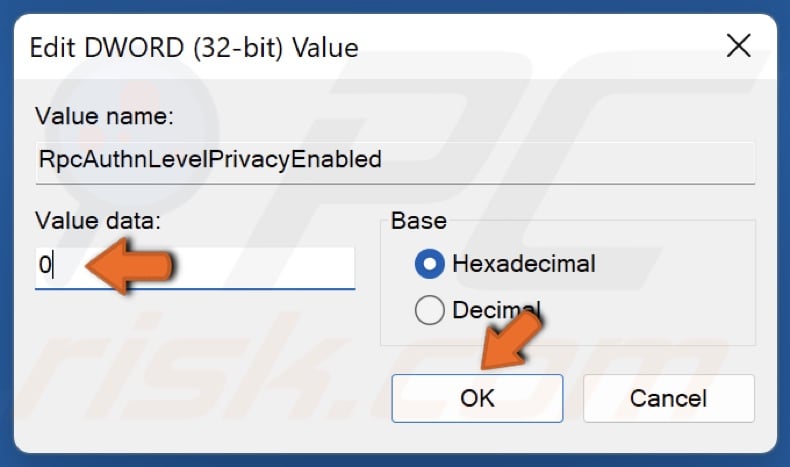
7. Set the Value data to 0 and click OK. Close the Windows Registry Editor.
8. Hold down Windows+R keys to open Run.
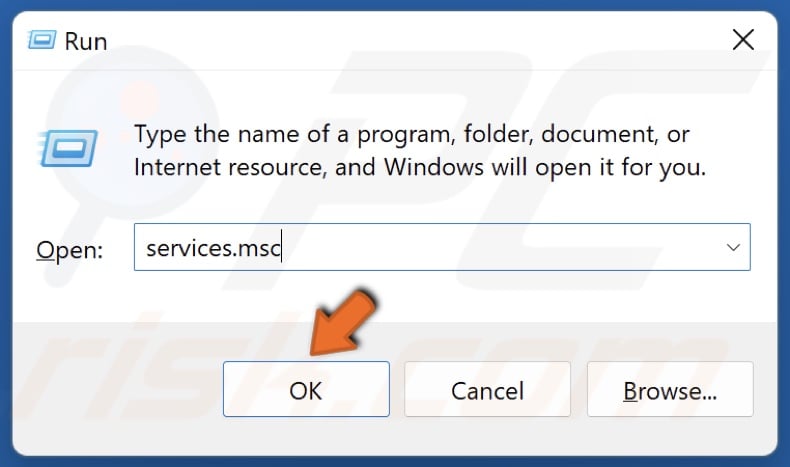
9. In the Run dialog box, type in services.msc and click OK.
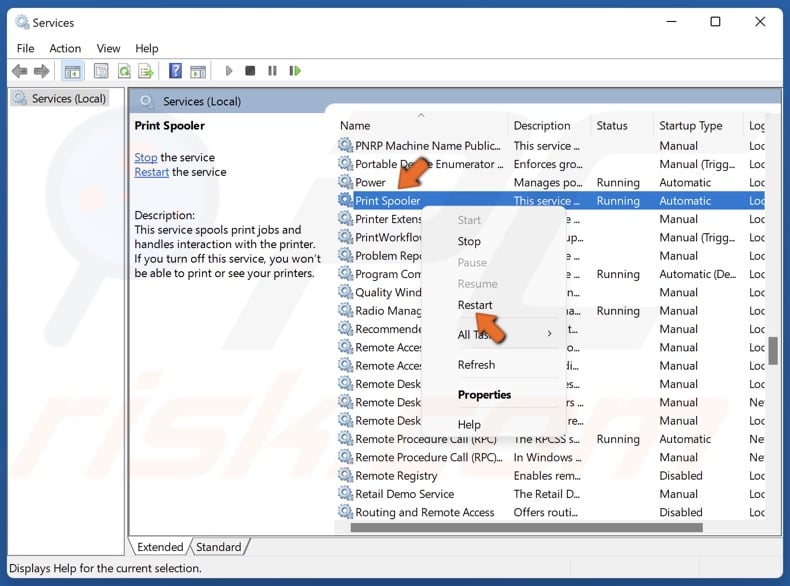
10. Find Print Spooler, right-click it and click Restart. Close the Services window.
11. Try connecting to your printer on the client computer.
Did this article help? Let us know by commenting below.
[Back to Top]

