Java is one of the best development tools for creating games and applications and server-side programs. Games or apps written in Java need the Java Virtual Machine environment to run.
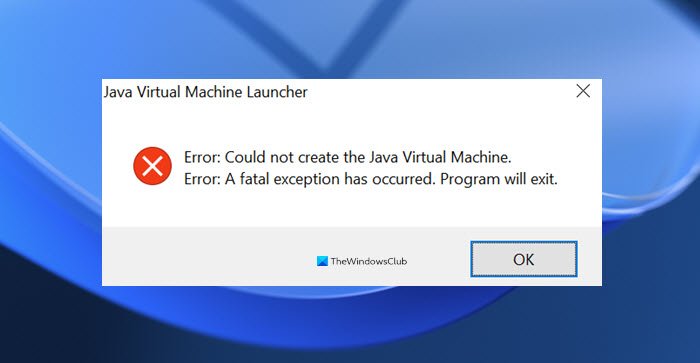
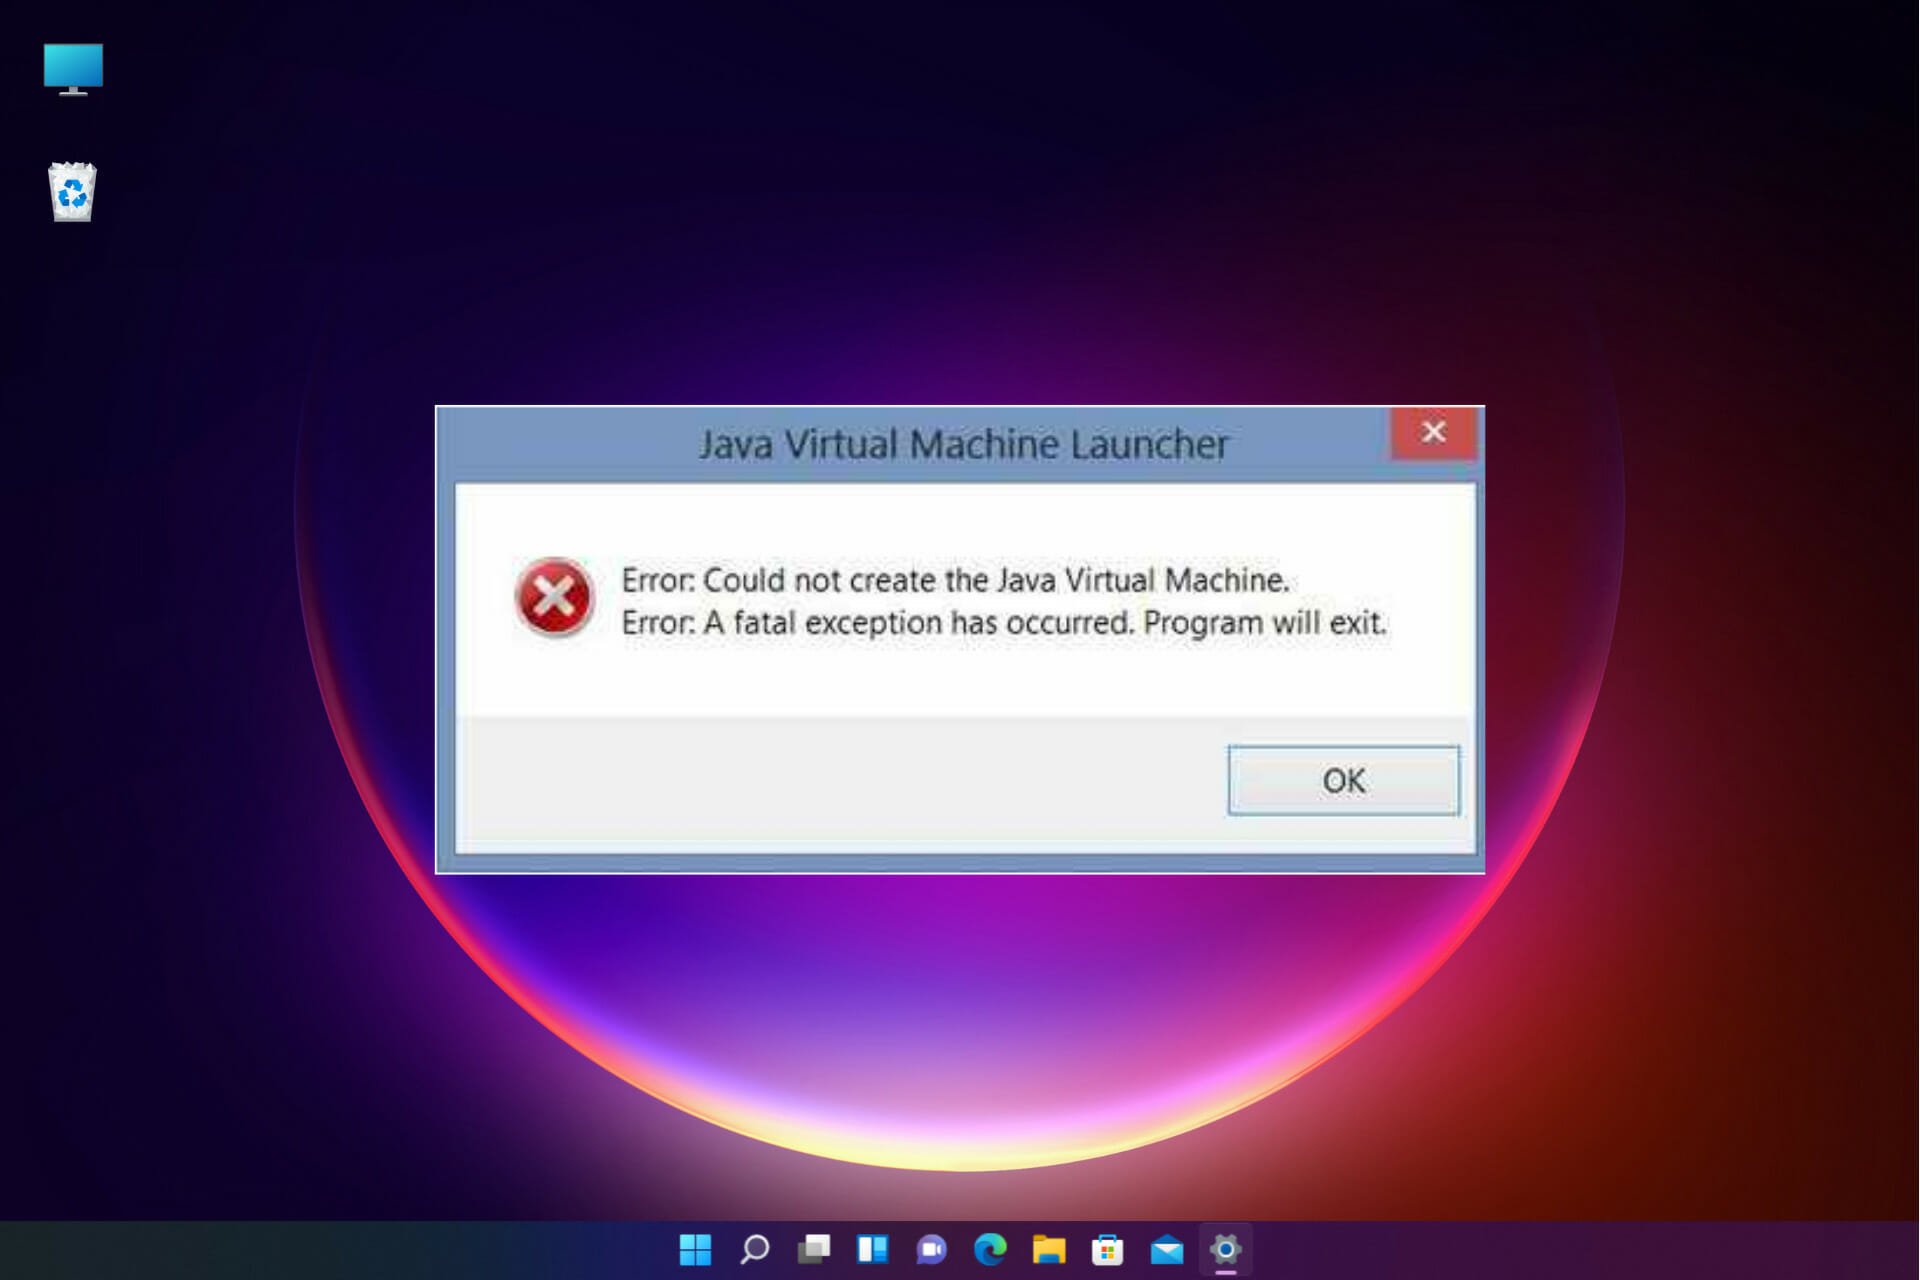
Games or applications developed with Java may crash unexpectedly or fail to open for various reasons, displaying the error «Could Not Create the Java Virtual Machine. Error: A fatal exception has occurred. Program will exit».

Below you will find several methods to resolve the Java Virtual Machine Launcher error «Could Not Create the Java Virtual Machine», in Windows 10/11 OS.
How to FIX: Could Not Create the Java Virtual Machine in Windows 10/11.*
* Suggestion: Before continuing with the following methods, try the following and see if the problem persists
-
- Install all Windows Updates.
- Press CTRL + SHIFT + ESC to open Task Manager and at Processes tab close all instances of Java Virtual Machine (right-click > End Task)
- 1. Install the Correct version of JAVA version for Java IDE app.
- 2. Increase Allocated Memory for JAVA Apps.
- 3. Launch JAVA with Admin rights.
- 4. Completely Remove and Reinstall JAVA.
Method 1. Install the Correct version of JAVA version for Java IDE app*
* Note: This method only applies to users using a JAVA IDE application for coding.
If you receive the mentioned error on a JAVA IDE application, you must ensure that the installed version of Java is compatible with the Java version (JRE or JDK) is running on JAVA IDE (Java Integrated Development Environment) application. So, proceed as follows:
Step 1. Check the JRE/JDK running version of JAVA IDE.
e.g. In the Eclipse IDE, check which version of the JRE or JDK it is running on by following the steps below:
1. From main menu, click Help > About Eclipse.
2. Click on Installation Details and choose the Configuration tab.
3. In the ‘Eclipse IDE Installation Details’ window, look at the line starting with -vm
4. The value at the line below will show you which JDK or JRE version on which Eclipse is running.
- e.g.: If the path contains “jre6”, that means that Eclipse is running JRE version 6
- e.g.:If the path contains «jdk1.8.0_05» means that Eclipse is running JDK version 8.
Step 2. Check which version of JRE or JDK is installed on Windows.
1. In the Search box type: cmd (or command prompt). Then select Run as administrator.

2. To find out the installed JAVA version give the following command and hit Enter:
- java –version

3. If the IDE does not support the Java version on your device, proceed to install the correct version of Java. *
* Note: In some cases the installed JRE & JDK versions may be different. So, if you JAVA IDE application running on JDK, proceed and check also if the installed JDK matches the running JDK of the JAVA IDE app. To find out the installed JDK version on Windows, give the following command:
- javac -version
Method 2. Increase Allocated Memory for JAVA Apps.
Launching an application that exceeds the maximum memory size of the Java virtual machine could result in the error «Could Not Create the Java Virtual Machine». To work around this problem, go ahead and increase the allocated system memory that JAVA can use as follows:
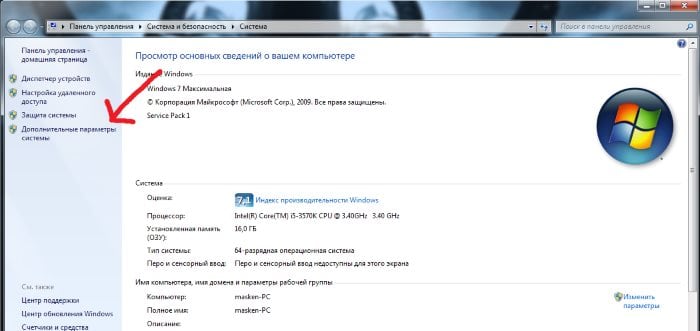
1. Click on the Start menu and type in search bar: view advanced system settings. Then click Open.
![image_thumb[8]](https://www.wintips.org/wp-content/uploads/2022/02/image_thumb8_thumb.png "image_thumb[8]")
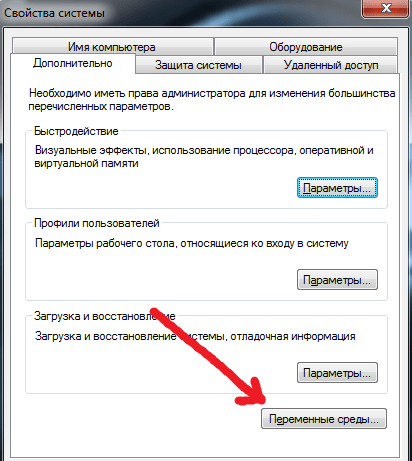
2. In the ‘System Properties’ window, select the Advanced tab and click Environment Variables.

3. Below the System variables pane, select New.

4. Set the Variable name as _JAVA_OPTIONS and the Variable value as -Xmx1024M. Then, click OK twice to save the change and close all open windows. *
* Info: This will adjust the allocated memory for Java to 1GB (1024MB).

5. Restart your machine to apply the change.
6. Finally try to open your game or app on Java Virtual Machine. The problem should be gone.
Method 3. Launch java.exe with Admin rights.
The Java error also appears when the user does not have the admin rights or permissions to launch certain executables. Configuring Java to always run as an Administrator could fix the problem.
1. Press the Start menu and type Java in the search box.
2. Click Open file location.

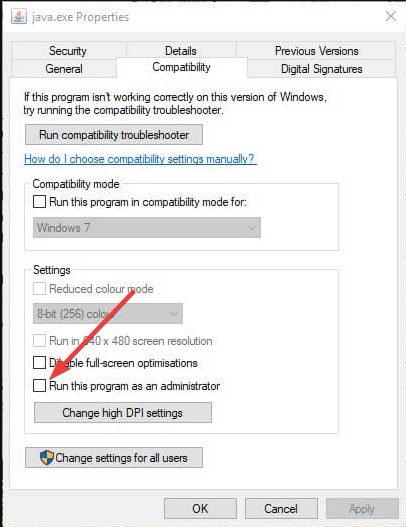
3. In the File Explorer window, right-click the Java executable file and select Properties.

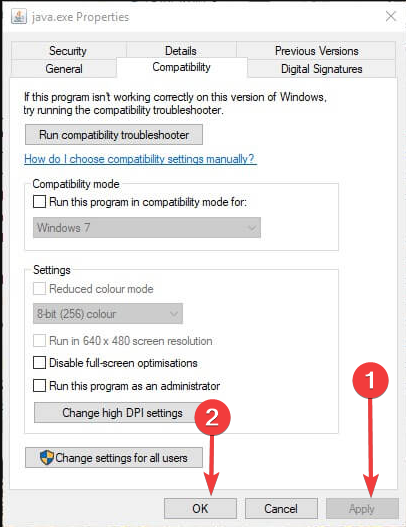
4. At ‘java Properties» window select the Compatibility tab and below the Settings pane, check the box Run this program as an administrator. Then click Apply and OK.

5. Finally, start the program that cannot run because of the «Could Not Create the Java Virtual Machine» error and see if the problem persists.
Method 4. Completely Remove and Reinstall JAVA.
In some cases, Java may be corrupted or missing components, causing games or applications you are trying to run to close. In this case, follow the instructions below to remove all versions of JAVA versions from your computer and reinstall it.
1. Download Java Uninstall tool.
2. Run the tool and select to remove all Java versions.

3. After removal, proceed and delete the Java folder(s) from the following locations on disk (if exist):
- C:\Program Files\
- C:\Program Files (x86)\
4. Restart your computer.
5. After reboot, visit Java official download page to download and install the latest version of Java.

That’s it! Which method worked for you?
Let me know if this guide has helped you by leaving your comment about your experience. Please like and share this guide to help others.
A programming language like Java is more than just a way to write programs; game and app developers use it too. However, it’s very common to experience Java crashes. If you are having trouble when trying to launch an application that is built around Java, then this guide will help you fix the problem.
Not all Java virtual machine errors are the same. They can occur for many different reasons. In this article, we will explain the most common causes of Java virtual machine launcher error – Could not create the Java Virtual Machine and how to fix it.

What is Java in simple words?
Java is a popular programming language that can run on a variety of different operating systems and devices. It has many different uses, including in web development, mobile applications, desktop applications, and server-side programming. Java generates a virtual machine (VM) that executes the code written in Java. A Java virtual machine launcher error can occur if something goes wrong with the data or code that’s being processed by the Java virtual machine.
What is a Java virtual machine error?
A Java virtual machine error, also known as a JVM error, is classified as an error generated by the Java Virtual Machine. When this type of error occurs, it usually means that the computer cannot read or understand the code. This can happen for a number of reasons, such as when the computer isn’t updated with required patches or if it’s not compatible with Java. If you come across a JVM error while using your computer, it’s important to know how to recover from this problem. Here are some steps to take in order to fix this issue and continue using your computer.
Over the past couple of days, we have come to understand that some users have been experiencing an error known as Could not create the Java Virtual Machine. From what we’ve gathered, the error tends to pop up when a user is attempting to launch an application that was built using Java.
In order to resolve this issue, first, make sure that you have all of the necessary updates and that the program is installed correctly. After that, you can start looking for possible solutions to fix Java virtual machine launcher error on Windows 11/10:
- Add a new system variable for Java
- Run Java.exe as administrator
- Uninstall & Reinstall the Java application.
Could not create the Java Virtual Machine
Now let’s take a closer look at them:
1] Add a new system variable for Java
To fix this error, you must add a new variable to Java’s system and see if it solves the error. Please follow the steps below to resolve this issue:
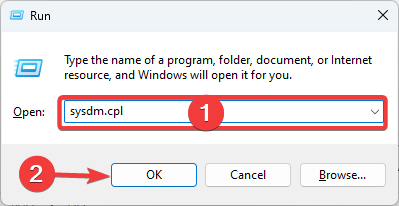
- Right-click on the Start menu and select Run from the menu list.
- Type sysdm.cpl in the search box and click the OK button.
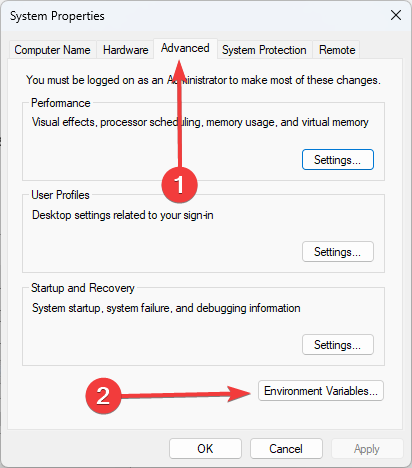
- Go to the Advanced tab and select Environment Variables at the bottom.
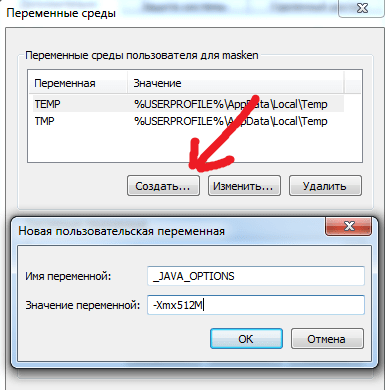
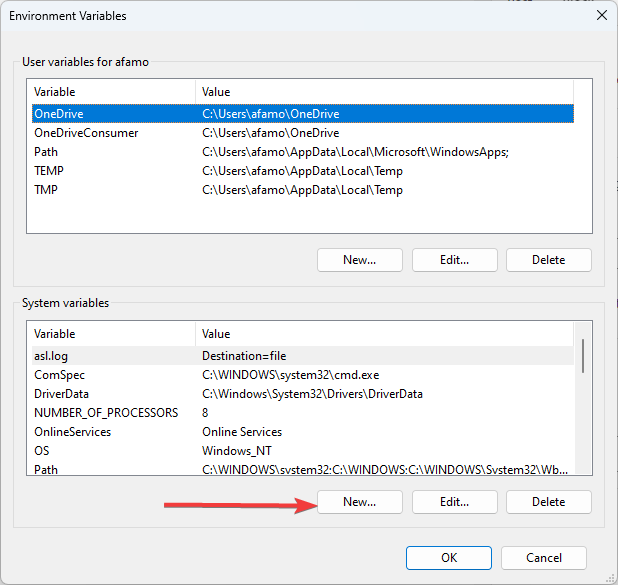
- Under the System variables section, click on the New button.
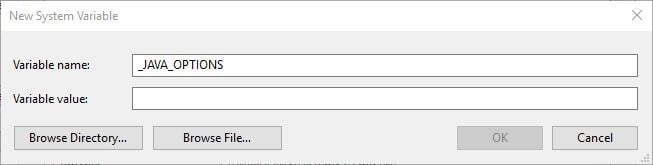
- On the next screen, type _JAVA_OPTIONS in the Variable name field.
- You will then need to input –Xmx512M in the Variable value box.
- Now click on the OK button to apply the changes.
Below you can find a detailed explanation of the above steps:
To get it started, open the System Properties window first. This can either be done through the Run dialog box or the File Explorer.
So, press the Windows + R keyboard shortcut to launch the Run command. Then type sysdm.cpl in the search box and click the OK button.
Alternatively, open File Explorer using Windows + E keyboard shortcut. Then right-click on This PC and select the Properties option from the context menu.

Inside the System Properties window, select Environment Variables at the bottom of the Advanced tab.

Then click on the New button in the System variables section.

You will now need to type _JAVA_OPTIONS in the Variable name field. To set a variable, you will need to enter –Xmx512M in the Variable value text box. By doing this, the RAM allocation will increase to 512 megabytes.
Once you have made your changes, click OK to save them. Also, click OK on the Environmental window.
2] Run the program as an administrator
According to the reports, some users could able to solve this error when they open the Java executable file with administrative privileges. The following steps will guide you through doing this:
- Press Windows key + Q keyboard shortcut.
- Type Java in the search box.
- Right-click on Java and select Open file location from the context menu.
- On the next page, right-click on Java executable file and select the Properties option.
- When the Java Properties window opens, switch to the Compatibility tab.
- Under the Settings section, mark the checkbox next to the Run the program as an administrator.
- Click on Apply and then hit the OK button to save changes.
- Now close the File Explorer window.
When you have finished all the steps above, restart your computer and see if the problem has been resolved now.
3] Uninstall & Reinstall the Java application
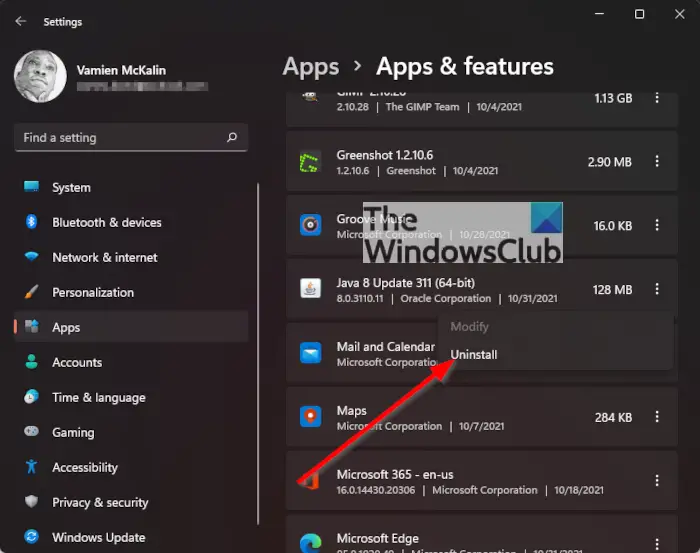
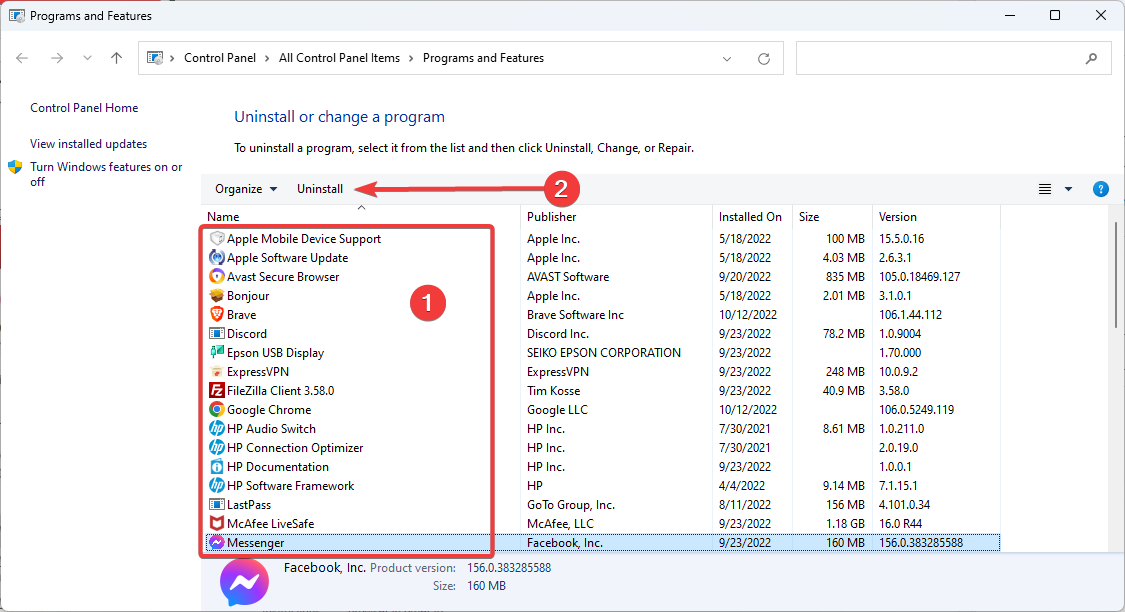
You could reinstall the Java JRE application. However, before we go down that road, it makes a lot of sense to uninstall the program first. Do this by pressing the Windows key + I to fire up the Settings menu, then go to Apps > Apps & Features. Scroll down until you’ve come across the Java program, then click on the three-dotted button, and be sure to select Uninstall to remove it.
In terms of reinstalling the app, you must visit the official Jave Runtime Environment page and download it for your Windows 11 computer. Once you’re done, install the tool, then restart your computer. From there, go ahead and check if Could Not Create The Java Virtual Machine is still showing up.
That’s it. Hopefully, one of these solutions will work for you!
What is the cause behind the Could not create the Java Virtual Machine error?
The cause for this error on Windows 11/10 varies quite a lot. For example, if you are running a homebrew Java application, then maybe it is being invoked by the wrong options. Alternatively, the Java application you’re trying to open could fail if the heap memory size is larger than the System Variable size.
What is Virtual Machine error in Java?
This error indicates that the Java Virtual Machine is not working properly or no longer has enough resources for it to continue operating.
Related:
- How to manually enable the latest Java version on Windows systems
- Java Install or Update did not complete – Error Code 1603.
Ошибка «Could not create the Java Virtual Machine» встречается во всех версиях операционной системы Windows. Она появляется как при запуске игр, которые требуют наличие виртуальной машины Java на устройстве, так и при установке самой виртуальной машины на компьютере. Текст ошибки Java Virtual Machine Launcher говорит нам следующее: системе не удалось создать виртуальную машину Java. В этой статье мы с вами рассмотрим причины, по которым возникает эта проблема и, конечно же, устраним саму ошибку.
Содержание
- Причины возникновения ошибки Джава
- Устраняем ошибку Java Virtual Machine Launcher
- Способ 2. Освобождаем оперативную память ПК
- Дополнительные методы устранения ошибки
Причины возникновения ошибки Джава
Чаще всего на появление данной ошибки жалуются игроки Minecraft. При клике на лаунчер и очередной запуск любимой игры, пользователи сталкиваются с окном ошибки. Это происходит из-за того, что в предыдущий раз сессия игры была прекращена некорректно. Возможно вы не дождались полного завершения игры и выключили устройство.
Ошибка JVM при запуске игр и приложений может также возникать по причине недостатка оперативной памяти на вашем устройстве. Для работы виртуальной машины Java требуется определенное количество выделенной памяти компьютером. Для компьютера это очень ценный ресурс, чем этой памяти больше, тем быстрей и лучше процессор справляется с поставленными задачами.
Устраняем ошибку Java Virtual Machine Launcher
Рассмотрим самый распространенный способ исправить ошибку «Could not create the Java Virtual Machine» – создание новой переменной среды.
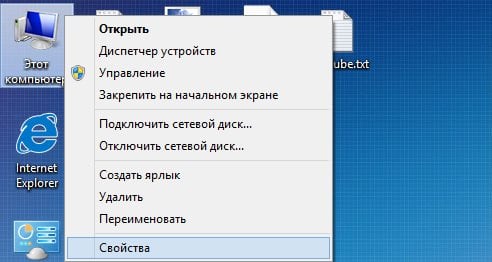
- Нажмите правой кнопкой по иконке «Мой компьютер» и выберите из контекстного меню «Свойства».

Выберите «Свойства» - В следующем окне в блоке слева выберите пункт «Дополнительные параметры».

- Далее найдите внизу окна кнопку «Переменные среды».

- Под списком переменных нажмите кнопку «Создать».

- Введите в первой строке «Имя переменной» – «_Java_Options», а напротив строки «Значение переменной» – значение «-Xmx512M» и подтвердите действия, нажав кнопку «Ок». Перезагрузите компьютер и попробуйте снова сделать те же действия, которые привели к ошибке.
Способ 2. Освобождаем оперативную память ПК
Следующий метод устранения ошибки заключается в освобождении оперативной памяти вашего компьютера. Как уже было сказано, ошибка может возникать по причине недостатка памяти. Чтобы ее освободить, нужно закрыть все ненужные программы, а также «убить» все лишние процессы. Ведь каждая программа нуждается в определенном количестве этого ресурса. На официальном сайте Майкрософт вы можете ознакомиться со всеми важными процессами Windows, прекращение которых повлечет за собой сбои системы. Чтобы остановить лишние процессы:
-
- Нажмите сочетание клавиш CTRL+SHIFT+ESC для Windows 7,8,10. CTRL+ALT+DEL – для Windows XP.
- Откроется окно со списком запущенных программ и процессов на вашем ПК.

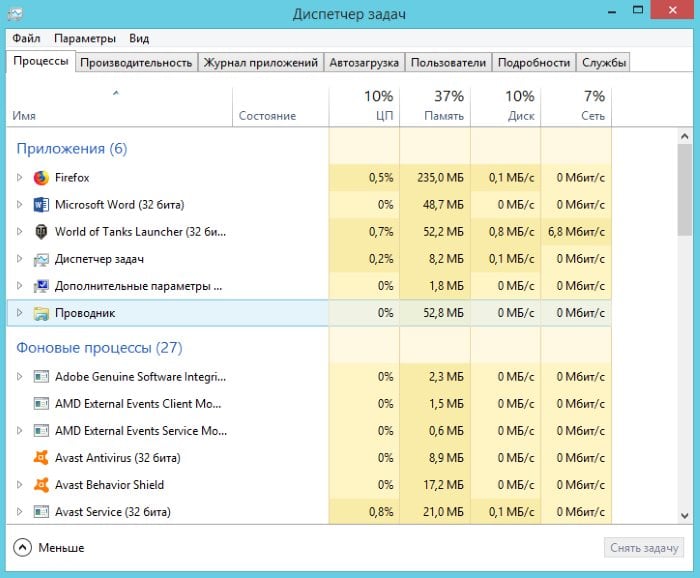
Чтобы закрыть программу или остановить процесс, нужно выделить мышью название программы или процесса, затем нажать на кнопку внизу окна «Снять задачу».
Некоторые запущенные фоновые программы не отображаются в списке, но их можно увидеть в списке процессов. Эта разнообразные модули обновлений, они работают в фоновом режиме и следят за выходом новых версий определенных программ. Они также потребляют оперативную память. Вашей задачей будет отыскать такие процессы и остановить для решения текущей проблемы. Когда вы очистите память и остановите все ненужные программы и процессы, попробуйте запустить снова игру, чтобы убедиться, что окно с ошибкой «Could not create the Java Virtual Machine» уже не появляется.
Дополнительные методы устранения ошибки
Если программное обеспечение, при запуске которого появляется ошибка, было скачано со сторонних ресурсов, варезных сайтов, торрент-трекеров, то его действия часто блокируют антивирусы. Чтобы избежать такой преграды при запуске вам необходимо проверить список карантина антивируса и, если в нем имеются игры или программы, вы можете их удалить с этого списка. Но будьте осторожны при этом. Ведь такое ПО может действительно нести угрозу для системы. Если вы полностью уверенны в программе или игре, вы можете добавить ее в список исключений. В таком случае антивирус перестанет «подозревать» такое ПО.
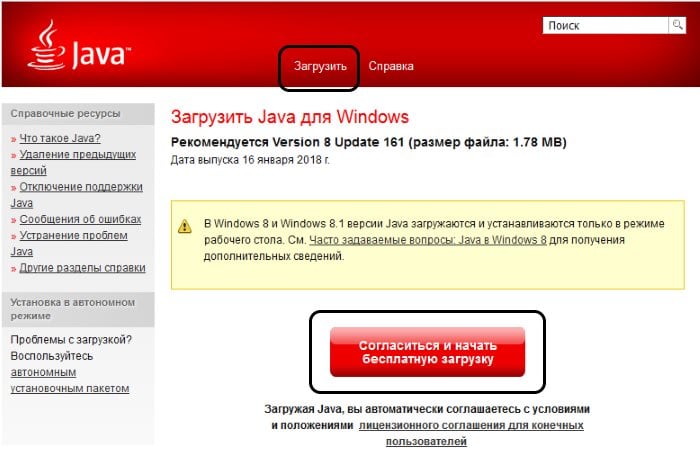
Если у вас не установлено программное обеспечение Java, вы можете загрузить его по ссылке https://www.java.com/ru/download/win8.jsp. Попадая на страницу, нажмите кнопку «Согласиться и начать бесплатную загрузку».
После этого будет загружен пакет данных, который нужно будет установить на свой ПК.
Причиной ошибки может также стать устаревшая версия Java. Если у вас уже были установлены более ранние версии Java, то их необходимо полностью удалить. Для этого вы можете воспользоваться специальной утилитой, которая помогает найти и проверить все файлы предыдущей версии. Скачать ее можно по следующей ссылке – https://www.java.com/ru/download/uninstalltool.jsp. Часто после полного удаления старой версии Java и установки последней, ошибка «Could not create the Java Virtual machine» навсегда исчезает.
Don’t hesitate to take a closer look at our quick solutions
by Matthew Adams
Matthew is a freelancer who has produced a variety of articles on various topics related to technology. His main focus is the Windows OS and all the things… read more
Updated on
- You should run the software as an administrator as the lack of rights can trigger the error.
- If you’re still experiencing this problem, it all comes down to reinstalling Java from scratch.
XINSTALL BY CLICKING THE DOWNLOAD
FILE
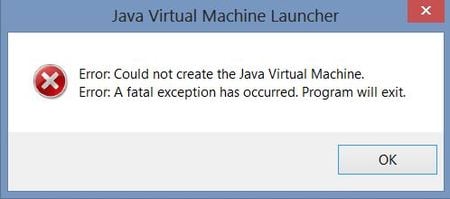
The Java virtual machine fatal exception error pops up for some users when they try to launch software built on Java. Minecraft users are no strangers to this issue.
The full error message states: Could not create the Java Virtual Machine. Error: A fatal exception has occurred. Consequently, the Java program doesn’t run, yet we will share some simple fixes.
Why am I getting Could not create Java Virtual Machine?
The following are some of the possible causes that you should pay attention to:
- Memory size issues – The Java Virtual Machine error often arises when Java needs a larger global maximum heap memory size. The problem was resolved by users increasing the maximum RAM allotted to Java.
- Incorrect path settings – In this case, you need to set or modify the path as described below.
- Corrupted files – Such files may contribute to this error, so note that reinstallation of Java should fix this. This applies the Windows error 2 while loading the Java VM error message as well.
Do I need to install JVM?
Any machine on which you want to run Java code must have the Java Runtime Environment (JRE) installed. This is because Java does not run natively on a computer as C++ or C does; instead, someone must translate Java’s instructions into machine code, which the JVM does.
This error may come in different shades, including Could not create the Java Virtual Machine in Android Studio, Docker, Pentaho, Elasticsearch, Sonarqube, Minecraft, Eclipse, React Native, and IntelliJ, yet rest assured that you’ll find our solutions useful.
How we test, review and rate?
We have worked for the past 6 months on building a new review system on how we produce content. Using it, we have subsequently redone most of our articles to provide actual hands-on expertise on the guides we made.
For more details you can read how we test, review, and rate at WindowsReport.
How do I fix Could not create the Java Virtual Machine error?
- Why am I getting Could not create Java Virtual Machine?
- Do I need to install JVM?
- How do I fix Could not create the Java Virtual Machine error?
- 1. Remove JDK (Java Development Kit)
- 2. Set up a new system variable for Java
- 3. Select the Run as administrator option for Java
- 4. Reinstall Java
1. Remove JDK (Java Development Kit)
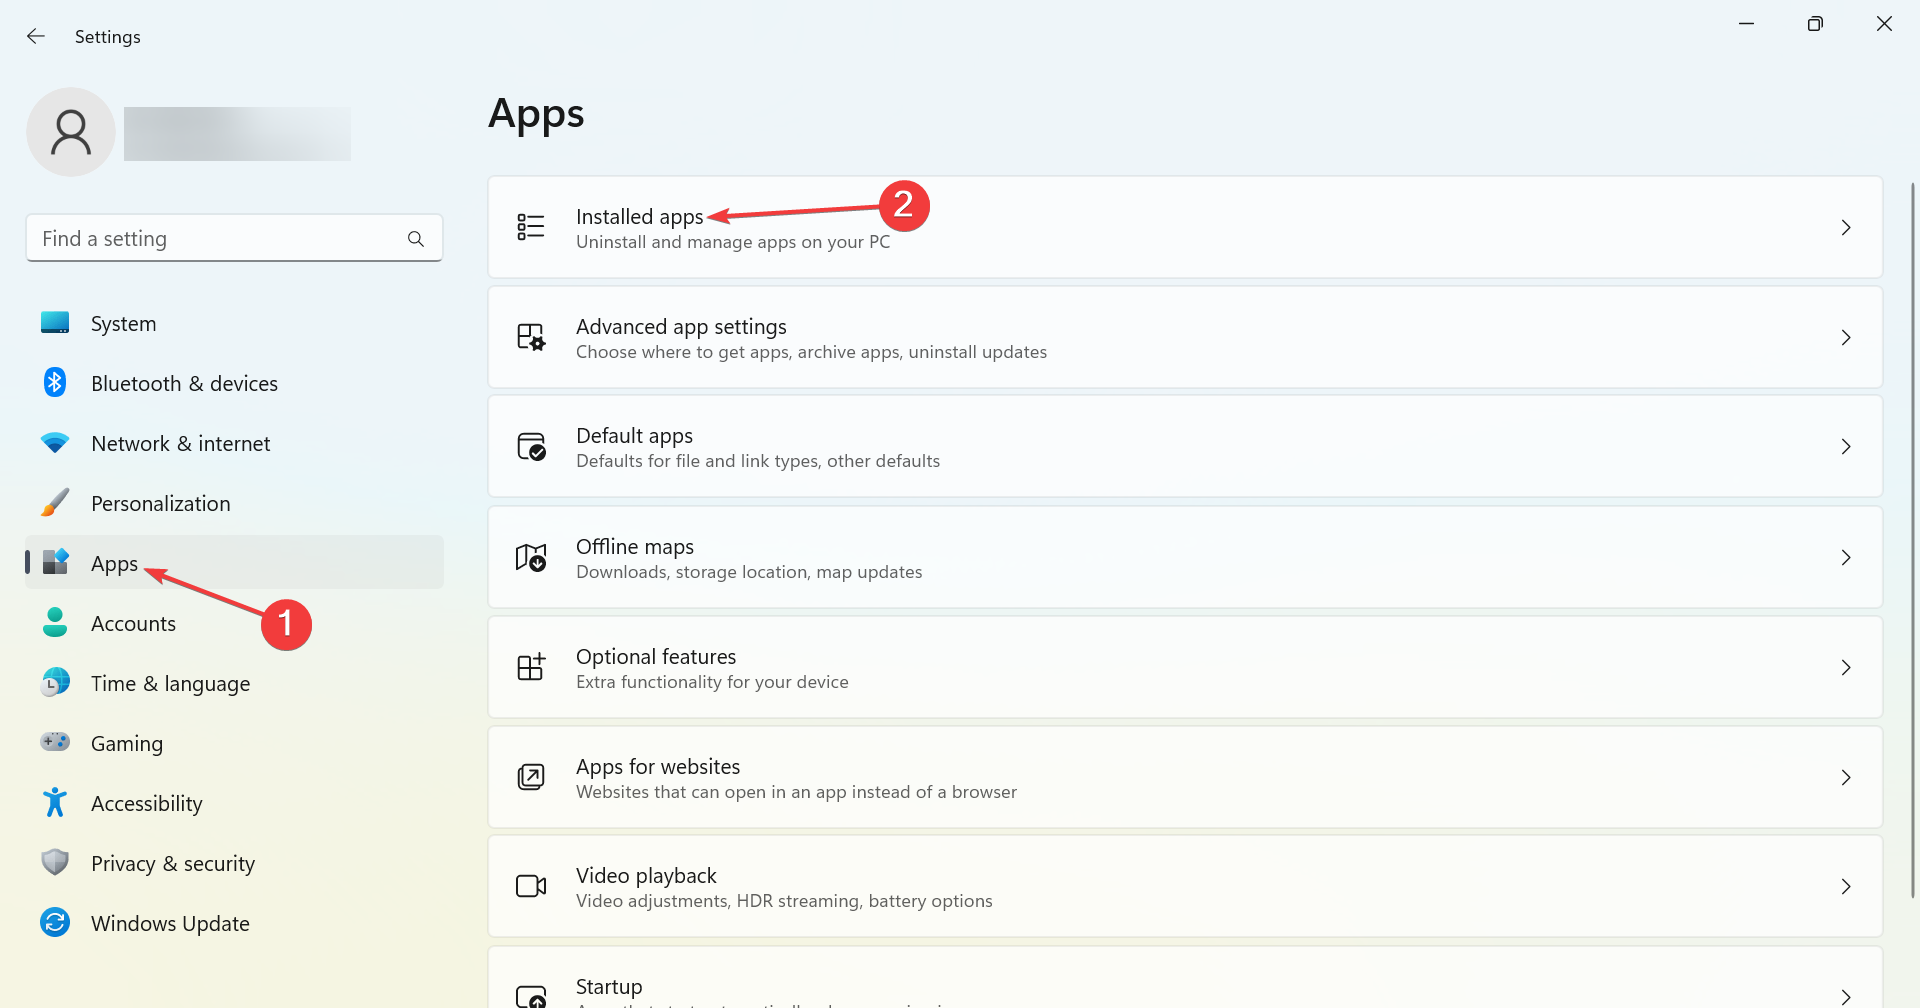
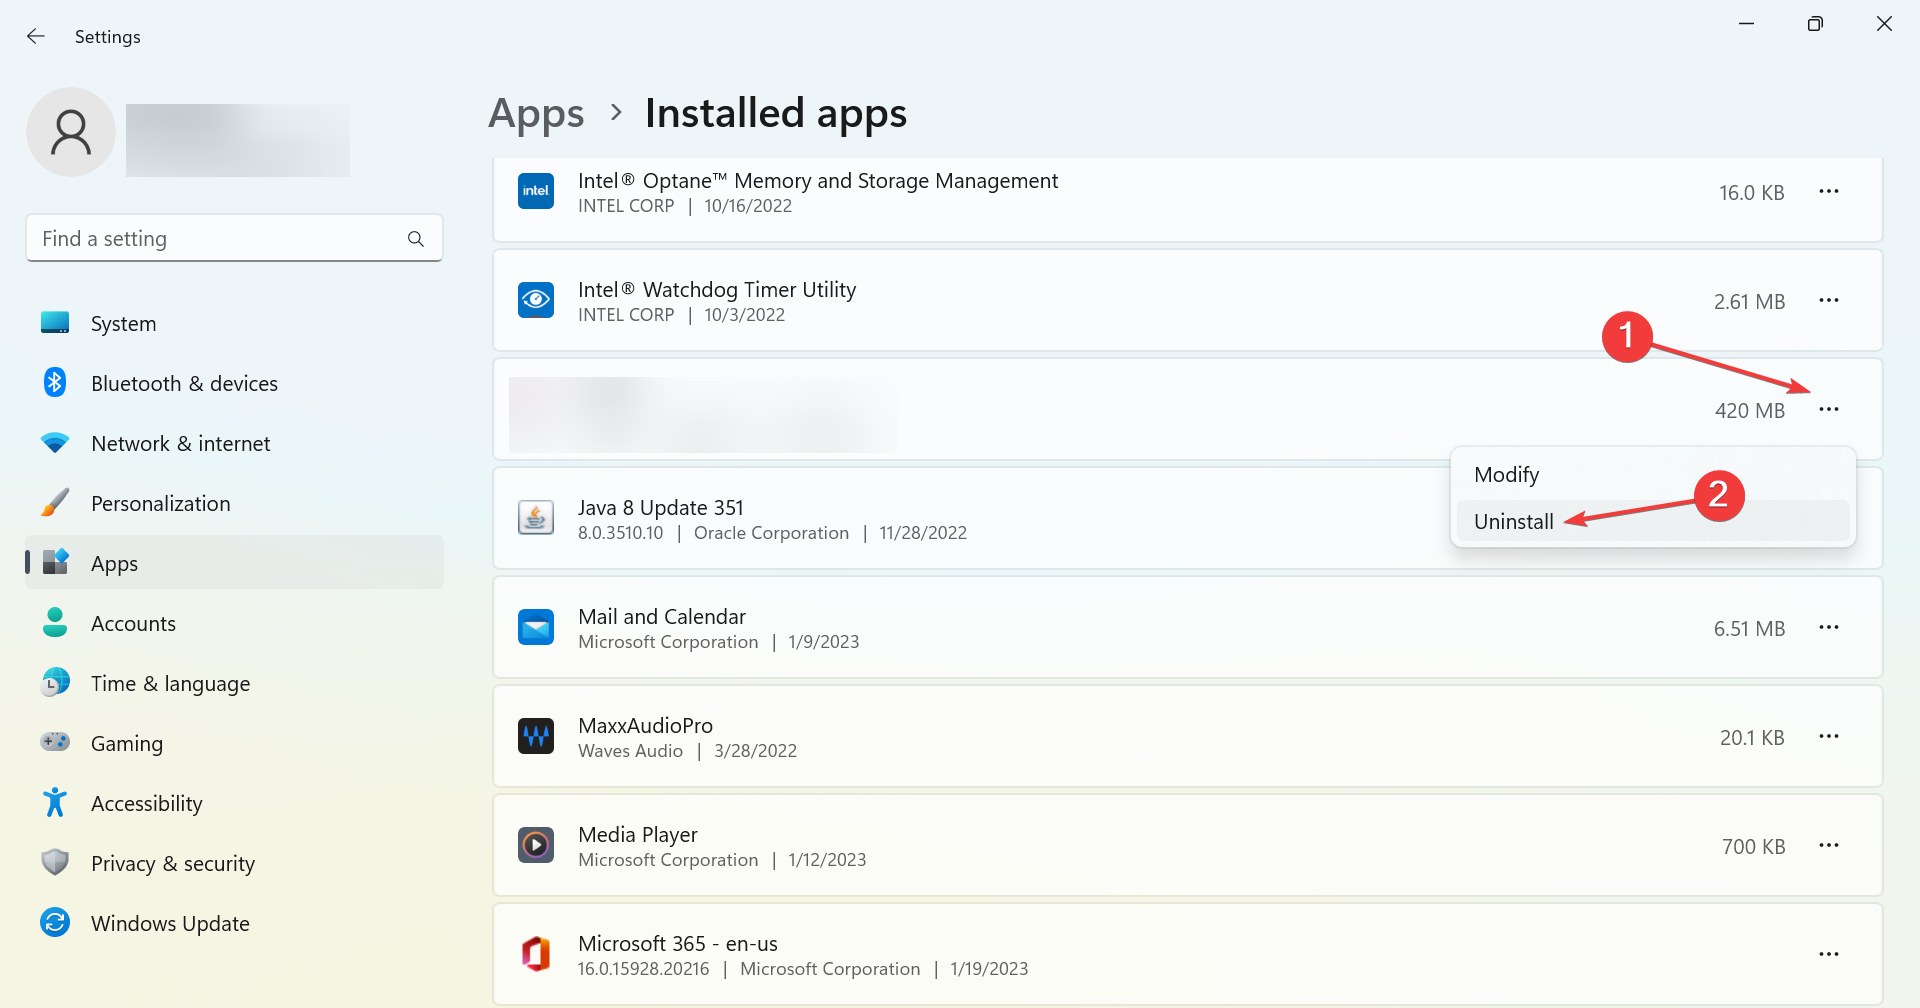
- Press Windows + I to open Settings, head to Apps from the navigation pane, and click on Installed apps.

- Locate the Java Development Kit, click on the ellipsis next to it, and choose Uninstall.
- Follow the on-screen instructions to complete the process.
That’s it! Our readers pointed out that it was the development kit that conflicted with the process and led to the Could not create the Java Virtual Machine error, and uninstalling the program did the trick.
2. Set up a new system variable for Java
- Open Run with the Windows key + R keyboard shortcut, then enter sysdm.cpl in Run and click OK.

- Select the Advanced tab on that window, and click the Environment Variables button.

- Click the New button under the System variables box.

- Enter _JAVA_OPTIONS in the Variable name text box.

- Then, enter –Xmx512M in the Variable value text box, which increases RAM allocation to 512 megabytes.
- Click the OK button to close the window, then press the OK button on the Environmental window.

Importantly, note that instead of using a double hyphen in the Variable value as stated above, you can use a single hyphen (-Xmx512M) as this is often more effective, and would not spark up other complications.
- How to fix Windows error 2 while loading the Java VM
- Fit the Runtime error Java in just a few easy steps
- How to download Java 10 on your Windows PC
3. Select the Run as administrator option for Java
The Java Virtual Machine error can also be due to insufficient admin rights. Thus, some users might need to assign admin rights to Java. You can try the steps below to apply this solution.
1. Press the Windows key + S keyboard shortcut, and enter Java. Right-click on Java and select Open file location to open Java’s folder in File Explorer.
2. Right-click java.exe and select Properties.
3. Head to the Compatibility tab and select the Run this program as an administrator option.
5. Select the Apply option, and click OK to close the window.
4. Reinstall Java
- First, open the Run accessory by pressing the Windows key + R.
- Type the command below and hit Enter.
appwiz.cpl - Select Java from the program list and click Uninstall.

- Click Yes on any confirmation window that opens.
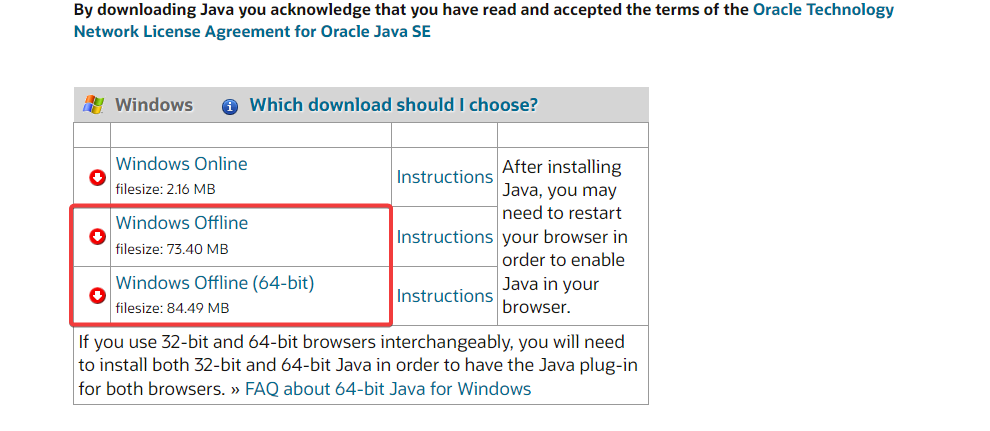
- Restart Windows, open the Java download page in a browser, and download either the 32 or 64-bit offline Windows versions.

- Users need 32-bit Java for 32-bit programs and 64-bit Java for 64-bit software. If in doubt, your best bet is to download and install both Java versions.
- Thereafter, open the Java setup wizard, and click the Install button.
That’s how users can fix this fatal error and get back to running the required Java software.
Any of the previously mentioned solutions may be successfully applied when getting a Java virtual machine launcher error which arises even if nothing has changed on your computer, and it’s most likely related to Java installation.
Things are no different when it comes to the Could not create the Java virtual machine a fatal exception has occurred error. This problem also seems to appear randomly. Make sure you aren’t using a 32-bit VM and a 64-bit Eclipse.
Minecraft could not create the Java virtual machine is an error that shows up when trying to launch Minecraft. The main reason is that it needs admin access in order to function properly. Also, read our detailed guide on how to install Java on Windows 11.
If you have any other questions or advice for other users to try, don’t hesitate to leave a comment below.
![]()
Java-based programs or games are ever-reliable when Java is properly installed. But recently users have reported that they could not create the java virtual machine while attempting to run Java programs like Minecraft. It means that the virtual machine used by Java programs to function is not installed properly. If you are also dealing with the same problem, you are at the right place. We bring to you a perfect guide that will help you fix the error: could not create the java virtual machine.

Table of Contents
The error: Could not construct the Java virtual machine is often appears when compiling code in Integrated Development Environment (IDE). It is usually caused by
- Incorrect arguments or options used to open Java: If you run your own app or an open-source application this error may appear and can make system unstable.
- Insufficient Java maximum heap memory: Executing an app that has more maximum heap size than what is set in System Variable may cause this error.
- Java executable or programme running without Administrative privileges: This error may occur when running apps that require admin access to work appropriately.
We now understand the reasons behind this error. There are other similar errors experienced by Java users like Java virtual machine launcher error that mostly occurs due to Java installation issue. Let us begin with the methods to fix could not create the java virtual machine error.
Preliminary Checks
- Check startup arguments: Examine the starting parameters you’ve specified. Even in correct Java version, startup settings can modify the version utilised for compilation. If you’ve done an in-place Java update, it is likely that startup parameters still refer to earlier version.
- Check syntax: Make sure your arguments syntax is correct. Even meagre mistakes in it can prompt could not create the Java virtual machine error. Check for extra hyphens or versions that have been incorrecly recorded.
- Check JDK Corruption: A corrupt Java Development Kit can cause error: could not create the java virtual machine. You can check whether it is corrupt or not by following these steps:
1. Hit the Windows key, type Command Prompt and click on Run as administrator.

2 Type c:\> java -version and hit the Enter key.

3. If executing the command gives an error, reinstall JDK. Check if reinstalling JDK resolves the issue. If not, try the fixed listed in this article.
Also Read: How to Fix javascript:void(0) Error
Method 1: Run Java in Administrator Mode
Apps without required Admin access can become unstable on Windows PC and may cause issues including error: could not create the java virtual machine. It can be fixed by forcing primary Java executable (java.exe) to run with administrative rights. Follow these steps to do so.
1. Press Windows + E keys to open File Explorer.
2. Navigate to Java.exe in File Explorer. It is generally in
C:\Program Files\Java\*JRE build version*\bin
where JRE build version varies depending on the installed version.
Or
C:\Program Files(x86)\Common Files\Oracle\Java\javapath
Note: If you installed Java in a different location, follow that path and locate Java.exe.

3. Right-click on Java.exe and select Properties to open Properties window.

4. Go to Compatibility tab, check the box marked Run this software as an administrator as shown.

5. Click Apply and OK to save changes.

Now whenever you open Java it will run with admin privileges.
Method 2: Increase Java Heap Size
This error can occur when Java is running out of system memory require to open Virtual Machine client. Java is configured by default to utilise maximum heap size and running an app that exceeds heap size limit, an error will occur. Creating a new System Variable to increase available memory might resolve this issue and you can do that by following these steps
1. Press Windows + R keys together to open the Run dialog box.
2. Type sysdm.cpl and press Enter key to open System Properties.

3. Go to the Advanced tab.

4. Click on Environment Variables… button as shown.

5. In Environment Variables window, click New… button under System Variables.

6. Set Variable name to _JAVA_OPTIONS and Variable value to –Xmx512M in New System Variable popup. Click OK to save changes.
Note: If the error persists, you can further increase memory by setting Variable value as –Xmx1024M instead of –Xmx512M as shown in Step 6.

Also Read: How to Enable or Disable JavaScript in your Browser
Method 3: Modify Java Code
Some users have reported that they can fix this error by making some simple changes in their code. Some of them are mentioned below.
1. Replacing double hyphen – with a single hyphen – in your code can fix this problem.
- The code with double hyphen
sony@sony-VPCEH25EN:~$ java –version
Picked up JAVA_TOOL_OPTIONS: –javaagent:/usr/share/java/jayatanaag.jar
Unrecognized option: –version
- The same code with a single hyphen
sony@sony-VPCEH25EN:~$ java -version
Picked up JAVA_TOOL_OPTIONS: -javaagent:/usr/share/java/jayatanaag.jar
Unrecognized option: -version
2. Also, consider eliminating the phrase from your argument:
-Djava.endorsed.dirs=”C:\Program Files\Apache Software Foundation\Tomcat 8.5\endorsed”
3. Make sure -vm entry is added above vm args in eclipse.ini file or else JVM V6 will be chosen in env wars.
Note: If you use Ubuntu, you must know it only supports Java 8. So, you can uninstall Java as shown in Method 3 and install an older version instead.
Method 4: Modify Eclipse.ini File
If you are using Eclipse IDE, then making some changes in eclipse.ini file can fix error code could not create the java virtual machine.
Note: Eclipse.ini is located inside Eclipse folder in the directory where you have installed Eclipse.
Step I: Decrease Memory Use
1. Right-click on Eclipse.ini file and select open with… > Notepad.
2. Look for a line matching -Xmx256m.
Note: It can also be -Xmx1024m or -Xmx 512m.
3. Change the default value to something more compatible with your PC RAM along with adding the version number.
For example,
-Xmx512m
-Dosgi.requiredJavaVersion=1.6
OR
-Xmx512m
-Dosgi.requiredJavaVersion=1.7
OR
-Xmx512m
-Dosgi.requiredJavaVersion=1.8
4. Try to delete 256m value from -launcher.XXMaxPermSize line.
Step II: Additional Modifications
1. Remove the following line from your file, if possible.
-vm P:\Programs\jdk1.6\bin
2. Replace the following line with the given code below.
set -Dosgi.requiredJavaVersion=1.5
To
set -Dosgi.requiredJavaVersion=1.6.
3. Above -marks! line, try adding this line:
-vm C:\Program Files (x86)\Java\jre6\bin\javaw.exe
4. Refer to JVM.dll by the following line.
-vm
C:\Program Files\Java\jre7\bin\client\jvm.dll
5. Replace -vmargs with the path of javaw.exe in eclipse.ini file.
-startup
plugins/org.eclipse.equinox.launcher_1.3.0.v20120522-1813.jar
--launcher.library
plugins/org.eclipse.equinox.launcher.win32.win32.x86_1.1.200.v20120522-1813
-product
com.android.ide.eclipse.adt.package.product
--launcher.XXMaxPermSize
256M
-showsplash
com.android.ide.eclipse.adt.package.product
--launcher.XXMaxPermSize
256m
--launcher.defaultAction
openFile
**-vm “c:\Program Files\Java\jdk1.7.0_07\bin\javaw.exe”**
-Dosgi.requiredJavaVersion=1.6
-Xms40m
-Xmx768m
-Declipse.buildId=v21.1.0-569685
6. Place the line at end of eclipse.ini file and check if it works.
-vmargs
-Xms40m
-Xmx512m
-XX:MaxPermSize=256m
7. Delete the following lines from eclipse.ini and check if it solves the issue.
-XX:+UseStringDeduplication
-XX:+UseG1GC
Note: If the problem persists, try erasing the eclipse.ini file, but make a copy beforehand. Also, close all apps that consume high memory before launching Java.
Also Read: Fix Java Virtual Machine or JVM not found error
Method 5: Reinstall Java
In certain circumstances, the issue is caused by Java not being installed correctly or because its installation has been damaged over time. As a result, after entirely removing Java, we will reinstall it in this step. As a result:
1. Press Windows + R keys together to open the Run dialog box.

2. Type Appwiz.cpl and click OK to launch Programs and Features.

3. Scroll through installed applications and locate Java.
4. Right-click on it and select Uninstall to uninstall Java.

Note: You should also uninstall other Java Development kits and updates.
5. Wait for the uninstallation process to complete and reboot your PC.
6. Go to Java Downloads page to download the most recent version of Java Runtime Environment.
Note 1: If reinstalling Java Runtime Environment doesn’t fix the issue, download the most recent version of JDK.
Note 2: If you already had JDK, try using a different version or delete Java Runtime Environment that came with it.

Frequently Asked Questions (FAQs)
Q1. What does it imply when it says could not construct Java Virtual Machine?
Ans: The -Xmx option is used by Java Virtual Machine to specify maximum heap memory size. The -Xmx option in eclipse.ini file is probably set too high for the present environment which is causing this error message.
Q2. What is the Java Virtual Machine?
Ans: Java Virtual Machine (JVM) is a program that allows a computer to run Java programs and other languages that have been translated to Java Bytecode. JVM is described by a standard that formally describes JVM implementation requirements.
Q3. Is it possible to get Java for free?
Ans: To install Java, you must first download Oracle installer application. Select Free Java Download from drop-down menu. After that, you’ll be asked to read and accept end-user licensing agreement.

Recommended:
- 26 Best Bulk WhatsApp Marketing Software
- 10 Best Programming Languages to Learn Today
- How to Use Snap Camera on Google Meet
- How to Extract Frames from Video in Windows 10
We hope that this guide was helpful and that you were able to fix could not create the Java virtual machine issue. Let us know which method worked for you the best. If you have any queries or suggestions then feel free to drop them in the comments section.