— Advertisement —
Hello, how are you doing? In this opportunity, we will talk about password policies on Windows Server 2019. Once we have managed users through Active Directory, we need to set the valid date of the passwords. Indeed, sometimes we need to restrict access to certain users due to the security policies of the organization.
Please keep in mind that when working with servers, security is a fundamental aspect. For this reason, there are several reasons for modifying the duration of passwords. For this reason, there are several reasons for modifying the duration of passwords. According to the type of use, it is convenient to establish passwords with security time. For example, to temporary users, test users or those who are practicing in the company.
Now, we have two options for modifying password expiration policies on Windows Server 2019. Group Policy: Apply for when the computer is included in a corporate domain with Windows Server Domain Controller. Local Security Policy: Applies when our group is not in a domain, but is in a workgroup or is managed locally. Here’s how to change a password or change the expiration date of a password within Windows Server 2019 step by step.
Changing password expiration through Local Security Policy on Windows Server 2019
Below we will detail the process for entering the password policy configuration.
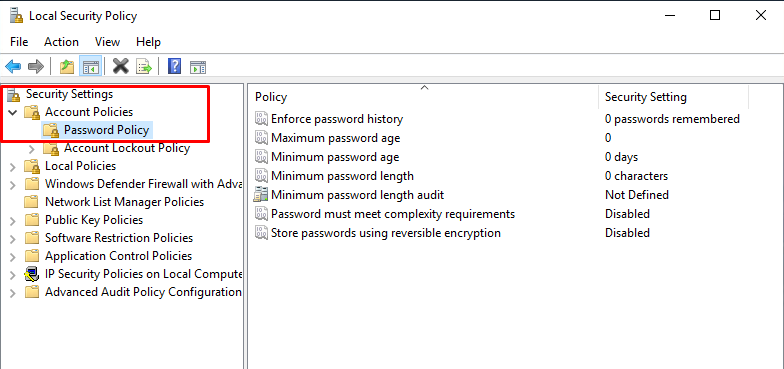
Step 1. Open Local Group Policy Editor
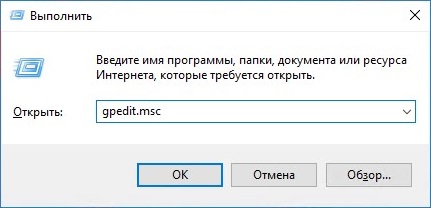
First, we need to enter Group Policy Management by clicking Windows+R and typing gpedit.msc

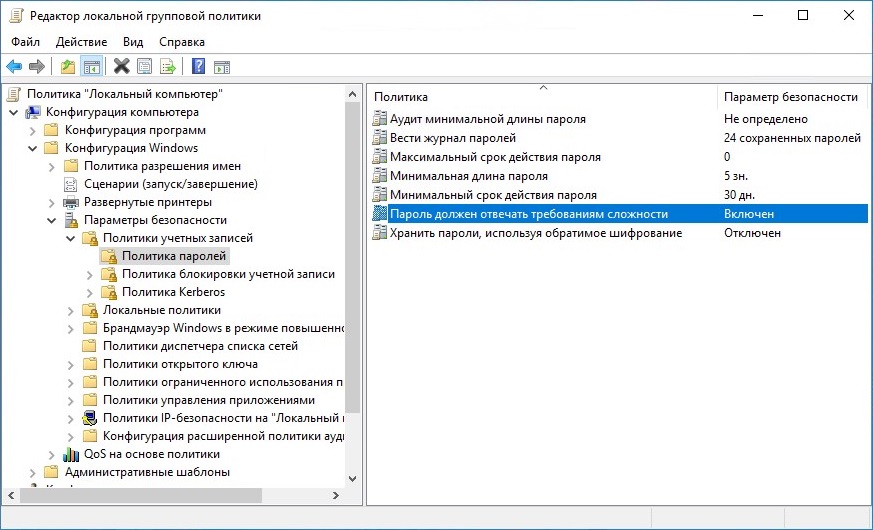
Once there, we must follow the next route: Local Computer Policy>Computer Configuration>Windows Settings>Security Settings>Password Policy

Step 2. Editing password policies
The editor allows you to configure different aspects of the password:
Enforce password history. This security setting determines the number of unique new passwords that have to be associated with a user account before an old password can be reused. The value must be between 0 and 24 passwords.
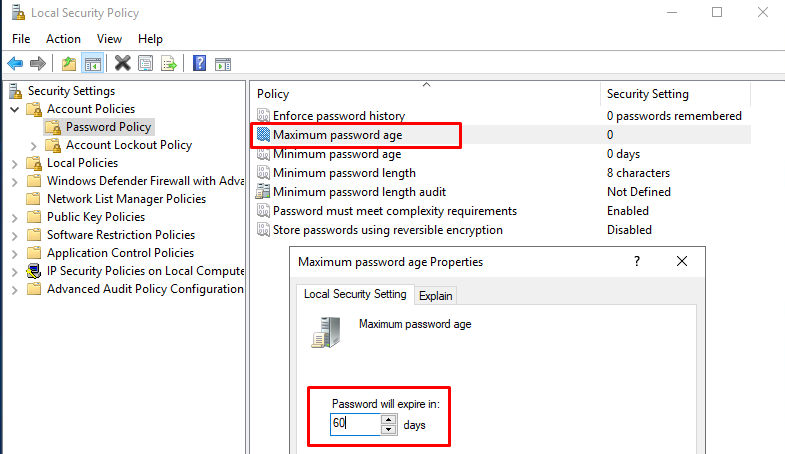
Maximum password age. This security setting determines the period of time (in days) that a password can be used before the system requires the user to change it. You can set passwords to expire after a number of days between 1 and 999, or you can specify that passwords never expire by setting the number of days to 0.
Minimum password age. This security setting determines the period of time (in days) that a password must be used before the user can change it. You can set a value between 1 and 998 days, or you can allow changes immediately by setting the number of days to 0.
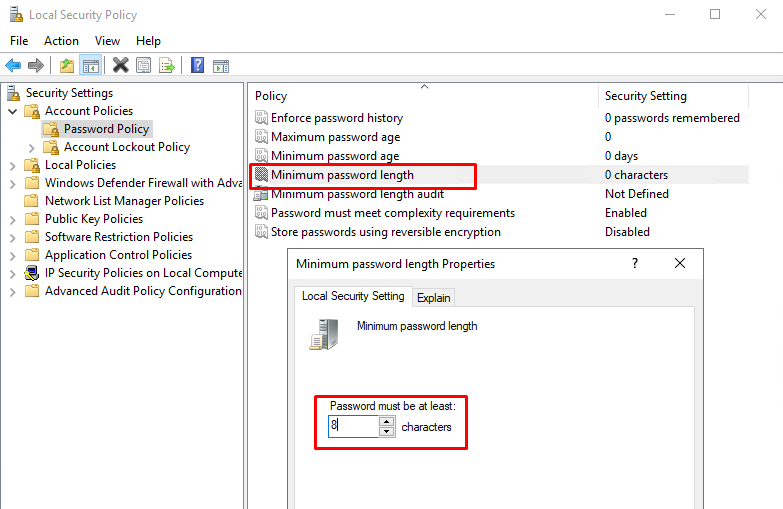
Minimum password length. This security setting determines the least number of characters that a password for a user account may contain. It can set a value of between 1 and 20 characters, or you can establish that no password is required by setting the number of characters to 0.
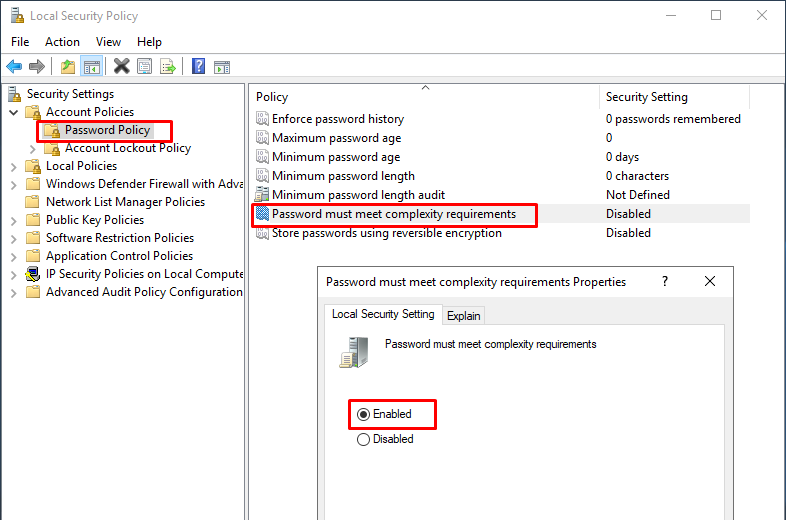
Password must meet complexity requirements. This security setting determines whether passwords must meet complexity requirements.
Password Requirements
If it enabled, the password must meet the following minimum requirements:
Not contain the user’s account name or parts of the user’s full name that exceed two consecutive characters
Be at least six characters in length
Contain characters from three of the following four categories:
English uppercase characters (A through Z)
English lowercase characters (a through z)
Base 10 digits (0 through 9)
Non-alphabetic characters (for example, !, $, #, %)
Store passwords using reversible encryption. This security setting determines whether the operating system stores passwords using reversible encryption. This policy provides support for applications that use protocols that require knowledge of the user’s password for authentication purposes.
Changing password expiration through Local Active Directory on Windows Server 2019
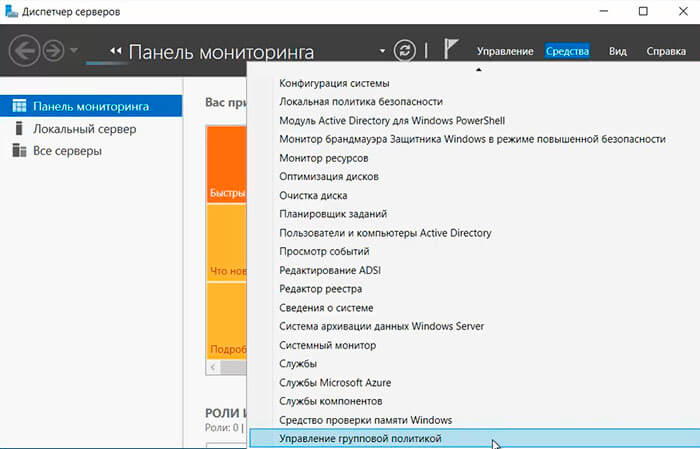
To access the domain password policy editor, we need to open the Server Manager. Next, click on the Active Directory Administrative Center tool.

In the next window, select the forest and then follow the following path: Domains>nameofdomain>Default Domain Policy. Where nameofdomain is the name of our domain, in my case telematic.local. Next, double click on Default Domain Policy to edit the values.

Once the window opens, follow this path: Default Domain Policy>Compuer Configuration>Policies>Windows Settings>Security Settings>Password policy

As we see we have the same options as in the local directives, the only difference is that if we open the local policies with our computer in a domain we cannot make any change in the directives. On the other hand, from a computer in a domain using this option if we will be able to make adjustments in the policies.
Changing or unlocking administrator password on Windows Server 2019
Sometimes it happens that we want to change the administrator password, or the account has been blocked. Sometimes it happens that we want to change the administrator password, or the account has been blocked. To do this, we must enter the Server Manager and select Active Directory Administrative Center.

Once there, all you have to do is select Reset Password, and enter the new password or unblock the account if it is locked.

As has been noted, the process for changing password policies is not that complicated. However, we must be careful when modifying these values, as it will affect the entry of users. In conclusion, Windows Server 2019 is a very friendly system and has wizards that facilitate the changes desired by the server administrator.
Well, this is all for now, before saying goodbye I would like to invite you to review our tutorial on installing Apache on Windows Server 2019.
После установки и настройки Windows server 2019, пришло время обратить внимание на управление доменом. Благодаря созданному механизму управления доменом, можно настроить сразу большое количество компьютеров, пользователей. Для этого достаточно освоить механизм управления объектами групповых политик. В данном случае с помощью GPO (Group Policy Object) обеспечим включение заставки на компьютере пользователя после 20 минут бездействия, отключим монитор через 40 минут, если не будет никаких действий пользователя и изменим политику паролей.
Включение экранной заставки через определенное количество времени бездействия пользователя обеспечит прежде всего безопасность компьютера, когда человек отошел или куда-нибудь уехал, ушел с работы. Переходя в режим заставки компьютер обезопасит различные данные на компьютере, такие как документы, файлы, почту, а также установленные программы и т.п. Доступ к компьютеру, благодаря включению этой функции, будет ограничен (необходимо ввести логин и пароль для входа на компьютер). Но при этом следует учесть, что время до включения этой заставки должно быть разумным, никому не хочется постоянно вводить пароль, например, через каждые 2 минуты.
Включение монитора после 40 минут бездействия пользователя поможет прежде всего сэкономить электроэнергию в компании. Если компьютеров в компании много, то экономия будет весомая. Все ведущие компании стараются заботиться об экономии электроэнергии не только с позиции экономии средств, но и с позиции уменьшения нагрузки на планету. Время выключения монитора выбираем разумно, чтобы было удобно пользователю (постоянно выключающиеся и включающиеся мониторы доставляют неудобства в работе, да и просто раздражают).
Разумное изменение политики паролей позволит не так сильно напрягать пользователя постоянными сменами пароля, что влечет за собой увеличение наклеенных маркеров с паролями на мониторах, но позволит улучшить стойкость пароля.
- Включение экранной заставки после 20 минут бездействия пользователя
- Выключение монитора после 40 минут бездействия пользователя
- Изменение политики паролей
- применение созданных групповых политик
- проверка на компьютере пользователя применения групповых политик
Включение экранной заставки (с обязательным вводом пароля) после 20 минут бездействия пользователя
1. Нажимаем «Пуск«, далее «Диспетчер серверов«.
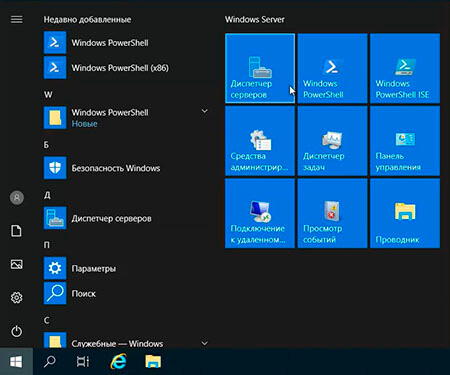
2. В новом окне выбираем «Средства«, в появившемся списке «Управление групповой политики«.
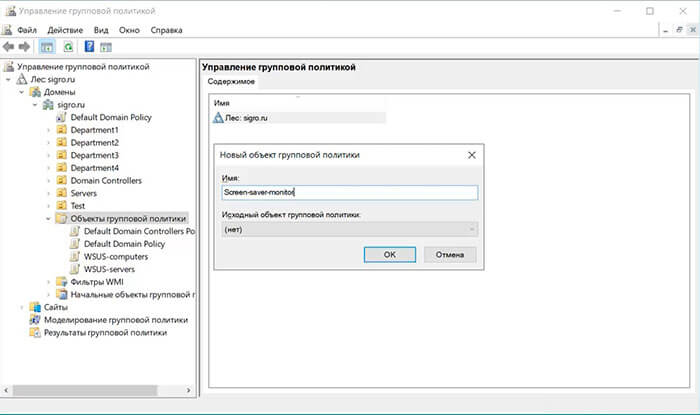
3. Нажимаем правой клавишей мыши на «Объекты групповой политики«, далее «Создать«.

4. В появившемся окне задаём имя групповой политики, нажимаем «ОК«.
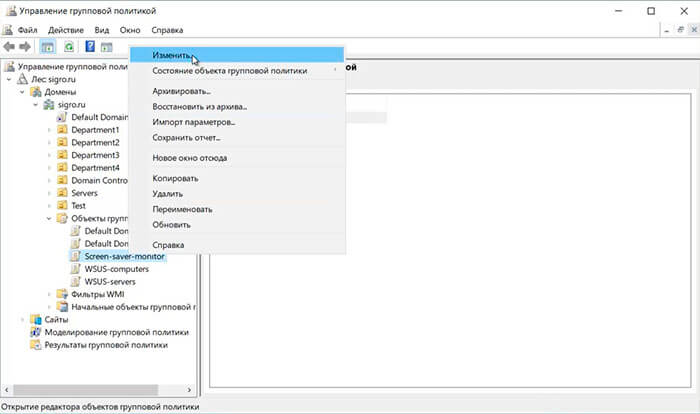
5. Для изменения групповой политики нажимаем правой клавишей мыши, далее «Изменить«.
6. Переходим в раздел Конфигурация пользователя — Политики — Административные шаблоны — Панель управления — Персонализация.
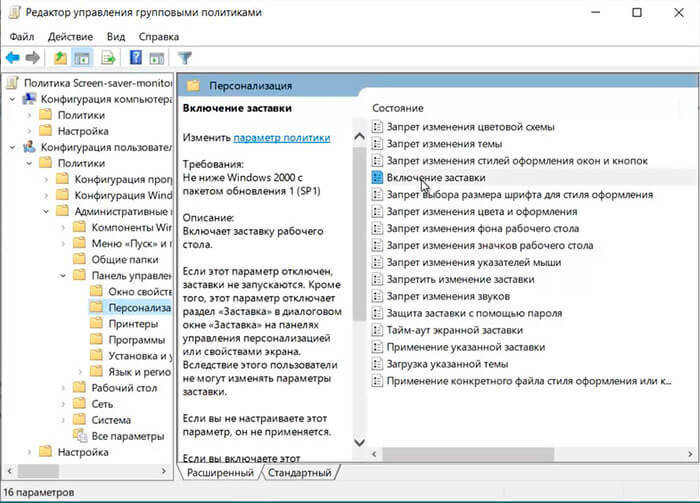
7. Устанавливаем следующие параметры:
- Включение заставки — Включено.
- Защита заставки с помощью пароля — Включено.
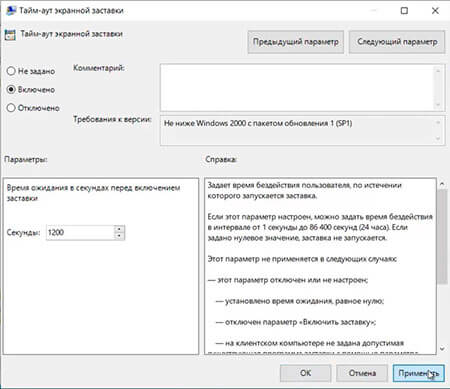
- Тайм-аут экранной заставки — Включено. Время включения в секундах перед включения заставки — Секунды: 1200.
Выключение монитора после 40 минут бездействия пользователя
1. Переходим в раздел Конфигурация пользователя — Политики — Административные шаблоны — Система — Управление электропитанием — Параметры дисплея и видео.
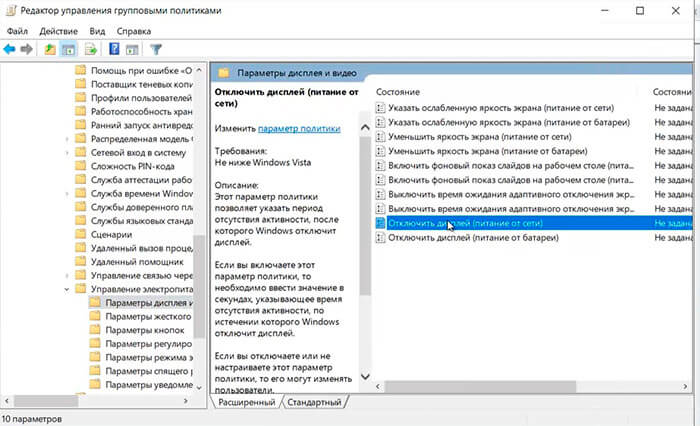
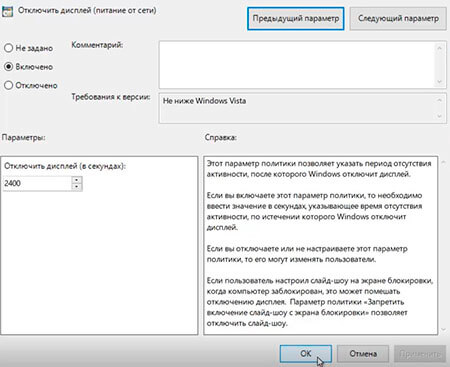
2. Выбираем «Отключить дисплей (питание от сети)«, меняем следующие параметры:
- Включено.
- Отключить дисплей (в секундах): 2400
Изменение политики паролей
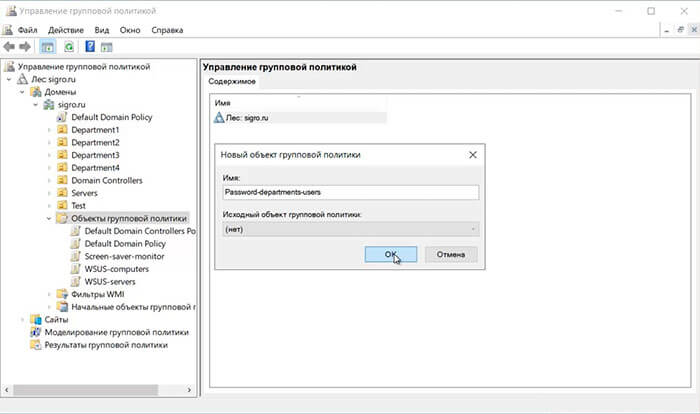
1. Для изменения политики паролей создаём новую групповую политику. Для этого правой клавишей мыши на «Объекты групповой политики» — «Создать«.
2. Задаём имя нового объекта групповой политики, далее нажимаем «ОК«.
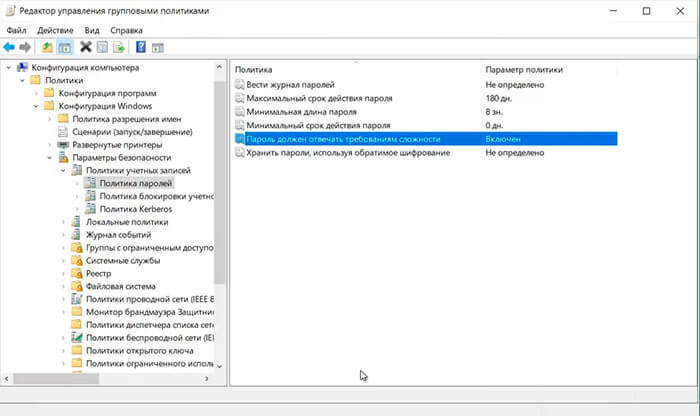
3. Далее правой клавишей на вновь созданную политику — «Изменить«. Переходим в раздел Конфигурация компьютера — Политики — Конфигурация Windows — Параметры безопасности — Политика паролей. Изменяем следующие параметры:
- Максимальный срок действия пароля — 180 дн.
- Минимальная длина пароля — 8 зн.
- Минимальный срок действия пароля — 0 дн.
- Пароль должен отвечать требованиям сложности — Включен.
Применение созданных групповых политик
Для применения вновь созданных групповых политик, необходимо связать политики с объектами домена.
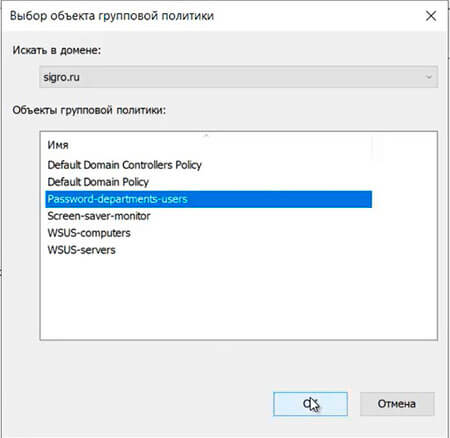
1. Для этого выбираем весь домен или нужное подразделение в домене, нажимаем на нем правой клавишей мыши, далее «Связать существующий объект групповой политики«.
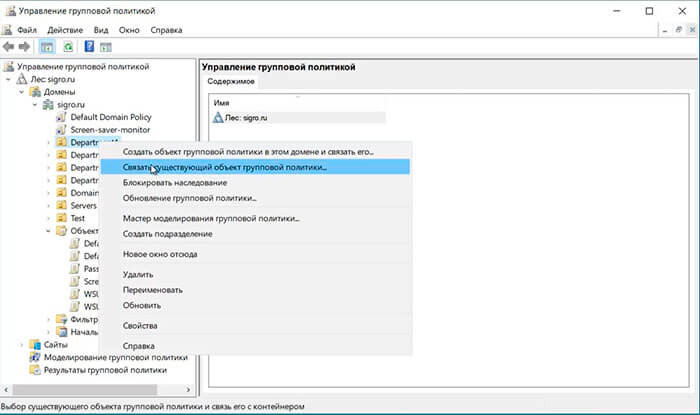
2. В появившемся окне выбираем необходимый объект групповой политики, далее «ОК«.
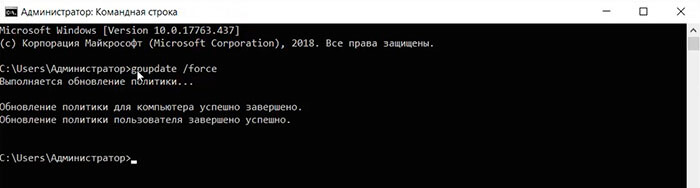
3. После того, как все политики привязаны к соответствующим объектам домена, открываем командную строку и выполняем следующую команду для немедленного применения групповых политик в домене:
gpupdate /force
Проверка применения групповой политики на компьютере пользователя
1. Для проверки применения созданных групповых политик заходим под доменным логином и паролем пользователя на компьютере, входящим в состав домена. В поиске набираем rsop.msc. Далее переходим к тем параметрам групповой политики, которые были настроены и смотрим изменения в политике.

Посмотреть видео — изменение экранной заставки, отключение монитора, изменение политики паролей с помощью GPO можно здесь:
- Windows server 2019 — установка и настройка WSUS, создание и настройка GPO
- Windows server 2019 — добавление и удаление компьютера в домене
- Windows server 2019 — переименование администратора домена, изменение формата выводимого имени пользователя
- Windows server 2019 — установка и настройка Active Directory, DNS, DHCP
- Windows server 2019 — создание и удаление пользователя, группы, подразделения в домене
- Windows server 2019 — установка и настройка сервера печати, разворачивание МФУ с помощью GPO
Estimated reading: 3 minutes
0 views
Using password policy can enhance password’s security. It requires users to set password length, password age, password history, etc. Via password policy, you can set a more complicated password that’s hard to be guessed or cracked.
In this article, we will guide you to Set Password Policy on Windows server 2019.
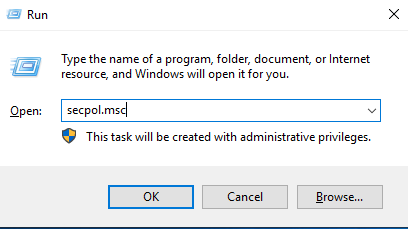
Step 1: Press “Win” + “R” key to open “Run” window. Type in: secpol.msc then click “OK”.
Step 2: After you open “Local Security Policy”, select them in order: “Security Settings” > “Account Policies” > “Password Policy”.
Step 3: In the right pane, double click any policy and change the setting according to your needs.
Explanation of Setting Each Password Policy
Password Must Meet Complexity Requirements
Requirements as below:
1. More than two contiguous characters from user name cannot be contained in password.
2. Be at least six characters in length and three of following four types of character need to be included in password.
• English uppercase characters (A through Z)
• English lowercase characters (a through z)
• Base 10 digits (0 through 9)
• Non-alphabetic characters (for example, !, $, #, %)
Minimum Password Length
The longer the password, the safer it will be. A password should at least contain the minimum number of characters for a user account.
Minimum Password Age
This security setting determines the period of time (in days) that a password must be used before the user can change it. For example, if you set 10 days, then your password can be changed after 10 days. Besides, password can be changed anytime if the minimum password age is set to be 0.
Maximum Password Age
This security setting determines the period of time (in days) that a password can be used before the system requires the user to change it. For example, if you set 90 days, your password will expire in 90 days then system will require you to change it. But the password will not expire if the maximum password age is set to 0.
Enforce Password History
This security setting determines the number of unique new passwords that have to be associated with a user account before an old password can be reused. It can ensure the old passwords are not reused continually. For example, if you keep 9 passwords remembered, then you need to change new passwords nine times before an old password can be reused.

Store Passwords Using Reversible Encryption
This security setting determines whether the operating system stores passwords using reversible encryption. If this policy is enabled, some bad guys may easily crack the password and access users’ PCs. It’s suggested to disable it unless application requirements are more important than the protection of password information.
Conclusion
So we have guided you through the steps set Password Policy on Windows server 2019 this will help increase security on your VPS.

Changing the password policy in Windows Server 2019 is a simple process that only requires a few steps. To begin, open the Local Group Policy Editor by typing ‘gpedit.msc’ into the Run command window. This will bring up the Local Group Policy Editor window with all of its categories and settings available for editing. Next, navigate to Computer Configuration > Windows Settings > Security Settings > Account Policies > Password Policy and make any desired changes to the settings there. Once you have finished making your changes, click Apply and then OK to save them and exit out of the editor. Your new password policy should now be in effect on your server!
How do I change my password complexity requirements in Server 2019?
Changing the password complexity requirements in Server 2019 is a straightforward process. Here are the steps to follow:
1. Open Server Manager and navigate to Local Users and Groups
2. Select Policies > Account Policies > Password Policy
3. Set your desired complexity requirements, such as minimum password length, password history, required characters etc., then click “Apply”
4. Close the window when done and restart the system for changes to take effect
It’s important that you choose secure settings that meet your organization’s security needs while still being easy enough for users to remember their passwords without having difficulty accessing their accounts.
What is the password expiration policy in Windows Server 2019?
The password expiration policy for Windows Server 2019 is set by administrators in the Local Group Policy Editor. This policy determines how often a user must change their password and when it will expire, as well as any other requirements such as complexity of passwords.
To access the Local Group Policy Editor, you can open the Start Menu on your server and type ‘gpedit.msc’ into the search bar to launch it directly. Once opened, navigate to Computer Configuration > Windows Settings > Security Settings > Account Policies > Password Policy in order to view and adjust your settings. Here you can make changes such as setting a maximum age before passwords expire or require users to change their passwords every 90–120 days (or whatever length of time works best for your environment). You can also configure rules about complexity of passwords if desired – e.g., minimum length, required characters like uppercase letters or numbers, etc – but keep in mind that overly complex policies may be difficult for end-users to remember and create security issues if they write down their credentials somewhere insecurely or use easily guessable sequences like ‘123456’ instead of thinking up something more secure on their own initiative.
Once you have configured all relevant settings according to your organization’s needs/preferences, click Apply followed by OK at the bottom right corner of this window in order save them successfully – this should now be active within your system!
What is the default Password Policy for Windows Server 2019 Active Directory?
The default password policy for Windows Server 2019 Active Directory is as follows:
– Minimum length of 8 characters.
– Passwords must contain 3 out of 4 character types (uppercase, lowercase, numeric and/or special).
– Password cannot be the same as any of the last 10 passwords used by the user.
– Maximum password age is 42 days.
– Enforce minimum password age to prevent users from changing their passwords too often (1 day recommended).
It is important to note that you can adjust these settings according to your organization’s security requirements; however, it’s advisable not to make drastic changes without consulting a security expert first.
How do I disable Password Policy in Windows Server 2019?
To disable Password Policy in Windows Server 2019, you will need to perform the following steps:
1. Log into your server using administrative credentials.
2. Open the Start Menu and type “Local Security Policy” into the search bar.
3. Select Local Security Policy from the search results list, then select Account Policies > Password Policy within Local Security Settings.
4. Here you can adjust or disable any of the settings related to password strength, expiry and length requirements; simply double-click on each setting to make changes as needed (you may need to enter a password twice before making changes). Once complete, click OK and close out of Local Security Settings window completely for your new settings to take effect.
Where do I change my Password Policy?
Changing your password policy depends on the platform and system you are using. Generally, most systems have a Password Policy section in their security settings where you can modify your requirements. To change your password policy, please follow these steps:
1. Log into the system or platform with administrative privileges
2. Navigate to the Security Settings page
3. Locate and open the Password Policy section
4. Change any parameters such as minimum length of passwords, complexity rules (e.g., special characters), expiration dates, etc., as needed
5. Save changes when finished
6. Test new settings by creating sample accounts with different types of passwords to ensure they meet the updated criteria before applying them broadly
It is important to note that some platforms may require additional configuration or coding for certain aspects of a password policy update; be sure to review all documentation prior to making changes so that you understand what modifications need to be made within each parameter option in order for it take effect properly and securely across all users’ accounts on your system
How do I find my Password Policy in Windows Server?
Finding your Password Policy in Windows Server is a fairly straightforward process. To begin, open the Local Security Policy window by going to Start > Run and entering «secpol.msc» into the search field. Once the Local Security Policy window opens, expand Account Policies followed by Password Policy to view all of your current password settings. Here you can review each policy setting and make any changes as needed to ensure that your server’s passwords remain secure.
Where is my server Password Policy?
It is important to ensure the security of your server by having a password policy in place. Depending on the type of server you are using, there are several ways you can find and set up your password policy. In this answer, I will provide an overview of how to locate and configure a password policy for your server.
Windows Server
- 10.12.2014
- 44 300
- 9
- 05.07.2022
- 42
- 38
- 4
- Содержание статьи
- Отключаем требования сложности к паролю через редактор групповых политик
- Комментарии к статье ( 9 шт )
- Добавить комментарий
Начиная с Windows Server 2003, для всех пользователей операционной системы стали предъявляться повышенные требования к сложности пароля. Пароль пользователя должен соответствовать как минимум 3 условиям из списка перечисленного ниже:
- Наличие прописных букв английского алфавита от A до Z;
- Наличие строчных букв английского алфавита от a до z;
- Наличие десятичных цифр (от 0 до 9);
- Наличие неалфавитных символов (например, !, $, #, %)
Отключаем требования сложности к паролю через редактор групповых политик
Если же кто-то находит все эти сложности лишними, то это весьма легко отключается. Для этого нужно проделать действия описанные ниже.
- Открываем «Выполнить» (Пуск — Выполнить или поочередно зажимаем клавиши Win+R), после чего набираем gpedit.msc и жмем ОК.

- В левой панели выбираем Конфигурация компьютера — Конфигурация windows — Параметры безопасности — Политики учетных записей — Политика паролей. Там выбираем пункт «Пароль должен отвечать требованиям сложности».

- Открываем настройки данного параметра, щелкнув по нему два раза. Выбираем «Отключен».

- Нажимаем на кнопку «ОК» для сохранения изменений.