Время на прочтение
8 мин
Количество просмотров 21K
Делимся с вами обзорным материалом про службу Windows Hello, обеспечивающую двухфакторную проверку на Windows 10. Также вы узнаете, чем она будет полезна для крупных компаний, почему стоит выбирать PIN-код, а не пароль и как её настроить.
Windows Hello — что это и зачем?
В Windows 10 служба Windows Hello для бизнеса заменяет пароли на строгую двухфакторную проверку подлинности на компьютерах и мобильных устройствах. Она заключается в создании нового типа учетных данных пользователя в привязке к устройству, использовании биометрических данных или PIN-кода.
В первых версиях Windows 10 были службы Microsoft Passport и Windows Hello, которые обеспечивали многофакторную проверку подлинности. Чтобы упростить развертывание и расширить возможности поддержки, Microsoft объединила эти технологии в единое решение — Windows Hello. Если вы уже выполнили развертывание этих технологий, то вы не заметите никаких изменений в функционировании служб. Для тех, кому еще предстоит оценить работу Windows Hello, выполнить развертывание будет гораздо проще благодаря упрощенным политикам, документации и семантике.
Служба Hello призвана решать типичные проблемы пользователей, возникающие при работе с паролями:
- Пароли могут быть трудны для запоминания, и пользователи часто повторно используют пароли на нескольких сайтах.
- Взломы сервера могут раскрывать симметричные сетевые учетные данные.
- Пароли могут подлежать атакам с повторением пакетов.
- Пользователи могут непреднамеренно предоставить свой пароль вследствие фишинга.
Hello позволяет выполнить проверку подлинности учетной записи Microsoft, учетной записи Active Directory, учетной записи Microsoft Azure Active Directory (Azure AD) и службы поставщика удостоверений или службы проверяющей стороны, которые поддерживают проверку подлинности Fast ID Online (FIDO) v2.0.
После начальной двухэтапной проверки при регистрации на вашем устройстве настраивается служба Hello, и вы сами устанавливаете жест, который может быть как биометрическим, например отпечатком пальца, так и PIN-кодом. Далее необходимо сделать жест для проверки своего удостоверения. После этого Windows использует Hello для проверки подлинности и предоставления им доступа к защищенным ресурсам и службам.
От имени администратора компании или общеобразовательной организации можно создать политики управления Hello для использования на устройствах под управлением Windows 10, которые подключаются к вашей организации.
Разница между Windows Hello и Windows Hello для бизнеса
Windows Hello предназначена для удобного и безопасного входа пользователя. Такое использование Hello обеспечивает отдельный уровень защиты, так как является уникальным для устройства, на котором настраивается, однако проверка подлинности на основе сертификатов при этом отсутствует.
Служба Windows Hello для бизнеса, которая настраивается групповой политикой или политикой MDM, использует проверку подлинности на основе ключа или сертификата.
В настоящее время в учетных записях Active Directory с использованием Windows Hello не поддерживается проверка подлинности на основе ключа или сертификата. Эта функция должна появиться в будущем выпуске.
Почему PIN-код, а не пароль?
Пароли представляют собой общие секреты, они вводятся на устройстве и передаются по сети на сервер. Перехваченные имя и пароль учетной записи могут быть использованы кем угодно. Например, учетные данные могут быть раскрыты при взломе сервера.
В Windows 10, в процессе подготовки, служба Hello создает пару криптографических ключей, привязанных к доверенному платформенному модулю (TPM), если устройство оснащено таким модулем, или в программной реализации. Доступ к этим ключам и получение подписи для проверки того, что пользователь владеет закрытым ключом, предоставляется только при вводе PIN-кода или биометрического жеста. Двухэтапная проверка, которая происходит при регистрации в службе Hello, формирует доверительные взаимоотношения между поставщиком удостоверений и пользователем, когда открытая часть пары «открытый/закрытый ключ» отправляется поставщику удостоверений и связывается с учетной записью пользователя. Когда пользователь выполняет жест на устройстве, поставщик удостоверений определяет по комбинации ключей Hello и жеста, что это проверенное удостоверение, и предоставляет маркер проверки подлинности, с помощью которого Windows 10 получает доступ к ресурсам и службам. Кроме того, в процессе регистрации генерируется претензия по удостоверению для каждого поставщика удостоверений, чтобы криптографически подтвердить, что ключи Hello привязаны к TPM. Если претензия по удостоверению во время регистрации не выставляется поставщику удостоверений, поставщик удостоверений должен предполагать, что ключ Hello создан программно.

Представьте, что кто-то подсматривает через ваше плечо при получении денежных средств из банкомата и видит вводимый вами PIN-код. Наличие этого PIN-кода не поможет им получить доступ к учетной записи, так как у них нет банковской карты. Аналогичным образом перехват PIN-кода для устройства не позволяет злоумышленнику получить доступ к учетной записи, так как PIN-код является локальным для конкретного устройства и не обеспечивает никакого типа проверки подлинности с любого другого устройства.
Hello как раз позволяет защищать удостоверения и учетные данные пользователей. Так как пароли не используются, фишинг и атаки методом подбора становятся бесполезными. Эта технология позволяет также предотвратить взломы серверов, так как учетные данные Hello являются асимметричной парой ключей, что предотвращает атаки с повторяющимися пакетами, так как эти ключи защищены доверенными платформенными модулями (TPM).
Также можно использовать устройства с Windows 10 Mobile в качестве удаленных учетных данных при входе на ПК под управлением Windows 10. В процессе входа в систему ПК под управлением Windows 10 он может подключаться и получать доступ к Hello на вашем устройстве под управлением Windows 10 Mobile по Bluetooth. Поскольку мы всегда носим с собой телефон, Hello позволяет гораздо проще реализовать двухфакторную проверку подлинности.
Функция входа через телефон в данный момент доступна только отдельным участникам программы принятия технологий (TAP).
Так как же PIN-код помогает защитить устройство лучше, чем пароль?
Преимущества PIN-кода в сравнении с паролем связаны не с его структурой (длиной и сложностью), а с принципом работы.
1. PIN-код привязан к устройству. Злоумышленник, получивший доступ к паролю, может войти в учетную запись с любого устройства, но в случае кражи PIN-кода вход в учетную запись будет невозможен без доступа к соответствующему устройству.
2. PIN-код хранится на устройстве локально. Пароль передается на сервер и может быть перехвачен в процессе передачи или украден с сервера. PIN-код задается на устройстве на локальном уровне, не передается и не хранится на сервере. При создании PIN-кода устанавливаются доверительные отношения с поставщиком удостоверений и создается пара асимметричных ключей, используемых для проверки подлинности. При вводе PIN-кода ключ проверки подлинности разблокируется и используется для подтверждения запроса, отправляемого на сервер для проверки подлинности.
3. PIN-код поддерживается оборудованием. PIN-код Hello поддерживается микросхемой доверенного платформенного модуля (TPM), представляющей собой надежный криптографический процессор для выполнения операций шифрования. Эта микросхема содержит несколько механизмов физической защиты для предотвращения взлома, и вредоносные программы не могут обойти функции безопасности TPM. TPM применяется во всех телефонах с Windows 10 Mobile и во многих современных ноутбуках.
Материал ключа пользователя создается и становится доступным в доверенном платформенном модуле (TPM) на устройстве пользователя, что защищает материал от перехвата и использования злоумышленниками. Поскольку технология Hello подразумевает использование пар асимметричных ключей, учетные данные пользователей не будут похищены в случае нарушения безопасности поставщика удостоверений или веб-сайтов, к которым пользователь осуществляет доступ.
TPM защищает от множества известных и потенциальных атак, в том числе атак методом подбора PIN-кода. После определенного количества попыток ввода неправильного PIN-кода устройство блокируется.
4. PIN-код может быть сложным. К PIN-коду Windows Hello для бизнеса применяется тот же набор политик управления ИТ, что и к паролю, в том числе сложность, длина, срок действия и история изменений. Несмотря на уверенность большинства пользователей в том, что PIN-код представляет собой простой код из 4 цифр, администраторы могут устанавливать для управляемых устройств политики, предполагающие уровень сложности PIN-кода, сопоставимый с паролем. Вы можете сделать обязательными или запретить специальные знаки, буквы в верхнем и нижнем регистрах, а также и цифры.
Раздел меню настроек в котором задаются параметры PIN-кода и биометрия:

Что произойдет в случае кражи ноутбука или телефона?
Для нарушения безопасности учетных данных Windows Hello, защищаемых TPM, злоумышленнику нужно осуществить доступ к физическому устройству, найти способ похитить биометрические данные пользователя или подобрать PIN-код. Все это нужно сделать раньше, чем функциональный механизм защиты от взлома TPM заблокирует устройство. Для ноутбуков, не имеющих TPM, можно настроить дополнительную защиту, активировав BitLocker и ограничив количество неудачных попыток входа в систему.
Настройка BitLocker без TPM
С помощью редактора локальных групповых политик (gpedit.msc) активируйте следующую политику:
Конфигурация компьютера → Административные шаблоны → Компоненты Windows → Шифрование диска BitLocker → Диски операционной системы → Требовать дополнительной проверки подлинности при запуске
В параметрах политики выберите Разрешить использование BitLocker без совместимого TPM, а затем нажмите кнопку ОК.

Перейдите в меню Панель управления → Система и безопасность → Шифрование диска BitLocker и выберите диск с операционной системой, который требуется защитить.
С помощью редактора локальных групповых политик (gpedit.msc) активируйте следующую политику: Конфигурация компьютера → Параметры Windows → Параметры безопасности → Политики учетных записей → Политика блокировки учетных записей → Пороговое значение блокировки.
Установите допустимое количество неудачных попыток входа в систему и нажмите ОК.

Как работает Windows Hello для бизнеса: основные положения
1. Учетные данные службы Hello основаны на сертификате или асимметричной паре ключей и привязаны к устройству, как и маркер, получаемый с помощью учетных данных.
2. Поставщик удостоверений (например, Active Directory, Azure AD или учетная запись Майкрософт) проверяет удостоверение пользователя и сопоставляет открытый ключ Hello с учетной записью пользователя на этапе регистрации.
3. Ключи могут генерироваться в аппаратном (TPM 1.2 или 2.0 для предприятий и TPM 2.0 для потребителей) или программном обеспечении на основании политики.
4. Проверка подлинности — это двухфакторная проверка с использованием сочетания ключа или сертификата, привязанного к устройству, и информации, известной пользователю PIN-код), или идентификационных данных пользователя (Windows Hello). Жест Hello не перемещается между устройствами и не предоставляется серверу. Он хранится локально на устройстве.
5. Закрытый ключ никогда не покидает устройство. Проверяющий подлинность сервер имеет открытый ключ, который был сопоставлен с учетной записью пользователя во время регистрации.
6. Ввод PIN-кода и биометрических жестов приводит к проверке удостоверения пользователя в Windows 10 и проверке подлинности с использованием ключей или сертификатов Hello.
7. Личные (учетная запись Майкрософт) или корпоративные учетные записи (Active Directory или Azure AD) использует один контейнер для ключей. Все ключи разделены по доменам поставщиков удостоверений в целях обеспечения конфиденциальности пользователя.
8. Закрытые ключи сертификатов могут быть защищены контейнером Hello и жестом Hello.
Сравнение проверки подлинности на основе ключа и сертификата
Для подтверждения личности служба Windows Hello для бизнеса может использовать ключи (аппаратный или программный) или сертификаты с ключами в аппаратном или программном обеспечении. Предприятия с инфраструктурой открытых ключей (PKI) для выпуска и управления сертификатами могут продолжать использовать PKI вместе со службой Hello. Предприятия, у которых нет PKI или которые хотят сократить объем работ, связанных с управлением сертификатами, могут использовать для службы Hello учетные данные на основе ключа.
Аппаратные ключи, которые создаются модулем TPM, обеспечивают наиболее высокий уровень гарантии. При изготовлении в модуль TPM помещается сертификат ключа подтверждения (EK). Этот сертификат EK создает корневое доверие для всех других ключей, которые генерируются в этом модуле TPM. Сертификация EK используется для генерации сертификата ключа удостоверения подлинности (AIK), выданного службой сертификации Microsoft. Этот сертификат AIK можно использовать как претензию по удостоверению, чтобы доказать поставщикам удостоверений, что ключи Hello генерировались одним и тем же TPM. Центр сертификации Майкрософт (CA) генерирует сертификат AIK для каждого устройства, пользователя и IDP, чтобы гарантировать защиту конфиденциальности.
Если поставщики удостоверений, например Active Directory или Azure AD, регистрируют сертификат в службе Hello, Windows 10 будет поддерживать тот же набор сценариев, что и смарт-карта. Если тип учетных данных представляет собой ключ, будет поддерживаться только доверие и операции на основе ключа.
Мы постарались написать для вас подробный и понятный туториал по работе со службой Windows Hello. Если у вас остались вопросы, задавайте в комментариях.
Доброго времени суток, Уважаемый. Сейчас я постараюсь рассказать что такое Windows Hello для бизнеса и как это настроить.
Windows Hello — это система аутентификации в Windows 10, на основе PIN кода, биометрических данных или гравифеского пароля. Приставка для бизнеса значит, что все это будет работать в домене.
Почему пароль уже не очень хорошо? Потому что! Если серьезно, то можно почитать тут.
Что нам надо?
- Active Directory — Минимум 1 контроллер домена на базе Windows Server 2016. Уровень домена не ниже Windows Server 2012 R2.
- Public Key Infrastructure
- Azure Active Directory.
- Windows 10 в качестве клиента.
Настройка сертификатов контроллера домена
Клиенты должны доверять контроллерам домена; лучший способ это обеспечить — предоставить каждому контроллеру домена сертификат проверки подлинности Kerberos. Установка сертификата на контроллер домена позволяет центру распространения ключей (KDC) подтверждать свою подлинность другим членам домена.
Войдите в центр сертификации или на рабочие станции управления, используя учетные данные, эквивалентные администратору домена.
- Откройте консоль управления Центр сертификации.
- Щелкните правой кнопкой мыши элемент Шаблоны сертификатов и затем выберите Управление.
- В консоли «Шаблон сертификата» щелкните правой кнопкой мыши шаблон Проверка подлинности Kerberos в области сведений, а затем щелкните Скопировать шаблон.
- На вкладке Совместимость снимите флажок Показать последующие изменения. Выберите Windows Server 2012 или Windows Server 2012 R2 из списка Центр сертификации. Выберите Windows Server 2012 или Windows Server 2012 R2 из списка Получатель сертификата.
- На вкладке Общие в поле отображаемого имени шаблона введите Проверка подлинности контроллера домена (Kerberos). Измените срок действия и период обновления в соответствии с потребностями вашей организации. Примечание: если используются другие имена шаблонов, их необходимо помнить и заменить на эти имена в разных частях лаборатории.
- На вкладке Субъект нажмите кнопку Строится на основе данных Active Directory, если она еще не нажата. Выберите пункт Нет в списке Формат имени субъекта. Выберите DNS-имя в списке Включить эту информацию в альтернативное имя субъекта. Снимите все остальные флажки.
- На вкладке Шифрование выберите Поставщик хранилища ключей из списка Категория поставщика. Из списка Имя алгоритма выберите RSA. Введите 2048 в текстовое поле Минимальный размер ключей. Выберите SHA256 из списка Хэш запроса. Нажмите кнопку OK.
- Закройте консоль.
Замена существующего сертификата контроллера домена
Большое количество контроллеров домена может иметь существующий сертификат контроллера домена. Службы сертификатов Active Directory предоставляют шаблона сертификата по умолчанию от контроллеров домена — шаблон сертификата контроллера домена. Более поздние версии включают новый шаблон сертификата — шаблон сертификата проверки подлинности контроллера домена. Эти шаблоны сертификатов были предоставлены до обновления спецификации Kerberos, в которой указано, что центры распространения ключей (KDC), выполняющие проверку подлинности сертификатов, должны включать расширение KDC для проверки подлинности.
Шаблон сертификата проверки подлинности Kerberos — самый новый шаблон сертификата, предназначенный для контроллеров домена, и именно его следует развернуть на всех контроллерах домена (2008 или более поздней версии). Функция автоматической регистрации в Windows позволяет легко заменить эти сертификаты контроллеров домена. Можно использовать следующую конфигурацию для замены более старых сертификатов контроллеров домена новыми сертификатами с помощью шаблона сертификата проверки подлинности Kerberos.
Войдите в центр сертификации или на рабочие станции управления, используя учетные данные, эквивалентные администратору предприятия.
- Откройте консоль управления Центр сертификации.
- Щелкните правой кнопкой мыши элемент Шаблоны сертификатов и затем выберите Управление.
- В консоли «Шаблоны сертификатов» щелкните правой кнопкой мыши шаблон Проверки подлинности на контроллере домена (Kerberos) (или имя шаблона сертификата, созданного в предыдущем разделе) в области сведений и нажмите кнопку Свойства.
- Выберите вкладку Устаревшие шаблоны. Нажмите кнопку Добавить.
- Из диалогового окна Добавление устаревшего шаблона выберите шаблон сертификата Контроллер домена и нажмите кнопку ОК. Нажмите Добавить.
- Из диалогового окна Добавление устаревшего шаблона выберите шаблон сертификата Проверка подлинности контроллера домена и нажмите кнопку ОК.
- Из диалогового окна Добавление устаревшего шаблона выберите шаблон сертификата Проверка подлинности Kerberos и нажмите кнопку ОК.
- Добавьте другие шаблоны сертификатов предприятия, настроенные ранее для контроллеров домена, на вкладку Устаревшие шаблоны.
- Нажмите кнопку ОК и закройте консоль Шаблоны сертификатов.
Шаблон сертификата настроен для замены всех шаблонов сертификатов, перечисленных в списке устаревших шаблонов сертификатов.
Публикация шаблонов сертификатов в центр сертификации
Центр сертификации может выдавать только сертификаты, соответствующие шаблонам сертификатов, опубликованным в этот центр сертификации.
- Откройте консоль управления Центр сертификации.
- Разверните родительский узел в области навигации.
- В области навигации щелкните Шаблоны сертификатов.
- Щелкните правой кнопкой мыши узел Шаблоны сертификатов. Выберите пункт Создать и щелкните выдаваемый Шаблон сертификата.
- В окне Включение шаблонов сертификатов выберите шаблон Проверка подлинности контроллера домена (Kerberos), созданный в предыдущих шагах. Нажмите кнопку ОК для публикации выбранного шаблона сертификатов в центр сертификации.
- Если вы опубликовали шаблон сертификата проверки подлинности контроллера домена (Kerberos), следует отменить публикацию шаблонов сертификатов, включенных в список устаревших шаблонов.
- Чтобы отменить публикацию шаблона сертификата, щелкните правой кнопкой мыши шаблон сертификата, публикацию которого вы хотите отменить, в области сведений консоли «Центр сертификации», а затем выберите Удалить. Нажмите кнопку Да для подтверждения операции.
- Закройте консоль.
Настройка контроллеров домена для автоматической регистрации сертификатов
Контроллеры домена автоматически запрашивают сертификат на основе шаблона сертификата контроллера домена. Однако контроллер домена не знает о более новых шаблонах сертификатов или устаревших конфигурациях шаблонов сертификатов. Чтобы продолжить автоматическую регистрацию и обновление сертификатов контроллера домена, которые знают о более новых шаблонах сертификатов и устаревших конфигурациях шаблона сертификата, создайте и настройте объект групповой политики для автоматической регистрации сертификатов и свяжите объект групповой политики с OU контроллеров домена.
- Запустите Консоль управления групповыми политиками (gpmc.msc).
- В области навигации разверните домен и выберите узел Объект групповой политики.
- Щелкните правой кнопкой мыши Объект групповой политики и выберите Создать.
- Введите Автоматическая регистрация сертификатов контроллера домена в поле имени и нажмите кнопку ОК.
- Щелкните правой кнопкой мыши объект групповой политики Автоматическая регистрация сертификатов контроллера домена и щелкните Изменить.
- В области навигации в узле Конфигурация компьютера разверните Политики.
- Разверните Параметры Windows, Параметры безопасности и выберите Политики открытого ключа.
- В области сведений щелкните правой кнопкой мыши Клиент служб сертификации: автоматическая регистрация и выберите Свойства.
- В окне Модель конфигурации выберите Включено.
- Установите флажок Обновлять сертификаты с истекшим сроком действия или в состоянии ожидания и удалять отозванные сертификаты.
- Установите флажок Обновлять сертификаты, использующие шаблоны сертификатов.
- Нажмите кнопку OK. Закройте Редактор управления групповыми политиками.
- В области навигации разверните домен и узел, имя которого соответствует имени вашего домена Active Directory. Щелкните правой кнопкой мыши подразделение Контроллеры домена и щелкните Связать существующий объект групповой политики…
- В диалоговом окне Выбор объекта групповой политики выберите Автоматическая регистрация сертификатов контроллера домена или имя объекта групповой политики регистрации сертификата контроллера домена, созданный ранее, и нажмите кнопку ОК.
Групповая политика «Включить Windows Hello для бизнеса»
Параметр групповой политики «Включить Windows Hello для бизнеса» необходим Windows для определения того, следует ли пользователю пытаться регистрироваться в Windows Hello для бизнеса. Пользователь будет пытаться регистрироваться только в случае, если этот параметр политики включен.
Создание объекта групповой политики Windows Hello для бизнеса
Объект групповой политики содержит параметры политики, необходимые для запуска подготовки Windows Hello для бизнеса, а также для обеспечения автоматического продления сертификатов проверки подлинности Windows Hello для бизнеса.
- Запустите Консоль управления групповыми политиками (gpmc.msc).
- В области навигации разверните домен и выберите узел Объект групповой политики.
- Щелкните правой кнопкой мыши Объект групповой политики и выберите Создать.
- Введите Включить Windows Hello для бизнеса в поле имени и нажмите кнопку ОК.
- В области содержимого щелкните правой кнопкой мыши объект групповой политики Включить Windows Hello для бизнеса и выберите Изменить.
- В области навигации в узле Конфигурация пользователя разверните Политики.
- Разверните Административные шаблоны, Компонент Windows и выберите Windows Hello для бизнеса.
- В области содержимого дважды щелкните Использовать Windows Hello для бизнеса. Щелкните Включить и нажмите кнопку ОК.
- Закройте Редактор управления групповыми политиками.
Настройка безопасности в объекте групповой политики Windows Hello для бизнеса
Самый лучший способ развертывания объекта групповой политики Windows Hello для бизнеса— это использование фильтрации по группам безопасности. Благодаря этому можно легко управлять пользователями, которые должны получить Windows Hello для бизнеса, просто добавляя их в группу. Это позволяет развернуть Windows Hello для бизнеса в несколько этапов.
- Запустите Консоль управления групповыми политиками (gpmc.msc).
- В области навигации разверните домен и выберите узел Объект групповой политики.
- Дважды щелкните объект групповой политики Включить Windows Hello для бизнеса.
- В разделе Фильтрация ограничений безопасности области содержимого нажмите кнопку Добавить. Введите Пользователи Windows Hello для бизнеса или имя ранее созданной группы безопасности и нажмите кнопку ОК.
- Перейдите на вкладку Делегирование, выберите Прошедшие проверку и нажмите кнопку Дополнительно.
- В списке Группы или пользователи выберите Прошедшие проверку. В списке Разрешения для прошедших проверку пользователей снимите флажок Разрешить для разрешения Применить групповую политику. Нажмите кнопку OK.
Развертывание объекта групповой политики Windows Hello для бизнеса
При применении объекта групповой политики Windows Hello для бизнеса используется фильтрация по группам безопасности. Это позволяет привязать объект групповой политики к домену, что гарантирует, что объект групповой политики будет находиться в пределах области для всех пользователей. Тем не менее, фильтрация по группам безопасности гарантирует, что только пользователи, входящие в глобальную группу Пользователи Windows Hello для бизнеса, будут получать и применять объект групповой политики, что приводит к подготовке Windows Hello для бизнеса.
- Запустите Консоль управления групповыми политиками (gpmc.msc).
- В области навигации разверните домен, щелкните правой кнопкой мыши узел с именем вашего домена Active Directory и выберите Связать существующий объект групповой политики…
- В диалоговом окне Выбор объекта групповой политики выберите Включить Windows Hello для бизнеса или имя ранее созданного объекта групповой политики Windows Hello для бизнеса и нажмите кнопку ОК.
Azure Active Directory
Теперь важно обновить структуру синхронизации Active Directory с Azure Active Directory. Если этого не сделать, то при вводе PIN кода, пользователи будут видеть ошибку вида «функция (входа по PIN коду) временно недоступна».
Windows 10
Можно приступать к настроке PIN кода, отпечатка пальцев и т.д.
Anyone who has purchased a Windows device from Microsoft or several other vendors in the last few years might have been presented with Windows Hello. A biometrics-based technology (face or fingerprint scans), it lets you securely and quickly sign in to your device. In this article, we’ll look at a real-world deployment of Windows Hello for Business at a small independent school in Australia.
Contents
- Windows Hello vs. Windows Hello for Business
- Deployment prerequisites
- Certificate services
- AAD device registration
- Configuring Windows Hello for Business settings
- End user experience
- Lessons learned
- Author
- Recent Posts

Paul Schnackenburg works part time as an IT teacher as well as running his own business in Australia. He has MCSE, MCT, MCTS and MCITP certifications. Follow his blog TellITasITis.
This won’t offer complete coverage of all Windows Hello for Business options, as there are quite a few paths you can take, depending on your starting environment. Instead, I’ll share my learnings from this particular deployment.
A few words about the client—they’re an independent school with approximately 90 students in grades 1–12 and about 20 staff. They use Microsoft 365 A3 (equivalent to commercial E3), Microsoft Endpoint Manager, and Windows 10 across all devices.
The device fleet comprises 13 Surface Book devices for teachers, 16 Surface Pros for senior students, and just over 50 Dell laptops (not Windows Hello for Business-capable) for the rest of the students, plus a smattering of Dell desktop PCs for admin staff. Server infrastructure is a R440 Dell Server, running Windows Server 2019 Hyper-V and seven VMs: two domain controllers, a file/print server, a LOB application, a WSUS server, Microsoft’s Advanced Threat Analytics (ATA), and a Linux Syslog server.
There’s also an older Dell server that’s the Hyper-V replica target for all VMs, located in a different building on campus. Each of the six buildings has a managed switch, which is connected with fiber optic cabling to the others. Each of these has a NetGear Wi-Fi access point in an ensemble, providing roaming indoor network access. Active Directory synchs user and computer accounts to Azure AD using AAD Connect.
Windows Hello vs. Windows Hello for Business
I’ve used Windows Hello for Business on every device since my first Surface Book, and it’s incredibly convenient. Most times I’m signed in before I’ve even sat down in the chair to start working. Setup is also quite quick: a few scans of your face (with and without glasses) and you’re good to go.
While Windows Hello for Business uses the same underlying technology, it’s quite a different beast. When the school decided to purchase Surface Books and later Surface Pros, I mentioned how great I found Windows Hello and said, «You can do this too.» IT consultant mistake number one: don’t promise until you’ve checked the prerequisites 😊.
Deployment prerequisites
Taking Windows Hello to Active Directory and using it on domain-joined PCs is a lot more complex than on consumer devices. When this first was discussed with the client, they were still running Windows Server 2008 R2 DCs, so that was the first hurdle—now their DCs are Windows Server 2019. Other requirements are Windows 10 1709 or later, either AD and AAD joined (hybrid) or AAD joined, Windows Server 2016 or later DCs (you can use 2008 R2/2012 but only with certificate trust—see below), with a Windows Server 2016 schema.
Windows Hello for Business isn’t just biometrics but an umbrella term for various stronger authentication methods, and you always have the option of falling back to a PIN that’s unique to that device, unlike a username/password pair.
As mentioned, there are a few paths to take in the quest toward Windows Hello for Business nirvana. Your first decision is between key-based and certificate-based authentication. The former is easier to deploy but doesn’t support Remote Desktop connections; the latter requires a public key infrastructure (PKI) for certificate deployment, which might fit right in if your business already has that deployed but raises the bar if you don’t. Note that even if you opt for key-based, you’ll still need a minimal PKI/AD Certificate Services (AD CS) service to deploy updated certificates to your DCs.
A second decision is whether you’re going to do a cloud-only deployment (Windows 10, AAD, Azure AD MFA only) or a hybrid deployment. For hybrid, you can do certificate trust and mixed managed, key trust and modern managed, or certificate trust modern managed, where «modern» means MDM (Intune/Endpoint Manager) enrolled. There is also an on-premises-only deployment path.
Microsoft provides a map for your quest in the form of a planning worksheet. Go through each question regarding your current environment in conjunction with the planning guide to gain insight into which options you have for your Windows Hello for Business deployment.
Here’s my resulting worksheet. We went with a hybrid deployment with key trust and Endpoint Manager. I automatically joined the client PCs to Azure AD using a GPO.

Windows Hello for Business Planning Worksheet
Another wrinkle is whether you’re still running AD Federation Services (AD FS; this client is not), which needs to be considered in your planning. As an aside, given that the SolarWinds attacks used AD FS, and Microsoft has been recommending migrating from AD FS to AAD for your federation needs, start your migration journey now if you have AD FS.
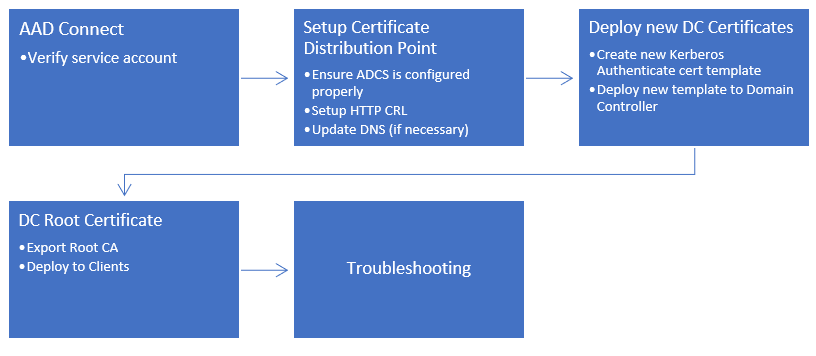
Once all devices were joined to AAD, I was ready to proceed. The documentation has clearly laid out steps, which in my case involved:
- Checking prerequisites—AD, AAD directories, and PKI will need to be deployed for DC certificates (see below)
- Deploying AD CS and configuring it
- Configuring directory synchronization
- Configuring Azure device registration
- Configuring Windows Hello for Business settings
- Signing in and provisioning
Certificate services
If you’re deploying AD CS in a large business with strict security requirements, be aware that there are many steps involved in planning such a deployment. One path is creating a root certificate server on a workgroup server (so that it doesn’t lose trust with the domain when it’s offline for extended periods of time), which deploys leaf certificate servers and is then shut down and locked away in a vault. This is beyond what this client needs, and I simply deployed CS on one of the DCs.

Setting up AD CS
By default, the AD CA publishes a Kerberos Authentication certificate template, but it uses older and less performant crypto APIs; hence, the documentation guided me through creating a new template with updated settings such as the RSA algorithm with 20148 minimum key size. This template is then configured to supersede the older ones and published, while the older certificate templates are deleted.

Configuring the certificate template
AAD device registration
Since AAD Connect is already running at this client, it was simply a matter of configuring it. There’s a Service Connection Point (SCP) required but since we’re running an up-to-date version of AAD Connect, it was already in place.
I checked a random sample of devices in Devices for their join status in the AAD portal as well as on the devices themselves. You can use either dsregcmd /status in a command window or Get-MSolDevice in PowerShell.
Configuring Windows Hello for Business settings
After what felt like an eternity of planning, checking prerequisites, and configuring the infrastructure itself, I could now configure the single GPO setting «Enable Windows Hello for Business,» along with a second GPO for the domain controllers to automatically enroll the certificate described above.

Group policy configuration
There are a few optional additional settings in the GPO that you can use, such as Use a hardware security device, which mandates storing credentials in a TPM chip. You can optionally also require only TPM 2.0 and not 1.2. You can also use biometrics; perhaps you want to disable the use of biometrics until you’re ready to switch it on, which will leave PIN as the only option. You can require PIN Complexity (I went with a minimum of six digits) and created a Windows Hello for Business Users group to control who gets the option for Windows Hello for Business in the staged rollout.
End user experience
I learned rather late in the deployment that Windows Hello for Business requires Azure MFA (or the now-retired Azure MFA server on-premises), so apart from the steps above, users also need to use the free Microsoft Authenticator app on their phones (or SMS text messages or phone calls—I disabled those options as they’re more insecure) and need to register at aka.ms/mfasetup.
I initially deployed this to six teachers during an afternoon training session, and the experience was flawless: set up MFA, sign off, sign back on, Windows Hello for Business asks the user to set up a PIN, scans their face, and then signs them in. One of the Surface Books had trouble with the biometrics and refused to do face registration, probably due to its age (troubleshooting to follow).
Lessons learned
This was a long process, spread out over years from the initial idea to last week’s training when teachers enrolled, with more students and teachers to follow. I really like the idea of an unphishable credential that also provides a convenient user experience. Given the hardware requirements for Windows 11, I’ve advised the client that new device purchases toward the end of this year need to come with TPM 2.0 chips and Windows Hello for Business-capable biometrics. We’ll see what price premium that brings.
I’m also trialing a FIDO 2 YubiKey with one student to assess whether having a separate device (again unphishable) for authentication is preferable, rather than having it built into each PC.
Subscribe to 4sysops newsletter!
I hope this real-world deployment experience retelling was useful. Good luck in your journey to being passwordless.
![]()
![]()
Everyone can use Windows Hello, but how about its business-based counterpart? Here’s everything you need to know.

You’ve probably heard of Windows Hello before. It’s a convenient feature that lets you unlock your device using biometrics (such as fingerprints or facial recognition).
Now, there’s another incredible tool called Windows Hello for Business. But what are its benefits, and how is it different from Windows Hello? Let’s explore everything about the “Windows Hello for Business” tool, how it works, why you should use it, and more.
What Is Windows Hello for Business?

Windows Hello for Business is a tool that allows you to unlock your device using biometrics or a PIN. It lets you access your device via fingerprint, facial recognition, and iris recognition. Each one of these has its own strengths and weaknesses, so be sure to check out our article on the most secure login option between face, iris, fingerprint, password, or PIN logins. It also uses multi-factor authentication (MFA) to ensure that your device is secure.
Although the tool might sound a bit similar to Windows Hello, it’s actually more secure. You can use Windows Hello for Business for both on-premise and cloud resources. For example, you can use it with Hybrid Azure Active Directory-joined, Azure AD, and Azure Active Directory-joined devices.
Interestingly, you can also use this tool on domain-joined devices (the devices that are connected to a specific domain such as a company intranet).

Let’s take a look at how this tool works.
Registration
This is the phase where the device registers with an identity provider (IDP). Simply put, an IDP refers to a service that stores and manages your digital identity.
For example, let’s say that a third-party website prompts you to log in to a certain tool using your Google account. In this case, Google is the identity provider.
Now, each “Windows Hello for Business” deployment option has a different identity provider.
For on-premise deployments, the identity provider is usually Active Directory Federation Services (AD FS). Meanwhile, Azure Active Directory is usually the identity provider for cloud and hybrid deployments.
Provisioning
After the registration part, you can now set up the «Windows Hello for Business» tool. This is where you’ll select the various methods for unlocking your device (such as using biometrics or a PIN).
From there, you should be ready to log in to your device using your preferred method. Each time you log in, the identity provider will verify your identity.
What Are the Benefits of Biometric Authentication?

Both Windows Hello and Windows Hello for Business come with these incredible features:
- Extra Layer of Security: It’s often easy for someone to crack your password and hack into your system. But the Windows Hello and Windows Hello for Business tools also give you the option to use biometrics. Now, this makes your device more secure because it’s difficult to replicate your biometric data.
- Convenience: Let’s face it—unlocking your device with a long password can often be quite irritating. And if you enter the wrong password, you have to start from scratch. But when using biometrics, you can sign in to your device within seconds.
You’re probably wondering why it might be worth picking Windows Hello for Business over Windows Hello. Well, it all comes down to security features!
Let’s now explore some of the benefits of using Windows Hello for Business.
Here’s why you might want to consider using Windows Hello for Business:
- Certificate-Based Authentication: Unlike Windows Hello, the «Windows Hello for Business» tool uses certificate-based authentication. This process uses a digital certificate to identify a user before granting them access to a resource, an app, or a network.
- Reduced Number of Password Resets: It’s common for employers to forget their login credentials. So, this means administrators might have to do frequent password resets. However, Windows Hello for Business’ multi-factor authentication ensures that you can unlock your device in various ways. So, it’s highly unlikely that you might end up locking yourself out of your device and requesting password resets.
- SSO Support: Unlike Windows Hello, the «Windows Hello for Business» tool supports single-sign-on (SSO) functionality. With SSO, you can sign in to multiple services with the same set of credentials.
By now, it’s clear that Windows Hello for Business is more secure and can be quite convenient than Windows Hello (especially if you’re a business owner).
How Do You Enable and Deploy Windows Hello for Business?

Let’s check out how you can enable and deploy Windows Hello for Business.
How to Enable Windows Hello for Business
You can enable Windows Hello for Business using the Local Group Policy Editor (LGPE).
Here are the steps you need to follow:
- Press Win + R to open the Run command dialog box.
- Type gpedit.msc and press Enter to open the LGPE.
- Navigate to Computer Configuration > Administrative Templates > Windows Components > Windows Hello for Business.
- Double-click on the Use Windows Hello for Business option on the right-hand side.
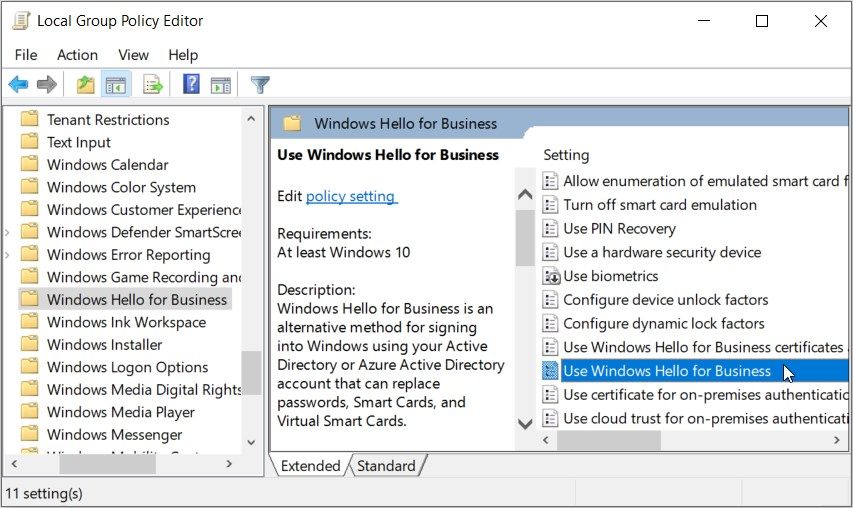
Select Enabled in the top-left corner. Finally, press Apply and then press OK.
Besides enabling the tool, you can also configure some of its settings in the LGPE. For example, you can configure the tool to use PIN recovery. Additionally, you can choose to use a certificate for on-premise authentication.
Here’s how to configure additional «Windows Hello for Business» settings using the LGPE:
- Open the Local Group Policy Editor as per the previous steps.
- Navigate to Computer Configuration > Administrative Templates > Windows Components > Windows Hello for Business.
- Select any of the options on the list (except for the «Use Windows Hello for Business» option).
- To enable the option you’ve picked, select Enabled on the next screen. Finally, press Apply and then press OK.
Additionally, you can configure some LGPE settings by checking out the Windows Hello for Business Policy Settings on the Microsoft website.
How to Deploy Windows Hello for Business

There are various ways to deploy Windows Hello for Business. If you want to deploy it for cloud devices, the process will depend on your organization’s cloud-based identity and access management (IAM) service. An example of an IAM is Azure AD.
And if you want to deploy the tool for on-premise devices, there are different methods for that too.
To get started, check out the infrastructure requirements for deploying Windows Hello for Business on the Microsoft website. From there, check out the Windows Hello for Business Deployment tips to find out how you can deploy this tool for your business.
Easily Access Your Device With Windows Hello for Business
Using long and complicated passwords on Windows is a thing of the past. You can now easily unlock your device using biometrics.
Wondering which tool can help you access Windows via biometrics? Try the “Windows Hello for Business” tool, especially if you’re a business owner.
But if you’re looking for something simple, give Windows Hello a try. And in case this tool runs into issues, there are some solutions you can check out.
Windows Hello for Business (WHfB) is an awesome Microsoft technology that replaces traditional passwords with PIN and/or Biometrics and linked with a cryptographic certificate key pair. This is set up by default as part of the Out of Box Experience with Windows 10. These certificates grant single sign-on access to legacy Active Directory resources. There are a number of other benefits of why a PIN is more secure than passwords as well and I would encourage you to read more about it on Microsoft’s documentation.
WHfB not only provides a more secure way to sign in to Windows, but it enables cloud-joined Azure Active Directory (AAD) devices to access resources on the domain. For many organizations adopting modern deployment technologies like Autopilot, AAD-joined PCs (also called cloud-joined) aren’t joined to the on-premise domain. Accessing a file share, for example, would not be possible without constantly prompting the user for username and password. With WHfB, however, Windows 10 clients are now able to generate a Kerberos ticket and they now act almost like they are joined to the domain. Users will be able to access file shares, printer shares, and other resources that leverage Kerberos authentication without any prompts at all. Nice!
WHfB is relatively simple to set up but it does have quite a few pre-requisites that must be met in order for it to function properly. In this blog, I’ll be going over which type of WHfB deployment is best, all the prereqs associated, and then walking step-by-step on setting this up in your lab or production environment. Let’s begin!
What is the difference between Windows Hello and Windows Hello for Business?
You are probably familiar with Windows Hello by setting it up on your home PC. It allows you to log in to your PC with an easier PIN and/or Biometric login. For most people, this is just a convenience; it doesn’t do anything beyond that. Windows Hello for Business, on the other hand, takes that same convenience but adds an additional layer of security on top. It not only makes it simpler for end-users to log into their corporate PC, but it also provides a secure way to access corporate resources on the domain.
Additionally, we can also control WHfB with GPO or MDM policies and tools like Microsoft Endpoint Manager or VMware Workspace ONE.
Two Methods
Microsoft has implemented two different methods for Hello For Business: Cert-Trust and Key-Trust. Key-Trust is the default and is the easiest to set up. It leverages the built-in Azure AD certificate that gets deployed each time a device joins Azure AD through the Out of Box Experience (OOBE). The private key of this certificate gets saved in the Microsoft Passport for Work store and the public key gets synced to Azure AD. AAD then syncs it back to on-premises Active Directory and saves it to a user attribute called msDS-KeyCredentialLink.
Cert-Trust on the other hand, adds an additional device registration step to the process. When the device goes through OOBE, it must talk to Active Directory Federation Services (ADFS) which then registers the device to on-premise AD. This device object is then written up to Azure AD (called “Device Writeback” in Azure AD Connect). After this happens, the user certificate, which is deployed from your own Active Directory Certificate Server instead of Azure AD, is then paired up with the device. This method uses both Device + User trust whereas the Key-Trust is only at the user level (no device registration required).
Which method should I pick?
Key-Trust is the default method and is the method I recommend. It is much simpler to implement and doesn’t require any additional infrastructure or services. Cert-Trust requires ADFS and thus adds a significant layer of complexity. Consult your Microsoft resource if you are unsure of which method to choose.
I’ll be demonstrating the Key-Trust method. Even though these steps will all be done in a lab environment, you should be able to easily replicate these to a UAT or Production environment at your organization.
PreReqs and Assumptions
Here are the following prereqs and assumptions we’ll need before we get started. You’ll need to complete these or be ready for them before continuing.
- Active Directory Domain Services installed on a Domain Controller running Windows Server 2016 or newer.
- Ensure Active Directory Schema is 2016 or higher.
- Active Directory Certificate Services (ADCS) 2012 or newer. You can also use third-party certificate services, but I won’t be showing that here.
- A certificate revocation list (CRL) that is accessible via HTTP. Ideally this should also be accessible on the internet.
- Resolvable DNS for the CRL on the client.
- A new Kerberos Authentication Template will be generated and must be installed on Domain Controllers (overwriting the previous one).
- Azure AD Connect Setup, configured, and syncing users from on-premise AD into AAD.
- Azure AD Premium P1 or P2 licensing or equivalent.
- Domain Controller Root Certificate deployed to clients.
One final note: Microsoft refers to this implementation as “Hybrid Key-Trust”. This just refers to the back-end architecture of having both on-premise Active Directory syncing into Azure AD via AAD connect. It does not mean the Windows 10 client is actually hybrid-joined to on-premise AD plus AAD. You can view the full list MS list of prereqs here.
Quick Checklist
Before we get in too deep, here is a quick reference on the steps we’ll be going through to set up Windows Hello for Business using the Key Trust method.
Verify the AAD Connect Service Account Permissions
First, you will need to ensure the service account used by AAD Connect has the correct permissions to update the msDS-KeyCredentialLink attribute on the user object. If you aren’t sure what service account is being used, here is how you check:
- Log in to the Azure AD Connect service and double-click on the Azure AD Connect icon on the desktop.
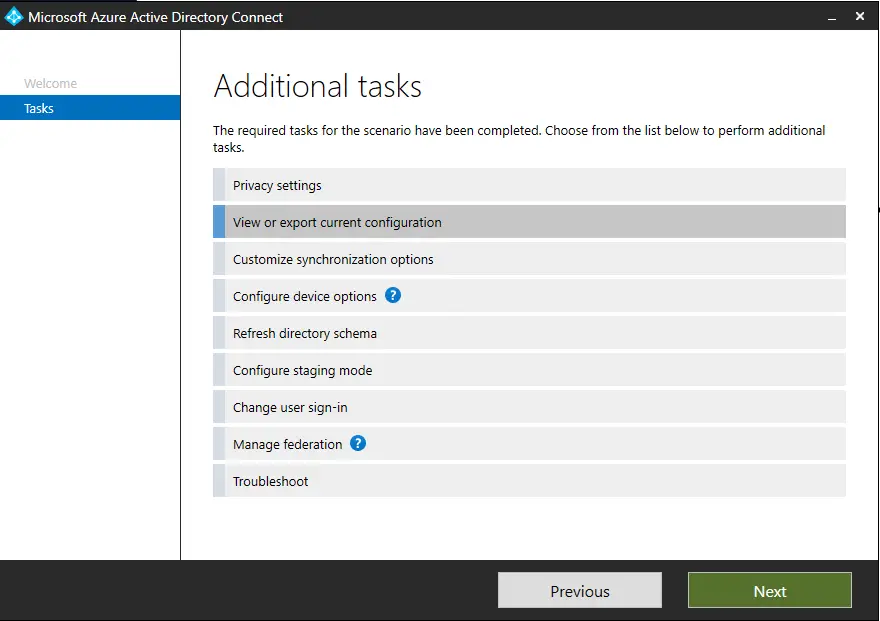
- Once the Azure AD connect wizard application launches, click on “View or Export Current Configuration” and click Next.
- Under Synchronized Directories, you will see the account used.
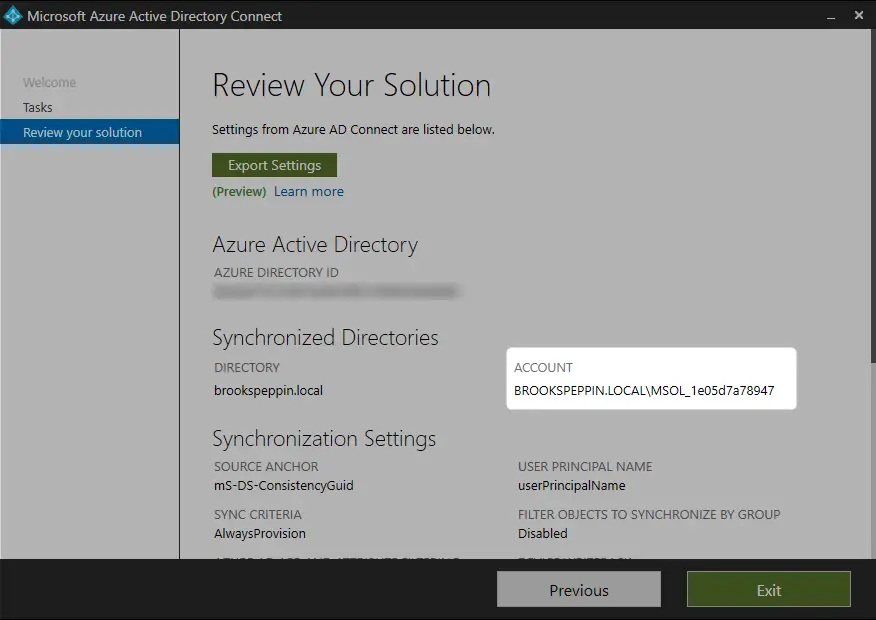
In my case, my account name is MSOL_1e05d7a78947.
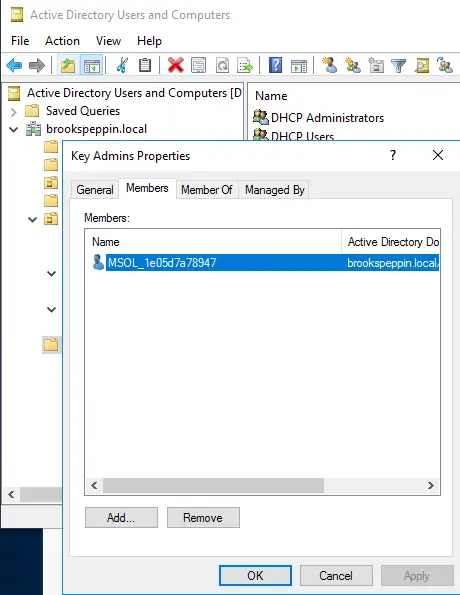
Now, add this account into the KeyAdmins security group in Active Directory. This group provides the correct level of permissions needed to read and write the public key to Active Directory.
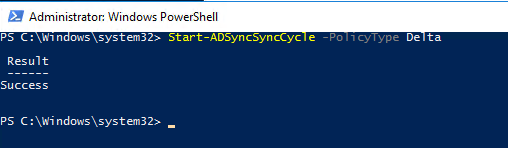
Close the Azure AD Connect wizard and perform delta sync on AAD connect after you make this change. You can do this by running the following PowerShell command from the Azure AD Connect server:
Start-ADSyncSyncCycle -PolicyType Delta
For more information on this topic, see the Microsoft documentation. Now that we have that taken care of, let’s move onto certs.
Setup CRL Distribution Point (CDP) accessible from the web
Clients will need the ability to query the certificate revocation list (CRL) in order for the authentication to happen. This may seem odd since we are not using the cert trust method, but remember that certificates are still used in the key-trust method. The domain controller is still doing authentication based on the trust between the key pair. It also needs to check to see if any domain-level certificates are revoked, including the root CA.
This CRL needs to be accessible via HTTP (not HTTPS) and ideally internet facing. Since this is primarily used to access on-premises resources you technically don’t have to make this internet-facing. Clients will need to be on the VPN in order to access internal file shares and thus will have access to an internally based CRL. However, it is best practice to put these on the internet. This may already be set up in your organization, but in case it’s not or you want to follow along in a lab here are the high-level steps:
- Setup an web server using IIS that has a fileshare configured. You will add this as a virtual directory in IIS. The Certificate Authority will publish the CRL there and that is also where clients will check. This will be your CPD or “Certificate Distribution Point.
- Create a CNAME record in DNS for that server which will house the CRL (i.e. pki.brookspeppin.local)
- Update the CA template to use this HTTP location for CRL
- Deploy (or re-deploy) your domain controller certificate as well as export the root certificate for installation on client machines.
MS has good documentation on how to properly set up a full web-based CRL and we’ll generally be following these steps.
I’m putting the Certificate Distribution Point (CPD) on the same server as my CA, but it’s not required. Any web server will do as long as the CA has write access to it in order to create the CRL files.
- Create a folder on the C drive where the CRL will reside. I’m calling mine C:\CRL
- Right click the folder, then Properties, then Sharing tab, then Advanced Sharing.
- Click Share this folder and name it. Add $ to the end if you want to make it hidden from normal file browsing.
- Then click Permissions. Ensure Everyone has “Read” permissions
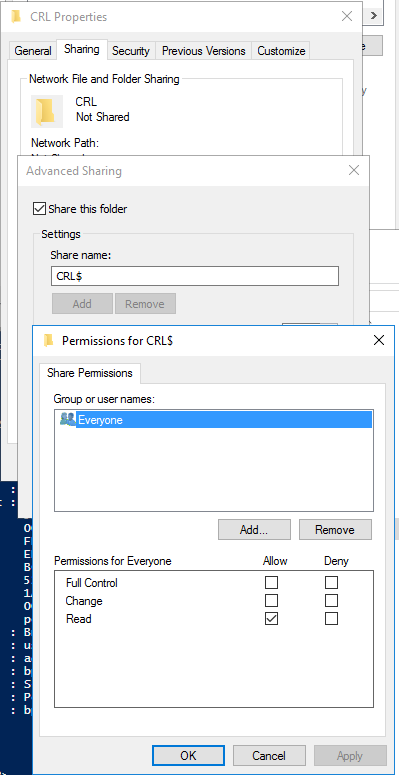
- Then click on Add and we will need to add the CA computer object to this.
- Click on Object Types and ensure ”Computers” box is checked.
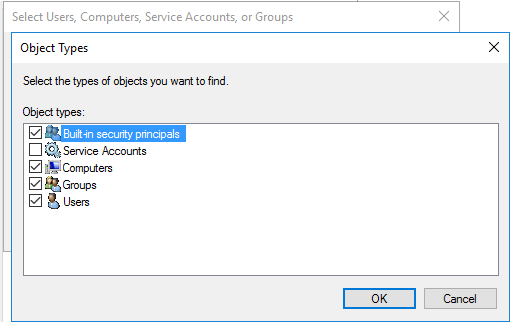
- Search for the computer name and it should resolve. Click OK and ensure the it has Full Control. In my lab, my CA is on my Domain Controller, DC01.
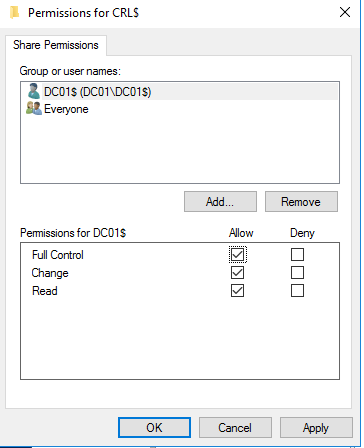
- Click Apply and OK on Advanced Sharing.
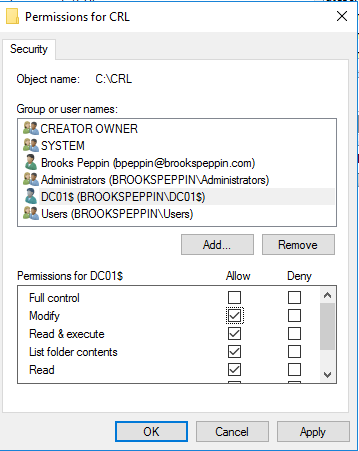
- On the security tab for your share (C:\CRL), repeat the same process giving the computer object modify permissions
- Finally, click Add and type ANONYMOUS LOGON; Everyone
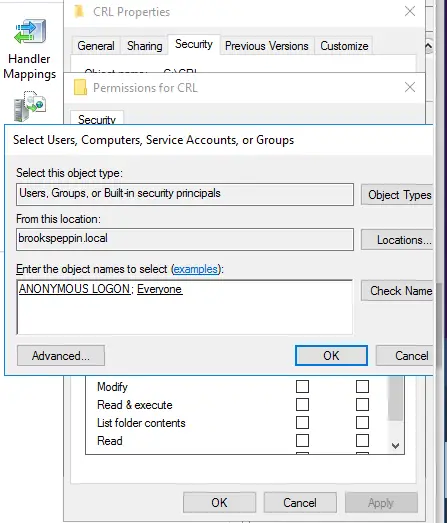
- Click ok. This allows anonymous access so that any clients can check the CRL.
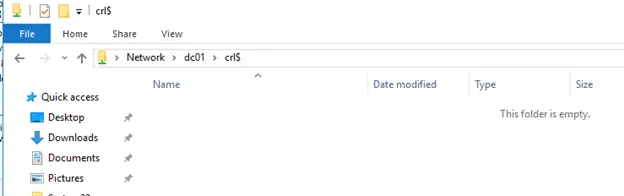
- Do a quick test by browsing to that share. It should resolve and be empty.
Configure IIS for HTTP CRL Location
Now that we have finished setting up our CDP, we need to configure IIS by adding it as a virtual directory.
- Load the IIS console
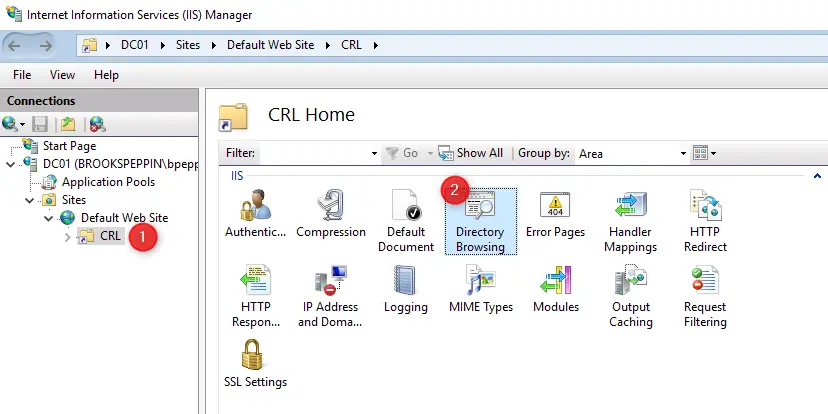
- In navigation tree, expand it and browse to your Default Web Site. Right click it and click Add Virtual Directory.
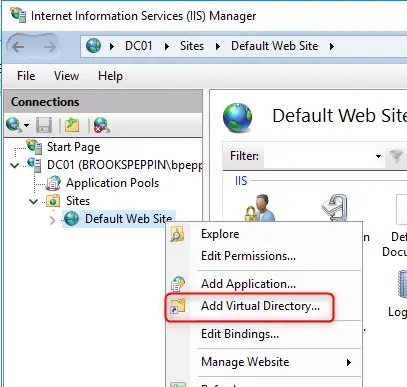
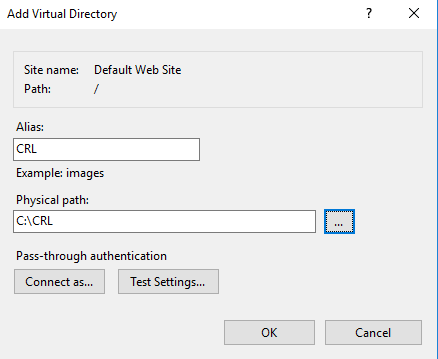
- Under Alias, type what you want your web URL to contain. I’ve just named it “CRL”. Also, browse for the CRL folder and select it. Click OK to close.
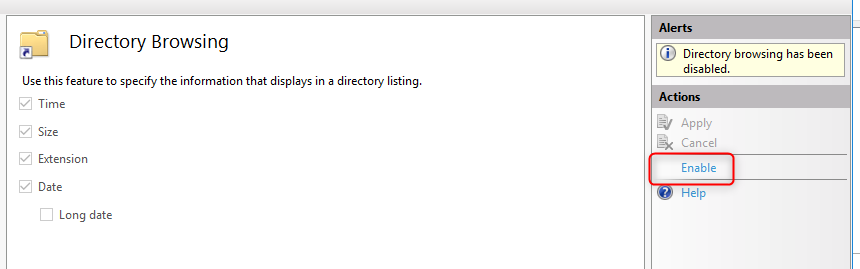
- On the left hand navigation tree, select the new folder (named “CRL”). Double-click on the Directory Browsing icon.
- Click Enable on the right hand side.
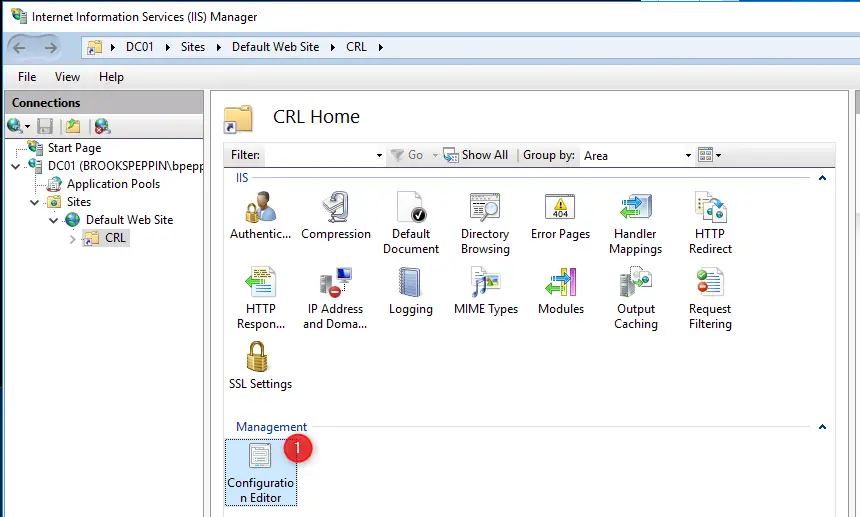
- Go back one screen and then double-click on the Configuration Editor icon.
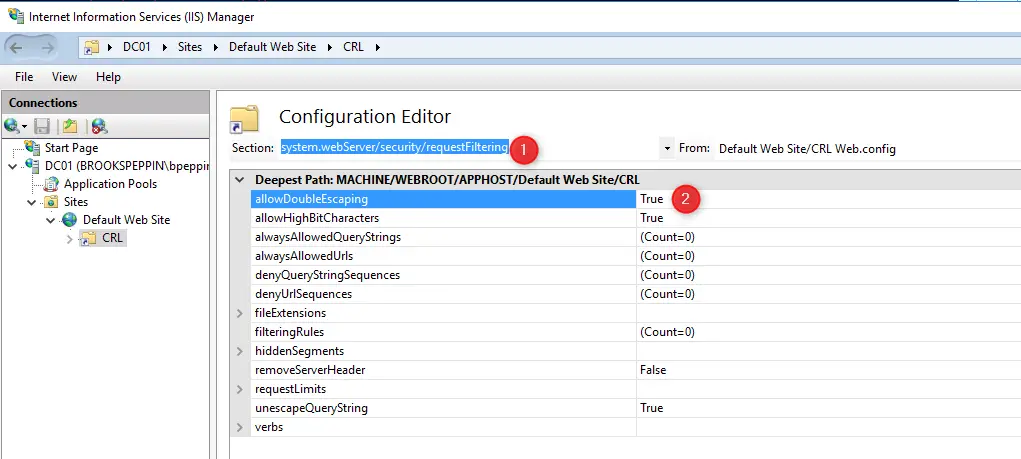
- In the drop down list, type or search for system.webServer/security/requestFiltering
- Change allowDoubleEscaping to be True. Then click Apply. This is required in order for the client to download a CRL delta file which has a ‘+’ symbol in it.
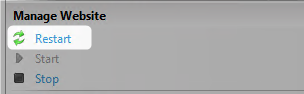
- Click on Default Web Site and then under Manage Website on the right click Restart.
- Load up a web browser and ensure you can get to your new website: http://dc01/crl
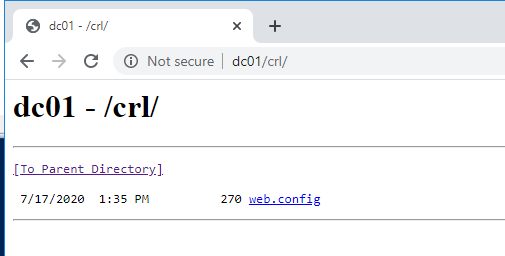
Now this resolves because I’m doing it on the same box, but it won’t be accessible by clients until we set up DNS. We’ll do that next.
Setup DNS for the CRL
DNS may already be set up in your environment for the IIS server we just created, but if you still need to do it, follow these steps. I’ll be using Active Directory integrated DNS and setting up an alias for this called “PKI”.
- Launch the DNS Manager mmc.
- Expand the tree under Server > Forward Lookup Zones. Right-click the forward lookup zone where you want to add the Alias resource record, and then click New Alias (CNAME).
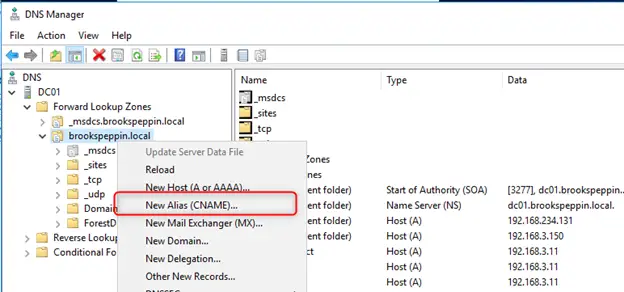
- In Alias name, type the alias name you would like. I’ll be using “pki”.
- In Fully qualified domain name (FQDN) for target host, type the FQDN of the IIS web server. Since I put it on my DC in my lab, the FQDN is “dc01.brookspeppin.local”.

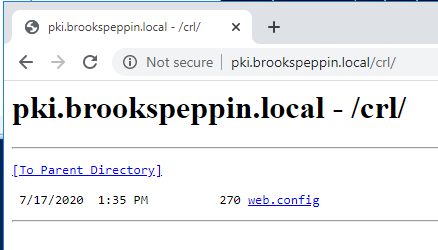
- Click OK to save.
- Type in the new alias URL to ensure it resolves (Make sure it’s http:// not https://)
You can reference the Microsoft Docs for more info. Now that we have this complete, we will move onto configuring a few things on the certificate authority.
We need to add the CDP URL to the CA itself.
- Log in to the CA if you are not already there.
- Search for and launch certsrv.mmc. Right click the CA name and click Properties.
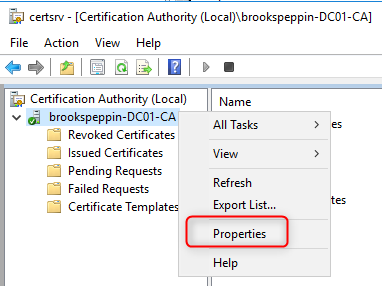
- Click the Extensions tab. In the dropdown for “Select extension”, ensure you have CRL Distribution Point (CDP) selected. Before you make changes here, take a screenshot of this in case you need to revert. In the Specify locations from which users can obtain a certificate revocation list (CRL) section, remove the following enteries:
- Entry starting with “file://\\<ServerDNSName>…”
- Entry starting with “http://<ServerDNSName>…”
- Entry starting with “ldap:///CN=<CATruncatedName>…”
You should only have one left starting with “C:\Windows\System32\CertServer…”
- Now we need to add our new CDP URL that we configured earlier.
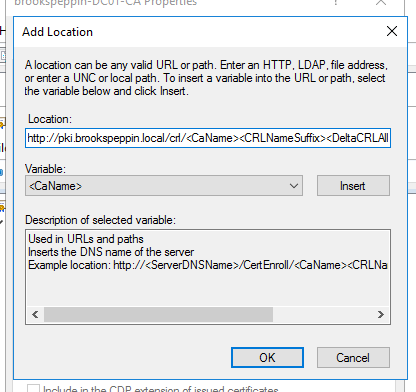
- Click Add.
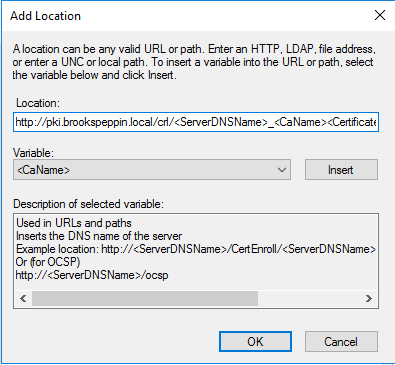
- In Add Location, in Location, type http://[yourDNSname]/[folder]/<CaName><CRLNameSuffix><DeltaCRLAllowed>.crl
So in my case I put “http://pki.brookspeppin.local/crl/<CaName><CRLNameSuffix><DeltaCRLAllowed>.crl”. Update yours accordinly. The items in between the <> are variables and when the CRLs are generated they will be populated with real data. Click OK to save.
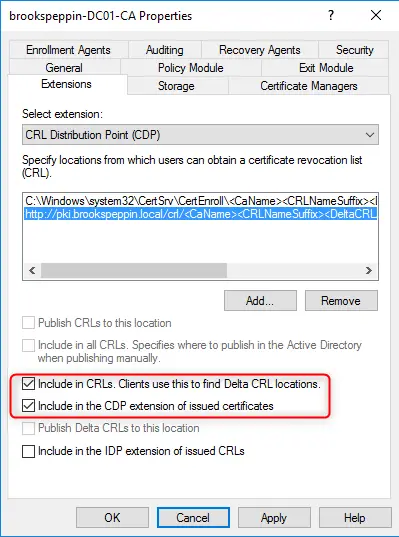
- At the bottom, ensure the following boxes are selected:
- Include in CRLs. Clients use this to find the Delta CRL locations
- Include in the CDP extension of issued certificates
- Click Add again.
- in Location, type
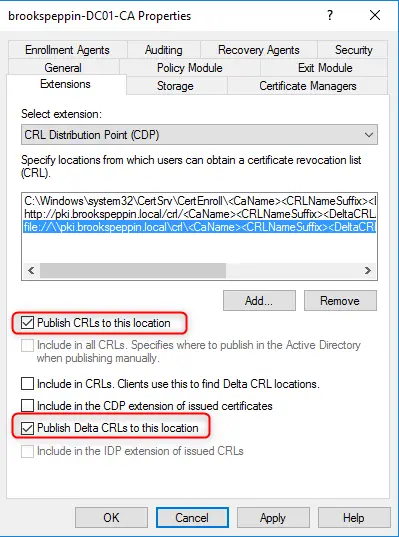
file://\\[dnsname]\[folder]\<CaName><CRLNameSuffix><DeltaCRLAllowed>.crl, (be sure to replace the value in teh brackets with your own server info). I.e. “file://\\pki.brookspeppin.local\crl$\<CaName><CRLNameSuffix><DeltaCRLAllowed>.crl” (note that I have a $ at the end since I set this up as a hiddens share) - Click OK. This returns you to the CA properties dialog box.
- At the bottom, select the following check boxes:
- Publish CRLs to this location
- Publish Delta CRLs to this location
- Change the dropdown from “Select extension” to Authority Information Access (AIA)
- Repeate what you did earlier by removing the three entries:
- Entry starting with “file://\\<ServerDNSName>…”
- Entry starting with “http://<ServerDNSName>…”
- Entry starting with “ldap:///CN=<CATruncatedName>…”
- Click Add.
- In the Location box type: http://[dnsname]/[folder]/<ServerDNSName>_<CaName><CertificateName>.crt, and then click OK. So for me this would be: “http://pki.brookspeppin.local/crl/<ServerDNSName>_<CaName><CertificateName>.crt”. Click OK to save.
- At the bottom, check the box Include in the AIA of issued certificates.
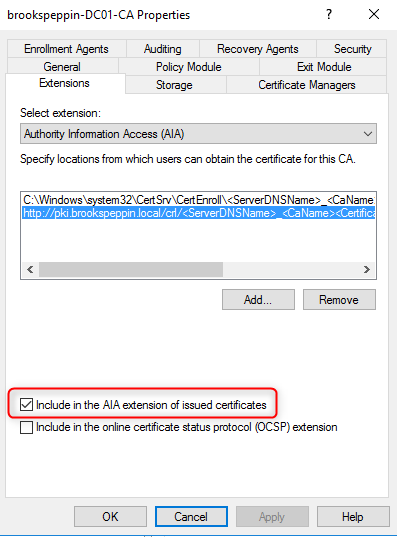
- Click OK to save all of these changes. You will be prompted to restart Active Directory Certificate Services. You can click No as we will be restarting the service later.
You can reference the Microsoft Docs for more info. Next, let’s move on to publishing the cert revocation list.
Publish the cert revocation list
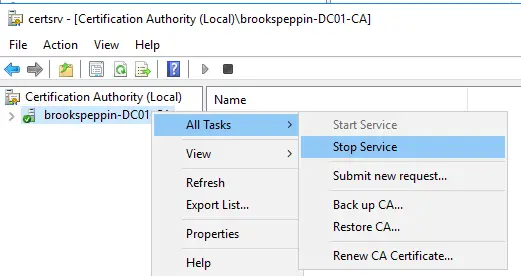
- Restart your CA service from certsrv.mmc by right-clicking your CA server name, All Tasks > Stop Service. Then Start the service again.
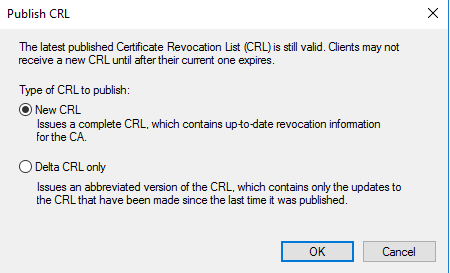
- Right click Revoked Certificates > All Tasks > Publish
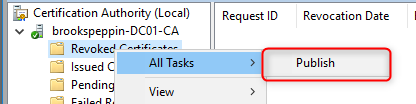
- Select New CRL and click OK.
NOTE: If you are doing all of this on the same server such as in a lab environment (DC, CA, DNS, etc) you may run into this error:
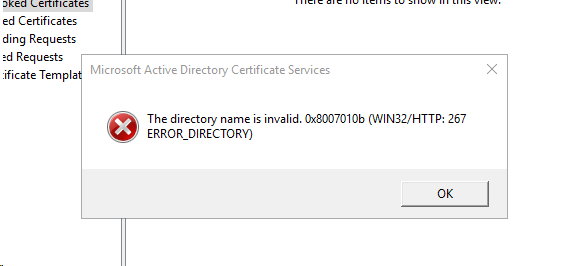
This either means the configuration on the Extensions tab is incorrect or because of a loopback problem. In my case, I had to disable loopback check on the DC. You can disable loopback by running the following PowerShell command:
New-ItemProperty HKLM:\System\CurrentControlSet\Control\Lsa -Name "DisableLoopbackCheck" -value "1" -PropertyType "DWORD"
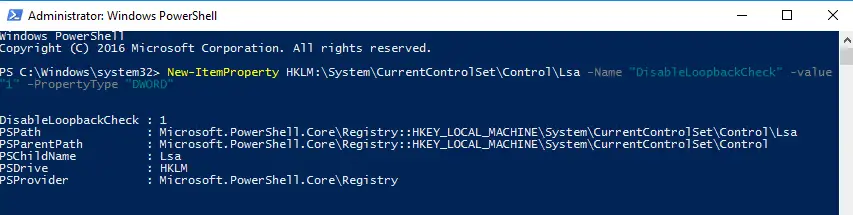
- Re-publish the CRL and the error should be gone.
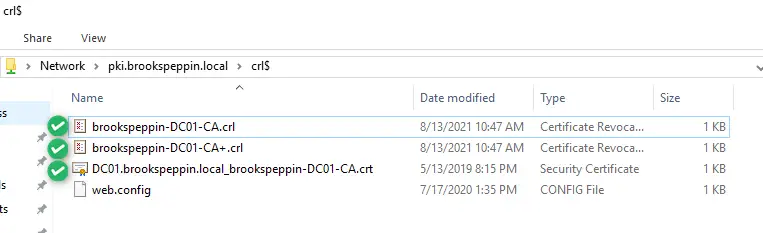
- Browse to your CDP and ensure the two CRL files are there:
- One ending in .crl (primary CRL)
- One ending in +.crl (delta CRL)
- Additionally, we will need to copy the CA certificate to this location as well. You can run this command (update it with your target URL)
copy C:\Windows\system32\certsrv\certenroll\*.crt \\pki.brookspeppin.local\crl$
A cert ending in .crt will be copied to your CDP. Once complete it should look like this:
- Finally, load pkiview.msc to verify everything is good

OK you’ve made it this far. Great job! We’re in the home stretch — only a few more things to configure.
Create a New Domain Controller Authentication (Kerberos) Certificate Template
Active Directory Schema 2016 adds some additional attributes in order to support the key-trust authentication used with Hello for Business. We will need to create an updated template and then issue them to the domain controllers. This new template will replace and supersede the old ones. Nothing is getting removed, we are just added additional authentication purposes to it (namely KDC and Smart Card Logon).
- On the CA server, open the Certificate Authority management console (certsrv.mmc)
- Right-click Certificate Templates and click Manage.
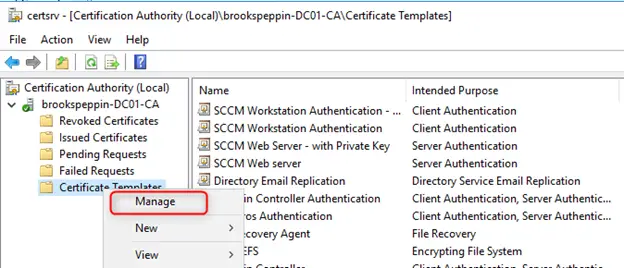
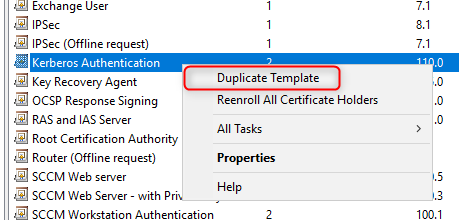
- In the Certificate Template Console, right-click the Kerberos Authentication template in the details pane and click Duplicate Template.
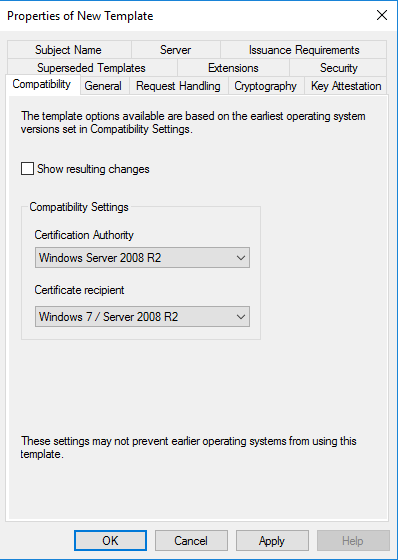
- On the Compatibility tab, clear the “Show resulting changes” check box. Select Windows Server 2008 R2 from the Certification Authority list. Select Windows 7 / Server 2008 R2 from the Certification Recipient list.
- On the General tab, type Domain Controller Authentication (Kerberos) in Template display name. Adjust the validity and renewal period as needed.

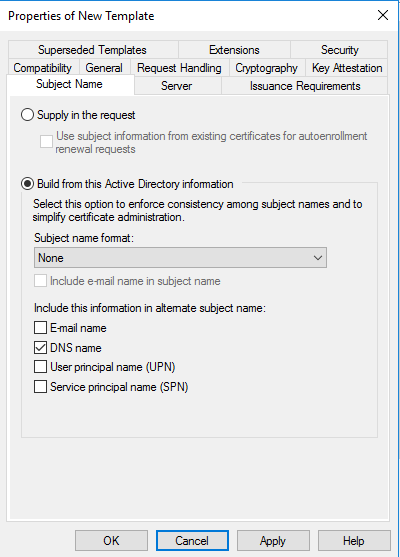
- On the Subject Name tab, select the Build from this Active Directory information button if it is not already selected. Select None from the Subject name format list. Select DNS name from the Include this information in alternate subject list.
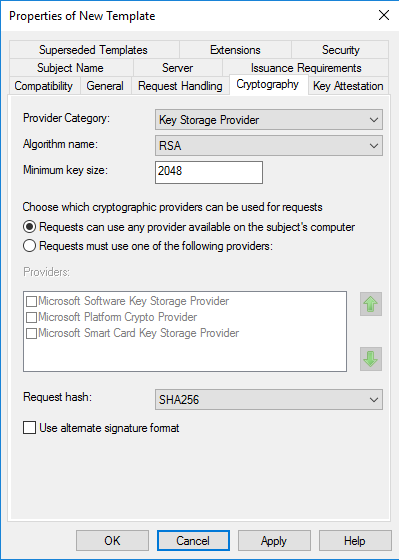
- On the Cryptography tab, configure the following:
- Provider Category: Key Storage Provider
- Algorithm name: RSA
- Minimum key size: 2048
- Request Hash: SHA256
- Click Apply.
Supercede Old templates
Now we need to supersede the older templates so that this new one gets automatically applied.
- In the Domain Contoller Authentication (Kerberos) template, click the Superseded Templates tab.
- Click Add.
- Select Domain Controller and Domain Controller Authentication (hold shift to multi-select) certificate templates and click OK.
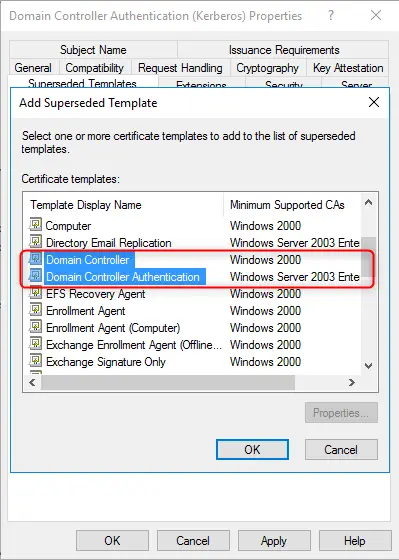
- There should be three listed in the superseded list:
- Domain Controller
- Domain Controller Authentication
- Kerberos Authentication
- Click Apply and OK.
- Close the Certificate Templates Console
You can read the Microsft Docs for additional information. Next, we need to publish this template so that it can be issued to Domain Controllers.
Publish the Template
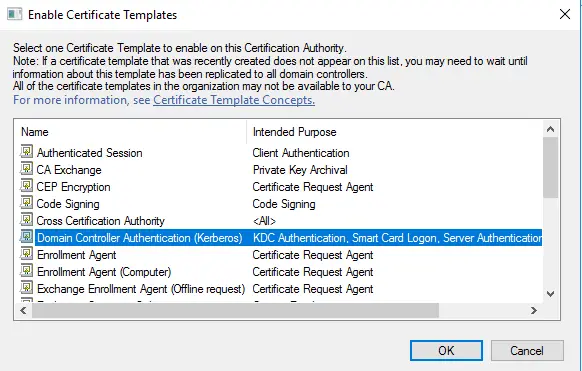
- In the Certificate Authority management console (certsrv.mmc), right-click the Certificate Templates node. Click New, and click Certificate Template to issue.
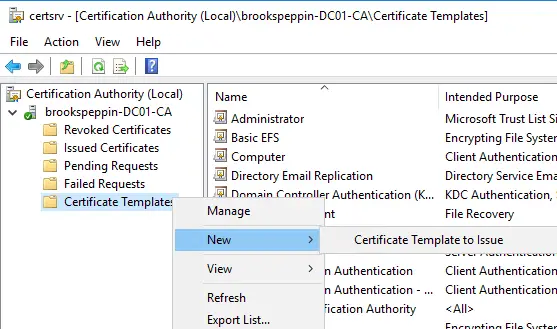
- In the Enable Certificates Templates window, select the Domain Controller Authentication (Kerberos) template you created in the previous steps. Click OK to publish the selected certificate templates to the certificate authority.
- It’s a good idea to unpublish the old, superceded templates. Select both the Domain Contoller and Domain Controller Authentication templates, right click and delete. Only the new “Domain Controller Authentication (Kerberos)” template should remain. The other templates in the list unrelated to this can also remain.
Now let’s deploy these to our domain controllers. You’ll want to do this on every domain controller.
Deploy new certificate to Domain Controller
You have two options here: manually deploy to each DC or configure group policy for automatic certificate enrollment. I’ll show you how to do it manually but in production, you’ll probably want to set up the GPO since you’ll have way more than one or two. To set up the GPO, follow the Microsoft docs here
Manual Steps
- Login to the DC and open the Local Computer cert store on the DC
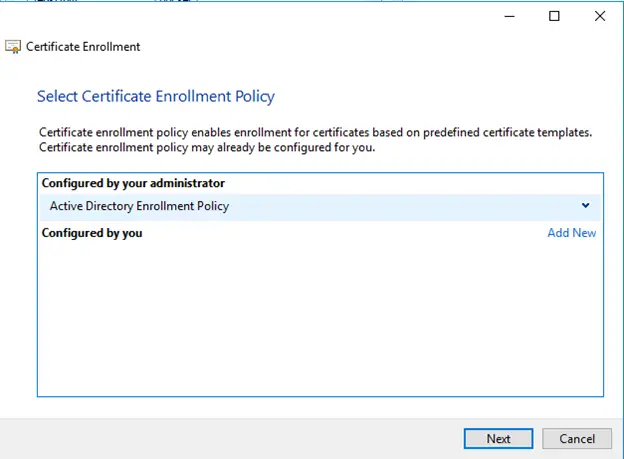
- Expand Personal > Certificates. Right click the Certificates folder then All Tasks > Request new Certificate
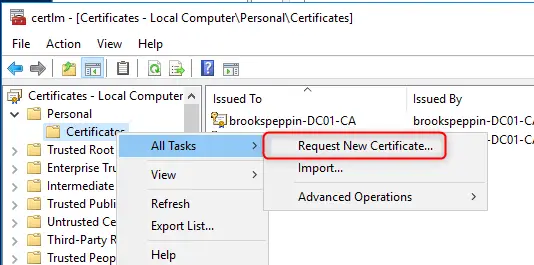
- Click Next in the window
- Select Active Directory Enrollment Policy and Click Next.
- Select Domain Controller Authenticate (Kerberos). You may need to select “show all templates” for it to appear. Then click Enroll.
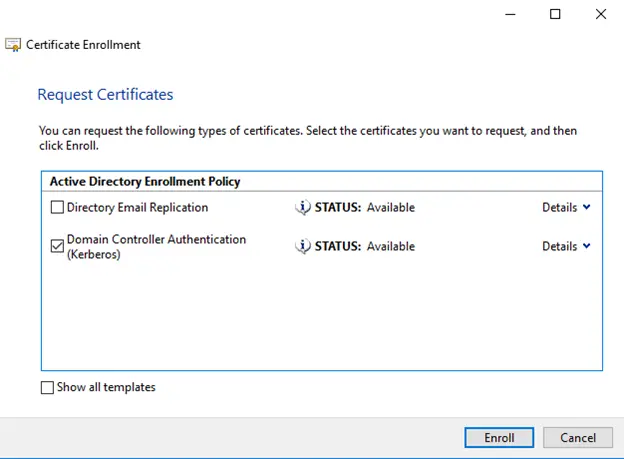
- You should see the new cert deployed and it should have “KDC Authentication” and “Smart Card Logon” added to it under the intended purposes column

- Select the older cert (the one that says just “Client Authentication, Server Authentication”) and delete it.
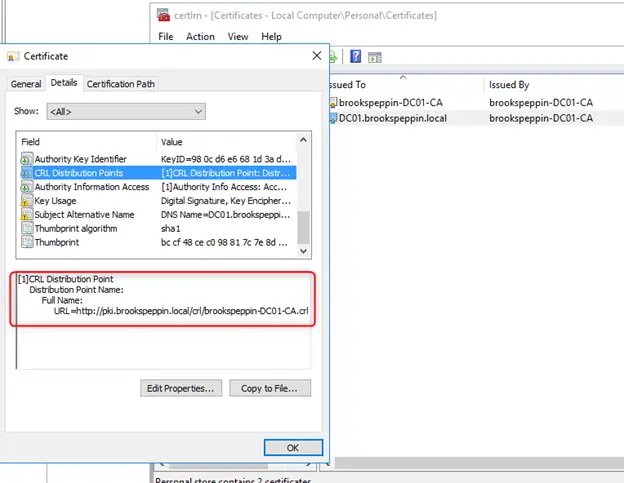
- Double click the newly issued cert to open it
- Click on Details tab
- Scroll down to CRL Distribution Points and ensure that it has the correct CRL information (it should show your http location)
The last step in the process is to ensure the Root CA is installed on the Windows 10 client machines. This will enable them to trust the DCs when making authentication requests.
Install ROOT CA on clients
Successful Connection
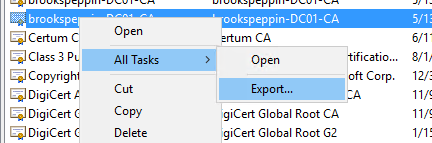
The easiest way to do this is to export the root certificate from the DC itself.
Export Root CA From DC
- In the certificates store, expand the “Trusted Root Certificate Authorities” node on the left and click on Certificates.
- Select the root certificate for you domain.
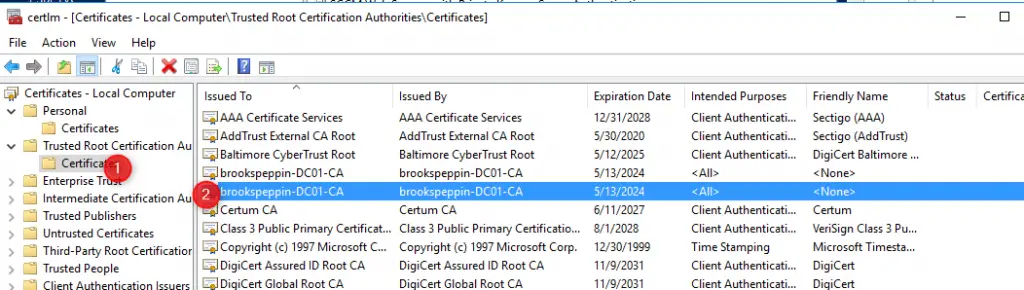
- Right click it > All Tasks > Export
- On the Export File Format, select DER encoded binary x.509 (.CER).
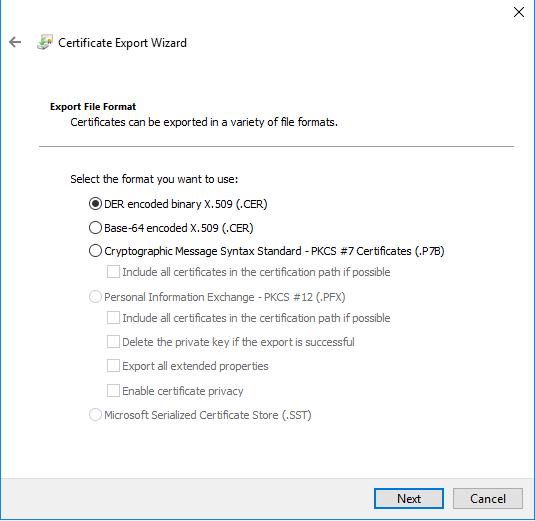
- Click next, name the file and finish the wizard to save the file.
Install Root CA on Client
For now, we will just install this manually on the client. Once you have validated the full Windows Hello for Business process, you will want to deploy this certificate automatically with a management tool such as MEM or Workspace ONE. For Workspace ONE, you can check out this video on how to deploy certs. You will want to ensure this certificate comes down automatically during the Out of Box Experience
- On the Windows 10 client, ensure you have fully completed the Out of Box Experience and enrolled into Windows Hello for Business.
- Copy the Root Certificate to the client, such as the desktop.
- Right-click the cert and click Install Certificate.
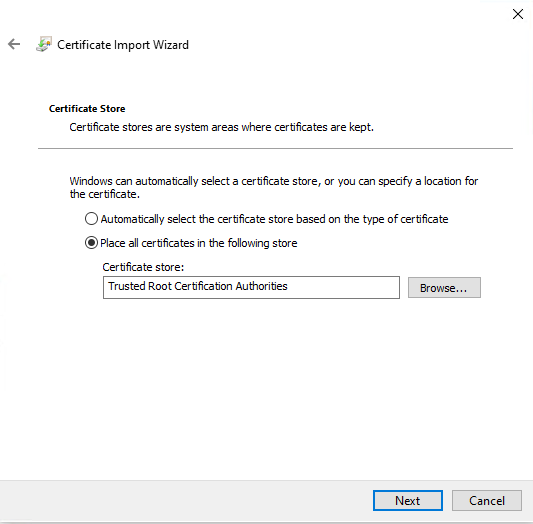
- In the Certificate Import Wizard screen, select Local Machine as the Store Location.
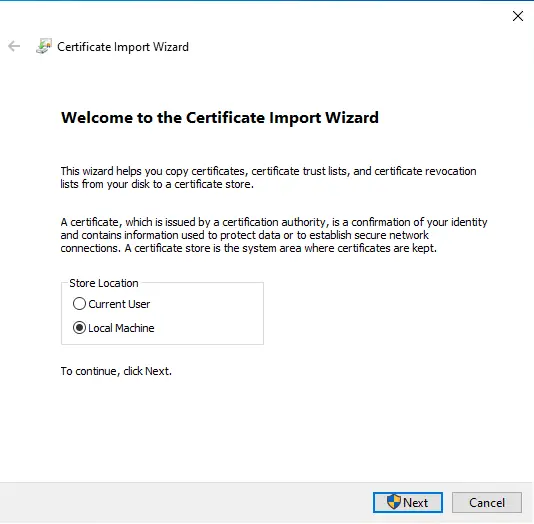
- Click Next and the Yes if prompted by UAC.
- Select Place all certificates in the following store. Click Browse and select Trusted Root Certification Authorities. Click Next and Finish to complete the wizard.
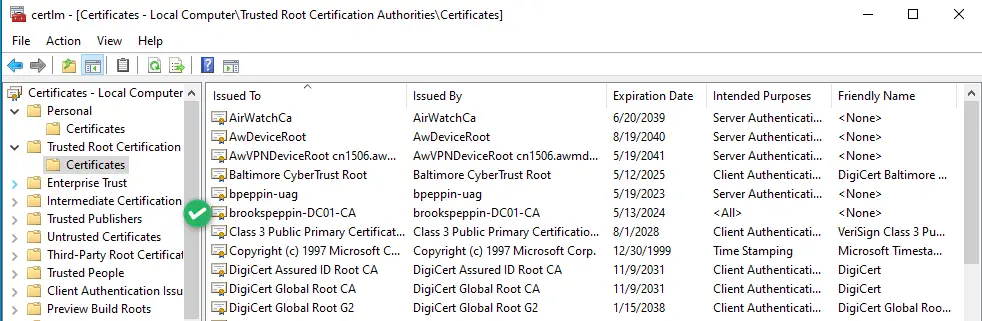
- Load up the certificate store on the client and ensure it got successfully installed
How to Check for Successful Hello
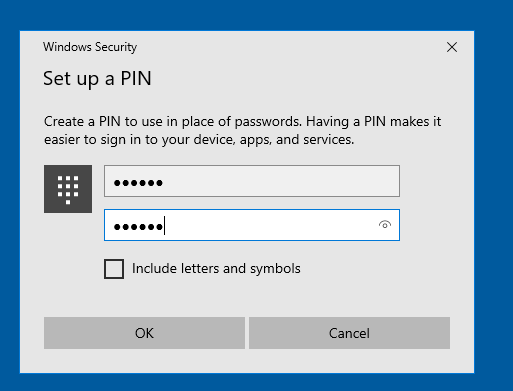
First, ensure that you have successfully registered for Hello for Business by setting up your PIN and completing Azure MFA.
After you complete these screens, Windows Hello for Business is successfully initialized. Let’s check to see if the key is successfully registered to Azure AD.
Check for Successful Key Registration
- Open Event Viewer
- Expand Applications and Services Logs > Microsoft > Windows. Navigate to User Device Registration. Click on Admin to view the log.
- Look for a record with Event ID 300. You should see a “The Microsft Passport key was successfully registered with Azure AD”. This indicates that the public key was sent to Azure and AAD connect will then attempt to sync it back to on-premises Active Directory.
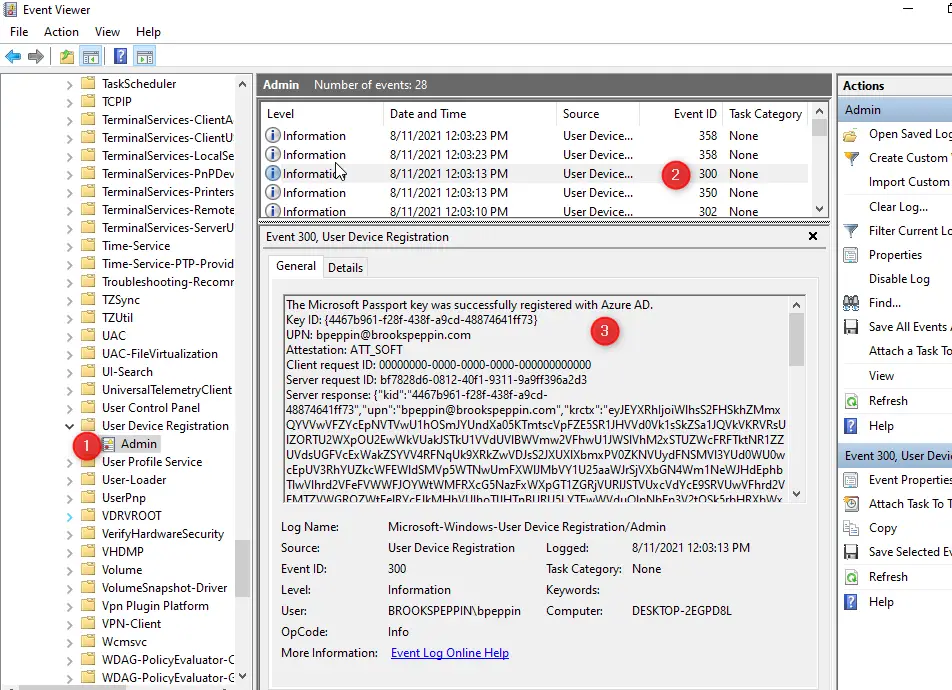
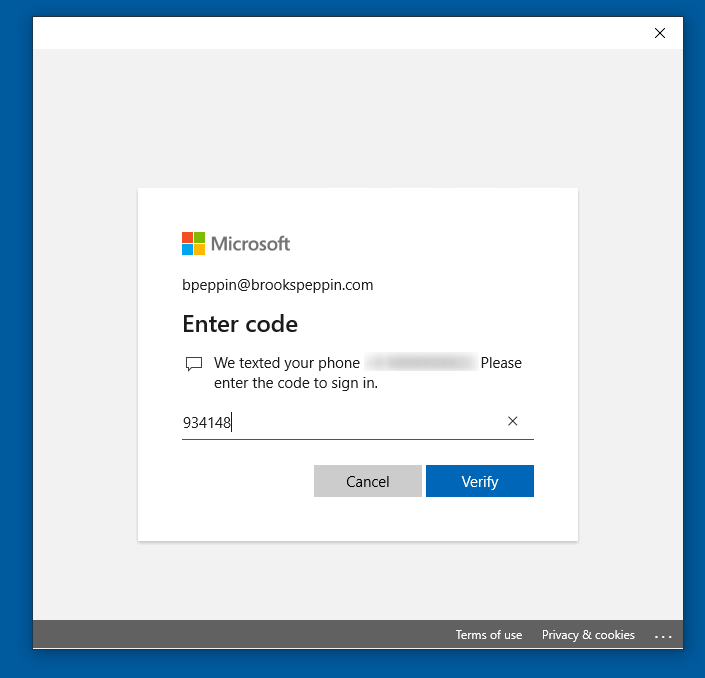
NOTE: The AAD Connect process, by default, is a sync every 30 min. Your organization may have changed this sync policy and so it may take longer. If you attempt to authenticate to on-premises resources such as a file share before the sync happens, you will probably see this popup:
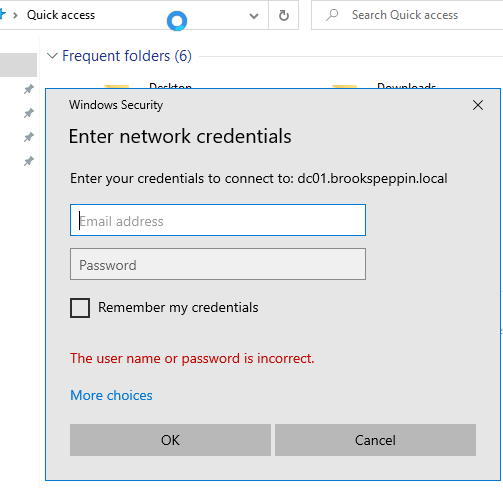
Don’t type your username and password as that will NOT use Windows Hello for Business. Wait until the key has synchronized to AD. You can speed up the process by running a delta sync on AAD connect (see earlier in this article for the command)
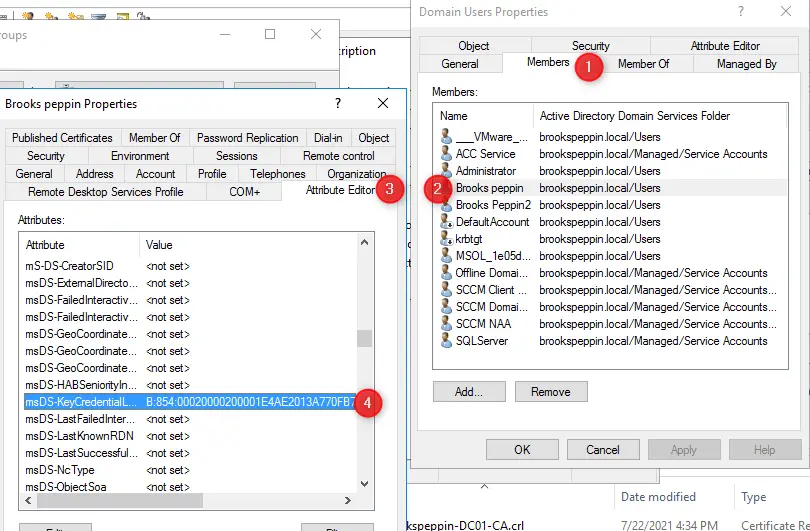
Check for msDS-KeyCredentialLink
You will want to validate that the user object in Active Directory has the msDS-KeyCredentialLink attribute available and that it is populated with the key. There are a couple of ways to do this.
Check via ADUC
- Open Active Directory Users and Computers
- Click View > Advanced Features
- Find the user object
- Click on Member Of tab. Double-click one of the groups to bring up the group membership page (doesn’t matter which group).
- While this is open, close the user properties page.
- Go back to the group properties page and click on the Members tab.
- Find the user and double click it.
- The attribute editor tab should be visible now. Click Attribute Editor Tab
- Scroll down and find the msDS-KeyCredentialLink value. It should be populated with the public key of the hello for business certificate. The private key is saved on the device in the Windows Passport store.
Check via PowerShell
An easier and quicker method is to use PowerShell. You must have the Active Directory PowerShell Module installed for this to work.
get-aduser bpeppin -Properties msDS-KeyCredentialLink
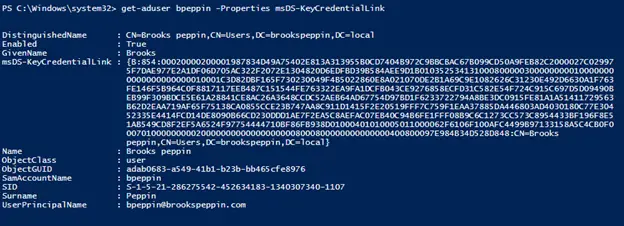
If this is empty, you will need to wait until the synchronization has been completed on AAD Connect.
Additionally, the user can have more than one entry here as well. Each time they go through the Out of Box experience and set up WHfB, a new key pair will be generated and synced back to AD.
A Successful Attempt
Once both of these things are completed, an authentication request to an on-premises file share should go through automatically without any prompting! Pretty slick. Also, if you run klist from the command prompt you will also see that a Kerberos ticket has been granted by the domain controller.
Check it out below!
Troubleshooting
If you followed this guide extremely close and were able to get this working on the first try, congratulations! You are awesome. However, due to the number of little things that need to be in place for this to work, there’s a good chance you have probably overlooked something. Since this blog is already so long, you’ll need to check out my troubleshooting Hello for Business blog for more details.
Conclusion
Wow, you made it! Well done on getting to the end. Now you know how to set up Windows Hello for Business and you should be proud. If you have been successful, let me know if the comments below! In my opinion, this is one of the coolest technologies that Microsoft has developed and is a must-have when doing Out of Box Experience. Enjoy using your PIN to access file shares.