Packet Tracer ISP
Overview: Configure a Router to act as an ISP
Difficulty: Easy
Objective: To have a router acting like an ISP for upcoming Lab Setup
I. ISP CONFIGURATION STAGE
<Configs>
First we will assign a hostname to our ISP Router
hostname ISP
Then we will create a loopback addresses to simulate the Public IP Address of the site were going to access
interface Loopback 1
description Global DNS
ip address 4.2.2.2 255.255.255.255
interface Loopback 2
description Google DNS
ip address 8.8.8.8 255.255.255.255
interface Loopback 3
description google.com
ip address 8.8.8.1 255.255.255.255
interface Loopback 4
description yahoo.com
ip address 98.139.183.24 255.255.255.255
We will then Assign IP Addresses to our interfaces
interface FastEthernet0/0
description ***Link to R1***
ip address 77.77.77.1 255.255.255.252
duplex auto
speed auto
interface FastEthernet0/1
ip address 2.2.2.1 255.255.255.252
duplex auto
speed auto
Then we will route it via EIGRP
router eigrp 1
network 77.77.77.0 0.0.0.3
network 2.2.2.0 0.0.0.3
network 8.8.8.8 0.0.0.0
network 8.8.8.1 0.0.0.0
network 98.139.183.24 0.0.0.0
Now were going to create an access-list to prevent entry of Private Addresses to our ISP Router
ip access-list standard BLOCKED
deny 10.0.0.0 0.255.255.255
deny 172.0.0.0 0.255.255.255
deny 192.0.0.0 0.255.255.255
permit any
Put this command under interface fastehernet 0/0 to filter those addresses
ip access-group BLOCKED in
II. Configuring a DNS Server for the ISP
Assign this IP Address to your Server.
IP
Then Configure the Server as follow.
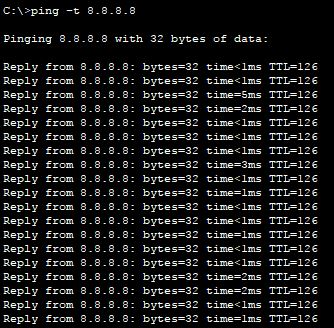
Perform a Ping test to verify connectivity.
pingping
How do I set up an ISP?
To configure an ISP route, first you need to add a subnet to an ISP, and then configure the ISP route. The destination of the route is determined by the name of the ISP. You can customize ISP information, or upload profiles that contain different ISP information.
How do I add a IP address to Packet Tracer?
Configure an IP Address to Fast Ethernet Interface
Step1: Open the Cisco Packet Tracer. Step2: Drag and drop any series of the router from the bottom of the interface into the middle of the working area. Step 3: Select cable from the bottom of the interface to connect the routers.
Where do I find my ISP routing?
Ping an IP in your provider’s network. If you can’t find one that’s publicly listed, or the helpdesk won’t give you one, do a traceroute to something in the internet, and use the second or third hop. This confirms that routing between you and your ISP is configured correctly.
What is ISP routing?
ISP routes can be used for outbound traffic and link load balancing traffic. Routes for outbound traffic are chosen according to the following priorities: Link local routes—Self-traffic uses link local routes. LLB Link Policy route—Configured policy routes have priority over default routes.
How many addresses are in a 27 subnet?
Subnet Cheat Sheet – 24 Subnet Mask, 30, 26, 27, 29, and other IP Address CIDR Network References
| CIDR | Subnet mask | # of IP addresses |
|---|---|---|
| /27 | 255.255.255.224 | 32 |
| /26 | 255.255.255.192 | 64 |
| /25 | 255.255.255.128 | 128 |
| /24 | 255.255.255.0 | 256 |
•
Feb 12, 2021
How do I add Ethernet ports to my router in Packet Tracer?
1 Answer
- Double click on the router.
- In the physical tab turn the router off by clicking the power button.
- The module section lists all supported modules just drag and drop them to an available slot. HMIC-4ESW will provide you switching ports.
- turn the router on by clicking the power button.
Which router is used in packet tracer?
Cisco 4321 ISR router (added in Cisco Packet Tracer 7.1)
With new levels of built-in intelligent network capabilities and convergence, the routers specifically address the growing need for application-aware networking in distributed enterprise sites.
Is IP a subnet?
A subnet mask is used to divide an IP address into two parts. One part identifies the host (computer), the other part identifies the network to which it belongs. To better understand how IP addresses and subnet masks work, look at an IP address and see how it’s organized.
How many IPS are in a subnet?
Essentially, a subnet is a smaller portion of the network within class A, B, or C. Creating and using subnets can help to keep your network organized and functional. Each IP address block can create 254 IP addresses, which allows 254 x 4 total IP addresses to be created for use in the network.
What is a 255.255 255.0 subnet?
A class C network would have a subnet mask of 255.255. 255.0 which means that 24 bits are used for the network. In CIDR notation this is designated by a /24 following the IP address.
What is Netmask and gateway?
The subnet mask splits the IP address into the host and network addresses, thereby defining which part of the IP address belongs to the device and which part belongs to the network. The device called a gateway or default gateway connects local devices to other networks.
What is a DNS server do?
The Domain Name System (DNS) Server is a server that is specifically used for matching website hostnames (like example.com)to their corresponding Internet Protocol or IP addresses. The DNS server contains a database of public IP addresses and their corresponding domain names.
What is IPv6 vs IPv4?
The main difference between IPv4 and IPv6 is the address size of IP addresses. The IPv4 is a 32-bit address, whereas IPv6 is a 128-bit hexadecimal address. IPv6 provides a large address space, and it contains a simple header as compared to IPv4.
What is subnet mask ps4?
A subnet mask is a number that outlines a range of IP addresses that are available within a given network. It is a 32-bit number that masks an IP address and divides the IP address into the network address and host address. A single subnet mask bounds the number of acceptable IPs for a specific network.
What is my subnet address?
On Windows
Go to Control Panel > Network and Sharing Centre. Click on your network name and then click Details. You will find the subnet mask along with other network details.
What is a 25 subnet?
/25 — 2 Subnets — 126 Hosts / Subnet
Network # IP Range. Broadcast. .0. .1 – .126.
What is the best IP address?
Some of the most trustworthy, high-performance DNS public resolvers and their IPv4 DNS addresses include:
- Cisco OpenDNS: 208.67. 222.222 and 208.67. 220.220;
- Cloudflare 1.1. 1.1: 1.1. 1.1 and 1.0. 0.1;
- Google Public DNS: 8.8. 8.8 and 8.8. 4.4; and.
- Quad9: 9.9. 9.9 and 149.112. 112.112.
What is DHCP Host Name?
The Dynamic Host Configuration Protocol (DHCP) is a network management protocol used on Internet Protocol (IP) networks for automatically assigning IP addresses and other communication parameters to devices connected to the network using a client–server architecture.
Which DNS is fast?
Cloudflare: 1.1.
1.1 to be the “internet’s fastest DNS directory,” and will never log your IP address, never sell your data, and never use your data to target ads.
How to configure a web server in packet tracer and access the internet in packet tracer
To simulate the internet, we have to configure the server endpoint available in the packet tracer. This server has the capability to provide web service.
Download
We have two hosts that will be able to access the internet via an ISP router. Our internal network is connected to the ISP router. The interface of the internal router which is connected to the ISP router has been given public IP address. This is static IP that has been configured on the interface.
ISP router is further connected to the Google web server so after the successful configuration of our network, we should be able to access the google.com
How to configure the web server
We have to open services and click on HTTP service. This service is enabled by default and we can see that server is hosting some files already. These files are present by default and when we point the web browser to this server, this server will serve the web page to our browser.
We have configured this server as a Google web server and it is serving a Google web page. To change the content of the webpage, we have to edit the index file present in the web server.
For testing purposes, we can copy the source code of any side that you want the webserver to show and paste it into the index file. After saving the file, the web server will show sites according to the source code.
Now, we can test the web server by opening the browser on the PC and pointing it to the server.
We have to enter the IP address of the web server in the URL and press enter. If everything is configured properly then we should see the browser loading the webpage successfully.
Before opening the browser, we must make sure that the connectivity of the server is fine.
Download the lab and test the Google web server and if you want the server to host any other site then change the index file present on the server.
This lab is the smaller presentation of a big network like the internet. This is the way how the internet works however there are thousands of routers and servers connected forming a huge network.
You can try adding more servers with different sites and accessing those sites on the browser of the PC.
Время на прочтение
3 мин
Количество просмотров 24K
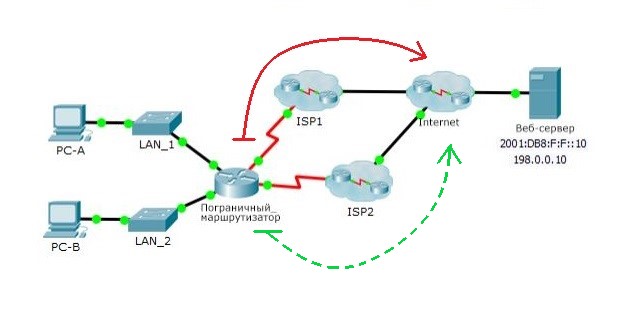
Топология сети
Задачи
- Создание основного статического маршрута по умолчанию
- Развертывание плавающего статического маршрута
- Проверка переключения на плавающий статический маршрут при отказе основного маршрута
Общие сведения
Итак, для начала пару слов о том, что же такое статический, да еще и плавающий маршрут. В отличие от динамической, статическая маршрутизация требует самостоятельного построения маршрута в конкретную сеть. Плавающий статический маршрут служит для предоставления резервного пути до сети назначения в случае сбоя основного маршрута.
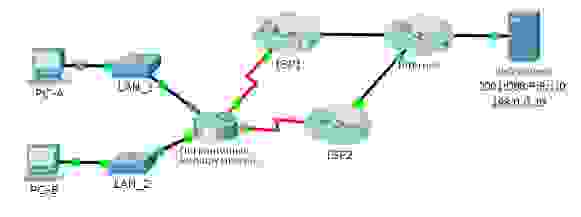
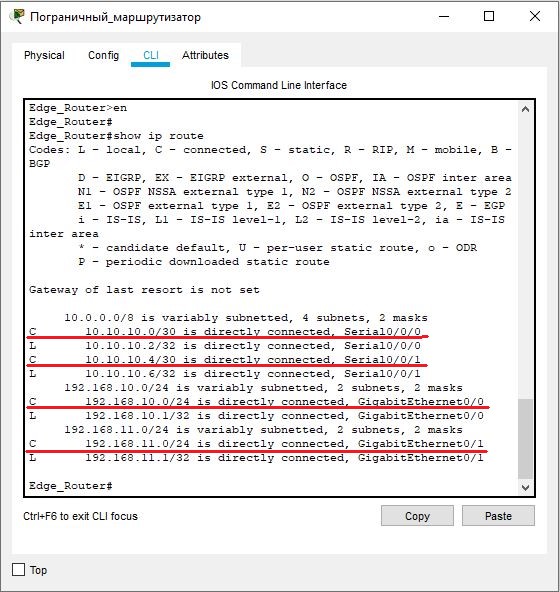
На примере нашей сети «Пограничный маршрутизатор» пока имеет только напрямую подключенные маршруты к сетям ISP1, ISP2, LAN_1 и LAN_2.
Создание основного статического маршрута по умолчанию
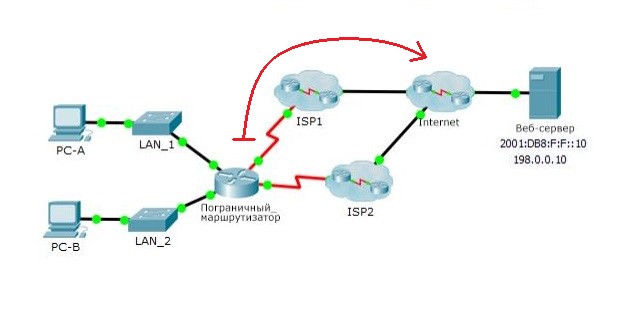
Перед тем, как говорить о резервном маршруте, для начала нужно построить основной маршрут. Пусть, основной маршрут от пограничного маршрутизатора будет проходить через ISP1 к сети Internet, а маршрут через ISP2 будет резервным. Для этого на пограничном маршрутизаторе в режиме глобальной конфигурации зададим статический маршрут по умолчанию:
Edge_Router>en
Edge_Router#conf t
Edge_Router(config)#ip route 0.0.0.0 0.0.0.0 s0/0/0
где:
- первые 32 бит нулей — адрес сети назначения;
- вторые 32 бит нулей — сетевая маска;
- s0/0/0 — выходной интерфейс пограничного маршрутизатора, который подключен к сети ISP1.
Данная запись говорит о том, что если пакеты, поступившие на пограничный маршрутизатор из сетей LAN_1 или LAN_2 содержат адрес сети назначения, которой нет в таблице маршрутизации, будут пересылаться через интерфейс s0/0/0.
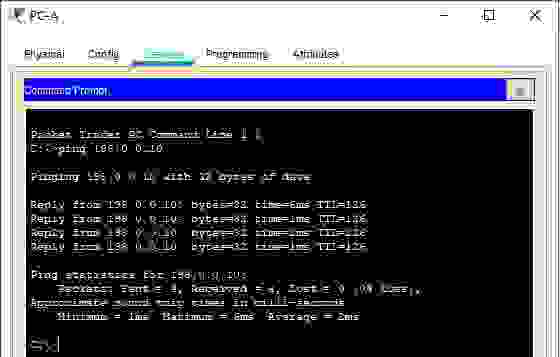
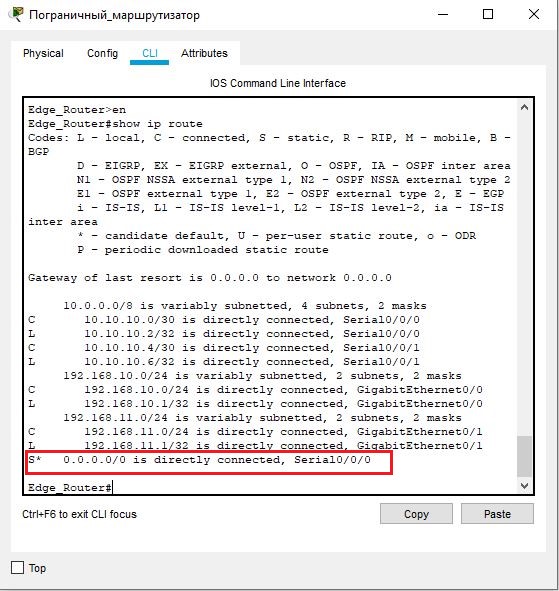
Проверим таблицу маршрутизации пограничного маршрутизатора и отправим эхо-запрос на веб-сервер от PC-A или PC-B:
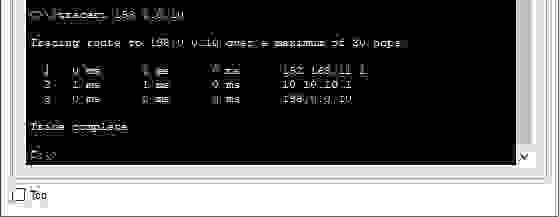
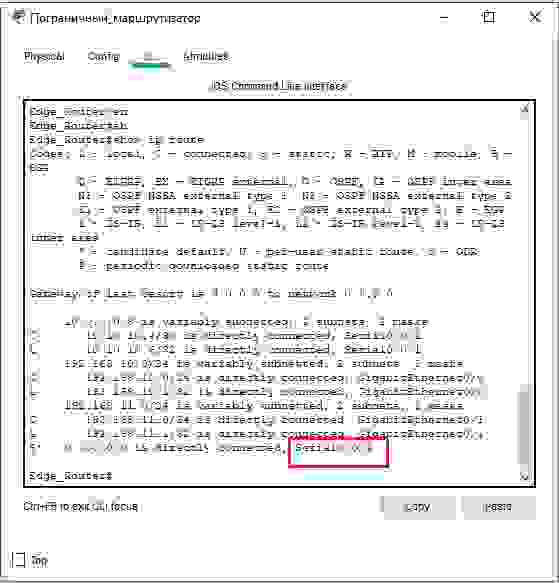
Видим, что в таблицу маршрутизации добавилась запись статического маршрута по умолчанию (о чем свидетельствует запись S*). Выполним трассировку маршрута от PC-A или PC-B до веб-сервера:
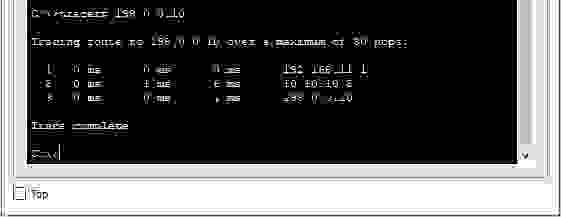
Первый переход осуществляется с PC-B на локальный IP-адрес пограничного маршрутизатора 192.168.11.1. Второй переход — от пограничного маршрутизатора до 10.10.10.1 (ISP1). Запомнили, в дальнейшем сравним переходы.
Развертывание плавающего статического маршрута
Итак, основной статический маршрут построили. Далее создаем, собственно, плавающий статический маршрут через сеть ISP2. Процесс создания плавающего статического маршрута ничем не отличается от обычного статического маршрута по умолчанию, кроме того, что в первом дополнительно указывается административное расстояние. Административное расстояние означает степень надежности маршрута. Дело в том, что административное расстояние статического маршрута равно единице, что означает абсолютный приоритет над протоколами динамической маршрутизации, у которых административное расстояние в разы больше, кроме локальных маршрутов — у них оно равно нулю. Соответственно, создавая статический плавающий маршрут, следует указывать административное расстояние больше единицы, например, 5. Таким образом, плавающий маршрут не будет иметь приоритет над основным статическим маршрутом, но на момент его недоступности маршрут по умолчанию будет считаться основным.
Синтаксис задания плавающего статического маршрута следующий:
Edge_Router(config)#ip route 0.0.0.0 0.0.0.0 s0/0/1 5где:
- 5 — это и есть значение административного расстояния;
- s0/0/1 — выходной интерфейс пограничного маршрутизатора, подключенного к сети ISP2.
Сразу хочется сказать о том, что
пока основной маршрут находится в рабочем состоянии плавающий статический маршрут в таблице маршрутизации отображаться не будет
. Для большей убедительности отобразим содержимое таблицы маршрутизации в то время, когда основной маршрут находится в исправном состоянии:
Видно, что в таблице маршрутизации по прежнему отображается основной статический маршрут по умолчанию с выходным интерфейсом Serial0/0/0 и никаких других статических маршрутов в таблице маршрутизации не отображается.
Проверка переключения на плавающий статический маршрут при отказе основного маршрута
А теперь самое интересное: смоделируем сбой основного маршрута. Сделать это можно путем отключения интерфейса на программном уровне, либо просто убрать соединение между маршрутизатором и ISP1. Отключаем интерфейс Serial0/0/0 основного маршрута:
Edge_Router>en
Edge_Router#conf t
Edge_Router(config)#int s0/0/0
Edge_Router(config-if)#shutdown
… и сразу же бежим смотреть таблицу маршрутизации:
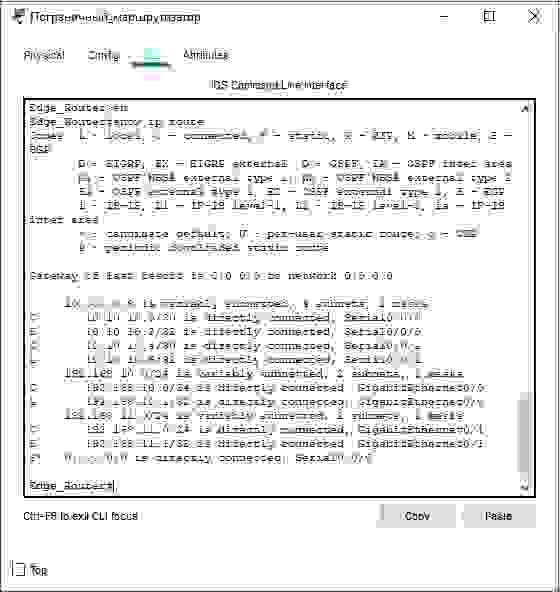
На рисунке выше видно, что после сбоя основного статического маршрута выходной интерфейс Serial0/0/0 изменился на Serial0/0/1. При первой трассировке, которую мы выполняли ранее следующий переход от пограничного маршрутизатора выполнялся на IP-адрес 10.10.10.1. Сравним переходы, выполнив повторную трассировку при использовании резервного маршрута:
Теперь переход от пограничного маршрутизатора до веб-сервера осуществляется через IP-адрес 10.10.10.5 (ISP2).
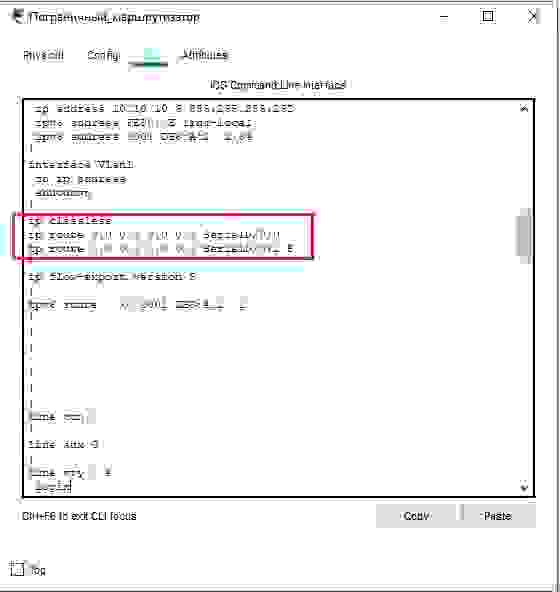
Конечно же, статические маршруты можно лицезреть, отобразив текущую конфигурацию маршрутизатора:
Edge_Router>en
Edge_Router#show run
A firewall is a network security device that monitors incoming and outgoing network traffic and decides whether to allow or block specific traffic based on a defined set of security rules.
Firewalls have been a first line of defense in network security for over 25 years. They establish a barrier between secured and controlled internal networks that can be trusted and untrusted outside networks, such as the Internet.
A firewall can be hardware, software, or both.
Configuration
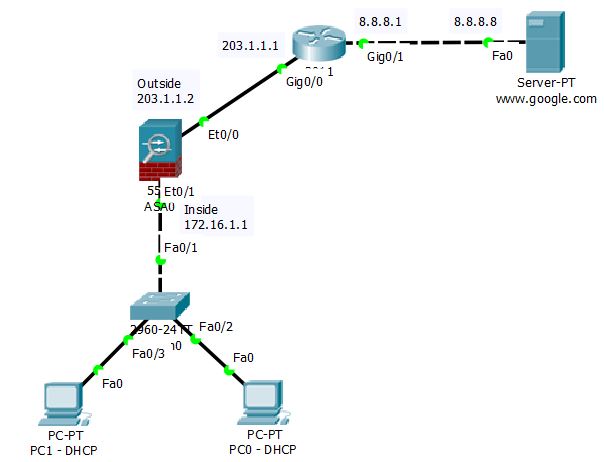
Assign IP on Cisco ASA and ISP Router and set Interface Inside and Outside on Cisco ASA
Security Level 100 = inside
Security Level 0 = ouside
Security Level 1-99 = DMZ
Cisco ASA
ciscoasa(config)#interface vlan 1
ciscoasa(config-if)#no ip address
ciscoasa(config)#no dhcpd address 192.168.1.5-192.168.1.35 inside

ciscoasa(config)#interface vlan 1
ciscoasa(config-if)#ip address 172.16.1.1 255.255.255.0
ciscoasa(config-if)#no shutdown
ciscoasa(config-if)#nameif inside
ciscoasa(config-if)#security-level 100

ciscoasa(config)#interface vlan 2
ciscoasa(config-if)#ip address 203.1.1.2 255.255.255.0
ciscoasa(config-if)#no shutdown
ciscoasa(config-if)#nameif outside
ciscoasa(config-if)#security-level 0

ciscoasa(config)#interface ethernet 0/1
ciscoasa(config-if)#switchport access vlan 1

ciscoasa(config)#interface ethernet 0/0
ciscoasa(config-if)#switchport access vlan 2
Router ISP
ISP(config)#interface gigabitEthernet 0/0
ISP(config-if)#ip address 203.1.1.1 255.255.255.0
ISP(config-if)#no shutdown

ISP(config)#interface gigabitEthernet 0/1
ISP(config-if)#ip address 8.8.8.1 255.255.255.0
ISP(config-if)#no shutdown
Configure DHCP server and DNS server on Cisco ASA
Ip range 172.16.1.5 – 172.16.1.6
ciscoasa(config)#dhcpd address 172.16.1.5-172.16.1.6 inside
ciscoasa(config)#dhcpd dns 8.8.8.8 interface inside
Configure Default Route on Cisco ASA
ciscoasa(config)#route outside 0.0.0.0 0.0.0.0 203.1.1.1
Configure Dynamic Route on Cisco Router (OSPF 1)
ISP(config)#router ospf 1
ISP(config-router)#network 203.1.1.0 0.0.0.255 area 0
ISP(config-router)#network 8.8.8.0 0.0.0.255 area 0
Create Object Network and Enable NAT
ciscoasa(config)#object network LAN
ciscoasa(config-network-object)#subnet 172.16.1.0 255.255.255.0
ciscoasa(config-network-object)#nat (inside,outside) dynamic interface
Create Access-list
ciscoasa(config)#access-list inside_to_internet extended permit tcp any any
ciscoasa(config)#access-list inside_to_internet extended permit icmp any any
ciscoasa(config)#access-group inside_to_internet in interface outside
Verify NAT
Ping from PC0 to Internet
Show Xlate
Show NAT
Refereces


