Протокол iSCSI (Internet Small Computer System) представляет собой протокол SCSI, работающий с системами хранения данных поверх протокола IP. С помощью iSCSI вы сможете подключать ваши сервера к сетевым хранилищам по обычной TCP/IP сеть без использования FC. В этой статье мы рассмотрим, как настроить iSCSI-хранилище на одном Windows Server 2019 и использовать его на других серверах(в Windows Server 2016 и 2012 R2 все настраивается аналогично). Первый пример использования iSCSI: файловому серверу необходимо дополнительное место, и мы по сети подключаем к нему виртуальный диск с другого сервера-хранилища по iSCSI. Другой пример – построение отказоустойчивого кластера, когда для нескольких серверов необходимо общее хранилище.
Для использования ISCSI-диска нужно на сервере-хранилище настроить виртуальный диск (это обычный vhd/vhdx файл) и опубликовать его в виде iSCSI таргета, к которому подключаются iSCSI инициаторы (другие сервера и устройства).
Содержание:
- Настройка iSCSI target в Windows Server
- Настройка iSCSI Initiator в Windows Server 2019
Настройка iSCSI target в Windows Server
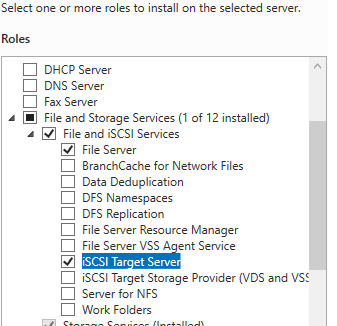
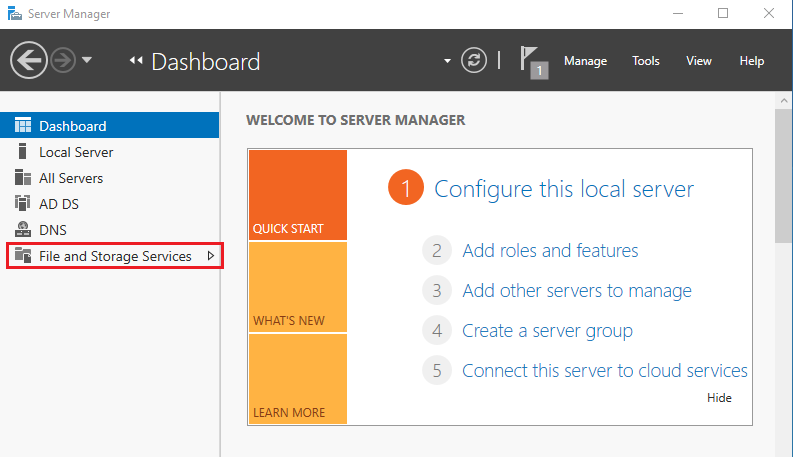
Сначала нужно включить iSCSI target (активировать роль iSCSI Target Server), зайдя в File and Storage Services -> File and iSCSI Services.
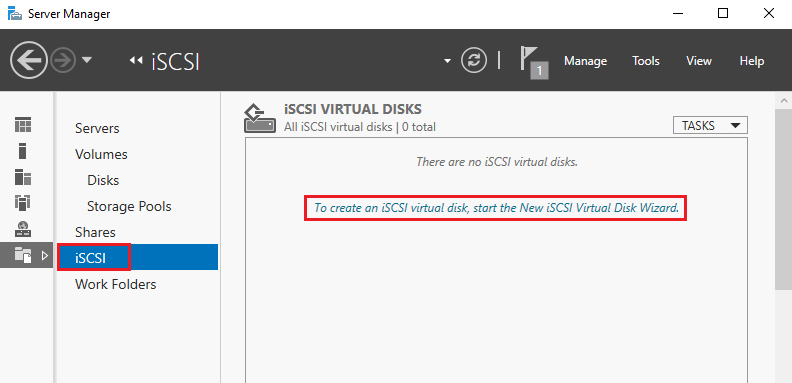
Теперь на iSCSI сервере нужно создать виртуальный диск. Для этого необходимо зайти в Server Manager -> File and Storage Services -> iSCSI, нажать To create an iSCSI virtual disk, start the New iSCSI Virtual Disk Wizard.

В мастере создания виртуального iSCSI диска нужно выбрать физический раздел, на котором его нужно разместить. Далее нужно присвоить имя iSCSI диска, указать размер диска и его тип (Fixed Size, Dynamically expanding или Differencing), имя iSCSI таргета.
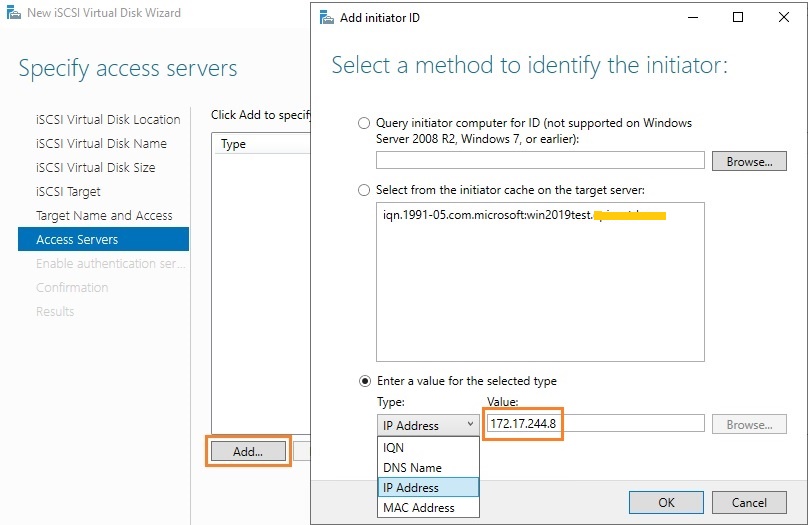
На шаге Access Servers нужно указать серверы (iSCSI инициаторы), которые смогут подключаться к данному iSCSI таргет, выбрав один из вариантов подключения:
- IQN (придется сначала включить iSCSI initiator на сервере и скопировать IQN);
- DNS Name
- IP Address;
- MAC Address.
Пусть используется вариант с IP-адресом.
Следующий шаг в этом мастере – это настройка протокола аутентификации CHAP. Его следует использовать, если необходимо проверять подлинность подключения от инициатора. Далее он включается, вписывается имя пользователя и 12-значный пароль (или длиннее), затем Next -> Next -> Finish. Проверьте, что виртуальный диск iscsiDisk2.vhdx создался в каталоге D:\iSCSIVirtualDisks.
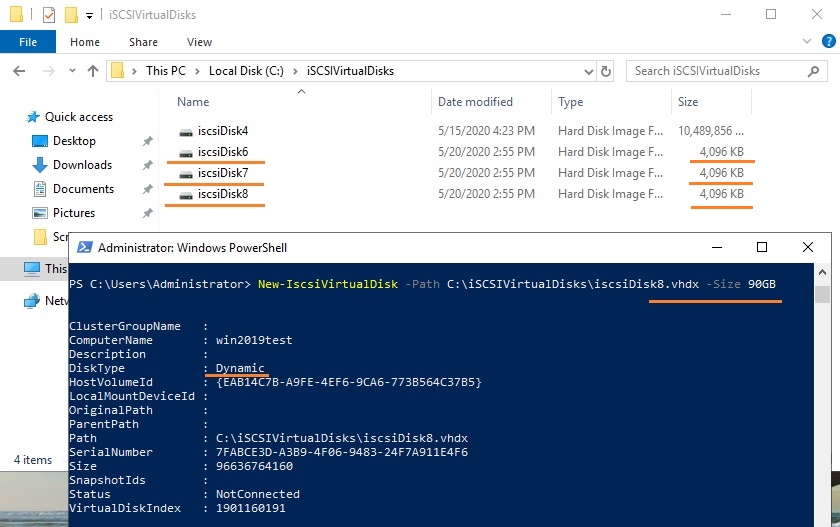
Можно создать iSCSI диск с помощью PowerShell. Создадим виртуальный диск размером 200 Гб:
New-IscsiVirtualDisk -Path С:\iSCSIVirtualDisks\iscsiDisk2.vhdx -Size 200GB.
По умолчанию создается динамический диск размером 4,096 Кб, независимо от того, сколько было указано параметром Size. Динамический диск будет расширяться по мере необходимости.
Если нужно использовать диск фиксированного размера (такие диске резервируют место на физическом носителе при создании), то его создать той же командой с дополнительным параметром UseFixed:
New-IscsiVirtualDisk -Path С:\iSCSIVirtualDisks\iscsiDisk2.vhdx -Size 200GB –UseFixed
Для дисков с высокой активностью и повышенными требованиями к IOPS нужно использовать диски фиксированного размера, т.к. для динамических дисков расходуются дополнительные ресурсы на операции приращения.
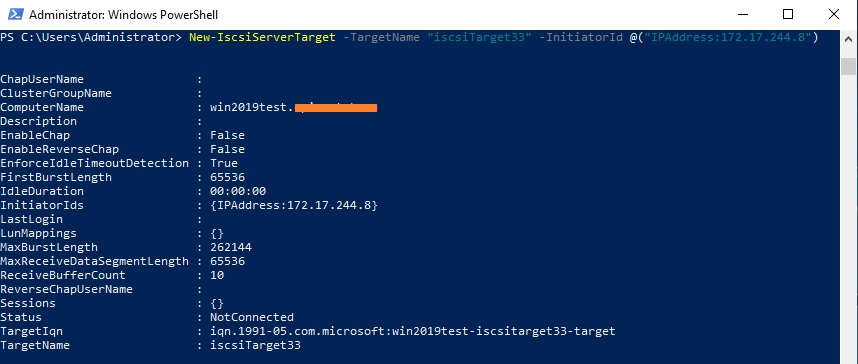
Далее таргету присваивается имя, здесь же можно разрешить к нему доступ с IP-адреса сервера-инициатора:
New-IscsiServerTarget -TargetName "iscsiTarget33" -InitiatorId @("IPAddress:172.17.244.8")
При желании вместо IP-адреса можно использовать IQN имя (iSCSI Qualified Name – уникальный идентификатор iSCSI устройства в сети):
New-IscsiServerTarget -TargetName iscsiTarget33 -InitiatorIds “IQN: 1991-05.com.microsoft:win2019test.ddd.com”
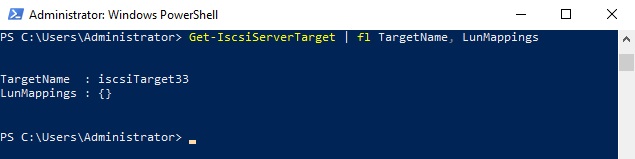
Затем желательно проверить результат:
Get-IscsiServerTarget | fl TargetName, LunMappings
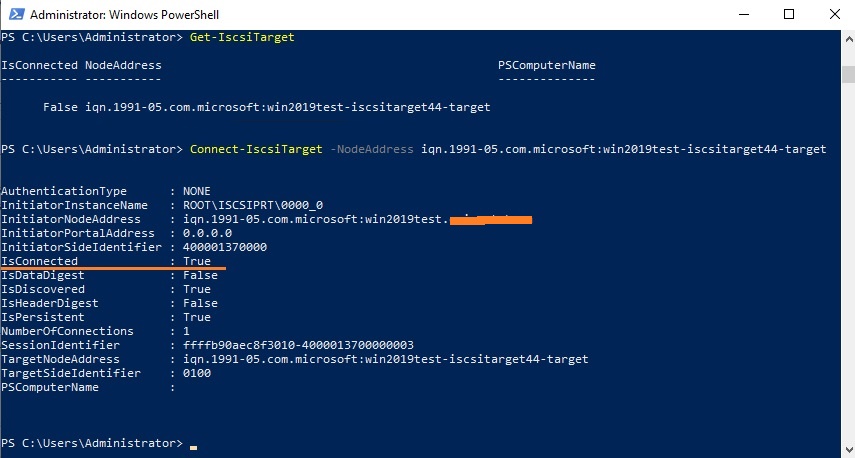
Получить полное имя таргета можно с помощью командлета
Get-IscsiTarget
, а затем подключить таргет:
Connect-IscsiTarget -NodeAddress iqn.1991-05.com.microsoft:win2019test-iscsitarget33-target
Настройка iSCSI Initiator в Windows Server 2019
Следующий шаг – подключение к созданному iSCSI диску со второго сервера-инициатора. Перейдите в панель управления Control Panel, запустите iSCSI initiator (или выполните команду
iscsicpl.exe
).
В консоли управления службами services.msc поставьте автоматический тип запуска для службы Microsoft iSCSI Initiator Service, Или используйте команду:
Set-Service -Name MSiSCSI -StartupType Automatic
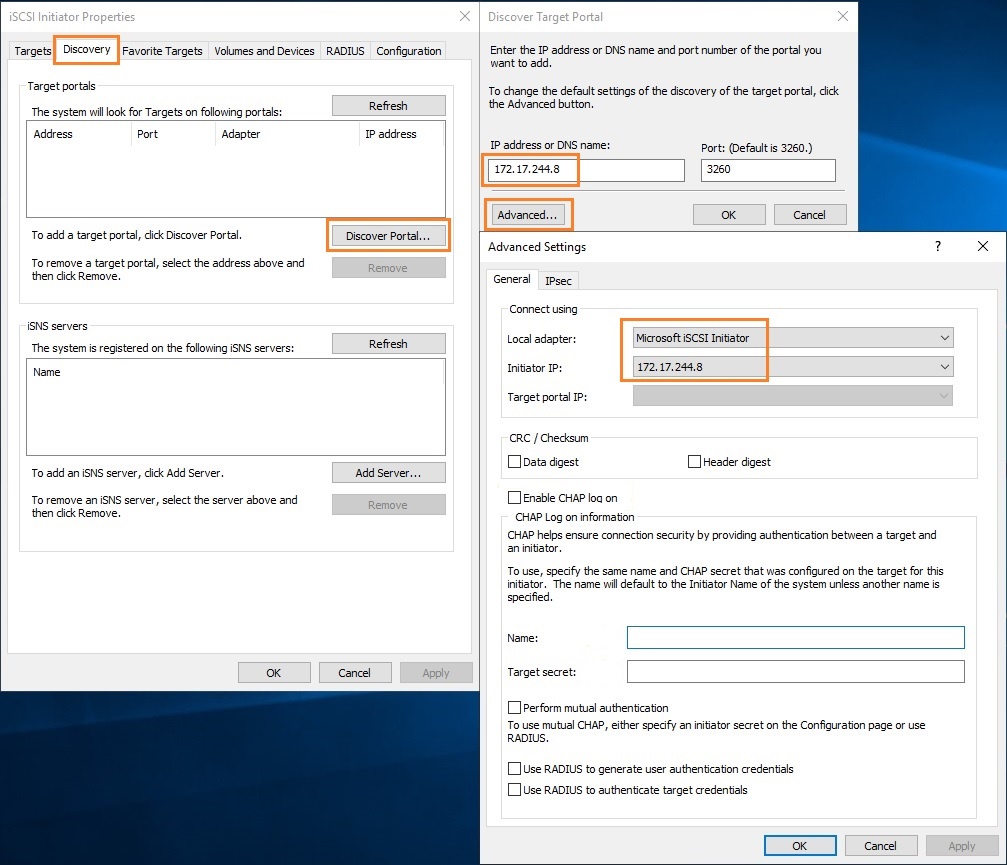
Перейдите на вкладку Discovery, нажмите на кнопку Discover Portal и введите ввести IP-адрес первого сервера (iSCSI-таргет). Чтобы трафик ходил только через определённый сетевой интерфейс, нужно нажать кнопку Advanced, и изменить значения по умолчанию в выпадающих списках: Local Adapter –> Microsoft iSCSI Initiator, Initiator IP –> 172.17.244.8.
Для подключения к iSCSI хранилищу необходимо открыть порты 860 и 3260 в Windows Firewall.
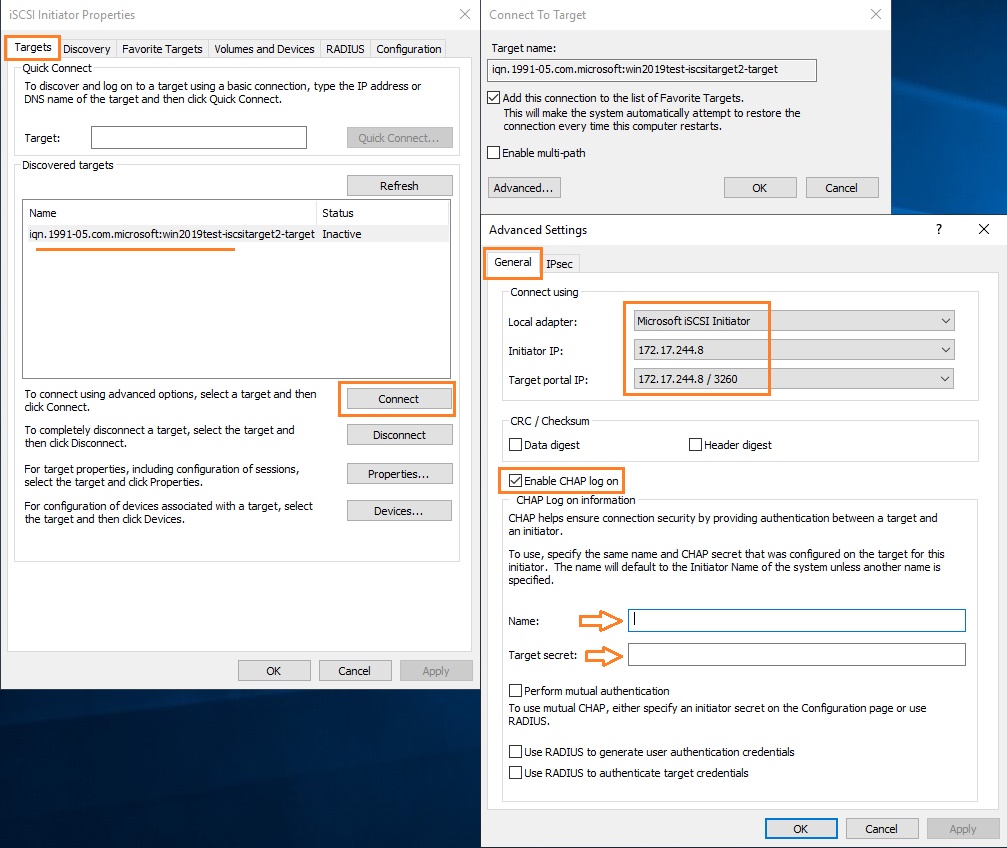
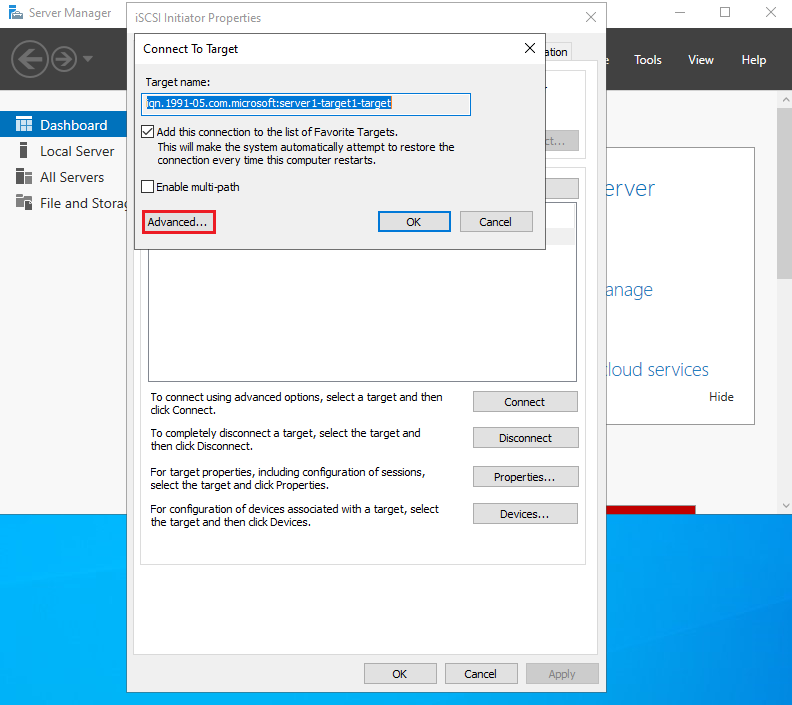
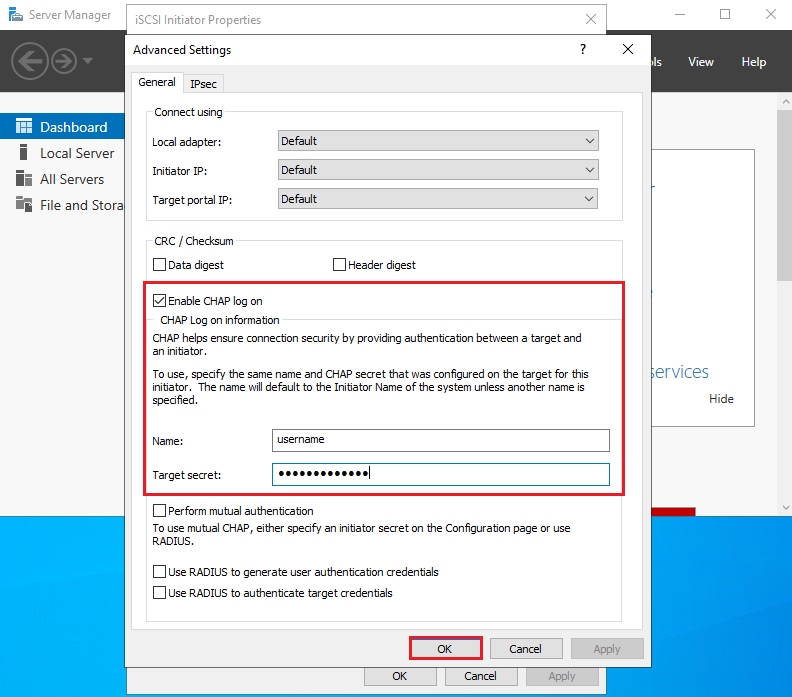
Теперь переключитесь на первую вкладку Targets, на ней появится новое подключение. Чтобы включить его, нажмите Connect -> Advanced, выберите значения из выпадающих полей, включите галочку Enable CHAP log on, укажите имя пользователя и 12-значный пароль.
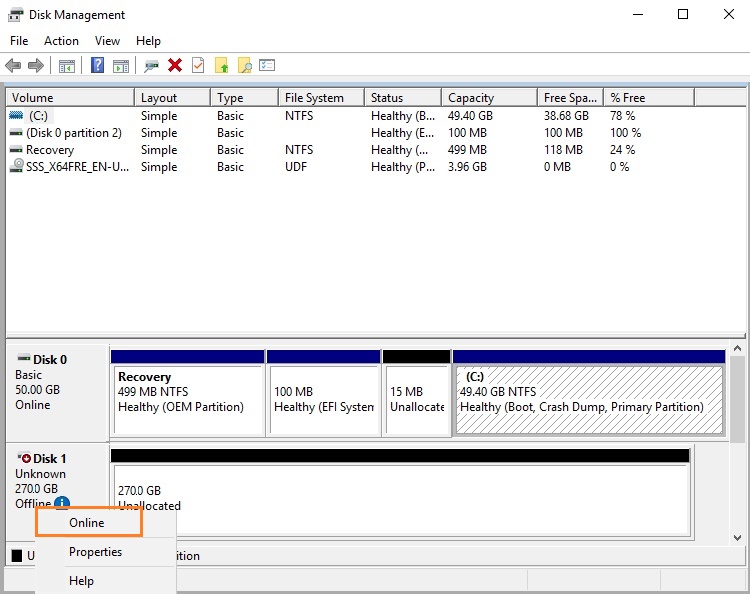
Осталось инициализировать сам iSCSI-диск, который сначала находится в состоянии Offline. Для этого на сервере-инициаторе необходимо в консоли Disk Management в контекстном меню нового диска выбрать пункт Online, а затем – Initialize Disk. Создайте на новом диске один или несколько разделов, присвойте метку и букву диска. Отформатируйте в файловой системе NTFS.
Для быстрой инициализации и форматирования нового диска можно использовать следующий однострочный PowerShell (см. пример в статье об управления дисками и разделами из PowerShell):
Get-Disk |Where-Object PartitionStyle -eq 'RAW' |Initialize-Disk -PartitionStyle MBR -PassThru |New-Partition -AssignDriveLetter -UseMaximumSize |Format-Volume -FileSystem NTFS -Confirm:$false
Примечание: iSCSI-диски не поддерживают файловую систему ReFS.
Теперь этот виртуальный диск, подключенный с другого сервера по протоколу iSCSI можно использовать как обычный локально подключенный диск.
Также вы можете подключить iSCSI диск на инициаторе из PowerShell. Чтобы получить IQN таргета, используйте командлет
Get-iSCSITarget
.
Чтобы подключится к iSCSI таргет выполните команду:
Connect-IscsiTarget –IsPersistent $False и введите IQN.

Если использовалась дополнительная проверка аутентификации CHAP, то необходимо будет это указать, используя следующую конструкцию:
Get-iScsiTarget | Connect-iScsitarget –AuthenticationType ONEWAYCHAP –ChapUserName <username> -ChapSecret <secret>
Если вы хотите обеспечить высокую доступность и балансировку нагрузки для iSCSI дисков, можно использовать несколько избыточные сетевые компоненты (сетевые карты, коммутаторы) и модуль MPIO.
Internet Small Computer Systems Interface is an Internet Protocol-based storage networking standard for linking data storage facilities. It provides block-level access to storage devices by carrying SCSI commands over a TCP/IP network. iSCSI follows the Server-Client model. The iSCSI Target (Server) makes storage available for iSCSI Initiator (Clients) to use.
Table of Contents
- Install iSCSI Target
- Configure iSCSI Target
- Configure iSCSI initiator
Demo environment – iSCSI Target
- Computer Name: server1.test.com
- Operating System: Windows Server 2022 Datacenter
- IP Address: 192.168.3.3
Demo environment – iSCSI Initiator
- Computer Name: server2.test.com
- Operating System: Windows Server 2022 Datacenter
- IP Address: 192.168.3.4
Install iSCSI Target
Steps for Install iSCSI Target
- Open Add roles and features Wizard
- Select installation type
- Select destination server
- Select server roles
- Select features
- Confirm installation selections
1. Open Add roles and features Wizard
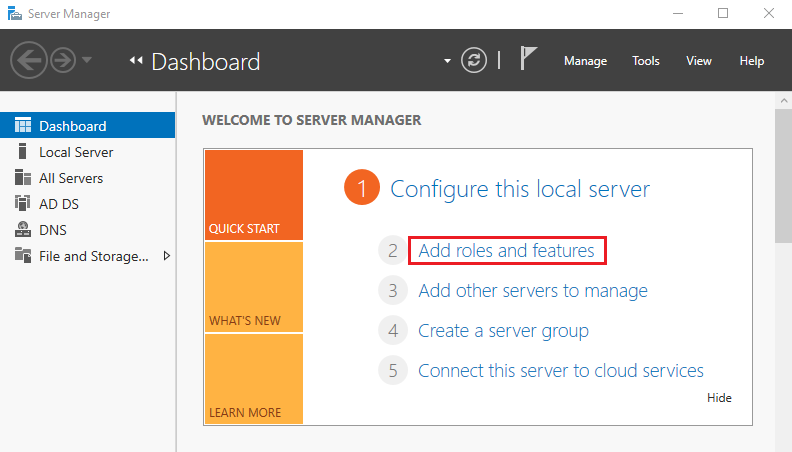
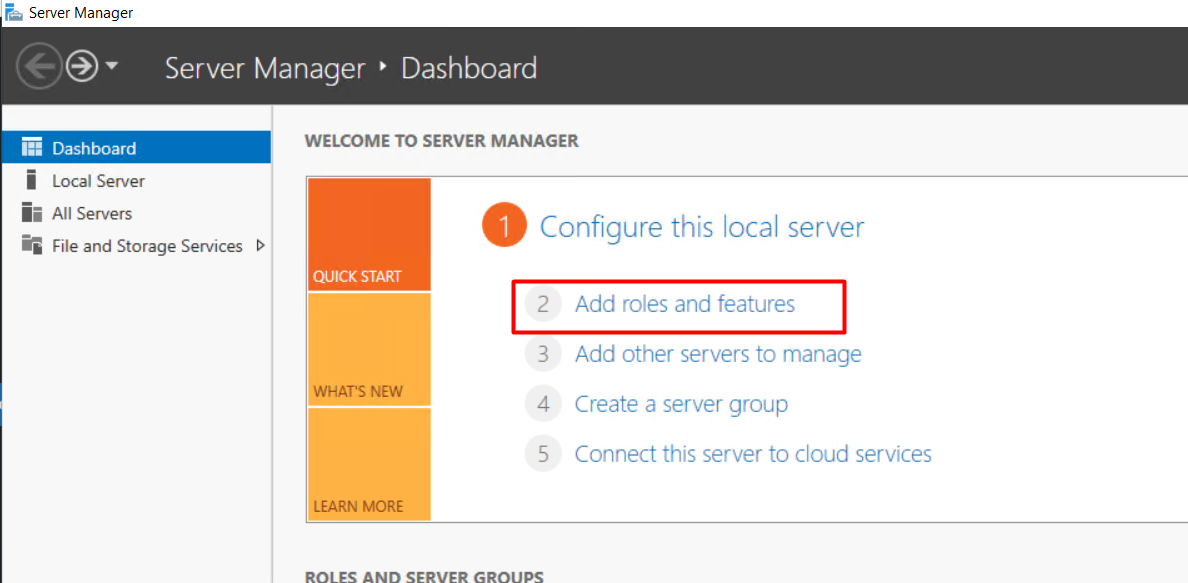
Open the Server Manager dashboard and click Add roles and features.
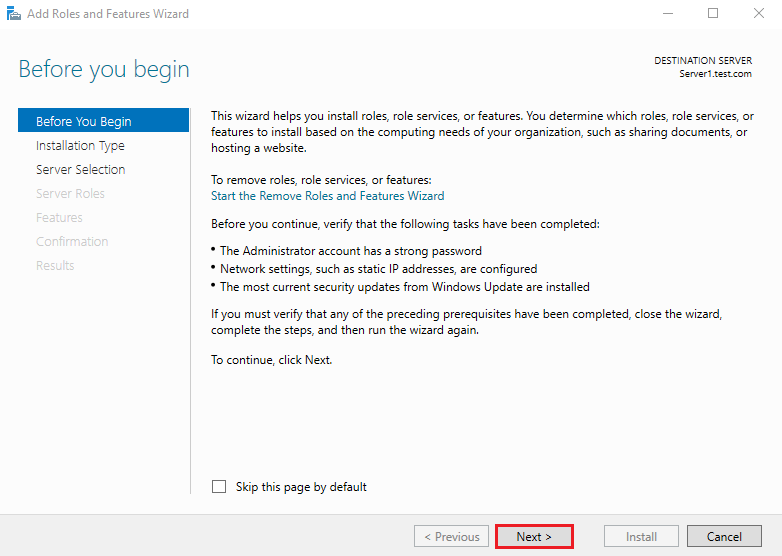
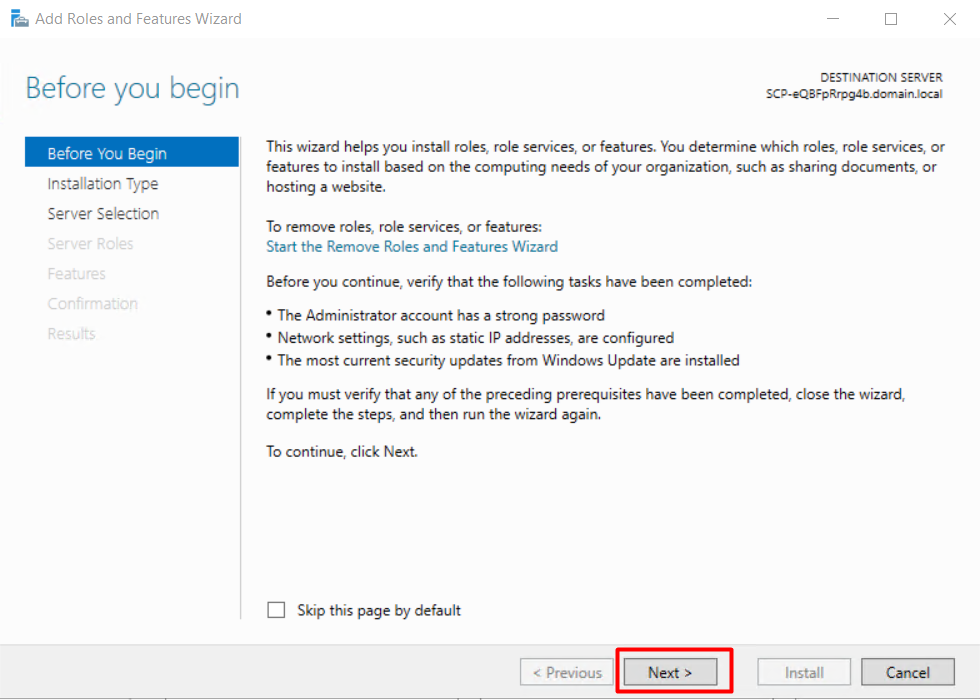
Before you begin, click Next.
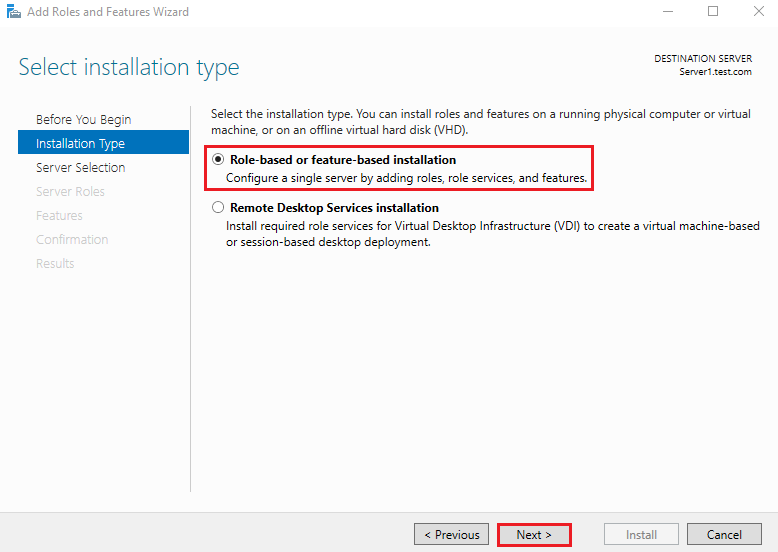
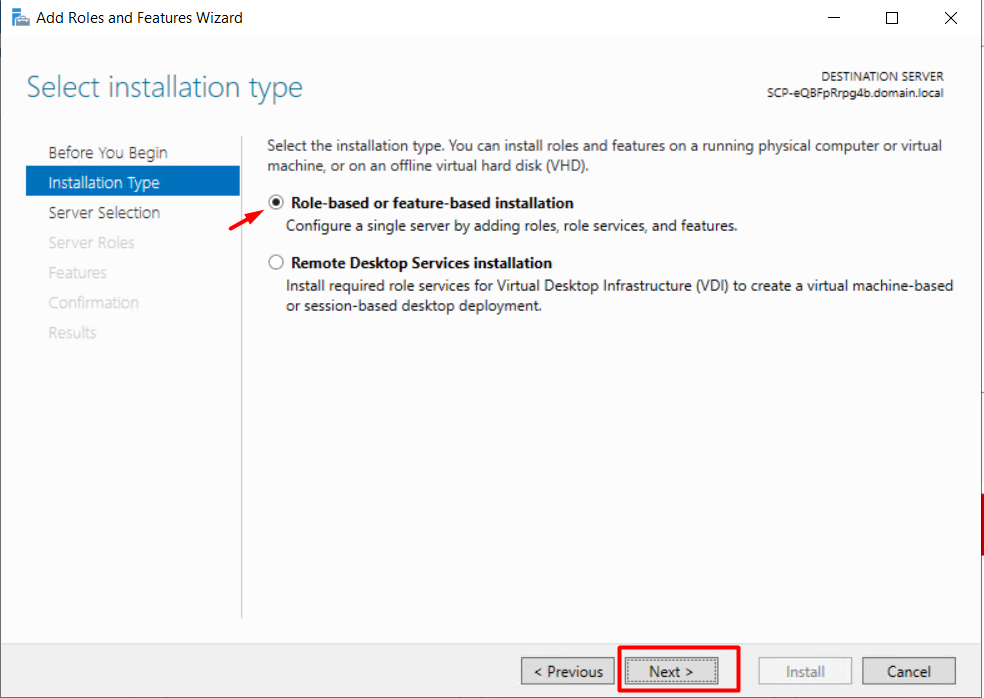
2. Select installation type
Select Role-based or feature-based installation and click on Next.
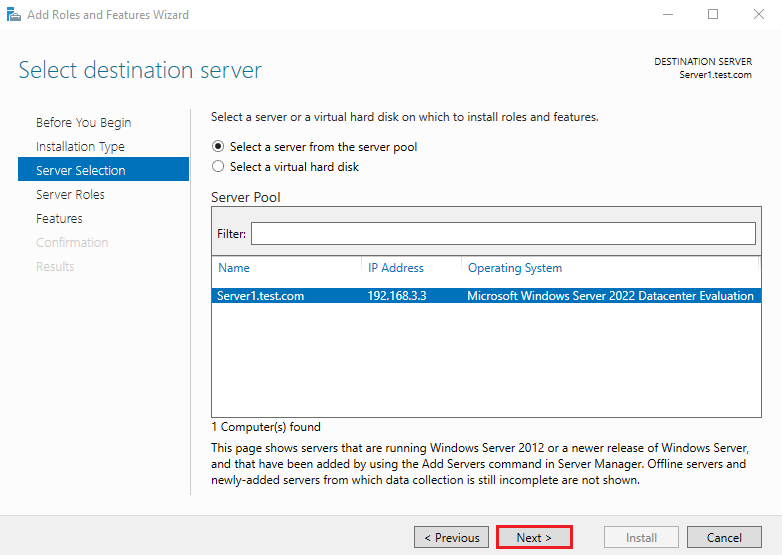
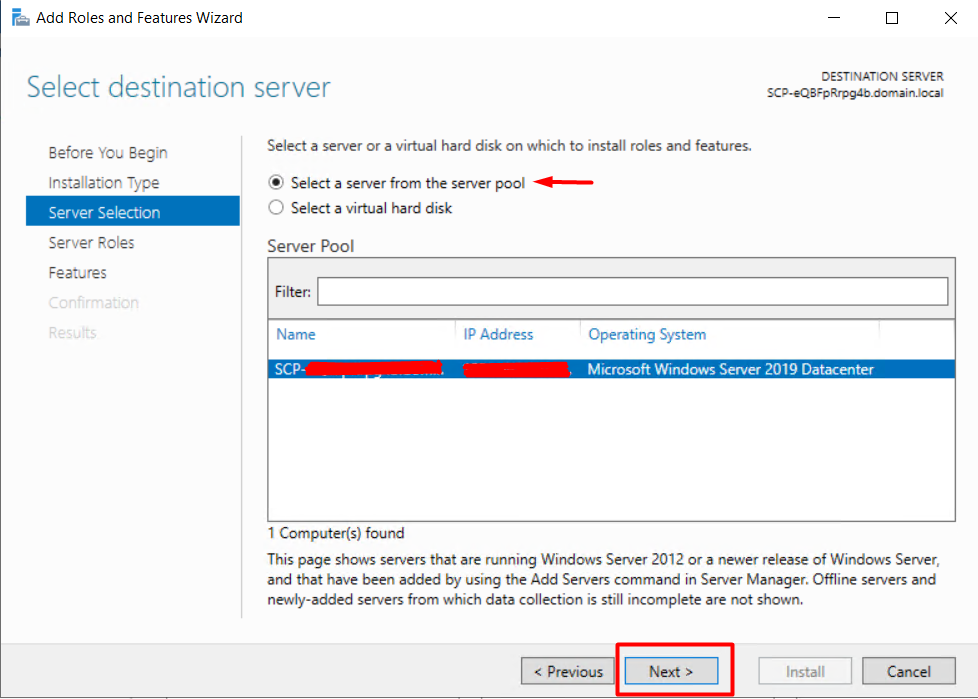
3. Select destination server
Select a Host to which you’d like to add services and click Next.
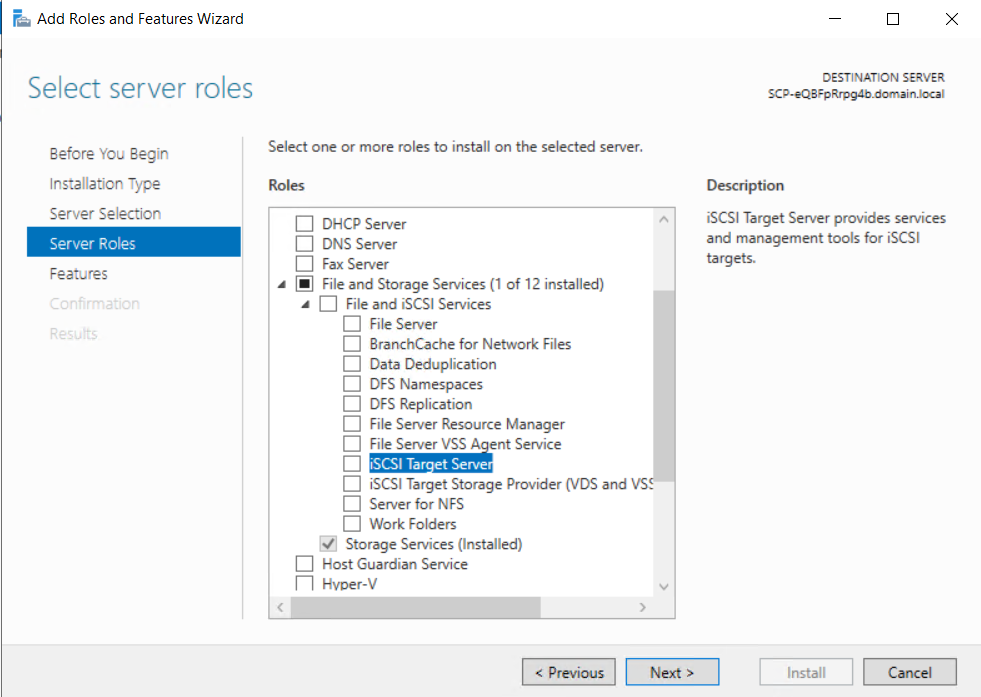
4. Select server roles
Choose the iSCSI Target Server box from the server roles page.

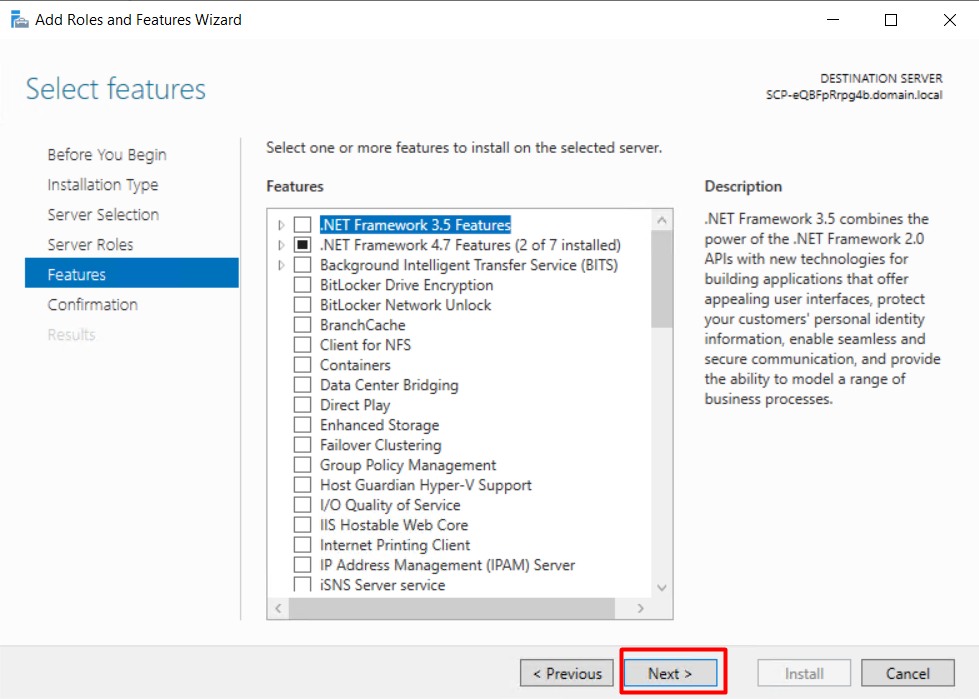
5. Select features
On the Select features console, just click Next because we do not require any extra features at the moment.

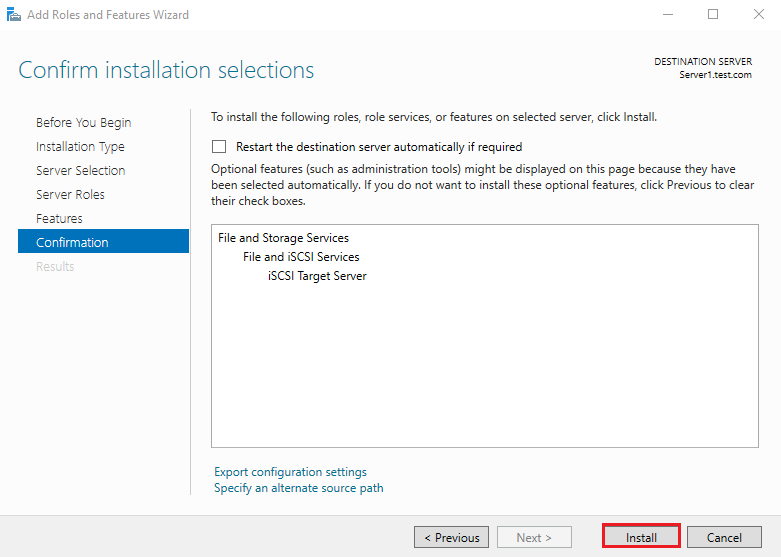
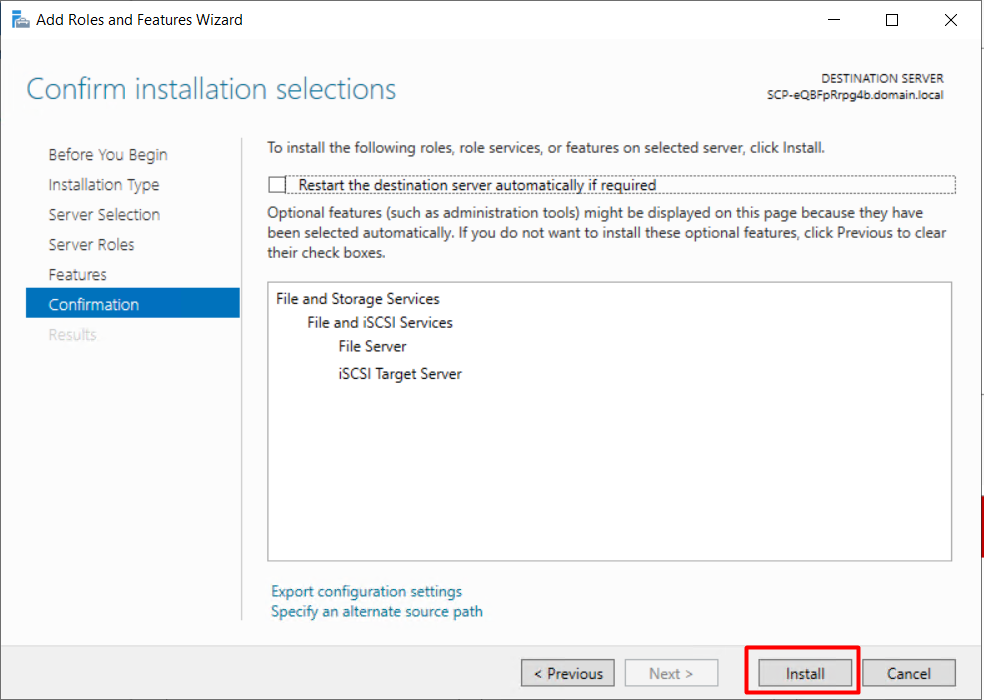
6. Confirm installation selections
Confirm installation selections and click on Install to start the installation process.
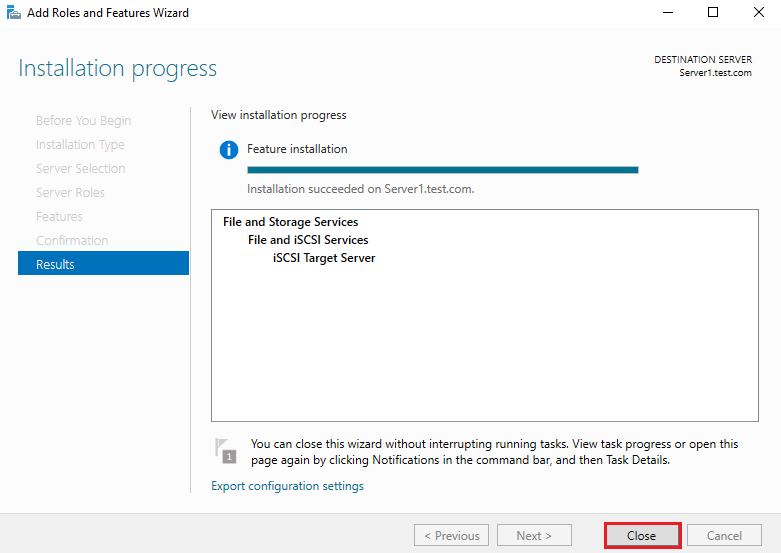
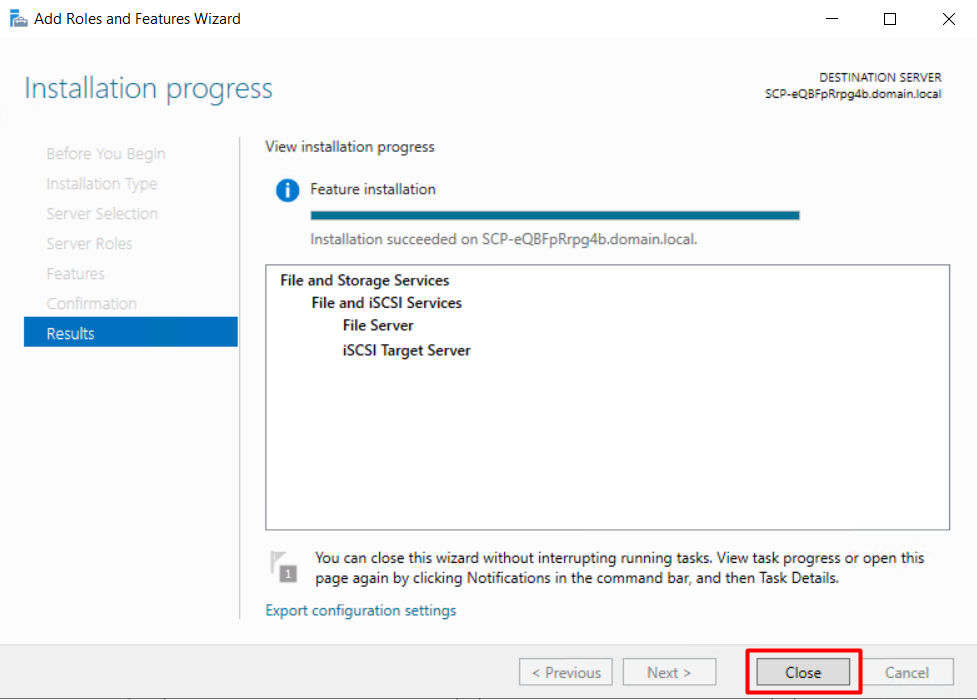
After finishing the installation, click Close.
Configure iSCSI Target
Steps for Configure iSCSI Target
- Open New iSCSI Virtual Disk Wizard
- Select iSCSI virtual disk location
- Specify iSCSI virtual disk name
- Specify iSCSI virtual disk size
- Assign iSCSI target
- Specify target name
- Specify access servers
- Enable Authentication
- Confirm selections
- View Results
1. Open New iSCSI Virtual Disk Wizard
Open the Server Manager dashboard and click File and Storage Services.
Select iSCSI and click To create an iSCSI virtual disk, start the New iSCSI Virtual Disk Wizard.
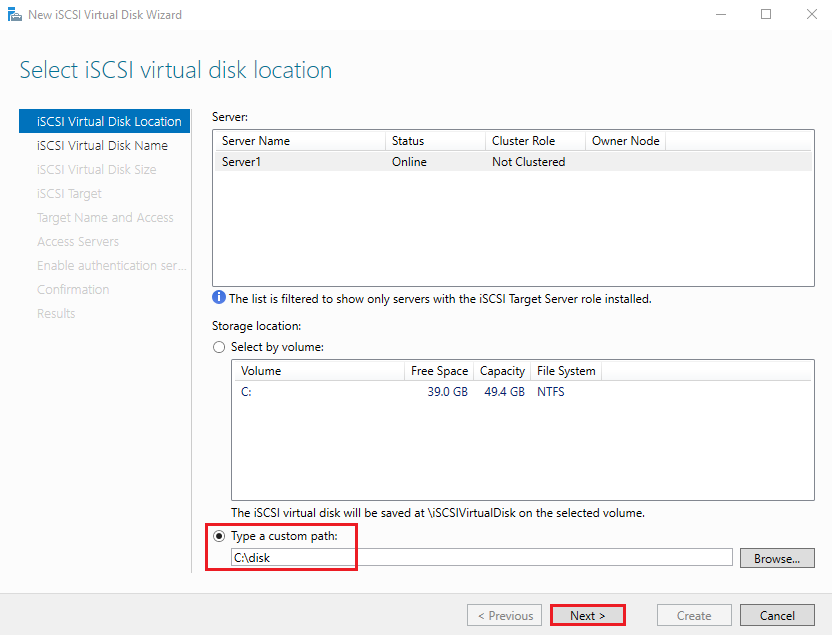
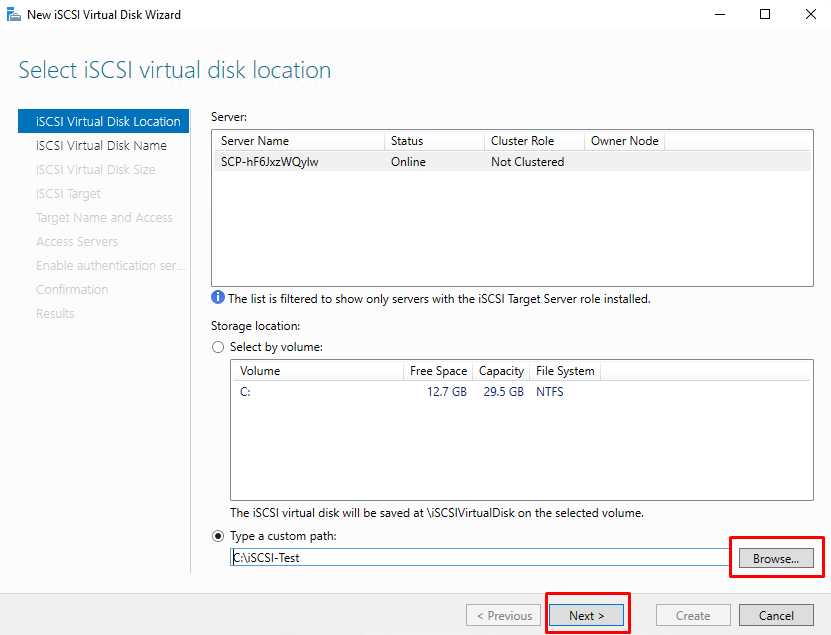
2. Select iSCSI virtual disk location
Select Type a custom path and browse for the folder we created earlier and click Next.
- Custom path: c:\disk
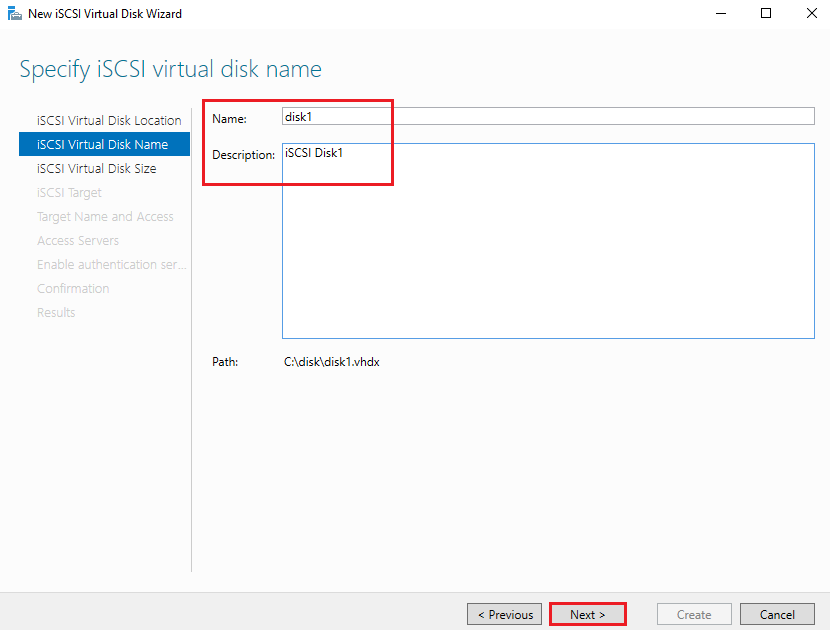
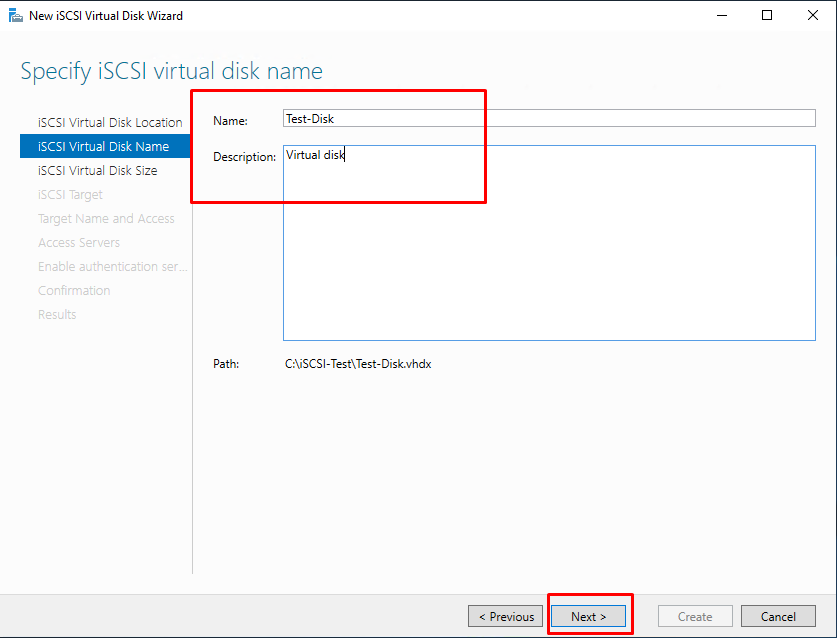
3. Specify the iSCSI virtual disk name
Enter the Name and Description for the virtual disk and click Next.
- Name: disk1
- Description: iSCSI Disk1
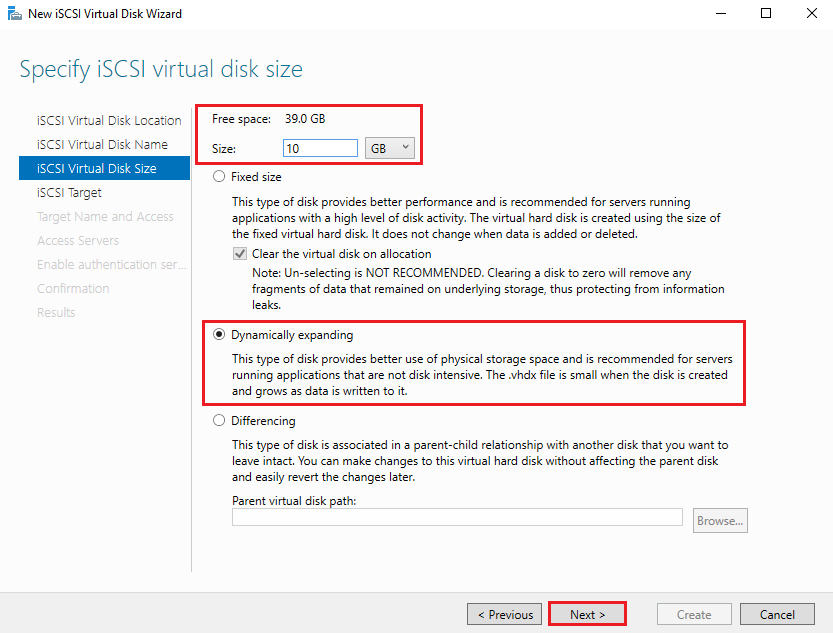
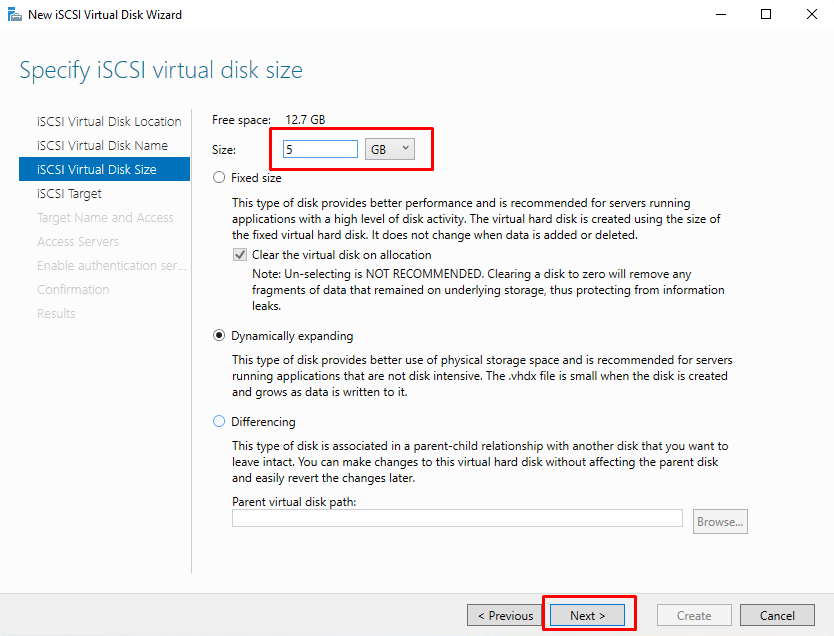
4. Specify iSCSI virtual disk size
Specify the disk size for the virtual disk, Select Dynamically expanding and click Next.
- Size: 10GB
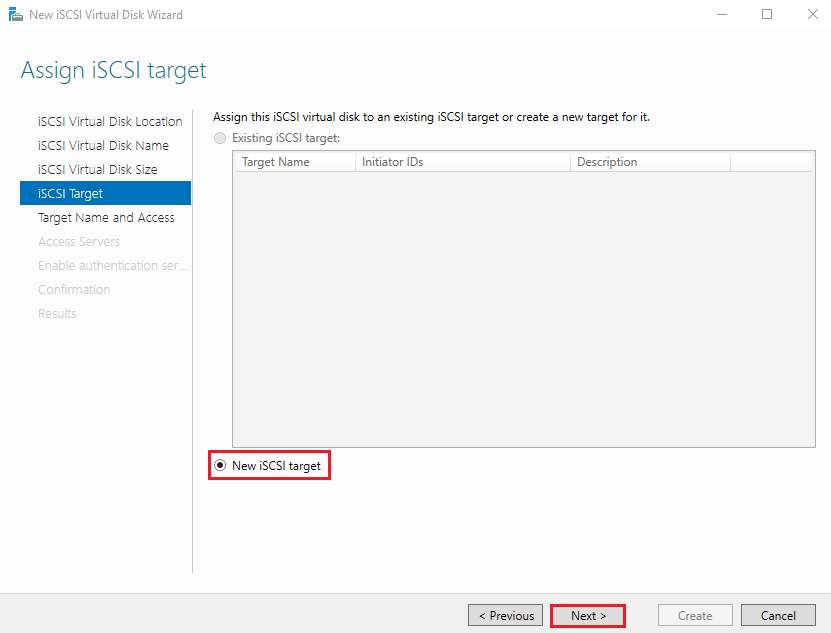
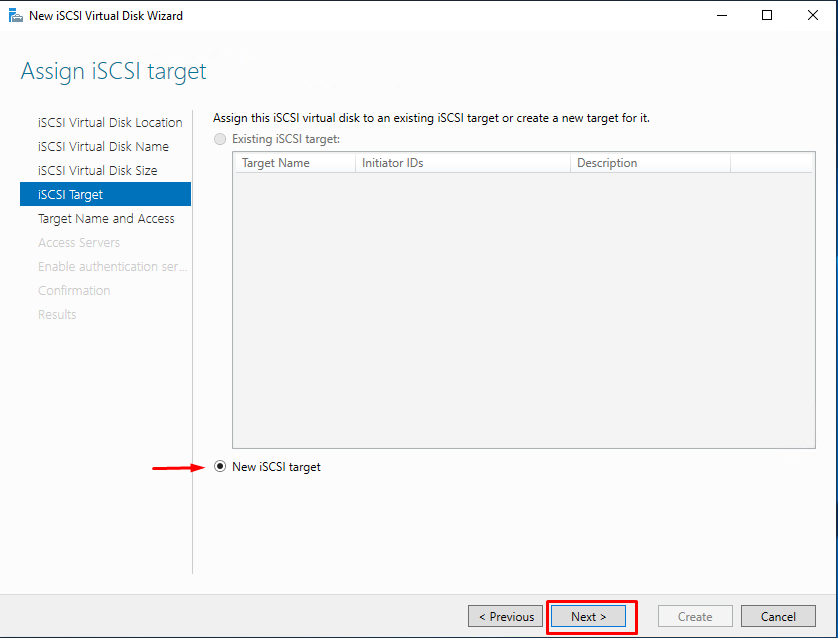
5. Assign iSCSI target
Select New iSCSI target and click Next.
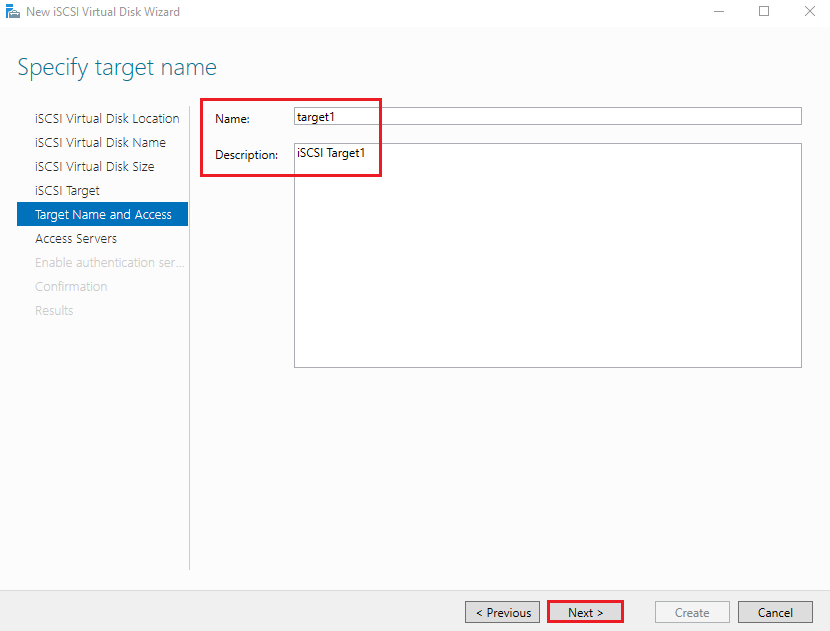
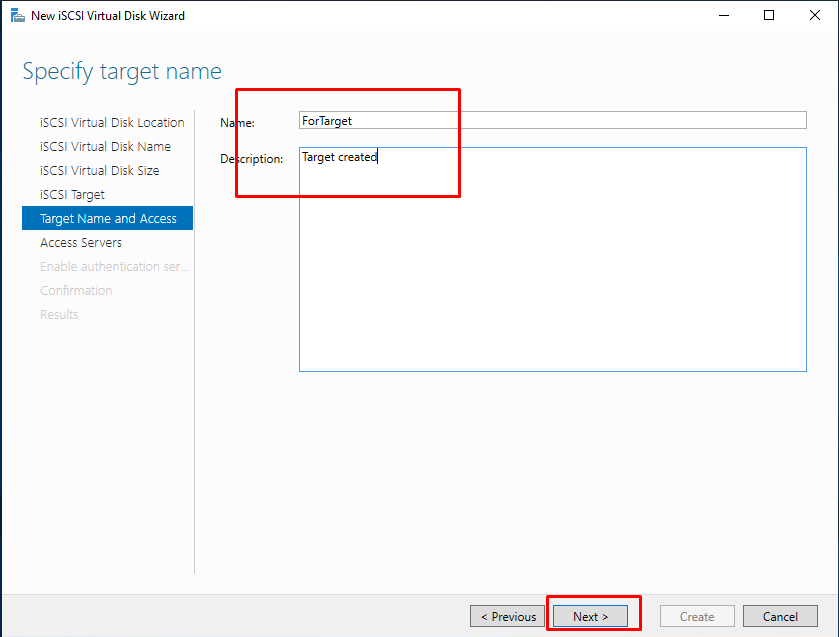
6. Specify target name
Enter the Name and Description for iSCSI Target and click Next.
- Name: target1
- Description: iSCSI Target1
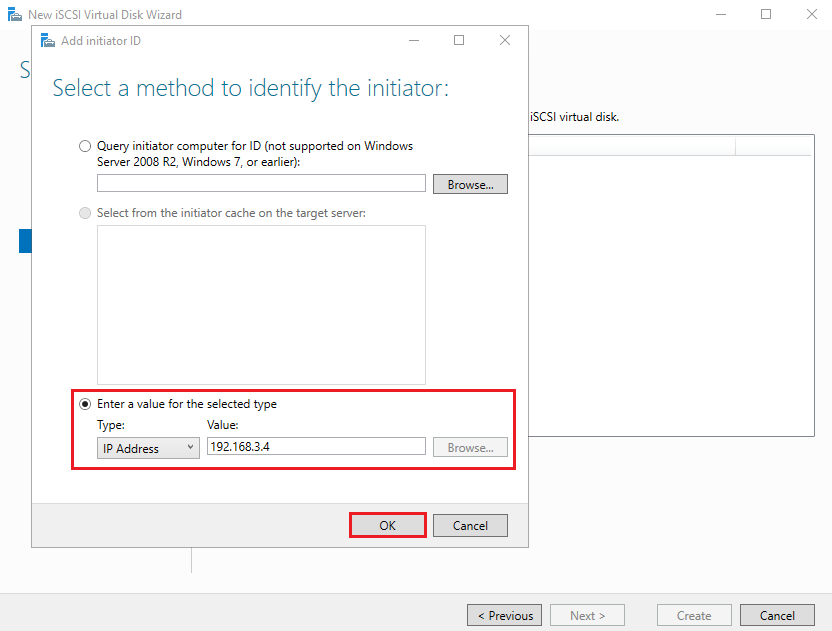
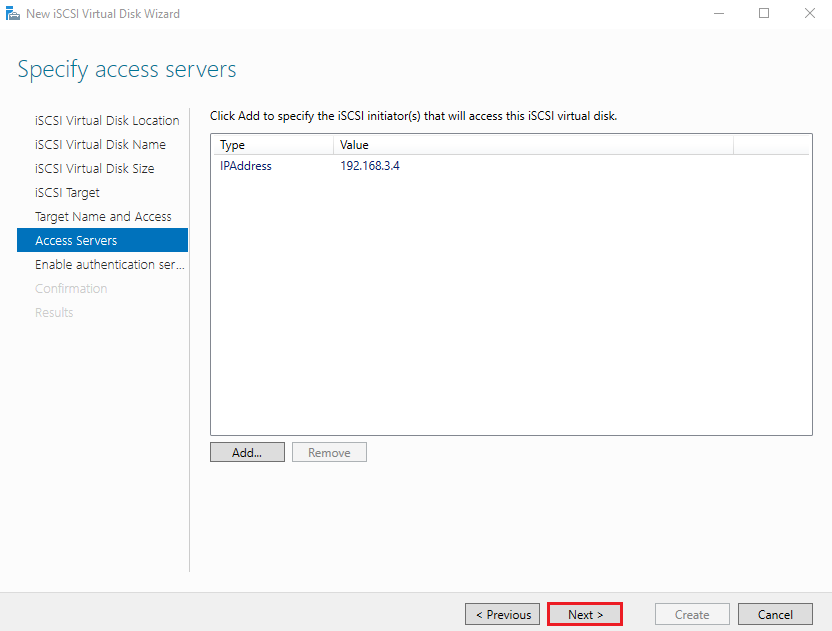
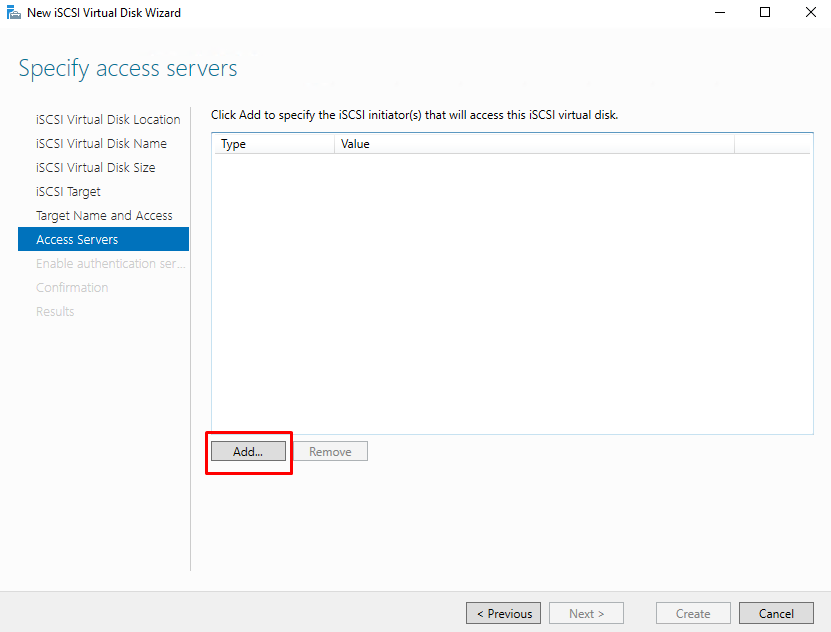
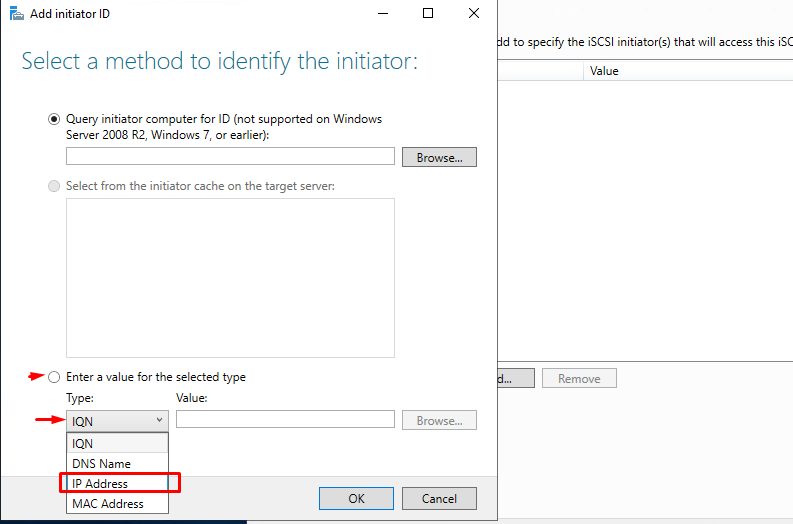
7. Specify access servers
Click Add to specify the iSCSI initiator that will access this iSCSI virtual disk.
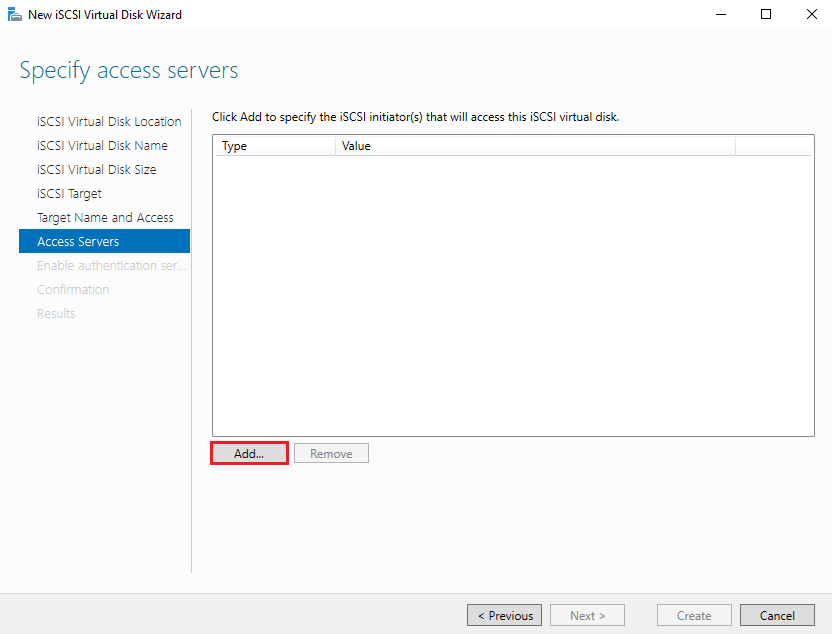
Select Enter a value for the selected type, choose IP Address from the drop-down menu, enter Initiator IP Address and click OK.
- Initiator IP Address:192.168.3.4
Click Next to continue.
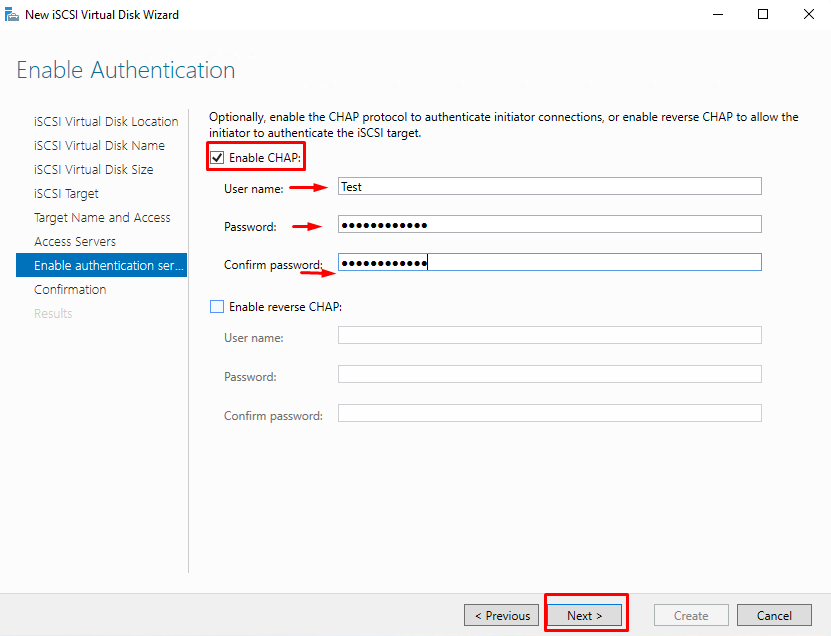
8. Enable Authentication
Select Enable CHAP, set username and password, and click Next.

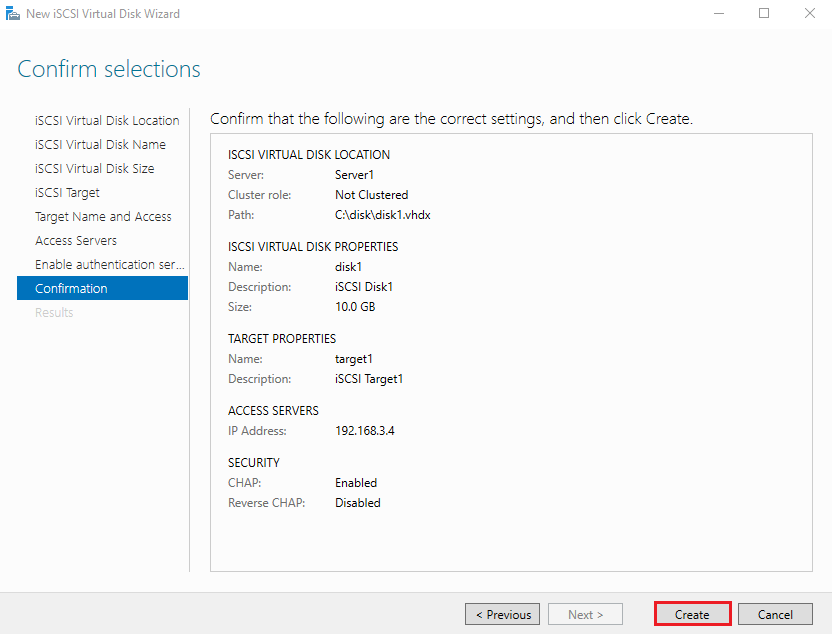
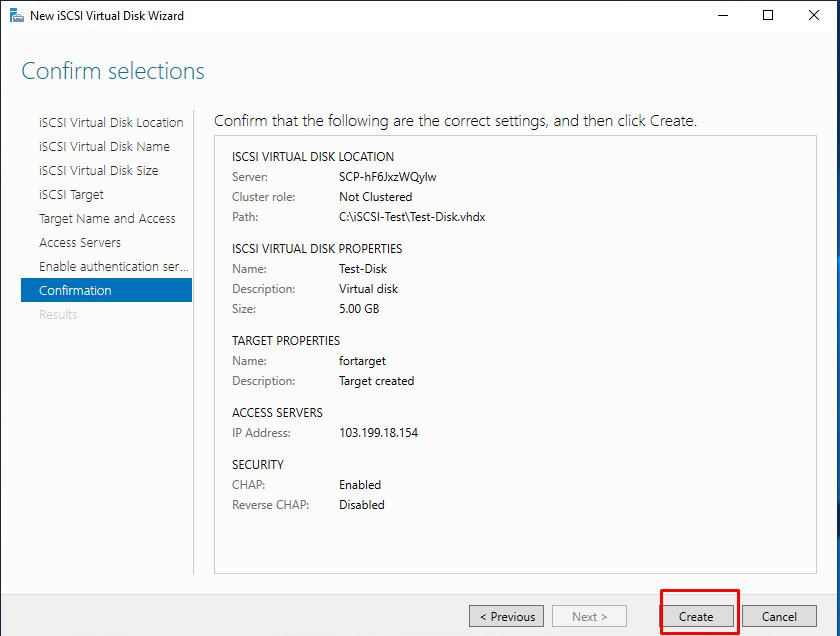
9. Confirm selections
Confirm selections and click Create.
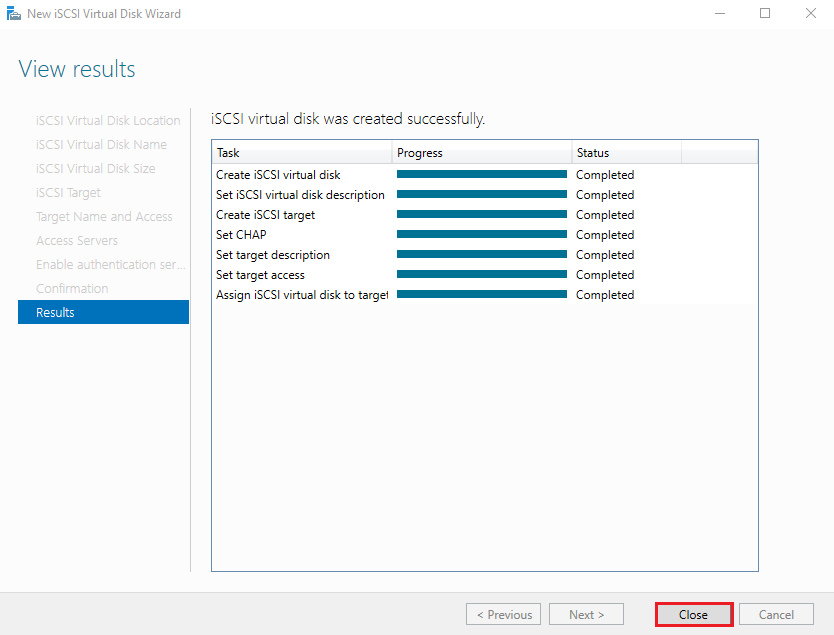
10. View Results
After finishing the installation, click Close.
Configure iSCSI initiator
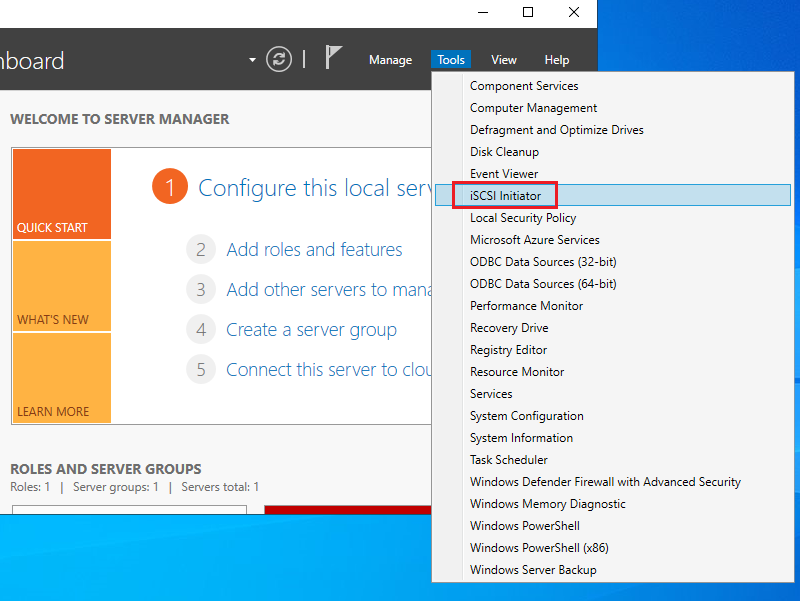
Open the Server Manager dashboard click Tools and select iSCSI Initiator.
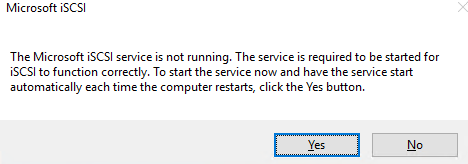
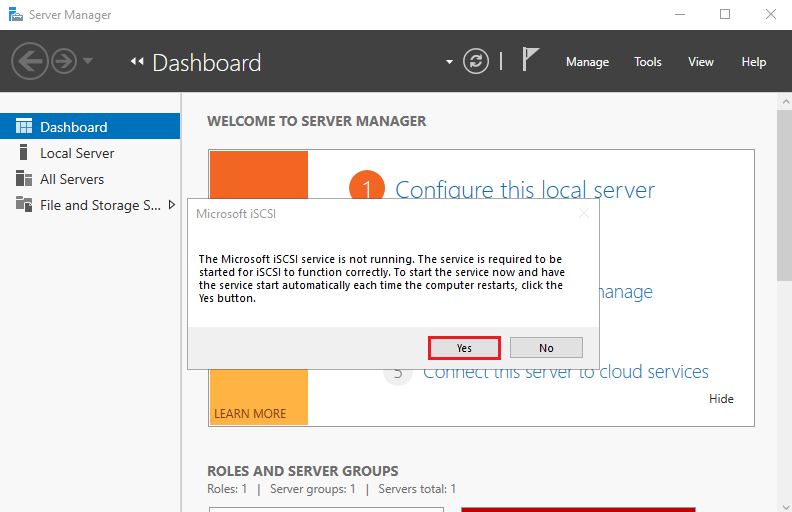
Click Yes to continue.
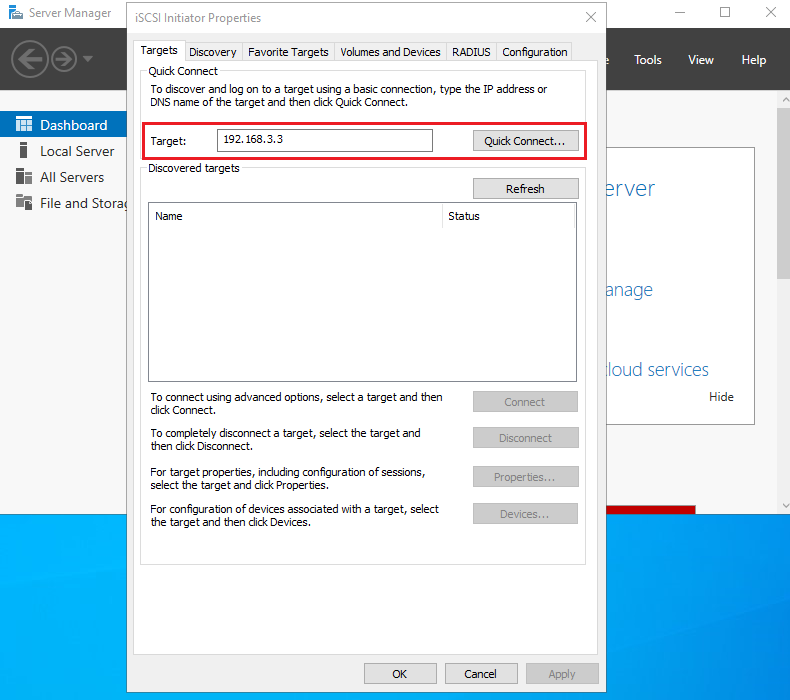
Enter Target’s IP address and click Quick Connect.
- Target: 192.168.3.3
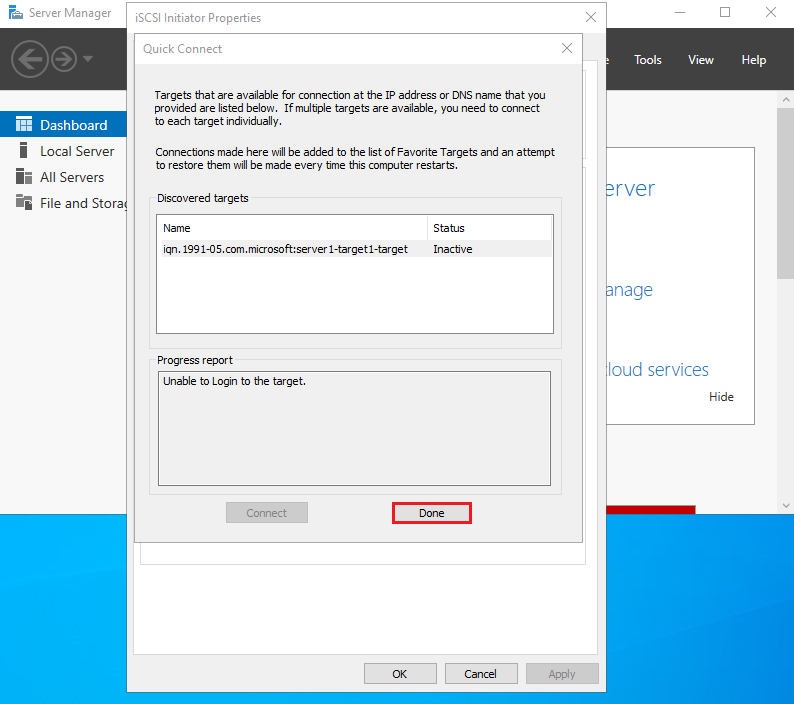
Click Done.
Click Connect.

Click Advanced.
Enable CHAP log on, set username & password, and Click OK.
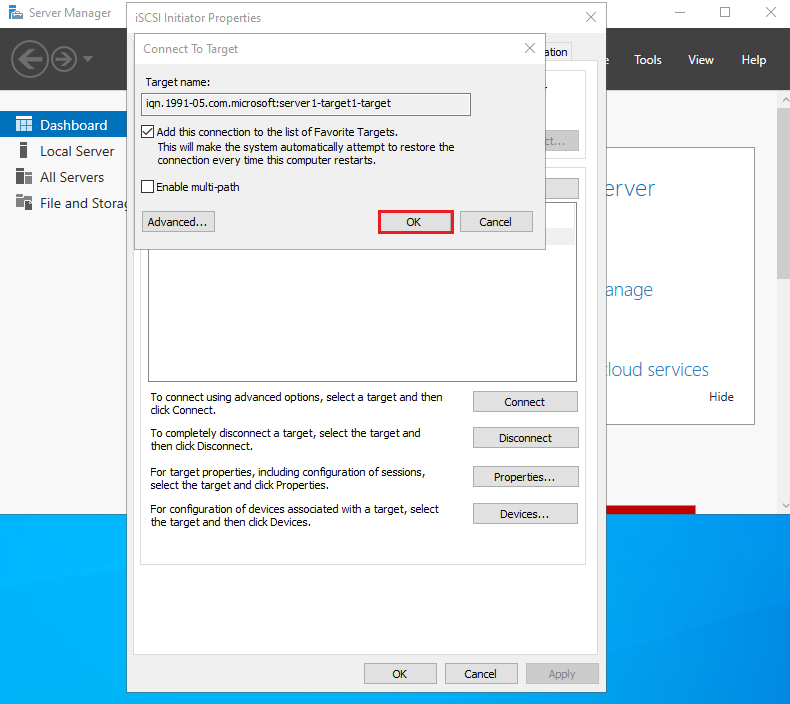
Click OK.
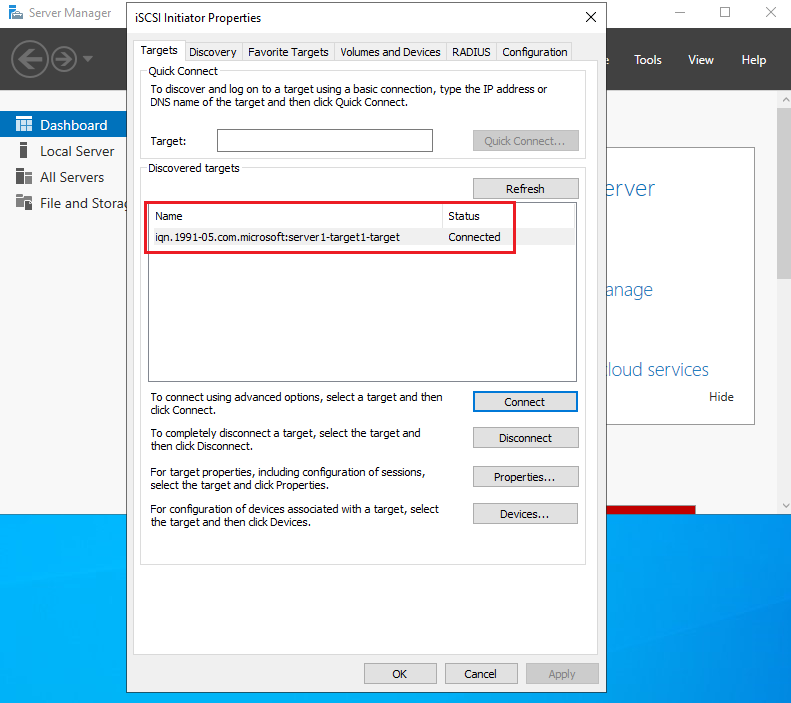
Check the Status.
Open the Server Manager dashboard, click Tools and select Computer Management.
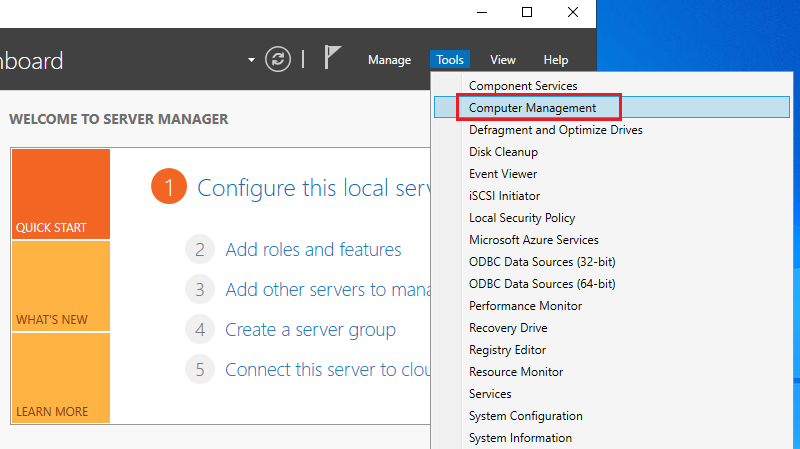
Click Disk Management, the iSCSI Disk has been attached as follows.
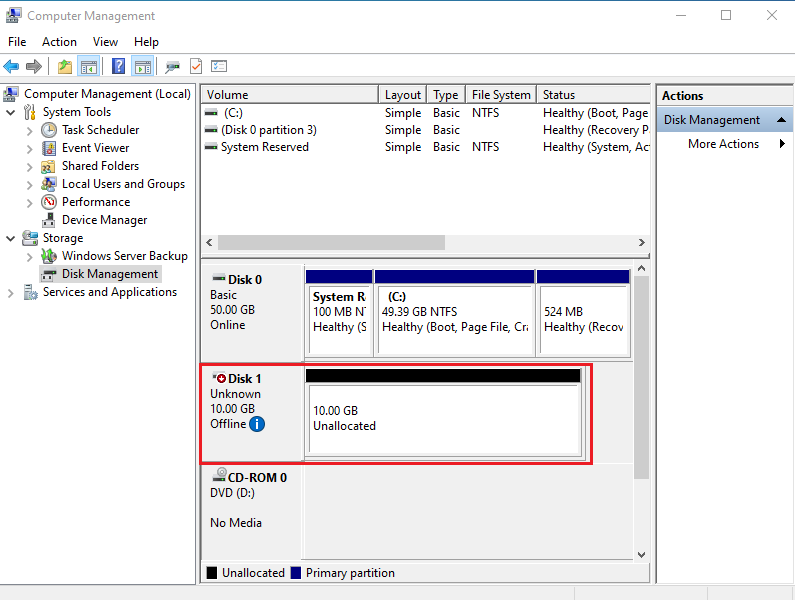
To use the iSCSI Disk turn it online and initialize it and then assign the drive letter.
Internet Small Computer System Interface (iSCSI) — это протокол передачи данных, предназначенный для обмена данными между серверами и системами хранения данных (Storage Area Network, SAN). iSCSI представляет из себя комбинацию протокола SCSI и стека протоколов TCP/IP и предназначен для передачи блоков данных через сети Ethernet. Управляющие команды SCSI передаются внутри IP-пакетов, а протокол TCP обеспечивает управление потоком и надежность передачи данных.
При использовании iSCSI данные между сервером и системой хранения передаются блоками, в необработанном виде. Это позволяет использовать SAN практически так же, как если бы они были подключены к серверу напрямую, а не по сети. Хост-система может создавать на SAN логические разделы, форматировать их и использовать как обычные локальные жесткие диски. В этом заключается основное отличие SAN от сетевых хранилищ (Network Area Storage, NAS), которые работают на уровне файловой системы и используют протоколы передачи файлов, такие как SMB или CIFS.
Технология iSCSI была разработана как более дешевая альтернатива Fibre Channel (FC). Системы на базе iSCSI поддерживают стандартные протоколы и могут быть построены на базе любой существующей сетевой инфраструктуры, поддерживающей протокол IP. Для работы iSCSI может использовать самые обычные сетевые устройства (коммутаторы, маршрутизаторы, сетевые адаптеры и т.п), тогда как для FC требуются специальные HBA-адаптеры, оптические кабеля и прочее дорогостоящее оборудование.
Архитектура iSCSI является клиент-серверной и включает в себя следующие компоненты:
iSCSI Initiator — клиентский компонент, который отправляет запросы на подключение компоненту iSCSI Target, находящемуся на стороне сервера. Инициатор может быть реализован программно, в виде драйвера, либо аппаратно, в виде специального iSCSI адаптера.
iSCSI Target — серверный компонент, слушающий клиентские запросы и обеспечивающий установку соединения между клиентом и сервером iSCSI. Кроме того, таргет связан с виртуальными дисками iSCSI, и после установки соединения все виртуальные диски, связанные с этим таргетом, становятся доступны через инициатор. В качестве iSCSI Target может выступать как специализированная СХД, так и обычный Windows сервер с установленной ролью iSCSI Target.
Виртуальные диски iSCSI — используются для разбиения дискового пространства на логические разделы (Logical Unit Number, LUN). В Windows Server 2012 iSCSI LUN представляют из себя обычные виртуальные диски формата VHD\VHDX. Кстати, в Windows Server 2012 для iSCSI поддерживался только формат VHD, что ставило ограничение в 2ТБ на максимальный размер LUN. В Windows Server 2012 R2 используется формат VHDX, что позволяет создавать LUN-ы размером до 64ТБ.
А теперь остановимся и уточним некоторые моменты:
• На каждом iSCSI сервере может быть один или несколько iSCSI Target;
• Каждый iSCSI Target может быть подключен к одному или нескольким виртуальным дискам;
• Каждый iSCSI Target может обслуживать одно или несколько подключений от iSCSI Initiator;
• В свою очередь, каждый iSCSI Initiator может подключаться к одному или нескольким iSCSI Target и, следовательно, к одному или нескольким виртуальным дискам.
Кроме того, в Windows Server 2012 поддерживается loopback-конфигурация, в которой и Target и Initiator могут находиться на одном и том же сервере.
В операционных системах Microsoft поддержка iSCSI появилась довольно давно. Первая версия Microsoft iSCSI Initiator устанавливалась в качестве отдельного компонента в Windows 2000, Windows XP SP2 и Windows Server 2003 SP1, а начиная с Windows Server 2008 и Vista iSCSI Initiator был встроен в операционную систему.
Что касается iSCSI Target, то изначально он входил в специальную версию серверной ОС Windows Data Storage Server 2003, которая была предназначена для построения систем хранения и поставлялась только в предустановленом виде. Однако с 2011 года компонент Microsoft iSCSI Software Target 3.3 стал доступен для загрузки и установки на Windows Server 2008R2, а в Windows Server 2012 он полностью интегрирован в систему и устанавливается в качестве роли сервера.
На этом закончим теоретическую часть и приступим к практике. Для настройки возьмем самый простой вариант, в качестве подопытных используем два сервера с установленной Windows Server 2012 R2: SRV2 для роли iSCSI Target и SRV3 для iSCSI Initiator.
Запуск службы iSCSI Initiator
Для начала проверим состояние службы инициатора на SRV3. Для этого открываем Server Manager и в меню «Tools» выбираем пункт «iSCSI Initiator».

Как видите, по умолчанию служба не запущена. Нажав на «Yes» в диалоговом окне, мы стартуем службу iSCSI Initiator и поставим ее в режим автоматического запуска.

Затем в окне свойств переходим на вкладку «Configuration» и запоминаем значение IQN, оно пригодится нам при настройке сервера.
IQN (iSCSI qualified name) — это уникальный идентификатор, назначаемый для каждого iSCSI Target и Initiator. IQN формируется из даты (месяц и год) регистрации домена, официального имени домена, написанного в обратном порядке и любого произвольного имени, например имени сервера. Получается примерно так: iqn:1991-05.com.microsoft:srv3.contoso.com

Стартовать сервис iSCSI Initiator и установить режим его запуска можно и из консоли PowerShell, следующими командами:
Start-Service msiscsi
Set-Service msiscsi -StartupType automatic
Установка роли iSCSI Target Server
Теперь перейдем на SRV2 и приступим к настройке серверной части. Первое, что нам надо сделать — это установить на сервер роль iSCSI Target. Открываем Server Manager, переходим по ссылке «Add roles and features»

И выбираем роль «iSCSI Target Server», которая находится в разделе File and Storage Services\File and iSCSI Services.

Либо воспользуемся командой PowerShell:
Install-WindowsFeature -Name FS-iSCSITarget-Server
Подготовка диска
Теперь подготовим физический диск, который будет использоваться для хранения виртуальных iSCSI дисков. Специально для этой цели к серверу подключен новый жесткий диск размером 120Гб. На данный момент диск неактивен (Offline). Для его активации в Server Manager переходим в раздел File and Storage Services -> Disks, кликаем на диске и переводим его в Online.

Теперь на этом диске надо создать новый раздел (или том), для чего в контекстном меню выбираем пункт New Volume.

Выбираем физический диск, на котором будет создаваться том

указываем размер тома

и выбираем букву диска.

Затем выбираем для диска файловую систему, размер сектора и указываем метку тома. Здесь напомню, что виртуальные диски iSCSI можно создавать только на томах NTFS, новая файловая система ReFS (Resilient File System) не поддерживается.

Смотрим суммарную информацию, и если все правильно, то жмем «Create», запуская создание тома.

Те же действия можно проделать с помощью PowerShell. Находим нужный диск:
Get-Disk | where {$_.OperationalStatus -eq ″Offline″}
Переводим его в online:
Set-Disk -Number 1 -IsOffline $false
Инициализируем:
Initialize-Disk -Number 1
Создаем раздел:
New-Partition -DiskNumber 1 -UseMaximumSize -DriveLetter D
И форматируем его в NTFS:
Format-Volume -DriveLetter D -FileSystem NTFS -NewFileSystemLabel ″iSCSI Storage″
Создание виртуальных дисков iSCSI
Следующим пунктом нашей программы идет создание виртуальных iSCSI дисков. Для этого переходим в раздел iSCSI и кликаем по ссылке, запуская очередной мастер.

Выбираем том, на котором будет храниться виртуальный диск.

Даем диску имя и описание.

Указываем размер виртуального диска и его тип. Выбирать можно из трех вариантов:
• Fixed size (фиксированного размера) — создаваемый диск сразу занимает весь выделенный объем. Это наиболее производительный, но наименее экономичный вариант;
• Dynamically expanding (динамически расширяемый) — изначально создается диск минимального размера, который затем динамически изменяется в зависимости от количества записанных на него данных. Наилучший вариант в плане использования дискового пространства;
• Differencing (разностный) — в этом варианте нужно указать расположение родительского диска, с которым будет связан создаваемый диск. Разностный диск может быть как фиксированным, так и динамическим, в зависимости от типа родителя. У этого типа дисков есть свои преимущества, но использовать их для iSCSI лично я особого смысла не вижу.

Теперь нужно указать iSCSI Target, к которому будет подключен данный диск. Поскольку на сервере не создано ни одного таргета, выбираем «New iSCSI target».

Даем таргету имя и описание.

И указываем сервера, которые могут получить к нему доступ.

При выборе серверов можно воспользоваться двумя способами. Если инициатор находится на Windows Server 2012 или Windows 8, то можно просто нажать «Browse» и выбрать нужный сервер из списка. Для более старых систем надо вручную ввести идентификатор сервера. В качестве идентификатора можно указать IQN инициатора, DNS имя или IP-адрес сервера, либо MAC-адрес сетевого адаптера.

Идем дальше. На следующей странице можно настроить аутентификацию по протоколу CHAP между серверами. CHAP (Challenge Handshake Authentication Protocol) — это протокол для проверки подлинности партнера по подключению, основанный на использовании общего пароля или секрета. Для iSCSI можно задействовать как одностороннюю, так и двухстороннюю (reverse) проверку подлинности CHAP.

Проверяем правильность настроек и запускаем создание диска.

Попробуем сделать все то же с помощью PowerShell. Создадим еще один виртуальный iSCSI диск на 20ГБ командой:
New-IscsiVirtualDisk -Path D:\iSCSIVirtualDisks\iSCSI2.vhdx
Обратите внимание, что по умолчанию создается динамический диск, для создания VHD фиксированного размера надо воспользоваться ключом -UseFixed.

Теперь создаем второй iSCSI Target c именем iscsi-target-2 и в качестве сервера доступа укажем IQN SRV3:
New-IscsiServerTarget -TargetName iscsi-target-2 -InitiatorIds ″IQN:iqn.1991-05.com.microsoft:srv3.contoso.com″

И проверим результат командой:
Get-IscsiServerTarget | fl TargetName, LunMappings

Подключение
Возвращаемся на SRV3, открываем окно свойств инициатора, переходим на вкладку Discovery и жмем кнопку Discover Portal.

Вводим имя или IP-адрес портала и жмем ОК.

По умолчанию iSCSI использует все доступные IP-адреса, и если вы хотите, чтобы трафик iSCSI шел только через определенный сетевой интерфейс, то надо перейти в расширенные настройки и в поле «Connect using» указать нужный IP.

Теперь переходим на вкладку Targets, где должны отобразиться все доступные для подключения iSCSI Target. Выбираем нужный таргет и жмем «Connect».

Не забудьте отметить чекбокс «Add this connection to the list of Favorite Targets», который обеспечивает автоматическое подключение к таргету при выключении или перезагрузке машины.

Подключение состоялось, и если открыть оснастку управления дисками, то там появится новый диск. Дальше с этим диском поступаем так же, как с обычным жестким диском, подключенным локально — переводим в Online, инициализируем, создаем на нем разделы и форматируем.

То же самое можно выполнить с помощью PowerShell. Выводим список доступных таргетов:
Get-IscsiTarget | fl
И подключаемся к нужному:
Connect-IscsiTarget -NodeAddress ″iqn.1995-05.com.microsoft:srv2-iscsi-target-2-target″ -IsPersistent $true
Ключ -IsPersistent $true обеспечивает автоматическое подключение при выключении или перезагрузке.

Ну и для отключения можно воспользоваться командой Disconnect-IscsiTarge, вот так:
Disconnect-IscsiTarget -NodeAddress ″iqn.1995-05.com.microsoft:srv2-iscsi-target-2-target″ -Confirm:$false

Заключение
На этом настройка завершена. Как я говорил, это самый простой, базовый вариант настройки хранилища. В iSCSI имеется еще много интересных возможностей. Например, можно использовать службу имен iSCSI (iSNS) для простоты управления, многопутевой ввод-вывод (MPIO) для обеспечения отказоустойчивости, а для безопасности настроить аутентификацию по протоколу CHAP и шифрование трафика с помощью IPSec. О некоторых из этих фич я планирую написать в следующих статьях.
И в заключение важные моменты, которые надо учесть при организации системы хранения iSCSI:
• Развертывать iSCSI желательно в быстрой сети, не ниже Gigabit Ethernet;
• Сетевой трафик iSCSI рекомендуется отделить от остального трафика и вынести в отдельную сеть, например с помощью VLAN или физического разделения на подсети;
• Для обеспечения высокой доступности на сетевом уровне необходимо использовать технологию MPIO, либо сеансы с несколькими подключениями (MCS). Объединение сетевых адаптеров (NIC Teaming) для подключения к устройствам хранения iSCSI не поддерживается;
• При использовании технологии Storage Spaces можно хранить виртуальные диски iSCSI на Storage Spaces, но нельзя использовать LUN-ы iSCSI для создания Storage Spaces;
• Для хранения виртуальных дисков iSCSI нельзя использовать общие кластерные тома CSV (Cluster Shared Volume).

iSCSI is an acronym for Internet Small Computer System Interface. It is a network protocol that encapsulates storage device communication data into IP packets for transmission over an Ethernet connection. This allows the IP-connected hosts to access the Storage Area Network (SAN). iSCSI Target Server also enables admins to run/boot multiple devices on a network from a single operating system image that’s stored in a central location. Traditional Storage Area Networks are based on Fiber Channel.
Fiber Channel SANs are very fast but they’re also expensive. iSCSI will provide us with most of the benefits of a Fiber Channel SAN without all the cost associated with Fiber Channel SAN. iSCSI is the most frequently used solution and it enables us to create a very reliable and fast SAN using ethernet hardware. It will also be nice to emphasize that, iSCSI does not run as fast as a Fiber Channel SAN and the associated offered by Fiber Channel SAN can not be achieved by iSCSI.
Here are some guides you may be interested in: Initialize and format a virtual disk: How to add and remove a new virtual disk from a VM on VMware Workstation, how to scale up and scale out on Azure, how to track your device performance and health via Windows Security in Windows 10, and Unable to access files in Synology Disk station from Windows 10.
iSCSI allows access to a remote server (target) disk by making it virtually available as a local disk. When you configure iSCSI SAN, the iSCSI target Server is configured and therefore offers access to the shared storage. The server that connects to the iSCSI Target is referred to as the iSCSI Initiator. The advantage of iSCSI over Fiber Channel is the cost as Fibre Channel is relatively very expensive to implement. By imploying iSCSI, we can create a SAN that runs at a relatively low cost which requires no additional interface cards, fiber optic cabling, no fiber-optic switches etc, therfore,, ensuring everything run as software. Below is a table showing some iSCSI terminologies.| Name | Description |
|---|---|
| IQN | The is referred to as the iSCSI qualified name. It is unique name that is used for identifying targets as well as initiators |
| Backend Storage | The storage location on the iSCSI target that the iSCSI target component is providing access to |
| Target | The service on an iSCSi server that gives access to backend storage devices. |
| Initiator | The iSCSi client that connects to a target and is identified by IQN |
| ACl | The access control list that is based on the iSCSI initiator IQN and used to provide access to specific user |
| LUN | A Logical Unit Number. The backend storage devices that are shared through the target. This can be any device that supports read/write operations, such as disk, partitions, logical volumes, files or tape drves |
| Discovery | The process whereby an initiator finds the targets that are configured on a portal and stores the information locally for future reference. |
Part A – Install iSCSI Server (Role):
There are quite a few different ways to add the iSCSI Target server on a Windows device.
– To do this via PowerShell, run the command below
Install-WindowsFeature -Name FS-iSCSITarget-Server– Via the Server Manager: Click on the Dashboard on the Server Manager and click on Add roles and features as shown below.

On the “Before you begin” page, you can click on Next. Nonetheless, If you do not want the page to appear subsequent times, check the button to skip the page by default.

In addition, On the next Window, “Select installation type“, select “Role-based or feature-based installation” and click on “Next“.

Moreover, If you have multiple servers, please ensure you select the right server to have the iSCSI Target Server installed.
– Click on Next to continue

However, Expand and check the iSCSI Target Server box as shown below. As you can see, it has not previously been installed.
– When you are done checking the box, click on Next to continue


Furthermore, On the Features page, we do not have to select any Feature, click on Next to continue as shown below.

To avoid restarting the Server when a restart is needed, you can check the button “Restart the destination server automatically if required”. For this setp, a restart is not required, therefore, I will still not check it.
– Additionally, Confirm you have selected the right role (iSCSI Target Server) and click on Install as shown below.

Once your installation is complete, click on “Close”. Therefore, You can also click on close while the installation is going on.


Part B – Create an iSCSI target:
Now that the iSCSI Target Server has been installed, we will configure a new iSCSI Target. Nevertheless, You can create an iSCSI disk (virtual disk)using PowerShell.
New-IscsiVirtualDisk -Path c:\xxxxxxxxxx\TechDASAN.vhdx -Size 10GBVia the Server Manager: To do this, click on File and Storage Services as shown below.

Similarly, Click To create an iSCSI virtual disk, click on iSCSI and under iSCSI Virtual Disks. Nonetheless, Click on the Task dropdown menu and
– Click on “New iSCSI Virtual Disk” Wizard

Consequently, Select a volume and click on Next to proceed as shown below.

Nonetheless, Enter the iSCSI Virtual Disk name and description. When you done, click on Next to continue.

In addition, Enter the size of the desired Virtual Disk GB. Also, select the vDisk type (Fixed Size, Dynamically expanding or Differencing) as shown below .
– I am going with the Dynmaically exapning as shown below.
– Click next to proceed.

Select New iSCSI target and click Next to continue.

Moreover, Under Target Name and Access, enter a name to identify the disk by Target servers. Therefore, type a Name, description and click on Next

Choose from these connection options to specify the servers (iSCSI initiators) that can connect to the iSCSI target at the Access Servers step. Before copying the IQN, configure the iSCSI initiator on your server, including Server Name (DNS Name), IP Address, and MAC Address.
– To proceed, click on “Browse” as shown below.

As you can see below, I am using the DNS “HyperV“.I will enter my Server Name, click “Check Names,” and then click “OK” to close the “Select Computer” wizard.


However, Ensure on the target server that you have also enabled the iSCSI initiator service. Click on OK on cloe the window below.

Furthermore, the iSCSI Target and Initiator creation are currently being saved.

Click on Next to continue.
– Note: You can click on Add. This will Add the Servers which will be accessing this disk.

On the Enable Authentication window, as you can see, this is optional. This is a Lab task and therefore, I will not be needing to authenticate the initiator’s connection.
– Click on Next to continue.

Confirm the iSCSI virtual disk settings and click Create.

You can see we successfully created the iSCSI virtual Virtual Disk.

You can follow the steps mentioned in creating an iSCSI Virtual Disk. As you can see below, you can perform the following settings you can perform for the iSCSI Virtual Disks and iSCSI Targets.


As yu can see in the figure below, here are the iSCSI Target Properties window.

Part C – Install and Configure iSCSI Initiator:
In this step, we will connect to the virtual iSCSI disk from another server (iSCSI initiator). Also, there are different ways to launch the iSCSI Initiator.
– First, launch the Control Panel and start the iSCSI initiator (or run iscsicpl.exe) from the run dialogbox.
– Alternatively, you can launch the Server Manager and click on Tools and then on the iSCSI Initiator.
Note: To connect to the iSCSI storage, you may need to open TCP ports 860 and 3260 in Windows Firewall. iSCSI target servers listen on port 3260 and initiators connect using port 860.
On the prompt, click on YES to automatically start t he Microsoft iSCSI service as shown below.

In the window below, click on the Target tab and this will open up the iSCSI initiator properties. Here, we will need to enter the DNS Name or IP Address of the iSCSI target configured in Part B above and then click on Quick Connect to automatically connect to the discovered targets.
– As you can see below, we discovered and connected the iSCSI targets. If you find an inactive iSCSI Target, select it and click on Connect.
– Navigate to the Volume and Devices Tab, click on Auto Configure to configure the volumes so upon restart, the it is readily available for use.


Note: It is also possible to connect an iSCSI disk on the initiator host via PowerShell. To get the target IQN, use the Get-iSCSITarget cmdlet as shown below. If you are using CHAP authentication, the command will be different. This is not covered in this guide.
Connect-IscsiTarget –IsPersistent $False and enter the IQN.Part D – Initialize and Format the vDisk:
Open disk management via the Server Manager or Windows Administrative Tools to do this. Here is a similar guide on how to do this: How to initialize and format a virtual disk. I will be showing you how to launch this via Windows Administrative Tools “Control Panel\System and Security\Administrative Tools\Computer Management.lnk”.
– Click on Computer Management

As you can see below, there is a new volume in the Disk Management panel of the client PC. You can format it and adminsister it just like other volumes.

Right-click the disk and select bring it online.
– If you do not find the drive yet, please under “Actions” > Rescan Disks“. If you on working on a cloud platform such as AWS, you may have to rescan in order to see the attached disk.

Click Initialize Disk after right-clicking the disk to initialize it. Windows prompts you to initialize the disk before the Logical Disk Manager can access it.

I will be selecting MBR but I recommend you select GPT.
– Kindly refer to this link. GPT is the abbreviation of GUID Partition Table, which is a standard for the layout of the partition table on a physical hard disk, using globally unique identifiers (GUID). MBR is another kind of partition table format. It is short for the master boot record. Comparatively, the MBR is older than the GPT

Right-click the unallocated space and click New Simple Volume.

Click on Next to continue

Enter the size of the partition (in MB) and click Next. I will leave it as default to use all available disk space.

Select a drive letter and click Next.

Select the file system type and volume label. For me as you can see below, I entered a Volume name “TechDAStorage”.

Click on Finish to complete the process.

As you can see below, we have our newly created virtual disk available on our VM.

iSCSI allows access to a remote server (target) disk by making it virtually available as a local disk. Note that accessing an entire disk is quite different than accessing file/folders over CIFS(Windows file sharing or Samba) or NFS. In case of iSCSI the client can choose any file-system supported by client and setup their own ACLs. Multiple clients can access the same iSCSI disk for creating a distributed or clustered filesystem for High-Availability (HA).
– iSCSI Target Server has the ability to boot hundreds of computers using just a single OS image.

I hope you found this blog post helpful. If you have any questions, please let me know in the comment session.
Internet Small Computer Systems Interface (iSCSI) is a storage network resource that uses Internet Protocol connectivity to link data storage facilities.
It provides block-level (block) access to storage locations via SCSI commands. iSCSI Target is the network (memory) location and it appears as a local hard drive to the iSCSI Initiator. Basically, the iSCSI Initiator is a client that connects to the iSCSI Target.
When activated and configured, iSCSI Target Server turns Windows Server operating system computers into network storage devices.
Install iSCSI Target
Step 1 – To install iSCSI Target, go to “Server Manager” choose to Manage then click to Add Roles and Features.
Step 2 – Click Next in the window as shown below.
Step 3 – Select the Role-based or feature-based installation option and then click Next.
Step 4: Select a host for the iSCSI Target roles and services.
This can be a local server or a virtual hard drive on the server. In the example case, the local server will be used.
Click Next to continue.
Step 5: Select the iSCSI Server Roles
In this step, we will define a list of server roles to install for the iSCSI Target.
Click the Files and Storage Services tab to expand it.
Select iSCSI Target Server, then check the box iSCSI Target Server
Step 6: Add features to iSCSI Target.
When you selected the iSCSI Target Server in the previous step, a pop-up window titled Add features that are required for iSCSI Target Server? will open.
Here, click the Add Features tab and then click Next.

Step 7: Select features.
Check all the additional features required to install iSCSI Target Server and click Next
Step 8: Confirm installation selection.
Confirm that the iSCSI Target Server and other choices you made in the steps above are listed, then select Install.
Step 9: Complete the installation of iSCSI Target Server.
When the installation of the selected roles, features, and services is complete, click Close to complete the iSCSI Target Server installation.
Configure iSCSI Target
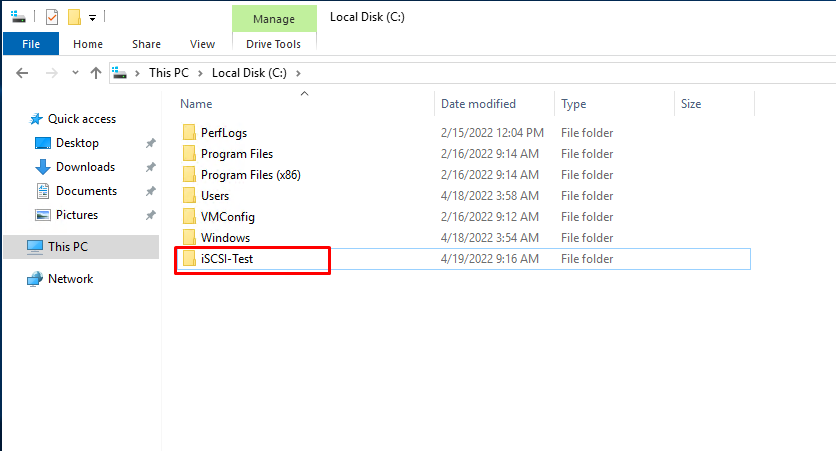
Step 1: Configure iSCSI Target Folder
We are now going to configure a folder that we shall be connected to by initiators. Create a directory/folder in your desired disk partition. We will create iSCSI-Test in C partition.
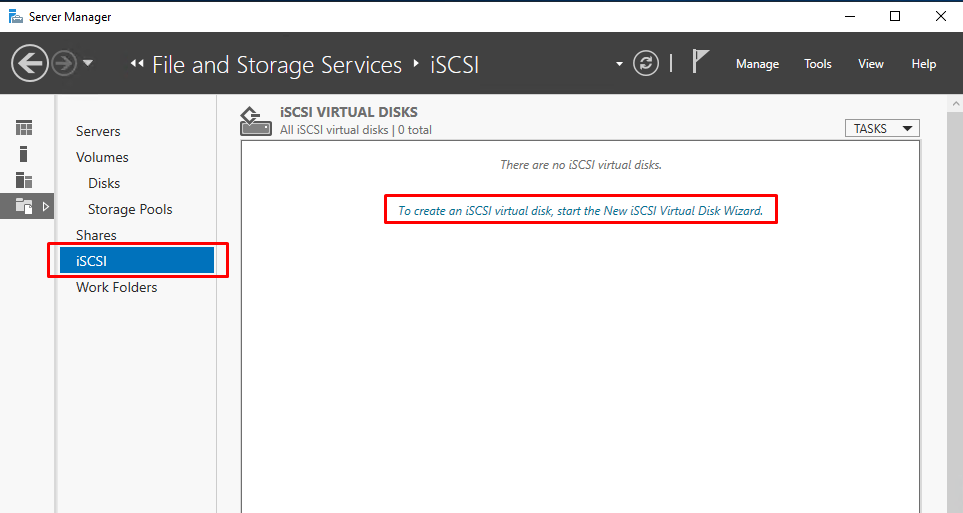
Head over to “Server Manager“. Click “File and Storage Services” and select iSCSI from the expanded menu. You will see “To create an iSCSI virtual disk, start the New iSCSI Virtual Disk Wizard” link on the right pane. Click on it. A wizard pops-up.
Step 2: Choose the folder we created
Select “Type a custom path” and browse for the folder we created earlier. Click “Next” after that.
Step 3: Name and describe your virtual disk
This is an easy step of just naming and describing your virtual disk. Click on “Next” after you are done.
Step 4: Set the size of the virtual disk
In this step, apart from setting the size of the virtual disk, you have the option of choosing if the disk will be fixed, dynamically grow or in differencing modes. All of the three are described adequately in the window. Select the one that makes more sense in your set-up and click “Next“
Step 5: Assign iSCSI Target
Since this is a new target, select “New iSCSI target” and click “Next“
Step 6: Name and describe your target
This is yet another easy step of just naming and describing your target. Click on “Next” after you are done.
Step 7: Specify access servers
For security, we have to explicitly allow known initiators to our targets. This page gives us that opportunity. Click on “Add” which opens “Add Initiator ID” pop-up window. For simplicity, use “Enter a value for the selected type” and under “Type” choose IP Address from the drop-down menu. Key-in your initiator IP Address and click “OK“.
Step 8: Authentication between initiator and Target
You can use either of the two CHAP options provided which are well described in this step. Enter username and passwords. Click on “Next” after you are done.
Step 9: Confirm selections and create
On this following page confirm your selections, click create and wait for it to finish.
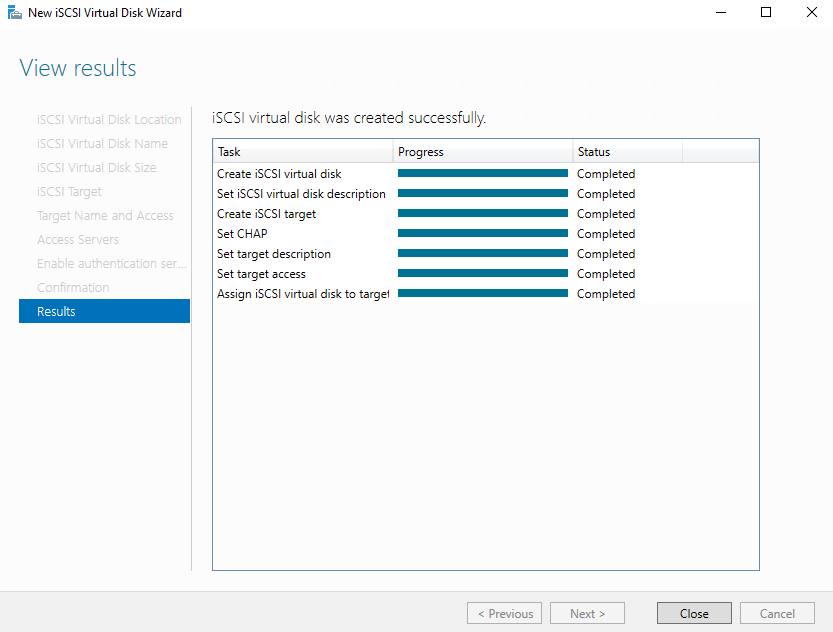
You should see your virtual disk created in the server manager.
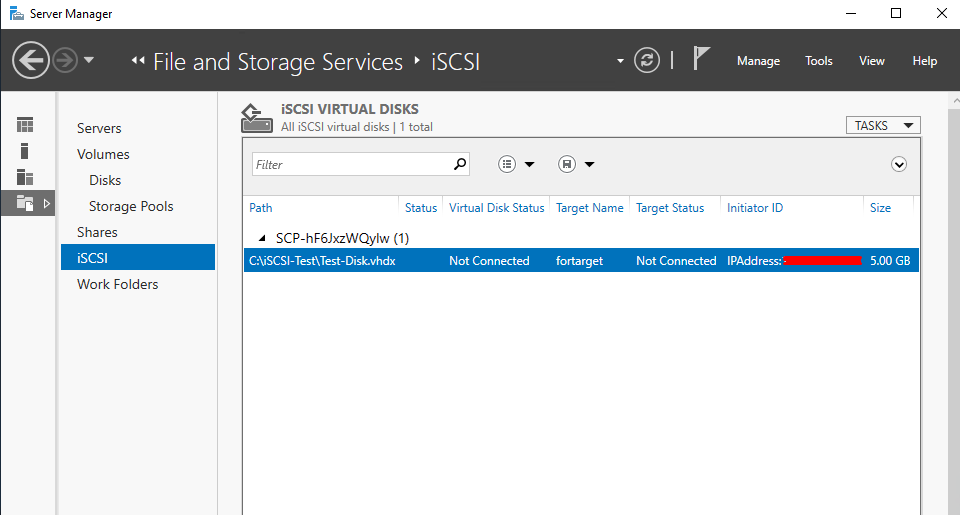
That’s all we guide you in this article !
