The IPv6 function needs to be supported by the local carrier and is subject to other network servers. To ensure optimal Internet access, exercise caution when enabling the IPv6 function on the router. If your Internet experience deteriorates after IPv6 is enabled, disable IPv6 and try again. For more information, contact your local carrier.
To enable the IPv6 function on a router, perform the following operations:

If you are configuring IPv6 for the first time, the Internet access wizard page will be displayed. You can follow the wizard to enable IPv6 in Network configuration.
Method 2: Using the web-based management page
- Connect your phone or computer to the router’s Wi-Fi (or to the router’s any port using an Ethernet cable). In the address box of a browser, enter the default IP address to log in to the web-based management page of the router. (For the default IP address, see the nameplate on the bottom of the router.)
- Go to More Functions > Network Settings > IPv6.
- Click the IPv6 switch to enable or disable the feature.

If your router does not support IPv6, update it to the latest version. Currently, IPv6 is only available on the router being configured, but not available on cascaded routers.
After enabling the IPv6 function of the router, you can go to More Functions > About Router to check whether there is an IPv6 address delivered by the local carrier. If a long time has passed and the IPv6 address cannot be obtained, contact the local carrier.
Procedure
- Enable the IPv6 forwarding function on switches. # Configure SwitchA. system-view [HUAWEI] sysname SwitchA [SwitchA] ipv6.
- Configure IPv6 addresses for the interfaces. # Configure SwitchA.
- Verify the configuration. # Check interface information on SwitchA.
How do I enable IPv6 on Arris router?
This Article Applies to:
- Log in to the web-based interface of the router.
- Go to Advanced > IPv6.
- Enable IPv6 and select the internet connection type provided by your ISP.
- Fill in information as required by different connection types.
- Configure LAN ports.
Does spectrum allow IPv6?
We’ve ensured that all Internet connections through our network are capable of reaching both IPv4 and IPv6 content and that our end users have access to both. We use a “Dual Stack” implementation. This means that IPv4 and IPv6 run at the same time at the network level.
How do I enable IPv6 on my Xfinity router?
Go to “IPv6” at the left hand side menu. Please make sure that IPv6 is enabled. Select “Dynamic IP” as Internet Connection Type. Go to advanced option, select “Auto” in the “Get IPv6 Address”.
How do I change the APN on my Huawei router?
Contact your network carrier or Huawei hotline staff beforehand about adding APN information.
- Click the Windows icon and the Settings icon, and then select Network & Internet. Click Cellular and then Advanced options. Click Add an APN.
- Enter APN information and click Save. Profile name: Enter a preferred name.
Does Huawei router support IPv6?
Does my router support IPv6? Yes. You router supports IPv6/IPv4 dual-stack.
Should I turn on IPv6 in router?
IPv6 is extremely important for the long-term health of the Internet. Switching from IPv4 to IPv6 will give the Internet a much larger pool of IP addresses. It should also allow every device to have its own public IP address, rather than be hidden behind a NAT router.
Should I enable IPv6 on my router 2021?
When possible, it is better to keep both IPv4 and IPv6 addresses enabled. Likewise, disabling IPv6 can cause certain problems, especially if your router is already using an IPv6 address. However, you should keep IPv6 enabled even if you use an IPv4 network.
Should I enable IPv6 on my TV?
Best answer: IPv6 can potentially add support for more devices, better security, and more efficient connections. While some older software may not work as expected, most of your network should work fine with IPv6 enabled.
How to assign an IPv6 address to an access point?
Click Static IPv6 as the IPv6 Connection Type to assign an IPv6 address manually to the access point. Step 2. Check the IPv6 Administrative Mode check box to enable IPv6 management access. This allows the device management interface to be accessed via an IPv6 address.
How to configure IPv4 on a wireless access point?
The objective of this document is to configure IPv4 and IPv6 settings on the Wireless Access Point device. Step 1. Log in to the web-based utility and choose LAN > IPv4 Setting or LAN > VLAN and IPv4 Address depending on the WAP model you have. Step 2. In the Connection Type area, click DHCP radio button to automatically obtain an IP address.
How to configure IPv6 settings on modem router?
Go to Status—-Basic Settings—IPv6 WAN, if it has IPv6 Address and Status shows connected, the IPv6 settings is configured successfully. Go to left hand side, System Tools—-Reboot, click on reboot button, when the process bar go to 100%, it has rebooted successfully, now you can enjoy your internet.
How do I get an IPv4 address for my router?
Log in to the web-based utility and choose LAN > IPv4 Setting or LAN > VLAN and IPv4 Address depending on the WAP model you have. Step 2. In the Connection Type area, click DHCP radio button to automatically obtain an IP address. This setting is chosen by default.
Huawei uses machine translation combined with human proofreading to translate this document to different languages in order to help you better understand the content of this document.
Note: Even the most advanced machine translation cannot match the quality of professional translators.
Huawei shall not bear any responsibility for translation accuracy and it is recommended that you refer to the English document (a link for which has been provided).
IPv6 link local
- Overview
- Understanding an IPv6 Link-Local Address
- IPv6 Address Structure and Classification
- Composition and Generation Method of an IPv6 Link-Local Address
- Configuring an IPv6 Link-Local Address
- Configuration Examples
- Relevant Information
Overview
This chapter defines and covers the configuration method, configuration examples, and other information related to Internet Protocol version 6 (IPv6) link-local addresses.
Understanding an IPv6 Link-Local Address
IPv6 Address Structure and Classification
An IPv6 link-local address is a type of IPv6 unicast address. This section briefly introduces an IPv6 address’s structure and classification.
IPv6 Address Structure
An IPv6 address is composed of two parts:
- Network prefix: It consists of n bits and has the same function as the network ID of an IPv4 address.
- Interface ID: It consists of (128 – n) bits and is parallel to the host ID of an IPv4 address.
Figure 1-1 illustrates the structure of the IPv6 address 2001:A304:6101:1::E0:F726:4E58 /64.
Figure 1-1 Structure of the IPv6 address 2001:A304:6101:1::E0:F726:4E58 /64
IPv6 Address Types
IPv6 addresses are classified into the following three types: unicast, anycast, and multicast.
- Unicast address: identifies a single network interface and is similar to an IPv4 unicast address. A packet sent to a unicast address is transmitted to a unique interface, which is identified by this address.
Unicast addresses can be sub-classified further into four types, as shown in Table 1-1.
Table 1-1 IPv6 unicast address types
|
Address Type |
Binary Prefix |
IPv6 Prefix ID |
|---|---|---|
|
Link-local unicast address |
1111111010 |
FE80::/10 |
|
Unique local unicast address |
1111110 |
FC00::/7 |
|
Loopback address |
00…1 (128 bits) |
::1/128 |
|
Unspecified address |
00…0 (128 bits) |
::/128 |
|
Global unicast address |
Others |
— |
Each unicast address type is defined as follows:
- Link-local unicast address: used in the Neighbor Discovery Protocol (NDP) and in the communication between nodes on the local link during stateless address autoconfiguration. A packet with the link-local unicast address as the source or destination address is only forwarded on the local link. The link-local unicast address can be automatically configured on any interface using the link-local prefix FE80::/10 (1111 1110 10), and the interface ID in the IEEE EUI-64 format (an EUI-64 interface ID can be created from an extended EUI-48 bit MAC address).
- Unique local unicast address: identifies a single site and has a globally unique prefix. Sites use unique local unicast addresses to establish private connections, which ensures there are no conflicts between addresses. Even if the routes destined for unique local unicast addresses leak, the routes do not conflict with the Internet routes. Upper-layer applications use unique local unicast addresses as global unicast addresses.
- Loopback address: is expressed as 0:0:0:0:0:0:0:1 or ::1 and not assigned to any physical interface. Similar to the IPv4 loopback address 127.0.0.1, the IPv6 loopback address indicates that a node sends IPv6 packets to itself.
- Unspecified address (::): is used in the Source Address field of an IPv6 packet sent by an initializing host before the host obtains an address. A neighbor solicitation (NS) message carries an unspecified address in the Source Address field to perform duplicate address detection (DAD). An unspecified address cannot be assigned to any node or function as a destination address.
- Global unicast address: is similar to an IPv4 public network address. Global unicast addresses are used on links that can be aggregated, and are provided to the Internet service provider (ISP). The structure of this type of address enables route-prefix aggregation to expand the limited number of global routing entries. A global unicast address consists of a 48-bit route prefix managed by carriers, a 16-bit subnet ID managed by local nodes, and a 64-bit interface ID. Unless otherwise specified, global unicast addresses include site-local unicast addresses.
- Anycast address: is assigned to a group of interfaces, which usually belong to different nodes. A packet sent to an anycast address is transmitted to only one of the interfaces, typically the nearest one according to distance as defined by the routing protocol.
An anycast address is not necessarily a subnet-router anycast address and can also function as a global unicast address.
- Multicast address: is assigned to a set of interfaces that belong to different nodes and is similar to an IPv4 multicast address. A packet that is sent to a multicast address is delivered to all the interfaces identified by that address.
IPv6 addresses do not include broadcast addresses. In IPv6, multicast addresses can provide the functions of broadcast addresses.
Composition and Generation Method of an IPv6 Link-Local Address
Composition of an IPv6 Link-Local Address
According to the classification of IPv6 addresses, an IPv6 link-local address is a type of IPv6 unicast address and is often called a link-local IPv6 unicast address. IPv6 link-local addresses are only used for communication between nodes on the same local link. An IPv6 link-local address consists of the link-local prefix FE80::/10 (the 10 most significant bits are 1111111010) and an interface ID in the IEEE EUI-64 format (an EUI-64 interface ID can be created from an extended EUI-48 bit MAC address).
After IPv6 is enabled on a node and the system is enabled to automatically generate an IPv6 link-local address or a global IPv6 unicast address is manually configured, an IPv6 link-local address is automatically assigned to each interface on the node. This mechanism enables two IPv6 nodes on a link to communicate with each other without any additional configuration. Therefore, IPv6 link-local addresses are widely used in scenarios, such as neighbor discovery and stateless address configuration. Routing devices do not forward IPv6 packets with an IPv6 link-local address as a source or destination address to devices on different links. Figure 1-2 shows the format of an IPv6 link-local address.
Figure 1-2 Format of an IPv6 link-local address
Generation Method of an IPv6 Link-Local Address
When IPv6 is enabled on an interface, an IPv6 link-local address can be configured for the interface in any of the following ways:
- After a global IPv6 unicast address is configured on the interface, an IPv6 link-local address is automatically generated.
- After the ipv6 address auto link-local command is run on the interface, an IPv6 link-local address is automatically generated.
- By running the ipv6 address link-local command, an IPv6 link-local address can be manually specified for the interface.
The rules for generating an IPv6 link-local address are not unique. Automatically generating such an address may cause address conflicts. Therefore, an IPv6 link-local address can be automatically generated or manually configured according to the protocol definition.
Note that only one IPv6 link-local address can be configured on a physical interface.
Configuring an IPv6 Link-Local Address
- Run system-view
The system view is displayed.
- Run interface interface-type interface-number
The interface view is displayed.
- Perform either of the following operations according to on-site requirements:
- To enable the system to automatically generate an IPv6 link-local address for the interface, run the ipv6 address auto link-local command.
- To manually configure an IPv6 link-local address for the interface, run the ipv6 address ipv6-address link-local command.
- Run commit
The configuration is committed.
Configuration Examples
Networking Requirements
As shown in Figure 1-3, Devices A and B are connected through GE interfaces. To check the automatic generation and interworking of IPv6 link-local addresses, configure global IPv6 unicast addresses 2001:db8::1/32 and 2001:db8::2/32 for each of the interfaces.
Figure 1-3 Configuring IPv6 addresses for the interfaces
Configuration Roadmap
The configuration roadmap is as follows:
- Enable IPv6 forwarding on both devices.
- Configure global IPv6 unicast addresses for the interfaces.
Procedure
- Configure global IPv6 unicast addresses for the interfaces.
# Configure Device A.
HUAWEI> system-view
[~HUAWEI] sysname DeviceA
[*HUAWEI] commit
[~DeviceA] interface GigabitEthernet 0/1/0
[~DeviceA-GigabitEthernet0/1/0] ipv6 enable
[*DeviceA-GigabitEthernet0/1/0] ipv6 address 2001:db8::1 32
[*DeviceA-GigabitEthernet0/1/0] undo shutdown
[*DeviceA-GigabitEthernet0/1/0] commit
[~DeviceA-GigabitEthernet0/1/0] quit
# Configure Device B.
<HUAWEI> system-view
[~HUAWEI] sysname DeviceB
[*HUAWEI] commit
[~DeviceB] interface GigabitEthernet 0/1/0
[~DeviceB-GigabitEthernet0/1/0] ipv6 enable
[*DeviceB-GigabitEthernet0/1/0] ipv6 address 2001:db8::2 32
[*DeviceB-GigabitEthernet0/1/0] undo shutdown
[*DeviceB-GigabitEthernet0/1/0] commit
[~DeviceB-GigabitEthernet0/1/0] quit
- Verify the configuration.
View the configured global IPv6 unicast addresses and check the states of the interfaces and the IPv6 protocol. If the states are displayed as up, the configuration is successful.
# Check the interface information on Device A.
[~DeviceA] display ipv6 interface GigabitEthernet 0/1/0
GigabitEthernet0/1/0 current state : UP
IPv6 protocol current state : UP
link-local address is FE80::C964:0:B8B6:1
  Global unicast address(es):
 2001:db8::1, subnet is 2001:db8::/32
  Joined group address(es):
 FF02::1:FF00:1
 FF02::1:FFB6:1
 FF02::2
 FF02::1
  MTU is 4470 bytes
  ND DAD is enabled, number of DAD attempts: 1
  ND reachable time is 1200000 milliseconds
  ND retransmit interval is 1000 milliseconds
  Hosts use stateless autoconfig for addresses
# Check the interface information on Device B.
[~DeviceB] display ipv6 interface GigabitEthernet 0/1/0
GigabitEthernet0/1/0 current state : UP
IPv6 protocol current state : UP
link-local address is FE80::2D6F:0:7AF3:1
  Global unicast address(es):
 2001:db8::2, subnet is 2001:db8::/32
  Joined group address(es):
 FF02::1:FF00:2
 FF02::1:FFF3:1
 FF02::2
 FF02::1
  MTU is 4470 bytes
  ND DAD is enabled, number of DAD attempts: 1
  ND reachable time is 1200000 milliseconds
  ND retransmit interval is 1000 milliseconds
  Hosts use stateless autoconfig for addresses
# Ping the IPv6 link-local address of Device B from Device A. Note that you need to use the parameter -i to specify the interface corresponding to the IPv6 link-local address.
[~DeviceA] ping ipv6 fe80::2d6f:0:7af3:1 -i GigabitEthernet 0/1/0
  PING FE80::2D6F:0:7AF3:1 : 56  data bytes, press CTRL_C to break
 Reply from FE80::2D6F:0:7AF3:1
 bytes=56 Sequence=1 hop limit=64  time = 60 ms
 Reply from FE80::2D6F:0:7AF3:1
 bytes=56 Sequence=2 hop limit=64  time = 50 ms
 Reply from FE80::2D6F:0:7AF3:1
 bytes=56 Sequence=3 hop limit=64  time = 50 ms
 Reply from FE80::2D6F:0:7AF3:1
 bytes=56 Sequence=4 hop limit=64  time = 30 ms
 Reply from FE80::2D6F:0:7AF3:1
 bytes=56 Sequence=5 hop limit=64  time = 1 ms

  --- FE80::2D6F:0:7AF3:1 ping statistics ---
 5 packet(s) transmitted
 5 packet(s) received
 0.00% packet loss
 round-trip min/avg/max = 1/38/60 ms
# Ping the global IPv6 unicast address of Device B from Device A.
[~DeviceA] ping ipv6 2001:db8::2
  PING 2001:db8::2 : 56  data bytes, press CTRL_C to break
 Reply from 2001:db8::2
 bytes=56 Sequence=1 hop limit=64  time = 30 ms
 Reply from 2001:db8::2
 bytes=56 Sequence=2 hop limit=64  time = 50 ms
 Reply from 2001:db8::2
 bytes=56 Sequence=3 hop limit=64  time = 50 ms
 Reply from 2001:db8::2
 bytes=56 Sequence=4 hop limit=64  time = 20 ms
 Reply from 2001:db8::2
 bytes=56 Sequence=5 hop limit=64  time = 40 ms

  --- 2001:db8::2 ping statistics ---
 5 packet(s) transmitted
 5 packet(s) received
 0.00% packet loss
 round-trip min/avg/max = 20/38/50 ms
Configuration Files
- Device A configuration file
#
 sysname DeviceA
#
admin
interface GigabitEthernet0/1/0
undo shutdown
ipv6 enable
ipv6 address 2001:db8::1/32
#
return
- Device B configuration file
#
 sysname DeviceB
#
admin
interface GigabitEthernet0/1/0
undo shutdown
ipv6 enable
ipv6 address 2001:db8::2/32
#
return
Relevant Information
- Overview
- Understanding an IPv6 Link-Local Address
- IPv6 Address Structure and Classification
- Composition and Generation Method of an IPv6 Link-Local Address
- Configuring an IPv6 Link-Local Address
- Configuration Examples
- Relevant Information
Enabling IPv6 on your fibre router is necessary because the world is running out of IPv4 addresses due to the growing number of internet-connected devices and increased traffic. The main function of IPv6 is to allow for more unique IP address identifiers to be created and assigned.
IPv4 addresses are made up of four sets of one to three-digit numbers, IPv6 uses eight groups of four hexadecimal digits, separated by colons.
- An example of IPv4 — 104.20.31.244
- An example of IPv6 — 2001:0db8:85a3:0000:0000:8a2e:0370:73b4.
What is an IP address?
An IP or Internet Protocol address is a numerical identifier assigned to each device that connects to the internet. IP addresses allow devices to talk to each other and exchange information.
PPPoE is used for an Openserve and Vodacom connection only.
DHCP is used for all the other fibre providers.
How to enable DHCP IPv6 on the D-link DIR825 router
- Open your internet browser.
- In the search bar enter the IP address of the router to log into the router.
D-Link: 192.168.0.1
- Hit enter to search.

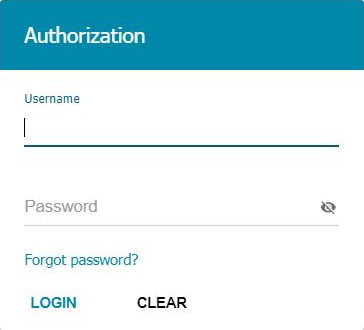
- This will take you to the D-Link login page. Log into the router with the username and password.
- Click ‘Login’.
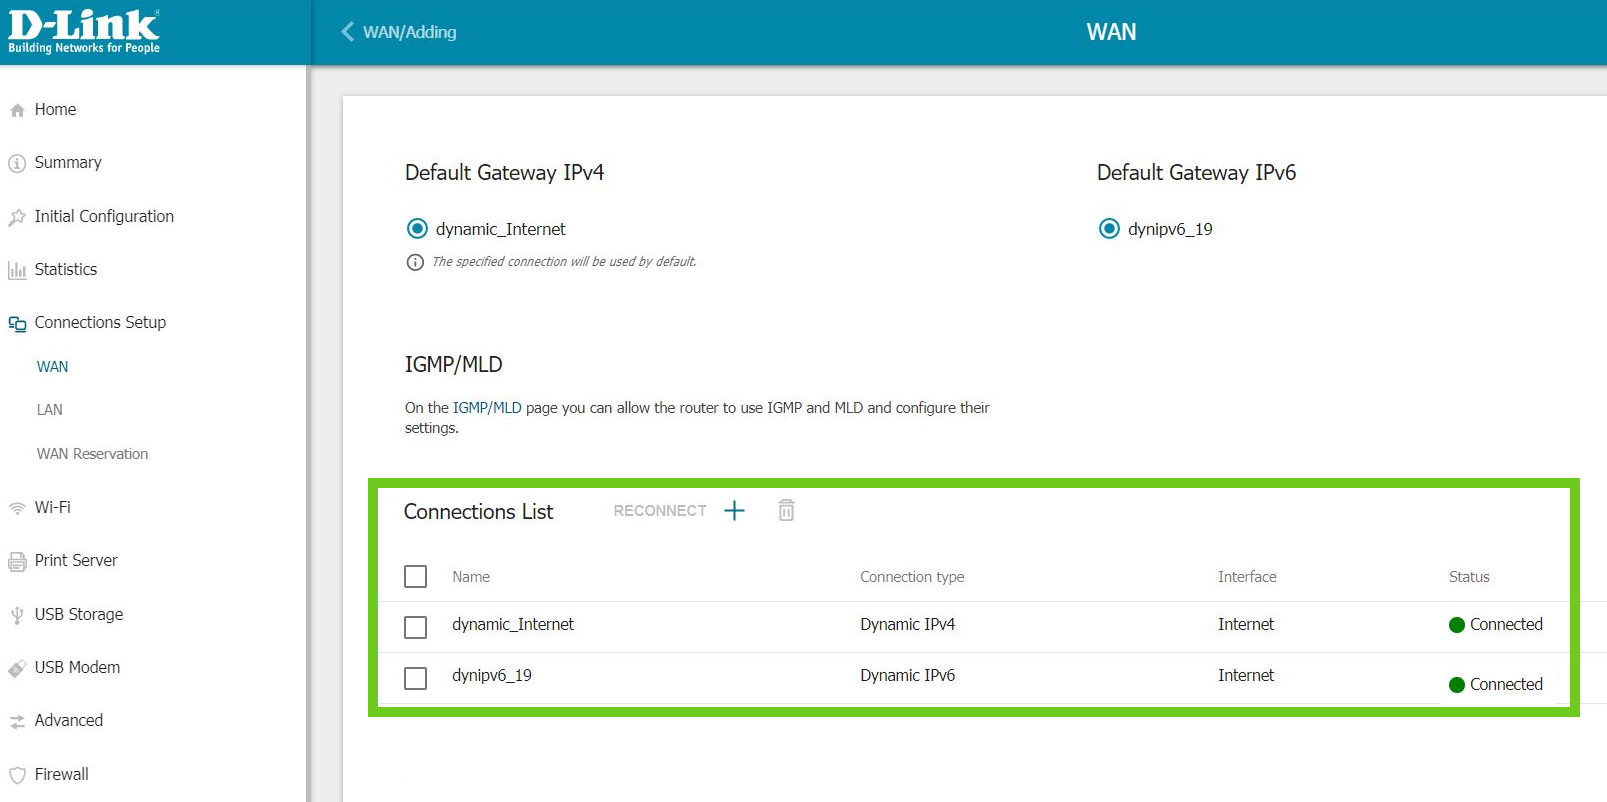
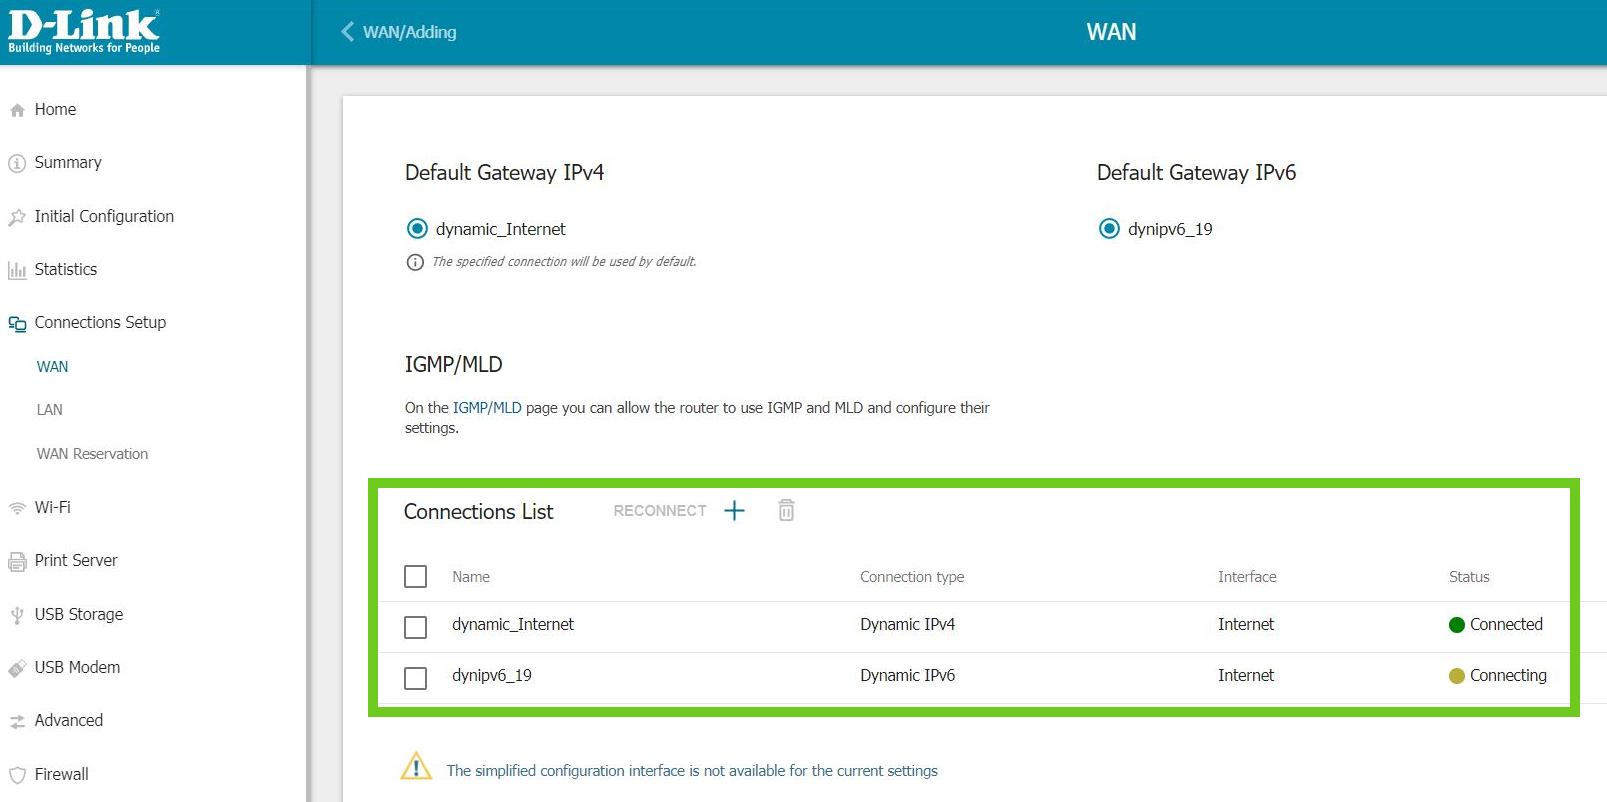
- This will open the router’s dashboard. Select ‘Connection Setup’ on the left and then select ‘WAN’ below that.

- Here you will see the current connection types in the Connections List.
- Select the ‘+’ button to add a new connection.
Do not remove IPv4.
You need both IPv4 and IPv6 connections enabled.
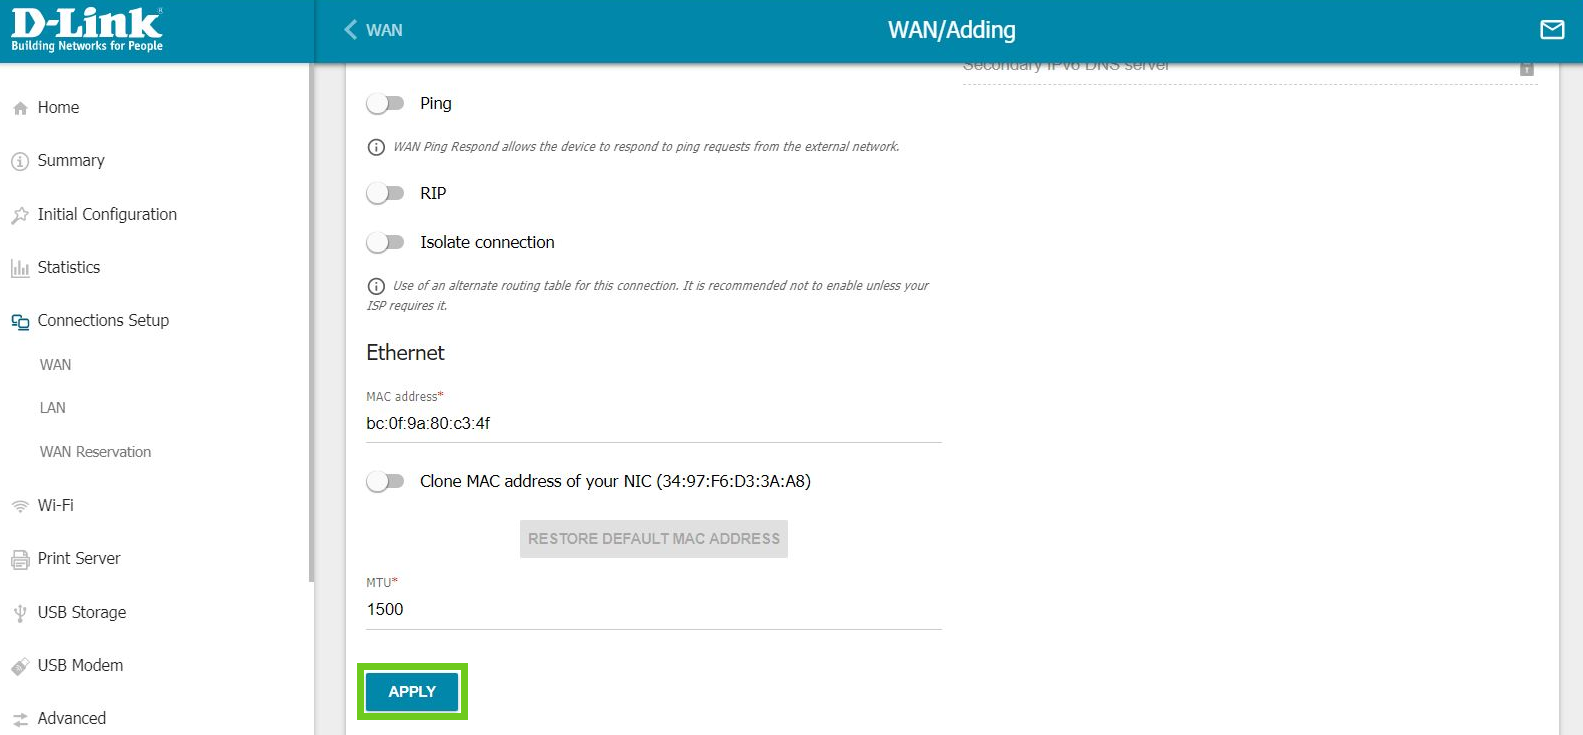
- In General Settings, under Connection Type, from the drop-down list select ‘Dynamic IPv6’.

- Scroll down, change nothing else and click ‘Apply’.
- In the Connection List, you will see that Dynamic IPv6 has been added.
You may now log out of the router.
If you are struggling to connect you may need to reboot the router and reconnect devices.
Follow these steps if your 2.4GHz band fails to establish an IPv6 connection
- Go to the menu on the left and find ‘WiFi’.
- Select ‘Additional’.
- Within the 2.4GHz additional settings, disable the ‘Drop- multicast’ toggle.
- Scroll down and click the ‘Apply’ button.

How to enable DHCP IPv6 on the Huawei router
- Log into the router’s web-based interface configuration page.
- Open your Internet browser and enter the device’s IP address to access the router.
- Enter 192.168.3.1 in the browser search bar.

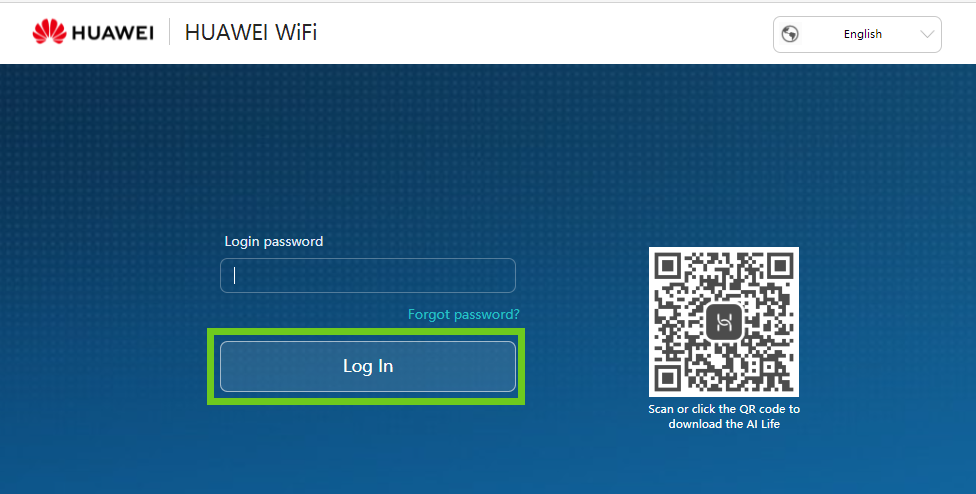
- This will take you to the Huawei log in page. Log into the router with the username and password.
- Click ‘Log In’.
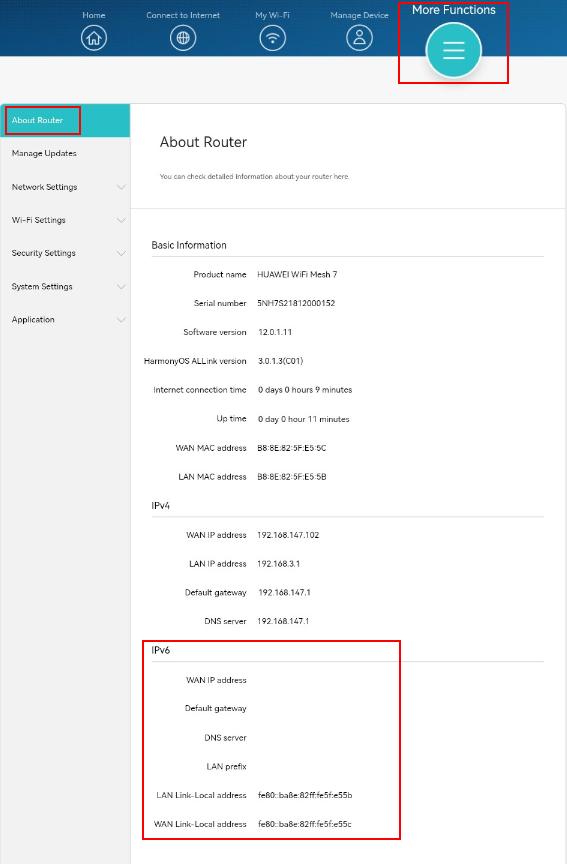
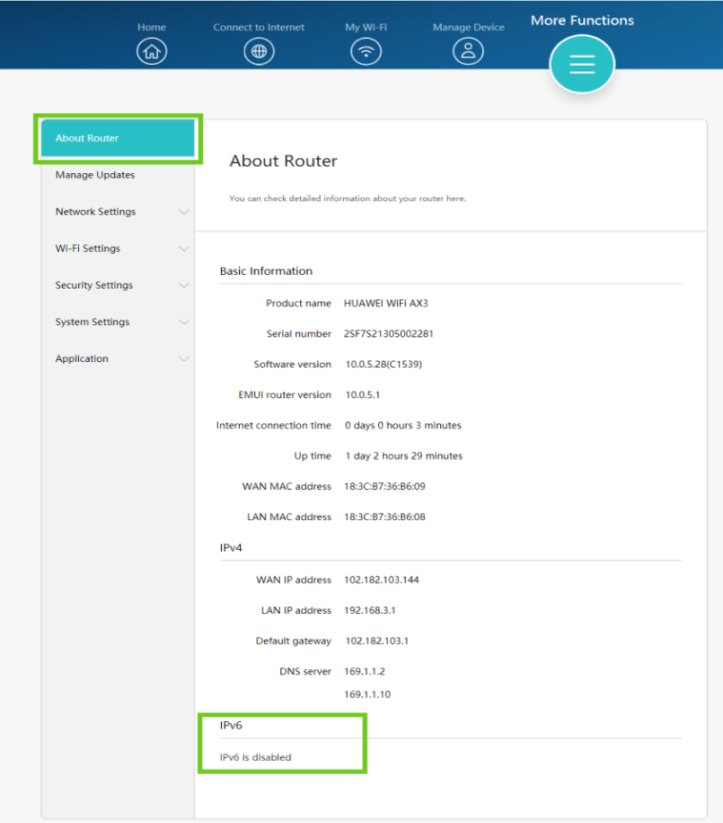
- This will open the Huawei routers dashboard. Select the ‘More Functions’ button on the top right.

- On the left-hand side menu, select ‘About Router’, scroll down to see the IPv6 status. It will probably be disabled
- If it is disabled, then you will need to enable it.
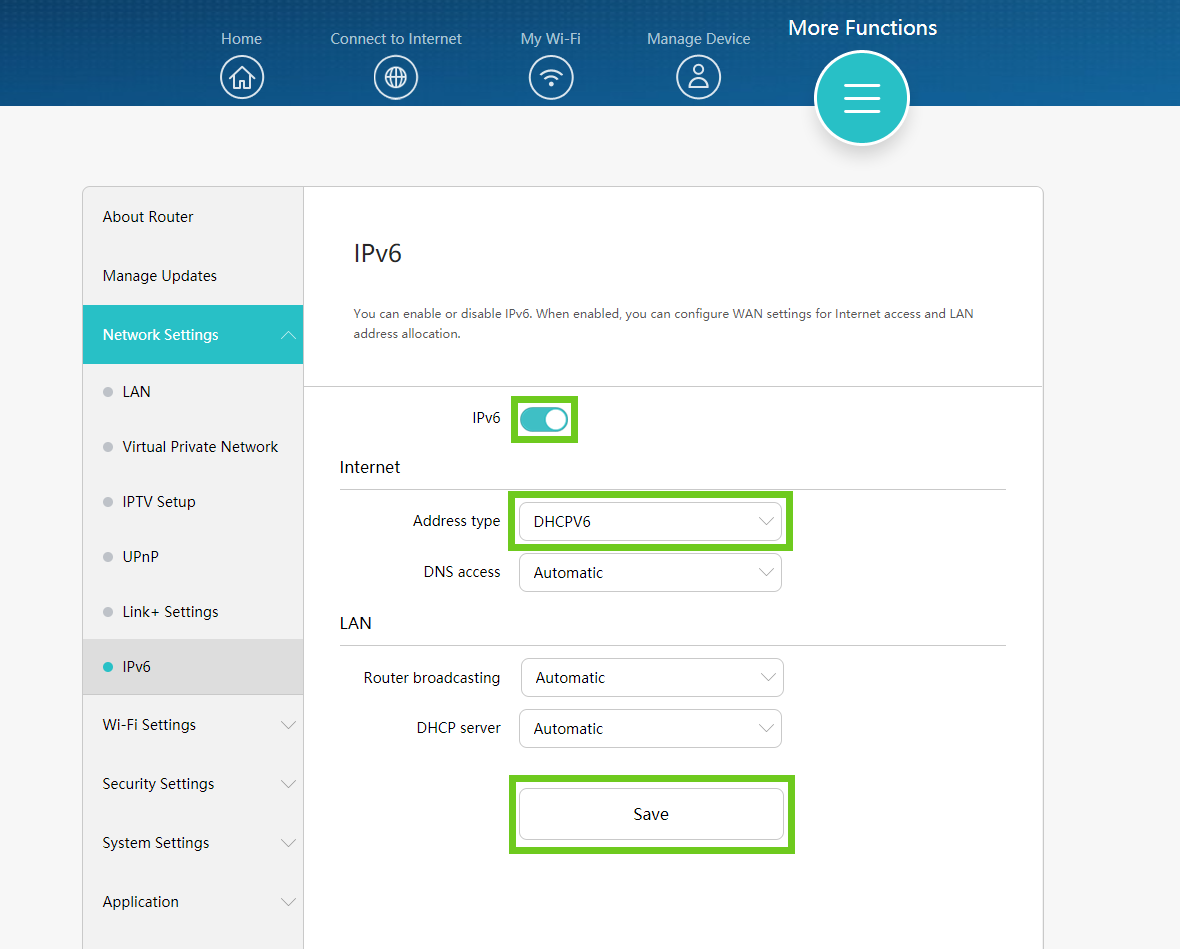
- Under ‘Network Settings’ on the left-hand side, select ‘IPv6’ from the options below.

- Enable the IPv6 toggle button.

- Under Internet, change the address type to ‘DHCPV6’.

- Scroll down and click ‘Save’.
- Go back to the ‘About Router’ page to check the IPv6 Status.
- Status should show IPv6 enabled information.

The setup is now complete, and you may now log out of the router.
Note!
Should the status read as below:
- WAN IP address: ‘Unable to obtain’
- Default gateway: ‘Unable to obtain’
- DNS server: ‘Unable to obtain’
- Prefix: ‘Unable to obtain’
You will have to perform a power cycle on your devices (Router and ONT):
- Disconnect both router and ONT from the power supply.
- Wait 5 minutes for the internal cache to clear.
- Then reconnect all devices to power and turn back on.
Was this article helpful?
На чтение 8 мин Просмотров 33.5к.

Виталий Леонидович Черкасов
Системный администратор, инженер компьютерных систем.
Протокол IPv4 с 1981 года используется для обеспечения работы интернета и локальных сетей. Его основной недостаток – это сравнительно небольшое количество подключенных компьютеров, так как количество адресов, отвечающих требованиям стандарта, ограничено (4,23 миллиарда). Поэтому в 1999 году был разработан и начал внедряться протокол IPv6.
Содержание
- Что такое IPv6
- Внедрение протокола
- Преимущества и особенности
- Отличия протоколов ipv4 и ipv6
- Включение и отключение
- Настройка на роутере
- Как узнать и посмотреть адрес
Что такое IPv6
IPv6 – это последняя на сегодняшний день версия IP-протокола, которая должна решить проблему нехватки интернет-адресов. В нее был внесен ряд полезных изменений. Эта технология была разработана IETF, открытым сообществом ученых, инженеров и провайдеров. Планируется, что IPv6 и IPv4 будут использоваться параллельно. При этом использование протокола версии интернета tcp IPv6 будет постепенно расширяться. Отказаться от IPv4 на данный момент невозможно, так как существует большая доля оборудования, не поддерживающая новый стандарт.
При совместной работе этих протоколов в одной сети пакеты IPv6 поколения передаются внутри пакетов 4-го поколения, а при приеме распаковываются.
Внедрение протокола
Разработка протокола IPv6 началась в 1992 году. Его тестирование состоялось 8 июня 2011 года и закончилось удачно, с тех пор этот день считается международным днем IPv6. В ходе экспериментов были получены рекомендации, которые показали направление, в котором нужно совершенствовать эту технологию.
Компания Google с 2008 года занялась внедрением IPv6 и в течение четырех лет проводила тестирование. Запуск нового сетевого протокола состоялся 6 июня 2012 года.
Сейчас в любом маршрутизаторе и другом сетевом оборудовании имеется встроенная поддержка IPv6. В мобильных сетях LTE поддержка этого протокола является обязательной. В крупнейших компаниях, таких как Google, Microsoft или Facebook используют эту технологию на своих web-сайтах. IPv6 все чаще используется в офисных и домашних сетях.
По данным компании Google, в начале 2020 года доля пакетов IPv6 во всемирной сети была примерно равна 30%, а в России около 4,5% трафика.
Внедрение IPv6 зависит от финансирования. Для его полноценного внедрения требуется масштабное обновление сетевого оборудования и программного обеспечения всех провайдеров. Однако количество сетевого оборудования растет очень быстро, и нехватка IP-адресов становится все острее, и поэтому переход на новую технологию все равно должен произойти.
Преимущества и особенности
Кроме того, что IPv6 обеспечивает более широкое адресное пространство, он имеет дополнительные преимущества.
У IP протокола шестого поколения заголовок короче, чем у пакетов, использующих IPv4. Благодаря этому маршрутизация становится проще, нагрузка на сетевое оборудование уменьшается, а обработка пакетов ускоряется.
Также поддерживается сервис Quality of Service (QoS). Благодаря ему задержка при отправке и приеме сетевых пакетов становится меньше. Эта технология позволяет также применять IPsec шифрование, повышающее безопасность передачи данных.
Отличия протоколов ipv4 и ipv6
В четвертой версии IP-протокола для адресации используется 32 бита, которые принято записывать блоками по 8 бит (диапазон от 0.0.0.0 до 255.255.255.255). Из-за нехватки адресов для выхода в интернет из локальной сети используется один внешний IP-адрес.
В шестой версии IP-протокола адрес состоит из 128 бит. При записи он разбивается на 8 шестнадцатибитных блоков, которые разделяются между собой двоеточием, например, 2dеc:0546:029be:cc76:02b7:cbbf:fa8c:0. В данной версии протокола используется префикс, который записывается через знак слеш «/» после IPv6 адреса. Например, запись «/64» означает что первые 64 бита идентифицируют сеть, а оставшиеся — конкретное устройство в этой сети.
Таким образом, можно задать адрес для 3,4*1038 устройств, этого должно с избытком хватить на достаточно долгое время.
Для упрощения записи адреса применяется режим, в котором несколько нулевых блоков, идущих подряд, можно заменить на два двоеточия. Так, адрес FBEA:0:0:0:0:CB28:1C12:42C4 можно записать так: FBEA::CB28:1C12:42C4.
Такую замену можно производить только один раз, поэтому имеет смысл выбрать самую длинную последовательность, состоящую из нулей. Но нельзя заменить :0: на ::, то есть это правило действует только если есть как минимум два нуля, идущих один за другим.
Кроме этого, в каждой последовательности из четырех шестнадцатеричных цифр можно удалить ведущие (которые идут первыми) нули. Например, 0СB0 заменяем на СB0, а 00ВС на ВС. Если все цифры равны нулю, то его меняют на один нуль.
Включение и отключение
При установке операционной системы Windows, начиная с 7 версии, IPv6 уже включен по умолчанию. Но ошибки могут возникнуть в процессе работы. Например, при установке некоторые программы могут внести изменения в сетевые настройки.
Чтобы проверить, включен ли нужный протокол и при необходимости подключить или отключить его в Windows 10, 7 IPv6 нужно:
В настройках обычно стоит «Получать IPv6-адрес автоматически». В этом случае IP-адрес выдает провайдер, но в последнее время стали появляться провайдеры, которые присваивают статический адрес. В таком случае нужно отметить пункт «Использовать следующий IPv6-адрес» и прописать все буковки и циферки, выданные провайдером и нажать кнопку «Ок». Вот и все, что нужно, чтобы получить адрес и перейти на ipv6.
Настройка на роутере
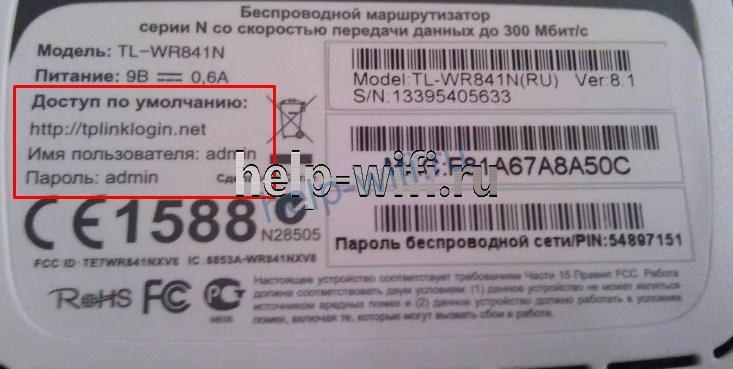
Если для доступа к интернету используется роутер, то на нем нужно настроить IPv6-протокол. Для этого заходим в административную панель маршрутизатора, открываем любой имеющийся браузер, вводим адрес роутера (192.168.0.1 или 192.168.1.1), логин и пароль (admin в оба поля). Всю нужную информацию можно найти на задней стенке устройства.
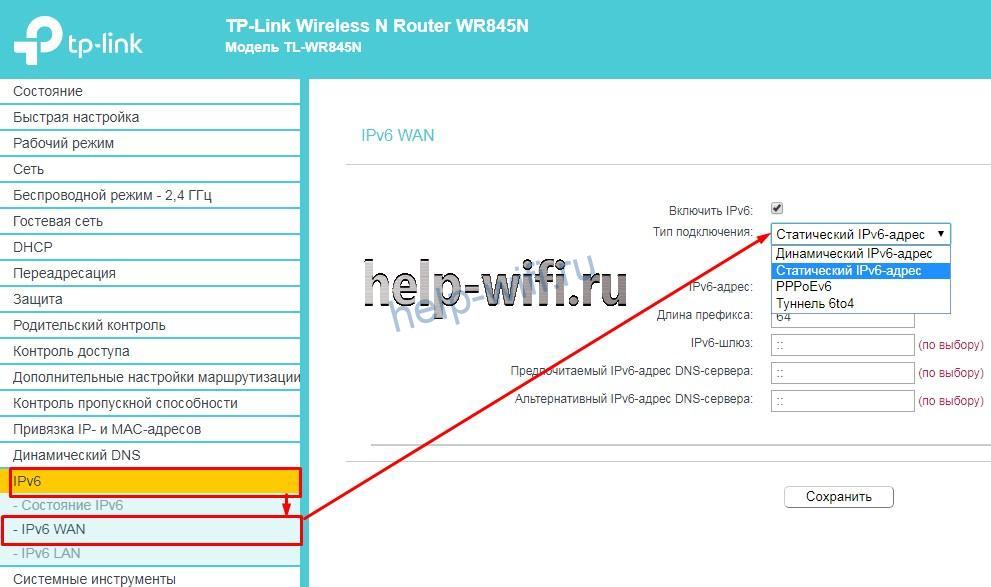
Дальнейший порядок действий зависит от модели маршрутизатора. Чтобы выполнить настройку ipv6 на роутере TP-Link WR841N:
- в левом меню выбираем строку «IPv6» и потом подменю «IPv6 WAN»;

- ставим галочку в строке «Включить IPv6», если она там не стоит;
- выбираем тот тип подключения, который использует провайдер, он может быть динамический, статический или PPPoEv6;
- если в предыдущем пункте было выбрано динамическое подключение, то больше делать ничего не нужно, если статическое, то вводим адрес, длину префикса, шлюз и DNS сервер (эти данные должен дать интернет провайдер), если был выбран PPPoEv6, то нужно ввести логин и пароль, которые предоставил поставщик интернет услуг;
Проверить соединение можно, зайдя на главную вкладку административной панели роутера или кликнув по пункту меню «Состояние».
Как узнать и посмотреть адрес
Узнать свой IP-адрес можно двумя способами: через командную строку и через свойства сети.
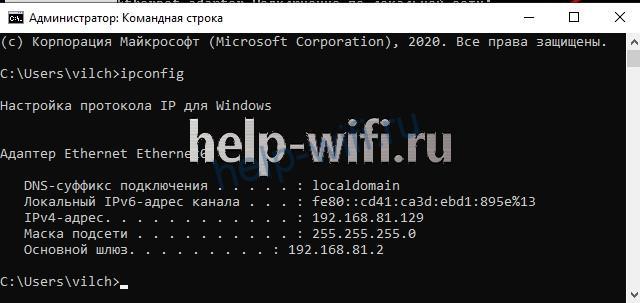
Чтобы воспользоваться командной строкой, нужно:
- в окне «Выполнить» (как его вызвать, уже рассказывалось выше) ввести команду «cmd»;
- в появившемся окне набираем «ipconfig»;
- в строке «Локальный IPv6-адрес канала» будет написан нужный нам IP-адрес.

Чтобы посмотреть адрес через свойства сети, нужно:
Если для доступа в интернет используется роутер, то IPv6-адрес необходимо смотреть на главной странице административной панели роутера или вызвав окно «Свойства» через меню.