[VPN] Как настроить IPsec VPN-соединение в Windows 10 (поддержка прошивки доступна для 3.0.0.4.386_4xxxx)
IKEv2 — это функция, доступная только в версиях прошивки 3004.386.4xxxx и выше. Найдите маршрутизатор, поддерживающий такие версии прошивки. Вы можете скачать последнюю версию прошивки в ASUS Центре загрузок
[Примечание] Поддержка прошивки доступна для 3.0.0.4.386_4xxxx
RT-AC3100
RT-AC5300
RT-AC86U
RT-AC88U
RT-AX88U
RT-AX92U
GT-AC2900
GT-AC5300
GT-AX11000
ZenWiFi XT8
[Беспроводной маршрутизатор] Как обновить прошивку Вашего роутера до последней версии? (ASUSWRT)
[Беспроводной маршрутизатор] Как обновить прошивку Вашего роутера до последней версии через ASUS Router App?
Настройте роутер ASUS
- Включите VPN Сервер
- Настройте логин и пароль для VPN клиента
- Экспорт сертификации
Настройте ПК с Windows 10
- Добавьте параметр в реестр
- Установите сертификат в Windows
- Создайте VPN соединение
Настройте роутер ASUS
Шаг 1. Включите VPN сервер
1. Подключите свой компьютер к маршрутизатору через проводное соединение или Wi-Fi и введите LAN IP Вашего роутера или URL http://www.asusrouter.com для доступа на страницу настроек WEB GUI.

Для получения более подробной информации, пожалуйста, обратитесь к [Беспроводной маршрутизатор] Как открыть страницу настроек роутера (Web GUI)
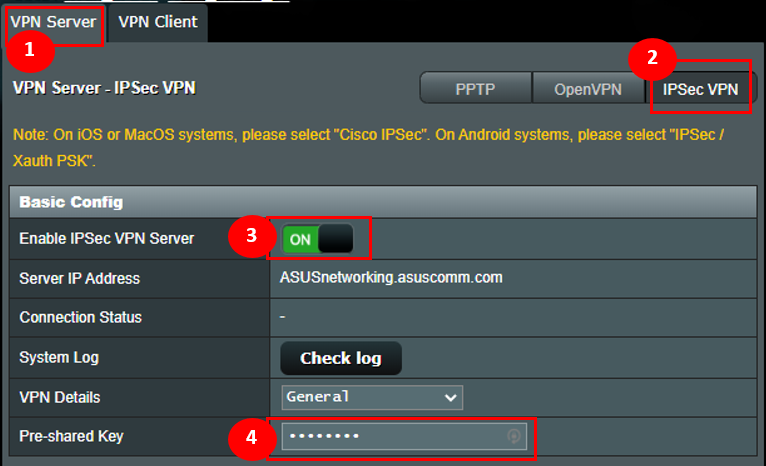
2. Выберите [VPN] с левой стороны Дополнительных настроек > [VPN Сервер]
3. Включите IPsec VPN сервер
Примечаниe: Пожалуйста, проверьте, что WAN IP является публичным IP адресом и рекомендуется настроить DDNS для Вашей сети.
4. Введите учетные данные в поле Pre-shared предоставленный ключ.
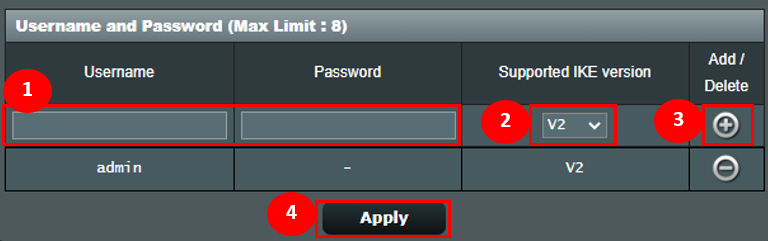
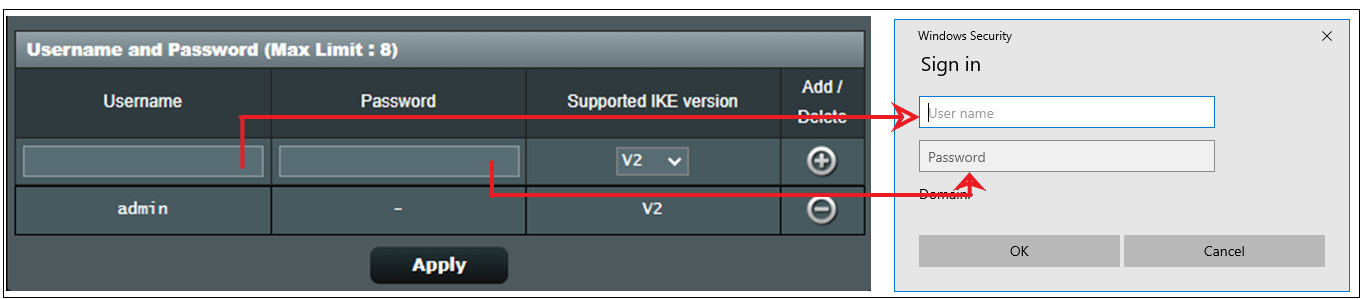
Шаг 2. Установите имя пользователя и пароль для VPN-клиента
- Введите имя пользователя и пароль для доступа к VPN-серверу.
- Выберите опцию “V2” Поддерживаемая версия IKE.
- Щелкните иконку [+] затем нажмите Применить для сохранения.
Шаг 3. Экспорт сертификата
1. Кнопка экспорта будет доступна после нажатия кнопки применить.
2. Выберите [For Windows].
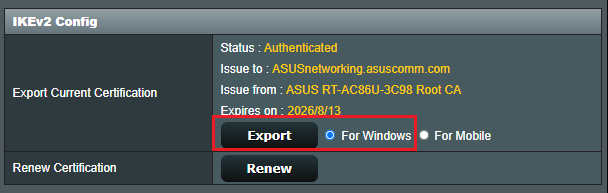
3. Нажмите кнопку Экспорт, после чего Вы загрузите файл сертификата с именем cert ikev2_cert_windows.der.
Настройте ПК с Windows 10
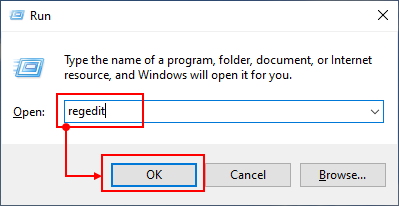
Шаг 4. Добавьте параметр в реестр
1. Нажмите клавишу Windows  +
+ одновременно.
2. Укажите: [regedit] и нажмите OK.
Примечание: нажмите да, если вас спросят, хотите ли Вы разрешить приложению вносить изменения в Ваш компьютер.
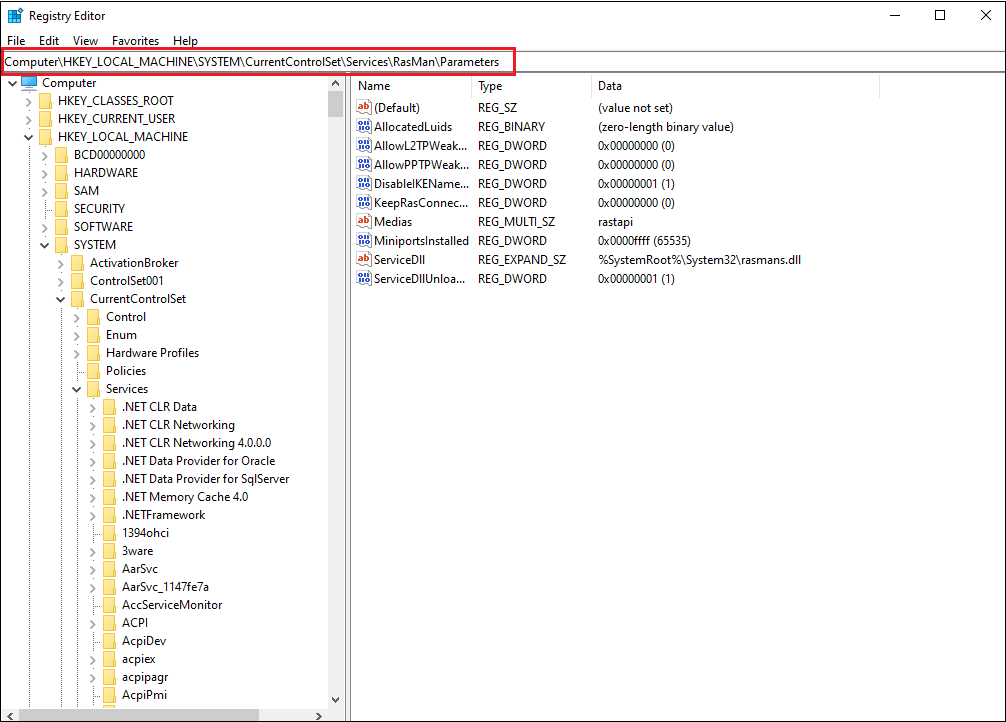
3. На левой панели найдите и щелкните папку: HKEY_LOCAL_MACHINE\SYSTEM\CurrentControlSet\services\RasMan\Parameters
4. Щелкните меню Правка и наведите курсор на Создать. Щелкните Значение DWORD.
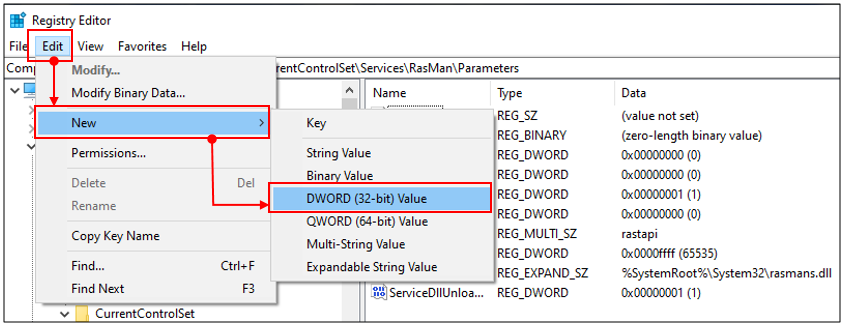
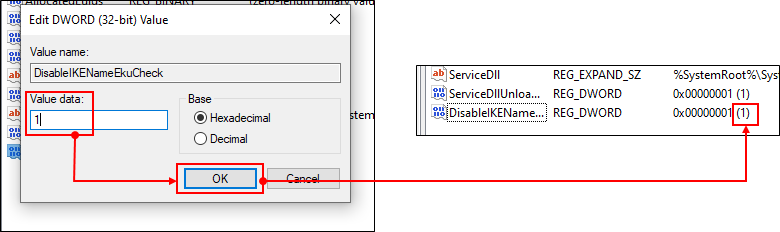
На правой панели появится новый реестр с именем DisableIKENameEkuCheck.

и установите значение 1.
5. Перезагрузите компьютер.
Шаг 5. Установите сертификат в Windows
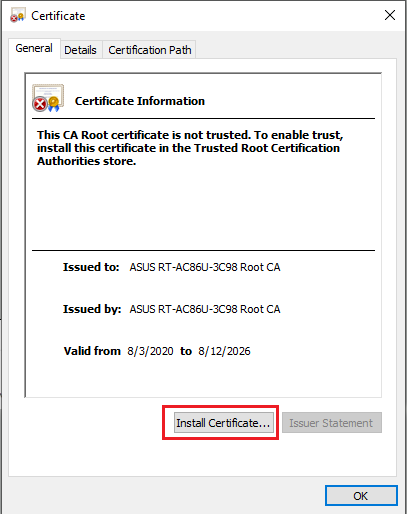
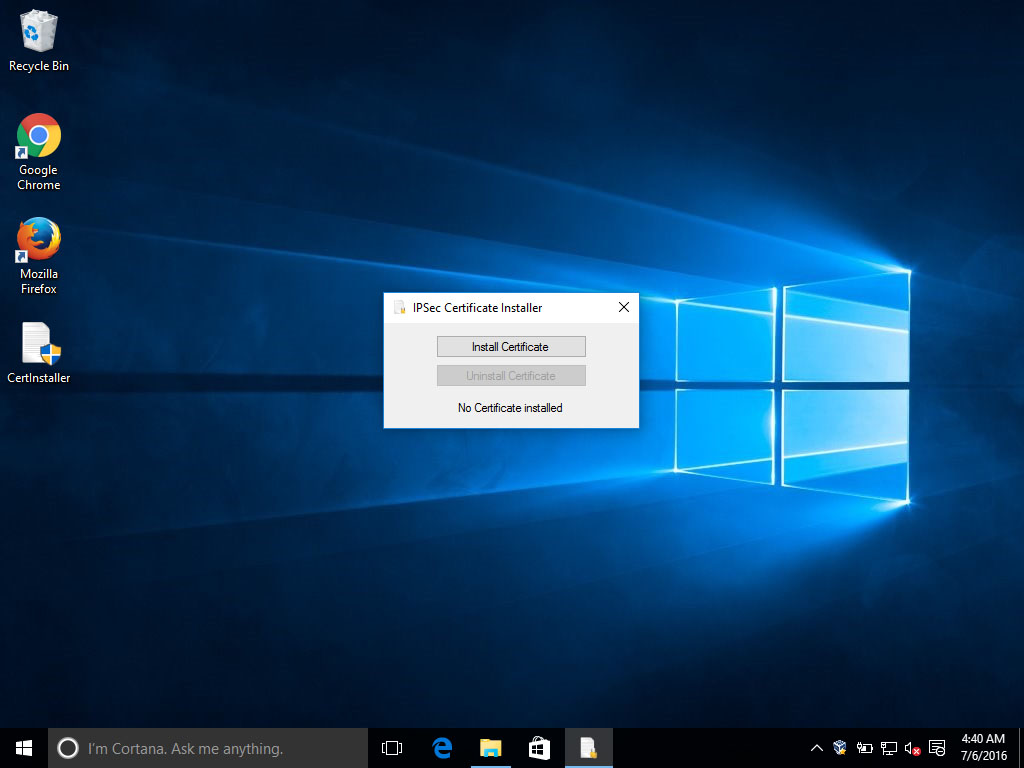
1. Дважды кликните на сертификат.

2. Нажмите на “Установить сертификат”
3. Выберите “Данное устройство” и нажмите Далее.
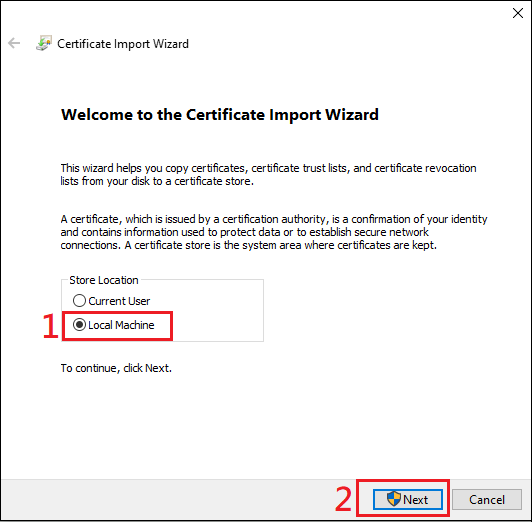
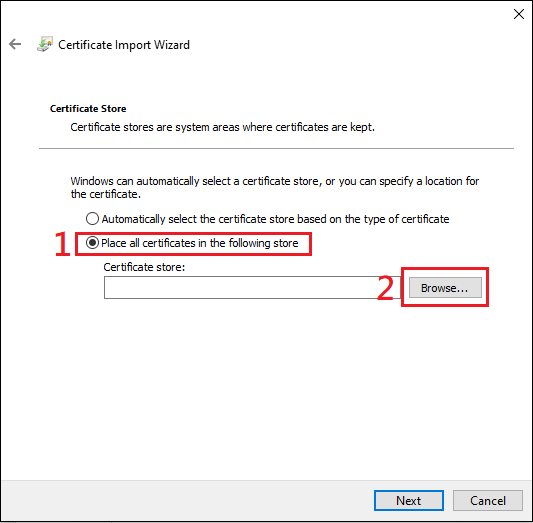
4. Выберите “Поместить все сертификаты в следующее хранилище” и нажмите “Обзор”.
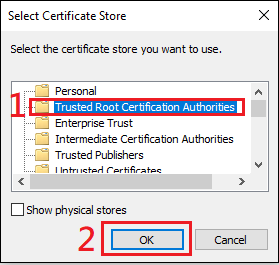
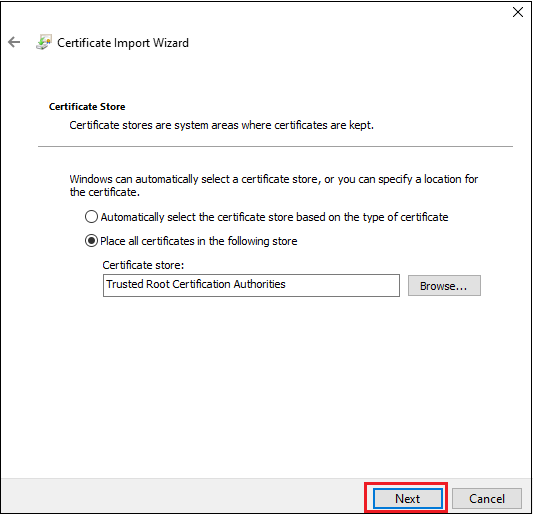
5. Выберите “Доверенные корневые центры сертификации” нажмите ОК.
6. Затем нажмите “Далее”
7. Нажмите Готово.

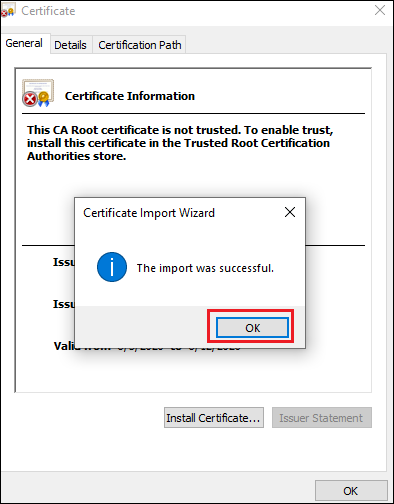
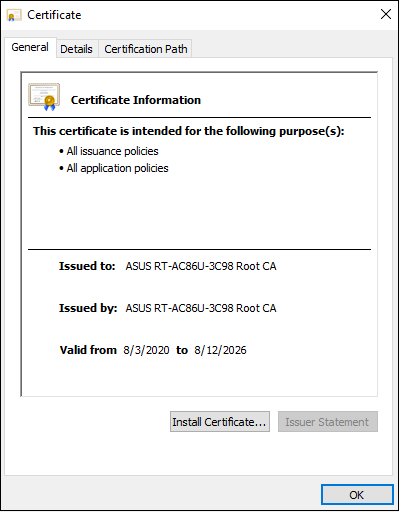
8. Дважды щелкните файл сертификации, чтобы проверить. Вы можете проверить, как показано ниже, если сертификация успешно установлена.
Шаг 6. установите подключение VPN
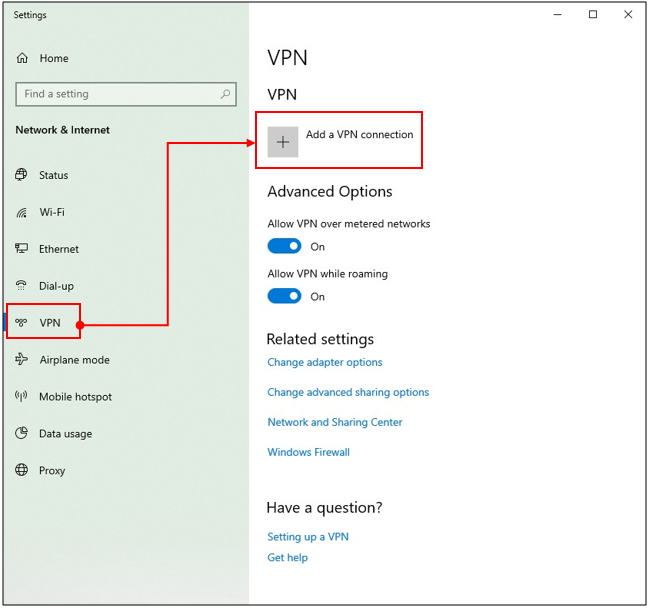
1. Откройте Параметры сети и Интернета
2. Перейдите на страницу настроек VPN. Нажмите кнопку [+], чтобы добавить VPN-соединение.
3. В поле Имя или адрес сервера на экране конфигурации VPN введите имя домена или IP-адрес, отображаемый в поле IP-адрес сервера на странице Сервер VPN. Нажмите Сохранить, чтобы завершить настройку.
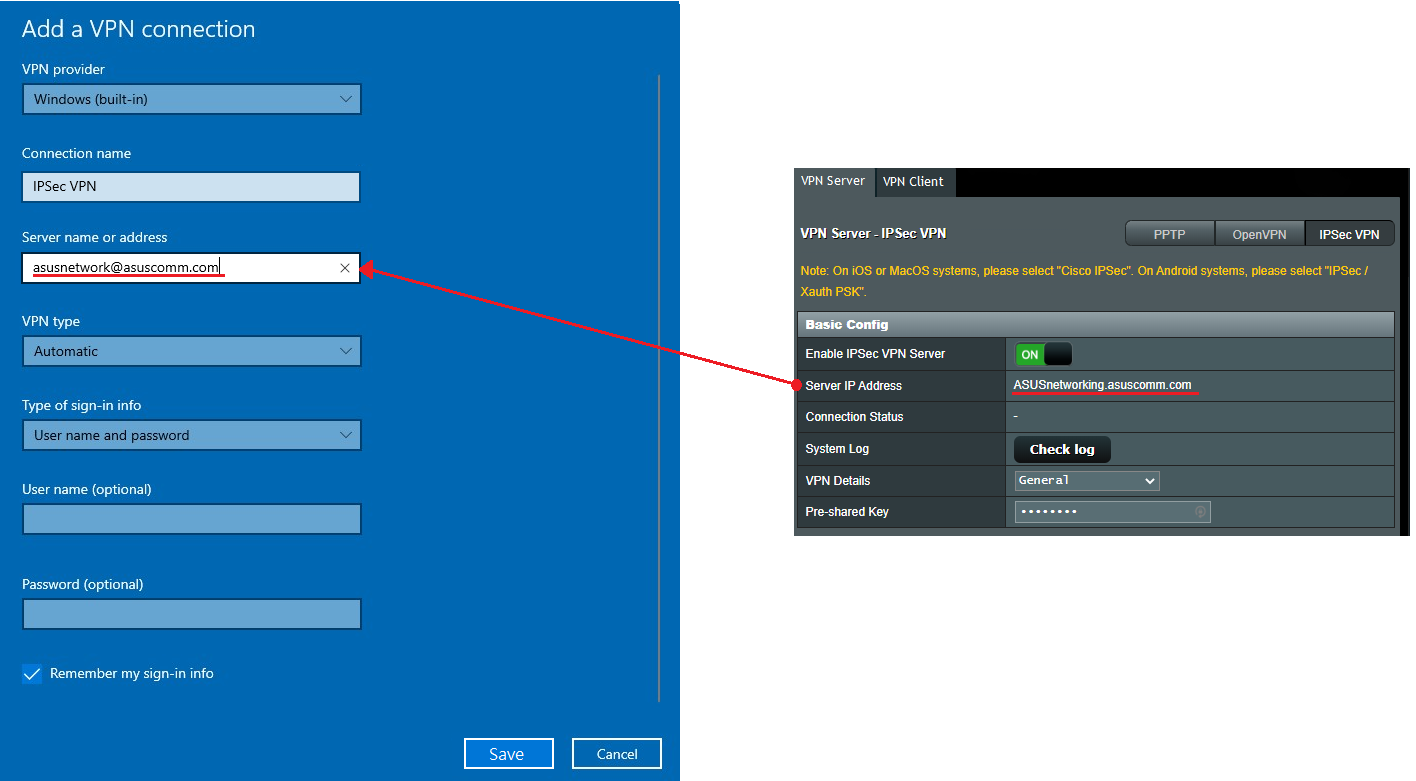
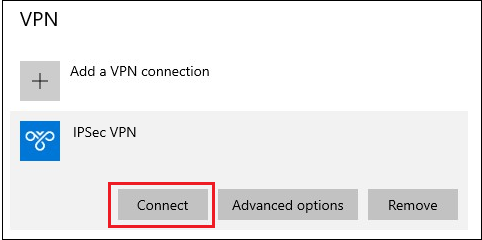
4. Нажмите кнопку Подключиться над созданным профилем VPN.
5. Введите имя пользователя и пароль, затем нажмите OK, чтобы подключиться к VPN-серверу. Готово!
Примечание:
1. Если Вы подключаетесь к маршрутизатору из Интернета через IPSec VPN и не можете получить доступ к серверу внутри локальной сети, отключите или проверьте настройки брандмауэра сервера локальной сети.
2. Если Вы одновременно настроили соединение IPSec VPN с мобильным устройством или ПК, подключенным к маршрутизатору, после его завершения Вы можете подключиться к другим устройствам в локальной сети через IPSec VPN без доступа в Интернет. В этом случае отключите Wi-Fi на своем мобильном устройстве или ПК, а затем подключитесь к Интернету через мобильную сеть 3G / 4G. Теперь Вы в другой сети. Попробуйте снова подключиться к VPN.
3. Может быть максимум 8 клиентов с соединениями IPSec.
4. Одна учетная запись / пароль IPsec может позволить подключаться только одному клиенту (максимум до 8 правил учетной записи / пароля).
5. IPsec требует учетной записи / пароля для подключения, а не поддержки бесплатного входа.
Как скачать (Утилиты / ПО)?
Вы можете загрузить последние версии драйверов, программного обеспечения, микропрограмм и руководств пользователя из ASUS Центра загрузок.
Узнать больше о Центре загрузок ASUS можно по ссылке.
Double click on the downloaded file and click on Install Certificate. Enter your Perfect Privacy login credentials.

You can then close this window. If you ever want to uninstall the certificate at a later point, you can do so by starting the Cert Installer and clicking on Uninstall Certificate.
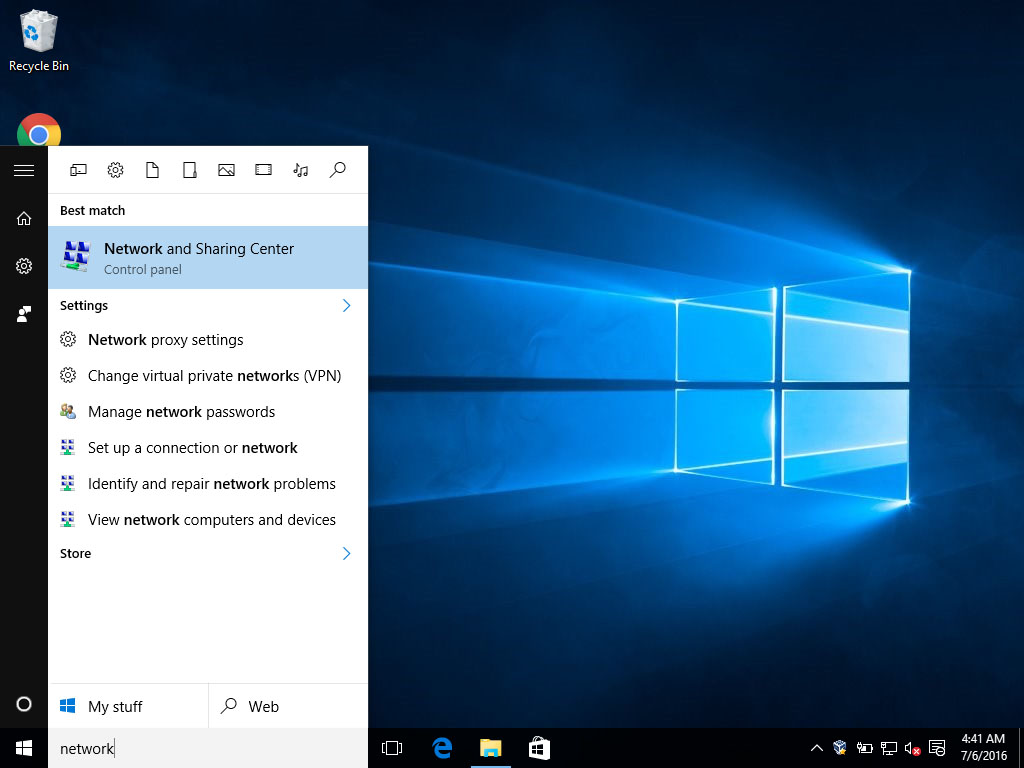
Open the start menu, type «Network» and go to the Network and Sharing Center.
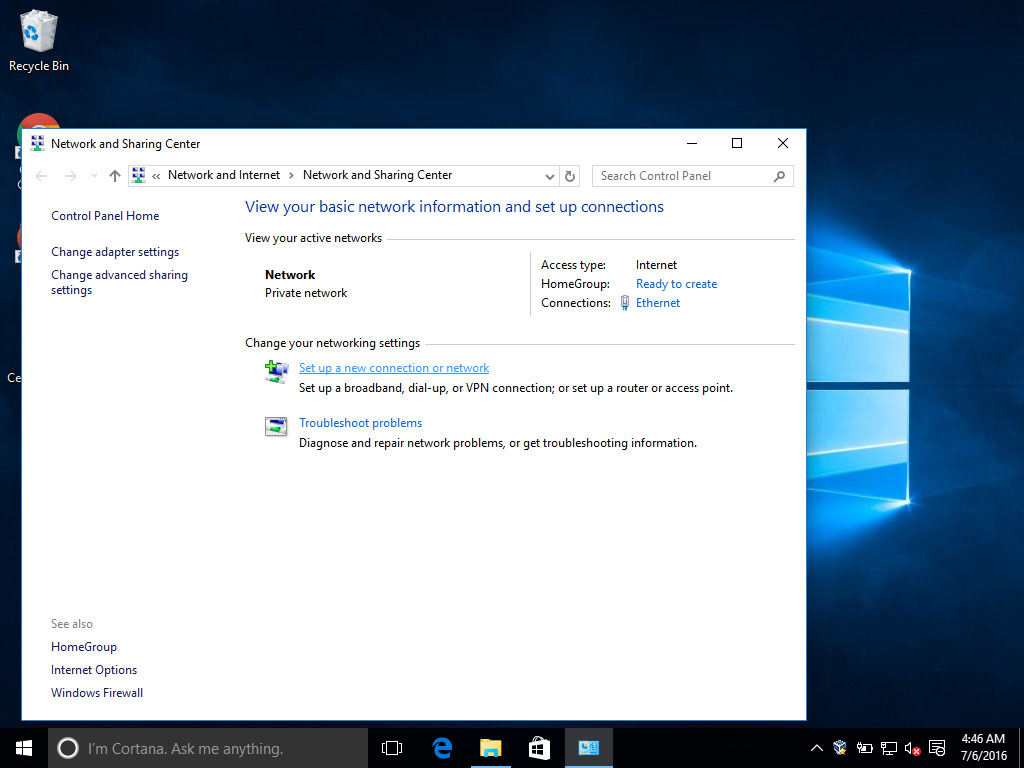
Click on Set up a new connection or network.

Click on Connect to a Workplace.
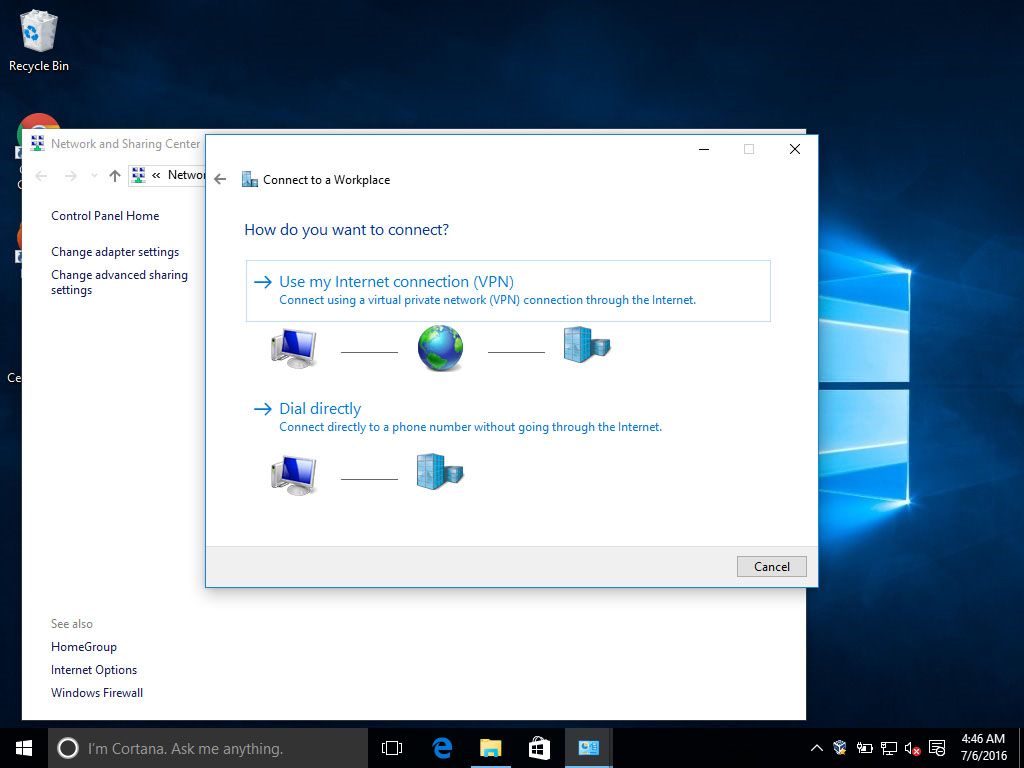
Choose Use my Internet connection (VPN).
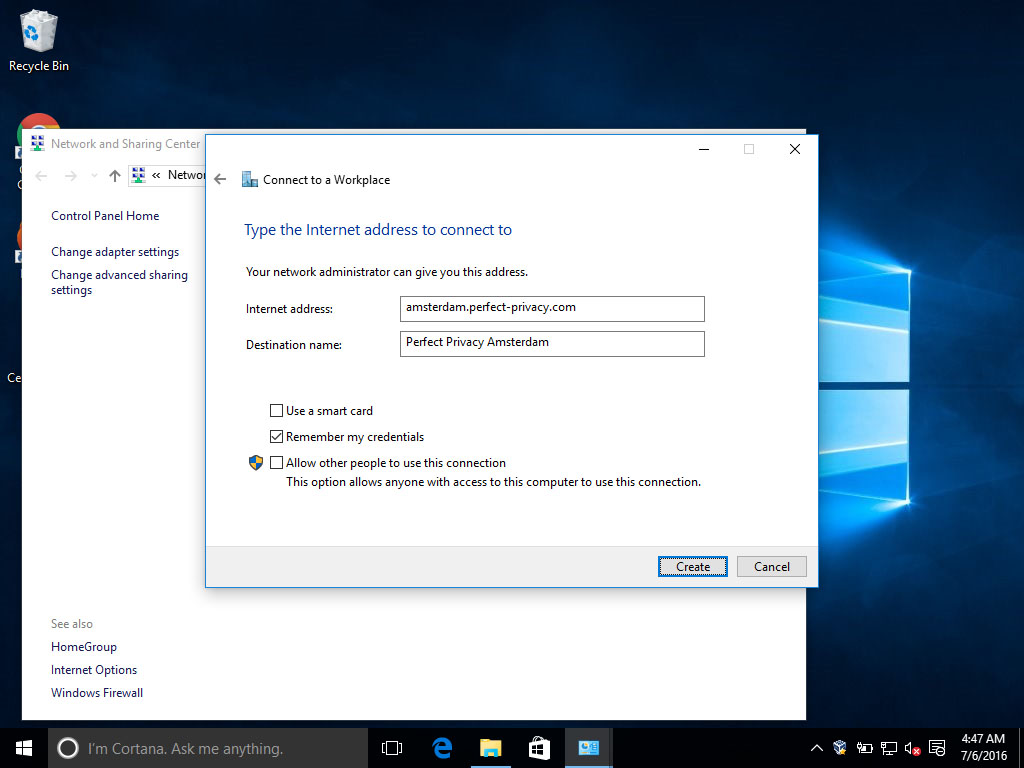
Enter a Perfect Privacy server of your choice. You can see which servers are available on the IPsec page in the download section. Make sure to use the general hostname of a location like amsterdam.perfect-privacy.com for the server group in Amsterdam, since the certificates will only match these hostnames. You can choose any destination name. Activate Remember my credentials so you not have to enter your Perfect Privacy username and password for every connection. Then click on Create.

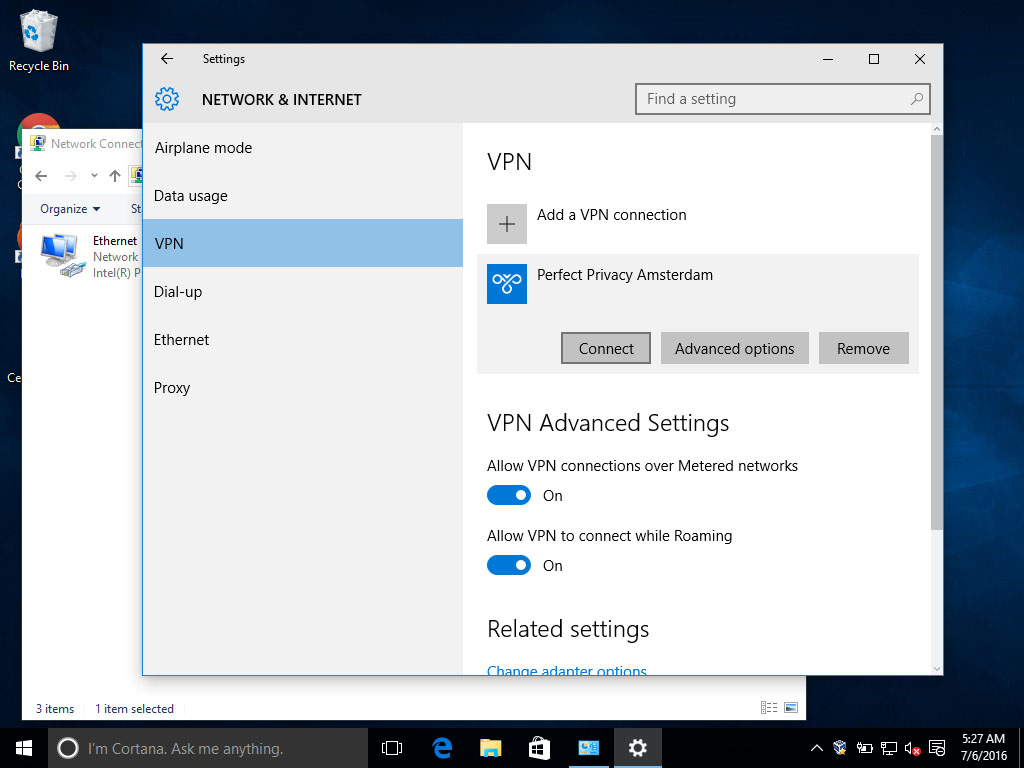
Click on Change adapter settings on the left side.
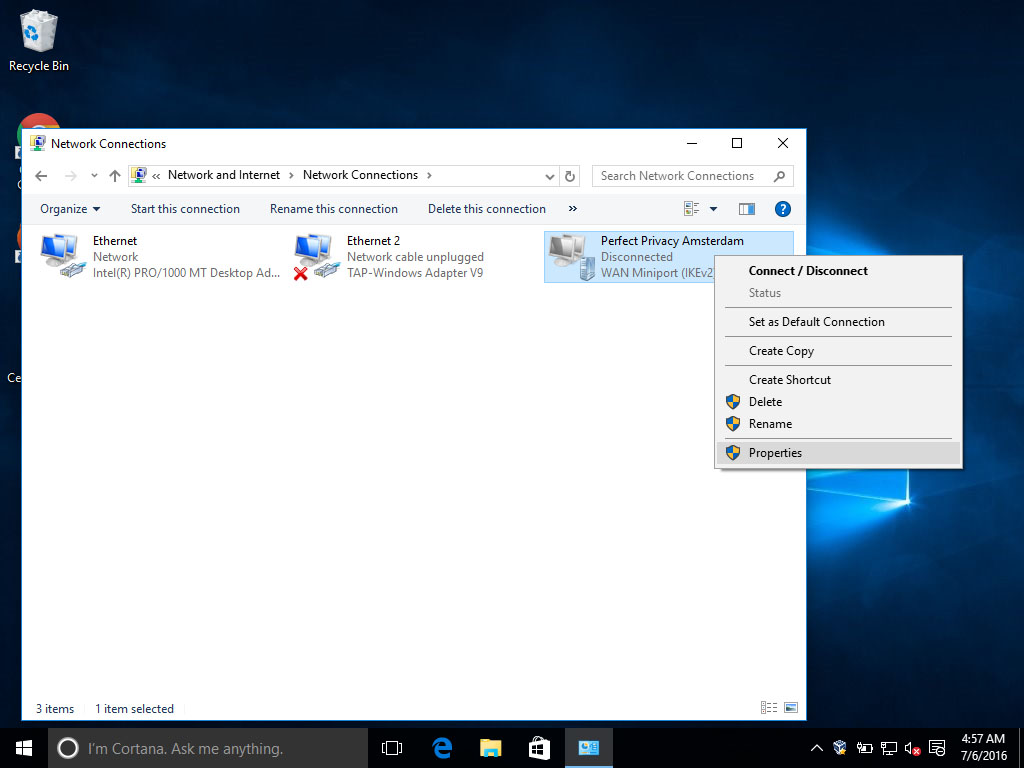
Right click on the newly created connection and choose Properties.
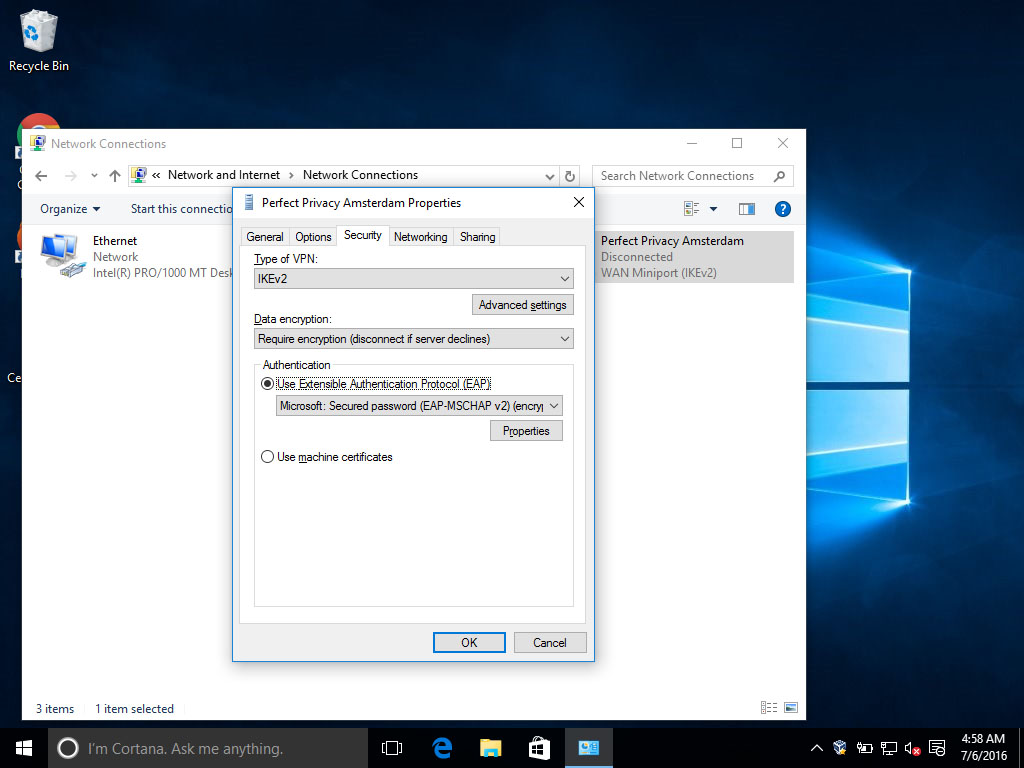
Under the security tab, set the VPN type to IKEv2, choose Require encryption for data encryption and activate Use Extensible Authentication Protocol (EAP). Click on OK to close this window.
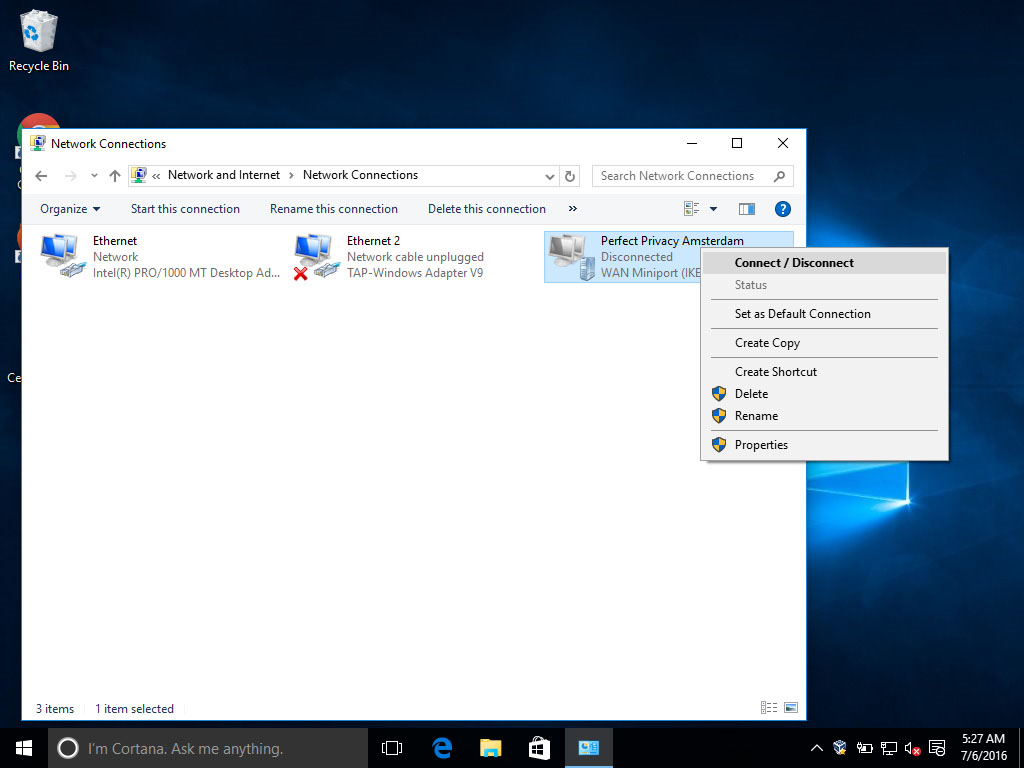
Double click on the connection or right click on it and choose Connect/Disconnect. This will open a new window.
Click on the VPN Connection to expand it and click Connect.
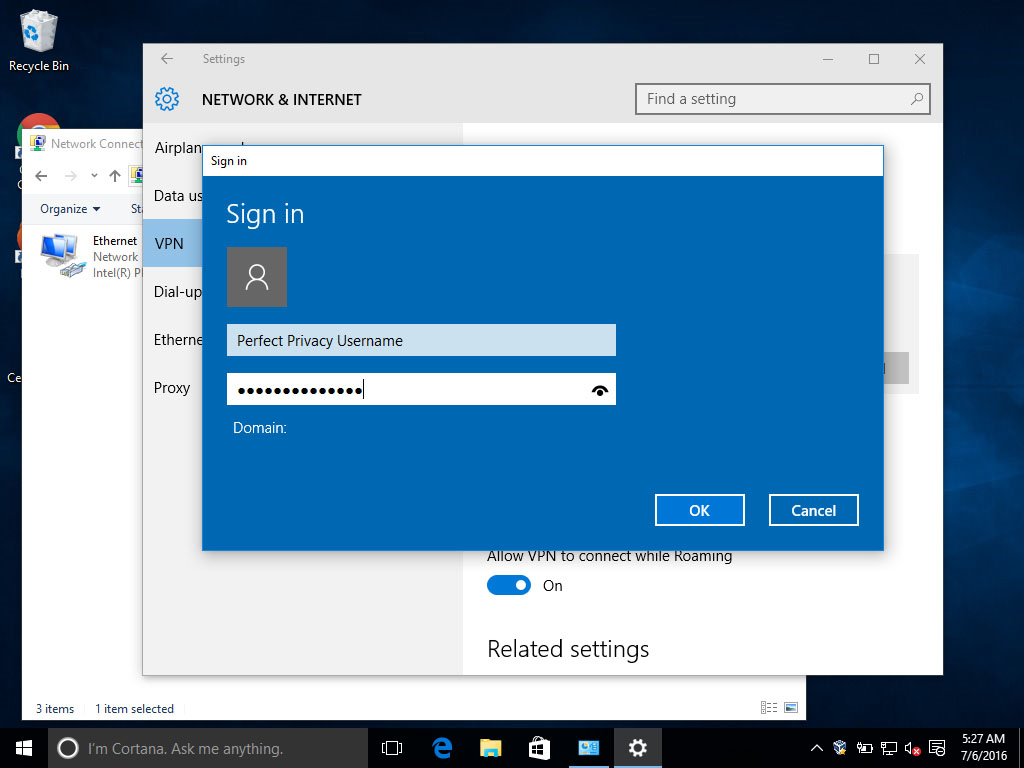
Enter your Perfect Privacy login credentials and click OK.

The IPsec connection should now be working. Below the VPN connection name it says Connected.

You can check that your VPN connection works correctly by visiting our Check IP website.
This website uses cookies to analyze the traffic and to control our advertising. By using this site, you agree to the use of cookies. More information can be found in our privacy policy.
Для L2TP/IPsec с общим ключом
Важно: L2TP IPsec клиенты, находящиеся за одним NAT’ом, могут испытывать проблемы подключения если их более одного. Решить проблему может помочь
инструкция
. Рекомендуем вместо L2TP IPsec использовать IKEv2 IPsec.
Имя подключения — название создаваемого подключения;
-
Имя или адрес сервера — адрес VPN-сервера;
-
Тип VPN — Протокол L2TP/IPsec с общим ключом;
-
Общий ключ — значение строки PSK в разделе Пользователи -> VPN-подключение -> Основное -> Подключение по L2TP/IPsec;
-
Тип данных для входа — Имя пользователя и пароль;
-
Имя пользователя — имя пользователя, которому разрешено подключение по VPN;
-
Пароль — пароль пользователя.

При настройке подключения по VPN из сети Интернет, в свойствах VPN-подключения нужно указать следующие параметры:
-
Перейдите в Настройки параметров адаптера;
-
Нажмите на созданное подключение правой кнопкой мыши и выберите Свойства;
-
Перейдите во вкладку Безопасность и установите:
-
Шифрование данных — обязательное (отключиться, если нет шифрования)
-
Протокол расширенной проверки подлинности (EAP) — Microsoft защищенный пароль (EAP MSCHAPV2)
-
Если создается VPN-подключение к UTM через проброс портов, рекомендуем выполнить следующие действия:
-
1.
Откройте Редактор реестра;
-
2.
Перейдите в
HKEY_LOCAL_MACHINE\SYSTEM\CurrentControlSet\Services\PolicyAgentи создайте DWORD-параметр с именем AssumeUDPEncapsulationContextOnSendRule и значением2;
-
1.
Неправильно указан логин или пароль пользователя. Часто при повторном соединении предлагается указать домен. Старайтесь создавать цифро-буквенные пароли, желательно на латинице для учетных записей. Если есть сомнения в этом пункте, то временно установите логин и пароль пользователю «user» и «123456».
-
2.
Для того, чтобы пакеты пошли через VPN-туннель, надо убедиться, что в настройках этого подключения стоит чекбокс Использовать основной шлюз в удалённой сети в разделе Настройка параметров адаптера -> Правой кнопкой мыши по подключению -> Свойства -> Сеть -> Свойства опции «Протокол Интернета версии 4 (TCP/IPv4)» ->Дополнительно. Если же маршрутизировать все пакеты в этот интерфейс не обязательно, то маршрут надо писать вручную.
-
3.
Подключение происходит через DNAT, т.е. внешний интерфейс Ideco UTM не имеет «белого» IP-адреса, а необходимые для работы порты (500 и 4500) «проброшены» на внешний интерфейс устройства, расположенного перед Ideco UTM и имеющего «белый» IP-адрес. В данном случае VPN-подключение либо вообще не будет устанавливаться, либо будут периодические обрывы. Решение — исключить устройство перед Ideco UTM и указать на внешнем интерфейсе Ideco UTM «белый» IP-адрес, к которому в итоге и будут осуществляться L2TP/IPsec-подключения. Либо используйте протокол SSTP, потому что его проще опубликовать с помощью проброса портов.
-
4.
Если в OC Windows 10 повторно подключиться по L2TP, но при этом использовать невалидный ключ PSK (введя его в дополнительных параметрах (скриншот ниже)), подключение все равно будет установлено успешно. Это связано с особенностями работы ОС.
Убедитесь, что локальная сеть (или адрес на сетевой карте) на удалённой машине не пересекается с локальной сетью организации. Если пересекается, то доступа к сети организации не будет (трафик по таблице маршрутизации пойдёт в физический интерфейс, а не в VPN). Адресацию необходимо менять.
Estimated reading time: 1 min
Introduction
This article will describe how to connect L2TP/IPsec VPN on Windows 10
Prerequisites
- Windows 10
- Access to your Windows 10 as Administrator or a user with administrator permissions
Step 1 – Log in to Windows 10
Click on the search icon in the Windows menu bar and search for control panel. You should see the Control Panel icon and click on it.

Open Network and Internet
Open Network and Sharing Center
Step 2 – Configure VPN
Click on Set up a new connection on a network
Select Connect to a workplace and click on Next
Click Use my Internet connection (VPN)
Enter your IP address in the Internet Address field. In our example, we use this IP, 193.33.61.185, click on Create
After you have clicked on Create the set up wizard will be closed.
Click Change adapter settings on the left side menu.
You will now see all available interfaces. Open Properties of the VPN connection interface
Open Security tab
Open dropdown of Type of VPN and select Layer 2 Tunneling Protocol with IPsec (L2TP/IPsec)
Click on Advanced settings. Select Use preshared key for authentication and fill in the preshared key which you created on the Windows Server. Apply it by clicking on OK.
Return back to the Security tab. Select Allow these protocols and check the following values:
- Challenge Handshake Authentication Protocol (CHAP)
- Microsoft CHAP Version 2 (MS-CHAP v2)
Apply the changes by clicking on OK.
Step 3 – Connect to VPN server
Open Network icon in the right bottom and click on VPN Connection
After you have clicked on VPN Connection a Connect button will be visible. Click on Connect
You will be asked to enter a User name and Password
Trying to connect.
Your VPN connection is established.
Step 4 – Check IP address
If you are routing all the traffic through VPN you see the VPN IP address of your VPN server. You can find your IP address by visiting whatismyip.com .
Conclusion
Congratulations, you have configured a VPN client on a Windows 10. You now know how to connect L2TP/IPsec VPN on Windows 10
Please see our knowledgebase for other articles on how to connect with VPN.
Was this article helpful?
Like
24
Dislike
11
Use a reliable L2TP/IPsec VPN client and quickly set it up to your PC
by Elena Constantinescu
Elena started writing professionally in 2010 and hasn’t stopped exploring the tech world since. With a firm grasp of software reviewing and content editing, she is always trying… read more
Updated on
- You create an IPsec VPN connection on a PC without having to install anything.
- But you still need the IPsec connection details of a VPN client.
- Follow our step-by-step guide to quickly install an IPsec VPN client in Windows.
- Learn how to find your L2TP/IPSec credentials and configure it from Settings.

If you need to set up an IPsec VPN client on Windows 10 PC, we’re here to help. Using a virtual private network, you can hide your IP address, encrypt your data traffic, and ultimately protect your online privacy.
There are numerous benefits to using a VPN, such as finding cheaper flights online, fixing network congestion, or reducing ping in multiplayer games.
You can also watch unlimited streaming by using a VPN to circumvent geoblocks and unblock Netflix libraries that aren’t normally available in your country.
What’s an IPsec VPN client?
An IPsec VPN client is a virtual private network service that supports the IPsec protocol. IPsec is used by the VPN to encrypt and protect your data across the Internet.
How we test, review and rate?
We have worked for the past 6 months on building a new review system on how we produce content. Using it, we have subsequently redone most of our articles to provide actual hands-on expertise on the guides we made.
For more details you can read how we test, review, and rate at WindowsReport.
IPsec (Internet Protocol security) is a VPN protocol that authenticates and encrypts data transferred over the web. It supports multiple encryption methods, including 256-bit AES.
An IPsec VPN client is a virtual private network client that uses the IPsec protocol. However, IPsec can’t be used standalone because it’s only an encryption protocol that provides data security and privacy.
A VPN connection also requires a tunneling protocol to deliver data. As such, IPsec is typically accompanied by L2TP or IKEv2, resulting in the L2TP/IPsec and IKEv2/VPN protocols.
Does Windows 10 support IPsec VPN?
Windows 10 has native support for L2TP/IPsec. You can also set up a VPN on Windows Vista or older editions if you can find one that’s still compatible.
You can use this protocol to set up the built-in Windows VPN (for Windows 10 and 11). It is also compatible with third-party VPN clients that support it.
It’s possible to create a VPN connection in Windows 10 using the built-in OS settings and then add the VPN client’s login information, but it’s recommended to use a dedicated client for best performance.
How do I set up an IPsec VPN client on Windows 10?
To set up a VPN with IPsec on Windows, you need a client that offers you the possibility to connect using this protocol, and our top choice in this regard is ExpressVPN.
The VPN has thousands of fast servers all around the world and industry-leading VPN security to make sure your data stays completely private: military-grade encryption,
1.Get IPsec VPN client credentials
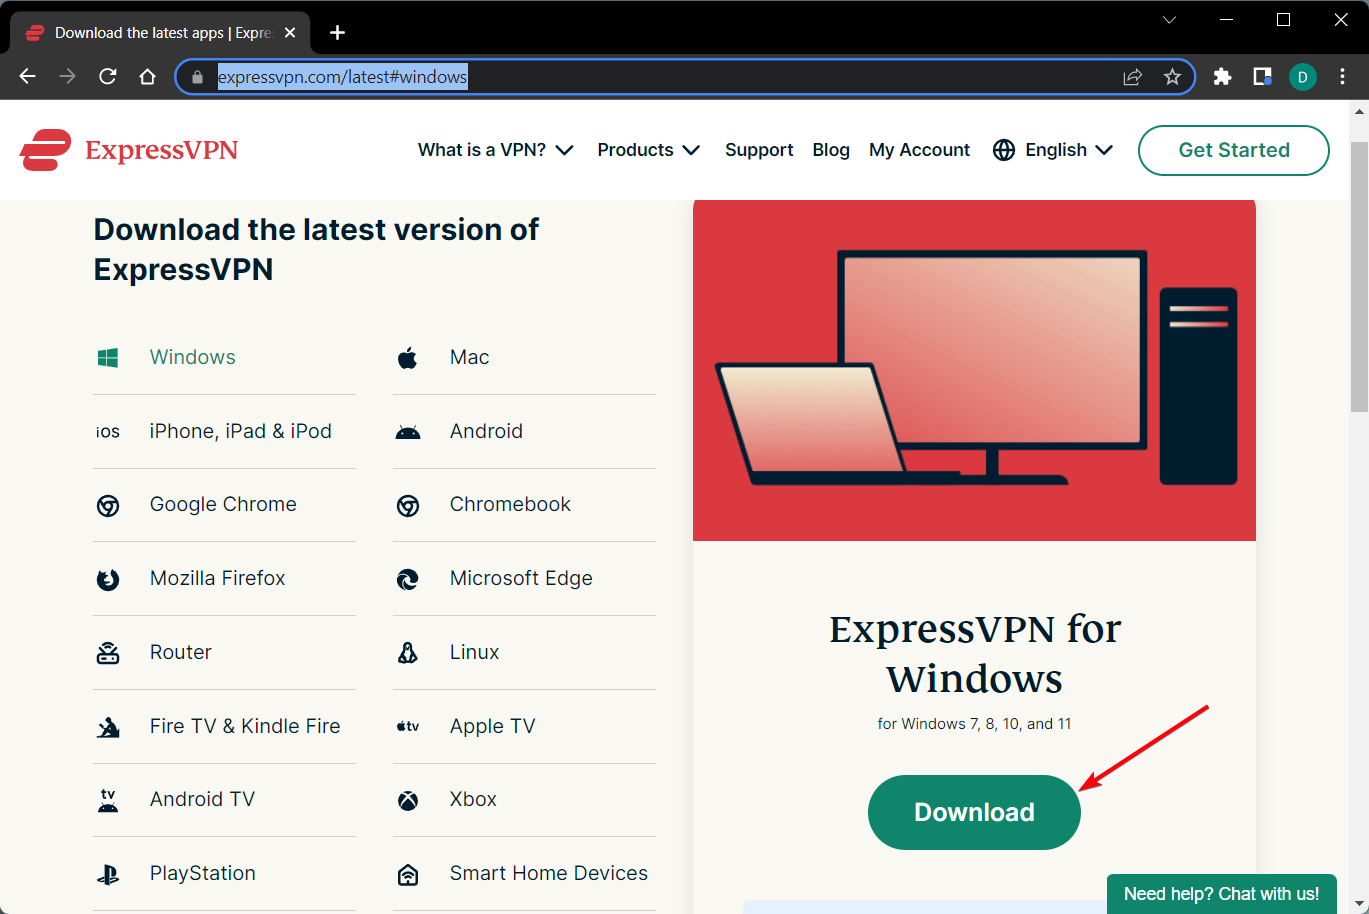
- Sign up for an ExpressVPN subscription.

- In your browser, open the ExpressVPN manual configuration page.
- Enter your credentials and select L2TP/IPsec.

- You’ll get information about your username and password + IPsec server addresses.
- Save this information so you can add it to your VPN connection.

The user name and password for the IPsec connection will be necessary once you configure your VPN connection using Windows settings.
2. Create a VPN connection
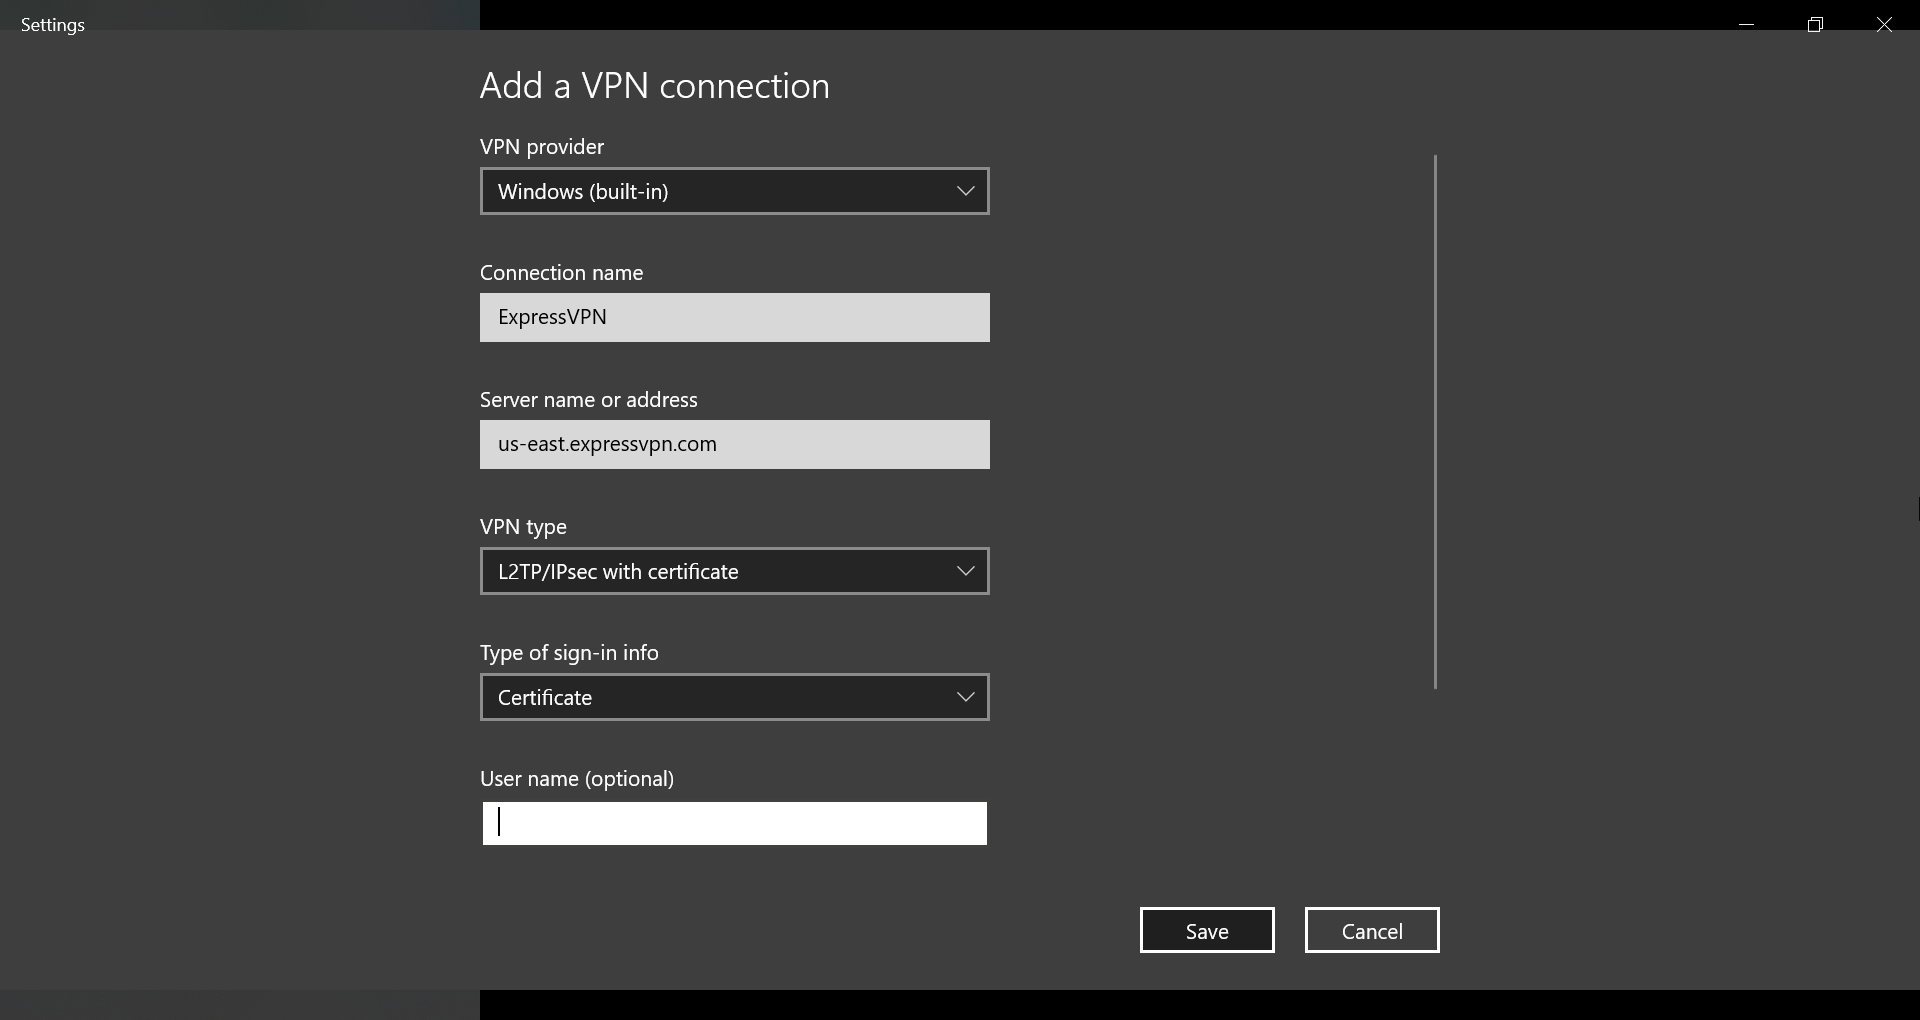
- Right-click the Start button and go to Network Connections.
- Select VPN on the left side and click Add a VPN connection.
- Set VPN provider to Windows (built-in) and write a Connection name.
- At Server name or address, type one of the server addresses provided by the ExpressVPN configuration page.
- Set VPN type to L2TP/IPsec with certificate.
- At Type of sign-in info, select User name and password.
- At User name (optional) and Password (optional), paste the ExpressVPN credentials you previously obtained.
- Enable Remember my sign-in info and click Save.
3. Connect and disconnect from the IPsec VPN
- Click the Network icon in the systray.
- Select the IPsec VPN connection.
- Click Connect or Disconnect.
4. Change IPsec VPN settings
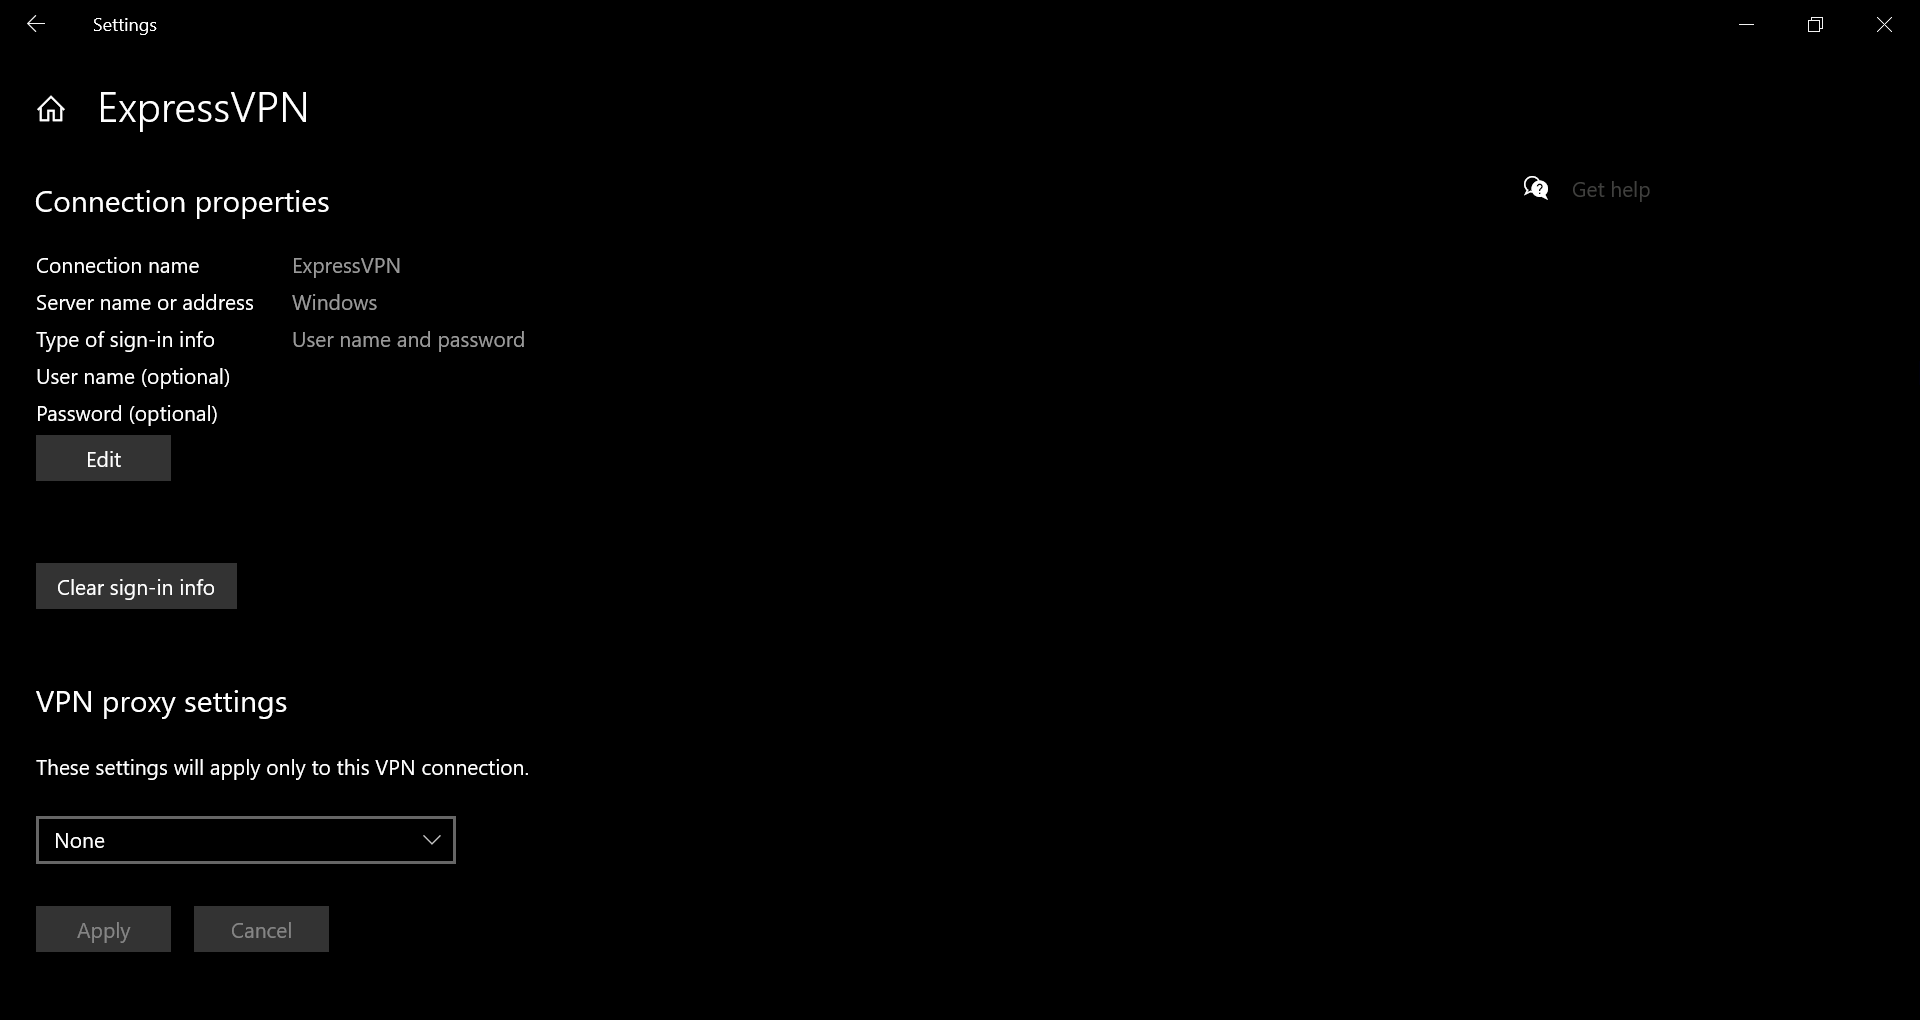
- Right-click the Start button and go to Network Connections > VPN.
- Select the IPsec VPN connection and click Advanced options.
- At Connection properties, click Edit.
- Change VPN connection details and click Save.
If you want to connect to a different VPN server, you can either edit VPN connection details to set the new address or create a new VPN connection for each address.
5. Remove the IPsec VPN connection
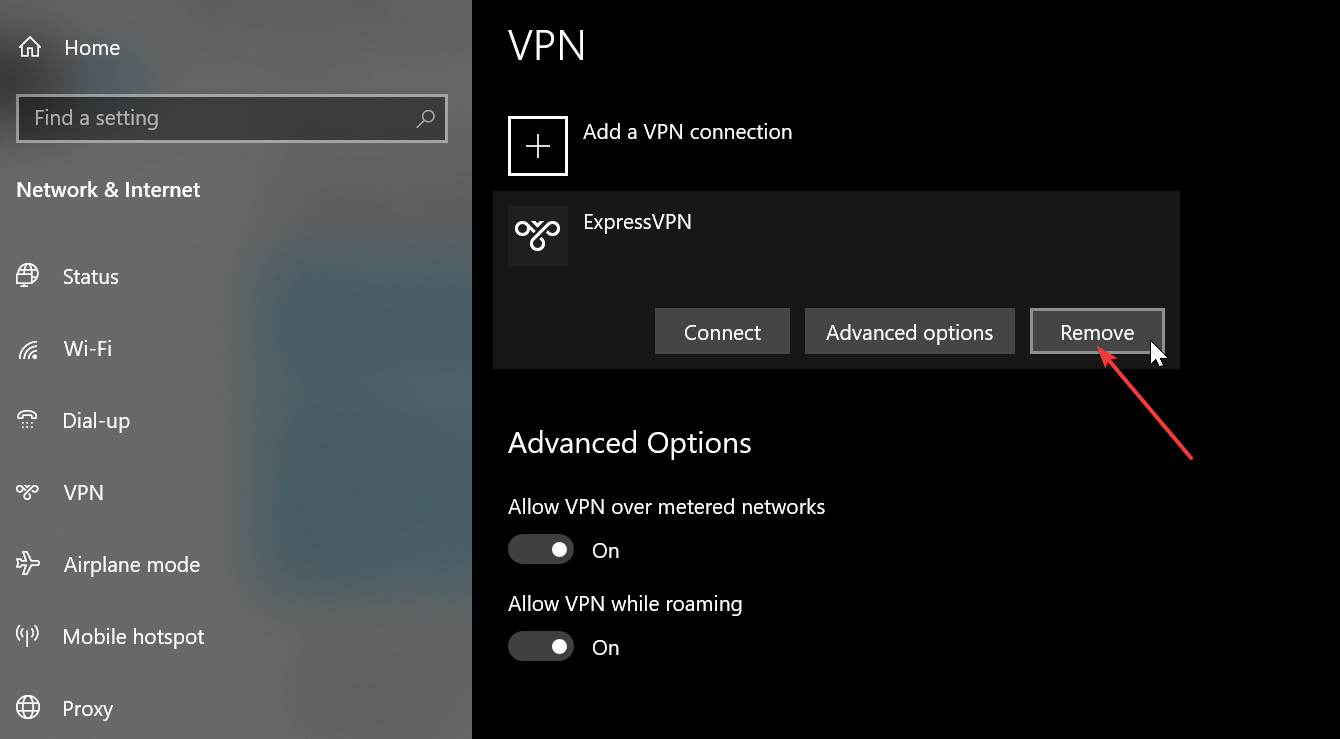
- Right-click the Start button and go to Network Connections > VPN.
- Select the IPsec VPN connection.
- Click Remove.
Why use ExpressVPN
ExpressVPN is compatible with all popular platforms, including Mac, Linux, Android, and iOS.
You can even set it up on a router to share VPN access with all connected devices. Otherwise, up to 5 devices can share the VPN account for ExpressVPN.
Furthermore, ExpressVPN supports OpenVPN and Lightway, in addition to PPTP and L2TP with IPsec.
It comes with private DNS, gaming optimized servers, SOCKS5 and Shadowsocks proxy servers, port forwarding, split tunneling, and a kill switch.
What else you should know about ExpressVPN:
- +4000+ servers in 94 countries
- No traffic logs
- 24/7 live chat support
- 30-days money-back guarantee
- 7-day free trial (mobile)
ExpressVPN
Quickly set up an IPsec VPN client connection on Windows 10 using this fast and secure VPN app.
In conclusion, you can easily set up an IPsec VPN client on Windows 10 in order to protect your online privacy and computer security, as well as to unblock streaming services and minimize jitter. You can even set up an IPsec connection on XP by using the best VPN for Windows XP.
You just need to get equipped with a premium VPN that not only supports the IPsec protocol but also comes with high-speed VPN servers and superior security features, like ExpressVPN.
![]()