Очередная подробная инструкция по настройке роутеров компании TP-LINK. И в этот раз мы будем настраивать TP-LINK TL-WR840N. Интересная модель маршрутизатора, которая подойдет для небольшого дома, или офиса. Я уже все подключил, проверил, сделал фото, и сейчас подробно напишу и покажу как правильно настроить роутер TP-LINK TL-WR840N, что бы он раздавал интернет на ваши устройства и радовал вас своей работой.

Не буду сейчас рассказывать о роутере, его обзор и свой отзыв я сделаю в отдельной статье. Да и вы скорее всего купили этот маршрутизатор, и читать о его характеристиках вам уже не интересно. Вам нужно быстрее его настроить. Что касается самой настройки, то здесь есть два варианта: настроить с мощью утилиты, которая находится на диске (который должен быть в комплекте), или через web-интерфейс роутера. Мы будем настраивать через web-интерфейс. Там есть доступ к самым разным настройкам, которые вам могут пригодится позже, и вы уже будете знать где их найти. Да и не у всех сейчас есть возможность запустить программу с диска.
Настраивать наш TP-LINK TL-WR840N будем по стандартной схеме:
- Установка и подключение маршрутизатора.
- Настройка подключения к интернету.
- Настройка Wi-Fi сети на TL-WR840N и защита беспроводной сети паролем.
- Настройка IPTV (если ваш провайдер предоставляет эту услугу).
- Защита настроек маршрутизатора.
Если вы уже раньше настраивали роутер TP-LINK, то и эту модель сможете настроить с закрытыми глазами, так как там все идентично. Да и настройки на русском языке, что немаловажно.
Как установить и подключить TP-LINK TL-WR840N?
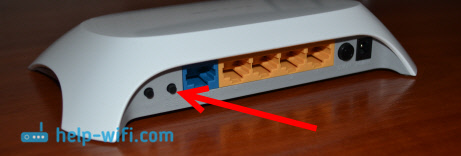
Если у вас уже все подключено, и вы просто выполняете повторную настройку, то можете пропустить этот пункт. А если вы только купили маршрутизатор, то первым делом подключите к нему адаптер питания, включите его в розетку, и проверьте включено ли питание кнопкой на задней стороне роутера. Там есть отдельная кнопка для включения/выключения роутера, что очень удобно. На лицевой панели должны загореться индикаторы.
Дальше, в WAN разъем (он синий) нужно подключить кабель от нашего интернет провайдера, или от ADSL модема. Если у вас интернет через модем, то TL-WR840N соединить с модемом можно с помощью сетевого кабеля, который идет в комплекте с роутером. На роутере подключаем в WAN разъем, а на модеме в LAN.
Ну и осталось подключить к маршрутизатору компьютер, или ноутбук с помощью сетевого кабеля. Я рекомендую сделать это только для настройки, потом вы сможете отключить кабель, и роутер будет сам раздавать интернет по Wi-Fi. Вы можете подключить 4 устройства по кабелю. На роутере подключаем в LAN разъем, а на компьютере в сетевую карту.

А если у вас нет компьютера, или ноутбука, а только мобильные устройства, то можно и с них настраивать. В таком случае, подключитесь к Wi-Fi сети, которая появится сразу после включения маршрутизатора. Беспроводная сеть будет иметь стандартное название (если роутер еще не настраивали), и будет закрыта заводским паролем. Этот пароль указан снизу маршрутизатора TP-LINK TL-WR840N, на наклейке. Там же указаны заводские параметры (адрес, имя пользователя и пароль), которые нужно использовать для входа в настройки маршрутизатора.

В итоге, вы должны быть подключены к маршрутизатору по сетевому кабелю, или по Wi-Fi.
Два важных момент:
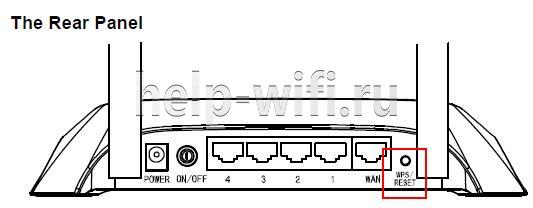
Если роутер уже раньше был настроен, то сделайте сброс настроек, зажав на 10 секунд кнопку WPS/RESET при включенном питании роутера.
Это удалить все параметры, которые уже возможно заданы, и которые могут нам помешать
Рекомендую еще перед настройкой обновить прошивку TL-WR840N. Скорее всего, на сайте уже есть новая версия. Я обновлял перед настройкой. Скачать прошивку для вашей аппаратной версии можно по ссылке http://www.tp-link.ua/ru/download/TL-WR840N.html#Firmware. Только обязательно проверьте аппаратную версию своего роутера (указана снизу устройства на наклейке), и прошивайте только при подключении по кабелю. А еще лучше, сделайте все по инструкции: подробная инструкция по обновлению прошивки на маршрутизаторе Tp-Link.
Вход в панель управления TL-WR840N и настройка интернета
Значит к роутеру мы подключились. Теперь открываем любой браузер, и переходим в нем по адресу http://tplinkwifi.net, или 192.168.0.1. Должно появится окно с запросом имени пользователя и пароля. По умолчанию, это admin и admin. Указываем их и попадаем в панель управления. Если не получается открыть настройки, то смотрите эту статью с возможными решениями.

Сейчас самое главное. Настройка роутера на подключение к провайдеру. Что бы роутер смог подключился к интернету, и раздавать его на все ваши устройства.
Если у вас на компьютере есть какое-то подключение к интернету, то теперь оно нам не нужно. Подключение будет устанавливать маршрутизатор.
Вы обязательно должны знать, какой тип подключения использует ваш интернет-провайдер. Это может быть: Динамический IP, Статический IP, PPPoE, L2TP, PPTP. И если у вас не Динамический IP, то у вас еще должна быть информацию по подключению, которую выдает провайдер. Обычно это имя пользователя и пароль (может быть еще адрес сервера, и IP-адрес).
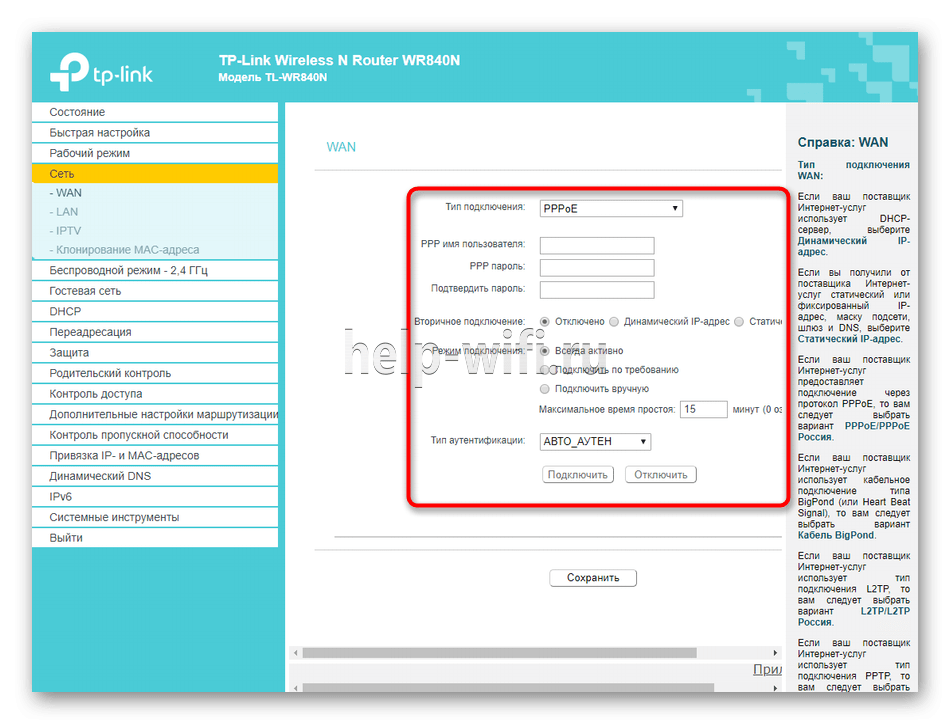
В настройках открываем вкладку Сеть – WAN, и в выпадающем меню Тип подключения WAN выбираем подключение, которое использует наш провайдер (если вы подключились через модем, то выберите Динамический IP, и сохраните настройки).

Если у вас подключение Динамический IP, то интернет сразу должен заработать через роутер. Может быть еще такое, что провайдер делает привязку по MAC-адресу. Это можно уточнить у самого провайдера, и попросить их прописать MAC-адрес роутера (указан снизу устройства), или клонировать его с компьютера, к которому раньше был подключен интернет.
Настройка других подключений:
Настройка PPPoE
Достаточно выбрать PPPoE, указать имя пользователя и пароль, выставить обязательно автоматическое подключение, и сохранить настройки.

Настройка подключения PPTP, или L2TP
Точно так же выбираем нужное подключение, указываем имя пользователя и пароль, затем указываем IP-адрес, или адрес сервера (например tp.internet.beeline.ru), ставим автоматическое подключение и сохраняем настройки.

Главное, что бы роутер подключился к интернету. Если это произошло, то можно продолжать настройку.
Настройка Wi-Fi сети и пароля
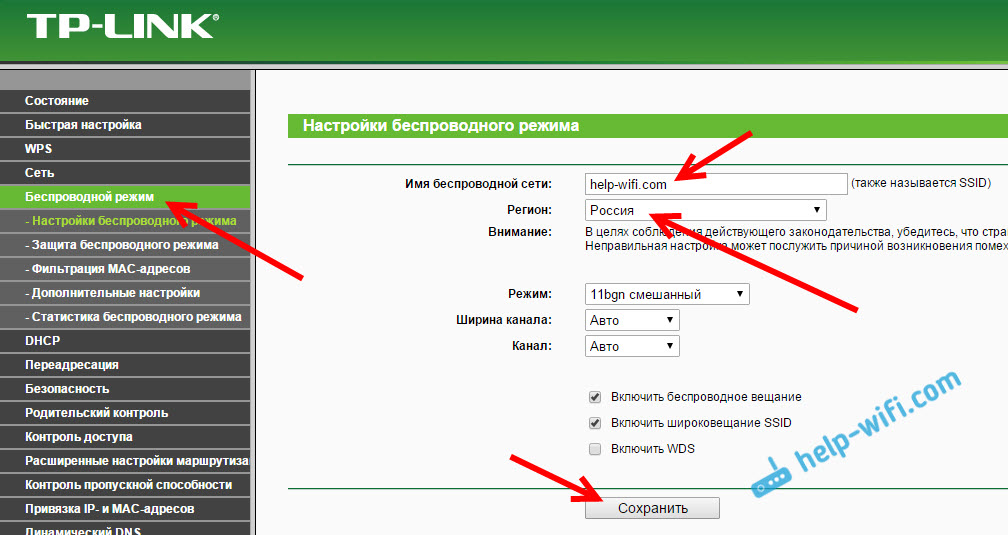
В панели управления открываем вкладку Беспроводной режим. Придумайте название для своей Wi-Fi сети, и запишите его в поле Имя сети. Если хотите, можете оставить стандартное имя. Дальше, в меню Регион выберите свой регион, и нажмите на кнопку Сохранить.
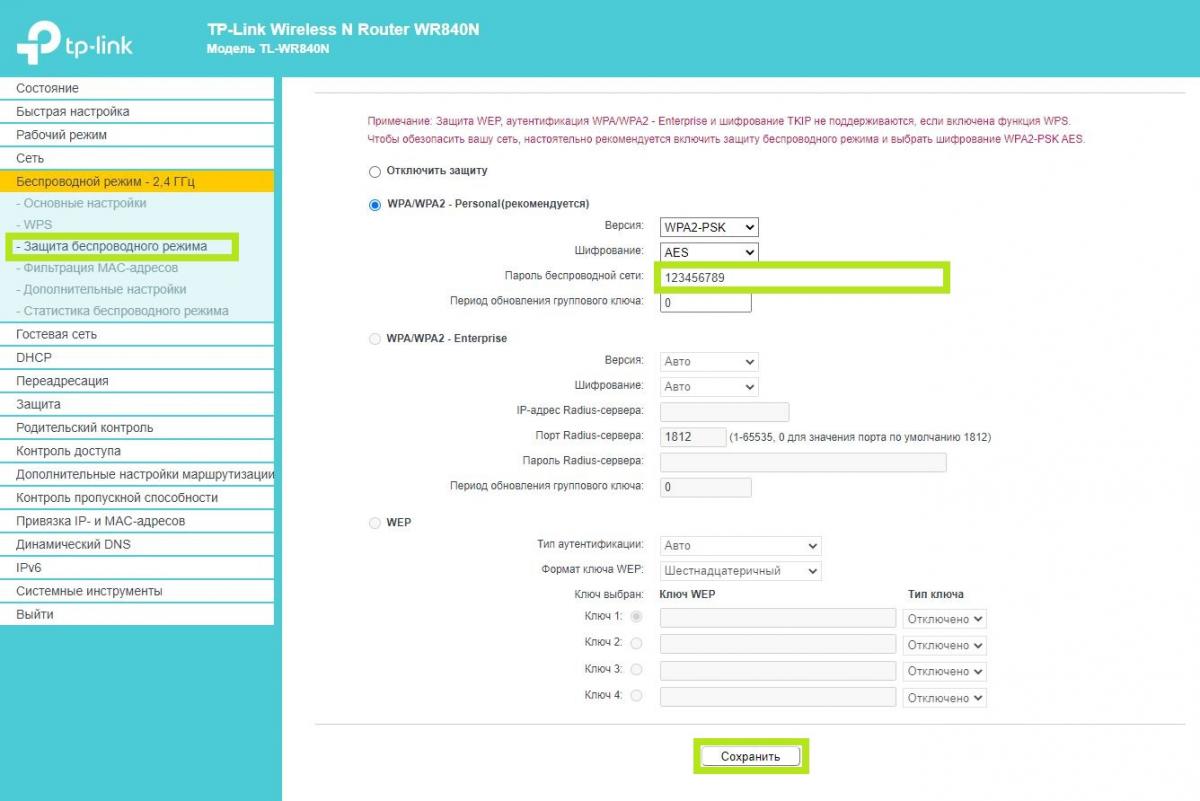
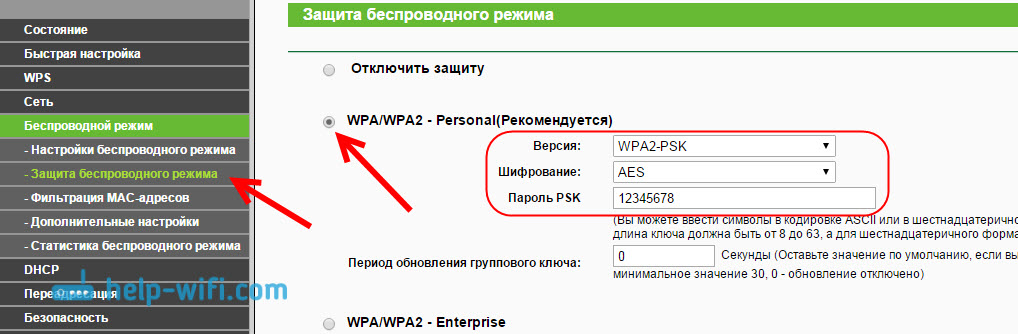
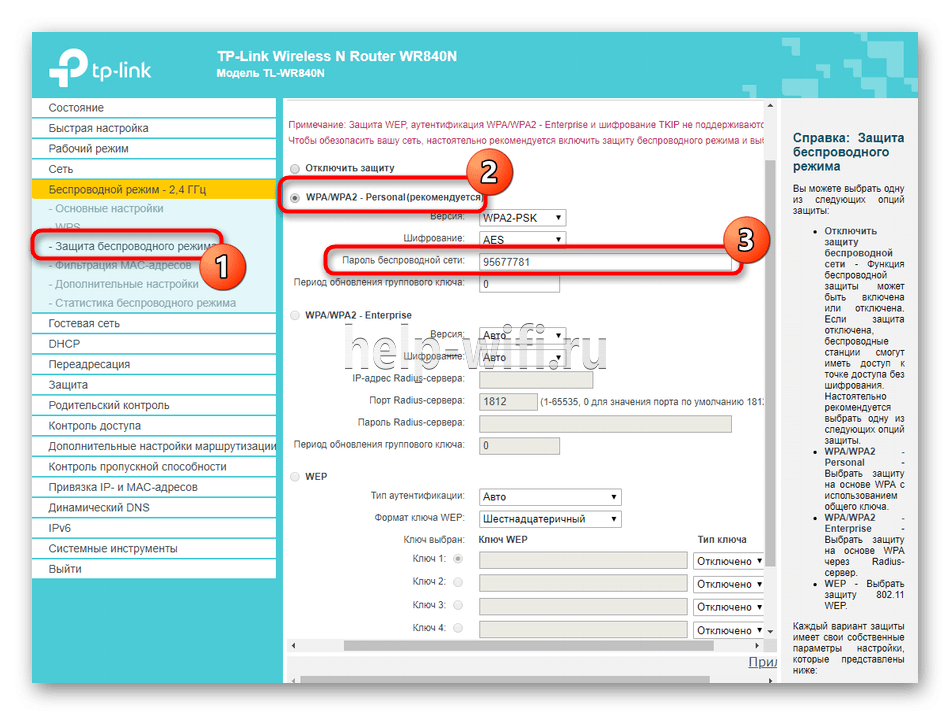
Откройте вкладку Защита беспроводного режима, что бы сменить пароль нашей Wi-Fi сети. Выберите WPA/WPA2 — Personal (рекомендуется), Версия – WPA2-PSK, Шифрование – можно оставить AES. И в поле Пароль PSK запишите пароль (минимум 8 символов), который нужно будет указывать при подключении к вашему Wi-Fi. Нажмите кнопку Сохранить.
Все, беспроводную сеть настроили.
Смена заводского пароля admin
Те устройства, которые будут подключаться к вашему роутеру, смогут зайти в его настройки. Это не совсем безопасно, поэтому, я рекомендую сменить стандартный пароль admin на какой-то другой. Это можно сделать на вкладке Системные инструменты – Пароль.
Там все просто. Указываем старые данные, и задаем новые. Не забудьте сохранить настройки.
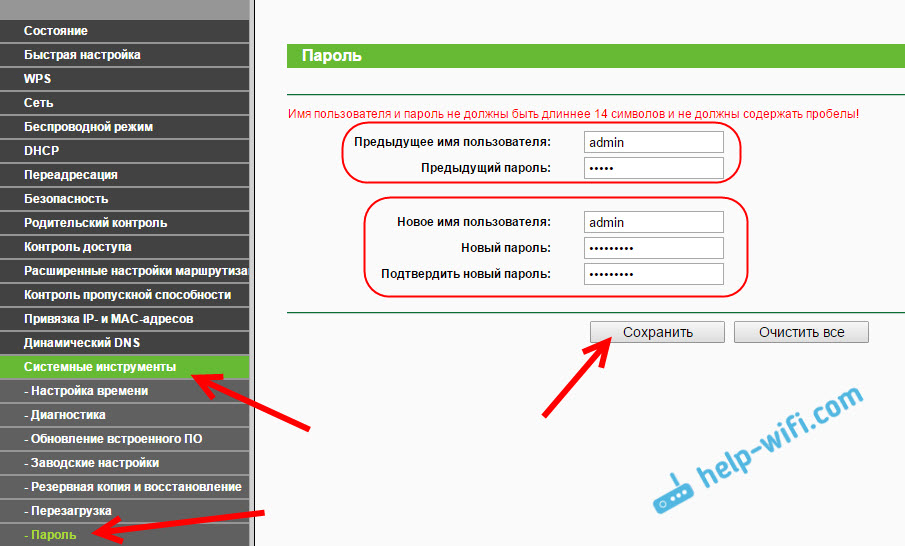
После этого, при входе в настройки нужно будет указывать установленный нами пароль. Постарайтесь его не забыть, а то придется делать сброс настроек к заводским.
Основные настройки мы задали, осталось только перезагрузить роутер что бы настройки вступили в силу. Сделать это можно на вкладке Системные инструменты – Перезагрузка, нажав на кнопку Перезагрузить. После этого можно подключать свои устройства к роутеру и пользоваться интернетом.
Настройка IPTV на TP-LINK TL-WR840N
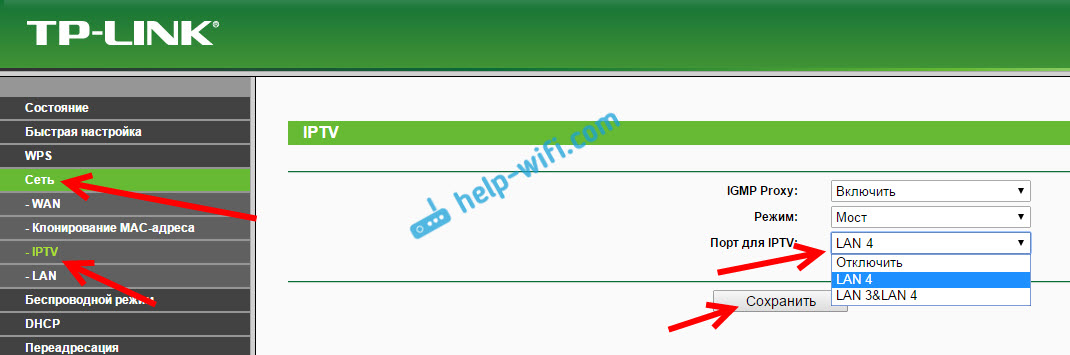
Если ваш интернет-провайдер предоставляем услугу цифрового телевидения, то его нужно будет настроить. Сделать это можно в панели управления на вкладке Сеть – IPTV.
В большинстве случаев, достаточно выбрать режим Мост, и указать в какой LAN разъем вы хотите подключить STB-приставку. Если же вам нужно настроить IPTV с указанием VLAN ID, то нужно в меню Режим выбрать 802.1Q Tag VLAN.
Думаю, это все настройки которые вам пригодятся. Инструкции по настройке других функций вы можете найти у нас на сайте в категории «TP-LINK».
Хотел еще добавить, что TP-LINK TL-WR840N поддерживает режим WDS. Настроить его можно по этой инструкции: https://help-wifi.com/tp-link/nastrojka-routera-tp-link-v-rezhime-mosta-wds-soedinyaem-dva-routera-po-wi-fi/.
Если у вас остались какие-то вопросы по настройке этого маршрутизатора, то задавайте их в комментариях. Всего хорошего!
На чтение 10 мин Просмотров 21.9к.

Андрей Корж
Системный администратор, специалист по оптимизации программного обеспечения и сетевых технологий
Разбираем инструкцию по настройке роутера TP-Link TL-WR840N (и его аналога с съемными антеннами — WR840ND). Устройство подходит для небольшого дома или офиса – позволяет выполнить проводное и беспроводное соединение с сетью. Имеет хорошую производительность и низкую стоимость. При покупке маршрутизатор комплектуется установочным диском, с помощью которого выполняется настройка роутера. Но мы рассмотрим ручной способ настройки через веб-интерфейс, чтобы воспользоваться расширенными функциями устройства.
Содержание
- Основные характеристики
- Подключение и вход в веб интерфейс
- Быстрая настройка
- Ручная настройка
- Настройка Wi-Fi
- IPTV
- Режим повторителя
- Обновление прошивки
- Смена пароля от админки
- Сброс на заводские настройки
- Отзывы
Основные характеристики
Перед тем, как подключить устройство к сети, стоит рассмотреть характеристики TP-Link TL-WR840N (и его аналога TL-WR840ND)
- Беспроводная передача данных со скоростью до 300 Мбит/сек – идеальный вариант, чтобы выполнять базовые и ресурсоемкие задачи.
- Кнопка WPS для быстрого подключения – достаточно одного нажатия, и роутер выполнит подключение самостоятельно.
- Контролируется пропускная способность администратором – допустимая ширина канала для каждого администратора.
- Увеличение зоны стабильного покрытия благодаря беспроводному мосту WDS.
- Поддерживает IGMP Proxy.
- Использует следующие стандарты — Wi-Fi 4, IEEE 802.11n/b/g 2,4 ГГц.
- Аппаратная часть оснащена одноядерным процессором.
- 1 порт WAN 10/100 Мбит/с.
- 4 порта LAN 10/100 Мбит/с.
- Использует протоколы IPv4, IPv6.
- 2 фиксированные антенны покрывают дом с двумя спальнями (у модели TP-Link TL-WR840ND антенны съемные).
- Наличие кнопки сброса настроек (Reset).
- Безопасность Wi-Fi WEP, WPA, WPA2, WPA/WPA2-Enterprise (802.1x).

Интуитивно понятный веб-интерфейс позволяет настроить соединение за считанные минуты, а сетевые настройки, родительский контроль и контроль доступа могут управляться приложением Tether с любого смартфона. Далее — пошаговая инструкция по настройке TP-Link TL-WR840N. Модель TP-Link TL-WR840ND настраивается точно так же.
Подключение и вход в веб интерфейс
Перед тем как подключить и настроить прибор, необходимо установить устройство в правильное место. Для охвата всей площади маршрутизатор устанавливается по центру квартиры. Вблизи роутера не должно быть металлических дверей и железобетонных перегородок, чтобы не создавать помехи в работе.
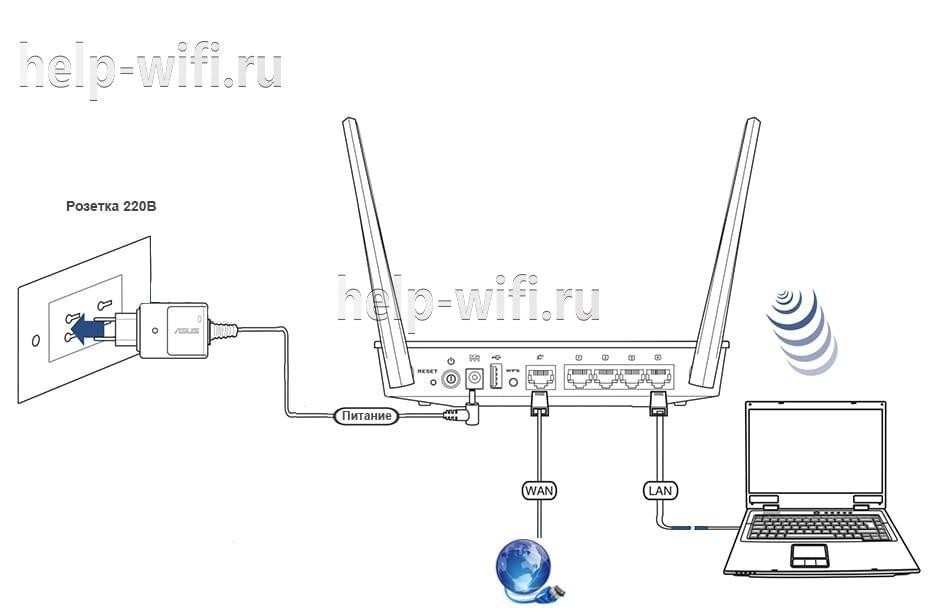
Теперь переходим к подключению. Вилку питания роутера вставляем в розетку и включаем устройство расположенной на задней панели кнопкой ON/OFF. При включении обратим внимание на лицевую сторону прибора – загораются индикаторы. Далее подсоедините кабель домашнего интернета в разъем WAN (расположен отдельно от других четырех разъемов). После этого необходимо подключить Wi-Fi-роутер TP-Link TL-WR840N к компьютеру. Используя провод под названием патч-корд, который идет в комплекте с маршрутизатором, вставляем один конец в разъем LAN (один из 4 разъемов на задней части устройства), а другой в разъем сетевой платы на компьютере или ноутбуке.
Провод используем при первом подключении. Как только настроим беспроводное соединение, он нам больше не понадобится. Роутер подключили к ПК, идем далее.
Чтобы самостоятельно настроить роутер TP-Link TL-WR840N, открываем любой браузер ПК и в адресной строке прописываем адрес роутера tplinkwifi.net, tplinklogin.net, 192.186.0.1 или 192.168.1.1 для старых моделей. Нажимаем Enter.
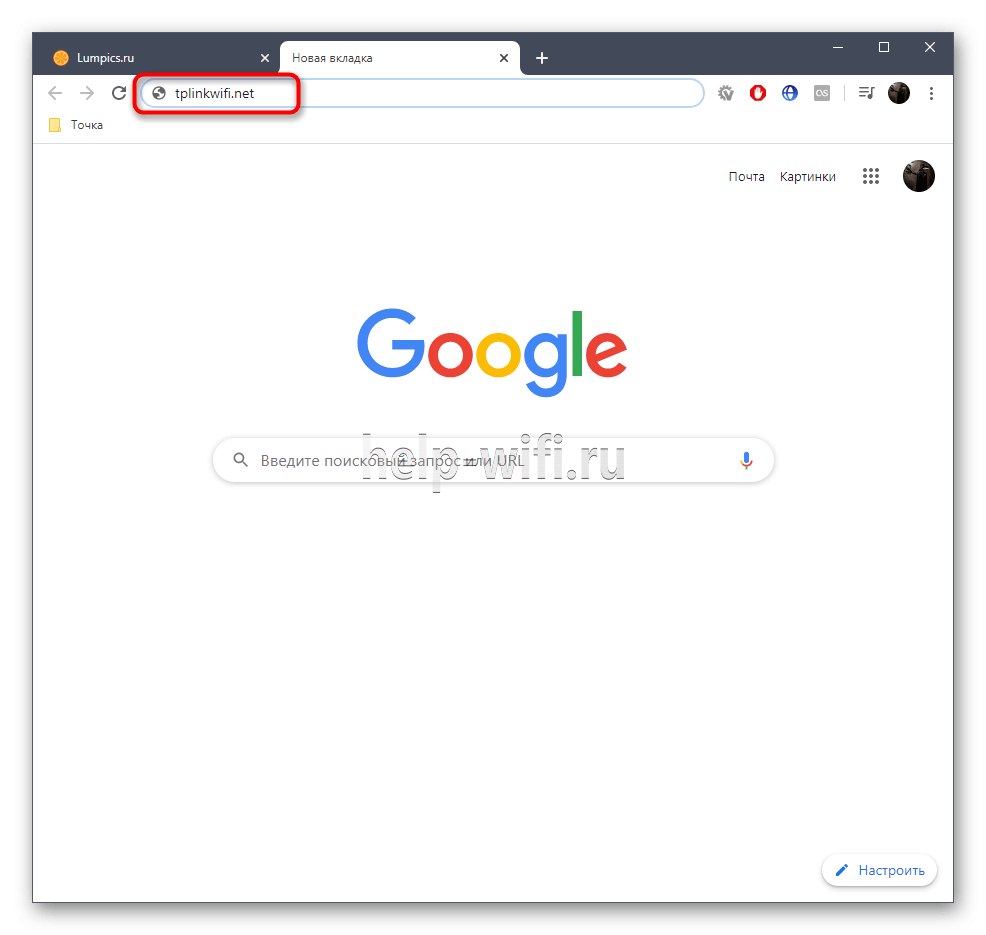
Откроется окно для ввода данных.
Вводим имя пользователя и пароль, которые находятся на нижней крышке роутера, и нажимаем «Вход». По умолчанию логин и пароль — admin.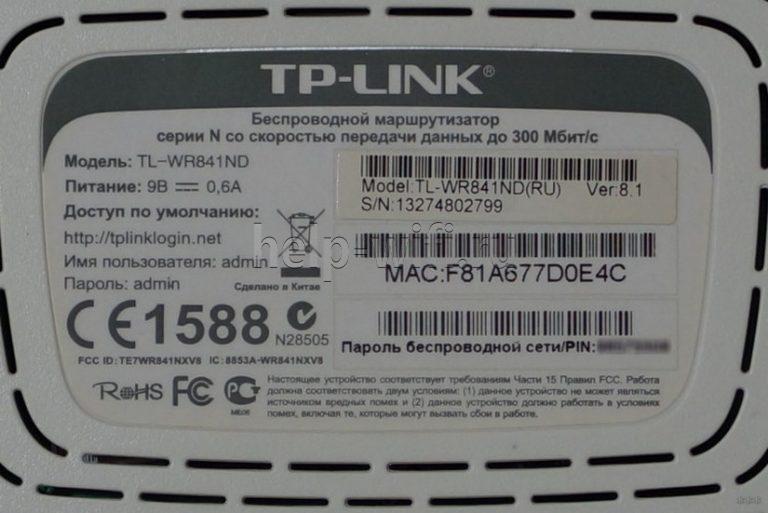
Мы вошли в веб-интерфейс.
Быстрая настройка
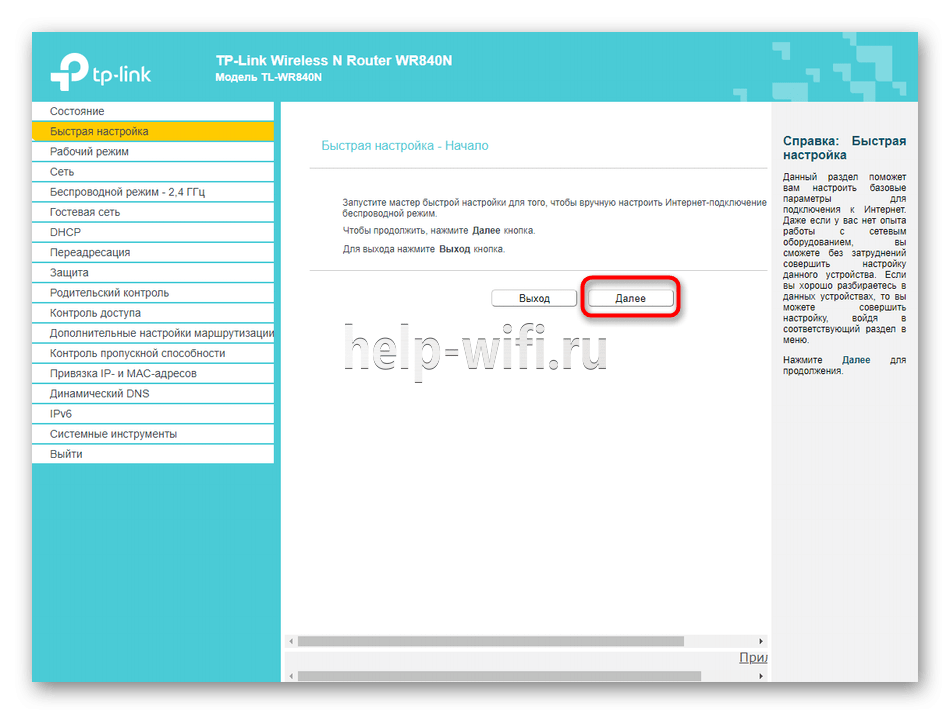
- После того, как мы вошли в веб-интерфейс, необходимо найти и открыть меню быстрой настройки.

- В этой ситуации настройка интернета и создание беспроводной сети по силам даже пользователю, который не обладает специальными знаниями в сфере информационных технологий. Здесь все просто – нажимаем кнопку «Далее» и следуем отображающимся на экране инструкциям.

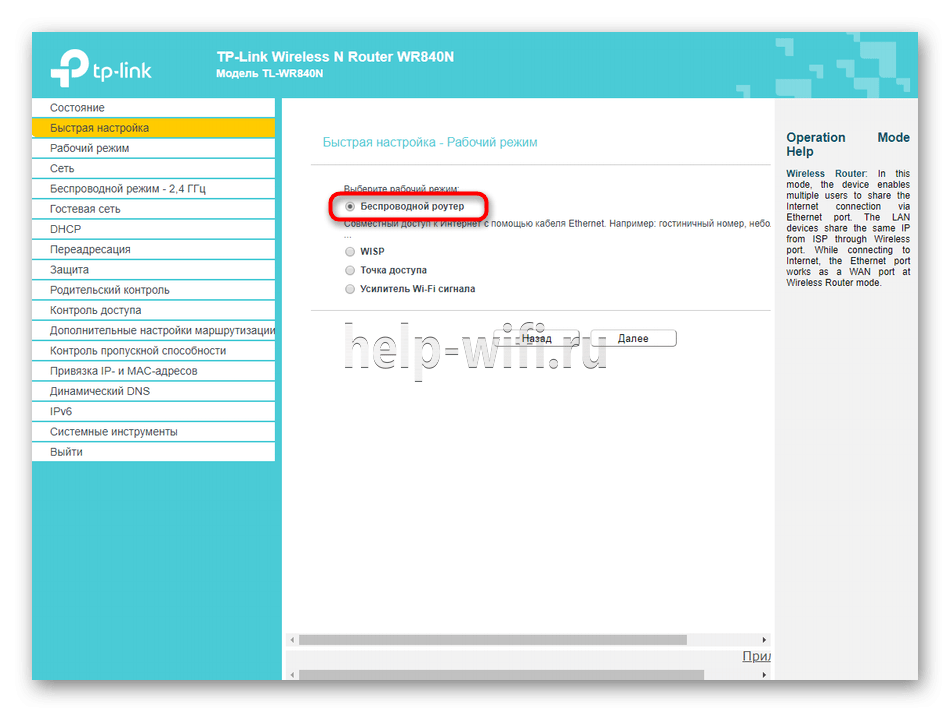
- Маркером отмечаем соответствующий пункт «Беспроводной роутер». Снова нажимаем «Далее».

- Теперь берем договор и другие документы, оставшиеся от провайдера. В следующем открывшемся окне вводим данные из бумаг (страна, город, провайдер и тип подключения WAN).

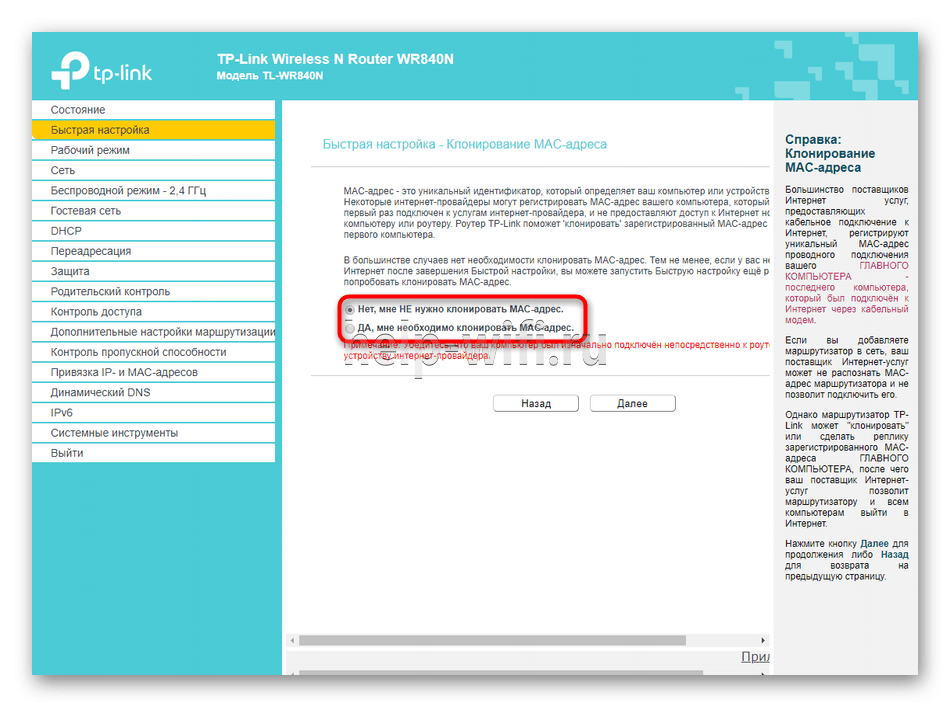
- Нажимаем кнопку «Далее» и перед нами открывается предложение клонировать MAC-адрес. Смотрим договор с провайдером. Если есть привязка по MAC-адресу, то выбираем «Да», если нет, то выбираем «Нет». В большинстве случаев не нужно клонировать Мак-адрес. Переходим к следующему разделу.

- Далее мастер предлагает настроить беспроводную сеть для доступа мобильным устройствам и ноутбукам через Wi-Fi. Придумываем название сети и прописываем в строку «Имя беспроводной сети». Галочкой устанавливается рекомендованная защита. Придумываем, прописываем и запоминаем надежный пароль – набор чисел и букв, используя которые устройства будут подключаться к сети через Wi-Fi (минимум 8 символов). Если защиту отключить, вашим интернетом воспользуется любой желающий.


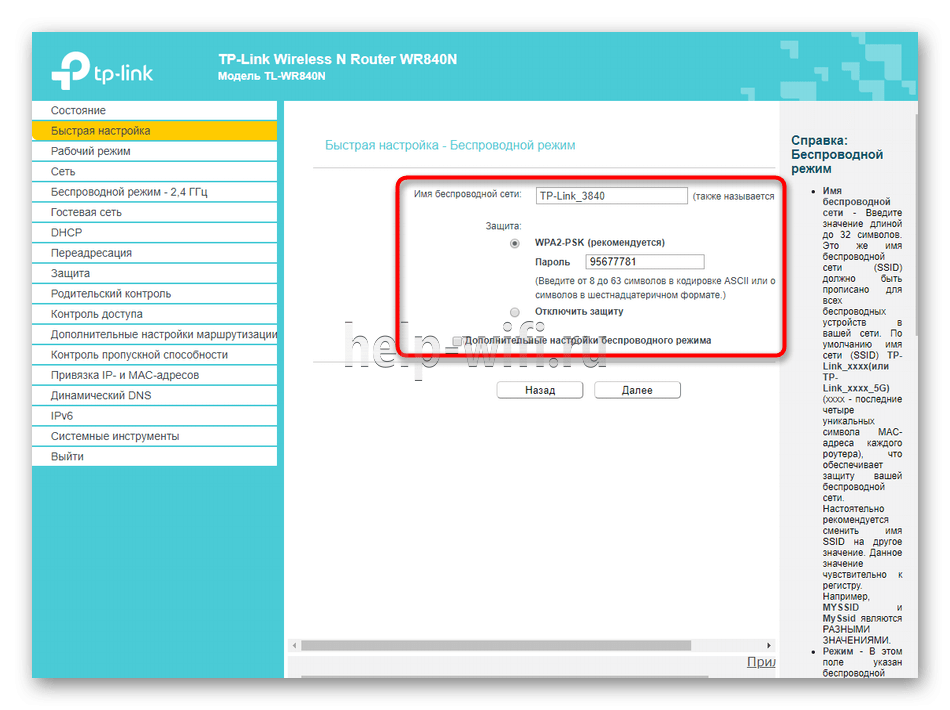
Остается лишь подтвердить настраиваемые параметры. Если это необходимо, легко возвращаемся к предыдущему этапу. Для подтверждения быстрой настройки нажимаем «Сохранить» — применяются все изменения и открывается доступ в интернет.
Режим «Быстрая настройка» предназначен для начинающих пользователей – отсутствуют лишние опции, а весь процесс длится не более нескольких минут. Если у вас не получилось настроить доступ в интернет таким способом, рассматриваем следующую инструкцию.
Ручная настройка
Чтобы настроить модель N300 TL-WR840N вручную, воспользуемся ручной настройкой. Рассмотрим инструкцию подробно с иллюстрациями:
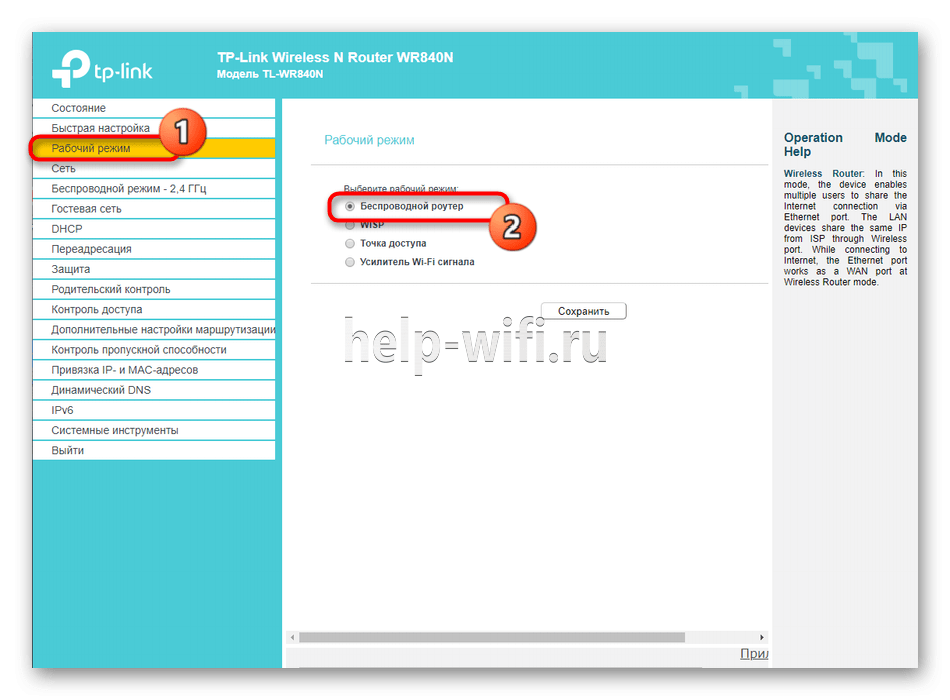
- Устанавливаем параметры WAN. Чтобы настроить любой роутер, требуется задать сетевые параметры, чтобы беспроводной маршрутизатор принимал соединение от провайдера. В веб-интерфейсе открываем меню «Рабочий режим» и устанавливаем маркер напротив «Беспроводной роутер». Сохраняем изменения.

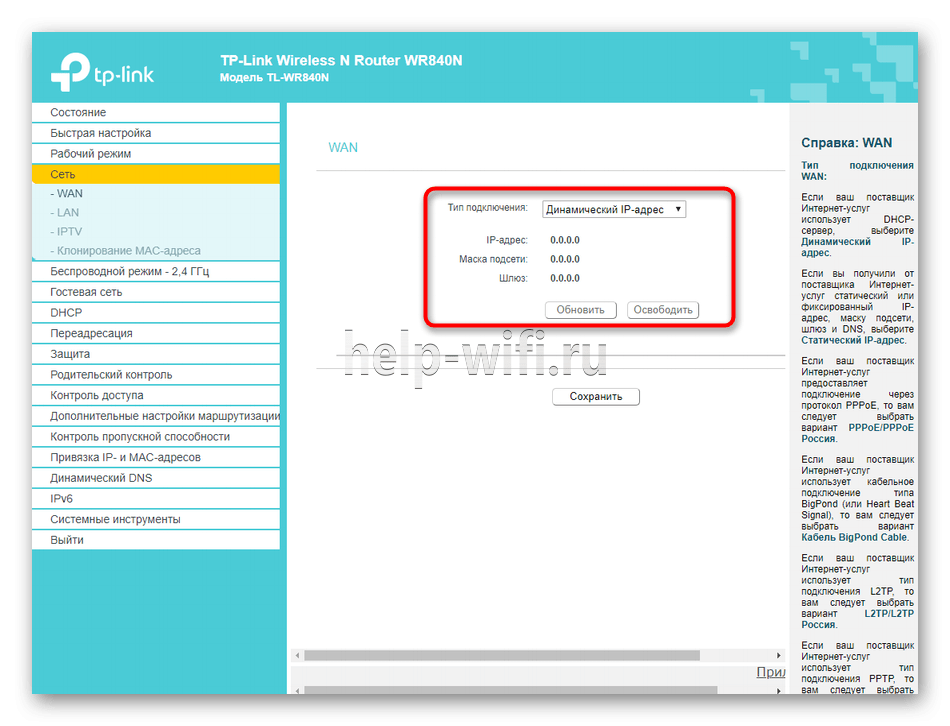
- Открываем слева вкладку «Сеть» и выбираем «WAN». Указываем тип подключения (чаще всего это динамический IP). Все параметры заполнятся автоматически.

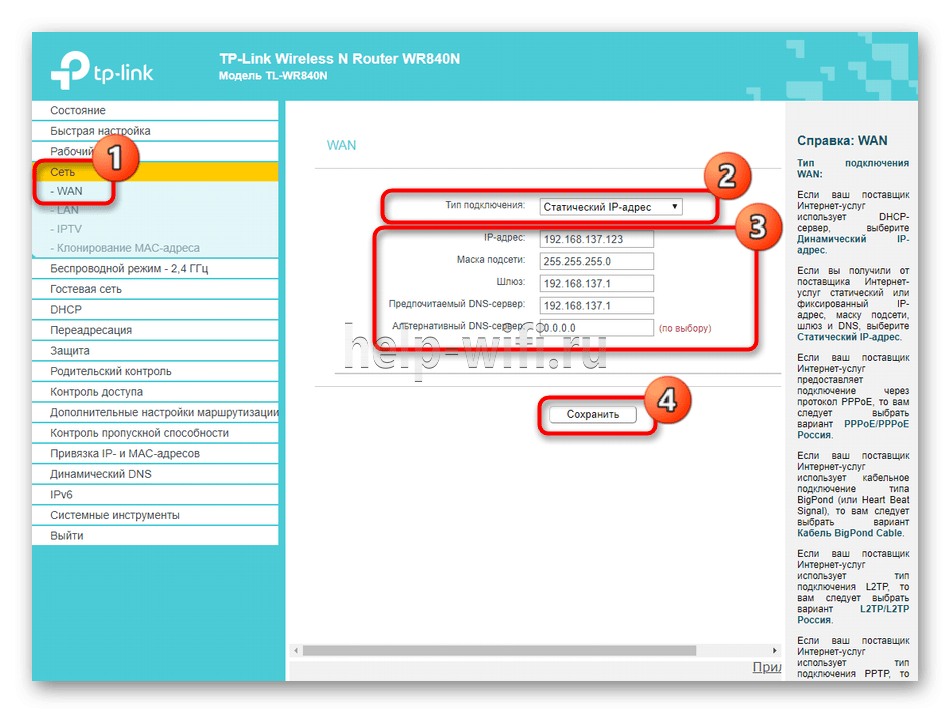
- Если тип подключения – статистический IP, то придется заполнять каждую строку таблицы.

- В редких случаях провайдеры предоставляют тип подключения PPPoE, PPTP. Здесь больше всего настроек – указание авторизационных данных, режима подключения и типа аутентификации.
Если вы не знаете, где искать данные для статистического и PPPoE подключения, дозваниваемся до технической поддержки своего провайдера. Все сведения указываются в договоре с поставщиком услуг. Только после этого заполняем таблицу. Если будет допущена хотя бы одна ошибка, доступа к интернету не будет.
Настройка Wi-Fi
Чтобы обеспечить подключение по вайфай, выполняем настройки беспроводного режима через веб-интерфейс роутера. Для обеспечения нормальной работоспособности Wi-Fi быстрых настроек обычно достаточно. Если вариант с быстрой настройкой, рассмотренный выше, вас не устраивает, переходим к следующей инструкции.
- Открываем меню «Беспроводной режим — 2.4 ГГц». Переходим в «Основные настройки». Включаем маркером беспроводную сеть и задаем наименование, с которым она будет показываться в списке доступных. Параметры режима, канала и ширины канала не трогаем.

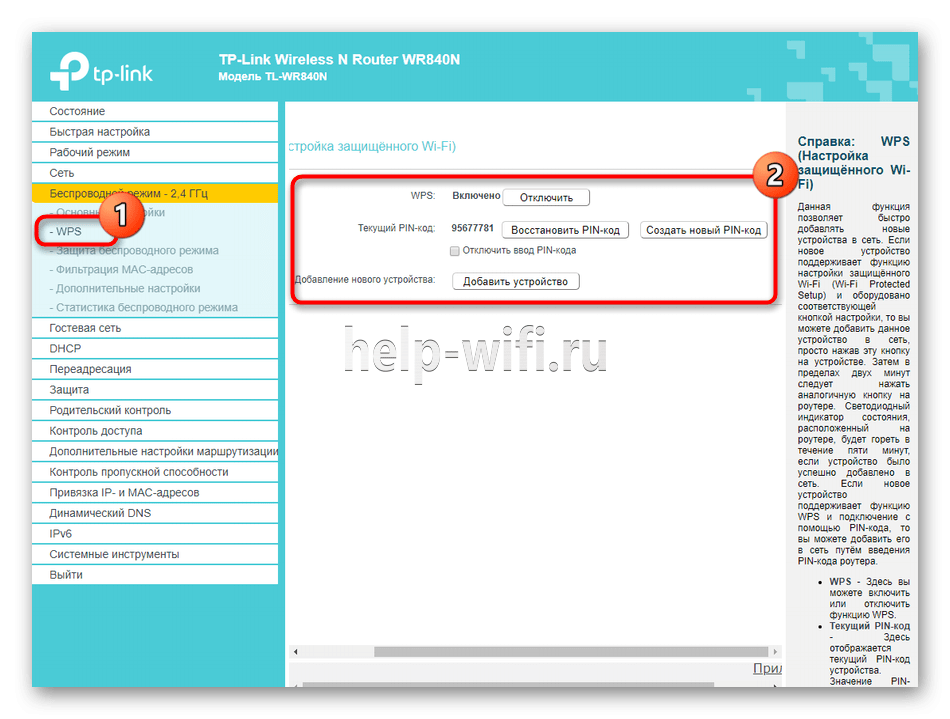
- Открываем меню WPS для быстрого соединения с маршрутизатором без необходимости вводить пароль. На ваше усмотрение могут быть добавлены доверенные устройства. Также можно ограничить свободное подключение.

- Открываем меню «Защита беспроводного режима». Здесь выбираем рекомендуемые параметры. Прописываем только пароль беспроводной сети, если требуется новый. В этом разделе задается свой пароль от вайфай (минимум 8 символов).


На этом настройки беспроводного соединения завершены, остальные разделы нам не понадобятся.
IPTV
При предоставлении провайдером услуги телевидения также требуется настройка. Особых сложностей нет. В веб-интерфейсе открываем меню «Сеть» и переходим во вкладку «IPTV». В открывшемся окне напротив строки «Режим» выбираем «Мост».

Обращаем внимание на строку «Порт для IPTV». Выбираем тот номер порта, в который подключена ТВ-приставка. Сохраняем настройки. После этого IPTV считается настроенным.

Режим повторителя
Чтобы расширить зону покрытия Wi-Fi, ТП-Линк TL-WR840N предусматривает работу в режиме повторителя (WDS). Например, в большом доме установлен роутер, а в дальней комнате устройства практически не ловят беспроводной сигнал. В данной ситуации предусматривается точка доступа для поддержания режима работы – репитер. Наш роутер позволяет работать в таком режиме.
- Открываем раздел «Быстрая настройка» в веб-интерфейсе и нажимаем «Далее».
- Выбираем значение не «Беспроводной роутер», как мы делали изначально, а «Усилитель Wi-Fi сигнала». Нажимаем «Далее».
- Выбираем подключение в нашей основной сети.

- Заполняем строку «Пароль» — прописываем значение от нашего Wi-Fi, который необходимо усилить. Нажимаем «Далее» — происходит синхронизация с сетью.


Обновление прошивки
Прошивка роутера обновляется легко даже для начинающего пользователя. Скачиваем файл обновления на компьютер – лучше искать на официальном сайте производителя. Отмечаем, что после обновления роутер может перестать работать.
- В веб-интерфейсе в левом меню открываем раздел «Системные инструменты» (System tools).
- Выбираем пункт «Обновление встроенного ПО» (Firmware Upgrade).
- В открывшемся окне нажимаем на «Выберите файл».
- Указываем место расположения файла.
- Нажимаем кнопку «Обновить».
Будет запущен процесс установки обновления на роутер.
Смена пароля от админки
Для повышения безопасности от несанкционированного доступа в веб-интерфейсе доступна смена стандартного логина и пароля. Чтобы установить свой пароль админки, рассмотрим следующую инструкцию.
- В веб-интерфейсе открываем меню «Системные инструменты».
- В раскрывшемся списке выбираем вкладку «Пароль».
- В двух верхних строках прописываем текущие логин и пароль, а в нижних – придумываем и прописываем свои.
- Нажимаем кнопку «Сохранить».
Нам удалось поменять пароль – остается только перезагрузить роутер функцией в «Системных инструментах».
Сброс на заводские настройки
При сбросе настроек на роутере на нем восстанавливаются заводские параметры. После этого пользовательская настройка производится заново. Данные модели имеют специальную кнопку «WPS/Reset» — она расположена на задней панели. Для перезагрузки маршрутизатора жмем эту кнопку в течение 10 секунд – после этого начнется перезапуск.
Мы рассмотрели первый способ восстановления заводских настроек – он подходит на тот случай, если вы забыли пароль от админки. После сброса настроек заходим в утилиту по заводским данным. Второй метод – утилита настройки маршрутизатора (веб-интерфейс).
В веб-интерфейсе открываем «Системные инструменты». Далее «Заводские настройки». Нажимаем «Восстановить». После этого роутер начнет восстанавливаться до стандартных настроек – нужно немного подождать.

При использовании TL-WR840N настройка Wi-Fi может производиться через руководство пользователя, которое идет в комплекте к роутеру.
Отзывы
Отзывы о TP-Link TL-WR840N начинающих пользователей и обзоры от профессионалов в целом положительные. В основном маршрутизатор характеризуется бесперебойной работой, компактностью, наличием нескольких портов. По словам владельцев, сменить настройки несложно, это вполне можно сделать самостоятельно.
Из недостатков – плохо раздает сигнал на несколько комнат в большой квартире.
Chapter 4 Configure the Router in Wireless Router Mode
This chapter presents how to configure the various features of the router working as a wireless router.
It contains the following sections:
•Status
•Operation Mode
•Network
•Wireless
•Guest Network
•DHCP
•Forwarding
•Security
•Parental Controls
•Access Control
•Advanced Routing
•Bandwidth Control
•IP&MAC Binding
•Dynamic DNS
•IPv6
•System Tools
•Logout
1. Status
1.Visit http://tplinkwifi.net, and log in with the username and password you set for the router.
2.Go to Status. You can view the current status information of the router.
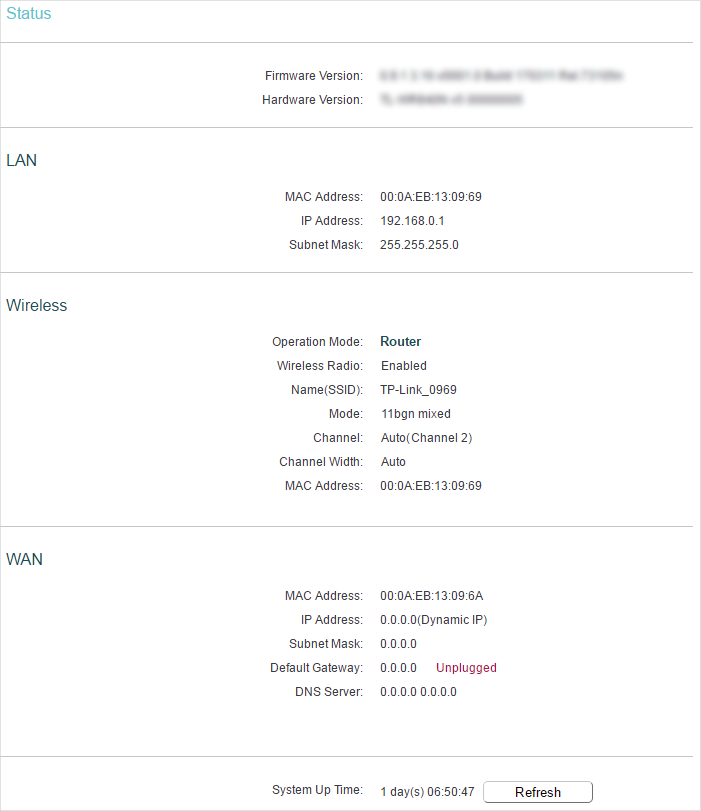
•Firmware Version — The version information of the router’s firmware.
•Hardware Version — The version information of the router’s hardware.
•LAN — This field displays the current settings of the LAN, and you can configure them on the Network > LAN page.
•MAC address — The physical address of the router.
•IP address — The LAN IP address of the router.
•Subnet Mask — The subnet mask associated with the LAN IP address.
•Wireless — This field displays the basic information or status of the wireless function, and you can configure them on the Wireless > Basic Settings page.
•Operation Mode — The current wireless working mode in use.
•Wireless Radio — Indicates whether the wireless radio feature of the router is enabled or disabled.
•Name(SSID) — The SSID of the router.
•Mode — The current wireless mode which the router works on.
•Channel — The current wireless channel in use.
•Channel Width — The current wireless channel width in use.
•MAC Address — The physical address of the router.
•WAN — This field displays the current settings of the WAN, and you can configure them on the Network > WAN page.
•MAC Address — The physical address of the WAN port.
•IP Address — The current WAN (Internet) IP Address. This field will be blank or 0.0.0.0 if the IP Address is assigned dynamically and there is no internet connection.
•Subnet Mask — The subnet mask associated with the WAN IP Address.
•Default Gateway — The Gateway currently used is shown here. When you use Dynamic IP as the internet connection type, click Renew or Release here to obtain new IP parameters dynamically from the ISP or release them.
•DNS Server — The IP addresses of DNS (Domain Name System) server.
•System Up Time — The length of the time since the router was last powered on or reset.
Click Refresh to get the latest status and settings of the router.
2. Operation Mode
1.Visit http://tplinkwifi.net, and log in with the username and password you set for the router.
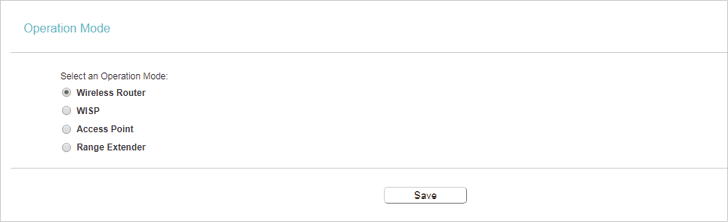
2.Go to Operation Mode.
3.Select the working mode as needed and click Save.
3. Network
3.1. WAN
1.Visit http://tplinkwifi.net, and log in with the username and password you set for the router.
2.Go to Network > WAN.
3.Configure the IP parameters of the WAN and click Save.
Dynamic IP
If your ISP provides the DHCP service, please select Dynamic IP, and the router will automatically get IP parameters from your ISP.
Click Renew to renew the IP parameters from your ISP.
Click Release to release the IP parameters.
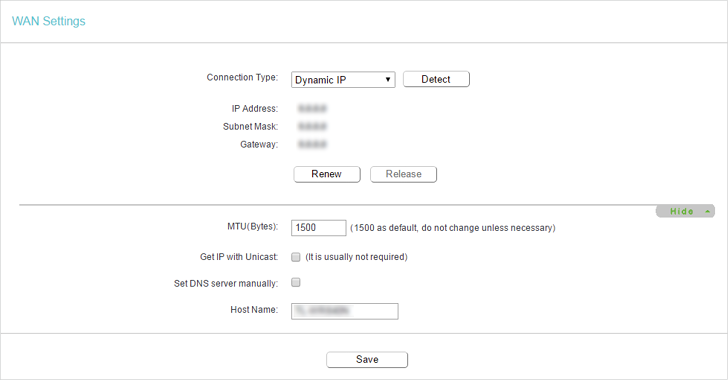
•MTU Size — The normal MTU (Maximum Transmission Unit) value for most Ethernet networks is 1500 Bytes. It is not recommended that you change the default MTU size unless required by your ISP.
•Get IP with Unicast — A few ISPs’ DHCP servers do not support the broadcast applications. If you cannot get the IP address normally, you can choose this option. (It is rarely required.)
•Set DNS server manually — If your ISP gives you one or two DNS addresses, select Set DNS server manually and enter the primary and secondary addresses into the correct fields. Otherwise, the DNS servers will be assigned automatically from your ISP.
•Host Name -This option specifies the name of the router.
Static IP
If your ISP provides a static or fixed IP address, subnet mask, default gateway and DNS setting, please select Static IP.
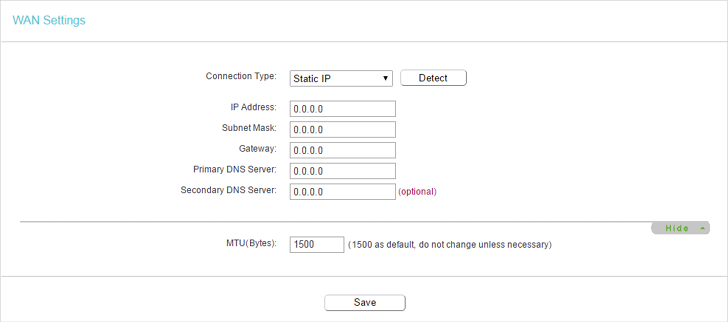
•IP Address — Enter the IP address in dotted-decimal notation provided by your ISP.
•Subnet Mask — Enter the subnet mask in dotted-decimal notation provided by your ISP. Normally 255.255.255.0 is used as the subnet mask.
•Gateway — Enter the gateway IP address in dotted-decimal notation provided by your ISP.
•Primary/Secondary DNS Server — (Optional) Enter one or two DNS addresses in dotted-decimal notation provided by your ISP.
•MTU (Bytes) — The normal MTU (Maximum Transmission Unit) value for most Ethernet networks is 1500 Bytes. It is not recommended that you change the default MTU size unless required by your ISP.
PPPoE
If your ISP provides PPPoE connection, select PPPoE.
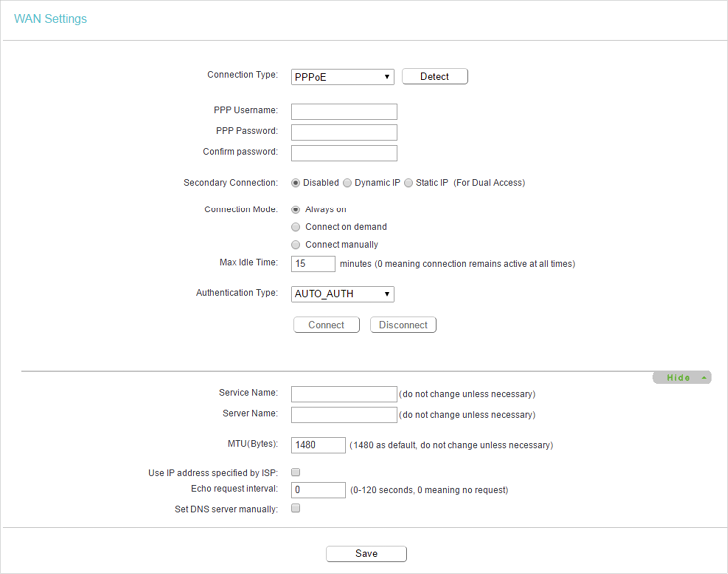
•User Name/Password — Enter the user name and password provided by your ISP. These fields are case-sensitive.
•Confirm Password — Enter the Password provided by your ISP again to ensure the password you entered is correct.
•Secondary Connection — It’s available only for PPPoE connection. If your ISP provides an extra connection type, select Dynamic IP or Static IP to activate the secondary connection.
•Connection Mode
•Always On — In this mode, the internet connection will be active all the time.
•Connect on Demand — In this mode, the internet connection can be terminated automatically after a specified inactivity period (Max Idle Time) and be re-established when you attempt to access the internet again. If you want to keep your internet connection active all the time, please enter 0 in the Max Idle Time field. Otherwise, enter the number of minutes you want to have elapsed before your internet access disconnects.
•Connect Manually — You can click Connect/Disconnect to connect/disconnect immediately. This mode also supports the Max Idle Time function as Connect on Demand mode. The internet connection can be disconnected automatically after a specified inactivity period (Max Idle Time) and not be able to re-establish when you attempt to access the internet again.
•Authentication Type — Choose an authentication type.
Note:
Sometimes the connection cannot be terminated although you have specified the Max Idle Time because some applications are visiting the internet continually in the background.
•Service Name/Server Name — The service name and server name should not be configured unless you are sure it is necessary for your ISP. In most cases, leaving these fields blank will work.
•MTU (Bytes) — The default MTU size is 1480 bytes. It is not recommended that you change the default MTU size unless required by your ISP.
•ISP Specified IP Address — If your ISP does not automatically assign IP addresses to the router, please select Use IP address specified by ISP and enter the IP address provided by your ISP in dotted-decimal notation.
•Echo Request Interval — The router will detect Access Concentrator online at every interval. The default value is 0. You can input the value between 0 and 120. The value 0 means no detect.
•DNS Server/Secondary DNS Server — If your ISP does not automatically assign DNS addresses to the router, please select Set DNS server manually and enter the IP address in dotted-decimal notation of your ISP’s primary DNS server. If a secondary DNS server address is available, enter it as well.
L2TP
If your ISP provides L2TP connection, please select L2TP.
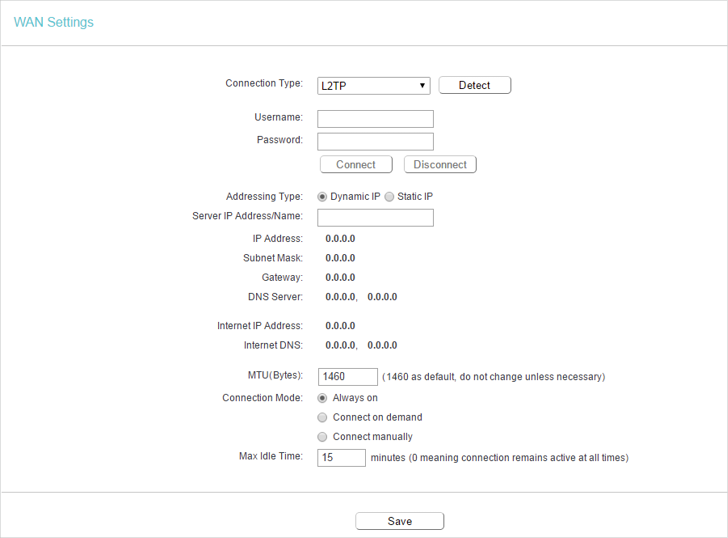
•Username/Password — Enter the username and password provided by your ISP. These fields are case-sensitive.
•Addressing Type — Choose the addressing type given by your ISP, either Dynamic IP or Static IP. Click the Connect button to connect immediately. Click the Disconnect button to disconnect immediately.
•MTU(Bytes) — The default MTU size is “1460” bytes, which is usually fine. It is not recommended that you change the default MTU Size unless required by your ISP.
•Connection Mode
•Always On — In this mode, the internet connection will be active all the time.
•Connect on Demand — In this mode, the internet connection can be terminated automatically after a specified inactivity period (Max Idle Time) and be re-established when you attempt to access the internet again. If you want to keep your internet connection active all the time, please enter 0 in the Max Idle Time field. Otherwise, enter the number of minutes you want to have elapsed before your internet access disconnects.
•Connect Manually — You can click Connect/Disconnect to connect/disconnect immediately. This mode also supports the Max Idle Time function as Connect on Demand mode. The internet connection can be disconnected automatically after a specified inactivity period (Max Idle Time) and not be able to re-establish when you attempt to access the internet again.
Note:
Sometimes the connection cannot be terminated although you have specified the Max Idle Time because some applications are visiting the internet continually in the background.
PPTP
If your ISP provides PPTP connection, please select PPTP.

•Username/Password — Enter the username and password provided by your ISP. These fields are case-sensitive.
•Addressing Type — Choose the addressing type given by your ISP, either Dynamic IP or Static IP. Click the Connect button to connect immediately. Click the Disconnect button to disconnect immediately.
•MTU(Bytes) — The default MTU size is “1460” bytes, which is usually fine. It is not recommended that you change the default MTU Size unless required by your ISP.
•Connection Mode
•Always On — In this mode, the internet connection will be active all the time.
•Connect on Demand — In this mode, the internet connection can be terminated automatically after a specified inactivity period (Max Idle Time) and be re-established when you attempt to access the internet again. If you want to keep your internet connection active all the time, please enter 0 in the Max Idle Time field. Otherwise, enter the number of minutes you want to have elapsed before your internet access disconnects.
•Connect Manually — You can click Connect/Disconnect to connect/disconnect immediately. This mode also supports the Max Idle Time function as Connect on Demand mode. The internet connection can be disconnected automatically after a specified inactivity period (Max Idle Time) and not be able to re-establish when you attempt to access the internet again.
Note:
Sometimes the connection cannot be terminated although you have specified the Max Idle Time because some applications are visiting the internet continually in the background.
BigPond Cable
If your ISP provides BigPond cable connection, please select BigPond Cable.
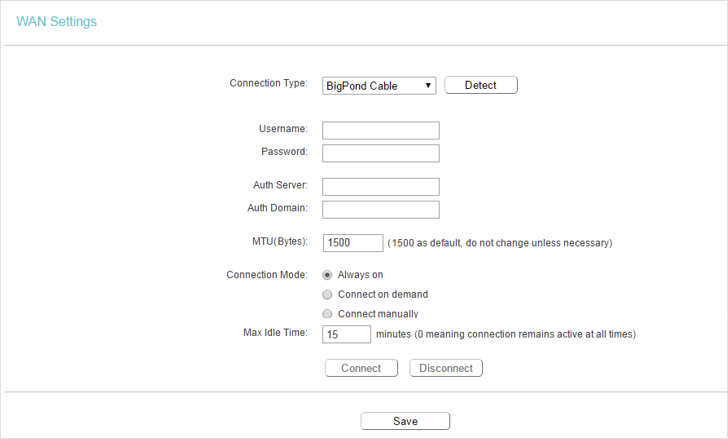
•Username/Password — Enter the username and password provided by your ISP. These fields are case-sensitive.
•Auth Server — Enter the authenticating server IP address or host name.
•Auth Domain — Type in the domain suffix server name based on your location.
•MTU(Bytes) — The default MTU size is 1500 bytes. It is not recommended that you change the default MTU size unless required by your ISP.
•Connection Mode
•Always On — In this mode, the internet connection will be active all the time.
•Connect on Demand — In this mode, the internet connection can be terminated automatically after a specified inactivity period (Max Idle Time) and be re-established when you attempt to access the internet again. If you want to keep your internet connection active all the time, please enter 0 in the Max Idle Time field. Otherwise, enter the number of minutes you want to have elapsed before your internet access disconnects.
•Connect Manually — You can click Connect/Disconnect to connect/disconnect immediately. This mode also supports the Max Idle Time function as Connect on Demand mode. The internet connection can be disconnected automatically after a specified inactivity period (Max Idle Time) and not be able to re-establish when you attempt to access the internet again.
3.2. LAN
1.Visit http://tplinkwifi.net, and log in with the username and password you set for the router.
2.Go to Network > LAN.
3.Configure the IP parameters of the LAN and click Save.
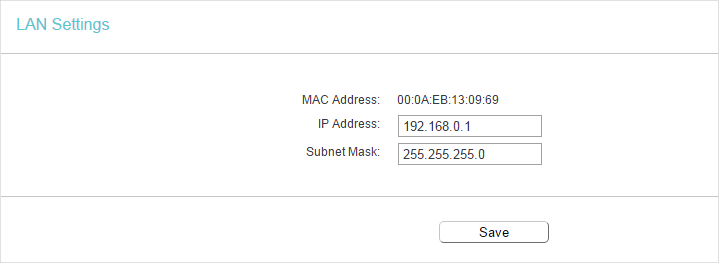
•MAC Address — The physical address of the LAN ports. The value can not be changed.
•IP Address — Enter the IP address in dotted-decimal notation of your router (the default one is 192.168.0.1).
•Subnet Mask — An address code that determines the size of the network. Normally 255.255.255.0 is used as the subnet mask.
Note:
•If you have changed the IP address, you must use the new IP address to log in.
•If the new IP address you set is not in the same subnet as the old one, the IP address pool in the DHCP Server will be configured automatically, but the Virtual Server and DMZ Host will not take effect until they are re-configured.
3.3. IPTV
1.Visit http://tplinkwifi.net, and log in with the username and password you set for the router.
2.Go to Network > IPTV.
3.Configure the WAN MAC address and click Save.
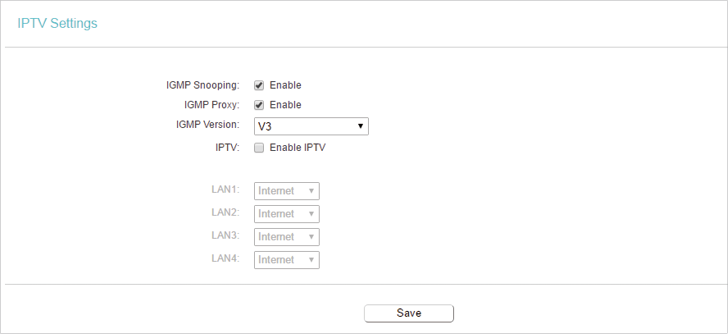
•IGMP Snooping — IGMP snooping is designed to prevent hosts on a local network from receiving traffic for a multicast group they have not explicitly joined. IGMP snooping is especially useful for bandwidth-intensive IP multicast applications such as IPTV.
•IGMP Proxy — IGMP (Internet Group Management Protocol) is used to manage multicasting on TCP/IP networks. The default value is enabled, and if you are not sure, please contact your ISP or just leave it.
•IGMP Version — Select the IGMP (Internet Group Management Protocol) Proxy Version, either V2 or V3, according to your ISP.
•IPTV — Select to enable the IPTV feature.
•IPTV Mode — Select the appropriate mode according to your ISP.
•LAN 1/2/3/4 — Assign your LAN port to whether function as the internet supplier or as the IPTV supplier.
3.4. MAC Clone
1.Visit http://tplinkwifi.net, and log in with the username and password you set for the router.
2.Go to Network > MAC Clone.
3.Configure the WAN MAC address and click Save.
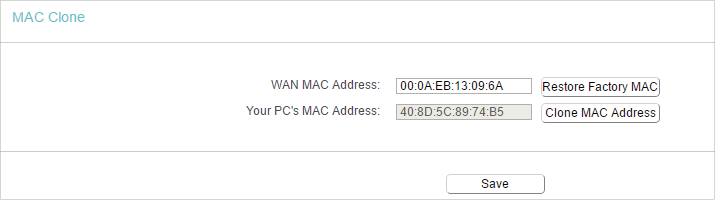
•WAN MAC Address — This field displays the current MAC address of the WAN port. If your ISP requires you to register the MAC address, please enter the correct MAC address in this field. Click Restore Factory MAC to restore the MAC address of WAN port to the factory default value.
•Your PC’s MAC Address — This field displays the MAC address of the PC that is managing the router. If the MAC address is required, you can click Clone MAC Address and this MAC address will be filled in the WAN MAC Address field.
Note:
•You can only use the MAC Address Clone function for PCs on the LAN.
•If you have changed the WAN MAC address when the WAN connection is PPPoE, it will not take effect until the connection is re-established.
4. Wireless
4.1. Wireless Settings
1.Visit http://tplinkwifi.net, and log in with the username and password you set for the router.
2.Go to Wireless > Basic Settings.
3.Configure the basic settings for the wireless network and click Save.
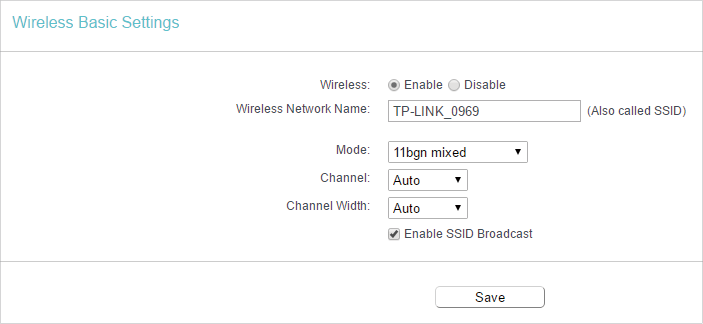
•Wireless — Enable or disable wireless network.
•Wireless Network Name — Enter a value of up to 32 characters. The same Name (SSID) must be assigned to all wireless devices in your network.
•Mode — You can choose the appropriate “Mixed” mode.
•Channel — This field determines which operating frequency will be used. The default channel is set to Auto. It is not necessary to change the wireless channel unless you notice interference problems with another nearby access point.
•Channel Width — This field determines which operating frequency will be used. It is not necessary to change the wireless channel unless you notice interference problems with another nearby access point. If you select auto, then AP will choose the best channel automatically.
•Enable SSID Broadcast — If enabled, the router will broadcast the wireless network name (SSID).
4.2. WPS
WPS (Wi-Fi Protected Setup) can help you to quickly and securely connect to a network. This section will guide you to add a new wireless device to your router’s network quickly via WPS.
Note:
The WPS function cannot be configured if the wireless function of the router is disabled. Please make sure the wireless function is enabled before configuration.
1.Visit http://tplinkwifi.net, and log in with the username and password you set for the router.
2.Go to Wireless > WPS.
3.Follow one of the following three methods to connect your client device to the router’s Wi-Fi network.
Method ONE: Press the WPS Button on Your Client Device
1.Keep the WPS Status as Enabled and click Add Device.
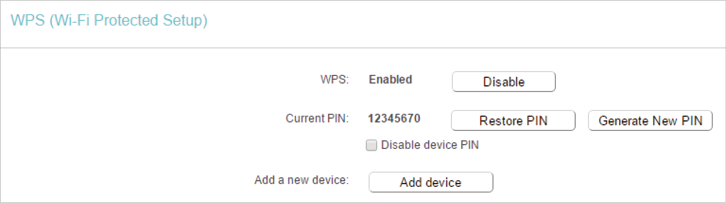
2.Select Press the WPS button of the new device within the next two minutes and click Connect.
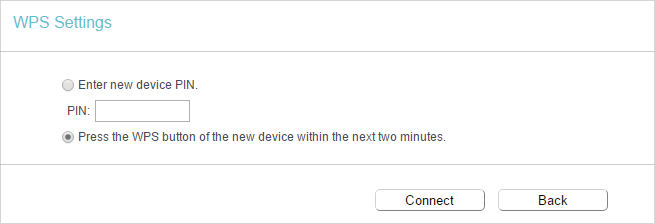
3.Within two minutes, press the WPS button on your client device.
4.A success message will appear on the WPS page if the client device has been successfully added to the router’s network.
Method TWO: Enter the Client’s PIN
1.Keep the WPS Status as Enabled and click Add Device.
2.Select Enter new device PIN, enter your client device’s current PIN in the PIN filed and click Connect.
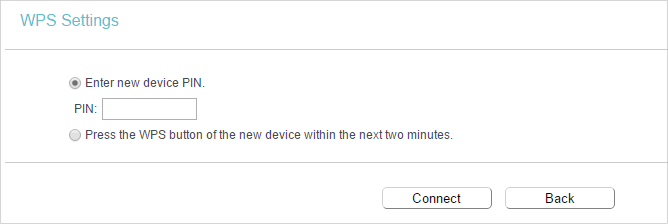
3.A success message will appear on the WPS page if the client device has been successfully added to the router’s network.
Method Three: Enter the Router’s PIN
1.Keep the WPS Status as Enabled and get the Current PIN of the router.
2.Enter the router’s current PIN on your client device to join the router’s Wi-Fi network.
4.3. Wireless Security
1.Visit http://tplinkwifi.net, and log in with the username and password you set for the router.
2.Go to Wireless > Wireless Security.
3.Configure the security settings of your wireless network and click Save.
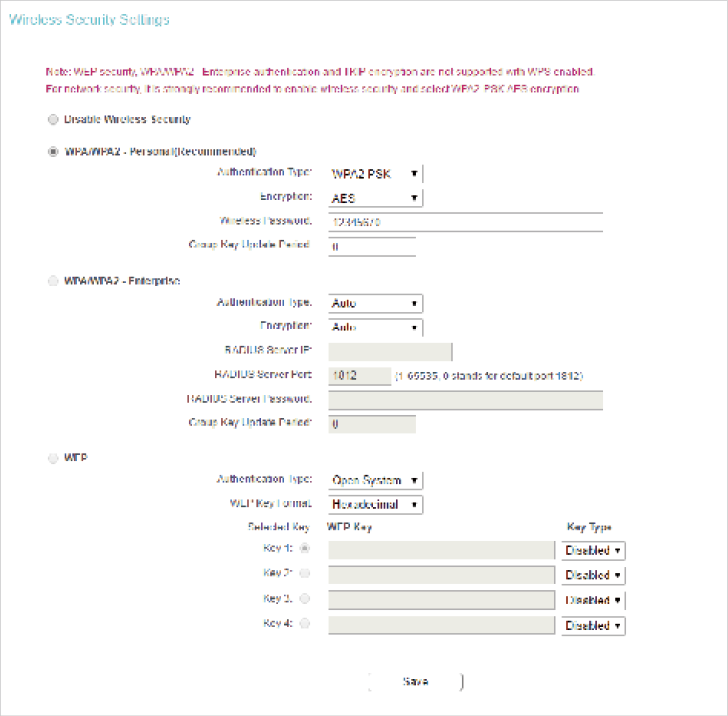
•Disable Wireless Security — The wireless security function can be enabled or disabled. If disabled, wireless clients can connect to the router without a password. It’s strongly recommended to choose one of the following modes to enable security.
•WPA-PSK/WPA2-Personal — It’s the WPA/WPA2 authentication type based on pre-shared passphrase.
•Authentication Type — Select Auto, WPA-PSK or WPA2-PSK.
•Encryption — Select Auto, TKIP or AES.
•Wireless Password — Enter ASCII or Hexadecimal characters. For Hexadecimal, the length should be between 8 and 64 characters; for ASCII, the length should be between 8 and 63 characters.
•Group Key Update Period — Specify the group key update interval in seconds. The value can be 0 or at least 30. Enter 0 to disable the update.
•WPA /WPA2-Enterprise — It’s based on Radius Server.
•Authentication Type — Select Auto, WPA or WPA2.
•Encryption — Select Auto, TKIP or AES.
•Radius Server IP — Enter the IP address of the Radius server.
•Radius Server Port — Enter the port that Radius server used.
•Radius Server Password — Enter the password for the Radius server.
•Group Key Update Period — Specify the group key update interval in seconds. The value should be 30 or above. Enter 0 to disable the update.
•WEP — It is based on the IEEE 802.11 standard.
•Authentication Type — The default setting is Auto, which can select Shared Key or Open System authentication type automatically based on the wireless client’s capability and request.
•WEP Key Format — Hexadecimal and ASCII formats are provided here. Hexadecimal format stands for any combination of hexadecimal digits (0-9, a-f, A-F) in the specified length. ASCII format stands for any combination of keyboard characters in the specified length.
•WEP Key (Password) — Select which of the four keys will be used and enter the matching WEP key. Make sure these values are identical on all wireless clients in your network.
•Key Type — Select the WEP key length (64-bit, 128-bit or 152-bit) for encryption. Disabled means this WEP key entry is invalid.
•64-bit — Enter 10 hexadecimal digits (any combination of 0-9, a-f and A-F. Null key is not permitted) or 5 ASCII characters.
•128-bit — Enter 26 hexadecimal digits (any combination of 0-9, a-f and A-F. Null key is not permitted) or 13 ASCII characters.
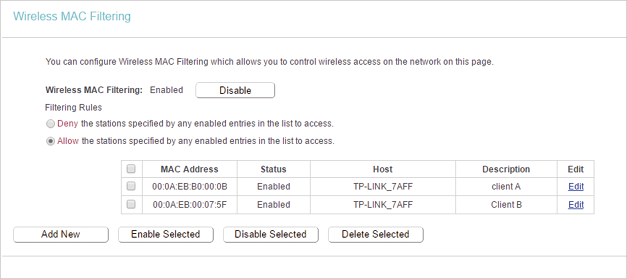
4.4. Wireless MAC Filtering
Wireless MAC Filtering is used to deny or allow specific wireless client devices to access your network by their MAC addresses.
I want to:
Deny or allow specific wireless client devices to access my network by their MAC addresses.
For example, you want the wireless client A with the MAC address 00-0A-EB-B0-00-0B and the wireless client B with the MAC address 00-0A-EB-00-07-5F to access the router, but other wireless clients cannot access the router
How can I do that?
1.Visit http://tplinkwifi.net, and log in with the username and password you set for the router.
2.Go to Wireless > Wireless MAC Filtering.
3.Click Enable to enable the Wireless MAC Filtering function.
4.Select Allow the stations specified by any enabled entries in the list to access as the filtering rule.
5.Delete all or disable all entries if there are any entries already.
6.Click Add New and fill in the blank.
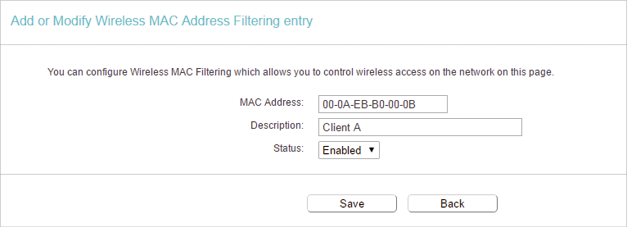
1 )Enter the MAC address 00-0A-EB-B0-00-0B / 00-0A-EB-00-07-5F in the MAC Address field.
2 )Enter wireless client A/B in the Description field.
3 )Select Enabled in the Status drop-down list.
4 )Click Save and click Back.
7.The configured filtering rules should be listed as the picture shows below.
Done!
Now only client A and client B can access your network.
4.5. Wireless Advanced
1.Visit http://tplinkwifi.net, and log in with the username and password you set for the router.
2.Go to Wireless > Wireless Advanced.
3.Configure the advanced settings of your wireless network and click Save.
Note:
If you are not familiar with the setting items on this page, it’s strongly recommended to keep the provided default values; otherwise it may result in lower wireless network performance.
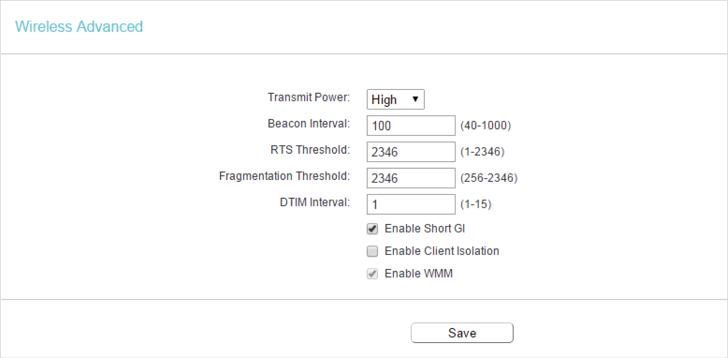
•Transmit Power — Select High, Middle or Low which you would like to specify for the router. High is the default setting and recommended.
•Beacon Interval — Enter a value between 40-1000 milliseconds for Beacon Interval here. Beacon Interval value determines the time interval of the beacons. The beacons are the packets sent by the router to synchronize a wireless network. The default value is 100.
•RTS Threshold — Here you can specify the RTS (Request to Send) Threshold. If the packet is larger than the specified RTS Threshold size, the router will send RTS frames to a particular receiving station and negotiate the sending of a data frame. The default value is 2346.
•Fragmentation Threshold — This value is the maximum size determining whether packets will be fragmented. Setting a low value for the Fragmentation Threshold may result in poor network performance because of excessive packets. 2346 is the default setting and is recommended.
•DTIM Interval — This value determines the interval of the Delivery Traffic Indication Message (DTIM). A DTIM field is a countdown field informing clients of the next window for listening to broadcast and multicast messages. When the router has buffered broadcast or multicast messages for associated clients, it sends the next DTIM with a DTIM Interval value. You can specify the value between 1-255 Beacon Intervals. The default value is 1, which indicates the DTIM Interval is the same as Beacon Interval.
•Enable Short GI — It is recommended to enable this function, for it will increase the data capacity by reducing the guard interval time.
•Enable Client Isolation — This function isolates all connected wireless stations so that wireless stations cannot access each other through WLAN. This function will be disabled if WDS/Bridge is enabled.
•Enable WMM — WMM function can guarantee the packets with high-priority messages being transmitted preferentially. It is strongly recommended to enable this function.
4.6. Wireless Statistics
1.Visit http://tplinkwifi.net, and log in with the username and password you set for the router.
2.Go to Wireless > Wireless Statistics to check the data packets sent and received by each client device connected to the router.

•MAC Address — The MAC address of the connected wireless client.
•Current Status — The running status of the connected wireless client.
•Received Packets — Packets received by the wireless client.
•Sent Packets — Packets sent by the wireless client.
•SSID — SSID that the station associates with.
5. Guest Network
Guest Network allows you to provide Wi-Fi access for guests without disclosing your host network. When you have guests in your house, apartment, or workplace, you can create a guest network for them. In addition, you can customize guest network settings to ensure network security and privacy.
1.Visit http://tplinkwifi.net, and log in with the username and password you set for the router.
2.Go to Guest Network.
3.Enable the Guset Network function.
4.Create a network name for your guest network.
5.Select the Security type and create the Password of the guest network.
6.Select Schedule from the Access Time drop-down list and customize it for the guest network.
7.Click Save.
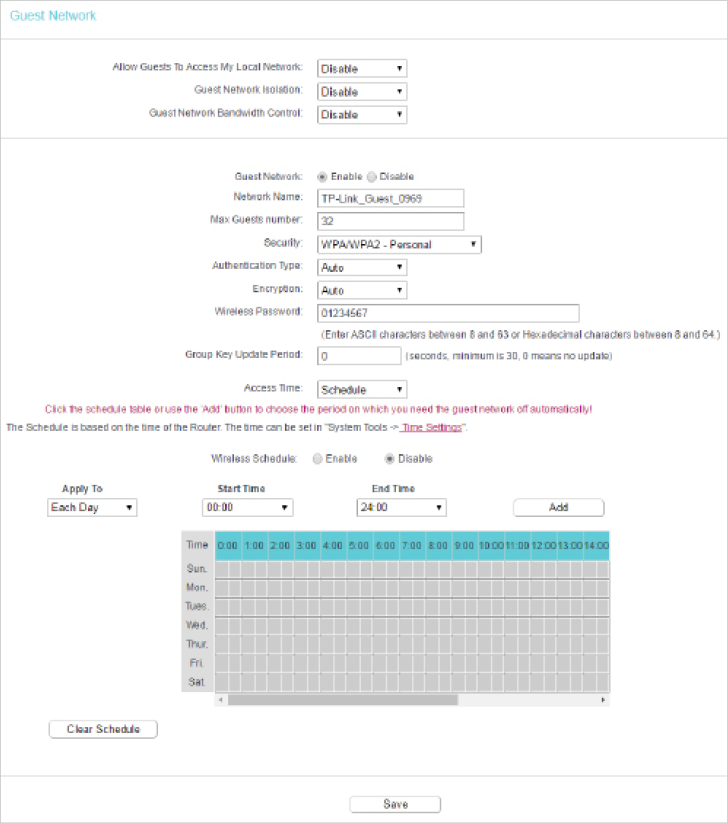
•Allow Guest To Access My Local Network — If enabled, guests can access the local network and manage it.
•Guest Network Isolation — If enabled, guests are isolated from each other.
•Enable Guest Network Bandwidth Control — If enabled, the Guest Network Bandwidth Control rules will take effect.
Note:
The range of bandwidth for guest network is calculated according to the setting of Bandwidth Control on the Bandwidth Control page.
6. DHCP
By default, the DHCP (Dynamic Host Configuration Protocol) Server is enabled and the router acts as a DHCP server; it dynamically assigns TCP/IP parameters to client devices from the IP Address Pool. You can change the settings of DHCP Server if necessary, and you can reserve LAN IP addresses for specified client devices.
6.1. DHCP Settings
1.Visit http://tplinkwifi.net, and log in with the username and password you set for the router.
2.Go to DHCP > DHCP Settings.
3.Specify DHCP server settings and click Save.
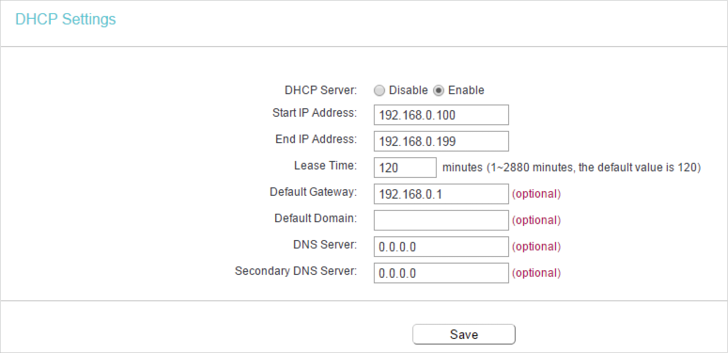
•DHCP Server — Enable or disable the DHCP server. If disabled, you must have another DHCP server within your network or else you must configure the computer manually.
•Start IP Address — Specify an IP address for the DHCP Server to start with when assigning IP addresses. 192.168.0.100 is the default start address.
•End IP Address — Specify an IP address for the DHCP Server to end with when assigning IP addresses. 192.168.0.199 is the default end address.
•Address Lease Time — The Address Lease Time is the amount of time a network user will be allowed to connect to the router with the current dynamic IP Address. When time is up, the user will be automatically assigned a new dynamic IP address. The range of the time is 1 ~ 2880 minutes. The default value is 120.
•Default Gateway (Optional) — It is suggested to input the IP address of the LAN port of the router. The default value is 192.168.0.1.
•Default Domain (Optional) — Input the domain name of your network.
•DNS Server (Optional) — Input the DNS IP address provided by your ISP.
•Secondary DNS Server (Optional) — Input the IP address of another DNS server if your ISP provides two DNS servers.
Note:
•To use the DHCP server function of the router, you must configure all computers on the LAN as Obtain an IP Address automatically.
6.2. DHCP Clients List
1.Visit http://tplinkwifi.net, and log in with the username and password you set for the router.
2.Go to DHCP > DHCP Clients List to view the information of the clients connected to the router.
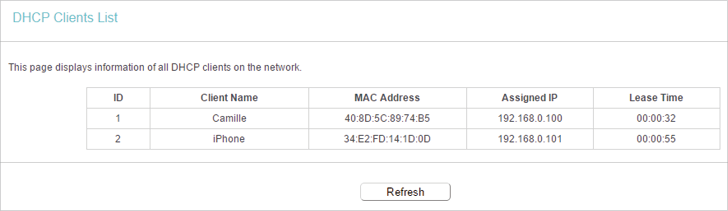
•Client Name — The name of the DHCP client.
•MAC Address — The MAC address of the DHCP client.
•Assigned IP — The IP address that the outer has allocated to the DHCP client.
•Lease Time — The time of the DHCP client leased. After the dynamic IP address has expired, a new dynamic IP address will be automatically assigned to the user.
You cannot change any of the values on this page. To update this page and show the current attached devices, click Refresh.
6.3. Address Reservation
You can reserve an IP address for a specific client. When you specify a reserved IP address for a PC on the LAN, this PC will always receive the same IP address each time when it accesses the DHCP server.
1.Visit http://tplinkwifi.net, and log in with the username and password you set for the router.
2.Go to DHCP > Address Reservation.
3.Click Add New and fill in the blanks.
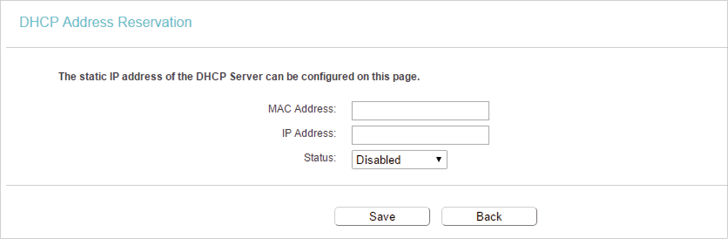
1 )Enter the MAC address (in XX-XX-XX-XX-XX-XX format) of the client for which you want to reserve an IP address.
2 )Enter the IP address (in dotted-decimal notation) which you want to reserve for the client.
3 )Leave the Status as Enabled.
4 )Click Save.
7. Forwarding
The router’s NAT (Network Address Translation) feature makes the devices on the LAN use the same public IP address to communicate on the internet, which protects the local network by hiding IP addresses of the devices. However, it also brings about the problem that external hosts cannot initiatively communicate with the specified devices in the local network.
With the forwarding feature, the router can traverse the isolation of NAT so that clients on the internet can reach devices on the LAN and realize some specific functions.
The TP-Link router includes four forwarding rules. If two or more rules are set, the priority of implementation from high to low is Virtual Servers, Port Triggering, UPNP and DMZ.
7.1. Virtual Server
When you build up a server in the local network and want to share it on the internet, Virtual Servers can realize the service and provide it to internet users. At the same time virtual servers can keep the local network safe as other services are still invisible from the internet.
Virtual Servers can be used to set up public services in your local network, such as HTTP, FTP, DNS, POP3/SMTP and Telnet. Different service uses different service port. Port 80 is used in HTTP service, port 21 in FTP service, port 25 in SMTP service and port 110 in POP3 service. Please verify the service port number before the configuration.
I want to:
Share my personal website I’ve built in local network with my friends through the internet.
For example, the personal website has been built in my home PC (192.168.0.100). I hope that my friends on the internet can visit my website in some way. My PC is connected to the router with the WAN IP address 218.18.232.154.
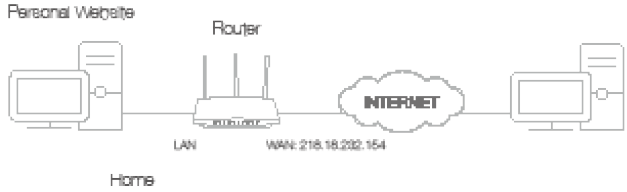
How can I do that?
1.Set your PC to a static IP address, for example 192.168.0.100.
2.Visit http://tplinkwifi.net, and log in with the username and password you set for the router.
3.Go to Forwarding > Virtual Server.
4.Click Add New. Select HTTP from the Common Service Port list. The service port, internal port and protocol will be automatically filled in. Enter the PC’s IP address 192.168.0.100 in the IP Address field.
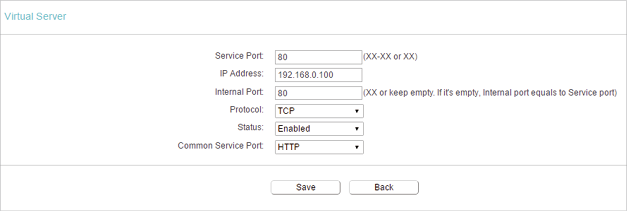
5.Leave the status as Enabled and click Save.
Note:
•It is recommended to keep the default settings of Internal Port and Protocol if you are not clear about which port and protocol to use.
•If the service you want to use is not in the Common Service Port list, you can enter the corresponding parameters manually. You should verify the port number that the service needs.
•You can add multiple virtual server rules if you want to provide several services in a router. Please note that the Service Port should not be overlapped.
Done!
Users on the internet can enter http:// WAN IP (in this example: http:// 218.18.232.154) to visit your personal website.
Note:
•If you have changed the default Service Port, you should use http:// WAN IP: Service Port to visit the website.
•Some specific service ports are forbidden by the ISP, if you fail to visit the website, please use another service port.
7.2. Port Triggering
Port triggering can specify a triggering port and its corresponding external ports. When a host in the local network initiates a connection to the triggering port, all the external ports will be opened for subsequent connections. The router can record the IP address of the host. When the data from the internet return to the external ports, the router can forward them to the corresponding host. Port triggering is mainly applied to online games, VoIPs, video players and common applications including MSN Gaming Zone, Dialpad, Quick Time 4 players and more.
Follow the steps below to configure the port triggering rules:
1.Visit http://tplinkwifi.net, and log in with the username and password you set for the router.
2.Go to Forwarding > Port Triggering.
3.Click Add New. Select the desired application from the Common Applications list. The trigger port amd incoming ports will be automatically filled in. The following picture takes application MSN Gaming Zone as an example.
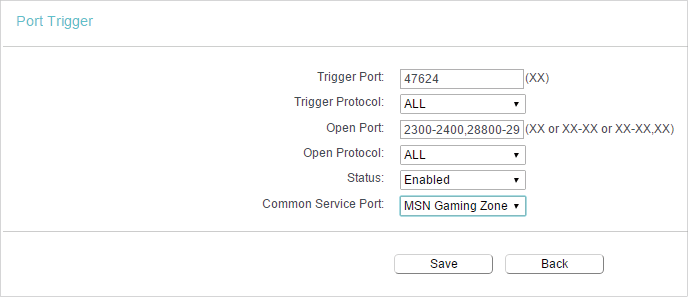
4.Leave the status as Enabled and click Save.
Note:
•You can add multiple port triggering rules as needed.
•The triggering ports can not be overlapped.
•If the application you need is not listed in the Common Applications list, please enter the parameters manually. You should verify the incoming ports the application uses first and enter them in Incoming Ports field. You can input at most 5 groups of ports (or port sections). Every group of ports must be set apart with “,”. For example, 2000-2038, 2050-2051, 2085, 3010-3030.
7.3. DMZ
When a PC is set to be a DMZ (Demilitarized Zone) host in the local network, it is totally exposed to the internet, which can realize the unlimited bidirectional communication between internal hosts and external hosts. The DMZ host becomes a virtual server with all ports opened. When you are not clear about which ports to open in some special applications, such as IP camera and database software, you can set the PC to be a DMZ host.
Note:
DMZ is more applicable in the situation that users are not clear about which ports to open. When it is enabled, the DMZ host is totally exposed to the internet, which may bring some potential safety hazards. If DMZ is not in use, please disable it in time.
I want to:
Make the home PC join the internet online game without port restriction.
For example, due to some port restriction, when playing the online games, you can log in normally but cannot join a team with other players. To solve this problem, set your PC as a DMZ host with all ports opened.
How can I do that?
1.Assign a static IP address to your PC, for example 192.168.0.100.
2.Visit http://tplinkwifi.net, and log in with the username and password you set for the router.
3.Go to Forwarding > DMZ.
4.Select Enable and enter the IP address 192.168.0.100 in the DMZ Host IP Address filed.
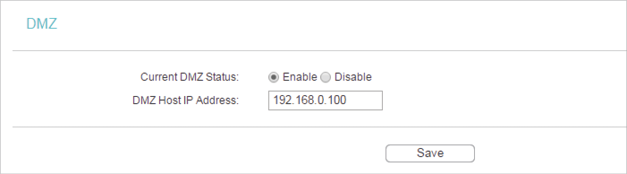
5.Click Save.
Done!
You’ve set your PC to a DMZ host and now you can make a team to game with other players.
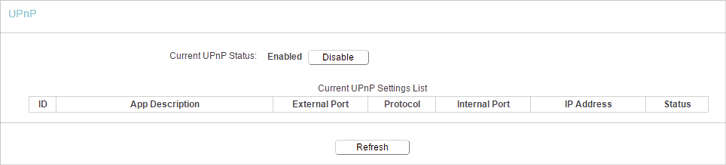
7.4. UPnP
The UPnP (Universal Plug and Play) protocol allows the applications or host devices to automatically find the front-end NAT device and send request to it to open the corresponding ports. With UPnP enabled, the applications or host devices on the local network and the internet can freely communicate with each other realizing the seamless connection of the network. You may need to enable the UPnP if you want to use applications for multiplayer gaming, peer-to-peer connections, real-time communication (such as VoIP or telephone conference) or remote assistance, etc.
Tips:
•UPnP is enabled by default in this router.
•Only the application supporting UPnP protocol can use this feature.
•UPnP feature needs the support of operating system (e.g. Windows Vista/ Windows 7/ Windows 8, etc. Some of operating system need to install the UPnP components).
For example, when you connect your Xbox to the router which is connected to the internet to play online games, UPnP will send request to the router to open the corresponding ports allowing the following data penetrating the NAT to transmit. Therefore, you can play Xbox online games without a hitch.

If necessary, you can follow the steps to change the status of UPnP.
1.Visit http://tplinkwifi.net, and log in with the username and password you set for the router.
2.Go to Forwarding > UPnP.
3.Click Disable or Enable according to your needs.
8. Security
This function allows you to protect your home network from cyber attacks and unauthorized users by implementing these network security functions.
8.1. Basic Security
1.Visit http://tplinkwifi.net, and log in with the username and password you set for the router.
2.Go to Security > Basic Security, and you can enable or disable the security functions.
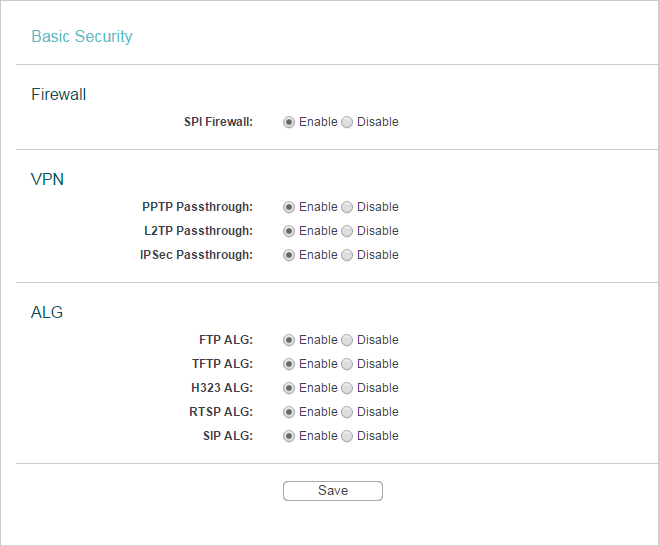
•Firewall — A firewall protects your network from internet attacks.
•SPI Firewall — SPI (Stateful Packet Inspection, also known as dynamic packet filtering) helps to prevent cyber attacks by tracking more state per session. It validates that the traffic passing through the session conforms to the protocol. SPI Firewall is enabled by default.
•VPN — VPN Passthrough must be enabled if you want to allow VPN tunnels using IPSec, PPTP or L2TP protocols to pass through the router’s firewall.
•PPTP Passthrough — Point-to-Point Tunneling Protocol (PPTP) allows the Point-to-Point Protocol (PPP) to be tunneled through an IP network. If you want to allow PPTP tunnels to pass through the router, you can keep the default (Enabled).
•L2TP Passthrough — Layer 2 Tunneling Protocol (L2TP) is the method used to enable Point-to-Point sessions via the internet on the Layer 2 level. If you want to allow L2TP tunnels to pass through the router, you can keep the default (Enabled).
•IPSec Passthrough — Internet Protocol Security (IPSec) is a suite of protocols for ensuring private, secure communications over Internet Protocol (IP) networks, through the use of cryptographic security services. If you want to allow IPSec tunnels to pass through the router, you can keep the default (Enabled).
•ALG — It is recommended to enable Application Layer Gateway (ALG) because ALG allows customized Network Address Translation (NAT) traversal filters to be plugged into the gateway to support address and port translation for certain application layer “control/data” protocols such as FTP, TFTP, H323 etc.
•FTP ALG — To allow FTP clients and servers to transfer data across NAT, keep the default Enable.
•TFTP ALG — To allow TFTP clients and servers to transfer data across NAT, keep the default Enable.
•H323 ALG — To allow Microsoft NetMeeting clients to communicate across NAT, keep the default Enable.
•RTSP ALG — To allow some media player clients to communicate with some streaming media servers across NAT, click Enable.
•SIP ALG — To allow some multimedia clients to communicate across NAT, click Enable.
3.Click Save.
8.2. Advanced Security
1.Visit http://tplinkwifi.net, and log in with the username and password you set for the router.
2.Go to Security > Advanced Security, and you can protect the router from being attacked by ICMP-Flood, UDP Flood and TCP-SYN Flood.
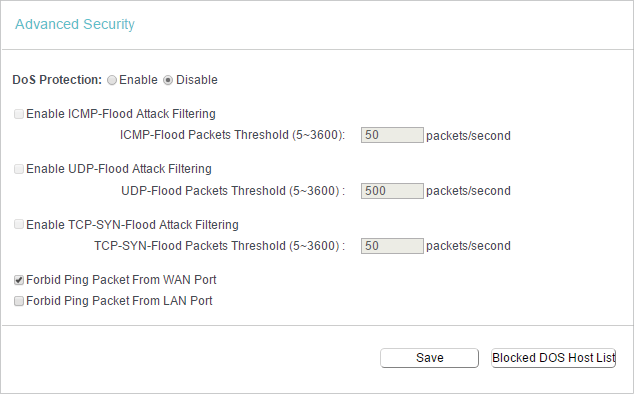
•DoS Protection — Denial of Service protection. Select Enable or Disable to enable or disable the DoS protection function. Only when it is enabled, will the flood filters be enabled.
Note:
Dos Protection will take effect only when the Statistics in System Tool > Statistics is enabled.
•Enable ICMP-FLOOD Attack Filtering — Tick the checkbox to enable or disable this function.
•ICMP-FLOOD Packets Threshold (5~3600) — The default value is 50. Enter a value between 5 ~ 3600. When the number of the current ICMP-FLOOD packets is beyond the set value, the router will startup the blocking function immediately.
•Enable UDP-FLOOD Filtering — Tick the checkbox to enable this function.
•UDP-FLOOD Packets Threshold (5~3600) — The default value is 500. Enter a value between 5 ~ 3600. When the number of the current UPD-FLOOD packets is beyond the set value, the router will startup the blocking function immediately.
•Enable TCP-SYN-FLOOD Attack Filtering -Tick the checkbox to enable or disable this function.
•TCP-SYN-FLOOD Packets Threshold (5~3600) — The default value is 50. Enter a value between 5 ~ 3600. When the number of the current TCP-SYN-FLOOD packets is beyond the set value, the router will startup the blocking function immediately.
•Ignore Ping Packet From WAN Port — The default setting is disabled. If enabled, the ping packet from the internet cannot access the router.
•Forbid Ping Packet From LAN Port — The default setting is disabled. If enabled, the ping packet from LAN cannot access the router. This function can be used to defend against some viruses.
3.Click Save.
4.Click Blocked DoS Host List to display the DoS host table by blocking.
8.3. Local Management
1.Visit http://tplinkwifi.net, and log in with the username and password you set for the router.
2.Go to Security > Local Management, and you can block computers on the LAN from accessing the router.
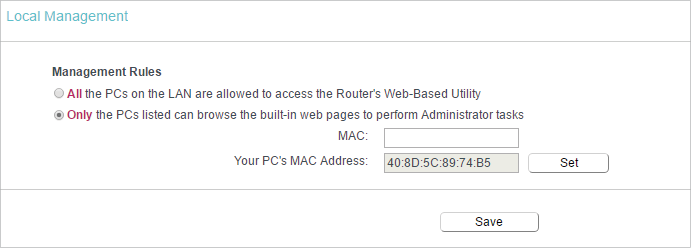
For example, if you want to allow PCs with specific MAC addresses to access the router’s web management page locally from inside the network, please follow the instructions below:
1 )Select Only the PCs listed can browse the built-in web pages to perform Administrator tasks.
2 )Enter the MAC address of each PC separately. The format of the MAC address is XX-XX-XX-XX-XX-XX (X is any hexadecimal digit). Only the PCs with the listed MAC addresses can use the password to browse the built-in web pages to perform administrator tasks.
3 )Click Add, and your PC’s MAC address will also be listed.
4 )Click Save.
Note:
If your PC is blocked but you want to access the router again, reset the router to its factory default settings.
8.4. Remote Management
1.Visit http://tplinkwifi.net, and log in with the username and password you set for the router.
2.Go to Security > Remote Management, and you can manage your router from a remote device via the internet.
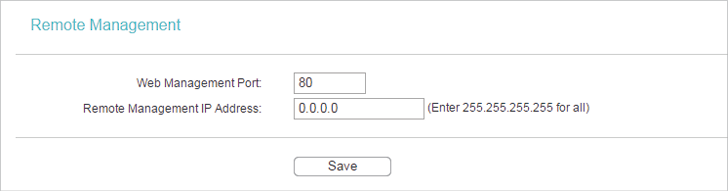
•Web Management Port — Web browser access normally uses the standard HTTP service port 80. This router’s default remote management web port number is 80. For higher security, you can change the remote management web port to a custom port by entering a number between 1 and 65534 but do not use the number of any common service port.
•Remote Management IP Address — This is the address you will use when accessing your router via a remote device. This function is disabled when the IP address is set to the default value of 0.0.0.0. To enable this function, change 0.0.0.0 to a valid IP address. If it is set to 255.255.255.255, then all the remote devices can access the router from the internet.
Note:
•To access the router, enter your router’s WAN IP address in your browser’s address bar, followed by a colon and the custom port number. For example, if your router’s WAN address is 202.96.12.8, and the port number used is 8080, please enter http://202.96.12.8:8080 in your browser. Later, you may be asked for the router’s password. After successfully entering the username and password, you will be able to access the router’s web management page.
•Be sure to change the router’s default password for security purposes.
9. Parental Controls
Parental Controls allows you to block inappropriate and malicious websites, and control access to specific websites at specific time for your children’s devices.
For example, you want the children’s PC with the MAC address 00-11-22-33-44-AA can access www.tp-link.com on Saturday only while the parent PC with the MAC address 00-11-22-33-44-BB is without any restriction.
1.Visit http://tplinkwifi.net, and log in with the username and password you set for the router.
2.Go to Parental Controls.
3.Tick the Enable Parental Controls checkbox, enter the MAC address 00:11:22:33:44:BB in the MAC Address of Parental PC field and then click Save.
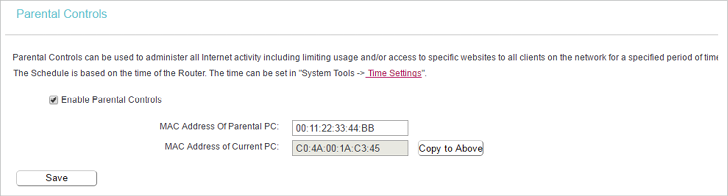
4.Enter 00:11:22:33:44:AA in the MAC Address 1 field.

5.Select Each Week from the Apply To drop-down list, and select Sat. Select 00:00 as the Start Time and Select 24:00 as the End Time. And then click Add.
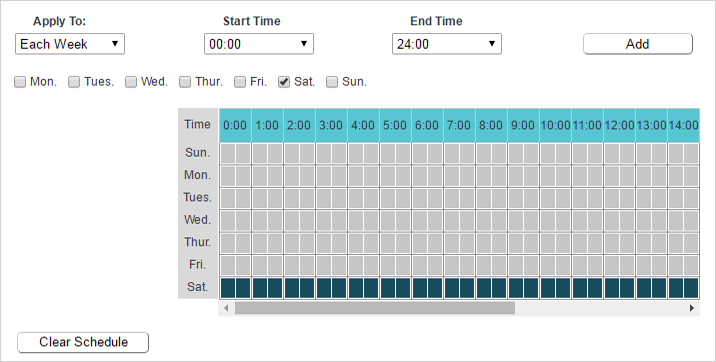
6.Enter www.tp-link.com in the Add URL field. Click Add.

7.Click Save.
10. Access Control
Access Control is used to deny or allow specific client devices to access your network with access time and content restrictions.
I want to:
Deny or allow specific client devices to access my network with access tiem and content restrictions.
For example, If you want to restrict the internet activities of host with MAC address 00-11-22-33-44-AA on the LAN to access www.tp-link.com only, please follow the steps below:
How can I do that?
1.Visit http://tplinkwifi.net, and log in with the username and password you set for the router.
2.Go to Access Control > Host and configure the host settings:
1 )Click Add New.
2 )Select MAC Address as the mode type. Create a unique description (e.g. host_1) for the host in the Description field and enter 00-11-22-33-44-AA in the MAC Address filed.
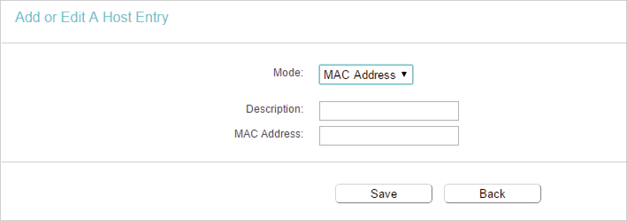
3 )Click Save.
3.Go to Access Control > Target and configure the target settings:
1 )Click Add New.
2 )Select URL Address as the mode type. Create a unique description (e.g. target_1) for the target in the Target Description field and enter the domain name, either the full name or the keywords (for example TP-Link) in the Add URL Address field. And then Click Add.
Note:
Any URL address with keywords in it (e.g. www.tp-link.com) will be blocked or allowed.
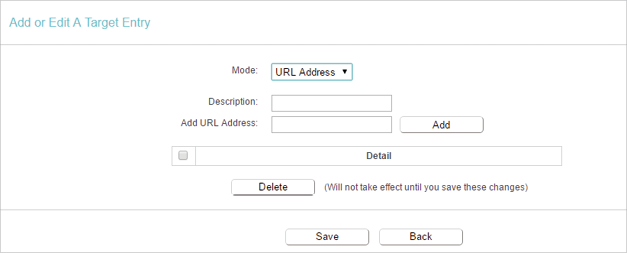
3 )Click Save.
4.Go to Access Control > Schedule and configure the schedule settings:
1 )Click Add New.
2 )Create a unique description (e.g. schedule_1) for the schedule in the Schedule Description field and set the day(s) and time period. And then click Add.
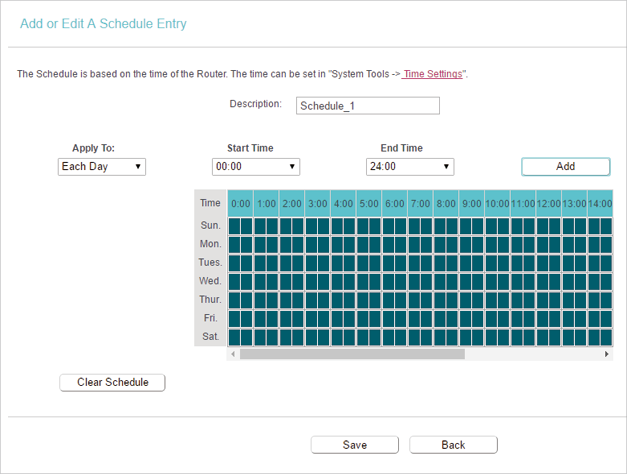
3 )Click Save.
5.Go to Access Control > Rule and add a new access control rule.
1 )Click Add New.
2 )Give a name for the rule in the Description field. Select host_1 from the LAN host drop-down list; select target_1 from the target drop-down list; select schedule_1 from the schedule drop-down list.

3 )Leave the status as Enabled as click Save.
6.Select Enable Internet Access Control to enable Access Control function.
7.Select Allow the packets specified by any enabled access control policy to pass through the Router as the default filter policy and click Save.
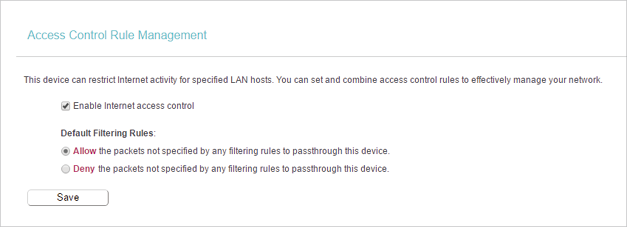
Done!
Now only the specific host(s) can visit the target(s) within the scheduled time period.
11. Advanced Routing
Static Routing is a form of routing that is configured manually by a network administrator or a user by adding entries into a routing table. The manually-configured routing information guides the router in forwarding data packets to the specific destination.
11.1. Static Route List
1.Visit http://tplinkwifi.net, and log in with the username and password you set for the router.
2.Go to Advanced Routing > Static Route List.
•To add static routing entries:
1. Click Add New.
2.Enter the following information.
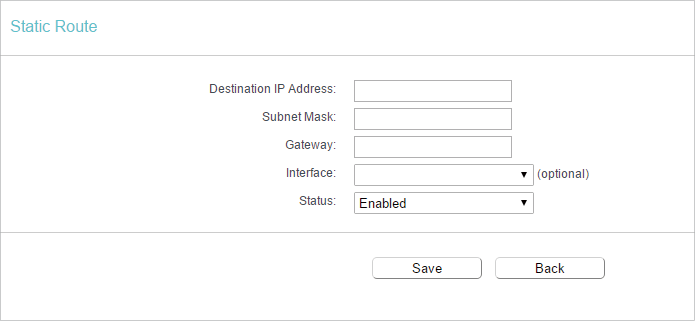
•Destination IP Address — The Destination Network is the address of the network or host that you want to assign to a static route.
•Subnet Mask — The Subnet Mask determines which portion of an IP address is the network portion, and which portion is the host portion.
•Gateway — This is the IP address of the default gateway device that allows the contact between the router and the network or host.
3.Select Enabled or Disabled for this entry on the Status drop-down list.
4.Click Save.
11.2. System Routing Table
1.Visit http://tplinkwifi.net, and log in with the username and password you set for the router.
2.Go to Advanced Routing > System Routing Table, and you can view all the valid route entries in use.
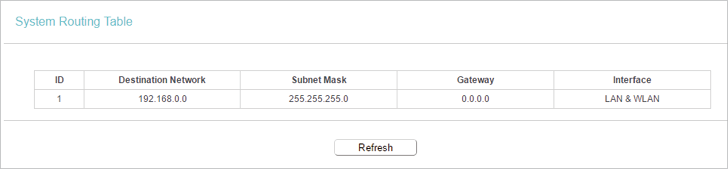
•Destination Network — The Destination Network is the address of the network or host to which the static route is assigned.
•Subnet Mask — The Subnet Mask determines which portion of an IP address is the network portion, and which portion is the host portion.
•Gateway — This is the IP address of the gateway device that allows for contact between the Router and the network or host.
•Interface — This interface tells you whether the Destination IP Address is on the LAN & WLAN (internal wired and wireless networks), or the WAN (Internet).
Click Refresh to refresh the data displayed.
12. Bandwidth Control
1.Visit http://tplinkwifi.net, and log in with the username and password you set for the router.
2.Go to Bandwidth Control.
3.Tick the Enable Bandwidth Control checkbox, and configure the Egress Bandwidth and Ingress Bandwidth, and then click Save. The Egress/Ingress Bandwidth is the upload/download speed through the WAN port. The value should be less than 100,000Kbps.

4.Click Add New, fill in the blanks and click Save.
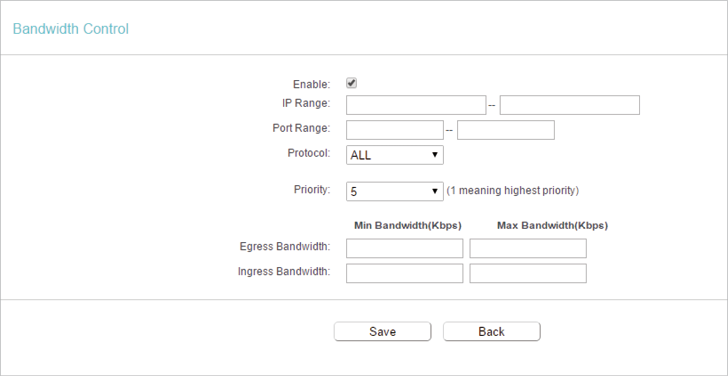
•IP Range — Interior PC address range. If both are blank or 0.0.0.0, the domain is noneffective.
•Port Range — The port range which the Interior PC access the outside PC. If all are blank or 0, the domain is noneffective.
•Protocol — Transport layer protocol, here there are ALL, TCP, UDP.
•Priority — Priority of Bandwidth Control rules. ‘1’ stands for the highest priority while ‘8’ stands for the lowest priority. The total Upstream/ Downstream Bandwidth is first allocated to guarantee all the Min Rate of Bandwidth Control rules. If there is any bandwidth left, it is first allocated to the rule with the highest priority, then to the rule with the second highest priority, and so on.
•Egress Bandwidth — The max and the min upload speed which through the WAN port.
•Ingress Bandwidth — The max and the min download speed through the WAN port.
13. IP&MAC Binding
IP & MAC Binding, namely, ARP (Address Resolution Protocol) Binding, is used to bind a network device’s IP address to its MAC address. This will prevent ARP spoofing and other ARP attacks by denying network access to a device with a matching IP address in the ARP list, but with an unrecognized MAC address.
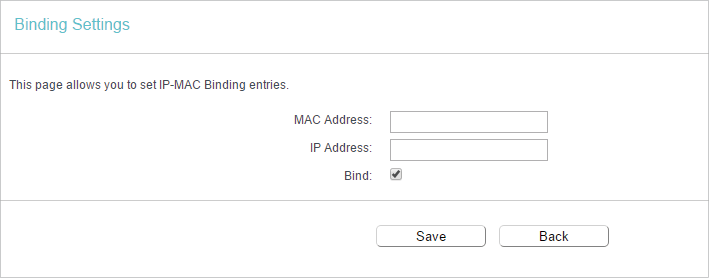
13.1. Binding Settings
1.Visit http://tplinkwifi.net, and log in with the username and password you set for the router.
2.Go to IP & MAC Binding > Binding Settings.
3.Select Enable for ARP Binding and click Save.
•To add IP & MAC Binding entries:
1.Click Add New.
2.Enter the MAC address and IP address.
3.Tick the Bind checkbox and click Save.
•To modify or delete an existing entry:
1.Select the desired entry in the table.
2.Click Edit or Delete Selected.
13.2. ARP List
To manage a device, you can observe the device on the LAN by checking its MAC address and IP address on the ARP list, and you can also configure the items. This page displays the ARP list which shows all the existing IP & MAC Binding entries.
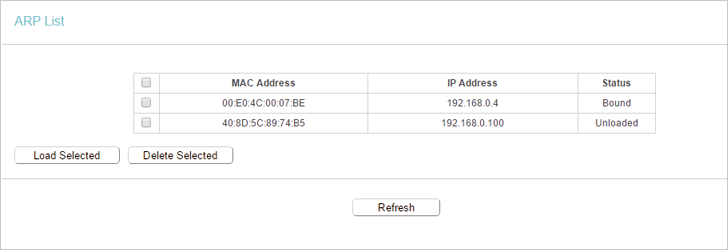
•MAC Address — The MAC address of the listed computer on the LAN.
•IP Address — The assigned IP address of the listed computer on the LAN.
•Status — Indicates whether or not the MAC and IP addresses are bound.
•Configure — Load or delete an item.
•Load — Load the item to the IP & MAC Binding list.
•Delete — Delete the item.
•Click the Load Selected button to load the selected items to the IP & MAC Binding list.
•Click the Delete Selected button to delete the selected items to the IP & MAC Binding list.
•Click the Refresh button to refresh all items.
Note:
An item can not be loaded to the IP & MAC Binding list if the IP address of the item has been loaded before. Error warning will prompt as well. Likewise, Load All only loads the items without interference to the IP & MAC Binding list.
14. Dynamic DNS
The router offers the DDNS (Dynamic Domain Name System) feature, which allows the hosting of a website, FTP server, or e-mail server with a fixed domain name (named by yourself) and a dynamic IP address. Thus your friends can connect to your server by entering your domain name no matter what your IP address is. Before using this feature, you need to sign up for DDNS service providers such as www.comexe.cn, www.dyndns.org, or www.noip.com. The Dynamic DNS client service provider will give you a password or key.
1.Visit http://tplinkwifi.net, and log in with the username and password you set for the router.
2.Go to Dynamic DNS.
Dyndns DDNS
If the dynamic DNS Service Provider you select is www.dyn.com, the following page will appear.
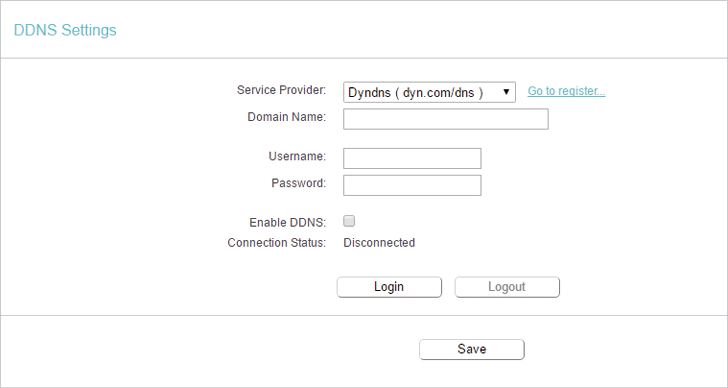
To set up for DDNS, follow these instructions:
1.Enter the Domain Name you received from dynamic DNS service provider here.
2.Enter the Username for your DDNS account.
3.Enter the Password for your DDNS account.
4.Click Login.
5.Click Save.
•Connection Status — The status of the DDNS service connection is displayed here.
•Logout — Click Logout to log out of the DDNS service.
No-IP DDNS
If the dynamic DNS Service Provider you select is www.noip.com, the following page will appear.
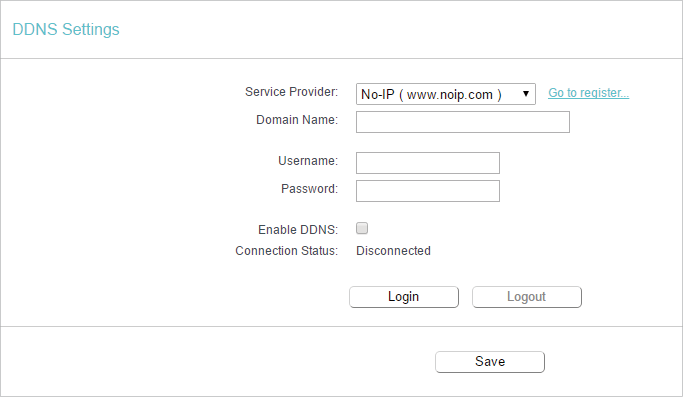
To set up for DDNS, follow these instructions:
1.Enter the Domain Name you received from dynamic DNS service provider.
2.Enter the Username for your DDNS account.
3.Enter the Password for your DDNS account.
4.Click Login.
5.Click Save.
•Connection Status — The status of the DDNS service connection is displayed here.
•Logout — Click Logout to log out of the DDNS service.
Comexe DDNS
If the dynamic DNS Service Provider you select is www.comexe.cn, the following page will appear.
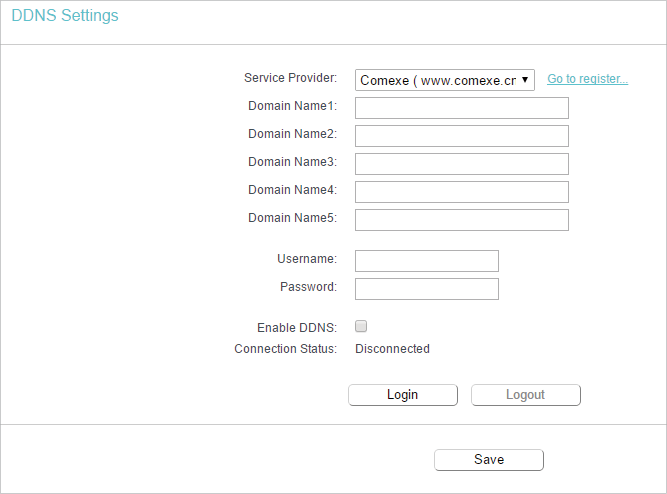
To set up for DDNS, follow these instructions:
1.Enter the Domain Name received from your dynamic DNS service provider.
2.Enter the Username for your DDNS account.
3.Enter the Password for your DDNS account.
4.Click Login.
5.Click Save.
•Connection Status — The status of the DDNS service connection is displayed here.
•Logout — Click Logout to log out of the DDNS service.
15. IPv6
This function allows you to enable IPv6 function and set up the parameters of the router’s Wide Area Network (WAN) and Local Area Network (LAN).
15.1. IPv6 Status
1.Visit http://tplinkwifi.net, and log in with the username and password you set for the router.
2.Go to IPv6 > IPv6 Status, and you can view the current IPv6 status information of the router.
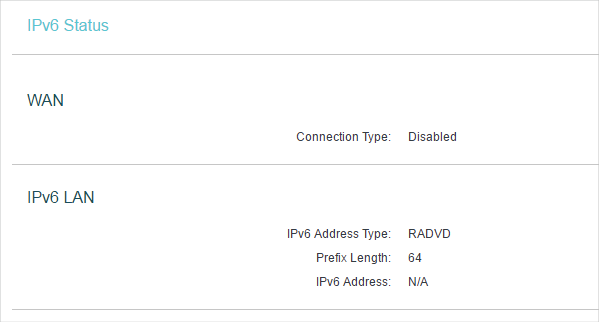
•WAN — This section shows the current IPv6 Connection Type.
•TPv6 LAN — This section shows the current IPv6 information of the router’s LAN port, including IPv6 Address Type, Prefix Length and IPv6 Address.
15.2. IPv6 WAN
1.Visit http://tplinkwifi.net, and log in with the username and password you set for the router.
2.Go to IPv6 > IPv6 WAN. Select Enable IPv6.
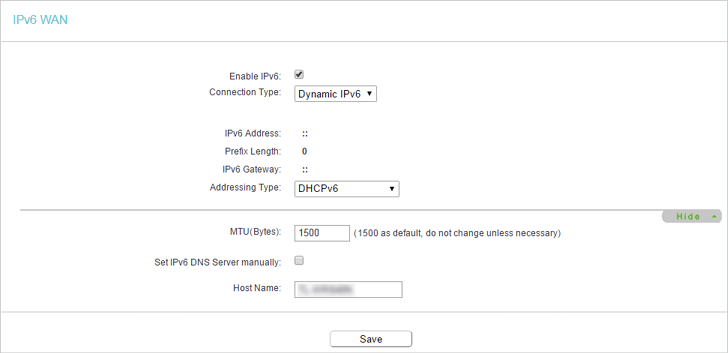
3.Select the WAN Connection Type and fill in the blanks according to your ISP, and then click Save.
•Dynamic IPv6 — Connections which use dynamic IPv6 address assignment.
•Static IPv6 — Connections which use static IPv6 address assignment.
•PPPoEv6 — Connections which use PPPoEv6 that requires a username and password.
•Tunnel 6to4 — Connections which use 6to4 address assignment.
Dynamic IPv6
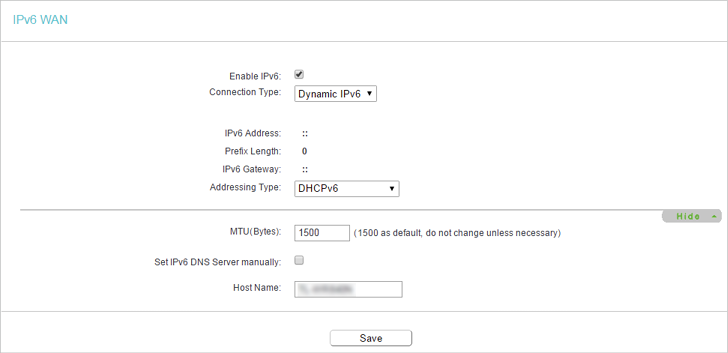
•IPv6 Address — The IPv6 address assigned by your ISP dynamically.
•Prefix Length — The length of IPv6 address prefix.
•IPv6 Gateway — Enter the default gateway provided by your ISP.
•Addressing Type — There are two types of assignation for IPv6 address: SLAAC (Stateless address auto-configuration) and DHCPv6 (Dynamic Host Configuration Protocol for IPv6) Server.
•MTU(Bytes) — The normal MTU (Maximum Transmission Unit) value for most Ethernet networks is 1500 Bytes. For some ISPs, you may need to modify the MTU. But this is rarely required, and should not be done unless you are sure it is necessary for your ISP connection.
•Set IPv6 DNS Server manually — If your ISP gives you one or two DNS IPv6 addresses, select Set IPv6 DNS Server manually and enter the IPv6 DNS Server and Secondary IPv6 DNS Server into the correct fields. Otherwise, the DNS servers will be assigned from ISP dynamically.
Note:
If you get Address not found error when you access a Web site, it is likely that your DNS servers are set up improperly. You should contact your ISP to get DNS server addresses.
Static IPv6
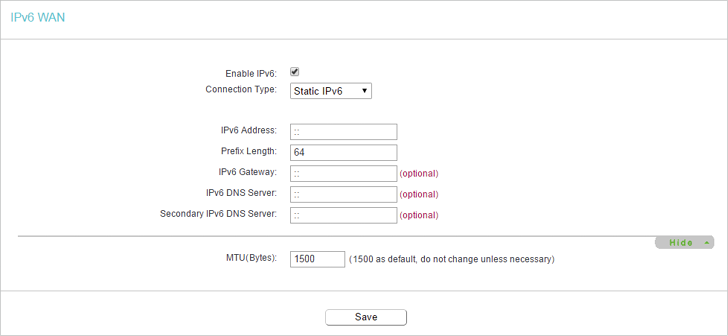
•IPv6 Address — Enter the IPv6 address provided by your ISP.
•Prefix Length — The length of IPv6 address prefix.
•IPv6 Gateway — Enter the default gateway provided by your ISP.
•IPv6 DNS Server— Enter the DNS IPv6 address provided by your ISP.
•Secondary IPv6 DNS Server — Enter another DNS IPv6 address provided by your ISP.
•MTU(Bytes) — The normal MTU (Maximum Transmission Unit) value for most Ethernet networks is 1500 Bytes. For some ISPs, you may need to modify the MTU. But this is rarely required, and should not be done unless you are sure it is necessary for your ISP connection.
PPPoEv6
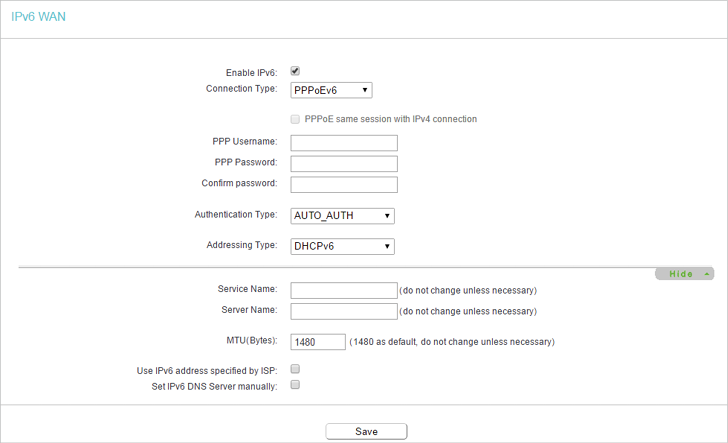
•PPP Username/Password — Enter the User Name and Password provided by your ISP. These fields are case-sensitive.
•Authentication Type – Choose one authentication type from AUTO-AUTH, PAP, CHAP and MS-CHAP.
•Addressing Type — There are two types of assignation for IPv6 address: SLAAC (Stateless address auto-configuration) and DHCPv6 (Dynamic Host Configuration Protocol for IPv6) Server.
•MTU(Bytes) — The normal MTU (Maximum Transmission Unit) value for most Ethernet networks is 1500 Bytes. For some ISPs, you may need to modify the MTU. But this is rarely required, and should not be done unless you are sure it is necessary for your ISP connection.
•Use IPv6 address specified by ISP — Input a static IPv6 address from the ISP.
•Set IPv6 DNS Server manually — Enter the IP address of the IPv6 DNS server and secondary IPv6 DNS server.
Tunnel 6to4
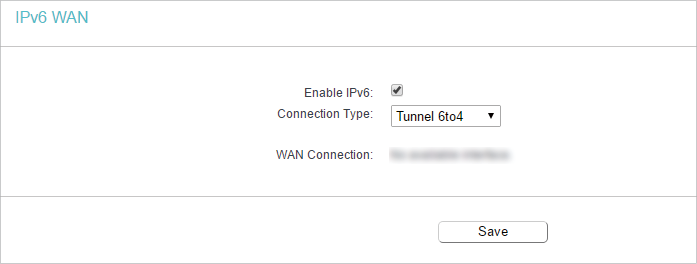
•WAN Connection — Display the available wan connection.
15.3. IPv6 LAN
1.Visit http://tplinkwifi.net, and log in with the username and password you set for the router.
2.Go to IPv6 > IPv6 LAN and configure the IPv6 LAN settings as needed.
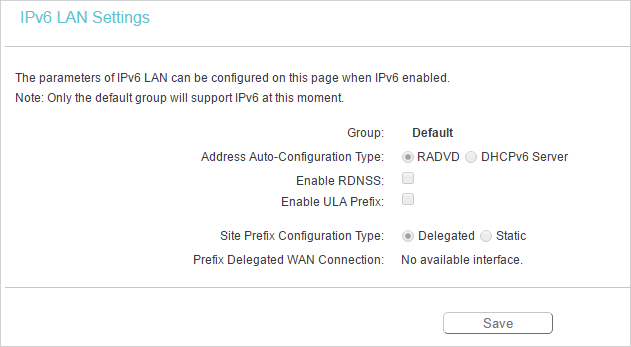
•Address Auto-Configuration Type — Select a type to assign IPv6 addresses to the computers in your LAN. RADVD and DHCPv6 Server are provided. I
•Site Prefix Configuration Type — The type of IPv6 address prefix.
•Delegated — Get the IPv6 address prefix from the ISP automatically, and the device will delegate it to the LAN.
•Static — Configure the Site Prefix and Site Prefix Length manually. Please contact your ISP to get more information before you configure them.
Note:
If your IPv6 wan connection type is “Tunnel 6to4”, the Site Prefix Configuration Type should be “Static” to make sure “Tunnel 6to4” works properly.
16. System Tools
16.1. Time Settings
This page allows you to set the time manually or to configure automatic time synchronization. The router can automatically update the time from an NTP server via the internet.
1.Visit http://tplinkwifi.net, and log in with the username and password you set for the router.
2.Go to System Tools > Time Settings.
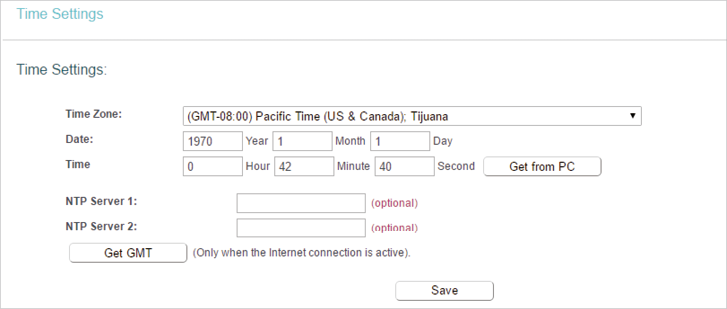
•To set time manually:
1.Select your local Time Zone.
2.Enter the Date in Month/Day/Year format.
3.Enter the Time in Hour/Minute/Second format.
4.Click Save.
•To set time automatically:
5.Select your local Time Zone.
6.Enter the address or domain of the NTP Server 1 or NTP Server 2.
7.Click Get GMT to get time from the internet if you have connected to the internet.
•To set Daylight Saving Time:
1.Select Enable Daylight Saving.
2.Select the start time from the drop-down list in the Start fields.
3.Select the end time from the drop-down list in the End fields.
4.Click Save.
Note:
This setting will be used for some time-based functions such as firewall. You must specify your time zone once you log in to the router successfully; otherwise, time-based functions will not take effect.
16.2. Diagnostic
Diagnostic is used to test the connectivity between the router and the host or other network devices.
1.Visit http://tplinkwifi.net, and log in with the username and password you set for the router.
2.Go to System Tools > Diagnostic.
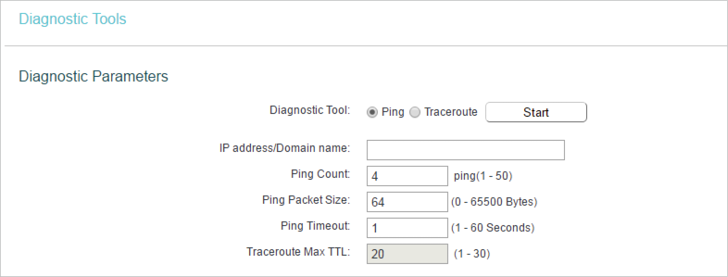
•Diagnostic Tool — Select one diagnostic tool.
•Ping — This diagnostic tool troubleshoots connectivity, reachability, and name resolution to a given host or gateway.
•Tracerouter — This diagnostic tool tests the performance of a connection.
Note:
You can use ping/traceroute to test both numeric IP address or domain name. If pinging/tracerouting the IP address is successful, but pinging/tracerouting the domain name is not, you might have a name resolution problem. In this case, ensure that the domain name you are specifying can be resolved by using Domain Name System (DNS) queries.
•IP Address/Domain Name — Enter the destination IP address (such as 192.168.0.1) or Domain name (such as www.tp-link.com).
•Pings Count — The number of Ping packets for a Ping connection.
•Ping Packet Size — The size of Ping packet.
•Ping Timeout — Set the waiting time for the reply of each Ping packet. If there is no reply in the specified time, the connection is overtime.
•Traceroute Max TTL — The max number of hops for a Traceroute connection.
3.Click Start to check the connectivity of the internet.
4.The Diagnostic Results page displays the diagnosis result. If the result is similar to the following figure, the connectivity of the internet is fine.
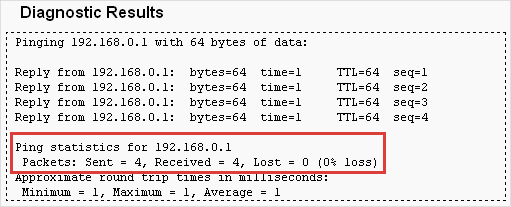
16.3. Firmware Upgrade
TP-Link is dedicated to improving and richening the product features, giving users a better network experience. We will release the latest firmware at TP-Link official website
www.tp-link.com. You can download the lastest firmware file from the Support page of our website and upgrade the firmware to the latest version.
1.Download the latest firmware file for the router from our website www.tp-link.com.
2.Visit http://tplinkwifi.net, and log in with the username and password you set for the router.
3.Go to System Tools > Firmware Upgrade.
4.Click Choose File to locate the downloaded firmware file, and click Upgrade.
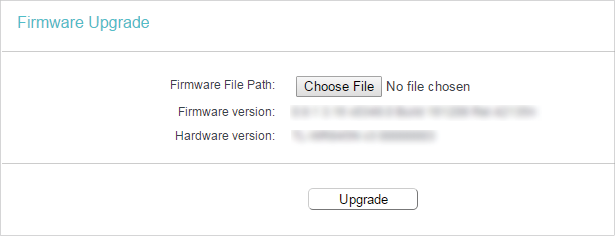
16.4. Factory Defaults
1.Visit http://tplinkwifi.net, and log in with the username and password you set for the router.
2.Go to System Tools > Factory Defaults. Click Restore to reset all settings to the default values.

•Default Username: admin
•Default Password: admin
•Default IP Address: 192.168.0.1
•Default Subnet Mask: 255.255.255.0
16.5. Backup & Restore
The configuration settings are stored as a configuration file in the router. You can backup the configuration file in your computer for future use and restore the router to the previous settings from the backup file when needed.
1.Visit http://tplinkwifi.net, and log in with the username and password you set for the router.
2.Go to System Tools > Backup & Restore.
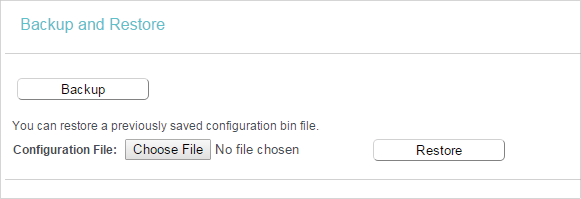
•To backup configuration settings:
Click Backup to save a copy of the current settings in your local computer. A “.bin“ file of the current settings will be stored in your computer.
•To restore configuration settings:
1.Click Choose File to locate the backup configuration file stored in your computer, and click Restore.
2.Wait a few minutes for the restoring and rebooting.
Note:
During the restoring process, do not power off or reset the router.
16.6. Reboot
Some settings of the router will take effect only after rebooting, including:
•Change the LAN IP Address (system will reboot automatically).
•Change the DHCP Settings.
•Change the Working Modes.
•Change the Web Management Port.
•Upgrade the firmware of the router (system will reboot automatically).
•Restore the router to its factory defaults (system will reboot automatically).
•Update the configuration with the file (system will reboot automatically).
1.Visit http://tplinkwifi.net, and log in with the username and password you set for the router.
2.Go to System Tools > Reboot, and you can restart your router.
•To reboot the router manually:
Click Reboot, and wait a few minutes for the router to rebooting.
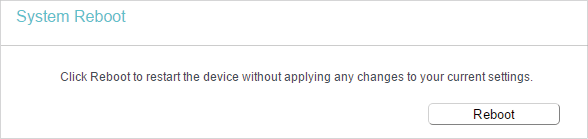
•To set the router reboot every a couple of hours:
1.Select Timeout from the Auto Reboot Time drop-down list.
2.Specify a time interval. The router will reboot automatically after every this interval.
3.Click Save.
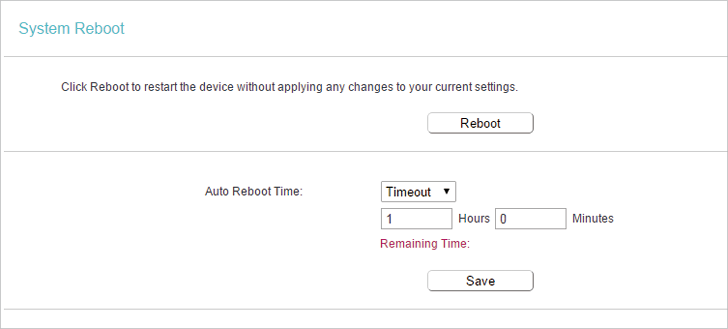
•To schedule the router to reboot at a specific time:
1.Select Schedule from the Auto Reboot Time drop-down list.
2.Specify the Day(s) and Time for the router to reboot.
3.Click Save.
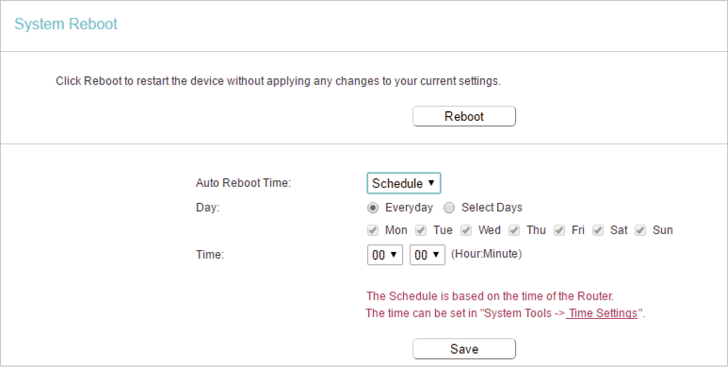
16.7. Password
1.Visit http://tplinkwifi.net, and log in with the username and password you set for the router.
2.Go to System Tools > Password, and you can change the factory default username and password of the router.
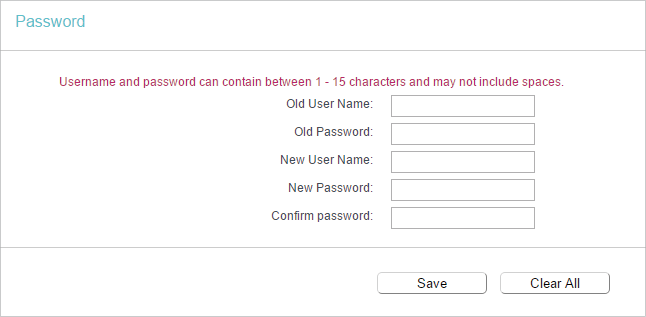
It is strongly recommended that you change the default username and password of the router, for all users that try to access the router’s web-based utility or Quick Setup will be prompted for the router’s username and password.
Note:
The new username and password must not exceed 15 characters and not include any spacing.
3.Click Save.
16.8. System Log
1.Visit http://tplinkwifi.net, and log in with the username and password you set for the router.
2.Go to System Tools > System Log, and you can view the logs of the router.
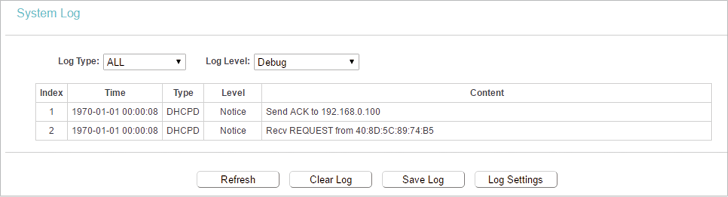
•Loge Type -By selecting the log type, only logs of this type will be shown.
•Log Level — By selecting the log level, only logs of this level will be shown.
•Refresh — Refresh the page to show the latest log list.
•Clear Log — All the logs will be deleted from the router permanently, not just from the page.
16.9. Statistics
1.Visit http://tplinkwifi.net, and log in with the username and password you set for the router.
2.Go to System Tools > Traffic Statistics.
3.Select Enable and click Save. You can view the network traffic of each PC on the LAN, including total traffic and the value of the last Packets Statistic interval in seconds.
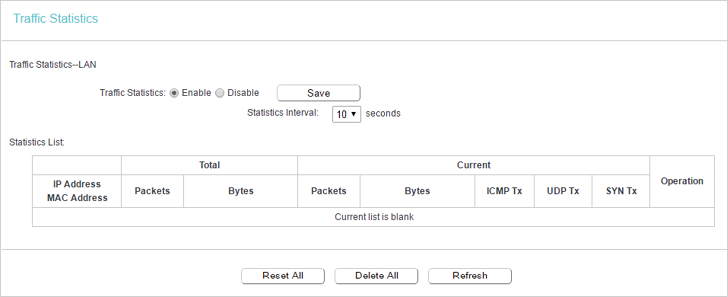
17. Logout
Click Logout at the bottom of the main menu, and you will log out of the web management page and return to the login window.
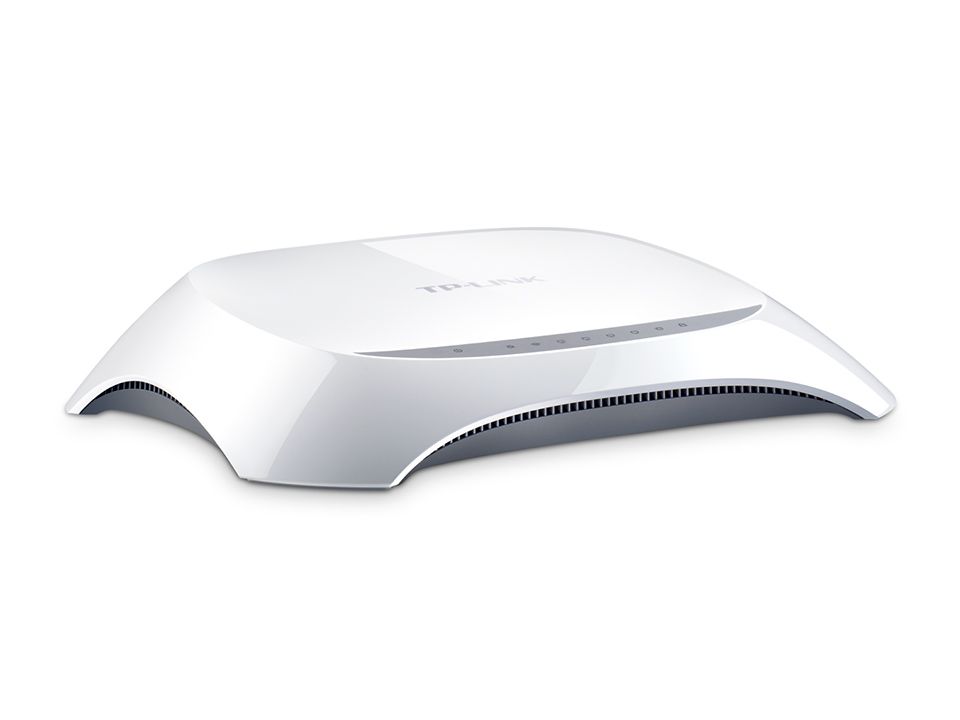

- Настройка подключения по локальной сети
- Подключение роутера TP-Link TL-WR840N к компьютеру
- Авторизация
- Настройка пароля на wi-fi
- Настройка PPTP
- Настройка PPTP со статическим IP-адресом
- Настройка L2TP
- Настройка L2TP со статическим IP-адресом
- Настройка PPPOE
- Настройка PPPOE со статическим IP-адресом
- Смена пароля web-интерфейса
- Сброс пароля web-интерфейса
- Обновление прошивки
- Подключение компьютера к wi-fi
Настройка подключения по локальной сети
Перед тем, как приступить к настройке роутера, проверим настройки подключения по локальной сети. Для этого:
Windows 7
Нажмем на «Пуск«, «Панель управления«.
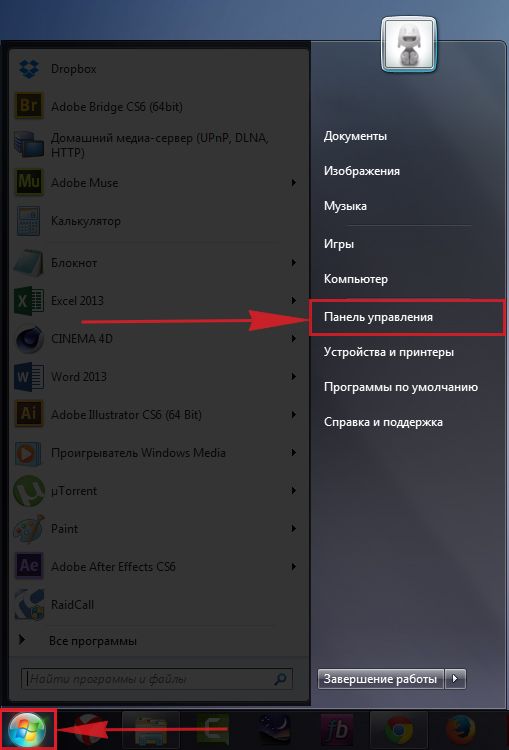
Затем нажимаем на «Просмотр состояния сети и задач«.

Далее жмем на «Изменение параметров адаптера«.
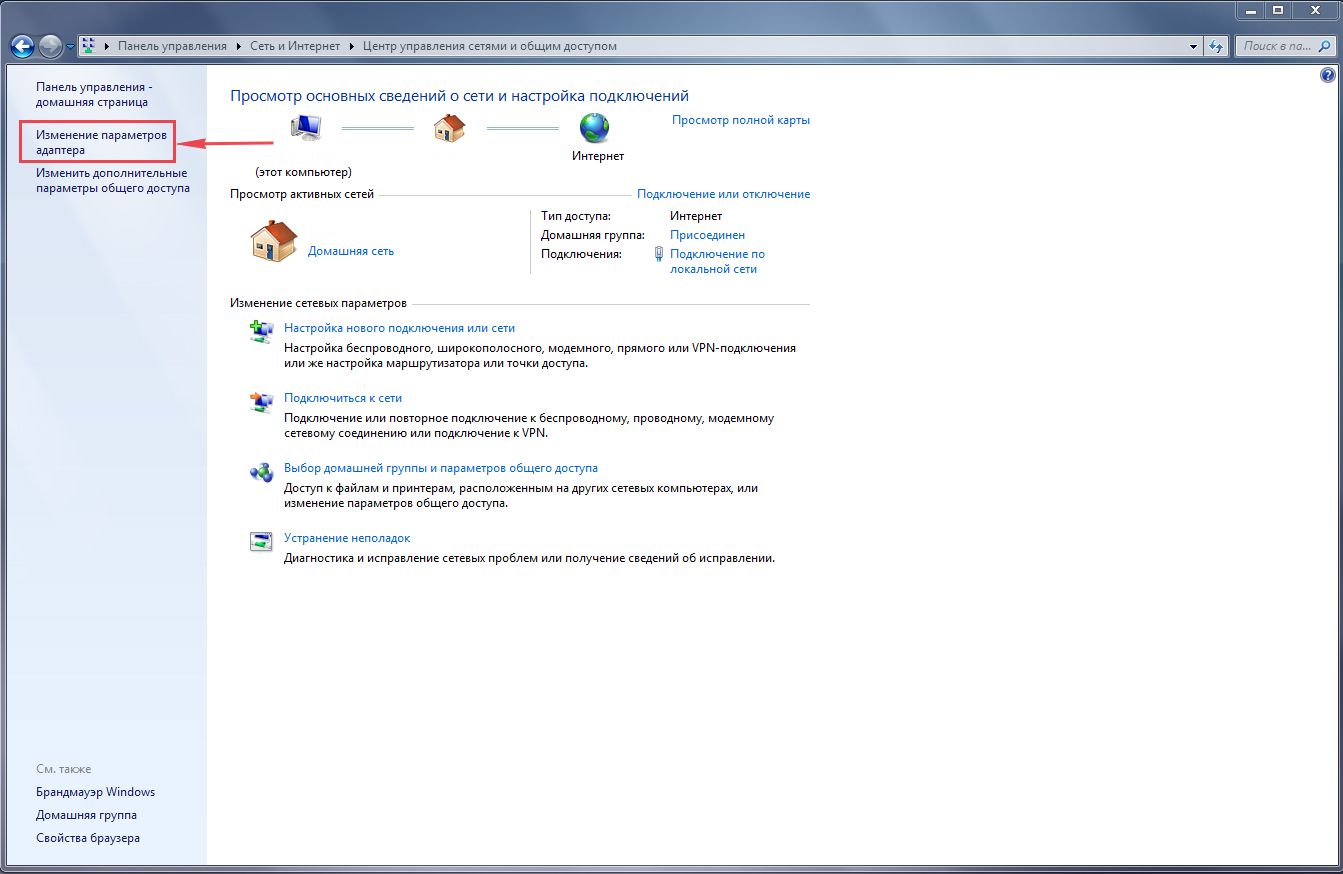
В открывшемся окне мы видим «Подключение по локальной сети«. Нажимаем по нему правой кнопкой мыши, выбираем «Свойство«.
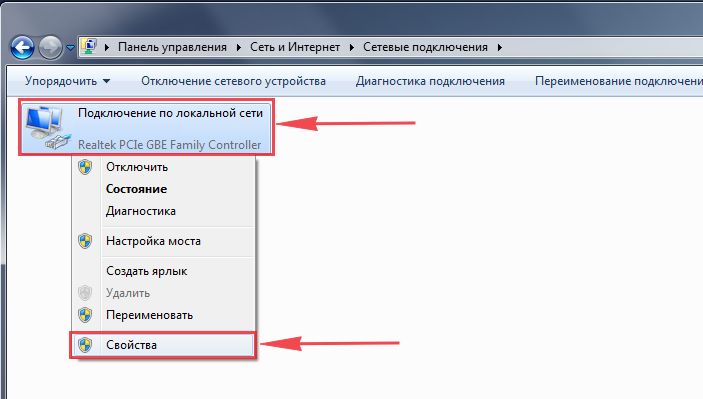
Затем из списка выбираем «Протокол Интернета версии 4 (TCP/IPv4)» и нажимаем «Свойство«.
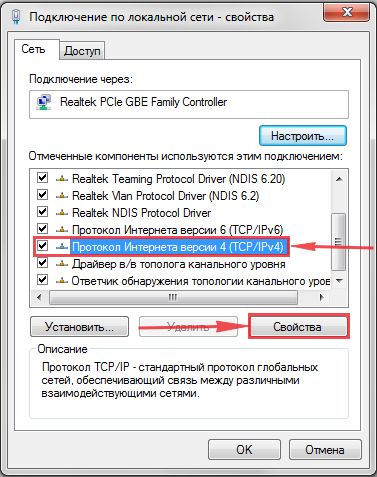
В открывшемся окне Вам нужно выставить галочки «Получить IP-адрес автоматически» и «Получить адрес DNS-сервера автоматически«, затем нажимаем кнопку «Ok«.
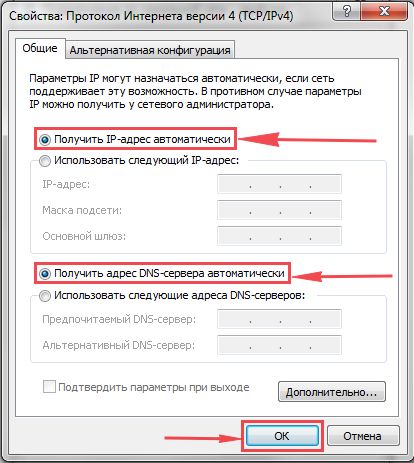
Windows 10
Нажмем на «Пуск«, «Параметры«.
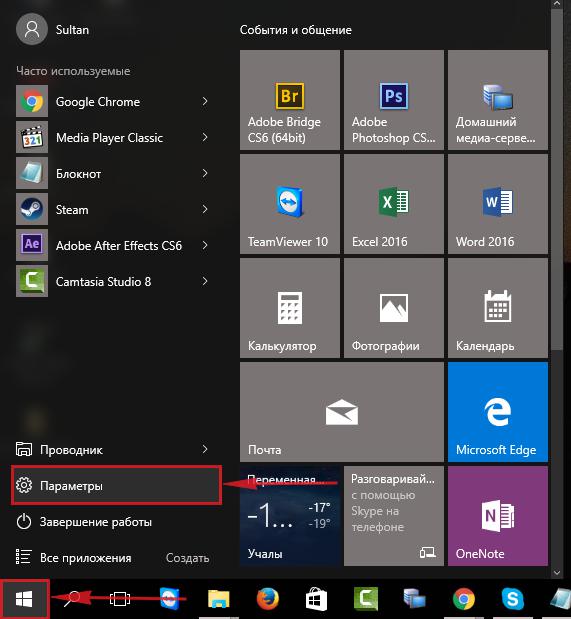
Затем нажимаем на «Сеть и Интернет«.
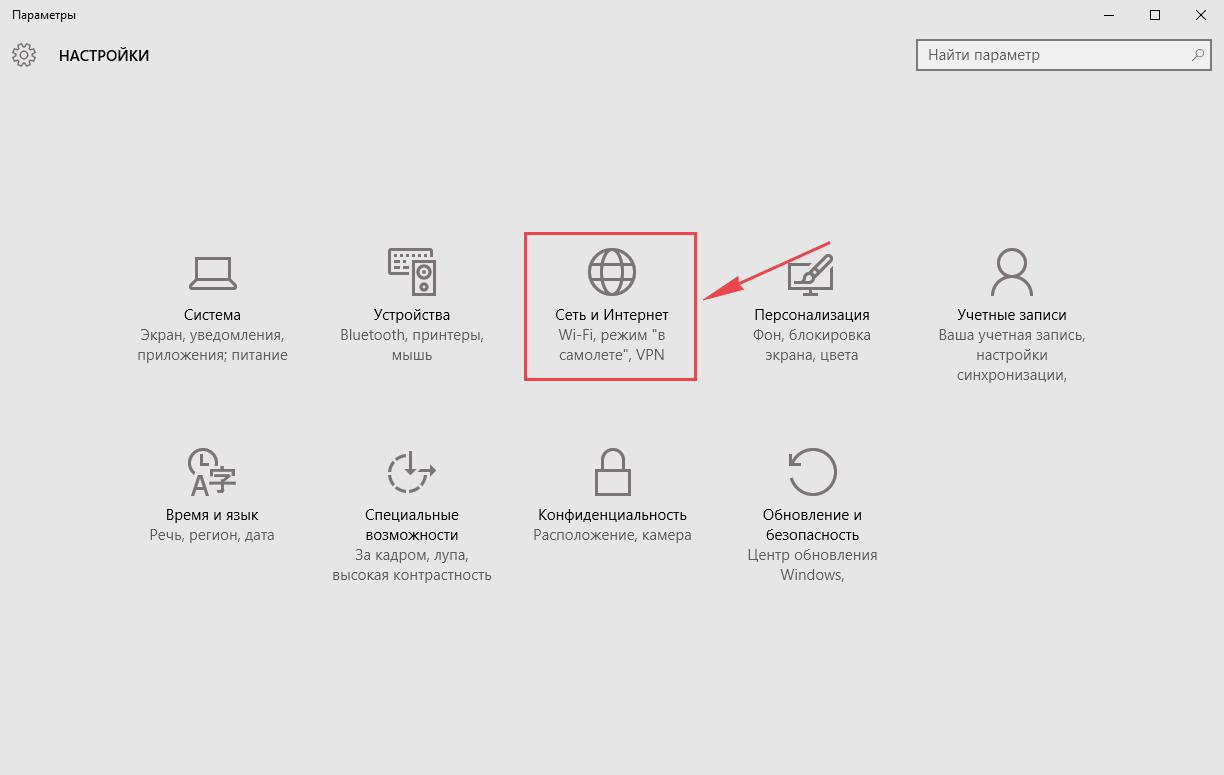
Далее выбираем «Ethernet» и нажимаем на «Настройка параметров адаптера«.

В открывшемся окне мы видим «Ethernet«. Нажимаем по нему правой кнопкой мыши, выбираем «Свойство«.
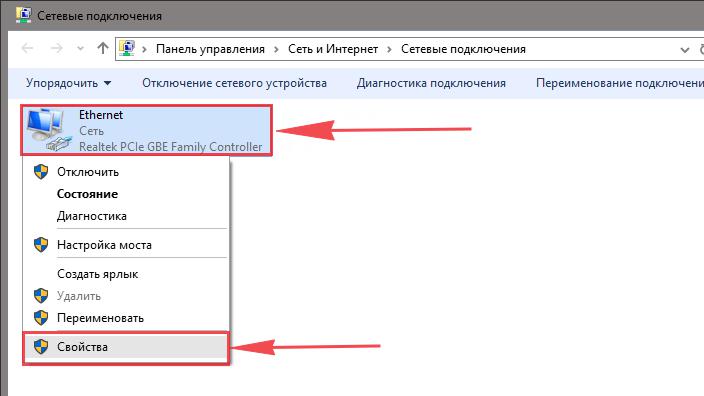
Затем из списка выбираем «IP версии 4 (TCP/IPv4)» и нажимаем «Свойство«.
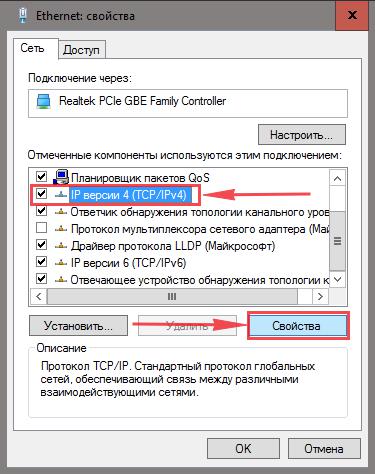
В открывшемся окне Вам нужно выставить галочки «Получить IP-адрес автоматически» и «Получить адрес DNS-сервера автоматически«, затем нажимаем кнопку «Ok«.
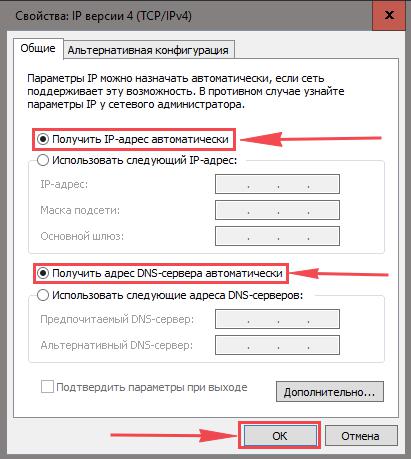
Подключение роутера TP-Link TL-WR840N к компьютеру
Следующим шагом будет подключение роутера TP-Link TL-WR840N к Вашему Ноутбуку либо Персональному компьютеру (ПК). Для этого Вам необходимо подключить кабель, который Вам провел провайдер, к синему порту роутера (то есть это тот кабель, который идет в Вашу квартиру, дом, офис, и т.д. из вне), а кабель, который шел в комплекте с роутером, один конец в один из четырех портов, которые обозначены желтым цветом на роутере, а другой конец подключите к Вашему ноутбуку либо ПК. И да, не забудьте подключить кабель питания.
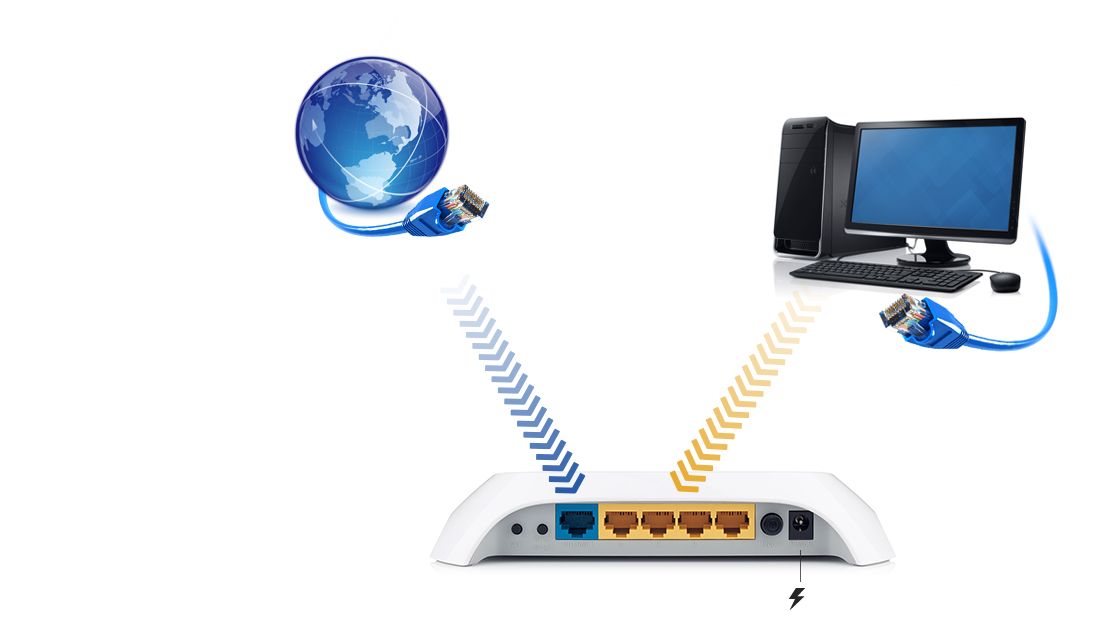
Авторизация роутера TP-Link TL-WR840N
Итак, подключили роутер, теперь Вам нужно через любой браузер (будь это Google Chrome, Mozilla Firefox, Internet Explorer, и т.д.) попасть в его web-интерфейс. Для это открываем браузер и в адресной строке вбиваем адрес роутера: 192.168.0.1 и нажимаем кнопку «Enter» на Вашей клавиатуре (в более старых моделях данного роутера этот адрес может быть: 192.168.1.1).

После Мы видим, что роутер требует авторизоваться, т.е. запрашивает имя пользователя и пароль. По умолчанию на роутерах Tp-Link установлены:
- Имя пользователя — admin
- Пароль — admin
Итак, вбиваем данные и нажимаем «Вход«
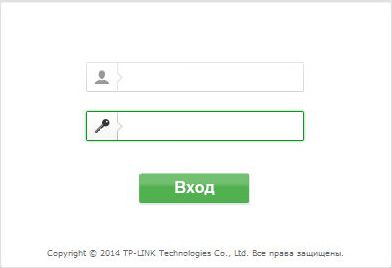
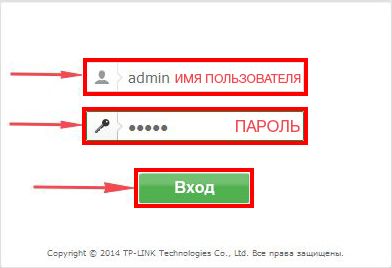
Настройка роутера Tp-Link TL-WR840N
И вот наконец мы попали на Web-интерфейс роутера и теперь Вам необходимо произвести настройки оборудования. Первым делом обезопасим беспроводную сеть, установив пароль на wi-fi. Затем Вам необходимо будет узнать какой тип подключения используется для входа в интернет, это PPTP, L2TP либо PPPOE. Узнать можно позвонив Вашему провайдеру (это организация, с которым Вы заключили договор для предоставления услуги интернет). Итак, начнем настройку роутера.
Настройка пароля на wi-fi
Предлагаю Вашему вниманию Видео инструкцию по настройке пароля на wi-fi на роутере Tp-Link TL-WR840N на примере роутера Tp-Link TL-WR1043ND.
Давайте также письменно и иллюстративно рассмотрим настройку пароля на wi-fi на роутере Tp-Link TL-WR840N.
Выбираем на Web-интерфейсе в меню вкладку «Беспроводной режим» и попадаем в «Настройки беспроводного режима«. Здесь необходимо в графе «Имя беспроводной сети:» придумать и указать имя Вашей беспроводной сети, данное имя в дальнейшем будет светиться, когда Вы будите подключаться к сети. Затем выберем «Регион:» — Россия. После этого нажимаем «Сохранить«.
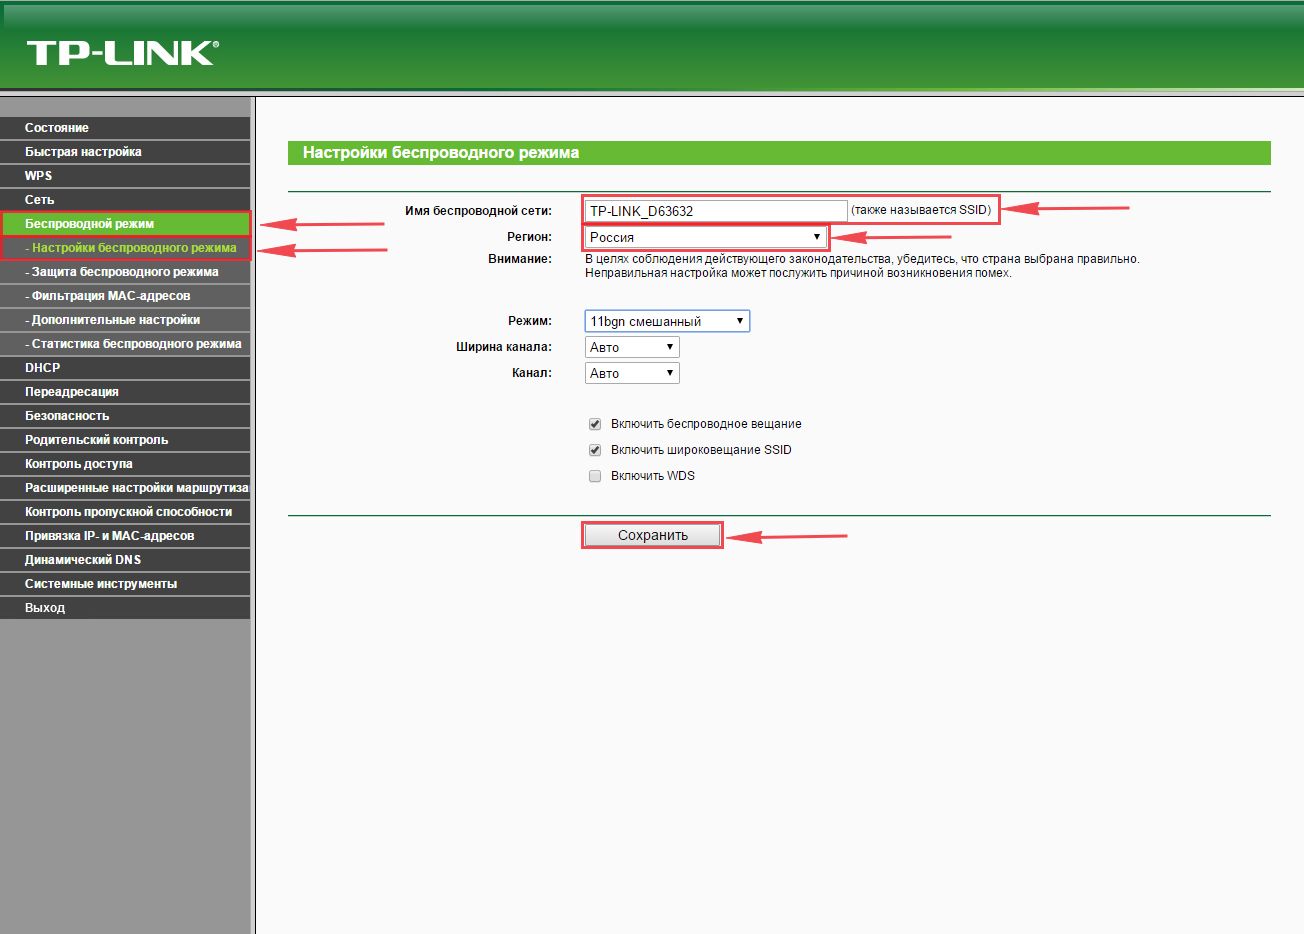
Далее переходим в меню во вкладку «Защита беспроводного режима«. Здесь мы будем настраивать пароль для придуманной выше беспроводной сети, для этого выбираем тип шифрования «WPA/WPA2-Personal(Рекомендуется)«, а затем ниже в поле «Пароль PSK» придумываем и вбиваем пароль. После жмем «Сохранить«.

После того, как мы нажали «Сохранить» над этой кнопкой появится надпись, указывающая на то, что настройки сохранены и теперь нам необходимо перезагрузить роутер. Что мы и делаем, нажав на кнопку «click here» отправив роутер на перезагрузку. После перезагрузки имя Вашей беспроводная сеть появится в настройках сети Вашего компьютера.

Настройка PPTP
Предлагаю Вашему вниманию Видео инструкцию по настройке типа подключения PPTP на роутере Tp-Link TL-WR840N на примере роутера Tp-Link TL-WR1043ND.
Давайте также письменно и иллюстративно рассмотрим настройку подключения PPTP на роутере Tp-Link TL-WR840N.
Итак переходим в меню во вкладку «Сеть«, затем «WAN«.
В «Тип подключения WAN:» выбираем «PPTP/PPTP Россия«, ниже Вам предложат указать имя пользователя (в строке «Имя пользователя:«) и пароль (в строке «Пароль:«). Также необходимо будет указать ip-адрес сервера (в строке «IP-адрес/Имя сервера:«). Все вышеперечисленные данные Вам предоставляет провайдер (Организация, которая провела Вам интернет).
Все эти данные обычно прописываются в договоре с провайдером. Если по какой-то причине Вы не смогли их найти, Вам необходимо позвонить на горячую линию Вашего провайдера и узнать как их можно получить.
После того, как Вы внесли все необходимые данные ставите галочку напротив «Подключить автоматически» (Данная настройка будет держать подключение к интернету постоянно, поэтому если у Вас НЕ безлимитный тариф рекомендую поставить галочку напротив «Подключить по требованию«, то есть интернет подключается только в том случае, когда Вы начинаете им пользоваться).
После всех манипуляций с настройками нажимаем кнопку «Сохранить«.
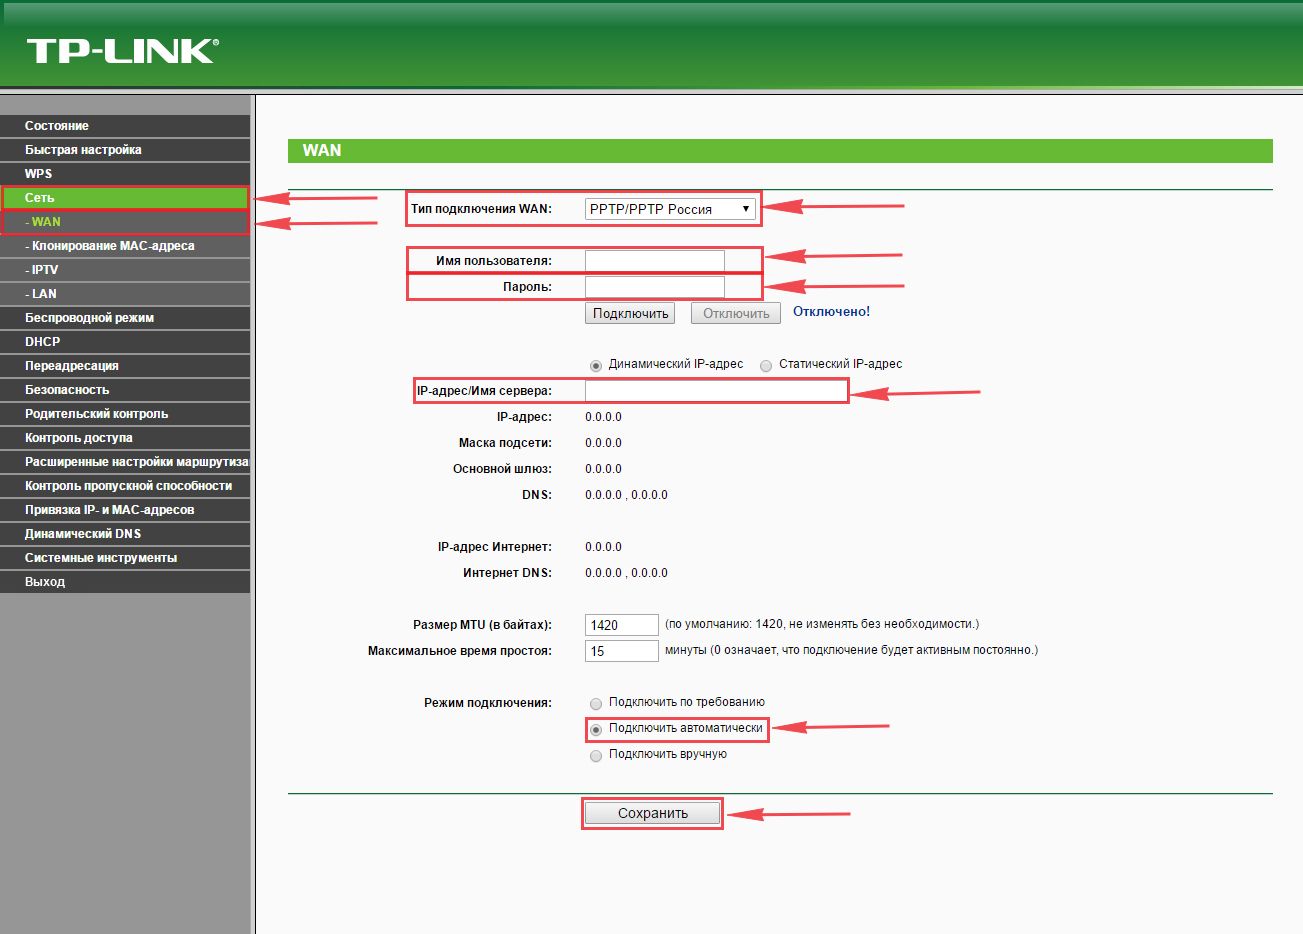
Настройка PPTP со статическим IP-адресом
Рассмотрим настройку подключения PPTP со статическим IP-адресом на роутере Tp-Link TL-WR840N. Обычно статический IP-адрес предоставляется юридическим лицам, либо как дополнительная услуга к основному тарифу физическим лицам.
Итак переходим в меню во вкладку «Сеть«, затем «WAN«.
В «Тип подключения WAN:» выбираем «PPTP/PPTP Россия«, ниже Вам предложат указать имя пользователя (в строке «Имя пользователя:«) и пароль (в строке «Пароль:«).
Так как подключение использует статический ip-адрес, Вы ставите галочку напротив «Статический IP-адрес«, далее указываете ip-адрес сервера (в строке «IP-адрес/Имя сервера:«), ip-адрес (в строке «IP-адрес:«), маску подсети (в строке «Маска подсети:«), основной шлюз (в строке «Основной шлюз:«) и DNS (в строке «DNS:«). Все вышеперечисленные данные Вам предоставляет провайдер (Организация, которая провела Вам интернет).
Все эти данные обычно прописываются в договоре с провайдером. Если по какой-то причине Вы не смогли их найти, Вам необходимо позвонить на горячую линию Вашего провайдера и узнать как их можно получить.
После того, как Вы внесли все необходимые данные ставите галочку напротив «Подключить автоматически» (Данная настройка будет держать подключение к интернету постоянно, поэтому если у Вас НЕ безлимитный тариф рекомендую поставить галочку напротив «Подключить по требованию«, то есть интернет подключается только в том случае, когда Вы начинаете им пользоваться).
После всех манипуляций с настройками нажимаем кнопку «Сохранить«.
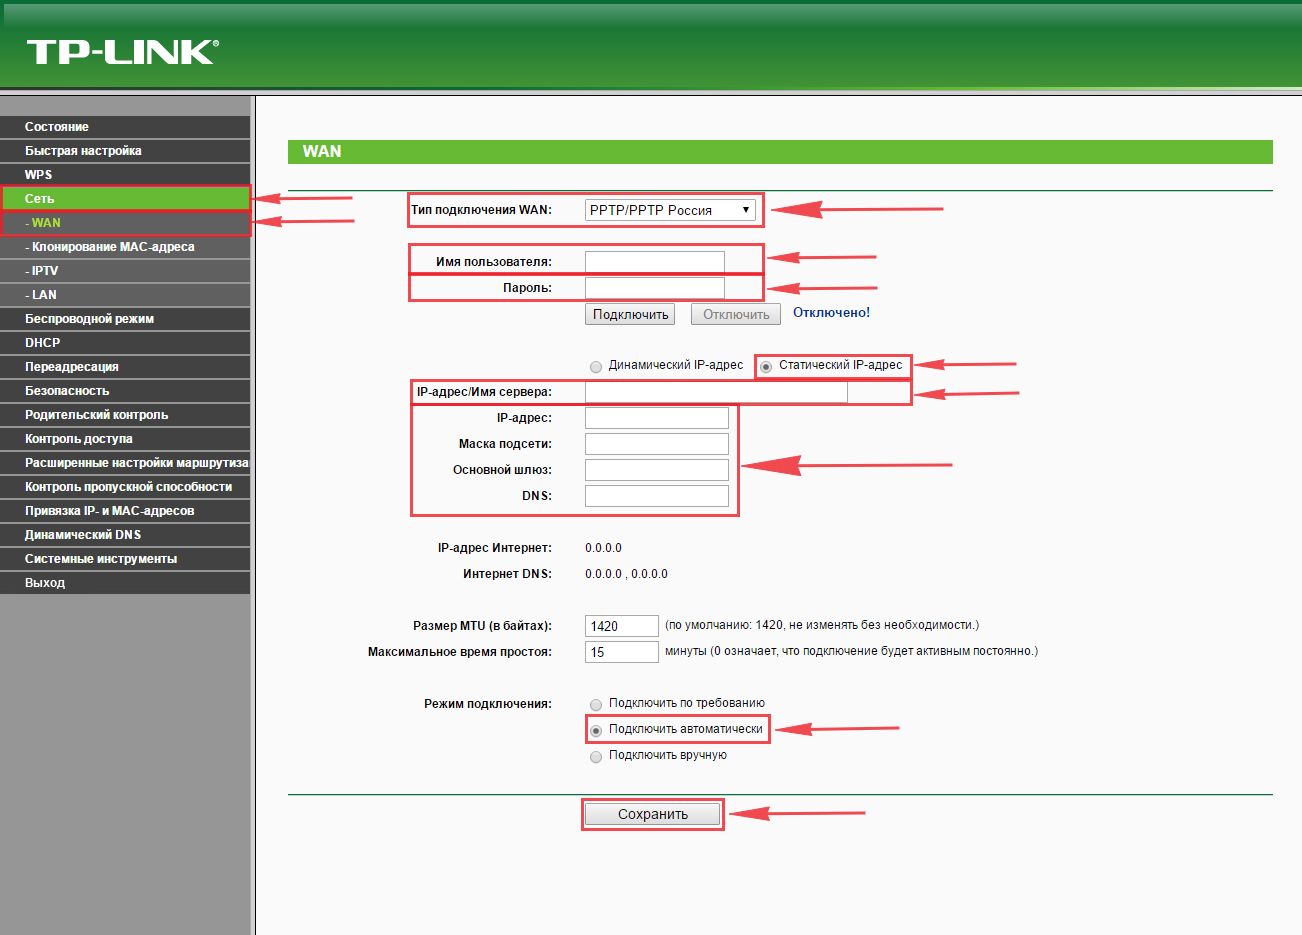
Настройка L2TP
Рассмотрим настройку подключения L2TP на роутере Tp-Link TL-WR840N.
Итак переходим в меню во вкладку «Сеть«, затем «WAN«.
В «Тип подключения WAN:» выбираем «L2T/L2T Россия«, ниже Вам предложат указать имя пользователя (в строке «Имя пользователя:«) и пароль (в строке «Пароль:«). Также необходимо будет указать ip-адрес сервера (в строке «IP-адрес/Имя сервера:«). Все вышеперечисленные данные Вам предоставляет провайдер (Организация, которая провела Вам интернет).
Все эти данные обычно прописываются в договоре с провайдером. Если по какой-то причине Вы не смогли их найти, Вам необходимо позвонить на горячую линию Вашего провайдера и узнать как их можно получить.
После того, как Вы внесли все необходимые данные ставите галочку напротив «Подключить автоматически» (Данная настройка будет держать подключение к интернету постоянно, поэтому если у Вас НЕ безлимитный тариф рекомендую поставить галочку напротив «Подключить по требованию«, то есть интернет подключается только в том случае, когда Вы начинаете им пользоваться).
После всех манипуляций с настройками нажимаем кнопку «Сохранить«.

Настройка L2TP со статическим IP-адресом
Рассмотрим настройку подключения L2TP со статическим IP-адресом на роутере Tp-Link TL-WR840N.
Обычно статический IP-адрес предоставляется юридическим лицам, либо как дополнительная услуга к основному тарифу физическим лицам.
Итак переходим в меню во вкладку «Сеть«, затем «WAN«.
В «Тип подключения WAN:» выбираем «L2T/L2T Россия«, ниже Вам предложат указать имя пользователя (в строке «Имя пользователя:«) и пароль (в строке «Пароль:«).
Так как подключение использует статический ip-адрес, Вы ставите галочку напротив «Статический IP-адрес«, далее указываете ip-адрес сервера (в строке «IP-адрес/Имя сервера:«), ip-адрес (в строке «IP-адрес:«), маску подсети (в строке «Маска подсети:«), основной шлюз (в строке «Основной шлюз:«) и DNS (в строке «DNS:«). Все вышеперечисленные данные Вам предоставляет провайдер (Организация, которая провела Вам интернет).
Все эти данные обычно прописываются в договоре с провайдером. Если по какой-то причине Вы не смогли их найти, Вам необходимо позвонить на горячую линию Вашего провайдера и узнать как их можно получить.
После того, как Вы внесли все необходимые данные ставите галочку напротив «Подключить автоматически» (Данная настройка будет держать подключение к интернету постоянно, поэтому если у Вас НЕ безлимитный тариф рекомендую поставить галочку напротив «Подключить по требованию«, то есть интернет подключается только в том случае, когда Вы начинаете им пользоваться).
После всех манипуляций с настройками нажимаем кнопку «Сохранить«.

Настройка PPPOE
Предлагаю Вашему вниманию Видео инструкцию по настройке типа подключения PPPOE на роутере Tp-Link TL-WR840N на примере роутера Tp-Link TL-WR1043ND.
Давайте также письменно и иллюстративно рассмотрим настройку подключения PPPOE на роутере Tp-Link TL-WR840N.
Итак переходим в меню во вкладку «Сеть«, затем «WAN«.
В «Тип подключения WAN:» выбираем «PPPoE/PPPoE Россия«, ниже Вам предложат указать имя пользователя (в строке «Имя пользователя:«), пароль (в строке «Пароль:«) и подтверждение пароля (в строке «Подтвердите пароль:«). Все вышеперечисленные данные Вам предоставляет провайдер (Организация, которая провела Вам интернет).
Все эти данные обычно прописываются в договоре с провайдером. Если по какой-то причине Вы не смогли их найти, Вам необходимо позвонить на горячую линию Вашего провайдера и узнать как их можно получить.
После того, как Вы внесли все необходимые данные ставите галочки напротив «Динамический IP-адрес» и «Подключить автоматически» (Данная настройка будет держать подключение к интернету постоянно, поэтому если у Вас НЕ безлимитный тариф рекомендую поставить галочку напротив «Подключить по требованию«, то есть интернет подключается только в том случае, когда Вы начинаете им пользоваться, либо «Подключить по расписанию«, то есть интернет работает в определенное, указанное Вами время).
После всех манипуляций с настройками нажимаем кнопку «Сохранить«.
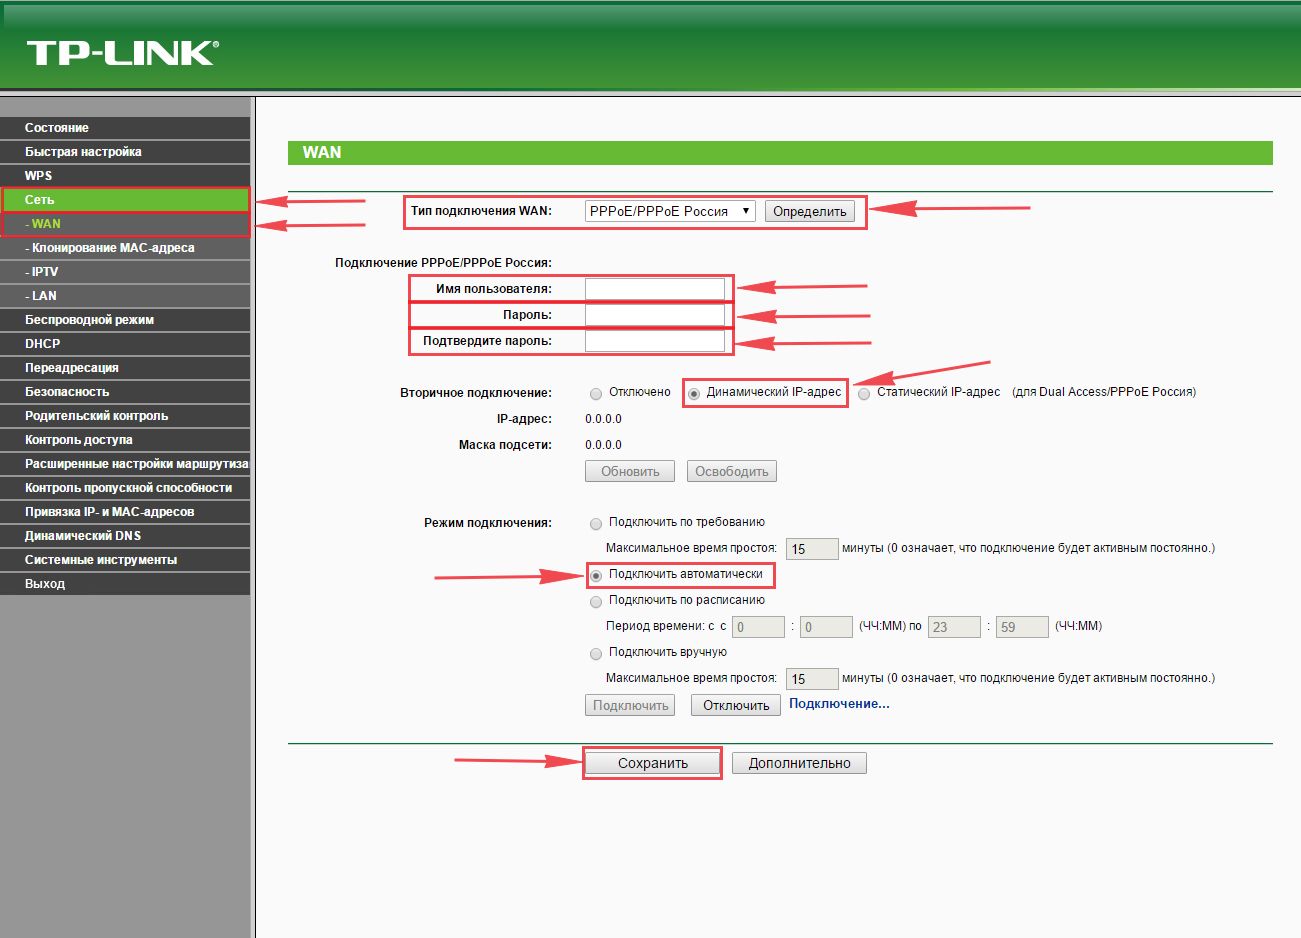
Настройка PPPOE со статическим IP-адресом
Рассмотрим настройку подключения PPPOE со статическим IP-адресом на роутере Tp-Link TL-WR840N.
Обычно статический IP-адрес предоставляется юридическим лицам, либо как дополнительная услуга к основному тарифу физическим лицам.
Итак переходим в меню во вкладку «Сеть«, затем «WAN«.
В «Тип подключения WAN:» выбираем «PPPoE/PPPoE Россия«, ниже Вам предложат указать имя пользователя (в строке «Имя пользователя:«), пароль (в строке «Пароль:«) и подтверждение пароля (в строке «Подтвердите пароль:«). Так как подключение использует статический ip-адрес, Вы ставите галочку напротив «Статический IP-адрес«, далее указываете ip-адрес (в строке «IP-адрес:«), маску подсети (в строке «Маска подсети:«).
Все вышеперечисленные данные Вам предоставляет провайдер (Организация, которая провела Вам интернет).
Все эти данные обычно прописываются в договоре с провайдером. Если по какой-то причине Вы не смогли их найти, Вам необходимо позвонить на горячую линию Вашего провайдера и узнать как их можно получить.
После того, как Вы внесли все необходимые данные ставите галочку напротив «Подключить автоматически» (Данная настройка будет держать подключение к интернету постоянно, поэтому если у Вас НЕ безлимитный тариф рекомендую поставить галочку напротив «Подключить по требованию«, то есть интернет подключается только в том случае, когда Вы начинаете им пользоваться, либо «Подключить по расписанию«, то есть интернет работает в определенное, указанное Вами время).
После всех манипуляций с настройками нажимаем кнопку «Сохранить«.
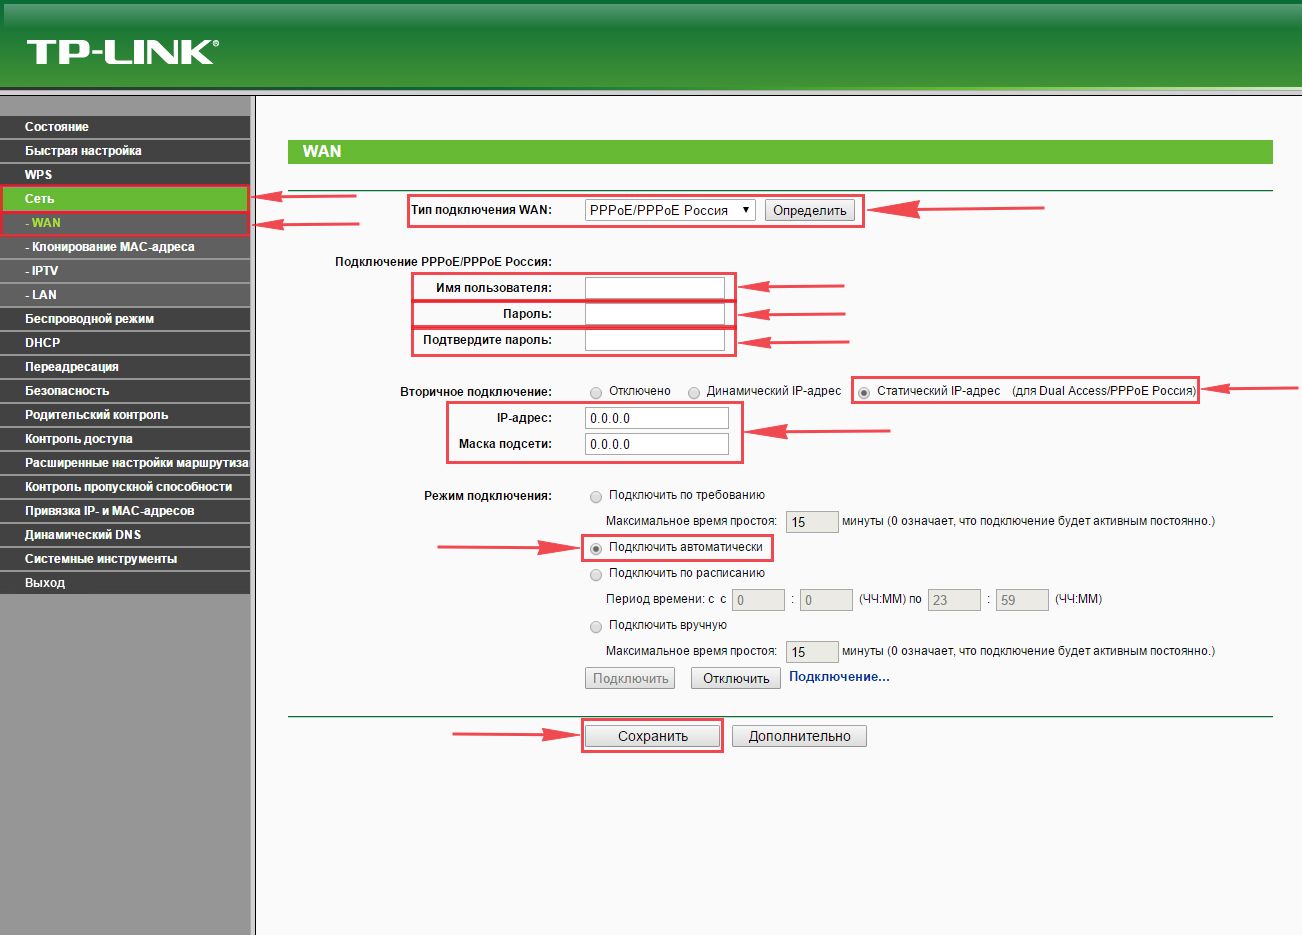
Смена пароля web-интерфейса
Предлагаю Вашему вниманию Видео инструкцию по смене пароля на web-интерфейс роутера Tp-Link TL-WR840N на примере роутера Tp-Link TL-WR1043ND.
Сброс пароля web-интерфейса
В случае, если Вы поставили пароль на web-интерфейс роутера и забыли его, предлагаю Вашему вниманию посмотреть Видео инструкцию по сбросу пароля web-интерфейса на роутере Tp-Link TL-WR840N на примере роутера Tp-Link TL-WR1043ND.
Обновление прошивки
Предлагаю Вашему вниманию Видео инструкцию по обновлению прошивки на роутере Tp-Link TL-WR840N на примере роутера Tp-Link TL-WR1043ND.
Подключение компьютера к wi-fi
После подключения и настройки роутера, необходимо подключить компьютер к беспроводной сети (wi-fi), рассмотрим подключение к wi-fi в двух операционных системах, это Windows 7 и Windows 10:
Windows 7
Видео инструкция
В правом нижнем углу рабочего стола находим значок беспроводной сети (wi-fi), щелкаем по нему левой кнопкой мыши.

Выскакивает окно со списком доступных беспроводных сетей. Выбираем беспроводную сеть, в моем случае это сеть «Sultan» (Вы выбираете ту сеть, название которой давали при настройке роутера).
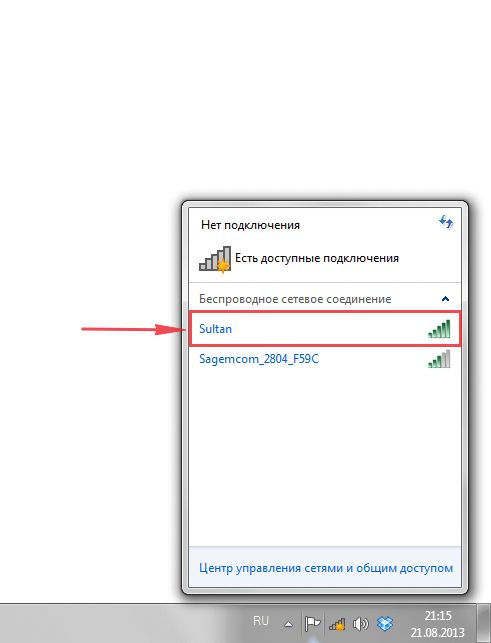
После выбора сети поставьте галочку напротив «Подключаться автоматически» и нажмите
«Подключение«.
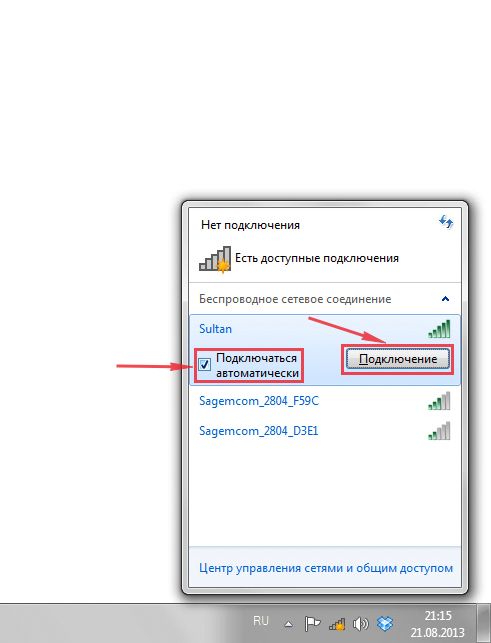
Далее необходимо указать «Ключ безопасности» это пароль беспроводной сети, который Вы указывали при настройке роутера. После того, как Вы указали ключ, нажимаем «OK«.
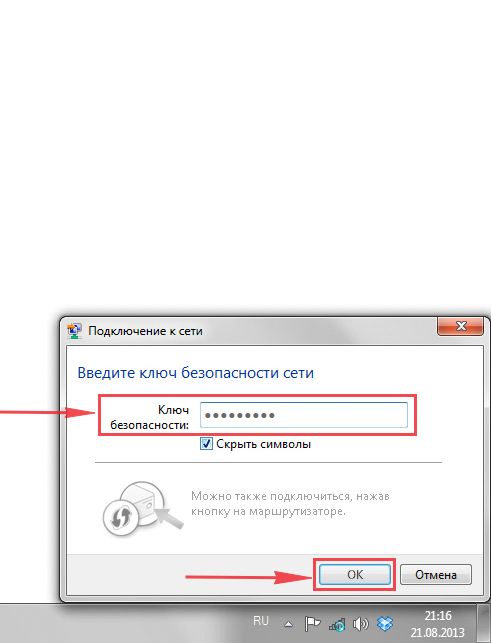
Ждем, возможно, пару секунд и Вы подключились к Вашей беспроводной сети.

Windows 10
Видео инструкция
В правом нижнем углу рабочего стола находим значок беспроводной сети (wi-fi), щелкаем по нему левой кнопкой мыши.

Выскакивает окно со списком доступных беспроводных сетей. Выбираем беспроводную сеть, в моем случае это сеть «Sultanova» (Вы выбираете ту сеть, название которой давали при настройке роутера).
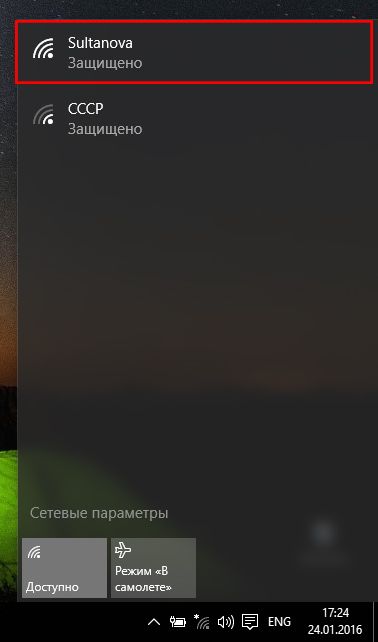
После выбора сети поставьте галочку напротив «Подключаться автоматически» и нажмите «Подключиться«.
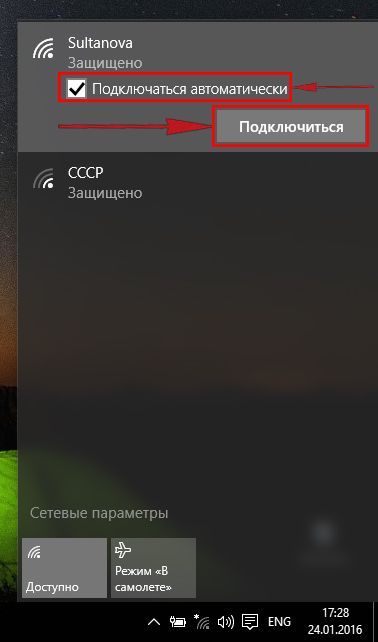
Далее необходимо указать «Ключ безопасности» это пароль беспроводной сети, который Вы указывали при настройке роутера. После того, как Вы указали ключ, нажимаем «Далее«.
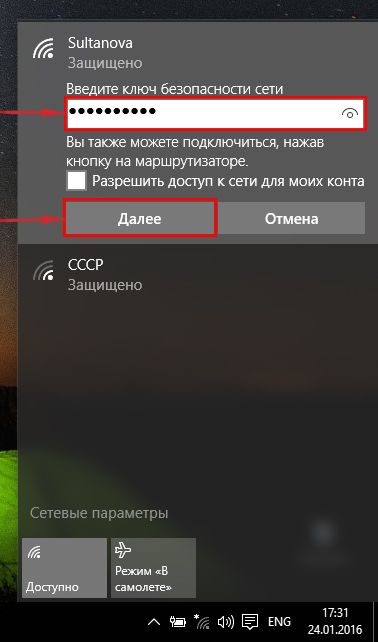
Ждем, возможно, пару секунд и Вы подключились к Вашей беспроводной сети.
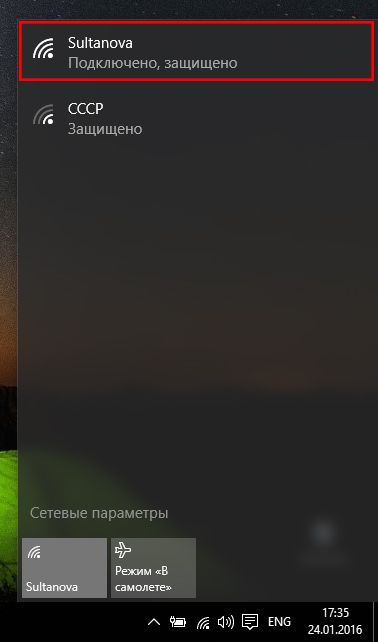
Для настройки роутера необходимо подключить Ваш роутер к компьютеру. Это можно сделать через Wi-Fi либо кабелем. После того, как подключение выполнено необходимо открыть браузер и в адресной строке 192.168.0.1 (на новых версиях прошивки адрес 192.168.1.1). В случае если интерфейс роутера не открывается в адресной строке введите tplinkwifi.net
При входе по IP адресу роутера потребуется авторизация. В окне Логин (User) вводим admin, в окне Пароль (Password) – admin
В случае, если заходим по ссылке авторизация не потребуется.
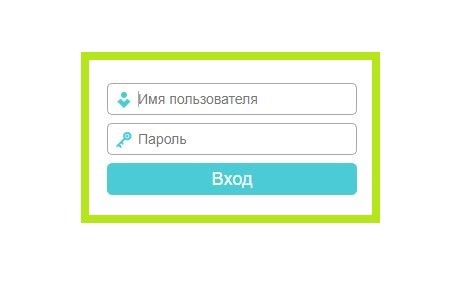
После авторизации откроется интерфейс роутера. Выходим из мастера быстрой настройки нажав “Выход”. В столбце слева нужно выбрать пункт “Сеть”.
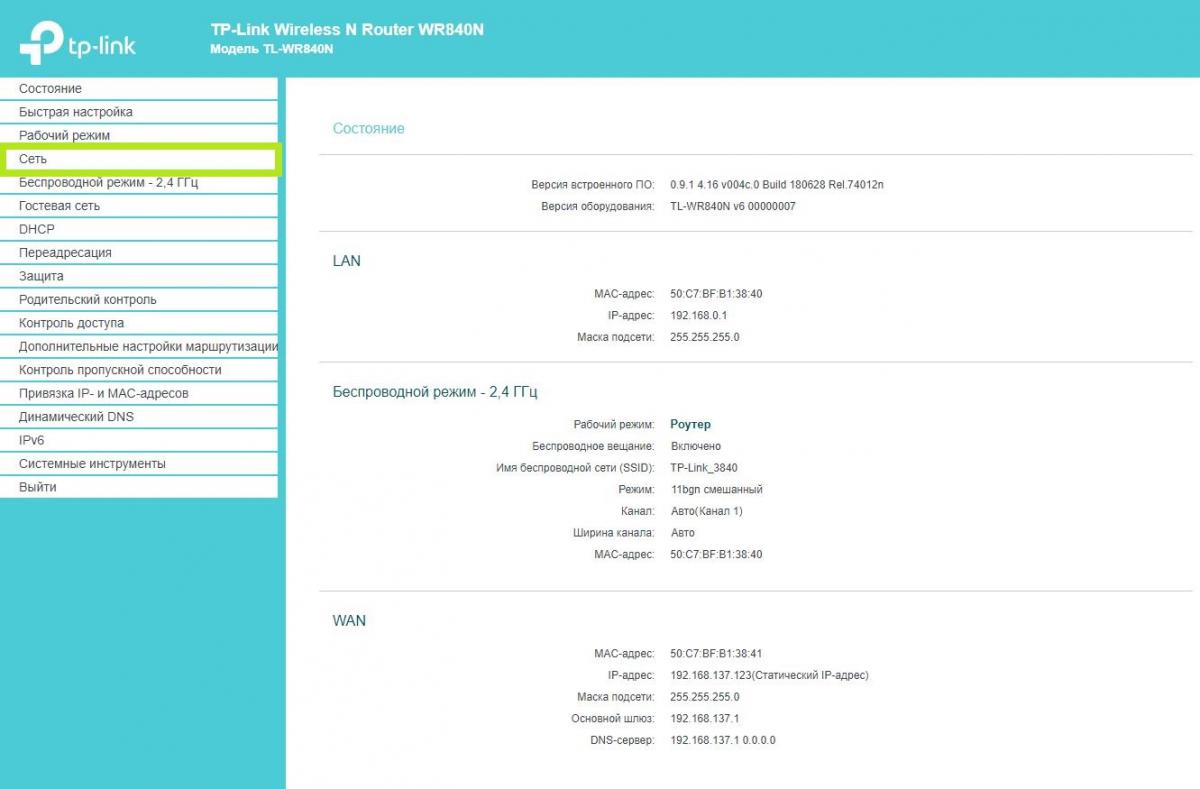 В пункте “Сеть” выбираем пункт “WAN”. В открывшемся окне, в графе “Тип подключения WAN” выбираем “РРРоЕ/РРРоЕ Россия”. “Имя пользователя” и пароль указаны в Вашем договоре в графе “Аутентификационные данные”. Обязательно подтвердите пароль и нажмите на кнопку “Сохранить”. Если все ввели правильно – подключение будет выполнено.
Для дальнейшей настройки Wi-Fi Вам необходимо перейти в пункт “Беспроводной режим”. В настройках сетевого режима вы можете изменить название вашей Wi-Fi сети в пункте “Имя сети”. После того, как измените имя – нажмите “Cохранить”
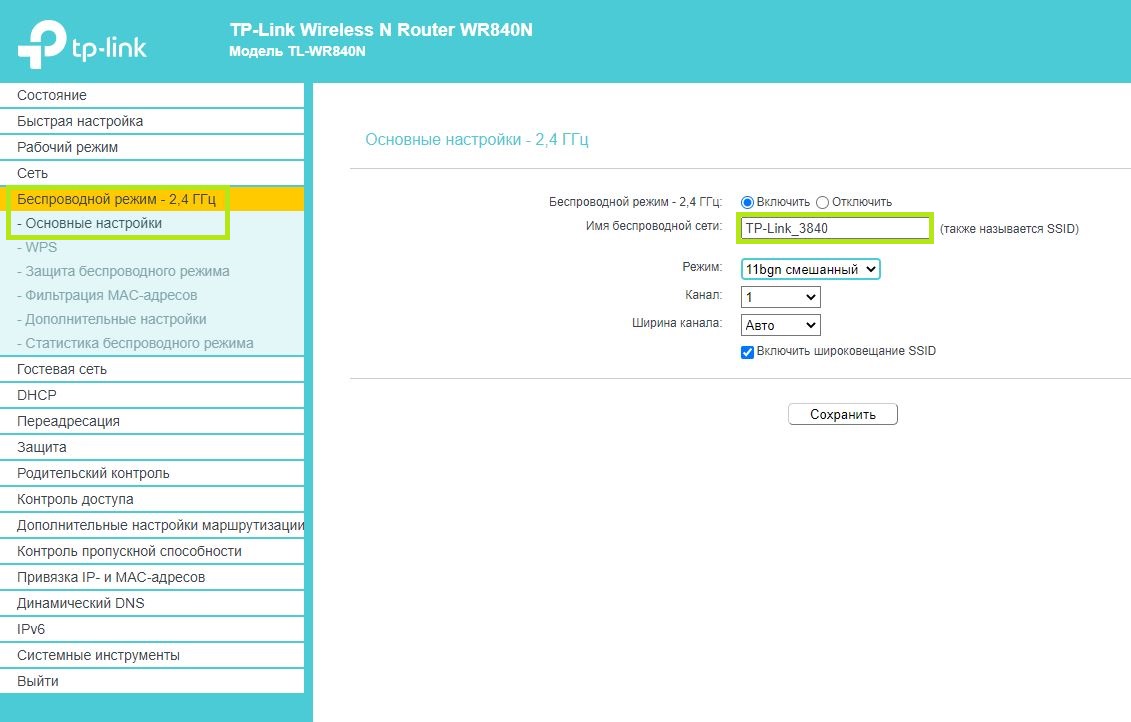
Защитить ваше Wi-Fi соединение можно создав пароль для подключения. Для этого перейдите в пункт “Защита беспроводного режима”, укажите подходящий Вам пароль и нажмите кнопку “Cохранить”.