Разработка приложений для Linux и Windows на любой платформе доступен, в то время как создание программного обеспечения для Mac не так просто, как для других платформ. Для создания приложений на Mac требуется SDK под названием Xcode. Xcode — это интегрированная среда разработки (IDE), состоящая из набора инструментов разработки программного обеспечения, разработанных Apple специально для разработки программного обеспечения на Mac OS X и iOS.
Комплект для разработки приложений Xcode недоступен ни для каких других операционных систем, кроме Mac OS X и iOS. Эта недоступность связана со многими причинами и проблемами совместимости. Если вы довольно твердо устанавливаете Xcode на свой ПК с Windows (7, 8.1 и 10) и проверяете рабочий процесс SDK framework/development kit в ОС Windows, то вот подробный способ установки Xcode на Windows 7 и 8/8.1 и Windows 10 ПК.
Xcode — комплект для разработки приложений
Xcode — это комплект для разработки приложений или SDK, содержащий инструменты разработки программного обеспечения, предназначенные для Mac OS X. Xcode — это конструктор интерфейса, который также можно рассматривать как приложение для тестирования и набор инструментов для управления активами. Вот способ установки Xcode на ПК с Windows (7, 8 или 8.1 и 10) с использованием Oracle VirtualBox. Следовательно, вы можете создавать и разрабатывать необходимые приложения на своем ПК с Windows, установив этот Xcode SDK на свою ОС Windows.
Требования для установки Xcode в ОС Windows 7/8/10
В этой статье мы подробно объясним, как установить Xcode в Windows 7, 8 или 8.1 и 10. Перед началом процесса установки вам необходимо выполнить следующие системные требования:
- Рабочая виртуальная машина Mac OS X на VMware или VirtualBox.
- Скачанный что собой представляет Пакет Xcode от Apple. Для загрузки Xcode из магазина Apple необходимо иметь Apple ID.
- Двухъядерный процессор Intel
- Минимум 2 ГБ ОЗУ (рекомендуется: 4 ГБ +)
- Аппаратная виртуализация
Если вы профессиональный разработчик приложений, вам необходимо приобрести оборудование Apple с OS X и идентификатором разработчика приложения. Использование Xcode на вашем оборудовании Apple лучше всего протестирует приложение на реальном устройстве Apple. Поскольку мы используем Virtual Box для установки Xcode в Windows, убедитесь, что у вас есть работающая виртуальная машина Mac OS X. Если у вас нет установленной копии Virtual Box, вы можете скачать ее здесь, так как она бесплатна и имеет открытый исходный код.
Скачать VirtualBox
Шаги по установке Xcode на ПК или ноутбук с Windows 10, 8/8.1 и 7
Выполните следующие шаги, чтобы установить Xcode на Windows 10, 8 или 8.1 и настольный компьютер или ноутбук с Windows 7 для iOS SDK.
Шаг 1: Загрузите и установите VMware или VirtualBox на свой компьютер с Windows по приведенной выше ссылке.
Шаг 2: Вы должны скачать и установить ОС X Маверикс ISO как виртуальная машина.
Шаг 3: Вы должны создать виртуальную машину на своем виртуальном ящике Oracle. Для этого вам нужно открыть Virtual Box и нажать Новый.
Шаг 4: Теперь вы получите новое окно с запросом имени новой операционной системы. Введите имя как OSX, Тип ОС как Mac OS Xи введите версию как Mac OS X (32 бит). Нажмите Далее.

Шаг 5: Вы должны выбрать размер оперативной памяти для виртуальной машины. Достаточный объем памяти для запуска Android на вашем компьютере с Windows требует 1024 МБ (1 ГБ). Выберите объем памяти и нажмите Следующая.

Шаг 6: Выберите и создайте тип файла виртуального жесткого диска.
Шаг 7: Выберите тип файла оборудования как VDI (VirtualBox Disk Image). Всегда рекомендуется использовать VDI с точки зрения образа ISO. Нажмите Далее.

Шаг 8: Выберите физический жесткий диск в качестве динамического. Теперь вам нужно выделить местоположение файла и размер Android на физическом жестком диске вашего устройства. Затем нажмите на Создать.

Шаг 9: Вы успешно создали виртуальную машину на своем виртуальном ящике. Вам нужно смонтировать iso-файл, который был загружен ранее. Для этого перейдите в «Настройки» >> «Хранилище» >> «Загрузить iso-файл» >> «ОК» >> «Пуск».

Шаг 10: Позже вы будете следовать инструкциям на экране загрузки OSX в качестве мастера, после чего OSX будет установлена в Oracle Virtual.

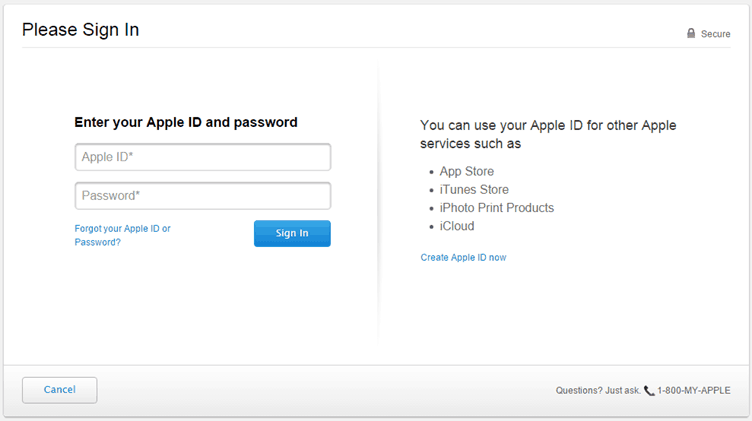
Шаг 11: Перейдите в браузер Safari в вашем Virtualbox и откройте официальный Apple App Store. Войдите, используя свой Apple ID в App Store. Вам необходимо ввести Apple ID и пароль, как показано на изображении ниже:
Шаг 12: После подписания введите Xcode в поле поиска, чтобы получить полный пакет. Он показывает вам различные связанные приложения. Найдите Xcode в разных приложениях и нажмите «Бесплатно и скачать». Затем нажмите OK скачать комплект.

Шаг 13: После завершения установки откройте его из приложений. Теперь вам нужно предоставить свои учетные данные root, чтобы получить права доступа для установки компонентов Xcode и изменения настроек вашей системы. Введите свое имя и пароль и нажмите OK.

Шаг 14: Вот и все. Мы успешно установили последнюю версию Xcode на ваш ПК с Windows 10, 8/8.1 и 7, используя рабочую станцию VMware с программным обеспечением для виртуализации рабочих столов.
 Таким образом, вы можете установить Xcode, программное обеспечение для разработки приложений на свой ПК с Windows или ноутбук. Теперь вы можете создавать новые проекты и лучшие приложения с помощью этого интерфейса. Поскольку вы запускаете это программное обеспечение в Windows, производительность и скорость Xcode не будут чрезвычайно высокими.
Однако его можно использовать в образовательных целях, а не для профессиональных разработчиков приложений. Теперь пришло время использовать Xcode на нашем ПК. Таким образом, вы можете легко загрузить и установить Xcode на свой персональный компьютер или ноутбук с Windows, а также создавать лучшие приложения в соответствии с вашими потребностями. Я надеюсь, что это руководство поможет вам лучше всего установить Xcode на ОС Windows 10, 8/8.1 и 7 под управлением ПК или ноутбука.
Mac on Windows + ios SDK & X-code on windows 7
|
|
|
X-code SDK — Hardik patel’s Blog img 1 |

The TechExxpert guide has been updated to fully allow Xcode 4.1 to work. that the past fixes did not work.
Please let me know if this guide works/doesn’t work.This guide has been modified ..
Apple has been adamantly refusing to create an iPhone SDK support for Windows-based machines. Luckily, there is a work around to be able to fully run the iOS SDK and Xcode support for most all PC’s.
The following steps involve installing a virtual machine on your PC, updating the virtual machine to 10.7 , then running the machine and downloading and installing the iOS SDK and Xcode on to the virtual machine.
There are other ways to install OS X on your machine but they involve creating a new partition and installing the Operating System directly to your hard drive. Those ways are much harder and have more confusing steps that could potentially damage your computer. This method is easier and safer to use.
The process will take 2-3 hours, but most of the time is consumed by large downloads. There’s no software to buy or developer fees to pay.
PROCEDURE
1. Follow the steps : here to download and install a virtualized version of OS X Lion on your PC.
__________________________________________________________________________________
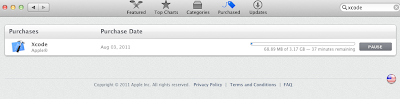
2. If you don’t have a free Apple Dev Account, create one here. You’ll need this to be able to download Xcode 4.1 for free. In OS X, open the App Store and download Xcode. You can view progress of the download under the Purchases tab.

__________________________________________________________________________________
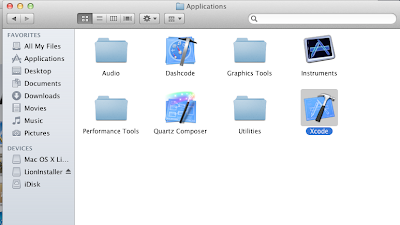
3. Once the progress bar is finished, it will say it is installed but it really isn’t. Open the Applications folder from Finder. Double-click on the Install Xcode icon

__________________________________________________________________________________

4. Follow the on-screen directions then wait for the installation to finish.
__________________________________________________________________________________
5. Once it’s done, it should open by itself. If it doesn’t, you will NOT find the iPhone SDK in your dock. You will need to open your hard drive. Then Click on Developer, then on Applications.
__________________________________________________________________________________
7. You will now see an icon for Xcode, click it and you can start coding applications.
__________________________________________________________________________________
Here to download and install a virtualized version of OS X Lion on your PC
Requirements
A laptop or desktop computer that supports virtualization (most newer computers do).
At least 1 GB of RAM (the more, the better).
VMWare Workstation (this is a paid program but a little research will get you it for free).
Instructions
Before you start, make sure that you have enabled Virtualization in the BIOS of your computer. This is usually disabled by default by computer manufacturers.
Video tutorial : Available
__________________________________________________________________
1. From the file downloaded, double click on Mac OS X Lion VMware Files.exe. Click Run thenYes. This will decompress the files.

2. Once done, a folder named Mac OS X Lion VMware Files will appear, double click it.
3. You will need to follow the instructions in this video to unlock VMWare. Instead of using the files from the video, use the files from Step 2.
4. From Step 1, you should have also gotten a folder named Mac OS X Lion. Open that up and open the file named Mac OS X Lion.vmx. Double-click this file. It will open in VMWare Workstation.

5. On the left column, click on Edit Virtual Machine Settings. In the Memory tab, you can edit how much RAM OS X will get. In the Sound tab, change to Specify host sound card, change it to your sound card. After the machine has started and sound doesn’t work, change to Use default host sound card.

6. At the bottom of the box is an Add button, click it. Select Hard Disk from the left, click Next. Choose Use and existing virtual disk.

7. Browse for the Mac OS X Lion Installer.vmdk that was downloaded from the torrent. ClickFinish. Click OK to close the box.

8. On the left column, click Power on this virtual machine.

9. If a box asks to repair the image, click Repair. Once the box comes up, click I copied it, clickOK. A message about the CD Drive may come up, just click OK.

10. The machine should power up in a few moments, ready to go. For ease of use, click in VMWare Workstation, click File > Add to Favorites.
11. You should now have a Install Mac OS X screen. At the top, click Utilities then Disk Utility. Select the 42.45 GB Hard Disk. Click on the Erase tab. Now you can name your hard drive what you want. Then click on Erase. Click Erase again.

12. Once the process is done, close out of the Disk Utility box, the Install screen will come back up. Click Continue, Agree. Select the 40GB Hard Disk to install Lion. Click Install. The process will take about 30 minutes. Once it’s done, the account setup will start. Once that’s done, Lion will start.
13. To be able to use the machine in full screen, in OS X open Preferences, click on Displays. Now select the resolution of your monitor. Now in VMWare, click on the Full Screen button on the toolbar (10th button from the left).

14. Now you’re done, you can use this OS as a normal to install programs.
________________________________________________________________
Video tutorial
Virtualize OS X Lion 10.7 Windows 7
copyright holder : techexxpert
For educational purposes only.
«Copyright Disclaimer Under Section 107 of the Copyright Act 1976, allowance is made for fair use for purposes such as criticism, comment, news reporting, teaching, scholarship, and research. Fair use is a use permitted by copyright statute that might otherwise be infringing. Non-profit, educational or personal use tips the balance in favor of fair use.»
Как установить IOS SDK и Xcode на Windows
Категория: Инструкции / Просмотров: 43524
Самый простой способ установить iOS SDK и Xcode на операционную систему Windows. Для установки и последующего запуска нам понадобится виртуальная машина с macOS 10.10.
!Внимание: На компьютере должно быть установлено не менее 1гб озу и 256мб видеопамяти!
Скачиваем нужные файлы:
— VMWare Workstation
— VMWare Hard Driver
— OS X Lion (Образ)
Инструкция по запуску Xcode в виртуальной машине.
1. Регистрируем аккаунт в Apple Dev Accoun
2. Переходим в App Store и скачиваем там Xcode( Ход загрузки доступен во вкладке «Покупки»).
3. После чего переходим в папку «Приложения» из папки «Finder»,дважды щёлкаем по установочному файлу и ожидаем завершения процедуры.
4. После чего в доке появиться иконка Xcode (Если иконка не появилась то переходим по адресу «Жесткий диск» — «Разработчик» — «Приложения»).
5. Теперь вы можете нажать на иконку Xcode и начать программировать.
Автор материала
Developing apps for Linux and Windows on any platform is an easy task while building software for Mac is not so easy compared to other platforms. For building apps on Mac requires a SDK called Xcode. Xcode is an integrated development environment (IDE) that consists of set of software development tools which are designed by Apple specifically for developing software on Mac OS X and iOS. The app development kit, Xcode is not available for any other operating systems except Mac OS X and iOS. There are many reasons and compatibility issues behind this unavailability. If you are quite firm to install Xcode on your Windows PC (7, 8.1 and 10) and check the working process of SDK framework/development kit on Windows OS, then here is a detailed way on how to install Xcode on Windows 7 and 8/8.1 and Windows 10 pC.
Xcode – App Development Kit
Xcode is an application development kit or simply SDK containing set of software development tools designed for Mac OS X. Xcode is an interface builder which can also be considered as a testing application and an asset management toolkit. Here is a method on how to install Xcode on Windows PC (7, 8 or 8.1 and 10) using Oracle VirtualBox. Hence, by installing this Xcode SDK on your Windows OS, you can create and develop basic apps on Windows PC.
Requirements to Install Xcode on Windows 7/8/10 OS
In this article, we are going to explain you in a detailed way on how to install Xcode on Windows 7, 8 or 8.1 and 10. Before initiating the installation process, you need to have the following system requirements:
- A working Mac OS X virtual machine on VMware or VirtualBox.
- Downloaded Xcode package from Apple site. You need to have Apple ID in order to download Xcode from Apple store.
- Dual Core Intel processor
- Minimum 2GB of RAM (Recommended: 4 GB+)
- Hardware Virtualization
If you are a professional app developer, you have to purchase Apple hardware with OS X and app developer ID. You need to use Xcode on your Apple hardware at the time of testing the app on a real Apple device. As we are using Virtual Box to install Xcode on Windows, make sure that you have a working Mac OS X virtual machine. If you don’t have a copy of an installed Virtual Box, then you can download it here as it is free and open source.
Download VirtualBox
Steps to Install Xcode on Windows 10, 8/8.1 and 7 PC or Laptop
Follow the below steps so as to install Xcode on Windows 10, 8 or 8.1 and Windows 7 desktop or Laptop for iOS SDK.
Step 1: Initially, download and install VMware or VirtualBox on your Windows computer from the above link.
Step 2: Now, you need to download and install OSX Mavericks ISO as a virtual machine.
Step 3: You have to create the virtual machine on your oracle virtual box. For that, you need to open Virtual Box and click New.
Step 4: Now, you will get a new window asking for the name of the new operating system. Enter Name as OSX, Type of the OS as Mac OS X and also enter the Version as Mac OS X (32 bit). Click Next.

Step 5: You need to select the size of RAM for the virtual machine. The sufficient size of memory for Android to run on your Windows computer requires 1024 MB (1 GB). Select the memory size and then click Next.

Step 6: Now, Select and create the type of virtual hard drive file.
Step 7: Select the type of Hardware file as VDI (VirtualBox Disk Image). It is always recommended to go for VDI in terms of ISO image. Click Next.

Step 8: Select the physical hard drive as Dynamically allocated. Now, you need to allocate the file loaction and size of Android from physical hard drive on your device. Then, Click on Create.

Step 9: Now, you have successfully created virtual machine on your virtual box. You need to mount the iso file which is downloaded before. For that, Go to Settings >> Storage >> Load iso File >> Click Ok >> Start.

Step 10: Later, you just follow the on-screen steps of OSX boot as Wizard and then OSX will be installed in Oracle Virtual.
Step 11: Now, go to safari browser in your Virtualbox and open official Apple App store. Sign in using your Apple ID into the App store. You need to enter the Apple ID and password as shown in the image below:

Step 12: After signing, type xcode in the search box in order to get the complete package. It shows you various related apps. Locate Xcode from different apps and click on Free and Download. Then, click OK to download the kit.

Step 13: After completing the installation process, open it from the applications. Now, you need to provide your root credential in order to get access privilege to install Xcode components and also for modifying your system settings. Enter your name and password and press OK.

Step 14: That’s it,. We have now successfully installed the latest Xcode version on your Windows 10, 8/8.1 and 7 PC using desktop virtualization software VMware workstation.

This way you can install Xcode, app development software on your Windows PC or Laptop. Now, you can create new projects and better apps using this interface. As you are running this software on Windows, the performance and speed of Xcode won’t be extremely high.
However, it can be used for educational purpose, but not for professional app developers. Now it’s time to use Xcode on our PC. So in this way you can easily download and install Xcode on your any windows Personal computer or laptop and you can create better apps as per your need. Hope this tutorial helps you in the best way to install Xcode on Windows 10, 8/8.1 and 7 OS running PC or Laptop.

Update 2: August 17, 2011 The TechExxpert guide has been updated to fully allow Xcode 4.1 to work. Sorry that the past fixes did not work. Thanks for the comments! Please let me know if this guide works/doesn’t work.
Update: This guide has been modified to the latest updates as of August 2, 2011 including the latest Xcode 4.1 and OS X Lion 10.7.
Apple has been adamantly refusing to create an iPhone SDK support for Windows-based machines. Luckily, there is a work around to be able to fully run the iOS SDK and Xcode support for most all PC’s.
The following steps involve installing a virtual machine on your PC, updating the virtual machine to 10.7 , then running the machine and downloading and installing the iOS SDK and Xcode on to the virtual machine.
There are other ways to install OS X on your machine but they involve creating a new partition and installing the Operating System directly to your hard drive. Those ways are much harder and have more confusing steps that could potentially damage your computer. This method is easier and safer to use.
The process will take 2-3 hours, but most of the time is consumed by large downloads. There’s no software to buy or developer fees to pay.
Instructions
1. Follow the steps here to download and install a virtualized version of OS X Lion on your PC.
2. If you don’t have a free Apple Dev Account, create one here. You’ll need this to be able to download Xcode 4.1 for free. In OS X, open the App Store and download Xcode. You can view progress of the download under the Purchases tab.
3. Once the progress bar is finished, it will say it is installed but it really isn’t. Open the Applications folder from Finder. Double-click on the Install Xcode icon.

4. Follow the on-screen directions then wait for the installation to finish.

6. Once it’s done, it should open by itself. If it doesn’t, you will NOT find the iPhone SDK in your dock. You will need to open your hard drive. Then Click on Developer, then on Applications.

7. You will now see an icon for Xcode, click it and you can start coding applications.
If the icons don’t show up, you may not have enough virtual hard drive space to fit the program. Make sure you have at least 10 GB of free memory in the virtual machine. Restarting your machine may be another way to make the icon appear.
Now you can start coding an app for your personal use. The language you will be coding in is Objective-C. If you don’t have any experience with Objective-C, TheNewBoston provides free tutorials on Xcode and Xcode iPhone development. I recommend following the Objective-C tutorials
first.
You will be able to test your app on the iPhone simulator in Xcode but you will not be able to add the app to your own device. To add an app that you’ve created to your device, see the two options below.
Option 1: If you want to submit your app to the App Store, you will need to pay Apple $100 for an official Developers Certificate. This will allow you to sell your app to a very large audience but Apple does place large restrictions on its approval of submissions.
Option 2: If you don’t want to pay the $100, you can develop your application for Cydia (similar to the App Store). This option will also allow you to place your app on to your iPhone, not just only in the Xcode simulator.
Cydia is the unofficial App Store for users who have jailbroken and want to sell/share their apps. There are almost no restrictions as to what kind of apps that can be added to Cydia.
To develop for Cydia, you will need to have your device jailbroken (How do I jailbreak?) and before you start developing your app, you will need to follow these steps to create an alternate Certificate.