Компьютерная мышь была бы неполноценной, если бы в ней отсутствовал такой важный элемент как колесико, основной задачей которого является вертикальная прокрутка. По умолчанию, если крутить колесико от себя, окна будут прокручиваться вверх, а если на себя, то вниз, что вполне логично. Но что, если вдруг пользователь пожелает изменить направление прокрутки? Некоторое время в Windows 10 была доступна опция изменения направления прокрутки, но затем разработчики таки решили ее убрать.
Тем не менее, вы можете ею воспользоваться, внеся изменения в системный реестр, но для начала вам нужно узнать идентификатор мыши.
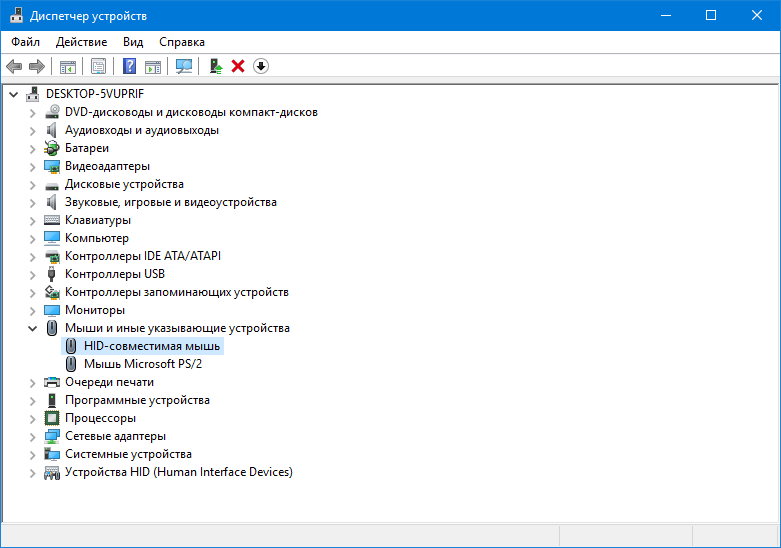
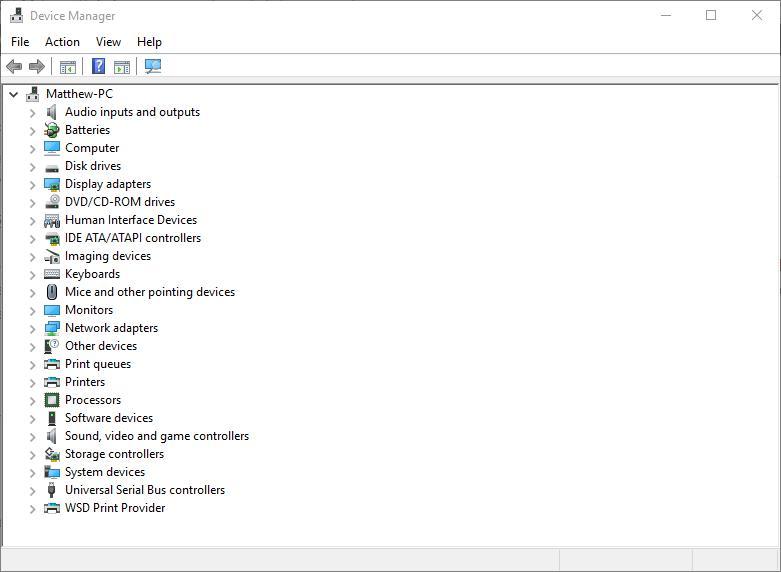
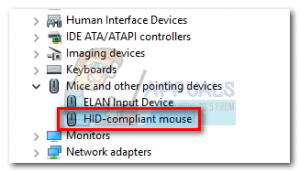
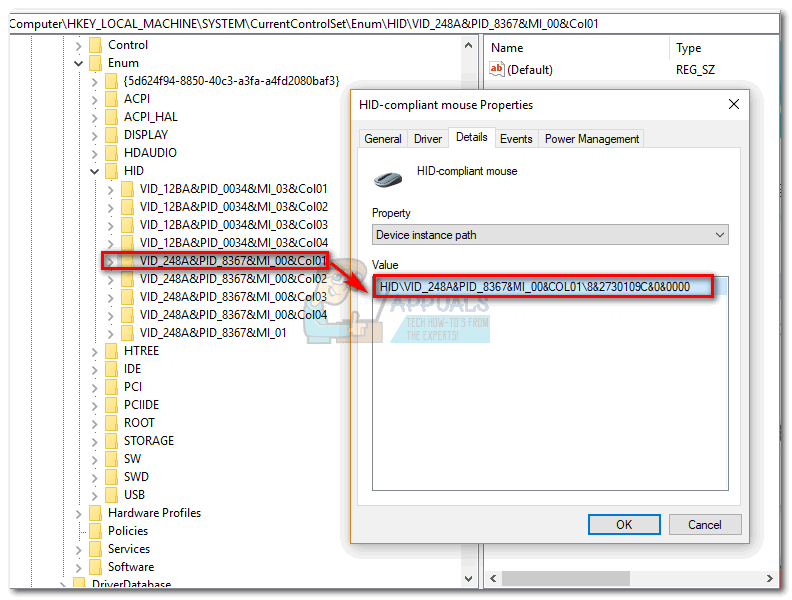
Откройте Диспетчер устройств, разверните пункт «Мыши и иные указующие устройства» и выберите вашу мышь (если устройство подключается по USB, это будет HID-совместимая мышь).
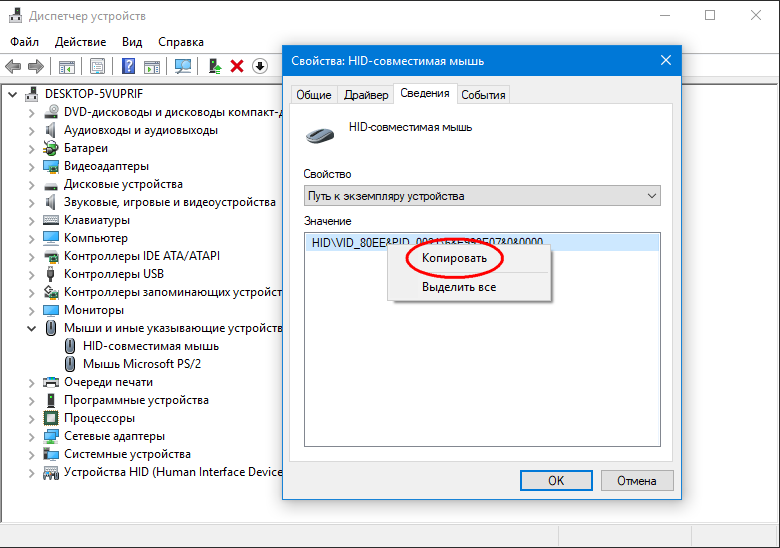
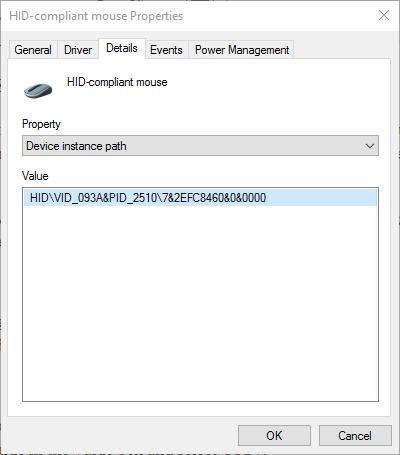
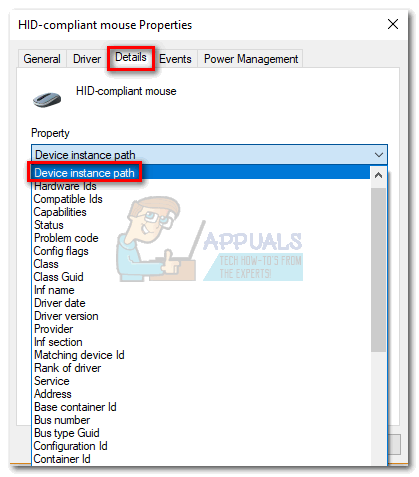
Переключитесь в открывшемся окошке на вкладку «Сведения».
Выберите в выпадающем меню «Путь к экземпляру устройства», скопируйте полученное значение и вставьте его в Блокнот.
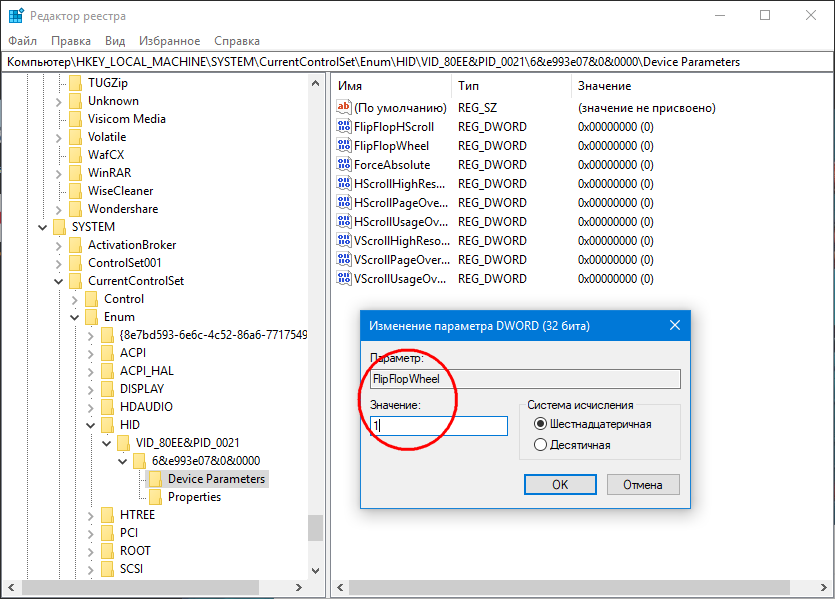
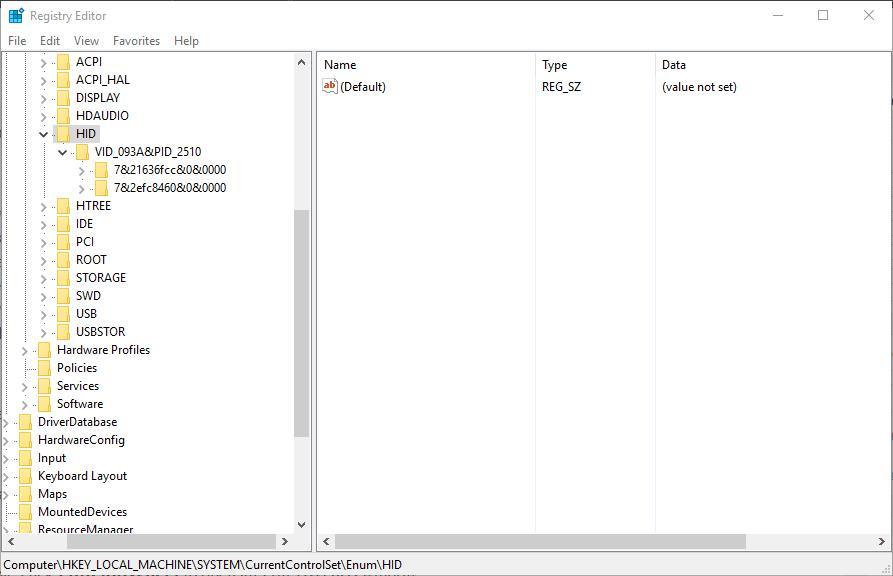
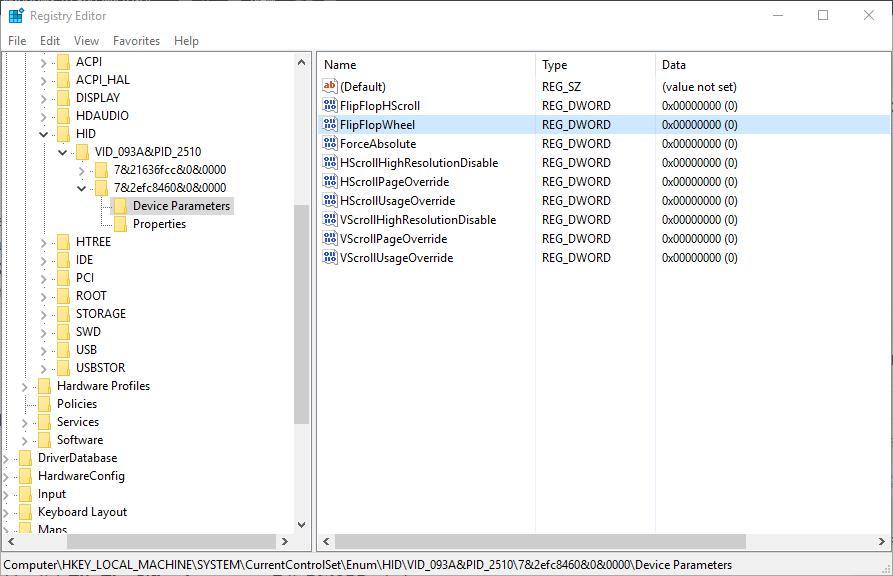
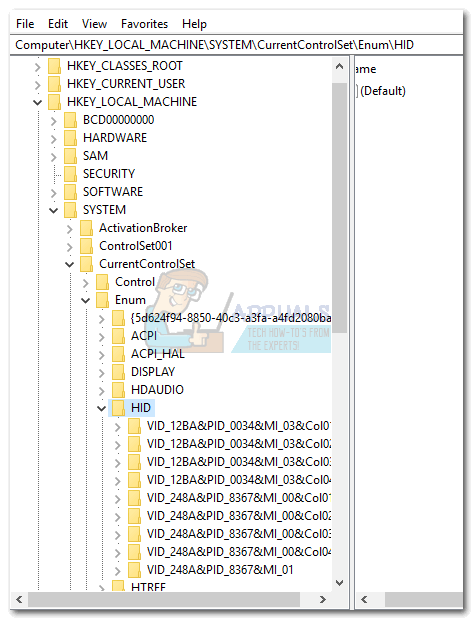
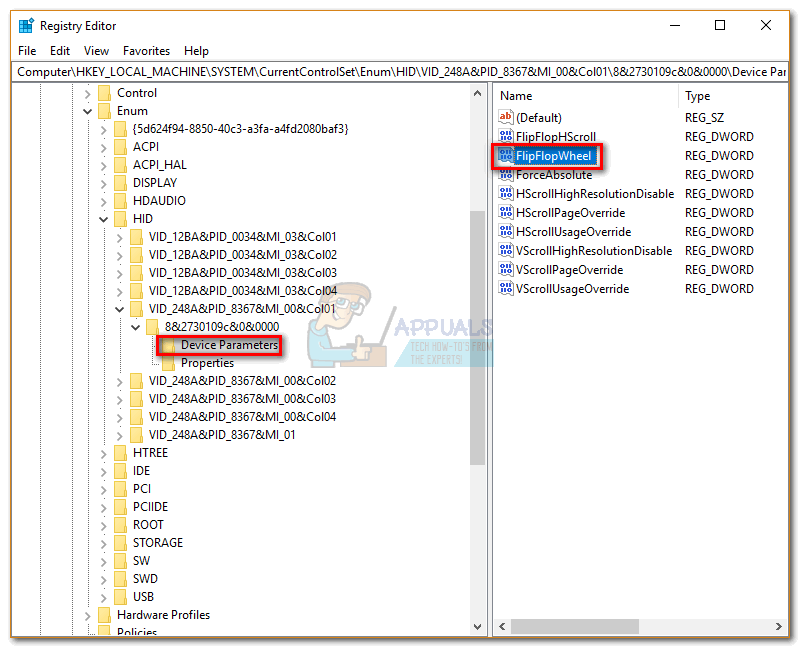
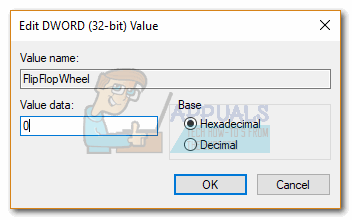
За сим откройте редактор реестра и перейдите к ключу HKLM\SYSTEM\CurrentControlSet\Enum\HID. Разверните элемент, название которого соответствует VID мыши вплоть до вложенного подраздела Device Parameters. Справа у вас будет DWORD-параметр FlipFlopWheel, кликните по нему два раза и замените его текущее значение 0 на 1.
Чтобы изменения вступили в силу, перезагрузите компьютер.
С помощью AutoHotkey
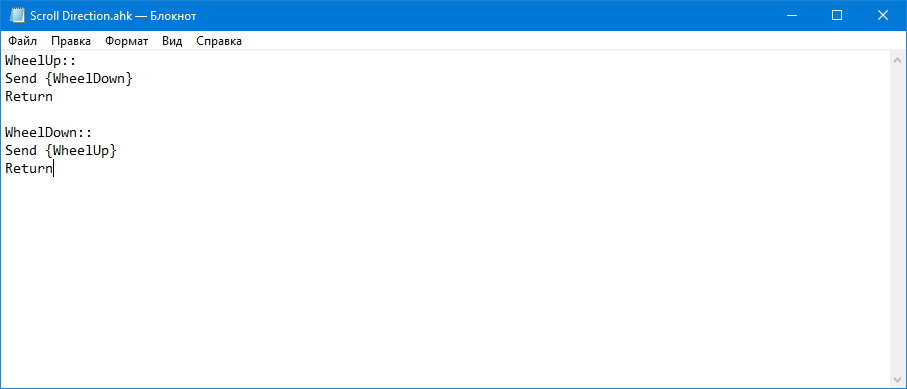
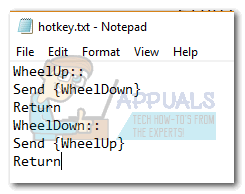
Если твик реестра не сработает, в качестве альтернативы можно воспользоваться утилитой AutoHotkey, предназначенной для переназначения действий, выполняемых аппаратными кнопками. Скачав и установив утилиту, создайте в Блокноте текстовый файл и пропишите в него этот код:
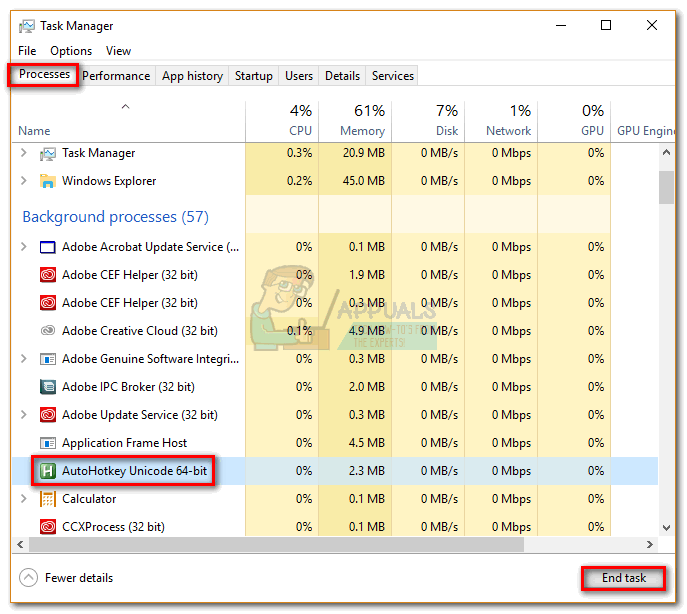
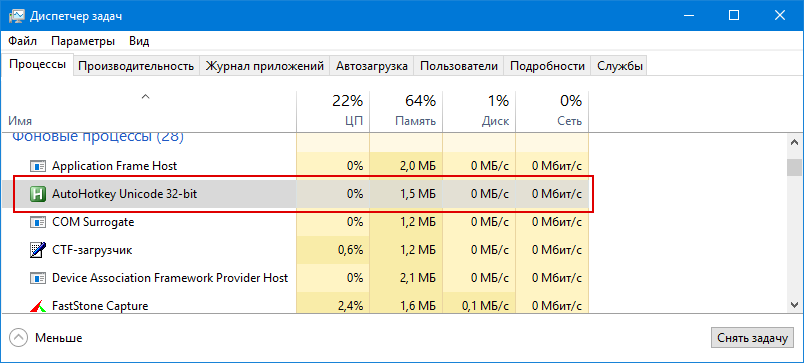
Сохраните файл с расширением ahk на рабочем столе и запустите, что изменит направлении прокрутки колесика мыши в обратном направлении. Новые настройки вступят в силу немедленно и будут действовать до тех пор, пока вы не перезагрузите Windows или не завершите запущенный процесс скрипта принудительно из Диспетчера задач.
Загрузка…
A comprehensive guide on adapting a mouse to your needs
by Matthew Adams
Matthew is a freelancer who has produced a variety of articles on various topics related to technology. His main focus is the Windows OS and all the things… read more
Updated on
- Mice and touchpads are essential input devices for your PC.
- Many users prefer to customize their mouse in different ways, such as changing their scroll direction.
- Windows 10 used to have a built-in option to reverse the mouse scroll’s direction, but now you need to apply other methods to accomplish this.
Scrollbars are ubiquitous in all types of computers and by default, rolling the mouse wheel down scrolls down a page. But some users want to reverse the scroll direction in Windows 10.
Read on to find out what options you have to change the mouse scroll’s direction on your device.
Windows 10 used to have a Settings option that you could use to configure the scrolling direction with.
However, an update removed the Reverse scrolling direction setting. So how can we now configure the mouse wheel’s scroll direction in Windows 10?
Well, there are two easy alternatives you can try out, as you will see from the guides below.
1. Edit the Registry
Even if there’s no longer a Reverse scrolling direction option via Settings in Windows 10, you can still customize the mouse wheel’s scroll direction with a registry edit.
For that, you’ll need the mouse VID ID which is listed in Device Manager.
1. Press the Win + S keys at the same time on your keyboard to open the search box.
How we test, review and rate?
We have worked for the past 6 months on building a new review system on how we produce content. Using it, we have subsequently redone most of our articles to provide actual hands-on expertise on the guides we made.
For more details you can read how we test, review, and rate at WindowsReport.
2. Type device manager in it and click on the first result to open the app.
3. Select Mice and other pointing devices and double-click your mouse.
4. Click on the Details tab, which includes the drop-down menu shown directly below.
5. Select Device instance path from the drop-down menu.
6. Right-click the value in the Value box and select Copy.
7. Press OK and close the Device Manager window.
8. Open Notepad and paste the VID ID in Notepad.
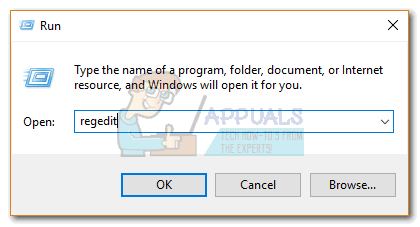
9. Press the Win + R keys to open the Run dialog.
10. Enter regedit in Run’s text box to open the Registry Editor app.
11. Open this registry location: HKEY_LOCAL_MACHINESYSTEMCurrentControlSetEnumHID
12. This is where the VID ID comes in handy. Click the key that matches the VID ID in Notepad.
13. Now you can select a Device Parameters key that has a FlipFlopWheel DWORD as shown below.
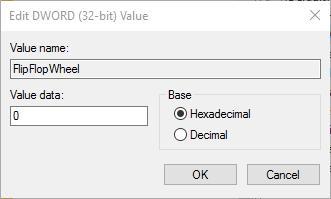
14. Next, double-click FlipFlopWheel to open an Edit DWORD window.
15. Enter 1 in the Value data text box and press OK.
16. Close the Registry Editor window (You’ll need to restart Windows for the changes to take effect).
17. Click the Start button and roll your mouse wheel up. That will scroll the Start menu’s bar slider down. Roll the mouse wheel down to scroll back up the menu.
18. To revert back to the default setting, select the FlipFlopWheel DWORD in Registry Editor window and enter 0 in the Value data box.
Did you know that you can improve your scrolling experience significantly with the smooth scrolling feature? Learn more from our dedicated article.
- 3+ best tools to automate mouse clicks online and in games
- How to use Apple keyboard and mouse on Windows 10
- Mouse settings reset/keep changing [Full Fix]
2. Set up an AutoHotkey Script
AutoHotkey is software that users can set up macro scripts with and with which they reverse the scroll direction.
This is freeware software you can add to Windows by pressing the Download button on the program’s website. Set up a reverse scroll direction script as follows:
- Press the Cortana button and enter Notepad in the search box. Select to open Notepad.
- Now you can enter the script in Notepad. Copy and Paste this script in Notepad:
WheelUp::
Send {WheelDown}
Return
WheelDown::
Send {WheelUp}
Return - Click File > Save as to open the Save as window and select All Files from the Save as type in the drop-down menu.
- Enter a file title for the script and make sure to include .ahk at the end of it. For example, you could save it as Scroll Direction Script.ahk.
- Select to save the script to Desktop and press the Save button. That should add an AutoHotkey script icon to the desktop as shown below.
- Close Notepad and double-click the AutoHotkey script shortcut on the desktop to run it.
- Click the Start button and roll the mouse wheel up to scroll down the menu.
- To close the script, right-click the taskbar and select Task Manager. Select AutoHotkey Unicode on the Processes tab and press its End task button.
These are two ways that you can reverse the mouse wheel’s scroll direction in Windows 10. Now, the scrollbar slider will move down when you roll the mouse wheel up and vice versa.
Let us know if you found this guide helpful and write down any questions you have in the comments section below.
Skip to content
На чтение 4 мин. Просмотров 5.7k. Опубликовано
Полосы прокрутки распространены повсеместно на всех типах компьютеров, и по умолчанию прокручивание колесика мыши вниз прокручивает страницу или окно и наоборот. В частности, в Windows 10 была опция «Настройки», с помощью которой можно было настроить направление прокрутки. Однако в результате обновления был удален параметр Обратное направление прокрутки . Так как же теперь мы можем настроить направление прокрутки колесика мыши в Windows 10?
Изменить реестр, чтобы изменить направление прокрутки
Даже если больше нет опции Обратное направление прокрутки , вы все равно можете настроить направление прокрутки колесика мыши с помощью редактирования реестра. Для этого вам понадобится VID ID мыши, который указан в диспетчере устройств.
- Сначала откройте Устройство Менеджер , нажав кнопку Кортана и войдя в «Диспетчер устройств».
- Выберите Устройство Менеджер , чтобы открыть окно непосредственно ниже.

- Выберите Мыши и другие указывающие устройства и дважды щелкните мышью.
- Перейдите на вкладку Подробности , которая содержит раскрывающееся меню, показанное непосредственно ниже.

- Выберите Путь к экземпляру устройства в раскрывающемся меню.
- Нажмите правой кнопкой мыши значение в поле Значение и выберите Копировать .
- Нажмите ОК и закройте окно Устройство Менеджер .
- Откройте Блокнот и вставьте VID ID в Блокнот с помощью сочетания клавиш Ctrl + V.
- Нажмите клавишу Win + R, чтобы открыть Run. Введите «regedit» в текстовом поле «Выполнить», чтобы открыть редактор реестра.
- Откройте это местоположение реестра: HKEY_LOCAL_MACHINE \ SYSTEM \ CurrentControlSet \ Enum \ HID .

- Здесь вам пригодится VID ID . Нажмите клавишу, соответствующую идентификатору VID в Блокноте .
- Теперь вы можете выбрать ключ параметров устройства, который имеет FlipFlopWheel DWORD, как показано ниже.

- Затем дважды нажмите FlipFlopWheel , чтобы открыть окно «Редактировать DWORD».

- Введите «1» в текстовое поле «Значение» и нажмите ОК .
- Закройте окно редактора реестра. (Вам нужно перезапустить Windows, чтобы изменения вступили в силу.)
- Нажмите кнопку «Пуск» и поверните колесо мыши вверх. Это прокрутит ползунок панели меню «Пуск» вниз. Прокрутите колесико мыши вниз, чтобы прокрутить меню вверх. Направление прокрутки колеса мыши теперь обратное!
- Чтобы вернуться к настройкам по умолчанию, выберите FlipFlopWheel DWORD в окне редактора реестра и введите «0» в поле «Значение».
Установите скрипт AutoHotkey
AutoHotkey – это программное обеспечение, с помощью которого пользователи могут устанавливать макропрограммы и с помощью которых можно изменять направление прокрутки. Это бесплатное программное обеспечение, которое вы можете добавить в Windows, нажав кнопку Загрузить на веб-сайте программы. Настройте сценарий обратной прокрутки следующим образом:
- Нажмите кнопку Cortana и введите «Блокнот» в поле поиска. Выберите, чтобы открыть Блокнот .
- Теперь вы можете ввести скрипт в Блокнот . Скопируйте (Ctrl + C) и вставьте (Ctrl + V) этот скрипт в Блокнот:
WheelUp ::
Отправить {WheelDown}
Возврат
WheelDown ::
Отправить {WheelDp}
Возврат

- Нажмите Файл > Сохранить как , чтобы открыть окно Сохранить как, и выберите Все файлы в раскрывающемся меню Тип файла как.
- Введите заголовок файла для скрипта и обязательно добавьте .ahk в его конец. Например, вы можете сохранить его как Scroll Direction Script.ahk.
- Выберите, чтобы сохранить сценарий на рабочем столе, и нажмите кнопку Сохранить . Это должно добавить иконку скрипта AutoHotkey на рабочий стол, как показано ниже.

- Закройте Блокнот и дважды щелкните ярлык сценария AutoHotkey на рабочем столе, чтобы запустить его.
- Нажмите кнопку «Пуск» и поверните колесико мыши вверх, чтобы прокрутить меню вниз.
- Чтобы закрыть сценарий, щелкните правой кнопкой мыши панель задач и выберите Диспетчер задач . Выберите AutoHotkey Unicode на вкладке “Процессы” и нажмите кнопку Завершить задачу .
Это два способа изменения направления прокрутки колесика мыши в Windows 10.Теперь ползунок полосы прокрутки будет двигаться вниз, когда вы поворачиваете колесико мыши вверх, и наоборот.
On Windows 10, you can use the mouse and touchpad to navigate and interact with the elements easily. Both of the 2 input devices come with a default scrolling direction. However, some users want to change scroll direction Windows 10. Here MiniTool will show you how to invert scrolling on Windows 10.
The following part will introduce the guide to change the scrolling directions for a mouse and touchpad separately. You can utilize the Settings app to invert touchpad scrolling Windows 10. To reverse mouse scroll Windows 10, you need to use the Registry Editor.
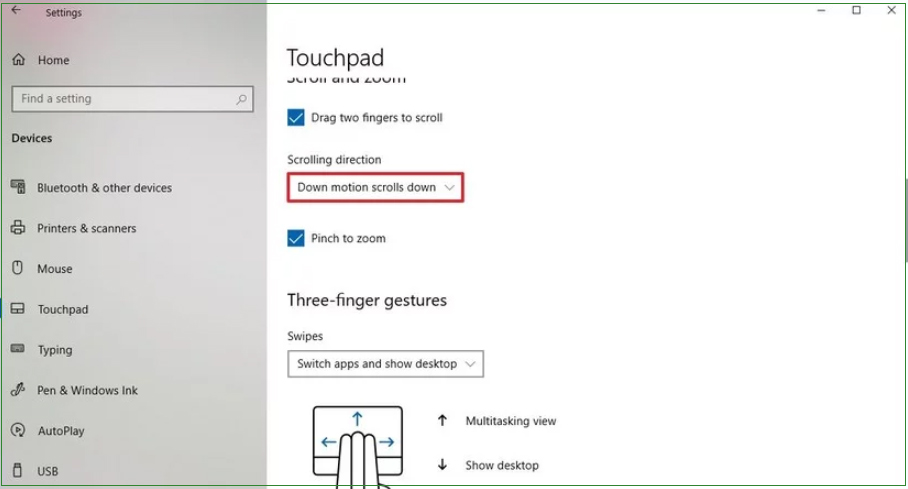
Here’s how to reverse scrolling Windows 10 of your touchpad using the Settings app.
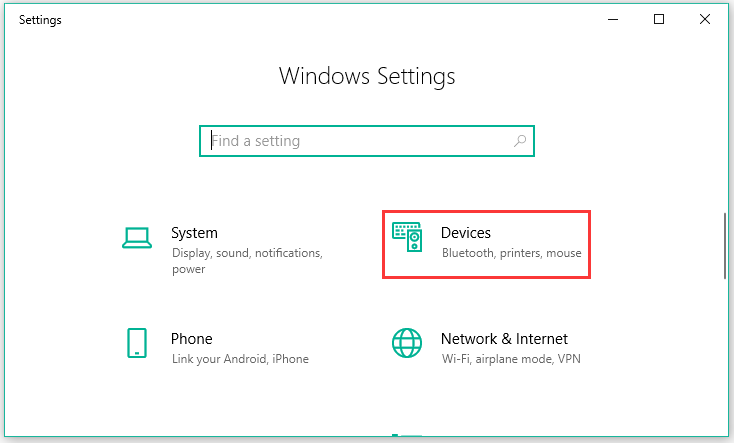
Step 1. Press Win + I keys to open the Settings app, and then click on the Devices option from the pop-up window.
Step 2. In the Settings window, click on the Touchpad section from the left side.
Note: This reverse scrolling option is only available for these devices with a precision touchpad. If you can’t find the option, you can invert touchpad scrolling Windows 10 through the software provided by its manufacturer.
Step 3. Under the Scrolling directions, select the Down motion scrolls down option from the drop-down menu.
After you finish the above steps, you can use the scroll the pages in the downward direction. How to reverse scrolling Windows 10 of your mouse? Please keeping reading.
If there is no option to reverse mouse scroll Windows 10 in the Settings window, you need to use the Registry Editor to change the scrolling behavior. There are 2 major parts to change the mouse scroll direction.
Warning: It is necessary to remind you that editing the Registry has potential risks, which can lead to irreversible damage to your Windows installation. So, please follow the steps carefully and we recommend that you make a full backup of your PC in advance.
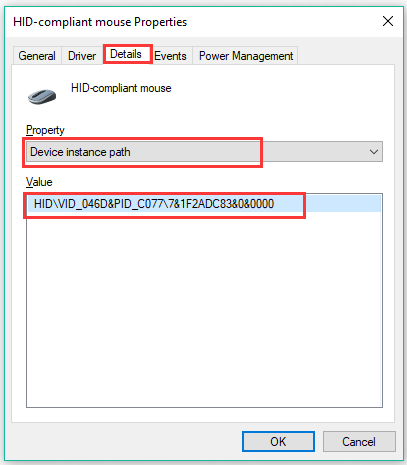
Check the Mouse Identification Number
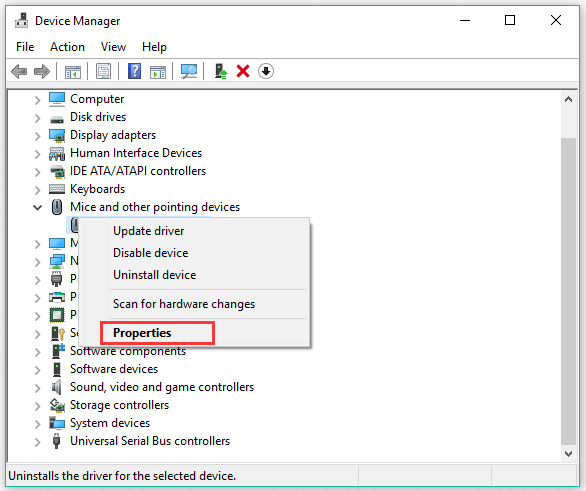
Step 1. Right-click the Start menu and select the Device Manager option from the context menu.
Step 2. Expand the Mice and other pointing devices category, right-click the mouse that you are using and select the Properties option.
Step 3. Navigate to the Details tab and select the Device instance path option from the drop-down menu to check the VID ID value for the mouse.
Then you can continue the following part to reverse the mouse scrolling using the Registry Editor.
Reverse Mouse Scroll Windows 10
To change the scroll direction Windows 10 for a mouse, follow the steps below carefully.
Step 1. Press the Win + R keys to call out the Run dialog box, and then type regedit in the box and hit Enter.
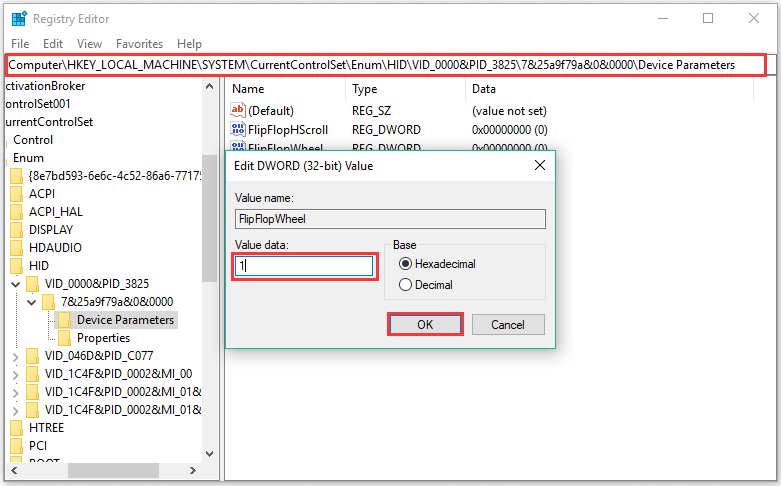
Step 2. In the Registry Editor window, navigate to the following destination path through the left sidebar.
ComputerHKEY_LOCAL_MACHINESYSTEMCurrentControlSetEnumHID
Step 3. Expand the key folder that matches the VID ID value of your mouse, and then expand the available key folder and select the Device Parameters key.
Step 4. Double click the FlipFlopWheel DWORD and set the Value data from 0 to 1, and click on OK.
Step 5. Restart your PC to execute this change. After that, you can scroll up the page when scrolling up with the mouse.
Windows users can be split into two different types of people. There are the ones that scroll the default way, and some that prefer to use a reversed scrolling direction. I’m a proud member of the default category, but I know some people that regard reversed scrolling to be the “more natural” way.
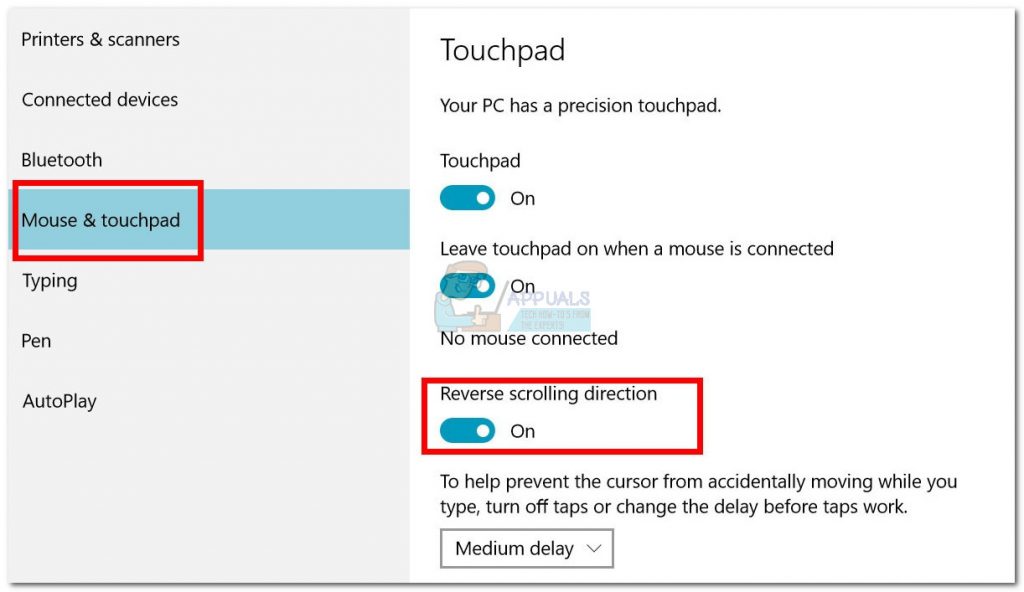
Reversing the scrolling direction used to be as easy as turning on a switch, but Microsoft decided to make things harder for those who prefer to scroll the “unnatural” way. It’s no longer possible to navigate to Devices > Mouse & Trackpad and toggle Reverse scrolling direction.
If you’re on one of the latest Windows 10 updates, you can’t reverse the scrolling direction as easily anymore. However, it’s still possible to do it, but you’ll have to take the long route. From our investigations, we discovered three different ways of reversing the scroll direction in Windows 10 (if you’re on the latest update).
Method 1 might not be possible to replicate in your situation depending on your laptop manufacturer, but the other two methods should work if followed on any Windows-based computer. If you use a touchpad, stick with Method 1. Let’s begin.
Method 1: Reverse the Scrolling Direction of a Touchpad (Touchpad only)
The steps of this method are highly dependable on the manufacturer of your laptop. Most laptop manufacturers use proprietary touchpad technologies, so you can expect your screen to look different than ours. We managed to reverse the scrolling direction of an ELAN Touchpad. If you have an Asus laptop, you should be able to follow this guide with no problems. If not, read the Note paragraphs for additional information.
- Press Windows key + I and click on Devices.
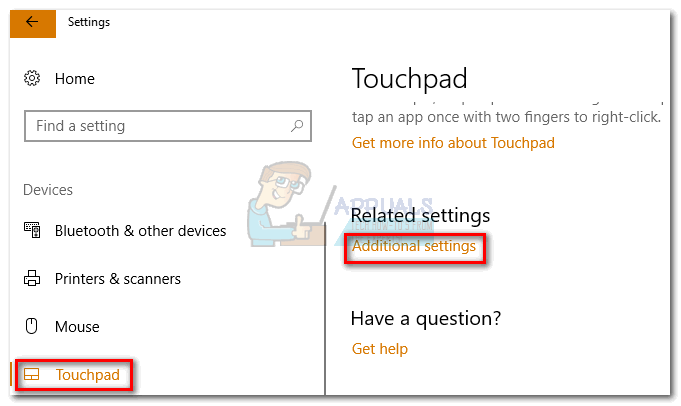
- Select Touchpad from the left-hand side menu, then click on Additional settings under Related settings.
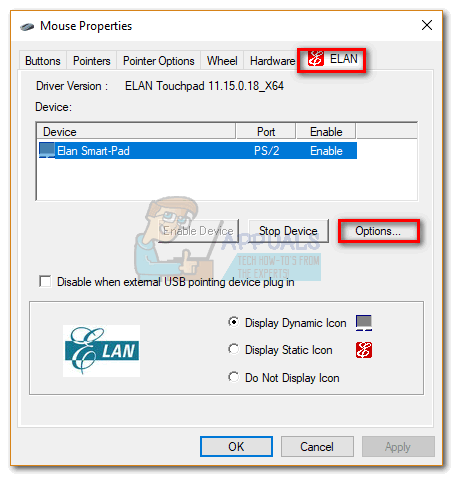
- This is where it starts to be different according to your manufacturer. Once you arrive in the Mouse Properties screen, look for the tab belonging to your Touchpad software. In our case it’s ELAN. If it doesn’t take you to another window directly, look for an Options button.
Note: Depending on your manufacturer, the tab can be named Clickpad settings, Smart Gestures, Synaptics, or Device Settings. If you can’t identify it, note that it’s usually located last when counting from the left and it’s usually the only tab with a logo.
- Look for the Multi-finger tab, select Scrolling, and then check the box next to Reverse.
Note: Remember that this menu is likely to look entirely different on your side. Generally, look for an option similar to Two-finger scrolling and look for a reverse toggle.
Method 2: Reversing the Scrolling direction for a Mouse Wheel (Mouse only)
If you decide to use a mouse, reversing the touchpad’s settings will not have an effect on the mouse wheel. To change the direction of your mouse wheel, you need to dig deep into your Windows Registry files. Here’s what you need to do:
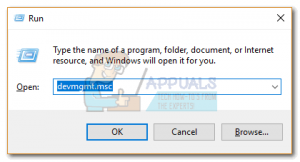
- Press Windows key + R to open a Run dialog. Type in “devmgmt.msc” and hit Enter.
- Expand the drop-down menu within Mice and other pointing devices and double-click on your mouse (HID-compliant mouse).
- Expand the Details tab and use the drop-down menu under Property to select Device instance path.
- Right-click on the path and select Copy, just to be safe. Once the path is copied to your clipboard, you can safely close Device Manager, but make sure you leave the HID-compliant mouse Properties window open.
Note: You can make sure you don’t lose the path by pasting it into a notepad file. This isn’t necessary if you leave the window open.
- Press Windows key + R, type “regedit” and press Enter.
- In Registry Editor, navigate to HKEY_LOCAL_MACHINE \ SYSTEM \ CurrentControlSet \ Enum \ HID.
- Compare the registry keys in HID with the path you’ve discovered in the device manager. Once you found a match, click on the folder in Registry Editor to expand it.
- Explore the key further until you get to Device Parameters. Click it once to select it, then double-click on FlipFlopWheel.
- Set the base to Hexadecimal, then modify the Value data to 1. Click OK and Close Registry Editor to save your configuration.
- The changes won’t take effect until you restart your computer or log out and in with your user.
Note: If you want to revert to the default way of scrolling, get back to the FlipFlopWheel in Registry editor and change the Value data to 0.
Method 3: Reversing the Scrolling Direction with a Macro Script (Mouse and Touchpad)
Another way to go around reversing your scrolling direction is to use software capable of setting up macro scripts. By far, the most reliable way of doing this is with AutoHotkey. It’s completely free and the difficulty of utilizing it is minimal. This method will reverse both your touchpad and your mouse wheel scroll direction. Here’s what you need to do:
- Visit this link and press the Download button to download the freeware, then install it on your computer.
- Right-click anywhere on your desktop and create a New Text Document. It doesn’t really matter how you name it. At least not right now.
- Open the new document and paste the following commands:
WheelUp:: Send {WheelDown} Return WheelDown:: Send {WheelUp} Return - Save your modifications, then change the extension from .txt to .ahk. It will prompt you that the file might become unusable. Ignore it and hit OK.
Note: If you are unable to view extensions, open a File Explorer window, go to View and check the box next to File Name Extensions.
- You should thee the icon of the text file transform into something else as soon as you hit OK. This means that Windows is recognizing it as an AutoHotkey file. Double-click on it to enforce the hotkey and reverse the scrolling of your mouse.
If you decide to disable the hotkey and revert to the default way of scrolling, press Ctrl + Alt + Delete and click on Task Manager. From there, select the Processes tab and find AutoHotkey Unicode under Background processes. Select it and click End Task to revert to the default scrolling.
Note: Keep in mind that you need to run the script again whenever you restart or turn off your computer.
Kevin Arrows
Kevin Arrows is a highly experienced and knowledgeable technology specialist with over a decade of industry experience. He holds a Microsoft Certified Technology Specialist (MCTS) certification and has a deep passion for staying up-to-date on the latest tech developments. Kevin has written extensively on a wide range of tech-related topics, showcasing his expertise and knowledge in areas such as software development, cybersecurity, and cloud computing. His contributions to the tech field have been widely recognized and respected by his peers, and he is highly regarded for his ability to explain complex technical concepts in a clear and concise manner.





 Note: Depending on your manufacturer, the tab can be named Clickpad settings, Smart Gestures, Synaptics, or Device Settings. If you can’t identify it, note that it’s usually located last when counting from the left and it’s usually the only tab with a logo.
 Note: Remember that this menu is likely to look entirely different on your side. Generally, look for an option similar to Two-finger scrolling and look for a reverse toggle.
 Note: You can make sure you don’t lose the path by pasting it into a notepad file. This isn’t necessary if you leave the window open.



 Note: If you are unable to view extensions, open a File Explorer window, go to View and check the box next to File Name Extensions.
 If you decide to disable the hotkey and revert to the default way of scrolling, press Ctrl + Alt + Delete and click on Task Manager. From there, select the Processes tab and find AutoHotkey Unicode under Background processes. Select it and click End Task to revert to the default scrolling.