Repairing corrupt files often fixes this issue
by Loredana Harsana
Loredana is a passionate writer with a keen interest in PC software and technology. She started off writing about mobile phones back when Samsung Galaxy S II was… read more
Updated on
- Before upgrading to Windows 11, make sure to check if your computer is compatible or not.
- During the Windows 11 installation, the Invalid Data Access Trap error could be triggered by third-party apps.
- One of the workarounds is to uninstall third-party media players and antivirus solutions.
XINSTALL BY CLICKING THE DOWNLOAD
FILE
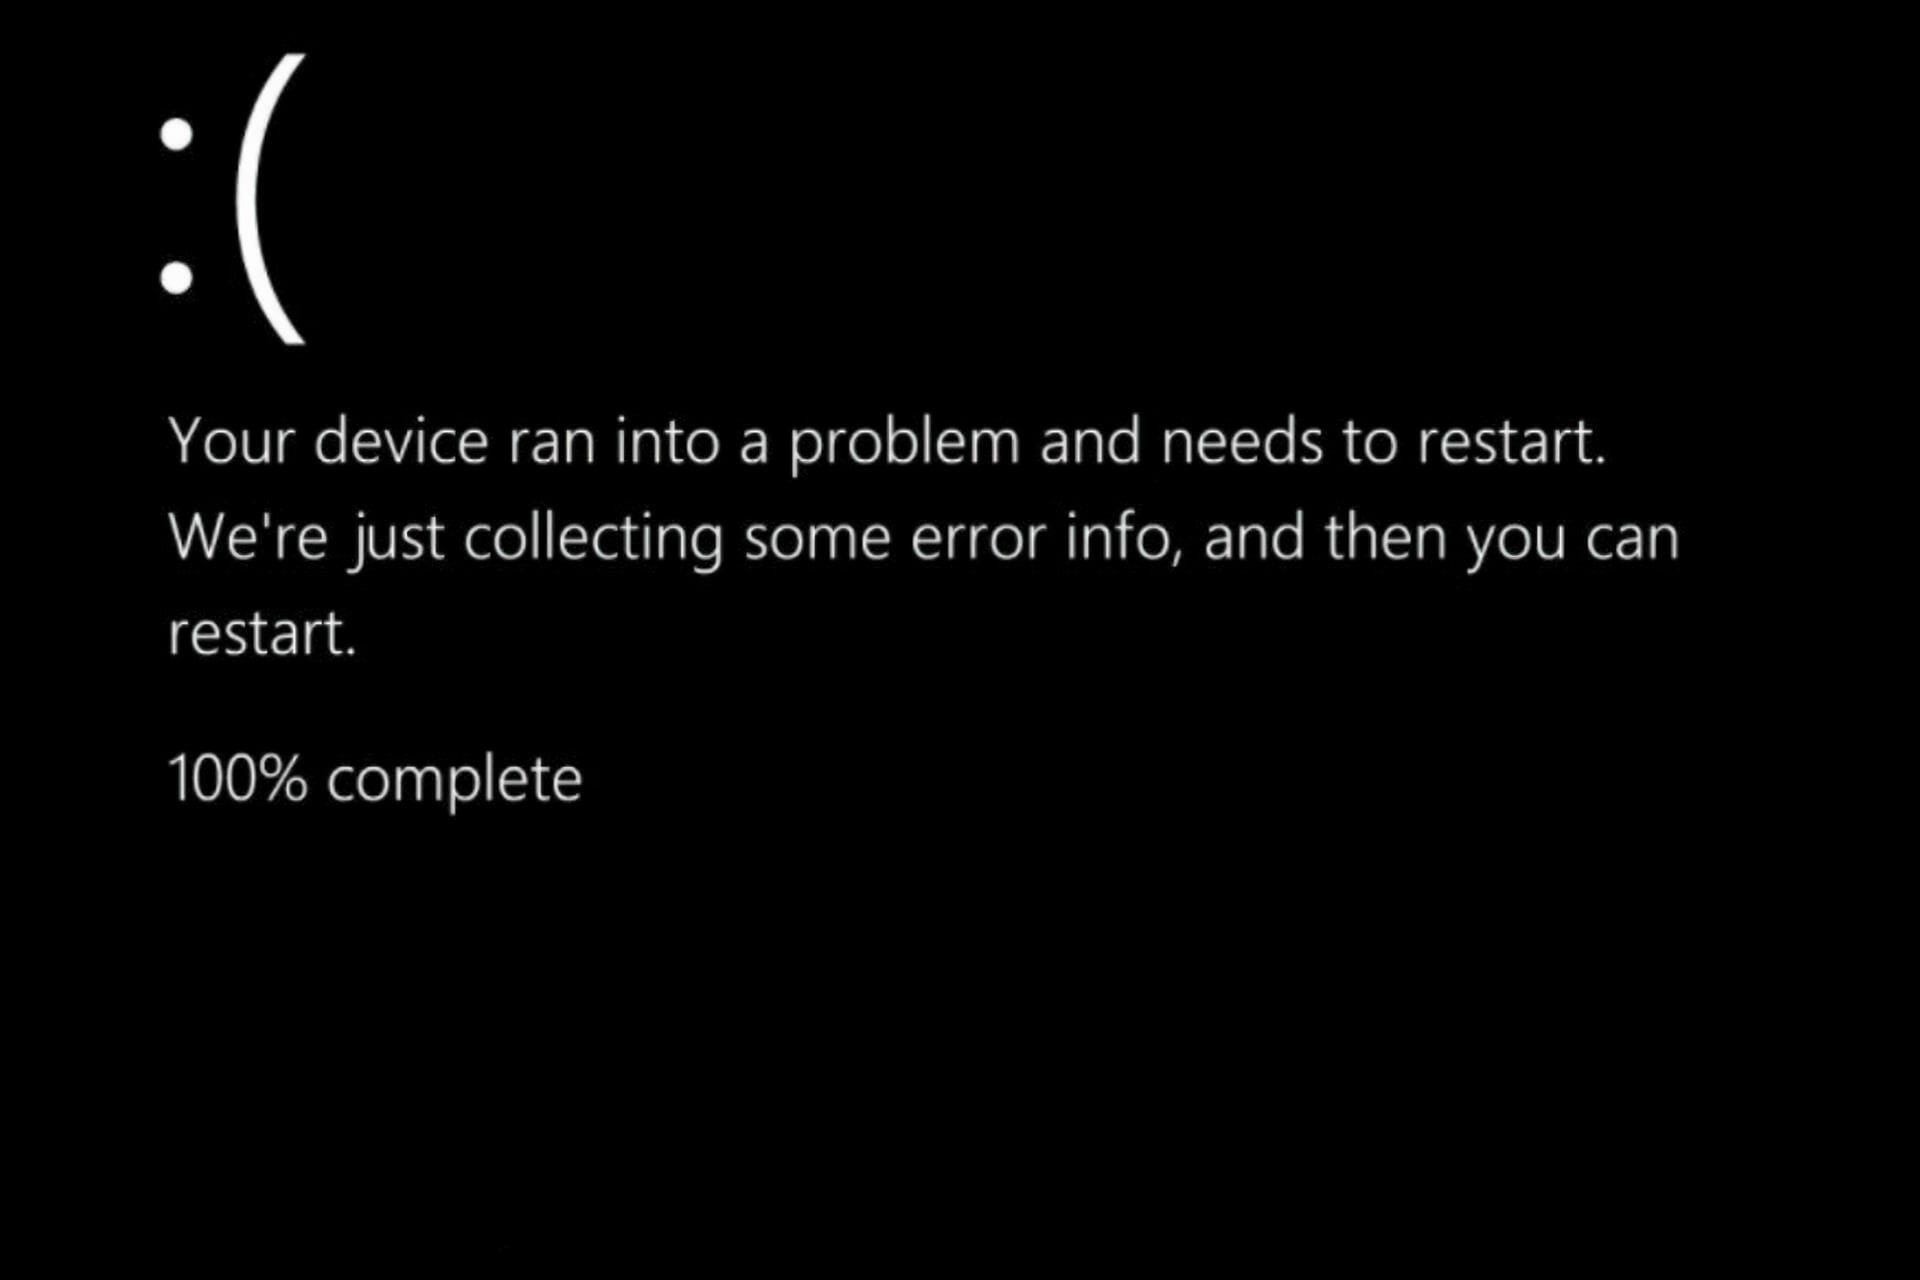
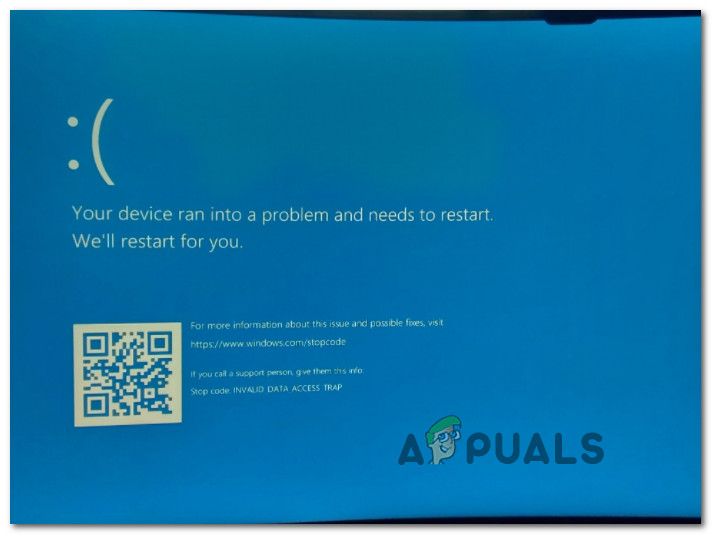
While trying to upgrade to Microsoft’s new Windows 11, some users encountered the Invalid Data Access Trap error, at a certain percentage, during the installation process.
This often will cause the PC to roll back to Windows 10. For example, it has happened when installing Windows 11 through a bootable USB drive or updating the Windows version from the Settings app.
The following sections will guide you through causes and practical solutions.
What causes Invalid Data Access Trap on Windows 11?
A few things on the new OS may trigger the Invalid data access trap. So, on top of this list, we have:
- System requirements problems – One of the most common reasons the Windows 11 installation fails is that your PC doesn’t meet the minimum hardware requirements and is incompatible.
- Third-party antivirus solutions – Microsoft has blocked updates to Windows 11 for some users who have antivirus tools running on their systems from top cybersecurity firm Avast, and its subsidiary AVG.
- Outdated drivers – Driver updates for Windows and many devices, such as network adapters, monitors, and printers, are automatically downloaded and installed through Windows Update. However, you sometimes need to check their state and update them, if necessary manually.
- Corrupted files – This problem is sometimes triggered when a computer’s critical files are corrupted.
Here are some solutions you must apply. Note the fixes will come in handy if you have an invalid data access trap on a Windows 11 install, upgrade, or update process.
How we test, review and rate?
We have worked for the past 6 months on building a new review system on how we produce content. Using it, we have subsequently redone most of our articles to provide actual hands-on expertise on the guides we made.
For more details you can read how we test, review, and rate at WindowsReport.
How can I fix the Invalid Data Access Trap error in Windows 11?
Before proceeding with these solutions, you should unplug any peripherals, as in some cases, this minor oversight might hinder the process.
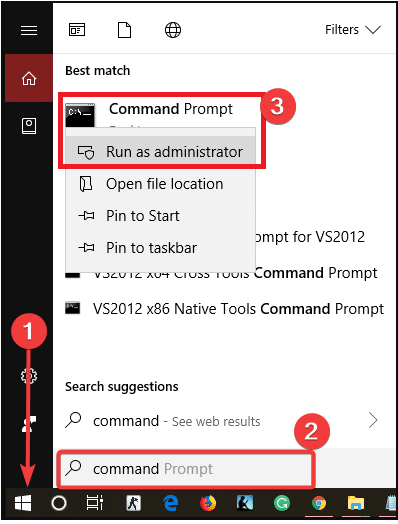
1. Run a CHKDSK scan
- Click on the Start menu, type control, right-click on the control panel option, and select Run as administrator.

- Type or paste the following command and press Enter:
chkdsk c: /f /r /x
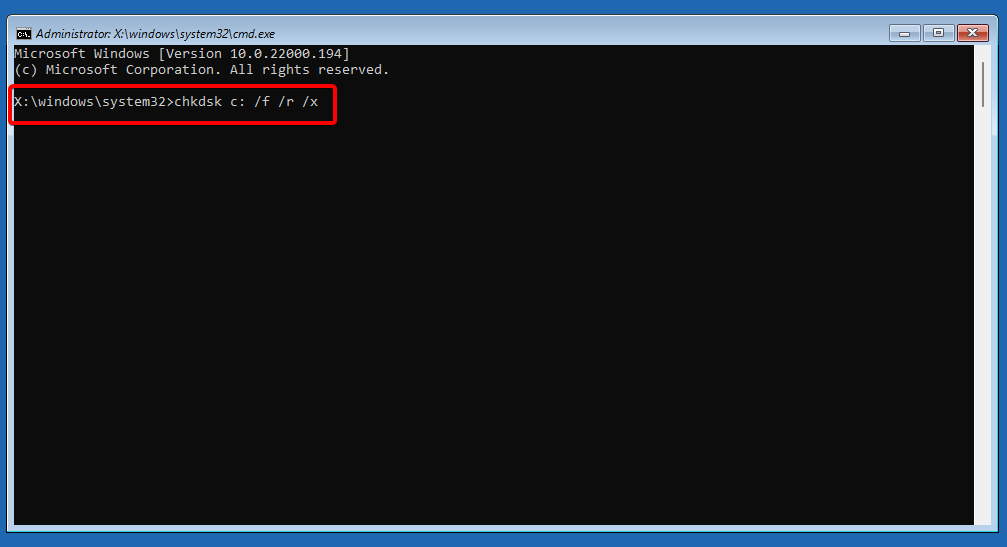
Specific physical issues on the drive can also bring forth the Invalid Data Access Trap error. After the process is done, reboot the PC and proceed to install Windows 11.
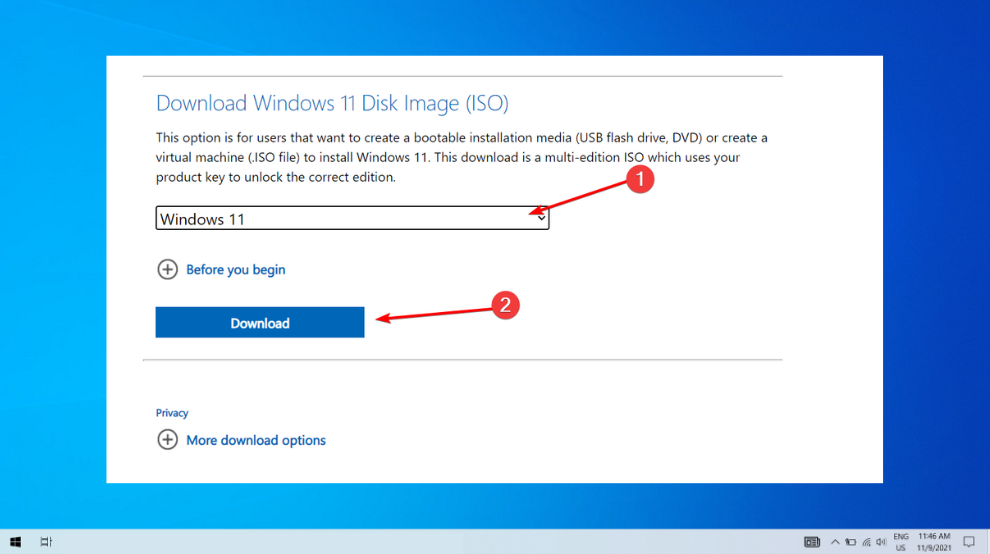
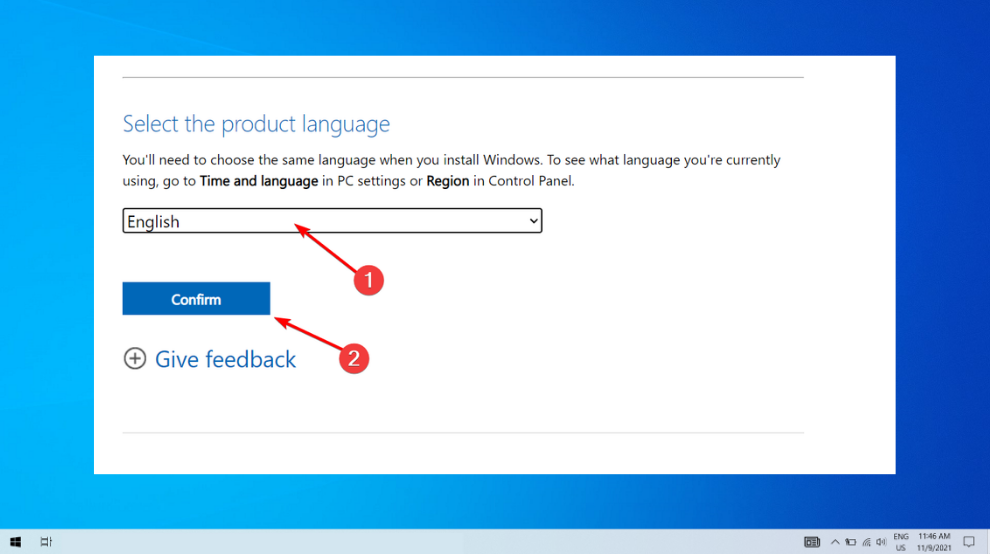
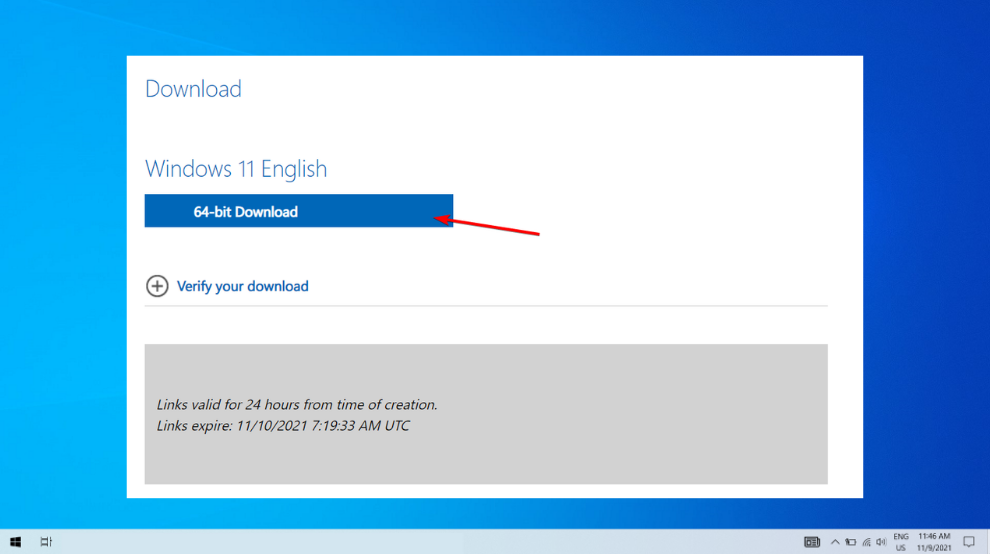
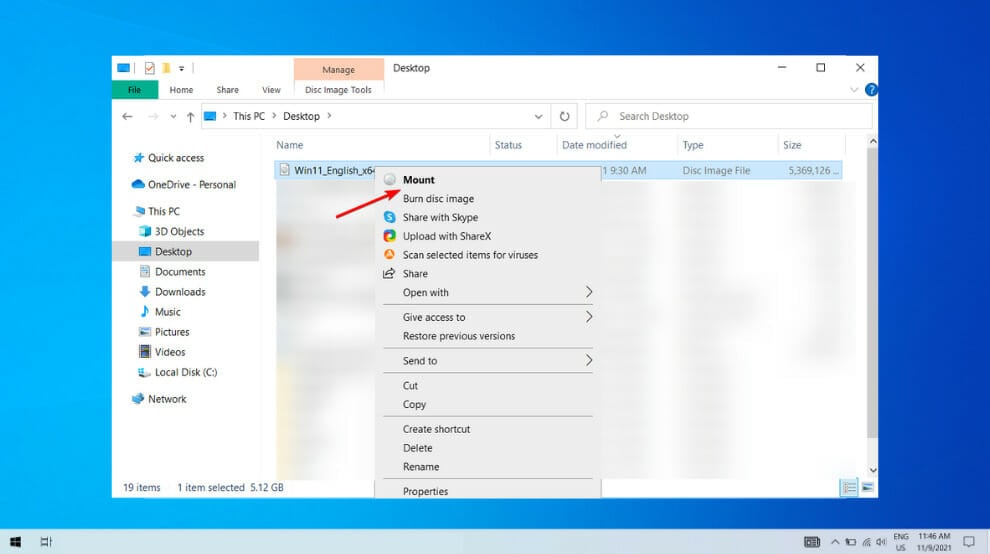
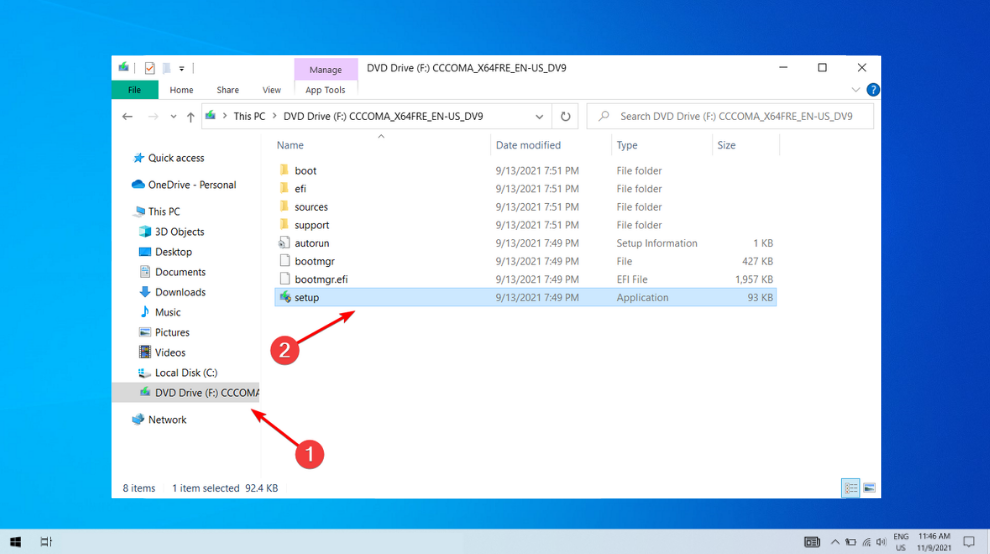
2. Download the Windows 11 ISO
- Access Microsoft’s dedicated webpage, select Windows 11 from the menu, and click the Download button.

- You will be prompted to select the product language, then click the Confirm button.
- Click the 64-bit Download button.
- Wait for the ISO file to download, then press the Windows key + E to start File Explorer.
- Before installing, disconnect from the Internet and temporarily disable any third-party antivirus you may have installed.

- At the start of the installation, you may be asked if you want to install other updates; choose No.
- Please navigate to the file’s location, right-click, and select Mount.
- Click on the created virtual DVD Drive and the setup file to start the Windows 11 installation.

Once the installation is done, you can reenable the antivirus and connect to the Internet without further issues.
- Microsoft Paint Cocreator: A complete guide on the new AI tool
- Windows 11 adds more apps to the share links feature
3. Update device drivers

NOTE
When downloading a driver update from the manufacturer support website, it’s recommended to use their instructions instead of the general steps outlined below.
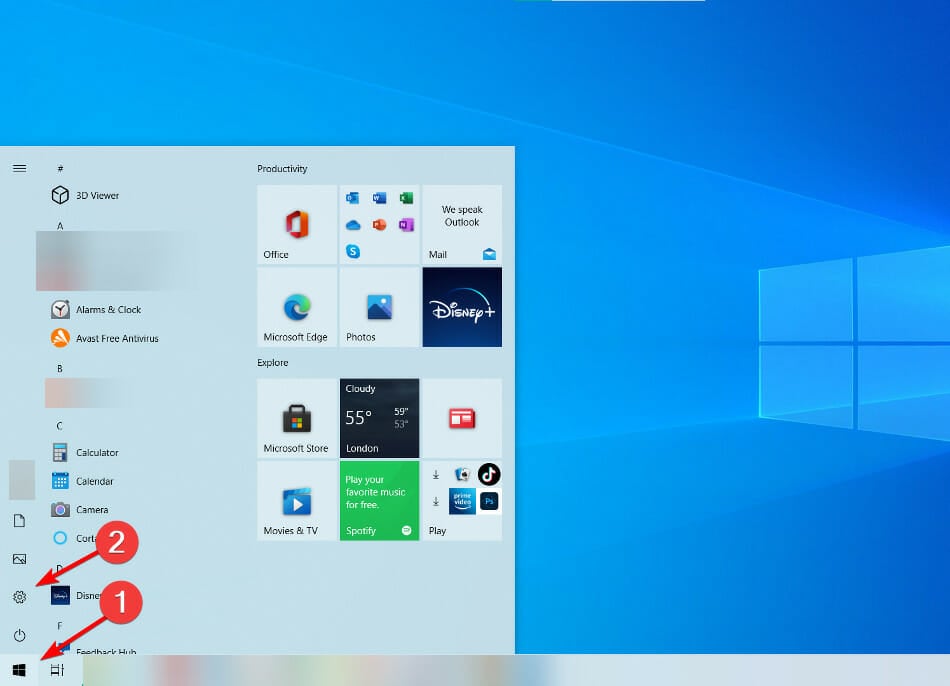
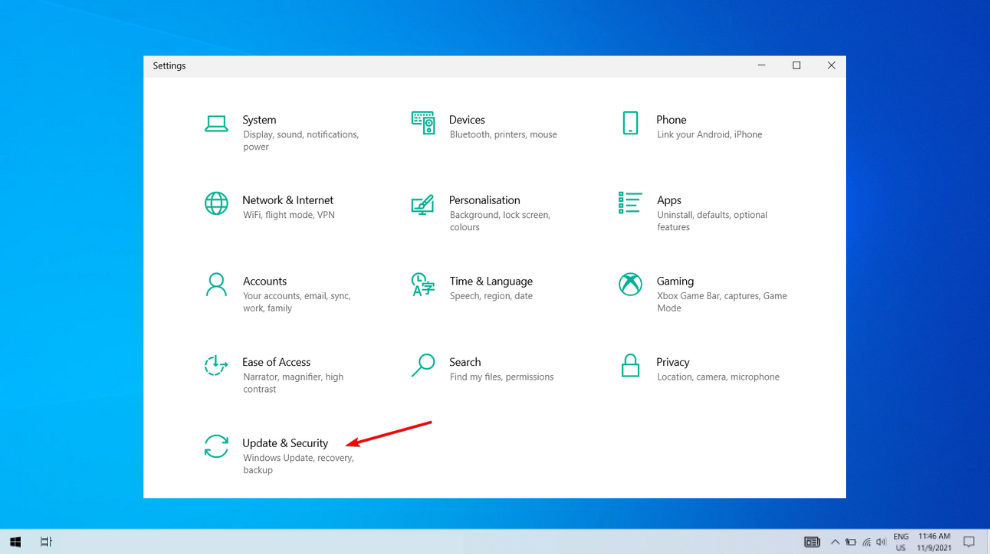
- Click the Start button, then tap on the Settings icon.

- Once the Settings panel opens, click on Update & Security.
- Click on Windows Update in the left panel.
- Tap on the View optional updates option.
- Select the drivers to update, one by one, then click the Download and install option.


Once you complete the steps above, the driver update should resolve any errors preventing the installation of Windows 11. For automatic scans of outdated drivers, we strongly recommend a dedicated tool such as Outbyte Driver Updater.

Outbyte Driver Updater
Prevent your PC from experiencing various errors and keep your drivers updated with Outbyte Driver Updater.
Hopefully, you are now enjoying Microsoft’s Windows 11, but if you find out that your PC doesn’t meet the install requirements or any other error persists, you can try the OS on a virtual machine and test it.
Alternatively, you can try out other solutions to common errors during Windows 11’s installation.
Please share in the comments below how your experience with Windows 11 is going so far and which solution worked best for you.
![]()
Сегодня у нас в разборе очередной GSOD (зеленый экран смерти), но может быть и BSOD (синий экран смерти). На этот раз с кодом INVALID_DATA_ACCESS_TRAP. Он возникает при попытке обновить операционную систему Windows. При чем может появляться как в Windows 11 после некоторого времени ее использования, так и при попытке обновиться с Windows 10 до Windows 11. Процесс может зависать на любом количестве процентов и повторный перезапуск тоже приводит к сбою. Нам удалось выяснить истинную причину ошибки, откуда логически вытекают и решения. Кстати, иногда это связано со STOP кодом 0x00000004.
Причины BSOD INVALID_DATA_ACCESS_TRAP
Настоящей причиной проблемы во всех известных нам случаях (проанализировано более 10 отчетов) является стороннее программное обеспечение. Весьма часто речь идет о драйверах всевозможной периферии, подключаемой по USB. Однако еще чаще проблема в видеоплеерах. По какой-то неведомой причине, службы некоторых программ, что работают с медиаконтентом, препятствуют нормальному обновлению Windows. Все остальное, о чем упоминают различные сайты с инструкциями не находит подтверждения ни в пользовательских отчетах, ни на форумах.
Как исправить ошибку INVALID_DATA_ACCESS_TRAP?
Есть один путь, который практически гарантировано позволит вам обновиться – это переход в безопасный режим. Так как GSOD, BSOD связан с программным обеспечением, независимо от его типа, запуск в данном режиме должен сработать. Однако это не совсем удобное решение, поэтому сейчас мы посмотрим все то ПО, что засветилось в INVALID_DATA_ACCESS_TRAP.
Решения ошибки INVALID_DATA_ACCESS_TRAP:
- Удалить звуковые драйвера. Это легко сделать через «Диспетчер устройств», который отображается в меню, что можно вызвать комбинацией Win + X. Точно известно, что GSOD может вызывать Realtek Audio Driver и FiiO USB Audio Driver. Можно даже не удалять, а временно отключить их на момент обновления, а затем вернуть назад.
- Отключить или удалить видеоплееры. Очень часто сообщение с кодом INVALID_DATA_ACCESS_TRAP всплывает из-за Plex Media Server, реже – из-за AverMedia, но может быть следствием работы VLC, OBS. Достаточно открыть «Панель управления», выбрать вкладку «Администрирование» — «Службы» и через клик правой кнопкой мыши отключить все из установленных на компьютере видеоплееров. Особенно обращайте внимание на перечисленные выше.
- Удаление другого проблемного ПО. В некоторых отчетах фигурировали другие программы, удаление которых помогли вернуть систему в нормальное состояние. Речь о SVLoadSense, mySQL Workbench и MySQLServer. Порой еще всплывает AVG и Avast – антивирусные приложения от стороннего разработчика.
- Отключить все постороннее USB-оборудование. Если дело в драйвере звуковой карты, наушников, карт захватов и другой подключаемой периферии, ее отключение на момент обновления должно сработать.
На основании тех сведений, которые нам передали пользователи в своих сообщениях, у нас есть большая надежда, что эти действия сработают. Скорее всего что-то из перечисленного поможет победить ошибку INVALID_DATA_ACCESS_TRAP в Windows. Однако ваш комментарий может помочь сделать статью еще полезнее и информативнее. Пожалуйста, не поленитесь и опишите свою ситуацию. Помогите всем нам в поиске лучших решений.
Download Windows Speedup Tool to fix errors and make PC run faster
Some Windows users are complaining about an issue, where, when trying to update Windows 11, or after upgrading to Windows 11, they are seeing INVALID DATA ACCESS TRAP error. Because of this, they are forced to roll back to Windows 10. In this article, we are going to talk more about this error and see how to fix it.

The INVALID_DATA_ACCESS_TRAP bug check has a value of 0x00000004. It indicates an incorrect data access trap.
What am I seeing INVALID DATA ACCESS TRAP error on Windows?
Corrupted software or faulty hardware can trigger the INVALID DATA ACCESS TRAP error in the Windows operating system. Other than that, this issue can also occur because of driver or software incompatibility.
If you see INVALID DATA ACCESS TRAP error on Windows 11 or Windows 10, then follow the given solutions to resolve this issue. There are two scenarios:
1] You see this error and have to roll back to Windows 10
In this case, do the following and then try the Windows 11 upgrade again:
- Update Windows 10 with all available updates
- Unplug External USB Drives
- Uninstall Media related apps like PowerDVD
- Disable your antivirus software
If the upgrade succeeds, good!
If the upgrade fails and you see Error Code 0x900101 – 0x40021 you may need to further troubleshoot Windows Upgrade Errors. Or then use a Windows 11 ISO and carry out a fresh install.
2] You see this error after upgrading to Windows 11
In this case, do the following:
- Install all available Windows 11 Updates including Driver and Optional Updates
- Make sure that your device drivers are updated
- Check incompatible software and update them to their latest version
- If your User files are not on C Drive, move them to their default C drive location and see if that helps.
- Use the Microsoft Online Blue Screen Troubleshooter and see if that helps.
If you continue seeing this Stop Error then you may have to further troubleshoot this Stop Error or alternatively roll back to Windows 10 and then carry out a fresh Windows 11 using ISO.
Here are the explanations for some of the suggestions made above.
Install all available Windows 11 Updates including Driver and Optional Updates
To install all the available Windows 11 Updates. open Settings and go to Windows Update > Additional Options. Now, you can see Optional updates, go there and install all the pending Driver and Optional Updates.
Make sure that your device drivers are updated
Outdated drivers can cause this error, so, you need to make sure that you are keeping your drivers up-to-date. Therefore, update your Device Drivers and see if the issue persists.
Check incompatible software and update them to their latest version
You need to check if a third-party application is causing the error. To do that, you can use troubleshoot the issue in Clean Boot and find what’s causing the issue. Before removing those software, try updating them and see if the issue persists.
If your User files are not on C Drive, move them to their default C drive location and see if that helps.
You need to make sure that the User files are in C drive, as that’s the drive that contains your Operating System. This solution doesn’t apply to all users as not all of us move our User folder, but if you did, then it’s time to put it where it belongs. This has helped some, reports say.
Use Online Blue Screen Troubleshooter
You should also try Online Blue Screen Troubleshooter to resolve the issue. It can resolve the issue for you easily. So, to do that, and see if the issue persists
All the best!
Anand Khanse is the Admin of TheWindowsClub.com, a 10-year Microsoft MVP (2006-16) & a Windows Insider MVP (2016-2022). Please read the entire post & the comments first, create a System Restore Point before making any changes to your system & be careful about any 3rd-party offers while installing freeware.
The INVALID DATA ACCESS TRAP bugcheck, which has a value of 0x4, occurs when a Windows upgrade fails due to an incompatible driver.
In most cases, this BSOD results from problematic third-party media drivers. As such, uninstalling the faulty software will resolve this error in most cases.
If you can’t upgrade despite that, we’ve also detailed other ways to resolve BSOD error in this article.
Table of Contents
We recommend trying the first two methods, as they will most likely resolve the issue. In case they don’t, you can analyze the dump file to get further information.
Remove Media Software
Most users have reported third-party capture software like AVerMedia Capture, PowerDVD, OBS Studio, etc., as the cause of this BSOD. Uninstalling such software allowed them to proceed with the upgrade without any issues, so we recommend that you do the same with the following steps:
- Press Win + R, type
appwiz.cpl, and press Enter. - Select the media software, press Uninstall, and follow the on-screen instructions.

- Restart your PC afterward and try upgrading now.

Uninstalling the software will remove the corresponding driver, which resolves the issue. But do note that if a separate driver update is available from the manufacturer, installing said update could be another way to fix the problem. Additionally, using an older stable software/driver version could also do the same.
Clean Boot and Upgrade
Certain third-party services could also be the reason for this BSOD. We recommend clean booting and trying to update, and if it does work, you can always re-enable the services afterward. Here’s how you can do so:
- Press Win + R, type
msconfig, and press Enter. - In the Services tab, enable the Hide all Microsoft services option.

- Click on Disable all and press OK.
- Restart your PC and check if you can upgrade.

Install Pending Updates
Some users were also able to resolve this BSOD by installing all pending updates before upgrading. Here’s how you can do the same:
- Press Win + R, type
control update, and press Enter. - Check for updates, then download and install any pending updates.
- Restart your PC afterward and test if you can upgrade.

Analyze Upgrade Logs
Numerous log files are created during the Windows Upgrade process. These are very helpful for diagnosing upgrade issues.
The setupact.log file from the $Windows.~BT\Sources\Panther directory will be most helpful. The log file from $Windows.~BT\Sources\Rollback is more generic, but it may still be worth analyzing as a second resort.

Although this won’t be as helpful, you could also check the Event Viewer logs for further information. Here’s how you can do this:
- Press Win + R, type
eventvwr, and press Enter. - Expand the Windows Logs tab and click on System.

- Click on Filter Current Log from the right pane.
- In the Event Sources section, select Bug Check and press OK.
- Note the bugcheck event’s Date and Time and click on Clear Filter.
- After clearing, sort by Date and Time and locate the events from Step 5.
- First, select the Event and check if the General and Details tabs provide any useful information, such as Driver Names.
- If not, check the events before and after the bugcheck to get hints on what could’ve been the issue.


Analyze Dump File
A failed upgrade will lead to a rollback, which creates a dump file named setupmem.dmp in the C:\$WINDOWS.~BT\Sources\Rollback directory. Analyzing this dump should give you further hints as to what’s causing the BSOD. Here are the steps for this:
- Download the WinDbg Preview App from the Microsoft Store.
- Launch the WinDbg Preview App and press CTRL + D.
- Navigate to the aforementioned directory and open the
setupmem.dmpfile.
- Select View > Command and enter
!analyze -v.
- Check the MODULE_NAME and Probably caused by sections.
- If you have additional dump files, analyze the rest similarly to get more information.


Manually Install Windows
If the BSOD is still not resolved, your only may be to manually install Windows with an installation media instead of trying to upgrade. You can use the media creation tool for this, or you can download the ISO from Microsoft’s site and create a bootable USB using something like Rufus. We also have an article with full steps on installing Windows from a USB for your further reading.
Some Windows 11 are reportedly getting a BSOD (Blue Screen of Death) whenever they attempt to perform an update or when they perform a certain action that such as deleting, moving, or copying files from the OS drive.
After investigating this issue, it turns out that this problem has multiple potential causes that might be responsible for this error code. Here’s a list of reasons why you might be seeing this problem occur on your Windows 11 computer:
- Corrupted USB 2 / USB 3 drivers – As it turns out, this might occur due to an issue with the USB drivers. This is mostly reported to occur when a PCI USB 2.0 or 3.0 card is in use. To fix this problem, you’ll need to manually update your fleet of USB 3 drivers.
- Bad drive error – Bad sectors on your HDD or SSD can also be the underlying cause of why you’re experiencing the BSOD when performing certain system actions. This is much more common with traditional hard drives and can typically be fixed by running a CHKDSK scan with the /f parameter.
- System file corruption – System file corruption can also ve responsible for this crash, especially if you’re dealing with this problem when attempting to update your current Windows 11 build. To fix this problem, you’ll need to run SFC and DISM scans in quick succession (with admin access) in an attempt to repair your system files. Additionally, you can go for a repair install procedure or even a clean install.
- Outdated BIOS firmware – If you’re using an older motherboard model that was released prior to the release of Windows 11, chances are you’re experiencing this crash due to an outdated BIOS firmware. In this case, you should use a flash USB disk to update your current BIOS version to the latest.
- Interfering legacy media 3rd party apps – If you’re using the legacy Media Features app or the Windows 10 version of VLC, chances are you might get this type of BSOD when your OS is forced to use some common dependencies that are currently in use by some of these apps. To fix this issue, you’ll need to uninstall the problematic apps from your system.
- Interfering media burning 3rd party apps – Certain feature updates (and cumulative updates) that are mandatory to Windows 11 might be inhibited by a capture software like Avermedia or a traditional media burning app like PowerDVD. If you have these apps installed on your system, uninstall them before checking if the issue is resolved.
Now that we went over every potential reason why you might see this BSOD crash occurring on Windows 11, let’s go over a few methods that have been confirmed by other users that have been dealing with the same kind of issue.
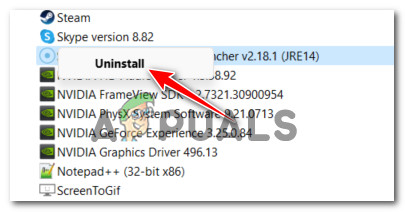
Uninstall Media Related apps (if applicable)
As it turns out, the fix that seems to help a lot of Windows 11 users eradicate the INVALID_DATA_ACCESS_TRAP blue screen of death is uninstalling every media app.
There are no official explanations on why this is effective, but community members are suspecting that some old dependencies that are used by legacy apps like VLC and Media Feature are somehow conflicting with the new file-sharing protocol on Windows 11.
If you’re experiencing this issue while trying to access some native components of Windows 11, follow the instructions below to uninstall legacy media player apps such as VLC, BS player, and the Media Feature Pack.
Here’s what you need to do:
- Press Windows key + R to open up a Run dialog box. Next, type ‘appwiz.cpl’ inside the text box and press Ctrl + Shift + Enter to open up the Programs and Features menu.

Open up the Programs and Features menu - At the User Account Control window, click Yes to grant admin access.
- Inside the Programs and Features menu, scroll down through the list of installed programs and locate the legacy media programs that you currently have installed.
- Right-click on the media program and click on Uninstall from the context menu that just appeared.

Uninstall the media program - Follow the on-screen instructions to complete the uninstallation. If you have multiple media apps available, uninstall each one individually.
- Once the legacy media apps are all uninstalled, reboot your PC and see if the issue is fixed by repeating the action that was previously triggering the BSOD crash.

If the problem is still not fixed or this method was not applicable, move down to the next potential fix below.
Reinstall every USB 2 and USB 3 drivers
As it turns out, a scenario that often causes the INVALID_DATA_ACCESS_TRAP BSOD is a scenario in which your USB 2.0 or 3.0 drivers are corrupted or partially incompatible with your current PC configuration.
In order to fix this issue, you’ll need to go into Device Manager and manually update every USB driver under Universal Serial Bus Controllers.
This method has been confirmed to be effective n situations where every attempt at updating Windows 11 resulted in the same blue screen of death (INVALID_DATA_ACCESS_TRAP).
If this scenario is applicable, follow the instructions below to reinstall every USB 2.0 and USB 3.0 drivers.
Here’s what you need to do:
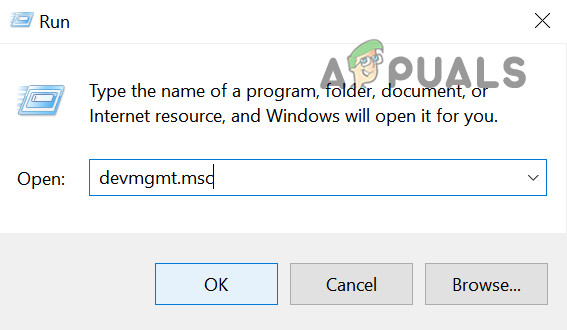
- Start by pressing Windows key + R to open up a Run dialog box.
- Next, type ‘devmgmt.msc‘ and press Enter to open up a Run dialog box.

Open Device Manager Note: At the UAC (User Account Control), click Yes to grant administrative privileges.
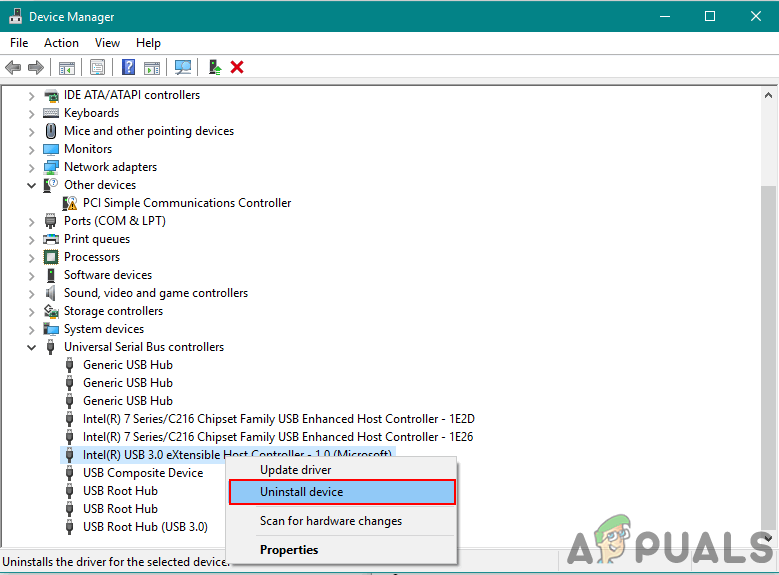
- Once you’re inside Device Manager, expand the drop-down menu associated with Universal Serial Bus controllers.
- Next, you’ll see a list of USB controller drivers. Right-click on each one and click on Uninstall until you manage to get rid of all of them.

Uninstall the USB controller drivers Note: Repeat this action with every USB controller driver you have under Universal Serial Bus controllers until every device is uninstalled. DO NOT restart your PC until you get this done.
- Once every Universal Serial Bus controller is uninstalled, reboot your PC.
- At the next startup, your Windows installation will realize that the USB 2.0 and USB 3.0 drivers are missing and it will install generic driver equivalents that won’t cause this behavior again.
- Repeat the action that was previously causing the INVALID_DATA_ACCESS_TRAP BSOD and see if the problem is now fixed.
If the same kind of issue is still occurring, move down to the next potential fix below.
Uninstall Capture Software & Power DVD (if applicable)
If you get this issue while attempting to upgrade to Windows 11 or when attempting to install a pending feature upgrade and you don’t have any 3rd party media program installed, you should take a look if you have PowerDVD or a capture software like Avermedia installed on your PC.
Capture software products and CD / DVD burning suites like PowerDVD are known to interfere with certain cumulative feature updates, so it wouldn’t hurt to have them uninstalled prior to checking if the INVALID_DATA_ACCESS_TRAP is fixed.
If you’re looking for specific instructions on uninstalling capture or burning software, move down to the next method below:
- Start by pressing Windows key + R to open up a Run dialog box.
- Type ‘appwiz.cpl’ inside the text box and press Ctrl + Shift + Enter to open up the Programs and Features menu.
Open up the Programs and Features menu - If you are prompted by the UAC window, click Yes to grant admin access.
- From the Programs and Features menu, scroll down through the list of installed programs and locate the PowerDVD, Avermedia, or any other media burning or media capture 3rd party app that you have installed.
- Right-click on the program that you wish to uninstall and click on Uninstall from the context menu that just appeared.
Uninstall the media program - Inside the uninstallation screen, follow the on-screen instructions to complete the uninstallation.
- Once every app that’s potentially interfering with the Windows feature update is uninstalled, reboot your PC and see if the issue is fixed by repeating the action that was previously triggering the BSOD crash.
If the problem is still not fixed or this method was not applicable, move down to the next potential fix below.
Deploy a CHKDSK Scan
According to some affected users, the INVALID_DATA_ACCESS_TRAP blue screen of death can also appear as a result of some bad sectors on your HDD that might be crashing the OS when you’re trying to perform a certain action.
In the event that bad sector data ends up affecting a critical service and crashing your system, you’re most likely seeing the INVALID_DATA_ACCESS_TRAP due to a critical crash.
Some users that were facing this issue when attempting to move, delete or manage files on the OS drive have confirmed that running a CHKDSK scan ended up resolving the issue for them entirely.
Note: A CHKDSK (Check Disk) scan will scan your disk space for any inconsistencies and automatically attempt to repair it (if you run it with the /f parameter.
You can also follow this method if you’re experiencing the INVALID_DATA_ACCESS_TRAP crash when attempting to update your Windows build to the latest.
Here’s a quick guide on running a CHKDSK scan:
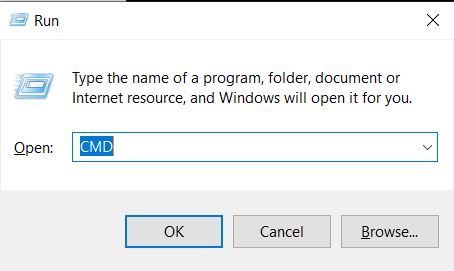
- Start by opening up a Run dialog box by pressing Windows key + R.
- Next, type ‘cmd’ inside the text box and press Ctrl + Shift + Enter to open up an elevated Command Prompt.

Deploying a CHKDSK scan - At the UAC (User Account Control) prompt, click Yes to grant administrative privileges.
- Once you’re inside the elevated Command Prompt, type the following command and press Enter to initiate an offline CHKDSK scan with the option to automatically repair the corrupted system files :
chkdsk /f
- Once the CHKDSK scan is complete, restart your computer and wait until the next startup is complete.
- After your PC boots back up, repeat the action that was causing the BSOD and see if you still end ups seeing the INVALID_DATA_ACCESS_TRAP error.
If the problem is still not fixed, move down to the next potential fix below.
Update your BIOS version
According to a few technical Windows users that have been experiencing this issue, the BSOD crashes with the INVALID_DATA_ACCESS_TRAP error code can originate from an outdated BIOS firmware that’s not updated to accommodate Windows 11.
This is even more likely if you’re experiencing this issue while trying to update your Windows 11 to a newer build.
In this case, you’ll have to flash your current BIOS version and update it to the latest version made available by your motherboard manufacturer.
If you’re still experiencing the INVALID_DATA_ACCESS_TRAP BSOD despite following every potential fix above, proceed by creating a bootable USB containing the BIOS update and installing it from the initial screen.
Note: Each manufacturer has its own BIOS updates according to their various models and the steps of installing it will be slightly different. There is no universal way of flashing a BIOS via USB, so the best we can do is create a few general steps that should point you in the right direction.
Important: Before starting with the steps below, take the time to look over the official documentation provided by your manufacturer on how to update your BIOS version via USB.
Here are the general instructions on how to do this:
- Start by ensuring that you have a blank USB flash drive at the ready.
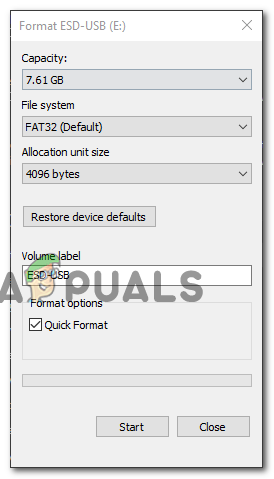
- If the USB stick you are planning to use already contains data, back it up and then right-clicks on the flash drive and choose Format from the newly appeared context menu.

Formatting the USB drive - Once you’re inside the Format window, set the File System to FAT32 and check the box associated with Quick Format.
- Next, click Start once you are ready to format the drive.

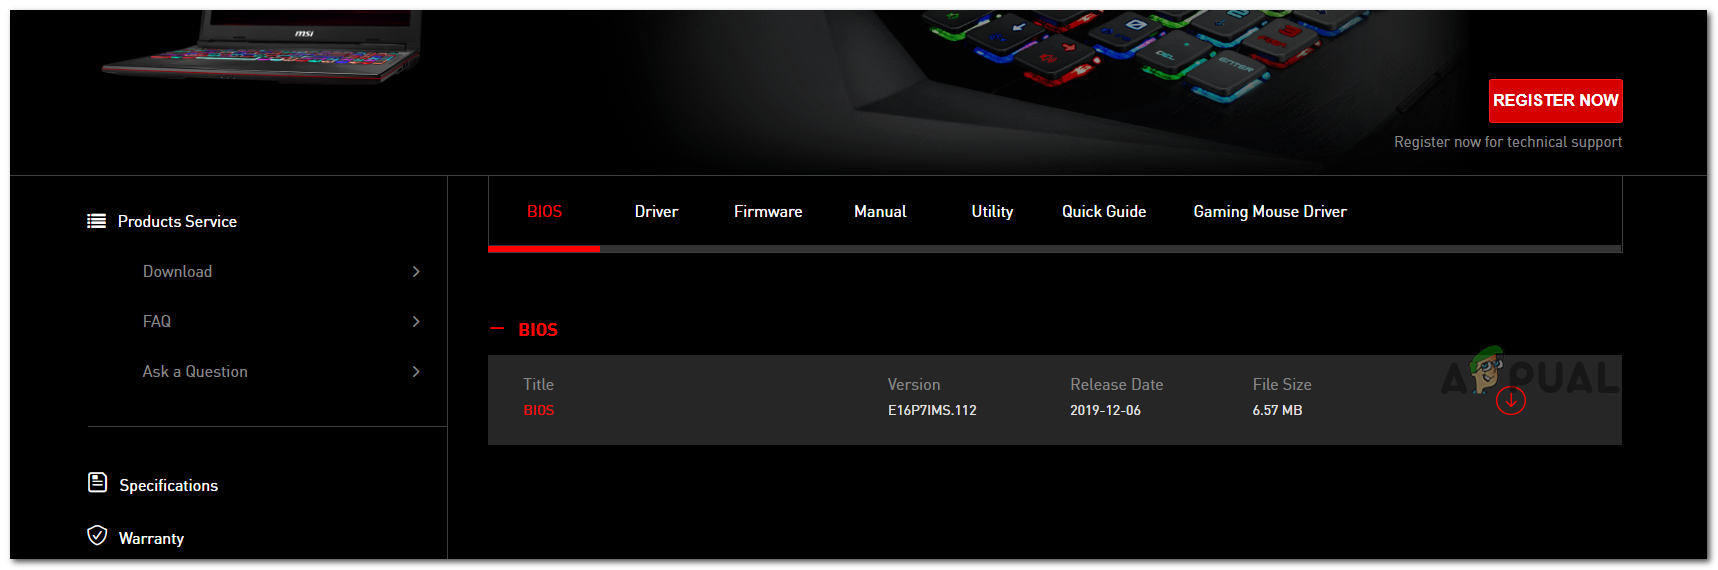
Formatting the drive - Once the formatting procedure is finished, the next step is to download the BIOS update that you want to install from the manufacturer’s website and copy it on the USB flash drive.

Downloading the latest BIOS firmware update Note: You might be required to make some specific files to the files in order to allow them to install them from a USB drive.
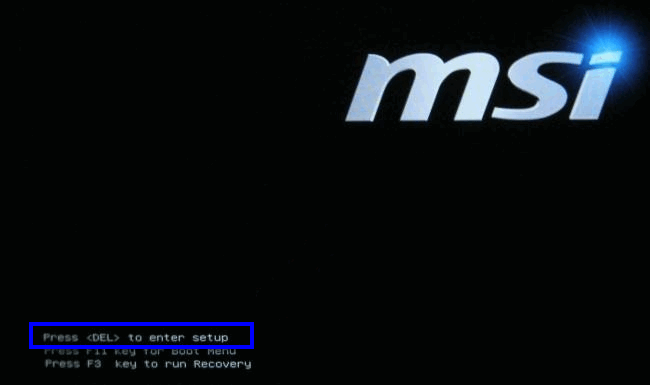
- After the Boot files are copied on the USB flash drive, restart your computer and press the required key (Setup key) at the next startup to enter your BIOS settings.

Pressing the setup key Note: In most cases, the Setup key is either Esc, Del, or one of the F keys (F2, F4, F6, F8, F12). If none of these keys work, look online for specific steps of accessing your BIOS settings according to your motherboard model.
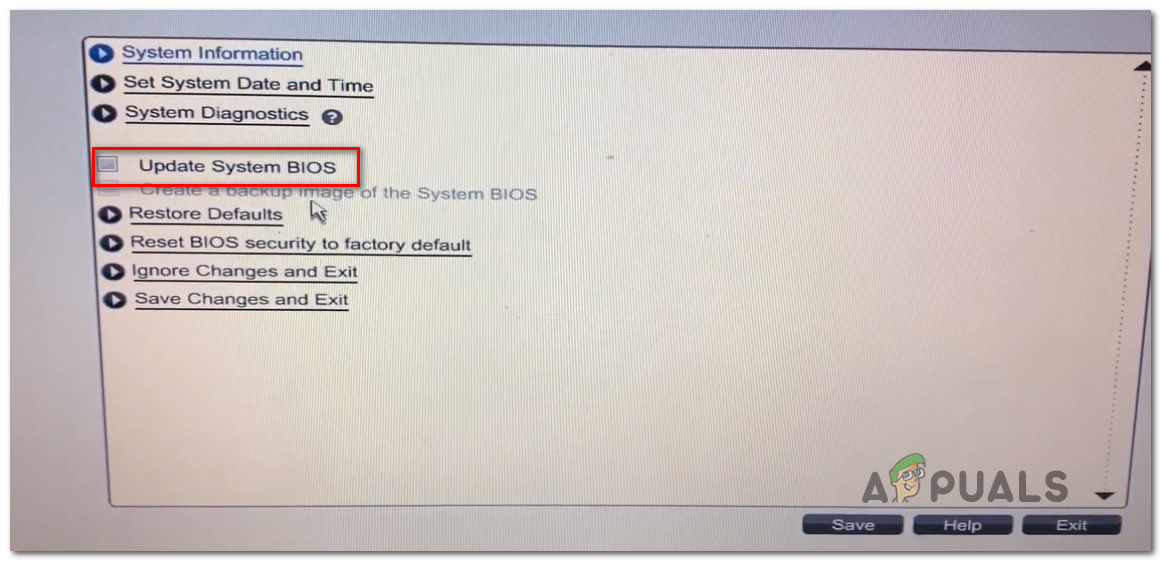
- Once you’re inside your BIOS settings, look for an option named Update System BIOS (or similar).

Updating the BIOS version - When you are asked to confirm the process, do so as instructed, then select the drive containing the BIOS update.
- Once you select the appropriate drive and confirm, the process of updating your BIOS will start automatically.

Accepting the BIOS update - After the operation is complete, restart your computer and wait for it to boot up.
- Once the next startup sequence is complete, you can safely remove the USB flash disk from your computer.
- Repeat the action that was previously triggering the INVALID_DATA_ACCESS_TRAP error and see if the problem is now fixed.

In case the problem is not fixed or you were already using the latest available BIOS firmware version, move down to the next method below.
Deploy SFC and DISM scans
Another scenario that might indirectly cause a critical crash with the INVALID_DATA_ACCESS_TRAP status code is some type of system file corruption. Most likely, a critical process used in the action that you’re taking when getting the error is unreachable due to some type of system file corruption.
If this scenario looks like it could be applicable, you should be able to resolve the most common file corruption instances by running a couple of utilities capable of fixing this behavior: SFC (System File Checker) and DISM ( Deployment Image Servicing and Management).
Both utilities are useful for situations where a system file corruption is involved. The key difference is the two have different approaches when it comes to fixing system file corruption. And this is why we recommend running them in quick succession.
SFC is much more efficient when dealing with logical errors rooted in a drive problem, while DISM is better at fixing OS components.
But keep in mind that DISM requires an Internet connection since it relies on the WU component to download healthy copies to replace corrupted files. On the other hand, SFC is entirely local and uses a locally cached copy to replace corrupted instances.
If you haven’t tried fixing your INVALID_DATA_ACCESS_TRAP error using these two utilities so far, follow the instructions below to run both in quick succession from an elevated CMD prompt:
- Start by up a Run dialog box by pressing Windows key + R.
- From the screen that just appeared, type ‘cmd’ and press Ctrl + Shift + Enter to open up a Command Prompt with admin access.

Open up a Command Prompt window - After you see the UAC (User Account Control) prompt, click yes to grant admin access.
- From the CMD window that just appeared, type the following command in order and press Enter after each one to initiate a DISM scan:
Dism.exe /online /cleanup-image /scanhealth
Dism.exe /online /cleanup-image /restorehealth
Note: DISM will actively use Windows update to download healthy copies. You need to ensure that you have a stable internet connection before initiating this procedure. The first command will scan your system for inconsistencies while the second will repair them.
- As soon as the DISM scan is finished, restart your computer and wait for the next startup to complete.
- After your PC boots back up, follow step 1 again to open up another elevated CMD prompt.
- Inside the elevated CMD prompt, type the following command and press Enter to initiate an SFC scan:
sfc /scannow
Note: Once you start the SFC scan, don’t interrupt it prematurely even if it looks like it’s frozen indefinitely. If you do this, you might end up causing additional logical errors as the utility is busy mitigating current system issues.
- Finally, restart your computer once again and see if the issue is resolved at the next system startup.
If you’re still experiencing the same type of critical BSOD crash (INVALID_DATA_ACCESS_TRAP) despite the fact that you run both scans (SFC and DISM) in quick succession, move down to the final potential fix below.
Perform a repair install
In case the SFC and DISM scans above didn’t fix the issue in your case, there’s a big chance that you’re dealing with some type of system file corruption that cannot be fixed conventionally. In this case, the only viable fix is to perform a series of instructions that will reset every OS component.
If you’ve come this far with no resolutions, there are two ways you can deal with this issue:
- Perform a repair install.
- Perform a clean install.
If you don’t mind losing the data currently stored on your OS drive, a clean install is a less tedious procedure that only requires a few clicks and no installation media. However, the major disadvantage is that you will lose your personal data (apps, games, user preferences, etc.) unless you back up your data in advance.
If you don’t want to lose your personal data, you should go for a repair install. But keep in mind that this procedure is a bit more lengthy and you will need to use compatible installation media.
However, the big advantage is that you get to keep all your personal components including apps, games, user preferences, and personal media. The operation will only rest the OS components.