by Matthew Adams
Matthew is a freelancer who has produced a variety of articles on various topics related to technology. His main focus is the Windows OS and all the things… read more
Updated on
- If you get the intelppm.sys error on Windows 10, the culprit might be outdated drivers or faulty registry entries.
- It might take a little knowledge to edit registry files, but it will surely help to fix the intelppm.sys blue screen on Windows 10.
- Restoring your Window 10 to a previous point should be helpful to get rid of BSoD intelppm.sys.
- We’re also taking you through the system resetting process, so keep reading.

Windows BSoD ( Blue Screen of Deaths) errors can occur due to multiple reasons and often shows different error messages.
Intelppm.sys error is one of Windows 10’s driver system files (for Intel architecture). There are a few BSoD error messages that can include intelppm.sys.
How is this error displayed and how does it impact the PC?
The PAGE FAULT IN NONPAGED AREA STOP 0×00000050 intelppm.sys error is just one example of the numerous related errors messages.
The error sometimes also reads kmode_exception_not_handled intelppm.sys. This is how some affected users were affected by the error:
I am frequently getting BSOD errors with error code that intelppm.sys has stopped working. Alternate black and white boxes like a chess board appear on my screen then my computer freezes and BSOD is displayed. It happens 3-4 times a week.
Fortunately, there are a few ways to solve the PAGE FAULT IN NONPAGED AREA STOP 0×00000050 intelppm.sys error, which is why we recommend you carefully read our guide below.
How we test, review and rate?
We have worked for the past 6 months on building a new review system on how we produce content. Using it, we have subsequently redone most of our articles to provide actual hands-on expertise on the guides we made.
For more details you can read how we test, review, and rate at WindowsReport.
How do I fix the intelppm.sys BSOD error in Windows 10?
1. Edit the Registry
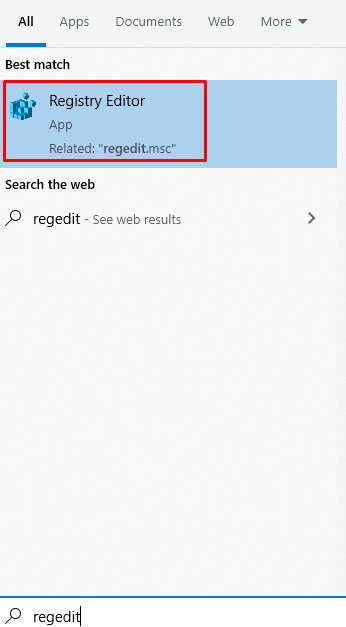
- Press the Windows key + R.
- Enter regedit in the Open box, and click OK to open the Registry Editor.
- Then open this registry path:
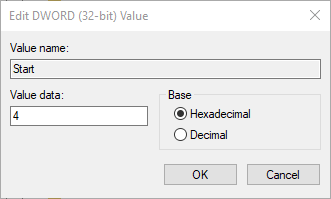
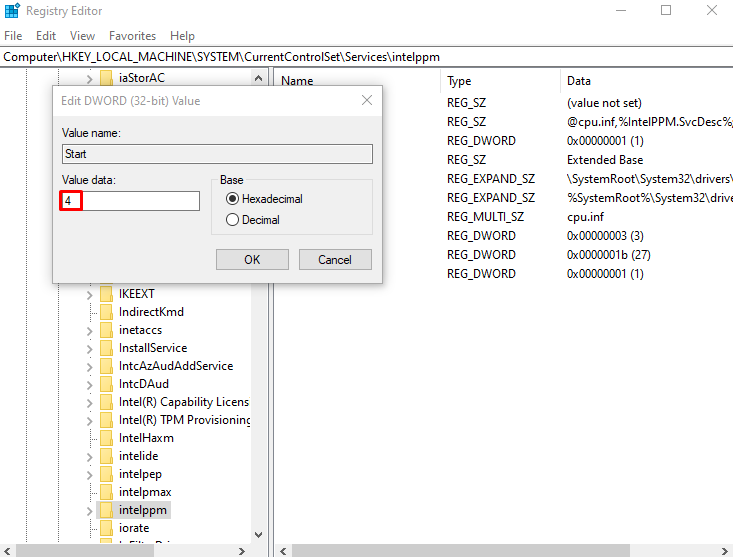
HKEY_LOCAL_MACHINE\SYSTEM\CurrentControlSet\Services\Processor - Double-click Start DWORD to open the Edit DWORD window.
- Enter 4 in the Value data box, and click OK.

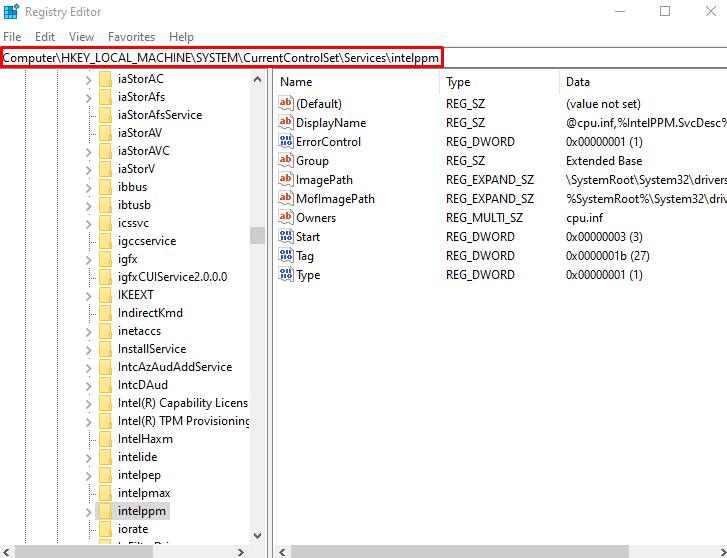
- Next, browse to this path in the Registry Editor:
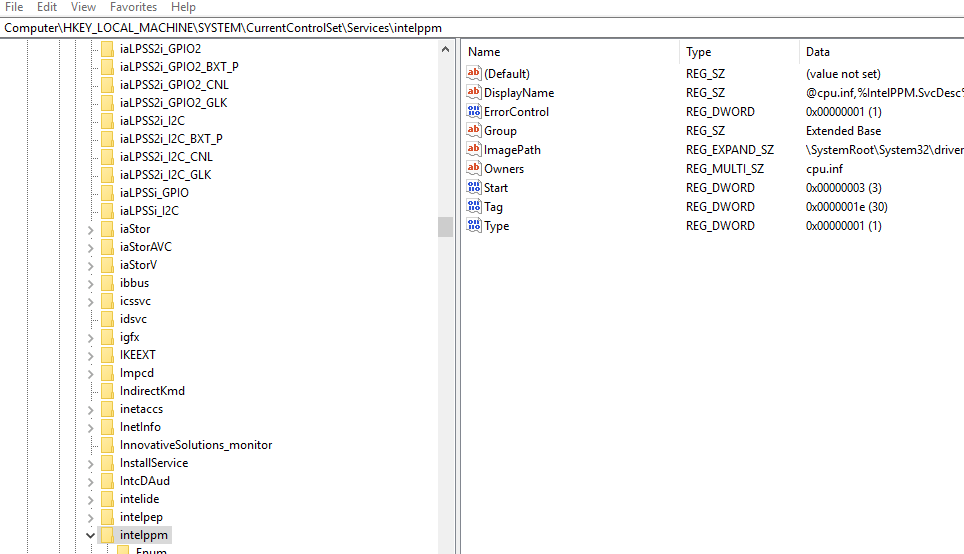
HKEY_LOCAL_MACHINE\SYSTEM\CurrentControlSet\Services\Intelppm
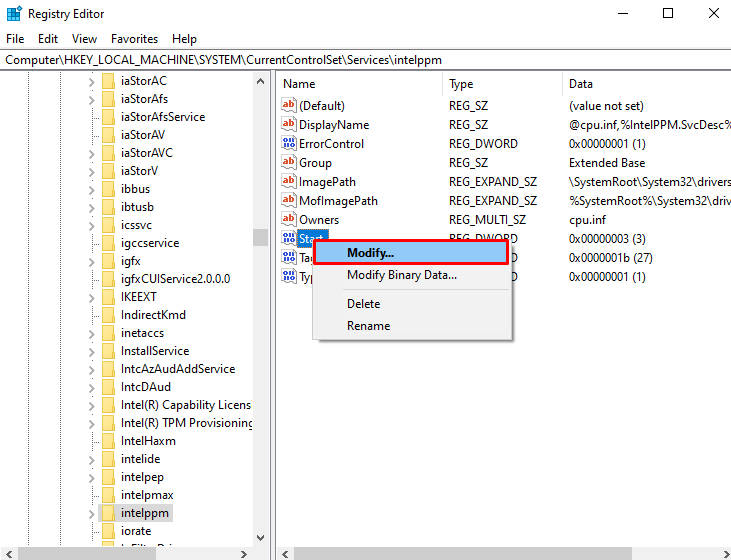
- Select the Intelppm subkey, and double-click the Start DWORD.
- Delete the current value in the Value data box, and then enter 4 as the replacement value.
- Click the OK button.
- Thereafter, restart Windows.
2. Run a BSoD troubleshooter
To fix BSoD errors, we recommend repairing your operating system, restoring it to a previous state of health with the help of dedicated advanced software.
Relying on this great tool, you can repair damaged files that are sometimes responsible for BSoD errors, as well as remove any other errors from your PC.
3. Uninstall the problematic driver
- Press the Windows Key + X to open the menu, and select Device Manager from the list.
- When Device Manager opens, locate the problematic driver, right-click it and choose Uninstall device from the menu.

- A confirmation dialog will now appear. Click on Uninstall to remove the driver.

- Optional: You can click on the Scan for hardware changes icon or restart your PC, and Windows will install the default driver.
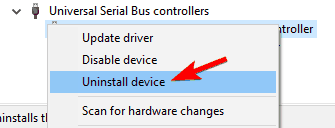

Sometimes the PAGE FAULT IN NONPAGED AREA STOP 0×00000050 intelppm.sys error can appear due to problematic drivers, and in order to fix it, you need to find and remove the problematic driver.
Several users reported that Windows will automatically update the problematic driver, causing the issue to reappear. However, you can easily prevent Windows 10 from updating specific devices.
Keep in mind that almost any driver can cause this problem to occur, so you’ll need to do a bit of research before you find the problematic driver.
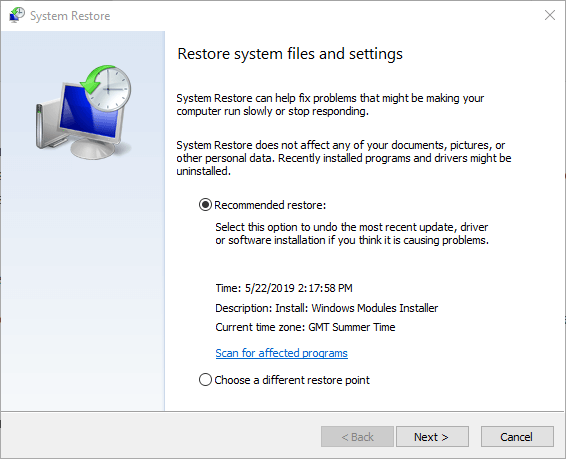
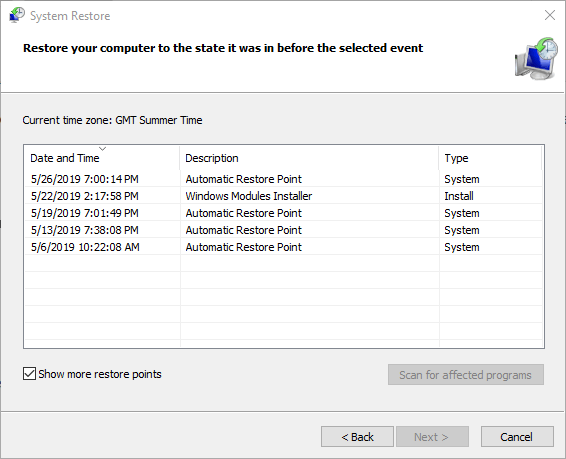
4. Run System Restore
- Open the Run accessory.
- To open System Restore, enter rstrui in Run, and click OK.
- Select Choose a different restore point if the System Restore window includes that option, and press the Next button.

- Click the Show more restore points checkbox.
- Choose a restore point.
- Press the Scan for affected programs button to check what software gets removed for a restore point.
- Click the Next button, and select the Finish option.
5. Run System File Checker
- Press the Windows key and type cmd.
- Click on Run as Administrator for Command Prompt.
- In the Command Prompt, enter the following command and hit Enter:
sfc /scannow
- Wait for the system file checker tool to scan, and validate the system files.
- The tool will fix missing or corrupted files in the system if required.
- Once the scan is 100% complete, reboot the computer and check if the error is resolved.
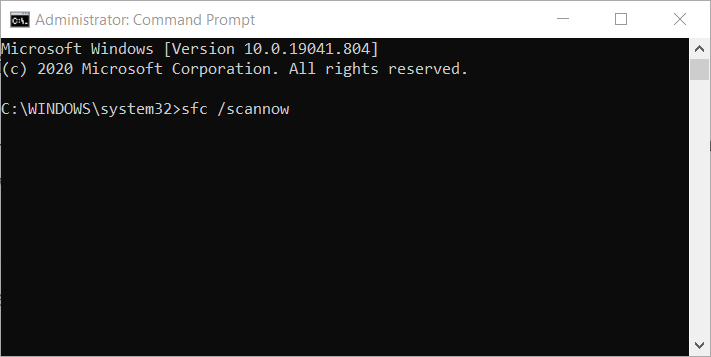
The SFC scan is a command-line tool that will scan your system for potential errors and resolve them on the way. So, it can also fix the PAGE FAULT IN NONPAGED AREA STOP 0×00000050 intelppm.sys error.
If SFC /scannow stops on Windows 10, take a closer look at our comprehensive guide in order to fix the issue with ease.
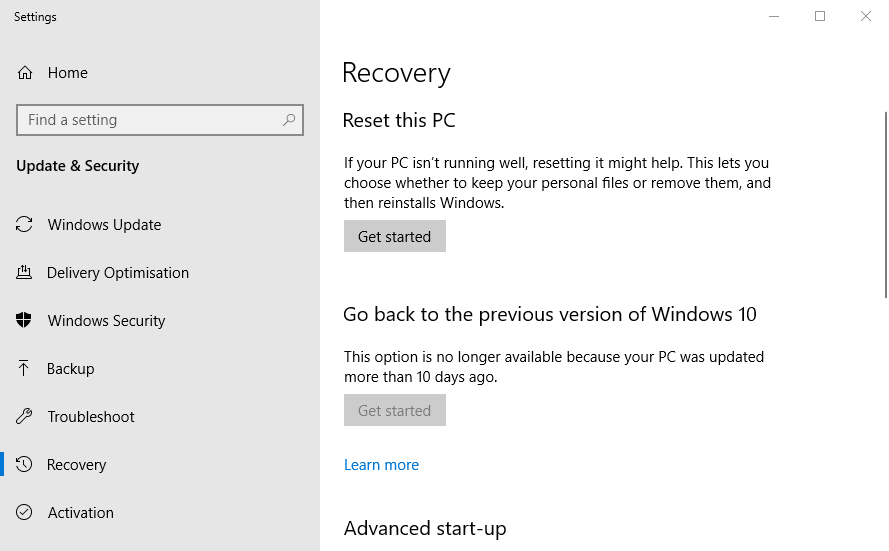
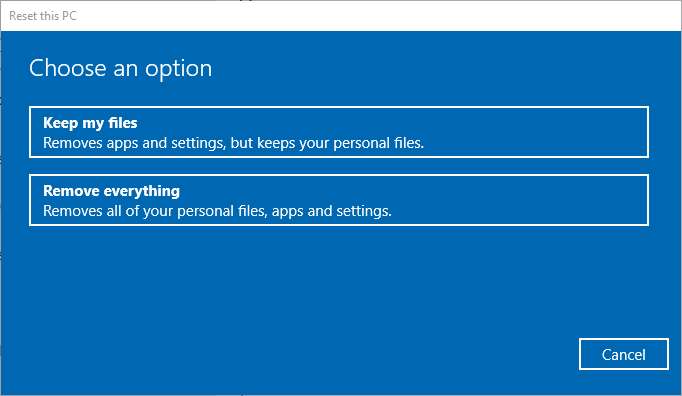
6. Reset Windows 10
- Open Windows 10’s Search box by pressing the Windows key + S.
- Input the keyword reset in the search box, and select Reset this PC to open Settings as shown directly below.

- Click Get started to open the window in the shot directly below.

- Select the Keep my files option.
- Press the Next button, and select the Finish option to confirm.
Useful tips for users
The Blue Screen of Death errors are critical errors that the operating system was unable to repair automatically, and there are many reasons why BSOD errors occur.
Among other reasons, these may occur due to outdated operating systems, so be sure to always keep your OS updated to the latest version.
Another common cause for Blue Screen of Death on Windows 10 is your drivers. That’s why you can use a reliable tool to take care of drivers in the background, without you even knowing about it.
Malware can damage certain registers of your PC, and this leads directly to BSoD errors. Fortunately, there are plenty of powerful antivirus programs that destroy and keep viruses off your PC.
By following the above solutions, you should be able to use your PC again normally, and no longer have to deal with errors like the PAGE FAULT IN NONPAGED AREA STOP 0×00000050 intelppm.sys error.
We would like to know which of these solutions is the most efficient, so it would help if you let us know which ones you used by leaving us a message in the comments section below.
![]()
Skip to content
На чтение 4 мин. Просмотров 3k. Опубликовано
Intelppm.sys – это один из системных файлов драйверов Windows 10 (для архитектуры Intel). Есть несколько сообщений об ошибках BSOD (синий экран), которые могут включать intelppm.sys. Ошибка PAGE FAULT IN NONPAGED AREA STOP 0 × 00000050 intelppm.sys – это только один пример многочисленных связанных сообщений об ошибках.
Некоторые затронутые пользователи говорили об ошибке.
Я часто получаю ошибки BSOD с кодом ошибки, что intelppm.sys перестал работать. На моем экране появляются чередующиеся черные и белые квадраты, такие как шахматная доска, затем компьютер зависает и отображается BSOD. Это происходит 3-4 раза в неделю.
Проверьте решения ниже.
Содержание
- Как исправить ошибку BSOD Intelppm.sys в Windows 10?
- 1. Обновите драйверы устройств с помощью Driver Booster 6
- 2. Сканирование реестра
- 3. Изменить реестр
- 4. Запустите восстановление системы
- 5. Сбросить Windows 10
Как исправить ошибку BSOD Intelppm.sys в Windows 10?
1. Обновите драйверы устройств с помощью Driver Booster 6
- Откройте страницу Driver Booster 6 здесь.
-
Нажмите Загрузить бесплатно , чтобы установить программное обеспечение в Windows 10.

- DB 6 автоматически проверит системные драйверы при запуске. После этого пользователи могут нажать кнопку Обновить сейчас , чтобы обновить перечисленные драйверы устройств.

2. Сканирование реестра
- Нажмите Бесплатная загрузка на веб-странице CCleaner, а затем установите программное обеспечение с помощью загруженного мастера установки.
-
Откройте окно CCleaner и нажмите Реестр слева.
- Установите все флажки реестра и нажмите кнопку Сканировать на наличие проблем .
- После этого нажмите Исправить выбранные проблемы.
- Откроется диалоговое окно, из которого пользователи могут выбрать для резервного копирования реестра в первую очередь. Выберите Да или Нет в соответствии с предпочтениями.
- Нажмите кнопку Исправить все выбранные проблемы , чтобы подтвердить.


3. Изменить реестр
- Пользователи также могут отключить файл драйвера intelppm.sys, чтобы исправить ошибки BSOD. Для этого нажмите клавишу Windows + горячую клавишу R.
- Введите “regedit” в поле “Открыть” и нажмите ОК , чтобы открыть редактор реестра.
-
Затем откройте этот путь регистрации: HKEY_LOCAL_MACHINE> SYSTEM> CurrentControlSet> Services> Processor.
SYSTEM> CurrentControlSet> Службы> Процессор regedit “width =” 975 “height =” 623 “data-lazy-srcset =” https://cdn.windowsreport.com/wp-content/uploads/2019/05/The-processor- registry-subkey.png 975w, https://cdn.windowsreport.com/wp-content/uploads/2019/05/The-processor-registry-subkey-300×192.png 300w, https://cdn.windowsreport.com/ wp-content/uploads/2019/05/The-processor-registry-subkey-768×491.png 768w “data-lazy-sizes =” (максимальная ширина: 975px) 100vw, 975px “/>
СИСТЕМА> CurrentControlSet> Службы> Regedit процессора “width =” 975 “height =” 623 “srcset =” https://cdn.windowsreport.com/wp-content/uploads/ 2019/05/The-processor-registry-subkey.png 975w, https://cdn.windowsreport.com/wp-content/uploads/2019/05/The-processor-registry-subkey-300×192.png 300 Вт, https: //cdn.windowsreport.com/wp-content/uploads/2019/05/The-processor-registry-subkey-768×491.png 768w “размеры =” (максимальная ширина: 975 пикселей) 100 вольт, 975 пикселей “/>
- Дважды щелкните Start DWORD, чтобы открыть окно Edit DWORD.
-
Введите “4” в поле “Значение” и нажмите ОК .
-
Затем перейдите по этому пути в редакторе реестра: HKEY_LOCAL_MACHINE> SYSTEM> CurrentControlSet> Services> Intelppm.
SYSTEM> CurrentControlSet> Службы> Intelppm regedit “width =” 964 “height =” 554 “data-lazy-srcset =” https://cdn.windowsreport.com/wp-content/uploads/2019/05/The-intelppm- registry-subkey.png 964w, https://cdn.windowsreport.com/wp-content/uploads/2019/05/The-intelppm-registry-subkey-300×172.png 300w, https://cdn.windowsreport.com/ wp-content/uploads/2019/05/The-intelppm-registry-subkey-768×441.png 768w “data-lazy-sizes =” (максимальная ширина: 964px) 100vw, 964px “/>
SYSTEM> CurrentControlSet> Службы> Intelppm regedit “width =” 964 “height =” 554 “srcset =” https://cdn.windowsreport.com/wp-content/uploads/ 2019/05/The-intelppm-registry-subkey.png 964w, https://cdn.windowsreport.com/wp-content/uploads/2019/05/The-intelppm-registry-subkey-300×172.png 300 Вт, https: //cdn.windowsreport.com/wp-content/uploads/2019/05/The-intelppm-registry-subkey-768×441.png 768w “sizes =” (максимальная ширина: 964px) 100vw, 964px “/>
- Выберите подраздел Intelppm и дважды щелкните Start DWORD.
- Удалите текущее значение в поле «Значение», а затем введите «4» в качестве значения замены.
- Нажмите кнопку ОК .
- После этого перезапустите Windows.
 СИСТЕМА> CurrentControlSet> Службы> Regedit процессора “width =” 975 “height =” 623 “srcset =” https://cdn.windowsreport.com/wp-content/uploads/ 2019/05/The-processor-registry-subkey.png 975w, https://cdn.windowsreport.com/wp-content/uploads/2019/05/The-processor-registry-subkey-300×192.png 300 Вт, https: //cdn.windowsreport.com/wp-content/uploads/2019/05/The-processor-registry-subkey-768×491.png 768w “размеры =” (максимальная ширина: 975 пикселей) 100 вольт, 975 пикселей “/>

 SYSTEM> CurrentControlSet> Службы> Intelppm regedit “width =” 964 “height =” 554 “srcset =” https://cdn.windowsreport.com/wp-content/uploads/ 2019/05/The-intelppm-registry-subkey.png 964w, https://cdn.windowsreport.com/wp-content/uploads/2019/05/The-intelppm-registry-subkey-300×172.png 300 Вт, https: //cdn.windowsreport.com/wp-content/uploads/2019/05/The-intelppm-registry-subkey-768×441.png 768w “sizes =” (максимальная ширина: 964px) 100vw, 964px “/>
4. Запустите восстановление системы
- Откройте аксессуар Run.
- Чтобы открыть восстановление системы, введите «rstrui» в «Выполнить» и нажмите ОК .
-
Выберите Выберите другую точку восстановления, если в окне «Восстановление системы» есть эта опция, и нажмите кнопку Далее .
- Установите флажок Показать больше точек восстановления .
-
Выберите точку восстановления.
- Нажмите кнопку Сканировать на наличие уязвимых программ , чтобы проверить, какое программное обеспечение удаляется для точки восстановления.
- Нажмите кнопку Далее и выберите параметр Готово .


5. Сбросить Windows 10
- Откройте окно поиска Windows 10, нажав сочетание клавиш Windows + S.
-
Введите ключевое слово “сброс” в поле поиска и выберите Сбросить этот компьютер , чтобы открыть настройки, как показано ниже.
-
Нажмите Начать , чтобы открыть окно в кадре прямо под ним.
- Выберите параметр Сохранить мои файлы .
- Нажмите кнопку Далее и выберите вариант Готово для подтверждения.


Последнее обновление: 07/02/2023
[Среднее время чтения: 4,5 мин.]
Файл intelppm.sys, также известный как файл Windows System Configuration, был создан компанией Cerulean Studios для разработки Trillian 6.1.0.17. Файлы SYS относятся к категории типов файлов Драйвер (Windows System Configuration).
Первая версия intelppm.sys была выпущена для операционной системы Windows Vista 11/08/2006 в составе Windows Vista.
Последней версией файла для Trillian 6.1.0.17 является v6.1.0.17, выпущенная 09/04/2019.
Файл intelppm.sys включен в версии ОС Windows 10, Windows 8.1 и Windows 8.
В этой короткой статье приводятся подробные сведения о файле, шаги по устранению проблем SYS с intelppm.sys и список бесплатных загрузок для каждой версии, содержащейся в нашем полном каталоге файлов.
Что такое сообщения об ошибках intelppm.sys?
Intelppm.sys — ошибки «синего экрана» (BSOD)
Существует ряд причин, по которым вы можете столкнуться с проблемами с intelppm.sys. Большинство проблем с файлами SYS связаны с ошибками «синего экрана» (BSOD). Эти типы ошибок intelppm.sys могут быть вызваны аппаратными проблемами, устаревшей прошивкой, поврежденными драйверами или другими проблемами, связанными с программным обеспечением (например, обновление Trillian). В число этих ошибок входят:
- Не удается найти intelppm.sys.
- Не удалось загрузить intelppm.sys.
- Файл intelppm.sys отсутствует или поврежден.
- Windows не удалось запустить — intelppm.sys.

Обнаружена проблема, в результате которой ОС Windows завершила работу, чтобы предотвратить повреждение компьютера. По всей видимости, причиной проблемы стал следующий файл: intelppm.sys.
 На вашем ПК возникла проблема, которую не удалось устранить, и его необходимо перезагрузить. Сведения об ошибке можно найти в Интернете: [BSOD] (intelppm.sys).
STOP 0×0000007A: KERNEL DATA INPAGE (intelppm.sys)
STOP 0x0000003B: SYSTEM SERVICE EXCEPTION (intelppm.sys)
STOP 0x0000001E: KMODE EXCEPTION NOT HANDLED (intelppm.sys)
STOP 0x00000050: PAGE FAULT IN A NONPAGED AREA (intelppm.sys)
STOP 0x0000007E: SYSTEM THREAD EXCEPTION NOT HANDLED (intelppm.sys)
STOP 0x0000000A: IRQL NOT LESS EQUAL (intelppm.sys)
Крайне важно устранять ошибки «синего экрана»
В большинстве случаев ошибки BSOD intelppm.sys возникают после установки нового оборудования, программного обеспечения (Trillian) или выполнения неудачного обновления Windows. В остальных случаях к ошибке «синего экрана» intelppm.sys может привести повреждение программного обеспечения, вызванное заражением вредоносным программным обеспечением. Таким образом, крайне важно, чтобы антивирус постоянно поддерживался в актуальном состоянии и регулярно проводил сканирование системы.

СОВЕТ ОТ СПЕЦИАЛИСТА: Как показывает опыт, целесообразно всегда создавать резервную копию системы Windows и (или) точку восстановления системы, прежде чем вносить какие-либо изменения в аппаратное или программное обеспечение на компьютере. Таким образом, в случае неблагоприятного поворота событий и возникновения связанной с файлом intelppm.sys ошибки «синего экрана» после недавних изменений можно восстановить систему в предыдущее состояние.
Как исправить ошибки intelppm.sys — 3-шаговое руководство (время выполнения: ~5-15 мин.)
Если вы столкнулись с одним из вышеуказанных сообщений об ошибке, выполните следующие действия по устранению неполадок, чтобы решить проблему intelppm.sys. Эти шаги по устранению неполадок перечислены в рекомендуемом порядке выполнения.
Шаг 1. Восстановите компьютер до последней точки восстановления, «моментального снимка» или образа резервной копии, которые предшествуют появлению ошибки.
Чтобы начать восстановление системы (Windows XP, Vista, 7, 8 и 10):
- Нажмите кнопку «Пуск» в Windows
- В поле поиска введите «Восстановление системы» и нажмите ENTER.
- В результатах поиска найдите и нажмите «Восстановление системы»
- Введите пароль администратора (при необходимости).
- Следуйте инструкциям мастера восстановления системы, чтобы выбрать соответствующую точку восстановления.
- Восстановите компьютер к этому образу резервной копии.
Если на этапе 1 не удается устранить ошибку intelppm.sys, перейдите к шагу 2 ниже.

Шаг 2. Если вы недавно установили приложение Trillian (или схожее программное обеспечение), удалите его, затем попробуйте переустановить Trillian.
Чтобы удалить программное обеспечение Trillian, выполните следующие инструкции (Windows XP, Vista, 7, 8 и 10):
- Нажмите кнопку «Пуск» в Windows
- В поле поиска введите «Удалить» и нажмите ENTER.
- В результатах поиска найдите и нажмите «Установка и удаление программ»
- Найдите запись для Trillian 6.1.0.17 и нажмите «Удалить»
- Следуйте указаниям по удалению.
После полного удаления приложения следует перезагрузить ПК и заново установить Trillian.
Если на этапе 2 также не удается устранить ошибку intelppm.sys, перейдите к шагу 3 ниже.
![]()
Trillian 6.1.0.17
Cerulean Studios
Шаг 3. Выполните обновление Windows.
Когда первые два шага не устранили проблему, целесообразно запустить Центр обновления Windows. Во многих случаях возникновение сообщений об ошибках intelppm.sys может быть вызвано устаревшей операционной системой Windows. Чтобы запустить Центр обновления Windows, выполните следующие простые шаги:
- Нажмите кнопку «Пуск» в Windows
- В поле поиска введите «Обновить» и нажмите ENTER.
- В диалоговом окне Центра обновления Windows нажмите «Проверить наличие обновлений» (или аналогичную кнопку в зависимости от версии Windows)
- Если обновления доступны для загрузки, нажмите «Установить обновления».
- После завершения обновления следует перезагрузить ПК.
Если Центр обновления Windows не смог устранить сообщение об ошибке intelppm.sys, перейдите к следующему шагу. Обратите внимание, что этот последний шаг рекомендуется только для продвинутых пользователей ПК.

Если эти шаги не принесут результата: скачайте и замените файл intelppm.sys (внимание: для опытных пользователей)
Если ни один из предыдущих трех шагов по устранению неполадок не разрешил проблему, можно попробовать более агрессивный подход (примечание: не рекомендуется пользователям ПК начального уровня), загрузив и заменив соответствующую версию файла intelppm.sys. Мы храним полную базу данных файлов intelppm.sys со 100%-ной гарантией отсутствия вредоносного программного обеспечения для любой применимой версии Trillian . Чтобы загрузить и правильно заменить файл, выполните следующие действия:
- Найдите версию операционной системы Windows в нижеприведенном списке «Загрузить файлы intelppm.sys».
- Нажмите соответствующую кнопку «Скачать», чтобы скачать версию файла Windows.
- Скопируйте этот файл в соответствующее расположение папки Trillian:
Windows 10: C:\Windows\System32\drivers\
Windows 10: C:\Windows\System32\DriverStore\FileRepository\cpu.inf_x86_a88ab4dcf5241bae\
Windows 10: C:\Windows\WinSxS\amd64_dual_cpu.inf_31bf3856ad364e35_10.0.16299.15_none_7192addcb1d5a4ba\
Windows 8.1: C:\Windows\System32\drivers\
Windows 8.1: C:\Windows\System32\DriverStore\FileRepository\cpu.inf_x86_c50e101d7dfcaec2\
Показать на 8 каталогов больше +Windows 8: C:\Windows\System32\drivers\
Windows 8: C:\Windows\System32\DriverStore\FileRepository\cpu.inf_x86_b51058b2735124f5\
Windows 7: C:\Windows\System32\DriverStore\FileRepository\cpu.inf_amd64_neutral_ae5de2e1bf2793c3\
Windows 7: C:\Windows\System32\drivers\
Windows Vista: C:\Windows\System32\DriverStore\FileRepository\cpu.inf_c9b3b962\
Windows Vista: C:\Windows\System32\drivers\
Windows Vista: C:\Windows\System32\DriverStore\FileRepository\cpu.inf_5acff2c0\
Windows XP: C:\Windows\System32\drivers\ - Перезагрузите компьютер.
Если этот последний шаг оказался безрезультативным и ошибка по-прежнему не устранена, единственно возможным вариантом остается выполнение чистой установки Windows 10.
СОВЕТ ОТ СПЕЦИАЛИСТА: Мы должны подчеркнуть, что переустановка Windows является достаточно длительной и сложной задачей для решения проблем, связанных с intelppm.sys. Во избежание потери данных следует убедиться, что перед началом процесса вы создали резервные копии всех важных документов, изображений, установщиков программного обеспечения и других персональных данных. Если вы в настоящее время не создаете резервных копий своих данных, вам необходимо сделать это немедленно.
Скачать файлы intelppm.sys (проверено на наличие вредоносного ПО — отсутствие 100 %)
ВНИМАНИЕ! Мы настоятельно не рекомендуем загружать и копировать intelppm.sys в соответствующий системный каталог Windows. Cerulean Studios, как правило, не выпускает файлы Trillian SYS для загрузки, поскольку они входят в состав установщика программного обеспечения. Задача установщика заключается в том, чтобы обеспечить выполнение всех надлежащих проверок перед установкой и размещением intelppm.sys и всех других файлов SYS для Trillian. Неправильно установленный файл SYS может нарушить стабильность работы системы и привести к тому, что программа или операционная система полностью перестанут работать. Действовать с осторожностью.
Файлы, относящиеся к intelppm.sys
Файлы SYS, относящиеся к intelppm.sys
| Имя файла | Описание | Программа (версия) | Размер файла (байты) | Расположение файла |
|---|---|---|---|---|
| pvhdparser.sys | Windows System Configuration | Trillian 6.1.0.17 | 22034 | C:\Windows\WinSxS\amd64_microsoft-hyper-v-pvhd-… |
| hidusb.sys | Windows System Configuration | Trillian 6.1.0.17 | 12 | C:\Windows\WinSxS\amd64_dual_input.inf_31bf3856… |
| null.sys | Windows System Configuration | Trillian 6.1.0.17 | 217 | C:\Windows\WinSxS\amd64_microsoft-windows-null_… |
| pciidex.sys | Windows System Configuration | Trillian 6.1.0.17 | 12 | C:\Windows\WinSxS\amd64_mshdc.inf_31bf3856ad364… |
| AppvVfs.sys | Windows System Configuration | Trillian 6.1.0.17 | 12 | C:\Windows\WinSxS\amd64_microsoft-windows-a..na… |
Другие файлы, связанные с intelppm.sys
| Имя файла | Описание | Программа (версия) | Размер файла (байты) | Расположение файла |
|---|---|---|---|---|
| cht_boot.ttf | TrueType Font | Trillian 6.1.0.17 | 3878407 | C:\$WINDOWS.~BT\efi\microsoft\boot\fonts\ |
| GlobalUserInterface.Co… | Windows Composite Font | Trillian 6.1.0.17 | 12 | C:\Windows\WinSxS\amd64_netfx4-globaluserinterf… |
| GlobalMonospace.Compos… | Windows Composite Font | Trillian 6.1.0.17 | 12 | C:\Windows\WinSxS\amd64_netfx4-globalmonospacec… |
| GlobalSerif.CompositeFont | Windows Composite Font | Trillian 6.1.0.17 | 12 | C:\Windows\WinSxS\amd64_netfx4-globalserifcf_b0… |
| cour.ttf | TrueType Font | Trillian 6.1.0.17 | 21374 | C:\Windows\WinSxS\amd64_microsoft-windows-f..tr… |
Вы скачиваете пробное программное обеспечение. Для разблокировки всех функций программного обеспечения требуется покупка годичной подписки, стоимость которой оставляет 39,95 долл. США. Подписка автоматически возобновляется в конце срока (Подробнее). Нажимая кнопку «Начать загрузку» и устанавливая «Программное обеспечение», я подтверждаю, что я прочитал (-а) и принимаю Лицензионное соглашение и Политику конфиденциальности компании Solvusoft.
Do you encounter system crash with bug checking frequently on the startup of your PC? If the computer starts with Intelppm.sys BSOD or Blue Screen error then this is the right location to find solutions. IntelPPM refers to Intel Processor Power Management Driver which when gets corrupted creates glitches and issues. As a result, Blue screen appears at the startup showing this stop code.
What failed: Intelppm.sys BSOD Error mostly occurs because of conflicts between this Intel driver and other third-party programs. Sometimes it is found that this Blue screen appears in computers running AMD processors due to the conflict with Intelppm.sys. Furthermore, incorrect registry settings and mistakenly removed file might also give rise to the problem. The error is commonly accompanied by Driver Irql Not Less Or Equal, DPC Watchdog Violation, Driver Power State Failure, Kmode Exception Not Handled, and Unexpected Kernel Mode Trap.
Here is how to fix Intelppm.sys BSOD Blue Screen Error in Windows 11 or 10:
Edit Registry
The intelppm.sys error can occur due to registry-related issues in your system obviously by editing the value, this bug checking can be fixed. So, follow the simple steps:
- Press Windows + R on your keyboard to open the Run dialog box.
- Type Regedit and click OK.
- Once Registry Editor opens, navigate to this folder:
HKEY_LOCAL_MACHINE\SYSTEM\CurrentControlSet\Services\intelppm- Then, double-click on the Start DWORD from the right side of the screen.
- Set the value data 4 and click on OK.
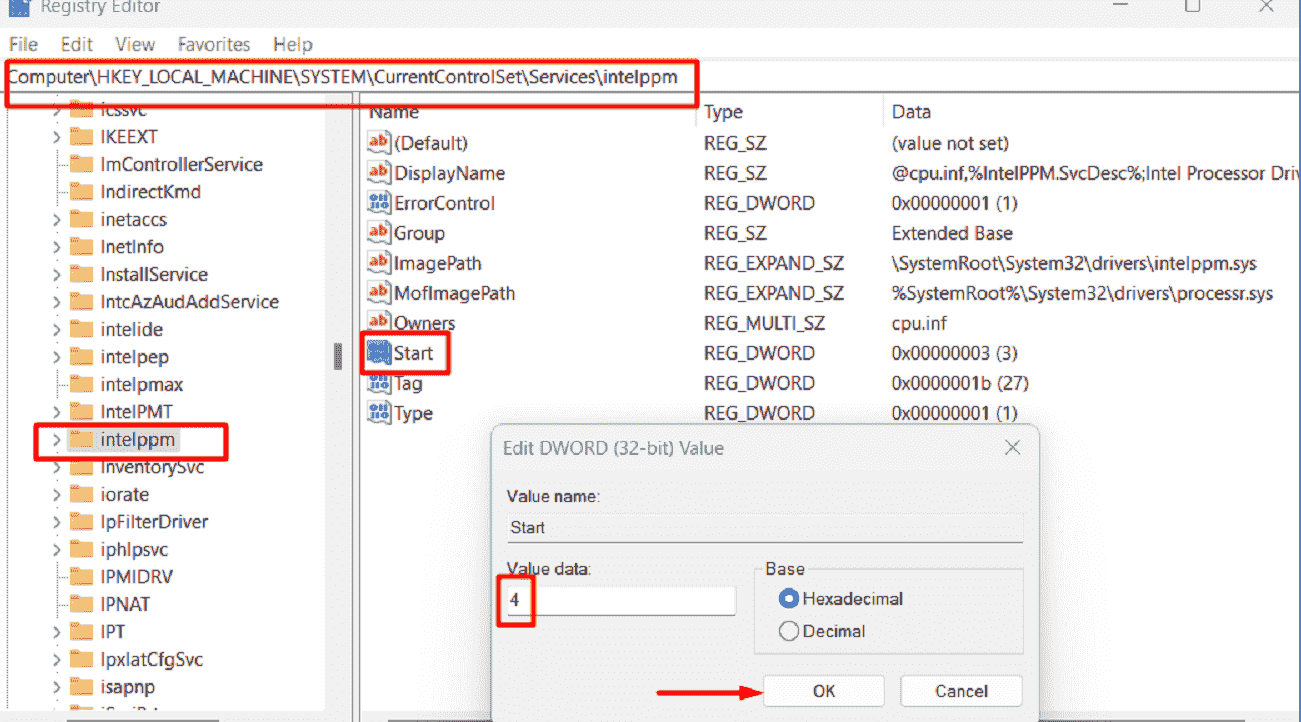
- Reboot your system and check if the error is resolved.
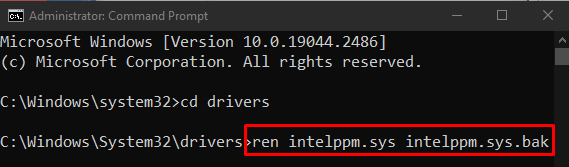
Rename intelppm.sys File
To disable intelppm.sys you will need to rename this file. This is located in C:\Windows\System32\Drivers, therefore, move forward to the folder and change its name:
- Press Winkey+R.
- Navigate to the path C:\Windows\System32\Drivers.
- Find the file intelppm.sys and rename it to intelppm.sys.bak.
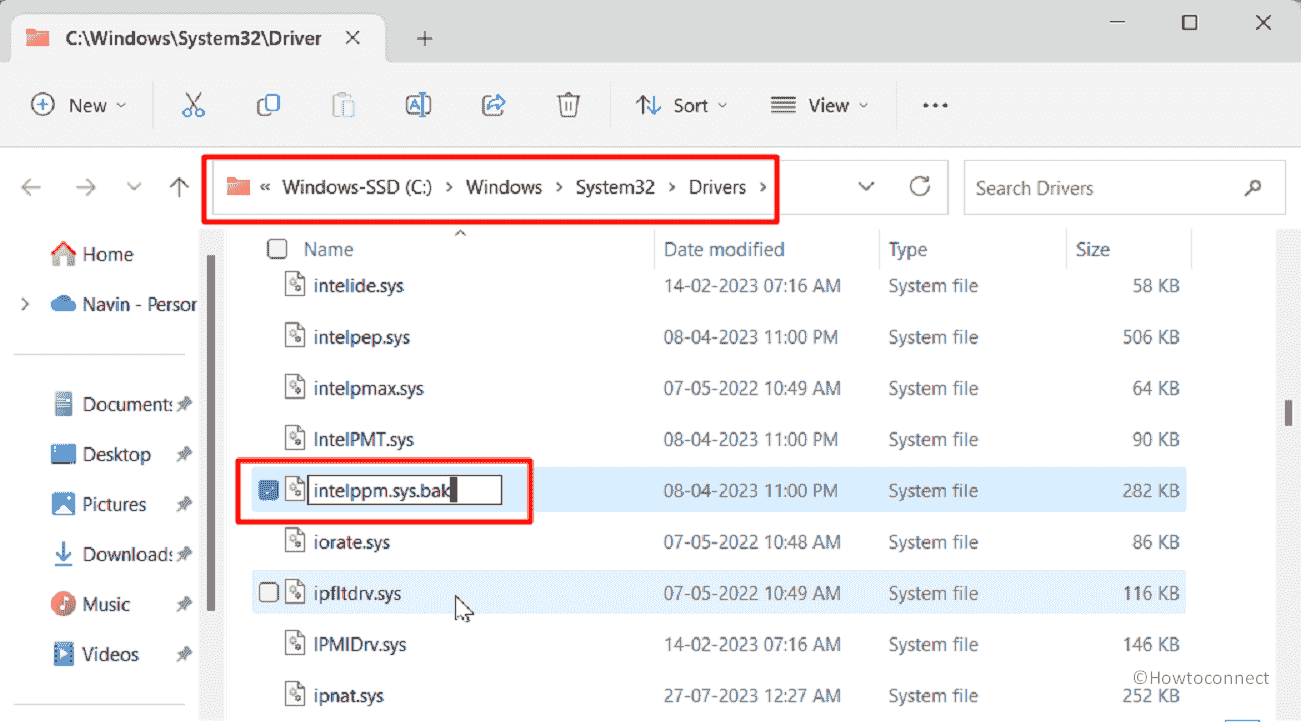
- You may require permission to change the name; click on Continue.
- Reboot your system and identify if the problem is fixed.
Intelppm.sys driver update
Often conflicts between outdated Intelppm.sys processor driver and system file might give rise to this blue screen error. But don’t worry, Windows 11 following its predecessors provide a tool to update the driver in easy mode:
- Right-click on Start.
- Select Device Manager.
- Find Processors in the list and double-click on it
- In the Processor’s list, find the driver showing a yellow warning mark.
- Right-click the driver and select – Update driver.
- Choose – Search automatically for drivers.
- Close the windows and restart the system.
Update Windows Version
Sometimes intelppm.sys BSOD error can occur because of an outdated Windows version. So it’s essential to keep your Windows updated to fix this issue and prevent it from appearing.
- Press Windows + I.
- Navigate to the Windows Update and click the “Check for Updates” button at the top right.
- Now, if any updates are available, it shows in the list here. Just click on the Download & Install button for all updates.
- Once installation is done, check if the error is resolved.
Use System File Checker (SFC) and Deployment Image Servicing and Management (DISM)
SFC is like a detective that looks for problems in your computer’s essential files. Just like your system has lots of files that make it work correctly, sometimes some of those files can get corrupted or go missing. When that happens, your computer might start acting strangely, like showing error messages or crashing more often.
DISM is like a repair and maintenance crew for your computer’s operating system. By using the System File Checker (SFC) and DISM tools, you can scan your whole system, identify damaged files as intelppm.sys, and fix them.
Here’s how you can use the SFC and DISM:
- Go to Windows search and type CMD.
- Select Run as Administrator.
- When a pop-up appears, click on Yes.
- On the Command Prompt that opens, paste the below-given line, and hit Enter.
sfc /scannow
- The SFC will identify and fix corrupted files in your system.
- Once the process is completed, close the command prompt and restart your PC to check if the error is fixed.
- Still, the issue persists then launch Command prompt with administrative authorities and run the below lines sequentially:
DISM /Online /Cleanup-Image /CheckHealth
DISM /Online /Cleanup-Image /ScanHealth
DISM /Online /Cleanup-Image /RestoreHealth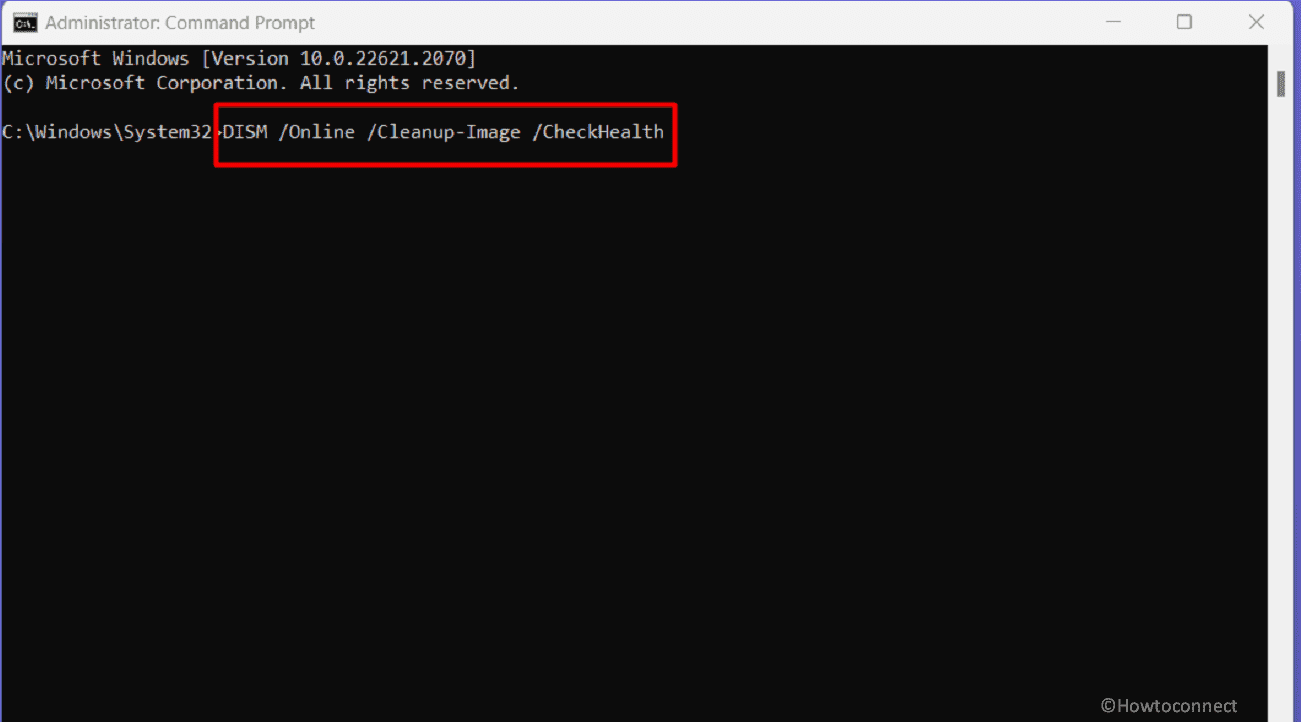
- In the end, reboot the device.
Run System Restore
By restoring you can roll back the system to the previous state, where it runs smoothly without any issues. If your device suddenly gets a BSOD error, it’s a safer option. Here’s how you can restore your pc:
- Click on Start, and type rstrui.
- Press Enter to launch System Restore.
- Click on Next to continue.
- Select a date and time when intelppm.sys BSOD did not start.
- Again click “Next”.
- Select Finish and confirm the prompt by clicking on Yes.
Reset your System
Over time, as you use your system, you may install new apps, create files, and change settings. Sometimes, the computer might start running slower, not working, or throw blue screen error as well due to various reasons.
“Reset PC” is a way to make your computer go back to its original state, just like when you first got it from the store. Therefore, if nothing works as a solution, reset your system:
- Press Windows + I on your keyboard to open Windows settings.
- Click “Recovery” on the right.
- Then, click on “Reset PC“.
- Select Keep my files.
- Click on Local reinstall.
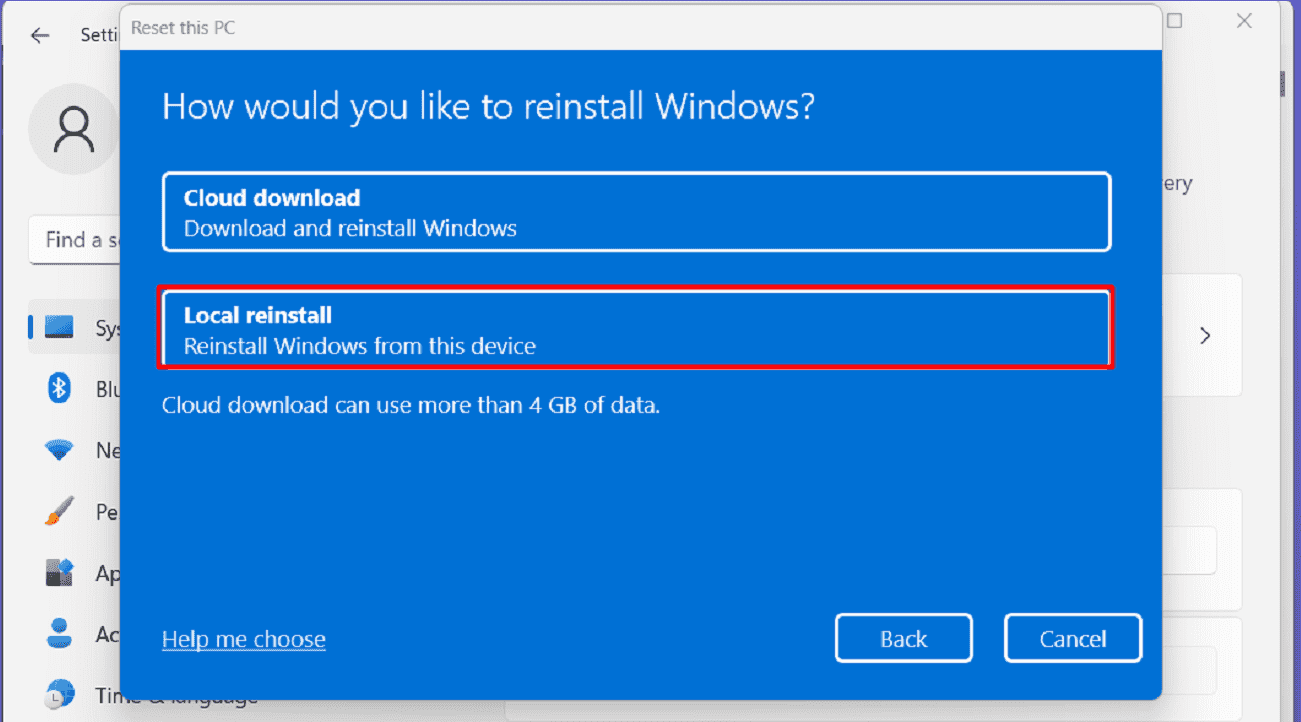
- Now, select Next.
- On the next window, click on Reset and then confirm.
- Once the process is done, then check if the issue is resolved on your PC.
These are the top six working ways to resolve the intelppm.sys BSOD error in your Windows 11/10. We hope this guide helps you fix this Windows error by implementing these methods.
Intelppm download
Methods:
Edit Registry
Rename intelppm.sys File
Update Windows Version
Use System File Checker (SFC) and Deployment Image Servicing and Management (DISM)
Run System Restore
Reset your System
That’s all!!
Repair any Windows problems such as Blue/Black Screen, DLL, Exe, application, Regisrty error and quickly recover system from issues using Reimage.
Виндовс 10″Ошибка «синий экран» intelppm.sys” — это синий экран проблемы/проблемы смерти. Эта ошибка может быть вызвана тем, что мы случайно удалили файл «intelppm.sys» из системы. Кроме того, причиной этой проблемы может быть драйвер управления питанием Intel, поскольку он ограничивает мощность система в различных состояниях, например, когда вы работаете или когда компьютер находится в спящем режиме или впасть в спящий режим.
В этой статье будут описаны решения для устранения упомянутой проблемы с экраном смерти.
Как исправить ошибку «Ошибка синего экрана intelppm.sys» в Windows 10?
Чтобы исправить ошибку «Ошибка синего экрана intelppm.sys» в Windows 10, попробуйте следующие исправления:
- Изменить системный реестр
- Отключить драйвер управления питанием Intel
- Сбросить вашу систему
Способ 1: изменить системный реестр
Измените системный реестр, следуя приведенным ниже инструкциям. Обратите внимание, что будьте осторожны при редактировании «Системный реестр», потому что одна ошибка может повредить вашу систему.
Шаг 1: Откройте редактор реестра
Тип «regedit» в поле поиска меню «Пуск» и нажмите Enter, чтобы открыть « »Редактор реестра”:
Шаг 2: Навигация по файлам
Перейдите к «HKEY_LOCAL_MACHINE\SYSTEM\CurrentControlSet\Services\Intelppm”:
Шаг 3. Измените начальное значение DWORD
Теперь щелкните правой кнопкой мыши на «Начинать” значение DWORD и нажмите “Изменить”:
Шаг 4: Установите значение
Установите значение «Начинать», который по умолчанию будет равен 3 «4”:
Способ 2: отключить драйвер управления питанием Intel
Мощность, которую получает ваше устройство в различных состояниях, например, когда вы переводите компьютер в спящий режим или когда вы работаете на нем, определяется и устанавливается драйвером intelppm. Это может быть причиной возникновения этой ошибки/проблемы. Поэтому отключите «Драйвер управления питанием Intel”, следуя приведенным ниже инструкциям.
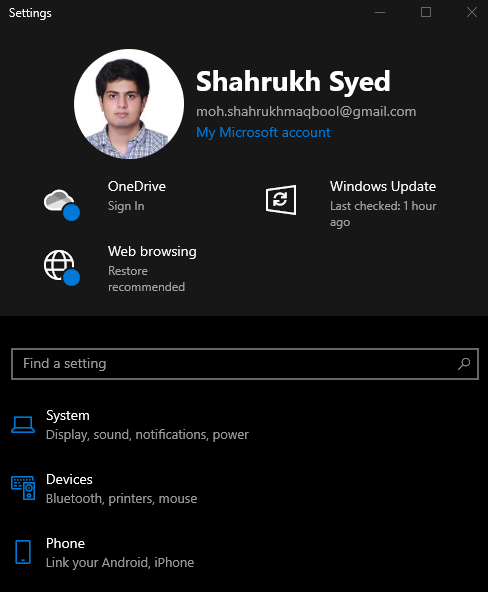
Шаг 1. Откройте приложение «Настройки»
Чтобы открыть «Настройки» и нажмите кнопку «Окна + я” на клавиатуре:
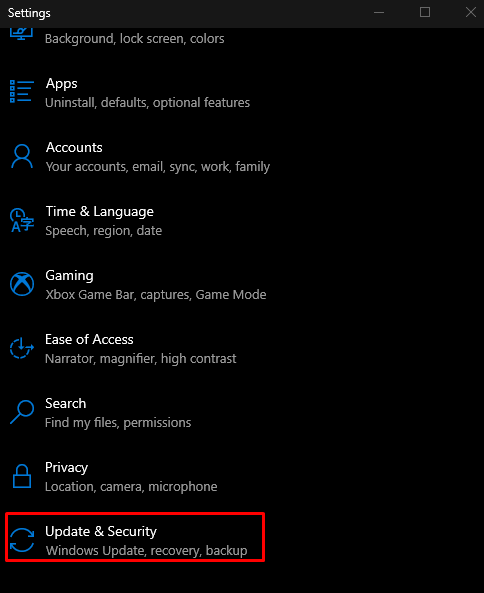
Шаг 2. Перейдите в «Обновление и безопасность».
Прокрутите вниз и найдите «Обновление и безопасность” и нажмите на него, когда найдете:
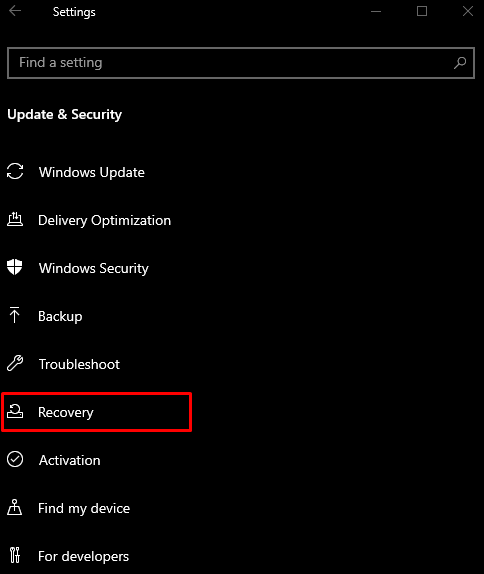
Шаг 3: выберите вариант восстановления
Выбирать «Восстановление” из списка, выделенного ниже на изображении:
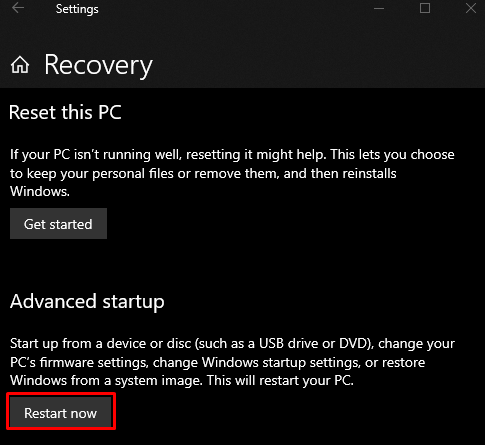
Шаг 4: Нажмите «Перезагрузить сейчас»
Под «Расширенный запуск», нажмите на кнопку «Перезагрузить сейчас» кнопка:
Шаг 5. Перейдите к командной строке
Ваша система загрузится в «Режим восстановления”. Нажмите на «Устранение неполадок»> «Дополнительные параметры»> «Командная строка”.
Шаг 6: переименуйте файл драйвера
Введите предоставленную команду, чтобы изменить каталог:
>CD водители
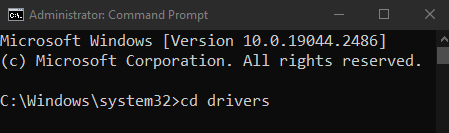
Затем переименуйте файл драйвера:
>ren intelppm.sys intelppm.sys.bak
Способ 3: сброс вашей системы
Чтобы перезагрузить систему:
- Нажать на «Перезагрузить сейчас” внутри “Восстановление», как обсуждалось ранее.
- Перейдите к «Сбросить этот компьютер», выбрав «Устранение неполадок» вариант.
- Вам будет предложено 2 варианта. Вы можете либо выбрать «Обнови свой компьютер», чтобы оставить все как есть, а только удалить некоторые настройки, или выберите «Перезагрузите компьютер», который сотрет все в вашей системе. Сделайте свой выбор и нажмите на него.
- После загрузки система начнет работать нормально.
Заключение
“Ошибка «синий экран» intelppm.sys» в Windows 10 можно исправить разными способами. Эти методы включают в себя изменение системного реестра, отключение драйвера управления питанием Intel или сброс системы. В этом руководстве предложены решения для исправления упомянутой ошибки «синий экран смерти».