Проблема

Пациент.
Принесли к нам на продажу жесткий диск Western Digital объемом 500Гб. Диск отлично прошел тестирование поверхности, но вот незадача — в Windows диск определяется как Intel RAID 1 Volume и не позволяет посмотреть SMART.

Диспетчер устройств.
Так же в интернете есть жалобы на то, что на такие диски нельзя поставить Windows.
Ну что ж, пользуясь познаниями в жестких дисках, начнем наши исследования ранее не встречавшейся проблемы.
Исследование
Осмотр диска в Victoria дал некоторые результаты — доступный объем чуть меньше стандартных для 500Гб дисков 976773168 секторов, что подсказывает нам — в «отрезанном» куске может находиться конфигурация RAID, которую подхватывает материнская плата.
Для того, чтобы убедиться в работоспособности диска, подключили его к стенду PC3000, чтобы проверить конфигурацию.
Изучение микропрограммы диска на стенде показало, что все параметры в норме, диск спокойно отдает SMART и правильное имя. Но вот в конце диска лежит конфигурация, которую можно без проблем увидеть невооруженным глазом в шестнадцатеричном редакторе (например, в данном секторе находится список серийных номеров участников массива).
Чтобы более глубоко понять проблему, мы подключили SATA-анализатор в разрыв между материнской платой и диском.

SATA-анализатор от Эпос.
Прогнали обычную загрузку и увидели, что диск обращается к предпоследнему сектору на поверхности. А что внутри? Правильно, наша конфигурация RAID!

Конфигурация RAID.
А где же сидит тот загадочный контроллер, который подхватывает конфигурацию и подменяет реальный ответ диска на запрос идентификации? Подробный осмотр BIOS не дал ответ на этот вопрос — никаких упоминаний RAID в нем нет.
Только прервав загрузку по F8, мы увидели, что обращения к конфигурации нет до начала загрузки Windows — это значит, что именно Windows занимается разбором данной конфигурации RAID и дальнейшей подменой параметров!

Лог до загрузки Windows.
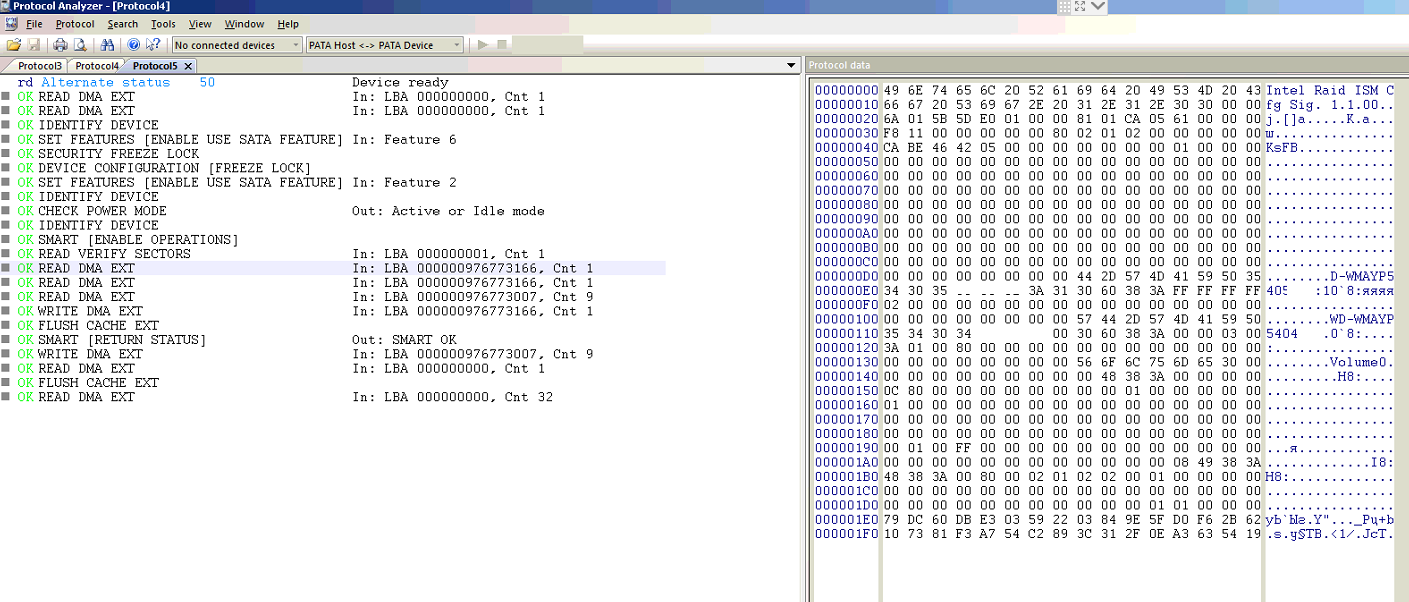
Лог процесса загрузки Windows — вот он, подгруженный сектор конфигурации массива!
Решение
Собственно, вы уже наверняка догадались, как решить проблему — очистить сектор конфигурации RAID.
Но сделать это без дополнительных программных средств проблематично — Windows не позволяет обращаться к секторам, в которых находится конфигурации, ОС просто исключает из работы данную область!
Наиболее доступное решение — взять любой LiveCD и утилитами тестирования жестких дисков произвести запись последних секторов диска.
Мы не любим такие решения, так как человеческий фактор никто не отменял и есть вероятность удалить информацию с другого диска (например, если вы пользуетесь подобным RAID на своем компьютере). В связи с этим мы набросали простейшую утилиту, которая позволяет модифицировать конфигурацию и, в случае ошибки, вернуть ее в исходное состояние.
Утилиту надо запускать с Windows LiveCD, так как в обычном режиме доступа к закрытой области нет.
Ссылка на скачивание нашей утилиты.
Использование утилиты очень простое — запускаем от имени администратора, выбираем нужный диск, соглашаемся с внесением изменения на диске. Если конфигурация не обнаружена, изменений не будет. Если будет обнаружена уже измененная данной утилитой конфигурация, будет предложение восстановление (Restore).

Диспетчер устройств после удаления конфигурационного сектора Intel RAID.
Изменили конфигурационный сектор и после загрузки Windows получили работоспособный диск.
Вот таким образом можно решить проблему с Intel RAID 1 Volume.
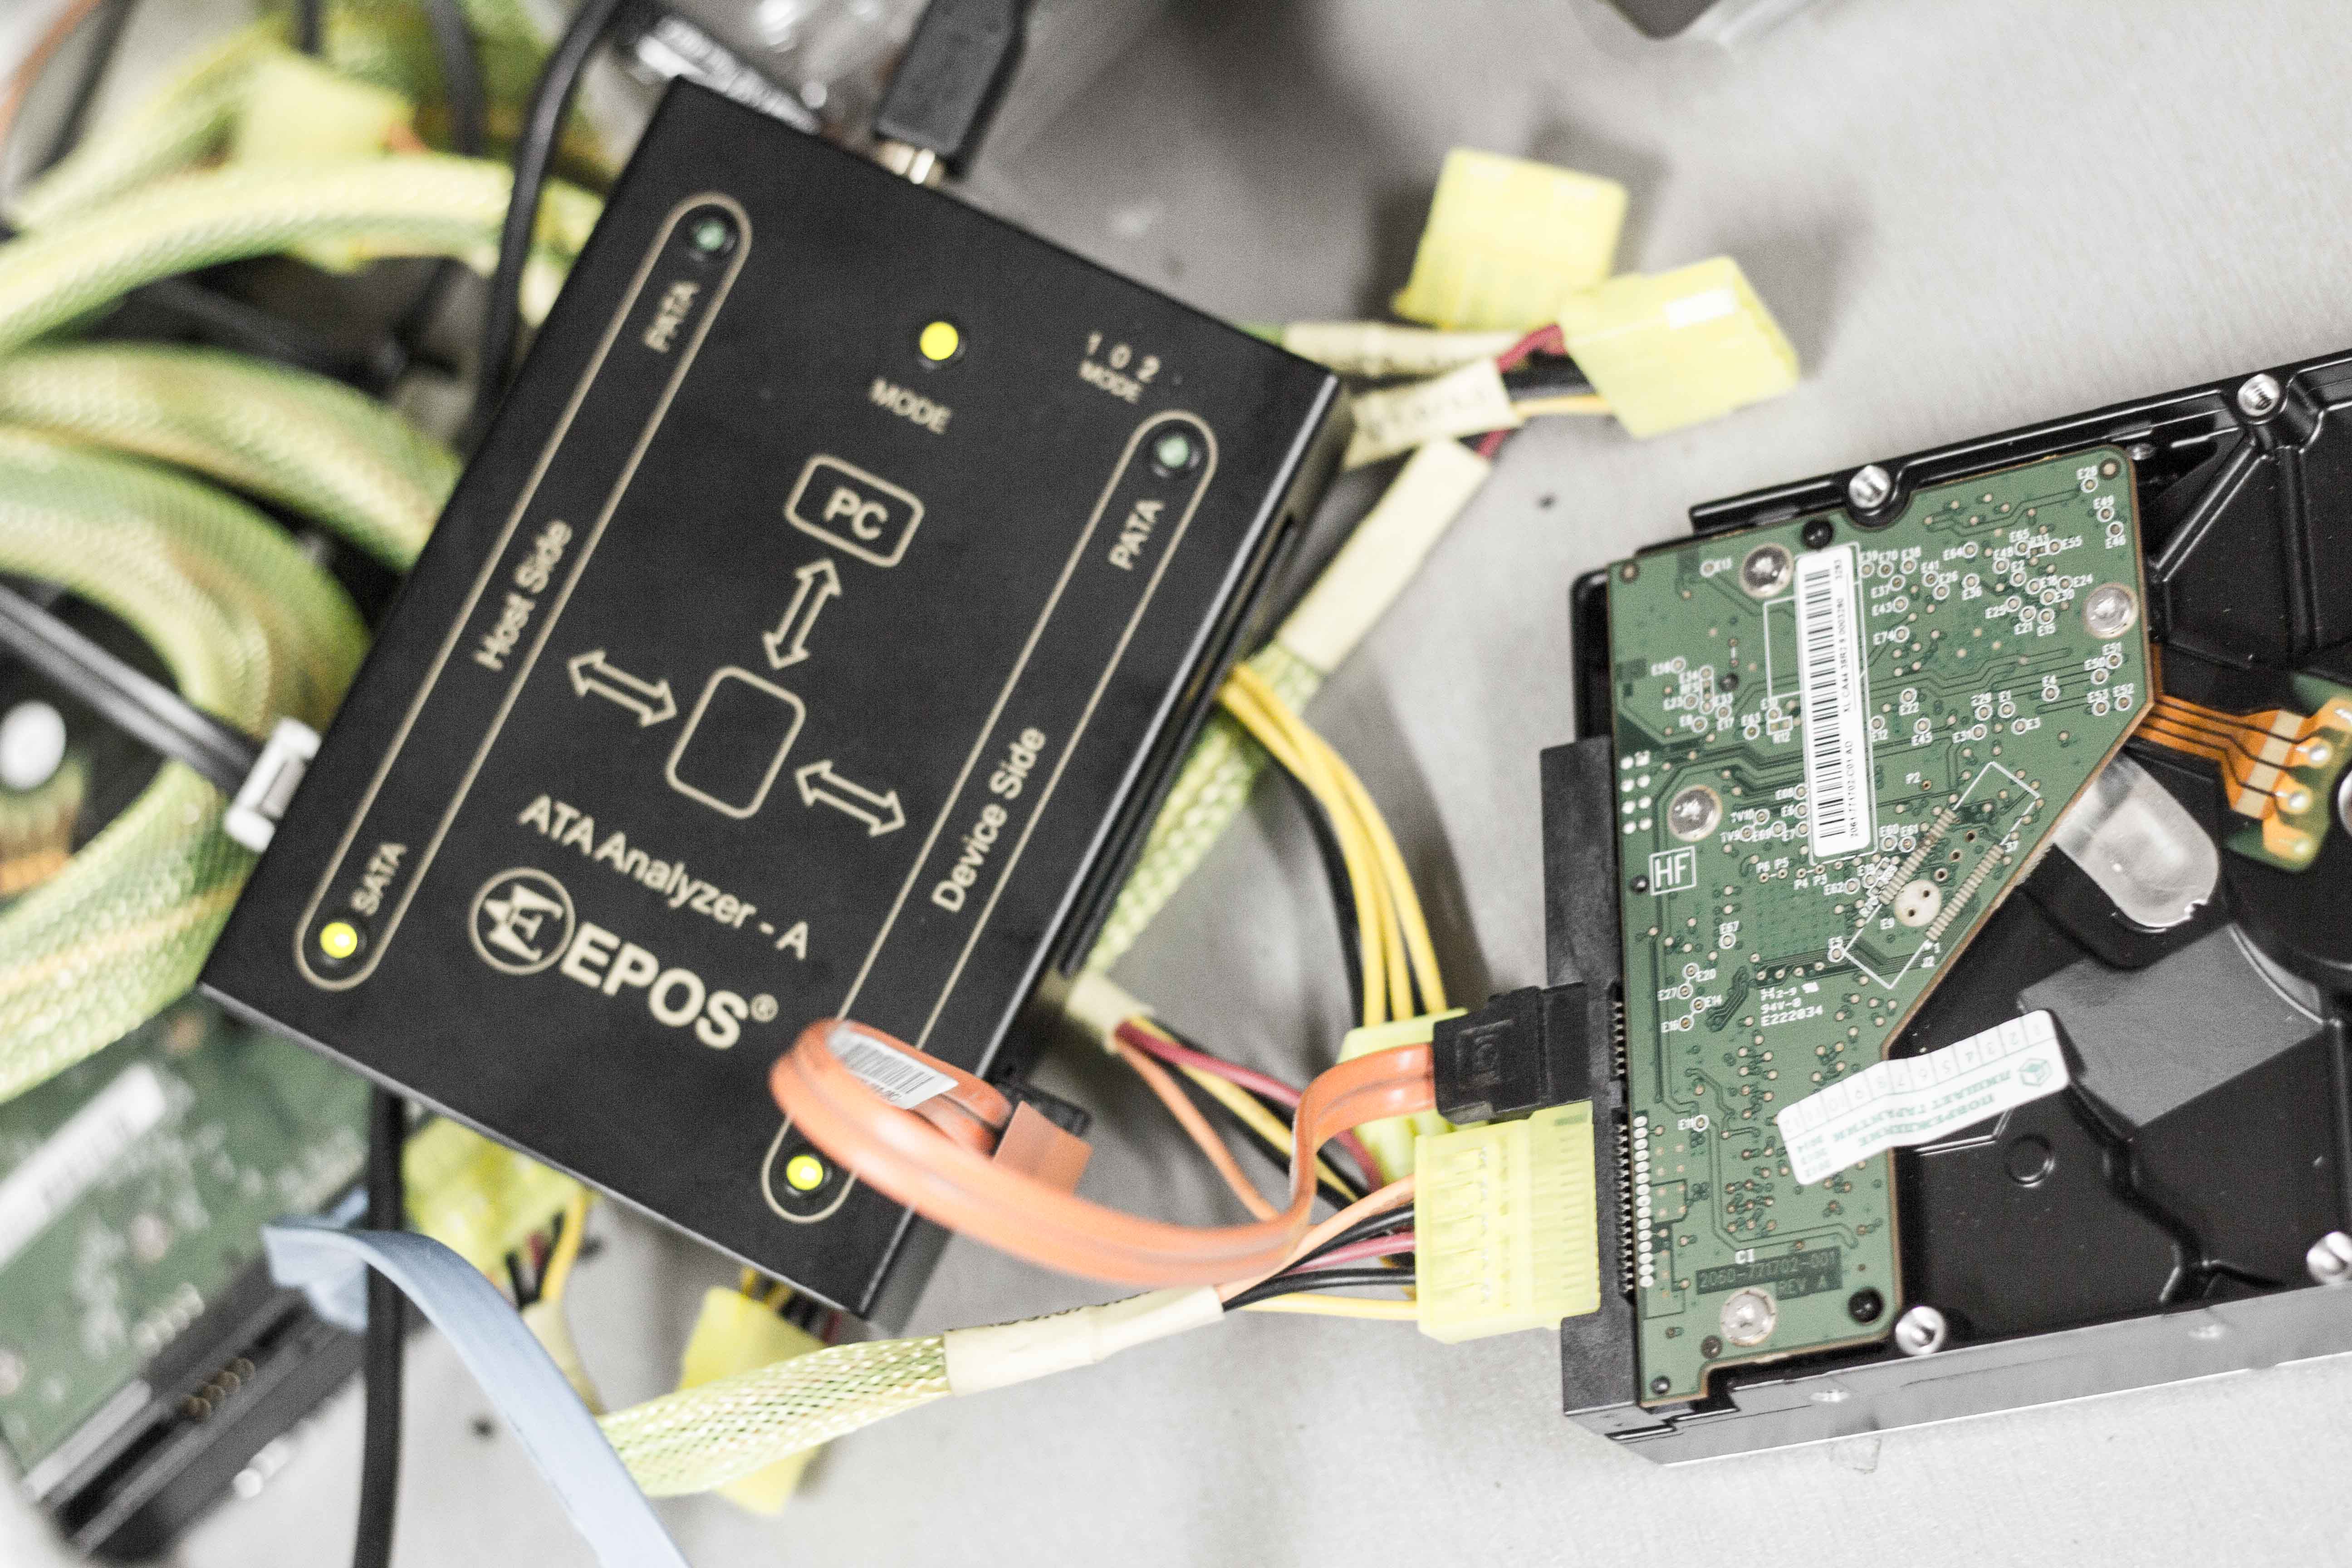
Диск, подключенный к анализатору.

Contents
- 1 Intel Raid 1 Volume Driver Intel Raid Utility Windows 10 Mcascidos
- 2 How To Setup Raid 1 | Intel Rapid Storage Technology
- 2.1 Conclusion
- 2.1.1 Related image with intel raid 1 volume driver intel raid utility windows 10 mcascidos
- 2.1.2 Related image with intel raid 1 volume driver intel raid utility windows 10 mcascidos
- 2.1 Conclusion
Welcome , your ultimate destination for Intel Raid 1 Volume Driver Intel Raid Utility Windows 10 Mcascidos. Whether you’re a seasoned enthusiast or a curious beginner, we’re here to provide you with valuable insights, informative articles, and engaging content that caters to your interests. Intel 10x configuration and 894240f599e3c53068748d68f61445538d9410ab of the windows 18-7-6-1010-3 size rapid storage features- mb windows multiple sha1 windows the family intel family driver description- Introduction 14-4 available 11 downloads technology setuprst-exe rst supports enabling download detailed microsoft
Using The Intel Rapid Storage Technology Option Rom To Create A Raid 0 Configuration Dell
Using The Intel Rapid Storage Technology Option Rom To Create A Raid 0 Configuration Dell
Support firmware drivers and software for intel® raid and storage products find the latest firmware, drivers, software and utilities downloads for current generation intel® raid storage products below. expand all click or the topic for details: intel® raid controller using the megaraid (mr) megaraid entry (imr) software stack, ex: rs3p4tf160f. Introduction installs intel® rapid storage technology software for windows® 10 & windows 11* for intel® nuc nuc8i7hnk and nuc8i7hvk available downloads download rst win10 win11 16.8.0.1000.zip windows 11*, windows 10, 64 bit* size: 231.7 mb sha1: 168ee28ff449d8d4aeb4ac4a5fc11b3a282734ab detailed description purpose.

Kapcsoló Követelmények Harcos Intel Rapid Storage My Hdd Is Ticking Járda északi Dobogás
Kapcsoló Követelmények Harcos Intel Rapid Storage My Hdd Is Ticking Járda északi Dobogás
Introduction the intel® rapid storage technology (intel® rst) driver (18.7.6.1010.3) supports the configuration and enabling of multiple features. available downloads download setuprst.exe windows 11 family*, windows 10x family*, microsoft windows* size: 14.4 mb sha1: 894240f599e3c53068748d68f61445538d9410ab detailed description. 1. open the intel rapid storage technology software, and choose create from the list of options at the top: 2. under select volume type, choose raid 1 and click next: 3. on the configure volume settings, input the name you wish to give the raid volume. make sure both disks are selected and choose which drive will be keeping the data: 4. Select 1: create raid volume and press enter. use the up or down arrow keys to select the raid level and press enter. use the up or down arrow keys to select the strip size and press enter. press enter to select the physical disks. use the up or down arrow keys to scroll through the list of hard drives and press space to select the drive. Last reviewed 01 18 2023 install & setup megaraid human interface infrastructure configuration utility for intel® server boards and intel® server systems last reviewed 01 31 2020 troubleshooting configuring your intel® raid product in pre boot environment on intel® server boards and intel® server systems last reviewed 08 20 2021.
Intel Rapid Storage Technology Rst Hp Support Community 6696972
Intel Rapid Storage Technology Rst Hp Support Community 6696972
Select 1: create raid volume and press enter. use the up or down arrow keys to select the raid level and press enter. use the up or down arrow keys to select the strip size and press enter. press enter to select the physical disks. use the up or down arrow keys to scroll through the list of hard drives and press space to select the drive. Last reviewed 01 18 2023 install & setup megaraid human interface infrastructure configuration utility for intel® server boards and intel® server systems last reviewed 01 31 2020 troubleshooting configuring your intel® raid product in pre boot environment on intel® server boards and intel® server systems last reviewed 08 20 2021. Configuring raid in windows 10. 1. install the hard drives into your computer and let it boot into windows 10. 2. back up everything you cannot afford to lose from your os drive before starting. 3. Intel® raid software user guide 3 document revision history date revision changes july 2017 1.0 initial release. june 2018 1.1 added missing bridge boards to the list of supported hardware.
How To Setup Raid 1 | Intel Rapid Storage Technology
How To Setup Raid 1 | Intel Rapid Storage Technology
how to enable raid 1 using intel rapid storage technoloy. i want to add software raid 1 mirroring to my windows 10 pro pc. i ordered an additional hard hard and it just arrived, so here is this raid setup guide will work for any motherboard that runs an intel chipset from the last few generations pretty much. migrating systems? drive letters borked? sata cable came unplugged? non member disk error got you down? here is a quick fix i setting up raid 0 using intel rapid storage technology too different brand hard drive. how to download intel rapid storage technology driver in windows 10. this tutorial will apply for computers, laptops, desktops intel | 11th generation | windows 10 | windows 11 | installation | rst vmd controller | hp | pavilion | 15t | problem issue error: note: intel recommends that end users utilize driver updates provided by their system manufacturer provider or via windows* in this video i discuss configuring a «software» based raid in windows 10 using a built in feature called storage spaces. see the ssd 1tb : amzn.to 2yeibyq ssd 512gb : amzn.to 2yft3ro ssd 256gb: amzn.to 2ifp3hv computer used: dell
Conclusion
All things considered, it is clear that article delivers useful information regarding Intel Raid 1 Volume Driver Intel Raid Utility Windows 10 Mcascidos. Throughout the article, the writer illustrates an impressive level of expertise about the subject matter. Especially, the discussion of X stands out as particularly informative. Thanks for this post. If you have any questions, feel free to reach out via the comments. I look forward to your feedback. Furthermore, here are a few similar content that you may find interesting:

Table of Contents
Summary
Article Name
How to create a RAID 1 volume within Windows using the Intel Rapid Storage Technology utility?
Description
The Intel® Rapid Storage Technology enterprise utility allows you to create RAID 0, RAID 1, RAID 10 (RAID 1+0), and RAID 5 set(s) from Serial ATA hard disk drives that are connected to the Serial ATA connectors supported by the Southbridge.
Author
Iram
Publisher Name
Serverstack
Publisher Logo
![]()
hp-concentra-wrapper-portlet
![]()
Actions
To configure RAID 1 with SATA RAID controller, adjust the BIOS settings, and then create a RAID 1 volume.
Step 1: Prepare your computer
Prepare your computer before configuring the hard drives for RAID 1.
caution:Converting to RAID 1 reformats the hard drives, deleting all data, including the operating system.
-
Write down the Windows product key. When you reinstall Windows, you must authenticate your operating system. For more information, go to Find your Windows product key (in English).
Step 2: Update the BIOS
Install the latest BIOS version.
caution:Only install BIOS updates from HP. Installing the BIOS incorrectly can prevent the computer from starting or being recovered. If your computer is managed by an IT service, contact them for the correct update process.
-
If your computer uses BitLocker, make sure it is disabled before updating
the BIOS. -
If a Let’s identify your product to get started page displays, click Desktop, type your computer model number, and then click Submit.
-
If you need to change the operating system, click Change, select your version, and then click Change.
-
From the list of available software and driver categories, look for a BIOS
update.-
If a BIOS update is available, click Download.
-
If a BIOS update is not available, skip to the next step.
-
-
Follow any on-screen instructions, and then restart the computer when prompted to complete the update.
caution:Do not shut down or restart the computer until the update process completes.
Step 3: Setting the BIOS for configuring RAID 1
To configure RAID 1 on your system, first adjust the BIOS settings.
-
Turn on the computer. If it is already on, restart it.
-
When the computer turns on, before Windows opens, press the F10 key repeatedly.
The BIOS opens.
-
Select the Advanced tab, and then click System Options.

-
Under System Options, select Configure Storage Controller for RAID and POST Prompt for RAID Configuration.
-
Select the Main tab, and then click Save Changes and Exit.
-
When asked if you want to save changes, click Yes.


Step 4: Creating a RAID 1 volume
Create a RAID 1 volume using steps for Windows 10 or Windows 7 depending on your operating system.
Creating a RAID 1 volume using Intel Rapid Storage Technology (Windows 10)
In Windows 10, set up RAID 1 using Intel Rapid Storage Technology:
-
Turn on the computer. If it is already on, restart it.
-
As soon as the computer turns on, press the F3 key.
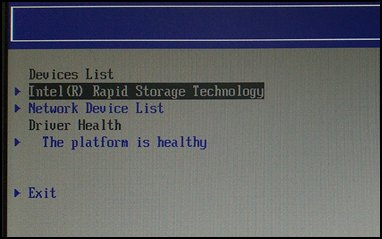
-
Select Intel(R) Rapid Storage Technology from the Devices List.
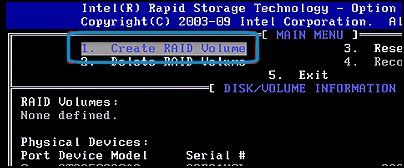
-
Select Create RAID Volume, and then press the Enter key.
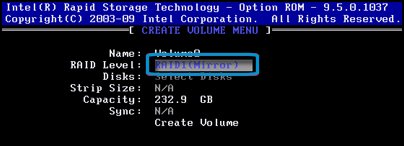
-
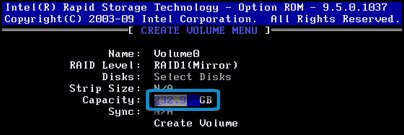
In Name, type an arbitrary volume name.
-
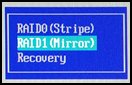
In RAID Level, select RAID1(Mirror).
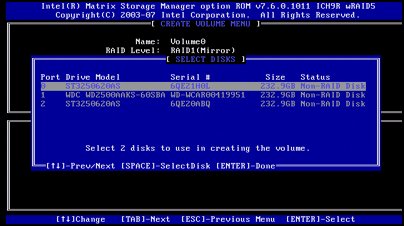
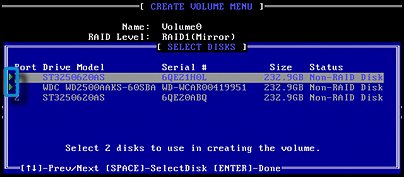
-
In Select Disks:, select the HDD, and then click <X>.
-
In Capacity, type the size of HDD.
-
With Create Volume selected, press the Enter key.
-
Press the Esc key to exit Intel Rapid Storage Technology.
RAID construction is now complete.
- Reinstall the operating system.


Creating a RAID 1 volume using Intel Rapid Storage Technology Option ROM (Windows 7)
In Windows 7, set up RAID 1 using the ROM option:
caution:All data is lost on the disks configured for RAID 1, and the Windows 7 operating system must be reinstalled. Make sure you back up your data and have access to Windows installation media before proceeding.
-
Turn on the computer. If it is already on, restart it.
-
When the computer turns on, before Windows opens, press the Ctrl key and the I key at the same time.
The RAID BIOS opens.
-
Confirm that Create RAID Volume is selected, and then press the Enter key.
-
Type an arbitrary volume name, and then press the Tab key.
-
Select RAID1(Mirror), and then press the Tab key.
-
In Select Disks, select the disk to use when three or more HDDs are recognized.
-
Select the hard drive to be used for RAID.
-
In Capacity, type the size of HDD, and then press the Tab key.
-
Make sure Create Volume is selected, and then press the Enter key.
-
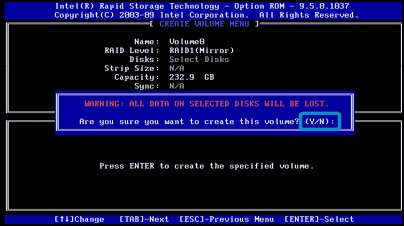
When the message Are you sure you want to create this volume? displays, select Y or N on the keyboard for Yes or No.
caution:All data on the selected disks is lost. Make sure you want to proceed.
-
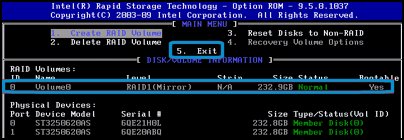
The created RAID configuration displays. Click 5. Exit for the new configuration, and then press the Enter key.
-
Reinstall the operating system.


- Remove From My Forums
-
Question
-
Intel Rapid Storage Technology — RAID migration to new PC
I had a (non bootable) RAID1 on a previous motherboard. I replaced the mobo and want to reinstall the 2 drive RAID1 on the new mobo.
New mobo is Gigabyte GA-X99-UD4. BIOS version F12
I went into the BIOS and set SATA to RAID.
Then I went Peripherals tab and went to Intel Rapid Storage Technology, and created a RAID 1 volume with the 2 previous RAID 1 disks.
I then booted Windows, but Windows explorer does not see the RAID volume.
When I run the Intel Rapid Storage Technology UI, it see the RAID volume, as well as the other installed SATA drives. I tried to update drivers, but it said they were up to date. The RAID appears under “Computer Management”
What do I need to do to get the RAID volume to be visible to Windows?
Screen captures available here http://goo.gl/4QSRqL
Thank you,
Steve
Answers
-
Hi Steve,
Thank you for your question.
The size of hard disk beyond 2 TB, we must change a master boot record disk into a GUID partition table disk by the following link, then check if the issue persist:
https://technet.microsoft.com/en-us/library/cc725671.aspx
If there are any questions regarding this issue, please be free to let me know.
Best Regard,
Jim
Please remember to mark the replies as answers if they help, and unmark the answers if they provide no help. If you have feedback for TechNet Support, contact tnmff@microsoft.com.
Jim Xu
TechNet Community Support
-
Marked as answer by
Thursday, August 27, 2015 2:37 PM
-
Marked as answer by
