С некоторых пор на серверных операционных системах от Microsoft, запущенных на “не серверном железе” перестали устанавливаться драйвера на сетевые карты от компании Intel. При этом на аналогичных десктопных операционных системах, драйвера успешно устанавливаются без каких-либо проблем. Суть проблемы, возможно кроется в наглом маркетинговом сговоре двух корпораций Microsoft и Intel. Далее рассмотрим, как решить данную проблему.
Рассмотрим решение проблемы пошагово.
Модифицируем файлы драйвера
- Для начала, находим на сайте Intel свою операционную систему и качаем пакет драйверов для сетевых карт I219.
- Переходим в диспетчер устройств и находим DevID нашей сетевой карты. В моем случае это: PCI\VEN_8086&DEV_0D55
- Распаковываем скачанный файл 7zip’ом и переходим в директорию “PRO1000\Winx64” далее, в зависимости от требуемой ОС переходим в требуемую директорию:
- NDIS63 — для Windows 8/Server 2012
- NDIS64 — для Windows 8.1/Server 2012 R2
- NDIS65 — для Windows 10/Server 2016
- Внутри выбранной директории находим и открываем файл e1d63x64.inf (для других ОС: e1d64x64.inf / e1d65x64.inf)
- Находим раздел [ControlFlags] и удаляем строчки, между [ControlFlags] и [Intel]
- Далее, в зависимости от исходной ОС (десктопной) ищем разделы:
- [Intel.NTamd64.6.2.1] – Windows 8
- [Intel.NTamd64.6.3.1] – Windows 8.1
- [Intel.NTamd64.10.0.1] – Windows 10
- Находим в нем строки со своим идентификатором (который мы нашли в пункте 2). Копируем их полностью в буфер обмена.
- Переходим в следующий раздел, в зависимости от целевой ОС (серверной)
- [Intel.NTamd64.6.2] – Windows Server 2012
- [Intel.NTamd64.6.3] – Windows Server 2012 R2
- [Intel.NTamd64.10.0] – Windows Server 2016
- В конец раздела после перечисления идентификаторов оборудования вставляем наши строки.
- Сохраняем изменения и закрываем файл.


Отключаем проверку подписи драйверов
После модификации файлов драйверов они не смогут пройти проверку подписи и, если мы все еще хотим установить драйвер десктопной сетевой карты Intel на Windows Server, то отключаем проверку подписи следующим образом:
Открываем консоль (cmd) от имени администратора и выполняем следующие команды:
bcdedit -set loadoptions DISABLE_INTEGRITY_CHECKS
bcdedit -set TESTSIGNING ON
Первая отключает проверку подписи, вторая включает тестовый режим.
Далее перезагружаем компьютер/сервер.
Установка драйвера
Открываем диспетчер устройств, далее выбираем нашу сетевую карту и жмем “Обновить драйверы…” -> “Выполнить поиск драйверов на этом компьютере” -> Указываем путь до папки с нашим модифицированным файлом -> На злобную ошибку о проверке издателя выбранных драйверов отвечаем решительно “Все равно установить этот драйвер”
Теперь драйвер сетевой карты успешно установится и будет работать.
Включение защиты и отключение тестового режима
После выполнения всех вышеуказанных действий снова включаем защиту от установки “не хороших” драйверов и выключаем тестовый режим командами в командной строке, запущенной от имени администратора:
bcdedit -set loadoptions ENABLE_INTEGRITY_CHECKS
bcdedit -set TESTSIGNING OFF
Вот и все! Удачи!
Источник информации: https://baduser.info/?p=1075
Downloaded: 90,201 times
Last Time: 08 October 2023
Option 1: Update Intel lan driver windows server 2016 with the Device Manager
The Device Manager software displays all of your system’s connected devices. This Windows integrated utility makes it simple to manage your devices. As a result, when you connect the printer to your PC, you may use Device Manager to download and update the Intel lan driver windows server 2016 driver download and update. To learn more about the same, follow the guidelines:
So that was the manual technique for getting Intel lan driver windows server 2016 software for free and updating it. Check out the following solution if you want an automatic way (because this one is a little complicated).
Option 2: Automatically Download Intel lan driver windows server 2016 With Iobit Driver Updater (Prefered)
As you may have noticed, the prior process for downloading and updating Intel lan driver windows server 2016 was a little convoluted. Furthermore, due to technological issues, the procedure may not even operate at times. As a result, we’ve outlined the most effective way to obtain driver updates for Intel lan driver windows server 2016 and other devices.
For your convenience, we recommend that you use the Iobit Driver Updater. The Quick Driver Updater, as its name implies, provides quick driver updates for a variety of devices. Furthermore, the program provides you with so many other advantages that you will never have a difficulty using the drivers. All of your driver needs are taken care of by the tool, including updates, backups, restores, update schedules, rapid updates, safe updates, and so on.
All of this is available with a single tool for PCs running Windows 11, 10, 8, 7, or earlier versions of Windows. You might wonder what the tool’s best feature is. The best feature, in our opinion, is single-click updates. This allows both novices and pros to apply updates without difficulty.
Comments
26-Jul-22 22:52
Fantastic!
23-Jul-22 01:35
You have great ideas.
18-Jul-22 15:41
Brillant!
18-Jul-22 12:19
I was looking this driver all day, thanks!
29-Jun-22 20:22
You are magnificent.
29-Jun-22 04:33
What a creative idea!
05-May-22 18:30
I’m impressed.
13-Apr-22 06:17
Worked fine for me 
01-Apr-22 22:48
i was looking for Intel lan windows server 2016 for ages…
08-Mar-22 02:34
You’ve got the hang of it.
21-Feb-22 23:33
Amazing, much love for the uploader.
17-Feb-22 05:26
Thanks for Intel lan windows server 2016 upload
22-Jan-22 03:47
That’ coming along nicely.
18-Jan-22 15:40
That’s better than ever.
18-Jan-22 01:07
Oh, Man, THANK YOU!!! For Intel lan windows server 2016
16-Jan-22 13:56
Thank You..!! Very Good Intel lan windows server 2016 driver…!!
14-Jan-22 01:25
omg, it is so easy! 
11-Jan-22 08:04
Excellent, thankyou!
More drivers for Intel lan driver windows server 2016
intel-centrino-wireless-n-2230-model-2230bnhmw-driver hdmi-driver-windows-7-64-bit-intel intel-management-engine-driver-windows-10 download-intel-android-driver-setup-110-0 intel-onboard-graphics-driver-for-microsoft-windows-7-64-bit intel-wireless-n-6235-driver integrated-intel-graphics-media-accelerator-x4500-driver intel-e210882-lan-driver intel-b820-driver-download driver-intel-para-envy-14-hp intel-core-2-duo-e8400-driver-download driver-for-intel-q9650 intel-video-controller-vga-compatible-driver intel-graphics-media-accelerator-gma-4500m-driver intel-750-nvme-driver intel-r-wireless-bluetooth-r-driver-download
Category:Mainboards
Manufacturer:ASRock
Name:Intel Lan driver
Version:25.2_210303
Released:29 Jul 2021
System:Windows 10 64-bitWindows Server 2016Windows Server 2019
Size:563.04Mb
Description:Intel Lan driver for ASRock C621A WS
Category:Mainboards
Manufacturer:Gigabyte
Name:Intel LAN Driver
Version:25.1
Released:04 Apr 2021
System:Windows 10 64-bitWindows Server 2016Windows Server 2012 R2Windows Server 2012Windows Server 2019
Size:466.66Mb
Description:Intel LAN Driver for Gigabyte WRX80-SU8-IPMI (rev. 1.0)
Category:Mainboards
Manufacturer:Gigabyte
Name:Intel LAN driver
Version:23.2
Released:04 Apr 2021
System:Windows Server 2016
Size:72.4Mb
Description:Intel LAN driver for Gigabyte X299-WU8 (rev. 1.0)
Category:Mainboards
Manufacturer:Gigabyte
Name:Intel® LAN Driver and Utility
Version:23.5.2
Released:04 Apr 2021
System:Windows 10 64-bitWindows Server 2016Windows Server 2012 R2Windows Server 2012Windows Server 2019
Size:77.8Mb
Description:Intel® LAN Driver and Utility for Gigabyte C621-SU8 (rev. 1.0)
Category:Mainboards
Manufacturer:Gigabyte
Name:Intel® LAN Driver and Utility
Version:23.5.2
Released:04 Apr 2021
System:Windows Server 2016Windows Server 2012 R2Windows Server 2012Windows Server 2019
Size:77.8Mb
Description:Intel® LAN Driver and Utility for Gigabyte C621-SD8 (rev. 1.0)
Category:Mainboards
Manufacturer:Gigabyte
Name:Intel LAN driver
Version:24.0
Released:02 Apr 2021
System:Windows 10 64-bitWindows Server 2016Windows Server 2012 R2
Size:141.4Mb
Description:Intel LAN driver for Gigabyte C246-WU4 (rev. 1.0)
На этой странице вы можете бесплатно скачать Gigabyte X299-WU8 (rev. 1.0) Intel LAN драйвер v.23.2
Категория:Mainboards
Производитель:Gigabyte
Оборудование:Gigabyte X299-WU8 (rev. 1.0)
Тип программы:Драйвер
Название:Intel LAN driver
Версия:23.2
Размер файла:72.4Mb
Рейтинг:5/5
Тип архива:ZIP
Дата выхода:04 Apr 2021
Система:Windows Server 2016
Status:Free
Загрузок:571
Описание:Intel LAN driver for Gigabyte X299-WU8 (rev. 1.0)
Правовая информация:Все програмное обеспечение, размещённое на Driver.ru является бесплатным. Все названия и торговые марки принадлежат их владельцам.
Внимание:Некоторые программы получены из непроверенных источников. Мы не гарантируем их совместимость и работоспособность. Всегда проверяйте загруженные файлы с помощью антивирусных программ. Мы не несём никакой ответственности за возможные потери, возникшие в результате установки загруженных программ. Загрузка файла с Driver.ru обозначает вашу информированность об этом и согласие с данными условиями.
Похожие файлы:
Название:Smart HUD
Версия:B17.0817.1
Система:Windows 10 64-bit
Название:USB Blocker
Версия:B17.0816.1
Система:Windows 10 64-bit
Название:Smart Keyboard
Версия:B17.0817.1
Система:Windows 10 64-bit
Название:Smart Time Lock
Версия:B17.0817.1
Система:Windows 10 64-bit
Название:Smart Backup
Версия:B17.0817.1
Система:Windows 10 64-bit
Название:System Information Viewer / Smart Fan 5
Версия:B18.0905.1
Система:Windows 10 64-bit
Название:RGB Fusion
Версия:B18.0814.1
Система:Windows 10 64-bit
Название:Platform Power Management
Версия:B17.0628.1
Система:Windows 10 64-bit
Название:Smart Survey
Версия:B18.0808.1
Система:Windows 10 64-bit
Название:EZRAID
Версия:B17.0913.1
Система:Windows 10 64-bit
Introduction
This blog will be all about installing Intel I211, I217V, I218V and I219V drivers on Windows Server 2016 with EUFI boot. I’m running Windows Server 2016 as my main OS for lab, testing, Hyper-V with nested virtualization etc. I like it that way because I have all the options of the server OS at my disposal. Especially with the nested virtualization an NVME disk comes in handy. I also boot from NVMe so I need UEFI and use secure boot. That’s OK as it’s way better than the old BIOS and enables more scenario.
Windows Server 2016 doesn’t have any drivers for the I211, I217V, I218V and the I219V NICs.
The Intel driver for them are only for Windows 10 and won’t install on a server OS. As you can see in the screenshot above that’s a system where I have the I211 driver already installed actually. We’ll work on the I218V as an example here.
That’s nothing new and we’ve dealt with this before by editing the .inf file for the driver. What might be new to some people as EUFI & NVME become a bit more popular is how to get a driver with an edited .inf file installed on your Windows Server OS.
Don’t worry even with an OS booting from EUFI with secure boot you can still disable driver signing / integrity checking when needed. We’ll walk you through an approach for installing Intel I211, I217V, I218V and I219V drivers on Windows Server 2016 with EUFI boot.
Installing Intel I211, I217V, I218V and I219V drivers on Windows Server 2016 with EUFI boot
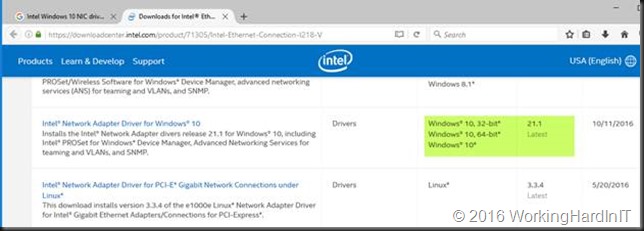
Google for the Intel drivers of your NIC. Mine is a I218V. The instructions will work for a I217V or and i219V as well. Just adapt accordingly.
After downloading the most recent Windows 10 (x64 bit, we’ll use them with a server OS so there is no 32 bit here) Intel drivers form the Intel site we rename the exe to identify what package it is. We then extract the content to our work space. A free tool like 7zip will do the job just fine.
Prepping the .INF file
For the I211 we need to edit the .inf file and for the I217V, 218V and 219V we’ll edit the e1d65x64.inf file in note pad or your editor of choice. You’ll find it in the NDIS65 folder: C:\SysAdmin\PROWinx64\PRO1000\Winx64\NDIS65. The 65 in the folder and file names identifies our OS version (Windows 10 / Windows Server 2016).
But how do we know what .inf file to edit? We grab the hardware ID’s from the properties of our NIC or NICS.
Below you see the Hardware IDs for mu I218V. The I211 has PCI\VEN_8086&DEV_1539&SUBSYS_85F01043&REV_03 and my Iv218V has PCI\VEN_8086&DEV_15A1&SUBSYS_85C41043&REV_05.
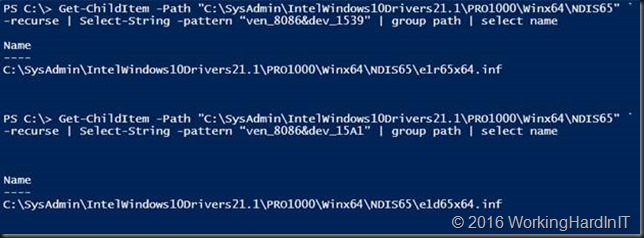
Drop the PCI\ from the beginning of the string and everything from the “&” on at the end. So for the I211 we’ll use VEN_8086&DEV_1539 and for the I218V we’ll use VEN_8086&DEV_15A1. We throw these ID strings into some PowerShell we run in our C:\SysAdmin\PROWinx64\PRO1000\Winx64\NDIS65 folder.
Get-ChildItem -Path “C:\SysAdmin\IntelWindows10Drivers21.1\PRO1000\Winx64\NDIS65” `
-recurse | Select-String -pattern “ven_8086&dev_1539” | group path | select name
Get-ChildItem -Path “C:\SysAdmin\IntelWindows10Drivers21.1\PRO1000\Winx64\NDIS65” `
-recurse | Select-String -pattern “ven_8086&dev_15A1” | group path | select name
So for my I218V I open op the e1d65x64.inf file in notepad++
I search for [ControlFlags] section and I edit the content of that section by deleting everything in it.
So it looks likes
Then I search for section [Intel.NTamd64.10.0.1] and I copy everything in there (I don’t bother to only copy the entries for my particular NIC or so.
Copy everything under that heading
I then search for section [Intel.NTamd64.10.0] and I paste what I just copied from section [Intel.NTamd64.10.0.1] nicely underneath what’s already in there.
Save the file. Basically, you’re done here.
Installing the driver
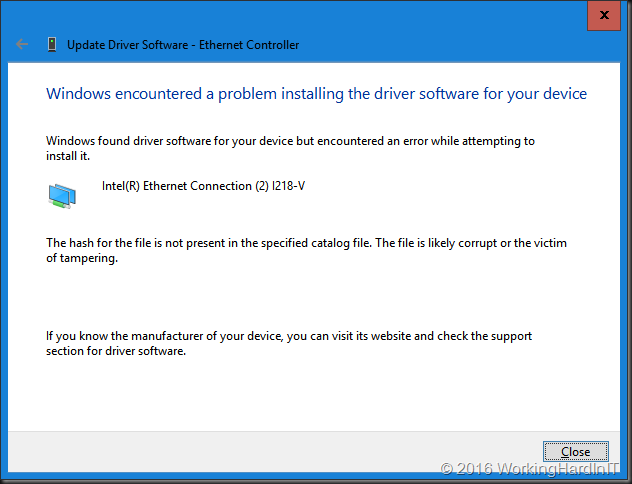
We now need to alter the standard startup setting of Windows Server 2016 temporarily because we will not be able to install a driver that’s been tampered with. If you don’t lower the security settings, you’ll get an error just like this one:
What I did is run the following in an elevated command prompt:
bcdedit /set LOADOPTIONS DISABLE_INTEGRITY_CHECKS
Note: as I’m using UEFI & secure boot the following won’t work as if you were using an older BIOS without secure boot.
bcdedit /set TESTSIGNING ON
bcdedit /set nointegritychecks OFF
But that’s OK. What we need to do is turn it of in another way. That last command bcdedit /set nointegritychecks OFF iIs not needed anyway. So, forget about that one. As a replacement for bcdedit /set TESTSIGNING ON you can use and advanced start option (requires reboot). You can also disable secure boot in EUFI, start again and then run bcdedit /set TESTSIGNING ON. I prefer the first as fixes itself the next boot and I don’t have to turn secure boot on again afterwards.
Go to setting and select Update & security.
Navigate to Recovery and click Restart Now
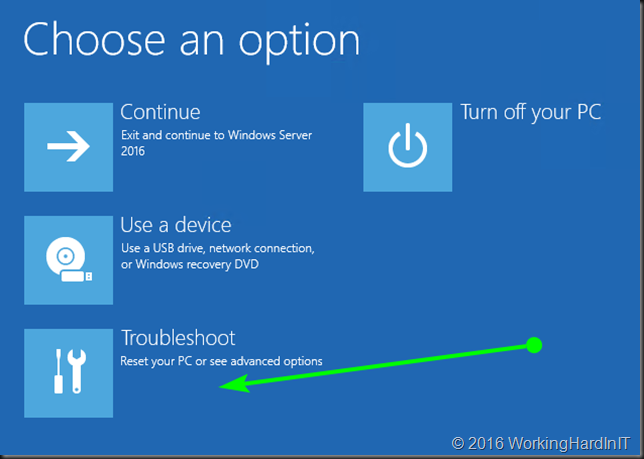
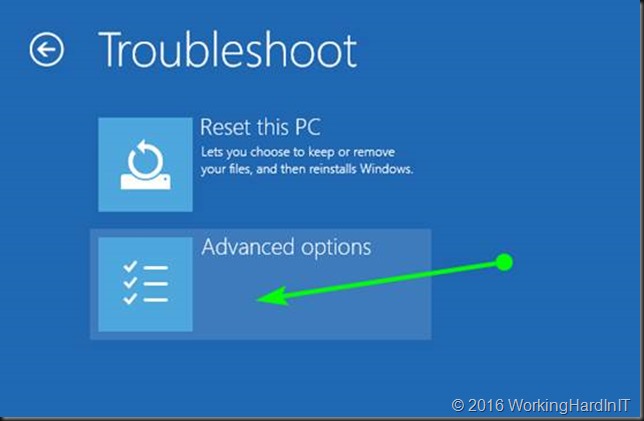
It will reboot to the following screen.Click Troubleshoot.
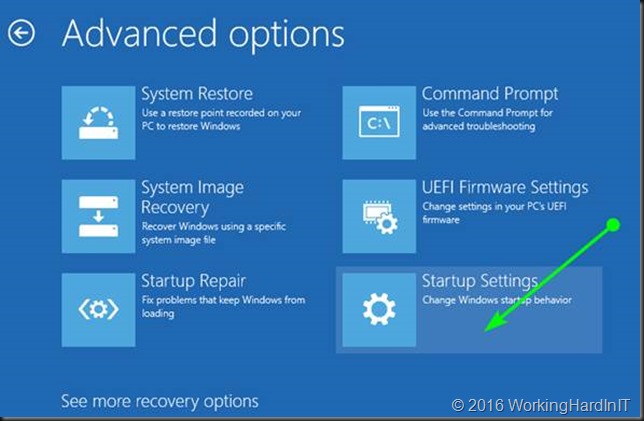
Select and click Advanced options.
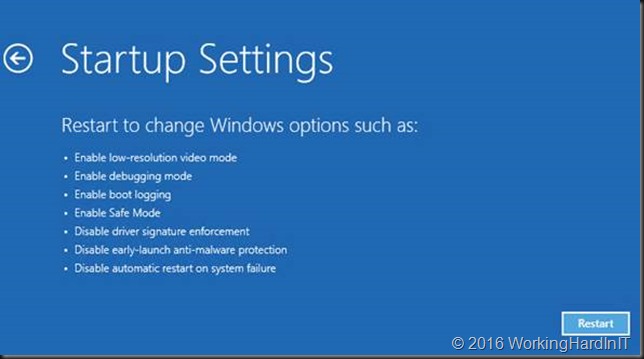
Click Startup Settings.
We click restart on the next screen
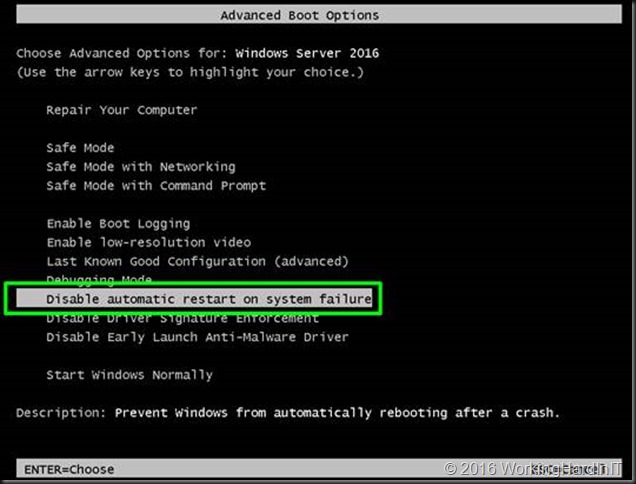
It will restart Advanced boot options. Select to disable driver signature enforcement. Hit ENTER.
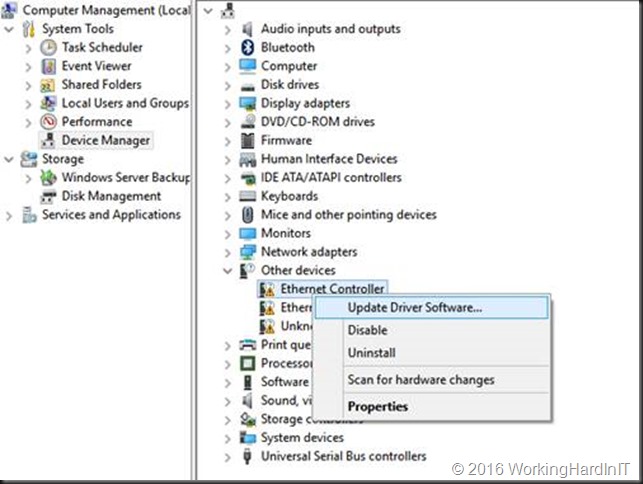
When your server has restarted, you’ll be able to install the driver you tampered with. To do so, in device manager select your NIC and click Update Driver Software.
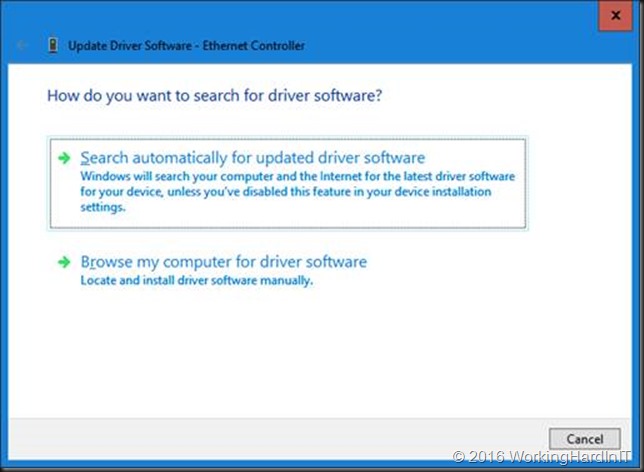
Select to Browse my computer for driver software
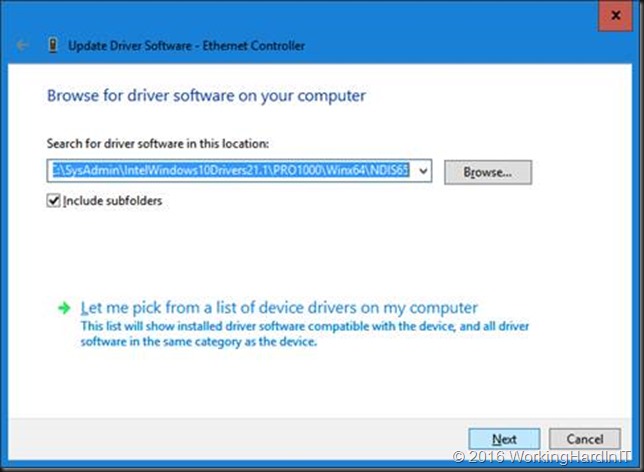
Point to the C:\SysAdmin\PROWinx64\PRO1000\Winx64\NDIS65 folder with your edited .inf files.
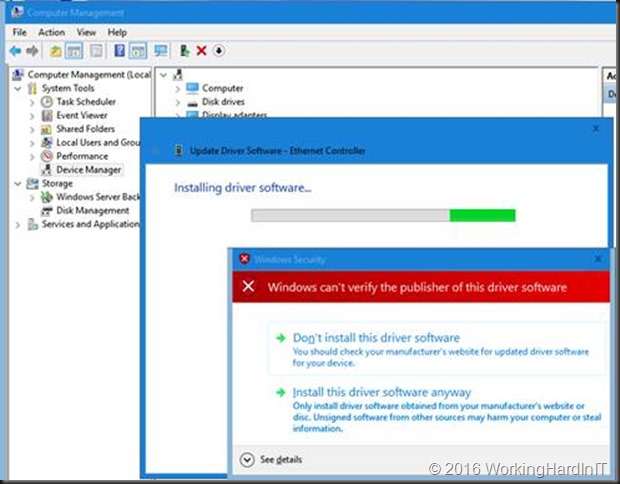
You’ll get a warning that the publisher of this driver can’t be verified. But as you’re the one doing the tampering here, you’ll be fine.
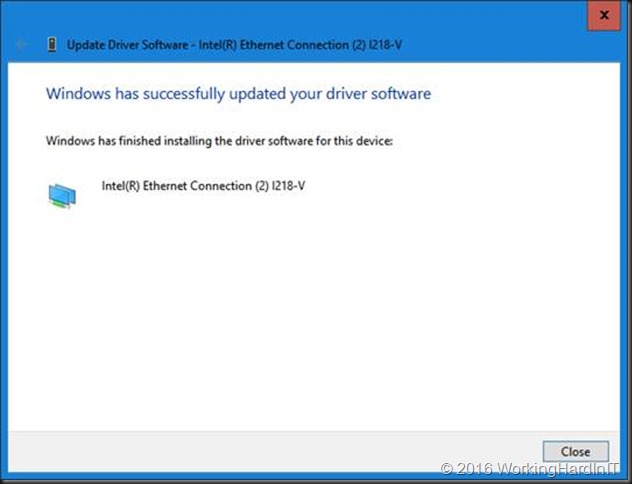
The result is successful install of the driver with a functional NIC for your system.
Cool, you’re in business!
No please reverse the setting you made to the integrity checks to make your system more secure again. From an elevated command prompt run:
bcdedit /set LOADOPTIONS ENABLE_INTEGRITY_CHECKS
Now reboot and you’re all secure again. That’s it, you’re done. I had both an I211 and an I218V NIC on my motherboard so I had to do this for both. Happy testing!


