Download the latest Intel Wi-Fi driver version 22.240.0 released for Intel’s wireless hardware. This release includes functional updates, but more importantly, it addresses link speed stability issues, amongst others.
If you have the supported hardware, download and install the latest Intel Wi-Fi driver using the direct download link provided below.
Note: The 32-bit Windows is still on Wi-Fi driver version 22.160.0.
On this page
Download Intel Wi-Fi driver v22.240.0
For Windows 11, 10 (x64)
Download Intel Wi-Fi Driver v22.240.0 for Windows 11, 10 (x64) [40.2 MB]
For Windows 10 (x86)
Download Intel Wi-Fi Driver v22.160.0 for Windows 10 (x86) [8.5 MB]
What’s new in Intel wireless driver 22.240.0
The following fixes and improvements have been made in the Intel Wi-Fi driver version 22.240.0:
- The issue of Rx link speed not being stable and the wireless dock APP sometimes showing a “weak connection” is now fixed.
- The Beamformee report with VHT causing a fatal error resulting in a yellow bang is fixed.
- The issue of QoS with a P2P connection disconnecting is fixed.
- A few functional updates.
Intel Wi-Fi driver 22.240.0 supported hardware
Here is a list of the supported Wi-Fi hardware compatible with this driver:
- Intel Wi-Fi 6E AX411 (Gig+)
- Intel Wi-Fi 6E AX211 (Gig+)
- Intel Wi-Fi 6E AX210 (Gig+)
- Intel Wi-Fi 6 AX203
- Intel Wi-Fi 6 AX201
- Intel Wi-Fi 6 AX200
- Intel Wi-Fi 6 AX101
- Intel Wireless-AC 9560
- Intel Wireless-AC 9461/ 9462
- Intel Wireless-AC 9260
To learn more about the Wi-Fi driver version 22.240.0, read the Release Notes.
How to install Intel Wi-Fi drivers
Once you have downloaded the respective driver(s), the process to install it is simple. Here are the steps to install an Intel wireless driver:
-
Run the downloaded setup file by double-clicking it.
The installation wizard will launch.
-
Click Next.

Begin Intel wireless driver update installation -
Agree to the End User License Agreement by checking the box below and then click Install.
Agree to the End User License Agreement The driver will then begin installation and the process should not take more than more than a minute.
-
When done, click Finish.
Close the Intel Wi-Fi driver installation wizard


Note that installing this driver would automatically replace the installed wireless driver by Microsoft through Windows Update.
Roll Back Driver
If a driver has been updated, Windows still keeps the previous version of the driver just in case. This will be made available in case you decide to roll back to it at a later time.
You may need to go back to the previous version of the driver if you find that the newer one is having issues, or is just not compatible with your setup.
That said, Windows only keeps the last installed version of the driver and discards the rest. You can roll back to the latest version using these steps:
-
Press Windows Key + R keys simultaneously to open the Run Command box.
-
Type in “devmgmt.msc” and press Enter to open the Device Management console.

Open the Device Manager -
Expand the branch of the hardware whose driver you want to roll back.

Click to expand the hardware branch -
Right-click on the device and then click Properties from the context menu.

Open device properties -
Switch to the Driver tab and click Roll Back Driver.
Roll back the driver version -
From the pop-up window, select the reason for rolling back and then click Yes.
Justify the rollback


The window will now close. Give your system a few seconds for the driver to successfully rollback.
Note that you will not be prompted whether the driver has rolled back or not. You can confirm this by checking that the “Roll Back Driver” button has been greyed out in the device’s Properties window. If it has, it means that the rollback was successful.

Proceed to close the Properties window and the Device Management console.
Closing words
This wireless driver update by Intel is published to include a few functional updates and some fixes. At the moment, there aren’t any reports of issues with this driver. Therefore, we think that it is safe for you to install the Intel Wi-Fi driver version 22.240.0, even in your live production environments.
Table of Contents
How to Update the Intel Network Adapter Driver for Windows 11?
If your Windows 11 PC is unable to connect to your network, it may be because of a problem with the Ethernet driver. The Intel Network Adapter Driver for Windows 11 is necessary for your PC to communicate with your network interface card, which can cause errors and trouble using the internet.
Luckily, there are ways to address this issue in Windows 11. In this article, we’ll discuss Intel Network Adapter Driver for Windows 11, how to install and update it, and more.
How to Install Intel Network Adapter Driver for Windows 11?
The Intel Network Adapter Driver for Windows 11 is a vital component that allows your PC to communicate with the hardware. It also plays an important role in your ability to access the internet.
The driver is a software component that relays commands from the operating system to the hardware. It’s necessary for all devices connected to your PC, including the mouse, keyboard, disk driver, and network adapters.
Getting the right drivers for your device is crucial to the overall performance of your machine. It can help you fix issues with your hardware, improve your experience, and even avoid a complete system crash.
There are several ways to install the driver for your network adapter. One of the easiest ways is to check for an update with Windows Update.
Check for Updates:
Keeping your network adapter driver updated can help you avoid issues with your connection. This is especially true when you are using WiFi.
Intel is currently rolling out a new version of the Intel Network Adapter Driver for Windows 11 called version 26.6. This version of the driver includes a number of new features and fixes.
It is a good idea to upgrade your drivers for any Intel hardware you have, as this can help prevent problems in the future.
To update your Ethernet adapter driver, follow these steps:
First, download and install the driver from the manufacturer’s website. This can be done via the official Intel Driver Center.
Second, you can use a third-party driver update tool to scan your system for any pending updates. This will allow you to automatically install all updates at once and save you a lot of time and frustration!
If you are having trouble updating your drivers, try a free tool like Advanced Driver Updater. This tool will quickly scan your computer for pending updates and install them automatically on your system.
Reinstall the driver:
If the Windows Update fails to install drivers for your Intel Network Adapter, you may need to manually download and reinstall them. There are several ways to do this, including using the manufacturer’s website or a third-party driver download software.
You can also uninstall the network driver from Device Manager, then reboot your computer. Depending on your situation, you might also want to try setting a system restore point before installing a driver.
Most Ethernet problems are software-related. If you can’t get the internet, it’s likely your Ethernet drivers are missing or corrupted. You can reinstall them by running a driver updater tool and following its directions. This can even work offline if you can’t use the internet.
Reset:
If you’re having trouble getting a wireless network to work, or your Ethernet adapter is giving you errors, try resetting the Intel Network Adapter Driver for Windows 11. This will remove and reinstall your network adapters, as well as reset all other networking settings back to their defaults.
This will restore your network connection and prevent future problems with your Wi-Fi. It will also fix issues with virtual machine software and VPN clients.
You can reset the Intel Network Adapter Driver for Windows 11 with a tool in your Settings app. Just go to Network & Internet > Advanced network settings and select Network reset.
The Intel driver is necessary for Windows to use a wired network, and it’s also the main reason many users have no internet connection. However, this driver can be problematic, so it’s a good idea to check and update it if necessary.
Network drivers such as Bluetooth and Wi-Fi are crucial to connect peripherals or connect to the Internet. Typically the drivers are installed along with the operating system. However, there could be scenarios where Windows entirely skipped installing any network drivers. On the flip side, you could face some issues with the drivers, and no fix seems to work for you.
Your noble steed of a machine has failed to equip itself with the necessary network drivers, and it’s like Superman forgetting his cape at home! But don’t fret. Whatever your reason for landing on this page, this guide will be all you need to install Intel network drivers on your computer.
Installing Intel Network Drivers
There are three major ways you can install network drivers on your computer. You can either install them from the Option Updates or uninstall the drivers manually and then force reinstall them on your computer. Otherwise, you can head to the official Intel website and download drivers.
For your ease of convenience, we are going to discuss all these methods in this guide.
1. Check for Optional Updates
If you have purchased a new PC or the driver is not present after a system reset, it is highly likely that Windows found the missing driver on Microsoft servers, and it is sitting in the ‘Optional Updates’ queue. Typically Windows itself manages the installation of updates. However, at times you may need to intervene to download them.
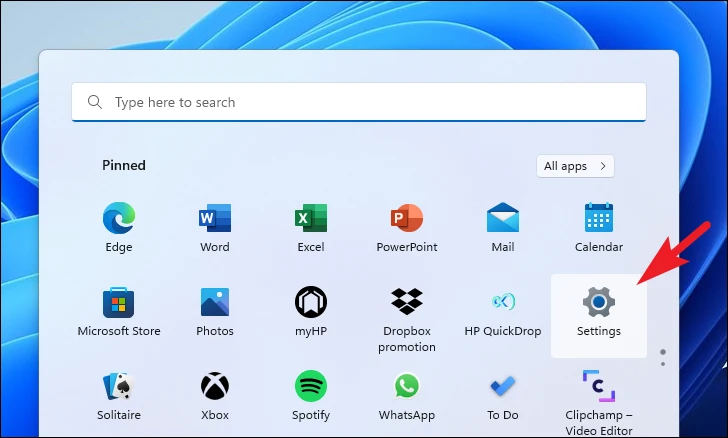
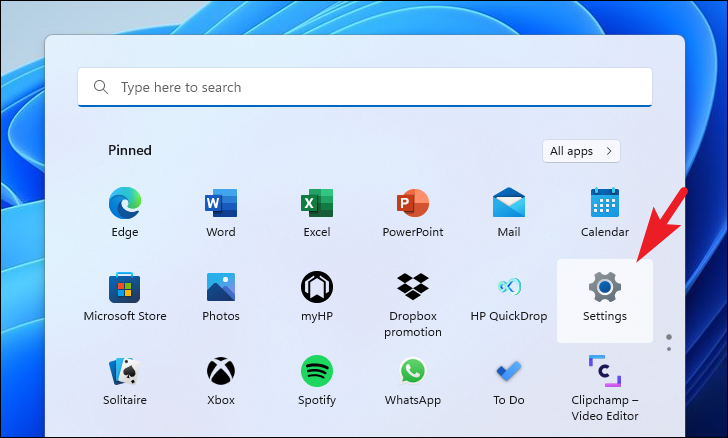
First, head to the Start Menu and click on the ‘Settings’ tile.

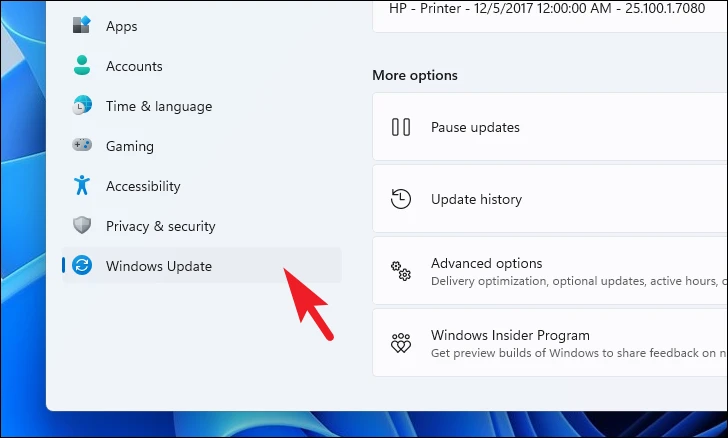
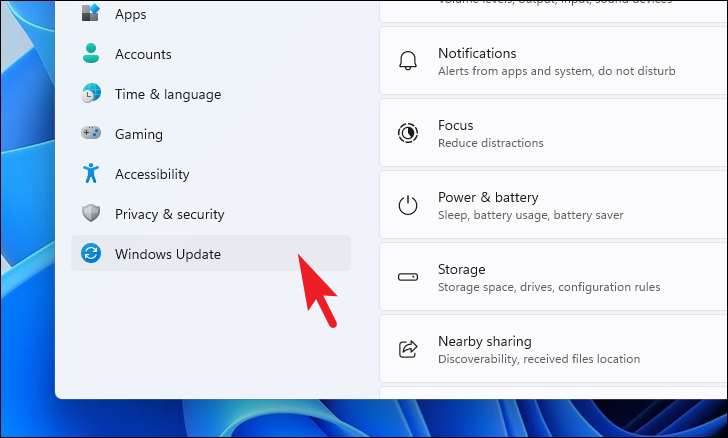
After that, click on the ‘Windows Update’ tab from the left sidebar.

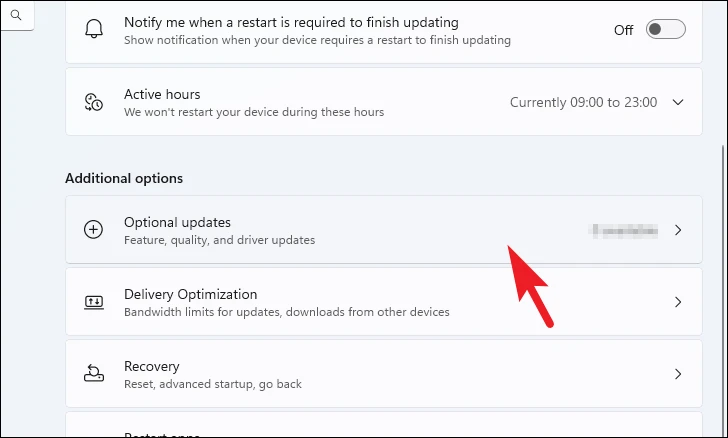
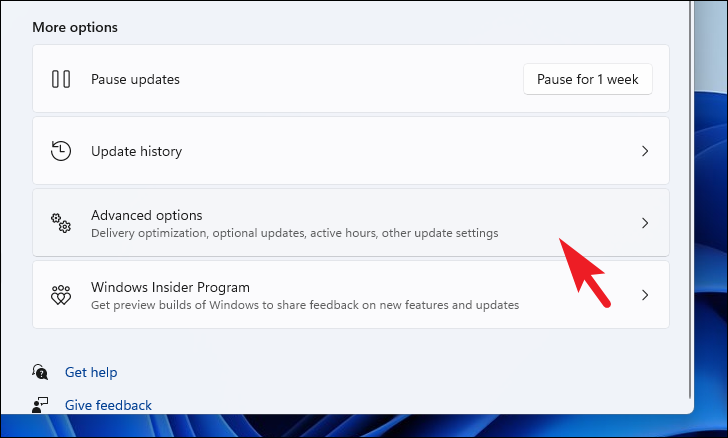
Next, from the right section of the window, click on the ‘Advanced options’ tile.

Then, on the next screen, locate and click on the ‘Optional Updates’ tile to continue.

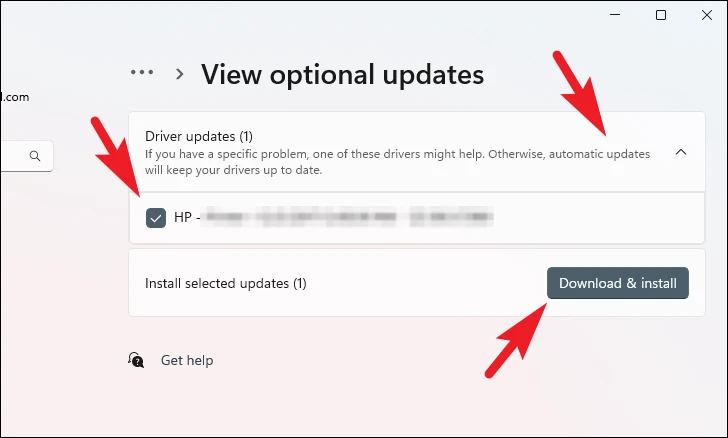
After that, from the list of available drivers, locate the ‘Bluetooth/Wi-Fi’ driver and click on the checkbox preceding it. Then, click on the ‘Download & Install’ button.

2. Force Reinstall Network Drivers
In case you are facing some issues with the already installed drivers, you can uninstall them and then force reinstall them on your computer.
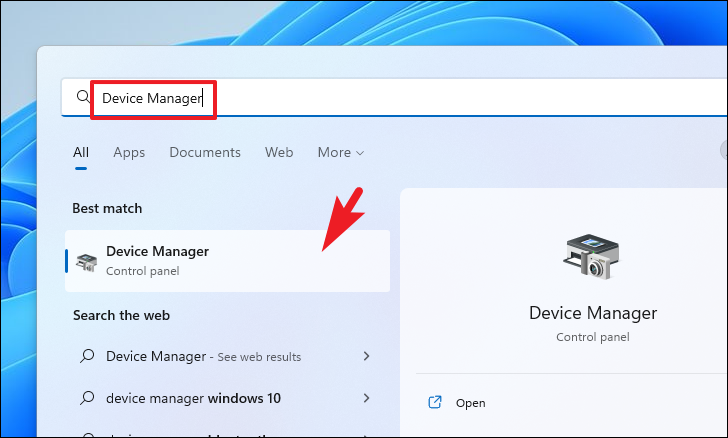
First, head to the Start Menu and type Device Manager. Then, from the search results, click on the ‘Device Manager’ tile.

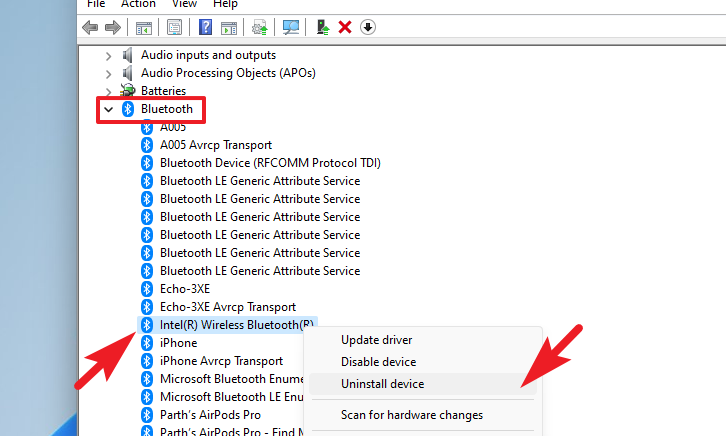
To uninstall Bluetooth drivers, double-click on the ‘Bluetooth’ category. After that, right-click on ‘Intel Bluetooth Wireless’ and select the ‘Uninstall’ option. This will open a separate window on your screen.

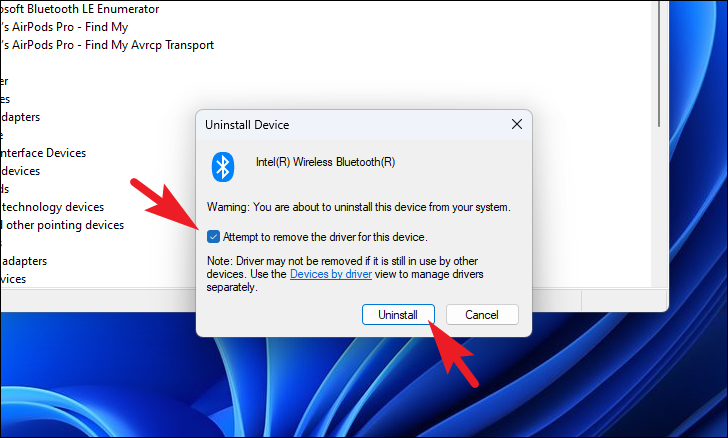
Now, check the ‘Attempt to remove the driver for this device’ option and click ‘Uninstall’.

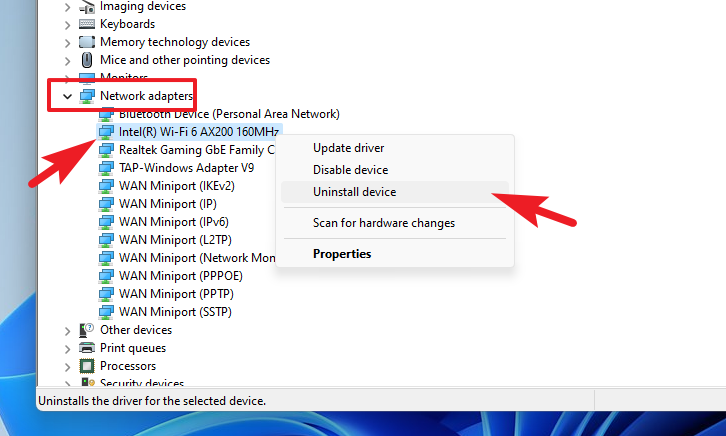
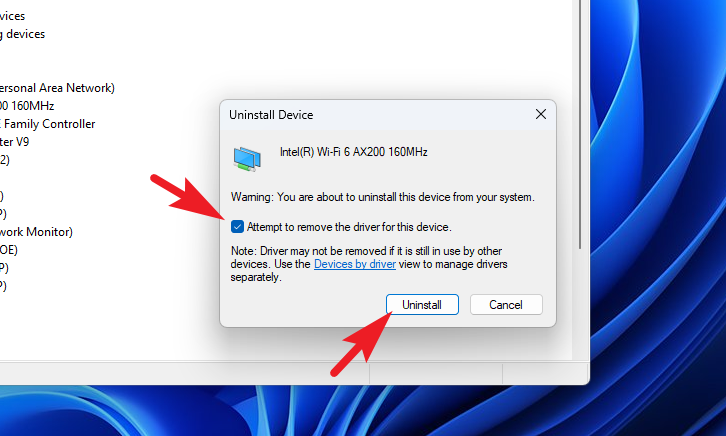
To uninstall Wi-Fi drivers, double-click on the ‘Network Adapters’ section. Then, right-click ‘Intel Wi-Fi’ and select the ‘Uninstall’ option.

From the separately opened window, check the ‘Attempt to remove the driver for this device’ and click ‘Uninstall’.

Once you have successfully uninstalled both drivers, restart your PC. After restarting, head to the Start Menu and click on the ‘Settings’ tile.

Then, click on the ‘Windows Update’ tab from the left sidebar.

Next, from the right section of the window, click on ‘Advanced options’ to continue.

Afterward, click on the ‘Optional Updates’ tile.

Then, you should see Bluetooth and Wi-Fi drivers in the list. Select the drivers by clicking on the checkbox and clicking the ‘Download & Install’ button.

3. Download the Driver from Intel Website
In case the above two methods did not work for you, the last option is to head to the official support website of Intel and download the drivers manually.
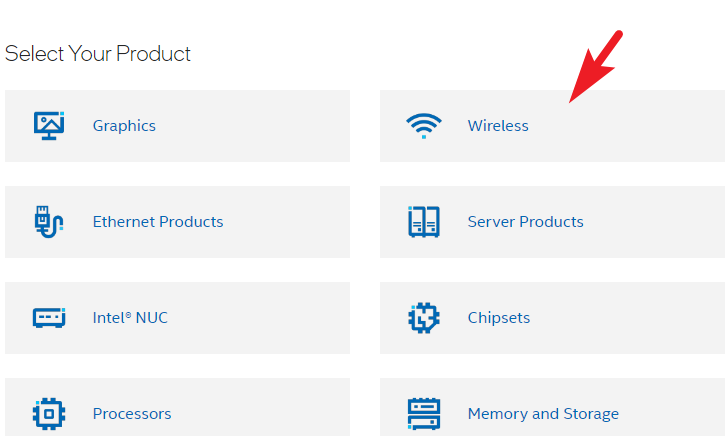
First, head to www.intel.com/download-center using your preferred browser. Then, click on the ‘Wireless’ tile.

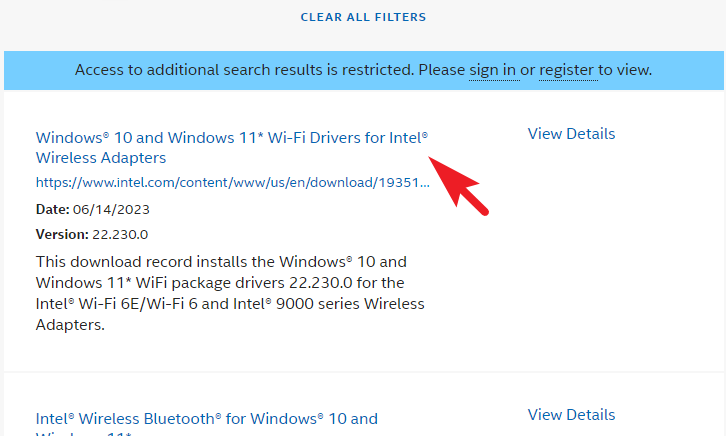
To download Wi-Fi drivers, locate and click on the ‘Wi-Fi Drivers for Intel Wireless Adapters’ option.

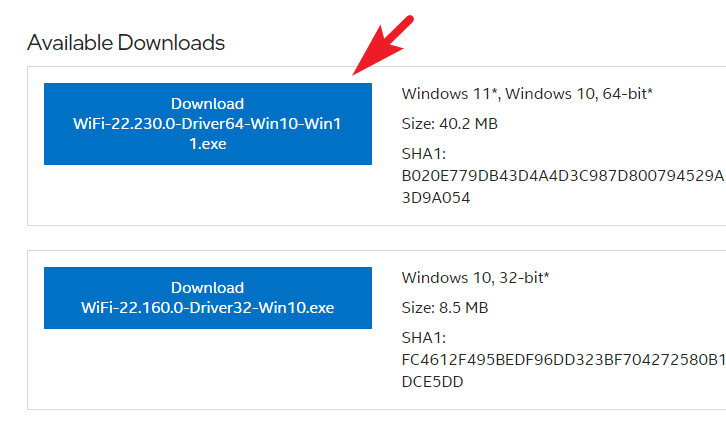
Next, click on the 32-Bit or 64-Bit version depending on your Windows 11 version. This will bring an overlay window to your screen.

From the overlay window, click on the ‘I accept the terms in the license agreement’ button. The download should start automatically after that.

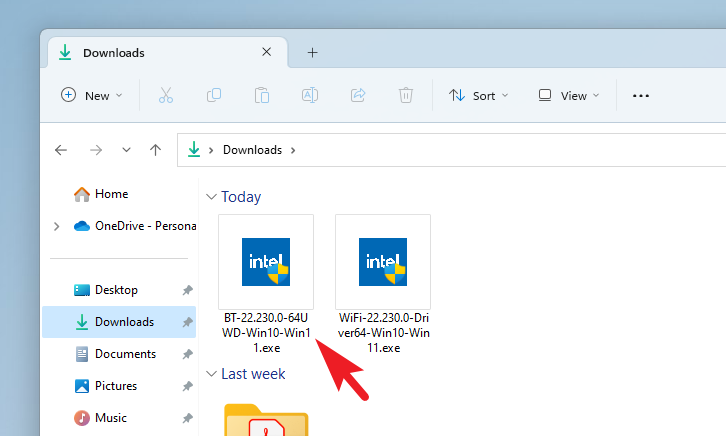
Once the download is complete, head to the default downloads directory and double-click on the .EXE file to run the installer.

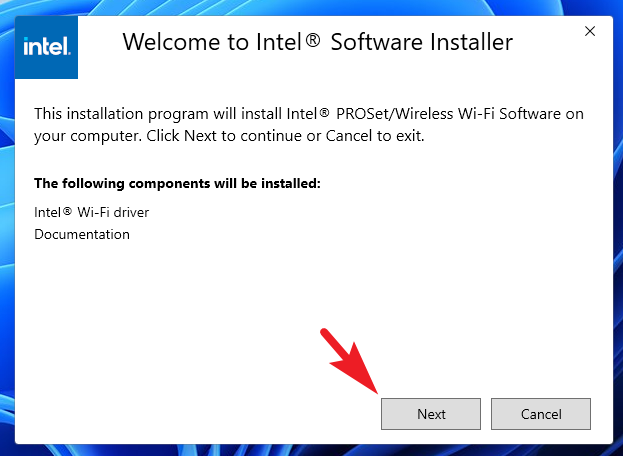
After that, from the installer window, click on the ‘Next’ window.

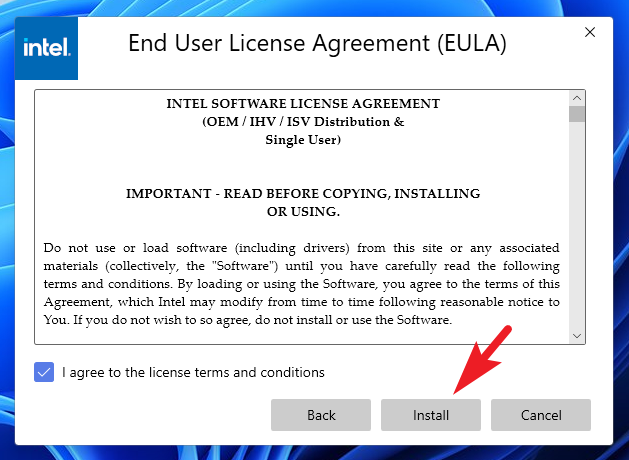
On the next window, check on the ‘I agree to the license terms and conditions’ option and click on the ‘Install’ button.

Once the driver is installed, restart your PC from the Start Menu. Your Wi-Fi drivers should be installed and ready to use.
To download and install the Bluetooth driver, click on the ‘Wireless’ tile from the main page of the website.

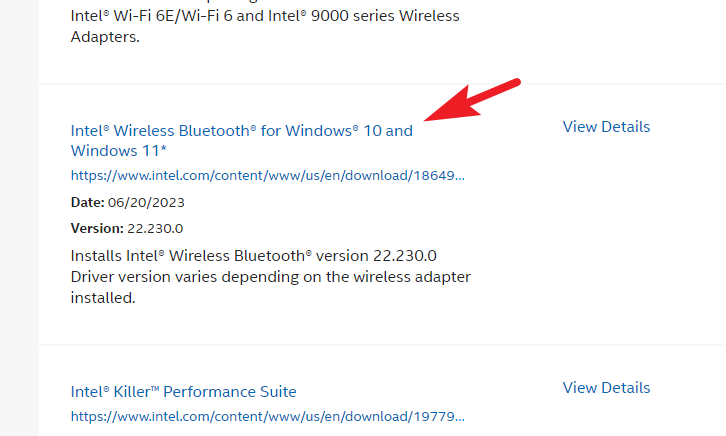
After that, locate and click ‘Wireless Bluetooth for Windows 10 and Windows 11’ to continue.

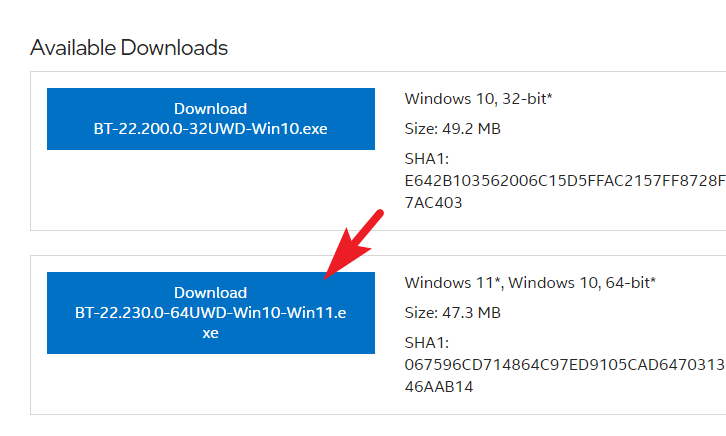
Then, select the ‘Windows 11’ tile to download the installer on your computer. This will bring an overlay window to your screen.

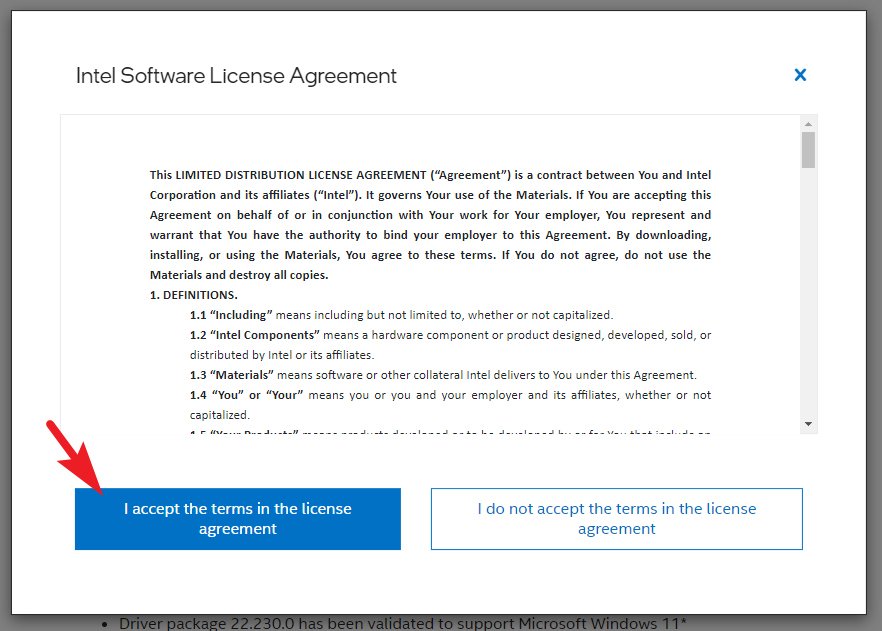
Next, click the ‘I accept the terms in the license agreement’ option to continue.

Once the installer has been downloaded, head to your default downloads directory and double-click on the .EXE file to run the installer.

After that, follow the on-screen instructions to install the driver on your computer, as shown earlier in this guide.
Once installed, restart your computer to let the changes take effect. Your Bluetooth driver should now be installed and work as intended.
Bluetooth and Wi-Fi not working properly can be a big issue as your computer is as good as a paperweight without the Internet, and you will not be able to connect any wireless peripherals without Bluetooth. Thankfully, this guide will help you resolve that problem in a swish and get your productivity back on track.

How to Update the Intel Ethernet Driver for Windows 11?
If your computer is not working properly when connected to the Internet, you may need to update the Intel Ethernet Driver. There are several ways to do this, including updating through Windows Update, Device Manager, or visiting the Manufacturer’s website. Updating your driver is easy and completely free, but it’s important to make sure that the latest version is compatible with your system. This article will walk you through the process of updating your driver. So, read the article to get information on this Intel Ethernet Driver Windows 11.
Download Intel Ethernet Driver Windows 11 (Here)
Installing the latest version of the Intel Ethernet driver:
When your ethernet connection fails in Windows 11, reinstalling or updating your ethernet driver may help. You can update it through Windows Update, Device Manager, or by visiting the manufacturer’s website. Usually, updating your driver is free, but you should check if the upgrade is for Windows 11 first. Here are some easy steps to update your ethernet driver. Once you’ve found the right version, follow the instructions to install it.
The first step is to launch the Windows Update feature on your PC. Once you’ve downloaded and installed the update, you can go to the manufacturer’s website to install the updated driver. If you can’t find the latest driver version in the Windows Update section, try manually updating the ethernet driver from the manufacturer’s website. However, many manufacturers do not submit their drivers to Microsoft, so you may have to download them from the manufacturer’s website.
Identifying a newer version of the driver:
There are many ways to update your network drivers, the easiest of which is from the manufacturer’s website. However, if you cannot locate the driver from the manufacturer’s website, you can try manually searching the internet for it. Double-click the driver version to start the installation wizard. You can also contact the manufacturer of the Ethernet card to find the correct driver for your machine.
If you are experiencing problems using a wired internet connection, it’s likely that your Ethernet driver is corrupted or outdated. If yours is outdated, you may need to change your Ethernet cable or switch to a wireless network instead. It’s always a good idea to backup important data before you upgrade your operating system. Using reliable backup software will automatically protect your data from unexpected errors and disasters.
Reinstalling the driver:
The reason you may want to reinstall the Intel Ethernet driver for Windows 11 is that it can be the root cause of a number of hardware problems. Despite being a physical device, the network adapter is not compatible with Windows 11 without the correct driver installed. To install the driver, you must first run the netsh Winsock reset command and then restart the computer. If this doesn’t work, you may want to switch to a wireless network.
If you have this problem, you should first check to see whether the network adapter driver for your computer is compatible with Windows 11. You can do this by launching File Explorer and double-clicking the EXE file in the driver folder. Once it is opened, follow the instructions in the installer window to complete the process. If the process still fails, you may need to reinstall the driver again. This should resolve most networking issues.
Enabling automatic driver downloads:
You can enable automatic driver downloads for Intel Ethernet driver Windows 11, but you may have to manually install the latest version of the driver. To do so, click on the ‘Driver’ tab and right-click on the Ethernet adapter. Select ‘update driver’. Click OK. After the update has been completed, Windows will ask you to restart your computer. The new driver will then install automatically.
If you do not wish to manually install drivers, you can enable automatic driver downloads for Intel Ethernet driver Windows 11. You may use the built-in Device Manager or optional updates to manually install the driver. Or, you can use third-party driver updater software to automatically download the drivers. We recommend Advanced Driver Updater. It is free and can be used by people with all levels of experience.
Network drivers such as Bluetooth and Wi-Fi are crucial to connect peripherals or connect to the Internet. Typically the drivers are installed along with the operating system. However, there could be scenarios where Windows entirely skipped installing any network drivers. On the flip side, you could face some issues with the drivers, and no fix seems to work for you.
Your noble steed of a machine has failed to equip itself with the necessary network drivers, and it’s like Superman forgetting his cape at home! But don’t fret. Whatever your reason for landing on this page, this guide will be all you need to install Intel network drivers on your computer.
Installing Intel Network Drivers
There are three major ways you can install network drivers on your computer. You can either install them from the Option Updates or uninstall the drivers manually and then force reinstall them on your computer. Otherwise, you can head to the official Intel website and download drivers.
For your ease of convenience, we are going to discuss all these methods in this guide.
1. Check for Optional Updates
If you have purchased a new PC or the driver is not present after a system reset, it is highly likely that Windows found the missing driver on Microsoft servers, and it is sitting in the ‘Optional Updates’ queue. Typically Windows itself manages the installation of updates. However, at times you may need to intervene to download them.
First, head to the Start Menu and click on the ‘Settings’ tile.
After that, click on the ‘Windows Update’ tab from the left sidebar.
Next, from the right section of the window, click on the ‘Advanced options’ tile.

Then, on the next screen, locate and click on the ‘Optional Updates’ tile to continue.
After that, from the list of available drivers, locate the ‘Bluetooth/Wi-Fi’ driver and click on the checkbox preceding it. Then, click on the ‘Download & Install’ button.
2. Force Reinstall Network Drivers
In case you are facing some issues with the already installed drivers, you can uninstall them and then force reinstall them on your computer.
First, head to the Start Menu and type Device Manager. Then, from the search results, click on the ‘Device Manager’ tile.
To uninstall Bluetooth drivers, double-click on the ‘Bluetooth’ category. After that, right-click on ‘Intel Bluetooth Wireless’ and select the ‘Uninstall’ option. This will open a separate window on your screen.
Now, check the ‘Attempt to remove the driver for this device’ option and click ‘Uninstall’.
To uninstall Wi-Fi drivers, double-click on the ‘Network Adapters’ section. Then, right-click ‘Intel Wi-Fi’ and select the ‘Uninstall’ option.
From the separately opened window, check the ‘Attempt to remove the driver for this device’ and click ‘Uninstall’.
Once you have successfully uninstalled both drivers, restart your PC. After restarting, head to the Start Menu and click on the ‘Settings’ tile.
Then, click on the ‘Windows Update’ tab from the left sidebar.
Next, from the right section of the window, click on ‘Advanced options’ to continue.
Afterward, click on the ‘Optional Updates’ tile.

Then, you should see Bluetooth and Wi-Fi drivers in the list. Select the drivers by clicking on the checkbox and clicking the ‘Download & Install’ button.

3. Download the Driver from Intel Website
In case the above two methods did not work for you, the last option is to head to the official support website of Intel and download the drivers manually.
First, head to www.intel.com/download-center using your preferred browser. Then, click on the ‘Wireless’ tile.
To download Wi-Fi drivers, locate and click on the ‘Wi-Fi Drivers for Intel Wireless Adapters’ option.
Note: Here, we are downloading the driver for Wi-Fi version 6 and Intel 9000 series adapter. If you have a different series of adapters, you can scroll down to locate the driver compatible with your device.
Next, click on the 32-Bit or 64-Bit version depending on your Windows 11 version. This will bring an overlay window to your screen.
From the overlay window, click on the ‘I accept the terms in the license agreement’ button. The download should start automatically after that.

Once the download is complete, head to the default downloads directory and double-click on the .EXE file to run the installer.

After that, from the installer window, click on the ‘Next’ window.
On the next window, check on the ‘I agree to the license terms and conditions’ option and click on the ‘Install’ button.
Once the driver is installed, restart your PC from the Start Menu. Your Wi-Fi drivers should be installed and ready to use.
To download and install the Bluetooth driver, click on the ‘Wireless’ tile from the main page of the website.
After that, locate and click ‘Wireless Bluetooth for Windows 10 and Windows 11’ to continue.
Then, select the ‘Windows 11’ tile to download the installer on your computer. This will bring an overlay window to your screen.
Next, click the ‘I accept the terms in the license agreement’ option to continue.
Once the installer has been downloaded, head to your default downloads directory and double-click on the .EXE file to run the installer.
After that, follow the on-screen instructions to install the driver on your computer, as shown earlier in this guide.
Once installed, restart your computer to let the changes take effect. Your Bluetooth driver should now be installed and work as intended.
Bluetooth and Wi-Fi not working properly can be a big issue as your computer is as good as a paperweight without the Internet, and you will not be able to connect any wireless peripherals without Bluetooth. Thankfully, this guide will help you resolve that problem in a swish and get your productivity back on track.