Содержание
- Способ 1: Системный трей
- Способ 2: Сочетание клавиш (ноутбук)
- Способ 3: «Поиск»
- Что делать, если не получается открыть настройки Intel
- Вопросы и ответы
Способ 1: Системный трей
В гибридных системах на ноутбуках или в настольных ПК без дискретной графики средство управления Интел быстрее всего открыть с помощью системного трея: специальной области на панели задач, которая находится в нижнем правом углу экрана.
Кликните левой кнопкой мыши по стрелке для показа скрытых элементов, затем наведите курсор на ярлык требуемой программы (современные версии выглядят как синий квадрат), снова щёлкните мышкой (кнопка не важна) и выберите «Открыть приложение» («Open App»).
Теперь переходите в нужные вам разделы и настраивайте производительность чипа по своему усмотрению.
Способ 2: Сочетание клавиш (ноутбук)
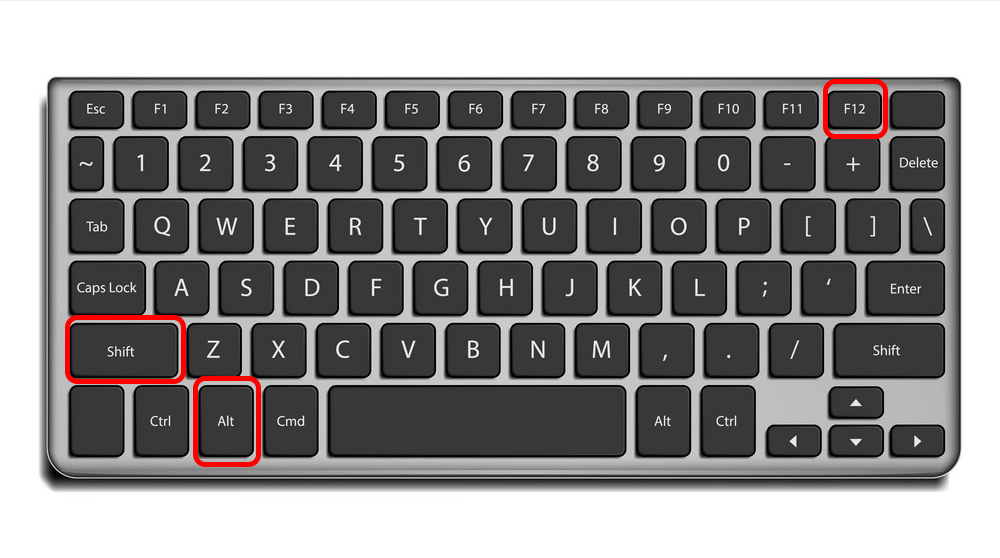
Владельцы лэптопов для быстрого доступа к панели управления драйвером графики Intel могут задействовать комбинацию Ctrl+Shift+F12 – большинство производителей, использующих продукты «синих», привязывают её именно для этой функции.
Впрочем, стоит иметь в виду, что иногда данное сочетание может не работать, особенно если речь идёт об игровых сериях.
Способ 3: «Поиск»
Также можно задействовать встроенные в Виндовс средства поиска – в некоторых случаях это может быть единственным доступным вариантом. Использование этого метода покажем на примере актуальной «десятки».
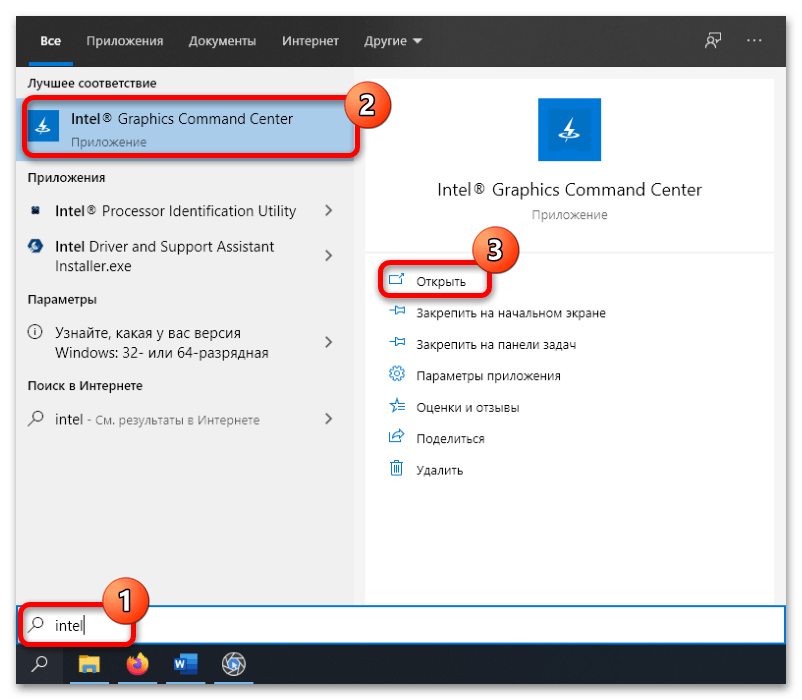
Нажмите на иконку средства или текстовую строку на панели задач. Введите запрос intel graphics – должен появиться соответствующий результат, по которому нужно кликнуть для открытия.
Если по указанному в предыдущем шаге запросу ничего нет, попробуйте написать просто intel и затем уже выбрать подходящее приложение.
Данный метод универсален и должен работать на всех без исключения системах, в которых установлен драйвер для соответствующего устройства.
Иногда происходит так, что ни один из представленных выше вариантов не помогает. Далее мы рассмотрим шаги с возможными решениями этой проблемы.
- Первым делом нужно удостовериться, что необходимое ПО вообще установлено. Проверить это можно через «Диспетчер устройств», поскольку при отсутствии драйвера в нём это будет отображено. Самый быстрый способ вызова нужной оснастки – окно «Выполнить»: нажмите комбинацию Win+R, введите запрос
devmgmt.mscи щёлкните «ОК».
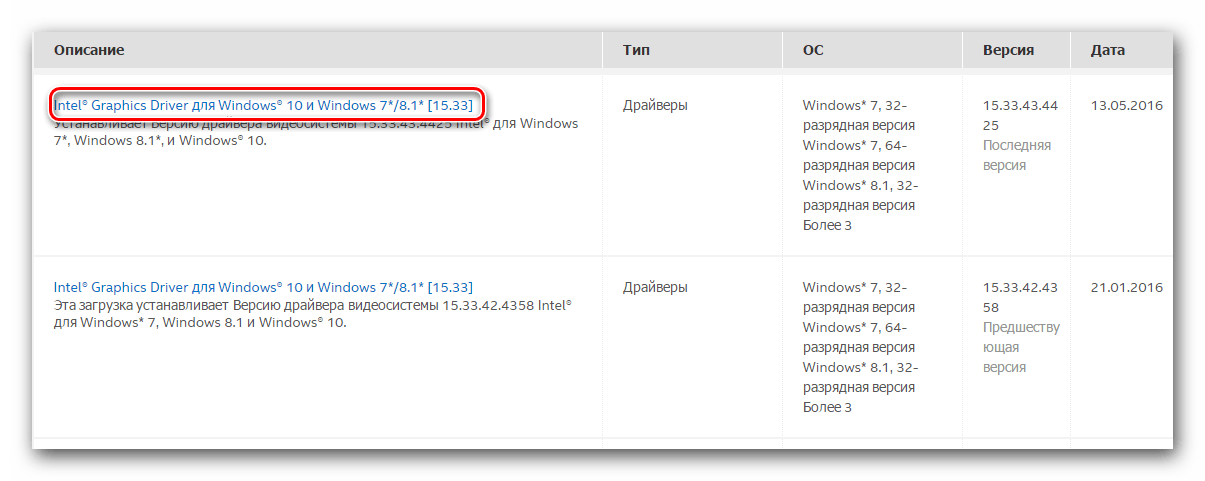
Далее раскройте категорию «Видеоадаптеры» и проверьте, нет ли там позиций с ошибками или записи «Базовый драйвер Microsoft». Если есть, скорее всего, это значит, что необходимое для работы программное обеспечение отсутствует. Чтобы решить проблему, инсталлируйте подходящий комплект софта.
Подробнее: Пример установки драйверов для графики Intel
- Если на предыдущем шаге у вас не возникло никаких проблем и по логике вещей панель настроек должна открываться, стоит обратить внимание на саму версию ПО – возможно, она устарела и больше не совместима с инсталлированной операционной системой. Разумным выходом из такой ситуации будет обновление софта – принцип тот же, что и в обычной установке с нуля.
- Нередко возможны случаи, когда уже имеющаяся версия драйверов оказалась повреждена, причём до такой степени, что даже установить новую поверх не получается. Выход из подобной ситуации есть – полное удаление с зачисткой всех следов в системе и инсталляция последнего актуального пакета.
Подробнее: Как переустановить драйвер видеокарты
Повреждение драйверов возможно также вследствие активности вирусов, поэтому перед переустановкой нелишним будет провести проверку системы и избавиться от угроз, если таковые обнаружатся.
Подробнее: Борьба с компьютерными вирусами
Еще статьи по данной теме:
Помогла ли Вам статья?
Click Graphics Properties box and this will open the panel you should see in desktop. It should launch from desktop though. You can also click on the Intel HD graphics icon in the control panel.
The Intel® Graphics Control Panel can be opened from the Windows Start menu or using the shortcut CTRL+ALT+F12.
Where is Intel HD Graphics Control Panel in Windows 10?
You can click Start button and type/paste Intel Graphics Control Panel and launch Intel® Graphics Control Panel from search results. You can also press CTRL+ALT+F12 keys to launch Intel® Graphics Control Panel.
Why can’t I open Intel graphics control panel?
The Intel Graphics Control Panel not opening can be a problem, but there’s a way to fix it. One way to fix this issue is to update all your drivers with specialized software. You can also fix this issue simply by resetting the app to the default or by reinstalling it.
How do I enable Intel HD graphics in Windows 10?
How can I re enable Intel HD Graphics Right click the start button and click Device Manager. Double click “Display adapters”. Double click “Microsoft Basic Display Adapter”. Click on the “driver” tab. Press “update driver”. Press “browse my computer for driver software”.
How do I fix Intel HD graphics control panel?
Click Start > Settings > Apps & Features. Locate and uninstall the Intel® Graphics Control Panel and Intel® Graphics Driver. Restart the computer. Right-click the start menu and go to Device Manager. Click Display Adapters. Right-click the Intel® HD Graphics Adapter and click Update Driver.
How do I use Intel HD graphics control panel?
You can use Intel’s graphics control panel to optimize your graphics settings for performance instead of image quality and battery life. To launch it, right-click the Windows desktop and select “Graphics Properties.” You can also launch the “Intel HD Graphics Control Panel” tool from your Start menu.
How do I update Intel HD graphics control panel?
Intel graphics drivers Select Windows Start > Control Panel. Open Device Manager. Click the arrow next to Display Adapters. Right-click on Intel HD Graphics. Choose Search automatically for updated driver software.
How do I uninstall Intel HD graphics control panel?
Open the Device Manager using the steps provided for your operating system: Expand the Display Adapters section. Find the Intel Graphics Driver. Right-click the Intel Graphics Driver and select Uninstall. Select the check box Delete the driver software for this device.
How do I reset Intel HD graphics?
INTEL Right-click on your desktop and select Graphics Properties. Click 3D. Click Restore Defaults.
What is Intel HD graphics control panel?
Intel Graphics Control Panel is an Intel utility program you can use to monitor and adjust the settings of your Intel graphics adapter. There are two ways you can get this Control Panel.
How do I troubleshoot Intel graphics?
You could also allow Windows Update services to automatically find and install the latest driver validated for your system. On your keyboard, press the Windows key + X. Click on Device Manager. Click on Display Adapters. Right-click on the Intel Graphics Controller. Click on Update driver.
How do I enable my Intel graphics card?
From the Windows Start Menu, search for the Intel Graphics Command Center. Double click the Intel Graphics Command Center icon to open the application. Click Preferences in the left navigational menu. Next to the System Tray setting, click the switch button to enable or disable the system tray icon.
How do I install Intel HD graphics control panel?
To manually download Intel ® Graphics Control Panel, perform the following: Click the Microsoft Store icon on the taskbar and search for Intel. Select Intel ® Graphics Control Panel. Download and install Intel ® Graphics Control Panel.
How do I enable my graphics driver Windows 10?
Enable Graphic Driver. Press “Windows + X” and select Device manger. Select Display Adapter and expand the driver icon. Right click on the driver icon and click on Enable.
Is Intel HD graphics compatible with Windows 10?
Support for second generation Intel HD Graphics is not officially available for Windows 10. Some drivers are available through Windows update, however these tend to be older Windows 8 or Windows 8.1 drivers.
How do I enable Intel HD graphics in BIOS?
Step 1: Hold or tap the ‘Delete’ key immediately after powering on the system to enter the bios. Step 2: Use the arrow keys to choose ‘Advanced’ menu > System Agent (SA) Configuration\Graphics Configuration > iGPU Multi-Monitor setting > Enable as below. Press the ‘F10’ key to save and exit.
How do I download my graphics driver?
Double-click on the graphics card entry. There’s a separate Driver tab — click on that to see the options. Click on Update Driver. Select Search automatically for updated driver software.
Is Intel HD Graphics good?
However, most mainstream users can get good enough performance from Intel’s built-in graphics. Depending on the Intel HD or Iris Graphics and the CPU it comes with, you can run some of your favorite games, just not at the highest settings. Even better, integrated GPUs tend to run cooler and are more power efficient.
How do I know which Intel HD graphics I have?
Right-click the desktop and select Properties. Click the Settings tab. Click the Advanced button. Click the Intel® Graphics Technology or Intel® Extreme Graphics tab. The graphics driver version number is listed below the graphics controller name. For example: 6.13. 01.3004. Note.
How do I open my graphics card control panel?
How to open Nvidia Control Panel Right‐click the Windows desktop, then click NVIDIA Control Panel from the context menu, or. From the Windows Start menu, select Control Panel, then in the Control Panel window, double‐click the NVIDIA Control Panel icon.
What is the latest Intel HD graphics driver?
Download the latest Version Intel HD integrated graphics for their Graphics Integrated processors. This download installs the Intel Graphics Driver for 6th, 7th, 8th, 9th, 10th and 11th generation, Apollo Lake, Gemini Lake, Amber Lake, Whiskey Lake and Intel DG1 (Xe).
How do I change my Intel graphics settings?
On your keyboard, simultaneously press CTRL+ALT+F12. Original equipment manufacturers (OEM) can disable certain hot-key functions. In desktop mode, right-click the Desktop. Then, select Intel® Graphics Settings.
How do I download new graphics drivers?
How to upgrade your graphics drivers in Windows Press win+r (the “win” button is the one between left ctrl and alt). Enter “devmgmt. Under “Display adapters”, right-click your graphics card and select “Properties”. Go to the “Driver” tab. Click “Update Driver…”. Click “Search automatically for updated driver software”.
Опубликовано
Обновлено
Привет ! Мы продолжаем разбирать операционную систему Windows 10 ! Сегодня вы узнаете как настроить параметры устройства видеоадаптер Intel HD Graphics на компьютере Windows 10. Вы сможете узнать состояние устройства, характеристики, значение свойств, события, параметры ресурсов и т.д. Вы сможете обновить драйвер устройства. Можно отключить или откатить устройство.
Чтобы открыть параметры устройства, внизу экрана слева откройте меню «Пуск». В открывшемся окне нажмите на вкладку или значок «Параметры».
Далее, на странице «Параметры» нажмите на вкладку «Устройства».
Далее, на странице «Устройства», внизу страницы, нажмите на вкладку «Диспетчер устройств».
Далее, на странице «Диспетчер устройств» нажмите два раза на вкладку «Видеоадаптеры». У вас откроется вложение — Intel HD Graphics, нажмите два раза на данную вкладку.
Далее, у вас откроется окно — Свойства Intel HD Graphics. Здесь вы сможете узнать и настроить параметры данного устройства.
Общие:
— Вы можете узнать тип устройства.
— Изготовителя устройства.
— Размещение устройства.
— Вы можете узнать состояние устройства.
Драйвер:
— Вы можете узнать поставщика драйвера.
— Дату разработки драйвера.
— Версию драйвера.
— Цифровую подпись.
— Сведения о файлах драйвера.
— Вы можете обновить драйвер.
— Вы можете откатить драйвер к предыдущему, если устройство не работает после обновления.
— Вы можете отключить устройство.
— Вы можете обновить драйвер.
— Нажмите на кнопку OK.
Сведения:
— Вы можете узнать значения свойств устройства.
— Выберите свойство и вам автоматически покажут его значение.
— Например, вы можете узнать код проблемы устройства, класс, характеристики и т.д.
События:
— Вы можете узнать какие события происходили с данным устройством.
— Вы можете узнать дату и время события.
— Вы можете узнать сведения события.
— Вы можете посмотреть все события.
Ресурсы:
— Вы можете узнать параметры ресурсов.
— Вы можете узнать список конфликтующих устройств.
— Нажмите на кнопку OK.
Остались вопросы ? Напиши комментарий ! Удачи !
Open the Settings app in Windows 10 using WIN+I. In the Find a setting box, type graphics and select Graphics settings from the list. In the dropdown menu below Graphics performance preference, select either Desktop app or Microsoft Store app, depending on the kind of app for which you want to set a preference.
Contents
- 1 How do I change my graphics settings?
- 2 How do I enable graphics on Windows 10?
- 3 How do I change my graphics card to High Performance Windows 10?
- 4 Where do I find my graphics card settings on Windows 10?
- 5 How do I enable my graphics card?
- 6 How do I change Nvidia graphics card settings?
- 7 How do I get to advanced graphics settings?
- 8 How do I set my graphics card to Intel high-performance?
- 9 How do I check my graphics card performance?
- 10 Where do I find my graphics card info?
- 11 How do I know my graphics card is working?
- 12 How do I make Nvidia graphics card default in Windows 10?
- 13 How do I switch from integrated graphics to graphics card?
- 14 How do I force Windows to use my graphics card?
- 15 How do I change my default Graphics card in Windows 10 Radeon?
- 16 How do I access my Intel graphics settings?
- 17 How can I improve graphics on my laptop?
- 18 How do I put games on my Intel HD graphics?
- 19 Are Intel HD Graphics good?
- 20 What graphics card do I have Nvidia?
Changing graphics card settings to use your dedicated GPU on a Windows computer.
- Right click on your desktop and select Graphics Properties, or Intel Graphics Settings.
- In the next window, click on the 3D tab and set your 3D preference to Performance.
How do I enable graphics on Windows 10?
Open up the Settings app and navigate to System -> Display. Scroll down to the bottom and click on the “Graphics settings” link. Now, you can customize the graphics performance preference of any specific applications. For universal app, select the app from the list, and then click on Add.
How do I change my graphics card to High Performance Windows 10?
To change your graphical performance settings for an app:
- Launch the Settings app.
- Browse to System > Display > (scroll down) > Graphics settings.
- Browse for a Classic app or Universal app to set preferences for.
- Click the added app in the list and press Options.
- Choose your performance mode preference and press “Save”.
Where do I find my graphics card settings on Windows 10?
You can right-click the blank space on the computer screen and choose “Display” Settings. Click on “Advanced Display Settings”. Then you can scroll down and click on “Display adapter properties” option, then you will see the installed graphics card(s) on your Windows 10.
How do I enable my graphics card?
Solution
- Right click on the desktop and choose NIVIDIA Control Panel.
- Choose Manage 3D settings. Select High performance NVIDIA processor under Preferred graphics processor. Then the graphics card will be used when the system executes the task.
How do I change Nvidia graphics card settings?
NVIDIA Graphics Card Settings
- Right-click on your computer’s desktop and select ‘NVIDIA Control Panel.
- Under Select a Task select ‘Manage 3D Settings.
- Select the ‘Global Settings tab’ and choose ‘High-performance NVIDIA processor’ under the preferred graphics processor drop-down bar.
How do I get to advanced graphics settings?
Open the Settings app and go to the System group of settings. Go to the Display tab and scroll down to the Advanced graphics settings option. Click it.
How do I set my graphics card to Intel high-performance?
You can use Intel’s graphics control panel to optimize your graphics settings for performance instead of image quality and battery life. To launch it, right-click the Windows desktop and select “Graphics Properties.” You can also launch the “Intel HD Graphics Control Panel” tool from your Start menu.
How do I check my graphics card performance?
How to check if GPU performance will appear on your PC
- Use the Windows key + R keyboard shortcut to open the Run command.
- Type the following command to open DirectX Diagnostic Tool and press Enter: dxdiag.exe.
- Click the Display tab.
- On the right, under “Drivers,” check the Driver Model information.
Where do I find my graphics card info?
How can I find out which graphics card I have in my PC?
- Click Start.
- On the Start menu, click Run.
- In the Open box, type “dxdiag” (without the quotation marks), and then click OK.
- The DirectX Diagnostic Tool opens.
- On the Display tab, information about your graphics card is shown in the Device section.
How do I know my graphics card is working?
Open Windows’ Control Panel, click “System and Security” and then click “Device Manager.” Open the “Display Adapters” section, double click on the name of your graphics card and then look for whatever information is under “Device status.” This area will typically say, “This device is working properly.” If it does not
How do I make Nvidia graphics card default in Windows 10?
Set discrete graphics card as default
- Right-click any blank space on the desktop and choose NVIDIA Control Panel.
- Click Manage 3D settings, go to Preferred graphic processor, and select High-Performance NVIDIA processor and then Apply.
How do I switch from integrated graphics to graphics card?
Right-click on the desktop and select Nvidia Control Panel.
- Switch to Manage 3D settings in the left-hand pane.
- Switch to the Program Settings tab.
- Under Select a program to customize, choose the relevant app.
- Under Select the preferred graphics processor for this program, choose the GPU you prefer.
How do I force Windows to use my graphics card?
Right-click the app you want to force to use the dedicated GPU. The right-click context menu will have a ‘Run with graphics processor’ option. Select ‘High-performance NVIDIA processor‘ from the sub-options and the app will run using your dedicated GPU.
How do I change my default Graphics card in Windows 10 Radeon?
Right-click on the Windows desktop and select AMD Radeon Software. Click on GPU Workload and select the preferred setting (Graphics is default).
How do I access my Intel graphics settings?
The Intel® Graphics Control Panel can be opened from the Windows Start menu or using the shortcut CTRL+ALT+F12.
How can I improve graphics on my laptop?
Laptop Gaming Performance: Improved!
- Regularly clean your laptop.
- Update your drivers (especially for the GPU).
- Install the latest version of DirectX.
- Overclock the GPU.
- Optimize the power settings.
- Activate Windows 10’s Game Mode.
- Close background apps.
- Check the network speed for online gaming.
How do I put games on my Intel HD graphics?
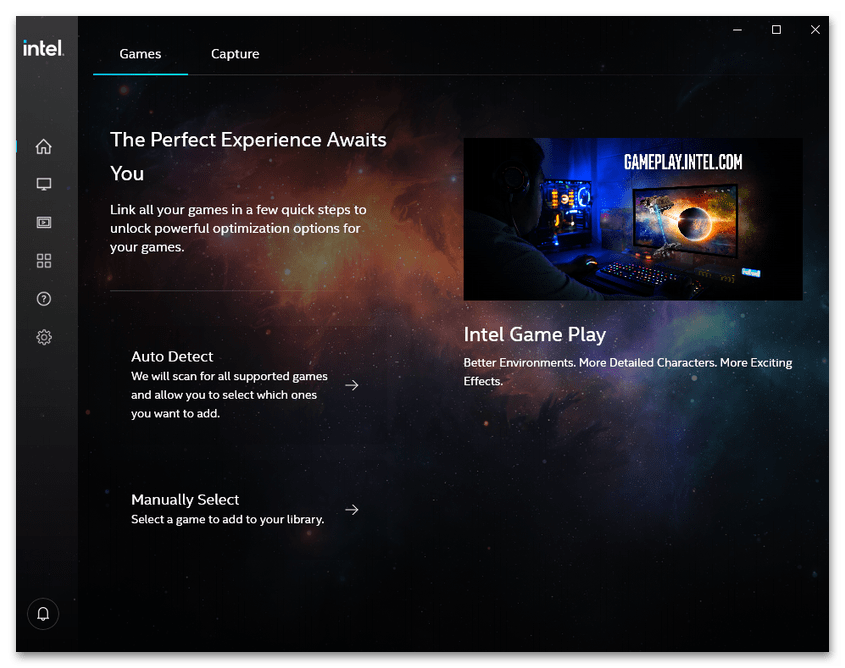
Double click the Intel® Graphics Command Center icon. Go to the Home tab and under the Games section click Auto Detect. This will scan for all supported games and allow you to select which games you want to add. You may also click Manually Select to manually add the games.
Are Intel HD Graphics good?
However, most mainstream users can get good enough performance from Intel’s built-in graphics. Depending on the Intel HD or Iris Graphics and the CPU it comes with, you can run some of your favorite games, just not at the highest settings. Even better, integrated GPUs tend to run cooler and are more power efficient.
What graphics card do I have Nvidia?
Right click the desktop and open NVIDIA Control Panel. Click System Information in the bottom left corner. In the Display tab your GPU is listed in the Components column.
The Intel Graphics Command Center offers graphics configuration options and optimizations.
Requirements:
- 6th Generation Intel® Core processor or newer.
- Windows® 10 version 1709 or higher.
- Windows 11* version 21H2 or higher. Windows 11* requires an 8th-generation processor or newer.
- Intel® Graphics driver version 25.20.100.6618 or newer.
- Internet connection.
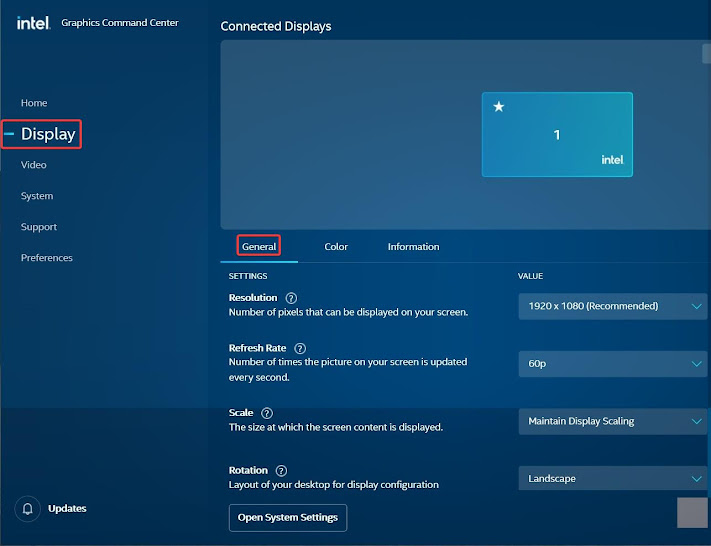
1. Display Tab Settings
A. General
Resolution: This setting lets the user select the resolution of Windows OS Desktop. It is recommended to keep this resolution setting the same as the resolution of the Monitor.
Refresh Rate: This setting lets the user select the Refresh rate of the monitor.
Scale: This setting lets the user scaling mode used by the Intel GPU to scale the Windows OS Desktop.
- Maintain Display scaling: This setting can be used when the Desktop screen aspect ratio is the same as the aspect ratio of the Display screen. The Intel GPU will scale the Desktop screen to completely fit the Monitor screen.
- Maintain Aspect ratio: The intel GPU will scale the Desktop screen to fit the Monitor screen while maintaining the aspect ratio of the Desktop screen.
- Stretched: The GPU will scale the desktop screen to completely fit the Display monitor. The aspect ratio of the Desktop screen will not be maintained.
- Centered: The GPU will not perform scaling on the Desktop Screen and position the Desktop screen at the center of the Display monitor.
Rotation: This setting lets the user select the orientation of the Desktop screen in reference to the Monitor screen. This is useful when the user needs to orient the monitor physically into various positions.
- Landscape: The orientation of the desktop screen in which the horizontal part is longer than the vertical part and the top of the Desktop screen aligns with the top of the Monitor screen.
- Portrait: The orientation of the Desktop screen in which the horizontal part is shorter than the vertical part and the top of the Desktop screen aligns with the left of the Monitor screen.
- Landscape (flipped): The orientation of the desktop screen in which the horizontal part is longer than the vertical part and the top of the Desktop screen aligns with the bottom of the Monitor screen.
- Portrait (flipped): The orientation of the Desktop screen in which the horizontal part is shorter than the vertical part and the top of the Desktop screen aligns with the right of the Monitor screen.
B. Color
This setting lets the user set the Brightness, Contrast, Hue, and Saturation of the Windows OS Desktop. This processing is done by the GPU and affects everything that is displayed on the Desktop Screen
Color Profiles: This setting lets the user create Custom color profiles in addition to the Default Profile. Each profile stores settings related to Brightness, Contrast, Hue, and saturation.
Brightness Enhancement: This setting lets the user adjust the Brightness level of the Windows OS Desktop.
Contrast Enhancement: This setting lets the user adjust the Contrast of the Windows OS Desktop.
Hue: This setting lets the user set the color Hue level of the desktop screen.
Saturation: This setting lets the user set the color saturation level of the Desktop screen.
Information: Here are various stats related to the Display monitor.
2. Video Tab Settings
Video settings let the user configure various color-related settings which affect the display of video playback by the Video applications and the images.
Video Profiles: This setting lets the user create Custom color profiles in addition to the Default Profile. Each profile
Standard Color Correction
- On: It will enable color correction processing by the Intel GPU on the video playback and images. It will disable the processing of the Brightness, Contrast, Hue, and Saturation level done by the video application and images.
- Off: It will disable the color correction processing by the Intel GPU on the video playback and images. The Brightness, Contrast, Hue, and Saturation level of video playback is controlled by the Video Application. It will disable the video color correction processing by the Intel GPU.
Brightness: This setting lets the user adjust the Brightness level of video playback and images by the Intel GPU driver.
Contrast: This setting lets the user adjust the Contrast level of video playback and images by the Intel GPU driver.
Hue: This setting lets the user adjust the Hue level of video playback and images by the Intel GPU driver.
Saturation: This setting lets the user adjust the Saturation level of video playback and images by the Intel GPU driver.
Sharpness
- On: It will enable the Sharpness level processing of the Video Playback by the Intel GPU driver and will disable the Sharpness level processing of the video playback by the Video application.
- Off: It will disable the Sharpness level processing of the Video Playback by the Intel GPU. The Sharpness level processing of the video playback is controlled by the Video Application.
Sharpness Range: This setting lets the user select the Sharpness level of the video playback done by the Intel GPU.
Noise reduction
- On: It will enable the Noise reduction processing of the Video Playback by the Intel GPU driver and will disable the Noise reduction processing of the video playback by the Video application.
- Off: It will disable the Noise reduction processing of the Video Playback by the Intel GPU. The Noise reduction processing of the video playback is controlled by the Video Application.
Noise Range: This setting lets the user select the Noise reduction level of the video playback done by the Intel GPU.
Film Mode Detection
- Enable: The Intel GPU will detect if the video being played is part of the film and improve the picture quality of the video.
- Disable: The Intel GPU will not try to detect if the video being played is part of the film.
Skin Tone Enhancement
- Enable: The Intel GPU will enhance the skin tone of the video playback. Users can select the level of enhancement.
- Disable: The Intel GPU will not enhance the skin tone of the video playback.
Total color Correction
- Enable: This option lets the user customize various color-related properties of video playback and images by the Intel GPU. This includes Red, Green, Blue, Cyan, Magenta, and Yellow.
- Disable: When this option is selected, no advanced color enhancement processing is done on video playback and images by the Intel GPU.
Contrast Enhancement
- On: It will enable the Contrast enhancement processing of the Video Playback and images by the Intel GPU driver.
- Off: It will disable the Contrast enhancement processing of the Video Playback and images by the Intel GPU driver.
Contrast Enhancement Range: This setting lets the user select the Contrast enhancement level of the video playback and images done by the Intel GPU.
Input range
This setting lets the user select the YUV color levels of the video being played are controlled by the Intel GPU driver.
- None: The output YUV color level of the video playback is not known.
- Limited Range: The output YUV color level of the video playback is limited( 16-235).
- Full Range: The output YUV color level of the video playback is limited(0-255).
3. System Tab Settings
A. Hotkeys
Enable System Hotkeys
- On: Enable system hotkeys.
- Off: Disable system hotkeys.
Open Intel Graphics Command Center: This setting lets the user set the shortcuts for Intel Graphics Command Center.
Screen Rotation
- Landscape: This setting lets the user set the shortcuts to set the Desktop in Landscape mode.
- Portrait: This setting lets the user set the shortcuts to set the Desktop in Portrait mode.
-
Landscape (flipped): This setting lets the user set the shortcuts to set the Desktop in Landscape (flipped) mode.
-
Portrait (flipped): This setting lets the user set the shortcuts to set the Desktop in Portrait (flipped) mode.
B. Power
It shows data related to the battery.
Extend Battey life for Gaming
C. On Battery
This setting lets the user do various power-related customization when the computer is running on Battery.
Power plans
- Maximum Battery Life: When this option is selected the Intel GPU focuses on saving power by keeping the operating frequency of the Intel GPU at a lower level. This lowers the overall power consumption. This degrades the performance of video playback and 3D games.
- Maximum Performace: When this option is selected the Intel GPU focuses on Graphics performance by increasing the operating frequency of the Intel GPU. This increases the overall power consumption. This enhances the performance of video playback and 3D games.
- Balanced Mode: When this option is selected the Intel GPU minimizes power consumption when its usage is low. When applications, video playback, and 3D games need high GPU computing power the Intel GPU increases the operating frequency of the GPU and provides high graphics performance.
Display power savings
- On: It enables a power-saving feature by decreasing the display backlight intensity.
- Off: It disables a power-saving feature by decreasing the display backlight intensity.
Power Efficiency: This setting lets the user select the level of power-saving efficiency by the Intel GPU. The higher the power efficiency level the higher the power saving and the lower the graphics quality.
Enhanced Power Saving
- On: The brightness of the images will be lowered to save power.
- Off: The brightness of the images will not be lowered to save power.
D. Plugged In
This setting lets the user choose the Power plans when the computer is running connected to the power supply.
Power plans
- Maximum Battery Life: When this option is selected the Intel GPU focuses on saving power by keeping the operating frequency of the Intel GPU at a lower level. This lowers the overall power consumption. This degrades the performance of video playback and 3D games.
- Maximum Performace: When this option is selected the Intel GPU focuses on Graphics performance by increasing the operating frequency of the Intel GPU. This increases the overall power consumption. This enhances the performance of video playback and 3D games.
- Balanced Mode: When this option is selected the Intel GPU minimizes power consumption when its usage is low. When applications, video playback, and 3D games need high GPU computing power the Intel GPU increases the operating frequency of the GPU and provides high graphics performance.
4. Preferences Tab Settings
System tray
- On: The Intel Graphics Command center icon will be displayed in the Notification Area.
- Off: The Intel Graphics Command center icon will not be displayed in the Notification Area.
Notifications
- On: The app will show a notification when an update is available.
- Off: The app will not show a notification when an update is available.
