About This Guide
This guide is a complement to Quick Installation Guide. The Quick Installation Guide instructs you on quick internet setup, and this guide provides details of each function and shows you the way to configure these functions appropriate to your needs.
When using this guide, please notice that features of the router may vary slightly depending on the model and software version you have, and on your location, language, and internet service provider. All screenshots, images, parameters and descriptions documented in this guide are used for demonstration only.
Conventions
In this guide the following conventions are used:
|
Convention |
Description |
|
Teal Underlined |
Hyperlinks are in teal and underlined. You can click to redirect to a website or a specific section. |
|
Teal |
Contents to be emphasized and texts on the web page are in teal, including the menus, items, buttons and so on. |
|
> |
The menu structures to show the path to load the corresponding page. For example, Advanced > Wireless > MAC Filtering means the MAC Filtering function page is under the Wireless menu that is located in the Advanced tab. |
|
|
Ignoring this type of note might result in a malfunction or damage to the device. |
|
|
Indicates important information that helps you make better use of your device. |
More Info
•The latest software, management app and utility are available from the Download Center at https://www.tp-link.com/support.
•The Quick Installation Guide can be found where you find this guide or inside the package of the router.
•Specifications can be found on the product page at https://www.tp-link.com.
•A Technical Support Forum is provided for you to discuss our products at
https://forum.tp-link.com.
•Our Technical Support contact information can be found at the Contact Technical Support page at https://www.tp-link.com/support.
* Maximum wireless signal rates are the physical rates derived from IEEE Standard 802.11 specifications. Range, coverage, and maximum quantity of connected devices are based on test results under normal usage conditions. Actual wireless data throughput, wireless coverage, and quantity of connected devices are not guaranteed and will vary as a result of 1) environmental factors, including building materials, physical objects, and obstacles, 2) network conditions, including local interference, volume and density of traffic, product location, network complexity, and network overhead, and 3) client limitations, including rated performance, location, connection quality, and client condition.
Решил подготовить небольшое руководство по настройке Wi-Fi роутера TP-Link Archer MR400. Если вы еще не знакомы с этим роутером, то рекомендую почитать мой обзор на эту модель. Так как Archer MR400 в основном покупают для того, чтобы подключаться к интернету через 3G/4G сеть, то я обязательно покажу, как подключить SIM-карту к этому роутеру и выполнить необходимые настройки подключения к интернету и Wi-Fi сети. Так же на всякий случай рассмотрим вариант подключения к интернету не через 3G/4G сеть, а Ethernet-кабель. Такая возможность в этом маршрутизаторе тоже есть.
В настройках доступно два режима работы: «3G/4G Router Mode» – когда роутер подключается к интернету через SIM-карту (3G/4G сеть). И «Wireless Router Mode» – когда интернет к роутеру мы подключаем по кабелю (напрямую от провайдера, или от модема) в WAN-порт. По умолчанию роутер работает в режиме «3G/4G Router Mode». Вставив SIM-карту в отдельный слот на роутере, он сразу подключается к сети мобильного оператора и начинает раздавать интернет. Настройки Wi-Fi сети и других функций на Archer MR400 практически ничем не отличаются от другим роутеров TP-Link. На этом роутере установлена новая версия веб-интерфейса.
Настройка TP-Link Archer MR400 с SIM-картой
В роутере слот под Micro SIM. Если у вас Nano SIM, то можно использовать переходник, который идет в комплекте с роутером.
Необходимо вставить карту в переходник и зафиксировать ее наклейкой с обратной стороны. После чего вставить SIM-карту в слот на роутере.
Включаем роутер и наблюдаем за индикаторами на передней панели. Примерно через минуту должен загореться индикатор уровня сигнала сотовой сети (деления, у меня на фото их три) и индикатор подключения к интернету. Это при условии, что роутер смог сам настроить подключение к интернету, есть покрытие 3G/4G сети и нет никаких ограничений со стороны нашего оператора.
Уже можно подключать устройства к роутеру и использовать подключение к интернету. Подключаться можно как по сетевому кабелю, так и по Wi-Fi. Заводское имя Wi-Fi сети (SSID) и пароль (Wirelles Password/PIN) можно найти на наклейке снизу TP-Link Archer MR400.
Нужно просто выбрать Wi-Fi сеть в списке доступных сетей на своем устройстве и указать пароль. Чтобы зайти в настройки роутера (например, для смены имени Wi-Fi сети и пароля), нужно сначала подключиться к самому роутеру. В настройки можно зайти через любой браузер. В том числе с телефона и планшета. Но на мобильных устройствах, для настройки и управления роутером Archer MR400 можно установить и использовать приложение TP-LINK Tether.
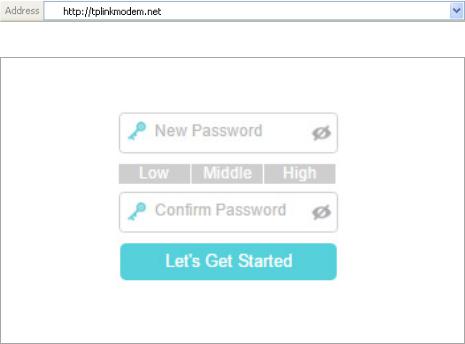
Через браузер в настройки зайти можно по адресу tplinkmodem.net, или 192.168.1.1. При первом входе в веб-интерфейс роутер попросит вас установить пароль администратора, который будет защищать настройки роутера. Нужно придумать и указать пароль (2 раза). Обязательно запишите его где-то.
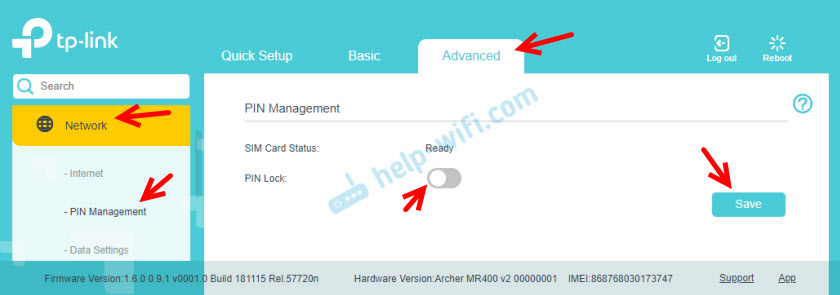
Все параметры, которые связаны с подключением к интернету через сеть мобильного оператора находятся на вкладке «Advanced», в разделе «Network». Если сразу появится сообщение связанное с PIN-кодом, значит SIM-карта заблокирована. Нужно перейти в раздел «Network» – «PIN Management» и ввести PIN-код (указан на карточке от SIM-карты, если вы его не меняли). Либо отключить блокировку PIN переключателем напротив «PIN Lock».
В разделе «Network» – «Internet» можно изменить параметры подключения к сотовой сети. Если это необходимо. У меня все настройки прописались автоматически.
Рекомендую обратить внимание на пункт «Network Mode» (режим сети). По умолчанию там стоит 4G Preferred (Предпочтительнее 4G). Это значит, что рутер будет подключаться к сети 4G, если есть покрытие. Если покрытия нет, то он будет подключаться к сети 3G. Менять настройки на «3G Only» (Только 3G) рекомендую лишь в том случае, когда покрытия 4G нет совсем. А «4G Only» – когда есть покрытие 4G, но роутер почему-то периодически переключается на 3G (при этом скорость в сети 4G выше по сравнению с 3G).
В разделе «USSD» можно отправлять USSD-запросы. Например, для проверки баланса, подключения каких-то тарифов и т. д. Управлять SMS сообщениями можно в отдельном разделе «SMS».
О настройке Wi-Fi сети я расскажу в одном из следующих разделов в этой статье. Просто прокрутите страницу ниже.
Настройка в режиме обычного маршрутизатора (интернет по кабелю)
Если вы хотите подключить к TP-Link Archer MR400 интернет по сетевому кабелю, то нужно для начала подключиться к роутеру с компьютера или мобильного устройства по кабелю или Wi-Fi, зайти в настройки и переключить его в соответствующий режим работы.
Выше я уже писал, что в настройки можно зайти по адресу http://tplinkmodem.net или http://192.168.1.1. На вкладке «Advanced», в разделе «Operation Mode» нужно поставить переключатель возле пункта «Wireless Router Mode» и нажать на кнопку «Save».
Подтверждаем смену режима работы. Ждем пока роутер будет перезагружен. После чего, если страница с настройка не кроется автоматически – открываем ее вручную.
К роутеру нужно подключить интернет. Кабель подключаем в порт LAN4/WAN.
В настройках (веб-интерфейсе) открываем раздел «Advanced» — «Network» — «Internet». Там сразу бросается в глаза переключатель «3G/4G Backup». Я так понимаю, если эта функция включена и к роутеру подключена SIM-карта, то при потере соединения с интернетом по кабелю, подключение через сотовую сеть будет использоваться как резервное.
Чтобы настроить подключение к интернет-провайдеру, нужно создать новый профиль (нажать на кнопку «Add»).
Сначала нужно правильно выбрать тип подключения к интернету (Internet Connection Type). Если вы не знаете какой тип подключения использует ваш провайдер, то нет смысла продолжать настройку. Обязательно выясните эту информацию у своего интернет-провайдера.
Во всех случаях кроме «Dynamic IP» (Динамический IP, DHCP) нужно прописывать настройки. Обратите внимание, что провайдер может делать еще и привязку по MAC-адресу. Если интернет не работает, то нужно выяснить это момент у поддержки. Для PPPoE нужно прописать имя пользователя и пароль. А для L2TP и PPTP еще и адрес сервера. Все эти адреса и пароли выдает провайдер.
Настройка PPPoE, для примера.
Сохраните настройки и смотрите на статус подключения. Если роутер не может подключится к интернету, то еще раз проверьте все параметры. Если необходимо – уточните их у провайдера. И выясните, нет ли ограничений с его стороны.
Настройка Wi-Fi сети на TP-Link Archer MR400
Все настройки беспроводной сети собраны в разделе «Advanced» — «Wireless» — «Wireless Settings». Так как роутер у нас двухдиапазонный, то там две вкладки: «2.4GHz» и «5GHz«. Каждая сеть настраивается отдельно. Нам нужно только сменить имя сети (Network Name (SSID)) и пароль (Password). Остальные настройки без необходимости не советую менять. Настраиваем сеть на 2.4GHz:
И 5GHz. Точно так же, меняем имя сети и пароль. Рекомендую задать другое имя сети. Пароль можно оставить такой же.
После сохранения настроек не забудьте заново подключить свои устройства к Wi-Fi сети. Если вы подключали их к сети со старым (заводским) именем и паролем.
Сброс настроек
Всегда можно восстановить заводские настройки на TP-Link Archer MR400 и начать процесс настройки заново. Для этого нужно нажать и примерно секунд 5 подержать кнопку WPS/Reset.
Начнет мигать индикатор питания. Еще через несколько секунд роутер будет перезагружен, а настройки сброшены до заводских.

User Guide
AC1350 Wireless Dual Band 4G LTE Router
Archer MR400
REV1.2.0 1910012197
Contents
|
About This Guide |
…………………………………………………………………………………………….1 |
Chapter 1. Get to Know Your 4G LTE Router . . . . . . . . . . . . . . . . . . . . . . . . . . 2
1. 1. Product Overview . . . . . . . . . . . . . . . . . . . . . . . . . . . . . . . . . . . . . . . . . . . . . . . . . . . . . . . . . . . .3 1. 2. Panel Layout . . . . . . . . . . . . . . . . . . . . . . . . . . . . . . . . . . . . . . . . . . . . . . . . . . . . . . . . . . . . . . . . .3 1. 2. 1.Top View. . . . . . . . . . . . . . . . . . . . . . . . . . . . . . . . . . . . . . . . . . . . . . . . . . . . . . . . . . . . . . .3 1. 2. 2.The Back Panel . . . . . . . . . . . . . . . . . . . . . . . . . . . . . . . . . . . . . . . . . . . . . . . . . . . . . . . .5
Chapter 2. Connect the Hardware . . . . . . . . . . . . . . . . . . . . . . . . . . . . . . . . . . . 6
2. 1. Requirements for Operation . . . . . . . . . . . . . . . . . . . . . . . . . . . . . . . . . . . . . . . . . . . . . . . . . .7 2. 2. Position Your 4G LTE Router . . . . . . . . . . . . . . . . . . . . . . . . . . . . . . . . . . . . . . . . . . . . . . . . . .7 2. 3. Connect Your 4G LTE Router . . . . . . . . . . . . . . . . . . . . . . . . . . . . . . . . . . . . . . . . . . . . . . . . .7
Chapter 3. Log In to Your 4G LTE Router. . . . . . . . . . . . . . . . . . . . . . . . . . . . . 10
Chapter 4. Set Up Internet Connections . . . . . . . . . . . . . . . . . . . . . . . . . . . . 12
4. 1. Use Quick Setup Wizard . . . . . . . . . . . . . . . . . . . . . . . . . . . . . . . . . . . . . . . . . . . . . . . . . . . . 13 4. 2. Create a Connection Profile . . . . . . . . . . . . . . . . . . . . . . . . . . . . . . . . . . . . . . . . . . . . . . . . 13 4. 3. Test Internet Connectivity . . . . . . . . . . . . . . . . . . . . . . . . . . . . . . . . . . . . . . . . . . . . . . . . . . 15
Chapter 5. Bandwidth Control . . . . . . . . . . . . . . . . . . . . . . . . . . . . . . . . . . . . . . 16
Chapter 6. Network Security. . . . . . . . . . . . . . . . . . . . . . . . . . . . . . . . . . . . . . . . 20
6. 1. Firewall & DoS Protection. . . . . . . . . . . . . . . . . . . . . . . . . . . . . . . . . . . . . . . . . . . . . . . . . . . 21
6. 2. Service Filtering. . . . . . . . . . . . . . . . . . . . . . . . . . . . . . . . . . . . . . . . . . . . . . . . . . . . . . . . . . . . 22
6. 3. Access Control. . . . . . . . . . . . . . . . . . . . . . . . . . . . . . . . . . . . . . . . . . . . . . . . . . . . . . . . . . . . . 23
6. 4. IP & MAC Binding. . . . . . . . . . . . . . . . . . . . . . . . . . . . . . . . . . . . . . . . . . . . . . . . . . . . . . . . . . . 25
Chapter 7. Parental Controls. . . . . . . . . . . . . . . . . . . . . . . . . . . . . . . . . . . . . . . . 27
Chapter 8. SMS . . . . . . . . . . . . . . . . . . . . . . . . . . . . . . . . . . . . . . . . . . . . . . . . . . . . . 31
8. 1. View Messages . . . . . . . . . . . . . . . . . . . . . . . . . . . . . . . . . . . . . . . . . . . . . . . . . . . . . . . . . . . . 32
8. 2. Edit and Send a New Message. . . . . . . . . . . . . . . . . . . . . . . . . . . . . . . . . . . . . . . . . . . . . . 32
8. 3. View Sent Messages . . . . . . . . . . . . . . . . . . . . . . . . . . . . . . . . . . . . . . . . . . . . . . . . . . . . . . . 33
8. 4. View Drafts. . . . . . . . . . . . . . . . . . . . . . . . . . . . . . . . . . . . . . . . . . . . . . . . . . . . . . . . . . . . . . . . . 33
8. 5. SMS Settings . . . . . . . . . . . . . . . . . . . . . . . . . . . . . . . . . . . . . . . . . . . . . . . . . . . . . . . . . . . . . . 33
Chapter 9. Guest Network . . . . . . . . . . . . . . . . . . . . . . . . . . . . . . . . . . . . . . . . . . 35
9. 1. Create a Network for Guests . . . . . . . . . . . . . . . . . . . . . . . . . . . . . . . . . . . . . . . . . . . . . . . 36 9. 2. Customize Guest Network Options . . . . . . . . . . . . . . . . . . . . . . . . . . . . . . . . . . . . . . . . . 36
Chapter 10.NAT Forwarding . . . . . . . . . . . . . . . . . . . . . . . . . . . . . . . . . . . . . . . . . 38
10. 1. Share Local Resources in the Internet by Virtual Server . . . . . . . . . . . . . . . . . . . . . 39 10. 2. Open Ports Dynamically by Port Triggering . . . . . . . . . . . . . . . . . . . . . . . . . . . . . . . . . 40 10. 3. Make Applications Free from Port Restriction by DMZ. . . . . . . . . . . . . . . . . . . . . . . 41 10. 4. Make Xbox Online Games Run Smoothly by UPnP. . . . . . . . . . . . . . . . . . . . . . . . . . . 42
Chapter 11.Specify Your Network Settings . . . . . . . . . . . . . . . . . . . . . . . . . . 44
11. 1. USSD . . . . . . . . . . . . . . . . . . . . . . . . . . . . . . . . . . . . . . . . . . . . . . . . . . . . . . . . . . . . . . . . . . . . . . 45 11. 2. PIN Management. . . . . . . . . . . . . . . . . . . . . . . . . . . . . . . . . . . . . . . . . . . . . . . . . . . . . . . . . . . 45 11. 3. Data Settings . . . . . . . . . . . . . . . . . . . . . . . . . . . . . . . . . . . . . . . . . . . . . . . . . . . . . . . . . . . . . . 46 11. 4. LAN Settings. . . . . . . . . . . . . . . . . . . . . . . . . . . . . . . . . . . . . . . . . . . . . . . . . . . . . . . . . . . . . . . 47 11. 4. 1.Change the LAN IP Address . . . . . . . . . . . . . . . . . . . . . . . . . . . . . . . . . . . . . . . . 47 11. 4. 2.Use the 4G LTE Router as a DHCP Server . . . . . . . . . . . . . . . . . . . . . . . . . . . 48 11. 4. 3.Reserve LAN IP Addresses . . . . . . . . . . . . . . . . . . . . . . . . . . . . . . . . . . . . . . . . . 49
11. 5. Wireless Settings . . . . . . . . . . . . . . . . . . . . . . . . . . . . . . . . . . . . . . . . . . . . . . . . . . . . . . . . . . 50 11. 5. 1.Specify Basic Wireless Settings . . . . . . . . . . . . . . . . . . . . . . . . . . . . . . . . . . . . 50 11. 5. 2.Use WPS for Wireless Connection . . . . . . . . . . . . . . . . . . . . . . . . . . . . . . . . . . 51 11. 5. 3.Schedule Your Wireless Function . . . . . . . . . . . . . . . . . . . . . . . . . . . . . . . . . . . 53 11. 5. 4.View Wireless Information . . . . . . . . . . . . . . . . . . . . . . . . . . . . . . . . . . . . . . . . . . 54 11. 5. 5.Advanced Wireless Settings . . . . . . . . . . . . . . . . . . . . . . . . . . . . . . . . . . . . . . . . 55
11. 6. Set Up a Dynamic DNS Service Account . . . . . . . . . . . . . . . . . . . . . . . . . . . . . . . . . . . . 57 11. 7. Create Static Routes . . . . . . . . . . . . . . . . . . . . . . . . . . . . . . . . . . . . . . . . . . . . . . . . . . . . . . . 57 11. 8. Set up a VPN Connection. . . . . . . . . . . . . . . . . . . . . . . . . . . . . . . . . . . . . . . . . . . . . . . . . . . 60
Chapter 12.Administrate Your Network . . . . . . . . . . . . . . . . . . . . . . . . . . . . . . 64
12. 1. Set System Time . . . . . . . . . . . . . . . . . . . . . . . . . . . . . . . . . . . . . . . . . . . . . . . . . . . . . . . . . . . 65 12. 2. Update the Firmware . . . . . . . . . . . . . . . . . . . . . . . . . . . . . . . . . . . . . . . . . . . . . . . . . . . . . . . 66 12. 2. 1.Online Upgrade. . . . . . . . . . . . . . . . . . . . . . . . . . . . . . . . . . . . . . . . . . . . . . . . . . . . . 66 12. 2. 2.Local Upgrade. . . . . . . . . . . . . . . . . . . . . . . . . . . . . . . . . . . . . . . . . . . . . . . . . . . . . . 67
12. 3. Back up and Restore Configuration Settings . . . . . . . . . . . . . . . . . . . . . . . . . . . . . . . . 67 12. 4. Change the Administrator Account . . . . . . . . . . . . . . . . . . . . . . . . . . . . . . . . . . . . . . . . . 68 12. 5. Local Management. . . . . . . . . . . . . . . . . . . . . . . . . . . . . . . . . . . . . . . . . . . . . . . . . . . . . . . . . 69 12. 6. Remote Management . . . . . . . . . . . . . . . . . . . . . . . . . . . . . . . . . . . . . . . . . . . . . . . . . . . . . . 69
12. 7. System Log . . . . . . . . . . . . . . . . . . . . . . . . . . . . . . . . . . . . . . . . . . . . . . . . . . . . . . . . . . . . . . . . 70
12. 8. Monitor the Internet Traffic Statistics . . . . . . . . . . . . . . . . . . . . . . . . . . . . . . . . . . . . . . . 72
12. 9. CWMP Settings . . . . . . . . . . . . . . . . . . . . . . . . . . . . . . . . . . . . . . . . . . . . . . . . . . . . . . . . . . . . 72
12. 10. SNMP Settings . . . . . . . . . . . . . . . . . . . . . . . . . . . . . . . . . . . . . . . . . . . . . . . . . . . . . . . . . . . . . 74
|
FAQ………………………………………………………………………………………………………………… |
76 |

About This Guide
This guide provides details of each function and shows how to configure the router appropriate to your needs. In addition to this guide, a Quick Installation Guide is also released with each TP-Link router, you are suggested to configure your router for quick internet setup by following the published Quick Installation Guide before you get started with a further configuration.
Conventions
In this guide the following conventions are used:
|
Convention |
Description |
|
|
Teal Underlined |
Hperlinks are in teal and underlined. You can click to redirect to a website or a specific |
|
|
section. |
||
|
Teal |
Contents to be emphasized and texts on the web page are in teal, including the menus, |
|
|
items, buttons and so on. |
The menu structures to show the path to load the corresponding page. For example,
>Advanced > Wireless > MAC Filtering means the MAC Filtering function page is under the Wireless menu that is located in the Advanced tab.
|
Note: |
Ignoring this type of note might result in a malfunction or damage to the device. |
||||
|
Tips: |
Indicates important information that helps you make better use of your device. |
||||
More Info
•The latest software, management app and utility are available from the Download Center at www.tp-link.com/support.
•The Quick Installation Guide can be found where you find this guide or inside the package of the router.
•Specifications can be found on the product page at http://www.tp-link.com.
•A Technical Support Forum is provided for you to discuss our products at http://forum.tp-link.com.
•Our Technical Support contact information can be found at the Contact Technical Support page at www.tp-link.com/support.
1

Chapter 1
Get to Know Your 4G LTE Router
This chapter introduces what the router can do and shows its appearance. It contains the following sections:
•Product Overview
•Panel Layout
|
Chapter 1 |
Get to Know Your 4G LTE Router |
1. 1. Product Overview
What This Product Does
The AC1350 Wireless Dual Band 4G LTE Router, Archer MR400, shares the latest generation 4G LTE network with multiple Wi-Fi devices, anywhere you want. It creates simultaneous dual band 802.11ac Wi-Fi, with speeds up to 450Mbps on 2.4GHz band and 867Mbps on 5GHz band. Also four Ethernet ports add your wired devices to the 4G LTE network.
Great Coverage and Dual Band Wi-Fi
Featuring two fixed external antennas and high power amplifiers, Archer MR400 is able to boost Wi-Fi coverage throughout your home. Advanced Beamforming technology enables Archer MR400 to focus Wi-Fi signal to connected devices, delivering a more targeted and highly efficient wireless connection.
Interchangeable LAN/WAN Port — Versatile Connectivity
The Archer MR400 supports 4G LTE or Ethernet WAN connections (EWAN), which allows users to have the flexibility of different internet connections among LTE, cable or fiber modem using its SIM card slot and interchangeable LAN/WAN port. This unique feature makes it easier when users need to change to fiber or cable services when necessary.
1. 2. Panel Layout
1. 2. 1. Top View
3

|
Chapter 1 |
Get to Know Your 4G LTE Router |
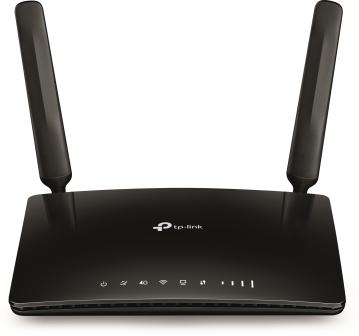
The router’s LEDs (view from left to right) are located on the front panel. You can check the router’s working status by following the LED Explanation table.
|
LED Explanation |
||||
|
Name |
Status |
Indication |
||
|
(Power) |
On |
Power is on.. |
||
|
Off |
Power is off. |
|||
|
(Internet) |
On |
The router is connected to the internet. |
||
|
Off |
There is no internet connection. |
|||
|
(4G) |
On |
The router is connected to the 4G network. |
||
|
Off |
The router is disconnected from the 4G network. |
|||
|
(Wireless) |
On |
At least one wireless radio band (2.4 GHz or 5 GHz) is enabled. |
||
|
Off |
The wireless radio band is disabled. |
|||
|
(LAN) |
On |
At least one LAN port is connected to a powered-on device. |
||
|
Off |
No LAN port is connected to a powered-on device. |
|||
|
On/ Off |
The light remains on for 5 minutes when a WPS connection is |
|||
|
(WPS) |
established, then turns off. |
|||
|
Flashing |
WPS connection is in progress. This may take up to 2 minutes. |
|||
|
On |
Indicates the signal strength the router received from the mobile |
|||
|
(Signal Strength) |
internet. More lit bars indicates a better signal strength. |
|||
|
Off |
There is no mobile internet signal. |
|||

1.If the Internet LED is off, please check your internet connection first. Refer to Connect Your 4G LTE Router for more information about how to make internet connection correctly. If you have already made a right connection, please contact your ISP to make sure your internet service is available now.
2.If the Signal Strength LED is off, please check your Internet LED first. If your Internet LED is also off, please refer to Note 1. If your Internet LED is on, please relocate the router to a location that receives a strong mobile internet signal, such as near a window.
4
|
Chapter 1 |
Get to Know Your 4G LTE Router |
1. 2. 2. The Back Panel
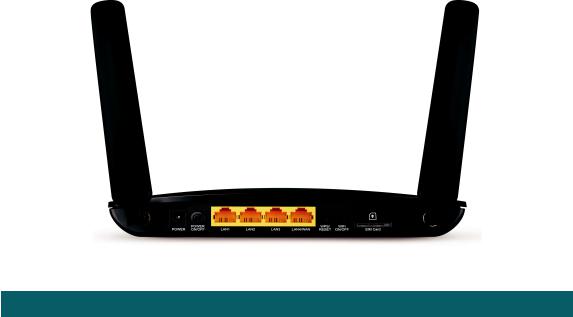
The following parts (view from left to right) are located on the rear panel.
|
Item |
Description |
|
|
POWER Port |
For connecting the router to power socket via the provided power adapter. |
|
|
POWER ON/OFF Button |
Press this button to power on or off the router. |
|
|
LAN1, LAN2, LAN3, |
For connecting to your PCs or other Ethernet network devices. |
|
|
In wireless router mode, the LAN4/WAN port is used for connecting to a Cable/FTTH/ |
||
|
LAN4/WAN |
||
|
VDSL/ADSL device. |
||
|
Press and hold this button until all the LEDs except the Power LED turn on momentarily to |
||
|
restore the router to its factory default settings. |
||
|
WPS/RESET |
To enable the WPS function, press this button about 2 seconds. If you have a WPS- |
|
|
supported device, you can press this button to quickly establish connection between |
||
|
the router and the client device and automatically configure wireless security for your |
||
|
wireless network. |
||
|
Wi-Fi ON/OFF |
For turning on/off the Wi-Fi function. |
|
|
SIM Card Slot |
For holding the SIM card. |
|
|
Antennas |
Used for data sessions over LTE. Upright them for the best mobile internet signal. |
5

Chapter 2
Connect the Hardware
This chapter contains the following sections:
•Requirements for Operation
•Position Your 4G LTE Router
•Connect Your 4G LTE Router
|
Chapter 2 |
Connect the Hardware |
2. 1. Requirements for Operation
To connect and use the router for internet sharing, you must have the following:
•SIM card with internet access enabled.
•PCs with an active Ethernet Adapter and an Ethernet cable with RJ45 connectors.
•TCP/IP protocol on each PC.
•Web browser, such as Microsoft Internet Explorer, Mozilla Firefox and Apple Safari.
2. 2. Position Your 4G LTE Router
With the router, you can access your network from anywhere within the wireless network coverage. However, the wireless signal strength and coverage varies depending on the actual environment where your router is in. Many obstacles may limit the range of the wireless signal, for example, concrete structures, thickness and number of walls.
For your security and best Wi-Fi performance, please:
•Do not locate the router in the place where it will be exposed to moisture or excessive heat.
•Keep away from strong electromagnetic radiation source and electromagneticsensitive devices.
•Place the router in a location where it can be connected to the various devices as well as to a power source.
•Place the router in a location where it can receive a strong mobile internet signal.
•Make sure the cables and power cord are safely placed out of the way so they do not create a tripping hazard.

2. 3. Connect Your 4G LTE Router
Follow the steps below to connect your router.
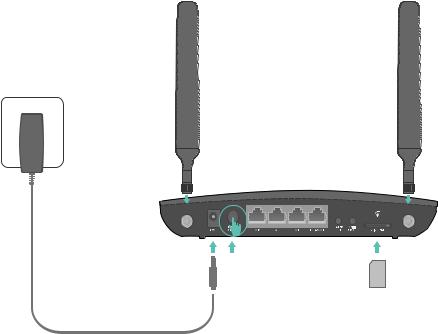
1.Connect the power adapter. The power source shall be near the device and shall be easily accessible.
7
|
Chapter 2 |
Connect the Hardware |
3 Connect the power adatpter to the router and push in to turn on the router.
1 Install the 4G LTE antennas and position them upwards.
2 Insert the SIM card into the slot until you hear a click.
Note: A Micro or Nano SIM card must be converted using the SIM card adapter provided.
2. Connect your computer to the router.
Method 1: Wired
Connect your computer’s Ethernet port to one of the LAN ports on Archer MR400 via an Ethernet cable.
Method 2: Wirelessly
Use the default SSID (Wireless Network Name) and Wireless Password printed on the product label of the router to connect wirelessly.
Method 3: Use the WPS button
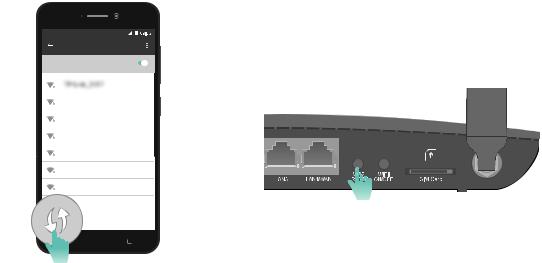
Wireless devices that support WPS, including Android phones, tablets, most USB network cards, can be connected to your router through this method. (WPS is not supported by iOS devices.)

The WPS function cannot be configured if the wireless function of the router is disabled. Also, the WPS function will be disabled if your wireless encryption is WEP. Please make sure the wireless function is enabled and is configured with the appropriate encryption before configuring the WPS.
|
1 ) |
Tab the WPS icon on the device’s screen. |
|
2 ) |
Immediately press the WPS button on your router. |
|
3 ) |
The WPS LED flashes for about 2 minutes during the WPS process. |
|
4 ) |
When the WPS LED is on, the client device has successfully connected to the |
|
router. |
8
|
Chapter 2 |
Connect the Hardware |
WLAN
On
|
TP-Link_Home |
|
My Home |
|
My Network |
|
Home Network |
|
TP-Link_Network |
|
TP-Link_Test |
9

Chapter 3
Log In to Your 4G LTE Router
|
Chapter 3 |
Log In to Your 4G LTE Router |
With a web-based management page, it is easy to configure and manage the Archer MR400 AC1350 Wireless Dual Band 4G LTE Router. The Web-based management page can be used on any Windows, Macintosh or UNIX OS with a web browser, such as Microsoft Internet Explorer, Mozilla Firefox or Apple Safari.
Follow the steps below to log in to your router.
1.If the TCP/IP Protocol on your computer is set to the static (fixed) IP address, you need to change its settings to obtain an IP address automatically. Refer to FAQ to configure your computer.
2.Launch a web browser and type in http://tplinkmodem.net or http://192.168.1.1. Set a strong password using 1-15 characters and click Let’s Get Started.

11

Chapter 4
Set Up Internet
Connections
This chapter introduces how to connect your router to the internet. The router is equipped with a web-based Quick Setup wizard. It has many ISP information built in, automates many of the steps and verifies that those steps have been successfully completed. Furthermore, you can set up IPv6 connection if your ISP provides IPv6 service.
This chapter includes the following sections:
•Use Quick Setup Wizard
•Create a Connection Profile
•Test Internet Connectivity
|
Chapter 4 |
Set Up Internet Connections |
4. 1. Use Quick Setup Wizard
To set up your router with several easy steps quickly:
1.Visit http://tplinkmodem.net, and log in with the password you set for the router.
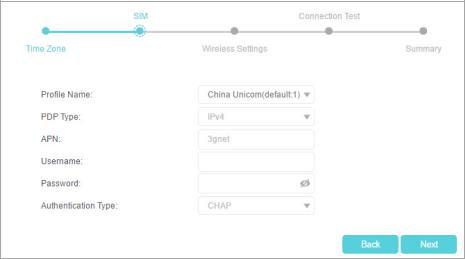
2.Click Quick Setup, after configuring your time zone, confirm the parameters with the information provided by your ISP in the SIM part and click Next.

Quick Setup is not available if your SIM card is locked. Unlock your SIM card according to the prompt.
3. Follow the on-screen instructions to complete the setup.

1.During the quick setup process, you can change the preset wireless network name (SSID) and wireless password. Once done, all your wireless devices must use the new SSID and password to connect to the router.
2.The router supports two operation modes, 3G/4G Router Mode and Wireless Router mode. If you already have a modem or your internet comes via an Ethernet cable from the wall, you can set up the router as a regular wireless router to share the internet. Refer to FAQ for details.
4. 2. Create a Connection Profile
If your ISP settings are not detected by the router, you can create an internet connection profile by following the steps below:
1.Visit http://tplinkmodem.net, and log in with the password you set for the router.
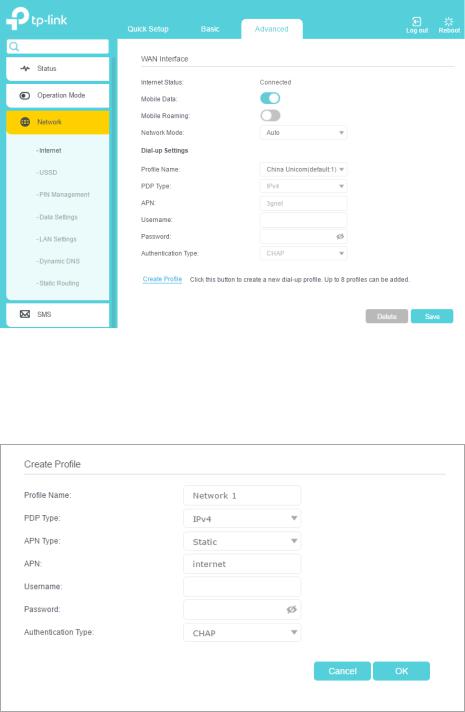
2.Go to Advanced > Network > Internet page.
13
|
Chapter 4 |
Set Up Internet Connections |
||
3.Click Create Profile.
4.Specify the Profile Name, Username and Password. Select the PDP Type, APN Type and Authentication Type according to your ISP.
5.Click OK to make the settings effective and the new profile will be used to set up a new connection.

1.You can view all internet connections or edit connections that are set up manually on this page.
2.You can change the Network Mode to 4G Only or 3G Only according to your needs.
14

|
Chapter 4 |
Set Up Internet Connections |
4. 3. Test Internet Connectivity
Aftermanuallysetuptheinternetconnection,youneedtoknowtheinternetconnectivity. The router provides a diagnostic tool to help you locate the malfunction.
1.Visit http://tplinkmodem.net, and log in with the password you set for the router.
2.Go to Advanced > System Tools > Diagnostics page.
3.Click Start to test the internet connectivity and you will see the test result in the gray box.
15

Chapter 5
Bandwidth Control
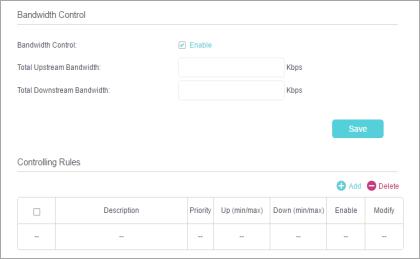
The Bandwidth Control feature is used to fully utilize your limited bandwidth and optimize the load respectively. With this feature enabled, you can assign a specific minimum or maximum bandwidth for each computer, thus minimizing the impact caused when the connection is under heavy load.
|
Chapter 5 |
Bandwidth Control |
I want to:
Tips:
How can I do that?
Use an independent bandwidth and enjoy a good internet experience without being affected by other users who are sharing the same router.
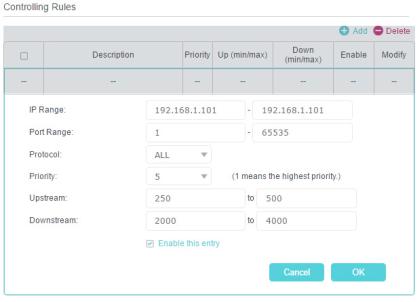
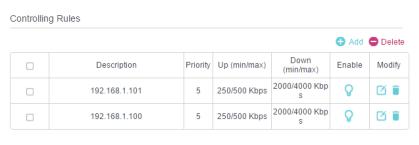
For example, my roommate and I share 512Kbps Upstream Bandwidth and 4Mbps Downstream Bandwidth via this router, she likes to watch live show and play online games, which may take up much bandwidth. I don’t want to be affected, so we agree to equally distribute the bandwidth. The IP addresses of her computer and my computer are 192.168.1.101 and 192.168.1.100.
To use the bandwidth control feature, you’d better set each computer to a static IP Address or configure Address Reservation on the router in order to manage it easily. About how to configure address reservation, please refer to Reserve LAN IP Addresses.
1.Visit http://tplinkmodem.net, and log in with the password you set for the router.
2.Go to Advanced > Bandwidth Control page.
3.Enable Bandwidth Control.
4.EntertheTotalUpstreamBandwidthandtheTotalDownstream Bandwidth given by your ISP (1Mbps=1024Kbps). Click Save to save the settings.
5.Click Add to add controlling rules for each computer respectively.
17
|
Chapter 5 |
Bandwidth Control |
1 ) IP Range — Enter the IP address. The field can be single IP address or IP address range according to your demands. When you enter a single IP address, the computer with this IP address will get independent given bandwidth. When you enter an IP address range, all computers in the range will share the given bandwidth.
2 ) Port Range — Keep the default settings. The default port range of TCP protocol or UDP protocol is from 1 to 65535.
3 ) Protocol — Keep the default setting. Or you can choose the TCP protocol or UDP protocol or both of them.
4 ) Priority — Keep the default setting. You can change the value if you want to first guarantee the bandwidth for one computer. The smaller value has the higher priority.
5 ) Upstream/Downstream — Enter the bandwidth according to your division.
6 ) Check to enable this entry and click OK to save the settings.
6.Follow the steps above to add a rule for the other client device. And then you will get the following table.
18
|
Chapter 5 |
Bandwidth Control |
|
Done! |
Now you and your roommate have an independent bandwidth. |
19

Chapter 6
Network Security
This chapter guides you on how to protect your home network from unauthorized users by implementing these three network security functions. You can block or allow specific client devices to access your wireless network using MAC Filtering, or using Access Control for wired and wireless networks, or you can prevent ARP spoofing and ARP attacks using IP & MAC Binding.
•Firewall & DoS Protection
•Service Filtering
•Access Control
•IP & MAC Binding

|
Chapter 6 |
Network Security |
6. 1. Firewall & DoS Protection
The SPI (Stateful Packet Inspection) Firewall and DoS (Denial of Service) Protection protect the router from cyber attacks.
The SPI Firewall can prevent cyber attacks and validate the traffic that is passing through the router based on the protocol. This function is enabled by default, and it’s recommended to keep the default settings.
DoS Protection can protect your home network against DoS attacks from flooding your network with server requests. Follow the steps below to configure DoS Protection.
1.Visit http://tplinkmodem.net, and log in with your TP-Link ID or the password you set for the router.
2.Go to Advanced > Security > Firewall & DoS Protection.
3.Enable DoS Protection.
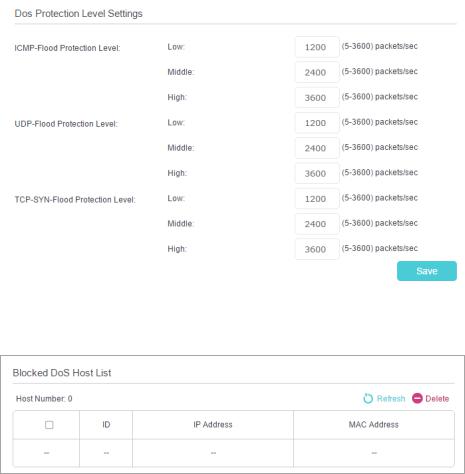
4.Set the level (Low, Middle or High) of protection for ICMP-Flood Attack Filtering, UDP-Flood Attack Filtering and TCP-Flood Attack Filtering.
•ICMP-Flood Attack Filtering — Enable to prevent the ICMP (Internet Control Message Protocol) flood attack.
•UDP-Flood Attack Filtering — Enable to prevent the UDP (User Datagram Protocol) flood attack.
•TCP-Flood Attack Filtering — Enable to prevent the TCP (Transmission Control Protocol) flood attack.
5.Click Save.

1.The level of protection is based on the number of traffic packets. Specify the level at DoS Protection Level Settings.
21
|
Chapter 6 |
Network Security |
||
2.The protection will be triggered immediately when the number of packets exceeds the preset threshold value, and the vicious host will be displayed in the Blocked DoS Host List.
6.2. Service Filtering
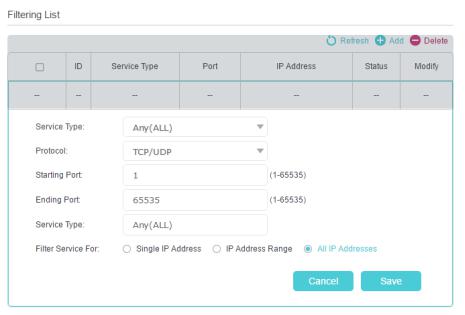
With Service Filtering, you can prevent certain users from accessing the specified service, and even block internet access completely.
1.Visit http://tplinkmodem.net, and log in with your TP-Link ID or the password you set for the router.
2.Go to Advanced > Security > Service Filtering.
3.Toggle on Service Filtering.
4.Click Add.
22
|
Chapter 6 |
Network Security |
||
5.Select a Service Type from the drop-down list and the following four fields will be auto-populated. Select Custom when your desired service type is not listed, and enter the information manually.
6.Specify the IP address(es) that this filtering rule will apply to.
7.Click Save.


6. 3. Access Control
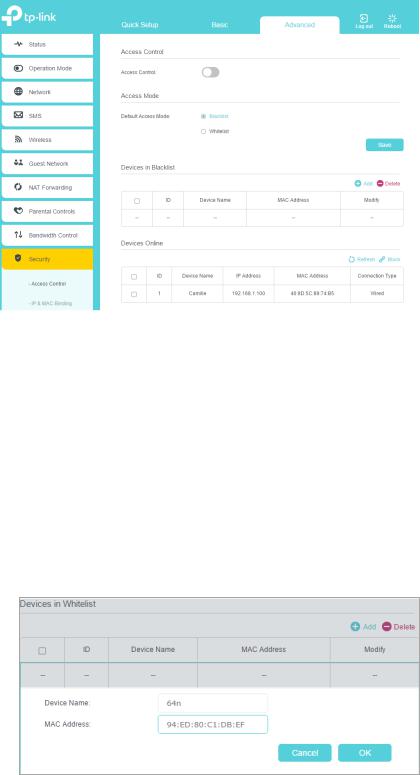
Access Control is used to block or allow specific client devices to access your network (via wired or wireless) based on a list of blocked devices (Blacklist) or a list of allowed devices (Whitelist).
I want to:
How can I do that?
Block or allow specific client devices to access my network (via wired or wireless).
1.Visit http://tplinkmodem.net, and log in with the password you set for the router.
2.Go to Advanced > Security > Access Control and enable Access Control.
23
|
Chapter 6 |
Network Security |
3.Select the access mode to either block (recommended) or allow the device(s) in the list.
To block specific device(s)
1 ) Select Blacklist and click Save.
2 ) Select the device(s) to be blocked in the Devices Online table.
3 ) Click Block above the Devices Online table. The selected devices will be added to Devices in Blacklist automatically.
To allow specific device(s)
1 ) Select Whitelist and click Save.
2 ) Click Add.
3 ) Enter the Device Name and MAC Address (You can copy and paste the information from Devices Online table if the device is connected to your network).
4 ) Click OK.
24

Specifications:870/870985-archer_mr400.pdf file (06 Jun 2023) |
Accompanying Data:
TP-Link Archer MR400 Network Router, Wireless Access Point PDF Operation & User’s Manual (Updated: Tuesday 6th of June 2023 08:57:57 AM)
Rating: 4.7 (rated by 67 users)
Compatible devices: MR100, TL-WN821N, TL-WDR4300, Auranet Series, EC120-F5, TL-WA901ND, TD-W8961N, TL-MR3220.
Recommended Documentation:
Operation & User’s Manual (Text Version):
(Ocr-Read Summary of Contents of some pages of the TP-Link Archer MR400 Document (Main Content), UPD: 06 June 2023)
-
27, 23 Chapter 6 Network Security 5. Select a Service Type from the drop-down list and the following four fields will be auto-populated. Select Custom when your desired service type is not listed, and enter the information manually. 6. Specify the IP address(es) that this filtering rule will apply to. 7. Click Save. Note: If you want to disable this entry, …
-
29, 25 Chapter 6 Network Security Now you can block or allow specific client devices to access your network (via wired or wireless) using the Blacklist or Whitelist. 6. 4. IP & MAC Binding IP & MAC Binding, namely, ARP (Address Resolution Protocol) Binding, is used to bind network device’s IP address to its MAC address. This will prevent ARP spoofing a…
-
85, 81 Q7. What can I do if I cannot find my wireless network or I cannot connect the wireless network? ¾ If you fail to find any wireless network, please follow the steps below: 1. Make sure the wireless function is enabled if you’re using a laptop with built-in wireless adapter. You can refer to the relevant document or contact the laptop manufacturer. 2. Make sure the wireless …
-
17, 13 Chapter 4 Set Up Internet Connections 4. 1. Use Quick Setup Wizard To set up your router with several easy steps quickly: 1. Visit http://tplinkmodem.net, and log in with the password you set for the router. 2. Click Quick Setup, after configuring your time zone, confirm the parameters with the information provided by your ISP in the SIM part and click …
-
19, TP-Link Archer MR400 15 Chapter 4 Set Up Internet Connections 4. 3. Test Internet Connectivity After manually set up the internet connection, you need to know the internet connectivity. The router provides a diagnostic tool to help you locate the malfunction. 1. Visit http://tplinkmodem.net, and log in with the password you set for the router. 2. Go to Advanced > System Tools > Diagnostics p…
-
73, TP-Link Archer MR400 69 Chapter 12 Administrate Your Network 3. Enter the old password. Enter the new password and enter again to confirm. 4. Click Save to make the settings effective. 12. 5. Local Management You can control the local devices’ authority to manage the router via the Local Management feature. By default all local connected devices are allowed to manage the router. …
-
3, 8. 5. SMS Settings . . . . . . . . . . . . . . . . . . . . . . . . . . . . . . . . . . . . . . . . . . . . . . . . . . . . . . . . . . . . . . . 33 Chapter 9. Guest Network. . . . . . . . . . . . . . . . . . . . . . . . . . . . . . . . . . . . . . . . . . 35 9. 1. Create a Network for Guests . . . . . . . . . . . . . . . . . . . . . . . . . . . . . . . . . . . . . . . . . . . . . . …
-
70, 66 Chapter 12 Administrate Your Network 12. 2. Update the Firmware TP-Link is dedicated to improving and richening the product features, giving you a better network experience. We will inform you through the web management page if there’s any update firmware available for your router. Also, the latest firmware will be released at TP-Link official webs…
-
51, 47 Chapter 11 Specify Your Network Settings 3. Enable Data Limit to set total/monthly data allowance and usage alert to prevent data overuse. 4. Enter the allowed amount of total/monthly data in the Total/Monthly Allowance field. When data usage exceeds the allowed level, the router will disconnect from the internet and notify you on the Basic > Network Map Page. 5. Enter a per…
-
58, 54 Chapter 11 Specify Your Network Settings 4. Click Add to set the Wireless Off Time, and click Save to save the settings. Note: 1. Please make sure that the time of the router is correct before using this function. For more details, refer to Set System Time. 2. The wireless LED will turn off if both wireless networks are disabled. 3. The wireless network w…
-
TP-Link Archer MR400 User Manual
-
TP-Link Archer MR400 User Guide
-
TP-Link Archer MR400 PDF Manual
-
TP-Link Archer MR400 Owner’s Manuals
Recommended:
6510, 50EX12B, AM-100 AirMedia, kx-ft902
Operating Impressions, Questions and Answers:
-
1 HX-200/Linear Installation Procedure Revision A.04 When installing a Pre-Commissioned HX 200 follow the procedure in Appendix C 1. Assemble and install the antenna mount as per instructions included with unit. 2. Assemble the antenna and install on the mount as per instructions included with unit 3. Pull and terminate 2 IFL cables from the antenna loc …
HX200, 18
-
Cisco Systems, Inc.All contents are Copyright © 1992–2003 Cisco Systems, Inc. All rights reserved. Important Notices and Privacy Statement.Page 1 of 5Q & ACisco 7600 Series RouterQ.What are Cisco® 7600 Series routersand where are they deployed in thenetwork?A.The Cisco 7600 Series is the industry’sonly edge router that delivers robust, highperforma …
7609, 5
-
H3C SR8800 10G Core RoutersMPLS Configuration Guide Hangzhou H3C Technologies Co., Ltd. http://www.h3c.com Software version: SR8800-CMW520-R3347 Document version: 6W103-20120224 …
SR8800 10G, 410
-
I-Fly Wireless Broadband Router A02-WR-54GPOURQUOI L’ACHETERLES PLUS PRODUIT Pour une totale liberté de mouvement sans perdre sa connection. Facile à installer, rapide et flexible avec l’ I-Fly Wireless Broadband Router vous n’avez plus l’obligation de câbler votre réseau: vous pouvez aisément l’utiliser pour connecter au résea …
I-Fly Wireless Broadband Router A02-WR-54G, 3
-
Features=1 x 10/100Mbps Auto-MDIX RJ-45 port=1 x RJ-11 port=1 x USB 2.0 Type B-port (male) for alternate Ethernet connection = On / off power button= Diagnostic LEDs= Modem features: =Compliant with ADSL, ADSL2, and ADSL2+ (Annex A, L, and M) standards=Up to 24Mbps downstream and 1.2Mbps upstream Annex M is up to 3Mbps upstream =Compliant with PPPoE, PPPoA, …
TDM-C500, 2
-
User manual.RAy3 Microwave Link.fw 1.1.3.02021-04-23version 1.10www.racom.euRACOM s.r.o. | Mirova 1283 | 592 31 Nove Mesto na Morave | Czech RepublicTel.: +420 722 937 522 | E -mail: [email protected] …
RAy3, 210
-
Modem OverviewLabel with Wi-Fi name and passwordTelephone portsUSB portLAN portsWAN portPower buttonPower supply socketReset buttonWi-Fi on/off buttonWPS buttonDSL portCrease Fold Crease FoldValley FoldValley FoldValley FoldValley FoldCrease Fold Crease FoldYour modem connects your computer and other devices to the Internet.Vodafone HG 659 Quick start guide …
HG 659, 2
-
Alcatel-Lucent 7705SERVICE AGGREGATION ROUTER OS | RELEASE 2.0INTERFACE CONFIGURATION GUIDEAlcatel-Lucent ProprietaryThis document contains proprietary information of Alcatel-Lucent and is not to be disclosedor used except in accordance with applicable agreements.Copyright 2009 © Alcatel-Lucent. All rights reserved. …
Service Aggregation Router 7705, 226
-
Americas HeadquartersCisco Systems, Inc.170 West Tasman DriveSan Jose, CA 95134-1706 USAhttp://www.cisco.comTel: 408 526-4000800 553-NETS (6387)Fax: 408 527-0883Cisco 860 Series, Cisco 880 Series, and Cisco 890 Series Integrated Services Routers Hardware Installation GuideText Part Number: OL-16193-04 …
860 Series, 100
-
The Wireless G ADSL Firewall Modem Router (TEW-435BRM) delivers an all-in-one high-performance Internet and wireless network access solution. No need to buy a separate modem and router. The TEW-435BRM offers an access point, ADSL modem, firewall, Internet router and 4-port switch in a single product. Install this device in minutes and seamlessly sur …
TEW-435BRM — 54MBPS 802.11G Adsl Firewall M, 3


