In this tutorial I am going to show you how to install Windows Server 2022 on Ubuntu Nested KVM.
You can download the Windows Server 2022 from the official Microsoft Evaluation Download site. You need to enter you information do download the eval.
https://www.microsoft.com/en-us/evalcenter/evaluate-windows-server-2022
You can download the virtual IO drivers from here.
https://fedorapeople.org/groups/virt/virtio-win/direct-downloads/stable-virtio/virtio-win.iso
To install the necessary packages to run KVM virtualized software packages, install the following.
sudo apt -y install bridge-utils cpu-checker libvirt-clients libvirt-daemon qemu qemu-kvm virt-manager
Check if you Ubuntu machine allows running of KVM or nested KVM.
sudo kvm-ok

Add your sudoer user to the following group.
sudo adduser <username> kvm
sudo adduser <username> libvirt
Make sure that your Virtualized Daemon is running
sudo systemctl status libvirtd
If you have not create a directory where there is enough space you might want to do so.
sudo ln -s /mnt/ /mnt/
sudo mkdir -p /
Make sure you have install remote access tool such as VNC. You can follow the following tutorial if you need the steps to do it.
https://old.dracocybersecurity.com/install-tightvncserver-on-ubuntu-20-04/
First copy or download the windows iso and virtio windows driver file necessary for the installation to the Ubuntu Server
We are going to use virtual manager (virt-manager) to install the Windows Server 2022.
Next you can follow the step by step guide to install Windows Server 2022 using Virtual Manager (virt-manager)
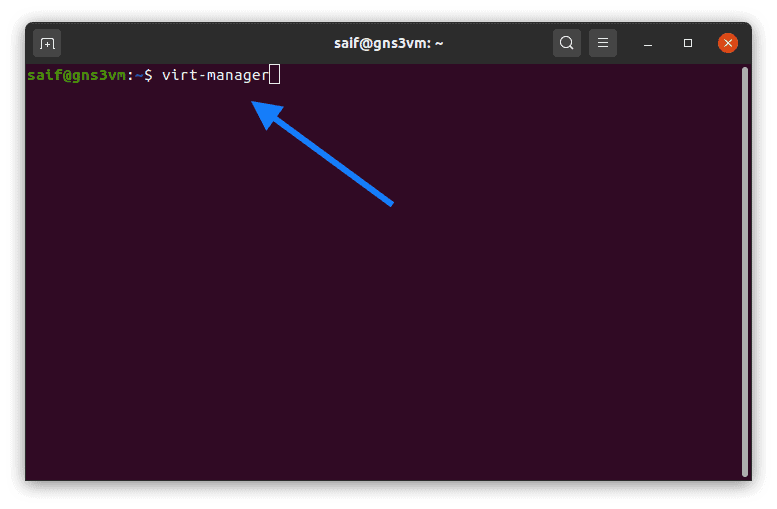
Run virt-manager from the terminal in the GDE

Right Click on QEMU/KVM and select New.

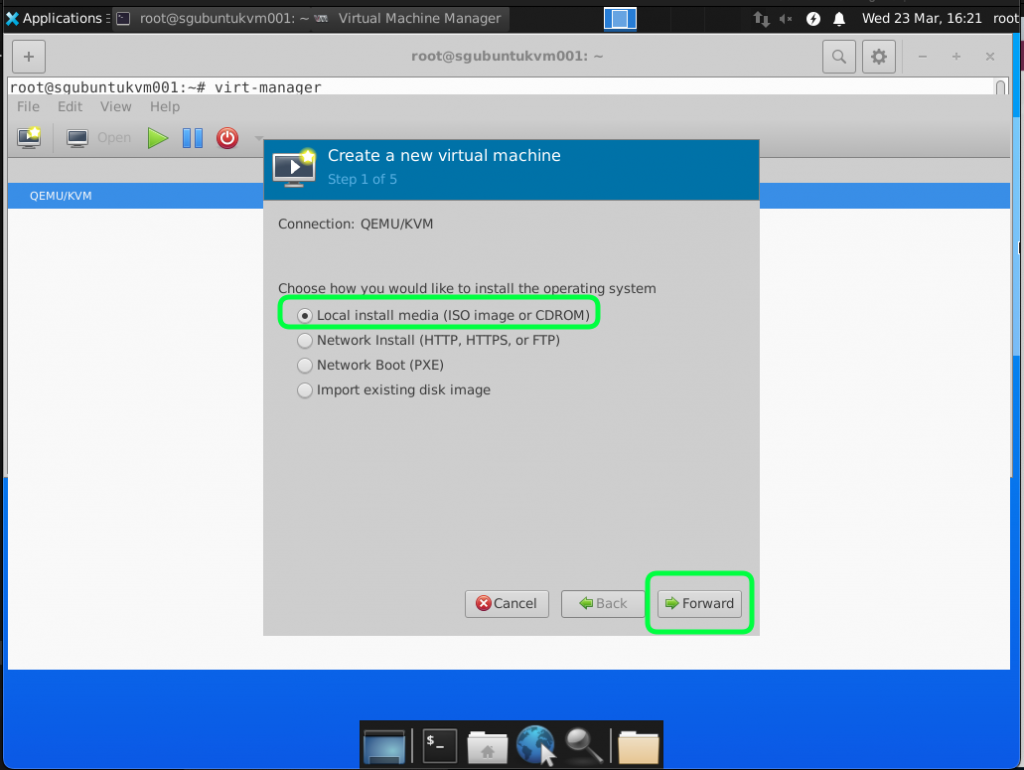
We are using local images that we have copied into the Ubuntu so select Local install media and click Forward.
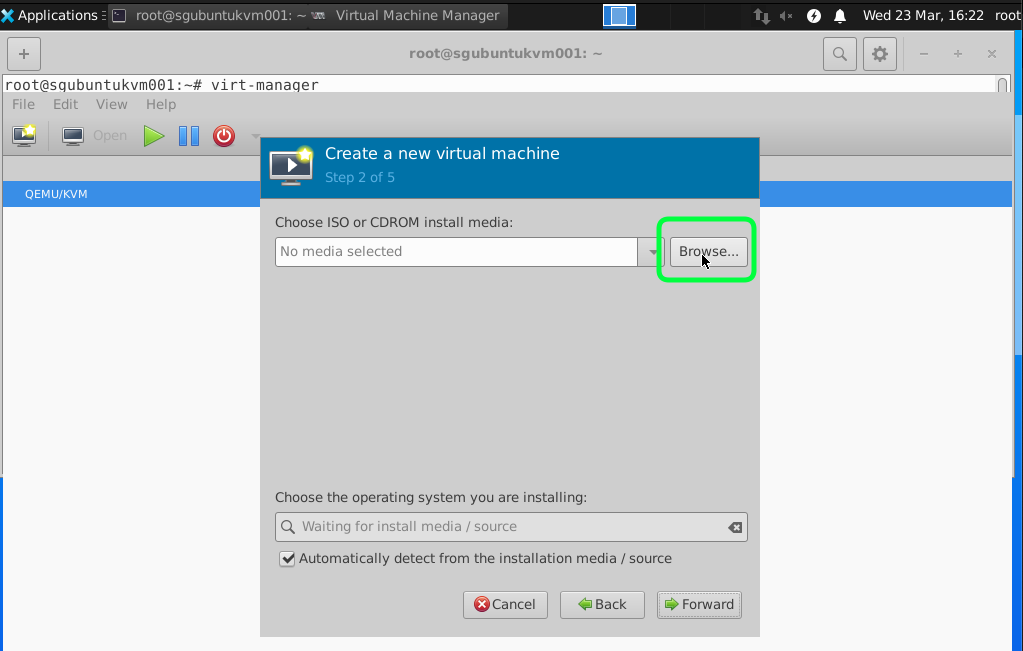
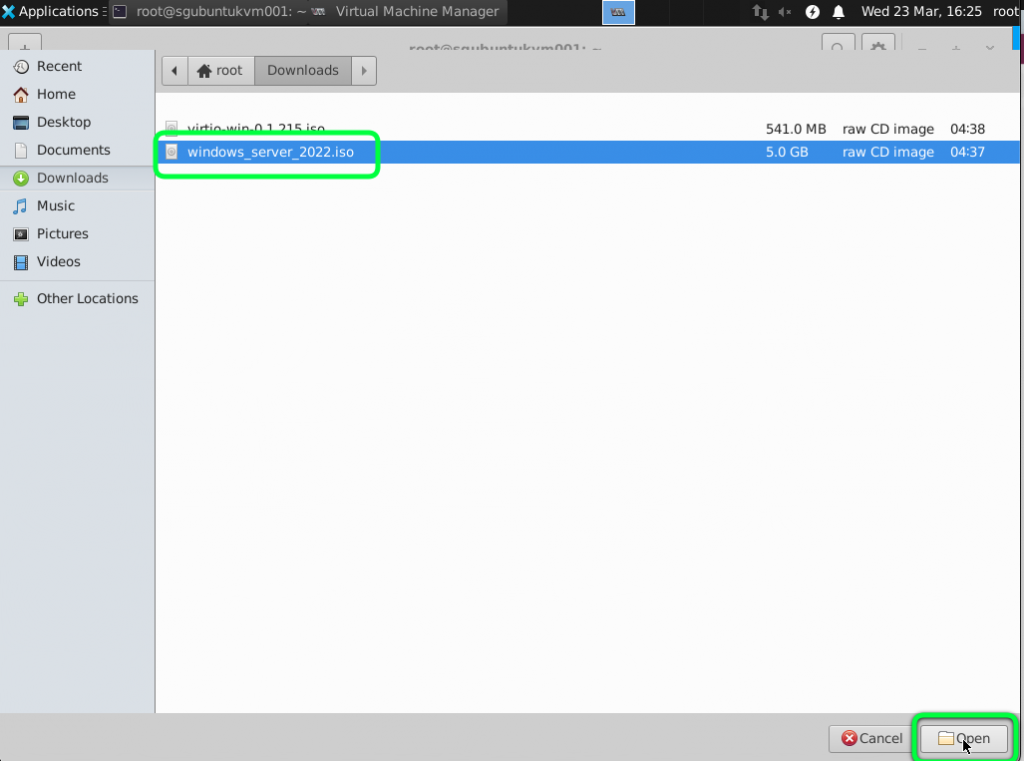
Click on Browse and Select the Windows Image.

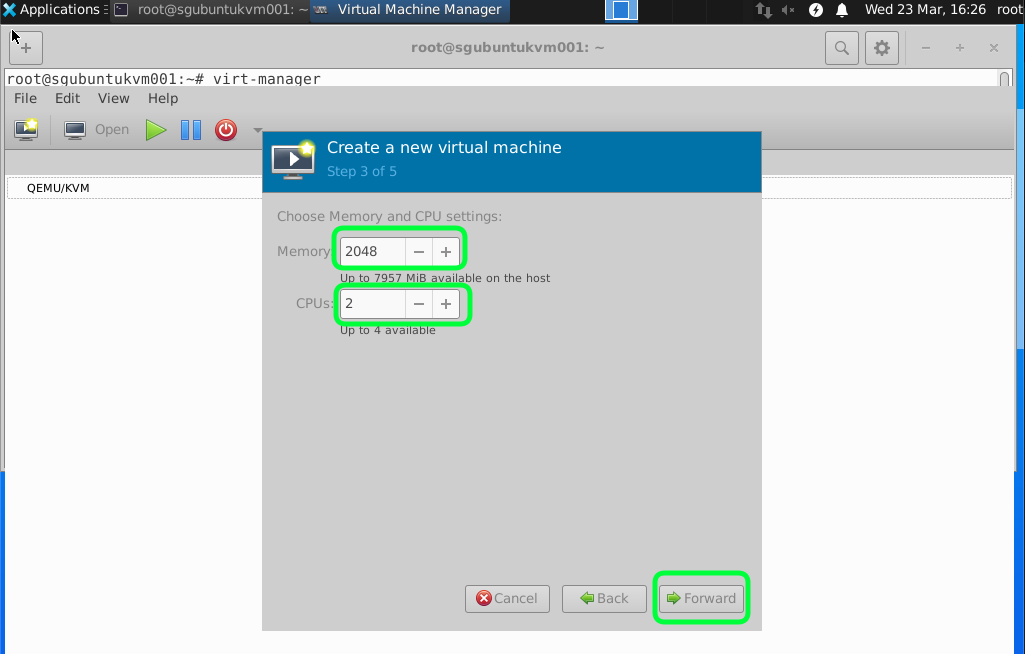
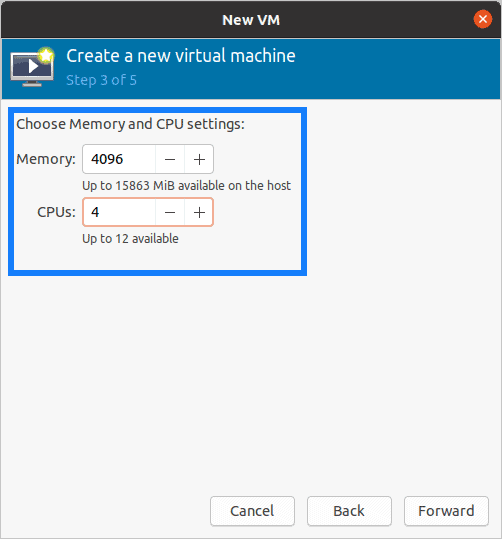
I would recommend having minimum 2GB RAM and 2 vCPUs for a start. As anything lower than this make the VM very slow and can become unstable.
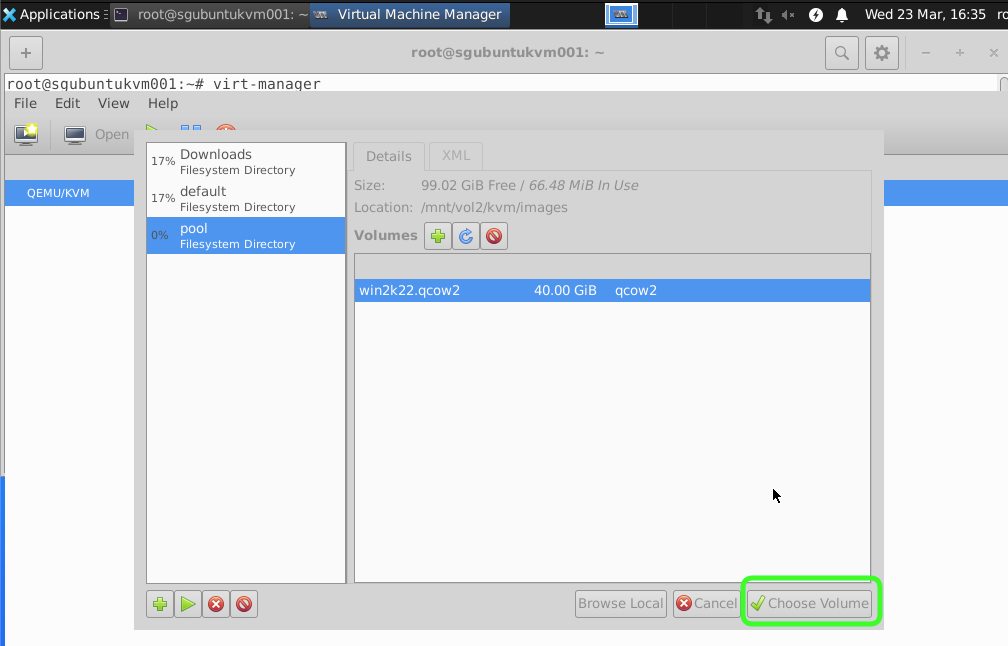
For this tutorial we are going to add and select a attached storage.
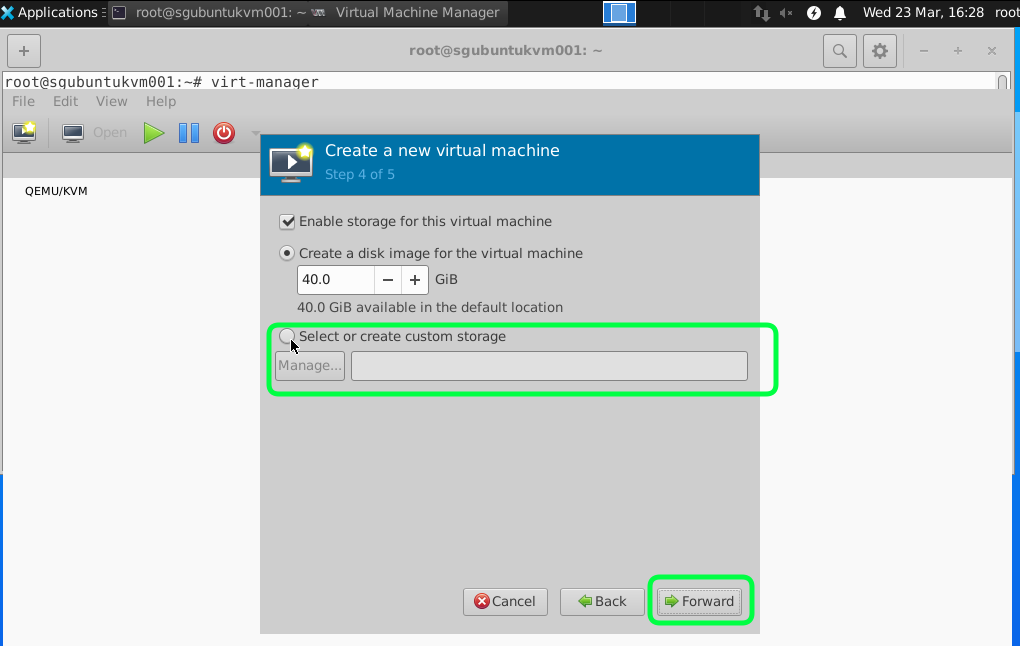
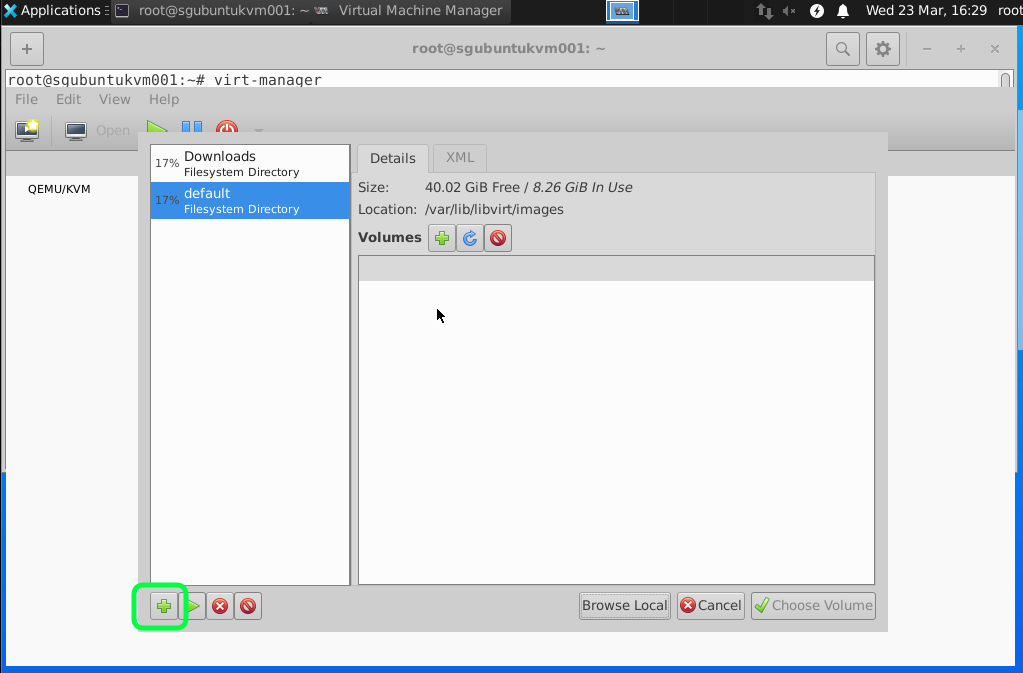
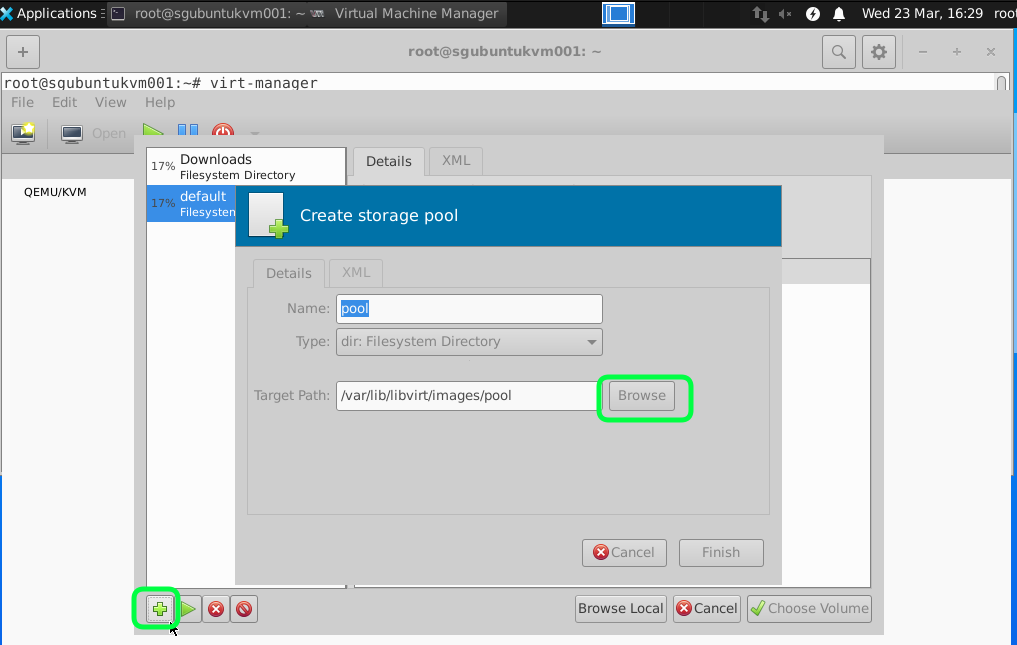
Click on the add icon to select a new Directory.
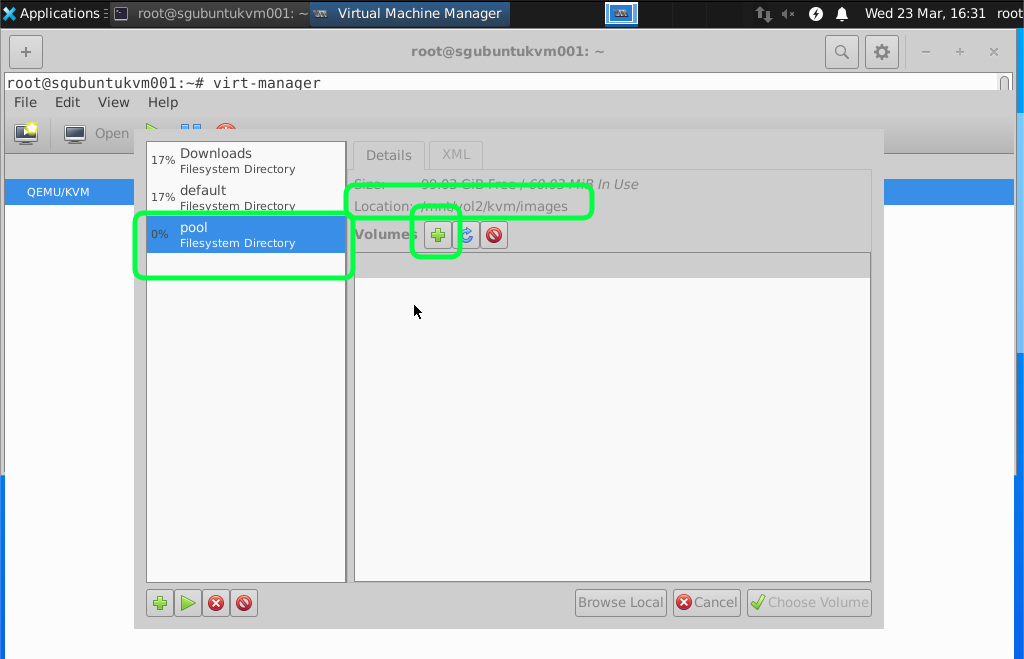
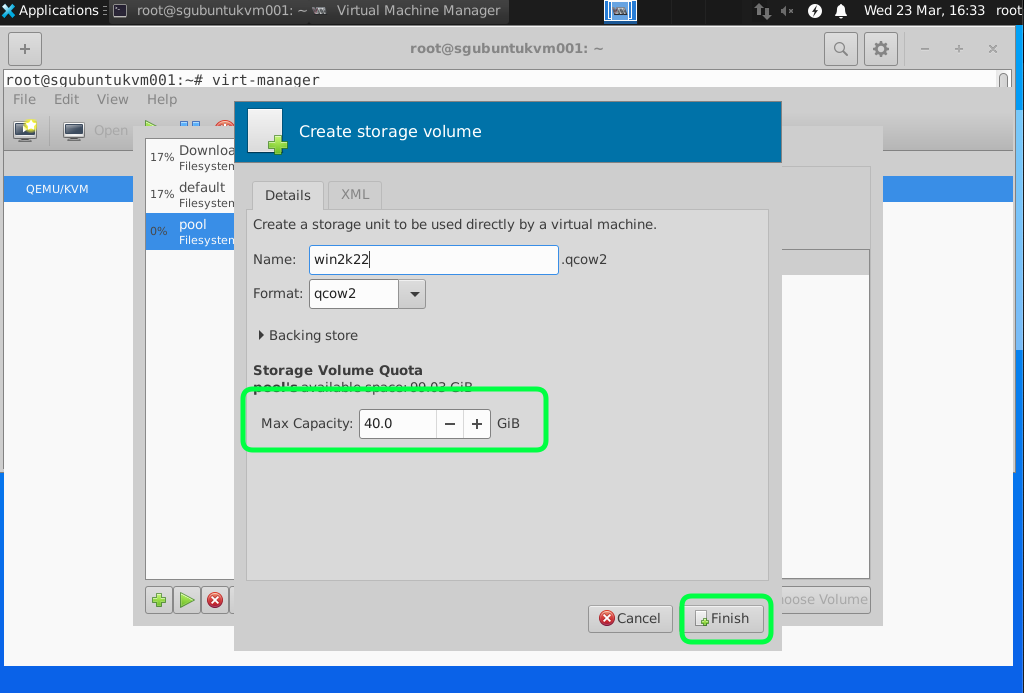
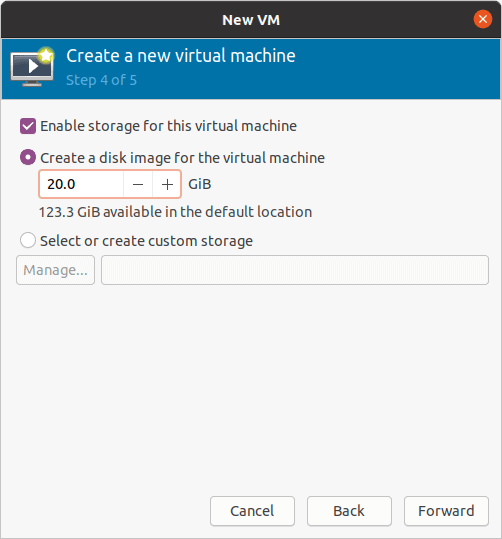
Recommend to have 40GB of Hard disk space you can start with a smaller size and fix disk with more capacity later but setting the minimum of 40GB it should last you for a while. If you are using the Windows Server just as a Active Directory for my lab.
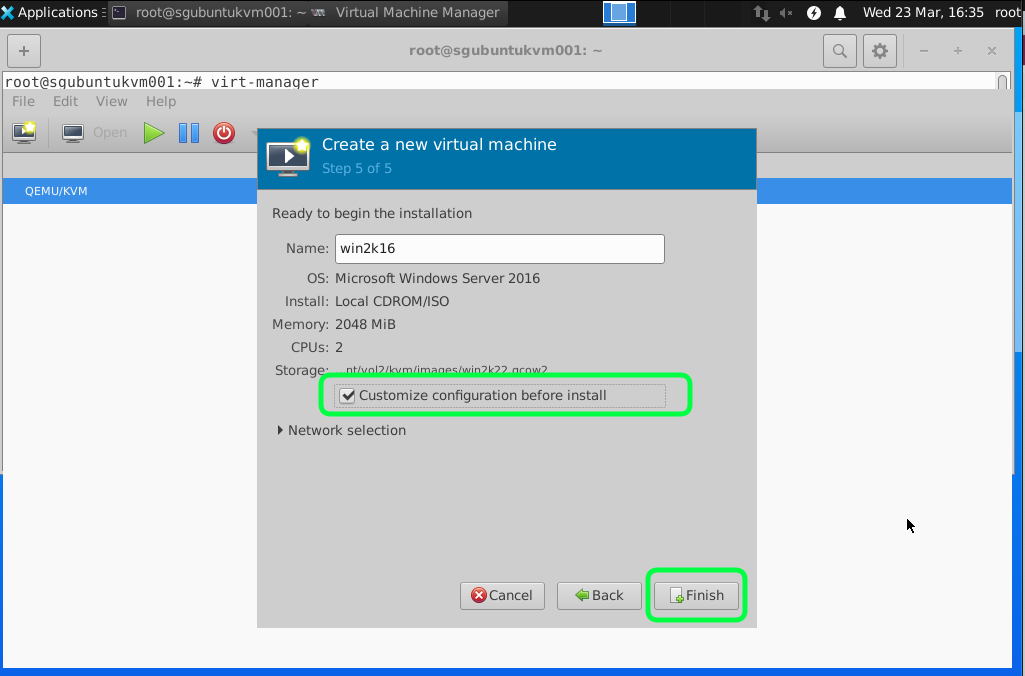
Click on Customize Configuration before install to adjust a few settings.
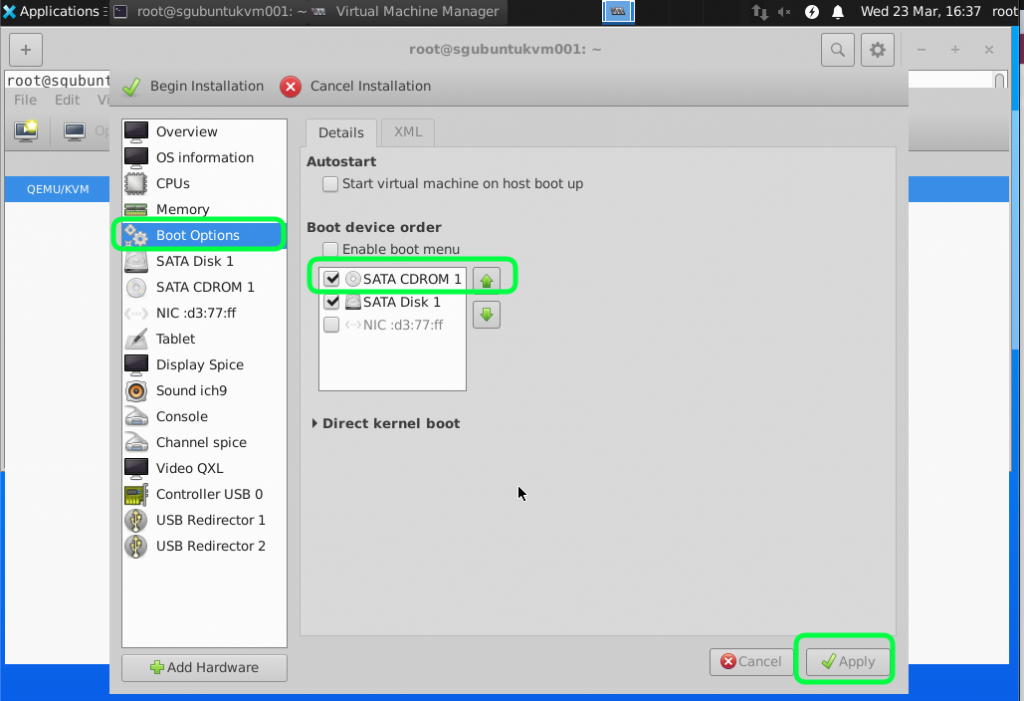
Set the boot option to boot from the CD ROM where the Windows Server ISO is stored.
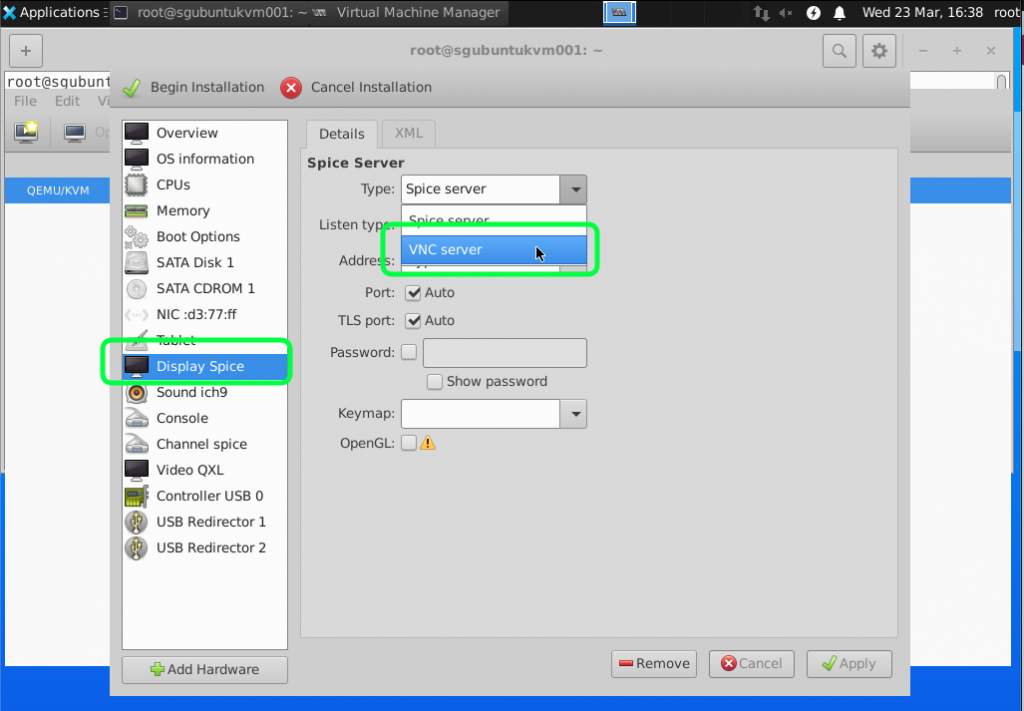
I find VNC Server Display better for installing Windows Server. For Spice I sometime lose the keyboard control.
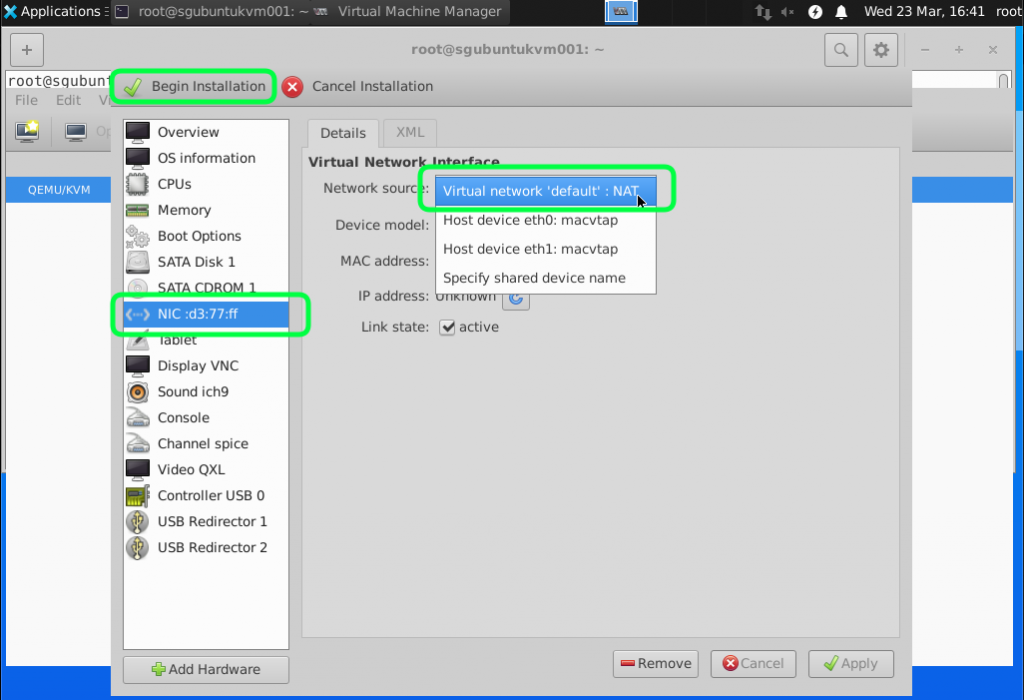
We are going to use the default NAT just to test the connectivity and ensure that the virtual nic/network is working. We will go through the bridge mode in the next tutorial. You can start the installation by clicking on Begin Installation.
Once that is done you can go through the normal windows installation process. Depend on the resources and the connection to the internet it might take some time to complete the installation.
To allow non root (sudo) users that you have added to the libvirt group to be able to configure the VM you need to edit the /etc/libvirt/libvirtd.conf file.
nano /etc/libvirt/libvirtd.conf
Add or uncomment the following and change the permission accordingly.
unix_sock_group = “libvirt”
unix_sock_rw_perms = “0770”

Restart the libvirtd service.
sudo systemctl restart libvirtd.service

Install Windows Server 2022 In A Nested Kvm Environment On Ubuntu 20 04 With Standard Nat
Journey Through Literary Realms and Immerse Yourself in Words: Lose yourself in the captivating world of literature with our Install Windows Server 2022 In A Nested Kvm Environment On Ubuntu 20 04 With Standard Nat articles. From book recommendations to author spotlights, we’ll transport you to imaginative realms and inspire your love for reading. 02 configure Install settings 07 server ubuntu ntp ssh 06 ntpd server root ntp 01 20-04 02 20-04 01 01 install configure ubuntu- install user system 02 04 network ntp services user accounts configure 03 vim get server add update 03- ubuntu configure ntp enable configure settings server- chrony initial sudo 05
Install Windows Server 2022 In A Nested Kvm Environment On Ubuntu 20 04
Install Windows Server 2022 In A Nested Kvm Environment On Ubuntu 20 04
Install windows server 2022 on nested kvm – ubuntu 20.04 – standard nat may 1, 2022 | tech, virtualization, windows in this tutorial i am going to show you how to install windows server 2022 on ubuntu nested kvm. you can download the windows server 2022 from the official microsoft evaluation download site. In this tutorial i will show you how to install windows server 2022 in a nested kvm environment on ubuntu 20.04. using the standard nat virtual network capab.

Install Windows Server 2022 On Nested Kvm Ubuntu 20 04 Standard Nat
Install Windows Server 2022 On Nested Kvm Ubuntu 20 04 Standard Nat
Windows server 2022 windows server 2019 debian 12 debian 11 fedora 38 fedora 37 almalinux 9 rocky linux 8 vmware esxi 7 other tips commands help centos 7 ubuntu 23.04 ubuntu 21.04 ubuntu 19.04 ubuntu 18.04 lts ubuntu 17.04 ubuntu 16.04 lts ubuntu 15.04 ubuntu 14.04 lts ubuntu 13.04 windows 2016 windows 2012 r2 suse enterprise 15 suse enterprise 12. Step 1. download windows server 2022 iso to get the windows server 2022 iso, you will be required to sign up at the officia l windows insider page from microsoft. choose the “ download the iso ” option and proceed. you will be required to fill in your information before you can start the download of the iso. Install ubuntu. install (01) get ubuntu 20.04 (02) install ubuntu 20.04; initial settings (01) add user accounts (02) enable root user (03) network settings (04) configure services (05) update system (06) configure vim (07) configure sudo; ntp ssh server. ntp server (01) configure ntp server (ntpd) (02) configure ntp server (chrony) (03. And many more! let’s dive in! if you’re looking to upgrade your it infrastructure to be more reliable and efficient, then the time has never been better! some of the new features in windows server 2022 include the following: amd cpus now support nested virtualization. as the default web browser, microsoft edge is bundled with the system.

How To Install Kvm On Ubuntu 22 04 Server
How To Install Kvm On Ubuntu 22 04 Server
Install ubuntu. install (01) get ubuntu 20.04 (02) install ubuntu 20.04; initial settings (01) add user accounts (02) enable root user (03) network settings (04) configure services (05) update system (06) configure vim (07) configure sudo; ntp ssh server. ntp server (01) configure ntp server (ntpd) (02) configure ntp server (chrony) (03. And many more! let’s dive in! if you’re looking to upgrade your it infrastructure to be more reliable and efficient, then the time has never been better! some of the new features in windows server 2022 include the following: amd cpus now support nested virtualization. as the default web browser, microsoft edge is bundled with the system. Prerequisites a system running ubuntu 20.04 an account with sudo privileges access to the command line terminal check virtualization support on ubuntu 20.04 1. before you begin with installing kvm, check if your cpu supports hardware virtualization via egrep command: egrep c ‘ (vmx|svm)’ proc cpuinfo check the number in the output:. Step 2 – configure bridged networking on ubuntu 20.04. by default, kvm installation creates “virbr0” bridge, and we can use the same for the outside world for communication. let us find information about the “virbr0” bridge using the ip command: $ ip link show master virbr0. $ bridge link show dev virbr0 nic. $ ip a s virbr0.

Ubuntu 20 04 Lts Kvm Create Virtual Machine Gui Server World
Ubuntu 20 04 Lts Kvm Create Virtual Machine Gui Server World
Prerequisites a system running ubuntu 20.04 an account with sudo privileges access to the command line terminal check virtualization support on ubuntu 20.04 1. before you begin with installing kvm, check if your cpu supports hardware virtualization via egrep command: egrep c ‘ (vmx|svm)’ proc cpuinfo check the number in the output:. Step 2 – configure bridged networking on ubuntu 20.04. by default, kvm installation creates “virbr0” bridge, and we can use the same for the outside world for communication. let us find information about the “virbr0” bridge using the ip command: $ ip link show master virbr0. $ bridge link show dev virbr0 nic. $ ip a s virbr0.
Install Windows Server 2022 In A Nested Kvm Environment On Ubuntu 20.04 With Standard Nat.
Install Windows Server 2022 In A Nested Kvm Environment On Ubuntu 20.04 With Standard Nat.
in this tutorial i will show you how to install windows server 2022 in a nested kvm environment on ubuntu 20.04. using the in this tutorial we will go through the commands and steps to setup a nested kvm with a ubuntu client vm using qemu and in this video, we’ll install microsoft windows 11 onto a linux virtual machine, using lxd! lxd supports attaching virtual trusted learn how to install kvm, qemu, & virt manager to create an ubuntu server virtual machine. yevgen will go over the following in qemu kvm shortly known as quick emulator which is an open source type 2 hypervisor that allows to create and manage virtual attempting to create a nested hyperv server in 2016 didnt go well. more of a fail. this video demonstrates how to install kvm on an ubuntu server to allow that server to work as a virtual machine host. learn how to install microsoft windows server 2022 core edition. this is a lightweight version of windows server which has as lab to show nested virtualisation, create vms using windows deployment services and sysprep (using windows templates) in this tutorial, we will guide you step by step on how to install ubuntu server desktop environment (gui) on ubuntu 20.04.
Conclusion
Having examined the subject matter thoroughly, it is clear that the article delivers informative information regarding Install Windows Server 2022 In A Nested Kvm Environment On Ubuntu 20 04 With Standard Nat. Throughout the article, the writer illustrates a wealth of knowledge about the subject matter. Especially, the section on X stands out as particularly informative. Thank you for reading this post. If you need further information, please do not hesitate to reach out via email. I am excited about your feedback. Moreover, below are a few related posts that might be interesting:
Related image with install windows server 2022 in a nested kvm environment on ubuntu 20 04 with standard nat
Related image with install windows server 2022 in a nested kvm environment on ubuntu 20 04 with standard nat
You wanted to install the windows 2019 server on a hypervisor and the option that you have right now is to use the QEMU KVM hypervisor. Then you are in the right place.
And when it comes to virtualization I love KVM, as it is Open-source and free too. Whenever I had to choose between hypervisors I would always prefer KVM than anything else.
I was working for Palo Alto and Checkpoint lab the other day, and I wanted to test out the LDAP integration with the firewall.
The only way I can test LDAP configuration is by installing the windows server with its services in it. So I decided to spin up the window server 2019 in KVM.
The Windows server 2016/2019 works really well with the KVM hypervisors. Since there are support virtio drivers, you get to install all the display, network, and graphics related drivers in it.
If you are new to KVM, don’t worry, I have covered some of the useful KVM commands here, I would highly recommend you check them out. It will be useful when you wanted to manage the VM’s with KVM.
In the past, I covered the installation of windows 10 on a Centos/Redhat and Ubuntu KVM hypervisors, and in this article, I am going to install windows server 2019 on a KVM hypervisor.
Prerequisite
You need to have a good configuration machine or a server with Linux installed in it, either Centos/Redhat or Ubuntu with GUI. And we can install KVM software in it.
To install kvm on Ubuntu you can enter the command below.
sudo apt update
sudo apt install qemu-kvm bridge-utils virt-manager libosinfo-bin -y
If you are using Centos then the command will be as follows.
yum install qemu-kvm libvirt virt-install virt-manager virt-install -y
Windows server 2019 ISO image.
If you have the server ISO image then great, or you can get a trail from the Microsoft site here.
Windows 2019 VirtIO drivers
You can download the VirtIO drivers here
How to install windows server 2019 in KVM?
- Creation of windows server VM.
- Setup windows resources.
- Customize configuration before install.
- Configure the CPU for the KVM windows guest properly.
- Add windows VirtIO driver.
- Change the boot order.
- Start the Windows installation.
- No windows harddisk in KVM ?, fix that now.
- Set the Administrator Password.
- Install the virtio drivers for windows server 2019.
1. Creation of windows server VM.
Open terminal and type virt-manager and hit enter.
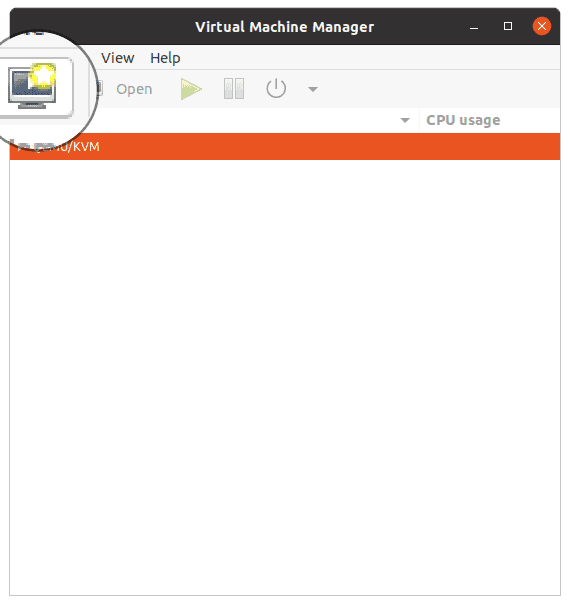
A new virtual machine manager window now pop up, click on create new virtual machine icon.
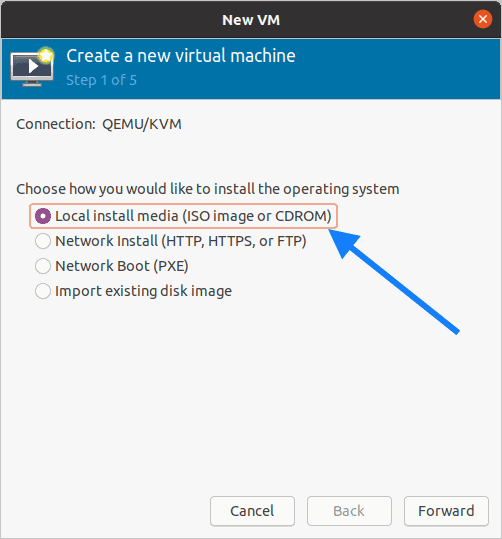
In the creation of New VM pop up, select Local install media (ISO image or CDROM), then click on Forward.
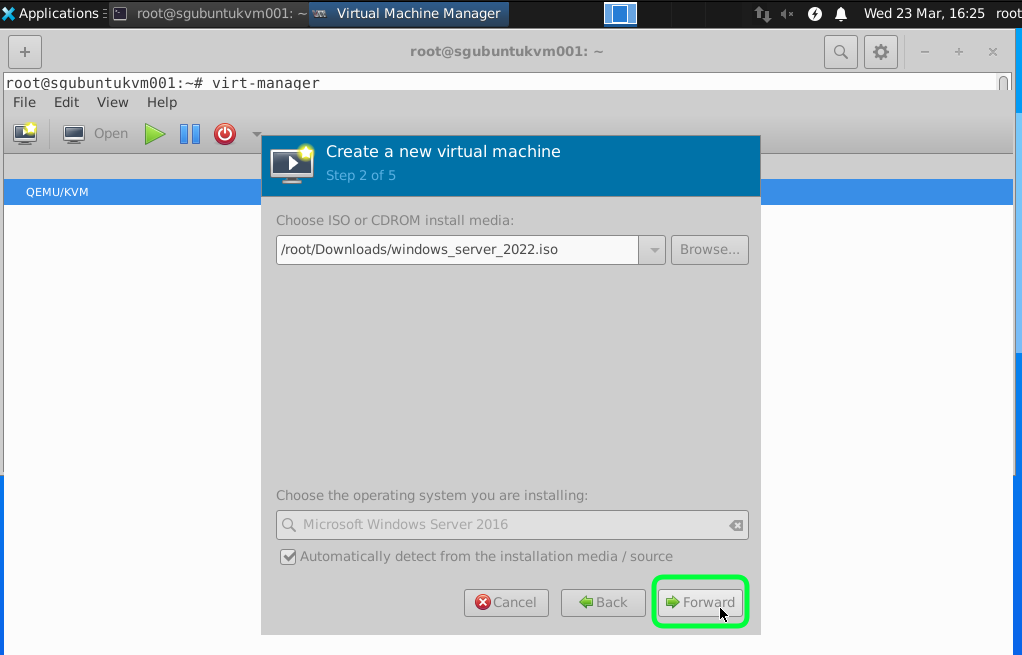
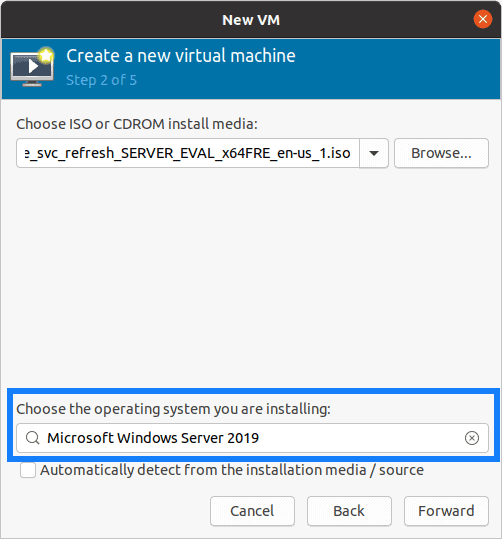
You now have to choose the Microsoft windows server 2019 as the operating system.
Uncheck the option which says Automatically detect from the installation media/source and start typing Microsoft window server 2019.
Choose the same from the list and click on Forward.
You can now configure the Memory and CPU for the machine, I am adding memory as 4GB and 4 CPU.
2. Setup windows resources.
Configure the the memory and CPU here and click on Forward.
You may add more if you require.
In the windows Storage, by default it would pick up the storage size as 40GB, I am changing it to 20GB.
You may select the default size or more, but don’t worry, you can change the storage size later by following the guide here.
3. Customize configuration before install.
Check the option which says Customize configuration before install and click on Finish.
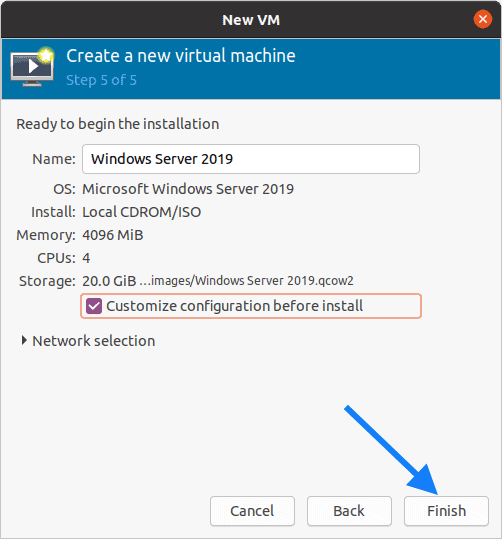
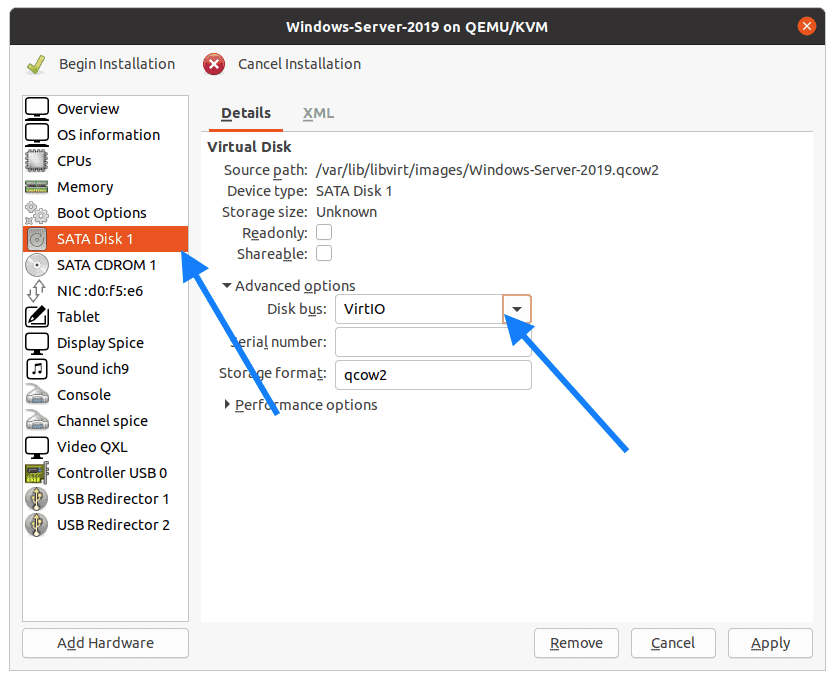
You will now be presented with QEMU KVM customization wizard.
First lets go ahead and change the storage to VirtIO, click on SATA Disk 1 and in the disk bus select VirtIO and click on Apply.
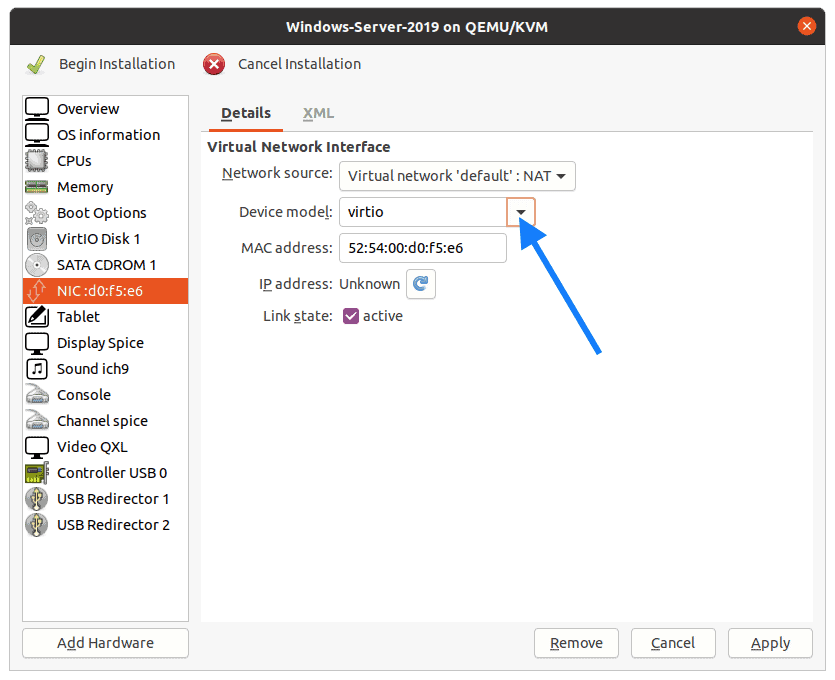
Click on the Network Interface Card and change it to Virtio here as well and click on Apply.
Notice that I have selected the NAT as the interface, this would help my server to connect the internet via the host machine.
In production, this must be different, as you might use a bridge interface that connects to the switch to get to the network.
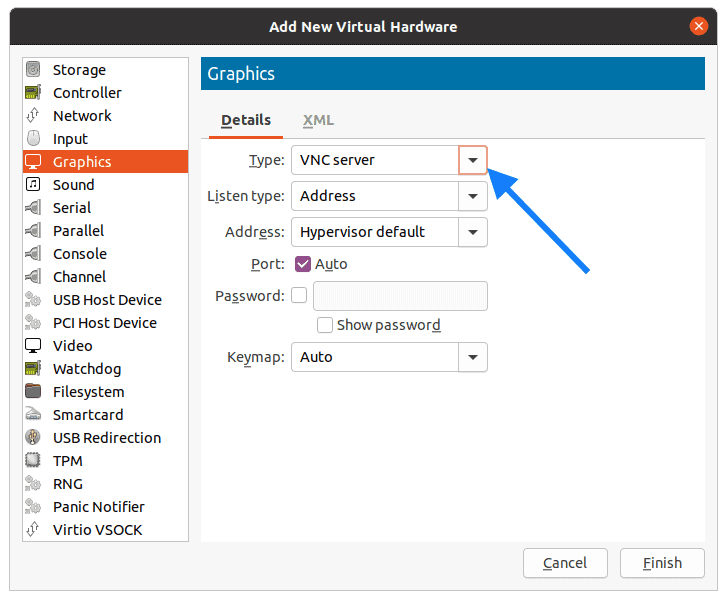
Next lets go ahead and add the VNC server as the Graphics.
Click on Add hardware again, and from the list select Graphics and in Type select VNC Server, then click on Finish.
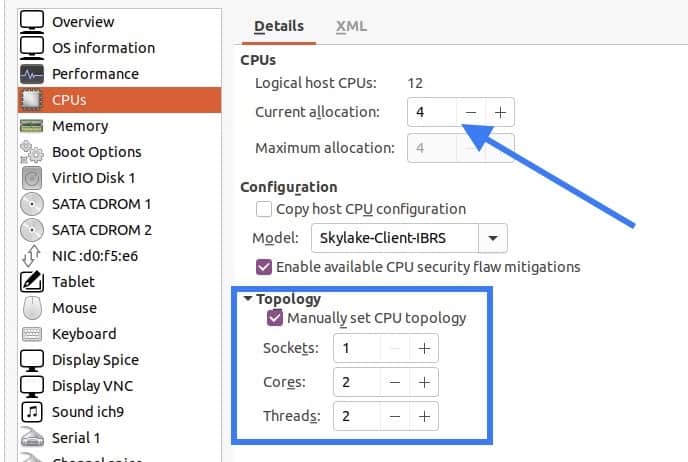
4. Configure the CPU for the KVM windows guest properly.
Though we configured the CPU as 4, it will actually not pick up all four cores until you specify in the configuration.
So make changes like below. Click on CPU’s and in the Current Allocation specify 4 CPU and in the topology check the options Manually set CPU topology and in Sockets type 1 and cores 2 and Threads 2 as well. You may change it as per your requirements.
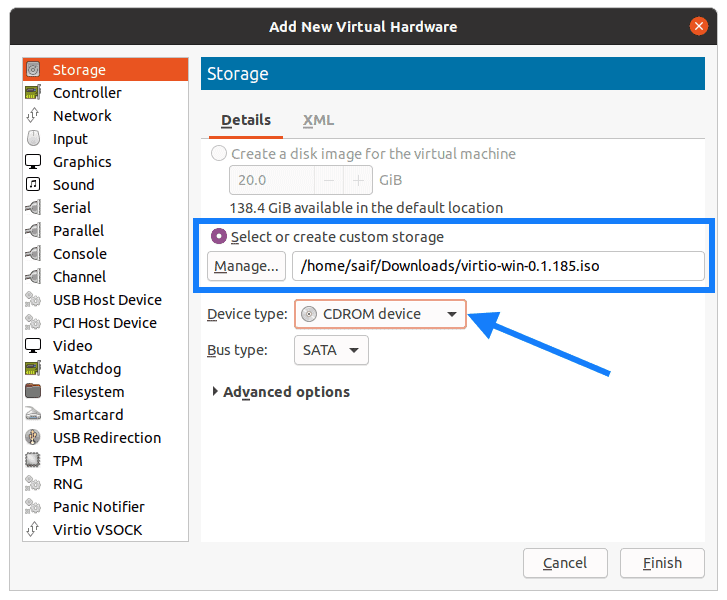
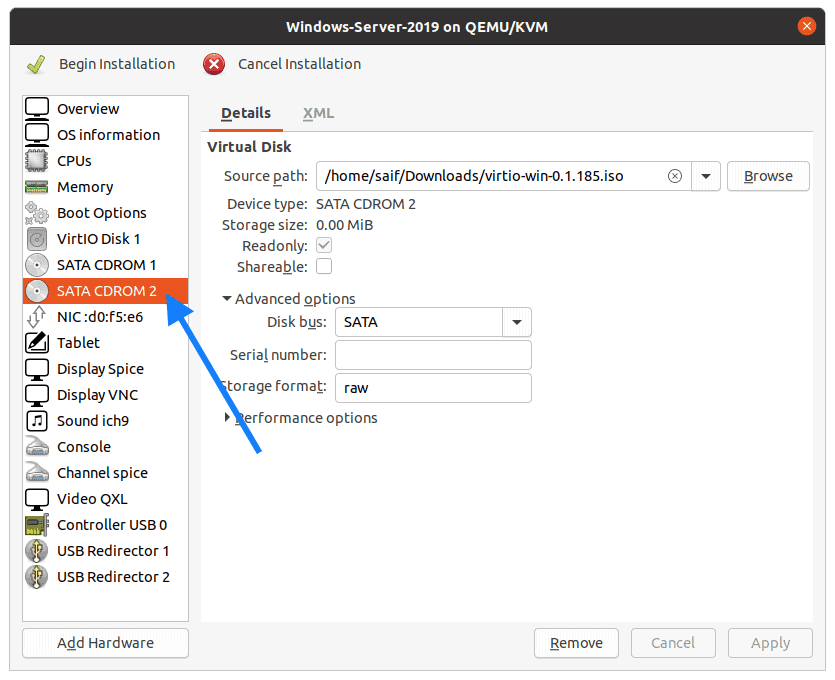
5. Add windows VirtIO driver.
Remember that we have download virtio drivers for windows server 2019 at the beginning? Lets add that now.
CLick on Add hardware and select storage.
Check the option Select or create custom storage and click on Manage to attach the windows kvm drivers to the configuration.
In the device type select CDROM device from the list then click on Finish.
When you look VM configuration you should be able to see there are two CDROM’s.
CDROM1 is for the windows 2019 iso image.
CDROM2 is for the windows 2019 KVM Qemu drivers.
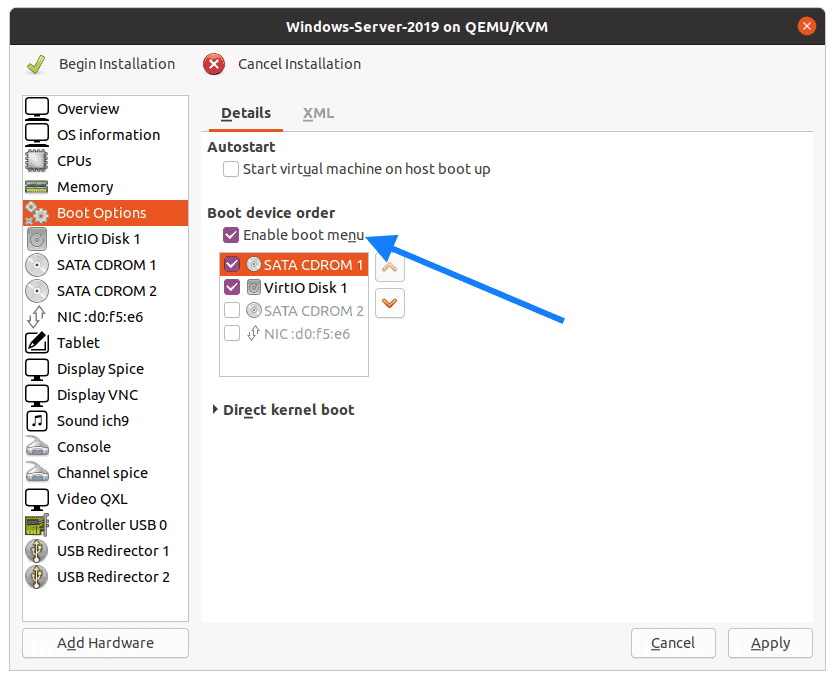
6. Change the boot order.
You need to make sure that you choose windows ISO image during the boot when you proceed with the installation.
Click on Boot options and check the options which says Enable boot menu.
And check the SATA CDROM1 and VirtIO disk 1.
Move CDROM1 to be the primary boot device.
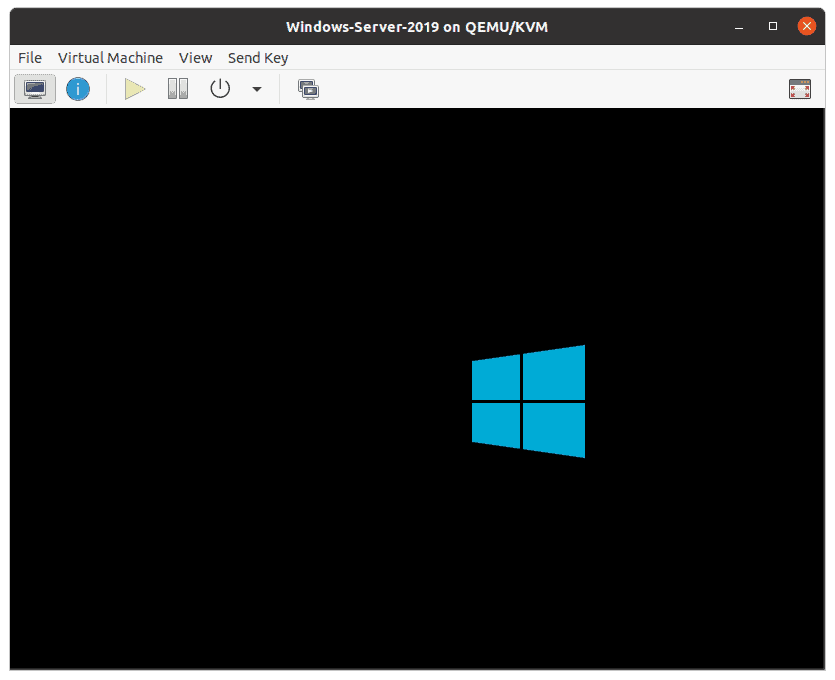
7. Start the windows installation.
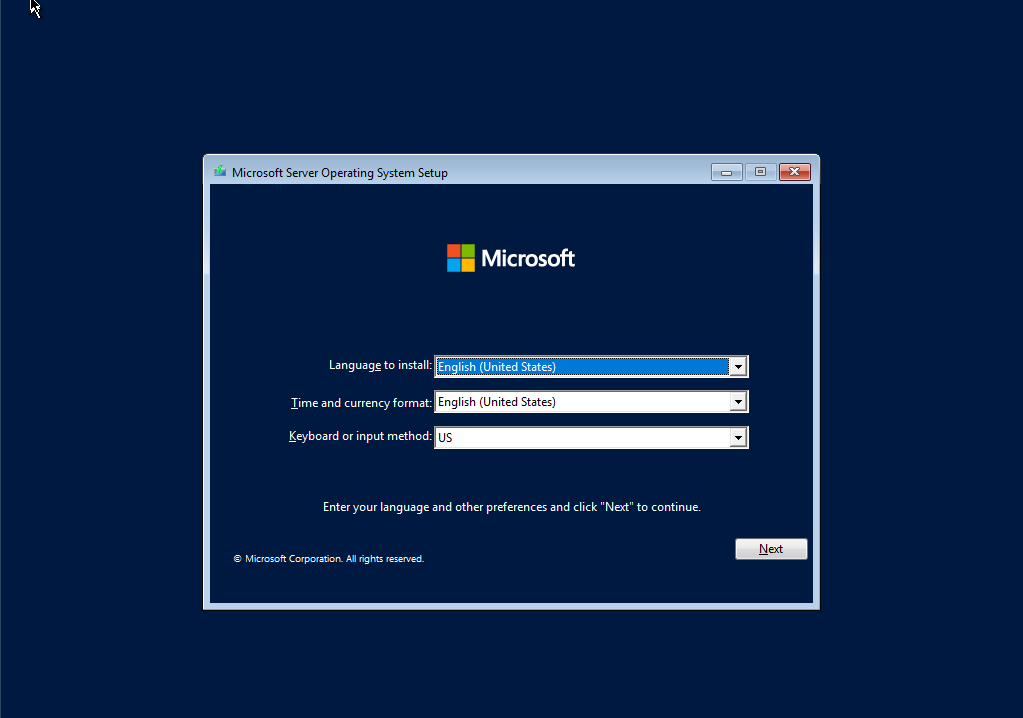
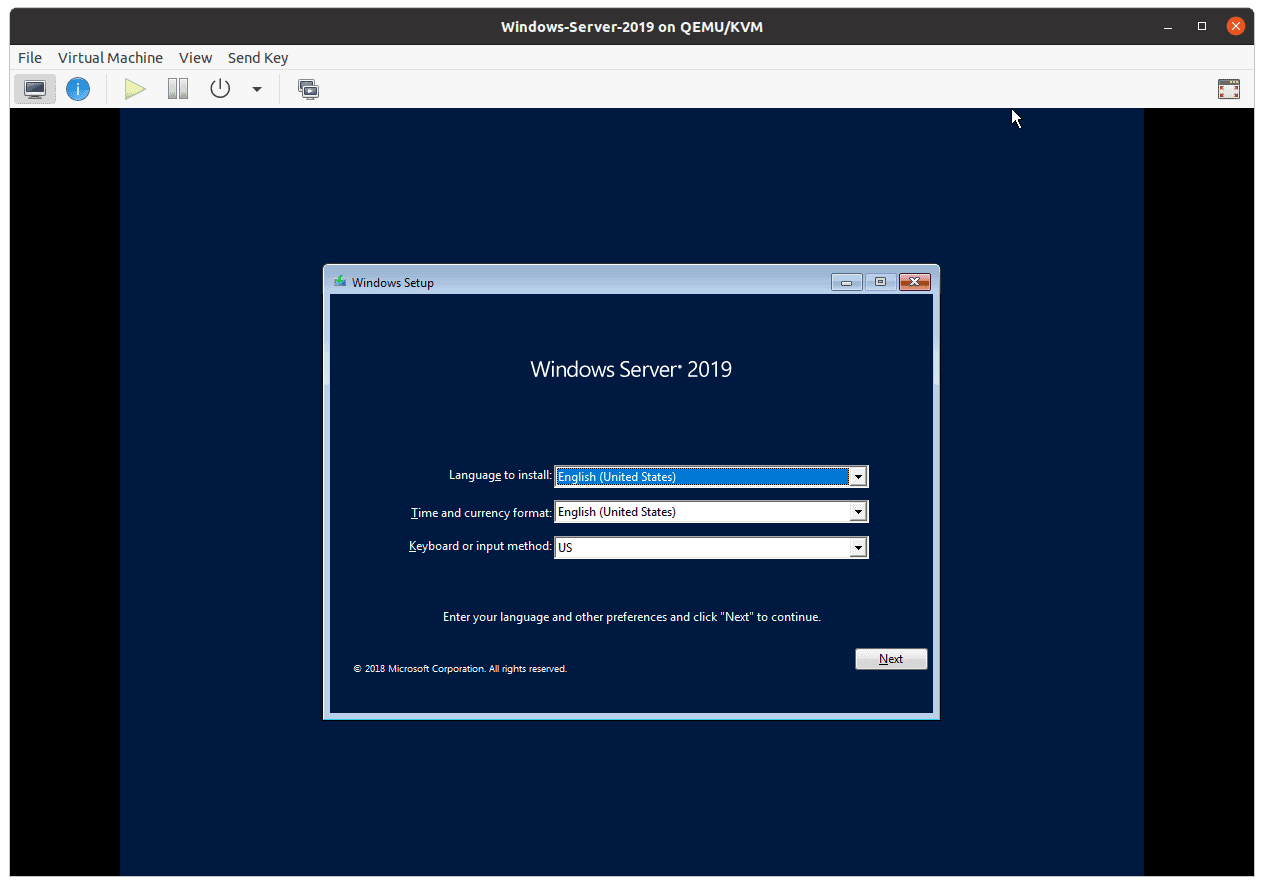
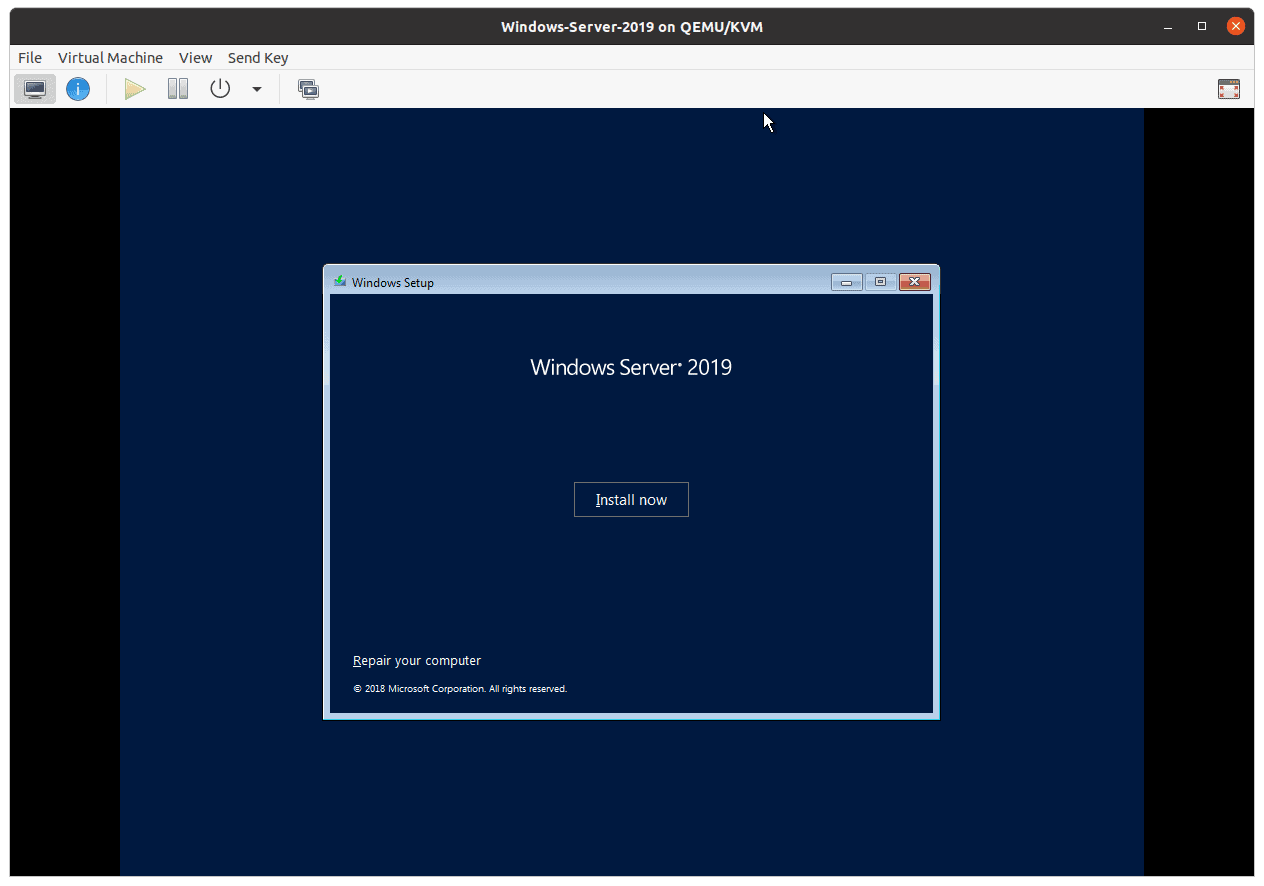
You may now click on begin installation and you should be able to see the windows 2019 installation screen appears with the windows logo.
In the setup wizard Choos the Langauge and the country then click on Next.
You may click on Install now on the windows Setup wizard.
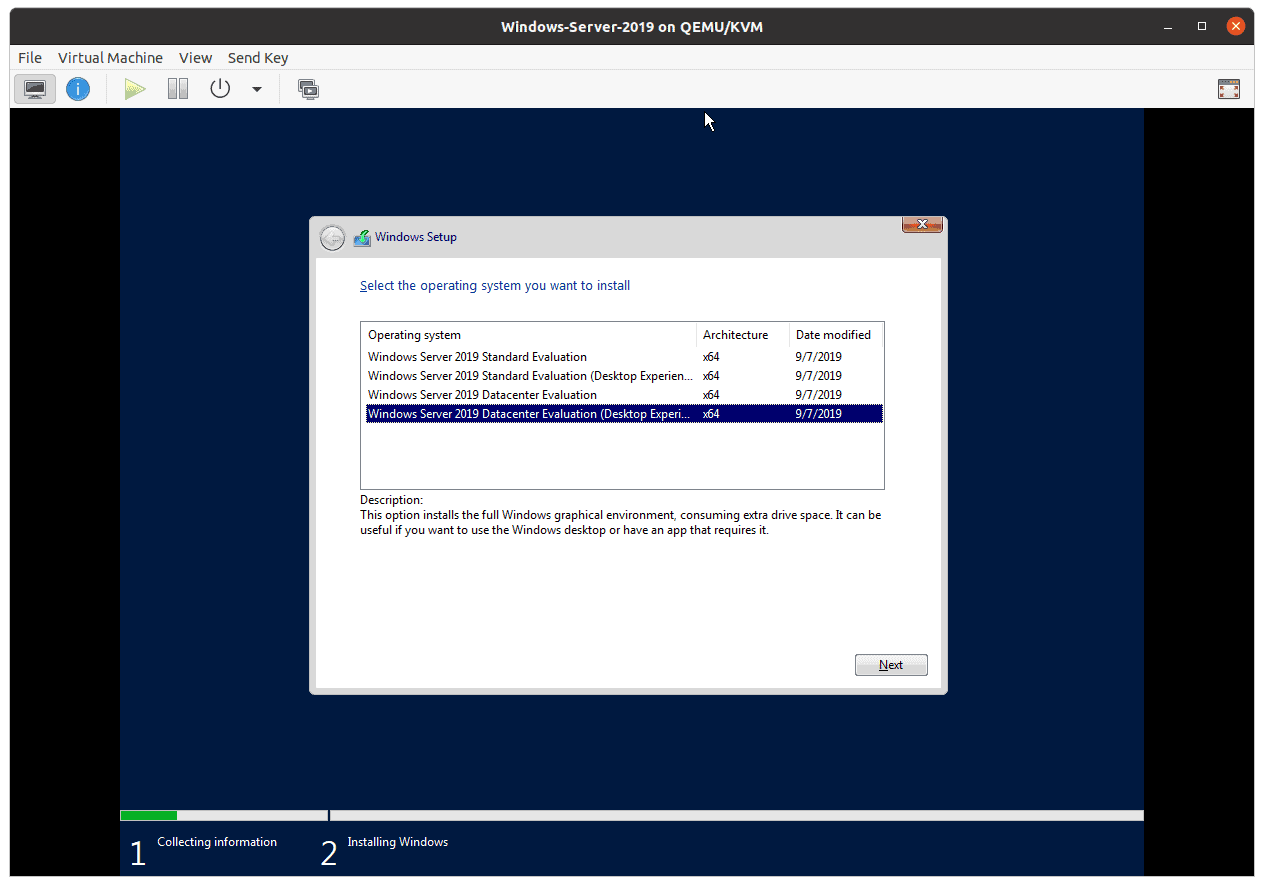
Choose the windows server version that you would like to install then click on Next.
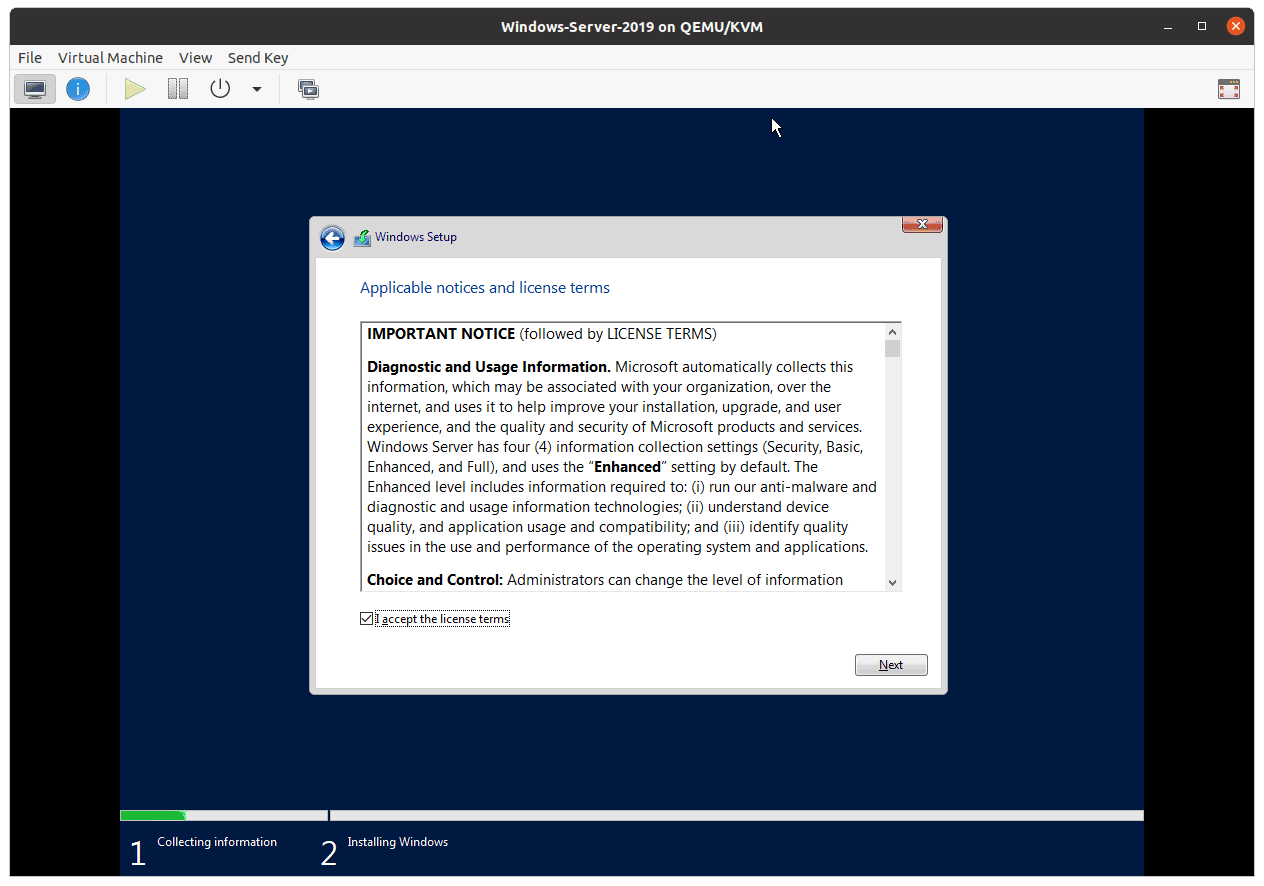
Accept the license agreement then click on next.
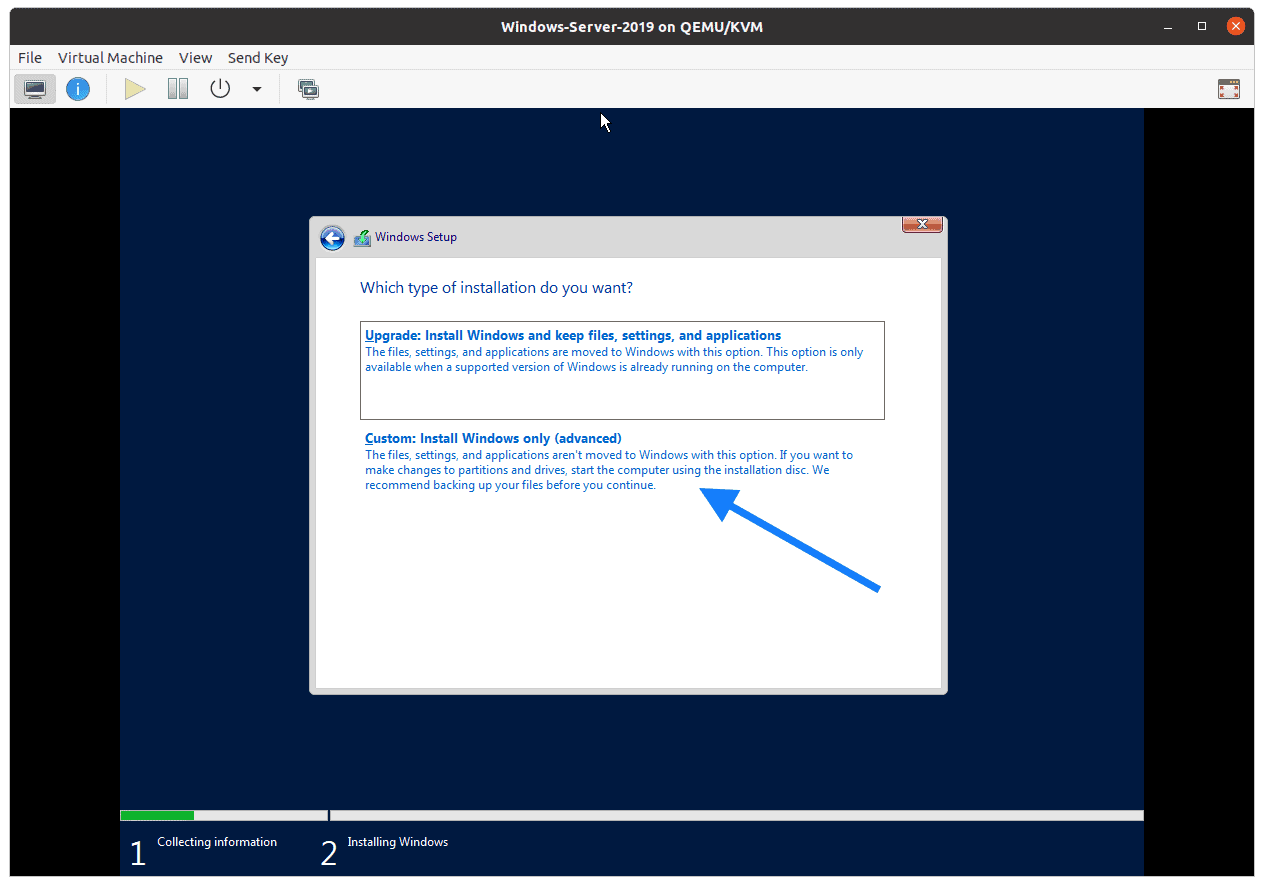
From the installation option choose Custom
8. No windows harddisk in kvm ?, fix that now.
As you can see the we have added a hardisk of 20GB but we are not able to see them, lets go ahead and fix that by clicking Load driver.
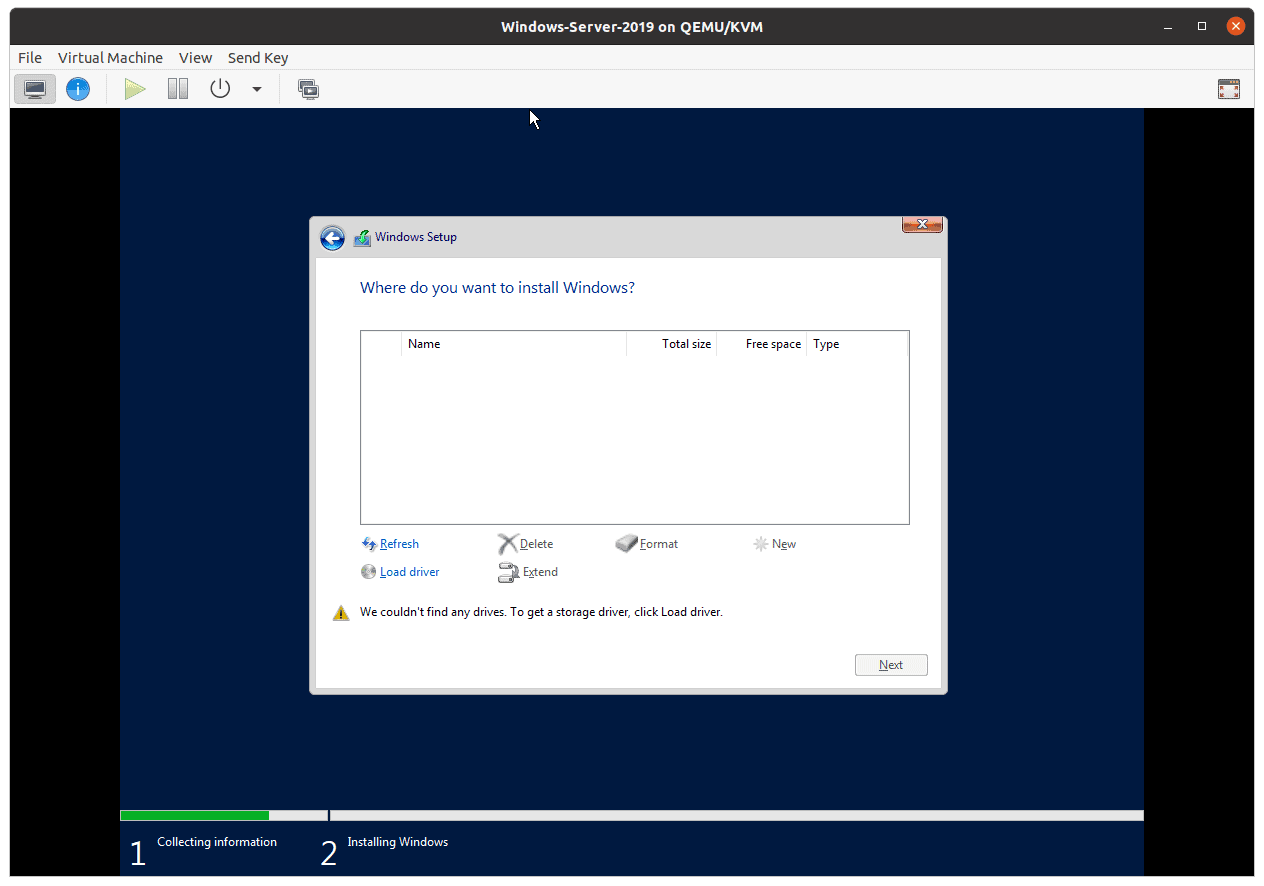
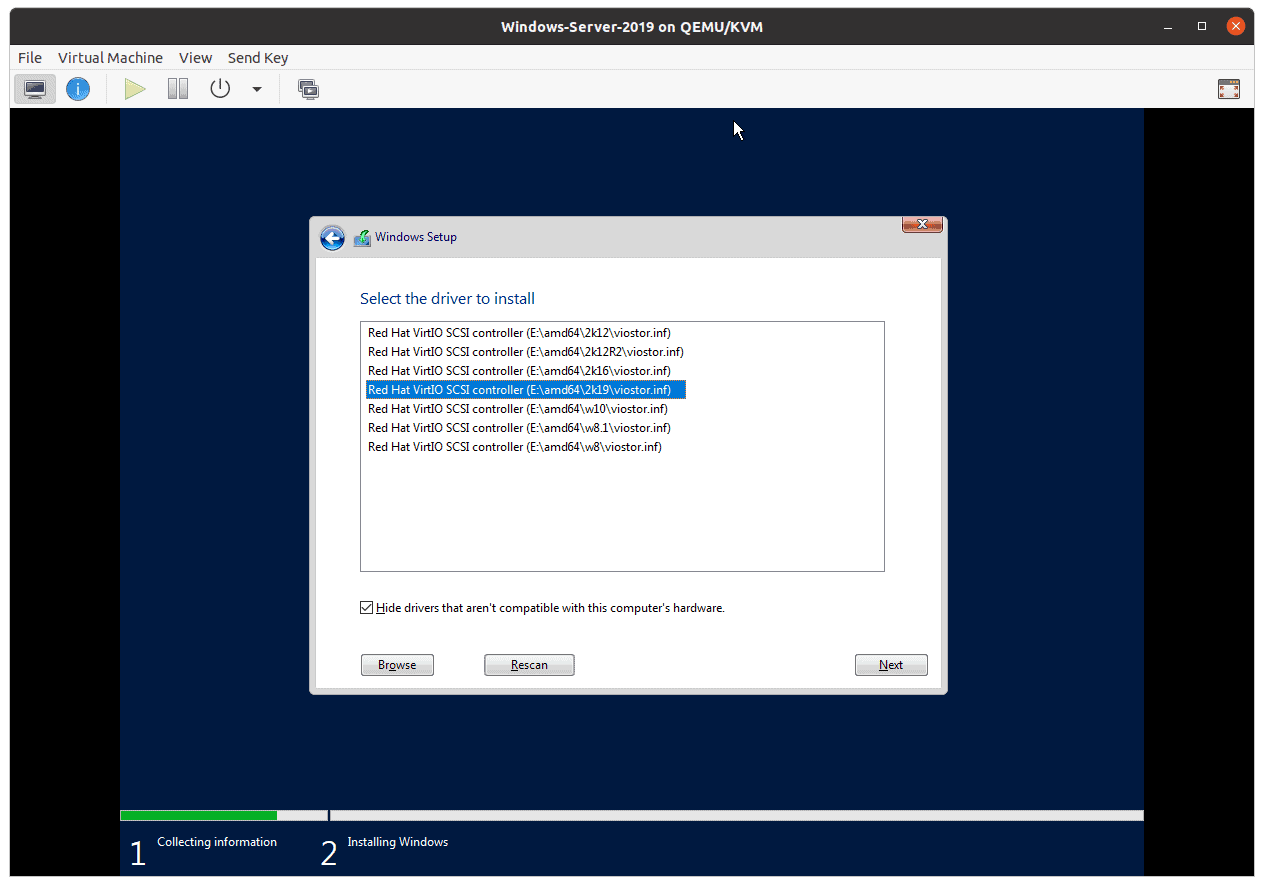
Since we already attached VirtIO driver for windows, the steup wizard will list out available drivers.
Select windows server 2019 from the list and then click on Next.
After few seconds, you should be able to see the harddisk that you have added, select the harddisk then click on Next.
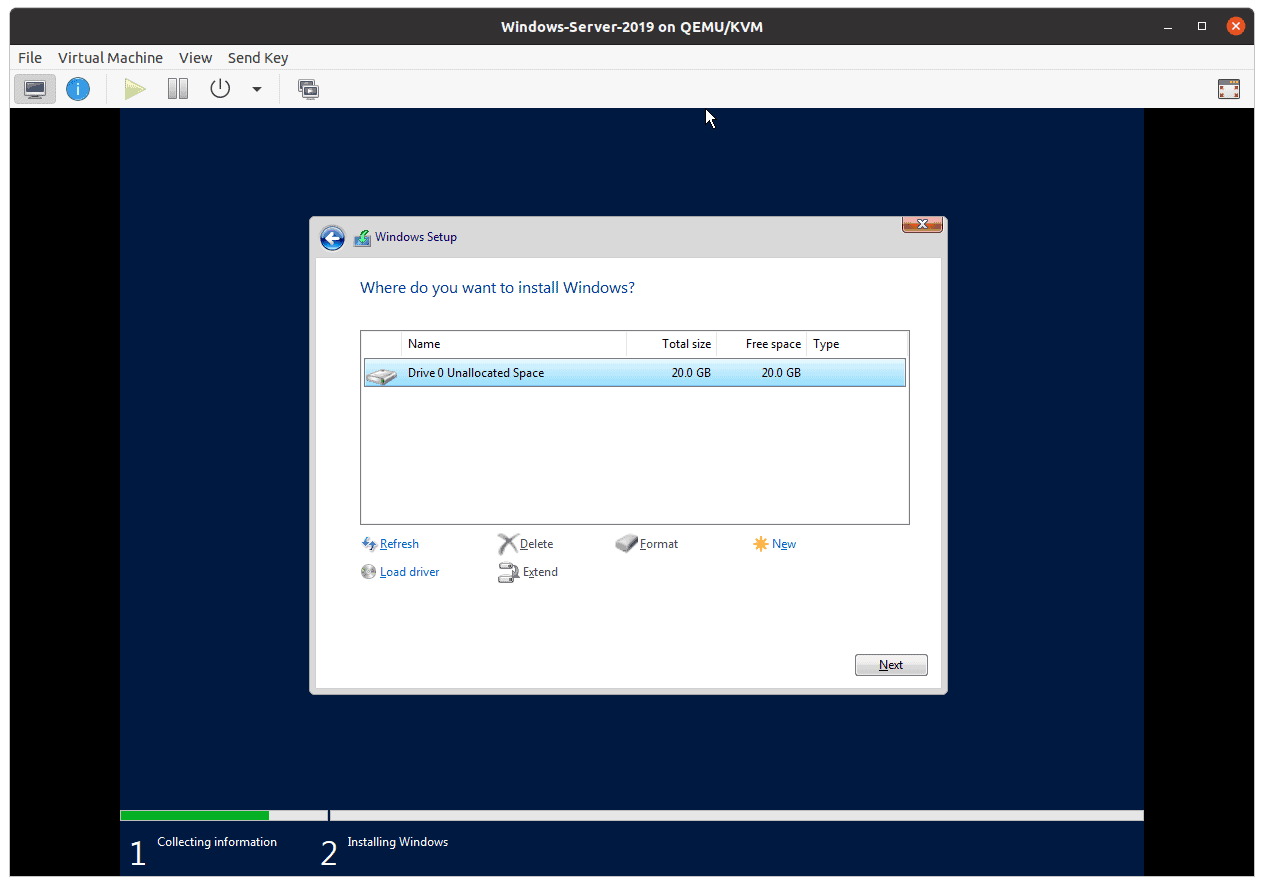
The installation now begin now.
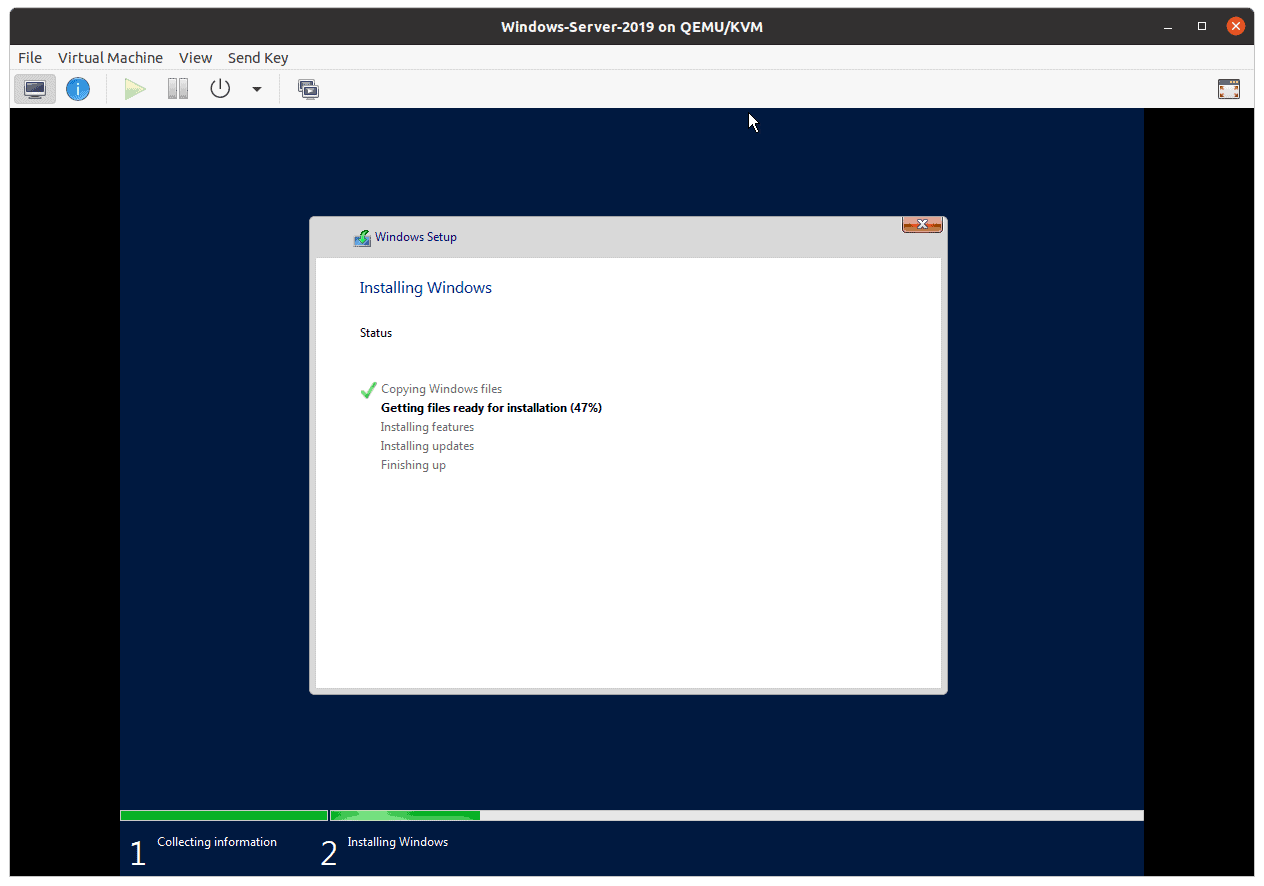
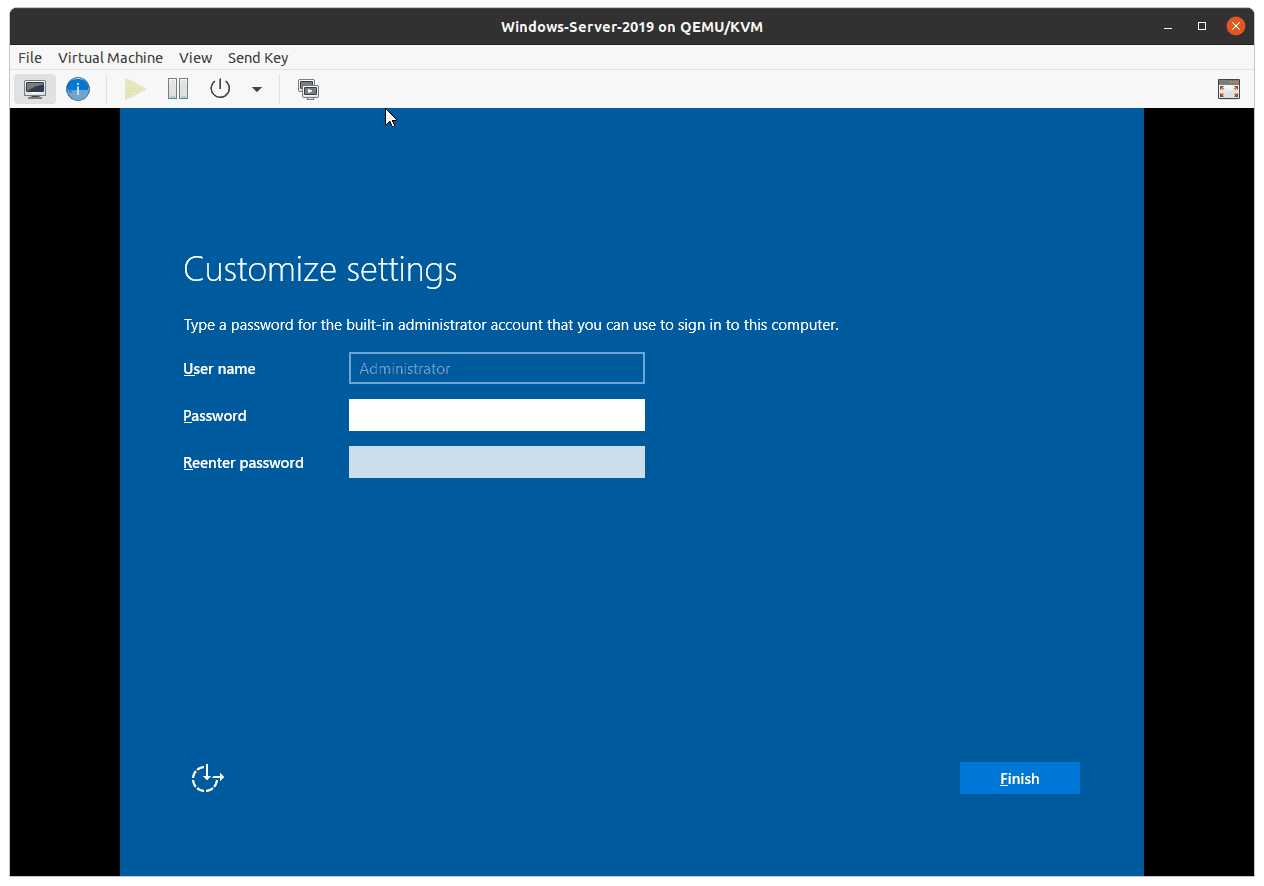
9. Set the administrator Password.
After the installation is completed, it will ask you to setup the Administrators password, type that in and then click on Finish.
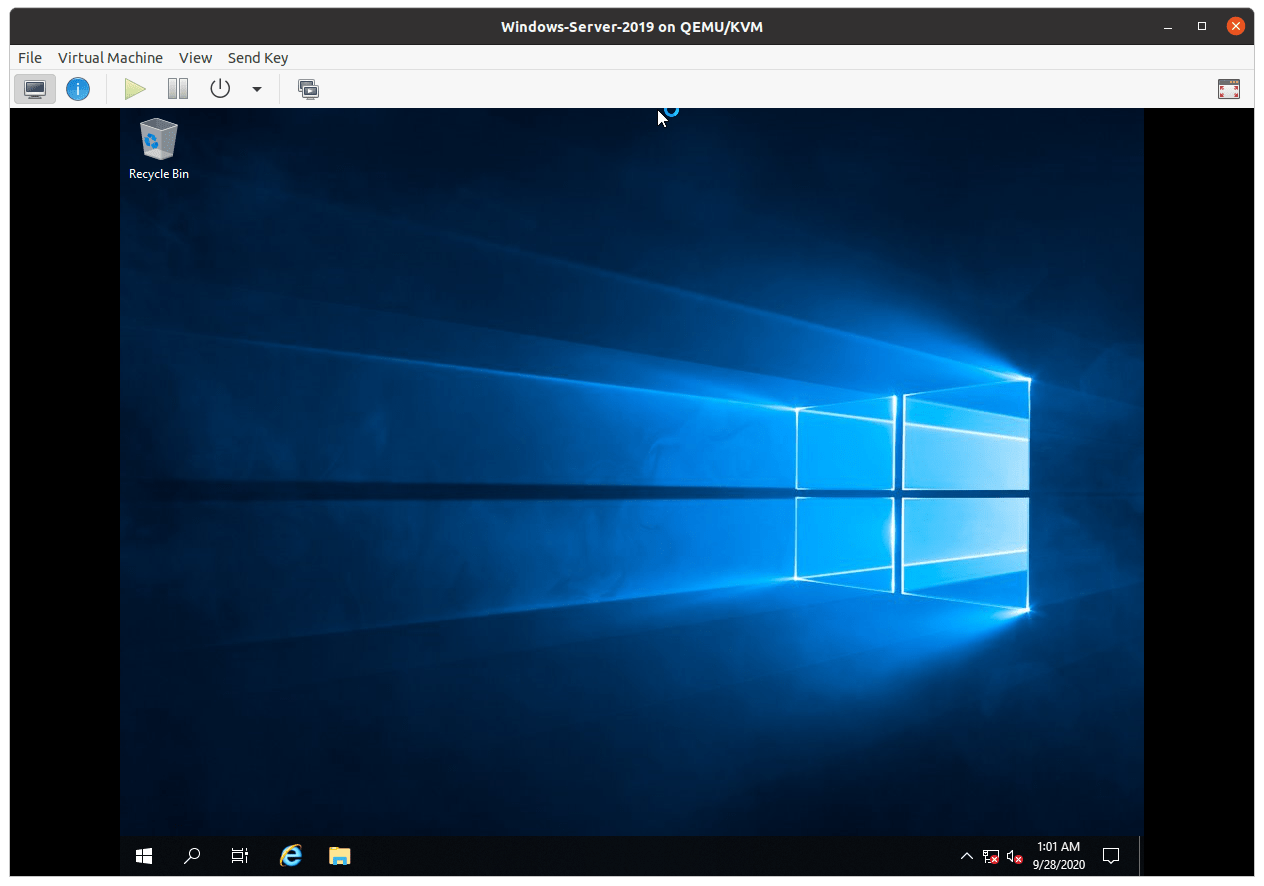
You now will be presented to the windows server 2019 homescreen.
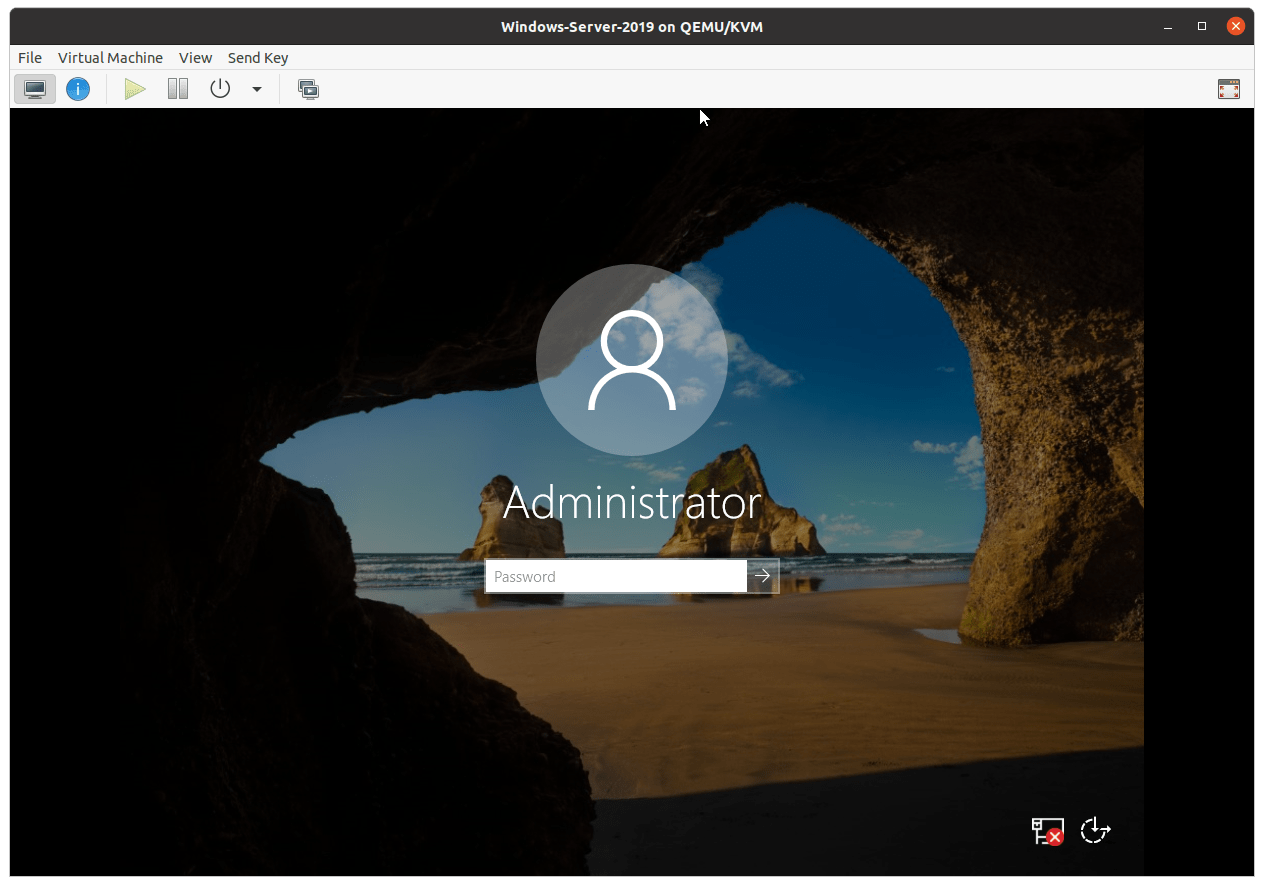
If you lock the machine, it would ask you to press CRL ALT DEL to log back in again.
Type the Administrator password then you should be able to login.
10. Install the virtio drivers for windows server 2019.
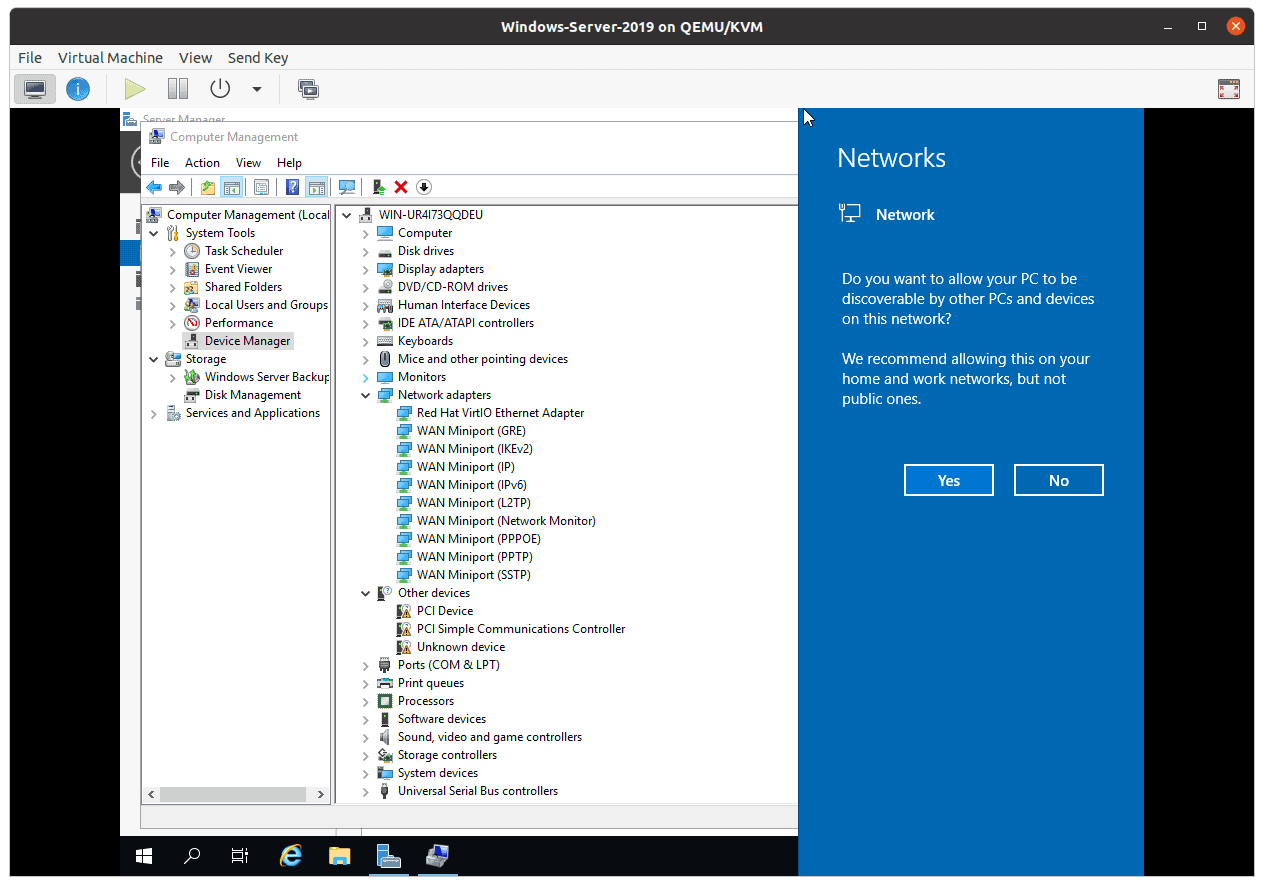
If you looked into the screen, you should be able to see that the network connection is showing x mark, which indicate there is no network confiurated.
Basically we haven’t installed the network driver in order for the windows server to communicate with the network.
In the server manager, click on Tools, then click on Computer management.
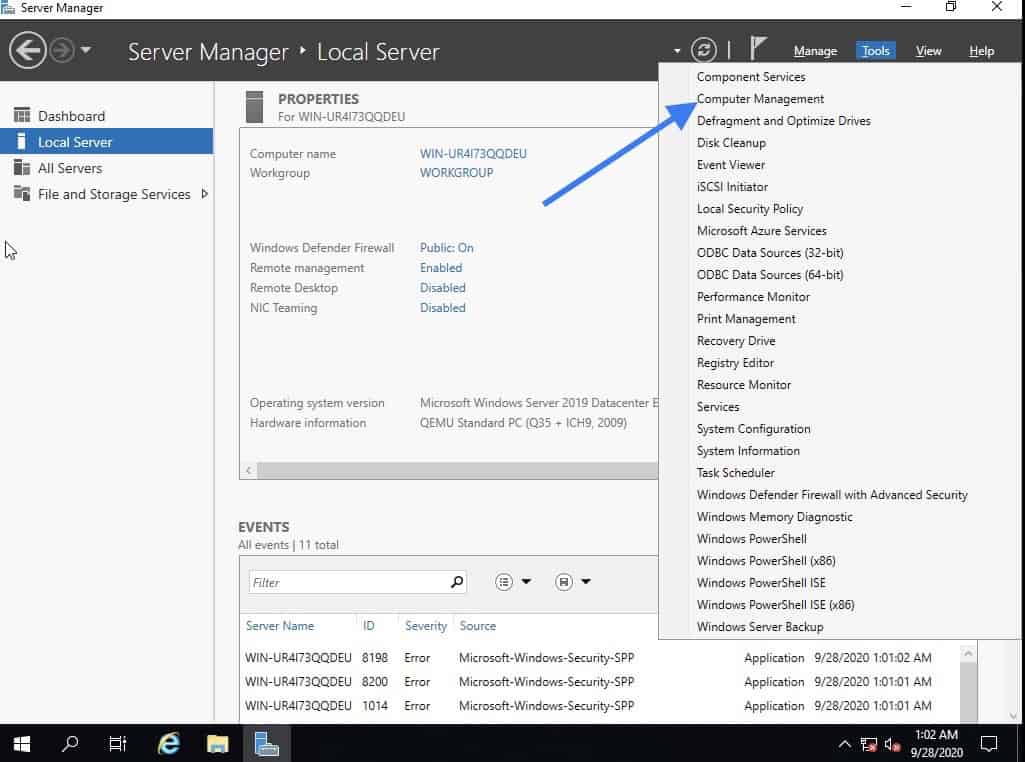
In the computer management, click on Device manager.
You can see under device manager, in Other devices list of drivers that needs to be installed.
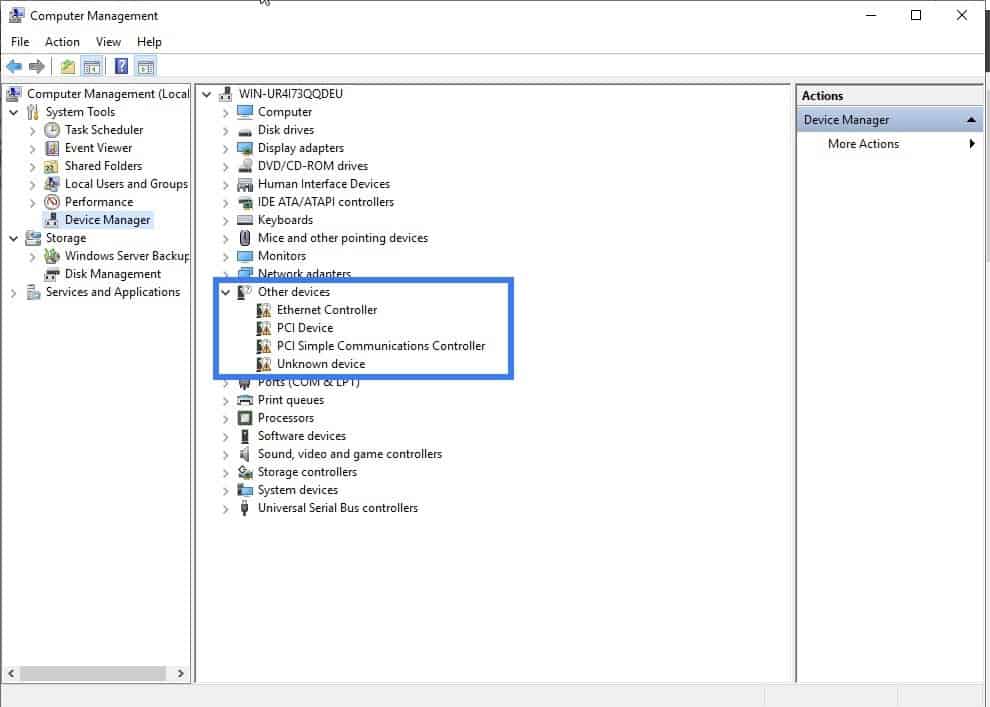
Lets go ahead and install the network driver first.
Right click on Ethernet controller and click on Update driver.
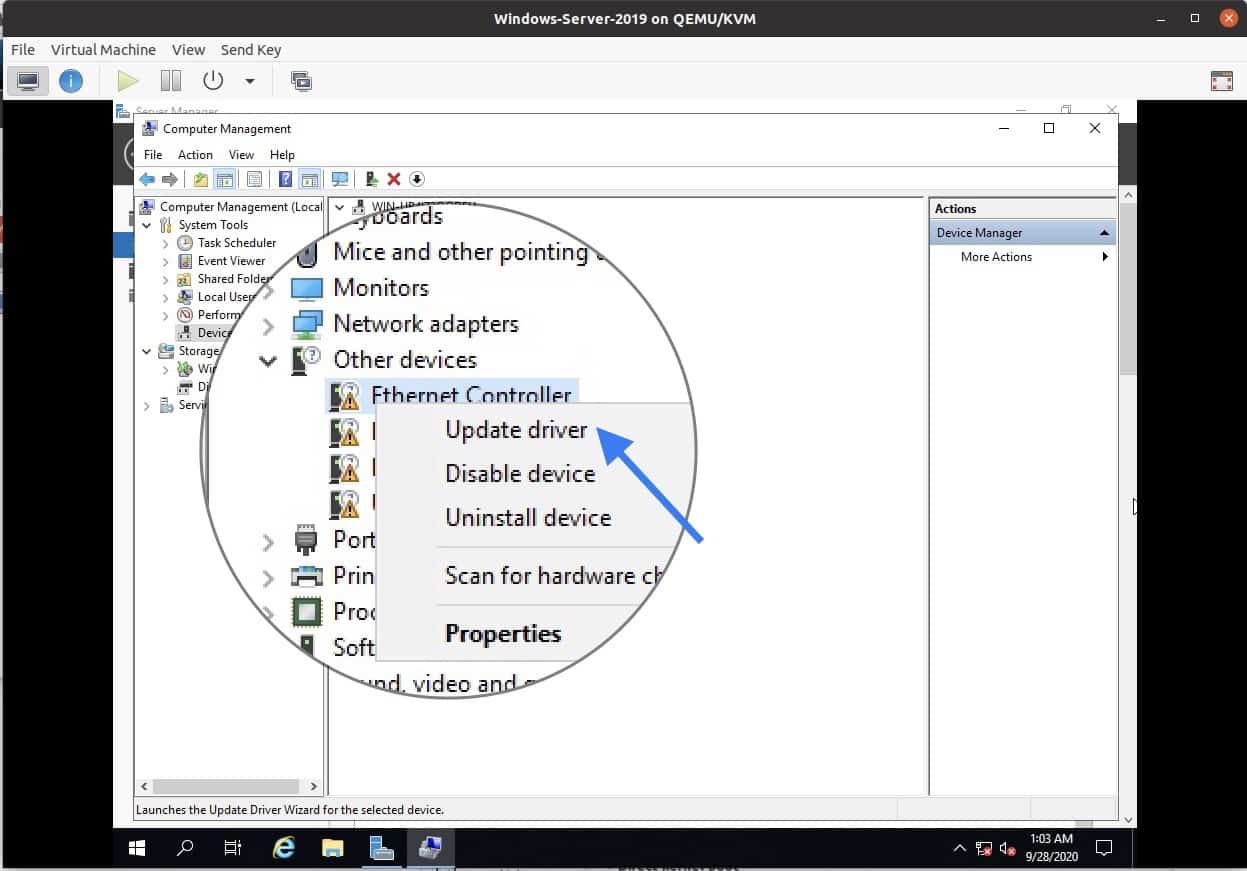
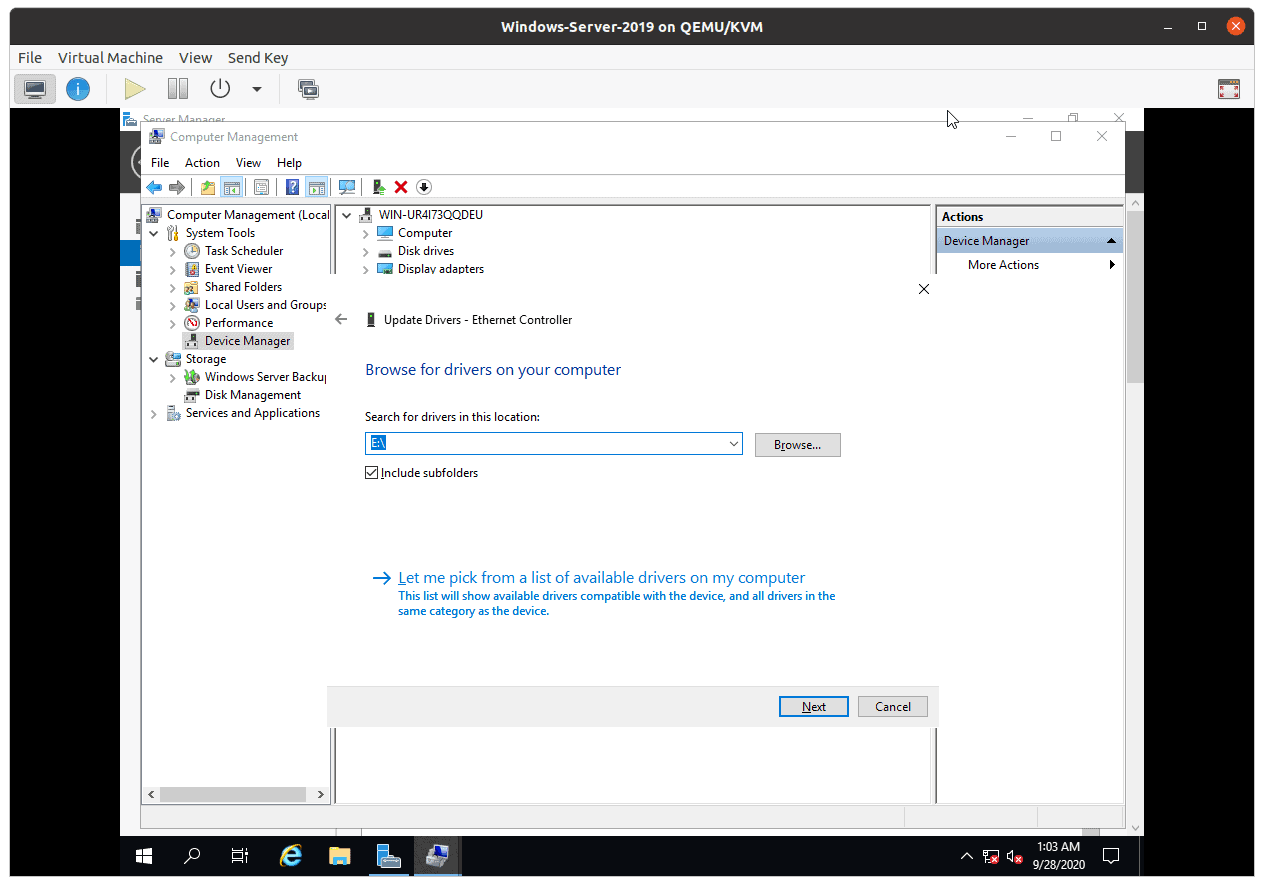
Select the option, browse for my local machine to install the driver.
In the browse attach the Windows qemu drivers that you had downloaded earlier in CDROM 2.
Click on next.
You will get a prompt to install the Redhat network driver, click install.
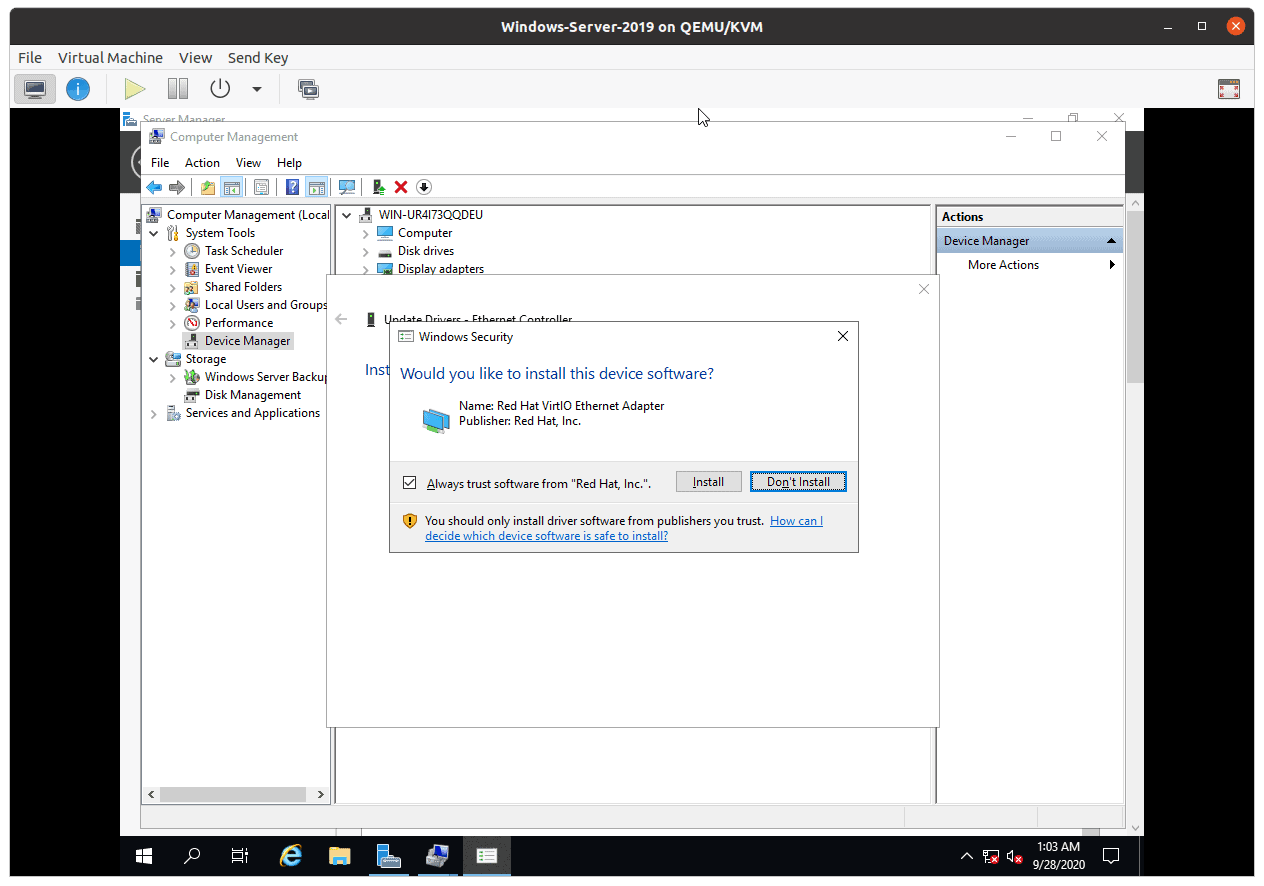
Once the installation is complete, you should now be able to see the netwokrs notification asking whether you want to share the network or not, which I clicked on No at the moment.
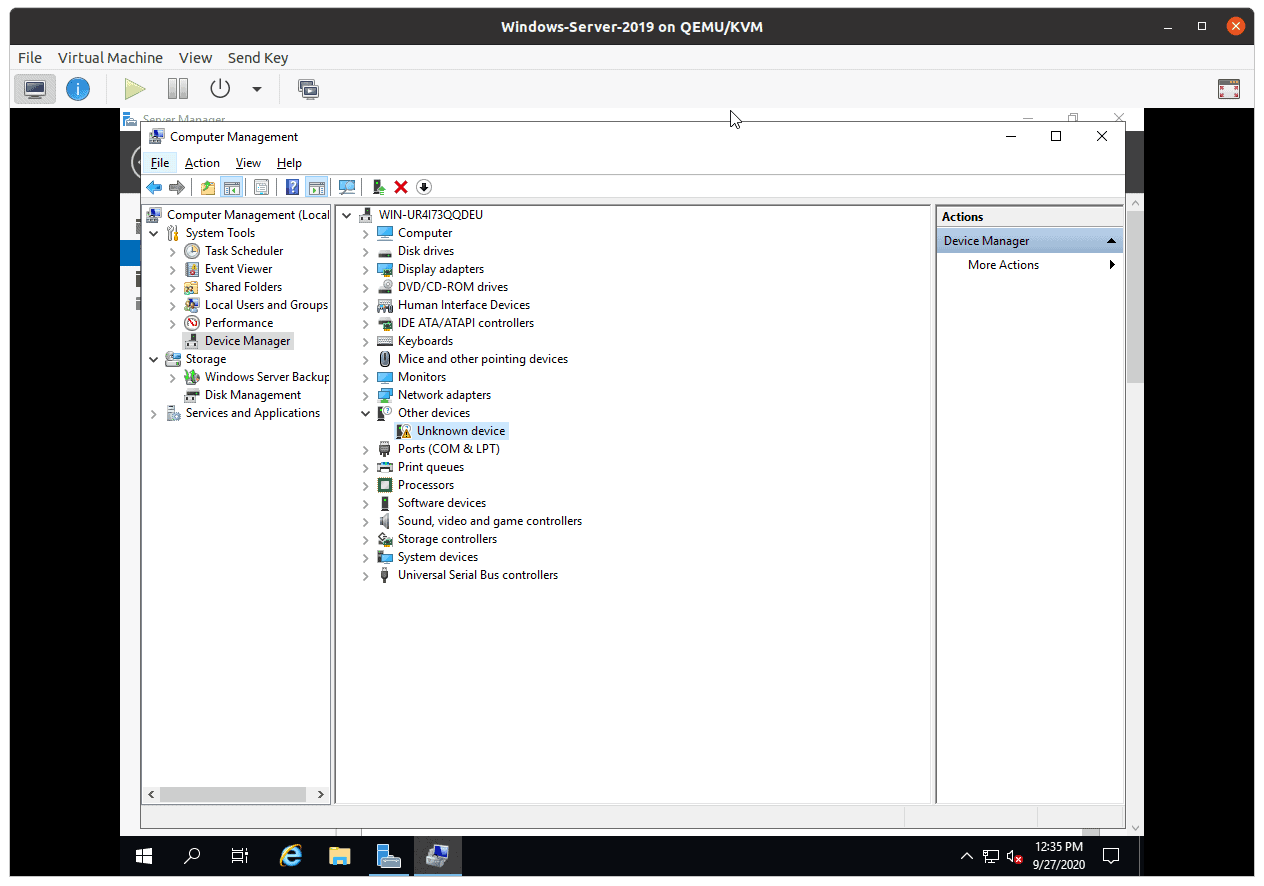
Install rest of other drivers as well.
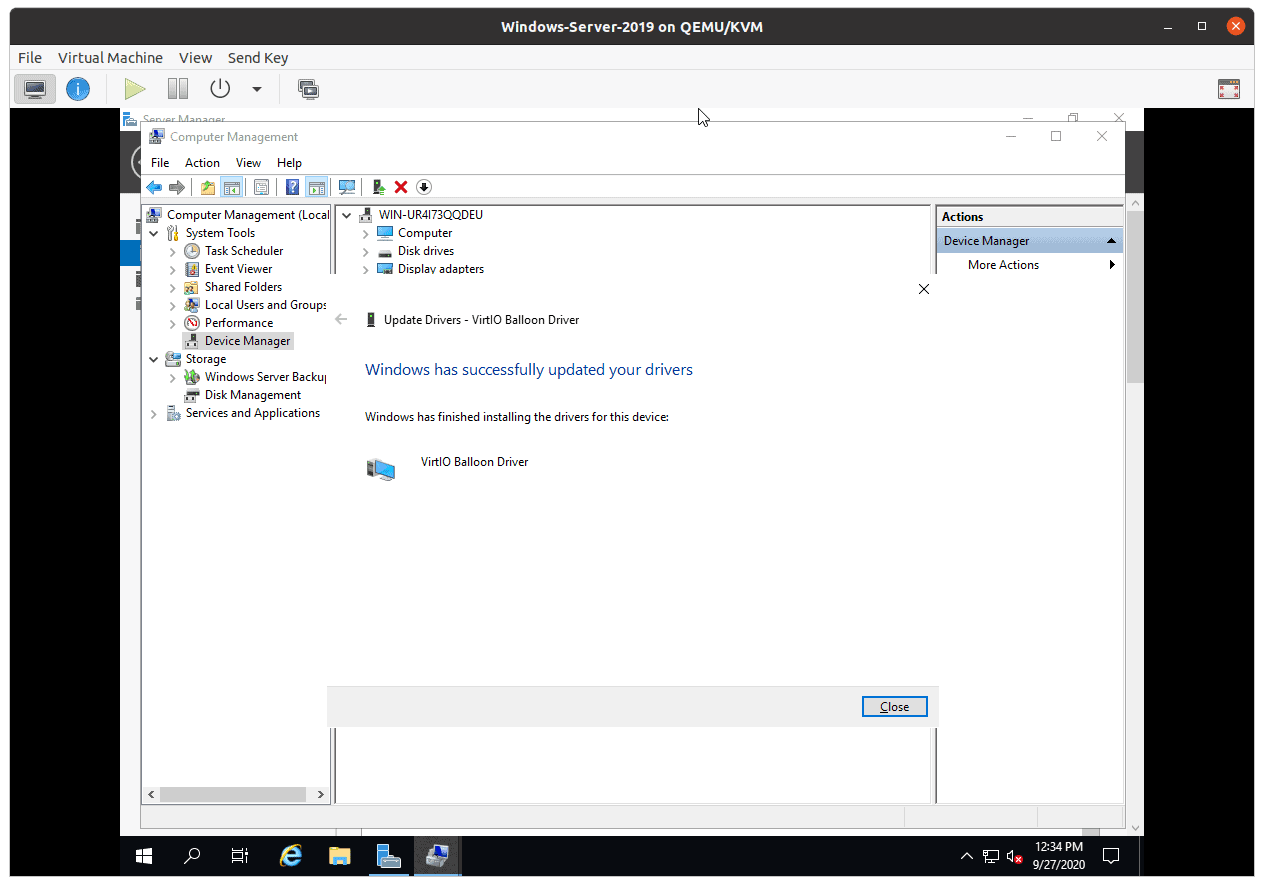
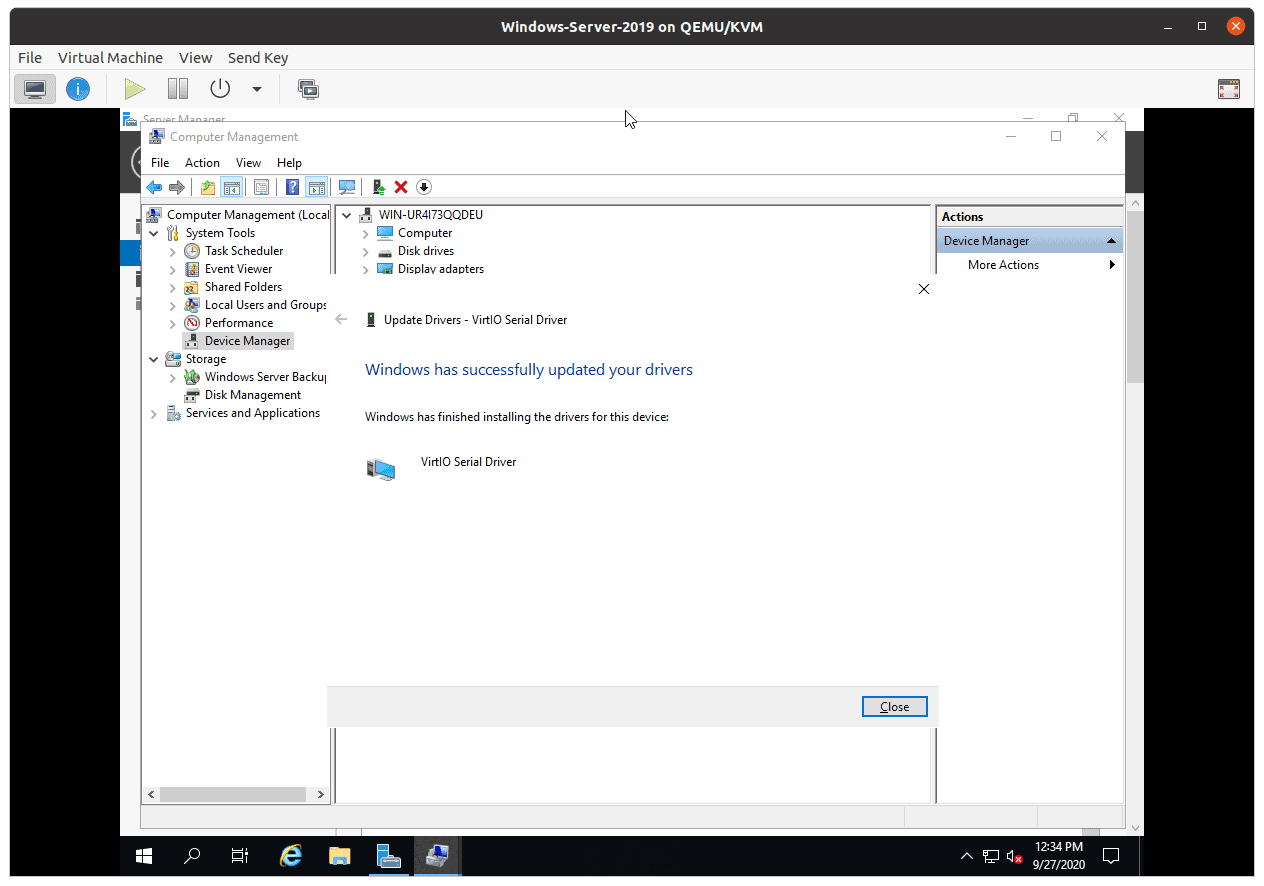
The only driver that you now left at last is Unknown device, even if you try to update it it wont get updated.
So you should be fine at this point.
When you wanted to access this VM again, you just open the terminal and do a virt-viewer and choose the windows server as the VM.
If you have remote SSH access to the KVM host with X11 forwarding then you can open this server using the virt-viewer as well, which is cool.

Contents
- 1 Install Windows Server 2022 In A Nested Kvm Environment On Ubuntu 20 04 With Standard Nat
- 2 Install Windows Server 2022 In A Nested Kvm Environment On Ubuntu 20.04 With Standard Nat.
- 2.1 Conclusion
- 2.1.1 Related image with install windows server 2022 in a nested kvm environment on ubuntu 20 04 with standard nat
- 2.1.2 Related image with install windows server 2022 in a nested kvm environment on ubuntu 20 04 with standard nat
- 2.1 Conclusion
Step into a realm of endless possibilities as we unravel the mysteries of Install Windows Server 2022 In A Nested Kvm Environment On Ubuntu 20 04 With Standard Nat. Our blog is dedicated to shedding light on the intricacies, innovations, and breakthroughs within Install Windows Server 2022 In A Nested Kvm Environment On Ubuntu 20 04 With Standard Nat. From insightful analyses to practical tips, we aim to equip you with the knowledge and tools to navigate the ever-evolving landscape of Install Windows Server 2022 In A Nested Kvm Environment On Ubuntu 20 04 With Standard Nat and harness its potential to create a meaningful impact. And in internet windows windows guide In this step kvm using tutorial you nested will server 2022 you nat in 20-04- do to the network update- capability ubuntu the the virtual install find can environment a show standard step the below- link by to on i a how access
How To Install Domain Controller On Windows Server 2022 Doovi
How To Install Domain Controller On Windows Server 2022 Doovi
Install windows server 2022 on nested kvm – ubuntu 20.04 – standard nat may 1, 2022 | tech, virtualization, windows in this tutorial i am going to show you how to install windows server 2022 on ubuntu nested kvm. you can download the windows server 2022 from the official microsoft evaluation download site. In this tutorial i will show you how to install windows server 2022 in a nested kvm environment on ubuntu 20.04. using the standard nat virtual network capab.

Windows Server 2022 Public Preview New Features Download Install Virtualization Howto
Windows Server 2022 Public Preview New Features Download Install Virtualization Howto
Windows server 2022 windows server 2019 debian 12 debian 11 fedora 38 fedora 37 almalinux 9 rocky linux 8 vmware esxi 7 other tips commands help centos 7 ubuntu 23.04 ubuntu 21.04 ubuntu 19.04 ubuntu 18.04 lts ubuntu 17.04 ubuntu 16.04 lts ubuntu 15.04 ubuntu 14.04 lts ubuntu 13.04 windows 2016 windows 2012 r2 suse enterprise 15 suse enterprise 12. In this tutorial i will show you how to install windows server 2022 in a nested kvm environment on ubuntu 20.04. using the standard nat virtual network capability to access the internet and do a windows update. you can find the step by step guide in the link below. Step 1. download windows server 2022 iso to get the windows server 2022 iso, you will be required to sign up at the officia l windows insider page from microsoft. choose the “ download the iso ” option and proceed. you will be required to fill in your information before you can start the download of the iso. Install ubuntu. install (01) get ubuntu 20.04 (02) install ubuntu 20.04; initial settings (01) add user accounts (02) enable root user (03) network settings (04) configure services (05) update system (06) configure vim (07) configure sudo; ntp ssh server. ntp server (01) configure ntp server (ntpd) (02) configure ntp server (chrony) (03.
Install Windows Server 2022 In A Nested Kvm Environment On Ubuntu 20.04 With Standard Nat.
Install Windows Server 2022 In A Nested Kvm Environment On Ubuntu 20.04 With Standard Nat.
in this tutorial i will show you how to install windows server 2022 in a nested kvm environment on ubuntu 20.04. using the in this tutorial we will go through the commands and steps to setup a nested kvm with a ubuntu client vm using qemu and in this video, we’ll install microsoft windows 11 onto a linux virtual machine, using lxd! lxd supports attaching virtual trusted learn how to install kvm, qemu, & virt manager to create an ubuntu server virtual machine. yevgen will go over the following in qemu kvm shortly known as quick emulator which is an open source type 2 hypervisor that allows to create and manage virtual attempting to create a nested hyperv server in 2016 didnt go well. more of a fail. this video demonstrates how to install kvm on an ubuntu server to allow that server to work as a virtual machine host. learn how to install microsoft windows server 2022 core edition. this is a lightweight version of windows server which has as lab to show nested virtualisation, create vms using windows deployment services and sysprep (using windows templates) in this tutorial, we will guide you step by step on how to install ubuntu server desktop environment (gui) on ubuntu 20.04.
Conclusion
Having examined the subject matter thoroughly, there is no doubt that the post provides valuable knowledge about Install Windows Server 2022 In A Nested Kvm Environment On Ubuntu 20 04 With Standard Nat. Throughout the article, the author illustrates a deep understanding about the subject matter. Notably, the discussion of Z stands out as particularly informative. Thank you for the article. If you need further information, feel free to contact me via the comments. I am excited about hearing from you. Moreover, below are a few similar content that might be interesting:
Related image with install windows server 2022 in a nested kvm environment on ubuntu 20 04 with standard nat
Related image with install windows server 2022 in a nested kvm environment on ubuntu 20 04 with standard nat

In this article, we will explore how to create a Windows Virtual Machine (VM) on an Ubuntu Server. This process involves using KVM (Kernel-based Virtual Machine), a full virtualization solution for Linux on x86 hardware. KVM allows you to run multiple VMs running unmodified Linux or Windows images.
Creating a Windows Virtual Machine on Ubuntu Server involves installing necessary packages like KVM and libvirt-bin, configuring the firewall, installing the Virtual Machine Manager, connecting to the server, creating a new VM, and installing Windows on the VM.
- Pre-requisites
- Step 1: Installing Necessary Packages
- Step 2: Configuring Firewall
- Step 3: Installing Virtual Machine Manager
- Step 4: Connecting to the Server
- Step 5: Creating a New Virtual Machine
- Step 6: Installing Windows on the VM
- Conclusion
Pre-requisites
Before we start, ensure that you have the following:
- An Ubuntu Server
- A Windows ISO file for the VM
- Sufficient hardware resources on your server to run a VM
Step 1: Installing Necessary Packages
First, we need to install the necessary packages. This includes KVM and libvirt-bin. KVM is the virtualization module for the Linux kernel, while libvirt-bin provides a unified interface for managing different virtualization technologies.
You can install these packages using the following command:
sudo apt-get install kvm libvirt-binStep 2: Configuring Firewall
Next, allow incoming TCP and UDP packets on port 22 (SSH) on the server. This step is necessary to enable remote access to your server. Use the following command:
sudo ufw allow 22Step 3: Installing Virtual Machine Manager
Now, we need to install the Virtual Machine Manager on your Ubuntu Desktop machine. This tool provides a graphical interface for managing your VMs. Use the following command to install it:
sudo apt-get install virt-managerStep 4: Connecting to the Server
After installing the Virtual Machine Manager, you can connect to your server. Use the following command:
gksudo virt-managerIn the Virtual Machine Manager, go to File > Add Connection. Select “Connect to remote computer”. Choose the SSH method and enter your server’s IP address and your server’s username.
Step 5: Creating a New Virtual Machine
Once connected, you can create a new VM. Right-click on the server and select “New”. Follow the step-by-step prompts to configure the VM, such as the number of processors, memory, etc.
Step 6: Installing Windows on the VM
Finally, install the Windows operating system on the VM using your regular CD/DVD installer or ISO image.
Conclusion
Creating a Windows VM on an Ubuntu Server is a straightforward process that involves installing necessary packages, configuring your firewall, installing and connecting to the server using the Virtual Machine Manager, creating a new VM, and installing Windows on the VM.
For more detailed information, you can refer to the official Ubuntu Server Documentation on libvirt.
Remember, running VMs require sufficient hardware resources. Always ensure your server has enough resources to run the VM smoothly. Happy virtualizing!
No, KVM is the recommended virtualization solution for running Windows VMs on Ubuntu Server.
While KVM is the preferred choice for running Windows VMs on Ubuntu Server, you can explore other virtualization technologies such as VirtualBox or VMware. However, the steps outlined in this article specifically focus on KVM.
Yes, KVM allows you to run multiple VMs, including multiple Windows VMs, on Ubuntu Server. However, keep in mind that the hardware resources of your server should be sufficient to handle the workload.
Yes, you will need a Windows ISO file or a CD/DVD installer to install the Windows operating system on the VM. Make sure you have a valid Windows license to use with the VM.
Yes, you can use the Virtual Machine Manager tool to manage your VMs on Ubuntu Server. It provides a graphical interface for creating, configuring, and managing VMs.
Yes, you can access the VM remotely using tools like SSH or remote desktop protocols. However, the specific steps for remote access may vary depending on your setup and preferences.
Yes, when creating a new VM, you can allocate specific hardware resources such as processors, memory, and storage. Adjust the settings according to your requirements and the available resources on your server.
Yes, besides Windows, you can install various operating systems, including different Linux distributions, on the VM using KVM on Ubuntu Server. The process is similar to installing Windows, but you will need the respective ISO or installer for the desired operating system.
The steps outlined in this article are specifically for creating a Windows VM on Ubuntu Server using KVM. While some steps might be similar on other Linux distributions, there may be differences in package names, tools, or configuration. It is recommended to refer to the documentation or resources specific to the Linux distribution you are using.
The hardware requirements will depend on the specific Windows version and the workload you plan to run on the VM. Generally, you will need sufficient CPU cores, memory, and storage to ensure smooth performance. It is recommended to check the official documentation or system requirements for the Windows version you intend to install on the VM.